N° | Problem encountered | Possible causes | Solution | Result |
| 1 | Machine does not turn on. Power lights  are off after having pressed the switch-on/ supply buttons. are off after having pressed the switch-on/ supply buttons. | 1 - Machine is not connected to the power source. | Connected the machine to the power source. | OK: call solved. Non-OK: go to step 2 |
| 2 - The machine is connect to power strip not working. | Connected the machine directly to the power source. | OK: call solved. Non-OK: go to step 3 |
| 3 - Power supply not present | Connect another device to check the power supply | OK machine being serviced. Non-OK: electric system fault |
| 2 | The machine requires a lot of time to heat up. | 1 - Machine storage at low temperatures (e.g.: cellar/garage). | Store the coffee machine in a proper environment and run 2 supplies without capsules. | OK: call solved. Non-OK: go to step 2 |
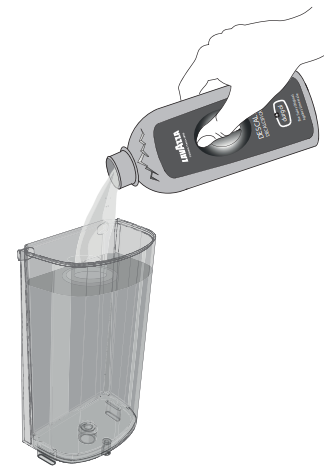
| 2 - The machine has lime scale build-up. | De-scale the machine. | OK machine being serviced. Non-OK: electric system fault |
| 3 | The machine is very noisy. | 1 - Machine not is on a flat and stable surface. | Check the surface | OK: call solved. Non-OK: go to step 2 |
| 2 - Power supply cable incorrectly positioned. | Check the correct position of the cable into the base of the machine. | OK: call solved. Non-OK: go to step 3 |
| 3 - Movable parts not fitted properly. | Fit the movable parts properly | OK: call solved. Non-OK: go to step 4 |
| 4 - No water in the tank. | Top up the tank with fresh drinking water. | OK: call solved. Non-OK: go to step 5 |
| 5 -Capsule not present. | Insert Lavazza BLUE capsule or compatible. | OK machine being serviced. Non-OK: electric system fault |
| 4 | No supply | 1 - Electrical failure: buttons not working. | Press one of the buttons and check the operation of the pilot light (ON with white blinking light) and the machine power-on. | OK: call solved. Non-OK: go to step 2 |
| 2 - No water in the tank. | Top up the tank with fresh drinking water. | OK: call solved. Non-OK: go to step 3 |
| 3 - Tank not inserted correctly. | Insert the tank correctly | OK: call solved. Non-OK: go to step 4 |
| 4 - Power-on failed. | Repeat the coffee machine power-on procedure (6 attempts at supplying) | OK machine being serviced. Non-OK: electric system fault |
| 5 | Water leaks at the front side of the coffee machine. | 1 - Spent capsule drawer not inserted correctly. | Insert the spent capsule drawer correctly | OK: call solved. Non-OK: go to step 2 |
| 2 - Spent capsule drawer filled. | Empty the spent capsule drawer and the drip tray. | OK: call solved. Non-OK: go to step 3 |
| 3 - Capsule stuck. | Lift and lower the capsule loading lever. If this is not enough, disconnect the machine from power mains and operate manually to remove the capsule from the duct. | OK: call solved. Non-OK: go to step 4 |
| 4 - Capsule not compatible. | Use Lavazza BLUE capsules or compatibles | OK machine being serviced. Non-OK: electric system fault |
| 6 | Water leaks at the rear side of the coffee machine. | 1 - Tank not inserted correctly. | Insert the tank correctly | OK: call solved. Non-OK: go to step 2 |
| 2 - Tank damaged. | Check for leaks in the tank keeping it separate from the machine. | OK machine being serviced. Non-OK: electric system fault |
| 7 | The loading lever does not reach the supply position or requires an excessive closing effort. | 1 - Spent capsule drawer filled. | Empty the spent capsule drawer | OK: call solved. Non-OK: go to step 2 |
| 2 - Capsule fitted incorrectly. | Repeat the sequence, lever in the off position, lever in the brewing position; if this is not enough, operate manually to remove the capsule from the duct with the machine disconnected from power mains. | OK machine being serviced. Non-OK: electric system fault |
| 8 | Blinking red warning light ON | 1 - The temperature measured inside the machine is lower than 5°C (41 °F) | Disconnect the plug from the socket, then allow the machine to rest at ambient temperature for the necessary time. (N.B. Depending on the initial temperature, this time may be of up to 2 hours). Connect the machine plug again to the socket, then press either push-button. | OK machine being serviced. Non-OK: electric system fault |
| 9 | Pilot lights ON with white light and blinking fast. | 1 - Spent capsule drawer filled. | Empty the spent capsule drawer and press one of the power on/supply buttons to reset the machine. | OK machine being serviced. Non-OK: electric system fault |
| 10 | Coffee is dispensed too fast and, therefore, it is not so creamy. | 1 -Capsule not compatible. | Use Lavazza capsules or compatibles. | OK: call solved. Non-OK: go to step 2 |
| 2 - Insertion of a soluble product pod instead of a coffee one. | Use a Lavazza coffee pod (or any one compatible pod). | OK machine being serviced. Non-OK: electric system fault |
| 11 | The coffee is cold. | 1 - Coffee pours out in drops, water circuit clogged. | Run the machine washing cycle. | OK: call solved. Non-OK: go to step 2 |
| 2 - The machine has lime scale build-up. | De-scale the machine. | OK machine being serviced. Non-OK: electric system fault |
| 12 | Dispensed coffee is insufficient or excessive. | 1 - Coffee pours out in drops, water circuit clogged. | Run the machine washing cycle | OK: call solved. Non-OK: go to step 2 |
| 2 - The machine has lime scale build-up. | De-scale the machine. | OK machine being serviced. Non-OK: electric system fault |
| 13 | Coffee not supplied and steam coming out of the capsule compartment. | 1 - The loading lever was not set to the brewing position. | Set the loading lever to the brewing position. | OK machine being serviced. Non-OK: electric system fault |
| 14 | Coffee pours out in drops | 1 - Faulty capsule. | Replace the capsule. | OK: call solved. Non-OK: go to step 2 |
| 2 - Pump working improperly | Check for abnormal noise of the machine. | OK: call solved. Non-OK: go to step 3 |
| 3 - Spout/water circuit clogged. | Clean the coffee dispensing spout (see MAINTENANCE AND CLEANING). | OK: call solved. Non-OK: go to step 4 |
| 4 - The machine has limescale build-up. | De-scale the machine | OK machine being serviced. Non-OK: electric system fault |
| 15 | One of the two buttons is not working and the relevant LED is off. | 1 - Mechanical blocking. | Try to power the machine off by disconnecting the power plug for 10 seconds then reconnect it. Power the machine on and check the correct operation of both buttons. | OK machine being serviced. Non-OK: electric system fault |
| If the problem persists, the machine can continue to be used with the other button; in this case, the button working regularly will no longer have the automatic dosing but will be free dosing, and the user will decide when stopping the dose. |