User Manual
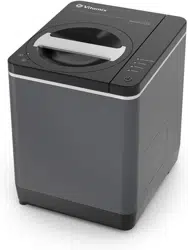
Parts and Features
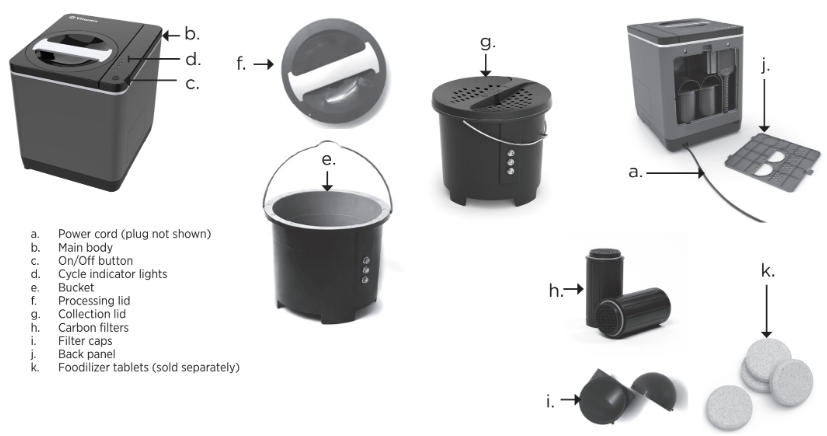
a. Power cord (plug not shown) - It is suggested that you unplug the FoodCycler before leaving your home for an extended period of time.
b. Main body - DO NOT immerse the base unit in any liquid, including water.
c. On/Off Button - 
- When the unit is plugged in the On/Off button will flash on and off once indicating that the FoodCycler has entered STANDBY mode. In STANDBY mode, no LED lights will be illuminated.
- To enter PROCESSING mode, press the On/Off button once. The Drying LED will illuminate, indicating that the Drying cycle has begun. The On/Off symbol will illuminate
- when the unit is in PROCESSING mode.
- Removing the lid or pressing the On/Off button during PROCESSING mode is NOT RECOMMENDED.
- WARNING: TO AVOID INJURY - DO NOT TOUCH surfaces inside the FC-50 if the process is interrupted. Surfaces (including the bucket and bucket handle), will get hot and
- could burn.
- If the lid is opened during PROCESSING mode, the existing cycle will be paused and the On/Off button will flash. Once the lid is closed and locked, the cycle will resume.
- To put the unit into STANDBY, cancel a PROCESSING mode, or to reset the unit, press and hold the On/Off button for 3 seconds.
- PROCESSING has ended when all operating modes have completed and no indicators light are illuminated.
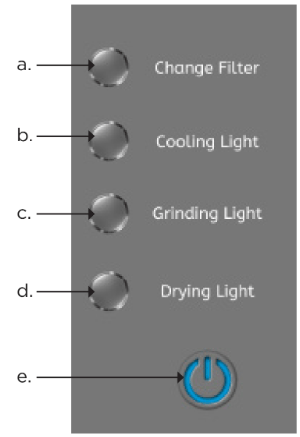
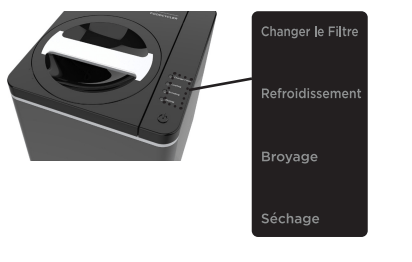
d. Indicator lights (Drying, Grinding, Cooling and Change Filter)
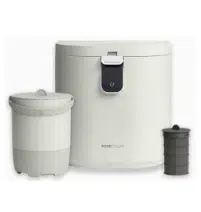
e. Bucket - removable. The bucket is designed to fully grind and process your food waste.
Note: If the bucket coating fades or chips, this is not a defect. This cosmetic damage is a result of a hard material scraping along the bucket coating during a cycle, but it will not affect the function of the unit.
f. Processing lid - (used during cycling)
- Unplug the unit before opening the lid. If opening the lid after cycling, allow the bucket to cool before handling.
- To open the lid - grip the lid handle and rotate counterclockwise until the arrow on the lid is aligned with the unlock symbol. Lift up on the lid to remove.
- Closing the lid - close the lid by inserting it into the top of the unit, over the bucket. Turn the lid handle clockwise until the arrow on the lid aligns with the lock symbol on the unit.
g. Collection lid - (used when the bucket is not in an active cycle.)
- This lid allows the bucket to be kept on a countertop while collecting food scraps without off-putting smell.
- The unit will not operate with the collection lid.
- The collection lid filter is removable for cleaning or replacement. See page 12.
h. Carbon filters - the filters wick away any and all odors during processing.
- IMPORTANT! Remove filter stickers - Check to see if your unit has stickers on the filters. They must be removed before using the machine. To remove the filter stickers, remove the back panel from the unit and peel the stickers from the top of the two carbon filters. Dispose of the stickers and replace the back panel.
i. Filter caps - small funnels sit on top of your carbon filters, ensuring that the air and steam flow is properly directed toward the unit vents. (set of two)
- The filter caps are placed inside the unit in transportation. Remove the filter caps from inside the unit prior to running a cycle.
- To install - remove the plastic wrap from the Filter Caps and secure them over the top of each filter inside the unit. Place the circle-shaped openings on top of the filters, ensuring that the half-moon-shaped opening faces out toward the back of the unit.
j. Back panel - To remove, face the back of your unit. Grip the plastic tab (with the arrow) at the top of the back panel. Pull down gently on the tab to release the back panel from
the unit.
k. Foodilizer tablets - (sold separately) dissolvable soil probiotic that adds beneficial bacteria into soil mixed with recycled food compound from the FC-50.
Indicator Lights and On/Off
Note: when a cycle is active, the light next to the cycle description will illuminate.
a. The change filter light will illuminate when it is time to change your filters. You must manually reset
the Change Filter light after you have installed new filters. Refer to page 12.
b. The cooling cycle is the last mode in unit’s cycle. The cooling mode lasts approximately 35 minutes.
c. The grinding cycle is the longest cycle mode and can last anywhere between
150 minutes. Once this cycle is done, the unit will switch automatically to cooling.
d. The drying cycle can last anywhere between 70 minutes. The unit will automatically switch to the
grinding cycle after the drying cycle has completed.
e. On/Off - See page 5 for more information about the On/Off button.
Setup
1. Remove the back panel.
- Grip the plastic tab (with the arrow) at the top of the back panel. Pull down gently on the tab to release the back panel from the unit.
2. Remove the white stickers from the top of each carbon filter.
3. Open the lid.
- Grip the lid handle and rotate counterclockwise until the arrow on the lid is lined up with the unlock symbol
 .
.
Lift up on the lid to remove.
4. Remove the filter caps from inside the bucket.
5. Remove the sticker on the vent on the inside of the bucket compartment.
6. Install a filter cap onto each filter.
- Remove the plastic wrap from the filter cap and discard. Secure each cap. To do so, place the circle-shaped opening on the top of the filter, ensuring the half-moon shaped
- opening faces towards the back panel (when it is installed).
7. Replace the back panel.
- Place the back panel so that the two bottom tabs fit into the grooves lining the bottom of the unit’s back cavity. Push the back panel into the unit’s back cavity until the panel’s tab fits into place in the unit’s back cavity. If the sides of the panel do not sit flush against the unit’s back cavity press against the non-flush panel sections with your thumb or fingers until it snaps flush to the unit.
8. Remove the bucket.
- Remove and discard the max fill sticker from the inside wall of the bucket.
- Grip the metal handle and pull straight up.
The bucket should slide out easily.
9. Add food waste to the bucket.
- DO NOT add food waste directly into the machine without the bucket installed in the FoodCycler. The bucket doesn’t have to be installed in the unit to fill with food waste.
- You can add food waste to the bucket throughout the day, until the bucket is full. Do NOT fill the bucket above the max fill line.
- To ensure optimal food waste breakdown, mix food waste together, with heavier foods interspersed with lighter, dryer foods.
- Avoid high concentrations of the following foods (the dense, starchy and/or moisture-rich composition of these foods make them difficult to process in large quantities.):
» starches (bread, cake, rice, pasta, mashed potatoes, stuffing)
» citrus fruit rinds
» condiments, dressings, sauces & soups
» nut butters
» jam, jellies, marmalades
» high sugar fruits (grapes, cherries, melon, oranges, bananas, etc)
- DO NOT cycle large bones (such as pork or beef bones), pits, candy, gum, nuts or hard shells: these materials may cause serious damage to the bucket, and/or cause a motor
- overload.
- DO NOT add oil, flammable materials or compounds, or water to the FoodCycler.
- When the bucket is not in use and you are adding food waste, use the collection lid to reduce the amount of off- putting smells.
Running a Cycle
1. Open the plastic lid.
- Grip the lid handle and rotate counterclockwise until the arrow on the lid is lined up with the unlock symbol . Lift up on the lid to remove.
2. Insert the bucket by aligning the arrow shape on the rim of the bucket with the arrow stamped along the interior of the unit cavity. This will interlock the unit.
Note: If the bucket does not easily drop into the unit, try turning the bucket’s bottom bolt slightly and then insert the bucket again.
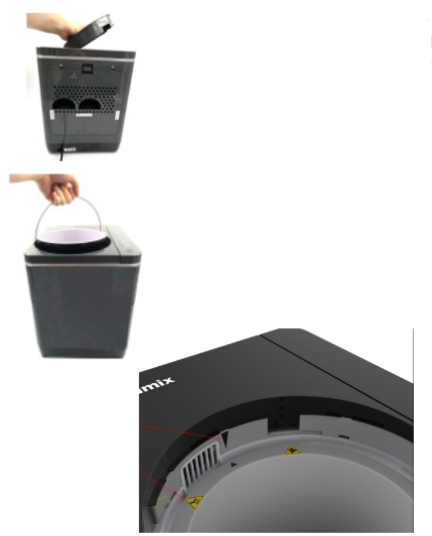
3. Close the lid.
- To place the lid back in the unit, align the arrow on the lid with the “Unlock Symbol” until the lid fits back into the FoodCycler. Turn the lid handle clockwise until the arrow on the lid aligned with the “Lock Symbol” .

4. To start the cycle, press On/Off .
- The unit’s cycle will run anywhere between 3-8 hours, depending on what is being cycled, and the volume of the contents.
- DO NOT open the lid during a cycle.
5. When complete, the unit will auto shut off and enter Standby mode.
- The unit will beep once the cycle is complete.
- The unit will remain in Standby for up to 30 minutes.
- To turn the unit off manually, press the On/Off button for 3 seconds. This will shut the unit down completely while it is still plugged into an outlet.
- DO NOT put your hands inside the FoodCycler unless it has completely finished cycling and has gone through all cycle modes and you have unplugged the unit.
Cleaning
1. Soak a dish cloth and wring out the dish cloth until damp (not dripping wet).
2. Wipe down the outside of the main body.
3. Remove any remaining moisture with a clean, dry towel or cloth.
4. Remove the bucket.
5. Remove all blockages and loose particles from the bucket.
6. Place the bucket into the lower rack of the dishwasher.
7. If using the hot cycle in the dishwasher, allow your bucket to cool before handling it, or placing it back in your FoodCycler.
Note: You can also hand wash your bucket. Use warm water, a small amount of dish soap and a dish cloth. Scrub around and beneath the grinding arms as much as possible to clean all surfaces.
Periodically clean the inside of the unit with the bucket removed.
1. Turn off and unplug the unit.
2. Use a damp dish cloth that is not dripping to wipe down the interior surfaces.
3. Allow the inside surfaces to completely dry before using.
Cleaning the Collection Lid:
- The collection lid is dishwasher-safe.
- You must remove the carbon filter liner prior to placing in the dishwasher or immersing in water. See page 12.
- To handwash the lid, use a wrung-out dishcloth or paper towel to wipe away any food waste residue that has adhered to the outer plastic part of the lid, or the inner silver grill.
- Do not attempt to wash the filter. Replacements are sold separately at Vitamix.com.
Troubleshooting
Note: If the FoodCycler bucket coating fades or chips this is not a defect. This cosmetic damage is a result of a hard material scraping along the bucket coating during a cycle, but it will not affect the function of the unit.
If your unit is signalling a machine issue, DO NOT continue using your unit. Contact Vitamix Customer service for instructions.
Power (On/Off symbol)
- Flashing light(s) and audible “beeps” (what it means) :
- Lid unlocked, sensor dislodged
- Light remains on (what it means and what to do next):
- Light not illuminated (what it means and what to do next):
- Standby mode - no action required other than collecting food waste and starting the processing modes.
- No Power - (machine is not plugged in and turned on). If plugged in, unplug the unit, plug it in again. If problem persists, contact Vitamix Customer Service for instructions.
Drying
- Flashing light(s) and audible “beeps” (what it means) :
- If this light is flashing, it indicates that the unit is overloaded. In this case, unplug the unit and allow to cool for at least 35 minutes before opening the lid. Refer to page 11 for instructions to help with determining the cause of overload.
- Light remains on (what it means and what to do next):
- in drying cycle - no issue
- Light not illuminated (what it means and what to do next):
- These lights won’t be illuminated until the machine is in these cycles. No action required
Grinding
- Flashing light(s) and audible “beeps” (what it means) :
- Light remains on (what it means and what to do next):
- in grinding cycle - no issue
- Light not illuminated (what it means and what to do next):
- These lights won’t be illuminated until the machine is in these cycles. No action required
Cooling
- Flashing light(s) and audible “beeps” (what it means) :
- Light remains on (what it means and what to do next):
- in cooling cycle - no issue
- Light not illuminated (what it means and what to do next):
- These lights won’t be illuminated until the machine is in these cycles. No action required
All lights
- Flashing light(s) and audible “beeps” (what it means) :
- Light remains on (what it means and what to do next):
- Contact Vitamix Customer Service for instructions
- Light not illuminated (what it means and what to do next):
- These lights won’t be illuminated until the machine is in these cycles. No action required.
IF YOUR MACHINE IS OVERLOADED (DRYING INDICATOR LIGHT IS FLASHING)
1. Unplug the unit and allow to cool for at least 35 minutes.
2. Remove the processing lid.
3. Look to see if any food waste is in the unit after the bucket is removed. Remove any food waste that might be inside the unit.
4. Remove the bucket.
- There is a gear on the underside of the bucket. Turn it counterclockwise.
- If the grinding arms turn without an issue, proceed to STEP 5 without emptying the bucket.
- If the grinding arms turn with hesitation or won’t turn at all, remove all food waste from the bucket and try to rotate the gear again. If the prob-lem persists, contact Vitamix Customer Service for instructions.
5. Look inside the bucket. Look to see if food waste is above the max fill line. If food waste is above that line, you have overfilled the bucket. Remove some food waste until the top of the material is below the max fill line. Install the bucket. Plug the unit it. Attach the lid and begin the process again. The machine will start with the drying cycle.
6. If the material is not above the max fill line and the machine is overloaded, pieces of the food waste might be too large or the material is not ideal for use in the FoodCycler. See page 7, paragraph 9 for parameters about loading the bucket.
7. If the problem persists after trying to diagnose with these steps, contact Vitamix Customer Service for instructions.
MANUAL RESET INSTRUCTIONS
A manual reset is necessary if the FoodCycler’s operating system needs to be reset. Follow these instructions to properly complete a manual reset:
1. Plug the unit’s power cord into an outlet.
2. Press and hold the On/Off  button for upwards of 3 seconds, until you hear a beep and the unit shuts off.
3. Unplug your unit for 1 minute.
4. Plug your unit back in and wait ten seconds.
5. Press the On/Off button  as you normally would to start a cycle.
Note: If the Manual Reset does not work the first time, perform the manual reset again. If this doesn’t fix the issue, contact Vitamix Customer Service for instructions.
Filters
1. Remove the back panel.
- Grip the plastic tab (with the arrow) at the top of the back panel. Pull down gently on the tab to release the back panel from the unit.
2. Remove the filter caps.
3. Locate and remove the filters.
- Turn each filter counter-clockwise to remove. Discard.
4. Remove the packaging on the replacement filters and filter caps (including stickers).
5. Install the new filters.
- Place the filter with threaded end down into the FoodCycler and turn clockwise until you feel resistance and the filter stops turning.
6. Install a filter cap onto each filter.
- To do so, place the circle-shaped opening on the top of the filter, ensuring the half-moon shaped opening faces towards the back panel (when it is installed).
7. Reset filter indicator light.
- If the change filter indicator light does not reset automatically once the filters are replaced, you must reset it manually. Feel around along the upper, inner lip of the unit cavity (where, if the unit’s back panel were in place, a white filter reset arrow would point). Press and hold the small round button until you hear a beep. The change filter indicator light should go off.
8. Replace the back panel.
- Place the back panel so that the two bottom tabs fit into the grooves lining the bottom of the unit’s back cavity. Push the back panel into the unit’s back cavity until the panel’s tab fits into place in the unit’s back cavity. If the sides of the panel do not sit flush against the unit’s back cavity press against the non-flush panel sections with your thumb or fingers until it snaps flush to the unit.
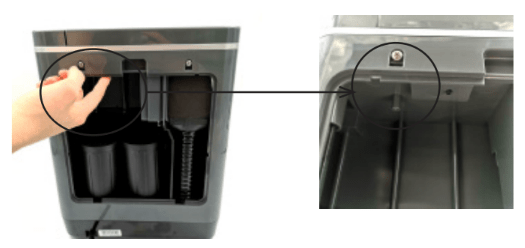
Note: The reset filter button is small and round. Hold it for three seconds until your unit beeps, and the reset filter light goes off.
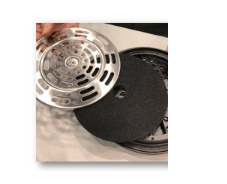
Collection Lid Filter
To remove:
1. Remove the wingnut.
2. Pull the slotted metal plate from under the lid.
3. Remove the filter and discard.
To install:
1. Fit the filter in the slotted metal plate.
2. Place both under the lid.
3. Use the wingnut to tighten both to the bucket lid.
Parts
Contact Vitamix Customer Service or order replacement parts for your Food Cycler, including:
• Filters (sold in sets of 2)
• Foodilizer Tablets (not included in the first purchase of the unit, sold separately)
• Collection Lid Filter
Control Panel Overlay
This sticker is provided in the FoodCycler packaging for use by our Canadian customers, if you choose.
To apply, remove the backing and simply put the overlay over the English text next to the cycle indicator lights.
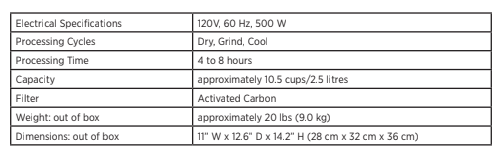
FoodCycler FC50 Specifications