Parts and Features
Technology - The blender, containers and cups communicate through wireless technology. Each container is programmed to run on the base for optimum performance according to it’s size and functionality.
Legacy Vitamix Containers - Legacy Vitamix containers will not work with your Ascent blender base. Legacy machines are Vitamix C Series, G Series and S Series. For more information about Vitamix products, please go to vitamix.com.
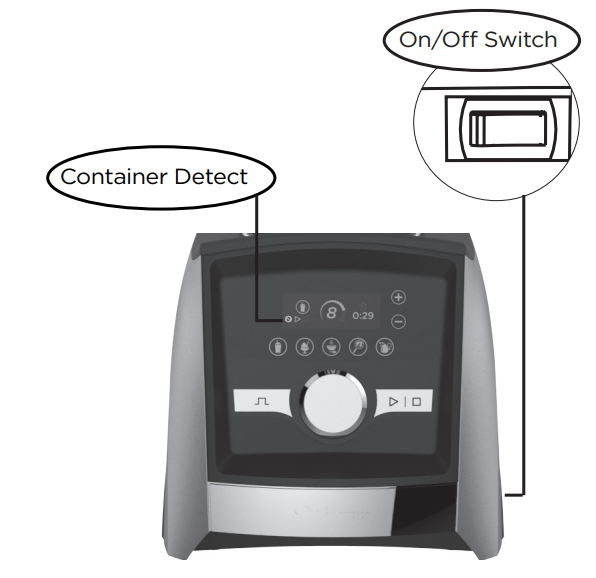
On /Off (I/O) Switch - The On/Off switch (I/O) is located on the right side of the base. The On/Off switch controls power to the machine.
Sleep Mode - The blender will enter sleep mode if the control panel is not used after 60 seconds. The screen will dim and then a spinning vortex will appear on the control panel. To exit sleep mode, touch any part of the control panel.
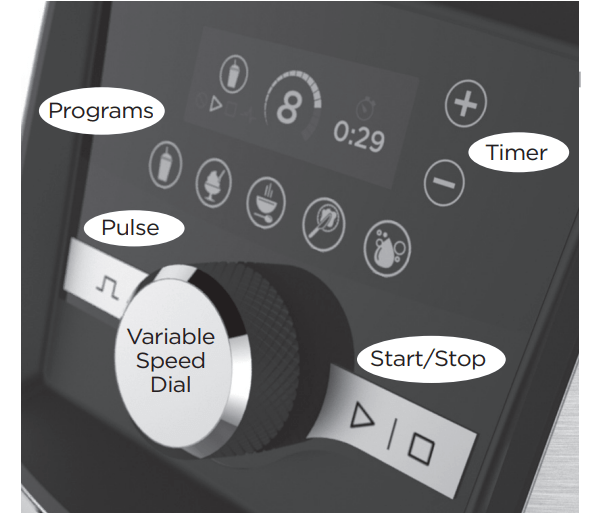
Two Touch Operation - The control panel is designed to require two interactions of the controls to activate the blending cycle.
Container Detect - This symbol  will be displayed on the control panel until a container is put on the blender base. The blender will not operate without a container in place. The control panel will display Variable 1 and a container/cup icon when ready for use.
Start/Stop  - Stop the blender at any time by pressing Start/Stop
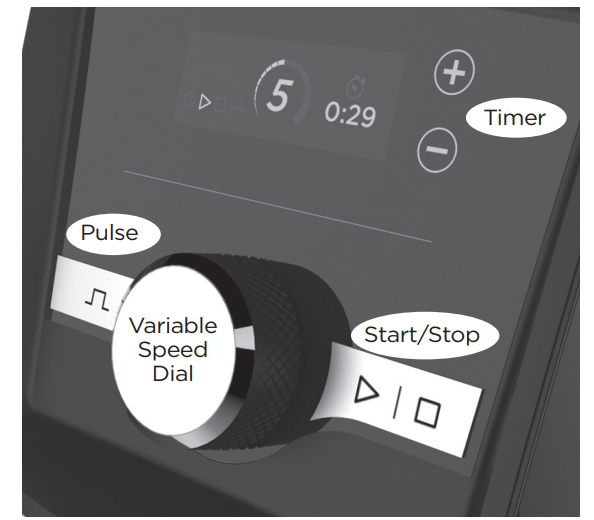
Variable Speed Dial - The Variable Speed Dial gives you manual control from Variable 1 (slowest) to 10 (highest).
Pulse ( )- The blades will rotate at the speed displayed on the control panel when pressed.
Using the Timer - The timer will count up when using variable speed until Start/Stop is pressed. Each container is programmed with a specific maximum run time. The blender will shut down automatically when the maximum run time has elapsed.
To program a time for the blend: This feature is only available when using Variable Speed. Program times are not adjustable with the timer function. This feature will count down from the set time and the blender will shut off automatically. Press the + icon to increase blend time. To decrease time, press the - icon. The + and - icons do not work during the blend. To stop, press Start/Stop.
Programs - The icons are listed in Vitamix recipes. The blender will stop at the end of the program automatically. Programs can be stopped by pressing Start/Stop at any time. Program times are not adjustable with the timer function. When Start/Stop is pressed mid-program; Blender will stop and Variable Speed 1 will display. If you want to run a program, select a program and press Start/Stop.
Smoothies  Frozen Desserts
  Soups
Soups  Dips and Spreads
  Self-Cleaning
Error Codes - If you see an error code on the display (E1, E2, E3, E4), make note of the numbers on the display after the error code. Call Vitamix Customer Service for help with the issue.. Recording the numbers isn’t necessary, but will give the Customer Service team more information to help with the issue.
Motor - The motor is designed to protect itself from overheating. If the blender will not start immediately check to make sure you have plugged the unit in and the On/Off switch is On. If the motor has overheated, allow the motor to cool for 20-45 minutes.
Tips to prevent ‘overloading’ your blender: Process only Vitamix recipes when learning to use the blender. Do not process recipes at lower speeds than recommended. Do not process recipes at higher speeds than recommended. Do not process recipes for longer than recommended. Use your tamper to process thicker mixtures and keep ingredients moving around and through the blades.
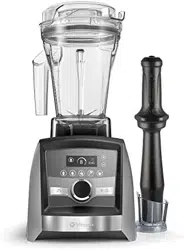
Tamper - Lids and tampers are not interchangeable between different container styles, types and sizes. Use the tamper that was supplied with your blender. The container should not be more than two-thirds full when the tamper is used during blending. To avoid overheating, DO NOT use the tamper for more than 30 consecutive seconds.
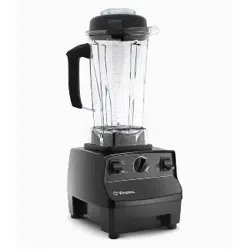
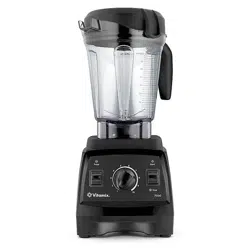
Blender with Variable Speed
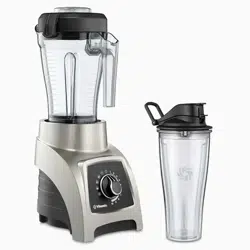
Blender with Variable Speed and Programs
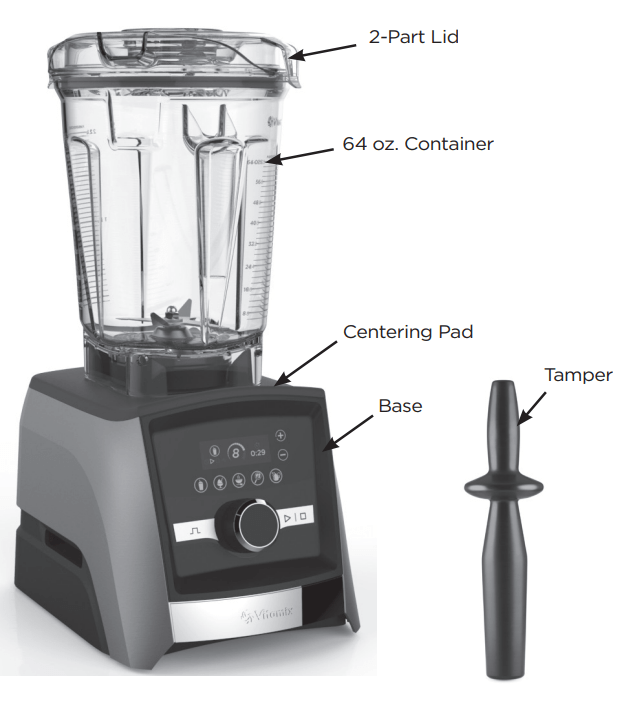
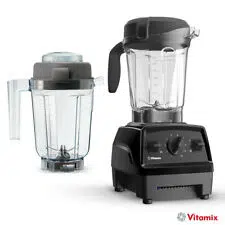
Container, Lid, Lid Plug and Tamper
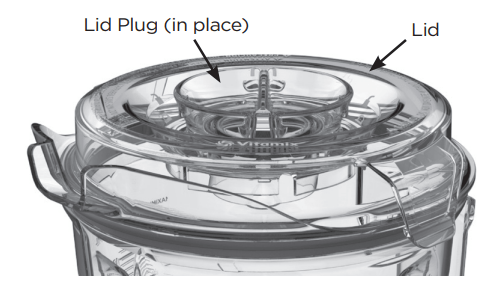
- Always use the lid and the lid plug when operating the blender.
- Never operate the blender without checking to make sure that the lid is securely locked in place.
- The lid plug is marked so it can be used as a measuring cup.
- Insert the lid plug through the lid plug opening. Lock the plug in place by turning clockwise. To remove, turn counter-clockwise and lift out.
- Remove the lid plug to use the tamper or to add ingredients.
- Legacy Vitamix containers (C, G and S Series) will not operate on the Ascent blender base.
Accessories
Accessories are available for creative recipe development. Visit vitamix.com for product offerings and inspiration
Blending
WARNING
- To Avoid Possible Burns, Never Start on Speeds Above 1 when Processing Hot Liquids in a Large Container. Escaping steam, splashes or contents may burn. Always start on Variable 1, then slowly increase to 10. DO NOT use your 20 ounce cup or 8 ounce cup to heat ingredients or to blend hot liquids. Heated ingredients and liquids may create internal pressure which could cause the cup to burst and cause injury.
- DO NOT continuously use your machine for more than 2 minutes with the 20 ounce cup or 45 seconds for the 8 ounce cup. If a cup becomes warm to the touch or steams or vents, immediately stop blending ingredients and turn off or unplug blender.
- Parts will become hot with extended use. DO NOT touch.
- To secure the contents in a full size container, lock the lid and lid plug securely in place before operating the blender.
1. The On/Off switch is on the right hand side of the base. Press the On/Off switch to the On () position. After the blender is turned on, “Vitamix” will appear on the control panel. This symbol will be displayed on the control panel when no container is on the blender base.
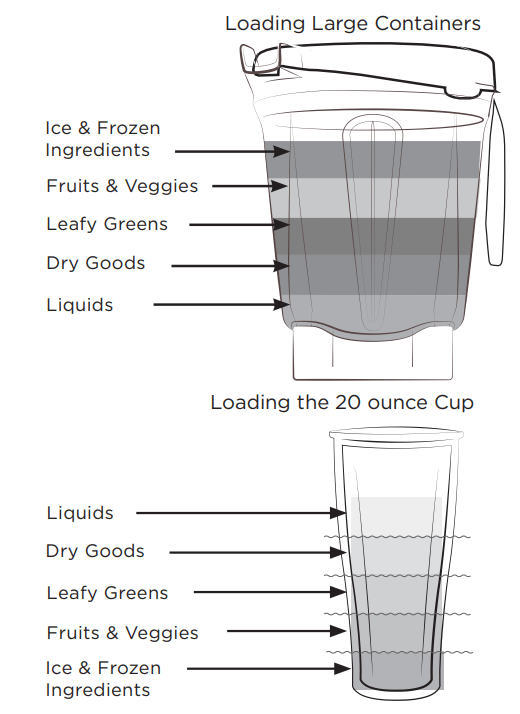
2. Load your container according to your recipe or the load order in the illustration here. Note: Recipe ingredients for cups load in the opposite order of the large containers.
IMPORTANT! Always use the lid and the lid plug on the Large Container when the machine is in operation. Never operate the blender without checking to make sure that the lid and lid plug are securely locked in place
3. Perform one of the following:
- Large Containers - Put the lid onto the container. Push the lid down into place until the two tabs snap onto the lip of the container. Insert the lid plug. Turn the lid plug clockwise to lock.
- Cups - Put a seal on the bottom thread of the adapter. The seal should fit snugly and evenly around the thread. Thread the adapter onto the cup in a clockwise direction just until tight. DO NOT overtighten or leaking can occur.
4. Put the container (or cup and adapter) onto the base. Variable Speed 1 will display when a container/cup is detected and the blender is ready to operate.
5. Perform one of the following:
a. Turn the variable speed dial counter-clockwise until Variable Speed 1 appears on the control panel.
b. Press Start/Stop. The blades will begin to turn and the timer will count the minutes and seconds that the blend has been processing. To set a blend time, use the +/- icons on the controls.
c. Rotate the Variable Speed Dial between 1 and 10 during the blending cycle to increase or decrease the speed of the blades.
d. At the end of the blend, rotate the Variable Speed Dial counter-clockwise until Variable 1 is displayed and press Start/Stop.
Note: The soup program is not available for use with the cups. DO NOT blend hot liquid in the cups.
a. Press the icon for the desired program. (The default program time and variable speed setting will display on the control panel).
b. Press Start/Stop to start the program. (The blender will automatically stop at the end of the program.) Press Start/Stop at any time to stop the program.
6. If the mixture stops circulating:
- Large Containers - Insert the tamper through the lid plug and stir until it ‘burps’. If this does not work, press the On/Off switch to stop the motor. Remove the container from the blender base and use a rubber spatula to press the air bubble away from the blades. Add liquid if necessary. Replace the lid and lid plug. Return the container to the blender base and continue blending.
- Cups - Press the On/Off switch to stop the motor. Wait until the blades stop rotating. Remove the cup and adapter from the blender base. Turn the cup over. Unthread the adapter from the cup. Stir the ingredients. Add liquid if necessary. Reattach the adapter, place on blender base and continue blending.
7. After blending, wait until the blades completely stop before removing the lid or container/cup from the blender base.
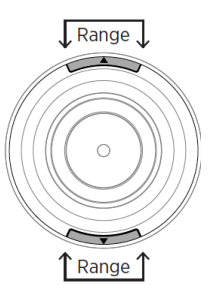
Before putting the blade base onto the cup, locate the two arrows on the blade base. Tighten the blade base onto the cup until the arrows line up within the range marked on the cup.
Care and Cleaning
BEFORE FIRST USE:
1. Wipe the base with a warm damp cloth and wipe clean with a dry, soft cloth. Wash the container, cups, lids, lid plug, and tamper with warm, soapy water. Rinse all parts. Wipe dry with a dry, soft cloth.
2. Choose a space on the counter that is level, dry and clean. Plug the blender into a grounded, 3-prong outlet.
Note: Your Vitamix container is designed to be completely cleanable without removing the retainer nut and blade assembly. DO NOT attempt to remove the retainer nut or blade assembly from the container. Our Normal Cleaning and Sanitizing procedures or a dishwasher cleaning cycle will ensure a complete and thorough cleaning of your container and it’s components. If your container is damaged, please do not use. Contact Vitamix Customer Service IMMEDIATELY for assistance
Care and Cleaning of Large Containers:
To Clean:
1. Fill the container half full with warm water and add a couple of drops of dishwashing liquid.
2. Snap or push the complete 2-Part lid into the locked position.
3. Perform one of the following procedures:
a. Press the Start / Stop.
b. Slowly increase variable speed to 10.
c. Run the machine for 30 to 60 seconds.
d. Rotate the Variable Speed dial back to Variable 1.
- Model A3500, press the Self-Cleaning Icon () to select. Press Start/Stop. The program will stop automatically when complete.
4. Rinse and drain all pieces
To Sanitize:
1. Follow the cleaning instructions above.
2. Fill the container half full with water and 1 ½ teaspoons of liquid bleach.
3. Snap or push the complete 2-part lid into the locked position. 4. Perform one of the following procedures:
a. Press the Start / Stop.
b. Slowly increase variable speed to 10.
c. Run the machine for 30 to 60 seconds.
d. Rotate the Variable Speed dial back to Variable 1.
- Model A3500, press the Self-Cleaning Icon () to select. Press Start/Stop. The program will stop automatically when complete.
5. Allow mixture to stand in the container for an additional 1 ½ minutes.
6. Pour bleach mixture out. Allow container to air dry. Do not rinse after sanitizing
Lids, Lid Plug, Centering Pad and Tamper
The parts are dishwasher safe. If preferred, wash the parts in warm soapy water. Rinse clean under running water, then dry.
Accessories
Refer to the care and cleaning instructions included with the accessory for more information.
Blender Base
1. Turn off and unplug the blender.
2. Wash the outside surface with a damp, soft cloth or sponge that has been rinsed in a mild solution of liquid dish soap and warm water. Do not place the blender base in water. The centering pad can be removed for more thorough cleaning. The centering pad is dishwasher safe.
3. Immediately dry all surfaces and polish with a soft cloth.
Specifications
Voltage: 120 V
Height (with 64 oz. container on base): 17 inches
Frequency: 50 - 60 Hz
Width: 8 inches
Amps: 12 Amps
Depth: 11 inches
- This device complies with part 15 of the FCC Rules. Operation is subject to the following two conditions: (1) This device may not cause harmful interference, and (2) this device must accept any interference received, including interference that may cause undesired operation.
- This device complies with Industry Canada licence-exempt RSS standard(s). Operation is subject to the following two conditions: (1) this device may not cause interference, and (2) this device must accept any interference, including interference that may cause undesired operation of the device.