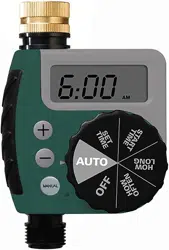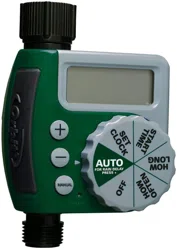
6:00
RESET
MANUAL
94292
94292-24 rB
ENGLISH
FRENCH
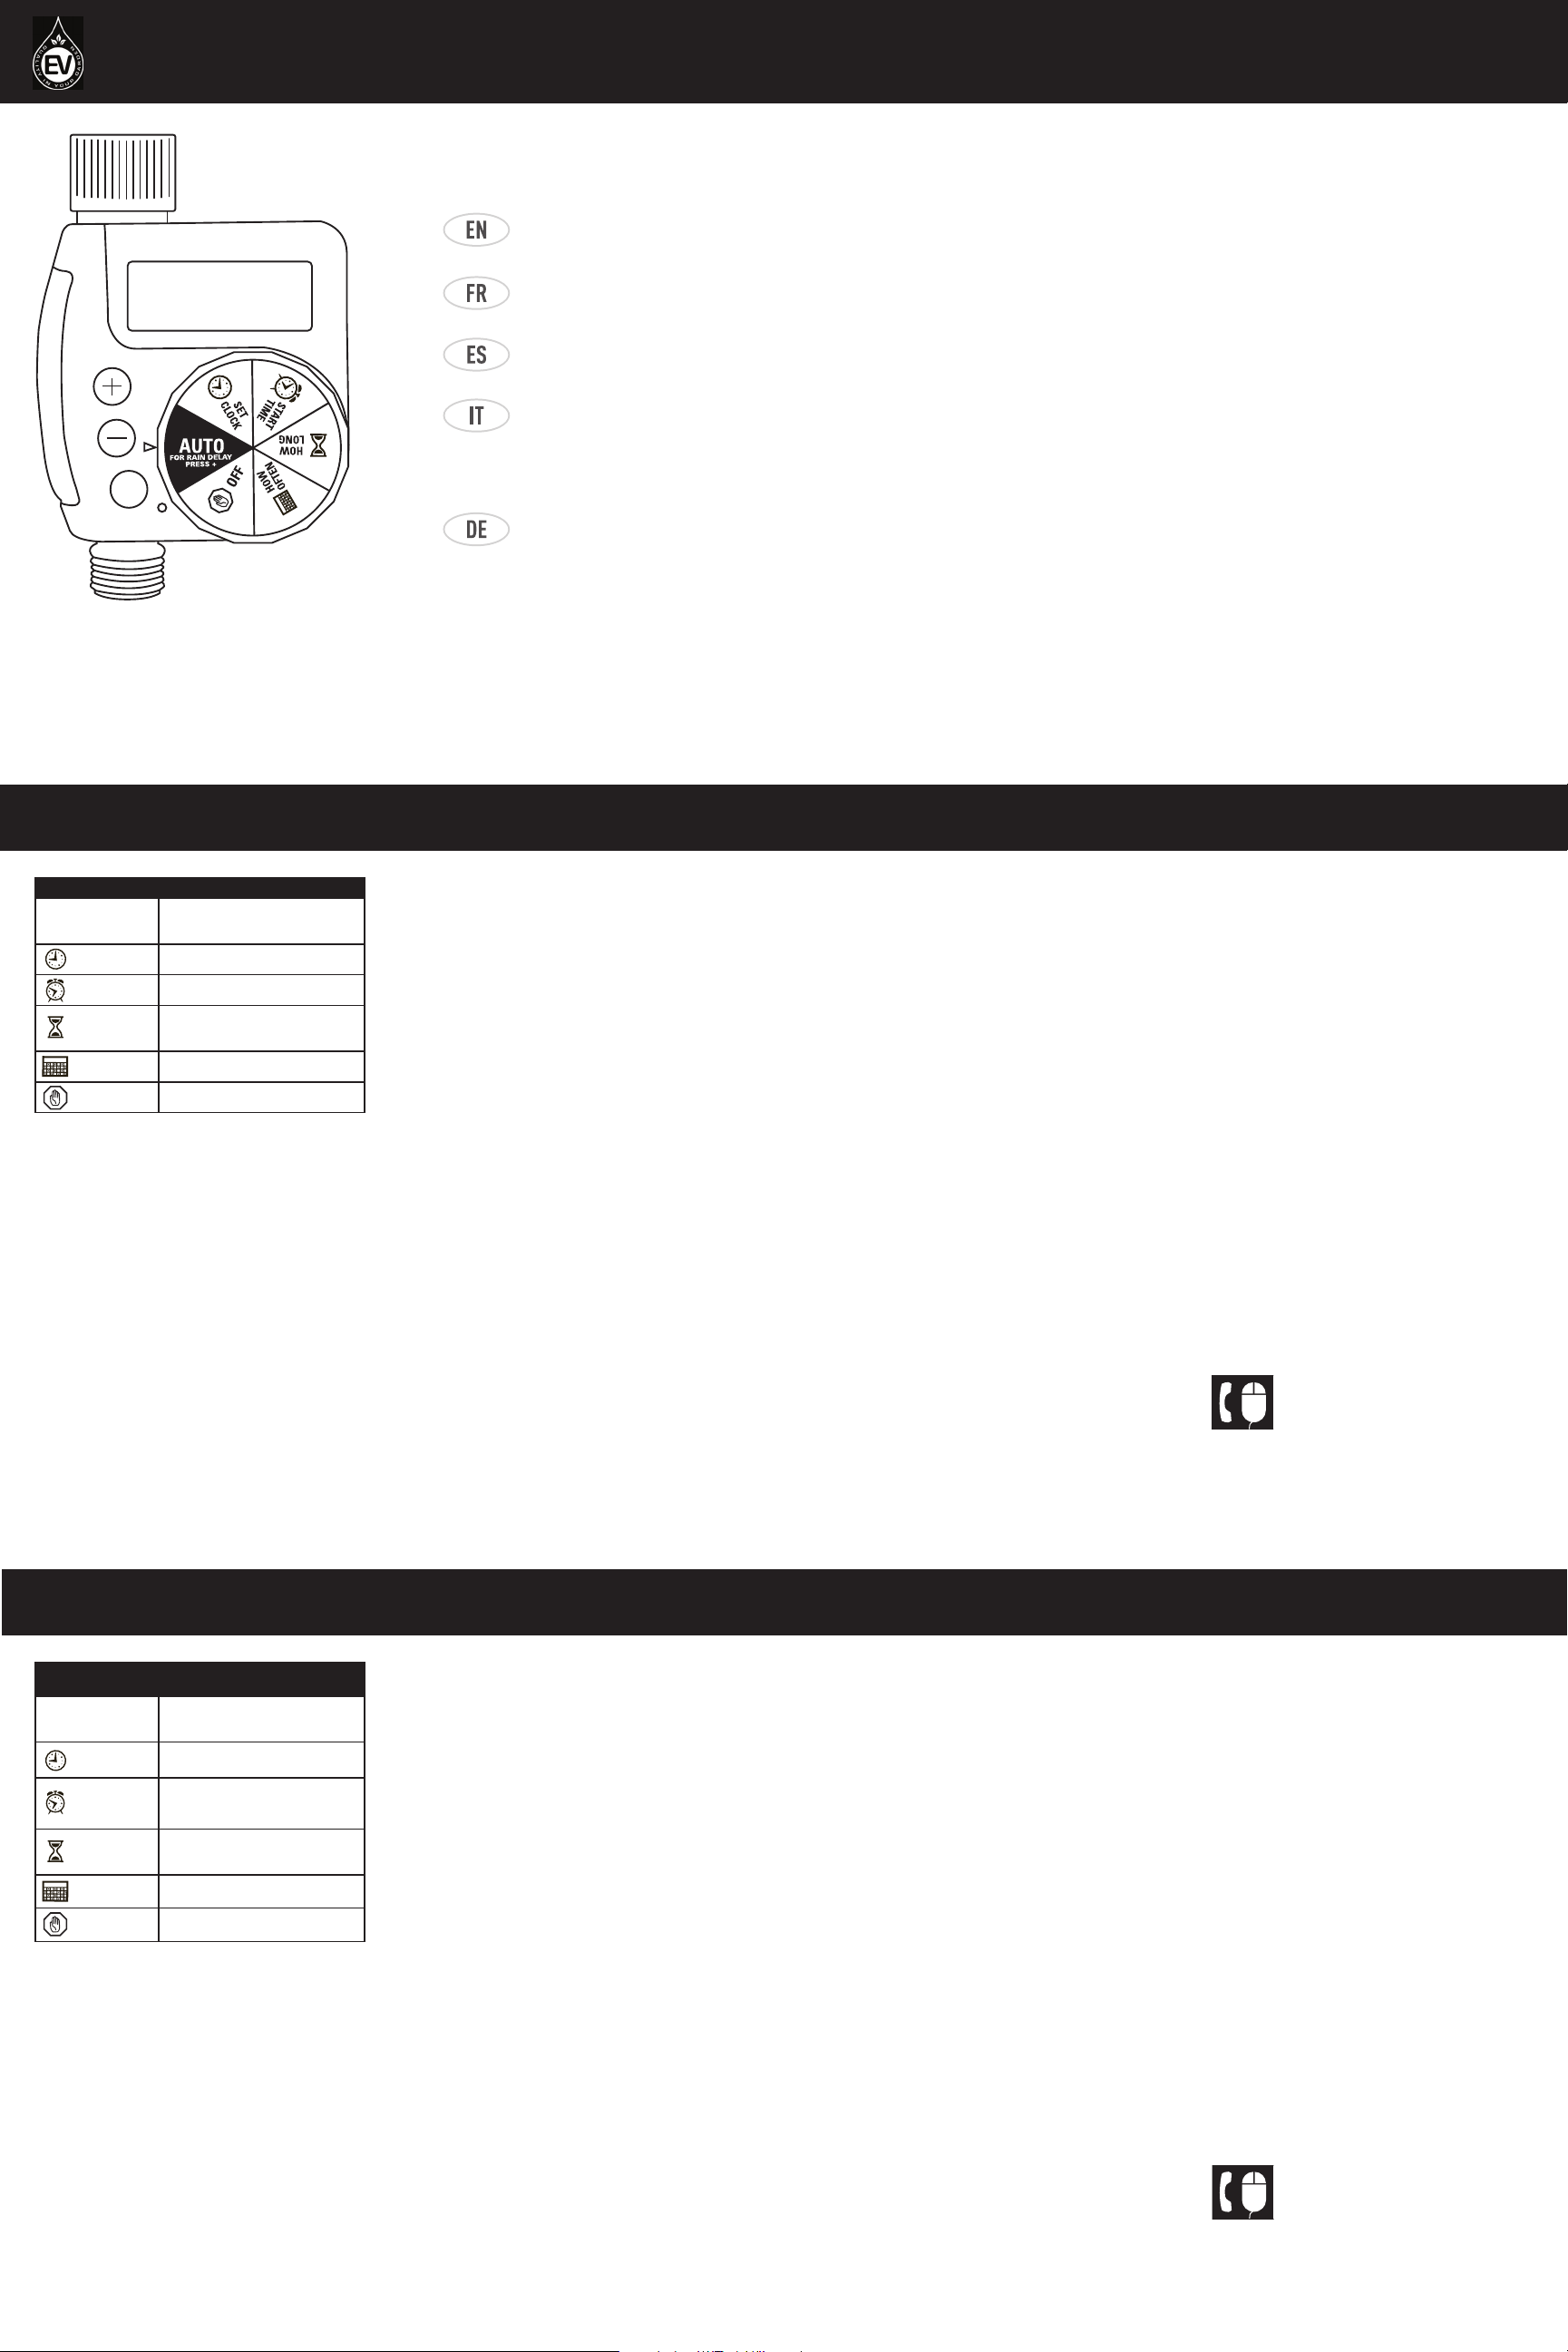
PROGRAMMING THE TIMER
■
Rotate the dial to positions indicated for
setup.
SET CLOCK
■
Press the + button to advance clock time
(hold button for quick advance).
■
Press the – button to reverse clock time
(hold button for quick reverse).
START TIME
■
Press the + button to advance start time
(hold button for quick advance).
■
Press the – button to reverse start time (hold
button for quick reverse).
HOW LONG
Set watering duration from 1 to 240 minutes
using the + and – buttons.
HOW OFTEN
Set watering frequency as every 6 hrs, 12 hrs,
or from 1 to 7 days using the + and – buttons.
1 is every day, 2 is every other day etc. up to 7
days.
AUTO
Timer waters according to programmed time,
duration, and frequency.
RAIN DELAY
■
When in AUTO, press + button for 24 hrs, 48
hrs, or 72 hrs.
■
Screen will flash between clock and hours
remaining before programmed cycle
resumes.
■
To remove rain delay, turn dial to OFF and
then back to AUTO.
INSTALLING THE BATTERIES
■
Remove the tray on the back of the timer by
sliding it out.
■
Insert two AA (1.5V) alkaline batteries (not
included) and replace the tray.
■
Replace batteries when low battery icon
appears.
Note:
Used up or dead batteries must be removed
from the timer and disposed of properly.
Batteries must be removed from the timer at
the end of the watering season and replaced
with new ones at the beginning of the next
watering season.
INSTALLATION
Attach timer to an outdoor hose faucet and
turn on after programming.
MANUAL/HAND WATERING
To water without interrupting the set cycle,
press [MANUAL] button and then use + and –
buttons to set from 1 to 240 minutes.
■
To remove manual watering (turn off), turn
dial to OFF.
■
To resume programmed cycle turn the dial
back to AUTO.
TROUBLESHOOTING
Water does not come on at desired time.
Check if:
■
Clock is set to correct time including AM and
PM.
■
Start time is set to desired time including
AM and PM.
■
Rain Delay is on.
Timer does not water.
Check if:
■
Timer is set to AUTO.
■
Hose faucet is on.
■
Batteries are low.
■
Clock is set to correct time including AM and
PM.
■
Rain Delay is on.
Water won’t turn off.
Check if:
■
Watering duration is set to desired time.
Working Water Pressure
Minimum: 25 psi Maximum: 100 psi
Working Temperature
Maximum: Do not exceed 120 degrees F
Minimum: Keep from freezing
INSTALLATION
Fixez la minuterie à un robinet de tuyau
d’arrosage et une fois programmée, mettez la
minuterie en marche.
PROGRAMMATION DE LA MINUTERIE
■ Tournez le cadran à la position indiquée pour
régler la fonction désirée.
RÉGLAGE DE L’HORLOGE
■ Appuyez sur la touche + pour avancer l’heure
■ Appuyez sur la touche - pour reculer l’heure
(maintenez la touche enfoncée pour reculer
plus rapidement).
HEURE DE MISE EN MARCHE
■ Appuyez sur la touche + pour avancer l’heure
de mise en marche (maintenez la touche
enfoncée pour avancer plus rapidement).
■ Appuyez sur la touche – pour retarder l’heure
de mise en marche (maintenez la touche
enfoncée pour reculer plus rapidement).
DURÉE
Réglez la durée de l’arrosage de 1 à 240
minutes avec les touches + et –.
FRÉQUENCE
Réglez la fréquence d’arrosage toutes les 6
heures, 12 heures ou de 1 à 7 jours en utilisant
les touches + et –. 1 est tous les jours, 2 est
tous les deux jours, etc, jusqu’à 7 jours.
AUTO
La minuterie arrose suivant l’heure, la durée
et la fréquence programmées.
INSTALLATION DES PILES
■ Retirez le couvercle du compartiment à
piles, situé sur le côté de la minuterie, en le
faisant glisser.
■ Insérez deux piles alcalines AA (1,5 V), puis
replacez le couvercle.
■ Remplacez les piles lorsque l’icône de piles
faibles est affiché.
Remarque :
Les piles mortes ou usagées doivent enlevées
de la minuterie et jetées correctment.
Il faut enlever les piles de la minuterie à la
fin de la saison d’arrosage et les remplacer
par des neuves au début de la nouvelle saison
d’arrosage.
INTERRUPTION EN CAS DE PLUIE
■ En mode AUTO, appuyez sur la touche + pour
régler la durée de l’interruption à 24, 48 ou
72 heures.
■ L’écran clignotera entre l’horloge et la durée
restante avant la reprise du cycle.
■ Pour arrêter la fonction d’interruption en cas
de pluie, tournez le cadran à la position OFF
(arrêt) et remettez-le ensuite à la position
AUTO.
ARROSAGE MANUEL
Pour arroser sans interrompre le cycle réglé,
appuyez sur la touche [MANUAL], puis utilisez
les touches + et – pour régler la durée de
l’arrosage de 1 à 240 minutes.
■ Pour arrêter l’arrosage manuel, tournez le
cadran à la position OFF (arrêt).
■ Pour reprendre le cycle programmé,
remettez le cadran à la position AUTO.
DÉPANNAGE
L’arrosage ne débute pas au moment voulu.
Vérifiez si :
■ l’horloge est réglée à la bonne heure (AM-
PM);
■ l’heure de mise en marche est réglée tel que
vous le désirez (AM-PM);
■ la fonction d’interruption en cas de pluie est
activée.
©2011 Orbit Irrigation Products, Inc.
All rights reserved. All trade names
are registered trademarks of
respective manufacturers listed.
Orbit
®
Irrigation Products, Inc.
North Salt Lake, UT 84054, USA
CUSTOMER SERVICE
001-801-299-5555
www.orbitonline.com
infoorbiteurope.com
©2011 Orbit Irrigation Products, Inc.
Tous droits réservés. Toutes les appellations
commerciales sont des marques de commerce
déposées de leur propriétaire respectif.
Orbit
®
Irrigation Products, Inc.
North Salt Lake, UT 84054, USA
Single-port digital timer
Programmateur robinet digital
Programador digital de grifo
Programmatore elettronico
da rubinetto
Digitale einzelportzeitschaltuhr
Warnings
For outdoor use with cold water only.
AUTO
Timer waters according to
programmed time, station,
duration, and frequency
SET CLOCK Set clock time
START TIME Set time to begin watering
HOW LONG
Set watering duration from 1 to
240 minutes using the + and –
buttons
HOW OFTEN Set frequency of watering days
OFF Turn all stations/functions off
DIAL POSITION FUNCTION
La minuterie ne fonctionne pas.
Vérifiez si :
■ la minuterie est réglée à AUTO;
■ le robinet du tuyau est ouvert;
■ les piles sont faibles;
■ l’horloge est réglée à la bonne heure (AM-
PM);
■ la fonction d’interruption en cas de pluie
est activée.
L’arrosage ne s’arrête pas.
Vérifiez si :
■ l’arrosage est réglé à la durée désirée.
Pression de service
Minimum : 25 lb/po2 Maximum : 100 lb/po2
Température de fonctionnement :
Maximum : 48,9 °C
Minimum : Conservez le produit à l’abris du
gel.
Avertissements
Pour usage à l’extérieur avec de l’eau froide
seulement
AUTOMATIQUE
La minuterie arrose suivant
l’heure, la station, la durée et la
fréquence programmées
RÉGLER
L’HORLOGE
Régler l’heure de l’horloge
HEURE DE
DÉMAR
RAGE
Régler l’heure du début d’arrosage
DURÉE
Réglez la durée d’arrosage de 1
à 240 minutes avec les boutons
+ et –
FRÉQUENCE
Régler la fréquence des jours
d’arrosage
ARRÊT
Arrêter toutes les stations/
fonctions
POSITION DU CADRAN
DE SÉLECTION
FONCTION
Rain S.P.A. – www.rain.it
SERVICE À LA CLIENTÈLE
001-801-299-5555
www.orbitonline.com
infoorbiteurope.com
ESPAÑOL
ITALIANO
GERMAN
INSTALACIÓN
Conecte el programador a un grifo para
manguera exterior y enciéndalo después de
programarlo.
PROGRAMACIÓN
■
Gire el selector a la posición que se indica
para la configuración.
AJUSTE DEL RELOJ
■
Presione el botón + para adelantar la hora
del reloj (mantenga presionado el botón para
avanzar rápido).
■
Presione el botón – para retrasar la hora del
reloj (mantenga presionado el botón para
retroceder rápido).
HORA DE INICIO
■
Presione el botón + para avanzar la hora de
inicio (mantenga presionado el botón para
avanzar rápido).
■
Presione el botón – para retroceder la hora
de inicio (mantenga presionado el botón para
retroceder rápido).
DURACIÓN
Programe la duración del riego de 1 a 240
minutos usando los botones + y – .
FRECUENCIA
Programe la frecuencia del riego cada 6 horas
o 12 horas, o cada 1-2-3-4-5-6-7 días usando
los botones + y – . 1 es todos los días, 2 es
cada dos días, etc. hasta 7 días.
INSTALACIÓN DE LAS PILAS
■
Retire la tapa trasera del programador
deslizándola hacia fuera.
■
Inserte 2 pilas alcalinas AA (1.5 V) (no
incluidas) y vuelva a colocar la tapa.
■
Cambie las pilas cuando aparezca en
pantalla el icono de batería baja.
Nota:
Las pilas agotadas deben retirarse del
programador y eliminarse de forma segura.
Las pilas se deben retirar del programador
al final de la temporada de riego y se deben
reemplazar con nuevas al inicio de la
siguiente temporada de riego.
RIEGO AUTOMÁTICO
El programador activa el riego de acuerdo a la
hora, duración y frecuencia programadas.
RETARDO POR LLUVIA
■
Cuando esté en modo AUTO, presione el
botón + para programar una pausa de
24, 48 o 72 horas.
■
La pantalla cambiará entre el reloj y el
número de horas que faltan para que se
reanude el ciclo programado.
■
Para desactivar el retardo por lluvia, gire el
dial a OFF y después a AUTO.
RIEGO MANUAL
Para regar sin interrumpir el ciclo
programado, presione el botón [MANUAL] y
luego use los botones + y – para establecer
una duración de entre 1 y 240 minutos.
■ Para desactivar el riego manual (apagarlo),
gire el selector a la posición OFF.
■
Para reanudar el ciclo programado, gire el
selector a la posición AUTO.
SOLUCIÓN DE PROBLEMAS
El agua no sale a la hora programada. Revise
si:
■
El reloj está programado a la hora correcta
incluso en AM y PM.
■
La hora de inicio está programada a la hora
correcta incluso en AM y PM.
■
Está activado el retardo por lluvia.
PROGRAMMAZIONE DEL TIMER
■
Ruotare il quadrante sulle posizioni indicate
per
l’impostazione.
IMPOSTAZIONE DELL’OROLOGIO
■
Premere il tasto + per avanzare all’ora
corretta
(tenere premuto il tasto per avanzamento
rapido).
■
Premere il tasto – per retrocedere all’ora
corretta (tenere premuto il tasto per
retrocessione rapida).
ORARIO D’INIZIO
■
Premere il tasto + per avanzare all’ora
corretta
(tenere premuto il tasto per avanzamento
rapido).
■
Premere il tasto – per retrocedere all’ora
corretta (tenere premuto il tasto per
retrocessione rapida).
OGNI QUANTO TEMPO
Impostare la frequenza d’irrigazione ad ogni
6, 12 ore oppure da 1 a 7 giorni, utilizzando
i tasti + e –. 1 si riferisce ad un’irrigazione
quotidiana, 2 a giorni alternati, ecc...fino ad un
massimo di 7 giorni .
AUTO
Il timer irriga a seconda dell’ora, della durata
e della frequenza impostate.
COME ISTALLARE LE PILE
■
Rimuovere il coperchio sul retro del timer
facendolo scorrere verso l’esterno.
■
Inserire due pile alcaline tipo AA (1,5V)
(non incluse) e riposizionare il coperchio.
■
Sostituire le pile quando l’icona delle pile
scariche appare sul display.
N.B.:
Batterie usate o scariche devono essere
rimosse dal timer e smaltite adeguatamente.
Rimuovere le batterie dal timer alla fine della
stagione secca e sostituirle con delle nuove
all’inizio della stagione secca successiva.
ISTALLAZIONE
Collegare il timer ad un rubinetto esterno
ed aprire il rubinetto una volta terminata la
programmazione.
RITARDO PIOGGIA
■
In modalità AUTO, premere il tasto + per 24,
48 o 72 ore.
■
Il display lampeggerà tra l’orologio e le ore
rimanenti, prima che il ciclo programmato
sia ripristinato.
■
Per cancellare il Ritardo Pioggia, ruotare il
quadrante su OFF e successivamente
riposizionarlo su AUTO.
IRRIGAZIONE MANUALE
Per irrigare senza interrompere il ciclo,
premere il tasto [MANUAL], quindi utilizzare i
tasti + e – per impostare da 1 a 240 minuti.
■
Per cancellare l’irrigazione manuale
(spegnimento), ruotare il quadrante su OFF.
RISOLUZIONE DEI PROBLEMI
L’irrigazione non parte all’ora desiderata
Controllare se:
■
L’orologio è impostato correttamente,
inclusi AM e PM.
■
L’orario di inizio irrigazione è impostato
correttamente, inclusi AM e PM
■
Il Ritardo Pioggia è attivato. Il timer non
irriga.
Controllare se:
■
Il timer è impostato su AUTO.
■
Il rubinetto è aperto.
■
Le pile sono scariche.
■
L’orologio è impostato correttamente, inclusi
AM e PM.
INSTALLATION
Zeitschaltuhr an Außenwasserhahn für
Gartenschlauch anschließen und nach
Programmierung einschalten.
PROGRAMMIEREN DER ZEITSCHALTUHR
■ Drehschalter auf Positionen zum
Programmeinrichten einstellen.
SET CLOCK (Uhreinstellung)
■ Die +-Taste drücken, um die Uhrzeit
vorlaufen zu lassen (zum schnellen Vorlauf
Taste gedrückt halten).
■ Die „-“-Taste drücken, um die Uhrzeit
rückwärts laufen zu lassen (zum schnellen
Rücklauf Taste gedrückt halten).
START TIME (Startzeit)
■ Die +-Taste drücken, um die Startzeit
vorlaufen zu lassen (zum schnellen Vorlauf
Taste gedrückt halten).
■ Die „-“-Taste drücken, um die Startzeit
rückwärts laufen zu lassen (zum schnellen
Rücklauf Taste gedrückt halten).
HOW LONG (Bewässerungsdauer)
Bewässerungsdauer mit + oder - auf 1 bis
240 Minuten einstellen.
HOW OFTEN (Bewässerungshäufigkeit)
Bewässerungshäufigkeit mit + oder - auf alle
6 Std., 12 Std. oder auf 1 bis 7 Tage einstellen.
1 steht für täglich, 2 jeden 2. Tag usw. bis zu 7
Tagen.
AUTO (Automatikmodus)
Zeitschaltuhr bewässert gemäß der
EINLEGEN DER BATTERIEN
■ Batteriefach an der Rückseite der
Zeitschaltuhr herausschieben.
■ Zwei AA-Alkalibatterien (1,5V, nicht
inbegriffen) einlegen und Fach wieder
zuschieben.
■ Batterien austauschen, wenn Symbol für
leere Batterie erscheint.
Hinweis:
Aufgebrauchte bzw. leere Batterien müssen
aus der Zeitschaltuhr entnommen und
korrekt entsorgt werden.
Batterien müssen am Ende der
Bewässerungssaison aus der Zeitschaltuhr
entnommen und zu Beginn der nächsten
Bewässerungssaison durch neue Batterien
ersetzt werden.
programmierten Startzeit, Dauer und
Häufigkeit.
RAIN DELAY (REGENVERZÖGERUNG)
■ Im Automatikmodus die +-Taste drücken für
24 Std., 48 Std. oder 72 Std.
■ Anzeige wechselt zwischen Uhrzeit
und verbleibenden Stunden, bevor der
programmierte Zyklus wieder aufgenommen
wird.
■ Zum Abschalten der Regenverzögerung
Drehschalter auf OFF (Aus) und dann zurück
auf AUTO stellen.
MANUAL (MANUELLE BEWÄSSERUNG)
Um ohne Unterbrechung der eingestellten
Zyklen zu bewässern, die [MANUAL]-Taste
drücken und dann die Dauer mit + und - auf 1
bis 240 Minuten einstellen.
■ Zum Abschalten der manuellen
Bewässerung Drehschalter auf OFF (Aus)
stellen.
■ Um den programmierten Zyklus wieder
aufzunehmen, Drehschalter wieder auf
AUTO stellen.
FEHLERSUCHE
Wasser fließt nicht zur gewünschten Zeit.
Prüfen Sie, ob:
■ die Uhrzeit korrekt eingestellt ist, inkl. AM
bzw. PM.
■ die Startzeit wie gewünscht eingestellt ist,
inkl. AM bzw. PM.
■ die Regenverzögerungsfunktion aktiviert ist.
Zeitschaltuhr bewässert nicht.
Prüfen Sie, ob:
©2011 Orbit Irrigation Products, Inc.
All rights reserved. All trade names
are registered trademarks of
respective manufacturers listed.
Orbit
®
Irrigation Products, Inc.
North Salt Lake, UT 84054, USA
©2011 Orbit Irrigation Products, Inc.
All rights reserved. All trade names
are registered trademarks of
respective manufacturers listed.
Orbit
®
Irrigation Products, Inc.
North Salt Lake, UT 84054, USA
©2011 Orbit Irrigation Products, Inc.
All rights reserved. All trade names
are registered trademarks of
respective manufacturers listed.
Orbit
®
Irrigation Products, Inc.
North Salt Lake, UT 84054, USA
■ die Zeitschaltuhr auf AUTO eingestellt ist.
■ der angeschlossene Wasserhahn
aufgedreht ist.
■ die Batterien leer sind.
■ die Uhrzeit korrekt eingestellt ist, inkl. AM
bzw. PM.
■ die Regenverzögerungsfunktion aktiviert
ist.
Wasser hört nicht auf zu fließen.
Prüfen Sie, ob:
■ die Bewässerungsdauer auf die
gewünschte Zeit eingestellt ist.
Betriebswasserdruck
Min.: 25 psi (1,73 bar) Max.: 100 psi (6,9 bar)
Betriebstemperatur
Max.: Darf 49 °C nicht überschreiten
Min.: Vor Frost schützen
Warnhinweise
Nur zur Verwendung im Außenbereich
mit kaltem Wasser.
El programador no activa el riego. Revise si:
■
El programador está en modo AUTO.
■
El grifo para la manguera está abierto.
■
Las pilas tienen carga baja.
■
El reloj está programado a la hora correcta,
incluso en AM y PM.
■
Está activado el retardo por lluvia.
El agua no se corta. Revise si:
■
La duración del riego está establecida en
el tiempo deseado.
Presión de trabajo
Mínima: 1,7 atm - Máxima: 6,8 atm
Temperatura de trabajo
Máxima: No supere los 49 grados C
Mínima: Evite el congelamiento
Advertencias
Para uso en exteriores con agua fría
solamente.
AUTOMÁTICO
El programador activa el riego de
acuerdo a la hora, estación, dura-
ción y frecuencia programadas
FIJE LA
HORA
Fija la hora en el reloj
HORA DE
INICIO
Fija la hora de comienzo del riego
DURACIÓN
Programa la duración de riego
de 1 a 240 minutos utilizando
los botones + y –
FRECUENCIA
Fija la frecuencia de los días de
riego
APAGADO
Desactiva todas las
estaciones/funciones
POSICIÓN DEL
SELECTOR
FUNCIÓN
AUTO
Controllare se:
■
La durata è impostata all’ora desiderata.
Presión de trabajo del agua
Mínima: 1,7 atm - Máxima: 6,8 atm
Temperatura de trabajo
Máxima: No supere los 49 grados C
Mínima: Evite el congelamiento
Advertencias
Para uso en exteriores con agua fría sola-
mente.
AUTOMATICO
Il timer irriga a seconda
dell’ora, della stazione,
della durata e della frequenza
impostate
IMPOSTAZIONE
DELL’OROLOGIO:
Imposta l’ora
ORARIO D’INIZIO
Imposta l’ora per iniziare
l’irrigazione
PER QUANTO
TEMPO
Impostare la durata
d’irrigazione da 1 a 240 minuti
utilizzando i tasti + e –.
OGNI QUANTO
TEMPO
Imposta la frequenza dei
giorni d’irrigazione
OFF
Spegne tutte le stazioni/
funzioni
POSIZIONE DEL
QUADRANTE
FUNZIONE
AUTO
AUTOMATIKMODUS
Zeitschaltuhr bewässert
gemäß der programmi-
erten Startzeit, Station,
Dauer und Häufigkeit.
UHREINSTELLUNG Einstellung der Uhrzeit
STARTZEIT
Uhrzeit, zu der die
Bewässerung beginnen
soll
BEWÄSSERUNGSDAUER
Bewässerungsdauer mit +
und - auf 1 bis 240 Minuten
einstellen.
BEWÄSSERUNGSHÄU
FIGKEIT
Einstellung der
Bewässerungshäufigkeit
in Tagen
AUS
Schaltet alle
Stationen/Funktionen aus
DREHSCHALTERSTELLUNG FUNKTION
SERVICIO AL CLIENTE
001-801-299-5555
www.orbitonline.com
infoorbiteurope.com
SERVIZIO ASSISTENZA
001-801-299-5555
www.orbitonline.com
infoorbiteurope.com
KUNDENDIENST
001-801-299-5555
www.orbitonline.com
infoorbiteurope.com