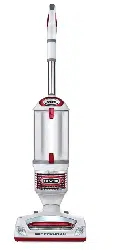
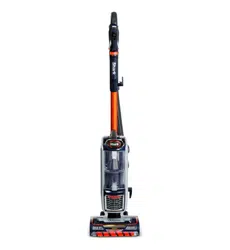
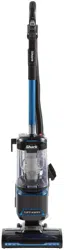
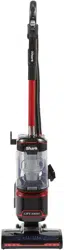
User Manual for Upright Vacuum
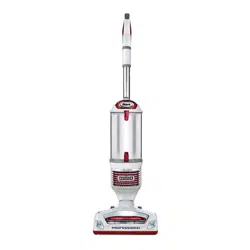
GETTING TO KNOW YOUR SHARK ® ROTATOR ® PROFESSIONAL LIFT-AWAY ®
WELCOME! Congratulations on your purchase. Use this instruction manual to learn about your new vacuum’s great features. From assembly to use to maintenance, you will find it all in here.
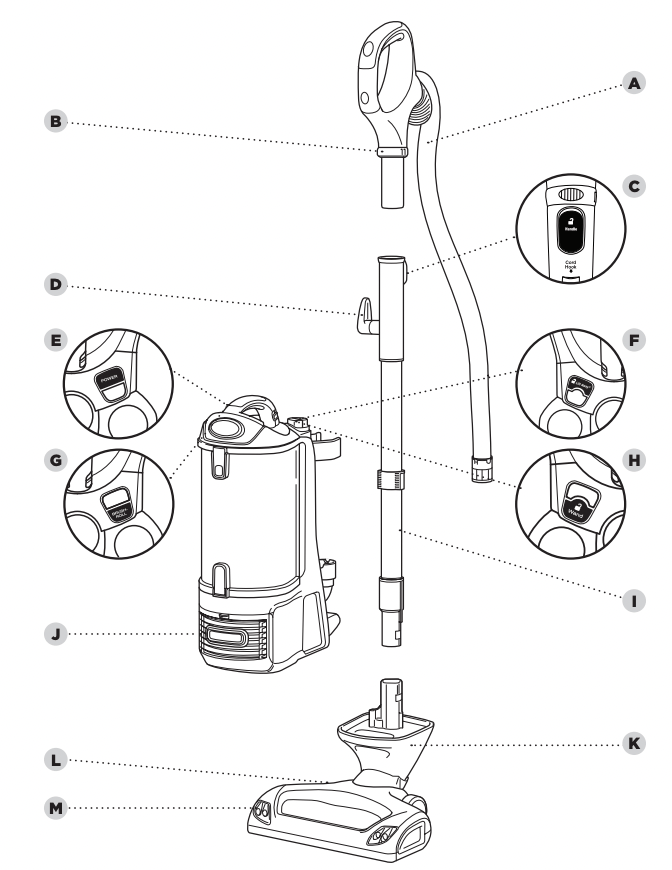
MAIN UNIT
A Hose
B Suction Control
C Handle Release Button
D Upper Cord Hook
E Power Button
F Lift-Away® Button
G Brushroll on/off button
H Wand Release Button
I Wand
J Lower Cord Hook
K Motorized Floor Nozzle
L Brushroll Indicator Light
M Headlights
ASSEMBLING YOUR VACUUM
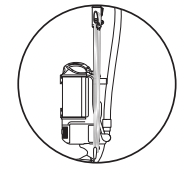
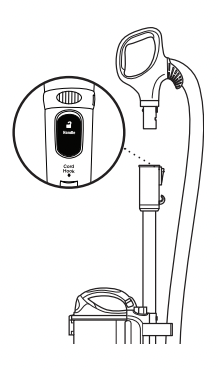
TIP: For quick cord access, rotate upper hook down and remove cord.
TIP: To store your vacuum, wrap cord around cord hooks.
STEP 1

1. Place the pod onto floor nozzle.
STEP 2
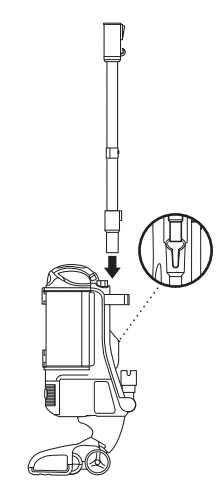
2. Slide wand into base of pod.
STEP 3
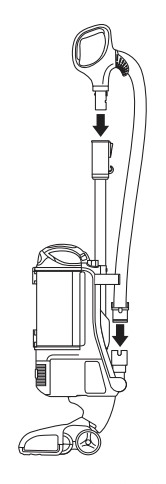
3. Insert handle into top of wand. Then attach hose into base of pod.
STEP 4
4. Insert tools into accessory clips, then tuck the hose between the clips.
USING YOUR VACUUM IN UPRIGHT MODE
WARNING: DO NOT use to pick up drywall dust, fireplace ash, or embers. DO NOT use as an attachment to power tools for dust collection.
WHAT DOES THE BRUSHROLL INDICATOR LIGHT MEAN?
Solid Green
The brushroll is on and working as it should.
Solid Red
There is a jam in the brushroll area. Turn your vacuum off and remove the blockage.
No Light
The brushroll is off. To turn it on, press the BRUSHROLL button. The light should turn green, and the brushroll should spin.
STEP 1
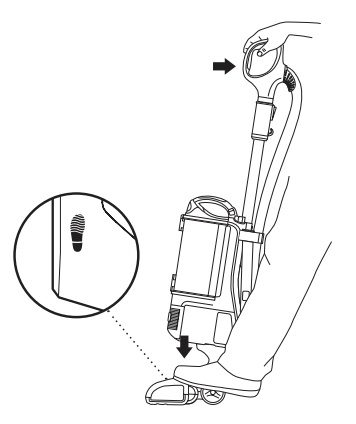
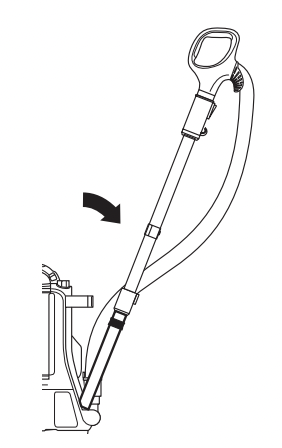
1. Plug power cord into outlet. Place foot on floor nozzle and tilt handle back.
STEP 2
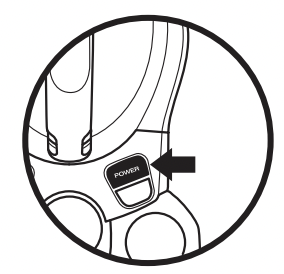
2. Press POWER to clean hard floor surfaces, area rugs or above-floor. The brushroll will not spin in this mode.
NOTE: For deep cleaning per ASTM F 608 (embedded dirt in carpets) please ensure brushroll is on with the suction control closed.
STEP 3
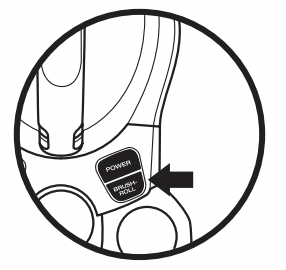
3. Press POWER and BRUSHROLL to clean carpets. The BRUSHROLL button will illuminate green. The brushroll will spin only when the vacuum is reclined and the BRUSHROLL button is green.
USING YOUR VACUUM IN ABOVE-FLOOR MODE
THE BENEFITS OF SUCTION CONTROL
Suction Control is a way for you to adjust suction power when you are using different tools or vacuuming different surfaces. For example, if you are feeling resistance vacuuming thick carpet or upholstery, opening the suction control to MIN will help reduce your push/pull effort.
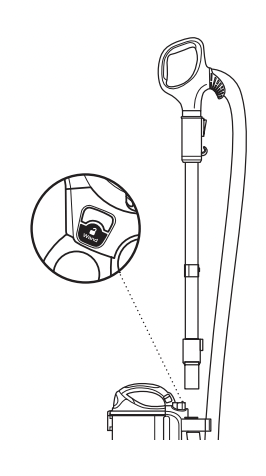
STEP 1
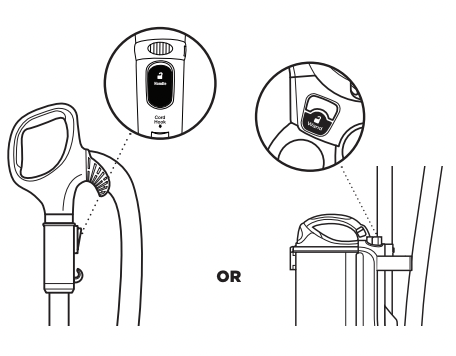
1. Press HANDLE release button when you need to clean within short reach.
OR Press WAND button on pod when you need to clean with a longer reach.
STEP 2
2. Insert wand or handle directly into desired tool and pivot back to release tool from clip.
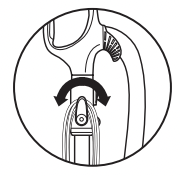
STEP 3
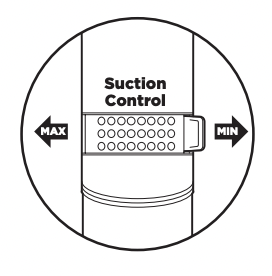
3. The collar is located at the base of the top handle. Rotate the collar counterclockwise to minimize suction. Close by rotating clockwise to maximize suction.
USING YOUR VACUUM IN LIFT-AWAY™ MODE
WARNING: Ensure solid footing when using in Lift-Away mode. Using for an application where you lack stability may result in personal injury.
TIP: Hold pod in hand to clean in Lift-Away mode.
WHAT IS LIFT-AWAY?
Our Lift-Away feature allows you to remove the pod from the floor nozzle to easily clean stairs, above floor with accessories, or hard floors with the hard-floor attachments.
LIFT-AWAY CLEANING
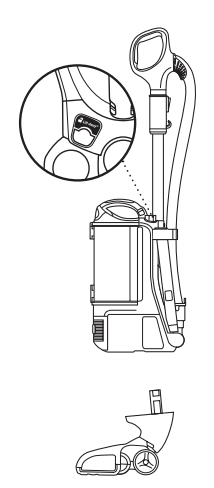
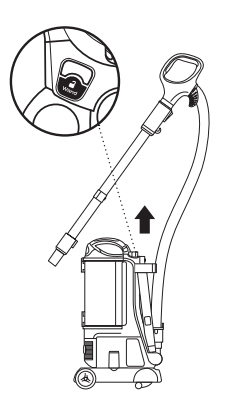
1. Press LIFT-AWAY to lift pod off floor nozzle.
2. Press HANDLE release button when you need to clean within short reach.
3. Or you can press WAND button on pod when you need to clean with a longer reach.
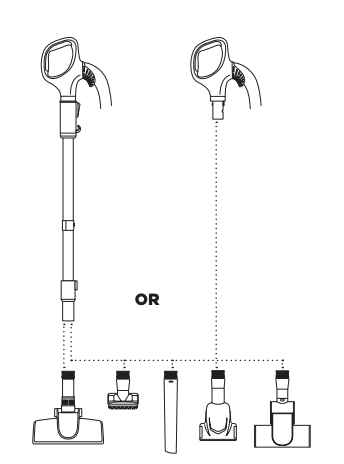
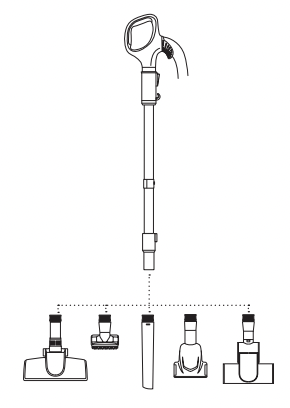
4. Attach desired cleaning tool to the end of handle or wand.
USING YOUR CADDY
If your vacuum comes with a caddy, use these instructions
TIP: Use the posts on the caddy to store additional cleaning accessories.

1. Press LIFT-AWAY to lift pod off floor nozzle and place pod onto canister caddy
2. Press WAND button to release the wand or press HANDLE button to release the handle only.
3. Attach preferred accessory to the wand or handle

4 .To release pod from caddy, press LIFTAWAY and lift the pod.
COMPATIBLE ACCESSORIES
There are a variety of accessories that are compatible with this vacuum series.
The top flap of your box shows the select accessories that are included with your model.
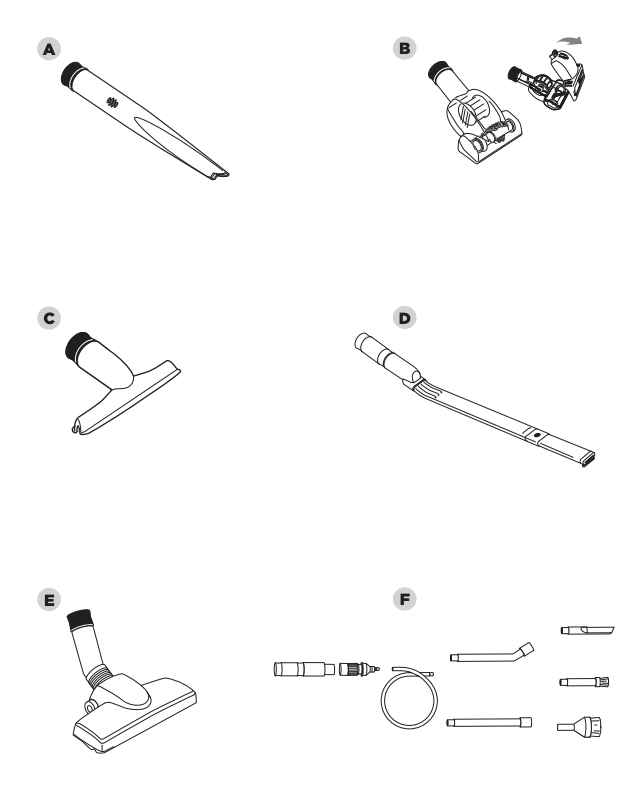
A Crevice Tool Gives you extended cleaning reach for small spaces.
B Pet Power Brush Designed for removal of pet hair and ground-in dirt from carpeted stairs and upholstery.
C Wide Upholstery Tool Remove pet hair and dust from curtains and other delicate fabrics and upholstery.
D Under-Appliance Wand Extend to access areas under hard-to-move appliances and furniture.
E Straight Suction Floor Nozzle Designed to pick up large and small debris from all hard floor surfaces and area rugs.
F Home & Car Detail Kit Extension tubes and micro-tools clean the tightest spaces.
MAINTENANCE
To keep your vacuum’s suction power optimal, follow these instructions. Make sure unit is off and cord is unplugged.
WARNING: To reduce the risk of shock and unintended operation, turn power off and unplug unit before servicing. Hand wash with water only to prevent damage from cleaning chemicals. Allow ALL filters to dry completely before replacing in the vacuum to prevent liquid from being drawn into electric parts.
IMPORTANT: Do not use soap when cleaning the HEPA filter.
RECOMMENDED FILTER CLEANING SCHEDULE:
Pre-Motor Filter Kit (Foam & Felt) XFF500
Clean every 3 months.
Post-Motor Filter (HEPA) XHF500
Clean once a year.
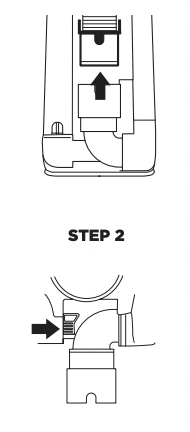
STEP 1

EMPTYING THE DUST CUP
1. Pull up on dust cup release latches and lift dust cup off pod.
STEP 2
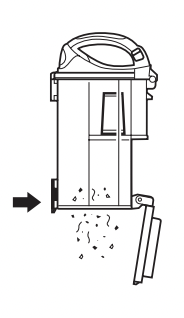
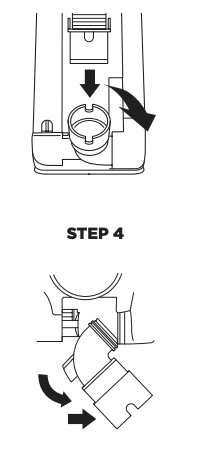
2. Hold dust cup over a trash bin and press the empty-release latch on the bottom.
STEP 3
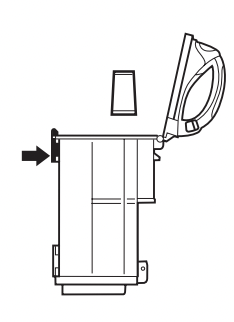
3. Press top dust-cup release latch to access dust screen and remove built-up debris as required.
CLEANING THE FILTERS
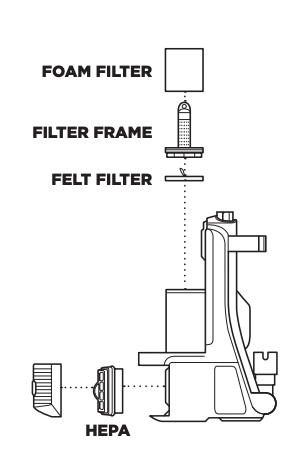
- Pre-Motor foam and felt): With the dust cup removed, take out and rinse the foam and felt filters with water. Tap loose dirt off filters between washes as needed.
- Post-Motor (HEPA): To access the HEPA filter, reach under the grill and press the button and pull the grill away from the vacuum. Remove and rinse the HEPA filter.
CHECKING FOR BLOCKAGES
WARNING: To reduce the risk of shock and unintended operation, turn power off and unplug unit before servicing.
TIP: You can also check for blockages in the hose and tubes. Just remove floor nozzle, dust cup and hose and shine a flashlight in the openings.
BOTTOM OF FLOOR NOZZLE
STEP 1
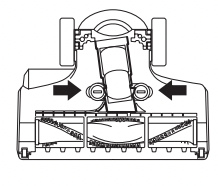
1. Using a coin, turn the screws to the unlock position and pull up to expose the airway. Remove the blockage.
STEP 2
2. Remove any string, hair or debris that may be wrapped around the brushroll.
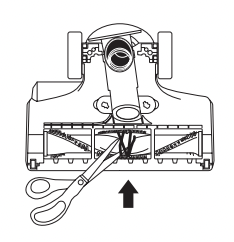
HOSE CUFF AT BASE OF POD
- Squeeze tabs and remove hose.
- Tilt elbow down 90 degrees.
3. Press elbow release latch.
4. Remove elbow and check for blockages. Once blockages are removed, replace elbow by inserting back into the opening, then clipping back into the latch.
TROUBLESHOOTING GUIDE
WARNING: To reduce the risk of shock and unintended operation, turn power off and unplug unit before servicing.
Vacuum is not picking up debris. No suction or light suction. (Refer to Maintenance section for more information.)
- Check filters to see if they need cleaning. Follow instructions for rinsing and drying the filters before re-inserting in the vacuum.
- Dust cup may be full; empty dust cup.
- Check hose, hose connections, nozzles, and accessories for blockages; clear blockages if required.
- Remove any string, carpet fibers, or hair that may be wrapped around the brushroll.
Vacuum lifts area rugs.
- Turn off unit to disengage the brushroll. Ensure brushroll is turned off and restart with the POWER button for suction only cleaning.
- Suction is powerful. Take care when vacuuming area rugs or rugs with delicately sewn edges.
- To minimize suction, refer to Suction Control section for more information on how to use.
Brushroll does not spin.
- If Brushroll Indicator Light on the floor nozzle turns red, the brushroll has stopped spinning. Immediately turn off and unplug vacuum, disconnect the nozzle, and remove blockage before reconnecting and turning vacuum back on.
- With the power on, recline the handle, which will automatically turn on the brushroll.
- Ensure that the BRUSHROLL button is on for brushroll to spin
Vacuum turns off on its own or indicator light flashes red.
- This vacuum is equipped with a motor-protective thermostat. If your vacuum overheats, the thermostat will automatically turn the suction motor off. Perform the following steps to restart the thermostat:
- Turn vacuum off and unplug it.
- Empty dust cup and clean filters (see Maintenance section).
- Check for blockages in hose, accessories, and inlet openings.
- Allow unit to cool for a minimum of 45 minutes.
- Plug in vacuum and turn it on.
- Restart the unit using either the POWER or BRUSHROLL buttons.
Note: If vacuum still does not start, contact Customer Service at 1-800-798-7398.