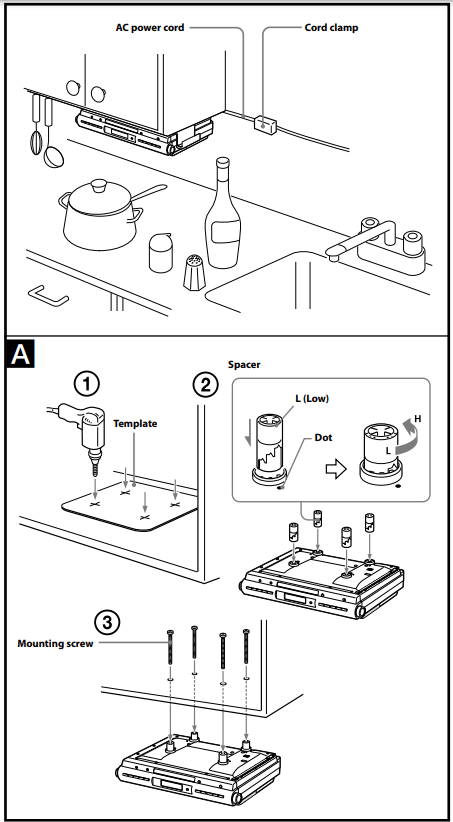
Caution Please read the following before installing the unit (See Fig. A )
Due to its heavy weight, the unit should be installed with great care.
Installation of the unit requires two persons.
Use tools carefully while installing of the unit. Be sure that the cabinet that is used is sturdy enough to support the weight of the unit.
To reduce the risk of fire, do not place any heating or cooking appliance beneath this unit.
Install the unit so that its AC power cord can be connected directly to a wall outlet. Do not use a converter or extension cord.
Be sure that the AC power cord has no slack during use of the unit, since the cord acts as an FM wire antenna. If the AC power cord has some slack, wind it around the cord hook so as to eliminate the slack.
The unit has a built-in ferrite bar antenna for AM radio reception. Confirm that AM reception is acceptable before finally attaching the unit.
Install the unit as far as possible from sources of noise (for example, a refrigerator, microwave oven or fluorescent lamp).
This unit is not waterproof. Install it where it will not be exposed to splashing by water, as this may damage the unit.
To reduce the risk of fire or electric shock, do not touch the AC power cord with wet hands.
Never place objects between the top of the unit and the bottom of the cabinet. This could cause the unit to fall.
Make sure the unit’s four screws are fastened tightly.
After installing the unit, do not pull down on it or hang something heavy on it.
Decide on the installation location and orientation of the unit based on the best reception that is possible (see “Improving the reception”).
Mark the position of the 4 holes by using the supplied template. Use a drill to make the holes (size 6.5 mm diam., 9 /32 inch). (See Fig. A - 1 )
When the cabinet door overhangs the shelf and obstructs the unit, you can adjust the unit/shelf height. First set the L mark to the dot which becomes the lowest position, then you can adjust the height in 4 steps (H●●L) by turning the spacer counterclockwise (See Fig. A - 2). The unit can be installed without the spacer.
Install the unit with the supplied mounting screws. (See Fig. A - 3 )
Note: If you lose the supplied screws, please purchase #10 or M5 screws.
Backup battery
To keep good time, this unit contains one CR2032 battery inside of the unit as a backup power source.
The battery keeps the clock operating in the event of a power interruption.
Knowing when to replace the battery
When the battery becomes weak, “” appears in the display.
If a power interruption occurs while the battery is weak, the current time will be initialized.
Replace the battery with a Sony CR2032 lithium battery. Use of another battery may cause a fire or explosion.
Note: If “AM 12:00” flashes in the display when the unit is connected to AC outlet for the first time, the battery may be weak. In this case, consult your Sony dealer.
Replacing the battery
Keep the AC plug connected to the AC outlet and pry out the battery holder at the bottom of the unit using a slender rod, such as a screwdriver. (See Fig.)
Push the exhausted battery out from the bottom of the battery holder and insert a new battery with the side facing up. (See Fig. )
Insert the battery holder back into the unit. (See Fig. )
Press RADIO/BAND, CD, or AUDIO IN to turn “” off in the display.
Note
When replacing the battery, do not disconnect AC plug from AC outlet.
If you do, the current time will be initialized.
Battery Warning
If the unit is to be left unplugged for a long time, remove the battery to avoid undue battery discharge and damage to the unit from battery leakage.
NOTES ON THE LITHIUM BATTERY
Dispose of the used battery promptly. Keep the lithium battery out of the reach of children.
Should the battery be swallowed, consult a doctor immediately.
Wipe the battery with a dry cloth to assure a good contact.
Be sure to observe correct polarity when installing the battery.
Do not hold the battery with metallic tweezers, otherwise a short-circuit may occur.
Do not expose the battery to excessive heat such as direct sunlight, fire or the like.
WARNING
There is a danger of explosion if the battery is incorrectly replaced.
Replace only with the same or equivalent type recommended by the equipment manufacturer.
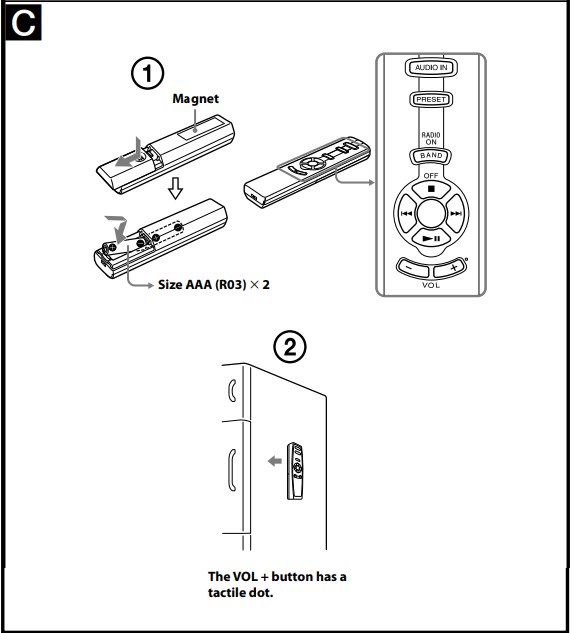
Installing the batteries into the remote commander
(See Fig. )
Insert two size AAA (R03) batteries (not supplied).
When to replace the batteries
With normal use, the batteries should last for about six months. When the remote no longer operates the CD kitchen clock radio, replace all the batteries with new ones.
Notes
Do not charge the dry batteries.
If you do not intend to use the remote for a long time, remove the batteries to prevent damage by leakage and corrosion.
Use of magnet (See Fig.)
A magnet is provided on the back of the remote so that it can be attached a refrigerator or other iron surface.
However, do not operate the remote while it is attached in this manner.
Note Do not place the remote commander near magnetic cards such as credit cards.
Setting the clock
Setting the clock for the first time
This unit is preset to the current EST (Eastern Standard Time) at the factory, and is powered by the back up battery. All you need to do the first time is just plug it in, select your time zone.
Plug in the unit. The current EST (Eastern Standard Time) appears in the display.
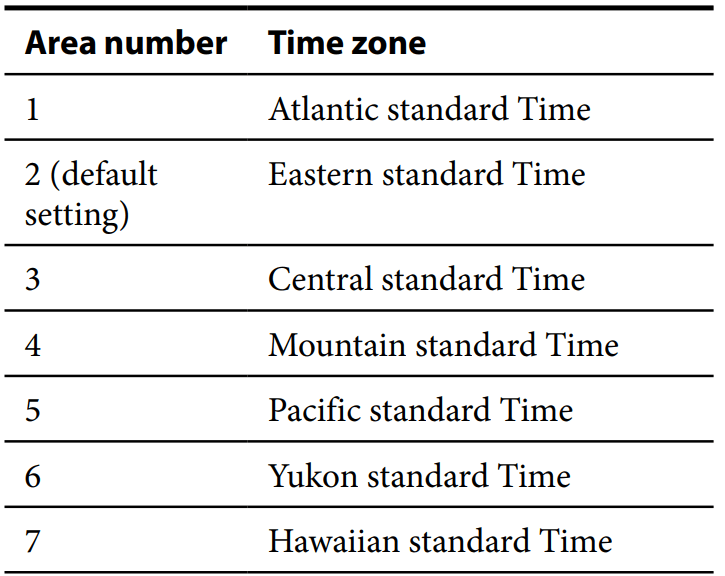
Press TIME ZONE. Area number “2” appears in the display.
Press TIME ZONE repeatedly to select the number as follows:
The area number appears in the display for a few seconds and then the display returns to the current time.
After the current time reappears, press TIME ZONE to check the area number.
Note Though the clock is correctly set at the factory, discrepancies may arise during transport or storage. If necessary, set the clock to the correct time by referring to “Setting the clock manually”.
When daylight saving time summer time) begins
This model automatically adjusts for daylight saving time (summer time).
is displayed from the beginning of daylight saving time (summer time) and disappears at the end of the daylight saving time (summer time) automatically.
Daylight saving time (summer time) begins at: 2:00AM on the second Sunday of March.
Standard time begins at: 2:00 AM on the first Sunday of November.
Setting the clock manually
Plug in the unit.
Hold down CLOCK/DATE until a short beep sounds. The year starts to flash in the display.
Turn the TIMER jog dial towards + or – repeatedly until the correct year appears in the display.
Push TIMER.
Repeat steps 3 and 4 to set the month, the day, hour, and minute, and then push TIMER.
Notes
The clock setting will be canceled if you press OFF while setting the clock.
If you do not press a button for about 65 seconds while setting the clock, the clock setting will be canceled.
To display the year and date
Press CLOCK/DATE once for the date, and within 4 seconds press it again for the year.
The display shows the date or year for about 4 seconds and then changes back to the current time.
To change to daylight saving time (summer time) indication
Hold down OFF and TIME ZONE until two short beeps sound.
"OFF” appears for a few seconds, and then “” disappears.
To activate the daylight saving time (summer time) function, hold down OFF and TIME ZONE until two short beeps sound again. “” is displayed, “On” appears for a few seconds, and then the time changes to daylight saving time (summer time).
Playing a CD
An 8 cm (3-inch) CD can be played without an adaptor.
1. Press OPEN/CLOSE, and insert a CD onto the disc tray
2. Press OPEN/CLOSE to close the disc tray. Do not force the disc tray closed with your finger, as this may damage the unit.
3. Press CD. "TRACK 01” appears in the display. The player plays all the tracks once.
4. Adjust the volume with the VOL control (VOL + or – on the remote).
* AMS = Automatic Music Sensor ** These operations are possible during both play and pause.
About CD-Rs/CD-RWs
This unit is compatible with CD-Rs/CD-RWs but playback capability may vary depending on the quality of the disc, the recording device and application software.
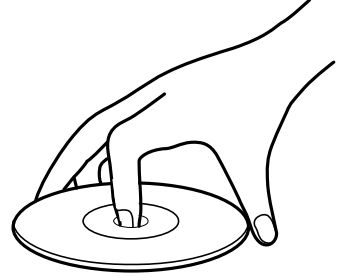
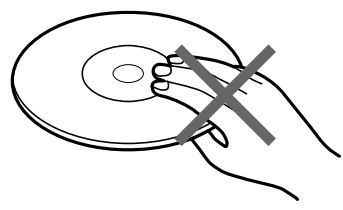
To handle compact discs
Correct
Handle the disc by its edge.
Incorrect
Do not touch the surface.
Do not stick paper or tape on the surface.
Note Discs with non-standard shapes (e.g., heart, square, star) cannot be played on this unit. Attempting to do so may damage the unit. Do not use such discs.
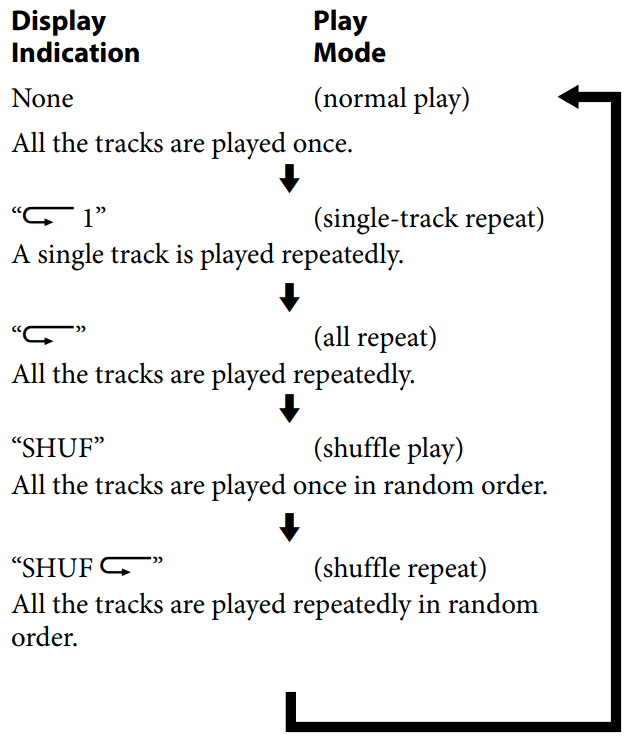
Various modes of CD playback
You can play tracks repeatedly or in random order.
Press MODE.
Each press changes the play mode as follows:
Listening to the radio
Manual Tuning
1. Press RADIO/BAND to turn on the radio. "RADIO” appears in the display. The display shows the band and frequency for 10 seconds, and then changes back to the current time.
2. Press RADIO/BAND repeatedly to select the desired band. Each press changes the band as follows:
When using FM1 or FM2 preset mode, you may listen to the radio on either mode (See “Presetting your favorite station”).
3. Use TUNE/TRACK or to tune in to the desired station.
Two short beeps sound when the minimum frequency of each band is received during tuning.
4. Adjust the volume with the VOL control VOL + or – on the remote).
To turn off the radio, press OFF.
To check the frequency of the current station, press RADIO/BAND. The display shows the band and frequency for 10 seconds, and then changes back to the current time.
Improving the reception
FM: Extend the AC power cord fully to improve FM reception.
AM: When installing the unit, rotate the unit horizontally for optimum reception and then install the unit. A ferrite bar antenna is built into the unit.
Presetting your favorite station
Preset Tuning
You can preset 10 FM stations and 5 AM stations.
1. Follow steps 1 to 4 in “Listening to the radio” and manually tune in to the station you wish to preset.
2. Hold down the PRESET TUNING button you wish to preset for more than 2 seconds.
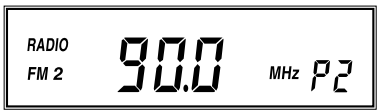
Example: Display window when you preset FM 90 MHz in the PRESET TUNING 2 button for FM2.
The display shows the frequency for a few seconds and then changes back to the current time.
To preset another station, repeat these steps.
To change the preset station, tune in to the desired station and hold down the PRESET TUNING 1 to 5 button. The new station will replace the previous station on the PRESET TUNING button.
Tuning in to a preset station
Press RADIO/BAND to turn on the radio.
Press RADIO/BAND repeatedly to select FM 1, FM2 or AM.
Press the desired PRESET TUNING button. "P” and the PRESET TUNING button number appear in the display.
Adjust the volume with the VOL control (VOL + or – on the remote).
After a few seconds, the display returns to the current time, but the preset button number is remained.
Note
Holding down the desired PRESET TUNING button for 2 seconds or more in step 3 will replace the previous station on the PRESET TUNING button with the station you tuned in.
Switching between monaural and stereo
Stereo reception is the default setting for the radio. will appear in the display when an FM broadcast is clearly received.
If FM stereo reception is poor, change to “FM MONO monaural)”. Noise will be reduced although the sound will not be in stereo.
Press RADIO/BAND to turn on the radio.
Press RADIO/BAND repeatedly to select FM or FM 2.
Press MODE. A short beep sounds. "FM MONO” appears in the display.
To change back to stereo mode, press MODE again.
Listening to the sound from a connected optional digital music player
1. Connect the built-in audio cable with the stereo-miniplug on the top of the unit to the line output jack or headphones jack on the optional component (e.g., digital music player)
2. Press AUDIO IN. "AUDIO IN” appears in the display.
3. Play the optional digital music player.
4. Adjust to the volume with the VOL control (VOL + or – on the remote).
To turn off the AUDIO IN function, press OFF.
Notes
Connect the cable firmly to prevent a malfunction.
Keep digital music players away from the speakers.
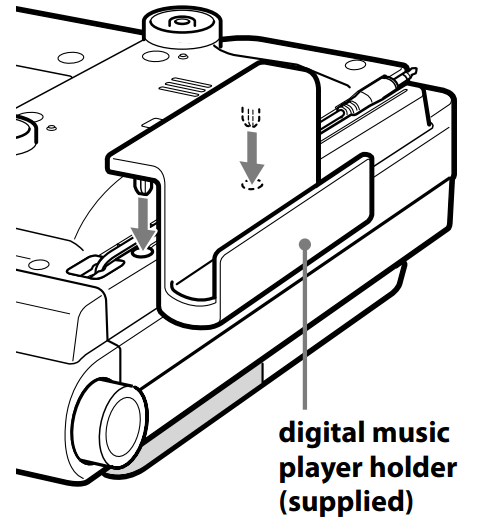
Attaching the supplied digital music player holder
The supplied digital music player holder allows you to place your digital music player onto the unit.
Attach the holder as shown below.
Note Do not place a digital music player weighing more than 500 grams (17.6 oz) on the holder; as this may damage the holder.
Useful function
Obtaining powerful bass
Press MEGA BASS.
The “MEGA BASS” system produces a powerful bass sound.
Operating the cooking timer (countdown timer)
The timer can be set for durations of 1 minute to 120 minutes.
Turn the TIMER jog dial towards + until the desired time appears in the display. "TIMER” appears in the display. After setting the time, the current time is displayed again if you do not perform any operation for more than 65 seconds.
Push TIMER once. TIMER indicator lights and a short beep sounds. While the timer is operating, the display shows the time remaining. Pressing the CLOCK/DATE will cause the current time to appear for a few seconds.
Cooking timer ON—
When the time has elapsed, the buzzer will sound and the TIMER indicator will flash.
Even if the CD, the radio, or AUDIO IN function is being played, the buzzer of the timer sounds together.
While the buzzer sounds, the volume of the CD, the radio, or AUDIO IN function is decreased. The volume returns to the previous volume level when the buzzer stops.
Cooking timer OFF—
The buzzer is turned off automatically after 60 minutes and the display shows current time.
To stop cooking timer
Push TIMER to turn off the buzzer.
Pressing function button or OFF button will turn off the buzzer also.
To deactivate cooking timer
Push TIMER.
The TIMER indicator goes off and the current time appears in the display
When carrying the unit
When carrying the unit, do the following to lock the CD mechanism in order to prevent damaging it.
Remove the disc from the disc tray.
Disconnect the AC power plug.
Unlocking the CD mechanism
Reconnect the AC power plug. The unit is unlocked.
TROUBLESHOOTING
Should the problem persists after you have made the following checks, consult your nearest Sony dealer.
The clock does not show the correct time.
Has an electrical power outage occurred?
The CD player does not operate.
Did you close the disc tray?
Did you place the disc correctly?
The disc should be placed with the labeled side up.
Dusty or defective disc—Clean the disc with an optional cleaning cloth. Wipe the disc from the center out.
Take out the CD and leave the CD compartment open for about an hour to allow condensation to evaporate.
Sporadic loss of sound during CD operation.
Dusty or defective disc—Clean or replace the disc.
Excessively high volume—Reduce the volume.
Strong vibration.
There is a noise from the speakers.
You may hear a noise when you operate the remote during an AM broadcast.
The remote does not work.
Remove any obstacles between the remote and the remote sensor on the unit, and move the unit away from fluorescent lights.
Point the remote at the system’s sensor.
Move the remote closer to the system.
SPECIFICATIONS
AUDIO POWER SPECIFICATIONS
POWER OUTPUT AND TOTAL HARMONIC DISTORTION
With 4-ohm loads, both channels driven from 100 - 10 000Hz; rated 1.5 W per channel-minimum
RMS power, with no more than 10% total harmonic distortion in AC operation.
CD player section
System: Compact disc digital audio system
Laser diode properties:
Emission duration: Continuous
Laser output: Less than 44.6 µW (This output is the value measured at a distance of about 200 mm from the objective lens surface on the optical pick-up block with 7 mm aperture.)
Number of channels: 2
Frequency response: 20 – 20 000 Hz +1
Wow and flutter: Below measurable limit
Radio section
Frequency range:
FM: 87.5 – 108 MHz
AM: 530 – 1 710 kHz
Antennas:
FM: AC power cord
AM: Built-in ferrite bar antenna
General
Time display: 12-hour system
Speaker: 66 mm (2 inches) diam., 4 Ω, cone type (2)
(Approx. 13 inches) incl. projecting parts and controls
Mass: Approx. 2.7 kg (6 lb 1 oz)
Supplied accessories:
mounting screws (M5 screw) (4)
template (1)
spacers (4)
cord clamp (1)
remote commander (1)
digital music player holder (1)
Design and specifications are subject to change without notice.
Important Safety Instructions
Read these instructions.
Keep these instructions.
Heed all warnings.
Follow all instructions.
Do not use this apparatus near water.
Clean only with dry cloth.
Do not block any ventilation openings. Install in accordance with the manufacturer’s instructions.
Do not install near any heat sources such as radiators, heat registers, stoves, or other apparatus (including amplifiers) that produce heat.
Do not defeat the safety purpose of the polarized or grounding-type plug. A polarized plug has two blades with one wider than the other. A grounding type plug has two blades and a third grounding prong. The wide blade or the third prong are provided for your safety. If the provided plug does not fit into your outlet, consult an electrician for replacement of the obsolete outlet.
Protect the power cord from being walked on or pinched particularly at plugs, convenience receptacles, and the point where they exit from the apparatus.
Only use attachments/accessories specified by the manufacturer.
Use only with the cart, stand, tripod, bracket, or table specified by the manufacturer, or sold with the apparatus. When a cart is used, use caution when moving the cart/apparatus combination to avoid injury from tip-over.
Unplug this apparatus during lightning storms or when unused for long periods of time.
Refer all servicing to qualified service personnel. Servicing is required when the apparatus has been damaged in any way, such as power-supply cord or plug is damaged, liquid has been spilled or objects have fallen into the apparatus, the apparatus has been exposed to rain or moisture, does not operate normally, or has been dropped.
Precautions
Use the power source specified in the Specifications” to operate the unit.
The nameplate indicating operating voltage, power consumption, etc. is located on the top exterior.
To disconnect the power cord (mains lead), pull it out by the plug, not the cord.
Do not leave the unit in a location near a heat source such as a radiator or air duct, or in a place subject to direct sunlight, excessive dust, mechanical vibration, or shock.
Allow adequate air circulation to prevent internal heat build-up. Do not place the unit on a surface a rug, a blanket, etc.) or near material that might block the ventilation holes such as a curtain.
Should any solid object or liquid fall into the unit, unplug the unit and have it checked by a qualified personnel before operating it any further.
To clean the casing, use a soft cloth dampened with a mild detergent solution.
The unit is not disconnected from the AC power source (mains) as long as it is connected to the wall outlet, even if the unit itself has been turned off.
If you have any questions or problems concerning your unit, please consult your nearest Sony dealer.
 ” appears in the display.
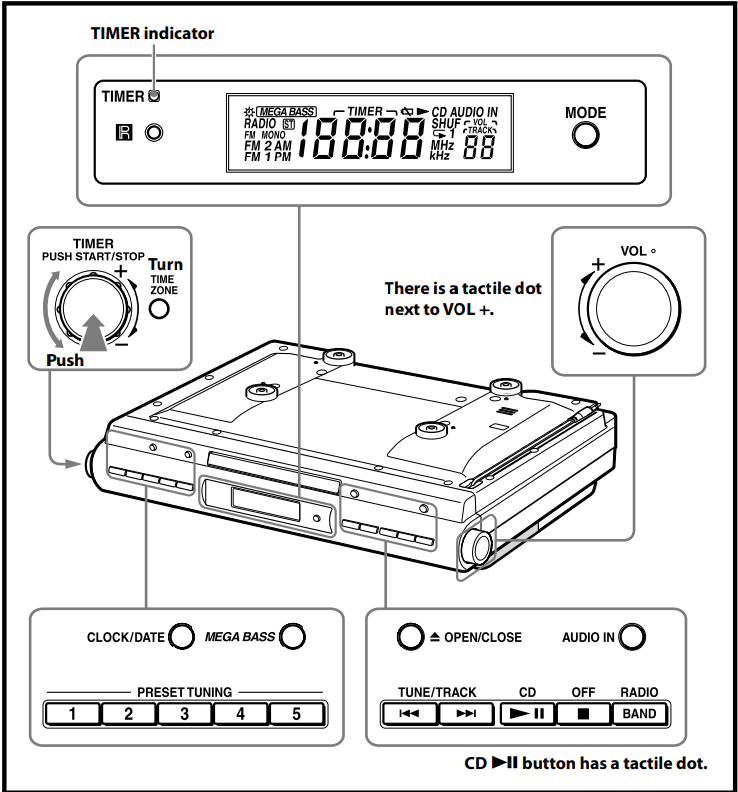

 )
) side facing up. (See Fig.
  )
) )
) , or AUDIO IN to turn “
 )
)
 is displayed from the beginning of daylight saving time (summer time) and disappears at the end of the daylight saving time (summer time) automatically.
 and TIME ZONE until two short beeps sound.
 ” disappears.
 OPEN/CLOSE, and insert a CD onto the disc tray
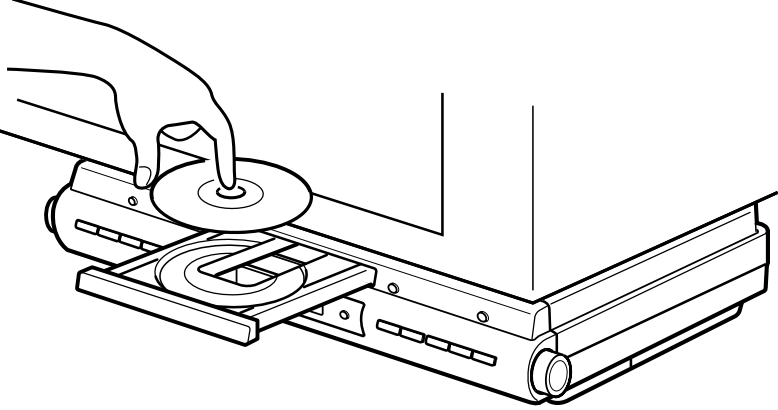
 . "TRACK 01” appears in the display. The player plays all the tracks once.


 or
or  to tune in to the desired station.
 .
.
 will appear in the display when an FM broadcast is clearly received.
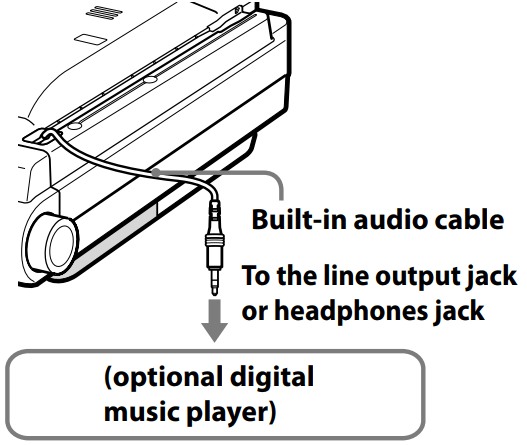
 .
.