User Manual
Installing the Unit Under a Cabinet
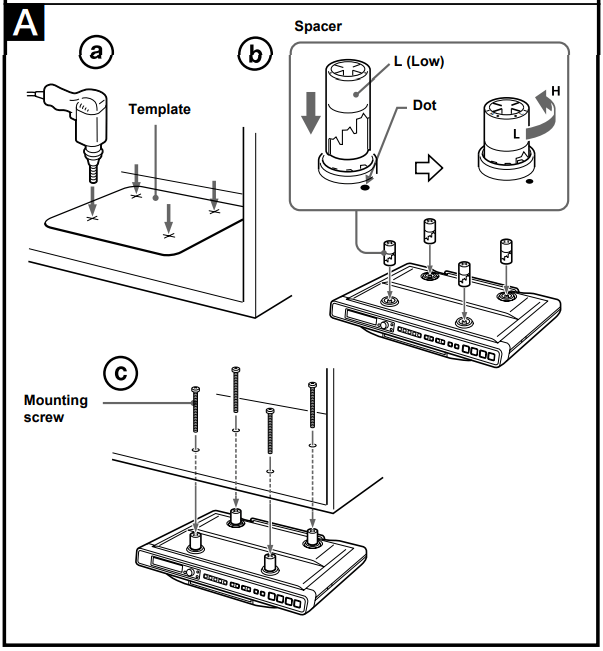
The unit can be installed without the spacer.
1 Mark the position of the 4 holes by using the supplied template. Use a drill to make the holes (size 6.5 mm dia., 9 /32 inch). (See Fig. A- a)
2 If the cabinet door overhangs the shelf and obstructs the unit, you can adjust the unit/ shelf height. First set the L mark to the dot which becomes the lowest position, then you can adjust the height in 4 steps (H••L) by turning the spacer counterclockwise. (See Fig. A- b)
3 Install the unit with the supplied mounting screws. (See Fig. A- c)
Caution
- Since the unit is very heavy, be careful when installing the unit.
- Hold the unit horizontally when installing it, since the CD tray may open if the unit is shaken.
- To reduce the risk of fire, do not place any heating or cooking appliance beneath this unit.
- Install the unit so that its AC power cord can be connected directly to a wall outlet. Do not use a converter or extension cord.
- Be sure that the AC power cord has no slack when using the unit, since the cord acts as an FM wire antenna. If the AC power cord has some slack, wind it up to the cord hook until the cord has no slack.
- The unit has a built-in ferrite bar antenna for AM radio reception. Check the condition of AM reception before fixing in position.
- Install the unit as far as possible from a source of noise (for example, refrigerator, microwave oven, fluorescent lamp, etc.).
Setting the Clock
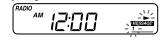
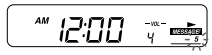
1 Plug in the CD kitchen clock radio. The display will flash “AM 12:00”.
2 Press CLOCK for a few seconds. You will hear a beep and the hour will start to flash in the display.

3 Press TUNE•TIME SET + or – until the correct hour appears in the display.
4 Press CLOCK once. The minutes will flash.

5 Repeat steps 3 and 4 to set the minutes. After setting the minutes, press CLOCK to start the counting of the seconds, and you will hear two short beeps.
To set the current time quickly, hold down TUNE•TIME SET + or –. 12-hour system: “AM 12:00” = midnight
In step 5, when you press CLOCK after the minute setting to activate the clock, the seconds start counting from zero.
Playing a CD
An 8 cm (3-inch) CD can be played without an adapter.
1 Press  CD OPEN/CLOSE and place a CD on the disc tray
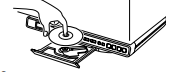
2 Press CD OPEN/CLOSE to close the disc tray.
3 Press CD  .
.
“ NCD” and “TRACK 01” appear on the display to indicate that track 1 of the CD is playing.
4 Adjust volume using VOLUME + or –.
About CD-Rs/CD-RWs
This unit is compatible with CD-Rs/CD-RWs but playback capability may vary depending on the quality of the disc, the recording device and application software.
Music discs encoded with copyright protection technologies
This product is designed to play back discs that conform to the Compact Disc (CD) standard. Recently, various music discs encoded with copyright protection technologies are marketed by some record companies. Please be aware that among those discs, there are some that do not conform to the CD standard and may not be playable by this product.
To handle compact discs
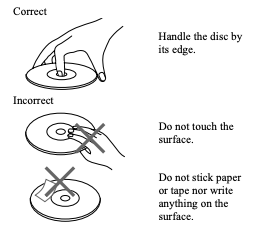
Notes
- Discs with non-standard shapes (e.g., heart, square, star) cannot be played on this unit. Attempting to do so may damage the unit. Do not use such discs.
- If you press CD
 when there is no disc in the CD compartment, “00” flashes for about 5 seconds on the display and the unit turns off automatically.
- After 20 minutes, playback will be stop when you press CD during play back.
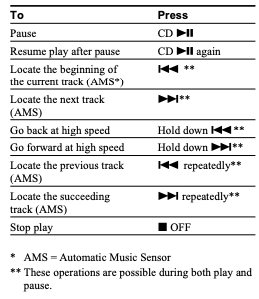
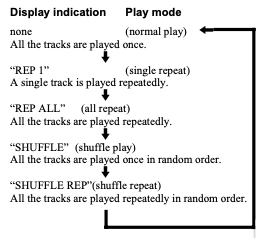
Various Modes of CD Playback
You can play tracks repeatedly or in random order.
Press MODE.
Each press changes the play mode as follows:
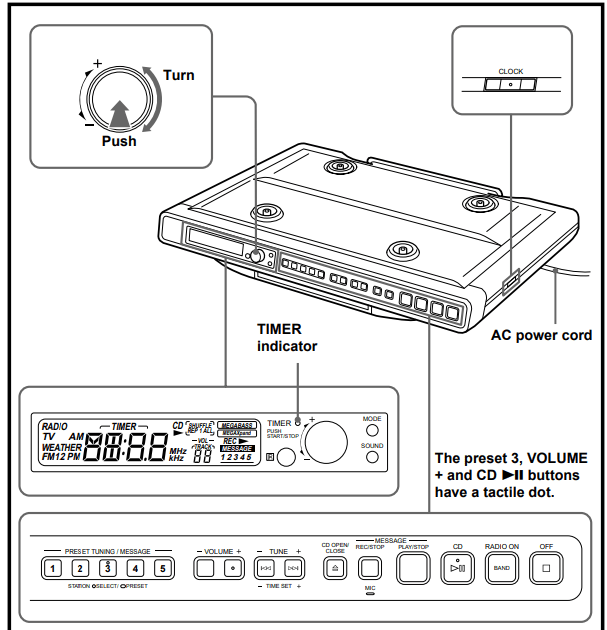
Playing the Radio —Manual Tuning
1 Press RADIO ON/BAND to turn on the radio. “RADIO” appears in the display. The display shows the band and frequency for a few seconds and then changes back to the current time.
2 Press RADIO ON/BAND repeatedly to select the desired band. Each press changes the band as follows:
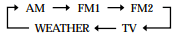
When using FM1 or FM2 preset mode, you may listen to the radio on either mode (See “Presetting Your Favourite Station”).
3 Use TUNE•TIME SET + or – to tune in to the desired station. Two short beeps sound when the minimum frequency of each band is received during tuning.
4 Adjust volume using VOLUME + or –.
To check the station being received
Press RADIO ON/BAND lightly. The display shows the band and frequency for a few seconds and then changes back to the current time.
To turn off the radio, press  OFF.
OFF.
Improving the Reception
TV, WEATHER, FM: Extend the AC power cord fully to improve FM reception.
AM: When installing the unit, rotate the unit horizontally for optimum reception and then install the unit. A ferrite bar antenna is built into the unit. Presetting Your Favourite Station
Presetting Your Favourite Station
—Preset Tuning
You can preset 10 stations in FM (5 stations in FM1, 5 stations in FM2) and 5 stations in each AM, TV, WEATHER.
Presetting a Station
1 Follow steps 1 to 4 in “Playing the Radio” and manually tune in to the station you wish to preset.
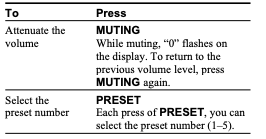
2 Hold down the PRESET TUNING/ MESSAGE button you wish to preset for more than 2 seconds.
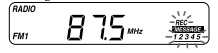
Example: Display window when you preset FM 90 MHz in the PRESET TUNING/MESSAGE button 2 for FM2.

The display shows the frequency for a few seconds and then changes back to the current time.
To preset another station, repeat these steps. To change the preset station, tune in to the desired station and hold down the PRESET TUNING 1 to 5 button. The new station will replace the previous station on the PRESET TUNING button.
Tuning in to a Preset Station
1 Press RADIO ON/BAND to turn on the radio.
2 Press RADIO ON/BAND to select the band.
3 Press the desired PRESET TUNING/ MESSAGE button.
4 Adjust the volume using VOLUME + or –. After a few seconds, the display returns to the current time but the PRESET TUNING button number remains.
Note
Holding down the desired PRESET TUNING/ MESSAGE button for more than a few seconds in step 3 will replace the previous station on the PRESET TUNING/MESSAGE button with the station you tuned into.
Switching between monaural and stereo
The radio is set for stereo reception at the default setting. If FM stereo reception is poor, set to “FM MONO (monaural)”. Noise will be reduced although the sound will not be heard in stereo.
1 Press RADIO ON/BAND to turn on the radio.
2 Press RADIO ON/BAND repeatedly to select FM 1 or FM 2.
3 Press MODE.
“Mono(monaural)” or “ST(Stereo)” appears in the display.
Each time you press MODE, the mode changes to either "Mono" or "ST".
4 Select Mono or ST. The mode you select appears in the display for a few seconds and returns to the current time.
Other Useful Functions
1 Press SOUND repeatedly to select the desired sound mode. Each press changes the sound mode as follows:

To obtain vast sound The “MEGA Xpand” system produces a extensive sound.
To obtain powerful bass sound The “MEGA BASS” system produces a powerful bass sound.
Note “MEGA Xpand” is not effective in monaural.
Using the Digital Voice Memo
—Recording the Message
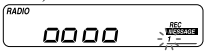
1 Press REC/STOP. “REC” and “VOICE MEMO numbers” flash, “MESSAGE” light up in the display to indicate recording is active.
2 Press the PRESET TUNING/ MESSAGE button you wish to record. In this case, only the number you pushed flashes in the display. You will hear a beep, and you can record your message.
3 Speak into the MIC while “  ” appears in the display (one will disappear every 3 seconds)
4 Press REC/STOP again to stop recording. Or recording automatically stops after 12 seconds. (A beep will sound, the preset number and  will flash). You can confirm voice memo recording by pressing PLAY/STOP within 5 seconds.
—Playing the Message
1 Press PLAY/STOP.
2 Press the PRESET TUNING/ MESSAGE button, you want to listen to. You will hear a beep.
The volume can be adjusted by pressing VOL + or - during message playback. Press PLAY/STOP, you can stop playing the message.
Notes
- Only one message can be recorded and up to about 12 seconds.
- After a message has been played, the preset number becomes permanently lit.
- When a power failure is over one minute, the recording voice memo is deleted.
Operating the Cooking Timer (Countdown Timer)
The timer can be set at one minute intervals between 1–120.
1 Turn TIMER until the desired time appears in the display.
“TIMER” will appear in the display when TIMER is turned. After setting the time, the current time is displayed again if you do not perform any operation for more than 65 seconds.
2 Push TIMER once.
Timer indicator lights and beep sounds. While the timer is set, the display shows the remaining time.
To display the current time, press CLOCK.
Cooking Timer ON—
When the time has elapsed, the buzzer will sound and the TIMER indicator flashes. Even if the CD or the radio is being played, the buzzer of the timer sounds together. While the buzzer sounds, the volume of the CD or the radio is decreased. The volume returns to the previous volume level when the buzzer stops.
Cooking Timer OFF—
The buzzer is turned off automatically after 60 minutes and the display shows current time.
To Stop Cooking Timer
Press TIMER to turn off the buzzer.
To Deactive Cooking Timer
Press TIMER. The TIMER indicator goes off and the current time appears in the display.
Note If a power failure occurs while the Cooking timer is operating. The remaining time becomes invalid.
Installing the Batteries into the Remote Commander (See Fig. B-a )
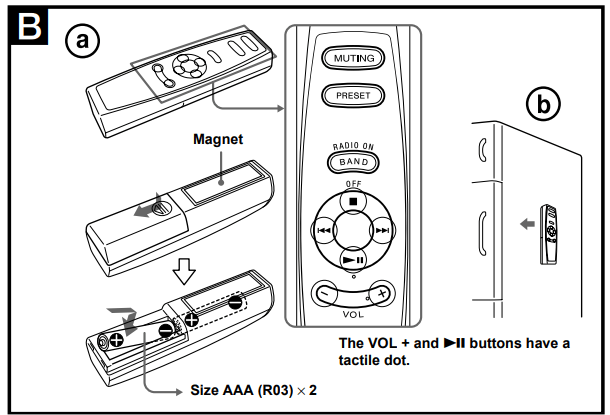
Insert two size AAA (R03) batteries (not supplied).
When to replace the batteries
With normal use, the batteries should last for about six months. When the remote commander no longer operates the CD kitchen clock radio, replace all the batteries with new ones.
Notes
- Do not charge the dry batteries.
- When you are not going to use the remote commander for a long time, remove the batteries to avoid any damage caused by leakage and corrosion.
Using the Remote Commander
You can play the CD or radio using the remote commander. The effective range of the frequency emitted from the remote commander is approximately 5 m (16 ft.). Make sure to use the remote commander within this range. Use the remote commander in the right direction to the receiver of the unit.
The command buttons on the remote commander are the same as the command buttons on the main unit as described below:
The RADIO ON/BAND on the remote commander is the same as the RADIO ON/BAND on the main unit.
The on the remote commander is the same as the CD on the main unit.
The OFF on the remote commander is the same as the OFF on the main unit.
The on the remote commander are the same as the on the main unit. However, you cannot use as the TUNE•TIME SET + and –, when tuning the radio or setting the time. The VOL + and – on the remote commander are the same as the VOLUME + and – on the main unit.
Use of Magnet (See Fig. B- b)
The magnet is attached on the back of the remote commander. You can put the remote commander on a iron board such as on a refrigerator. However, do not operate the remote commander while putting on the board.
Precautions
- Operate the unit on the power source specified in the “Specifications.”
- To disconnect the power cord (mains lead), pull it out by the plug, not the cord.
- Do not leave the unit in a location near a heat source such as a radiator or airduct, or in a place subject to direct sunlight, excessive dust, mechanical vibration, or shock.
- Allow adequate air circulation to prevent internal heat build-up. Do not place the unit on a surface (a rug, a blanket, etc.) or near materials (a curtain) which might block the ventilation holes.
- Should any solid object or liquid fall into the unit, unplug the unit and have it checked by a qualified personnel before operating it any further.
- To clean the casing, use a soft cloth dampened with a mild detergent solution.
- If you have any questions or problems concerning your unit, please consult your nearest Sony dealer.
Troubleshooting
Should any problem occur with the unit, make the following checks to determine whether or not servicing is required. If the problem persists, consult the nearest Sony dealer.
The clock does not show the correct time.
- Has an electrical power outage lasting more than one minute occurred?
The CD player does not operate.
- Did you close the disc tray?
- Did you place the disc correctly? The disc should be placed with the labeled side up.
- Dusty or defective disc — Clean the disc with an optional cleaning cloth. Wipe the disc from the center out.
- Take out the CD and leave the CD compartment open for about an hour to get rid of moisture condensation.
There is a noise from the speakers.
- You may here a noise when you operate the remote commander while receiving AM band.
Sporadic loss of sound in CD operation.
- Dusty or defective disc — Clean or replace the disc.
- Volume too high — Reduce the volume.
- Strong vibration.
The remote commander does not function.
- Make sure that you are pointing the remote commander at the remote sensor on the unit.
- Remove any obstacles in the path of the remote commander and the unit.
- Make sure the remote sensor is not exposed to strong light such as direct sunlight or fluorescent lamp light.
- Move closer to the unit when using the remote commander .