User Manual
Compact Air Fryer Oven
Notice d’emploi
Four-friteuse compact
Visit us at www.oster.com
Visiter www.oster.ca
MODEL/MODÈLE
TSSTTV-CRCMAFBK1
P.N. NWL0001654689 REV A
TSSTTV-CRCMAFBK1_24EFM1 (17L).indd 1TSSTTV-CRCMAFBK1_24EFM1 (17L).indd 1 2024/4/7 09:282024/4/7 09:28

-2-
IMPORTANT SAFEGUARDS
When using electrical appliances, basic safety precautions should always be
followed to reduce the risk of fire, electric shock, and/or injury to persons
including the following:
1. Read all instructions before using this product.
2. This appliance generates heat during use. Do not touch hot surfaces.
Use handles or knobs.
3. To protect against electric shock, do not place or immerse cord, plugs, or
appliance in water or other liquid.
4. This appliance is not intended for use by children or by persons with
reduced physical, sensory, or mental capabilities, or lack of experience
and knowledge. Close supervision is necessary when any appliance is
used near children. Children should be supervised to ensure that they do
not play with the appliance. Keep the appliance and its cord out of reach
of children.
5. Unplug from outlet when not in use, before putting on or taking off parts
and before cleaning. Allow to cool before putting on or taking off parts,
and before cleaning. To disconnect, turn any control to OFF, then unplug
power cord from outlet. Do not disconnect by pulling on cord.
6. Do not operate any appliance with a damaged cord or plug or after the
appliance malfunctions, or has been damaged in any manner. Do not
attempt to replace or splice a damaged cord. Return appliance to the
manufacturer (see warranty) for examination, repair or adjustment.
7. The use of accessory attachments not recommended by the appliance
manufacturer may cause injuries.
8. Do not use outdoors or for commercial purposes.
9. Do not let cord hang over edge of table or counter, or touch hot surfaces.
10. Do not place on or near wet surfaces, or heat sources such as a hot gas
or electric burner, or in a heated oven.
11. Extreme caution must be used when moving an appliance containing hot
oil or other hot liquids.
-3-
12. The heating base is subject to residual heat from cooking cycle. Do not
touch heating base immediately after using. Allow to cool before handling.
13. Use caution when opening the lid during or after a cooking cycle.
Escaping steam can cause burns.
14. Do not use appliance for other than intended use. Misuse can cause
injuries.
15. Intended for household countertop use only. Keep 6 inches (152 mm)
clear from the wall and on all sides. Always use appliance on a dry,
stable, level surface.
16. When the appliance is in the tilted position, the lid will not stay open on
its own. Always return the appliance to the level position before opening
the lid.
17. Never operate this appliance by means of an external timer or separate
remote-control system.
18. WARNING: Spilled food can cause serious burns. Keep appliance and
cord away from children. Never drape cord over edge of counter and
never use outlet below counter.
SAVE THESE
INSTRUCTIONS
HOUSEHOLD USE ONLY
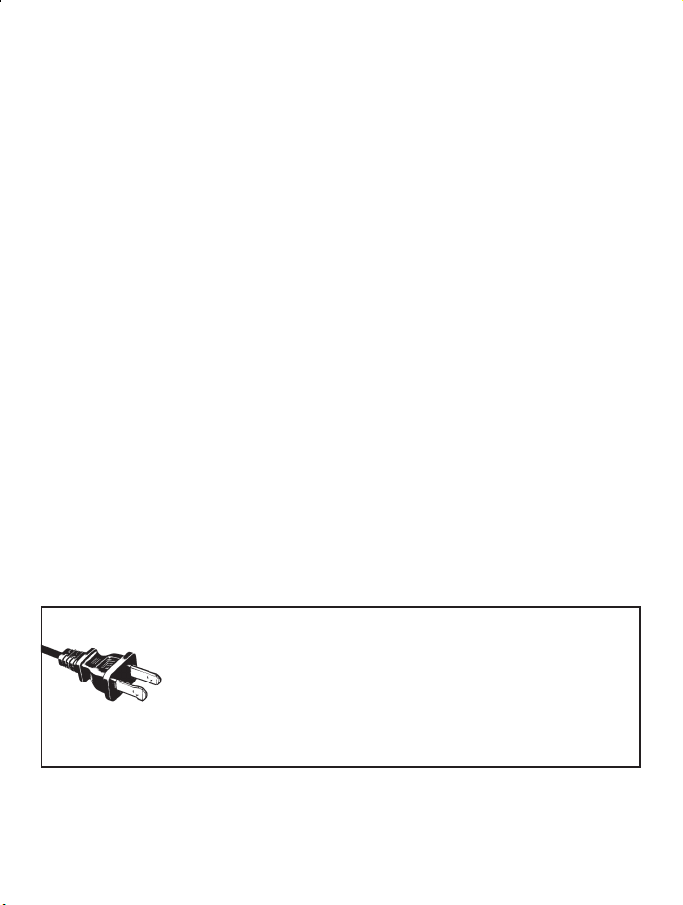
North American models with polarized plugs:
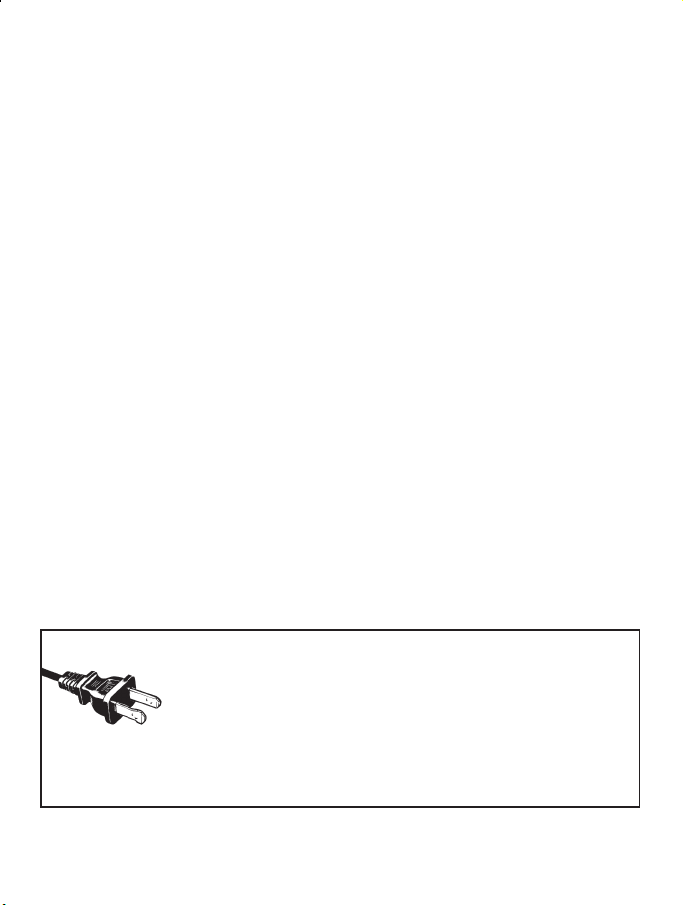
POLARIZED PLUG
This appliance has a polarized plug, (one blade is wider than the other). As a
safety feature to reduce the risk of electrical shock, this plug is intended to t
in a polarized outlet only one way. If the plug does not t fully in the outlet,
reverse the plug. If it still does not t, contact a qualied electrician. Do not
attempt to defeat this safety feature or modify the plug in any way. If the plug ts loosely into the
AC outlet or if the AC outlet feels warm do not use that outlet.
TSSTTV-CRCMAFBK1_24EFM1 (17L).indd 2-3TSSTTV-CRCMAFBK1_24EFM1 (17L).indd 2-3 2024/4/7 09:282024/4/7 09:28
-2-
IMPORTANT SAFEGUARDS
When using electrical appliances, basic safety precautions should always be
followed to reduce the risk of fire, electric shock, and/or injury to persons
including the following:
1. Read all instructions before using this product.
2. This appliance generates heat during use. Do not touch hot surfaces.
Use handles or knobs.
3. To protect against electric shock, do not place or immerse cord, plugs, or
appliance in water or other liquid.
4. This appliance is not intended for use by children or by persons with
reduced physical, sensory, or mental capabilities, or lack of experience
and knowledge. Close supervision is necessary when any appliance is
used near children. Children should be supervised to ensure that they do
not play with the appliance. Keep the appliance and its cord out of reach
of children.
5. Unplug from outlet when not in use, before putting on or taking off parts
and before cleaning. Allow to cool before putting on or taking off parts,
and before cleaning. To disconnect, turn any control to OFF, then unplug
power cord from outlet. Do not disconnect by pulling on cord.
6. Do not operate any appliance with a damaged cord or plug or after the
appliance malfunctions, or has been damaged in any manner. Do not
attempt to replace or splice a damaged cord. Return appliance to the
manufacturer (see warranty) for examination, repair or adjustment.
7. The use of accessory attachments not recommended by the appliance
manufacturer may cause injuries.
8. Do not use outdoors or for commercial purposes.
9. Do not let cord hang over edge of table or counter, or touch hot surfaces.
10. Do not place on or near wet surfaces, or heat sources such as a hot gas
or electric burner, or in a heated oven.
11. Extreme caution must be used when moving an appliance containing hot
oil or other hot liquids.
-3-
12. The heating base is subject to residual heat from cooking cycle. Do not
touch heating base immediately after using. Allow to cool before handling.
13. Use caution when opening the lid during or after a cooking cycle.
Escaping steam can cause burns.
14. Do not use appliance for other than intended use. Misuse can cause
injuries.
15. Intended for household countertop use only. Keep 6 inches (152 mm)
clear from the wall and on all sides. Always use appliance on a dry,
stable, level surface.
16. When the appliance is in the tilted position, the lid will not stay open on
its own. Always return the appliance to the level position before opening
the lid.
17. Never operate this appliance by means of an external timer or separate
remote-control system.
18. WARNING: Spilled food can cause serious burns. Keep appliance and
cord away from children. Never drape cord over edge of counter and
never use outlet below counter.
SAVE THESE
INSTRUCTIONS
HOUSEHOLD USE ONLY
North American models with polarized plugs:
POLARIZED PLUG
This appliance has a polarized plug, (one blade is wider than the other). As a
safety feature to reduce the risk of electrical shock, this plug is intended to t
in a polarized outlet only one way. If the plug does not t fully in the outlet,
reverse the plug. If it still does not t, contact a qualied electrician. Do not
attempt to defeat this safety feature or modify the plug in any way. If the plug ts loosely into the
AC outlet or if the AC outlet feels warm do not use that outlet.
TSSTTV-CRCMAFBK1_24EFM1 (17L).indd 2-3TSSTTV-CRCMAFBK1_24EFM1 (17L).indd 2-3 2024/4/7 09:282024/4/7 09:28

POWER CORD INSTRUCTIONS:
A short power-supply cord or detachable power-supply cord is provided to reduce risks
resulting from becoming entangled in or tripping over a longer cord. Longer detachable
power-supply cords or extension cords are available and may be used if care is exercised
in their use. If a long detachable power-supply cord or extension cord is used on short-cord
models:
a. The marked electrical rating of the detachable power-supply cord or extension
cord should be at least as great as the electrical rating of the appliance;
b. When the product is of the grounded type, the extension cord shall be a grounding
type 3-wire cord; and
c. The longer cord should be arranged so that it will not drape over the countertop or
tabletop where it can be pulled on by children or tripped over unintentionally.
Do not pull, twist or otherwise abuse the power cord.
NOTICES
1. Some countertop and table surfaces are not designed to withstand the prolonged
heat generated by certain appliances. Do not set the heated unit on a finished wood
table. We recommend placing a hot pad or trivet under your countertop oven to
prevent possible damage to the surface.
2. During initial use of this appliance, some slight smoke and/or odor may be detected.
This is normal with many heating appliances and will not recur after a few uses.
-5--4-
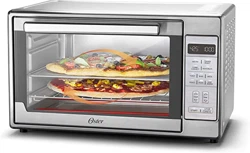
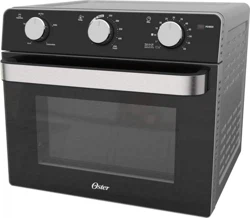
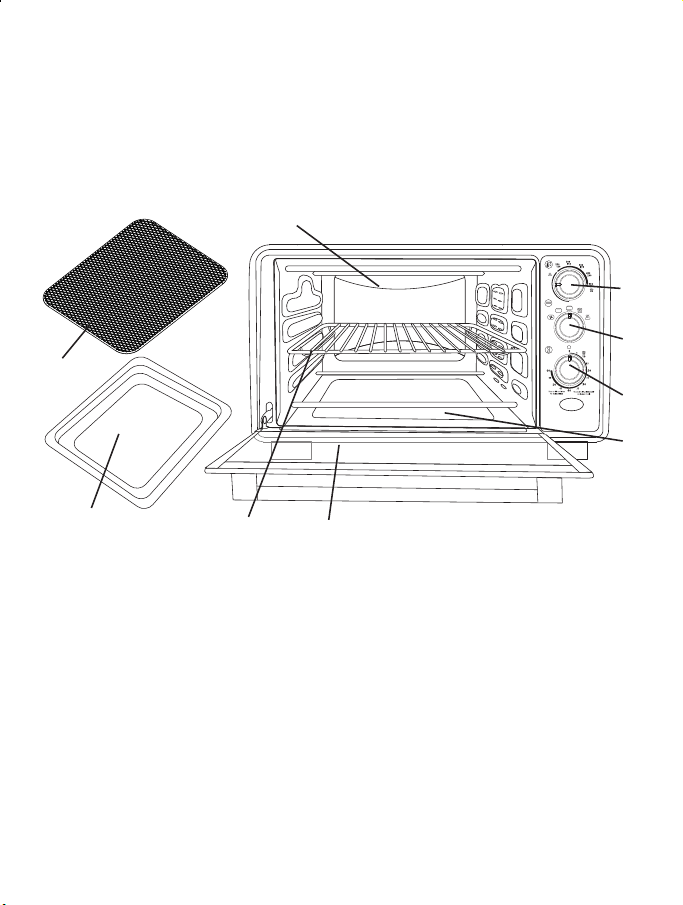
Learning about Your Countertop oven
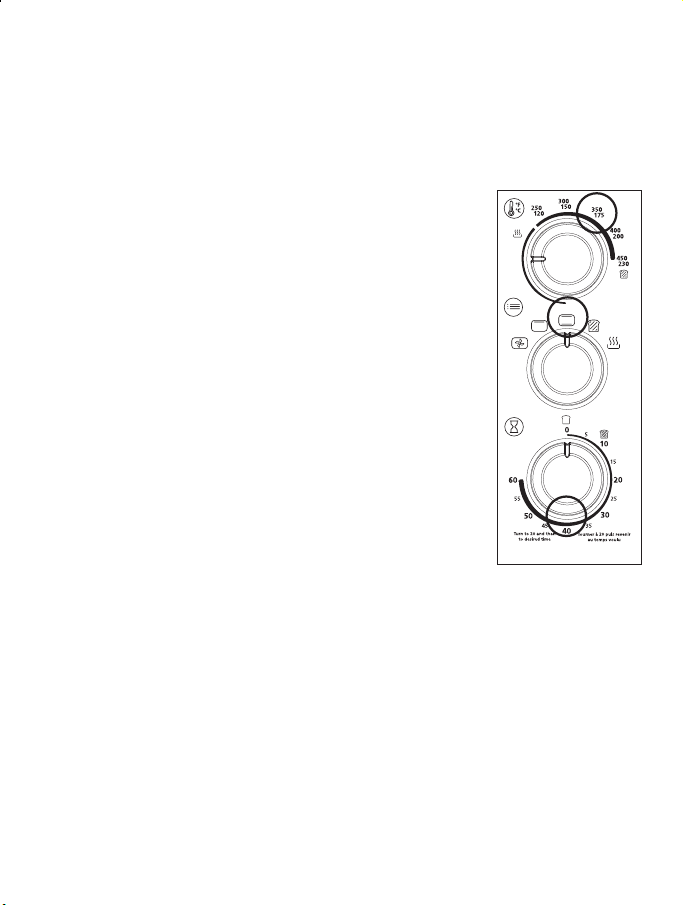
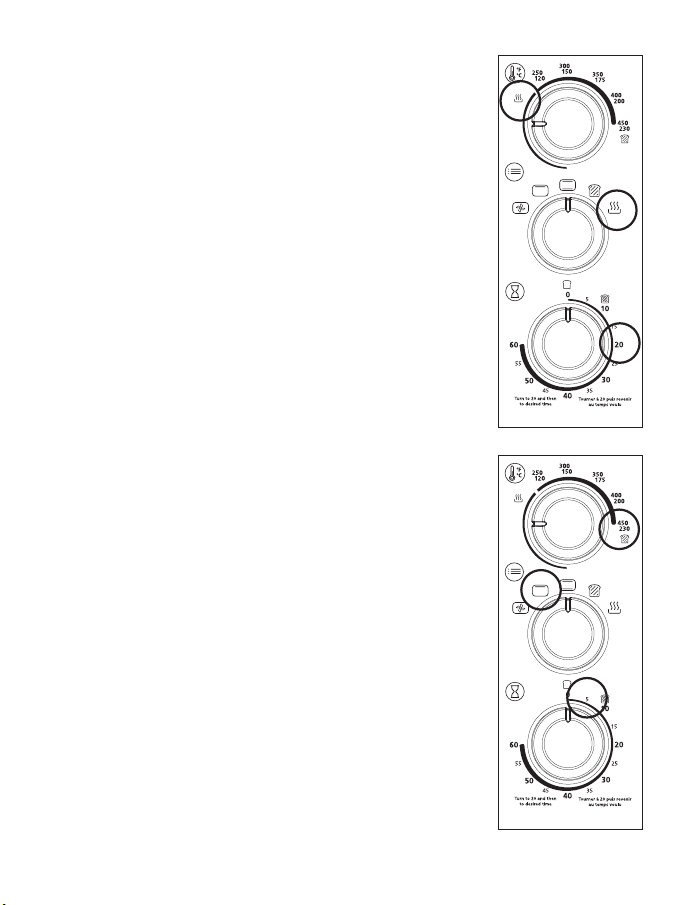
1. Temperature Control Knob – Adjust the dial thermostat to the desired
temperature. (See Figure 1)
2. Function Selector Knob – Select cooking function by turning knob to desired
setting. (See Figure 2)
3. Timer Control Knob with Bell Signal – Set cooking time up to 60 minutes.
Will automatically turn the oven OFF at the end of the cooking time.
(See Figure 3)
4. Removable Crumb Tray – For crumb or fallen food particles collection.
Pulls out for easy cleaning.
5. Removable Wire/Broil Rack – Use for all your broiling and grilling needs.
See “Positioning Rack” and “Positioning Pan” sections.
6. Tempered Glass Door – For front viewing of food.
1
7
9
2
3
4
5
6
8
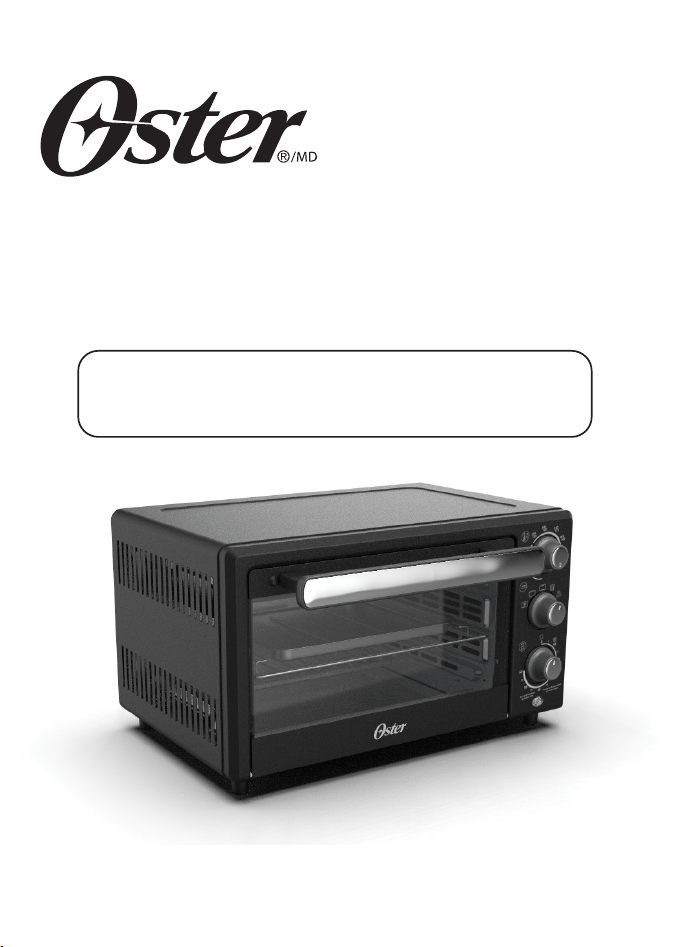
WeLCome
Congratulations on your purchase of an
OSTER
®
Countertop Oven! If you
require service on your
OSTER
®
Countertop Oven, do not return to place of
purchase. Please contact us at www.oster.com or 1.800.334.0759.
TSSTTV-CRCMAFBK1_24EFM1 (17L).indd 4-5TSSTTV-CRCMAFBK1_24EFM1 (17L).indd 4-5 2024/4/7 09:282024/4/7 09:28

POWER CORD INSTRUCTIONS:
A short power-supply cord or detachable power-supply cord is provided to reduce risks
resulting from becoming entangled in or tripping over a longer cord. Longer detachable
power-supply cords or extension cords are available and may be used if care is exercised
in their use. If a long detachable power-supply cord or extension cord is used on short-cord
models:
a. The marked electrical rating of the detachable power-supply cord or extension
cord should be at least as great as the electrical rating of the appliance;
b. When the product is of the grounded type, the extension cord shall be a grounding
type 3-wire cord; and
c. The longer cord should be arranged so that it will not drape over the countertop or
tabletop where it can be pulled on by children or tripped over unintentionally.
Do not pull, twist or otherwise abuse the power cord.
NOTICES
1. Some countertop and table surfaces are not designed to withstand the prolonged
heat generated by certain appliances. Do not set the heated unit on a finished wood
table. We recommend placing a hot pad or trivet under your countertop oven to
prevent possible damage to the surface.
2. During initial use of this appliance, some slight smoke and/or odor may be detected.
This is normal with many heating appliances and will not recur after a few uses.
-5--4-
Learning about Your Countertop oven
1. Temperature Control Knob – Adjust the dial thermostat to the desired
temperature. (See Figure 1)
2. Function Selector Knob – Select cooking function by turning knob to desired
setting. (See Figure 2)
3. Timer Control Knob with Bell Signal – Set cooking time up to 60 minutes.
Will automatically turn the oven OFF at the end of the cooking time.
(See Figure 3)
4. Removable Crumb Tray – For crumb or fallen food particles collection.
Pulls out for easy cleaning.
5. Removable Wire/Broil Rack – Use for all your broiling and grilling needs.
See “Positioning Rack” and “Positioning Pan” sections.
6. Tempered Glass Door – For front viewing of food.
1
7
9
2
3
4
5
6
8
WeLCome
Congratulations on your purchase of an
OSTER
®
Countertop Oven! If you
require service on your
OSTER
®
Countertop Oven, do not return to place of
purchase. Please contact us at www.oster.com or 1.800.334.0759.
TSSTTV-CRCMAFBK1_24EFM1 (17L).indd 4-5TSSTTV-CRCMAFBK1_24EFM1 (17L).indd 4-5 2024/4/7 09:282024/4/7 09:28

Figure 2
Figure 1 Figure 3
-6-
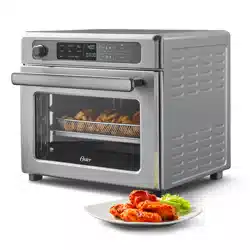
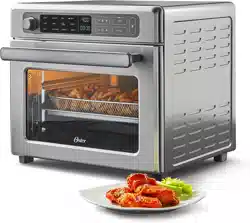
7. Baking Pan & Cookie sheet in one – Use for all your baking needs.
See “Positioning Pan” section.
8. Easy Clean Interior Walls – Allows fast clean up.
9. Air Fry Mesh Rack
preparing to use Your Countertop oven for the first time
NOTE: During initial start up you may detect a slight smell and/or smoke.
Turn the temperature to max and let run for approximately 5 minutes.
If you are using your Countertop Oven for the first time, please be sure to:
• Remove any stickers from the surface of the oven.
• Open oven door and remove all printed documents and paper from
inside the Countertop Oven.
• Clean the rack and pan with hot water, a small amount of dishwashing
liquid and a non-abrasive cleaning pad.
CAUTION: DO NOT IMMERSE THE BODY OF THE UNIT IN WATER.
• Dry the unit thoroughly before using.
• Select a location for the Countertop Oven. The location should be in
an open area on a flat counter where the plug will reach an outlet.
• Plug the Countertop Oven into a 120 Volt AC electrical outlet.
CAUTION: When Countertop Oven is in use or cooling down, please be
sure there is a 6-inch clearance between the Countertop Oven and any other
surface including cords. Be sure the cord is not resting against the back of the
Countertop Oven.
-7-
to open the oven Door:
Step 1: Grab the center of the handle underhanded with fingertips
(See Figure 4).
Figure 4
Step 2: Pull down the oven door carefully (See Figure 5).
Figure 5
CAUTION: This appliance generates heat during use. Do not touch hot
surfaces. Always use handles or knobs per above instructions.
TSSTTV-CRCMAFBK1_24EFM1 (17L).indd 6-7TSSTTV-CRCMAFBK1_24EFM1 (17L).indd 6-7 2024/4/7 09:282024/4/7 09:28

Figure 2
Figure 1 Figure 3
-6-
7. Baking Pan & Cookie sheet in one – Use for all your baking needs.
See “Positioning Pan” section.
8. Easy Clean Interior Walls – Allows fast clean up.
9. Air Fry Mesh Rack
preparing to use Your Countertop oven for the first time
NOTE: During initial start up you may detect a slight smell and/or smoke.
Turn the temperature to max and let run for approximately 5 minutes.
If you are using your Countertop Oven for the first time, please be sure to:
• Remove any stickers from the surface of the oven.
• Open oven door and remove all printed documents and paper from
inside the Countertop Oven.
• Clean the rack and pan with hot water, a small amount of dishwashing
liquid and a non-abrasive cleaning pad.
CAUTION: DO NOT IMMERSE THE BODY OF THE UNIT IN WATER.
• Dry the unit thoroughly before using.
• Select a location for the Countertop Oven. The location should be in
an open area on a flat counter where the plug will reach an outlet.
• Plug the Countertop Oven into a 120 Volt AC electrical outlet.
CAUTION: When Countertop Oven is in use or cooling down, please be
sure there is a 6-inch clearance between the Countertop Oven and any other
surface including cords. Be sure the cord is not resting against the back of the
Countertop Oven.
-7-
to open the oven Door:
Step 1: Grab the center of the handle underhanded with fingertips
(See Figure 4).
Figure 4
Step 2: Pull down the oven door carefully (See Figure 5).
Figure 5
CAUTION: This appliance generates heat during use. Do not touch hot
surfaces. Always use handles or knobs per above instructions.
TSSTTV-CRCMAFBK1_24EFM1 (17L).indd 6-7TSSTTV-CRCMAFBK1_24EFM1 (17L).indd 6-7 2024/4/7 09:282024/4/7 09:28

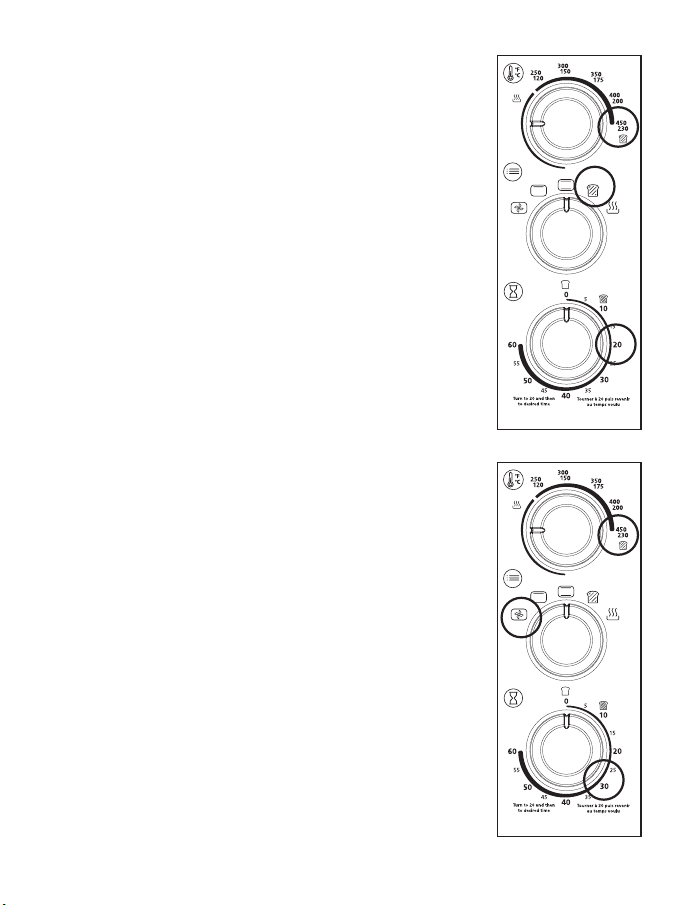
to use the toast funCtion (see fig. 6)
Select desired rack position. (See “Positioning Rack” Section)
NOTE: Different types of bread require different settings.
Lighter breads and waffles require lighter setting. Darker
breads, muffins and English muffins require a darker setting.
Step 1. Place food on wire rack.
Step 2. Close glass door completely.
Step 3. Turn the Function dial to Toast. Both the top and
bottom heater elements will operate.
Step 4. Turn the temperature control knob to the
450º/TOAST setting.
Step 5. To set the timer, turn the timer past the 20 minute
mark to engage timer switch and set back to
desired toast time.
Step 6. When toasting is complete, a bell will sound. Open
door completely and remove food. For best toasting
results, position the rack in the middle position.
WARNING: Cooked food, metal rack, and door can be
very hot, handle with care. Do not leave Countertop Oven
unattended.
to use the air frYer funCtion (see fig. 7)
The air fryer function turns on a built-in fan that
circulates hot air in the chamber for perfectly crispy
results that are healthier than deep frying.
Step 1. Place food on mesh rack.
NOTE: Mesh Rack should be placed in the middle of the
rack. If cooking food with high grease content, place food
directly on top of the Baking Pan, or on the Wire Rack with
Baking Pan directly underneath inserted into the guide rails.
See “Broiling” figure under Positioning Pan section for more
details.
Step 2. Close the glass door completely.
Step 3. Turn the function dial to Air Fry.
Step 4. Turn the Temperature dial to desired setting.
Step 5. Turn the Timer to desired cook time.
Figure 6
Figure 7
-8-
-9-
NOTE: If cook time is less than 20 minutes, you must turn
Timer past the 20 minute mark to engage the timer then back
to desired time.
Step 6. When Air Frying is complete open door completely
and remove food.
WARNING: Cooked food, metal rack, and door can be
very hot, handle with care. Do not leave Countertop Oven
unattended.
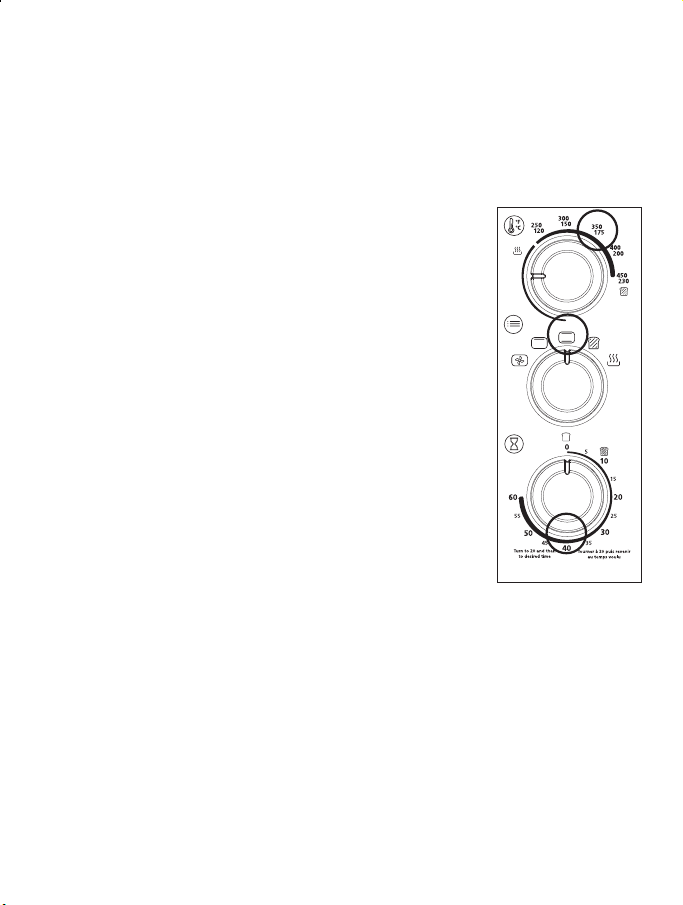
to use the bake funCtion (see fig. 8)
Step 1. Place baking pan with food inside on wire rack.
Step 2. Close glass door completely.
Step 3. Turn the Function dial to Bake.
Step 4. Turn the Temperature dial to desired setting.
Step 5. Turn the Timer to desired cook time.
NOTE: If cook time is less than 20 minutes, you must turn
Timer past the 20 minute mark to engage the timer then back
to desired time.
Step 6. When baking is complete, open door completely
and remove food.
WARNING: Cooked food and metal rack, and door can be
very hot, handle with care. Do not leave Countertop Oven
unattended.
Figure 8
TSSTTV-CRCMAFBK1_24EFM1 (17L).indd 8-9TSSTTV-CRCMAFBK1_24EFM1 (17L).indd 8-9 2024/4/7 09:282024/4/7 09:28
to use the toast funCtion (see fig. 6)
Select desired rack position. (See “Positioning Rack” Section)
NOTE: Different types of bread require different settings.
Lighter breads and waffles require lighter setting. Darker
breads, muffins and English muffins require a darker setting.
Step 1. Place food on wire rack.
Step 2. Close glass door completely.
Step 3. Turn the Function dial to Toast. Both the top and
bottom heater elements will operate.
Step 4. Turn the temperature control knob to the
450º/TOAST setting.
Step 5. To set the timer, turn the timer past the 20 minute
mark to engage timer switch and set back to
desired toast time.
Step 6. When toasting is complete, a bell will sound. Open
door completely and remove food. For best toasting
results, position the rack in the middle position.
WARNING: Cooked food, metal rack, and door can be
very hot, handle with care. Do not leave Countertop Oven
unattended.
to use the air frYer funCtion (see fig. 7)
The air fryer function turns on a built-in fan that
circulates hot air in the chamber for perfectly crispy
results that are healthier than deep frying.
Step 1. Place food on mesh rack.
NOTE: Mesh Rack should be placed in the middle of the
rack. If cooking food with high grease content, place food
directly on top of the Baking Pan, or on the Wire Rack with
Baking Pan directly underneath inserted into the guide rails.
See “Broiling” figure under Positioning Pan section for more
details.
Step 2. Close the glass door completely.
Step 3. Turn the function dial to Air Fry.
Step 4. Turn the Temperature dial to desired setting.
Step 5. Turn the Timer to desired cook time.
Figure 6
Figure 7
-8-
-9-
NOTE: If cook time is less than 20 minutes, you must turn
Timer past the 20 minute mark to engage the timer then back
to desired time.
Step 6. When Air Frying is complete open door completely
and remove food.
WARNING: Cooked food, metal rack, and door can be
very hot, handle with care. Do not leave Countertop Oven
unattended.
to use the bake funCtion (see fig. 8)
Step 1. Place baking pan with food inside on wire rack.
Step 2. Close glass door completely.
Step 3. Turn the Function dial to Bake.
Step 4. Turn the Temperature dial to desired setting.
Step 5. Turn the Timer to desired cook time.
NOTE: If cook time is less than 20 minutes, you must turn
Timer past the 20 minute mark to engage the timer then back
to desired time.
Step 6. When baking is complete, open door completely
and remove food.
WARNING: Cooked food and metal rack, and door can be
very hot, handle with care. Do not leave Countertop Oven
unattended.
Figure 8
TSSTTV-CRCMAFBK1_24EFM1 (17L).indd 8-9TSSTTV-CRCMAFBK1_24EFM1 (17L).indd 8-9 2024/4/7 09:282024/4/7 09:28

to use the Warm funCtion (see fig. 9)
Step 1. Place baking pan with food inside on wire rack.
Step 2. Close glass door completely.
Step 3. Turn the Function dial to Warm.
Step 4. Turn the Temperature dial past “Warm”.
Step 5. Turn the Timer to desired warming time.
NOTE: If cook time is less than 20 minutes, you must turn
Timer past the 20 minute mark to engage the timer then back
to desired time.
Step 6. When Warming is complete, open door completely
and remove food.
WARNING: Cooked food and metal rack, and door can
be very hot, handle with care. Do not leave Countertop
Oven unattended.
to use the broiL funCtion (see fig. 10)
Adjustable Broil allows the oven to broil at any
temperature. Great for melting cheese at 150º F or
cooking fish at 400º F. Adjust as needed.
Step 1. Place food on broil rack or on baking pan if
needed. See “Positioning Rack” and “Positioning
Pan” sections.
Step 2. Close glass door leaving approximately a 3-inch
opening at the top of the Countertop Oven.
Step 3. Turn the Function dial to Broil.
Step 4. Turn the Temperature dial to desired temperature.
Step 5. Turn the Timer to desired cook time.
NOTE: If cook time is less than 20 minutes, you must turn
Timer past the 20 minute mark to engage the timer then back
to desired time.
Step 6. When Broiling is complete, open door completely
and remove food.
WARNING: Cooked food and metal rack, and door can
be very hot, handle with care. Do not leave Countertop
Oven unattended.
Figure 10
-10-
-11-
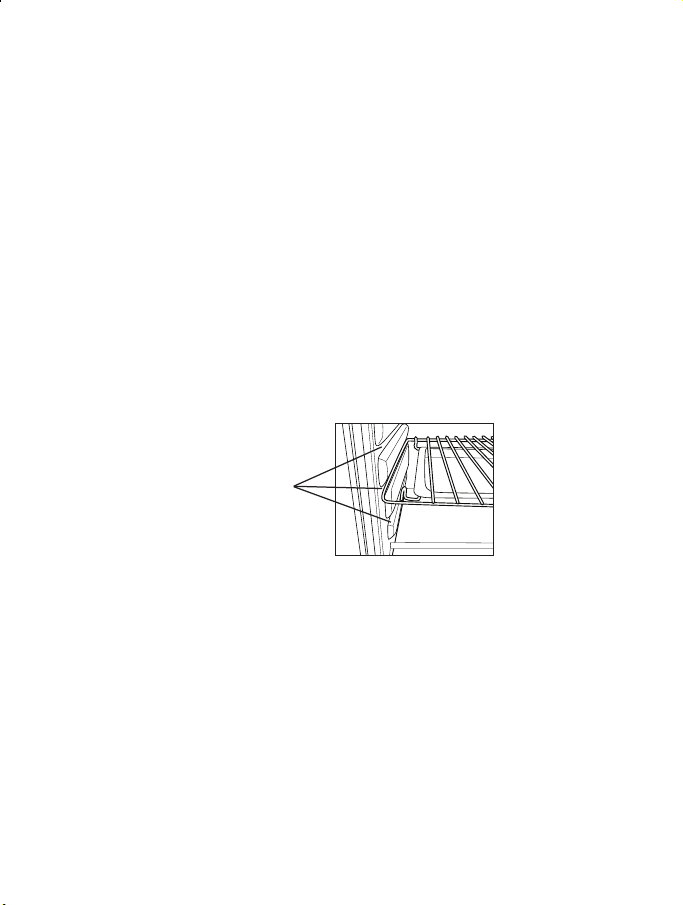
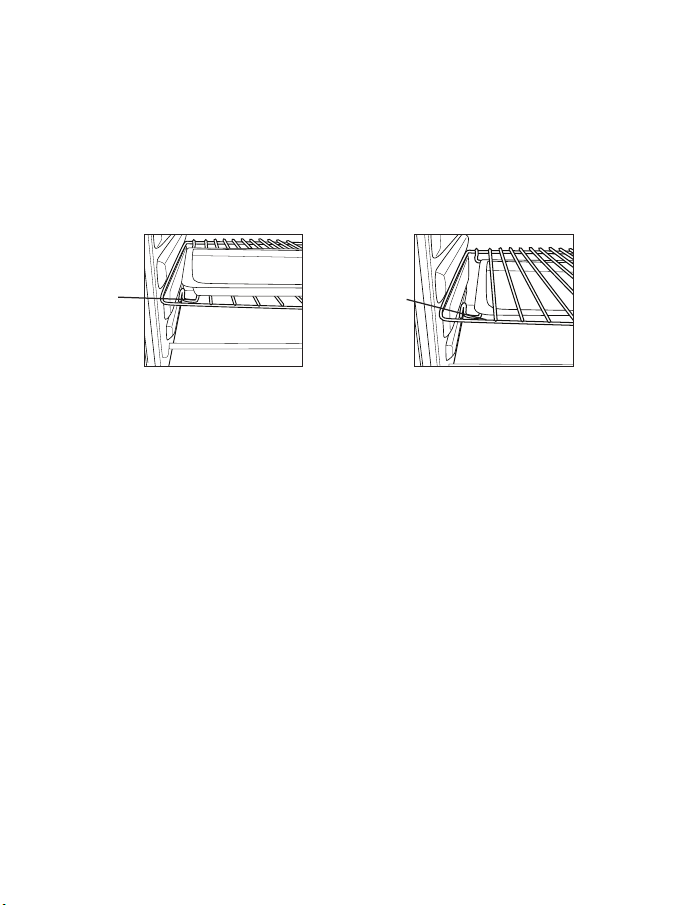
positioning raCk
• To accommodate a wide variety of foods the oven has 3 rack positions. The
rack can be inserted in the oven in the upper, middle or lower rack guides.
The rack will fit into either of the rack guides inside of the Countertop
Oven. (See Figure Below)
• Before removing the rack allow the unit to cool.
• To remove the rack, open the oven door and pull the rack towards the front
of the oven. The rack will slide on the rack guides on the inside of the oven.
PLEASE NOTE: the oven rack may tilt downward causing food to shift when
the rack is pulled out, proceed with caution.
• Positioning of the oven rack will depend on the size of the food and
desired browning. Move the rack to the lower rack position to prevent top
browning and move the rack to the upper rack position to prevent bottom
burning.
• For best toasting and pizza results, position the rack in the middle
rack guide.
raCk guiDe
options
Figure 9
TSSTTV-CRCMAFBK1_24EFM1 (17L).indd 10-11TSSTTV-CRCMAFBK1_24EFM1 (17L).indd 10-11 2024/4/7 09:282024/4/7 09:28
to use the Warm funCtion (see fig. 9)
Step 1. Place baking pan with food inside on wire rack.
Step 2. Close glass door completely.
Step 3. Turn the Function dial to Warm.
Step 4. Turn the Temperature dial past “Warm”.
Step 5. Turn the Timer to desired warming time.
NOTE: If cook time is less than 20 minutes, you must turn
Timer past the 20 minute mark to engage the timer then back
to desired time.
Step 6. When Warming is complete, open door completely
and remove food.
WARNING: Cooked food and metal rack, and door can
be very hot, handle with care. Do not leave Countertop
Oven unattended.
to use the broiL funCtion (see fig. 10)
Adjustable Broil allows the oven to broil at any
temperature. Great for melting cheese at 150º F or
cooking fish at 400º F. Adjust as needed.
Step 1. Place food on broil rack or on baking pan if
needed. See “Positioning Rack” and “Positioning
Pan” sections.
Step 2. Close glass door leaving approximately a 3-inch
opening at the top of the Countertop Oven.
Step 3. Turn the Function dial to Broil.
Step 4. Turn the Temperature dial to desired temperature.
Step 5. Turn the Timer to desired cook time.
NOTE: If cook time is less than 20 minutes, you must turn
Timer past the 20 minute mark to engage the timer then back
to desired time.
Step 6. When Broiling is complete, open door completely
and remove food.
WARNING: Cooked food and metal rack, and door can
be very hot, handle with care. Do not leave Countertop
Oven unattended.
Figure 10
-10-
-11-
positioning raCk
• To accommodate a wide variety of foods the oven has 3 rack positions. The
rack can be inserted in the oven in the upper, middle or lower rack guides.
The rack will fit into either of the rack guides inside of the Countertop
Oven. (See Figure Below)
• Before removing the rack allow the unit to cool.
• To remove the rack, open the oven door and pull the rack towards the front
of the oven. The rack will slide on the rack guides on the inside of the oven.
PLEASE NOTE: the oven rack may tilt downward causing food to shift when
the rack is pulled out, proceed with caution.
• Positioning of the oven rack will depend on the size of the food and
desired browning. Move the rack to the lower rack position to prevent top
browning and move the rack to the upper rack position to prevent bottom
burning.
• For best toasting and pizza results, position the rack in the middle
rack guide.
raCk guiDe
options
Figure 9
TSSTTV-CRCMAFBK1_24EFM1 (17L).indd 10-11TSSTTV-CRCMAFBK1_24EFM1 (17L).indd 10-11 2024/4/7 09:282024/4/7 09:28
heLpfuL tips / troubLeshooting
PROBLEM POTENTIAL CAUSE SOLUTION
Overcooked / Undercooked
Foods.
• Incorrect temperature
or time setting.
• Rack placement.
• You may have to adjust the
time and temperature to
desired taste.
• Because your Countertop Oven
is smaller than your regular
oven, it will heat up faster and
generally cook in shorter periods
of time.
• Refer to “Positioning Rack”
Section, Page 11. Rack
may need to be adjusted
toaccommodate food.
Burnt Smell. • Food build-up inside
oven, on heating
elements or in
crumb tray.
• Refer to “Cleaning Your
Countertop Oven” Section,
Page 12.
Only one heating element is
heating up.
• Function setting
selection determines
which heating
element will operate.
• Check to see if the Broil or
Warm setting is selected.
Heating elements donot
stay ON.
• Heating elements will
cycle ON and OFF to
maintain proper heat.
• Confirm function setting is the
correct one of choice.
-12-
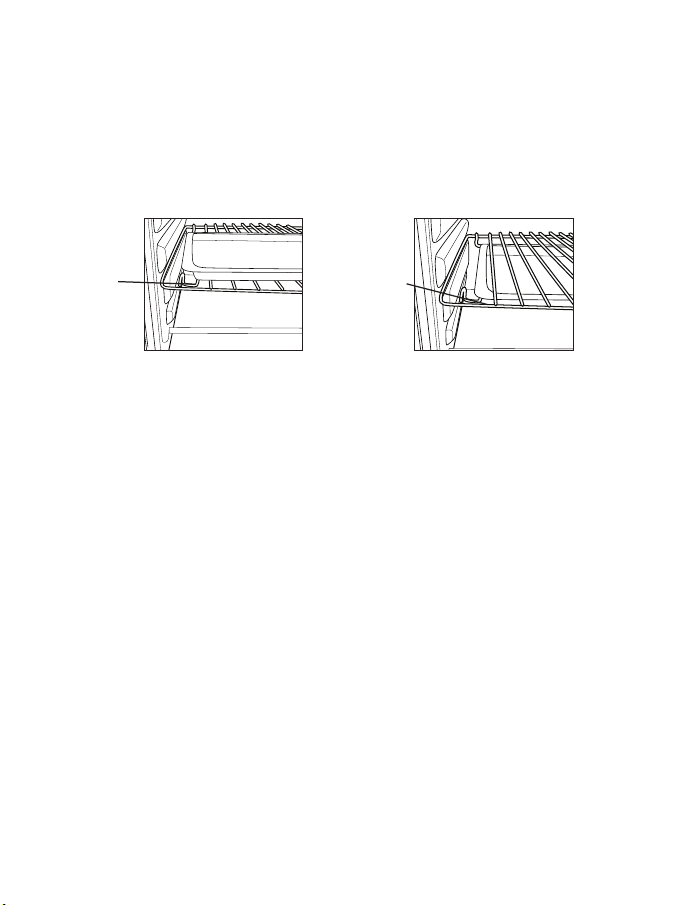
positioning pan
• To accommodate a wide variety of foods the oven has two pan positions.
The pan can be placed on top of the rack or inserted into the guide rails
below the rack. (See Figure Below)
• Before removing the pan allow the unit to cool.
• Positioning of the oven pan will depend on the desired cooking method. For baking,
place the pan on top of the rack. For broiling, insert the pan into the guide rails below
the rack and place the food on top of the rack.
for
baking
for broiLing
CLeaning Your Countertop oven
WARNING: to protect against electrical shock, do not immerse the appliance
in water or any other liquid.
Step 1. Turn Timer knob to “0”, and verify unit is off by checking that the
power indicator light has turned off. Remove the plug from the
electrical outlet. Allow to cool.
Step 2. Wipe unit down with damp cloth. Make sure to only use mild, soapy
water. Abrasive cleaners, scrubbing brushes and chemical cleaners will
damage the coating on this unit. WARNING: Do not clean with metal
scouring pads. Pieces can break off the pad and touch electrical parts
involving a risk of electrical shock.
Step 3. Remove crumb tray by pulling out of Countertop Oven.
Step 4. Shake off crumbs from crumb tray. Cleaning the crumb tray often will
avoid any accumulations.
Step 5. Remove wire rack and clean with damp cloth or place in top rack of dishwasher.
This appliance has no user serviceable parts. Any servicing beyond that
described in the Cleaning Section should be performed by an Authorized
Service Representative only. See Warranty Section.
-13-
storing Your Countertop oven
Allow the appliance to cool completely before storing. If storing the
Countertop Oven for long periods of time make certain that the Countertop
Oven is clean and free of food particles. Store the Countertop Oven in a dry
location such as on a table or countertop or cupboard shelf. Other than the
recommended cleaning, no further user maintenance should be necessary.
TSSTTV-CRCMAFBK1_24EFM1 (17L).indd 12-13TSSTTV-CRCMAFBK1_24EFM1 (17L).indd 12-13 2024/4/7 09:282024/4/7 09:28

heLpfuL tips / troubLeshooting
PROBLEM POTENTIAL CAUSE SOLUTION
Overcooked / Undercooked
Foods.
• Incorrect temperature
or time setting.
• Rack placement.
• You may have to adjust the
time and temperature to
desired taste.
• Because your Countertop Oven
is smaller than your regular
oven, it will heat up faster and
generally cook in shorter periods
of time.
• Refer to “Positioning Rack”
Section, Page 11. Rack
may need to be adjusted
toaccommodate food.
Burnt Smell. • Food build-up inside
oven, on heating
elements or in
crumb tray.
• Refer to “Cleaning Your
Countertop Oven” Section,
Page 12.
Only one heating element is
heating up.
• Function setting
selection determines
which heating
element will operate.
• Check to see if the Broil or
Warm setting is selected.
Heating elements donot
stay ON.
• Heating elements will
cycle ON and OFF to
maintain proper heat.
• Confirm function setting is the
correct one of choice.
-12-
positioning pan
• To accommodate a wide variety of foods the oven has two pan positions.
The pan can be placed on top of the rack or inserted into the guide rails
below the rack. (See Figure Below)
• Before removing the pan allow the unit to cool.
• Positioning of the oven pan will depend on the desired cooking method. For baking,
place the pan on top of the rack. For broiling, insert the pan into the guide rails below
the rack and place the food on top of the rack.
for
baking
for broiLing
CLeaning Your Countertop oven
WARNING: to protect against electrical shock, do not immerse the appliance
in water or any other liquid.
Step 1. Turn Timer knob to “0”, and verify unit is off by checking that the
power indicator light has turned off. Remove the plug from the
electrical outlet. Allow to cool.
Step 2. Wipe unit down with damp cloth. Make sure to only use mild, soapy
water. Abrasive cleaners, scrubbing brushes and chemical cleaners will
damage the coating on this unit. WARNING: Do not clean with metal
scouring pads. Pieces can break off the pad and touch electrical parts
involving a risk of electrical shock.
Step 3. Remove crumb tray by pulling out of Countertop Oven.
Step 4. Shake off crumbs from crumb tray. Cleaning the crumb tray often will
avoid any accumulations.
Step 5. Remove wire rack and clean with damp cloth or place in top rack of dishwasher.
This appliance has no user serviceable parts. Any servicing beyond that
described in the Cleaning Section should be performed by an Authorized
Service Representative only. See Warranty Section.
-13-
storing Your Countertop oven
Allow the appliance to cool completely before storing. If storing the
Countertop Oven for long periods of time make certain that the Countertop
Oven is clean and free of food particles. Store the Countertop Oven in a dry
location such as on a table or countertop or cupboard shelf. Other than the
recommended cleaning, no further user maintenance should be necessary.
TSSTTV-CRCMAFBK1_24EFM1 (17L).indd 12-13TSSTTV-CRCMAFBK1_24EFM1 (17L).indd 12-13 2024/4/7 09:282024/4/7 09:28

1-YEAR LIMITED WARRANTY
Sunbeam Products, Inc. or if in Canada Newell Brands Canada ULC
(collectively “Sunbeam”) warrants that for a period of one year from
the date of delivery to the original end user purchaser, this product
will be free from defects in material and workmanship. Sunbeam,
at its option, will repair or replace, free of charge, this product
or any component of the product found to be defective during the
warranty period. Replacement will be made with a new product
or new component at no cost to the consumer. If the product is no
longer available, replacement may be made with a similar product
of equal or greater value. This is your exclusive warranty. Do NOT
attempt to repair or adjust any electrical or mechanical functions
on this product. Sunbeam reserves all rights to decline coverage if
the defect or damage was caused by unauthorized components or
service. This warranty is valid for the original retail purchaser from
the date of delivery and is not transferable. Keep the original proof
of purchase. Dealers, service centers, or retail stores selling Sunbeam
products do not have the right to alter, modify, or any way change
the terms and conditions of this warranty. This warranty does not
cover normal wear of parts or damage resulting from any of the
following: negligent use or misuse of the product; use on improper
voltage or current; use contrary to the operating instructions provided
by Sunbeam; disassembly, repair, or alteration by anyone other than
Sunbeam or an authorized Sunbeam service center. Sunbeam expressly
excludes from this warranty and denies liability for defects or damage
caused by repair or alteration by anyone other than Sunbeam or an
authorized Sunbeam service center. Further, the warranty does not
cover: Acts of God, such as fire, flood, hurricanes and tornadoes.
No terms of this warranty may be construed to apply to non-warranty
service and maintenance. Accordingly, Sunbeam also denies liability
for defects and damage caused by repair or alteration outside the
terms of this warranty.
There are no warranties which extend beyond those stated herein.
ANY IMPLIED WARRANTIES THAT MAY BE APPLICABLE
TO PRODUCTS, INCLUDING IMPLIED WARRANTIES OF
MERCHANTABILITY OR FITNESS FOR A PARTICULAR PURPOSE,
ARE LIMITED IN DURATION TO THE DURATION OF THIS
WARRANTY. Some States do not allow limitations on how long an
implied warranty lasts, so the above limitation may not apply to you.
UNDER NO CIRCUMSTANCES SHALL SUNBEAM BE LIABLE FOR
ANY SPECIAL, INCIDENTAL, OR CONSEQUENTIAL DAMAGES
BASED UPON BREACH OF THIS LIMITED WARRANTY, BREACH
OF CONTRACT, OR STRICT LIABILITY. Some States do not allow
the exclusion or limitation of incidental or consequential damages, so
the above limitation or exclusion may not apply to you.
This warranty gives you specific legal rights, and you may also have
other rights which vary from State to State.
How to Obtain Warranty Service
In the U.S.A.
If you have any questions regarding this warranty or would like to
obtain warranty support, please call 1.800.334.0759 or visit the
Oster
®
Website. Proof of purchase and proof of delivery date if
different than your date of purchase is required to obtain warranty
performance.
In Canada
If you have any question regarding this warranty or would like to
obtain warranty service, please call 1.800.667.8623.
In the U.S.A. this warranty is offered by Sunbeam Products, Inc,
located at 6655 Peachtree Dunwoody Rd, Atlanta, GA 30328. In
Canada, this warranty is offered by Newell Brands Canada ULC,
located at 20B Hereford Street, Brampton, Ontario L6Y 0M1. If you
have any other problem or claim in connection with this product,
please write our consumer service department.
-14- -15-
TSSTTV-CRCMAFBK1_24EFM1 (17L).indd 14-15TSSTTV-CRCMAFBK1_24EFM1 (17L).indd 14-15 2024/4/7 09:282024/4/7 09:28

-16-
CONSIGNES IMPORTANTES
L’emploi d’un appareil électrique exige l’observation de précautions de
sécurité fondamentales pour réduire le risque d’incendie, de choc électrique
et/ou de blessures corporelles, y compris des suivantes :
1. Lisez toutes les instructions avant d’utiliser ce produit.
2. L’emploi de l’appareil génère de la chaleur. Ne touchez pas les
surfaces chaudes. Servez-vous des poignées ou boutons.
3. Pour vous protéger des chocs électriques, ne placez ou ne plongez pas le
cordon, les fiches ou bien l’appareil dans l’eau ou dans tout autre liquide.
4. Cet appareil n’est pas prévu pour être employé par des enfants ou par
des personnes dont les capacités physiques, sensorielles ou mentales
sont réduites, ou qui sont dénuées d’expérience ou de connaissance.
Redoublez de vigilance si l’appareil fonctionne près d’enfants. Surveillez
les enfants afin qu’ils ne jouent pas avec l’appareil. De plus, gardez
l’appareil et son cordon hors de leur portée.
5. Débranchez l’appareil entre utilisations, avant de monter et démonter
toute pièce ou de le nettoyer. Attendez qu’il ait refroidi pour le nettoyer,
monter ou démonter toute pièce. ÉTEIGNEZ-le et débranchez-le en tirant
la fiche – ne donnez jamais un coup sec pour déconnecter le cordon.
6. N’utilisez jamais un appareil dont le cordon ou la fiche est abîmé, qui a
mal fonctionné ou a été endommagé de quelque façon. Ne tentez pas de
changer ou d’épisser un cordon abîmé. Retournez l’appareil au fabricant
(voyez la garantie) pour vérification, réparation ou mise au point.
7. L’utilisation d’accessoires que ne conseille pas formellement le fabricant
de l’appareil peut causer des blessures.
8. Ne vous servez de l’appareil ni en plein air ni à des fins commerciales.
9. Veillez à ce que le cordon ne pende pas du comptoir ou du plateau de la
table et qu’il ne touche pas de surface chaude.
10. Ne posez pas l’appareil sur ou près de surfaces mouillées, de sources
de chaleur (foyer à gaz ou électrique chaud, par ex.) ou dans un four
chauffé.
-17-
11. Déplacez l’appareil ou retirez un plat de la cavité très prudemment s’il
contient de l’huile ou tout autre liquide chaud.
12. La base chauffante est susceptible à la chaleur résiduelle de la cuisson.
Ne la touchez pas aussitôt après l’utilisation. Attendez qu’elle refroidisse.
13. Ouvrez le couvercle avec prudence durant ou après un cycle de cuisson.
La vapeur qui s’échappe peut échauder.
14. N’employez l’appareil qu’aux fins prévues. L’usage abusif peut être
source de blessures.
15. Cet appareil domestique est uniquement destiné à l’emploi sur comptoir.
Placez-le à 15,2 cm (6 po) des murs et de tous articles ; faites-le
fonctionner sur une surface rigide, sèche, plane et d’aplomb.
16. Quand l’appareil est incliné, le couvercle ne reste pas ouvert de lui-
même. Remettez toujours l’appareil d’aplomb avant d’ouvrir le couvercle.
17. Ne faites jamais fonctionner l’appareil avec un minuteur externe ou un
système de commande à distance distinct.
18. AVERTISSEMENT : les aliments renversés peuvent gravement brûler.
Éloignez l’appareil et le cordon des enfants. Ne pendez pas le cordon au
bord du comptoir et n’utilisez jamais une prise située sous le comptoir.
GARDEZ CES
INSTRUCTIONS
RÉSERVÉ À L’USAGE DOMESTIQUE
Modèles nord-américains à fiches polarisées
FICHE POLARISÉE
Cet appareil est équipé d’une che polarisée (une lame est plus large que
l’autre). Par mesure de sécurité et pour réduire le risque de choc électrique,
la che ne s’enfonce dans les prises polarisées que dans un sens. Si elle ne
pénètre pas bien dans la prise, retournez-la. Si elle ne rentre toujours pas, faites
changer la prise par un électricien agréé. Ne tentez de modier la che en aucune façon. Si la che
s’enfonce dans la prise sans s’assujettir fermement ou bien si la prise de courant alternatif vous
semble chaude, ne vous servez pas de cette prise.
TSSTTV-CRCMAFBK1_24EFM1 (17L).indd 16-17TSSTTV-CRCMAFBK1_24EFM1 (17L).indd 16-17 2024/4/7 09:282024/4/7 09:28

INSTRUCTIONS RELATIVES AU CORDON
Cet appareil est délibérément équipé d’un cordon d’alimentation court ou amovible, afin de
réduire les risques de s’empêtrer les pieds ou de trébucher accidentellement, comme ça
pourrait être le cas avec un cordon plus long. Des cordons d’alimentation amovibles plus
longs et des cordons prolongateurs sont disponibles et utilisables, à condition d’observer
les précautions d’usage. Si un cordon amovible long ou une rallonge est employé…
a. sa puissance nominale marquée doit être au moins égale à la puissance nominale
de l’appareil ;
b. si l’appareil est mis à la terre, la rallonge doit obligatoirement être un cordon
trifilaire (à trois conducteurs) ; et enfin
c. la rallonge ou le cordon long doit être disposé de façon à ne pas pendre du
comptoir ou du plateau de table, afin que les enfants ne puissent ni le ou la tirer
et que personne ne risque de trébucher accidentellement.
Ne tirez, tortillez ou abusez du cordon d’alimentation en aucune façon.
AVIS
1. Tous les comptoirs et plateaux de table ne résistent pas à la chaleur que génèrent
certains électroménagers au cours de longues périodes. Ne posez pas un appareil
chauffant sur une belle table en bois, sans préalablement placer un coussinet
thermorésistant ou un dessous-de-plat pour protéger la surface d’appui.
2. À la mise en service, il peut se dégager un peu de fumée et/ou une faible odeur.
Courantes avec beaucoup d’appareils qui produisent de la chaleur, fumée et/ou odeur
cesseront après quelques utilisations.
-19--18-
famiLiarisez-vous aveC votre four De Comptoir
1. Sélecteur de température – Sert à régler le thermostat à la température
appropriée. (Voyez la figure 1)
2. Sélecteur de fonction – Vous tournez le bouton pour choisir le mode de
cuisson désiré. (Voyez la figure 2)
3. Minuterie à signal sonore – Permet de régler la durée de cuisson jusqu’à
60 minutes. Le four s’ÉTEINT automatiquement lorsque le temps réglé
s’est écoulé. (Voyez la figure 3)
4. Plateau ramasse-miettes amovible – Recueille les miettes et les particules
alimentaires qui tombent. Se nettoie vite et simplement.
5. Grille en métal/de gril amovible – Pour l’utilisation générale et les grillades.
Voyez « Positionnement de la grille » et « Positionnement du plat à four ».
6. Porte en verre trempé – Permet de contrôler la cuisson.
bienvenue
Félicitations d’avoir sélectionné un four de comptoir OSTER
MD
! Si vous avez
besoin de le faire réparer, ne le retournez pas au lieu d’achat mais communiquez
avec nous par le biais du site www.oster.ca ou en appelant le 1 800 667-8623.
1
7
9
2
3
4
5
6
8
TSSTTV-CRCMAFBK1_24EFM1 (17L).indd 18-19TSSTTV-CRCMAFBK1_24EFM1 (17L).indd 18-19 2024/4/7 09:282024/4/7 09:28

Figure 2
Figure 1 Figure 3
-20-
7. Plat à four et plaque à pâtisserie en un – Indispensable pour cuire au four.
Consultez la rubrique « Positionnement du plat à four ».
8. Parois intérieures d’entretien aisé – Nettoyage aussi rapide que facile.
9. Plaque grillagée de friture à l’air chaud
préparatifs pour L’utiLisation initiaLe Du four
REMARQUE : une faible odeur et/ou de la fumée peuvent se dégager à la
mise en marche initiale. En ce cas, faites chauffer le four environ 5 minutes à
la température maximale.
S’il s’agit de la toute première utilisation du four de comptoir, veuillez…
• enlever toutes les étiquettes apposées sur les surfaces du four ;
• ouvrir la porte puis retirer les documents papier de la cavité ;
• avec un tampon non abrasif, laver la grille et le plat à four à l’eau
chaude additionnée d’un peu de détergent liquide pour vaisselle ;
ATTENTION : N’IMMERGEZ PAS LA CARROSSERIE DANS L’EAU.
• assécher soigneusement toutes les surfaces avant l’utilisation ;
• décider où placer le four : de préférence sur un comptoir plat, dégagé et
d’aplomb, à proximité de la prise de courant qui l’alimentera ; et enfin
• brancher le four sur courant alternatif de 120 volts.
ATTENTION : durant le fonctionnement et le refroidissement, veillez à ce
que le four de comptoir soit bien situé à 15,2 cm / 6 po de toutes surfaces, y
compris des cordons. Vérifiez aussi que le cordon de l’appareil n’ait aucun
point de contact avec l’arrière de la carrosserie.
-21-
ouverture De La porte Du four
Étape 1 : tenez le milieu de la poignée du bout des doigts, par dessous (voyez
la figure 4).
Figure 4
Étape 2 : abaissez prudemment la porte (voyez la figure 5).
Figure 5
ATTENTION : le fonctionnement de cet appareil produit de la chaleur. Ne
touchez pas les surfaces chaudes. Utilisez toujours les poignées ou les boutons
prévus, conformément aux instructions ci-dessus.
TSSTTV-CRCMAFBK1_24EFM1 (17L).indd 20-21TSSTTV-CRCMAFBK1_24EFM1 (17L).indd 20-21 2024/4/7 09:282024/4/7 09:28
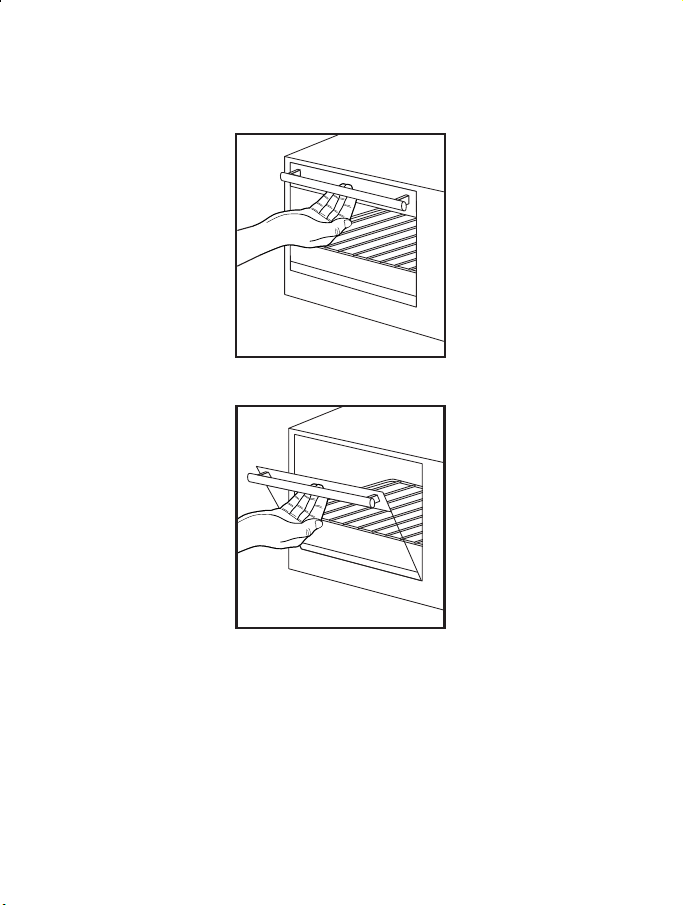
utiLisation De La fonCtion « rôtie » (fig. 6)
Choisir la position. (Voir « Positionnement de la grille »)
REMARQUE : un même réglage ne convient pas pour tous
les pains : pains légers et gaufres grillent à un réglage clair,
pains foncés et muffins (dont anglais) à un réglage plus foncé.
1. Disposer les aliments sur la grille en métal.
2. Fermer complètement la porte en verre.
3. Sélectionner la fonction « rôtie ». Les éléments de voûte
et de sole chaufferont.
4. Mettre le sélecteur de température à 450 °F/RÔTIE.
5. Pour régler la minuterie, tourner son bouton au-delà du
repère 20 minutes pour la mise en marche puis revenir
en arrière au temps de cuisson désiré.
6. Un signal retentira à la fin du grillage. Ouvrir la porte
en grand puis sortir les rôties. Pour résultats optimaux,
placer la grille en position centrale.
AVERTISSEMENT : être prudent car rôties, grille et porte
peuvent être brûlantes. Surveiller assidûment le four.
fonCtion « frire à air ChauD » (fig. 7)
À cette fonction, une turbine incorporée démarre et fait
circuler l’air chaud dans la cavité pour fournir des aliments
frits croquants et plus sains que cuits dans un bain d’huile.
1. Disposer les aliments sur la plaque grillagée.
REMARQUE : La plaque grillagée devrait être mise en
position centrale. Posez des aliments très gras soit directement
au-dessus du plat à four, soit sur la grille en métal, le plat à
four étant dans les coulisses directement dessous. Pour plus
de renseignements, voyez le schéma « Grillades » sous la
rubrique Positionnement du plat à four.
2. Fermer complétement la porte en verre.
3. Sélectionner la fonction « frire à air chaud ».
4. Mettre le sélecteur de température au réglage voulu.
5. Régler la minuterie à la durée de cuisson requise.
-22-
-23-
REMARQUE : si la durée de cuisson est de moins de 20
minutes, tourner le bouton au-delà du repère 20 pour la
mise en marche puis revenir en arrière au temps de cuisson
désiré.
6. Quand la friture à air chaud se termine, ouvrir la porte
en grand puis sortir les aliments du four.
AVERTISSEMENT : être prudent car friture, grille et
porte peuvent être brûlantes. Surveiller assidûment le four.
utiLisation De La fonCtion « four » (fig. 8)
1. Poser le plat à four garni d’aliments sur la grille en
métal.
2. Fermer complétement la porte en verre.
3. Sélectionner la fonction « four » à l’aide du cadran.
4. Mettre le sélecteur de température au réglage désiré.
5. Régler la durée de cuisson voulue.
REMARQUE : si la durée de cuisson est de moins de 20
minutes, tourner le bouton au-delà du repère 20 pour la mise
en marche puis revenir en arrière au temps de cuisson voulu.
6. La cuisson au four terminée, ouvrir la porte en grand
puis sortir les aliments cuits du four.
AVERTISSEMENT : agir avec prudence car les aliments
cuits, la grille en métal et la porte risquent d’être très chauds.
Ne pas laisser le four sans surveillance.
Figure 6
Figure 7
Figure 8
TSSTTV-CRCMAFBK1_24EFM1 (17L).indd 22-23TSSTTV-CRCMAFBK1_24EFM1 (17L).indd 22-23 2024/4/7 09:282024/4/7 09:28
utiLisation De La fonCtion « ChauD » (fig. 9)
1. Poser le plat à four garni d’aliments sur la grille en métal.
2. Fermer complètement la porte en verre.
3. Régler le sélecteur de fonction à « chaud ».
4. Régler la température au-delà de chaud.
5. Mettre la minuterie à la durée de maintien désirée.
REMARQUE : si la durée est de moins de 20 minutes,
tourner le bouton au-delà du repère 20 afin que la minuterie
se mette en marche puis revenir en arrière au temps requis.
6. Lorsque la durée de maintien chaud se termine, ouvrir
la porte en grand et retirer le plat du four.
AVERTISSEMENT : agir avec prudence car les aliments
cuits, la grille en métal et la porte peuvent être très
chauds. Ne pas laisser le four sans surveillance.
utiLisation De La fonCtion « griL » (fig. 10)
Polyvalent, ce four de comptoir permet de griller à toute
température. Il convient aussi bien pour faire fondre le
fromage à 150 °F/65 °C que pour griller le poisson à
400 °F/200 °C. Vous l’ajustez au besoin.
1. Disposer les aliments sur la grille en métal ou dans le
plat à four, si nécessaire. Voyez « Positionnement de la
grille » et « Positionnement du plat à four ».
2. Fermer la porte tout en laissant le haut entrouvert
d’environ 7,5 cm.
3. Sélectionner la fonction « gril ».
4. Régler le sélecteur de température selon le besoin.
5. Mettre la minuterie à la durée de cuisson voulue.
REMARQUE : si la durée de cuisson est de moins de 20
minutes, tourner le bouton au-delà du repère 20 pour la mise
en marche puis revenir en arrière au temps nécessaire.
6. Une fois le grillage terminé, ouvrir la porte en grand et
retirer les aliments cuits du four.
AVERTISSEMENT : être prudent car les grillades, la
grille et la porte pourraient être brûlants. Surveiller
assidûment le four pendant son fonctionnement.
-24-
-25-
positionnement De La griLLe en métaL
• Les trois hauteurs de cuisson prévues permettent de cuire une grande variété
de denrées. Vous choisissez la hauteur en fonction du volume de l’aliment à
cuire : à la position haute, centrale ou basse. (Voyez le schéma ci-dessous)
• Attendez que le four refroidisse pour retirer la grille.
• Pour sortir la grille du four, ouvrez la porte puis tirez la grille vers l’avant de
la cavité. La grille glisse dans les coulisses de la cavité du four.
VEUILLEZ NOTER : que la grille risque d’incliner vers le bas lorsque vous
la tirez vers vous et de provoquer le déplacement des aliments. Procédez
prudemment.
• La hauteur de cuisson dépendra du volume des aliments ainsi que du degré
de brunissement désiré. Mettez la grille en position basse pour empêcher les
aliments de dorer et placez-la en position haute pour empêcher le dessous de
trop cuire ou brûler.
• En ce qui concerne le grillage du pain et la cuisson de la pizza, c’est la
position centrale qui procure les résultats les plus satisfaisants.
options Des
hauteurs De
uisson
Figure 10
Figure 9
TSSTTV-CRCMAFBK1_24EFM1 (17L).indd 24-25TSSTTV-CRCMAFBK1_24EFM1 (17L).indd 24-25 2024/4/7 09:282024/4/7 09:28
ConseiLs pratiques / Dépannage
PROBLÈMES CAUSES PLAUSIBLES SOLUTIONS
Aliments trop ou pas
assez cuits
• La température ou la
durée de cuisson est
incorrecte.
• La grille n’est pas à la
hauteur appropriée.
• Essayez de modifier la durée de
cuisson ou la température pour
répondre à vos goûts.
• Le four étant plus petit qu’un
four de cuisinière ordinaire, sa
cavité chauffe plus vite et cuit
aussi généralement plus vite.
• Voyez « Positionnement de la
grille en métal » en page25.
Tenez compte non seulement
de l’aliment mais aussi de son
volume.
Odeur de brûlé • Des particules
adhèrent à la cavité,
aux éléments ou au
plateau ramasse-
miettes.
• Voyez la rubrique intitulée
« Entretien du four de comptoir »
en page 26.
Un seul élément chauffe • Le chauffage des
éléments dépend de la
fonction sélectionnée.
• Assurez-vous que ni le réglage
gril ni le réglage chaud n’a
été sélectionné.
Les éléments ne restent
pas ALLUMÉS
• Les éléments
chauffent de façon
INTERMITTENTE
pour maintenir la
température réglée.
• Assurez-vous que la fonction
sélectionnée est bien la fonction
de choix.
-26-
positionnement Du pLat à four
• Le plat à four loge dans la cavité de deux façons, selon les aliments à cuire.
Vous pouvez le poser sur la grille ou bien le glisser dans les coulisses se
trouvant sous la grille. (Voyez les schémas ci-après)
• Attendez que l’appareil refroidisse avant de sortir le plat à four de la cavité.
• La position du plat à four dépendra de la méthode de cuisson. Pour la cuisson
ordinaire au four, posez-le sur la grille ; pour faire rôties, glissez-le dans les
coulisses situées sous la grille et répartissez pain ou aliments sur la grille.
pour Cuire
au four
pour rôties
entretien Du four De Comptoir
AVERTISSEMENT : pour vous protéger des chocs électriques, n’immergez
cet appareil ni dans l’eau ni dans un autre liquide.
Étape 1. Réglez le sélecteur de température à « 0 » puis assurez-vous que
l’appareil est hors tension en vérifiant que le voyant d’alimentation
s’est éteint. Déconnectez le four à la prise de courant et laissez-le
refroidir.
Étape 2. Essuyez-le avec un chiffon humecté de solution savonneuse douce.
Des nettoyants abrasifs, brosses à récurer et agents chimiques
abîmeraient la finition de la carrosserie.
AVERTISSEMENT : n’utilisez pas de tampons à récurer métalliques,
des particules se détachant pourraient provoquer des chocs au
contact des pièces électriques.
Étape 3. Tirez le plateau ramasse-miettes hors de la carrosserie.
Étape 4. Videz le ramasse-miettes. Un nettoyage régulier empêche
l’accumulation de particules alimentaires et de miettes sur le plateau.
Étape 5. Sortez la grille en métal du four pour soit la nettoyer avec un chiffon
humecté, soit la mettre au lave-vaisselle (panier du haut seulement).
Cet appareil ne renferme pas de pièces que puisse réparer l’utilisateur.
Tout service ou entretien autre que celui décrit dans ces instructions doit
uniquement être confié à un commis d’un centre de services agréé. Consultez
la garantie.
-27-
rangement Du four De Comptoir
Ne rangez le four que lorsqu’il est froid. Si la durée de rangement est
indéfinie, veillez à ce qu’il soit immaculé et ne contienne pas de particules
alimentaires. Placez-le dans un lieu sec – sur une table, un comptoir ou dans
une armoire de cuisine, par exemple. Outre le nettoyage recommandé, aucun
autre entretien ne devrait être nécessaire.
TSSTTV-CRCMAFBK1_24EFM1 (17L).indd 26-27TSSTTV-CRCMAFBK1_24EFM1 (17L).indd 26-27 2024/4/7 09:282024/4/7 09:28

GARANTIE LIMITÉE DE UN AN
Sunbeam Products, Inc. ou, si au Canada, Newell Brands Canada
ULC (collectivement « Sunbeam ») garantit que pour une période de
un (1) an à partir de la date de livraison à l’acheteur final initial, ce
produit sera exempt de vices de matériaux et de fabrication. Sunbeam
se réserve le droit de choisir entre réparer ou remplacer gratuitement
ce produit ou tout composant du produit déclaré défectueux pendant
la période de garantie. Le produit ou composant de remplacement
gratuit sera soit neuf soit réusiné. Si le produit n’est plus disponible,
il sera remplacé par un produit similaire, de valeur égale ou
supérieure. La présente constitue votre garantie exclusive. N’essayez
PAS de réparer ou d’ajuster toute fonction électrique ou mécanique
de ce produit. Sunbeam se réserve le droit de refuser la couverture si
la défectuosité ou le dommage résulte de composants ou de services
non autorisés. Valable pour le premier acheteur au détail à compter
de la date de livraison initiale, cette garantie n’est pas cessible.
Gardez votre reçu de caisse original. Les détaillants, les centres de
services ou les magasins de détail qui vendent des produits Sunbeam
n’ont pas le droit d’altérer, de modifier ou de changer de toute autre
manière les termes et les conditions de cette garantie. Cette garantie
ne couvre pas l’usure normale des pièces ou les dommages résultant
de toute cause suivante : utilisation négligente ou mauvaise utilisation
du produit, utilisation d’une tension ou d’un courant incorrect,
utilisation contraire aux instructions d’utilisation que fournit
Sunbeam, démontage, réparation ou altération par quiconque autre
que Sunbeam ou un centre de services autorisé de Sunbeam. De cette
garantie, Sunbeam expressément exclut et décline toute responsabilité
pour les défectuosités et les dommages résultant de réparations ou
d’altérations exécutées par quiconque sauf Sunbeam ou un centre
de services agréé Sunbeam. De plus, cette garantie ne couvre pas
les catastrophes naturelles comme les incendies, les inondations, les
ouragans et les tornades.
Aucune disposition de cette garantie ne saurait être interprétée
comme s’appliquant à des services ou à un entretien que ne couvre
pas la garantie. En conséquence, Sunbeam dénie également toute
responsabilité pour les défauts et dommages provenant d’une
réparation ou altération en dehors des conditions stipulées dans la
présente garantie.
Aucune garantie n’est accordée hors de celles énoncées ici. TOUTES
GARANTIES IMPLICITES APPLICABLES AUX PRODUITS,
Y COMPRIS LES GARANTIES IMPLICITES DE QUALITÉ
MARCHANDE ET D’APPLICATION À UN USAGE PARTICULIER,
SONT LIMITÉES À LA DURÉE DE LA PRÉSENTE GARANTIE.
Certaines provinces ou juridictions et certains États ne permettent pas
de limiter la durée d’application de la garantie implicite, de sorte que
vous pouvez ne pas être assujetti aux limites ou exclusions énoncées
ci-dessus.
SUNBEAM NE SAURAIT EN AUCUN CAS ÊTRE TENU
RESPONSABLE DE TOUT DOMMAGE SPÉCIAL, ACCIDENTEL
OU INDIRECT DÉCOULANT DE LA VIOLATION DE CETTE
GARANTIE LIMITÉE, D’UNE RUPTURE DE CONTRAT OU DE
LA RESPONSABILITÉ STRICTE. Certaines provinces ou juridictions
et certains États interdisent d’exclure ou de limiter les dommages
accessoires ou indirects, de sorte que vous pouvez ne pas être assujetti
aux limites ou exclusions énoncées ci-dessus.
Cette garantie vous confère des droits juridiques précis et vous
pouvez avoir d’autres droits, ces droits variant d’une province, d’une
juridiction ou d’un État à l’autre.
Obtention du service prévu par la garantie
Aux États-Unis
Si vous avez des questions concernant cette garantie ou souhaitez
vous prévaloir du service de garantie prévu, veuillez appeler le
1.800.334.0759 ou visiter le site Web Oster
MD
. La preuve d’achat
ainsi que la date de livraison, si elle diffère de la date d’achat, sont
exigibles pour se prévaloir du service que prévoit la garantie.
Au Canada
Si vous avez des questions concernant cette garantie ou souhaitez vous
prévaloir du service de garantie prévu, veuillez appeler le
1 800 667.8623.
Aux États-Unis, cette garantie est offerte par Sunbeam Products,
Inc., du 6655 Peachtree Dunwoody Rd. à Atlanta, GA 30328. Au
Canada, cette garantie est offerte par Newell Brands Canada ULC,
du 20B Hereford Street à Brampton (Ontario) L6Y 0M1. Pour autre
problème ou réclamation concernant ce produit, veuillez écrire à notre
Service à la clientèle.
-28- -29-
TSSTTV-CRCMAFBK1_24EFM1 (17L).indd 28-29TSSTTV-CRCMAFBK1_24EFM1 (17L).indd 28-29 2024/4/7 09:282024/4/7 09:28

For product questions contact:
Sunbeam Customer Service
USA : 1.800.334.0759
Canada : 1.800.667.8623
www.oster.com/www.oster.ca
© 2024 Sunbeam Products, Inc. All rights reserved. Distributed by Sunbeam
Products, Inc., 6655 Peachtree Dunwoody Road, Atlanta, GA 30328. In
Canada, imported and distributed by Newell Brands Canada ULC, 20B
Hereford Street, Brampton, Ontario L6Y 0M1.
Pour les questions de produit :
Service aux consommateurs Sunbeam
États-Unis : 1.800.334.0759
Canada : 1 800 667.8623
www.oster.com/www.oster.ca
© 2025 Sunbeam Products, Inc. Distribué par Sunbeam Products, Inc., du 5
Concourse Parkway, 8th Rd à Atlanta, GA 30328, U.S.A.
Au Canada, importé et distribué par Newell Brands Canada ULC,
20B Hereford Street, Brampton (Ontario) L6Y 0M1.
TSSTTV-CRCMAFBK1_24EFM1 (17L)_GCDS-JC
Printed in Indonesia
Imprimé en Indonésie
TSSTTV-CRCMAFBK1_24EFM1 (17L).indd 40TSSTTV-CRCMAFBK1_24EFM1 (17L).indd 40 2024/4/7 09:282024/4/7 09:28