INSTRUCTION MANUAL
EXTRA LARGE DIGITAL AIR FRY OVEN
www.oster.comP.N. 923155 / NWL0001316233
SAP Number: 2161124
TSSTTV-ELXLDMP1 MODEL
TSSTTV-ELXLDMP1_21EM1.indd 1TSSTTV-ELXLDMP1_21EM1.indd 1 7/29/21 09:337/29/21 09:33
2 3
INTRODUCTION
Congratulations on your purchase of the OSTER® Extra Large Digital Air
Fry Oven! If you require service on your OSTER® Countertop Oven, do
not return to place of purchase. Please contact us at www.oster.com or
1.800.334.0759.
IMPORTANT SAFEGUARDS
When using electrical appliances, basic safety precautions should always be followed
to reduce the risk of re, electric shock, and/or injury to persons including the
following:
1. Read all instructions before using this product.
2. This appliance generates heat during use. Do not touch hot surfaces. Use
handles or knobs. Always protect your hands with non-slip oven mitts or similar.
3. To protect against electric shock, do not place or immerse cord, plugs, or
appliance in water or other liquid.
4. This appliance is not intended for use by children or by persons with reduced
physical, sensory, or mental capabilities, or lack of experience and knowledge.
Close supervision is necessary when any appliance is used near children.
Children should be supervised to ensure that they do not play with the
appliance. Keep the appliance and its cord out of reach of children.
5. Unplug from outlet when not in use, before putting on or taking off parts and
before cleaning. Allow to cool before putting on or taking off parts, and before
cleaning. To disconnect, turn any control to OFF, then unplug power cord from
outlet. Do not disconnect by pulling on cord. Always grasp the plug and pull to
disconnect.
6. Do not operate any appliance with a damaged cord or plug or after the
appliance malfunctions, or has been damaged in any manner. Do not attempt
to replace or splice a damaged cord. Return appliance to the manufacturer (see
warranty) for examination, repair or adjustment.
7. The use of accessory attachments not recommended by the appliance
manufacturer may cause injuries.
8. Do not use outdoors or for commercial purposes.
9. Do not let cord hang over edge of table or counter, or touch hot surfaces.
10. Do not place on or near wet surfaces, or heat sources such as a hot gas or
electric burner, or in a heated oven.
11. Extreme caution must be used when moving an appliance or removing a pan,
containing hot oil or other hot liquids. Always protect your hands with non-slip
oven mitts or similar.
12. Do not use appliance for other than intended use. Misuse can cause injuries.
Intended for household countertop use only. Keep 6 inches (152 mm) clear from
the wall and on all sides. Always use appliance on a dry, stable, level surface.
13. Oversize foods or metal utensils must not be inserted in a toaster-oven as they
may create a re or risk of electric shock.
14. A re may occur if the toaster-oven is covered, touching or near ammable
materials, including curtains, draperies, towels, walls, and the like, when in
operation. Do not store any item on top of the appliance when in operation.
15. Do not clean with metal scouring pads. Pieces can break off the pad and touch
electrical parts, creating a risk of electric shock.
TSSTTV-ELXLDMP1_21EM1.indd 2-3TSSTTV-ELXLDMP1_21EM1.indd 2-3 7/29/21 09:337/29/21 09:33

4 5
IMPORTANT SAFEGUARDS
SAVE THESE INSTRUCTIONS
HOUSEHOLD USE ONLY
POWER CORD INSTRUCTIONS
16. Extreme caution should be exercised when using containers constructed of
materials other than metal or glass.
17. Do not store any materials, other than manufacturers recommended accessories,
in this oven when not in use.
18. Do not place any of the following materials in the oven: paper, cardboard,
plastic, or any materials that may catch re or melt.
19. Do not cover crumb tray or any part of the oven with metal foil. This will cause
overheating of the oven.
20. Empty the crumb tray after each use.
21. The glass door is made of tempered glass. Always inspect the glass door for
chips, cracks or any other damage. Do not use the toaster oven if the glass door
is damaged, as the glass may shatter during use.
22. If your toaster oven is equipped with a STAY-ON feature, toaster oven will stay
ON if knob is turned counter-clockwise past zero. Exercise caution when using
this feature and do not operate unattended for long periods.
23. Do not use with a programmer, timer, wireless plug adapter or outlet that allows
control remotely, or connect to a circuit that is regularly switched on and off by
the utility.
North American models with polarized plugs:
A short power-supply cord or detachable power-supply cord is provided
to reduce risks resulting from becoming entangled in or tripping over a
longer cord. Longer detachable power-supply cords or extension cords
are available and may be used if care is exercised in their use. If a long
detachable power-supply cord or extension cord is used:
a. The marked electrical rating of the cord set or extension cord should be
at least as great as the electrical rating of the appliance;
b. The cord should be arranged so that it will not drape over the
countertop or tabletop where it can be pulled on by children or tripped
over unintentionally; and
c. If the appliance is of the grounded type, the cord set or extension cord
should be a grounding-type 3-wire cord.
Do not pull, twist or otherwise abuse the power cord.
Polarized plug
This appliance has a polarized plug, (one blade
is wider than the other). As a safety feature to
reduce the risk of electrical shock, this plug is
intended to t in a polarized outlet only one
way. If the plug does not t fully in the outlet, reverse the plug. If it still
does not t, contact a qualied electrician. Do not attempt to defeat
this safety feature or modify the plug in any way. If the plug ts loosely
into the AC outlet or if the AC outlet feels warm do not use that outlet.
PRODUCT NOTICES
1. Some countertop and table surfaces are not designed to withstand the
prolonged heat generated by certain appliances. Do not set the heated
unit on a nished wood table. We recommend placing a hot pad or trivet
under your countertop oven to prevent possible damage to the surface.
2. During initial use of this appliance, some slight smoke and/or odor may
be detected. This is normal with many heating appliances and will not
recur after a few uses.
TSSTTV-ELXLDMP1_21EM1.indd 4-5TSSTTV-ELXLDMP1_21EM1.indd 4-5 7/29/21 09:337/29/21 09:33
6 7
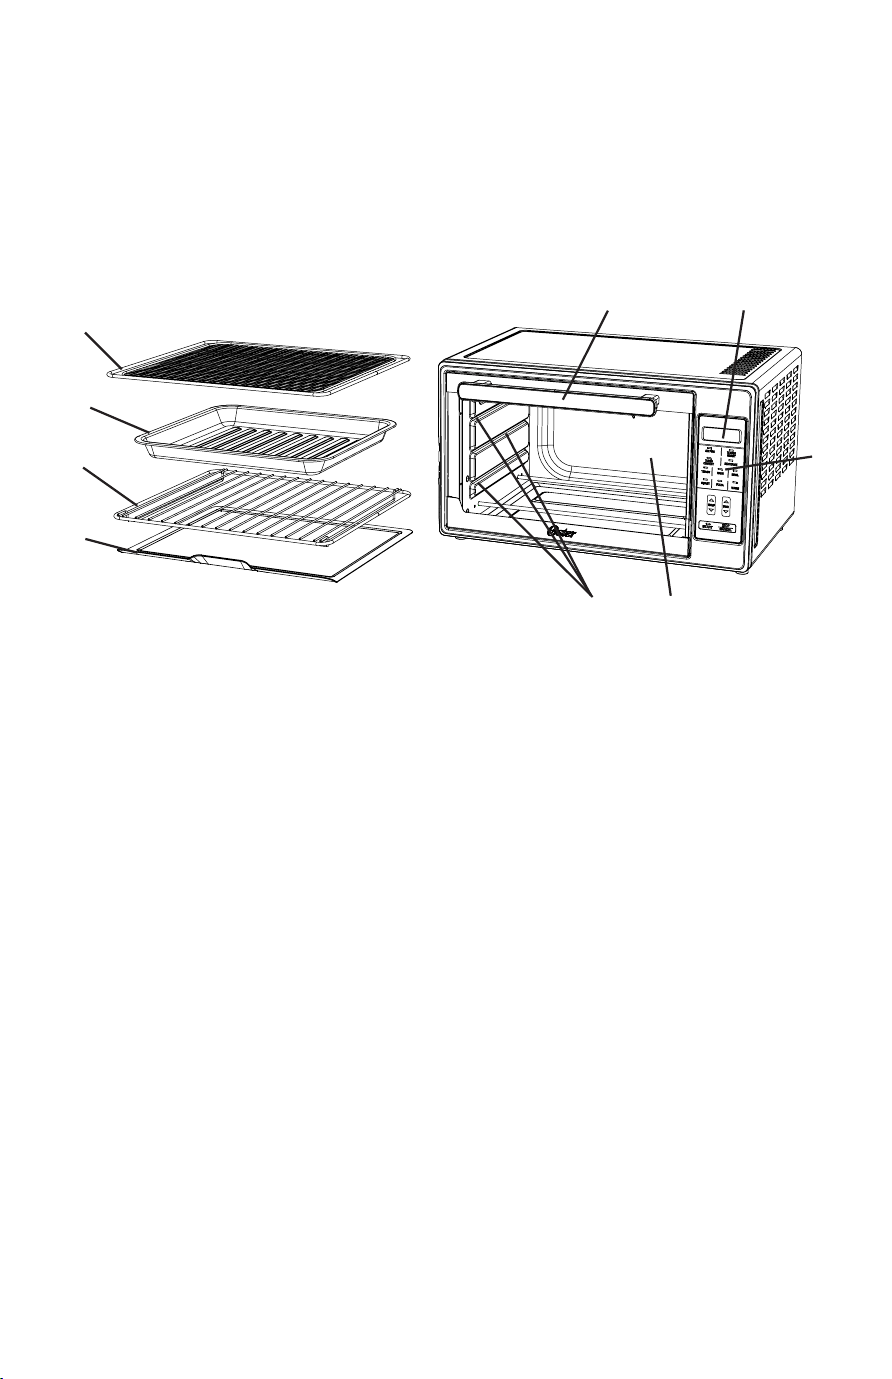
GET TO KNOW YOUR OVEN
1. Air Fry Rack
2. Baking Pan
3. Wire Rack / Broil Rack
4. Crumb Tray / Cookie Sheet
5. Three Rack Positions
6. Glass Door
7. Control Buttons
8. Time Display
9. Handle
NOTE: Accessories included are dependent of model purchased.
GETTING STARTED
Preparing To Use Your Countertop Oven for the
First Time
If you are using your countertop oven for the rst time, please be sure to:
1. Remove any stickers from the surface of the oven.
2. Open oven door and remove all printed documents and paper from
inside the countertop oven.
3. Clean the air fry rack, wire rack, baking pan, and removable crumb tray
with hot water, a small amount of dishwashing liquid and a non-abrasive
sponge or cleaning pad.
CAUTION: DO NOT IMMERSE THE BODY OF THE UNIT IN WATER.
4. Dry the unit thoroughly before using.
5. Select a location for the countertop oven. The location should be in an
open area on a at counter where the plug will reach an outlet.
6. Plug the countertop oven into a 120 Volt AC electrical outlet.
NOTE: It is recommended that the countertop oven heat at 450° for
approximately 15 minutes to eliminate any manufacturing residue that
may remain after shipping.
1
2
3
4
89
7
5 6
TSSTTV-ELXLDMP1_21EM1.indd 6-7TSSTTV-ELXLDMP1_21EM1.indd 6-7 7/29/21 09:337/29/21 09:33

6 7
GET TO KNOW YOUR OVEN
1. Air Fry Rack
2. Baking Pan
3. Wire Rack / Broil Rack
4. Crumb Tray / Cookie Sheet
5. Three Rack Positions
6. Glass Door
7. Control Buttons
8. Time Display
9. Handle
NOTE: Accessories included are dependent of model purchased.
GETTING STARTED
Preparing To Use Your Countertop Oven for the
First Time
If you are using your countertop oven for the rst time, please be sure to:
1. Remove any stickers from the surface of the oven.
2. Open oven door and remove all printed documents and paper from
inside the countertop oven.
3. Clean the air fry rack, wire rack, baking pan, and removable crumb tray
with hot water, a small amount of dishwashing liquid and a non-abrasive
sponge or cleaning pad.
CAUTION: DO NOT IMMERSE THE BODY OF THE UNIT IN WATER.
4. Dry the unit thoroughly before using.
5. Select a location for the countertop oven. The location should be in an
open area on a at counter where the plug will reach an outlet.
6. Plug the countertop oven into a 120 Volt AC electrical outlet.
NOTE: It is recommended that the countertop oven heat at 450° for
approximately 15 minutes to eliminate any manufacturing residue that
may remain after shipping.
1
2
3
4
89
7
5 6
TSSTTV-ELXLDMP1_21EM1.indd 6-7TSSTTV-ELXLDMP1_21EM1.indd 6-7 7/29/21 09:337/29/21 09:33
8 9
OVEN FUNCTIONS OVERVIEW OVEN FUNCTIONS OVERVIEW
Preset Preset
Best For: Best For:
Preheat Preheat
Accessory Accessory
Rack
Position
Rack
Position
Pizza
Air Fry
Roast
Yes
Yes
Yes
Middle
Middle
Bottom
Keep Warm
No
Bottom
Bake
Tender Roast
Toast
Dehydrate
Broil
Turbo Convect
Yes
Yes
No
Yes
No
Yes
Middle
Bottom
Middle
Bottom
Top
Bottom
NOTE: When cooking foods that contain grease, use cooking rack with
baking ban placed in cooking rack’s guard rails.
TSSTTV-ELXLDMP1_21EM1.indd 8-9TSSTTV-ELXLDMP1_21EM1.indd 8-9 7/29/21 09:337/29/21 09:33
10 11
To Use the Bake, Air Fry, Broil, Roast, Pizza,
Dehydrate, Turbo Convect or Keep Warm Functions
1. Select desired oven rack position. (See “Oven Functions Overview”
Section).
2. Arrange food on the Wire Rack, Air Fry Rack, Baking Pan, or in the
Cookie Sheet.
NOTE: When air frying foods with high amounts of fat or grease, it is
recommended to place the Wire Rack, with Baking Pan on top, in the
bottom rack position to catch drippings during the cooking cycle.
3. Select the desired cooking function.
4. Use the temperature arrow keys to select desired temperature and the
time arrow keys to select desired time.
5. Select the Start button.
When cooking is completed, open door fully and remove food carefully.
WARNING: Cooked food can be very hot. Handle with care. Do not leave
countertop oven unattended.
To Use the Toast Function
1. Place Wire Rack into the middle rack position before heating the oven.
NOTE: Different types of bread require different settings. Lighter breads
and wafes require a lighter setting. Darker breads, mufns, and English
mufns require a darker setting.
2. Select the Toast button.
3. Use the time arrows to select the Toast Shade.
4. Press the Start button.
When toasting is completed, open door fully and remove food carefully.
WARNING: Cooked food can be very hot. Handle with care. Do not leave
countertop oven unattended.
USING YOUR OVEN
To Preheat the Oven
1. Place oven rack into the desired position before heating the oven.
2. Select desired cooking function.
3. Use the temp arrow keys to select the desired temperature.
4. Use the timer arrow keys to select the desired time.
5. Select the start button.
NOTE: While preheating, the display will show PrE. When the oven
reaches the desired temperature, it will beep. Press the start button to
begin the cooking process.
This oven has a preheat feature in Bake, Air Fry, Turbo Convect, Pizza, and
Roast. To bypass the preheat function press the start button a second time.
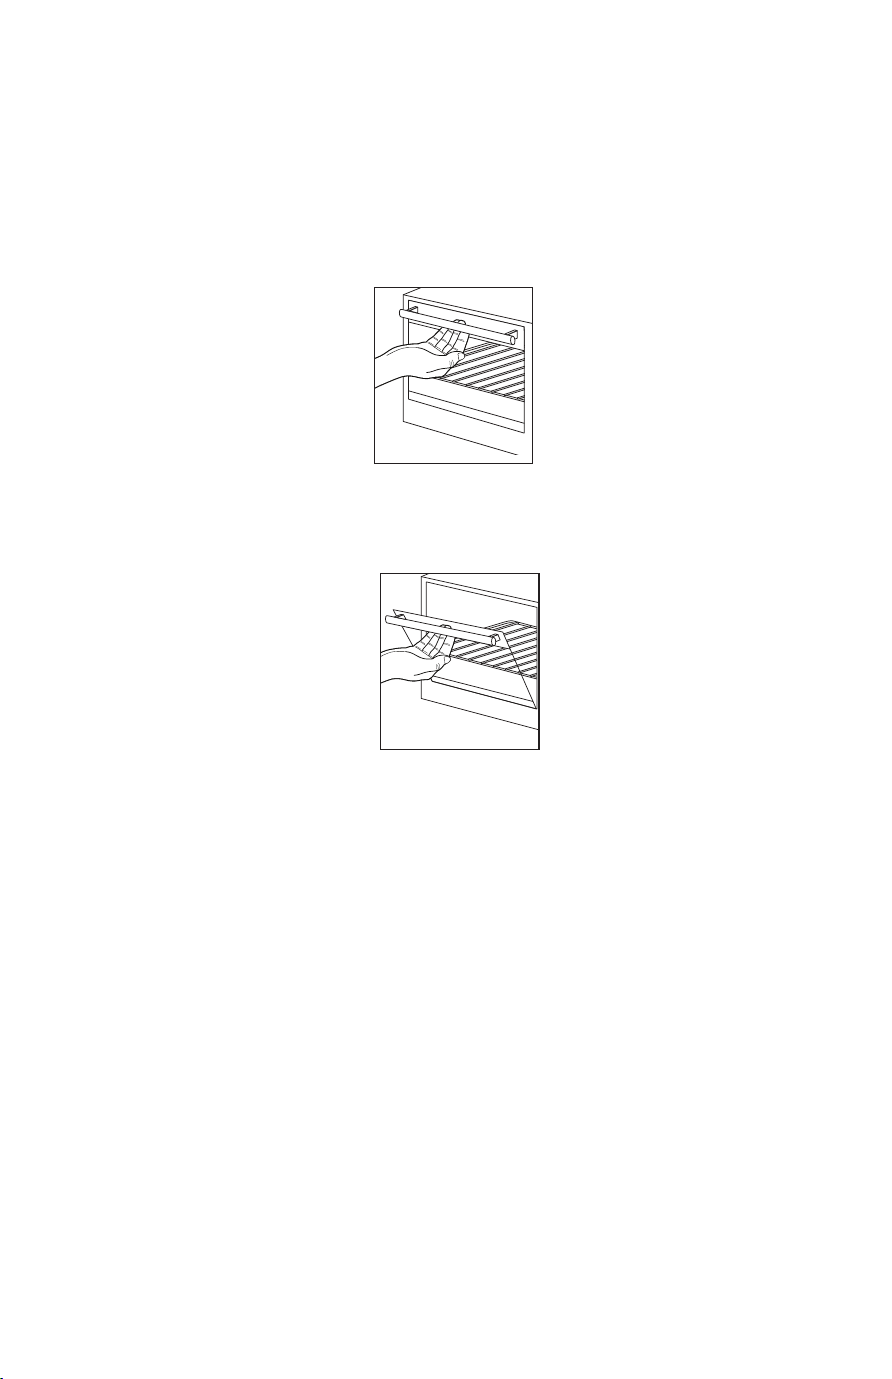
To Open the Oven Door:
Step 1: Grab the center of the handle underhanded with ngertips (See
Figure 1).
Step 2: Pull down the oven door carefully (See Figure 2).
CAUTION: This appliance generates heat during use. Do not touch hot
surfaces. Always use handles or knobs per above instructions.
Figure 1
Figure 2
TSSTTV-ELXLDMP1_21EM1.indd 10-11TSSTTV-ELXLDMP1_21EM1.indd 10-11 7/29/21 09:337/29/21 09:33

10 11
To Use the Bake, Air Fry, Broil, Roast, Pizza,
Dehydrate, Turbo Convect or Keep Warm Functions
1. Select desired oven rack position. (See “Oven Functions Overview”
Section).
2. Arrange food on the Wire Rack, Air Fry Rack, Baking Pan, or in the
Cookie Sheet.
NOTE: When air frying foods with high amounts of fat or grease, it is
recommended to place the Wire Rack, with Baking Pan on top, in the
bottom rack position to catch drippings during the cooking cycle.
3. Select the desired cooking function.
4. Use the temperature arrow keys to select desired temperature and the
time arrow keys to select desired time.
5. Select the Start button.
When cooking is completed, open door fully and remove food carefully.
WARNING: Cooked food can be very hot. Handle with care. Do not leave
countertop oven unattended.
To Use the Toast Function
1. Place Wire Rack into the middle rack position before heating the oven.
NOTE: Different types of bread require different settings. Lighter breads
and wafes require a lighter setting. Darker breads, mufns, and English
mufns require a darker setting.
2. Select the Toast button.
3. Use the time arrows to select the Toast Shade.
4. Press the Start button.
When toasting is completed, open door fully and remove food carefully.
WARNING: Cooked food can be very hot. Handle with care. Do not leave
countertop oven unattended.
USING YOUR OVEN
To Preheat the Oven
1. Place oven rack into the desired position before heating the oven.
2. Select desired cooking function.
3. Use the temp arrow keys to select the desired temperature.
4. Use the timer arrow keys to select the desired time.
5. Select the start button.
NOTE: While preheating, the display will show PrE. When the oven
reaches the desired temperature, it will beep. Press the start button to
begin the cooking process.
This oven has a preheat feature in Bake, Air Fry, Turbo Convect, Pizza, and
Roast. To bypass the preheat function press the start button a second time.
To Open the Oven Door:
Step 1: Grab the center of the handle underhanded with ngertips (See
Figure 1).
Step 2: Pull down the oven door carefully (See Figure 2).
CAUTION: This appliance generates heat during use. Do not touch hot
surfaces. Always use handles or knobs per above instructions.
Figure 1
Figure 2
TSSTTV-ELXLDMP1_21EM1.indd 10-11TSSTTV-ELXLDMP1_21EM1.indd 10-11 7/29/21 09:337/29/21 09:33

12 13
To Use the Tender Roast Function
This function is best for slow roasting poultry, meat, pork and seafood for
juicy, tender results.
1. Place Baking Pan in the bottom rack position.
NOTE: For maximum tender and juicy results, tightly wrap food in
1-2 layers of aluminum foil, and pour 1-2 tbsp of water/broth into the
bottom of the foil. This will increase tenderness and help food lock-in
moisture.
2. Press Tender Roast Button
3. Set the time and temperature using the time and temperature arrow
buttons. For best results, reference the Tender Roast Cooking Chart for
time and temperature recommendations.
NOTE: For more even cooking on larger cuts of protein, ip food
halfway through the cooking cycle.
4. Press the Start button to begin the preheating and cooking cycle.
5. At the end of the cooking cycle, the oven will beep and turn off
automatically. For a crispy nish after using Tender Roast, move the
Baking Pan to the top rack position and switch to the Broil function
for 5-10 minutes until your desired nish is reached. When cooking is
completed, open door fully and remove food carefully.
NOTE: The top and bottom heating elements will cycle ON and OFF to
maintain the desired temperature.
WARNING: Cooked food can be very hot. Handle with care. Do not
leave counter top oven unattended.
TENDER ROAST FUNCTION COOKING CHART
NOTE: Cook times are estimates and may vary based on food type and preparation.
Food Weight Function Temperature (°F) Time Foil Wrapped?
Beef
Chuck Roast 3.5 lbs Tender Roast 250 degrees 8-9 hours Yes
Brisket 2.5 lbs Tender Roast 250 degrees 7-8 hours Yes
Short Ribs 2 lbs Tender Roast 250 degrees 4 hours Yes
Corned Beef 4 lbs Tender Roast 250 degrees 6 hours Yes
Pork
Pork Shoulder 5 lbs Tender Roast 250 degrees 7 hours Yes
Pork Tenderloin 3.5 lbs Tender Roast 250 degrees 2.5-3 hours Yes
Pork Chops 1.5 lbs Tender Roast 250 degrees 5-6 hours Yes
Baby Back Ribs 3 lbs Tender Roast 250 degrees 4 hours Yes
Seafood
Fish (Whole Fillet) 3 lbs Tender Roast 275 degrees 40 min No
Chicken
Whole Chicken 6 lbs Tender Roast 250 degrees 5 hours No
Boneless Chicken Breast 2 lbs Tender Roast 250 degrees 4 hours Yes
Bone-In Chicken Breast 2.5 lbs Tender Roast 250 degrees 4 hours Yes
Boneless Chicken Thighs 2 lbs Tender Roast 250 degrees 4 hours Yes
Bone-In Chicken Thighs 2.5 lbs Tender Roast 250 degrees 4 hours Yes
TSSTTV-ELXLDMP1_21EM1.indd 12-13TSSTTV-ELXLDMP1_21EM1.indd 12-13 7/29/21 09:337/29/21 09:33

14 15
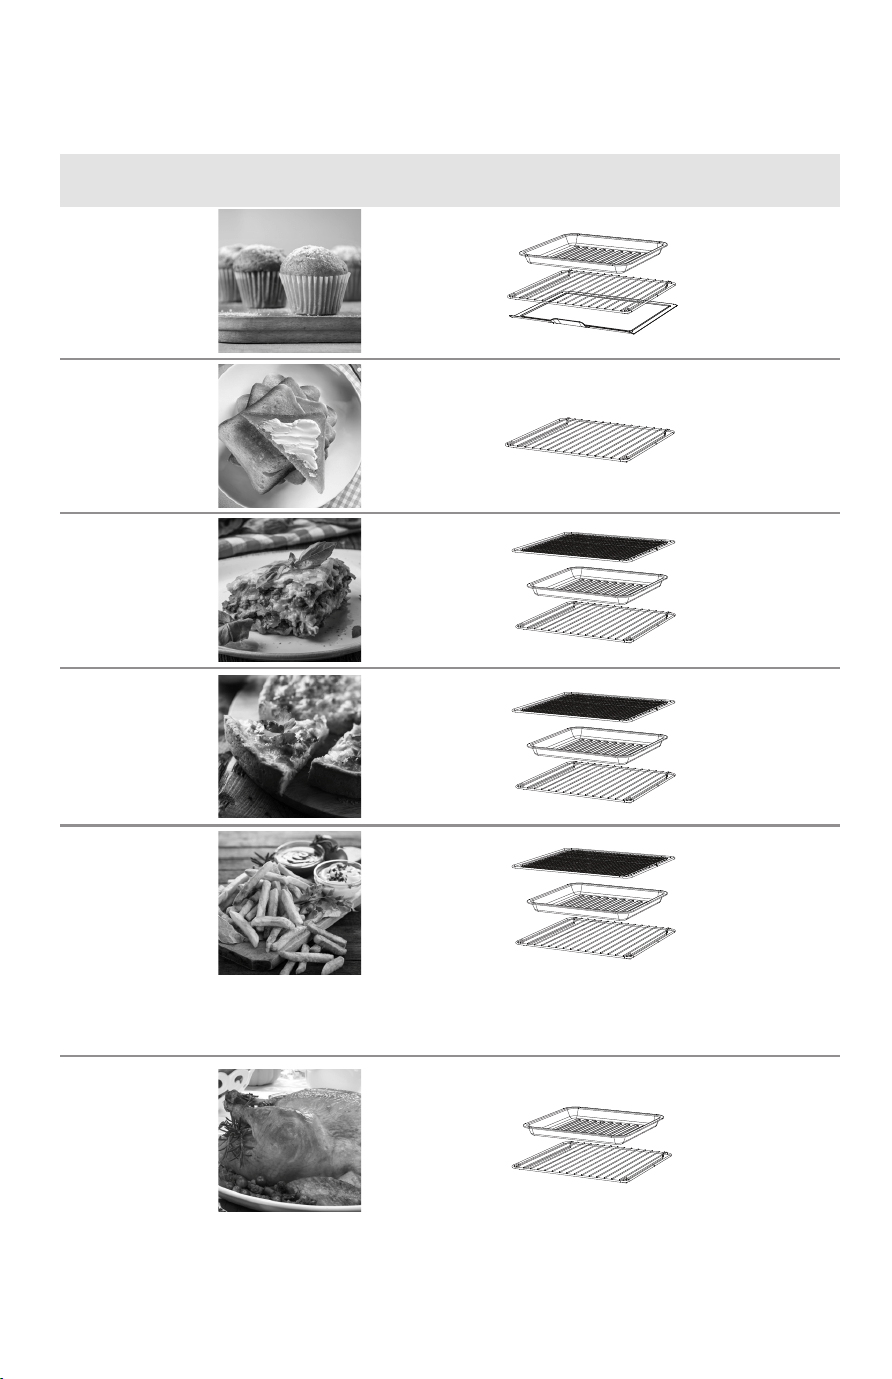
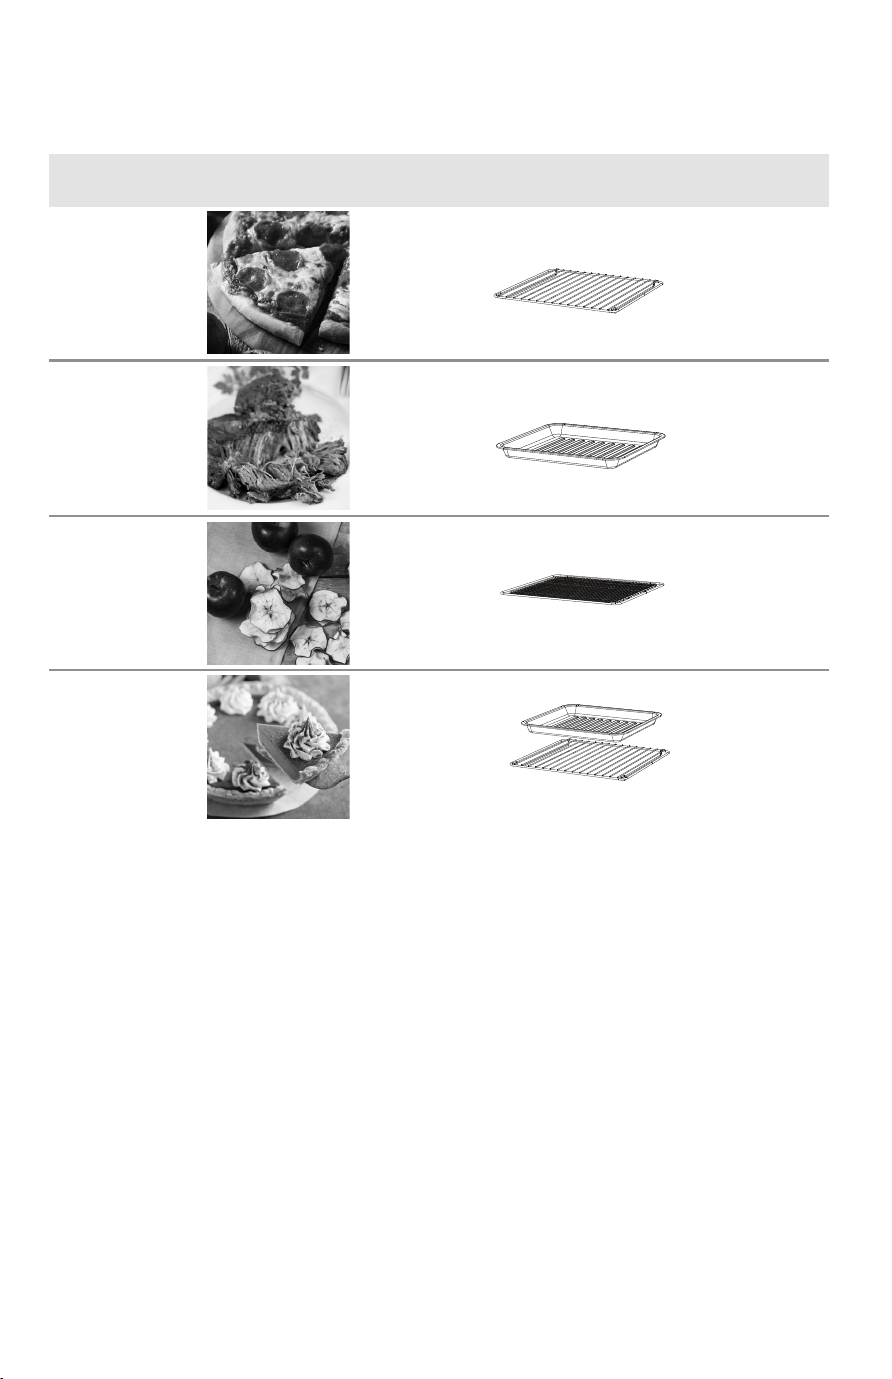
POSITIONING
Pan
Position
Baking pan on top of
the wire rack
Baking pan in guide rails
below wire rack
The baking pan can be placed on top of the rack or inserted
into the guide rails below the rack.
Before removing the baking pan allow the unit to cool.
Positioning of the baking pan will depend on the desired
cooking method. For baking, place the baking pan on top of
one of the racks. For broiling, insert the baking pan into the
guide rails below the rack and place the food on top of the
rack.
PLEASE NOTE: Do not use the baking pan under the wire
rack in the lower position.
AIR FRY CHART
Food Weight Function Temperature
(°F)
Time Oil?
Potatoes
Hand-Cut Fries 2 lbs AIR FRY 425 degrees 20-22 min Yes
Hand-Cut Sweet Potato Fries 2 lbs AIR FRY 425 degrees 19-21 min Yes
Frozen Fries (Thick Cut) 1.5 lbs AIR FRY 450 degrees 10-13 min No
Frozen Fries (Thin Cut) 1.5 lbs AIR FRY 450 degrees 10-12 min No
Meat/Poultry/Seafood
Chicken Wings 2 lbs AIR FRY 400 degrees 35 min No
Chicken Breast Cutlet 2.5 lbs AIR FRY 450 degrees 27-30 min Yes
Chicken Tenderloin 1.5 lbs AIR FRY 400 degrees 25-30 min Yes
Hamburger 1.5 lbs AIR FRY 450 degrees 18-22 min No
Pork Chops 4 lbs AIR FRY 450 degrees 20-25 min Yes
Breaded Fish 1 lb AIR FRY 425 degrees 18-22 min Yes
Frozen Snacks
Frozen Chicken Nuggets 1.5 lbs AIR FRY 450 degrees 15-18 min No
Frozen Chicken Fingers 1.5 lbs AIR FRY 425 degrees 18-20 min No
Frozen Mozzarella Sticks 1.5 lbs AIR FRY 425 degrees 8-10 min No
Frozen Onion Rings 1 lb AIR FRY 425 degrees 7-8 min No
Frozen Mixed Vegetables 1.5 lbs AIR FRY 450 degrees 35-40 min Yes
Fresh Vegetables
Broccoli 2 lbs AIR FRY 425 degrees 18-24 min Yes
Asparagus 2 lbs AIR FRY 425 degrees 18-24 min Yes
Brussels Sprouts 2 lbs AIR FRY 425 degrees 20-25 min Yes
Carrots 1 lb AIR FRY 400 degrees 20-25 min Yes
*Cook times are estimates and may vary based on food type and preparation.
Note: Not all foods will benet from being tossed in oil prior to being air
fried. Frozen foods and foods with a high fat content such as chicken wings
or bacon do not require oil. To achieve crispy and browned results on foods
such as hand-cut fries or vegetables, evenly coat food with about one
tablespoon of oil.
TSSTTV-ELXLDMP1_21EM1.indd 14-15TSSTTV-ELXLDMP1_21EM1.indd 14-15 7/29/21 09:337/29/21 09:33

14 15
POSITIONING
Pan
Position
Baking pan on top of
the wire rack
Baking pan in guide rails
below wire rack
The baking pan can be placed on top of the rack or inserted
into the guide rails below the rack.
Before removing the baking pan allow the unit to cool.
Positioning of the baking pan will depend on the desired
cooking method. For baking, place the baking pan on top of
one of the racks. For broiling, insert the baking pan into the
guide rails below the rack and place the food on top of the
rack.
PLEASE NOTE: Do not use the baking pan under the wire
rack in the lower position.
AIR FRY CHART
Food Weight Function Temperature
(°F)
Time Oil?
Potatoes
Hand-Cut Fries 2 lbs AIR FRY 425 degrees 20-22 min Yes
Hand-Cut Sweet Potato Fries 2 lbs AIR FRY 425 degrees 19-21 min Yes
Frozen Fries (Thick Cut) 1.5 lbs AIR FRY 450 degrees 10-13 min No
Frozen Fries (Thin Cut) 1.5 lbs AIR FRY 450 degrees 10-12 min No
Meat/Poultry/Seafood
Chicken Wings 2 lbs AIR FRY 400 degrees 35 min No
Chicken Breast Cutlet 2.5 lbs AIR FRY 450 degrees 27-30 min Yes
Chicken Tenderloin 1.5 lbs AIR FRY 400 degrees 25-30 min Yes
Hamburger 1.5 lbs AIR FRY 450 degrees 18-22 min No
Pork Chops 4 lbs AIR FRY 450 degrees 20-25 min Yes
Breaded Fish 1 lb AIR FRY 425 degrees 18-22 min Yes
Frozen Snacks
Frozen Chicken Nuggets 1.5 lbs AIR FRY 450 degrees 15-18 min No
Frozen Chicken Fingers 1.5 lbs AIR FRY 425 degrees 18-20 min No
Frozen Mozzarella Sticks 1.5 lbs AIR FRY 425 degrees 8-10 min No
Frozen Onion Rings 1 lb AIR FRY 425 degrees 7-8 min No
Frozen Mixed Vegetables 1.5 lbs AIR FRY 450 degrees 35-40 min Yes
Fresh Vegetables
Broccoli 2 lbs AIR FRY 425 degrees 18-24 min Yes
Asparagus 2 lbs AIR FRY 425 degrees 18-24 min Yes
Brussels Sprouts 2 lbs AIR FRY 425 degrees 20-25 min Yes
Carrots 1 lb AIR FRY 400 degrees 20-25 min Yes
*Cook times are estimates and may vary based on food type and preparation.
Note: Not all foods will benet from being tossed in oil prior to being air
fried. Frozen foods and foods with a high fat content such as chicken wings
or bacon do not require oil. To achieve crispy and browned results on foods
such as hand-cut fries or vegetables, evenly coat food with about one
tablespoon of oil.
TSSTTV-ELXLDMP1_21EM1.indd 14-15TSSTTV-ELXLDMP1_21EM1.indd 14-15 7/29/21 09:337/29/21 09:33

16 17
HELPFUL TIPS / TROUBLESHOOTING
Problem Potential Cause Solution
• Overcooked /
Undercooked Foods
• Incorrect
temperature or time
setting
• Rack placement
• You may have to adjust the
time and temperature to
desired taste.
• Because your countertop oven
is smaller than your regular
oven, it will heat up faster
and generally cook in shorter
periods of time.
• Refer to “Oven Functions
Overview” section, page 8.
Rack may need to be adjusted
to accommodate food type.
• Burnt Smell • Food build-up
inside oven, on
heating elements or
in crumb tray.
• Refer to “Cleaning you
Countertop Oven” Section,
page 13.
• Oven does not turn
ON
• Unit is unplugged
• Did not press start.
• Plug the countertop oven into
a 120-volt AC electrical outlet.
• Set timer and temperature
to desired setting. Both must
be turned on to operate the
countertop oven.
• Press Start.
• Only one heating
element is heating
up
• Function setting
selection
determines which
heating element
will operate.
• When toasting, make sure the
oven is not set to broil setting.
• Heating elements do
not stay ON
• Heating elements
will cycle ON and
OFF to maintain
proper heat.
• Be certain that function is as
desired.
• Heating elements may not
glow.
• Cannot change
function button
• Need to cancel
function.
• Press cancel.
CARE AND CLEANING
Cleaning Your Countertop Oven
Before cleaning your OSTER® Countertop Oven, unplug it and allow it to
cool. To clean, wipe with damp cloth.
CAUTION: DO NOT IMMERSE IN WATER!
Make sure to use only mild, soapy water. Clean the air fry rack, baking pan,
wire rack, and removable crumb tray with hot water, a small amount of
dishwashing liquid and a non-abrasive sponge or cleaning pad. Abrasive
cleaners, scrubbing brushes and chemical cleaners will damage the coating
on this unit. Empty crumb tray frequently to avoid accumulation of crumbs.
This appliance has no user serviceable parts. Any servicing beyond that
described in the Cleaning Section should be performed by an Authorized
Service Representative only. See Warranty Section.
Storing Your Countertop Oven
Allow the appliance to cool completely before storing. If storing the
countertop oven for long periods of time make certain that the countertop
oven is clean and free of food particles. Store the countertop oven in a dry
location such as on a table or countertop or cupboard shelf. Other than the
recommended cleaning, no further user maintenance should be necessary.
TSSTTV-ELXLDMP1_21EM1.indd 16-17TSSTTV-ELXLDMP1_21EM1.indd 16-17 7/29/21 09:337/29/21 09:33

18
Some provinces, states or jurisdictions do not allow the exclusion or limitation
of incidental or consequential damages or limitations on how long an implied
guarantee lasts, so the above limitations or exclusion may not apply to you.
This guarantee gives you specic legal rights, and you may also have other
rights that vary from province to province, state to state or jurisdiction to
jurisdiction.
How to Obtain Satisfaction Guarantee Service
In the U.S.A. If you have any question regarding this guarantee or would like
to obtain guarantee service, please call 1-800-334-0759 and a convenient
service center address will be provided to you.
In the U.S.A., this guarantee is offered by Sunbeam Products, Inc., located
in Boca Raton, Florida 33431. If you have any other problem or claim
in connection with this product, please write to the Consumer Service
Department.
PLEASE DO NOT RETURN THIS PRODUCT TO ANY OF THESE ADDRESSES
OR TO THE PLACE OF PURCHASE.
1 YEAR SATISFACTION GUARANTEED
Sunbeam Products, Inc., (collectively “Sunbeam”) warrants that for a period of
one year from the date of purchase, this product will be free from defects in
material and workmanship. Sunbeam, at its option, will repair or replace this
product or any component of the product found to be defective during the
guarantee period. Replacement will be made with a new or remanufactured
product or component. If the product is no longer available, replacement
may be made with a similar product of equal or greater value. This is your
exclusive guarantee. Do NOT attempt to repair or adjust any electrical or
mechanical functions on this product. Doing so will void this guarantee. This
guarantee is valid for the original retail purchaser from the date of initial retail
purchase and is not transferable. Keep the original sales receipt. Proof of
purchase is required to obtain satisfaction guarantee performance. Sunbeam
dealers, service centers, or retail stores selling Sunbeam products do not
have the right to alter, modify or any way change the terms and conditions of
this guarantee.
This guarantee does not cover damage resulting from any of the following:
negligent use or misuse of the product, use on improper voltage or current,
use contrary to the operating instructions, disassembly, repair or alteration
by anyone other than Sunbeam or an authorized Sunbeam service center.
Further, the guarantee does not cover: Acts of God, such as re, ood,
hurricanes and tornadoes.
What are the limits on Sunbeam’s Liability?
Sunbeam shall not be liable for any incidental or consequential damages
caused by the breach of any express, implied or statutory guarantee or
condition. Except to the extent prohibited by applicable law, any implied
guarantee or condition of merchantability or tness for a particular purpose
is limited in duration to the duration of the above guarantee. Sunbeam
disclaims all other guarantees, conditions or representations, express,
implied, statutory or otherwise. Sunbeam shall not be liable for any damages
of any kind resulting from the purchase, use or misuse of, or inability to use
the product including incidental, special, consequential or similar damages
or loss of prots, or for any breach of contract, fundamental or otherwise, or
for any claim brought against purchaser by any other party.
TSSTTV-ELXLDMP1_21EM1.indd 18-19TSSTTV-ELXLDMP1_21EM1.indd 18-19 7/29/21 09:337/29/21 09:33

20 21
Raspberry Baked Brie
Prep Time: 10 minutes
Cook Time: 25 minutes
Servings: 5
Ingredients
1 sheet thawed puff pastry
1 wheel Brie cheese
¹/3 cup raspberry preserves
1 egg
Instructions
1. Using a rolling pin, roll out the puff pastry at. Place the brie round in the
middle of the puff pastry.
2. Add the raspberry preserves to the top of the brie.
3. Gently fold the puff pastry corners over the brie towards the center to
create a pinched seal.
4. In a small bowl, beat egg along with 2 tbsp water. Using a pastry brush,
coat the outside of the puff pastry.
5. Wipe away any egg collected under the brie on the baking pan.
6. Set Oven to Bake at 400 degrees for 25 minutes. Once preheated, place
brie on baking pan in top rack position.
7. When nished cooking, remove from oven. Allow to cool for ve minutes
before serving.
RECIPES
Balsamic Air Fried Brussels Sprouts
Prep Time: 10 minutes
Cook Time: 20 minutes
Servings: 2
Ingredients
12 oz Brussels sprouts, halved
4 ounces bacon, ¼ inch diced
¼ cup olive oil
¼ teaspoon pepper
¼ teaspoon salt
1 tablespoon balsamic glaze
Instructions
1. Place the Brussels sprouts on the Air Fry rack. Add the bacon, olive oil,
salt and pepper. Then, toss and spread out in a single layer.
2. Set Oven to Air Fry at 450 degrees for 20 minutes. Once preheated, place
Air Fry rack in top rack position, with the baking pan as a drip tray in the
bottom rack position.
3. When nished cooking, remove from oven, and drizzle immediately with
balsamic glaze. Serve hot.
RECIPES
TSSTTV-ELXLDMP1_21EM1.indd 20-21TSSTTV-ELXLDMP1_21EM1.indd 20-21 7/29/21 09:337/29/21 09:33

22 23
BBQ Pulled Pork
Prep Time: 10 minutes
Cook Time: 7 hours
Servings: 6
Ingredients
5 lbs pork shoulder
1 cup brown sugar
2 tbsp paprika
2 tbsp chili powder
1 tbsp garlic powder
1 tbsp onion powder
1 tbsp cumin
1 tsp salt
1 tsp pepper
1 cup BBQ sauce
Instructions
1. Combine brown sugar, paprika, chili powder, garlic powder, onion
powder, cumin, salt, and pepper in a small bowl. Rub liberally on all sides
of pork shoulder.
2. Tightly wrap pork shoulder in 2 layers of aluminum foil.
3. Set Oven to Tender Roast at 250 degrees, for 7 hours. Once preheated,
place covered pork shoulder on baking pan in bottom rack position.
4. When nished cooking, remove from oven, and pull using a fork. Once
pulled, add BBQ sauce, and mix throughout.
5. Optional: For a crisp nish, set oven to Broil at 450 degrees for 5 minutes
and place pulled pork in top rack position until desired nish is reached.
RECIPES
Lemon Dill Salmon
Prep Time: 10 minutes
Cook Time: 40 minutes
Servings: 4
Ingredients
3 lbs fresh salmon
3 tbsp olive oil
2 tsp lemon zest
1 tsp salt
½ cup sour cream
1 tbsp lemon juice
2 tsp fresh dill, chopped
Instructions
1. Place salmon on baking pan, skin side down.
2. In a small bowl, mix olive oil, lemon zest, and salt. Brush mixture over
salmon.
3. Set Oven to Tender Roast at 275 degrees for 40 minutes. Once
preheated, place baking pan in the bottom rack position.
4. As salmon is cooking, mix sour cream, lemon juice, and dill in a small
bowl.
5. When nished cooking, remove from oven and top with sauce.
RECIPES
TSSTTV-ELXLDMP1_21EM1.indd 22-23TSSTTV-ELXLDMP1_21EM1.indd 22-23 7/29/21 09:337/29/21 09:33

24 25
Coconut Chicken Tenders
Prep Time: 15 minutes
Cook Time: 20 minutes
Servings: 4
Ingredients
1 lb chicken tenderloin
3 cups sweetened shredded coconut
2 tbsp olive oil
2 eggs
½ tsp salt
¼ cup all-purpose our
Instructions
1. Mix shredded coconut with olive oil in a small bowl. In another bowl,
whisk eggs until well beaten.
2. Coat chicken evenly with our, then dip in egg, followed by coconut.
Press the coconut mixture onto chicken evenly. Top each tenderloin with
salt.
3. Set Oven to Air Fry at 450 degrees, for 20 minutes. Once preheated,
place chicken tenders on Air Fry rack in the top rack position, and baking
pan in bottom rack position for use as a drip tray.
4. When chicken tenders are nished cooking, remove from oven. Serve
warm with your choice of dipping sauce.
RECIPES
Crispy Garlic Chicken Wings
Prep Time: 10 minutes
Cook Time: 30 minutes
Servings: 4
Ingredients
1 lb chicken wings, separated
2 tsp baking powder
1 tsp salt
3 tbsp olive oil
2 tbsp garlic, minced
1 tsp oregano
1 tsp basil
1 tbsp parsley
1 tsp salt
1 tsp pepper
Instructions
1. Pat chicken wings dry and place in large mixing bowl.
2. Stir in baking powder, salt, and pepper. Mix until chicken wings are
thoroughly coated.
3. Set Oven to Air Fry at 450 degrees, for 30 minutes. Once preheated,
place chicken wings on Air Fry rack in the top rack position, and baking
pan in bottom rack position for use as a drip tray.
4. While the chicken wings are air frying, heat olive oil, garlic, oregano, basil,
and parsley in pan for 30-40 seconds until fragrant.
5. When chicken wings are nished cooking, remove from oven and coat
completely with garlic sauce.
RECIPES
TSSTTV-ELXLDMP1_21EM1.indd 24-25TSSTTV-ELXLDMP1_21EM1.indd 24-25 7/29/21 09:337/29/21 09:33

26 27
Chipotle Mayo Cheddar Burger
Prep Time: 10 minutes
Cook Time: 20 minutes
Servings: 4
Ingredients
1 ½ lbs ground beef
½ tsp salt
½ tsp pepper
½ tsp onion powder
½ tsp garlic powder
1 cup mayonnaise
1 tbsp lime juice
2 tsp chipotle chili powder
1 package sliced cheddar cheese
Brioche hamburger buns
Instructions
1. In a small bowl, mix ground beef, salt, pepper, onion powder, and garlic
powder.
2. Form 4-6 patties, depending on desired thickness.
3. Set Oven to Air Fry at 450 degrees, for 18-25 minutes. Once preheated,
place burgers on Air Fry rack in the top rack position, and baking pan in
bottom rack position for use as a drip tray.
4. As the burgers are cooking, prepare the chipotle mayo sauce. In a small
bowl, mix mayonnaise, lime juice, and chipotle chili powder until smooth.
5. When burgers are nished cooking, remove from oven, and top with
cheddar cheese slices. Finish with a dollop of chipotle mayo and serve on
brioche bun.
RECIPES
Crispy Lemon-Roasted Broccoli and Feta
Prep Time: 5 minutes
Cook Time: 20 minutes
Servings: 4
Ingredients
1 ½ lbs broccoli orets
5 tbsp olive oil
1 tsp red pepper akes
1 lemon, juiced and zested
½ cup feta cheese
1 tsp salt
Instructions
1. Cut broccoli orets into small halves.
2. In a small bowl, mix broccoli orets with olive oil and salt.
3. Set Oven to Air Fry at 425 degrees, for 20 minutes. Once preheated,
place broccoli on Air Fry rack in the top rack position, and baking pan in
bottom rack position for use as a drip tray.
4. When broccoli is nished cooking, remove from oven.
5. Sprinkle broccoli with red pepper akes, then add zest and lemon juice.
6. Finish with a sprinkle of feta cheese on top.
RECIPES
TSSTTV-ELXLDMP1_21EM1.indd 26-27TSSTTV-ELXLDMP1_21EM1.indd 26-27 7/29/21 09:337/29/21 09:33

For product questions contact: Sunbeam Consumer Service
USA: 1.800.334.0759 - www.oster.com
© 2021 Sunbeam Products, Inc. All rights reserved. Distributed by Sunbeam Products, Inc., Boca
Raton, Florida 33431. Printed in China.
TSSTTV-ELXLDMP1_21EM1 GCDS-OST-JC
TSSTTV-ELXLDMP1_21EM1.indd 28TSSTTV-ELXLDMP1_21EM1.indd 28 7/29/21 09:337/29/21 09:33