Documents: Go to download!
- Owner's manual - (English)
- TV Control Switch & Operation (Optional)
- Using Main TV Menu
- Remote Control
- Remote Control- 2 (Optional)
- Connections
- General TV Operation
- Troubleshooting & Tips
Table of contents
TV Control Switch & Operation (Optional)
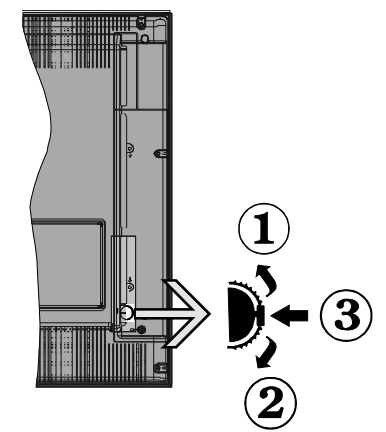
- Up direction
- Down direction
- Volume / Info / Sources List selection and Standby-On switch The Control switch allows you to control the Volume / Programme / Source and Standby-On functions of the TV.
To change volume: Increase the volume by pushing the switch up. Decrease the volume by pushing the switch down.
To change channel: Press the middle of the switch in, the information banner will appear on the screen. Scroll through the stored channels by pushing the switch up or down.
To change source: Press the middle of the switch in twice(for the second time in total), the source list will appear on the screen. Scroll through the available sources by pushing the switch up or down.
To turn the TV off: Press the middle of the switch in and hold it down for a few seconds, the TV will turn into standby mode.
To turn on the TV: Press the middle of the switch in, the TV will turn on.
Notes: If you turn the TV off, this cycle starts again beginning with the volume setting. Main menu OSD cannot be displayed via control switch.
Operation with the Remote Control
Press the Menu button on your remote control to display main menu. Use the directional buttons and OK button to navigate and set. Press Return/Back or Menu button to quit a menu screen.
Input Selection
Once you have connected external systems to your TV, you can switch to different input sources. Press the Source button on your remote control consecutively to select the different sources.
Changing Channels and Volume
You can change the channel and adjust the volume by using the Programme +/- and Volume +/- buttons on the remote.
Forced Standby
If your TV stops responding to commands, you can perform forced standby which will terminate the process. In order to do this, press and hold the Standby button on remote controller for about 5 seconds.
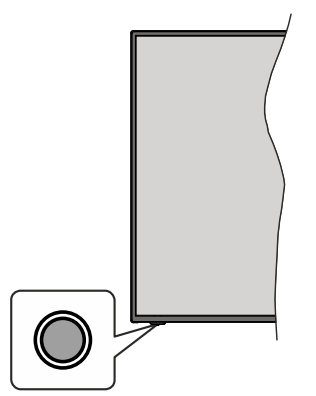
Note: The position of the control button may differ depending on the model.
Your TV has a single control button. This button allows you to control the Standby-On / Source / Programme and Volume functions of the TV.
Operating with the Control Button
- Press the control button to display the function options menu.
- Then press the button consecutively to move the focus to the desired option if needed.
- Press and hold the button for about 2 seconds to activate the selected option. The icon colour of the option changes when activated.
- Press the button once again to use the function or enter the sub menu.
- To select another function option, you will need to deactivate the last activated option first. Press and hold the button to deactivate it. The icon colour of the option changes when deactivated.
- To close the function options menu do not press the button for a period of about 5 seconds. The function options menu will disappear.
To turn the TV off: Press the control button to display the function options menu, the focus will be on the Standby option. Press and hold the button for about 2 seconds to activate this option. The icon colour of the option changes when activated. The TV will turn off when the button is released.
To turn on the TV: Press the control button, the TV will turn on.
To change volume: Press the control button to display the function options menu and then press the button consecutively to move the focus to Volume + or Volume - option. Press and hold the button for about 2 seconds to activate the selected option. The icon colour of the option changes when activated. Then press the button to increase or decrease the volume.
To change channel: Press the control button to display the function options menu and then press the button consecutively to move the focus to Programme + or Programme - option. Press and hold the button for about 2 seconds to activate the selected option. The icon colour of the option changes when activated. Then press the button to switch to the next or previous channel in the channel list.
To change source: Press the control button to display the function options menu and then press the button consecutively to move the focus to Source option. Press and hold the button for about 2 seconds to activate this option. The icon colour of the option changes when activated. The sources list will be displayed when the button is released. Scroll through the available sources by pressing the button. TV will automatically switch to the highlighted source.
Note: Main menu OSD cannot be displayed via the control button.
Operation with the Remote Control
Press the Menu button on your remote control to display main menu. Use the directional buttons and OK button to navigate and set. Press Return/Back or Menu button to quit a menu screen.
Input Selection
Once you have connected external systems to your TV, you can switch to different input sources. Press the Source button on your remote control consecutively to select the different sources.
Changing Channels and Volume
You can change the channel and adjust the volume by using the Programme +/- and Volume +/- buttons on the remote.
Forced Standby
If your TV stops responding to commands, you can perform forced standby which will terminate the process. In order to do this, press and hold the Standby button on remote controller for about 5 seconds.
Using Main TV Menu
When the Menu button is pressed, the main TV menu will appear on the screen. You can navigate through the menu items using the directional buttons on the remote. To select an item or see the sub-menu options of the highlighted menu press OK button. When you highlight a menu option some of the sub-menu items of this menu may appear on the upper side of the menu bar for quick access. To use a quick access item highlight it, press OK and set as desired using the Left/ Right directional buttons. When finished press OK or Back/Return button to exit.
Press Exit button to close the main menu.
1. Home
When main menu is opened Home menu bar will be highlighted. The content of the Home menu can be customised by adding options from other menus. Just highlight an option and press the Down direction button on the remote. If you see Add to Home option you can add it to the Home menu. Same way you can delete or change the position of any item in the Home menu. Press the Down direction button and select the delete or move icon and press OK. In order to move a menu item use the Right and Left direction buttons to select the position that you want the item to move to and press OK.
2. TV
2.1. Freeview Play
Connects to the Freeview Play platform where you can access available catch-up TV services (only appears when TV is connected to the internet).
2.2. Search
You can search for channels, programmes, services or settings using this option. Press OK and enter a key word using the virtual keyboard. Then highlight OK and press OK to start the search. Results will be displayed on the screen. Highlight the desired result using the directional buttons and press OK to open.
2.3. Guide
You can access the electronic programme guide menu using this option.
2.4. Channels
You can access the Channels menu using this option.
2.5. Timers
You can set timers for future events using the options of this menu. You can also review the previously created timers under this menu.
To add a new timer select the Add Timer tab using the Left/Right buttons and press OK. Set the sub-menu options as desired and when finished press OK. A new timer will be created.
To edit a previously created timer, highlight that timer, select the Edit Selected Timer tab and press OK. Change the sub-menu options as desired and press OK to save your settings.
To cancel an already set timer, highlight that timer, select Delete Selected Timer tab and press OK. A confirmation message will be displayed. Highlight Yes and press OK to proceed. The timer will be cancelled.
It is not possible to set timers for two or more events that will broadcasted on different channels at the same time interval. In this case you will be asked to choose one of these timers and cancel others. Highlight the timer you want to cancel and press OK, Options menu will be displayed. Then highlight Set/Cancel and press OK to cancel that timer. You will have to save changes after that. In order to do that press OK, highlight Save Changes and press OK again.
2.6. Recordings (Optional)
You can manage your recordings using the options of this menu. You can playback, edit, delete or sort previously recorded events. Highlight a tab by using the Left or Right direction button and press OK to see available options. Refer to the USB Recording section for more information.
2.7. Quick AI
AI stands for artificial intelligence. By means of this feature some TV settings can be adjusted automatically depending on the genre information of the currently watched programme or depending on your preferences.
3. Settings
You can manage the settings of your TV using the options of this menu.
4. Apps
When your TV is connected to the Internet related contents will also be available, including Apps related contents. Using the Apps menu you can access and manage your applications. You can add new apps from the market or delete the existing ones.
5. Sources
You can manage your input source references using the options of this menu. To change the current source highlight one of the options and press OK.
5.1. Source Settings
Edit the names, enable or disable selected source options. There are also Regular and Enhanced options available for HDMI sources. Regular and Enhanced options are affecting the colour settings of the selected HDMI source.
You can reset your customisations on the Home and Apps menus to defaults using the Reset Menu option in the Settings menu (availability depends on TV model and its features). Highlight this option and press OK. A confirmation message will be displayed. Highlight Yes and press OK to proceed. Note that you will not be able to perform this operation again within the next 2 minutes.
Remote Control
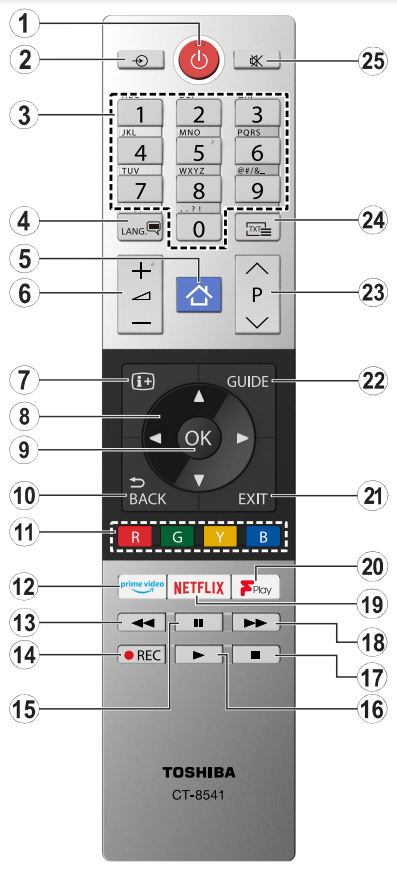
- Standby: Switches On / Off the TV
- Source: Shows available broadcast and content sources
- Numeric buttons: Switches the channel, enters a number or a letter in the text box on the screen.
- Language: Switches among sound modes (analogue TV), displays and changes audio/subtitle language and turns subtitles on or off (digital TV, where available)
- Menu: Displays TV menu
- Volume +/-
- Info: Displays information about on-screen content, shows hidden information (reveal - in TXT mode)
- Directional buttons: Helps navigate menus, content etc. and displays the subpages in TXT mode when pressed Right or Left
- OK: Confirms user selections, holds the page (in TXT mode), views Channels menu (DTV mode)
- Back/Return: Returns to previous screen, previous menu, opens index page (in TXT mode). Quickly cycles between previous and current channels or sources
- Coloured Buttons: Follow the on-screen instructions for coloured button functions
- Prime Video: Launches the Amazon Prime Video application
- Rewind: Moves frames backwards in media such as movies
- Record: Records programmes
- Pause: Pauses the media being played, starts timeshift recording
- Play: Starts to play selected media
- Stop: Stops the media being played
- Fast Forward: Moves frames forward in media such as movies
- Netflix: Launches the Netflix application
- Freeview Play: Connects to the Freeview Play platform where you can access available catch-up TV services
- Exit: Closes and exits from displayed menus or returns to previous screen
- Guide: Displays the electronic programme guide
- Programme +/-
- Text: Displays teletext (where available), press again to superimpose the teletext over a normal broadcast picture (mix)
- Mute: Completely turns off the volume of the TV
Remote Control- 2 (Optional)
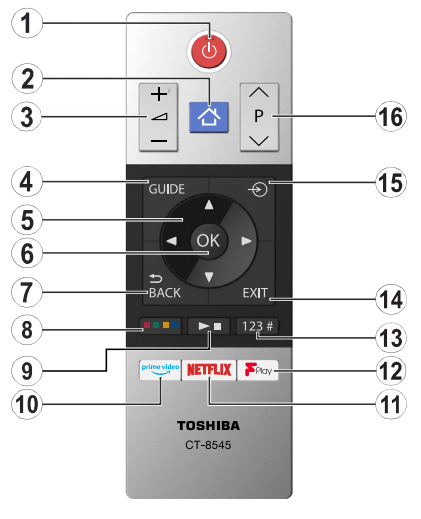
- Standby: Switches On / Off the TV
- Menu: Displays TV menu
- Volume +/-
- Guide: Displays the electronic programme guide
- Directional buttons: Helps navigate menus, content etc. and displays the subpages in TXT mode when pressed Right or Left
- OK: Confirms user selections, holds the page (in TXT mode), views Channels menu (DTV mode)
- Back/Return: Returns to previous screen, previous menu, opens index page (in TXT mode). Quickly cycles between previous and current channels or sources
- Coloured Buttons Select the coloured button you want to use from the dialogue box and press OK. Follow the on-screen instructions for coloured button functions
- Media Playback, Record and Language Buttons Select the button you want to use from the dialogue box and press OK Use the media buttons to control the playback of the media. Control elements to play, pause, stop, rewind and fast forward the media will be available. Select the REC button and press OK to record a programme or select the Pause(II) button and press OK to start timeshift recording Select the LANG. button and press OK to switch among sound modes (analogue TV), display and change audio/subtitle language and turn subtitles on or off (digital TV, where available)
- Prime Video: Launches the Amazon Prime Video application
- Netflix: Launches the Netflix application
- Freeview Play: Connects to the Freeview Play platform where you can access available catch-up TV services
- Numeric, Text and CEC Buttons Select the button you want to use from the dialogue box and press OK Use the numeric buttons to switch the channel, enter a number or a letter in the text box on the screen. Select the TEXT button and press OK to display teletext (where available). Press again to superimpose the teletext over a normal broadcast picture (mix) Select the CEC button and press OK to terminate the function that enables you to control the connected CEC device with the TV remote.
- Exit: Closes and exits from displayed menus or returns to previous screen
- Source: Shows available broadcast and content sources
- Programme +/-
Connections
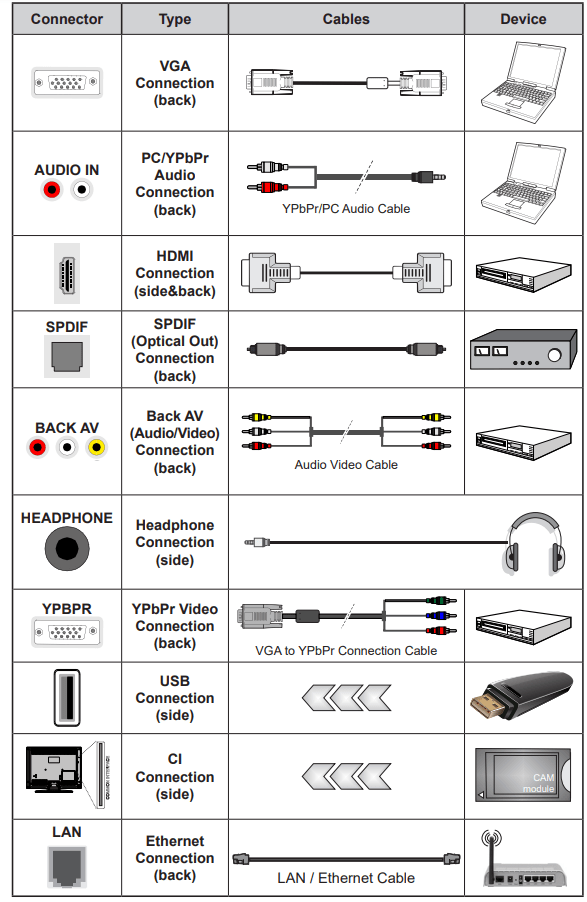
General TV Operation
Using the Channel List
The TV sorts all stored stations in the channel list. You can edit this channel list, set favourites or set active stations to be listed by using the Channels menu options. Press the OK button to open the channel list. You can filter the listed channels or make advanced changes in the current list using the Filter and Edit tab options. Highlight the tab you want and press OK to see available options.
In order to add the channel you are currently watching to the Home menu, highlight the Add to Home option in the Edit tab in the Channels menu and press OK.
Managing the Favourite Lists
You can create four different lists of your favourite channels. Enter the TV>Channels menu or press the OK button in order to open the Channels menu. Highlight the Edit tab and press OK to see the editing options and select the Tag/Untag channel option. Select the desired channel on the list by pressing the OK button while the channel is highlighted. You can make multiple choices. You can also use the Tag/ Untag all option to select all channels on the list. Then press Back/Return button to return to the Edit menu options. Select Add/Remove Favourites option and press the OK button again. Favourite channel list options will be displayed. Set the desired list option to On. The selected channel/s will be added to the list. In order to remove a channel or channels from a favourite list follow the same steps and set the desired list option to Off.
You can use the filtering function in the Channels menu to filter the channels in the channel list permanently according to your preferences. For instance, using the options of the Filter tab, you can set one of your four favourite lists to be displayed every time the channel list is opened.
Configuring Parental Settings
The Parental menu options can be used to prohibit users from viewing of certain programmes, channels and using of menus. These settings are located in the Settings> System>Parental menu.
To display parental lock menu options, a PIN should be entered. After coding the correct PIN, Parental menu will be displayed.
Menu Lock: This setting enables or disables access to all menus or installation menus of the TV.
Maturity Lock: If this option is set, TV gets the maturity information from the broadcast and if this maturity level is disabled, prohibits access to the broadcast.
Note: If the country option in the First Time Installation is set as France, Italy or Austria, Maturity Lock’s value will be set to 18 as default.
Child Lock: If this option is set to On, the TV can only be controlled by the remote control. In this case the control buttons on the TV will not work.
Guidance: This setting enables or disables access some of the MHEG applications. Disabled applications can be released by entering the right PIN.
Internet Lock (*): If this option is set to ON, the internet using applications will be disabled. Set to OFF to release these applications again.
(*) This feature may not be available depending on the model of your TV and the selected country in the First Time Installation.
Set PIN: Defines a new PIN number.
Default CICAM PIN: This option will appear as greyed out if no CI module is inserted into the CI slot of the TV. You can change the default PIN of the CI CAM using this option.
Note: Default PIN could have been set to 0000 or 1234. If you have defined the PIN(is requested depending on the country selection) during the First Time Installation use the PIN that you have defined.
Electronic Programme Guide
By means of electronic programme guide function of your TV you can browse the event schedule of the currently installed channels on your channel list. It depends on the related broadcast whether this feature is supported or not.
To access the programme guide, press the Guide button on your remote. You can also use the Guide option under TV menu.
There are 2 different types of schedule layouts available, Timeline Schedule and Now/Next. To switch between these layouts highlight the tab with the name of the alternative layout on the upper side of the screen and press OK.
Use the directional buttons to navigate through the programme guide. Use the Back/Return button to use the tab options on the upper side of the screen.
Timeline Schedule
In this layout option, all events of the listed channels will be displayed by timeline. You can use the directional buttons to scroll through the list of the events. Highlight an event and press OK to display event options menu.
Press Back/Return button to use available tab options. Highlight Filter tab and press OK to see the filtering options. To change the layout highlight Now/Next and press OK. You can use the Previous Day and Next Day options to display the events of the previous and next day.
Highlight Extras tab and press OK to access below options.
Highlight Genre: Displays Highlight Genre menu. Select a genre and press OK. The events in the programme guide matching the selected genre will be highlighted.
Guide Search: Displays searching options. Using these options, you can search the programme guide database in accordance with the selected criteria. Matching results will be listed.
Now: Displays current event of the highlighted channel.
Zoom: Highlight and press OK to see events in a wider time interval.
Now/Next Schedule
In this layout option, only the current and next events of the listed channels will be displayed. You can use the directional buttons to scroll through the list of the events.
Press Back/Return button to use available tab options. Highlight Filter tab and press OK to see the filtering options. To change the layout highlight Timeline Schedule and press OK.
Event Options
Use the directional buttons to highlight an event and press OK button to display Options menu. The following options are available.
Select Channel: Using this option, you can switch to the selected channel in order to watch it. The programme guide will be closed.
More Info: Display detailed information on the selected event. Use up and down directional buttons to scroll through the text.
Set Timer on Event / Delete Timer on Event: Select Set Timer on Event option and press OK. You can set timers for future events. To cancel an already set timer, highlight that event and press the OK button. Then select Delete Timer on Event option. The timer will be cancelled.
Record / Delete Rec. Timer: Select the Record option and press the OK button. If the event is going to be broadcasted at a future time, it will be added to Timers list to be recorded. If the selected event is being broadcasted at the moment, recording will start immediately.
To cancel an already set record timer, highlight that event and press the OK button and select the option Delete Rec. Timer. The record timer will be cancelled.
IMPORTANT: Connect a USB disk to your TV while the TV is switched off. You should then switch on the TV to enable the recording feature.
Notes: You cannot switch to any other channel while there is an active recording or timer on the current channel.
It is not possible to set timer or record timer for two or more individual events at the same time interval.
Integrated Catch-Up Services
You can enjoy Freeview Play catch-up TV services that work directly through the electronic programme guide. Whilst you are on a channel use the directional buttons to scroll back in time through the timeline-based guide. You will see contents from last few days. Available catch-up contents may change according to broadcasters and will be marked with a play icon. Highlight the content you want to play back and press the OK button.
Make sure that your TV is connected to your home network in order to use the catch-up services.
Troubleshooting & Tips
TV will not turn on
Make sure the power cord is plugged in securely to a wall outlet. Press the Standby button on the TV.
Poor picture
- Check if you have correctly tuned the TV.
- Low signal level can cause picture distortion. Please check antenna connections.
- Check if you have entered the correct channel frequency if you have performed manual tuning.
No picture
- TV is not receiving any signal. Make sure the correct source has been selected.
- Is the antenna connected properly?
- Is the antenna cable damaged?
- Are suitable plugs used to connect the antenna?
- If you are in doubt, consult your dealer.
No sound
- Check if the TV sound is muted. Press the Mute button or increase the volume to check.
Remote control - no operation
- The batteries may be exhausted. Replace the batteries.
- The batteries maybe inserted incorrectly. Refer to the section “Inserting the Batteries into the Remote”.
No signal on an input source
- It is possible that no device is connected.
- Check the AV cables and connections from your device.
- Check the device is switched on.
The Image is not centered in VGA source
To have your TV automatically center the image, enter the PC Position menu in Picture menu, highlight Autoposition and press OK. Wait for it to finish. In order to set the position of the image manually you can use H Position and V Position options. Select the desired option and use Left and Right directional buttons on the remote to set.
Recording unavailable
To record a programme, you should first correctly connect a USB storage device to your TV, while the TV is switched off. You should then switch on the TV to enable recording feature. If you cannot record, check the storage device is correctly formatted and there is sufficient space.
USB is too slow
If a “USB disk writing speed too slow to record” message is displayed on the screen while starting a recording, try restarting the recording. If you still get the same error, it is possible that your USB storage device does not meet the speed requirements. Try using a different USB storage device.
See other models: 43U2063DB ML-EM34PSS 43LL3A63DB HDTB410XK3AA 32L3863DB
