Toshiba LED TV User Guide
Introduction
Congratulations on your purchase of a high-quality, Toshiba TV. Your TV comes with the latest technology and state-of-the-art features, including:
• Fire TV Experience Built-In
• Voice Remote with Alexa
Get the most out of your TV
1. Access Your Favorite Content
• Fire TV Edition seamlessly integrates live over-the-air TV and your favorite streaming content on the Home screen, with access to tens of thousands of channels, apps, and Alexa skills.
2. Unlimited Entertainment
• Watch over 500,000 streaming movies and TV episodes from Netflix, Prime Video, Hulu, PlayStation Vue, HBO, and more.
3. Control It All With Your Voice—Voice Remote with Alexa
• Use your voice to control live TV playback, launch apps, search for content, control smart home devices, and more.
IMPORTANT: • To access all the described features, select Full (Recommended) during setup and make sure that you have a free Amazon account. • For help, contact Amazon Fire TV Customer Service at www.amazon.com/firetv/contactus
TV components
This section covers basic information for:
• TV front
• Jacks
• Remote control
TV front
You can find these items on the front of your TV
Remote control sensor
- Receives signals from the remote control. Do not block.
Power indicator
- Turns off when your TV is on. Lights when your TV is off (standby mode).
Jacks
Your TV may have any of the following items:
 Power/Input button
Power—Turns TV power on or off. When your TV is off, the LED indicator on the front of your TV lights blue.
Warning: When your TV is off, power still flows through it. To completely disconnect power, unplug the power cord.
Input—Quickly press and release to open the Input Selection list, press one or more times to select a video input source, then wait a few seconds. Your TV switches to the source you selected.
 Digital OPTICAL output jack
Connect a sound bar, digital speaker system, or home theater system to this jack to listen to TV audio through external speakers. See Digital audio on page 18.
 Headphone jack OR AUDIO OUT jack
On some TVs the headphone jack and audio out jack are combined into one jack.
Connect headphones, a sound bar, analog speaker system, or a home theater system to this jack to listen to TV audio through external speakers. See Analog audio on page 19.
 Antenna/Cable in jack
Connect an antenna or cable TV to this jack. See Coaxial (good) on page 13 or Connecting an antenna or cable TV (no box) on page 13.
 Analog video and audio (AV) jacks
Connect the video and audio for an AV device to these jacks. See AV (good) on page 12, 14, or 15.
 USB
USB
Connect a USB flash drive to this jack to view compatible JPEG picture files. See Connecting a USB flash drive on page 17.
 HDMI
HDMI
Connect an HDMI device to this jack. See HDMI (best) on page 12, 14, or 15, or Connecting a computer on page 16.
HDMI/ARC
Connect an ARC-enabled home theater receiver to this jack.
OR
Connect an HDMI device to this jack. See HDMI (best) on page 12, 14, or 15, or Connecting a computer on page 16.
 ETHERNET
Connect an Ethernet cable to this jack and to an Ethernet connection.
CAUTIONS:
• Check the jacks for position and type before making any connections.
• Loose connections can cause poor audio or video quality. Make sure that all connections are tight and secure.
• The external audio/video equipment shown may be different from your equipment. If you have questions, refer to the documentation that came with your equipment.
• Always unplug the power cord when connecting external equipment.
Remote control


Connecting a cable or satellite box
Many cable or satellite TV boxes have more than one connection type. To get the best video, you should use the best connection type available. See Jacks on page 10.
You can connect a cable or satellite box using:
• HDMI (best)
• AV (good)
• Coaxial (good)
HDMI (best)

1. Make sure that your TV’s power cord is unplugged and all connected equipment is turned off.
2. Connect a coaxial cable (not provided) to the cable wall jack and to the cable-in jack on the cable or satellite box.
3. Connect an HDMI cable (not provided) to one of the HDMI jacks on your TV and to the HDMI out jack on the cable or satellite box.
4. Plug your TV’s power cord into a power outlet, turn on your TV, then turn on the cable or satellite box.
5. On the HOME screen, navigate to the INPUTS row, then select HDMI1, HDMI2, or HDMI3.
Note: An HDMI cable carries both audio and video. You do not need to use any audio cables.
AV (good)
Note: Cables are often color-coded to match color-coded jacks.

1. Make sure that your TV’s power cord is unplugged and all connected equipment is turned off.
2. Connect a coaxial cable (not provided) to the cable wall jack and to the cable-in jack on the cable or satellite box.
3. Connect an AV cable (not provided) to the AV jacks on your TV and to the AV out jacks on the cable or satellite box.
IMPORTANT: When you connect the audio using the AV jacks, the audio output is analog.
4. Plug your TV’s power cord into a power outlet, turn on your TV, then turn on the cable or satellite box.
5. On the HOME screen, navigate to the INPUTS row, then select Composite.
Coaxial (good)

1. Make sure that your TV’s power cord is unplugged and all connected equipment is turned off.
2. Connect a coaxial cable (not provided) to the cable wall jack and to the cable-in jack on the cable or satellite box.
3. Connect another coaxial cable (not provided) to the antenna/cable jack on your TV and to the coaxial out jack on the cable or satellite box.
4. Plug your TV’s power cord into a power outlet, turn on your TV, then turn on the cable or satellite box.
5. On the HOME screen, navigate to the INPUTS row, then select Antenna.
6. If you cannot tune to channels you know exist, scan for channels. Go to Settings > Live TV > Channel Scan.
Connecting an antenna or cable TV (no box)

1. Make sure that your TV’s power cord is unplugged and all connected equipment is turned off.
2. Connect a coaxial cable (not provided) to the antenna/cable jack on your TV and to the antenna or cable TV wall jack.
3. Plug your TV’s power cord into a power outlet, then turn on your TV.
4. On the HOME screen, navigate to the INPUTS row, then select Antenna.
5. If you cannot tune to channels you know exist, scan for channels. Go to Settings > Live TV > Channel Scan.
Notes:
• Use a coaxial cable to eliminate interference and noise from radio waves.
• If the antenna is not installed correctly, contact qualified service personnel to correct the problem.
• If the signal level for a channel is weak, the picture may be distorted. Adjust the antenna or use a highly directional outdoor or set-top antenna with a built-in amplifier.
• If the picture quality is good on some channels and poor on others, the problem may be caused by a poor or weak signal from the broadcaster or cable TV provider.
• If you connect to cable TV without a set-top box and experience poor picture quality, you may need to install a set-top box to improve signal reception and picture quality. Contact your cable TV provider about upgrading to a set-top box.
• Many high-definition (HD) channels upscale standard-definition (SD) content. The picture displayed on your TV is still displayed as SD, thus the picture quality will not be as clear or crisp as it would be if the content was originally recorded in HD.
Connecting a DVD or Blu-ray player
Many DVD or Blu-ray players have more than one connection type. To get the best video, you should use the best connection type available. See Jacks on page 10.
You can connect a DVD or Blu-ray player using:
• HDMI (best)
• AV (good)
HDMI (best)
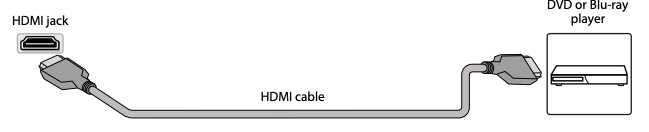
1. Make sure that your TV’s power cord is unplugged and the DVD or Blu-ray player is turned off.
2. Connect an HDMI cable (not provided) to one of the HDMI jacks on your TV and to the HDMI out jack on the DVD or Blu-ray player.
3. Plug your TV’s power cord into a power outlet, then turn on your TV and DVD or Blu-ray player.
4. On the HOME screen, navigate to the INPUTS row, then select HDMI1, HDMI2, or HDMI3.
Note: An HDMI cable carries both audio and video. You do not need to use any audio cables.
AV (good)
Note: Cables are often color-coded to match color-coded jacks.

1. Make sure that your TV’s power cord is unplugged and the DVD or Blu-ray player is turned off.
2. Connect an AV cable (not provided) to the AV jacks on your TV and to the AV out jacks on the DVD or Blu-ray player.
IMPORTANT: When you connect the audio using the AV jacks, the audio output is analog.
3. Plug your TV’s power cord into a power outlet, then turn on your TV and DVD or Blu-ray player.
4. If needed, set the player to the correct output mode. See the documentation that came with the player.
5. On the HOME screen, navigate to the INPUTS row, then select Composite.
Connecting a game console
You can connect a game console using:
• HDMI (best)
• AV (good)
HDMI (best)

1. Make sure that your TV’s power cord is unplugged and the game console is turned off.
2. Connect an HDMI cable (not provided) to one of the HDMI jacks on your TV and to the HDMI out jack on the game console.
3. Plug your TV’s power cord into a power outlet, then turn on your TV.
4. Turn on the game console, then set it to the correct output mode. See the documentation that came with the console.
5. On the HOME screen, navigate to the INPUTS row, then select HDMI1, HDMI2, or HDMI3.
Note: An HDMI cable carries both audio and video. You do not need to use any audio cables.
AV (good)
Note: Cables are often color-coded to match color-coded jacks.

1. Make sure that your TV’s power cord is unplugged and the game console is turned off.
2. Connect the console-specific AV cable to the AV jacks on your TV and to the AV jack(s) on the game console.
IMPORTANT:
• Some older game consoles come with a special AV cable. See the documentation that came with your game console or check the manufacturer’s website.
• When you connect the audio using the AV jacks, the audio output is analog.
3. Plug your TV’s power cord into a power outlet, then turn on your TV.
4. Turn on the game console, then set it to the correct output mode. See the documentation that came with the console.
5. On the HOME screen, navigate to the INPUTS row, then select Composite.
Connecting a computer

1. Make sure that your TV’s power cord is unplugged and the computer is turned off.
2. Connect an HDMI cable (not provided) to one of the HDMI jacks on your TV and to the HDMI out jack on the computer.
3. Plug your TV’s power cord into a power outlet, then turn on your TV and the computer.
4. On the HOME screen, navigate to the INPUTS row, then select HDMI1, HDMI2, or HDMI3.
5. Adjust the display properties on the computer, if necessary
Connecting to Ethernet
To access the Internet, you must connect to a LAN (Ethernet) network or use Wi-Fi to access the Internet

• Connect an Ethernet cable (not provided) to the LAN jack on your TV and to your Ethernet connection.
Connecting a USB flash drive
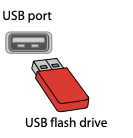
1. Plug a USB flash drive into the USB port on your TV.
CAUTION: Do not remove the USB flash drive or turn off the TV while using the USB flash drive. You may lose data or damage the USB flash drive.
2. When the “View Pictures” message appears, press MENU. The photos viewer opens.
Note: The Photos viewer only supports JPEG format images (with “.jpg” file extensions) and not all JPEG files are compatible with your TV.
Connecting headphones
When you connect headphones, the TV speakers are muted.
WARNING: Loud noise can damage your hearing. When using headphones, use the lowest volume setting on your headphones that still lets you hear the sound.

• Connect the headphones to the headphone jack on your TV.
Notes:
• If you connect headphones when your TV is turned off, then you turn on your TV, the TV speakers are muted and the audio plays through the headphones.
• You can also connect a home theater system, sound bar, or external speaker system to the headphone jack
Connecting external speakers or a sound bar
You can connect external speakers or a sound bar using:
• Digital audio
• Analog audio
Digital audio
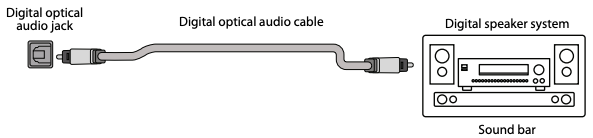
1. Make sure that your TV’s power cord is unplugged and the digital speaker system or sound bar is turned off.
2. Connect a digital optical audio cable (not provided) to the digital output jack on your TV and to the audio in jack on the digital speaker system or sound bar.
3. Plug your TV’s power cord into a power outlet, then turn on your TV.
4. Turn on the digital speaker system or sound bar, then set it to the correct source. See the documentation that came with the digital speaker system or sound bar.
Note: Depending on the audio device you are connecting, you may need to change the digital audio format for your TV. The default setting is Auto.
5. If you need to change the digital audio format, go to the Home menu, select Settings, then select Display & Sounds. Select Audio Output, then select Digital Audio Format and change the setting to PCM or Dolby Digital.
6. If you want to turn off your TV speakers, go the Home menu, select Settings, then select Display & Sounds. Select Audio Output, then select TV Speakers and change the setting to OFF.
Digital audio using the HDMI/ARC jack
Your TV can send sound to an ARC device, like an AV receiver, to create a home theater that uses two or more speakers. When you connect external speakers or a soundbar, sound plays through your TV speakers and the external speakers or soundbar.

1. Make sure that your TV’s power cord is unplugged and the digital speaker system or sound bar is turned off.
2. Connect an HDMI cable (not provided) to the HDMI/ARC jack on your TV and to the audio in jack on the digital speaker system or sound bar.
3. Plug your TV’s power cord into a power outlet, then turn on your TV.
4. Turn on the digital speaker system or sound bar, then set it to the correct source. See the documentation that came with the digital speaker system or sound bar.
Note: Depending on the audio device you are connecting, you may need to change the digital audio format for your TV. The default setting is Auto.
5. If you need to change the digital audio format, go to the Home menu, select Settings, then select Display & Sounds. Select Audio Output, then select Digital Audio Format and change the setting to PCM or Dolby Digital.
6. If you want to turn off your TV speakers, go the Home menu, select Settings, then select Display & Sounds. Select Audio Output, then select TV Speakers and change the setting to OFF.
Analog audio
When you connect an analog speaker system or sound bar to the audio out jack, the TV speakers are muted.

1. Make sure that your TV’s power cord is unplugged and the analog speaker system or sound bar is turned off.
2. Connect an audio cable (not provided) to the audio out jack on your TV and to the audio in jacks on the analog speaker system or sound bar.
3. Plug your TV’s power cord into a power outlet, then turn on your TV.
4. Turn on the analog speaker system or sound bar, then set it to the correct source. See the documentation that came with the analog speaker system or sound bar.
Connecting power
1. If your power cord is not permanently connected to your TV, connect it to the power connector on your TV.
2. Connect the power cord to a power outlet.
CAUTION:
• Your TV should only be operated from the power source indicated on the label.
• Always unplug the power cord from the power outlet when you will not be using your TV for an extended period of time.
• If the power cord is permanently attached to your TV, do not try to unplug it from your TV.
Programming a universal remote control
You can operate your Toshiba TV with a new or existing universal remote control.
1. See the table in Common universal remote control codes on page 21 for common codes. If you have problems programming your remote or need a different remote control code:
Contact the universal remote control maker.
OR
Contact the cable or satellite company that provided the remote control you are trying to program.
2. Follow your universal remote control’s instructions to enter the TV code you found in Step 1.
Tips:
• If your universal remote control has a code search feature, run a code search to identify a code that matches your TV. See your universal remote control’s instructions for details.
• If your universal remote control has a “Learn” feature, you can manually program it using the Toshiba TV remote to “teach” the commands one at a time. See your universal remote control’s instructions for details.
Common universal remote control codes
The following is a list of the most common remote control codes.
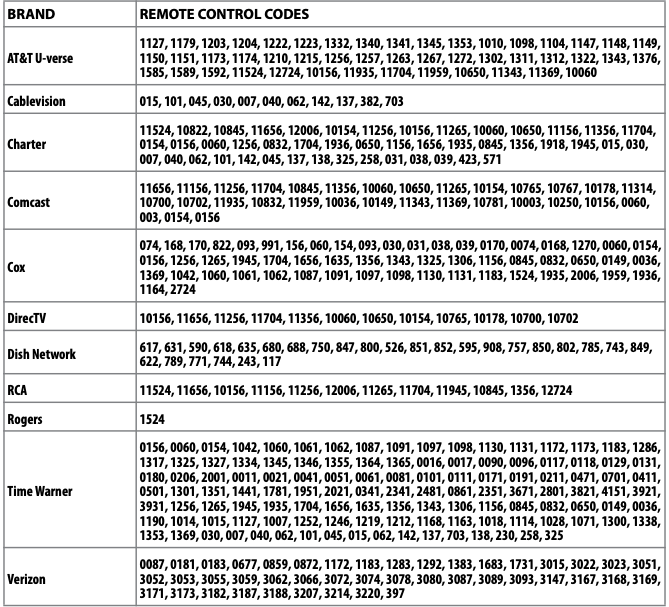
Tips:
• The brand name is often visible on the front of the universal remote control, and the model number is often visible on the back.
• If your universal remote control isn’t listed in the table, refer to your universal remote control’s instructions and try codes for the brands Orion, Emerson, Memorex, Sansui, Sylvania, or Zenith. You may need to try several codes before finding a match.
Setting up your TV
If you use an Ethernet cable to connect to the Internet, see Connecting to Ethernet on page 16.
1. Make sure that you have connected the power cord to your TV and that you turned on your TV.
2. Make sure that you have installed the batteries in your new Voice Remote with Alexa.
3. Make sure that your remote is paired with your TV. Pairing should occur automatically. If you have issues, press  (Home). If you continue to have issues, try re-inserting your batteries or replacing them, then repeat this step again.
4. Select your Wi-Fi network from the networks displayed on the screen.
Note: If your Wi-Fi network is password protected, have your Wi-Fi network password handy to connect your TV to the Internet. If your network is hidden, select the Join Other Network tile from the list. If required, enter your network password using the on-screen keyboard.
5. Select your experience: Full (Recommended) or Basic.
• Full: Get the most out of your experience with access to live TV, over 500,000 streaming movies and TV episodes, thousands of apps, and Alexa skills. To get started, sign in or sign up for a free Amazon account.
• Basic: This experience is limited to live TV and only six streaming apps. Alexa and the full Appstore are not included.
For more information about setting up your TV, go to: http://www.amazon.com/help/firetveditiontv
Using your TV
For information about using your TV, go to: http://www.amazon.com/help/firetveditiontv
Maintaining
• Do not use your TV in areas that are too hot or too cold, because the cabinet may warp or the screen may malfunction. Your TV works best in temperatures that are comfortable to you.
• Do not place your TV in direct sunlight or near a heat source.
Cleaning the TV cabinet
Clean the cabinet with a soft, lint-free cloth. If the cabinet is especially dirty, moisten a soft, lint-free cloth in a weak detergent solution, squeeze the excess moisture from the cloth, then wipe the cabinet with the cloth. Use a clean cloth to dry the cabinet.
Cleaning the TV screen
Clean the screen with a soft, lint-free cloth.
Troubleshooting
Video and audio
Picture does not fill the screen. There are black bars around the picture.
• Press and hold Home until the Quick Settings menu opens. Select Display - Picture Size, then change the setting. If Picture Size is grayed out (not available to select), change the setting for Auto Aspect to Off.
No picture (screen is not lit) and no sound.
• Press (power) on the TV or the remote control.
• Make sure that the video cables are connected correctly and securely to your TV.
• Make sure that the power cord is plugged into a working outlet.
• Press Home, then navigate to the INPUTS row and select the input you want to watch.
• Try another channel. The station may be experiencing problems.
• Make sure that the incoming signal is compatible.
Dark, poor, or no picture (screen is lit), but sound is good.
• Try another channel. The station may be experiencing problems.
• Make sure that the antenna or cable TV is connected correctly and securely. See Connecting a cable or satellite box on page 12 or Connecting an antenna or cable TV (no box) on page 13.
• Press and hold Home until the Quick Settings menu opens. Select Display - Picture Size, then change the setting. If Picture Size is grayed out (not available to select), change the setting for Auto Aspect to Off.
• If you are using an antenna and the signal strength is low, adjust the antenna or use a highly directional outdoor antenna or set-top antenna with a built-in amplifier.
• Make sure that the video cables are connected correctly and securely to your TV.
• The video cable(s) you are using may be bad. Try a new set.
No color, dark picture, or color is not correct.
• Try another channel. The station may be experiencing problems.
• Adjust the picture settings. Press and hold Home until the Quick Settings menu opens. Select Picture, then adjust the Contrast, Brightness, or Color settings.
• Make sure that the video cables are connected correctly and securely to your TV.
• Make sure that the antenna or cable TV is connected correctly and securely. See Connecting a cable or satellite box on page 12 or Connecting an antenna or cable TV (no box) on page 13.
• If you are using an antenna and the signal strength is low, adjust the antenna or use a highly directional outdoor antenna or set-top antenna with a built-in amplifier.
TV or cable channel reception is not good or consistent.
• Try another channel. The station may be experiencing problems.
• Make sure that the antenna or cable TV is connected correctly and securely. See Connecting a cable or satellite box on page 12 or Connecting an antenna or cable TV (no box) on page 13.
• If you are using an antenna and the signal strength is low, adjust the antenna or use a highly directional outdoor antenna or set-top antenna with a built-in amplifier.
Dotted lines or stripes appear on the screen.
• Make sure that the antenna or cable TV is connected correctly and securely. See Connecting a cable or satellite box on page 12 or Connecting an antenna or cable TV (no box) on page 13.
• If you are using an antenna and the signal strength is low, adjust the antenna or use a highly directional outdoor antenna or set-top antenna with a built-in amplifier.
• Make sure that the video cables are connected correctly and securely to your TV.
• The video cable(s) you are using may be bad. Try a new set.
• Other devices (for example, a surround sound receiver, external speakers, fans, or hair dryers) may be interfering with your TV. Try turning off one device at a time, then back on to determine which device is causing interference. After you have determined which device is causing interference, move it further from the TV to eliminate the interference.
Video description or voice guide does not work.
• Make sure that your TV is not muted and the volume is turned up.
• Make sure that the options listed under the Accessibility menu are turned on. Press Home menu, select Settings, then select Accessibility. Make sure that the VoiceView and Audio Description options are set to ON. • Video descriptions are not available on all broadcasts.
• Some remote functions are not narrated.
Good picture, but no sound.
• Increase the volume.
• Make sure that the sound is not muted.
• Make sure that you do not have headphones connected. When headphones are connected, the TV speakers are muted.
• Make sure that the TV speakers option are not turned off. Press and hold Home until the Quick Settings menu opens. Select Sound, then select TV Speakers and change the setting to On.
• If you are using a home theater system, soundbar, or external speaker system, make sure it is turned on and is not muted.
• If you are using a home theater system, soundbar, or external speaker system and have connected it with a digital optical cable, go to the Home menu, select Settings, then select Display & Sounds. Select Audio Output, then select Digital Audio Format and change the setting to PCM.
• Make sure that the audio cables are connected correctly and securely to your TV.
• Make sure that the antenna or cable TV is connected correctly and securely. See Connecting a cable or satellite box on page 12 or Connecting an antenna or cable TV (no box) on page 13.
• The audio cables you are using may be bad. Try a new set.
Good sound, but poor color.
• Adjust the contrast, color, and brightness settings. Press and hold Home until the Quick Settings menu opens. Select Picture, then adjust the Contrast, Brightness, or Color settings.
Audio noise.
• Other devices (for example, a surround sound receiver, external speakers, fans, or hair dryers) may be interfering with your TV. Try turning off one device at a time to determine which device is causing interference. After you have determined which device is causing interference, move it further from the TV to eliminate the interference.
No output from one of the speakers.
• Adjust the audio balance. Press and hold Home until the Quick Settings menu opens. Select Sound, then select Balance and adjust the setting. • Make sure that the audio cables are connected correctly and securely to your TV.
After images appear.
• Do not display a still image, such as a logo, game, or computer image, for an extended period of time. This can cause a permanent after-image to be burned into the screen. This type of damage is not covered by your warranty.
Remote control
Remote control does not work.
• Make sure that the power cord is plugged into a working outlet.
• Make sure that there are no obstructions between the remote control and the remote control sensor on the front of the TV.
• If you have not paired your TV to the remote control, point the remote control directly at the remote control sensor on your TV.
• The supplied batteries are wrapped tightly in clear plastic. Make sure that you have removed this plastic from the batteries.
• Make sure that the batteries are installed correctly.
• Replace dead batteries with new batteries.
General
No power.
• Make sure that the power cord is plugged into a working outlet. • Unplug the power cord, wait 60 seconds, then plug the cord back in and turn on your TV.
A no signal error message is displayed.
• Press Home, then navigate to the INPUTS row and select the input you want to watch.
After Auto Channel Search, there are no channels.
• Reception can vary by channel depending on the broadcast power level of a given station. Contact your cable or satellite TV provider.
• Make sure that the antenna or cable/satellite TV is connected securely to your TV.
• Try replacing the cable between the antenna/cable or cable/satellite box and your TV.
One or more channels do not display.
• If you are using a cable or satellite box, use the remote that came with that box to change channels.
• Press Home, then navigate to the INPUTS row and make sure that you have selected the correct input for the device or service you are trying to use.
Password is lost.
• If you are having trouble with your password (PIN) for parental controls and viewing restrictions, try resetting your PIN from your Prime Video Settings on the Amazon website. Go to the Parental Controls section, enter a new 5-digit PIN under Prime Video PIN, then select Reset Your PIN.
• If you need to reset a forgotten PIN and your TV has not been registered, you need to perform a factory reset. Press Home, then select Settings. Select Device & Software, then select Reset to Factory Defaults.
Some settings cannot be accessed.
• If a setting is grayed, the setting is not available in the current video input mode (for example TV mode). Change to a different video input source. Press Home, then navigate to the INPUTS row and select the input you want to watch.
The  /INPUT button does not work.
• Unplug the power cord, wait a few seconds, then plug the cord back in and turn on your TV.
TV keeps turning off.
• Make sure that the sleep timer is not turned on. Press and hold Home until the Quick Settings menu opens. Select Sleep Timer, then change the setting to Off.
CEC-compatible devices
My TV is not displaying the video from the connected CEC device.
• Make sure that the HDMI cable is connected securely to your TV and the device.
• Make sure that the device is connected to your TV with an HDMI cable.
• Make sure that the device is a CEC device. See the documentation that came with the device for more information.
• Press Home, then navigate to the INPUTS row and make sure that the correct video input is selected.
• On the Home menu, select Settings, then select Display & Sounds. Select HDMI CEC Device Control and change the setting to On.
My TV is not playing the audio from the connected CEC device.
• Make sure that the HDMI cable is connected securely to your TV and the device.
• Make sure that the device is connected to your TV with an HDMI cable.
• Make sure that the device is a CEC device. See the documentation that came with the device.
• Make sure that the TV volume is turned up and not muted.
• Make sure that the TV speakers option are not turned off. Press and hold Home until the Quick Settings menu opens. Select Sound, then select TV Speakers and change the setting to On.
• Make sure that the CEC control is turned on. On the Home menu, select Settings, then select Display & Sounds. Select HDMI CEC Device Control and change the setting to On.
• If you have connected an HDMI CEC audio receiver, adjust the volume on the receiver. When your TV detects an audio receiver, the TV speakers may turn off and sound plays through receiver speakers only.
• If you are using a home theater system, soundbar, or external speaker system, make sure that it is turned on and is not muted.
• If you are using a home theater system, soundbar, or external speaker system, make sure that you have selected the correct output mode.
• Depending on the digital audio device you have connected, you may need to change the digital audio format for your TV. The default setting is Auto. If you need to change the digital audio format, go to the Home menu, select Settings, then select Display & Sounds. Select Audio Output, then select Digital Audio Format and change the setting to PCM or Dolby Digital.
My TV’s remote control does not control the device.
• Depending on the device, all the buttons may not work.
• Make sure that the CEC control feature is turned on. On the Home menu, select Settings, then select Display & Sounds. Select HDMI CEC Device Control and change the setting to On.
• The device may not support this feature. See the documentation that came with the device for more information.
My connected CEC device does not turn off when I turn off my TV.
• Make sure that the CEC control feature is turned on. On the Home menu, select Settings, then select Display & Sounds. Select HDMI CEC Device Control and change the setting to On.
• The device may not support this feature. See the documentation that came with the device for more information.
My TV does not turn on when I turn on my connected CEC device.
• Make sure that the CEC control feature is turned on. On the Home menu, select Settings, then select Display & Sounds. Select HDMI CEC Device Control and change the setting to On.
• The device may not support this feature. See the documentation that came with the device for more information.
Note: If the problem is not solved by using these troubleshooting instructions, turn off your TV, then turn it on again.
Legal notices
FCC Statement
This device complies with Part 15 of the FCC Rules. Operation is subject to the following two conditions: (1) this device may not cause harmful interference, and (2) this device must accept any interference received, including interference that may cause undesired operation.
This equipment has been tested and found to comply with the limits for a Class B digital device, pursuant to Part 15 of the FCC Rules. These limits are designed to provide reasonable protection against harmful interference in a residential installation. This equipment generates, uses, and can radiate radio frequency energy and, if not installed and used in accordance with the instructions, may cause harmful interference to radio communications. However, there is no guarantee that interference will not occur in a particular installation. If this equipment does cause harmful interference to radio or television reception, which can be determined by turning the equipment off and on, the user is encouraged to try to correct the interference by one or more of the following measures:
• Reorient or relocate the receiving antenna.
• Increase the separation between the equipment and receiver.
• Connect the equipment into an outlet on a circuit different from that to which the receiver is connected.
• Consult the dealer or an experienced radio/TV technician for help
Warning
Changes or modifications not expressly approved by the party responsible for compliance could void the user's authority to operate the equipment.
Cables
Connections to this device must be made with shielded cables with metallic RF/EMI connector hoods to maintain compliance with FCC Rules and Regulations.
Canadian Notice
Analog and Digital Television Receiving Apparatus – Appareil de réception de télévision analogique et numérique, Canada BETS-7 / NTMR-7
IC Statement
This device complies with Industry Canada licence—exempt RSS standard(s).
Operation is subject to the following two conditions: (1) this device may not cause interference, and (2) this device must accept any interference, including interference that may cause undesired operation of the device.
This equipment complies with IC radiation exposure limits set forth for an uncontrolled environment.
Restrictions in the 5 GHz band:
The device for operation in the band 5150-5250 MHz is only for indoor use to reduce the potential for harmful interference to co-channel mobile satellite systems.
Restrictions dans labande 5GHz:
Dans la bande 5150 – 5250MHz, les appareils seront restreints aux opérations intérieurs pour réduire toute possibilité d'intérference dangereuse aux operations du systèmes satellite mobile dans le méme canal.