
OPERATING INSTRUCTIONS
40L1653DB
COLOUR TELEVISION WITH REMOTE CONTROL

English - 1 -
Contents
Safety Information ..................................................2
Mains Supply .......................................................... 2
Markings on the Product.........................................2
Accessories Included..............................................6
TV Control Switch & Operation...............................6
Inserting the Batteries into the Remote ..................6
Connect Power ...................................................... 6
Antenna Connection ............................................... 6
Notication .............................................................. 7
Remote Control ......................................................8
Switching On/Off .....................................................9
First Time Installation..............................................9
Teletext Services ....................................................9
English - 2 -
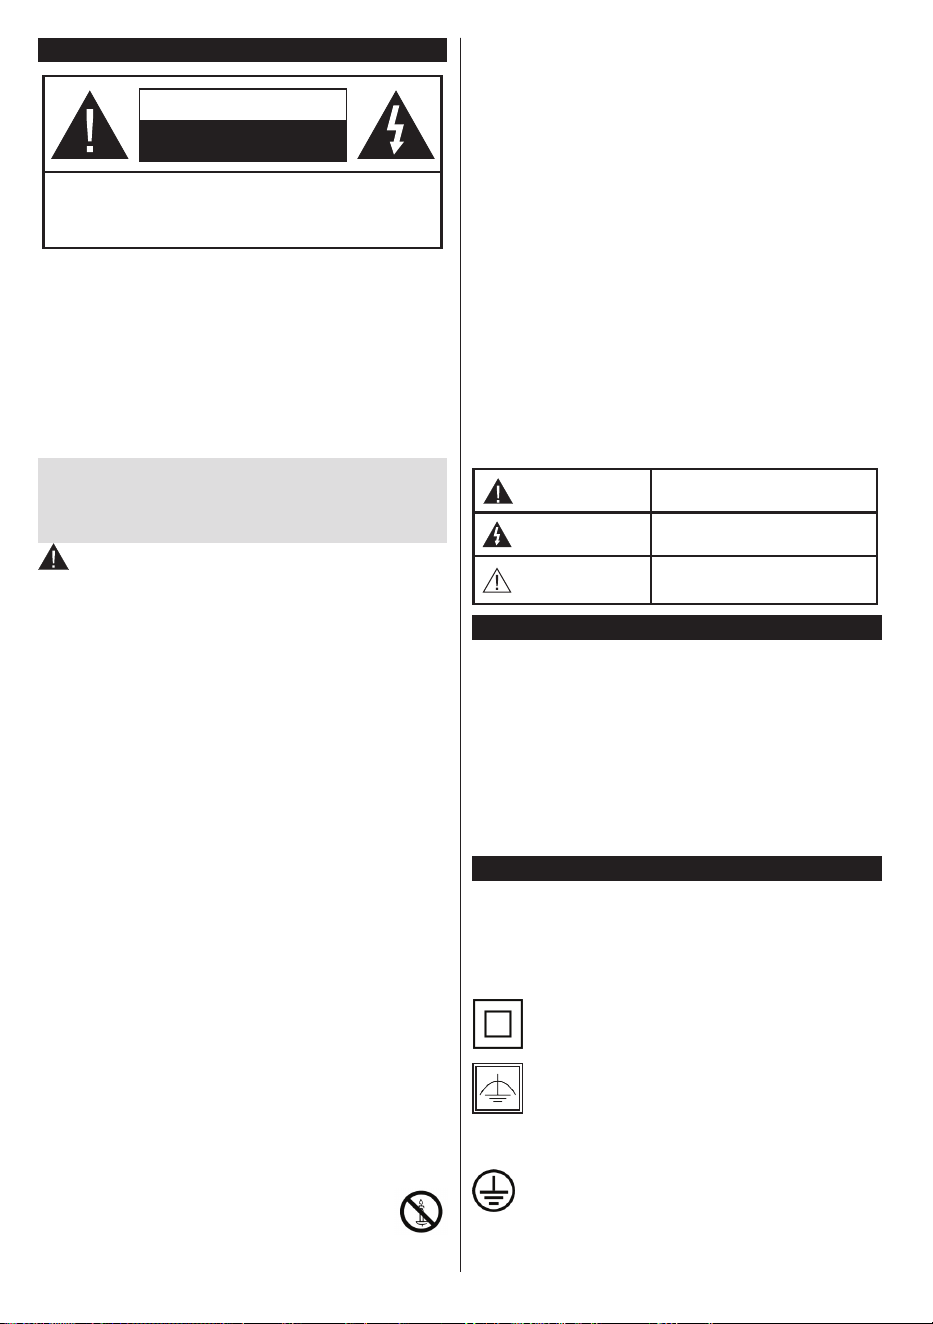
Safety Information
CAUTION
RISK OF ELECTRIC SHOCK
DO NOT OPEN
CAUTION: TO REDUCE THE RISK OF ELECTRIC SHOCK DO
NOT REMOVE COVER (OR BACK).
NO USER-SERVICEABLE PARTS INSIDE. REFER
SERVICING TO QUALIFIED SERVICE PERSONNEL.
Note: Follow the on screen instructions for operating the
related features.
In extreme weather (storms, lightning) and long inactivity
periods (going on holiday) disconnect the TV set from the
mains.
The mains plug is used to disconnect TV set from the mains
and therefore it must remain readily operable. If the TV set is
not disconnected electrically from the mains, the device will
still draw power for all situations even if the TV is in standby
mode or switched off.
IMPORTANT - Please read these
instructions fully before installing or
operating
WARNING: This device is intended to be
used by persons (including children) who are
capable / experienced of operating such a device
unsupervised, unless they have been given
supervision or instruction concerning the use of
the device by a person responsible for their safety.
•Use this TV set at an altitude of less than 2000
meters above the sea level, in dry locations and in
regions with moderate or tropical climates.
•The TV set is intended for household and similar
general use but may also be used in public places.
•For ventilation purposes, leave at least 5cm of free
space around the TV.
•The ventilation should not be impeded by covering
or blocking the ventilation openings with items, such
as newspapers, table-cloths, curtains, etc.
•The power cord plug should be easily accessible. Do
not place the TV, furniture, etc. on the power cord.
Adamagedpowercord/plugcancausereorgive
you an electric shock. Handle the power cord by the
plug, do not unplug the TV by pulling the power cord.
Never touch the power cord/plug with wet hands
as this could cause a short circuit or electric shock.
Never make a knot in the power cord or tie it with
other cords. When damaged it must be replaced,
thisshouldonlybedonebyqualiedpersonnel.
•Do not expose the TV to dripping or splashing of
liquids anddo not placeobjects lled withliquids,
such as vases, cups, etc. on or over the TV (e.g., on
shelves above the unit).
•Do not expose the TV to direct sunlight or do
notplaceopenamessuchaslitcandleson
the top of or near the TV.
•Do not place any heat sources such as electric
heaters, radiators, etc. near the TV set.
•Do not place the TV on the floor and inclined
surfaces.
•To avoid danger of suffocation, keep plastic bags
out of the reach of the babies, children and domestic
animals.
•Carefully attach the stand to the TV. If the stand is
providedwithscrews,tighten thescrewsrmlyto
prevent the TV from tilting. Do not over-tighten the
screws and mount the stand rubbers properly.
•Do not dispose of the batteries in fire or with
hazardousorammablematerials.
Warning: Batteries must not be exposed to excessive
heatsuchassunshine,reorthelike.
WARNING - excessive sound pressure from ear-
phones or headphones can cause hearing loss.
ABOVE ALL - NEVER let anyone, especially chil-
dren, push or hit the screen, push anything into
holes, slots or any other openings in the case.
Caution
Serious injury or death risk
Risk of electric shock
Dangerous voltage risk
Maintenance
Important maintenance
component
Mains Supply
The set should be operated only from a 220-240 V
AC 50 Hz outlet. Make sure the TV or its stand are
not placed on the power cord. DO NOT cut off the
mains plug from this equipment, this incorporates a
special Radio Interference Filter, the removal of which
willimpairitsperformance.IntheUK,thefusetted
in this plug is approved by ASTA or BSI to BS1362.
It should only be replaced by a correctly rated and
approved type. IF IN DOUBT PLEASE CONSULT A
COMPETENT ELECTRICIAN.
Markings on the Product
The following symbols are used on the product as
a marker for restrictions and precautions and safety
instructions. Each explanation shall be considered
where the product bears related marking only. Note
such information for security reasons.
Class II Equipment: This appliance is
designed in such a way that it does not require
a safety connection to electrical earth.
Class II Equipment With Functional
Earthing: This appliance is designed in such
a way that it does not require a safety
connection to electrical earth, the earth
connection is used for functional purposes.
Protective Earth Connection: The marked
terminal is intended for connection of the
protective earthing conductor associated with
the supply wiring.
English - 3 -
asd
Hazardous Live Terminal: The marked
terminal(s) is/are hazardous live under normal
operating conditions.
i
Caution, See Operating Instructions: The
marked area(s) contain(s) user replaceable
coin or button cell batteries.
Class 1 Laser Product:
This product contains Class
1 laser source that is safe
under reasonably foreseeable
conditions of operation.
WARNING
Do not ingest the battery, Chemical Burn Hazard
This product or the accessories supplied with the
product may contain a coin/button cell battery. If
the coin/button cell battery is swallowed, it can
cause severe internal burns in just 2 hours and
can lead to death.
Keep new and used batteries away from children.
If the battery compartment does not close secure-
ly, stop using the product and keep it away from
children.
If you think batteries might have been swallowed
or placed inside any part of the body, seek imme-
diate medical attention.
WARNING
Never place a television set in unstable or inclined
locations. A television set may fall, causing serious
personal injury or death. Many injuries, particularly
to children, can be avoided by taking simple pre-
cautions such as;
•Using cabinets or stands recommended by the
manufacturer of the television set.
•Only using furniture that can safely support the
television set.
•Ensuring the television set is not overhanging the
edge of the supporting furniture.
•Not placing the television set on tall furniture
(for example, cupboards or bookcases) without
anchoring both the furniture and the television set
to a suitable support.
•Not standing the television set on cloth or other
materials placed between the television and
supporting furniture.
•Educating children about the dangers of climbing
on furniture to reach the television set or its
controls. If your existing television set is being
retained and relocated, the same considerations
as above should be applied.
CLASS 1
LASER PRODUCT
WALL MOUNTING WARNINGS
•Read the instructions before mounting your TV
on the wall.
•The wall mount kit is optional. You can obtain from
your local dealer, if not supplied with your TV.
•Do not install the TV on a ceiling or on an inclined
wall.
•Usethespeciedwallmountingscrewsandother
accessories.
•Tightenthewallmountingscrewsrmlytoprevent
the TV from fall. Do not over-tighten the screws.
English - 4 -
Disposal...
The following information is only for EU-member states:
Disposal of products
The crossed out wheeIed dust bin symbol indicates that products must be collected and disposed of separately
from household waste. Integrated batteries and accumulators can be disposed of with the product. They will be
separated at the recycling centres.
The black bar indicates that the product was placed on the market after August 13, 2005.
By participating in separate collection of products and batteries, you will help to assure the proper disposal of
products and batteries and thus help to prevent potential negative consequences for the environment and human
health.
For more detailed information about the collection and recycling programmes available in your country, please
contactyourlocalcityofceortheshopwhereyoupurchasedtheproduct.
Disposal of batteries and/or accumulators
The crossed out wheeled dust bin symboI indicates that batteries and/or accumulators must be collected and
disposed of separately from household waste.
Ifthebatteryoraccumulatorcontainsmorethanthespeciedvaluesoflead(Pb),mercury(Hg),and/orcadmium
(Cd)denedintheEuropean Battery Directive, then the chemical symbols for lead (Pb), mercury (Hg) and/or
cadmium (Cd) will appear below the crossed out wheeled dust bin symbol.
By participating in separate collection of batteries, you will help to assure the proper disposal of products and
batteries and thus help to prevent potential negative consequences for the environment and human health. For
more detailed information about the coIIection and recycling programmes available in your country, please contact
yourlocalcityofceortheshopwhereyoupurchasedtheproduct.
English - 5 -
REACH information
The European Union (EU) chemical regulation, REACH (Registration, Evaluation, Authorization
and Restriction of Chemicals), entered into force on 1 June 2007, with phased deadlines to 2018.
Toshiba will meet all REACH requirements and is committed to provide our customers with
information about the presence in our articles of substances included on the candidate list according
to REACH regulation.
Please consult the following website www.toshiba-tv.com for information about the presence in
our articles of substances included on the candidate list according to REACH in a concentration
above 0.1 % weight by weight.
EU Conformity Statement
This product is carrying the CE-Mark in accordance with the related European Directives.
Responsible for CE-Marking is Vestel UK, Langley, Berkshire, SL3 6EZ.
This product is labeled with the CE Mark in accordance with the related European Directives, notably
Low Voltage Directive 2014/35/EU, Electromagnetic Compatibility Directive 2014/30/EU and RoHS
Directive 2011/65/EU. Furthermore the product complies with the Ecodesign Directive 2005/32/EC
(EuP) and 2009/125/EC (ErP) and its related implementing measures.
This equipment corresponds to requirements of the Technical Regulation on limitation of usage of certain
dangerous substances in electrical and electronic equipment.
English - 6 -
Accessories Included
•Remote Control
•Batteries: 2 x AAA
•Instruction Book
•Side AV Connection Cable
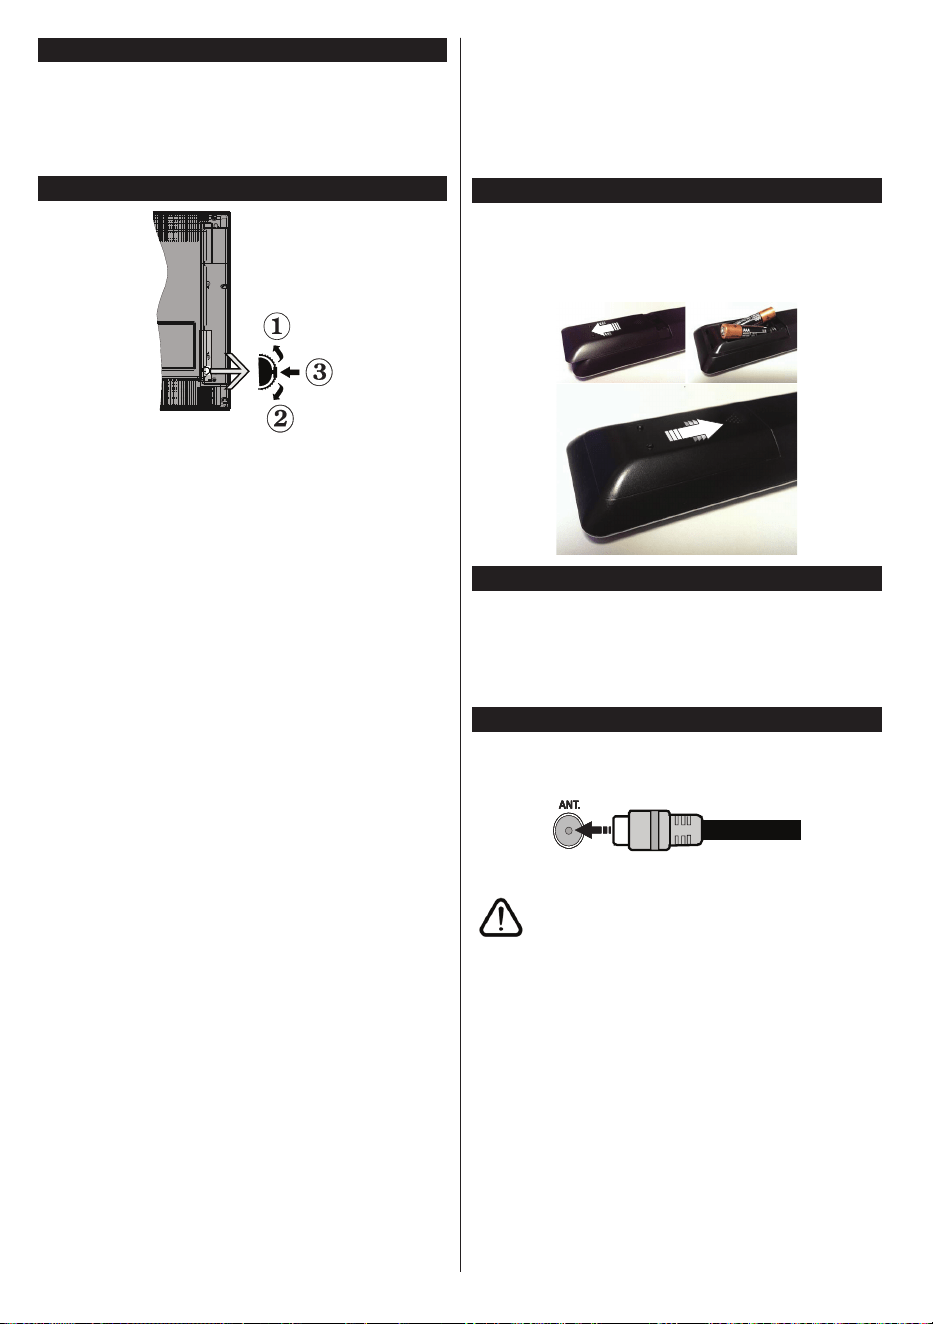
TV Control Switch & Operation
1. Up direction
2. Down direction
3. Volume / Info / Sources List selection and
Standby-On switch
The Control button allows you to control the Volume
/ Programme / Source and Standby-On functions of
the TV.
To change volume: Increase the volume by pushing
the button up. Decrease the volume by pushing the
button down.
To change channel: Press the middle of the button,
the information banner will appear on the screen.
Scroll through the stored channels by pushing the
button up or down.
To change source: Press the middle of the button
twice(for the second time in total), the source list will
appear on the screen. Scroll through the available
sources by pushing the button up or down.
To turn the TV off: Press the middle of the button
down and hold it down for a few seconds, the TV will
turn into standby mode.
Notes:
•If you turn the TV off, this circle starts again
beginning with the volume setting.
•Main menu OSD cannot be displayed via control
button.
Operation with the Remote Control
Press the Menu button on your remote control to
display main menu screen. Use the directional buttons
to select a menu tab and press OK to enter. Use the
directional buttons again to select or set an item. Press
Return/Back or Menu button to quit a menu screen.
Input Selection
Once you have connected external systems to your
TV, you can switch to different input sources. Press the
Source button on your remote control consecutively
to select the different sources.
Changing Channels and Volume
You can change the channel and adjust the volume
by using the Volume +/- and Programme +/- buttons
on the remote.
Inserting the Batteries into the Remote
Lift the cover on the back of the remote gently. Insert
two AAA batteries. Make sure the (+) and (-) signs
match (observe correct polarity). Place the cover
back on.
1.
3.
2.
Connect Power
IMPORTANT: The TV set is designed to operate on
220-240V AC, 50 Hz socket. After unpacking, allow
the TV set to reach the ambient room temperature
before you connect the set to the mains. Plug the
power cable to the mains socket outlet.
Antenna Connection
Connect the aerial or cable TV plug to the AERIAL
INPUT (ANT) socket located on the back of the TV.
If you want to connect a device to the TV, make sure
that both the TV and the device are turned off before
making any connection. After the connection is done,
you can turn on the units and use them.
English - 7 -
Notication
TRADEMARK ACKNOWLEDGMENT
The terms HDMI and High-Definition Multimedia
Interface, and the HDMI Logo are trademarks or
registered trademarks of HDMI Licensing LLC in the
United States and other countries.
Manufactured under license from Dolby Laboratories.
Dolby, Dolby Audio and the double-D symbol are
trademarks of Dolby Laboratories.
DVB is a registered trademark of the DVB Project.
[1] EIA/CEA-861-D compliance covers the
transmission of uncompressed digital video with high-
bandwidth digital content protection, which is being
standardized for reception of high-denition video
signals. Because this is an evolving technology, it is
possible that some devices may not operate properly
with the television.
English - 8 -
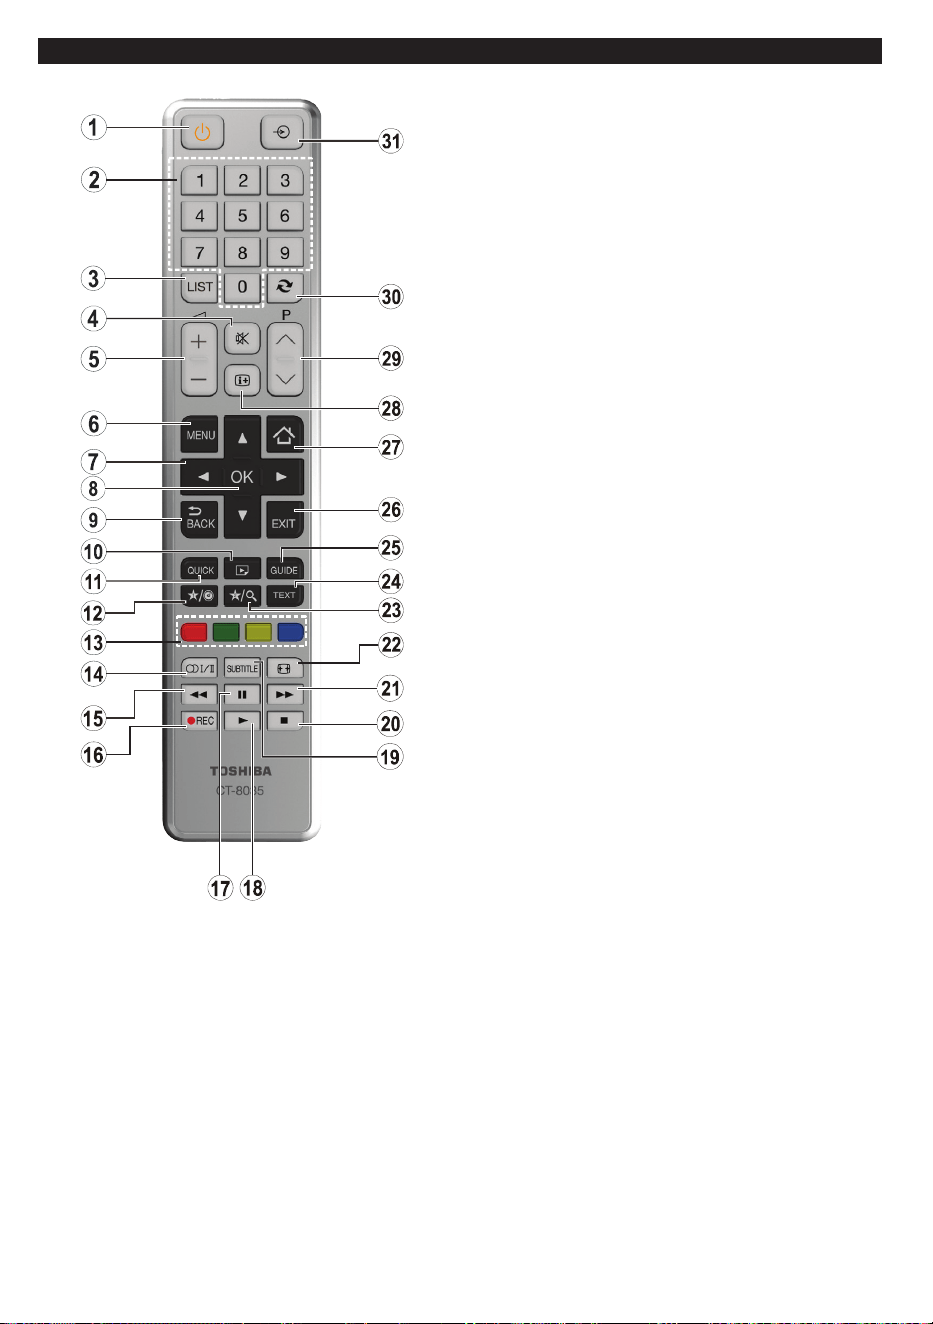
Remote Control
1. Standby: Switches On / Off the TV
2. Numeric buttons: Switches the channel, enters a
number or a letter in the text box on the screen.
3. TV: Displays channel list / Switches to TV Source
4. Mute: Completely turns off the volume of the TV
5. Volume +/-
6. Menu: Displays TV menu
7. Navigation buttons: Helps navigate menus, content
etc. and displays the subpages in TXT mode when
pressed Right or Left
8. OK:Conrmsuserselections,holdsthepage(inTXT
mode), views channel list (DTV mode)
9. Back/Return: Returns to previous screen, opens
index page (in TXT mode)
10. Media browser: Opens the media browsing screen
11. Quick Menu: Displays a list of menus for quick access
12. My button 1 (*)
13. Coloured Buttons: Follow the on-screen instructions
for coloured button functions
14. Language: Switches between sound modes
(analogue TV), displays and changes audio/subtitle
language (digital TV, where available)
15. Rapid reverse: Moves frames backwards in media
such as movies
16. Record: Records programmes
17. Pause: Pauses the media being played, starts
timeshift recording
18. Play: Starts to play selected media
19. Subtitles: Turns subtitles on and off (where available)
20. Stop: Stops the media being played
21. Rapid advance: Moves frames forward in media such
as movies
22. Screen: Changes the aspect ratio of the screen
23. My button 2 (*)
24. Text: Displays teletext (where available), press again
to superimpose the teletext over a normal broadcast
picture (mix)
25. EPG (Electronic programme guide): Displays the
electronic programme guide
26. Exit: Closes and exits from displayed menus or
returns to previous screen
27. Home: Opens the media browsing screen
28. Info: Displays information about on-screen content,
shows hidden information (reveal - in TXT mode)
29. Programme +/-
30. Swap: Quickly cycles between previous and current
channels or sources
31. Source: Shows all available broadcast and content
sources
(*) MY BUTTON 1 & MY BUTTON 2:
These buttons may have default functions depending on
the model. However you can set a special function to these
buttons by pressing on them for ve seconds when on a
desiredsourceorchannel.Aconrmationmessagewillbe
displayed on the screen. Now the selected MY BUTTON is
associated with the selected function.
Note that if you perform First Time Installation, MY BUTTON
1&2 will return to their default function.
English - 9 -
Switching On/Off
To Switch the TV On
Connect the power cord to a power source such as a
wall socket (220-240V AC, 50 Hz).
To switch on the TV from standby mode either:
•Press the Standby button, Programme +/- or a
numeric button on the remote control.
•Press the side function switch on the TV until the TV
comes on from standby.
To Switch the TV Off
Press the Standby button on the remote control or
press the side function switch on the TV until the TV
switches into standby mode.
To power down the TV completely, unplug the
power cord from the mains socket.
Note: When the TV is switched into standby mode, the
standby LED can blink to indicate that features such as
Standby Search, Over Air Download or Timer is active. The
LED can also blink when you switch on the TV from standby
mode.
First Time Installation
When turned on for the first time, the language
selection screen is displayed. Select the desired
language and press OK.
On the next screen, set your preferences using the
directional buttons.
Note: Depending on the Country selection you may be asked
to set and conrm a PIN at this point. The selected PIN cannot
be 0000. You have to enter it if you are asked to enter a PIN
for any menu operation later.
About Selecting Broadcast Type
Digital Aerial: If Digital Aerial broadcast search
option is turned on, the TV will search for digital
terrestrial broadcasts after other initial settings are
completed.
Digital Cable: If Digital Cable broadcast search
option is turned on, the TV will search for digital cable
broadcasts after other initial settings are completed.
Accordingtoyour otherpreferencesa conrmation
message may be displayed before starting to search.
Select YES and press OK to proceed. To cancel
operation, select NO and press OK. You can select
Network or set values such as Frequency, Network
ID and Search Step.Whennished,pressOK button.
Note: Searching duration will change depending on the
selected Search Step.
Analogue: If Analogue broadcast search option is
turned on, the TV will search for analogue broadcasts
after other initial settings are completed.
Additionally you can set a broadcast type as your
favourite one. Priority will be given to the selected
broadcast type during the search process and the
channels of it will be listed on the top of the Channel
List.Whennished,pressOK to continue.
You can activate Store Mode option at this point.
ThisoptionwillcongureyourTV’ssettingsforstore
environment and depending on the TV model being
used, the supported features of it may be displayed
on the top of the screen as an info banner. This option
is intended only for store use. It is recommended to
select Home Mode for home use. This option will be
available in System>Settings>More menu and can
be turned off/on later.
Press OK button on the remote control to continue.
After the initial settings are completed TV will start
to search for available broadcasts of the selected
broadcast types.
After all the available stations are stored, scan results
will be displayed. Press OK to continue. The Edit
Channel List menu will be displayed next. You can
edit the channel list according to your preferences or
press the Menu button to quit and watch TV.
While the search continues a message may appear,
asking whether you want to sort channels according
to the LCN(*). Select Yes and press OK toconrm.
(*) LCN is the Logical Channel Number system that organizes
available broadcasts in accordance with a recognizable
channel number sequence (if available).
Note: Do not turn off the TV while initializing first time
installation. Note that, some options may not be available
depending on the country selection.
Teletext Services
Press the Text button to enter. Press again to activate
mix mode, which allows you to see the teletext page and
the TV broadcast at the same time. Press once more
to exit. If available, sections in the teletext pages will
become colour-coded and can be selected by pressing
the coloured buttons. Follow the instructions displayed
on the screen.
Digital Teletext
Press the Text button to view digital teletext information.
Operate it with the coloured buttons, cursor buttons
and the OK button. The operation method may differ
depending on the contents of the digital teletext. Follow
the instructions displayed on the digital teletext screen.
When the Text button is pressed again, the TV returns
to television broadcast.
English - 10 -
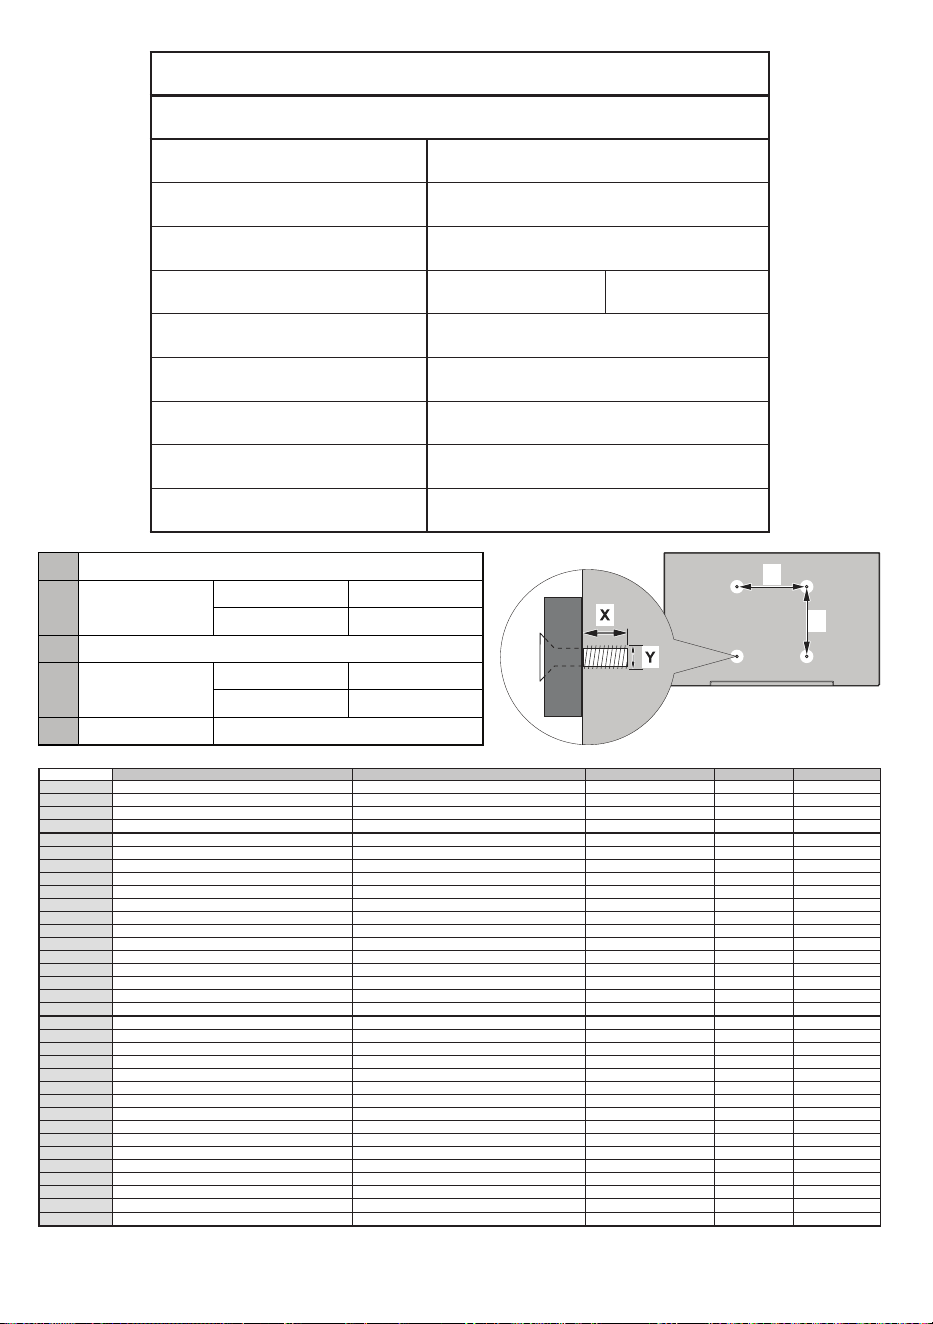
Product Fiche
Commercial Brand: TOSHIBA
Product No. 10104445
Model No. 40L1653DB
Energy eciency class A+
Visible screen size
(diagonal,approx.) (inch/cm)
40 inches 102 cm
On mode average power
consumpon (Wa)
48,0 W
A n n u a l e n e r g y c o n s u m p o n
(kWh/annum)
70,0 kWh
S t a n d b y p o w e r c o n s u m p o n
(Wa)
0,50 W
O m o d e p o w e r c o n s u m p o n
(Wa)
NA
Display resoluon (px) 1920 x 1080
A
VESA WALL MOUNT MEASUREMENTS
B
Hole Paern
Sizes (mm)
W H
200 200
C Screw Sizes
D Length (X)
min. (mm) 10
max. (mm) 13
E Thread (Y) M6
W
H
A B C D E
English VESA WALL MOUNT MEASUREMENTS
Hole Pattern Sizes (mm)
Screw Sizes Length (X)
Thread (Y)
Deutsch MASSANGABEN FÜR VESA-WANDMONTAGE Lochmustergrößen (mm)
Schraubengrößen
Länge (X) Gewinde (Y)
Français DIMENSIONS DU SUPPORT DE FIXATION MURALE VESA Dimensions des modèles de trous de montage (mm)
Dimensions des vis
Longueur (X) Filetage (Y)
Italiano Misurazioni installazione a parete VESA Dimensioni schema foro (mm)
Dimensioni vite
Lunghezza (X) Filettatura (Y)
Português MEDIÇÕES DE MONTAGEM MURAL VESA Dimensões do molde de furação (mm)
Tamanhos do parafuso
Comprimento (X) Rosca (Y)
Español MEDIDAS DEL MONTAJE DE PARED VESA
Tamaños de patrón para agujero (mm)
Tamaños de tornillo
Longitud (X) Rosca (Y)
Türkçe VESA DUVARA MONTAJ APARATI ÖLÇÜLERİ Açılacak Delik Ölçüleri (mm)
Vida Ölçüleri
Uzunluk (X) Yüzey (Y)
Eλληvικ ΔΙΑΣΤΑΣΕΙΣ ΒΑΣΗΣ ΤΟΙΧΟΥ VESA
Μεγέθη σχήματος οπών (mm)
Μεγέθη βιδών
Μήκος (X) Σπείρωμα (Y)
Polski WYMIARY DO MONTAŻU NAŚCIENNEGO VESA Rozmiary szablonu otworów (mm)
Rozmiary wkrętów
Długość (mm) Gwint (Y)
čeština ROZMĚRY DRŽÁKU NA ZEĎ VESA Rozměry velikosti děr (mm)
Rozměry šroubů
Délka (X) Závit (Y)
Magyar VESA FALI TARTÓ MÉRETEK Lyukak méretének nagysága(mm)
Csavar méret
Hossz (X) Menet (Y)
Română MĂSURĂTORI SUPORT PERETE VESA
Dimensiuni tipar gaură (mm)
Dimensiuni şuruburi
Lungime (X) Filet (Y)
Svenska VESA VÄGGMONTERINGSMÅTT Hålmönsterstorlear (mm)
Skruvstorlekar
Längd (X) Tråd (Y)
Nederlands VESA WANDMONTAGE METINGEN
Grootte booropening (mm)
Schroefgroote
Lengte (X) Draad (Y)
Suomi VESA-SEINÄASENNUKSEN MITAT Reikäkuvion koot (mm)
Ruuvinkoot
Pituus (x) Kierre (Y)
Norsk VESA VEGGMONTERINGSMÅL Hullmønster størrelser (mm)
Skruestørrelser
Lengde (x) Tråd (Y)
Dansk VESA VÆGMONTERINGS-MÅL Hulmønster-størrelser (mm)
Skruestørrelser
Længde(X) Tråd (Y)
Русский РАЗМЕРЫ НАСТЕННОГО КРЕПЛЕНИЯ VESA Размеры системы отверстий
Размеры винтов
Длина(Х) Резьба (Y)
беларуская ПАМЕРЫ НАСЦЕННАГА МАЦАВАННЯ VESA Памеры сістэмы адтулін
Памеры вінтоў
Даўжыня (X) Разьба (Y)
македонски
МЕРКИ ЗА МОНТИРАЊЕ НА ЅИД ЗА „ВЕСА“ Шема на големини на дупката (мм)
Големина на шрафот
Должина (Х)
Навој (Y)
український РОЗМІРИ НАСТІННОГО КРІПЛЕННЯ VESA Відстань між кріпильними отворами, мм
Розміри гвинтів
Довжина (X) Діаметр різьби (Y)
Srpski DIMENZIJE VESA ZIDNOG NOSAČA Dimenzije šablona za bušenje
Dimenzije zavrtnjeva
Dužina (X) Navoj (Y)
Slovenčina ROZMERY DRŽIAKA NA STENU VESA Rozmery veľkosti dier (mm)
Rozmery skrutiek
Dĺžka (X) Závit (Y)
Slovenščina
MERE STENSKEGA NOSILCA VESA Velikosti vzorca lukenj (mm)
Velikosti vijakov
Dolžina (X) Navoj (Y)
Hrvatski VESA MJERE ZIDNOG DRŽAČA Veličine uzorka otvora (mm)
Veličine vijka
Dužina (X) Navoji (Y)
Bosanski DIMENZIJE VESA ZIDNOG NOSAČA Dimenzije šablona za bušenje
Dimenzije vijaka
Dužina (X) Navoj (Y)
Български РАЗМЕРИ ЗА КОМПЛЕКТ ЗА МОНТАЖ НА СТЕНА VESA
Размери на отвора (mm)
Размер на болта
Дължинаt (X) Резба (Y)
Lietuvių VESA TVIRTINIMO PRIE SIENOS MATAVIMAI Angos šablono dydis (mm)
Varžtų dydis
Ilgis (X) Sriegis (Y)
Latviešu VESA SIENAS STIPRINĀJUMA IZMĒRI Caurumu šablona izmērs (mm)
Skrūvju izmēri
Garums (X) Vītne (Y)
Eesti VESA SEINALE KINNITAMISE MÕÕDUD Kruvi suuruse mõõt (mm)
Kruvi suurus
Kõrgus(x) Keere (Y)
Shqip PËRMASAT E NJËSISË SË MONTIMIT NË MUR VESA
Madhësitë modele të vrimave (mm)
Madhësitë e vidhave
Gjatësia (X) Filetimi (Y)
يبرع سيياقم VESA تيبثتلل ىلع رادجلا ماجحأ بوقثلا )مم(
ماجحأ يغاربلا
لوطلا )X( نسلا )Y(
תירבע תודימ ןקתמ היילתה לע ריקה גוסמ VESA לדוג תוינבת םירוחה )מ"מ(
לדוג םיגרבה
ךרוא )X( גירבת )Y(
یسراف هزادنا یريگ لاصتا یراويد VESA هزادنا یاه یوگلا خاروس )یليم رتم(
هزادنا یاه چيپ
لوط )X( هتشر )Y(