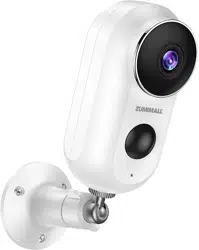
NOTE: Micro SD card and power adapter are not included.
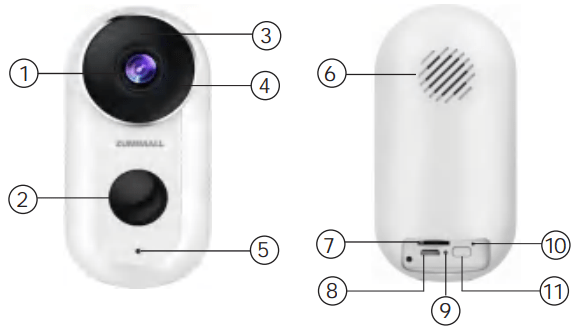
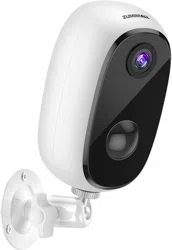
Product Diagram
Camera Lens
PIR Sensor
LED Indicator
IR Lamp
Microphone
Speaker
SD Card Slot
USB Port
Charging Status
Reset Hole
Power Button
Power Button
Keep pressing for 5-10 seconds to power on/power of
Reset Button
Keep pressing for 5-10 seconds to reset
Blink Slowly in Red
Awaiting Wi-Fi connection, ready for adding devices
Blink Fast in Red
Wi-Fi connecting
Solid in Red
Network problem
Solid in Blue
Wi-Fi connected, camera running normally
Blink Slowly in Blue
Firmware update
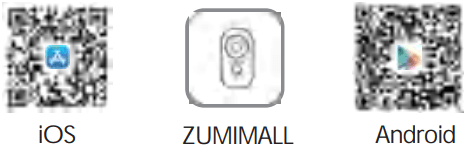
Download & Install App
Download ZUMIMALL App from Google Play™ or App Store™. Or scan the QR codes as below, with your smartphone.
NOTE: Google Play™ is a trademark of Google Inc. App Store™ is a service mark of Apple Inc
NOTE: Please turn on both of the following permissions.
Allow ZUMIMALL to access mobile cellular data and wireless LAN, otherwise, it will fail to connect the camera.
Allow ZUMIMALL to receive pushed messages, otherwise, the smartphone will not receive alarms when motion is detected.
Account Registration
New users need to sign up ’ZUMIMALL’ App with email address. Click ‘Sign up’ to create a new account and follow the steps to complete registration.
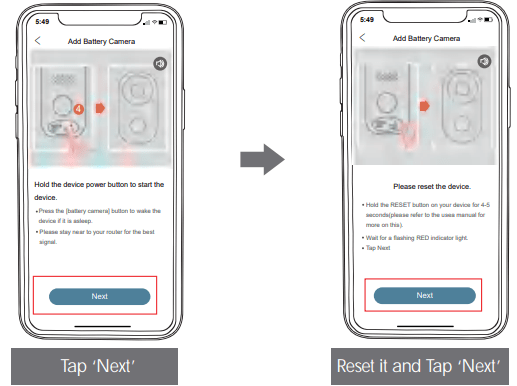
Add Camera to App
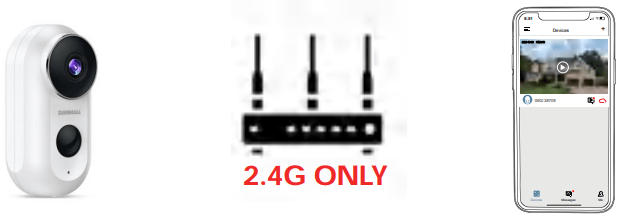
Preparation for Connection
Insert a Mirco SD Card into the camera to save video clips or you can start the 7-day free cloud service. Without Mirco SD Card or cloud service, no video will be saved.
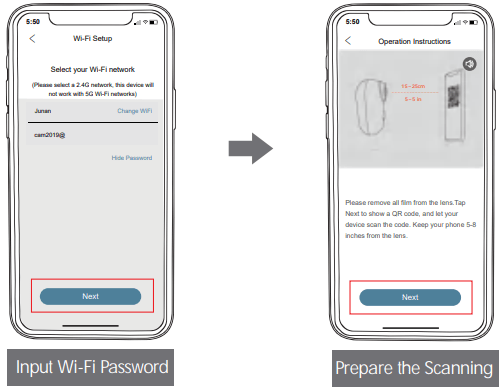
The camera only works with 2.4gHz Wi-Fi, not support 5gHz.
When connecting to the network, please take the camera close to the router (recommended within 10-15ft).
Connect Camera to App
Camera Installation
Step 1:
Fix the bracket to where you want to install the camera with the supplied screw.
Step 2:
Fasten the camera on the metal mount, and fix them.
Step 3:
Adjust the viewing angle of the camera.
Important Notes
To reduce false alarms, please note that:
Do not install the camera in a position facing strong lights/mirror/ window/swimming pool.
Do not place the camera too close to any angle with busy traffic.
Recommended distance between the camera and motion objects is within 32ft.
Keep camera away from the outlets, including air conditioner vents, humidifier outlets, the heat transfer vents of the projectors, etc.
Keep the camera at least 1 meter away from any wireless devices to avoid interference, such as microwave stoves, Wi-Fi routers and etc.
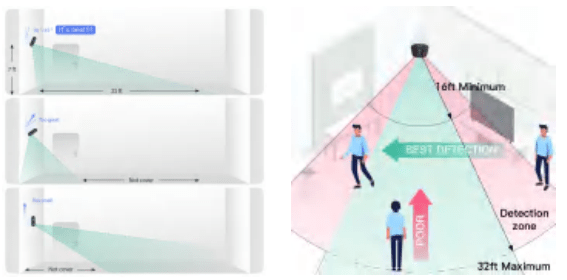
Monitoring Area
It is not suggested to install the camera vertically towards the moving objects, otherwise, it may not detect the motion events or cause delay.
It is suggested to make the angle between PIR Sensor and detected objects more than 10 degrees.
The Camera motion sensor is much more sensitive to side-to-side movement across its field of view than to movement directly toward or away from the camera.
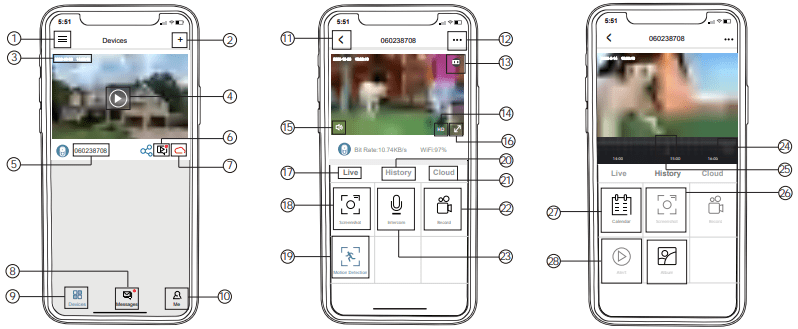
Device Menu
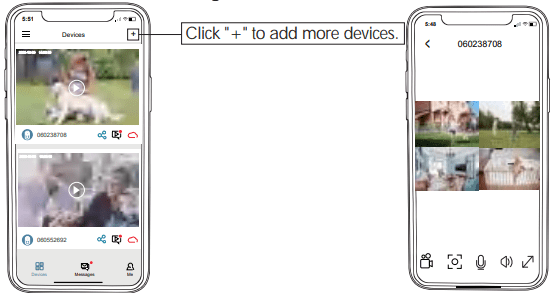
Device List
Add Camera
Real Time
Live View Button
Camera Name
History Playback
Cloud Storage
Messages
My Device List
Personal Homepage
Quit Live Viewing
Setting Manual
Battery Status
HD/SD Switch
Volume On/Off
Full Screen
View Live
Screenshot Button
Body Detection On/Off
Notification History
Cloud Storage
Record to Phone
Two-Way Talk
Zoom
Time Bar
History Screenshot
Alarm Record Album
Date of History Record
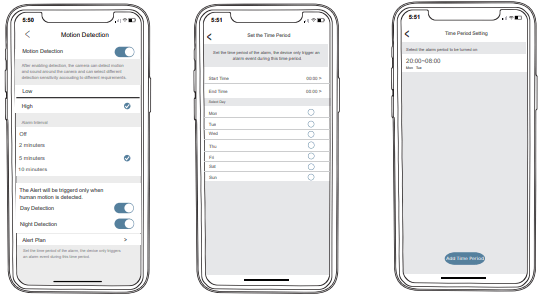
PIR Body Detection
Body Detection Alarm Setting
PIR ‘Motion Detection’ defaults to be ‘High’ level. But it is adjustable. Please refer to the pictures below
NOTE: The higher the sensitivity is, the longer distance the PIR can detect. Accordingly, the battery will drain faster.
Alarm Notification
This camera does not support 7*24 hours all day recording, it is an event recording camera. It is only triggered when motion is detected. Here are system’s reactions:
Alarm notifications with sounds from App.
Pics/videos automatically stored in Micro SD Card or Cloud.
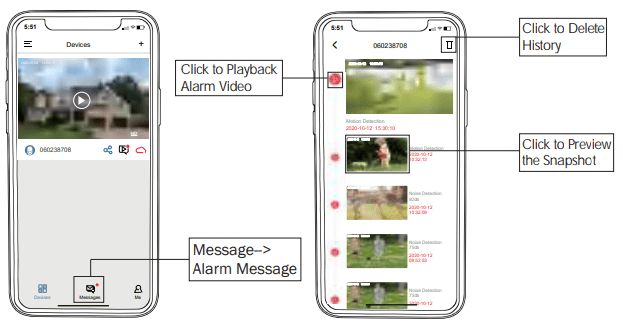
Records/Playback/Delete
On ‘MESSAGES’ page, click ‘Alarm Messages’, you can view all the records listed.
Click the following buttons to playback or delete.
All screenshots or manually recorded videos on live/history/ cloud page will be saved in Pictures & Videos. Files here can be saved in your phone Album or shared with others directly
Two - Way Audio
Go to the live view page
Step 1: Activate the audio option.
Step 2: Press and hold the intercom button to speak.
Step 3: Release the button to listen.
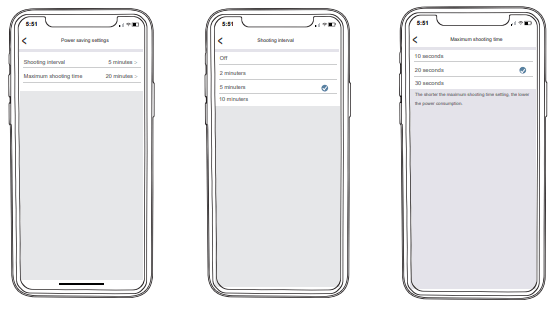
Power Saving Settings
Alarm interval & shooting interval
This is a function that avoids repeated alarms for the same event. You can choose an alarm interval of different lengths, if the interval is 5 minutes, then the camera is triggered at 08:00, you will receive an alarm message, and you will not receive a new alarm push in the next 5 minutes, even if motion detection continues to occur.
NOTE: This function is off by default, you can set it as needed.
Maximum shooting time & recording time
You can choose a different recording length if you set the recording length to 20 seconds, then after the camera is triggered, you can view the 20 seconds of alarm video in the history of cloud playback.
Alarm Plan
You can set the weekly/daily alarm schedule as you need. If you set the camera's working hours from 8:00 p.m. to 8:00 a.m., please set 20:00-8:00 a.m. The camera will only be triggered and record alarm video during this time period.
NOTE: Alarm schedule can be set for up to 4 time periods.
Battery Management
1. The camera has a built-in high-capacity battery, which can be used for 2-3 months, assuming the camera wakes up15 times per day and plays video for 10 minutes each day.
NOTE: The battery durability depends on how frequently the camera is woken up. The more it wakes up, the faster the battery drains. It is recommended to lower down the ‘Motion Detection’ sensitivity or turn it off occasionally
2. When power is less than 20%, the App will send you reminding messages for charging in time.
3. Charge the camera with DC 5V/2A charger, until it is fully charged after 5-8 hours.
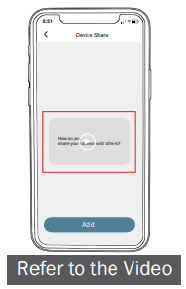
Multi Device Management
Multi Camera Management
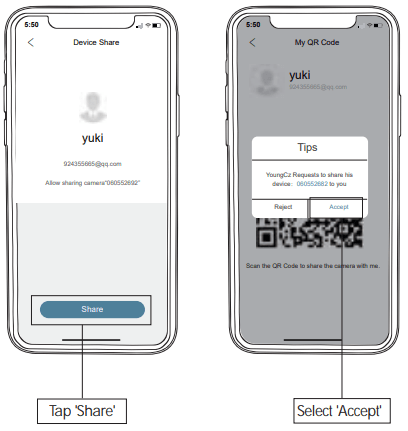
Mulit-User Sharing
NOTE: One App account can’t log in on multiple devices at the same time. One camera can’t be connected to multiple devices either.
But camera can be shared from A to B.
Step 1: B download ‘ZUMIMALL’ App to his/her phone and create a new account in the App.
Step 2: Click ‘Add’ in App on A’s phone.
Step 3: A scan B’s QR Code or input B’s account ID.
Step 4: B accept share and refresh the device page.
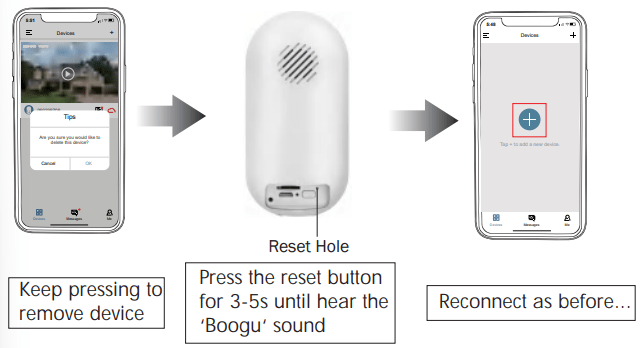
Reset Camera
Trouble Shooting
NO.
Description
Situation
1
Unable to charged
①Use 5V/2A adapter to charge at least 5~8 hours
②Make sure the charging cable and power adapter are working properly
③A red light indicates charging is in progress, a blue light indicates charging is complete
2
Unable to connect
①Check WiFi name and password (password cannot contain special symbols)
②Make sure that the WiFi is 2.4gHz , 5gHz is not supported
③Make sure that the camera and mobile phone are in the same WiFi environment when connecting, and add them close to the router
3
Reset Camera
①Press and hold the reset button until you hear the ‘Boogu’ sound and wait for the camera status indicator red light flash slowly
4
Change to a new network
①Remove the camera from ‘ZUMIMALL’ App
②Restore the factory settings by long pressing the reset button with a pin
③Reconnect
5
No person on video
①Turn up the camera sensitivity
②Moving objects may appear in the camera line of sight is a blind spot, it is recommended to adjusting the camera installation angle of 10 ° ~ 15 °
6
Frequent alarm messages
①Turn down the sensitivity of the motion detection alarm.
②Check whether there are objects within the camera detection range that interfere with and trigger the PIR sensor
③Enable ‘alarm only when someone is present’ and filter useless alarms using humanoid algorithm
7
No alarm when someone walks by
①Ensure that the network signal is good
②Ensure that the motion detection is on and the camera sensitivity is turned up
③Ensure that the motion occurs in the detection range of PIR
8
No alarm push
①Open the phone settings, click on the notification, find ‘ZUMIMALL’ APP, open allow notification
②Open the ‘ZUMIMALL’ APP, in the ‘Settings’ interface, open the alarm push
③In the ‘My’ screen, go to the settings and open the push sound
④Ensure that the device's motion detection function is successfully turned on
⑤Restart the phone, try to clear the cache for Android phones
⑥Check if the network signal is good
9
No alarm video saved
①Ensure that the camera successfully triggers motion detection
②Ensure successful insertion of Micro SD card or subscription to cloud services
10
Device offline
①Check whether the device is in a sufficient state of power, observe whether the camera's status indicator light is on normally
②Check whether the WiFi network is good, restart the router
③If the camera is installed in a location far from the router, resulting in the inability to obtain a good WiFi signal, it is recommended to move the router to a closer location, or add a WIFI signal expander to improve WiFi performance
④Remove the camera from your ZUMIMALL account, reset the device and then re-add it
⑤Check if the device firmware and ZUMIMALL APP are the latest version
11
Battery durability
①Reduce the sensitivity of camera motion detection and reduce the number of camera triggers
②Reduce the number of two-way intercoms and viewing live video
12
APP Flashback
①The system version of your phone is too high or too low
②Download ZUMIMALL APP in the application store again
Or scan the QR code on the manual to download ‘ZUMIMALL’ APP
13
Unable to register account
①Ensure that ‘ZUMIMALL’ APP accesses mobile cellular data and wireless LAN
②Enter an account that has not been registered and make sure the format of the registered account is correct
14
Cannot share devices
①You and your friend's registered accounts must be in the same country
For example, UK users cannot share with US users
15
Two-way intercom no sound
①Open the speaker button on the APP
②Adjust the intercom volume in the settings
③Open the phone media volume
16
Noise during two-way intercom
①If the camera and the phone is too close (1 ~ 2 meters) will produce whistling, it is a normal phenomenon
②Recommended intercom, the camera and cell phone to maintain a certain distance
③Intercom no distance limit
17
Unable to play local history replay
①Check the status of the SD card in ‘Settings’ to ensure that the Micro SD card has been successfully recognized
②Reinsert the Micro SD card
③Format the Micro SD card in APP
④Replace the Micro SD card with a new one
18
White dots on the night screen
①When the light source is directed at the lens, white spots will appear on the screen
②It is recommended that the lens should not be pointed at a strong light source
19
If you have other problems during the use
Please Email us for Better Solution, before returning any unqualified product to Amazon.