AZ
2558
AZ
2558
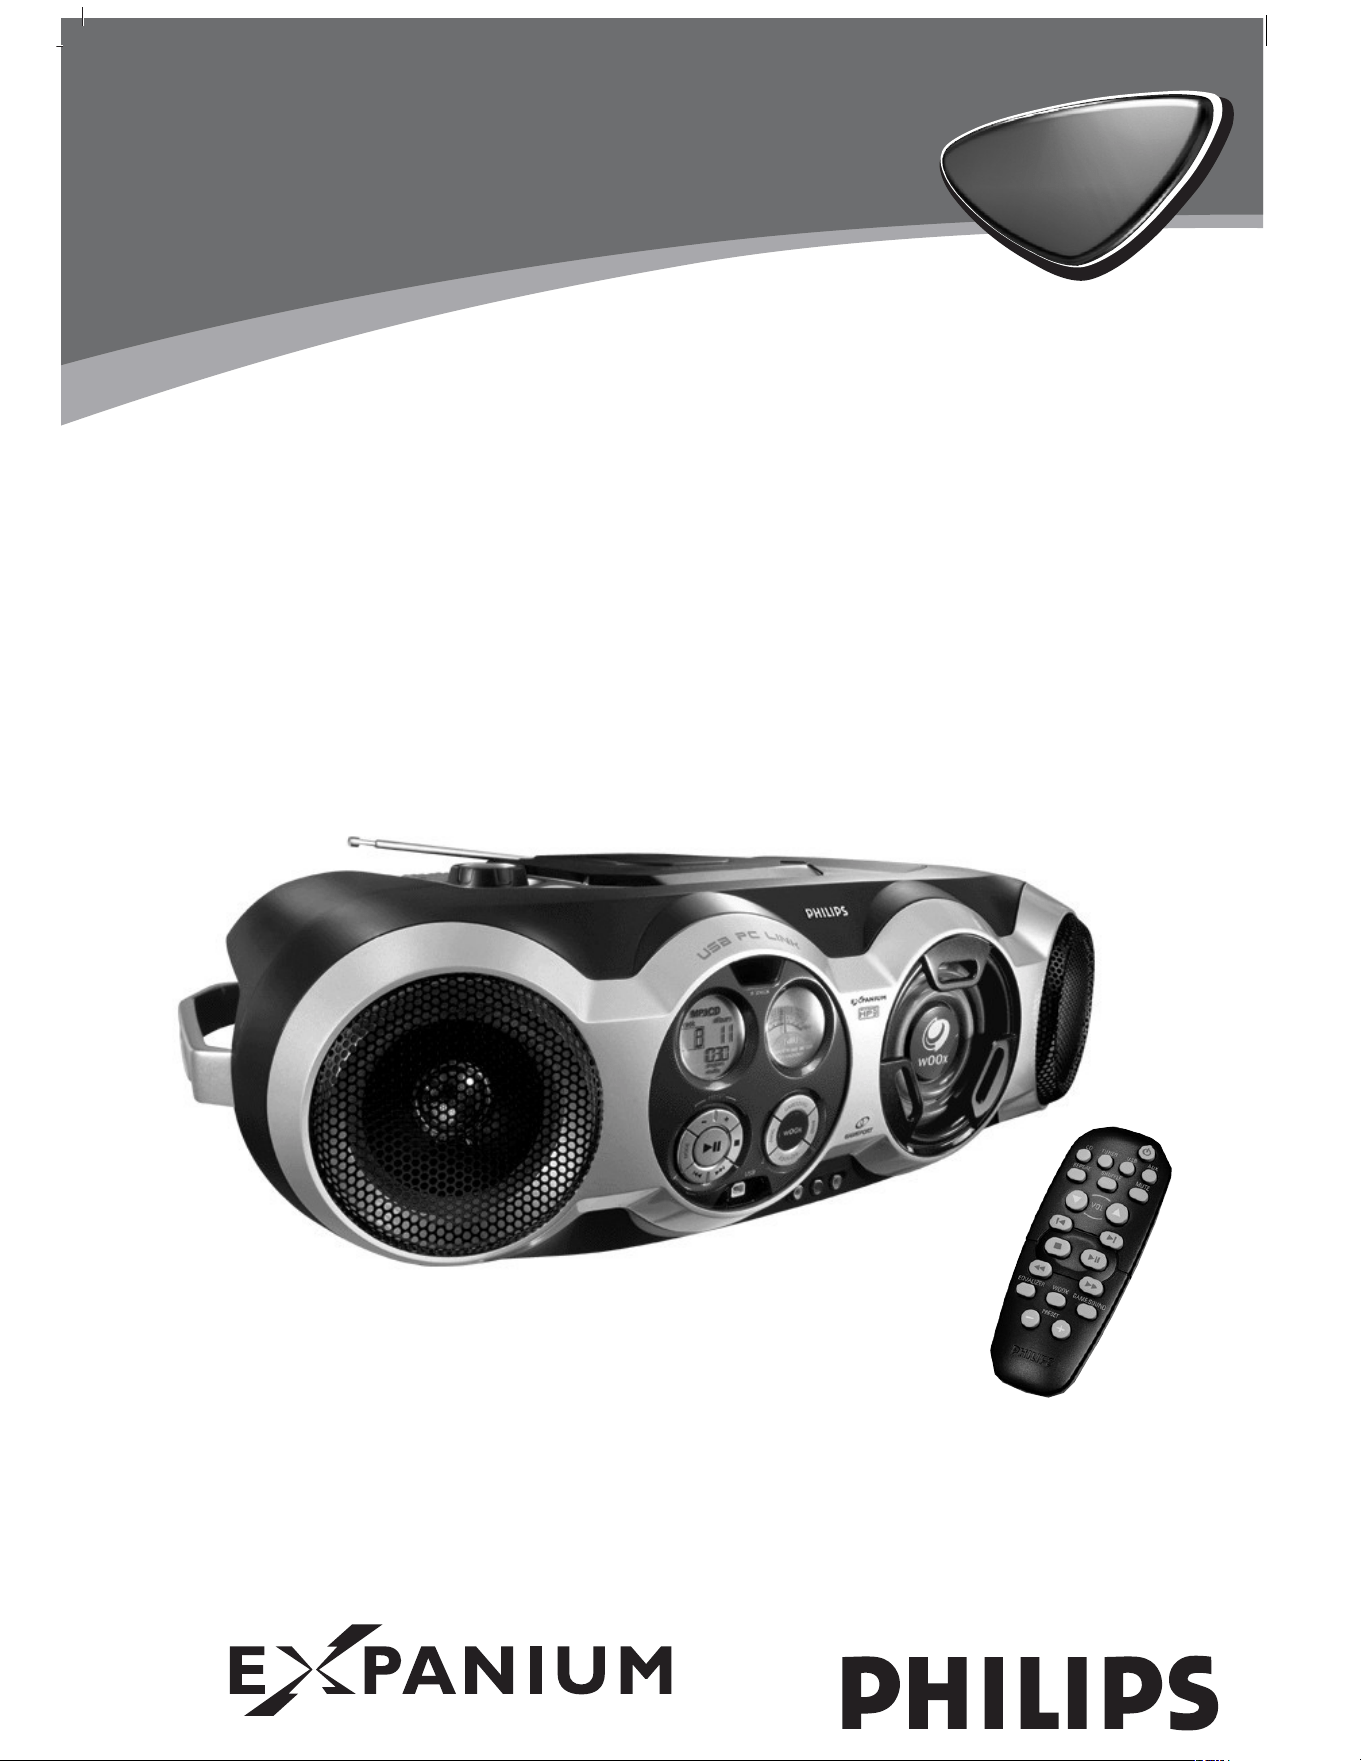
MP3-CD Soundmachine
3
5
6
7
8
9
0
!
#
$
^
%
1
2
4
@
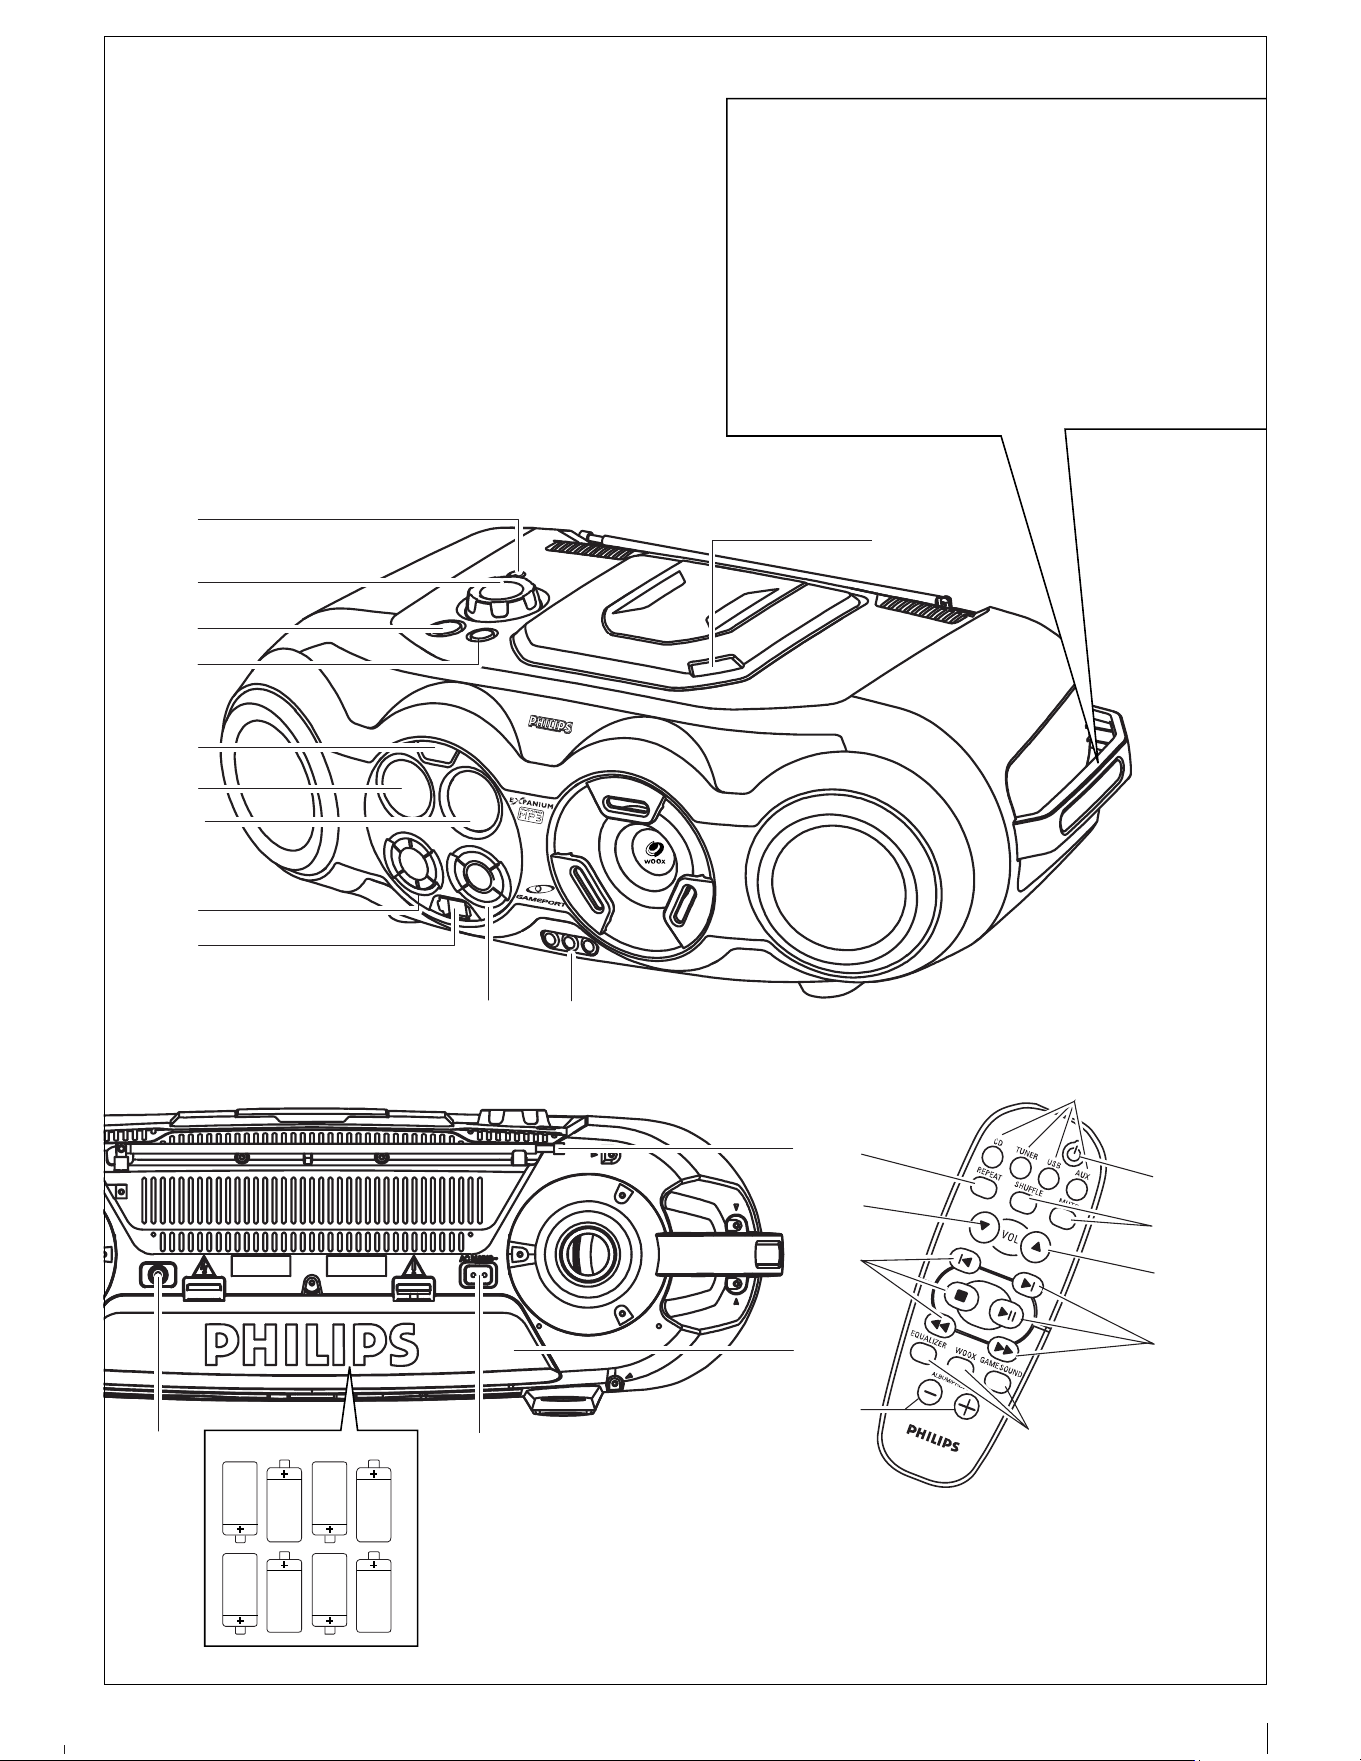
8 x R20/ UM1/ D CELL
2
1
7
5
3
4
5
6
4
3
LOURD !
Soin de prise de votre Soundmachine CD
Saisissez les deux poign
é
es quand vous
portez ou dé placez l'appareil.
Take care of your CD Soundmachine.
Grip both handles when you carry or
lift the set.
HEAVY !
1
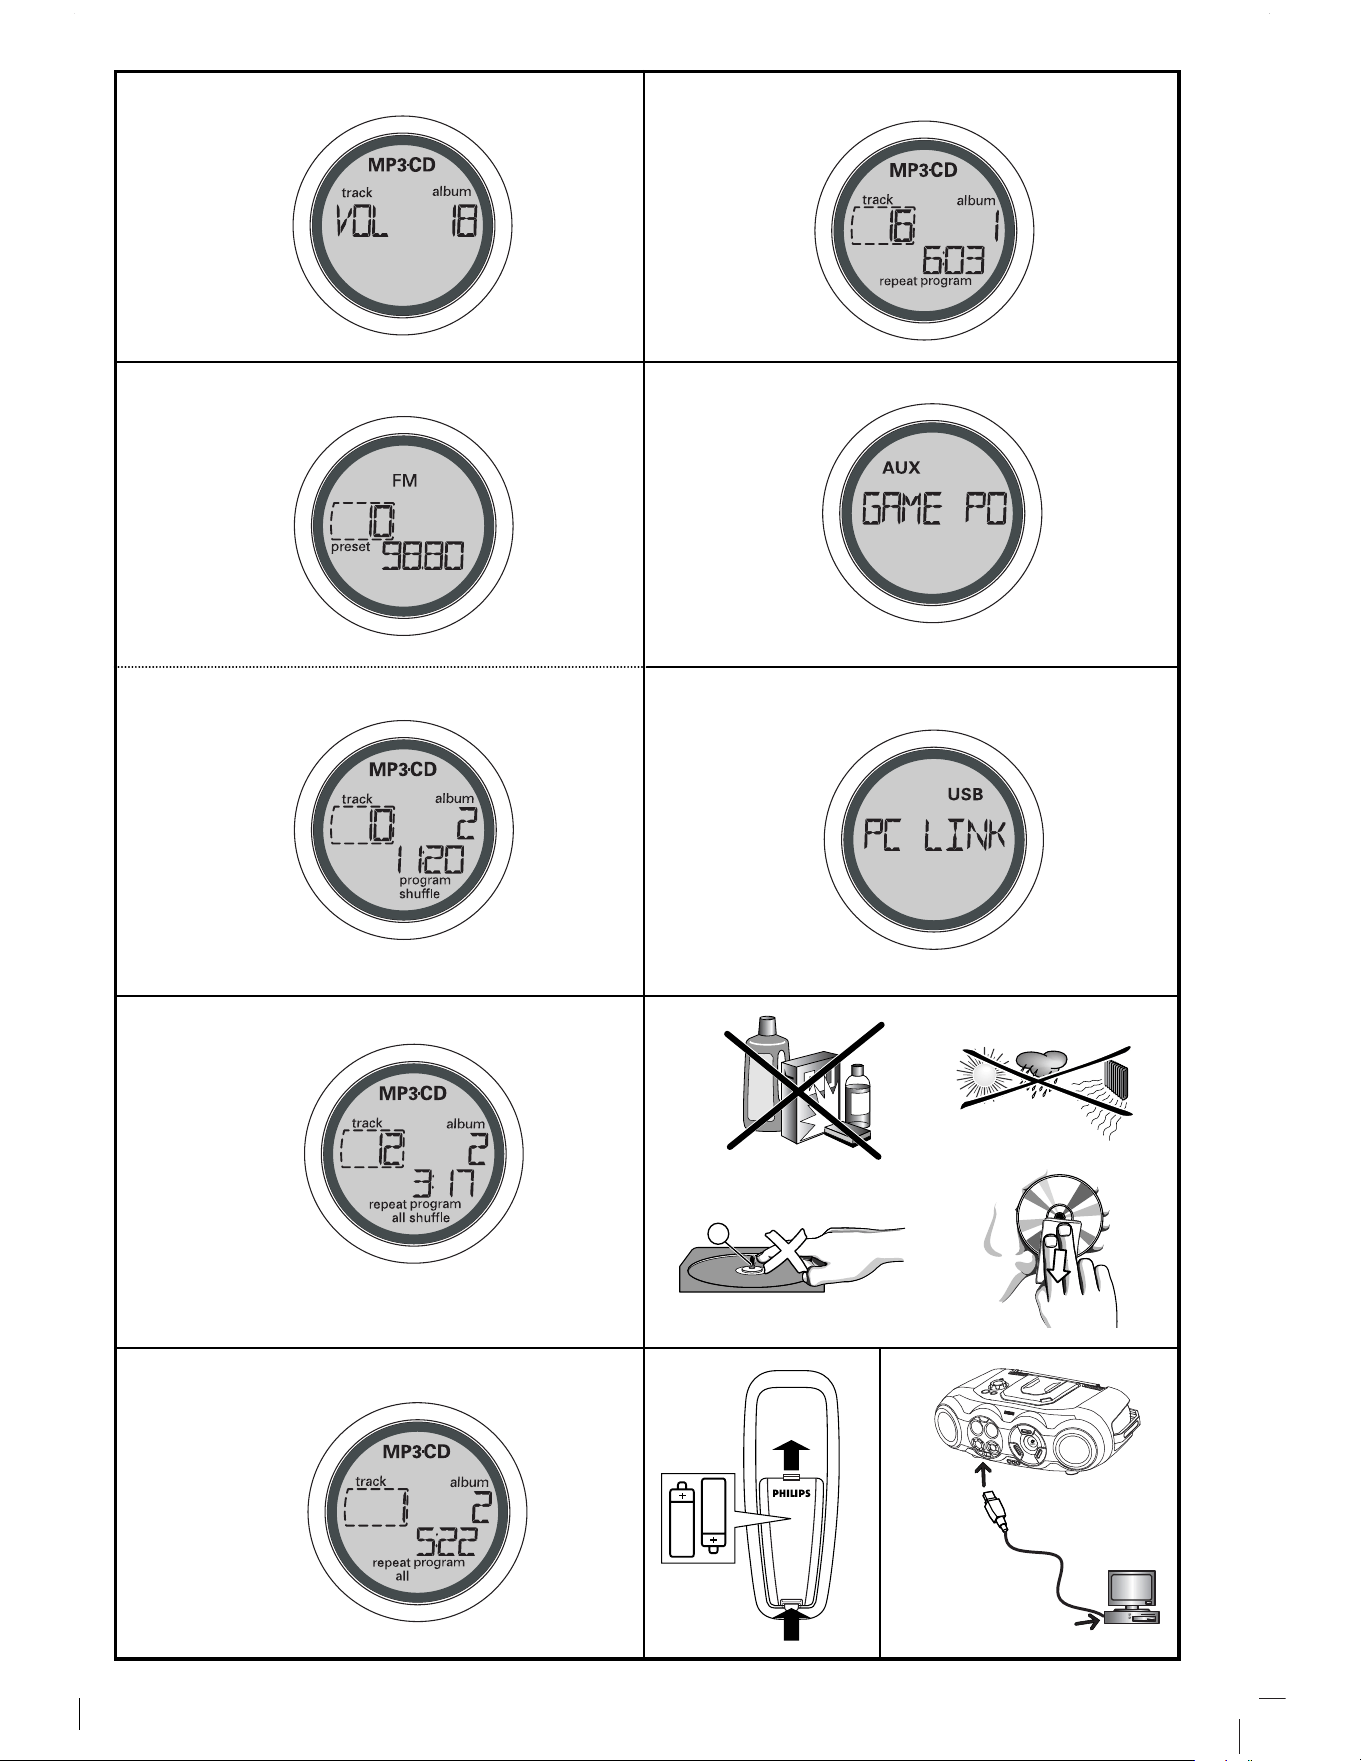
2 x AAA
2
3
4
5
A
X
0
6
8
9
USB
B
7

Mains plug
This apparatus is fitted with an approved 13 Amp plug. To change a fuse in this
type of plug proceed as follows:
1 .Remove fuse cover and fuse.
2.Fix new fuse which should be a BS1362 5 Amp, A.S.T.A. or BSI approved type.
3.Refit the fuse cover.
If the fitted plug is not suitable for your socket outlets, it should be cut off and
an appropriate plug fitted in its place. If the mains plug contains a fuse, this
should have a value of 5 Amp. If a plug without a fuse is used, the fuse at the
distribution board should not be greater than 5 Amp.
N ote: The severed plug must be disposed of to avoid a possible shock hazard
should it be inserted into a 13 Amp socket elsewhere.
How to connect a plug
The wires in the mains lead are coloured with the following code: blue = neutral
(N), brown = live (L). As these colours may not correspond with the colour mar-
kings identifying the terminals in your plug, proceed as follows:
• Connect the blue wire to the terminal marked N or coloured black.
• Connect the brown wire to the terminal marked L or coloured red.
• Do not connect either wire to the earth terminal in the plug, marked E (or e) or
coloured green (or green and yellow).
Before replacing the plug cover, make certain that the cord grip is clamped over
the sheath of the lead - not simply over the two wires.
Copyright in the U.K.
Recording and playback of material may require consent. See Copyright Act 1956
and The Performer’s Protection Acts 1958 to 1972.
Important notes for users in the U.K.

English
Français
CAUTION
Use of controls or adjustments or performance of procedures other than herein
may result in hazardous radiation exposure or other unsafe operation.
ATTENTION
L'emploi de commandes ou de ré glages, ainsi toute utilisation ou procé dure
autres que dé crits dans ce mode d’emploi, peut entraîner une exposition
dangereuse aux radiations ou encore un fonctionnement non conforme aux
normes de sé curité .
This set complies with the radio interference requirements of the
European Union.
Cet appareil est conforme aux normes de la Communauté
Europé enne en matiè re d’interfé rences radio.
IMPORTANT :
Modifications not authorized by the manufacturer may void users authority to operate
this device.
IMPORTANT!
Toute modification effectué e sans l’accord pré alable de fabricant peut annuler
toute possibilité pour le consommateur d’utiliser cet appareil.

Informations relatives à l’environnement
Nous avons fait au mieux pour ré duire l’emballage et le rendre facile à sé parer en trois
maté riaux : carton, polystyrè ne expansé , polyé thylè ne.
Les matériaux qui entrent dans la composition de cet appareil peuvent être
recyclés ou récupéré s par une entreprise spé cialisé e. Veuillez respecter la
législation en vigueur dans votre pays relative à la mise au rebut des emballages, des piles
usagé es et des é quipements inutilisables.
Environmental information
We have done our best to reduce the packaging and make it easy to separate into 3
materials:cardboard, expandable polystyrene, polyethylene.
Your set consists of materials which can be recycled if disassembled by a specialized
company. Please observe the local regulations regarding the
disposal of packaging, exhausted batteries and old equipment.
Informació n medioambiental
El embalaje esta compuesto de tres materiales fá cilmente separables: cartó n (la caja),
poliestireno expandible (amortiguació n) y polietileno (bolsas, plancha protectora de
espuma).
El aparato está fabricado con materiales que se pueden reciclar si son desmontados por
una empresa especializada. Observe las normas locales concernientes a la eliminació n
de estos materiales, pilas usadas y equipos desechables.
Uameltinformationen
Alles ü berflü ssige Verpackungsmaterial wurde vermieden. Wir haben unser mö glich-stes
getan, damit die Verpackung leicht in drei Monomaterialien aufteilbar ist: Wellpappe
(Schachtel), expandierbares Polystyrol (Puf-fer) und Polyä thylen (Beutel, Schutzschaum).
Ihr Gerä t besteht aus Materialien, die von darauf spezialisierten Betrieben wieder-verwer-
tet werden kö nnen. Bitte halten Sie sich beim Entsorgen von Verpackungs-material, ersch
ö pften Batterien und alter Ausrüstung an ö rtliche Bestimmungen.

6 EQUALIZER -- selects bass, mid and high
frequencies
WOOX -- select special bass enhancement on/ off
GAMESOUND - select sound effects: BLAST/
PUNCH/ SPEED/ NORMAL in game mode
7 ALBUM /PRESET -, + :
MP3 only :- select previous / next album.
TUNER :-select a previous / next preset station.
POWER SUPPLY
Whenever convenient, use the power supply to
conserve battery life. Make sure you remove the
power cord from the set and wall jack before inserting
batteries.
Batteries (not included) (See 1)
• Insert 8 batteries, type R-20, UM-1 or D-cells,
(preferably alkaline) with the correct polarity.
Remote control (See A)
• Insert 2 batteries, type AAA, R03 or UM4
(preferably alkaline).
Incorrect use of batteries can cause electrolyte leak-
age and will corrode the compartment or cause the
batteries to burst.
• Do not mix battery types: e.g. alkaline with carbon
zinc. Only use batteries of the same type for the set.
• When inserting new batteries, do not try to mix old
batteries with the new ones.
• Batteries con tain ch em ical substan ces, so
th ey sh ould be disposed of properly.
Using AC Power
1 . Check if the AC power supply, as shown on the
type plate located on th e bottom of th e set ,
corresponds to your local power supply. If it does
not, consult your dealer or service center.
2. If your set is equipped with a voltage selector,
adjust the selector so that it matches with the
local power supply.
3. Connect the power cord to the wall jack and the
set is now ready for use.
4. To disconnect the power supply, unplug the set
from the wall jack.
For users in th e U.K., please follow th e boxed
in struction s ‘Im portan t n otes...’ on th is sh eet.
POWER-SAVING AUTOMATIC STANDBY
As a power-saving feature, the system automatically
switches to standby 15 minutes after MP3-CD / CD has
reached the end and no control is operated.
Th e type plate is located on th e bottom of
th e set.
BASIC FUNCTIONS
Switching on and off and selecting function
1 . Press STANDBY ON
y
on the set to switch on.
2. Press SOURCE once or more to select your
desired function: CD, TUNER, USB PC LINK or
GAME
•AUX
.
3. Press STANDBY ON
y
to switch off the set.
N ote : The tone, sound settings, tuner presets and
the volume level (up to a maximum volume level of
VOL 20 ) will be retained in the set's memory.
Adjusting volume and sound (See 2)
1 . Adjust the volume with the VOLUME control.
= Display shows the volume level and a
number from 0-32.
2. wOOx
To enhance the bass response: press wOOx once or
more to switch on / off.
= wOOx-key backlight lights up when wOOx is
turned on.
N otes:
- wOOx can be used when you play TUNER, CD, USB
PC LINK and GAME
•AUX source.
- Some discs might be recorded in high modulation,
which causes a distortion at high volume. If this
occurs, deactivate w OOx or reduce the volume.
3. EQUALIZER
To adjust the bass, mid and high frequencies press
EQUALIZER once or more, then rotate VOLUME
within 3 seconds to adjust each level.
=Display briefly shows
,
, or
level (-5 to +5) or .
N ote:
1 . EQUALIZER can be used during TUNER, CD, USB
PC LINK and GAME
•AUX source.
POWER SUPPLY BASIC FUNCTIONS

SUPPLIED ACCESSORIES
– remote control
– USB cable
– video cable
– CD-ROM USB PC LINK installers
– AC mains lead
TOP AND FRONT PANEL (See 1)
1
p
- 3.5 mm stereo headphone jack.
Note: The speakers will be muted when headphones
are connected to the set.
2 VOLUME
-adjust volume level or equalizer level
(BASS/ MID /HIGH)
3 STANDBY ON y - switch the set on/ off.
4 SOURCE - selects sound source for functions: CD/
TUNER/ USB PC LINK/ GAME •AUX
5 IR SENSOR -infrared sensor for remote control
6 LCD Display - shows the status of the set
7 [dB]: - display to indicate bass power.
8 ALBUM /PRESET -, + :
MP3 only :- select previous / next album.
TUNER :-select a previous / next preset station.
SEARCH ∞ , §
MP3-CD / CD :
- searches backward or forward ;
- skips to the beginning of a current track/
previous/ later track.
USB PC LIN K -skips to the beginning of a
previous/ later track.
TUN ER : -
tunes to radio stations
2;- s
tarts or pauses
MP3-CD
/ CD / USB PC LINK
playback
9 - stop MP3-CD
/ CD / USB PC LINK
playback;
- erases a MP3-CD
/
CD program.
MODE :
- selects different MP3-CD play modes: e.g. repeat
or shuffle order.
9 USB - connect the supplied USB cable here to the
USB port of your computer
0 GAMESOUND - select sound effects: BLAST/
PUNCH/ SPEED/ NORMAL in GAME •AUX mode
WOOX - selects special bass enhancement on/ off
EQUALIZER -selects bass, mid and high
frequencies.
PROG
MP3-CD / CD : -p
rograms tracks and reviews the
programmed songs;
TUN ER : -
programs radio stations.
BA N D / DISPLA Y
BA N D : - selects waveband
DISPLA Y: - display MP3-CD functions
! AUDIO IN ( LEFT / RIGHT) -LINE-IN jack for
external audio appliance.
VIDEO IN - to keep video plug in place
@ OPEN•CLOSE – press to open/ close CD door
BACK PANEL (See 1)
# Telescopic antenna - improved FM reception
$ Battery compartment - for 8 batteries, type
R-20, UM-1 or D-cells
% AC MAINS - inlet for power cord
^ VIDEO OUT- connect to the VIDEO IN jack on a
TV or VCR for viewing or recording.
REMOTE CONTROL (See 1)
1 CD - selects MP3-CD
/
CD sound source
TUNER - selects tuner source / wavebands
USB - selects USB PC LINK
AUX - selects GAME •AUX
2 y -switches the set to standby / on if set
operating on AC power. (Switches set off only if
battery powered)
3 REPEAT -repeat all tracks in USB PC LINK source
or selects the repeat modes in CD source
SHUFFLE -plays MP3-CD
/
CD tracks in random
order in CD / USB PC LINK source
MUTE - interrupts/ resumes sound
4 VOL 4, 3 -- adjust volume level or adjust equalizer
level (BASS/ MID /HIGH)
5 ¡ , ™ -select previous/ next track in MP3-CD
/
CD /
USB PC LINK playback
9 - stop MP3-CD / CD / USB PC LINK playback;
- erases a MP3-CD / CD program.
2; - starts or pauses MP3-CD / CD / USB PC LINK
playback
5 / 6 -searches backwards/ forwards within a
MP3-CD / CD track.
TUN ER: -
tunes to radio stations
En glish CONTROL
Programming track numbers
Program in the stop position to select and store your
CD tracks in the desired sequence. If you like, store
any track more than once. Up to 20 tracks can be
stored in the memory.
1 . Press SEARCH
∞ or §
on the set to select your
desired track number.(on the remote control
¡ or
™
)
MP3-CD mode only:
First press ALBUM/ PRESET – or + once or more to
find your album, then press SEARCH
∞ or §
. (on
the remote control
¡ or ™
)
2. Press PROG.
™ Display: program and the selected track
number .appears briefly.
™ Display : if no track
selected for programming.
3. Repeat steps 1-2 to select and store all desired
tracks.
™ Display: if you try to program more
than 20 tracks.
4. To start playback of your disc program, press
2;.
N ote: During normal playback, you can press PROG
to add a current track to your program list.
Reviewing the program
In stop position, press and hold down PROG for a
while until the display shows all your stored track
numbers in sequence.
=Display if no tracks programmed.
Erasing a program
You can erase the program by:
• pressing
9
twice;
= displayed briefly, and program
disappears.
• pressing STANDBY ON
y
• selecting another sound source
• opening the CD door.
GAMESOUND (See 8)
PLAYING WITH GAMESOUND:
1 . Press SOURCE once or more on the set to select the
GAME
•
AUX function (AUX on the remote control)
=Display scrolls :
2. Connect your console to the cinches on the front
of the set AUDIO IN ( LEFT / RIGHT) and VIDEO
IN.
3. Press GAMESOUND once or more to select your
game sound option.
=
Display briefly shows , ,
or
.
Connecting other equipment to your system
Use the supplied video cable to connect the VIDEO
OUT terminal on the back of the set to VIDEO IN on
a TV or VCR for viewing or recording.
USB PC LINK
Quick Setup Guide
PC system requirements
– USB port with Windows 98 SE / ME/ 2000/ XP
– Intel Pentium MMXX200 or higher
– CD-ROM drive
Installing MusicMatch software
1 . Use the supplied USB cable to connect the set to the
USB port on your computer. (See B)
2. Press SOURCE (USB on the remote control) once or
more to select USB PC LINK.
3. Turn on your PC then insert the supplied USB PC LINK
installer disc in the PC's CD-ROM drive. This
application software can also be downloaded from
http://www.audio.philips.com.
IM PORTAN T!
Please use th is custom ized M usicM atch
softw are for your USB PC Lin k application .
Rem em ber to un -in stall all oth er M usicM atch
jukebox softw are first from your PC system (if
available).
MP3-CD / CD PLAYER
GAMESOUND / USB PC LINK
2. To prevent sound interference the bass control
options operate exclusively. You cannot combine
the bass from EQUALIZER with w OOx
4. GAMESOUND
To adjust the game sound, press GAMESOUND once
or more to select your option.
=Display briefly shows
, ,
or
.
N ote: GAM ESOUN Dis only available when you
play in GAM E
•
AUX source.
How to MUTE the sound
1 . Press MUTE on the remote control to interrupt
sound reproduction instantly.
= Playback continues without sound and the
display flashes .
2. To reactivate sound reproduction you can:
– press MUTE again;
– adjust the volume controls;
– change to another source.
DIGITAL TUNER (See 3)
Tuning to stations
1 . Press STANDBY ON
y
to on, then press
SOURCE once or more to select TUNER (or press
TUNER once on the remote control).
= Display: shows briefly followed by
waveband, frequency, and preset station
number if already stored.
2. Press BAND / DISPLAY once or more to select your
waveband ( TUNER on the remote control)
3. Tuning to stations: you can tune to your
stations manually or by automatic search tuning:
Press down on
∞ or §
(
5 or 6
on the remote
control ) and release button when the frequency in
the display starts running.
= The radio automatically tunes to a station of
sufficient reception. Display shows
during automatic tuning.
4. Repeat step 3 if necessary until you find the
desired station.
• To tune to a weak station, press
∞ or §
(
5 or
6
on the remote control ) briefly and repeatedly
until you have found optimal reception.
To improve radio reception:
• For FM, extend, incline and turn the telescopic
antenna. Reduce its length if the signal is too
strong.
• For MW, the set uses a built-in antenna. Direct
this antenna by turning the whole set.
Programming tuner stations:
You can store up to a total of 30 radio stations in the
memory, manually or automatically (Autostore).
Autostore
Automatic programming will start from preset 1. The
set will only program stations which are not in the
memory already.
1 . Press ALBUM / PRESET- or + once or more to
select the preset number .
2. Press PROG for 4 seconds or more to activate
auto store programming.
= Display: is shown and available
stations are programmed in order of waveband
FM, followed by MW , preset 1 station will
then be played after all stations are stored
automatically.
Manual programming
1 . Tune to your desired station (see Tuning to
stations).
2. Press PROG to activate programming.
= Display: program flashes.
3. Press ALBUM / PRESET- or + once or more to
allocate a number from 1 to 30 to this station.
4. Press PROG again to confirm.
= Display shows the preset number, waveband
and the frequency of the preset station.
5. Repeat the above four steps to store other
stations.
N ote : You can erase a preset station by storing
another frequency in its place.
To listen to a preset station
Press ALBUM / PRESET- or + once or more until
the desired preset station is displayed.
DIGITAL TUNER DIGITAL TUNER

– is shown if you have inserted a
non-finalized CD-R(W) / black disc.
Note: MP3-CDs may take more than 10 seconds to
read.
4. Press
2;
to start playback.
=Display: Current track number and elapsed track
time during
MP3-CD / CD
playback.
=If MP3-CD, the album number also is shown.
5. To pause playback press
2;
. Press
2;
again to
resume play.
= Time digits flashes during pause.
6. To stop
MP3-CD / CD
playback, press
9
.
7. Press
STANDBY ON y to switch off the set.
N ote:
MP3-CD / CD
play will also stop when:
– the CD door is opened
– the CD has reached the end
– you select other sound source.
M P3-CD/ CD text display
During playback, press the BAND / DISPLAY button
briefly and repeatedly to view text information:
M P3-CDs
Press BAND / DISPLAY once or more to view e.g.
– track name and elapsed track time;
– album name and elapsed track time;
– album number, track number and elapsed track
time;
– ID3 tag details, if available. Otherwise, display
shows .
CDs
Press BAND / DISPLAY once or more to view e.g.
– Current track number and elapsed track time dur-
ing CD playback;
– Remaining playback time of current track.
Selecting a different track
• Press SEARCH
∞ or §
(on the remote control
¡
or ™
) once or repeatedly until the desired track
number appears in the display.
• If you have selected a track number shortly after
loading a disc or in the PAUSE position, you will
need to press
2;
to start playback.
MP3-CD mode only:
First press ALBUM / PRESET – or + once or more to
find your album.
] Display: if no albums are
available.
Finding a passage within a track
1 . Press and hold SEARCH
∞ or §
.(on the remote
control
5 or 6
)
– The CD is played at high speed and low volume.
– No sound is heard during
MP3-CD
fast cue/
review.
2. When you recognize the passage you want,
release
∞ or §
. Normal playback continues.(on
the remote control
5 or 6
)
N ote: Searching is only possible within a track.
Different play m odes: SH UFFLE and REPEAT (See
4 - 7)
You can select and change the various play modes
before or during playback. The play modes can also be
combined with PROGRAM.
shuffle - tracks of the entire CD/ program are
played in random order
shuffle repeat all - to repeat the entire CD/ program
continuously in random order
repeat all - repeats the entire CD/ program
repeat - plays the current track continuously
1 . To select play mode, press M ODE once or more.
(SH UFFLE / REPEAT on the remote control).
2. Press
2;
to start playback if in the stop position.
]If you have selected shuffle, playback starts
automatically.
3. To select normal playback, press M ODE
repeatedly until the various modes are no longer
displayed.
– You can also press the
9
to cancel your play
mode in playing.
M P3-CD / CD PLAYER M P3-CD / CD PLAYER

IMPORTANT SPECIFICATIONS
Supported formats:
• Disc format ISO9660, Joliet and multi-session
CDs. Use ISO9660 disc format when burning CD-
ROMs.
• MP3 music fomats.
• MP3 bit rate (data rate): 32-320 Kbps and variable
bit rate.
• 650Mb and 700Mb CD-R and CD-RWs.
• Directory nesting up to a maximum of 8 levels
(max. 64 characters).
General information
The music compression technology MP3 (MPEG Audio
Layer 3) reduces the original digital audio data by a
factor up to 10 without losing significant sound
quality. This allows you to record up to 10 hours of
CD-like quality music on a single CD-ROM.
How to get MP3 music
Either download legal MP3 music from the internet or
convert your audio CD into MP3 format with any MP3
encoder software, and then record onto a CD-R(W).
• To achieve a good sound quality a bit rate of at
least 128kbps is recommended for MP3 files.
• Some encoder software offer an option to protect
music files, i.e. the files can only be played on the
computer which created them. If you burn such
files on a CD-ROM, you cannot play them on this
set. Make sure to deactivate the protection option
in the encoder software before creating the music
files. In this case you are responsible for
adherence to all local or international copyrights.
When burning the MP3-CD
• To avoid problems with playback or missing files,
make sure the file names are typed in English text
characters and that the MP3 files end with .mp3
• Use a writing software capable of recording MP3
track titles (files) in numerical and alphabetical
order. For details on using the software, refer to
the operating instructions of the software.
• When recording on a CD-RW, make sure that you
close (finalize) all sessions in order for the set to
read and play your tracks.
How to organize MP3 files
You can store up to a maximum number of 35 albums
and 400 titles on one MP3-CD, depending on the song
file sizes.
Albums and titles are alphabetically sorted.
• MP3-CD/ CD albums and titles are shown as
numbers in the display.
IMPORTANT!
This set does not play/support the following:
• Empty albums: an empty album is an album that
does not contain MP3 files, and will not be shown
in the display.
• Non-supported file formats are skipped. This
means that e.g.: Word documents .doc or MP3
files with extension .dlf are ignored and will not
be played.
• Playlist Files e.g. .m3u, .pls of WMA, AAC,
Winamp, Sonic, RealJukebox, MS Mediaplayer
7.0, MusicMatch.
• Recordings created on e.g. PacketWriting and
Package Writing.
Playing MP3-CD & CD
This CD player plays Audio Discs including
CD-R(W)s, and MP3 CD-ROMs.
• CD-I, CDV, VCD, DVD or computer CDs, are not
possible.
1 . Press
STANDBY ON y
once or more to on, then
select CD SOURCE.
2. Press OPEN
•
CLOSE to open the CD door.
] is displayed when the CD door is
open.
3. Insert a CD with the printed side facing up and press
down on OPEN
•
CLOSE to close the CD door.
]Display show ,when reading disc
contents;
]Display : if no disc inserted/
disc incorrectly inserted.,
]Display : or
if disc damaged / dirty:.
– throughout CD operation;
– throughout MP3-CD operation;
– In CD stop mode: total track number and total
playback time.
MP3-CD / CD PLAYER MP3-CD / CD PLAYER

MAINTENANCE & SAFETY (See 0)
CD player and disc handling
• If the CD player cannot read CDs correctly, use a
cleaning CD to clean the lens before taking the set
to repair.
• The lens of the CD player should never be touched!
• Sudden changes in the surrounding temperature
can cause condensation on the lens of your CD
player. Playing a CD is then not possible. Do not
attempt to clean the lens but leave the set in a
warm environment until the moisture evaporates.
• Always close the CD door to avoid dust on the lens.
• To take a CD out of its box, press the center spindle
while lifting the CD.
• To clean the CD, wipe in a straight line from the
center towards the edge using a soft, lint-free
cloth. Do not use cleaning agents as they may
damage the disc.
• Never write on a CD or attach any stickers to it.
Safety Information
• Don't expose the set, batteries, CDs to humidity,
rain, sand or excessive heat.
• Clean the set with a dry cloth. Don't use any cleaning
agents containing alcohol, ammonia, benzene or abra-
sives as these may harm the set.
• Place the set on a hard and flat surface so that the
system does not tilt. Make sure there is good ven-
tilation to prevent the set from overheating.
MAINTENANCE & SAFETY MAINTENANCE & SAFETY

USB PC LINK USB PC LINK
4. The installation guide will appear automatically. If it
does not, go to the CD-ROM drive in Windows
Explorer and double click on the USB PC LINK.exe.
Then perform the following steps:
– Select your desired language from the list.
– Select installer driver.
– Select installer MusicMatch jukebox.
– Select other options (Tutorial, Free goodies,
FAQ).
N ote:
- You are advised to read the MusicMatch tutorial
before using it for the first time. Make sure the
volume on your PC is suitably adjusted to ensure
sound output on the set. For optimum performance,
the equalizer function in MusicMatch should be set to
a low level.
5. Launch MUSICMATCH JUKEBOX and create
your own playlist of favorite songs by dragging and
dropping the music track from anywhere on your PC
into the playlist window.
N ote:
-- If you encounter any problem using the USB PC LINK,
please refer to the FAQ (Frequently Asked Questions)
stored in your USB PC LINK installer disc or visit
w w w .audio.ph ilips.com for the latest FAQ updates .
After setup, refer to "Connecting to USB PC Link"
for details on the USB PC LINK operations.
Enable digital CD audio output
Before playing CDs on your PC’s CD-ROM drive, it is
necessary to configure your PC’s hardware as follows:
For Windows ME/ 2000/ XP
1 . Enter the system panel menu and select
'SYSTEM', 'PROPERTIES', 'HARDWARE',
'DEVICE MANAGER', 'CD-ROM DRIVES' and
'PROPERTIES'.
For Windows 98 SE
2. Check the Enable digital CD audio for this CD-
ROM device setting option is selected (enabled).
N ote:-For w in dow s 98 SE you may need to refer
to your PC's manual for correct configura-
tion.
Connecting to USB PC Link (See 9)
The USB PC LINK allows you to playback your music col-
lection from the PC via the powerful amplifier and speak-
ers of this set.
IM PORTAN T!
M ake sure th e M usicM atch softw are h as been
in stalled. Refer to "Quick Setup Guide" for th e
USB PC Lin k.
1 . Turn on your set and computer .
] Check your PC volume is suitably adjusted and
not set to minimum / mute.
2. Press SOURCE (USB on the remote control) once
or more to select USB PC LINK .
3. If correctly connected your PC will automatically
launch MUSICMATCH JUKEBOX.
] If the audio streaming is detected, the current
track name scrolls .
] If scrolls for a while, check
the connection between your PC and set.
4. Press
¡ or ™
until the desired track in the playlist
is highlighted.
5. Press
2;
to start playback.
] The track time appears and the track name
scrolls once.
N ote: Th e display on ly supports En glish ch arac-
ters in uppercase.
6. If you want to see the track details displayed press
MODE.
During playback,
– Press SHUFFLE on the remote control to play all
available tracks in the playlist in random order.
– Press REPEAT on the remote control to repeat
playback all the tracks in the playlist.
7. To cancel play modes/ stop playback, press
9 or
select another sound sources.
TROUBLESHOOTING
No sound /power
– Volume not adjusted
• Adjust the VOLUME
– Mains lead not securely connected
• Connect the AC mains lead properly
– Batteries flat / incorrectly inserted
• Insert (fresh) batteries correctly
– Headphones connected to the set
• Disconnect headphones
– Electrostatic discharge/interference
• Unplug the set. If batteries inserted, remove batteries
from the battery compartment. Press and hold
STANDBY ON y
for 10 seconds, then re-plug /
replace battery supply, and try activating the set again.
• When in USB PC LINK mode, check that your PC's
volume is audible and not set to minimum.
• When playing a CD from the PC's CD-ROM drive, refer
to USB PC Link - Enable digital CD audio output.
– CD contains non-audio files
• Press SEARCH ∞ or §. once or more to skip to
a CD audio track, instead of the data file
Poor sound quality in GAME
•
AUX mode
• Adjust the volume on the set or on your game console
Severe radio hum or noise
– Electrical interference: set too close to TV, VCR or
computer
• Move the set to increase the distance
Remote control does not function properly
– Batteries flat/ incorrectly inserted
• Insert (fresh) batteries correctly
– Distance/ angle between the set too large
• Reduce the distance/ angle
Poor radio reception
– Weak radio signal
• FM / MW: Adjust the FM / MW telescopic aerial
indication
– CD-R(W) is blank/ not finalized
• Use an unfinalized CD-R(W)
indication
– No CD inserted
• Inserted a suitable disc
– CD badly scratched or dirty
• Replace/ clean CD, see Maintenance
– Laser lens steamed up
• Wait until lens has cleared
The CD skips tracks
– CD damaged or dirty
• Replace or clean CD
– shuffle or program is active
• Switch off shuffle / program
is displayed in USB PC LINK
mode for more than 10 sconds
– Check the connection between your PC and the set. If
necessary, please refer to the chapter Con n ectin g to
USB PC Lin k for the initial setup required.
• Make sure the connected PC is turned on and the
MusicMatch software is working.
Sound skips during MP3 playback
– MP3 file made at compression level exceeding
320kbps
• Use a lower compression level to record CD tracks
into MP3 format
– Disc damaged or dirty
• Replace or clean disc
Cannot find desired MP3 title
– Wrong file extension used and/ or file name with
unsuitable text characters used
• Make sure the file names are typed in English
text characters an that the MP3 files end with
.mp3
If a fault occurs, first check the points listed below before taking the set for repair. If you are unable
to remedy a problem by following these hints, consult your dealer or service center.
WARN IN G:
Do n ot open th e set as th ere is a risk of electric sh ock! Un der n o
circum stan ces sh ould you try to repair th e set yourself, as th is w ill in validate th e w arran ty.
Printed in China
CLASS 1
LASER PRODUCT
AZ 2558
3140 115 3053 2
English Français Españ ol
Meet Philips at the Internet
http://www.philips.com
Deutsch