1
IMPORTANT
CAUTION
RISK OF ELECTRIC SHOCK
DO NOT OPEN
Handle the power cord by the plug. Do not pull out the
plug by tugging the cord and never touch the power
cord when your hands are wet as this could cause a
short circuit or electric shock. Do not place the unit, a
piece of furniture, etc., on the power cord, or pinch the
cord, Never make a knot in the cord or tie with other
cords. The power cords should be routed such that
they are not likely are not likely to be stepped on. A
damaged power cord can cause a fire or give you an
electrical shock. Check the power cord once in a while.
When you find it damaged, ask your nearest
authorized service center or your dealer for a
replacement.
1. Install on a solid, flat surface - but not on top of a speaker.
2. Install away from high heat, moisture, or direct sunlight. Avoid dust, dirt, smoke and steam.
3. Install away from a TV set and tuner, To avoid interference. use an outdoor antenna or turn off the TV set and
tuner.
4. Moisture may condense on the turntable if it is brought from a cold area to a warm room, or if room
temperature increases rapidly. If so, do not use until moisture evaporates:
5. To clean records, use an antistatic spray or cleaning fluid and soft cloth. Wiping with a dry cloth or brush may
cause static noise.
Please read through these operating instructions so you will know how to operate your unit properly. After you have
finished reading the instructions, keep the manual in a safe place for future reference.
In some countries or regions, the shape of the power plug and power outlet may sometimes differ from that shown
in
the drawings. However, the method of connecting and operating the unit is the same.
HANDLING PRECAUTIONS
WARNING : To reduce the risk of fire or electric shock, do
not expose this appliance to rain or moisture.
CAUTION : To reduce the risk of electric shock, do not
remove the cover (or back).
No user-serviceable parts inside.
Refer servicing to qualified service personnel.
This symbol is intended to alert you to the presence
of dangerous
voltage inside the product that
presents
a risk of
electric shock.
Do not open the
product’s case.
This symbol is intended to tell you that important
operating and maintenance instructions are
contained in the papers accompanying this
turntable.
POWER-CORD CAUTION

2
SAFETY INSTRUCTIONS
1. Read Instructions
-
All the safety and operating
instructions should be read before the appliance is
operated.
2. Retain Instructions
-
The
safety and operating
instructions should be retained for future reference.
3. Heed Warnings
-
All warnings on the appliance and
in the operating instructions should be adhered to.
4. Follow Instructions
-
All operating and use instruc-
tions should be followed.
5. Water and Moisture
-
The appliance should not be
used near water - for example, near a bathtub,
washbowl, kitchen sink, laundry tub, in a wet
basement, or near a swimming pool, and the like.
6. Carts and Stands
-
The
appliance should be used
only with a cart or stand that is recommended by
the manufacturer.
6A. An appliance and cart combination
should
be moved with care Quick
stops, excessive force, and uneven
surfaces may cause the appliance
and cart combination to overturn.
7.
Wall or Ceiling Mounting
-
The
appliance should be
mounted to a wall or ceiling only as recommended
by
the manufacturer.
8.
Ventilation
-
The appliance should be situated so
that
its location or position does not interfere with its
proper ventilation. For example, the appliance
should
not be situated on a bed, sofa, rug, or
similar surface that may block the ventilation
openings;
or, placed in a built-in installation, such
as a bookcase or cabinet that may impede the flow
of
air through the ventilation openings.
9. Heat
-
The appliance should be situated away from
hea
t sources such as radiators, heat registers,
stoves, or other appliances (including amplifiers)
that
produce heat.
10. Power Sources
-
The
appliance should be con-
nected
to a power supply only of the type described
in the operating instructions or as marked on the
appliance.
11. Grounding or Polarization
-
Precautions
should be
taken so that the grounding or polarization means
of an appliance is not defeated.
12
. Power-Cord Protection
-
Power-supply
cords
should be routed so that they are not likely to be
walked on or pinched by items placed upon or
against them, paying particular attention to cords at
plugs, conve-nience receptacles, and the point
where they exit from the appliance.
13. Cleaning - The appliance should be cleaned only as
recommended
by the manufacturer.
Clean by wiping with a cloth slightly damp with
water. Avoid getting water inside the appliance.
14. Disconnect power cord before servicing.
15. Replace critical components only with factory
parts or recommended equivalents.
16
. For AC line powered units - Before returning
repaired unit to user, use an ohmmeter to measure
iron both AC plug badges to all exposed metallic
parts. The resistance should be more than
100,000ohms.
17. Nonuser Periods
-
The
power cord of the appliance
should be unplugged from the outlet when left
unused for a long period of time.
18. Object and Liquid Entry
-
Care
should be taken so
that objects do not fall and liquids are not spilled
into
the enclosure through openings.
19
. Damage Requiring Service
-
The appliance should
be
serviced by qualified service personnel when:
A. The power-supply cord or the plug has been
damaged; or
B. Objects have fallen, or liquid has been spilled
into
the appliance; or
C. The appliance has been exposed to rain; or
D. The appliance does not appear to operate
normally or exhibits a marked change in perfor-
mance; or
E. The appliance has been dropped, or the encl.-
sure damaged.
20. Servicing
-
The user should not attempt to service
the appliance beyond that described in the opera-
tinge instructions. All other servicing should be
referred to qualified service personnel.
3
CONDENSATION
When the turntable is brought into a warm room from previously cold surroundings or when the room temperature
is suddenly increased, condensation may form inside and the turntable may not be able to attain its full
performance. In cases like this, use the turntable after allowing it to stand for about an hour or after raising the
room temperature gradually.
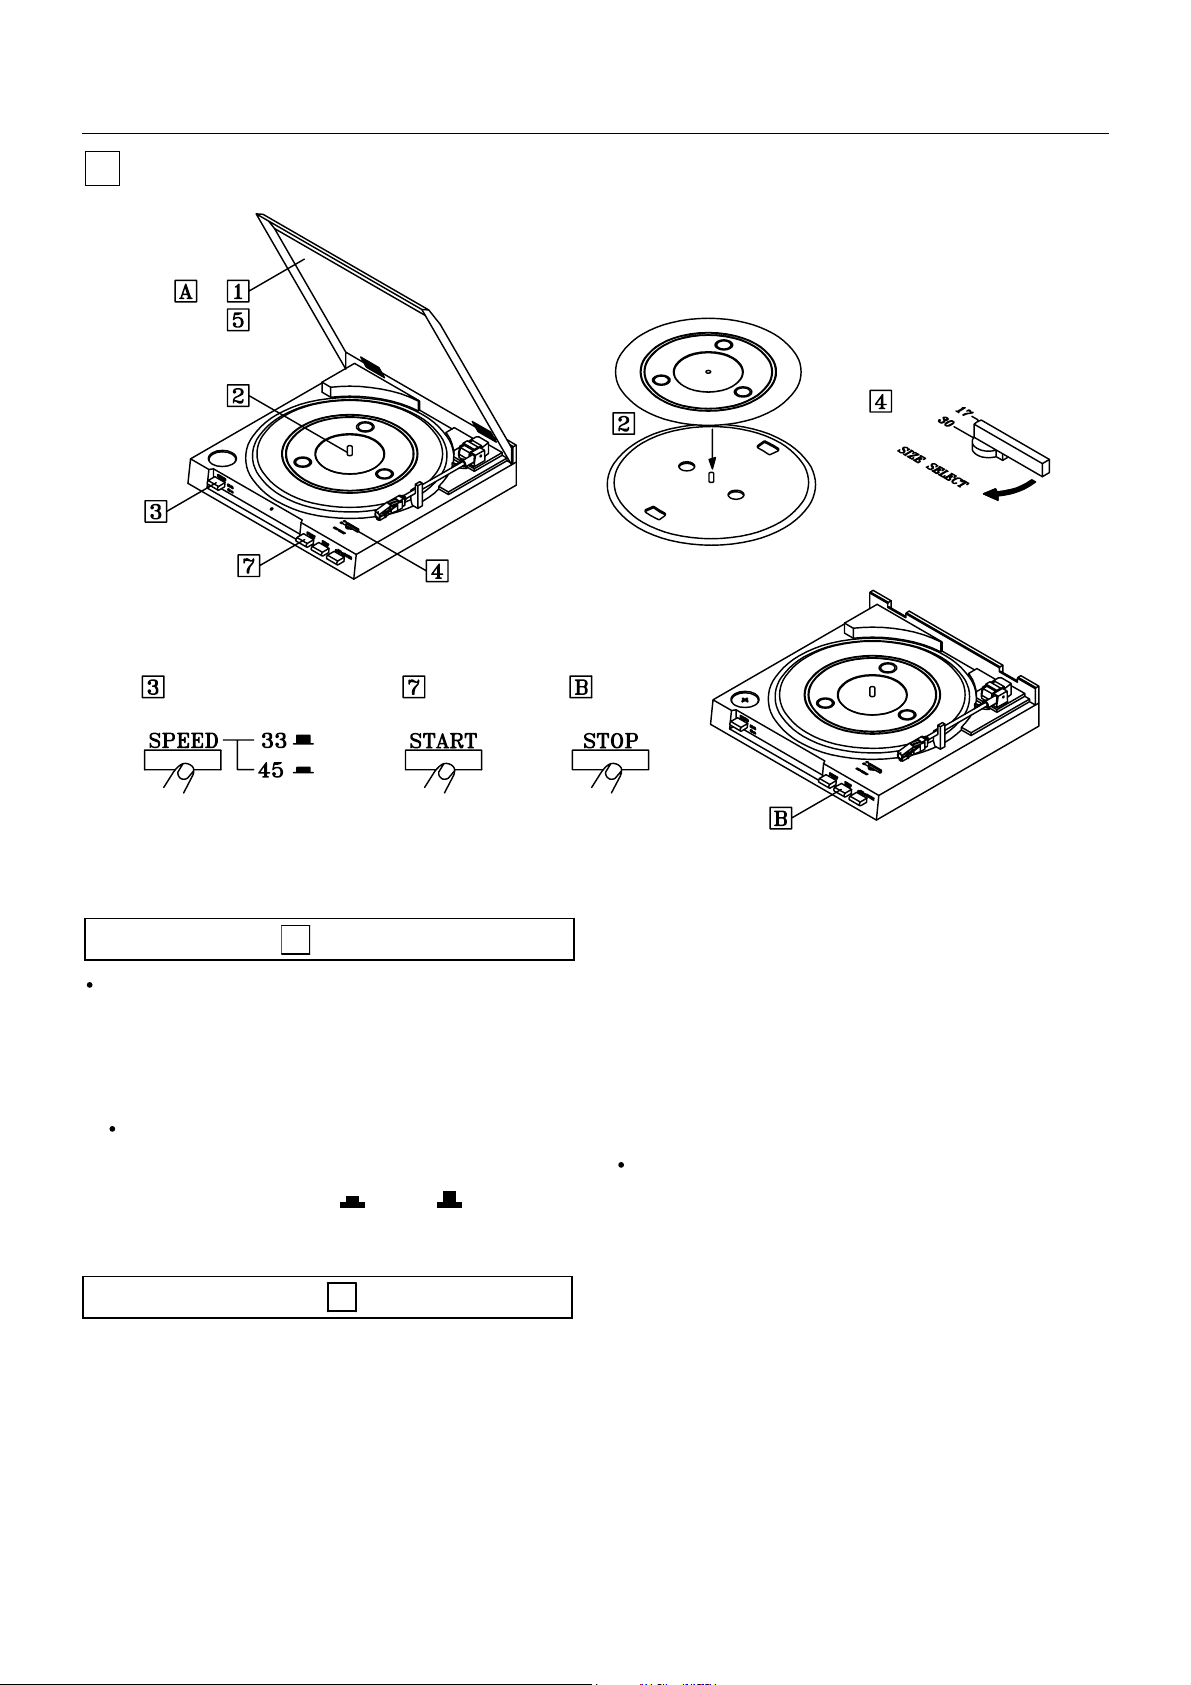
NAMES OF PARTS
1 AC power cord
2 Turntable platter
3 Dust cover
4 Output cord
5 Platter mat
6 Tonearm
7 Cartridge
8 SIZE select (30/17)
9 Arm-elevation button (
UP/ DOWN)
10 STOP button
11 START or PLAY button
12 SPEED button (
33/ 45)
4
BEFORE OPERATION
Please install the accessories on to the main turntable unit as follows:
1. Place the rubber slip mat on top of the platter.
2. Remove the twist tie securing the tonearm assambly.
3. Remove the clear plastic stylus guard.
Connections:
1
2
3
PHONO
Input
Jacks
Pre-amp
Selector
Switch
Amplier
White
Red
AC
AC
Figure 1 Inputs and pre-amp selector switch
Before making or changing any connections, please switch o the mains power switch and disconnect
from the AC power outlet.
1. Connect the red plug to your ampliers AUX or Phono ‘R’ jack.
2. Connect the white plug to your ampliers AUX or Phono ‘L’ jack.
3. Connect the power cord to your household mains power outlet.
For increased exibility of use, this turntable has an internal stereo phon pre-amplier. The Pre-amp
Selector Switch is located under the turntable platter, in the rear-centre (Fig. 1). If the system amplier
you are using has a PHONO input, set the Pre-amp Selector Switch to the “OFF” position. If your amplier
does not have a PHONO input, set the Pre-amp Selector Switch to the “ON” position and connect the
turntable’s output cables to the AUX or other high-level input on the amplier.
5
OPERATION
A
Automatic Play
A
30-cm (12”) LP records and 17-cm (7”) EP records
can be played automatically.
1 Open the dust cover.
2 Place the record on the platter.
Place the EP adaptor over the center spindle when
playing 17-cm (7”) EP records.
3 Set the SPEED button to
45 or 33.
4 Set the SIZE selector to 17 or 30
5 Close the dust cover.
6 Set the input selector on the amplifier.
7 Press the START or PLAY button.
8 Adjust the volume control on the amplifier.
The tonearm will automatically return to the rest
position when the record finishes.
To stop during play
B
Press the STOP button.

6
A B
Cleaning the stylus
A
A dirty stylus will cause noise and poor sound quality.
Use a stylus cleaning kit and brush off the dirt in the
direction of the arrow.
Do not brush in the opposite direction or from side to
side, since this can damage the stylus.
Replacing the stylus
B
When the sound quality drops, replace the stylus with
a new one Remove the old stylus by pulling it
downwards gently, and push the new stylus into place
as shown.
MAINTENANCE OF EXTERNAL SURFACES
Use a polishing cloth or dry cloth to wipe off dust
and dirt.
When the surfaces are very dirty, wipe with a soft
cloth dipped in some neutral cleanser diluted five or
six times with water, and wrung out well, and then
wipe again with a dry cloth. Do not use furniture wax
or cleaners.
Never use thinners, benzene, insecticide sprays and
other chemicals on or near this unit, since these will
corrode the surfaces.
SPECIFICATIONS
POWER SUPPLY : 240V, 50Hz
Power Consumption: 2W
Output Sensitivity: Line output: 112~270mv 1khz
Phono output: 1.5~3.6mv
Output Impedance: 47Kohms
DIMENSIONS : 350(W) x 341 (D) x 98 (H) mm
WEIGHT : 2.7Kgs
Precautions when playing records
Do not rotate or stop the platter manually.
Do not stop the tonearm manually when it is
returning automatically.
Moving or jarring the unit without securing the
tonearm can damage the tonearm.
Playing flexible records or badly warped records
can damage the records and the stylus.
MAINTENANCE