User Manual
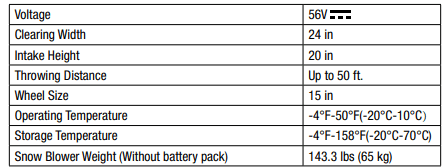
SPECIFICATIONS
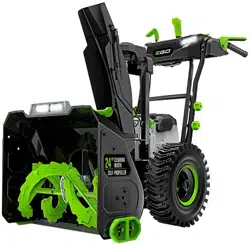
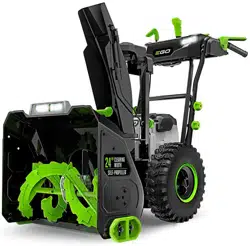
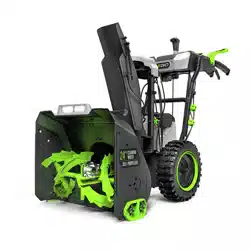
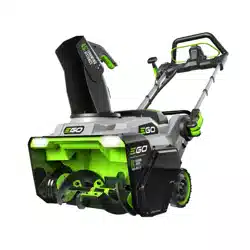
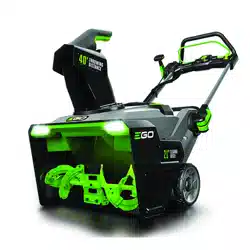
DESCRIPTION
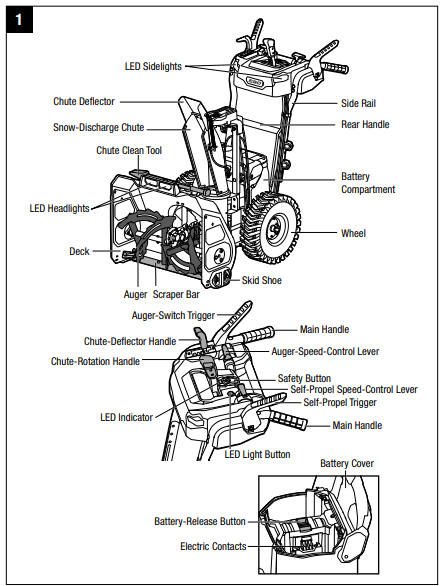
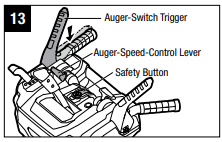
Safety Button
The safety button must be pressed down before the motor can be started.
WARNING: The safety button is safety device. Never attempt to bypass its operation.
Auger-Switch Trigger
Engages and disengages the motor. It can be working after pressing the safety button.
Auger-Speed-Control Lever
Adjusts the auger speed in order to adjust the throwing distance.
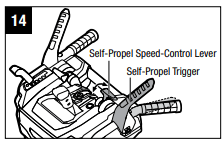
Self-Propel Trigger
Turns the self-propel function ON and OFF.
Self-Propel Speed-Control Lever
Increases or decrease the self-propel speed.
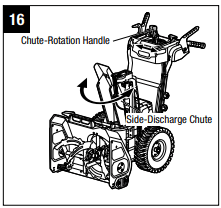
Chute-Rotation Handle
Rotates the chute so that the user may direct the discharged snow as desired. The handle allows the chute to rotate from left 100° to right 100°.
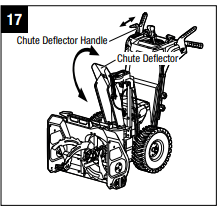
Chute-Deflector Handle
Adjusts the angle of the chute deflector and the height of the discharge stream.
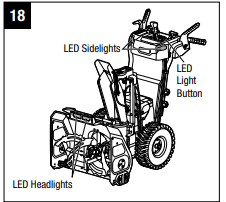
LED Headlights/Sidelights
This feature provides extra light for increased visibility
LED Light Button
Turns on/off the LED headlights and sidelights.
LED Indicator
Indicates the status of the snow blower and battery pack.
Scraper Bar
Removes the last bit of snow from the surface you are clearing.
Skid Shoe
Increases the ability to maneuver the snowblower on the snow and adjusts the distance between snow scraper and ground.
Battery-Release Button
Press to release the battery quickly.
ASSEMBLY
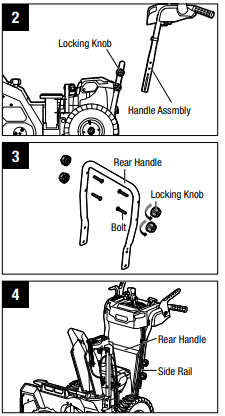
TO INSTALL THE HANDLE ASSEMBLY
NOTICE: The handle assembly requires assembly before operating the snow blower (Fig.2).
- Loosen the four locking knobs and remove the four bolts from the rear handle (Fig.3).
- Lift the handle assembly, align the holes in the side rails with the holes in the rear handle, select the preferred handle height, then secure the handle assembly with the bolts and locking knobs (Fig.4). Please see section “HANDLE HEIGHT ADJUSTMENT” for detailed adjustment instructions.
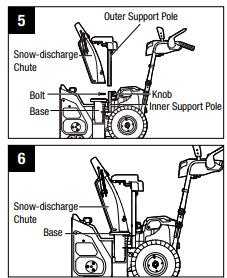
TO INSTALL THE SNOW DISCHARGE CHUTE ASSEMBLY
1. Loosen the knob on the inner support pole and remove the bolt (Fig.5). Save the knob and bolt for reassembly.
2. Lift the snow-discharge chute assembly, align the outer support pole with the inner support pole, and then slide the outer support pole into place (Fig. 5). Make sure that the snow-discharge chute is correctly seated on the base (Fig.6).
3. Secure the snow discharge chute assembly with the reserved knob and bolt.
OPERATION
APPLICATION
You may use this product for purpose listed below: Removing snow from areas such as driveways and sidewalks.
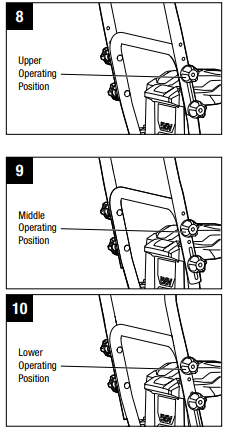
HANDLE-HEIGHT ADJUSTMENT
The handle assembly can be set to three different heights. Choose a comfortable operating position according to your height.
1. Loosen the two upper locking knobs and pull out the two bolts (Fig.7). Save them for reassembly.
2. Loosen the two lower locking knobs. It is not necessary to remove the two lower locking knobs and bolts from the side rails during handle height adjustment.
3. Raise or lower the handle and select the appropriate height relative to the positions of the holes in the rear handle.
4. Once arriving at the appropriate holes, tighten the handle with the reserved knobs and bolts; then tighten the two lower locking knobs to secure the rear handle.

The illustration shows the upper operating position (Fig.8), the middle operating position (Fig.9) and the lower operating position (Fig.10).
TO ATTACH/DETACH THE BATTERY PACK
CHARGE BEFORE FIRST USE.
NOTE: For best performance, we recommend use with two 5.0 Ah EGO 56V Arc-Lithium batteries or with two EGO 56V Arc-Lithium batteries of greater capacity. When not in use, 56V battery packs should be stored in an enclosed area where the temperature will not drop below -4°F (-20°C). Optimal charging temperatures are between 41°F (5°C) and 104°F (40°C).
WARNING: If any parts are broken or missing, do not attempt to attach the battery packs to the snow blower or operate the snow blower until the broken or missing parts are replaced. Failure to do so could result in serious injury.
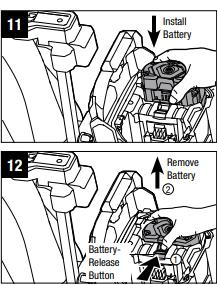
1. The battery cover is hinged. Raise the battery cover by lifting the front of the cover.
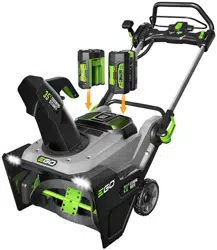
2. The snow blower is equipped with two battery compartments, which accommodate two battery packs at the same time.
3. Align the grooves in the battery pack with the raised ribs in one of the battery compartments, and then insert the battery pack into the compartment (Fig.11).
4. Push the battery pack until you hear a “click”. The battery-release button will spring up when the battery pack is securely attached.
5. Attach the other battery pack into the other battery compartment in the same way.
6. To detach the battery pack, depress the battery-release button to release the battery pack, and then lift it out of the compartment (Fig. 12).
7. Close the battery cover.
STARTING/STOPPING THE SNOW BLOWER
To Start the Snow Blower
1. Ensure that the handle assembly is securely adjusted to appropriate height, the side-discharge chute assembly is mounted properly, and the chute and chute deflector are adjusted to an appropriate position.
2. Attach the battery pack(s) to the snow blower and close the battery cover.
NOTICE: Make sure that the latch on the snow blower snaps into place and that the battery pack(s) are secured to the snow blower before operation.
3. Press the safety button and hold for 1 second, and the LED indicator will blink green. Press the auger-switch trigger to turn on the snow blower while the LED indicator blinks (Fig.13).
NOTICE: The snow blower can be turned on by the auger-switch-trigger only when the LED indicator blinks.
NOTICE: The snow blower may not properly start if its battery temperature is -4°F (-20°C) or less. If the snow blower doesn’t start, remove the battery from the snow blower and allow it to warm indoors for 10 minutes or longer. Reinstall the battery and try again.
To Stop the Snow Blower
1. Fully release the auger-switch trigger.
2. The electric brake in the Automatic Braking Mechanism will stop the auger rotation within 3 seconds of the auger-switch release.
Variable-Auger-Speed System (Fig. 13)
The speed of the auger can be adjusted to control the throwing distance.
1. To increase the speed, push the auger-speed-control lever forwards.
2. To decrease the speed, pull the auger-speed-control lever backwards.
Variable-Speed Self-Propel System (Fig.14)
This snow blower is equipped with variable-speed self-propel capability. This system is independent of the auger On-Off switch; it is not dependent on auger rotation. For example, when you have completed cleaning of the driveway, you can use the self-propel function to propel the snow blower to your storage location without auger rotation.
To operate the self-propel system without auger rotation, press the self-propel trigger to the handle.
To turn the self-propel function off, release the self-propel trigger. The system has variable speed. To increase the speed, move the self-propel speed control lever forwards. To decrease the speed, move the self-propel speed control lever backwards.
To move the snow blower backward, first stop the self-propel function; pull the self propel speed-control lever all the way toward the back of the snow blower, then press the self-propel trigger.
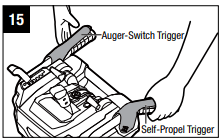
AUIGER-SWITCH TRIGGER AND SELF-PROPEL TRIGGER LINKAGE (Fig. 15)
When you activate the self-propel trigger and the auger-switch trigger at the same time, the auger-switch trigger will be temporarily locked. Release the auger switch trigger (right hand) and the auger switch trigger will remain engaged. This feature allows you to adjust the auger speed, self-propelling speed, and discharging direction of the snow while the auger rotates.
To stop the auger, release the self-propel trigger and both the auger and the self-propel function will stop.
CHUTE AND DEFLECTOR ADJUSTMENT
The chute can be adjusted to change both the direction and the distance of the discharged snow to assist you in moving snow away from one area and placing it in another.
The direction of snow removal can be adjusted up to left 100° and right 100° (Fig.16).
1. Pull the chute-rotation handle to the left to rotate the chute to the left.
2. Pull the chute-rotation handle to the right to rotate the chute to the right.
The throwing distance of the snow blower is adjusted by moving the chute deflector up or down.
To increase or decrease the distance that the snow is thrown, pull the chute deflector handle backward or forward to raise or lower the chute deflector(Fig.17). Once arriving at the desired chute deflector position, engage the chute deflector handle back into the locking slot.
LED SIDELIGHTS AND HEADLIGHTS OPERATION (Fig.18)
The LED sidelights are located on both left and right of the handle assembly. The LED headlights are located on the front of the deck. Press the LED light button once to turn on both the sidelights and headlights. Press the LED light button twice to turn off the sidelights. Press the LED light button three times to turn off all the lights.
NOTICE: All the LED lights will turn off automatically if the snow blower is not being operated within 5 minutes.
LED INDICATOR ON THE SNOW BLOWER (Fig. 19)
The snow blower is equipped with a LED indicator to indicate the charge level of the battery pack(s) and the working status of the snow blower.
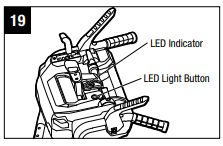
Shinning Green
- Snow blower is working properly; each battery has at least 15% of its charge.
Flashing Red
- The battery is nearly depleted.
- Stop the snow blower and charge the battery pack(s).
Flashing Green and Red alternately
- Error
- Contact EGO customer service center
Shinning Orange
- The snow blower stops due to overheating.
- Remove the batteries from the snow blower, move them to the shade and cool them at least 15 minutes.
Flashing Orange
- The snow blower is overloaded.
- First remove the battery pack, then check and clean if snow has collected beneath the deck. Slow down your pace when snow moving. If this does not work, please contact EGO customer service center.
Dark & LED on battery flashing
- Battery overheat (See section “BATTERY HIGH-TEMPERATURE PROTECTION” in this manual).
- Remove the battery from the snow blower and wait until the battery pack cools down to approximately 152°F (67°C), then reinstall the battery and restart the snow blower
SNOW BLOWER OVERLOAD PROTECTION
To prevent overload conditions, do not try to remove too much snow at one time. Slow down your pace or decrease the width of the snow-clearing swath. Your snow blower has built-in overload-sensing elements. When the snow blower is overloaded, the motor will decrease the speed automatically and you will hear the volume of the motor decrease. Slow down your pace or narrow the clearing width, after which the motor speed will automatically resume its normal setting. If this remedy does not solve the overload situation, the sensor will shut off the motor automatically and the LED indicator on the snow blower will flash orange. Remove the battery pack(s) from the snow blower,wait 10 seconds, and check to see if there is snow or ice stuck in the auger and deck. If necessary, follow instrucitons for “CLEARING A CLOGGED CHUTE”. Reinstall the batteries and restart the snow blower.
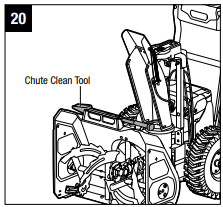
CLEARING A CLOGGED CHUTE
To Clear the Chute:
1. Shut the motor off!
2. Remove the battery pack(s) from the snow blower.
3. Wait 10 seconds to be sure the auger has stopped rotating.
4. Always use the chute clean tool which is attached to the machine as an accessory. DO NOT USE YOUR HAND (Fig.20)
BATTERY HIGH-TEMPERATURE PROTECTION
The battery pack will generate heat during operation. If the battery temperature exceeds 158°F (70°C) during operation, the protection circuit will immediately turn off the snow blower to protect the battery pack from heat damage. The snow blower LED indicator will turn off and the LED on the battery will flash orange or shine red
If the snow blower is over-heating itself, the LED indicator on the snow blower will flash orange and the battery indicator will be OFF.
When batteries are overheating, release all the triggers, wait until the overheated battery pack(s) cool down or change the new battery pack(s), then restart the snow blower. To prevent shut off due to battery high-temperature protection, don’t try to use a single battery to power the snow blower when the depth of the accumulated snow exceeds 8 inches or when the snow is very wet or icy. We recommend the use of two batteries working simultaneously. This is helpful in attaining the peak power of the snow blower. After high-temperature protection has occurred, slow down your pace and narrow width of the clearing swath to reduce the load on the battery.
MAINTENANCE
LUBRICATING THE MACHINE
All of the bearings in this product are lubricated with a sufficient amount of high grade lubricant for the life of the unit under normal operating conditions. Therefore, no further bearing lubrication is required.
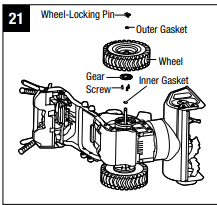
MOUNTING AND DETACHING WHEEL
1. Remove the battery packs.
2. Lay the snow blower on its side, pull out the wheel-locking pin to remove the outer gasket and the wheel. Save the inner gasket on the wheel shaft.
3. Loosen and remove the 3 screws to separate the gear from the wheel. Save the gear for reassembly (Fig.21).
4. Replace the wheel with a new one.
5. Reassemble the gear, new wheel and outer gasket in reverse order. Lock them with the wheel-locking pin.
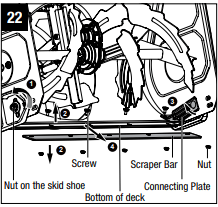
MOUNTING AND DETACHING THE SCRAPER BAR (Fig.22)
- Remove the batteries from the snow blower.
- Lay the snow blower on its side or any other convenient position for scraper bar service.
- Loosen the outer nut on the skid shoe just enough to allow the inner connecting plate to freely rotate around the corresponding screw inside (step 1 shown).
- Loosen the connecting plate on the other side in the same way.
- Loosen and remove the five nuts on the bottom of the deck, as well as the five screws inside (step 2 shown) and rotate the connecting plate towards the auger chamber direction (step 3 shown) to thoroughly remove the scraper bar away from the deck (step 4 shown).
- Replace the worn scraper bar with a new one.
- To reassemble, first insert the new scraper, bar between the connecting plate and the bottom of the deck. Rotate the connecting plate until the holes in the connecting plate, the bottom of the deck, and the scraper bar are aligned. With the five holes aligned, insert the five screws into the holes and secure them with the five nuts on the back.
- Securely tighten the outer nut on the skid shoe.
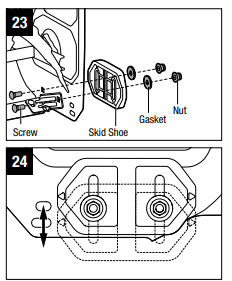
REPLACING AND ADJUSTING THE SKID SHOES
- Remove the batteries.
- Loosen and remove the nuts, gaskets, and the skid shoe from the screws (Fig.23).
- Replace the skid shoe with a new one, if necessary.
- The height of the skid shoes can be adjusted according to the actual snow conditions without removing the nuts. Just loosen the nuts, adjust the skid-shoe position, and then retighten (Fig.24)
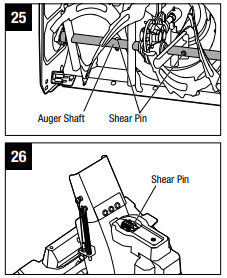
REPLACING THE SHEAR PIN
The shear pins are located in the auger shaft. They aids in absorbing the instant stall torque when the auger strikes obstacles during working and protect the gearbox and motor from damage. To replace the shear pins, remove the batteries, remove the broken shear pin from the auger shaft and replace it with new.
NOTICE: Two additional shear pins are stored onto the snow-discharge chute assembly, replace with the new one if the original one is broken (Fig.26).
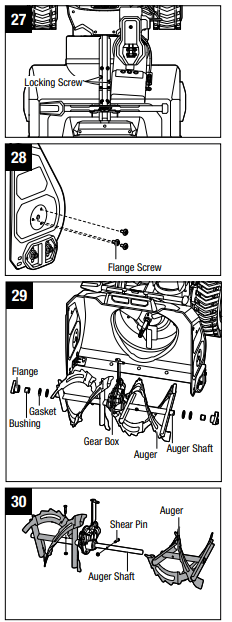
REPLACING THE AUGER
- Remove the batteries.
- Remove the two locking screws on the top of the deck (Fig.27).
- Remove the three flange screws on both left and right of the deck (Fig.28).
- Remove the auger, together with the gearbox as a whole set from the deck. Then remove the flange, bushing and gasket from the auger shaft (Fig.29).
- Remove the left and right shear pin and separate the augers from the auger shaft (Fig.30).
- Replace the worn auger and reassemble them in reverse order.
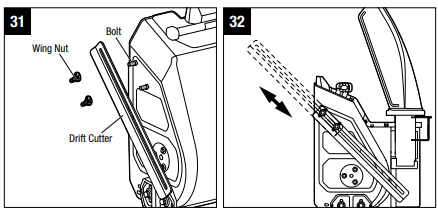
MOUNTING AND DETACHING DRIFT CUTTERS (AVAILABLE AND SOLD SEPARATELY)
- Remove the batteries.
- Insert the two bolts into the deck and mount the drift cutter and wing nuts onto the bolts. Pre-tighten the wing nuts and keep the drift cutter a little loose for adjustment (Fig. 31).
- Move the drift cutters to the desired position (Fig. 32).
- Tighten the wing nuts to secure the drift cutters.
STORING THE SNOW BLOWER
CAUTION: Ensure that all melted snow that may drip from the snow blower is properly wiped up to prevent a slip and fall hazard.
- Remove the battery pack(s) and store in a secure location out of the reach of children.
NOTE: When not in use, a 56V battery should be stored in an enclosed area where the temperature will not drop below -4°F (-20°C). Optimal charging temperatures are 41°F - 104°F (5°C - 40°C).
Before storage, wipe any moisture, dirt, or debris from the battery area.
- Wipe the snow blower with a clean dry cloth.
- Check all nuts, bolts, knobs, screws, etc., for tightness.
- Inspect moving parts for damage, breakage, and wear. Have repairs made on any damaged or missing parts.
- Store the snow blower in a clean, dry, enclosed place out of the reach of children.
- Do not store near corrosive materials such as fertilizer or rock salt.
TROUBLESHOOTING
Snow blower is not starting.
- Battery charge is low.
- The auger-switch trigger is not depressed at the moment of the LED indicator flashing green.
- Press the auger switch trigger when the LED indicator blinks. If the LED indicator stops blinking, the snow blower will not be response to the pressing of auger-switch trigger.
- The auger is frozen by snow or ice.
- Remove the battery pack(s) firstly, use the supplied chute clean tool to clear the snow or ice that obstructs on the auger.Restart the snow blower.
- The battery is overteated. The LED indicator on the battery flashes orange or shines red (see the section “BATTERY HIGH-TEMPERATURE PROTECTION” in this manual).
- Remove the overheated battery from the snow blower and wait until the battery pack cools down to approximately 152°F (67°C), then reinstall the battery and restart the snow blower.
The motor is on but the auger does not turn on.
- The shear pin is broken.
- Replace the shear pin following the section “REPLACING THE SHEAR PIN” in this manual.
The LED light button is insensitive to the first pressing.
- The internal self-checking process causes a slight delay in the first keystroke response.
- Press the LED light button and hold for 1 second.
The LED indicator on the battery keeps on after the snow blower auger stops working or self-propel system turns off.
- The electric circuit is in standby for next restart. The LED will shut off automatically if the snow blower is not operated in 5 to 10 mintues.
- Just leave it or remove the batteries from the battery compartment.