User Guide for Camera
Setting up your camera
1. Connect the camera to your computer using the included USB cable.
2. The Charging indicator light will illuminate red.
3. The battery indicator is located on the lower left corner of the camera's LCD screen.
SD card installation
This camera has no internal memory and requires a Micro SD card (not included) to take and save pictures or record videos. The camera can support Micro SD cards up to 32GB. To install the Micro SD card into the camera, follow the steps below:
- Turn off the camera.
- Insert the Micro SD card into the card slot (as shown below) until it clicks and locks into place.
- To remove the card, gently push it in until it pops out.
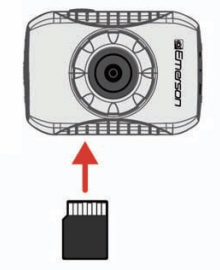
 • A card can only be inserted one way: do not use force when inserting the card.
• Inserting or removing a card while the camera is on may damage the card, files stored on the card.
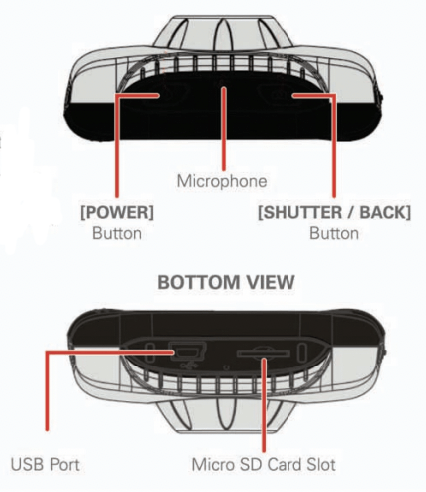
Location of controls
SIDE VIEW
BACK VIEW
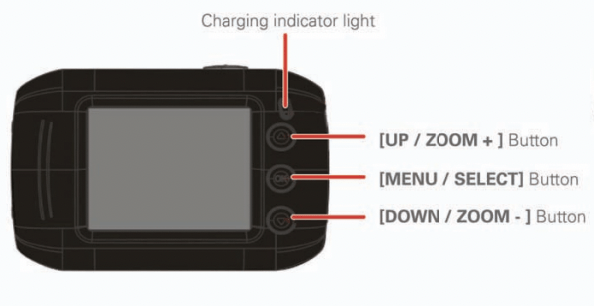
TOP VIEW
Using your camera
Turning the camera on/off
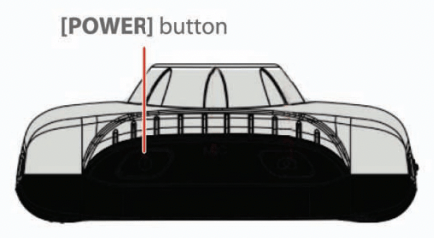
1. To turn the camera on, press and HOLD the [POWER] button until the display turns on.
2. To turn the camera off, press and HOLD the [POWER] button until the display turns off.
This camera has an auto-shutoff feature which can be set for specific times (refer to System Settings > Power Save).
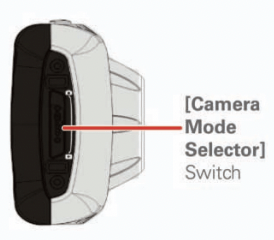
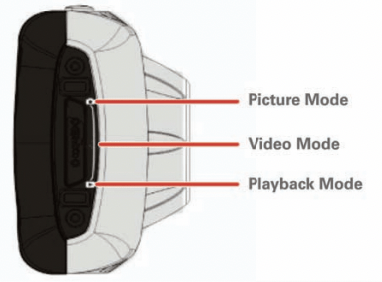
Using the Camera Mode Selector Switch
Camera Mode Selector
This camera has three different modes depending on what you are doing with the camera. For example:
A) To take pictures switch the [Camera Mode Selector] all the way up to the picture mode position.
B) To take videos switch the [Camera Mode Selector] to the middle, video mode position.
C) To playback pictures/videos switch the [Camera Mode Selector] to the bottom position, playback mode.
- Use the [Camera Mode Selector] Switch to activate any of the camera modes.
- Slide the selector up and down to choose one of three desired modes.
Picture Mode
1. Make sure that a Micro SD card is inserted into the camera.
2. Turn on the camera, and switch the [Camera Mode Selector] to picture mode.
3. Press the [SHUTTER / BACK] button to take a picture.
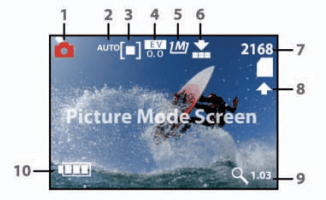
1. Picture Mode Icon
2. White balance
3. Metering
4. Exposure mode
5. Resolution
6. Picture Quality
7. Pictures Remaining
8. Micro SD Card Indicator
9. Zoom level
10. Battery Indicator
 Self timer and continuous shooting
1. While in picture mode, press the [MENU / SELECT] button, then press the [DOWN / ZOOM - ] button till you see the [Driver Mode], press the [MENU / SELECT] button to select it.
2. Use the arrows to select from 2 second self-timer, 10 second self-timer or Burst.
3. When you select 2 or 10 seconds self timer, the timer starts counting down from 2 or 10 seconds, and the camera takes a picture; when you select burst, the camera takes 3 pictures continuously.
4. Press the [SHUTTER / BACK] button to start self timer or burst snapshot.
5. To turn off the self timer or Burst feature repeat step 1 then select “Off".
Zooming in & Out -In picture of video mode press the up and down arrow keys to zoom in or out
Video Mode
1. Make sure that a Micro SD card is inserted into the camera.
2. Turn on the camera, and switch the [Camera Mode Selector] to video mode.
3. Press the [SHUTTER / BACK] button, the camera starts recording video.
4. To stop recording press the [SHUTTER / BACK] button again.
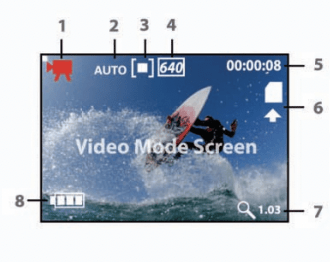
1. Video Mode Icon
2. White balance
3. Metering
4. Video quality
5. Recording time
6. Micro SD Card indicator
7. Zoom level
8. Battery Indicator
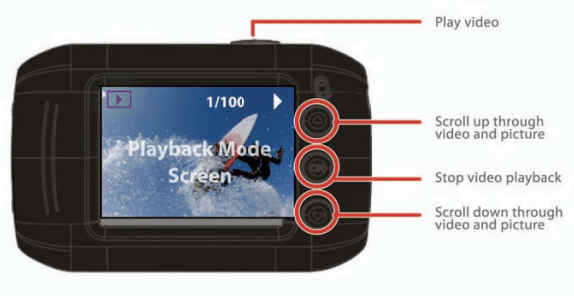
Playback Mode
1. Turn on the camera, and switch the [CAMERA MODE SELECTOR] to playback mode.
2. Use the [▲] or [▼] buttons to scroll through picture and video files.
Video Playback
1. If you select a video, press the [SHUTTER / BACK] button to start the video playback.
2. To stop the video playback press the [MENU / SELECT] button.
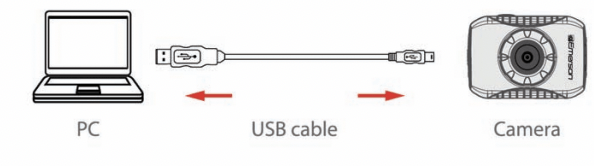
Connecting the camera
Connect your camera to a computer
To edit or upload and share your videos and pictures, you must first transfer them to your computer. Follow the steps below to connect the camera to your computer.
1. Make sure the camera is turned off, and that a Micro SD card is inserted in the camera before connecting it to your computer.
2. Insert the smaller end of the USB cable into the camera's USB port.
3. Connect the larger end of the USB cable into your computer's USB port.
4. Turn ON the camera.
5. Autoplay will prompt your device is connected.
6. On your PC select "open folder" to view files.
7. Select "DCIM" then select "100MEDIA".
8. Pictures and videos will be be displayed in this folder.
9. Before disconnecting the camera, click on the "Safely Remove Hardware" icon usually located on the lower right corner of your desktop.
OR
Click on "My Computer", RIGHT click on "MICROSD" then click on "Eject" from the drop down menu.
Please do not disconnect the USB cable during loading, as it may cause damage to the camera and the files on the SD card.
System Settings
To make changes to the camera's settings, follow the instructions below:
1. Press the [MENU / SELECT] Button.
2. Quickpress the [POWER] Button.
3. Use the [ ] or [
 ] buttons to scroll through the settings.
4. Press the [MENU / SELECT] button to select the desired setting.

System Settings Options
|
AUTO REVIEW
|
Set time of review after picture is taken (off, 1 sec, 3 sec).
|
|
POWER FREQUENCY
|
50Hz/60Hz
(The Camera's default setting is 60hz for the USA and North America)
|
|
POWER SAVE
|
Select off, 1,3, or 5 minutes. To conserve battery power, the camera will shut off if no buttons are pressed within the selected time.
|
|
DATE&TIME
|
Set the camera's date and time.
|
|
LANGUAGE
|
Set the camera's language
|
|
FORMAT
|
Erase all data on the SD card
|
|
RESET ALL
|
Reset the camera's settings to factory default.
|
Picture Mode Settings
To make changes to the picture mode settings, follow the instructions below:
1. Switch the [Camera Mode Selector] to picture mode.
2. Press the [MENU / SELECT] Button.
3. Use the [] or [] buttons to scroll through the settings.
4. Press the [MENU / SELECT] button to select the desired setting.
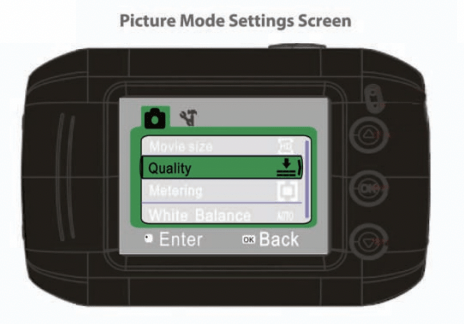
Picture Mode Settings Options
|
RESOLUTION
|
1M (1280x960)/3M (2048x1536)/5M (2592x1944)
(Higher picture resolution takes up more space on the SD card).
|
|
QUALITY
|
Super fine / Fine / Normal
|
|
METERING
|
Center / Multi / Spot
|
|
WHITE BALANCE
|
Auto / Daylight / Cloudy / Fluorescent / Tungsten
|
|
EXPOSURE
|
Adjust the exposure
|
|
DRIVER MODE
|
"Off" (disables the self timer), "2" or "10" second options (self timer), "Burst" (3 frame shot)
|
|
EFFECT
|
Norma / B&W / Sephia / Negative / Red / Green / Blue
|
|
DATE STAMP
|
OFF/DATE/DATE&TIME
|
Video Mode Settings
To make changes to the video mode settings, follow the instructions below
1. Switch the [Camera Mode Selector] to video mode.
2. Press the [MENU / SELECT] Button.
3. Use the [] or [] buttons to scroll through the settings.
4. Press the [MENU / SELECT] button to select the desired setting.
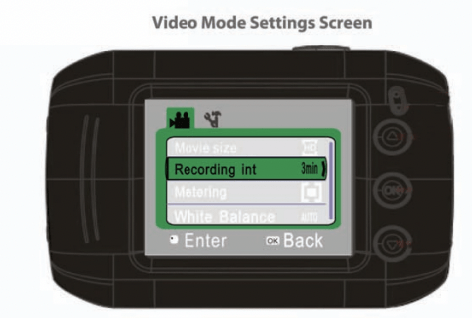
Video Mode Settings Options
|
MOVIE SIZE
|
HD 1280X720 / 640X480 / 320X240
|
|
RECORDING INTERVAL
|
Select OFF, 1,3, or 5 minutes.
|
|
METERING
|
Center / Multi / Spot
|
|
WHITE BALANCE
|
Auto / Daylight / Cloudy / Fluorescent / Tungsten
|
|
EFFECT
|
NOR / B&W / SEPIA / NEGATIVE / RED / GREEN / BLUE
|
|
DATE STAMP
|
OFF/DATE/DATE&TIME
|
Playback Mode Settings
To make changes to the playback mode settings, follow the instructions below:
1. Switch the [Camera Mode Selector] to playback mode.
2. Press the [MENU / SELECT] Button.
3. Use the [] or [] buttons to scroll through the settings.
4. Press the [MENU / SELECT] button to select the desired setting.

Playback Mode Settings Options
|
LOCK
|
Lock one or all of your picture and video files. When locked the files will not be to be deleted.
|
|
DELETE
|
"One" (Delete the currently displayed video or picture) or "All"
|
|
SLIDESHOW
|
Start a slide show, and adjust the slide show settings.
|
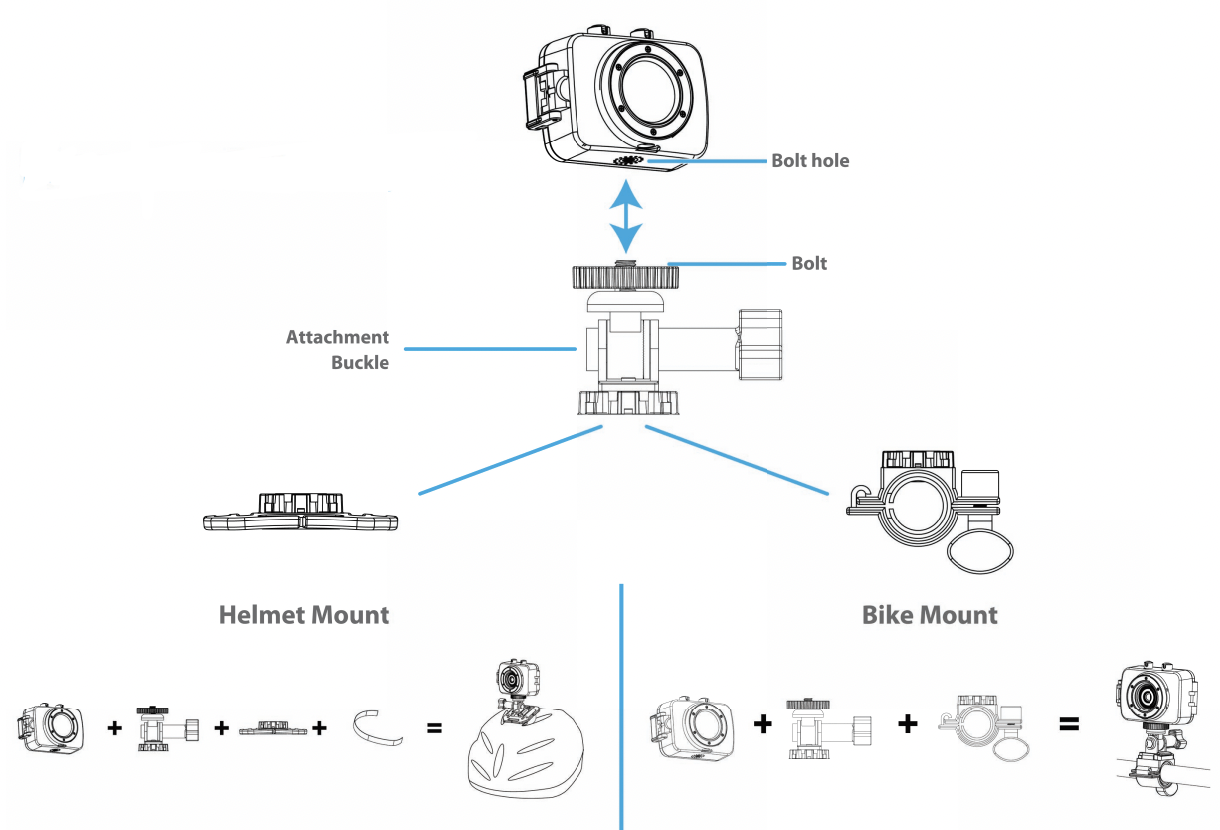
Mount Kit Assembly
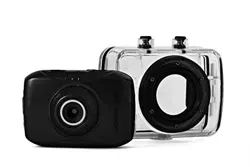
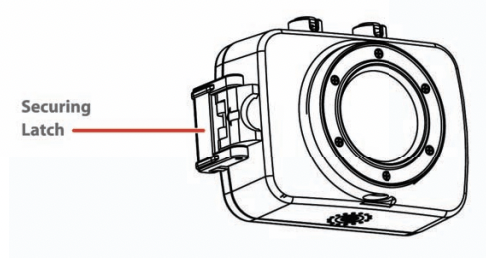
Waterproof case
Assembling camera into case
Your action cam comes with a water proof case for underwater action and added durability. To assemble your camera to the case, follow the instructions below:
1. Open the latch on the water proof case.
2. Insert the camera lens forward into the case.
3. Close the door and secure the latch.
NOTE: Please make sure latch is secure and that all seals are in place to ensure no water can seep in.
Bike Mount Assembly
Assembling camera to bike mount
Your action cam includes the necessary accessories for bike action. To assemble the the camera to the bike mount, follow the instructions below:
1. Install the bike mount onto your bikes handle bars by putting the bottom half of your bike mount onto the handle bar and connecting it to the top part of the mount.
NOTE: Use the included rubber swatch to mount it securely.
2. Use the included screw to secure the bike mount, tighten till the bike mount is secure.
3. With the camera assembled to the water proof case or included shield align the bolt on the attachment buckle to the hole on your waterpoof case or shield and turn. When the desired position is reached, you can use the wheel on the bottom end of the bolt to tighten.
4. Connect the attachment buckle to the bike mount by pinching both sides on the attachment buckle and sliding it on to the mount.
NOTE: You must either use the waterproof case or shield to assemble the camera fo the attachment buckle.
Helmet assembly
Assembling camera to helmet mount
Your action cam includes the necessary accessories for helmet action. To assemble the the camera to the helmet mount, follow the instructions below:
1. With the camera assembled to the water proof case or included shield align the bolt on the attachment buckle to the hole on your waterpoof case or shield and turn. When the desired position is reached, you can use the wheel on the bottom end of the bolt to tighten.
2. Connect the attachment buckle to the helmet mount by pinching both sides on the attachment buckle and sliding it on to the mount.
NOTE: You must either use the waterproof case or shield to assemble the camera to the attachment buckle.
3. Insert the helmet strap through the slots on the side of the helmet mount and velcro the mount through the holes on your helmet.