User manual Microwave Oven
INSTALLATION
1. Steady, flat location: When positioning the microwave oven, it should be set on a steady, flat surface.
2. Ventilation: Do not block air vents. If they are blocked during operation, the oven may overheat and eventually cause oven failure.
3. Radio and TV reception: Poor television reception and radio interference may result if the oven is located close to a TV, radio, antenna, or antenna wire. Position the oven as far from them as possible.
4. Temperature and moisture: Keep the oven away from hot air, steam or splashing liquids when choosing a place to locate it, otherwise, the unit’s operation may be adversely affected, causing it to break down.
5. Power supply:
- Check your local power source. This microwave oven requires a 120V, 60Hz ,15Amp power supply.
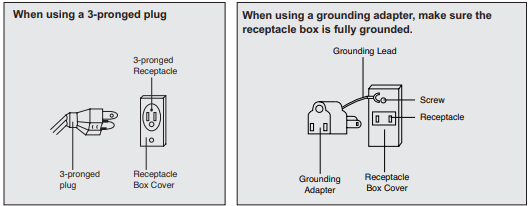
- Use a receptacle that will accept the ground prong.
(a) A short power supply cord is provided to reduce the risks resulting from becoming entangled in or tripping over a longer cord.
(b) Longer cord sets or extension cords are available and may be used if care is exercised in their use.
(c) If a long cord or extension cord is used, (1) the marked electrical rating of the cord set or extension cord should be at least as great as the electrical rating of the appliance, (2) the extension cord must be a grounding-type 3-wire cord, and (3) the longer cord should be arranged so that it will not drape over the counter top or tabletop where it can be pulled on by children or tripped over unintentionally
6. Examine the oven for any damage such as: Dents, a misaligned door, broken door or a dent in the cavity. If any of the above are visible, DO NOT INSTALL THE UNIT. Notify the dealer immediately
CARE OF YOUR MICROWAVE OVEN
1 Disconnect the AC plug from the outlet before cleaning.
2 Keep the inside of the oven clean. When food spatters or spilled liquids adhere to oven walls, wipe with a damp cloth. Mild detergent may be used if the oven gets very dirty. The use of harsh detergent or abrasives is not recommended.
3 The outside oven surface should be cleaned with mild soap and water. Then wiped dry with a soft cloth. To prevent damage to the operating parts inside the oven, water should not be allowed to seep into the ventilation slots. If the Control Panel becomes dirty or wet, clean with a soft, dry cloth. Do not use harsh detergents or abrasives cleaner.
4 If steam accumulates on both sides of the oven door, wipe with a soft cloth. This may occur when the microwave oven is operated under high humidity conditions and this is not an indication of a malfunction in the unit.
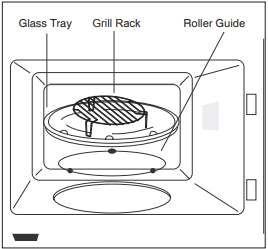
Roller Guide
1 The ROLLER GUIDE and oven floor should be cleaned frequently to prevent excessive noise.
2 The ROLLER GUIDE MUST ALWAYS be used for cooking together with the Glass Tray.
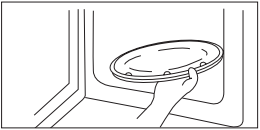
Glass Tray
1 Do NOT operate the oven without the Glass Tray in place.
2 Do NOT use any other Glass Tray with this oven.
3 If the Glass Tray is hot, ALLOW IT TO COOL before cleaning it or placing it in water.
4 Do NOT cook directly on the Glass Tray.
5 It is occasionally necessary to remove the glass tray for cleaning. Wash the tray in warm, sudsy water or in a dishwasher.
6 The roller guide and oven cavity floor should be cleaned regularly to avoid excessive noise. Simply wipe the bottom surface of the oven with mild detergent water or window cleaner and dry. The roller guide may be washed in mild, sudsy water or in the dishwasher.
Grill Rack
1 If the Grill Rack is hot, ALLOW IT TO COOL before cleaning or removing.
2 Clean the grill rack in mild or soap water.
HOW TO USE YOUR MICROWAVE OVEN SAFELY
Although your oven is provided with safety features, it is important to observe the following:
a) It is important not to defeat or tamper with safety interlocks.
b) Do not place any object between the oven face and the door or allow residue to accumulate on sealing surfaces. Wipe the sealing area frequently with a mild detergent, rinse and wipe dry. Never use abrasive powders or pads.
c) When opened, the door must not be subjected to strain, for example, a child hanging on an open door or any load which could cause the oven to fall forward and cause injury and damage to the door. Do not operate the oven if it is damaged, until it has been repaired by a qualified person. It is particularly important that the oven door close properly and that there is no damage to the following: (1) Door (bent), (2) Hinges and Latches (broken or loosened), (3) Door seals and sealing surfaces.
d) The oven should not be adjusted or repaired by anyone except properly qualified service personnel.
LOCATION OF CONTROLS
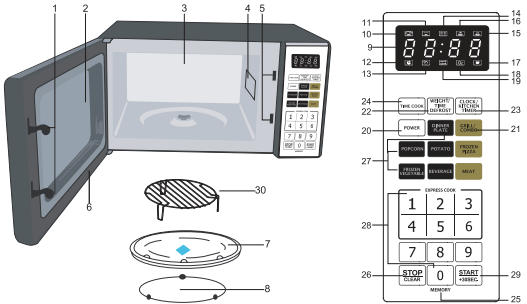
- Door Latches -When the door is closed. they will automatically lock shut. Ifthe door is opened while the oven is operating. the magnetron will automaticaly shut oft
- Door Screen-Allows viewing of food. The screen is designed so that light can pass through. but not the microwaves.
- Oven Cavity
- Spatter Shield(Do NOT Remove)-Protects the microwave outlet from splashes of cooking foods.
- Safety Interlock System-Prevents the oven from operating while the door is opened.
- Door Seal- The door seal maintains the microwaves within the oven cavity and prevents microwave leakage
- Glass Cooking Tray- Made of special heat resistant glass. The tray must always be in proper position before operating the oven. Do not cook food directly on the tray.
- Roller Guide- Supports the glass cooking tray. Must always be in proper position before operating the oven.
- Display
- Microwave Indicator
- Grill Indicator
- Clock Indicator
- Child Lock Indicator
- Defrost Indicator
- Low Cook Indicator
- High Cook Indicator
Alert: Please clean microwave oven often. Failure to do so may create a fire hazard and void the warranty
17. Cup Indicator
18. Ounce Indicator
19. Auto Cook Indicator
20. Power Button-Used to set a power level
21. GrilliCombo Button-Used to set grilling or combination cooking.
22. Weight/Time Defrost Button-Used to set the oven to estimate the defrosting time or by weight entered.
23. ClockiKitchen Timer Button- Used to set the kitchen timer function
24. Time Cook Button - Used to set the cooking according to the desired power and time
25. Memory Button- Used to set the memory function
26. Stop/Clear Button -Use to stop and/or clear a cooking program.
27. Auto Cook Menu- Used to select an Auto Cook program.
28. Number Button - Used to enter the cooking time. kitchen timer. etc. Number keys 1-6 are also used for Express Cook Function.
29. Start/#30Sec. Button - Press to start a cooking program.
30. Grill Rack - Piace on the turntable. The rack is designed especially for use in this oven onl {Bc gilhor gal combo cooking DO NOTUSE FOR MICROWAVE ONLY COOKING. Do not substitute a similar rack for this specially designed one. ~
OPERATION
SETTING THE CLOCK
When first plugged in. the oven will display “0:00”. Set the time as follows:
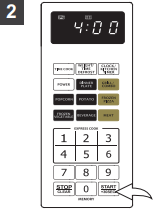
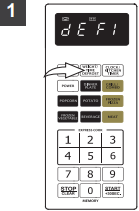
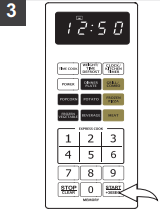
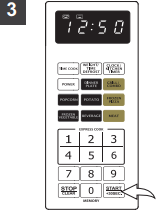
With the oven NOT cooking, press the CLOCK / KITCHEN TIMER button; the first hour digit will blink.
Press two Number buttons to set the current hour. Then press two Number buttons to set the current minute. Two buttons must be pressed, i.e. "0","5" for 5.
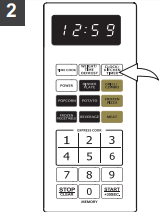
Press the CLOCK/KITCHEN TIMER button; the display will show the present time. After the clock has been set, the time will appear with blinking colon, unless the oven is cooking or defrosting.
NOTE
- To reset the present time in the display window, press the CLOCK/KITCHEN TIMER button and reset.
- If you make a mistake when setting the time, press the STOP/CLEAR button.
- To recall the actual time while the oven is cooking or defrosting, simply press the CLOCK/KITCHEN TIMER button and the display will show the actual time for three seconds.
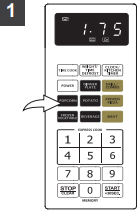
WEIGHT DEFROST
Weight Defrost lets you easily defrost foods by eliminating guesswork in determining defrosting time. The minimum weight for Auto Weight Defrost is 4 oz. and maximum weight is 100 oz.

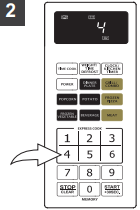
Press the WEIGHT/TIME DEFROST button once.
Press the Number buttons to set the desired weight, in ounces.
Press the START/+30SEC. button to start defrosting; the unit start counting down the remaining defrosting time and beep five times when completed.
TIME DEFROST
Time Defrost will automatically set the oven to defrost at a time set by the user. The minimum time for Time Defrost is one second. The maximum time is 99 minutes, 99 seconds.

Press WEIGHT/TIME DEFROST button (1) twice. Then press the Number buttons (2) to set the desired time.
Press the START/+30SEC. button to start defrosting; the unit start counting down the remaining defrosting time and beep five times when completed.
POWER
This microwave has eleven power levels to choose from when TIME COOK button is used. Follow steps in COOKING IN ONE STAGE or COOKING IN TWO STAGES. To change, press POWER once, then press number key for the power level you want.

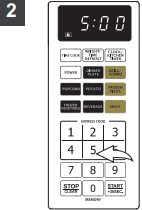
COOKING IN ONE STAGE
The maximum cooking time is 99 minutes, 99 seconds.
Press the TIME COOK button (1) Press the Number buttons (2) to set the desired cooking time.
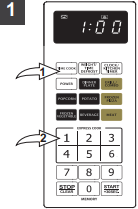
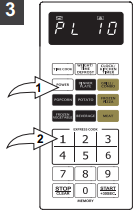
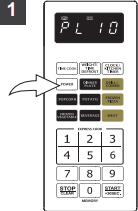
Press the POWER button (1) "PL 10" will light in the display to indicate power level 10. Press the Number buttons (2) to select a different power level.

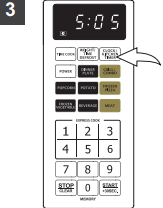
Press the START/+30SEC. button to start cooking; the unit will start counting down the remaining cooking time and beep five times when completed.
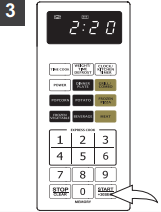
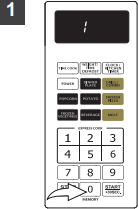
KITCHEN TIMER
Allow the timer to be set, no microwaves are produced when doing so.

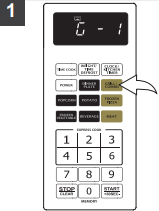
Press CLOCK/KITCHEN TIMER button twice.

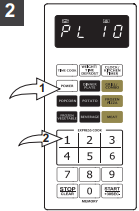
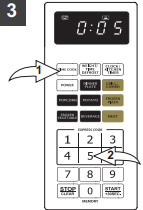
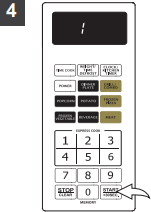
Press the number keys to enter the desired alarm time, for example press 2-3-0 for 2 minutes 30 seconds.
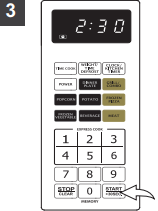
Press the START/+30SEC. button to start counting down the remaining Timer time. The unit will beep five times when completed.
COOKING IN TWO STAGES
The maximum cooking time is 99 minutes, 99 seconds.

Press the TIME COOK button (1) Then press the Number buttons (2) to set the desired cooking.
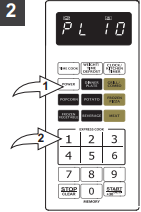
Press the POWER button (1) "PL 10" will light in the display to indicate power level 10. Then press the Number buttons (2) to select a different power level for the first stage.
Press the TIME COOK button (1) Then press the Number buttons (2) to set the desired cooking time.

Press the POWER button (1) "PL 10" will light in the display to indicate power level 10. Then press the Number buttons (2) to select a different power level for the second stage.

Press the START/+30SEC. button to start cooking; the unit will start counting down the remaining cooking time and beep once between stages, and then perform the second stage cooking.
DEFROSTING/COOKING IN TWO STAGES
The minimum weight for Weight Defrost is 4 oz. and maximum weight is 100 oz.
The minimum time for Time Defrost is 1 second and maximum time is 99 minutes 99 seconds.
Press the WEIGHT/TIME DEFROST button.
Press the Number buttons to set the desired weight, in ounces in WEIGHT DEFROST or to set the desired time in TIME DEFROST. Set the next stage by following steps 3 and 4 on the previous page.

Press the START/+30SEC. button to start defrosting (the first stage); the unit will start counting down the remaining cooking time and beep once between stages, and then perform the second stage cooking.
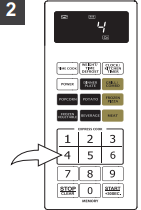
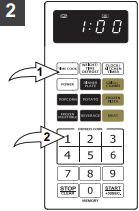
EXPRESS COOK

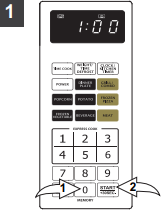
Press the Number buttons 1-6 and the microwave will immediately start cooking at power level 10 for the selected time. For example, press "2" to cook for two minutes.
Press the START/+30SEC. button and the unit will cook for additional 30 seconds. Each additional press will increase the cooking time by 30 seconds.
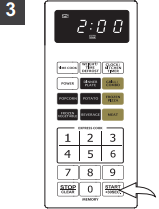
GRILLING COOKING
The maximum cooking time is 99 minutes, 99 seconds.
Press the GRILL/COMBO button once.

Press the Number buttons to set the desired cooking time.
Press the START/+30SEC. button to start cooking; the unit will start counting down the remaining cooking time and beep five times when completed.
COMBINATION COOKING (MICROWAVE + GRILLING)
The maximum cooking time is 99 minutes, 99 seconds.

Press the GRILL/COMBO button two or three times to choose "Combination 1" (55% Microwave +45% Grill) or "Combination 2" (36% Microwave + 64% Grill).
Press the Number buttons to set the desired cooking time.
Press the START/+30SEC. button to start cooking; the unit will start counting down the remaining cooking time and beep five times when completed.
AUTO COOK
Auto cook lets you easily cook items in the oven, as it will automatically set the times and power levels to give better results than one power only cooking.
Press the desired AUTO COOK button (POPCORN, POTATO, FROZEN PIZZA, BEVERAGE, DINNER PLATE, FROZEN VEGETABLE OR MEAT).

Repeatedly press the desired AUTO COOK button to select the desired weight/portion (see chart on page 16).
Press the START/+30SEC. button to start cooking: The unit will start counting down the remaining cooking time and beep five times when completed.
MEMORY
Memory is used to preset a cooking function in memory location 1-3.
Repeatedly press the MEMORY button to select a memory location ( 1 to 3)
Press the TIME COOK button (1) Then press the Number buttons (2) to set the desired cooking time.
Press the POWER button "PL 10" will light in the display to indicate power level 10. Then press the Number buttons (2) to select a different power level. Repeat step 2 and 3 to perform a second stage, if desired.
Press the START/+30SEC. button once to save your settings into the chip. To save in memory press STOP/CLEAR button or press START/+30SEC. button once again and cooking will start.
MEMORY RECALL
Used to select a memory preset.
Repeatedly press the MEMORY button (1) to select a preset (1-3). Then press the START/+30SEC. button (2) to start the cooking operation.
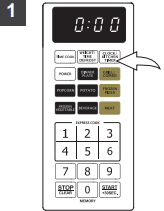
CHILD LOCK
The Child Lock prevents unwanted oven operation by small children.
The oven can be set so that the control panel is deactivated or locked.

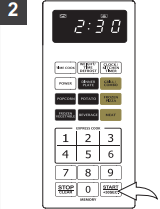
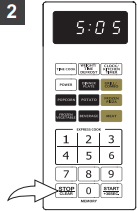
TO ACTIVATE: Press and hold the STOP/CLEAR button for three seconds (when the time appears in the display ); the unit beep once and the display will appear as shown above and no buttons can be pressed.
TO DEACTIVATE: Press and hold the STOP/CLEAR button for three seconds; the unit beep once and the current time will appear in the display.
INQUIRY
During cooking, press the POWER button to display the current power level for three seconds.
During cooking, press the CLOCK/KITCHEN TIMER button to display the current time for three seconds.
COOKING GUIDE
THE PRINCIPLES OF MICROWAVE COOKING
Microwaves are a form of high frequency radio waves similar to those used by a radio including AM, FM and CB. Electricity is converted into microwave energy by the magnetron tube. From the magnetron tube, microwave energy is transmitted to the oven where it is reflected, transmitted and absorbed by the food.
Reflection: Microwaves are reflected by metal just as a ball is bounced off of a wall. For this reason, metal utensils are not suitable for use in the microwave. A combination of stationary interior walls and a rotating metal turntable or stirrer fan helps assure that the microwaves are well distributed within the oven cavity to produce even cooking.
Transmission: Microwaves pass through some materials such as paper, glass and plastic much like sunlight shining through a window. Because these substances do not absorb or reflect the microwave energy, they are ideal materials for microwave oven cooking containers.
Absorption: During cooking, microwaves will be absorbed by food. They penetrate to a depth of about 3/4 to 1 1/2 inches. Microwave energy activates the molecules in the food (especially water, fat and sugar), and heat is produced. If you vigorously rub your hands together, you will feel heat produced by friction. The internal cooking of larger foods is done by conduction as the heat which is produced by friction is conducted to the middle of the food. Foods also continue to cook by conduction during standing time.
FOOD CHARACTERISTICS
Quantity: The amount of food placed in a microwave oven has a direct effect on the cooking time. Small amounts of food or liquid require less cooking time than larger amounts of the same substance. As quantity increases, concentration decreases.
Size: Small pieces cook faster than large ones. To speed cooking, cut pieces smaller than two inches (5 cm), so microwaves can penetrate to the middle from all sides. Pieces which are similar in size and shape cook more evenly.
Shape: Many foods are uneven, like a chicken, ribs or broccoli. The thin parts will cook faster than the thick parts, while uniformly thick foods cook evenly. To compensate for irregular shapes, place thin pieces toward the center of the dish and thicker pieces toward the edge of the dish.
Starting Temperature: Frozen or refrigerated foods take longer to cook than foods at room temperature.
Bone and Fat: Because bones conduct heat, the side of the meat the bone is on will cook first, while boneless cuts cook slower but more evenly. Fat attracts microwaves. The middle of these foods is cooked by heat conduction.
Moisture Content: Microwaves are attracted by moisture. Naturally moist foods absorb microwaves better than dry ones. Add a minimum of liquid to moist foods, as excess water slows cooking.
Density: The density of food determines how easily the microwaves can penetrate and how quickly it will cook. Porous foods, like chopped beef or mashed potatoes, microwave faster than dense ones like steak or whole potatoes.
Piercing: Steam builds up pressure in foods which are tightly covered by a skin or membrane. Pierce potatoes, egg yolks and chicken livers to prevent bursting.
MICROWAVE TECHNIQUES
Stirring: Stir foods from outside to center of dish once or twice during cooking to equalize heat and speed microwaving. Foods will not burn or stick, so there's no need to stir constantly as you do in conventional cooking.
Arrangement: Arrange foods with thin or delicate ends, like drumsticks or asparagus spears, with the thick or tougher portions to the outside of the dish. The parts which need more cooking will receive more energy, so food will microwave evenly.
Spacing: Individual foods, such as baked potatoes and cupcakes will cook more evenly if placed in the oven an equal distance apart. When possible, arrange foods in a circular pattern. Similarly, when placing foods in a baking dish, arrange around the outside of the dish, not lined up next to each other. Food should not be stacked on top of each other.
Rearrangement: Rearrange overlapping areas, like tails of long fish fillets, from top to bottom, and closely packed pieces, like meatballs, from the outside to the center of the dish.
Standing Time: Standing time is especially important in microwave cooking. Microwave energy creates heat in the outer layers of the food. As a result of normal conduction, the food continues to cook for a few minutes after removal from the oven. Letting roasts, large whole vegetables, casseroles and cakes stand to finish cooking allows the middles to cook completely without overcooking, drying or toughening the outsides.
Covering: Covering speeds cooking time, retains moisture, tenderizes, insures even cooking and prevents spattering. Casserole lids or plastic wrap are used for a tighter seal. Vent plastic by turning back one edge at the side of dish to form a narrow slot where excess steam can escape. Various degrees of moisture retention are also obtained by using wax paper or microwave-safe paper towels.
Browning: Microwave energy cooks some foods so quickly that the fats and sugars within the food do not have time to caramelize and give a "browned" appearance. Browning agents do not affect the quality of microwaved foods, but can add color and flavor. For meats and poultry, use bouquet sauce diluted with water or melted butter, soy, Worcestershire, barbecue or steak sauce, a sprinkling of paprika or dry gravy mix; jelly glaze or crumb coating Frosting and topping finish cakes and breads. Top casseroles at the end of microwaving with grated cheese or crumbs.
HOT SNACKS AND APPETIZERS
Hot appetizers can be prepared very quickly in the microwave oven.
Many appetizers may be cooked on the serving platter, provided the platter does not have metal trim. A time saving tip-prepare these foods ahead of time, refrigerate or freeze, and refresh in the oven at serving time.
A plate of appetizers will take only seconds to refresh. Cheese melts very rapidly and will toughen if overcooked, so watch foods combined with cheese closely so that overcooking will not occur. As soon as cheese starts to bubble, cooking is completed.
Appetizers that have a crisp pastry exterior are best prepared in a conventional oven.
To prepare appetizers wrapped in bacon, it will be necessary to precook the bacon and then wrap around the foods. Oysters wrapped in bacon are easier to prepare in the broiler of your conventional oven.
Seafood mixtures can be prepared in serving shells as microwave energy will pass through the seafood shells without heating. Aluminum foil should not be used for shells.
If spreads are placed on crackers, care should be taken not to overcook as moisture from the food will cause crackers to become soggy. Crackers used for spreads should be very dry and crisp. This helps avoid sogginess. Heat only until spread is at serving temperature.
The time required to heat all appetizers will depend on the amount of food, and the number and the type of dish selected. Remember the food will become very hot even if the dish is cool. Cheese mixtures retain heat longer when heated with microwave energy.
BEFORE YOU CALL FOR SERVICE
Refer to the following checklist before you call for service.
If the oven does not work:
1. Check that the power cord is securely plugged in.
2. Check that the door is firmly closed.
3. Check that the cooking time is set.
4. Check for a blown circuit fuse or tripped main circuit breaker in your house.
5. Check that the Child Lock feature is not engaged.
If there is sparking in the cavity:
1. Check the containers, dishes or utensils in the oven and make sure they are not metal or have metal trim.