User Gudie Samsung QN60Q60AAFXZA TV
Connections
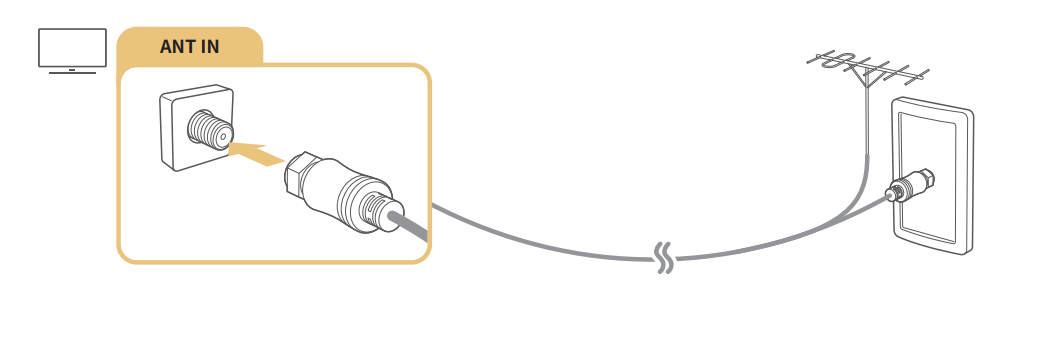
Connecting an Antenna
Connecting to the Internet

- If the TV does not automatically connect to the network, refer to "Network Issues" in "Troubleshooting."
- Use a CAT 7 (*STP type) cable for the connection.
- Shielded Twisted Pair
- The TV will not be able to connect to the Internet if your network speed is below 10 Mbps.
- This function may not be supported depending on the model.
Establishing a wireless Internet connection
- Settings General Network Open Network Settings Wireless Make sure that you have the wireless access point's SSID (name) and password settings before attempting to connect.
- The network name (SSID) and security key are available on the wireless access point's configuration screen. See the wireless access point's user manual for more information
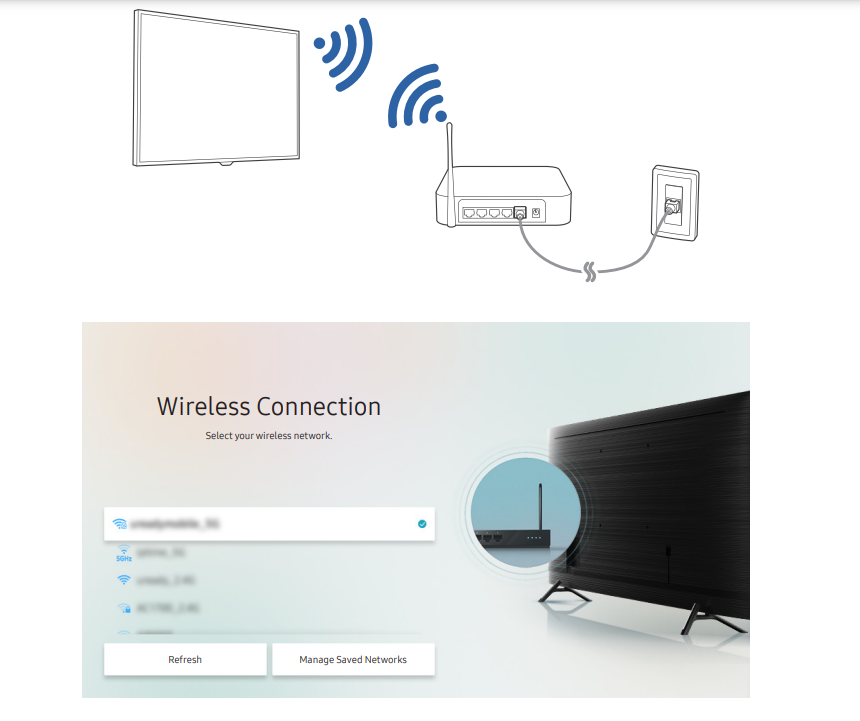
- The image on your TV may differ from the image above depending on the model and geographical area.
- If no wireless access point is found, select Add Network at the bottom of the list and enter the network name (SSID).
- If your wireless access point has a WPS or PBC button, select Use WPS at the bottom of the list, and then push the WPS or
- PBC button on your access point within 2 minutes. The TV will connect automatically.
- To view or delete previously connected network names (SSIDs), move the focus to Manage Saved Networks, and then press the Select button.
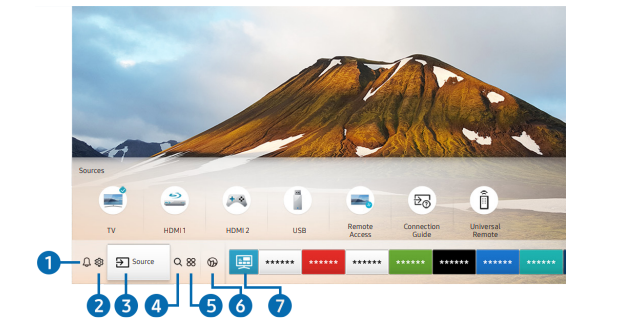
Switching between external devices connected to the TV
Source
- When you select a connected external device on the Source screen, the output of the selected device is displayed on the TV's screen.
- " On the standard remote control, press the SOURCE button. " To control a device (Blu-ray player, game console, etc.) that supports universal remote control with the TV's remote control, connect the device to an HDMI port on the TV, and then turn on the device.
- The output displayed on the TV is automatically switched to the output of the device or you can configure universal remote control for the device automatically. For more information, refer to "Controlling External Devices with a Samsung Remote Control -
- Using the Universal Remote." " When a USB device is connected to the USB port, a pop-up message appears that lets you switch easily to the media content listed on the device. " This function may not be supported depending on the device and geographical area.
Using additional functions
- You can use the following features on the Source screen.
- Remote Access
- Use the TV to access your PC via remote PC or Screen Sharing (Wireless).
- For more information, refer to "Using the Remote Access."
- Connection Guide
- Displays device connection instructions.
Universal Remote
- Lets you register external devices to your Samsung remote control and control them using the Remote.
- This function may not be supported depending on the model or geographical area.
- For more information, refer to "Controlling External Devices with a Samsung Remote Control - Using the Universal
Connection notes for HDMI
- The following types of HDMI cables are recommended:
- High Speed HDMI Cable
- High Speed HDMI Cable with Ethernet
- Premium High Speed HDMI Cable
- Premium High Speed HDMI Cable with Ethernet
- Ultra High Speed HDMI Cable
- Use an HDMI cable with a thickness of 0.66 inches (17 mm) or less.
- Using a non-certified HDMI cable may result in a blank screen or a connection error.
- Some HDMI cables and devices may not be compatible with the TV due to different HDMI specifications.
- This TV does not support HDMI Ethernet Channel. Ethernet is a Local Area Network (LAN) built with coaxial cables standardized by the IEEE.
- Use a cable shorter than 10 feet (3 m) to get the best UHD viewing quality.
- Many computer graphics adaptors do not have HDMI ports, but have DVI or DisplayPort ports instead. If your
- PC does not support HDMI video out, connect your PC with a DVI to HDMI or HDMI to DisplayPort cable.
- When the TV is connected to an external device such as a DVD/BD player or a set-top box via HDMI, power sync mode will be automatically activated. In the power sync mode, the TV continues to detect and connect external devices via HDMI cable. This function can be deactivated by removing the HDMI cable of the connected device.
Connection notes for audio devices
- For better audio quality, it is a good idea to use an AV receiver.
- If you connect an external audio device using an optical cable, the Sound Output setting is automatically changed to the connected device. However, to make this happen, you must turn on the external audio device before connecting the optical cable. To manually change the Sound Output setting, do one of the following:
- Use the Quick Settings screen to change to the connected device:
- Use the Select button to select Optical on the Sound Output menu. ( Settings up directional button Sound Output).
- Use the Settings screen to change to the connected device:
- Select Optical on the Sound Output menu. ( Settings Sound Sound Output).
- An unusual noise coming from a connected audio device while you are using it may indicate a problem with the audio device itself. If this occurs, ask for assistance from the audio device's manufacturer.
- Digital audio is only available with 5.1 channel broadcasts.
Connection notes for computers
- For the resolutions supported by the TV, refer to "Read Before Connecting a Computer (Supported
- Resolutions)."
- If you want to connect your PC and TV wirelessly, both of them must be connected to each other on the same network.
- When sharing content with other network-based devices such as those in an IP (Internet Protocol) storage system, sharing may not be supported due to the network’s configuration, quality, or functionality, for example, if the network has an NAS (Network-Attached Storage) device.
Connection notes for mobile devices
- To use the Smart View function, the mobile device must support a mirroring function such as Screen Mirroring or Smart View. To check whether your mobile device supports the mirroring function, refer to the mobile device's user manual.
- To use Wi-Fi Direct, the mobile device must support the Wi-Fi Direct function. To check whether your mobile device supports Wi-Fi Direct function, refer to the mobile device's user manual.
- The mobile device and your Smart TV must be connected to each other on the same network.
- The video or audio may stop intermittently, depending on network conditions.
- When sharing content with other network-based devices such as those in an IP (Internet Protocol) storage system, sharing may not be supported due to the network’s configuration, quality, or functionality, for example, if the network has an NAS (Network-Attached Storage) device.
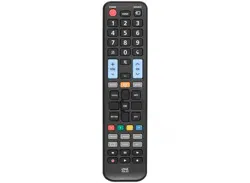
Remote Control and Peripherals
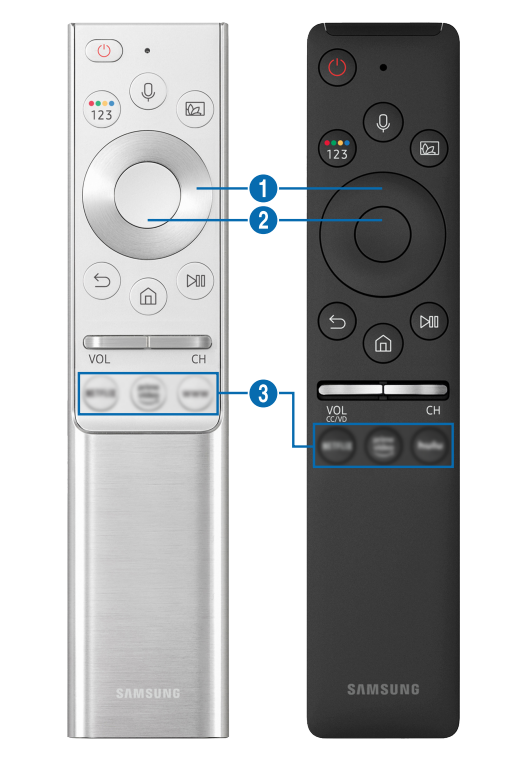
- Use the Samsung Smart Remote less than 20 feet (6 m) from the TV. The usable distance may vary with the wireless environmental conditions.
- The images, buttons, and functions of the Samsung Smart Remote may differ with the model or geographical area.
- The Samsung Smart Remote may not be supported depending on the model or geographical area.
- To use the Samsung Smart Remote to control a compatible external device that does not support HDMI-CEC (Anynet+), you must configure universal remote control for the device. For more information, refer to "Controlling External Devices with a
- Samsung Remote Control - Using the Universal Remote."
- To use the Samsung Smart Remote to control a compatible external device that does support HDMI-CEC (Anynet+), connect the device to an HDMI port on the TV using an HDMI cable. For more information, refer to "Using Anynet+ (HDMICEC)."
- For Q50R model, refer to "About the Samsung Smart Remote (UHD TV and Q50R model).
Connecting to the Samsung Smart Remote
When you turn on the TV for the first time, the Samsung Smart Remote pairs to the TV automatically.
- If the Samsung Smart Remote does not pair to the TV automatically, point it at the front of the TV, and then press and hold the and buttons simultaneously for 3 seconds or more.
- " The images, buttons, and functions of the Samsung Smart Remote may differ with the model or geographical area. " The Samsung Smart Remote may not be supported depending on the model or geographical area.
Controlling External Devices
- This function may not be supported depending on the model or geographical area.
- You can also use the Anynet+ (HDMI-CEC) function to operate external Samsung devices with your TV's remote control without any additional setup. For more information, refer to "Using Anynet+ (HDMI-CEC)."
- Specific external devices connected to the TV may not support the universal remote feature.
- Do not place any obstacles in front of an external device and TV's logo. It may cause signals from the remote control to be transmitted improperly.
- The TV memorizes both the external device and its connection port (HDMI 1, HDMI 2, etc.).
- If you have difficulty controlling external devices with the Universal Remote, try adjusting the positions of the external devices.
- This function may not operate properly depending on the TV installation environment and the features of external devices.
Using Anynet+ (HDMI-CEC)
- Control an external device connected via Anynet+ (HDMI-CEC) with the remote control.
- You can use the TV's remote control to control external devices that are connected to the TV by an HDMI cable and that support Anynet+ (HDMI-CEC). Note that you can only set up and operate Anynet+ (HDMI-CEC) with the remote control.
Connecting a USB keyboard, mouse, or gamepad
- Plug the keyboard, mouse or gamepad cable into the USB port.
- " If you connect a mouse, it is available only in the Internet app and Remote Access function. " XInput USB gamepads are supported. " For more information, refer to Input Device in Connection Guide
Smart Features
Using Smart Hub
- View descriptions of Smart Hub's basic functions. From Smart Hub, you can use the Internet search function, install and use various apps, view photos and videos, or listen to music stored on external storage devices, and perform more functions. " Some Smart Hub services are paid services.
- " To use Smart Hub, the TV must be connected to the Internet. " Some Smart Hub features may not be supported depending on the service provider, language, or geographical area. " Smart Hub service outages can be caused by disruptions in your Internet service.
- " To use Smart Hub, you must agree to the Smart Hub service agreement and the collection and use of personal information. Without giving consent, you cannot use the additional features and services.
- You can view the entire text of the Terms & Policy by navigating to Settings Support Terms & Policy.
- Try Now " If you want to stop using Smart Hub, you can cancel the agreement. To cancel the Smart Hub service agreement, select Reset Smart Hub ( Settings Support Self Diagnosis Reset Smart Hub).
Displaying the Home Screen
- On the Home Screen, you can easily run the apps you have used previously or frequently. The apps can also be moved or deleted from the screen.
- Notification You can view a list of notifications for all events that occur on your TV.
- A notification appears on the screen when it is time to view a scheduled program or when an event occurs on a registered device. If you move the focus to Notification, and then press the Select button, a notification window appears on the right and the following functions are available:
Picture Mode
- You can select the picture mode that provides the best viewing experience. To change the picture mode, press the Select button. To make fine adjustments, press the up directional button, and then select Picture Setup.
Sound Mode
- You can select a sound mode to optimize your listening experience. To change the sound mode, press the
- Select button. To make fine adjustments, press the up directional button, and then select Equalizer Setup.
Sound Output
- You can select which speakers the TV uses for audio output. To change the audio output, press the Select button. To connect to a Bluetooth speaker, press the up directional button, and then select Bluetooth Speaker
Ambient Mode
- You can enhance your living space with decorative content that matches the surroundings or view essential realtime information such as weather, time, and news on the TV screen when you are not watching TV.
- To enter Ambient Mode, press the button. To return to the TV mode, press the button. To shut off the TV, press the button.
- If you press the button when the TV is turned off, the TV turns on in Ambient Mode.
- If you use a remote control other than the Samsung Smart Remote, there may be restrictions to entering Ambient Mode.
- Because this function is specific to QLED TV (except for Q50R model) and The Serif, it may not be supported depending on the model.
- For more information about the Ambient Mode, refer to "Using the Ambient Mode."
TV Viewing
Using the Guide

- The image on your TV may differ from the image above depending on the model and geographical area.
- In the Guide, you can see the daily program schedules for each station, see program information, choose a program to watch, and set up a schedule viewing.
- To view the Guide while watching TV, press the (Channel) button on the Samsung Smart Remote or press the GUIDE button on the standard remote control.
- To see information about analog channels and use the analog channel functions of the Guide, you must fï͝ϑ˵ the service provider settings in initial setup.
To view the Guide, you must fiθϑϩ set the TV's clock
- Using the schedule viewing options from the guide screen
- On the Guide screen, select a program you would like to view, press and hold the Select button, and then select
- Schedule Viewing in the pop-up menu that appears.
Using the schedule viewing options while watching a program
- Press the Select button while watching TV. The Program Info window appears. Select a program that will be broadcast using the left or right directional buttons.
- Press the Select button, and then select Schedule Viewing to schedule viewing of that program.
Using the Channel List
- Change the channel or check programs on other digital channels.
Live TV Channel List
- Using the Channel List, you can change the channel or check programs on other digital channels while watching TV.
The Channel List screen contains the following icons:
A favorite channel
- If you press the left directional button when viewing the Channel List screen, you can use the following functions:
Air or Cable
- To select Air or Cable, move the focus to Air or Cable, and then press the Select button. Air is suitable for homes equipped with separate, over-the-air antennas
- Cable is suitable for homes that subscribe to a local cableservice, but do not have a cable box. You do not need to use this function if your TV is connected to a cable box or satellite box
Create a favorites list
- Live TV Channel List Edit Channels
- Press the left directional button on the remote control to select the desired Favorites list.
- Press the right directional button to select Add Channels.
- Select the desired channel in the list on the screen.
- Press Add Channels to add the selected channel in the Favorites list.
Using Program Rating Lock
- Settings Broadcasting Program Rating Lock Settings Try Now
- This function is useful for controlling what programs children can watch on the TV based on their ratings. Program
- Rating Lock Settings does not, however, block programs originating from external sources, such as Blu-ray players,
DVD players, or USB
- Every time you access Program Rating Lock Settings, you must enter the security PIN. You must also enter this PIN to watch a blocked program. The default PIN is "0000." To change the PIN, go to Settings General
- System Manager Change PIN.
System and Support
Using the Time Functions and the Timers
- Set the current time and use the timer function.
- Settings General System Manager Time Try Now
- You can set the Clock manually or automatically. Once the Clock is set, you can view the current time on the TV anytime.
- You must set the clock in the following cases:
- The power cable is disconnected and then connected.
- The Clock Mode is changed from Auto to Manual.
- The TV is not connected to the Internet.
- No broadcast signals are received
Setting the clock automatically
- Settings General System Manager Time Clock Clock Mode Auto
- This function works only when the TV is connected to the Internet or is receiving digital broadcasts through a connected antenna.
- The accuracy of the time information received may differ with the channel and signal.
- If you get your TV signal from a cable broadcast receiver/set-top box or a satellite receiver/satellite set-top box connected to an HDMI or Component port, you must set the current time manually.
Changing the current time
- Settings General System Manager Time Clock Time Offset
- Time Offset adjusts the time through a network connection.
- This function is available only when Clock Mode is set to Auto, the TV fails to receive time information through normal broadcast signals, and the TV is connected to the Internet through a local area network.
Using the sleep timer
- Settings General System Manager Time Sleep Timer
- You can use this function to automatically shut off the TV after a pre-set period of time. You can set the sleep timer for up to 180 minutes after which it will turn off the TV.
- This function may not be supported in some viewing modes.
- Turning off the TV using the off timer
Settings General System Manager Time Off Timer
- You can set Off Timer to shut off the TV automatically at a ϑΧʪʀ̈fiʀ time. Off Timer is only available if the Clock has been set.
- To use this function, fiθϑϩ set the Clock ( Settings General System Manager Time Clock).
- This function may not be supported in some viewing modes.
- Reducing the energy consumption of the TV
- Settings General Eco Solution Try Now
- You can adjust the brightness level of the TV, reduce overall power consumption, and prevent overheating.
- This function may not be supported depending on the model.
Ambient Light Detection Try Now
- Automatically adjusts the brightness level of the TV, according to the ambient light level, to reduce power consumption.
- If Ambient Light Detection has adjusted the screen brightness to a too bright or dark level, you can select Minimum Brightness to manually adjust the minimum screen brightness.
- Minimum Brightness Try Now
- When Ambient Light Detection is turned on, you can manually adjust the minimum brightness of the TV screen.
- This function acts only when the value is less than the setting in Settings Picture Expert Settings
Troubleshooting
The TV image does not look as good as it did in the store.
- Store displays are tuned to a digital UHD channel or HD channel. If you are using analog cable, upgrade to digital cable.
- If you use an analog cable box or satellite box, upgrade to a digital cable box or satellite box and adjust the digital cable box and satellite box's video output resolution to UHD or HD. Be sure to use an HDMI cable to enjoy high quality videos.
- To connect the TV with your PC, make sure that your PC's graphic card supports UHD resolutions. For more information about the supported UHD resolutions, refer to "Supported Resolutions for UHD Input Signals.
The picture is distorted.
- The compression of video content may cause picture distortions, especially in fast moving pictures from sports programs and action movies.
- If the signal reception is weak or poor, screen distortion may be visible but it is not a malfunction. Mobile phones used close to the TV (within 3.2 ft) may cause noise on analog and digital channels.
The color is wrong or missing.
- If you’re using a Component connection, make sure that the Component cables are connected to the correct jacks. Incorrect or loose connections may cause color problems or a blank screen.
The picture is black and white.
- Use a composite cable when you connect AV equipment to the TV. If you are using the composite cable, connect the video cable (Yellow) to the VIDEO (Yellow / Green) input port. Check whether Grayscale is set to On
The picture won’t display in full screen.
- HD channels will have black bars on either side of the screen when displaying upscaled SD (4:3) content.
- Black bars will appear at the top and bottom of the screen when you watch movies that have aspect ratios different from your TV. Adjust the picture size options on your external device or set the TV to full screen.
Captions appear on the TV screen.
- Turn off the Caption function in Caption Settings. • Settings General Accessibility Caption Settings Caption
There is no sound or the sound is too low at maximum volume.
- Check the volume control of your TV, and then check the volume control of the external device (cable box or satellite box, DVD, Blu-ray, etc.) connected to your TV.
The picture is good but there is no sound.
- If you are using an external device, check the device’s audio output option. For example, you may need to change your cable box’s audio option to HDMI if the box connected to your TV is using an HDMI cable.
- To listen to computer sound, connect an external speaker to the computer’s audio output connector. If your TV has a headphone jack, make sure there is nothing plugged into it.
- Reboot the connected device by disconnecting and then reconnecting the device’s power cable.
No sound is heard.
- Check whether Digital Output Audio Format is set to Dolby Digital+. Set Digital Output Audio Format to Dolby Digital+ only when you play Dolby Digital+ (with Atmos) content.
- If you are using an AV receiver that does not support Dolby Digital+, you will hear no sound when you select
The speakers are making an odd sound.
- Make sure that the audio cable is connected to the correct audio output connector on the external device. For antenna or cable connections, check the signal information. A low signal level may cause sound distortions.
The sound is interrupted.
- The sound may frequently be interrupted when a Bluetooth speaker is used.
- Make sure that the Bluetooth speaker and the wireless access point are on a straight line, and the Bluetooth speaker is placed as close as possible to the TV.
- To minimize interruptions, we recommend a wireless access point that uses a 5 GHz frequency. If the problem persists, we recommend that you use a wired connection
The TV audio is not being played through the AV receiver.
- Make sure that the AV receiver is connected to the TV's HDMI (ARC) port with an HDMI cable. Confirm that the AV receiver is HDMI (ARC) compatible.
- If the AV receiver is not HDMI (ARC) compatible, connect the TV and the AV receiver with an optical cable
Weak or No Signal” displayed in TV mode/ cannot find channel
- Make sure that the external device is connected securely and turned on. Move to Sources to switch to other input sources.
Broadcasting is deactivated.
- Broadcasting is only available when Source is set to TV. Broadcasting cannot be accessed while you watch TV using a cable box or satellite box.
- Broadcasting cannot be accessed while a recording is in progress or the Timeshift function is running.
The video is OK but there is no audio.
- If you are using an HDMI connection, check the audio output setting on your PC. If you are using a DVI to HDMI cable, a separate audio cable is required.
- To listen to the computer sound, connect external speakers to the audio output connection of the computer.
How can I use Screen Mirroring
- To wirelessly connect the TV to your PC, read the instructions at PC Screen Sharing (Wireless) in Connection Guide, and then try to connect.
- Source Connection Guide PC Screen Sharing (Wireless) Confirm that the TV and your PC are connected to the same wireless network. To wirelessly connect the TV to your mobile device, read the instructions at Smartphone Screen Sharing (Smart View) in Connection Guide, and then try to connect.
- Source Connection Guide Smartphone Screen Sharing (Smart View) If the TV has difficulties connecting to your PC or mobile device due to surrounding radio interferences, change the frequency of the wireless access band, and then try to connect.
Wireless network connection failed. Unable to connect to a wireless access point.
- Make sure that no items that can generate electromagnetic interferences are placed between the TV and the wireless/wired access point.
- Check if the access point is turned on. If it is on, turn it off, wait 1 or 2 minutes, and then turn it on. Enter the correct password if required.
- If the wireless connection fails, connect the TV to the access point via a LAN cable. If the TV can connect to the Internet normally via the wired connection, there might be a problem with the access point. In this case, try using a different access point.
Wired network connection failed.
- Check if the LAN cable is plugged in on both ends. If it is plugged in, check if the access point is turned on. If it is on, turn it off, wait 1 or 2 minutes, and then turn it on.
- Auto IP configuration failed. Unable to connect to the network.
- Check if the LAN cable is plugged in on both ends. If it is plugged in, check if the access point is turned on. If the access point is on, turn it off, wait 1 or 2 minutes, and then turn it on. Disconnect and then reconnect the power cable of the TV, or press and hold the power button for 3 seconds.
There is no response even if the voice entry button is pressed.
- Try pairing the remote control with the TV.
During voice recognition, the heavy load message appears and the function does not work.
- Unplug and then plug the TV power cable and then try again after 1 minute and 30 seconds. It may take a while if the voice recognition server is being inspected.
- I want to see weather information of the desired area.
- Say with the area name included.
The TV is hot.
- Watching TV for an extended period of time causes the panel to generate heat. The heat from the panel is dissipated through internal vents running along the top of the TV.
- The bottom, however, may feel hot to the touch after extended use.
- Children watching TV need constant adult supervision to prevent them from touching the TV. This heat, however, is not a defect and does not affect the TV's functionality.
The TV smells like plastic
- This smell is normal and will dissipate over time
The settings are lost after 5 minutes or every time the TV is turned off.
- If Usage Mode is set to Retail Mode, the TV's audio and video settings are automatically reset every 5 minutes.
The TV is tilted to the side
- Remove the base stand from the TV and reassemble it
The stand is wobbly or crooked.
- Refer to the Quick Setup Guide and make sure that the stand is assembled correctly.
A POP (TV’s internal banner ad) appears on the screen.
- PIP is available only when an external device is connected with an HDMI or Component cable. Note that the function is unavailable when Smart Hub is active.
- This function may not be supported depending on the model or geographical area.
The TV is making a popping noise
- The expansion and contraction of the TV's outer casing may cause a popping noise. This does not indicate a product malfunction. The TV is safe to use.
The TV is making a humming noise
- Your TV utilizes high-speed switching circuits and high levels of electrical current. Depending on the TV's brightness level, the TV may seem slightly noisier than a conventional TV.
- Your TV has undergone strict quality control procedures that meet our demanding performance and reliability requirements.
- Some noise coming from the TV is considered normal and is not an acceptable cause for an exchange or refund.
The TV narrates the screen events in voice-over.
- To turn off Voice Guide, move the focus from Accessibility Shortcuts to Voice Guide and then press the Select button.
- You can turn on or off Voice Guide. To run Accessibility Shortcuts, see the following:
- Press and hold the (Volume) button on your Samsung Smart Remote.
- Press the CC/VD button or press and hold the MUTE button on your standard remote control.