Wash the cooking pot, inner lid, steam port and other accessories, and then dry thoroughly before using.
Electrical Requirements
A 120 V, grounded electrical supply is required. It is recommended that a separate circuit serving only the rice cooker is used. Sharing the power supply with other appliances will result in overheating.
Power Supply Cord
NOTE This Rice Cooker has a 2-prong plug. To reduce the risk of electrical shock, the plug will fit into an outlet only one way. If the plug does not fit in the outlet, contact a qualified electrician. Do not modify the plug.
A short power supply cord is used to reduce the risks of becoming entangled in, or tripping over a longer cord, or of the cord being grabbed by children.
If the power supply cord is too short, have a qualified electrician or technician install an outlet near the appliance. Do NOT use an extension cord.
Location Requirements
This rice cooker is designed for household use only; the cooker should not be used for commercial use.
Use indoors on a stable, level, non-heat sensitive surface such as a countertop in a location where the lid can be fully opened; do NOT use outdoors.
Do not place the rice cooker on an area of the countertop that is exposed to direct sunlight, or where it might be splashed with cooking oil.
RECOMMENDED CLEARANCE
Steam and heat emitted from the rice cooker may damage or discolor nearby walls or cabinets. It is recommended that the rice cooker be placed a minimum distance of 12" (30.5 cm) from walls or cabinets.
OPERATING INSTRUCTIONS
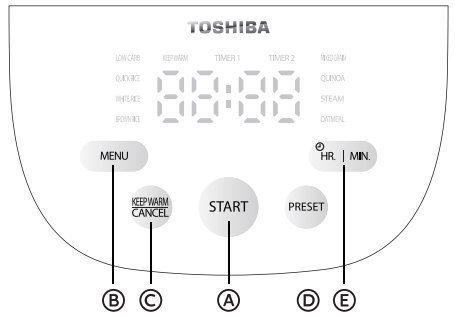
Controls
Start
Plug in the power supply, then the rice cooker is in standby mode, and the digital screen displays the current time. After selecting the required correspondence function, press the "START" button to start the corresponding function program.
Menu
In standby mode, press the "MENU" button to select various functions. Each time the "MENU" button is pressed, the selected function will also change in order. The function cycle is as follows: LOW CARB/QUICK RICE/WHITE RICE/BROWN RICE/MIXED GRAIN/QUINOA/STEAM/ OATMEAL. In the function selection state, the program returns to standby mode when no pressing operation for over 2 minutes.
KEEP WARM/CANCEL
1. In standby mode, press the "KEEP WARM/CANCEL" button to start the Keep Warm program. The digital screen displays "KEEP WARM" and Keep Warm time. The Keep Warm time is displayed from 0:00 to 24:00. After 24 hours in Keep Warm mode has passed, the rice cooker will return to the standby mode.
2. In working mode, press the "KEEP WARM/CANCEL" button to exit the working state and return back to the standby mode.
3. After cooking is completed, the Keep Warm mode starts up. The Keep Warm time is displayed from 0:00 to 24:00. After 24 hours in Keep Warm mode has passed, the rice cooker will return to the standby mode. It is recommended to eat the food within 5 hours after cooking so that its taste will not deteriorate.
PRESET
In standby mode, press "MENU" button, select various functions, and then press "PRESET" button to enter the Preset mode.
HR. I MIN.
Time setting button. When entering the "STEAM" function, Preset mode and clock setting mode, press "HR." for hours adjustment and "MIN." for minutes adjustment.
SET CURRENT TIME
Setting the current time:
1. In standby mode, press the "HR." button for 3 seconds to enter the clock setting mode. The digital screen flashes to display the current time.
2. Press "HR." and "MIN." to set the hours and minutes. The time is 24-hour clock. Press the "HR." button once for 1 hour adding and press the "MIN." button once for 1 minute adding. Long press to increase automatically.
3. After pressing the "START" button or 10~15 seconds no operation, the time setting is completed, the standby mode is entered, and the digital screen displays the set time.
Using the Rice Cooker
INTRODUCTION
The Toshiba® Rice and Grain Cooker benefits from the use of Fuzzy Logic, a technology that senses moisture levels to accurately cook food. Cooking time and temperature are defined by the appliance. Our highly intelligent Rice and Grain Multicooker automatically adjusts the heat and timing for perfect results every time.
IMPORTANT
Do NOT place anything on or over the rice cooker lid, during use.
Do NOT touch the steam vent during cooking.
Do NOT place the interior cooking pot on a cooktop burner; the high temperature will warp the pot. The cooking pot is designed to be used only in the rice cooker.
Do not use a pot or container other than the cooking pot (provided) in the rice cooker.
Do not insert any foreign objects into the air vent or gaps at the bottom of the rice cooker.
Do not season rice while it is being kept warm in the cooking pot. Seasonings left in contact with the interior of the cooking pot may damage the non-stick coating.
Do not use metal cooking utensils. Metal utensils may scratch or damage the non-stick coating.
MEASURING RICE
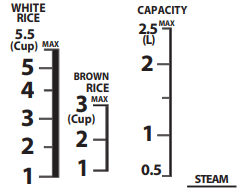
IMPORTANT The total amount of rice and water should NOT exceed the 5.5 cup MAX level marked inside the cooking pot.
NOTE The Rice Measure is significantly smaller than the standard U.S. cup measure.
To achieve the correct ratio of rice to water, use ONLY the Rice Measure (cup provided).
Level the rice in the Rice Measure cup so that it is even with the top.
For softer or firmer rice adjust the ratio of water to rice accordingly.
If the rice requires rinsing before cooking, measure the rice before you rinse it, Follow the rinsing directions for that specific type of rice.
RINSING RICE
Some types of rice are rinse-free and other types require rinsing before use to remove excess starch which may make the rice sticky. Also, cooking rice with starchy water may result in the rice burning or being improperly cooked.
If the water should turn white or cloudy, when added to rinse-free rice, drain and replace the water before cooking. Many recipes recommend rinsing quickly so the rice does not absorb water prior to cooking.
To Rinse Rice Quickly:
Place a colander inside a larger bowl.
Place the rice in the colander and rinse under cool running water. Rinsing rice in hot water may prevent the rice from cooking properly.
Using your hand stir the rice around 3 to 4 times to separate the grains.
Continue to rinse until the water in the bowl is clear.
ADDING OTHER INGREDIENTS
If you wish to add other ingredients or seasonings to the rice, do so after adding the water. The rice will not cook properly and be too firm if ingredients are added before the water.
COOKING RICE
NOTE Cooking time will vary depending on the type of rice or grain being cooked.
Before using for the first time, wash the cooking pot, inner lid, steam port, other accessories and attachments, and then dry each thoroughly.
Measure rice, and then rinse rice, if needed.
Add measured rice to the cooking pot.
Add water until it reaches the corresponding numbered Water Line marked on the interior of the cooking pot. For example, when cooking 3 measures of white rice, add water to third line from the bottom of the pot.
To suit your personal preference, the amount of liquid can be adjusted slightly (no more than of the distance between the lines).
5. Stir the rice into the water, so that each grain is immersed in the water.
6. Place the cooking pot into the rice cooker.
7. Rotate the pot two to three times to ensure a solid contact between the bottom of the cooking pot and the heating plate.
8. Close the lid, and then press downward until it clicks into place.
9. Plug the power supply cord into a grounded 2 prong electrical outlet.
NOTE The rice cooker is powered ON, but in standby mode (no heat).
10. Select desired cooking program. See "Controls" for explanation of options.
11. Press START.
NOTE During first use, there may be a plastic odor which will dissipate after using.
12. After cooking is completed, it will automatically change to Keep Warm mode, and "KEEP WARM" light turns on.
COOKING PROGRAMS
Average cooking time is approximate; it will automatically increase or decrease depending on the amount being cooked. Keep Warm mode begins automatically at the end of each cooking program. The timer displays from 0 to 24 hours. After 24 hours in Keep Warm mode has passed, the rice cooker will return to the ON (standby) mode.
LOW CARB
1. In standby mode, press the "MENU" button, select the "LOW CARB" function, and the "LOW CARB" light flashes.
2. Press the "START" button to start the "LOW CARB" program, the "LOW CARB" light remains on, and the digital screen displays the time countdown.
3. After cooking is completed, it will automatically change to the Keep Warm mode.
4. Recommended cooking volume range: 1-2 cups of rice.
5. When selecting LOW CARB function, use the metal steamer to put the rice into the inner pot to wash the rice. After washing the rice, add the corresponding amount of water according to the water level line on the metal steamer.
QUICK RICE
1. In standby mode, press the "MENU" button, select the "QUICK RICE" function, and the "QUICK RICE” light flashes.
2. Press the "START" button to start the "QUICK RICE" program, the "QUICK RICE" light remains on, and the digital screen displays the time countdown.
3. After cooking is completed, it will automatically change to the Keep Warm mode.
4. Recommended cooking volume range: 1-5.5 cups of rice. 5. Add the corresponding amount of water according to the "WHITE RICE" water level line on the inner pan.
WHITE RICE
1. In standby mode, press the "MENU" button, select the "WHITE RICE" function, and the "WHITE RICE” light flashes.
2. Press the "START" button to start the "WHITE RICE" program, the "WHITE RICE" light remains on, and the digital screen displays the time countdown.
3. After cooking is completed, it will automatically change to the Keep Warm mode.
4. Recommended cooking volume range: 1-5.5 cups of rice.
5. Add the corresponding amount of water according to the "WHITE RICE" water level line on the inner pan.
BROWN RICE
1. In standby mode, press the "MENU" button, select the "BROWN RICE" function, and the "BROWN RICE" light flashes.
2. Press the "START" button to start the "BROWN RICE" program, the "BROWN RICE" light remains on, and the digital screen displays the time countdown.
3. After cooking is completed, it will automatically change to the Keep Warm mode.
4. Recommended cooking volume range: 1-3 cups of rice.
5. Add the corresponding amount of water according to the "BROWN RICE" water level line on the inner pan.
MIXED GRAIN
1. In standby mode, press the "MENU" button, select the "MIXED GRAIN" function, and the "MIXED GRAIN" light flashes.
2. Press the "START" button to start the "MIXED GRAIN" program, the "MIXED GRAIN" light remains on, and the digital screen displays the time countdown.
3. After cooking is completed, it will automatically change to the Keep Warm mode.
4. Recommended cooking volume range: 1-3 cups of rice.
5. Add the corresponding amount of water according to the " WHITE RICE " water level line on the inner pan.
NOTE Mixed grains need to be soaked in water above 176℉for 2hours before cooking.
QUINOA
1. In standby mode, press the "MENU" button, select the "QUINOA" function, and the "QUINOA" light flashes.
2. Press the "START" button to start the "QUINOA" program, the "QUINOA" light remains on, and the digital screen displays the time countdown.
3. After cooking is completed, it will automatically change to the Keep Warm mode.
4. Recommended cooking volume range: 1-5.5 cups.
5. Add the corresponding amount of water according to the "WHITE RICE" water level line on the inner pan.
STEAM
In standby mode, press the "MENU" button, select the "STEAM" function, and the "STEAM" light flashes.
The default cooking time for the "STEAM" function is 30 minutes. You can press the "HR." button to change it to 1 hour, or press the "MIN." button to adjust the cooking time by minute. Press it once adding a minute at a time, and long press it to automatically increase it.
After setting the cooking time, press the "START" button to start the "STEAM" program, and the digital screen displays the countdown time when boiling.
After cooking is completed, it will automatically change to the Keep Warm mode.
Add the corresponding amount of water according to the "STEAM" water level line on the inner pan.
OATMEAL
In standby mode, press the "MENU" button, select the "OATMEAL" function, and the “OATMEAL” light flashes.
Press the "START" button to start the "OATMEAL" program, the "OATMEAL" remains on, and the digital screen displays the time countdown.
After cooking is completed, it will automatically change to the Keep Warm mode.
Recommended cooking volume range: 1-2 cups.
Add the corresponding amount of water as recommended for oatmeal.
DELAY COOKING
The Delay Timer can preset two different cooking completion times, Timer1 and Timer2.
IMPORTANT Before using the Preset function, the current time should be set correctly In order to avoid food deterioration, it is recommended that the preset time should not exceed 12 hours.
Presetting operation method
1. In standby mode, press the "MENU" button to select the function to be preset.
2. Press "PRESET" to enter the Preset mode, and the digital screen displays "TIMER1" and the current preset cooking completion time. Or press the "PRESET" button again, the digital screen displays “TIMER2” and the current preset cooking completion time. Press “TIMER1” and “TIMER2” continuously, they will display in a cycle. “TIMER1” and “TIMER2” have the same function. The rice cooker will store each preset cooking completion time. The last preset cooking completion times are remembered and recalled whenever you go back into the preset function and select “TIMER1” or “TIMER2”.
3. Press “HR” and “MIN.” to set the time to when you want the rice cooker to finish cooking. The maximum preset time is 24 hours. Press the "HR." button once for 1 hour adding and press the "MIN." button once for 10 minutes adding. Long press to increase automatically.
4. Press the “START” button to start the preset function. The screen displays the completion time. When the rice cooker needs to start cooking, the display will change to display the cook time remaining. The display will then begin to countdown. The rice cooker will finish cooking at the original completion time.
5. After cooking is completed, it will automatically change to the Keep Warm mode. The Keep Warm time can be as long as 24 hours, and the standby state is returned back after 24 hours. The shorter the Keep Warm time, the better the taste.
6. In the Preset setting state, the program returns to standby mode when no pressing operation for over 2 minutes.
7. Quinoa and oat porridge meal functions cannot be preset.
8. EXAMPLE OF HOW TO USE THE DELAY FUNCTION: You want to eat dinner at 6 PM tonight. You will press “MENU” button until you see the type of rice you want to cook. Then you press “PRESET” button and enter the time you want the rice cooker to finish cooking. Press “HR” button until the display shows “18:00”. Then you press “START” button. The rice cooker will display “18:00”. The display will change when the rice cooker needs to start cooking. The display will then countdown and the rice cooker will finish cooking at 6 PM.
TIPS FOR GREAT RESULTS
Measure rice and water accurately.
For added flavor you may substitute meat stock or broth for the water and chopped fresh herbs can be stirred into the rice at the end of cooking before allowing to rest.
Some varieties of rice should be rinsed before cooking. Enriched rice, commonly found in the U. S., is not rinsed to preserve the added nutrients. If rinsing rice before cooking, measure rice before rinsing and drain as much water as possible.
After adding the rice and water to the cooking pot, spread it evenly over the bottom.
Do not open the lid during cooking.
Most types of rice will be slightly undercooked at the end of the cooking program. Allow the cooked rice to “rest” in the cooking pot for 5 to 10 minutes to absorb the last bit of moisture.
CARE AND CLEANING
Unplug the rice cooker from the electrical outlet, allow it to cool, and then clean and dry the cooker and all its parts after each use to avoid odors and poor performance.
GENERAL CARE
IMPORTANT The rice cooker is not dishwasher safe. Use only soft cloths with a mild dish soap solution to clean the rice cooker. Do not wash either the rice cooker or its interior cooking pot in the dishwasher.
CLEANING THE COOKER EXTERIOR
IMPORTANT Do NOT immerse the rice cooker in water.
Using a soft, damp cloth, clean the outer surfaces of the rice cooker.
Using a soft, dry cloth thoroughly dry the outer surfaces.
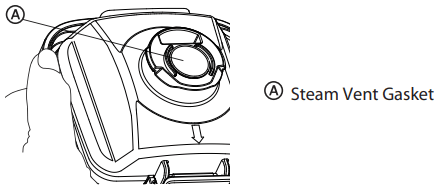
Steam Valve
IMPORTANT
Clean the steam valve frequently to ensure proper venting.
The rice cooker should be cool to the touch before cleaning the steam valve.
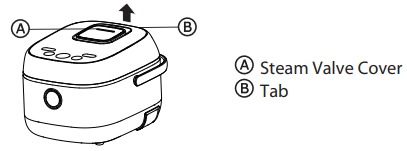
1. Grasp the tab on the Steam Valve Cover, and then lift up to remove the steam valve cover.
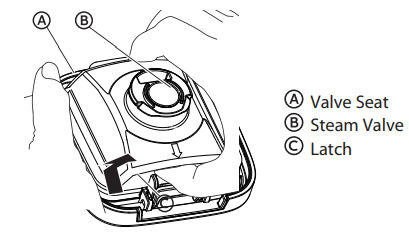
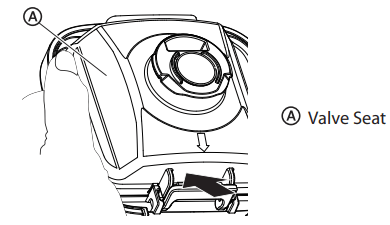
2. Push in where indicated to release the latch and open the valve seat and steam valve cover.
3. Wash the steam valve with soap and water after every use.
4. Using a soft doth, dry thoroughly.
NOTE Reinsert the steam vent gasket if it comes off when washing or drying the valve seat.
5. Close the valve seat cover. A "click" will sound to indicate the cover is closed completely.
6. Align the valve seat with the opening in the cooker lid, and then press downward to reinstall the steam valve cover.
CLEANING THE COOKER INTERIOR PARTS
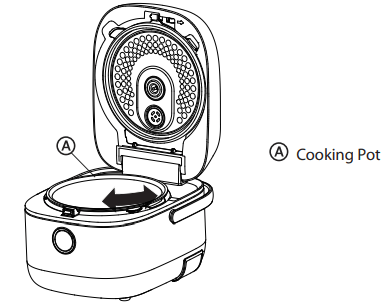
Press down on the metal lid latch to open the rice cooker cover.
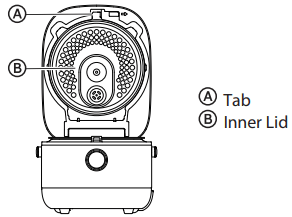
Inner Lid
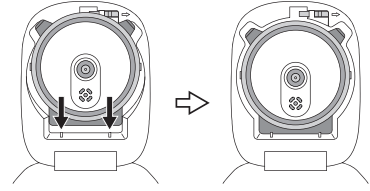
1. With the cover of the rice cooker open, press upward on the tab to release, and then pull out to remove the inner lid.
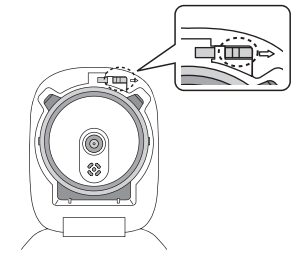
NOTE Inner Lid Removal Method
Move the slider to the right and take out the inner lid.
NOTE Inner Lid Installation Method
Insert the lower part of the lid into the protrusion on the lower part of the inner cover, and then clamp the upper part of the lid into the slider.
Note: If it is difficult for the lid to snap into the slider, move the slider to the right and press the lid again.
2. Wash and dry the inner lid.
3. Replace the inner lid by setting the lower edge into the bottom groove, and then pressing the upper edge under the tab until you feel it snap into place.
Condensation
Condensation from steam will collect in the well around the cooking pot and under the steam valve cover.
Using a soft cloth, thoroughly dry the areas where condensation collects.
Heating Plate
Using a steel wool pad, remove any residue burned onto the metal heating plate.
Using a soft, damp cloth, wipe the heating plate, and then dry thoroughly.
Cooking Pot
IMPORTANT
The inside of the cooking pot has a non-stick coating that can lose its non-stick properties if it becomes scratched or damaged.
Do not use abrasive cleansers, vinegar, bleaching agents, steel wool or other harsh scrubbing brushes to clean the cooking pot.
Do not use metal cooking utensils.
Wash the cooking pot immediately after removing rice that has been seasoned. Seasonings may damage the non-stick coating of the cooking pot if left in contact for any length of time.
1. Wash the cooking pot, using a soft cloth and a nonabrasive cleanser or a mild solution of dish soap and warm water.
2. Using a soft cloth, dry both the interior and exterior of the cooking pot.
TROUBLESHOOTING TIPS
Before calling for service, review the following tips. It may save you time and money.
This list includes common occurrences that are not the result of poor workmanship or defective materials.
Any other servicing should be performed by an authorized service representative.
PROBLEM
POSSIBLE CAUSE
SOLUTION
Rice cooker does not operate
The power supply cord is not completely plugged into a working outlet.
Plug the power supply cord into the electrical outlet.
There has been a power failure.
During a power failure, the time-of-day, not the countdown time, will appear in the display during a cooking program.
Reset the circuit breaker or replace the fuse once power is restored.
Another appliance was plugged into the same electrical outlet, which tripped the circuit breaker or blown a household fuse.
Reset the circuit breaker or replace the fuse. Plug power supply cord into a separate, dedicated circuit.
Rice is mushy, sticky or clumping
Rice was cooked with too much water
Use less water when cooking rice. Once cooked, fluff rice immediately using a fork to separate the grains.
Rice was rinsed or soaked before cooking
Pre-rinsing can cause the rice to crack and become mushy and sticky during cooking.
Soaking before cooking softens the texture of rice.
If rinsing is required, rinse the rice quickly and drain as much water as possible. Do not allow rice to soak in liquid prior to cooking.
Rice is hard or dry
Rice was not cooked with enough water or it was cooked with mineral water.
Use more water when cooking rice.
Soak the rice for a short time before cooking.
Rice is scorched
NOTE: Rice turning a light brown color is not a result of rice cooker failure.
Dirt or a foreign substance is stuck to the temperature sensor.
Remove foreign substance and clean well.
Other ingredients and/or seasonings were added to the rice before cooking.
Cook only rice with the proper ratio of water.
Rice was soaked for too long.
Soak rice for a shorter period of time.
Rice does not taste good
The cooking pot and inner cover are warm or hot when cooking begins.
Allow rice cooker to cool completely before cooking a new batch.
Dirt or a foreign substance is stuck to the temperature sensor, inner lid, or steam vent.
Remove foreign substance and clean well.
The inner lid or steam vent was not attached to the rice cooker.
After cleaning replace both the inner lid and steam vent into the rice cooker. See “Care and Cleaning.”
Used wrong ratio of ingredients to water or wrong cooking program for
Accurately measure the correct ratio of ingredients to water.
Unpleasant odor
NOTE: A plastic odor is normal the first few times the cooker is used.
Keep Warm mode was used too long.
Do not allow rice to remain in Keep Warm mode indefinitely. Serve rice soon after the 10-minute resting period.
Rice left in the cooking pot after Keep Warm mode has turned off.
Remove cooked rice from cooker.
The rice was not rinsed thoroughly.
Rinse rice until the water runs clear.
The cooking pot, inner lid and/or steam vent is dirty.
Clean and dry parts thoroughly. See “Cleaning.
The plastic scoop was left in the cooking pot.
Remove plastic scoop and all accessories from the rice cooker before using.
Rice is dry and has turned color
Rice has been reheated repeatedly
Rice should be reheated only once to maintain the quality. Sprinkle rice with water to help keep it from drying out during reheating.
Steam vent is not attached correctly.
After washing, attach the steam vent correctly to the rice cooker. See “Cleaning.”
Steam escaping from the rice cooker
The inner lid is not attached properly.
The inner lid and/or cooking pot is deformed.
Check the condition of the inner lid and gasket. Confirm that the inner lid is correctly seated in the cooker cover.
Foreign substances are stuck to the inner lid, cooking pot rim or the frame of the rice cooker.
Clean both the cooking pot and rice cooker after each use.
Rice cooker boiling over and spattering
NOTE: It is normal for moisture to appear on the inner lid or cooking pot and drip when the lid is opened.
The inner lid and/or steam vent are not attached properly.
After cleaning replace both the inner lid and steam vent into the rice cooker. See “Care and Cleaning.”
The steam vent and/or temperature sensor is dirty.
Clean the steam vent and temperature sensor.
Porridge program was unintentionally used to cook rice
Select the cooking program for the ingredients you are cooking
Difficult to close the cooker lid
The inner lid is not attached properly.
NOTE: The outer lid will not close unless the inner lid is attached correctly.
Replace the inner lid into the top cover of the rice cooker. See “Care and Cleaning.
Foreign substances in the lid latch well are preventing the outer lid from latching.
Remove debris from the lid latch well.
Film on interior of cooking pot
The starch in the rice will melt during cooking and dry onto the interior of the cooking pot.
During washing, use a non-abrasive plastic scouring pad or utensil to gently remove the firm.


 Start
Start 
 Menu
Menu 
 KEEP WARM/CANCEL
 PRESET
 HR. I MIN.