
USER
MANUAL
DIGITAL RICE COOKER
RC-10DRUNA(W)

01
CONTENTS
0 2
0 5
0 6
0 7
3 4
3 1
0 9
SAFETY INSTRUCTIONS
SPECIFICATIONS
PRODUCT OVERVIEW
INSTALLATION INSTRUCTIONS
OPERATION INSTRUCTIONS
CLEANING AND MAINTENANCE
TROUBLE SHOOTING TIPS
3 7
LIMITED ONE-YEAR WARRANTY
Read This Manual
THIS PRODUCT IS DESIGNED FOR HOUSEHOLD USEONLY.
KEEP APPLIANCE AWAY FROM CHILDREN.
SAVE THESE INSTRUCTIONS
02
Intended Use
SAFETY INSTRUCTIONS
The following safety guidelines are intended to prevent unforeseen risks or damage from
unsafe or incorrect operation of the appliance. Please check the packaging and appliance on
arrival to make sure everything is intact to ensure safe operation. If you find any damage,
please contact the retailer or dealer. Please note modifications or alterations to the appliance
are not allowed for your safety concern. Unintended use may cause hazards and loss of
warranty claims.
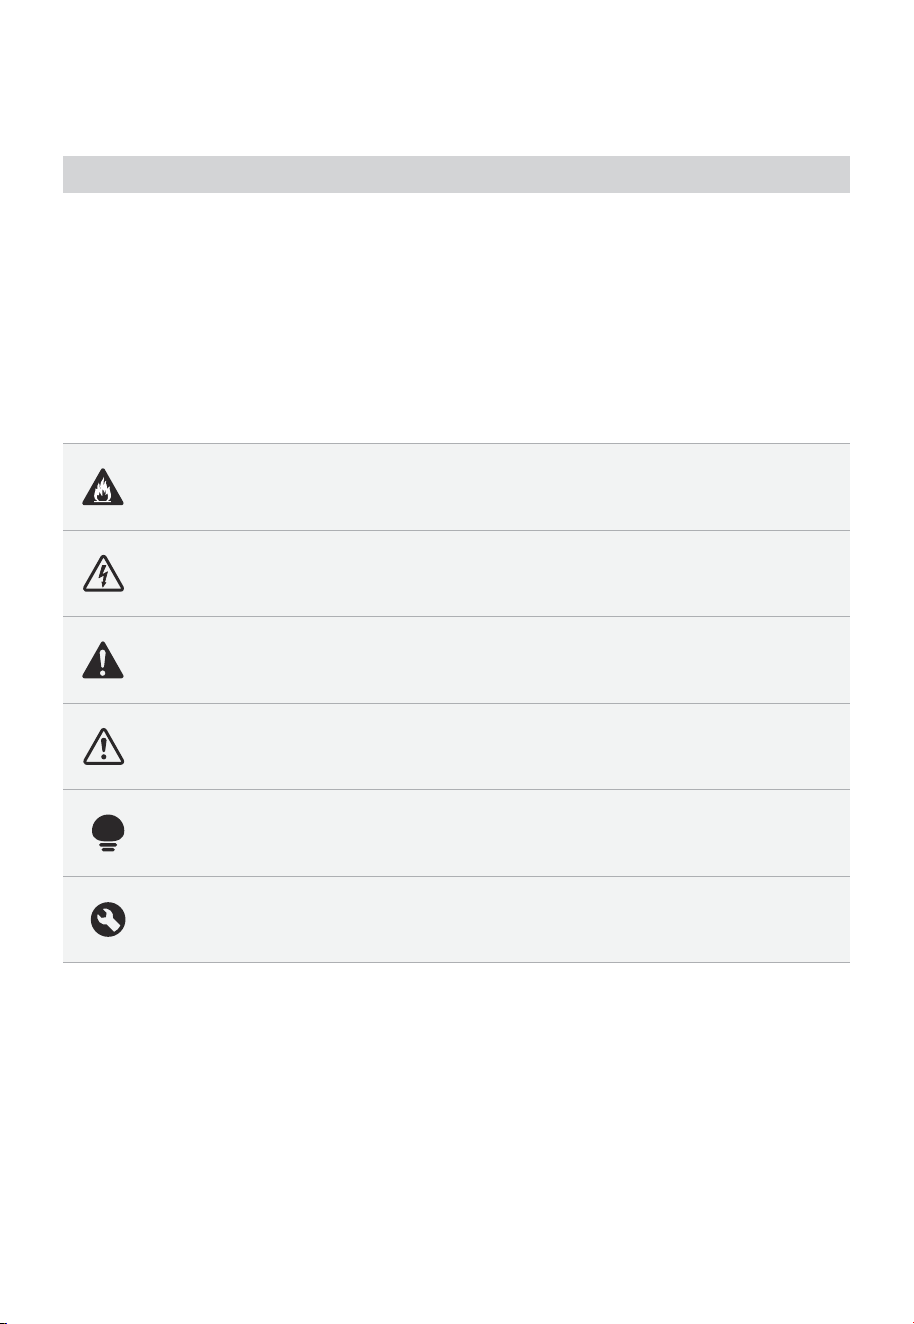
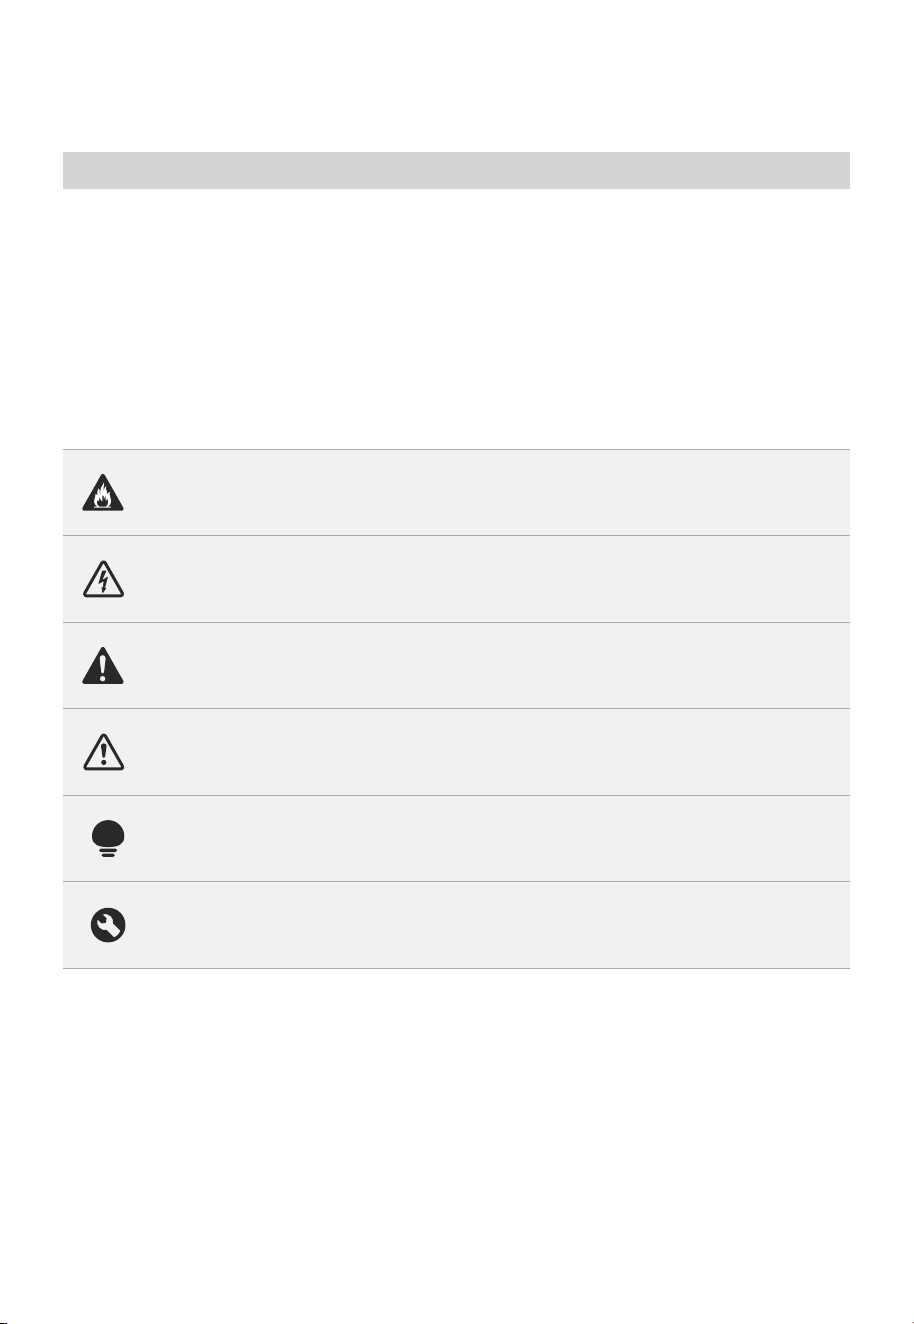
Danger
This symbol indicates that there are dangers to the life and health of
persons due to extremely flammable gas.
Warning of electrical voltage
This symbol indicates that there is a danger to life and health of
persons due to voltage.
Warning
The signal word indicates a hazard with a medium level of risk which, if
not avoided, may result in death or serious injury.
Caution
The signal word indicates a hazard with a low degree of risk which, if
not avoided, may result in minor or moderate injury.
Attention
The signal word indicates important information (e.g. damage to
property), but not danger.
Observe instructions
This symbol indicates that a service technician should only operate and
maintain this appliance in accordance with the operating instructions.
Explanation of Symbols
Read these operating instructions carefully and attentively before using/commissioning the
unit and keep them in the immediate vicinity of the installation site or unit for later use!
WARNING
03
To prevent injury to the user or other people and property damage, the following instructions
must be followed. Incorrect operation due to ignoring of instructions may cause harm or
damage. The level of risk is shown by the following indications.
When using electrical appliances, basic safety precautions should always be followed
including the following:
WARNING: This symbol indicates the possibility of death or serious injury.
CAUTION: This symbol indicates the possibility of injury or damage to property.
IMPORTANT SAFETY INSTRUCTIONS
SAFETY PRECAUTIONS
Read all instructions before use.
Do not touch hot surfaces. Use potholders or oven mitts when handling the
cooking bowl or lid.
To avoid electrical shock do not immerse cord, plugs, or the rice cooker housing
in water or other liquid.
This appliance is not intended for use by persons (including children) with
reduced physical, sensory or mental capabilities, or lack of experience and
knowledge, unless they have been given supervision or instruction concerning
the use of the appliance by a person responsible for their safety.
Close supervision is necessary when any appliance is used by or near children.
Keep appliance and cord away from children.
Unplug from electrical outlet when not in use and before cleaning.
Allow appliance to cool before putting on or taking off parts.
Do not operate any appliance with a damaged cord or plug or after the
appliance malfunctions or has been damaged in any manner. Return appliance
to the nearest Authorized Service Center for examination, repair, or adjustment.
Do not disassemble, repair or modify the rice cooker. For any repair, consult a
Toshiba authorized Service Center.
Do not operate the rice cooker if any part of the unit is damaged.
Do not use outdoors. Intended for indoor household use only.
Do not let cord hang over edge of countertop, or touch hot surfaces, including
the top of the rice cooker. Never use outlet below countertop, and never use
with an extension cord.
Do not place on or near a hot gas or electric burner, or in a heated oven.
Do not place near heat-sensitive curtains.
WARNING
CAUTION
04
To reduce the risk of Electric Shock, cook only in removable container.
Do not use appliance for other than intended use.
Intended for countertop use only.
WARNING: Spilled food can cause serious burns. Keep appliance and cord away
from children. Never drape cord over edge of counter, never use outlet below
counter, and never use with an extension cord.
The total amount of food and water should NOT exceed the MAX level marked
on the cooking pot. Some foods such as rice, expand during cooking and should
not fill the cooking pot over halfway.
Spilled food can cause serious burns. Extreme caution must be used when
moving an appliance containing hot liquids or hot oil.
Do not use appliance for other than intended use.
Always attach cord to appliance first, and then plug cord into a wall outlet.
A short power cord is used to reduce the risk resulting from the cord being
grabbed by children, or becoming entangled in or tripping over a longer cord.
To disconnect, set all controls to "Off," then remove plug from wall outlet.
The use of accessory attachments not recommended by Toshiba may cause
injuries.
Handles are not used to carry heavy objects. Items in the cooker cannot be
moved by the handle.
Extreme caution must be used when moving an appliance containing hot oil or
other hot liquids.
Do not use appliance for other than intended use.
Unplug from outlet when not in use and before cleaning. Allow to cool before
putting on or taking off parts.
The use of accessory attachments not recommended by the appliance manufac-
turer may cause injuries.
Do not place on or near a hot gas or electric burner, or in a heated oven.
SAVE THESE INSTRUCTIONS

SPECIFICATIONS
05
RC-10DRUNA(W)Product Model
Voltage
Frequency
120V~
60Hz
Capacity
3L/5.5Cups of uncooked rice
Power 650W
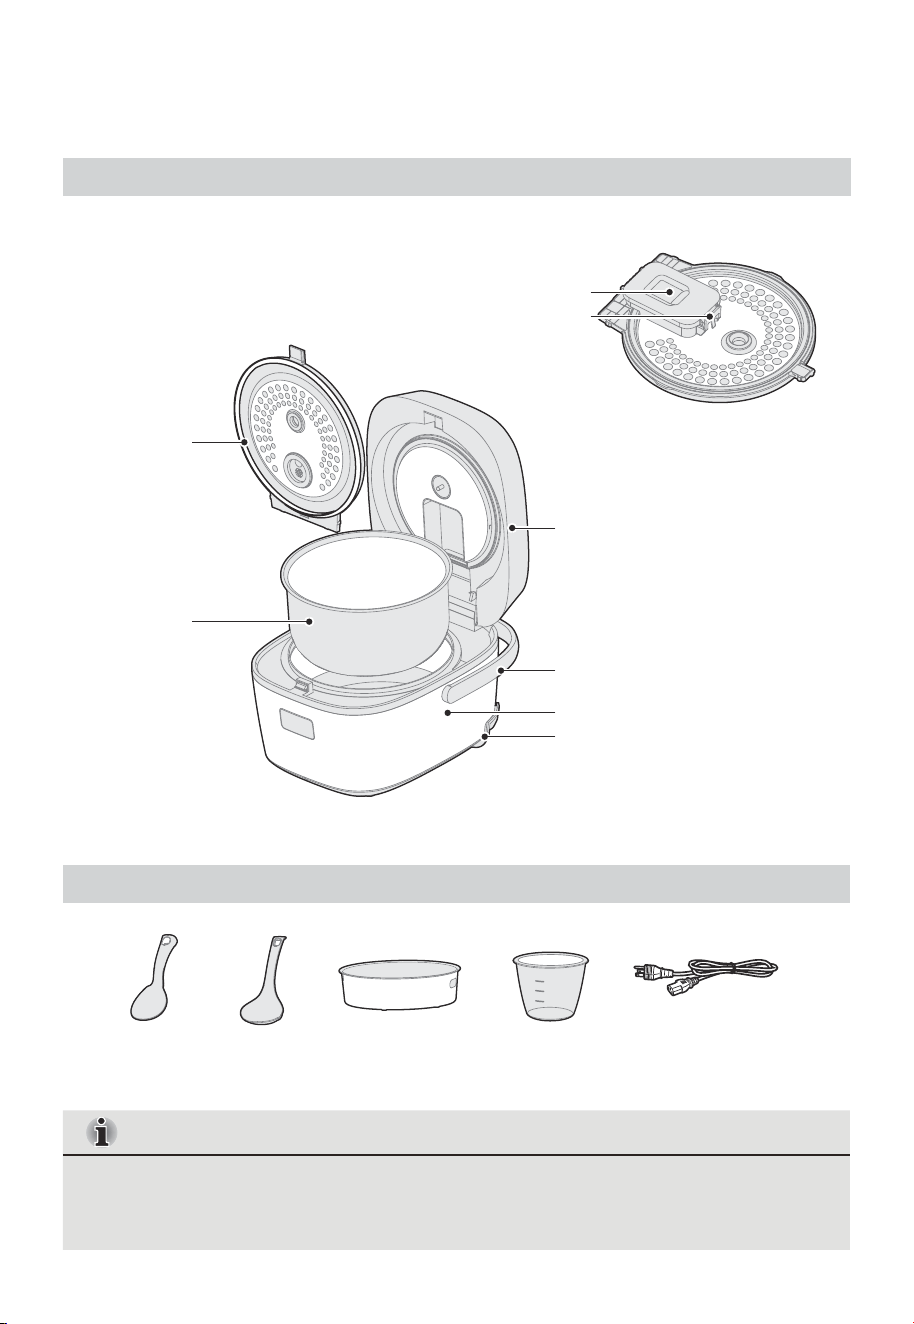
PRODUCT OVERVIEW
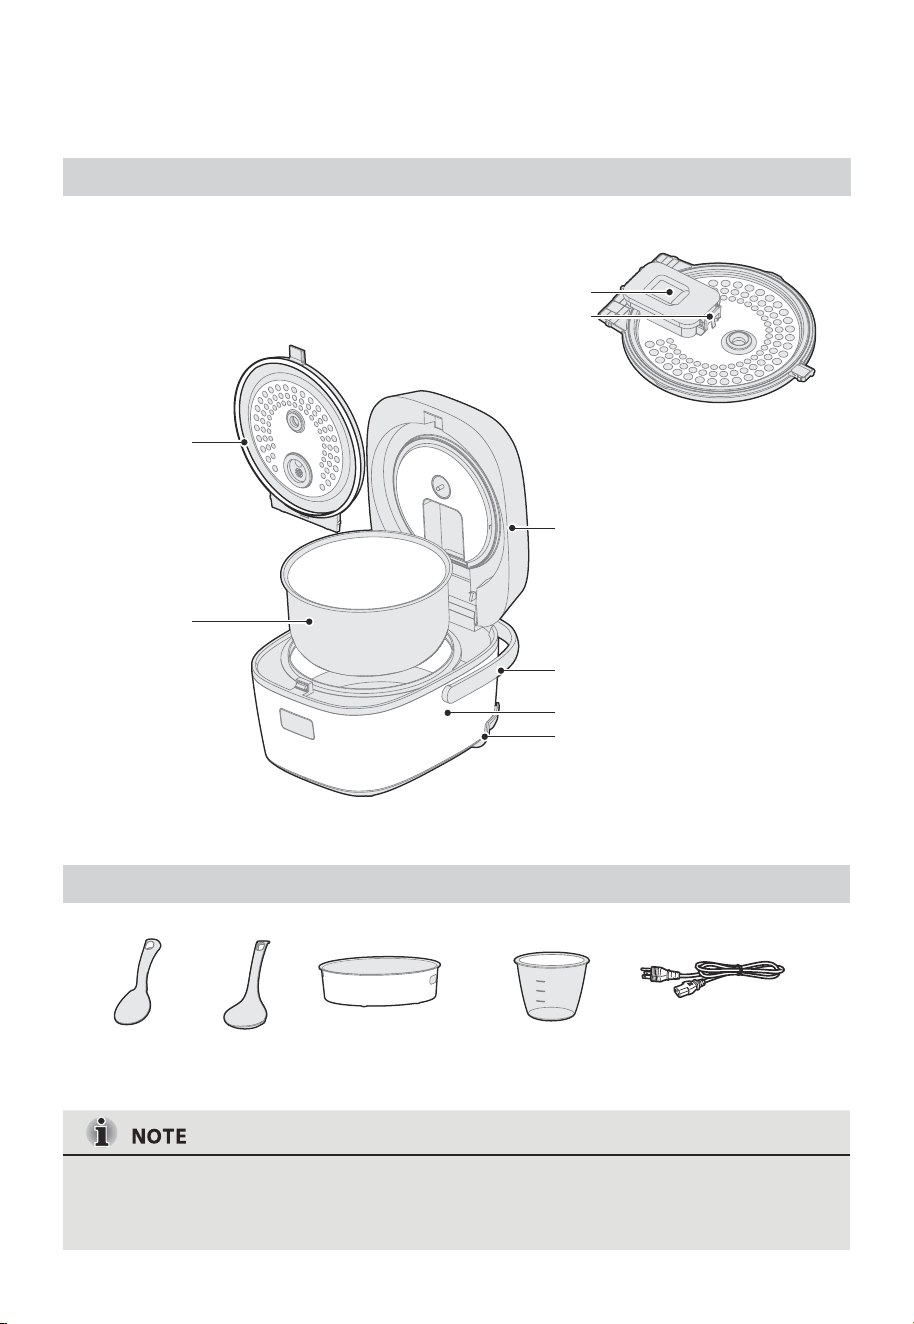
Component Name
Parts List
All the pictures in this manual are for explanation purpose only. Any discrepancy
between the real object and the illustration in the drawing shall be subject to the real
object.
06
Power
Cord x 1
Steam Cap
Steam Cap
Release Button
6oz Measuring
Cup x 1
Removable parts (please clean before use)
Upper Housing
Removable
inner lid
Inner Pot
Handle
Outer Body
Power
Serving
Spatula x 1
Soup
Ladle x 1
Steam
Basket x 1

INSTALLATION INSTRUCTIONS
Unpacking
Electrical Requirements
Power Supply Cord
Remove all packing materials.
Wash the inner pot, inner lid, steam cap and other accessories, and then dry thoroughly
before using.
A 120V, grounded electrical supply is required. It is recommended that a separate circuit
serving only the rice cooker is used. Sharing the power supply with other appliances will result
in overheating.
This Rice Cooker has a 3-prong grounded plug. To reduce the risk of electrical shock, the
plug will fit into an outlet only one way. if the plug does not fit in the outlet, contact a
qualified electrician. Do not modify the plug.
A short power supply cord is used to reduce the risks of becoming entangled in, or tripping
over a longer cord, or of the cord being grabbed by children.
If the power supply cord is too short, have a qualified electrician or technician install an
outlet near the appliance. Do NOT use an extension cord.
Electrical Shock Hazard
• Plug into a grounded 3 prong outlet.
• Do Not remove the ground prong.
• Do Not use an adapter.
• Do Not use an extension cord.
Failure to do so can result in death, fire or electrical shock.
07
WARNING
08
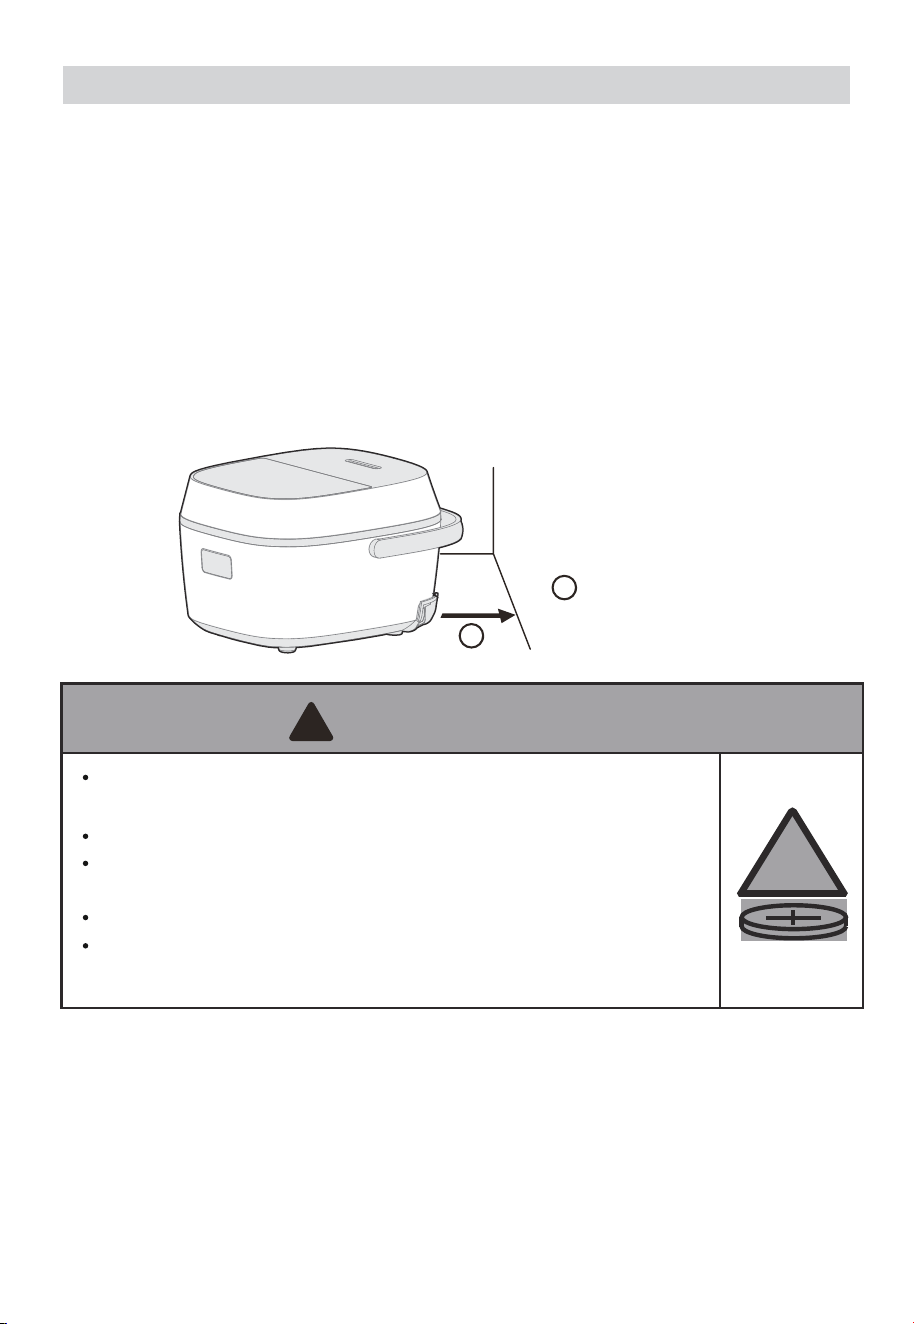
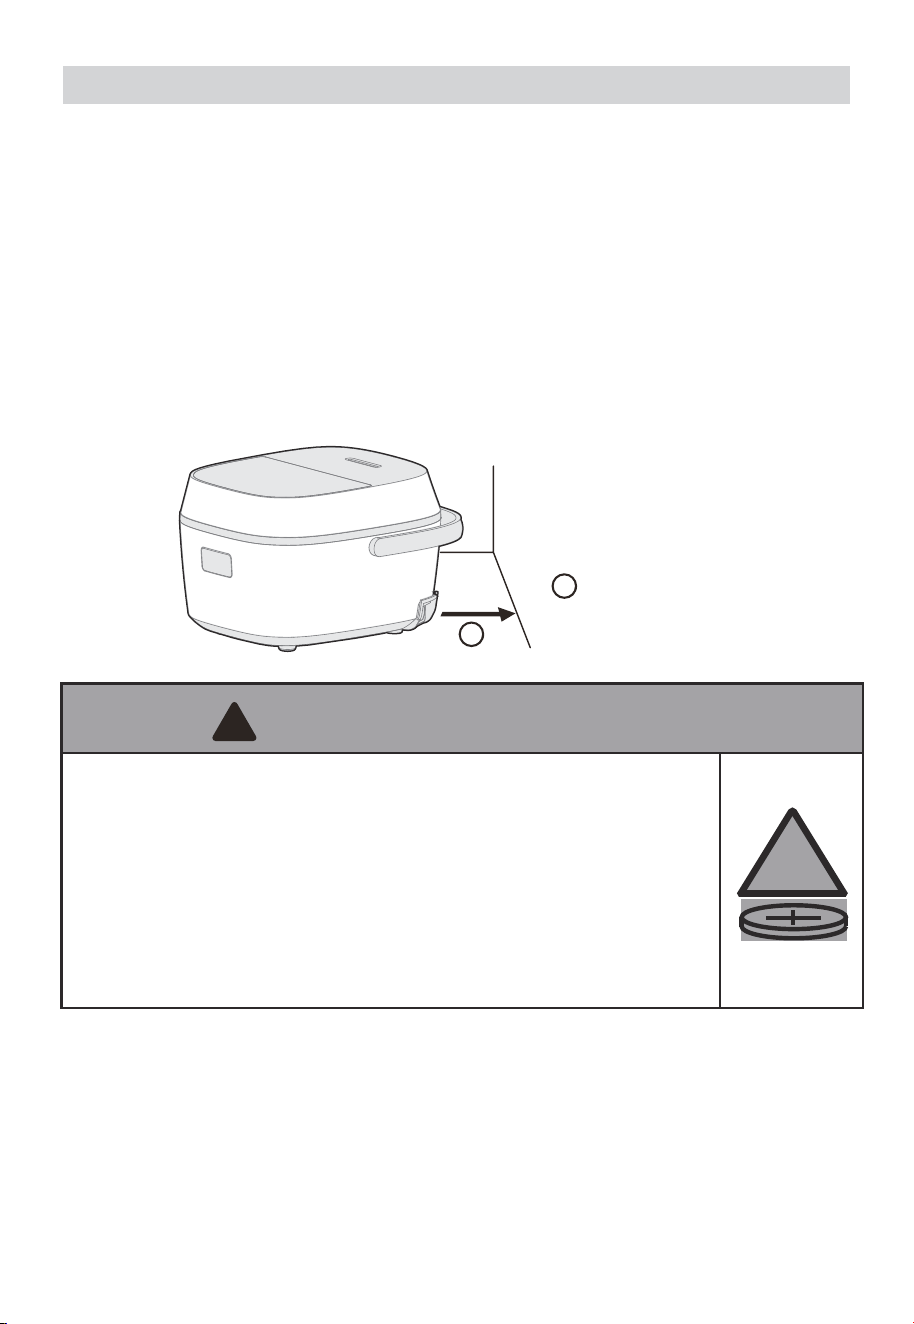
At least 12" (30.5 cm)
Location Requirements
This rice cooker is designed for household use only; the cooker should not be used for
commercial purpose.
Use indoors on a stable, level, non-heat sensitive surface such as a countertop in a location
where the lid can be fully opened; Do NOT use outdoors.
Do not place the rice cooker on an area of the countertop that is exposed to direct sunlight, or
where it might be splashed with cooking oil.
Steam and heat emitted from the rice cooker may damage or discolor nearby walls or cabinets.
It is recommended that the rice cooker be placed a minimum distance of 12" (30.5 cm) from
walls or cabinets.
RECOMMENDED CLEARANCE
A
A
recharged.
WARNING
!
a) Remove and immediately recycle or dispose of used batteries according to local
regulations and keep away from children.
Do NOT dispose of batteries in household trash or incinerate.
b) Even used batteries may cause severe injury or death.
c) Call a local poison control center for treatment information.
d) Compatible battery type: CR2477
e) Nominal battery voltage: 3V
f ) This product contains non-rechargeable. Non-rechargeable batteries are not to be
!
INGESTION HAZARD: This product contains a button cell or
coin battery.
DEATH or serious injury can occur if ingested.
A swallowed button cell or coin battery can cause Internal
Chemical
Burns in as little as 2 hours.
KEEP new and used batteries OUT OF REACH of CHILDREN
Seek immediate medical attention if a battery is suspected
to be swallowed or inserted inside any part of the body.
OPERATING INSTRUCTIONS
Fire/Burn Hazard
Unplug immediately and do not use rice cooker if:
• The power supply cord becomes abnormally hot during use.
• Smoke is emitted from the rice cooker or a burning odor is detected.
• The rice cooker is cracked or there are loose or rattling parts.
• The inner pot, outer lid or inner lid is broken or deformed.
Failure to do so may result in fire, electric shock or injury.
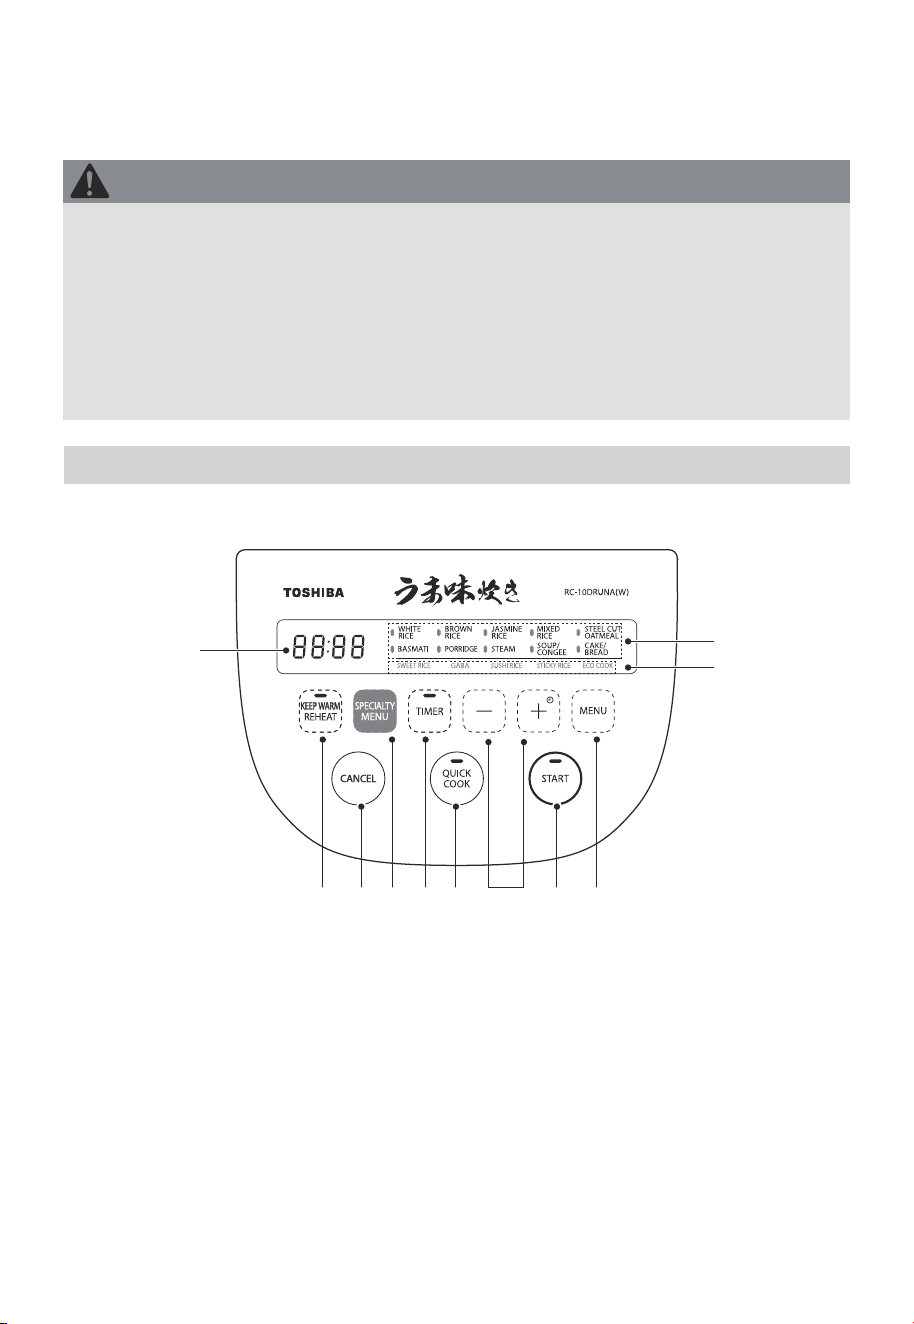
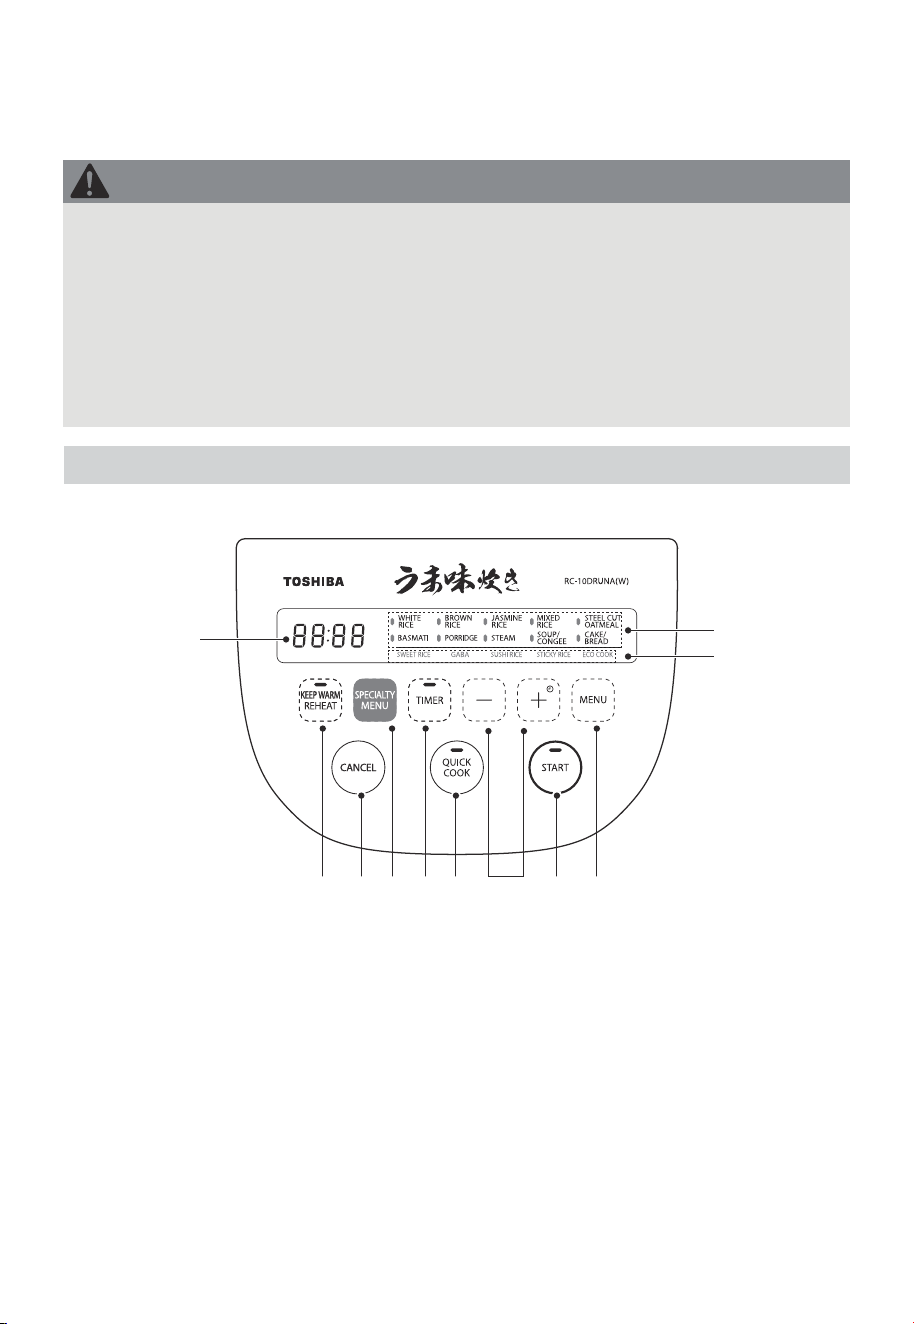
Operation Part
9
8
5
14 6
5 832 7
1. CANCEL
Press the CANCEL button to stop cooking and return to standby mode.
2. QUICK COOK
Press the QUICK COOK button to gets perfectly cooked rice on your table faster.
3. START
Press START to begin cooking. The control panel will illuminate with the set program.
4. KEEP WARM/REHEAT
Press the KEEP WARM/REHEAT button to keep warm or reheat the cooked rice.
09
WARNING

10
Status Messages
5. SPECIALTY MENU
Press SPECIALTY MENU to select special Japanese style rice menus from SWEET RICE to
ECO COOK.
6. TIMER
Press the TIMER button to set the desired delay-finish time.
7.
Press or button to adjust cooking time or delay timer.
8. MENU
Press MENU button select standard cooking menus from WHITE RICE to CAKE/BREAD.
9. TIME display
Status messageDisplay
The rice cooker is running a cooking program and calculating the remaining
cooking time.
The rice cooker is being preheated.
The display shows one of the following:
• Current time: The rice cooker display the clock that shows the current time (see
Set Current Time section).
• Default cooking time: After selecting a cooking program, the default cooking
time will show.
• Remaining cooking time: After starting a cooking program, the display will show
the countdow of set time.
• The Delay Timer count-down: When DELAY time is set, the display show the time
for the cooker to finish cooking.
• Keep Warm Timer count-up: The rice cooker is in keep warm mode and shows
how long the food has been kepted, for example: 0h, 1h, 2h.
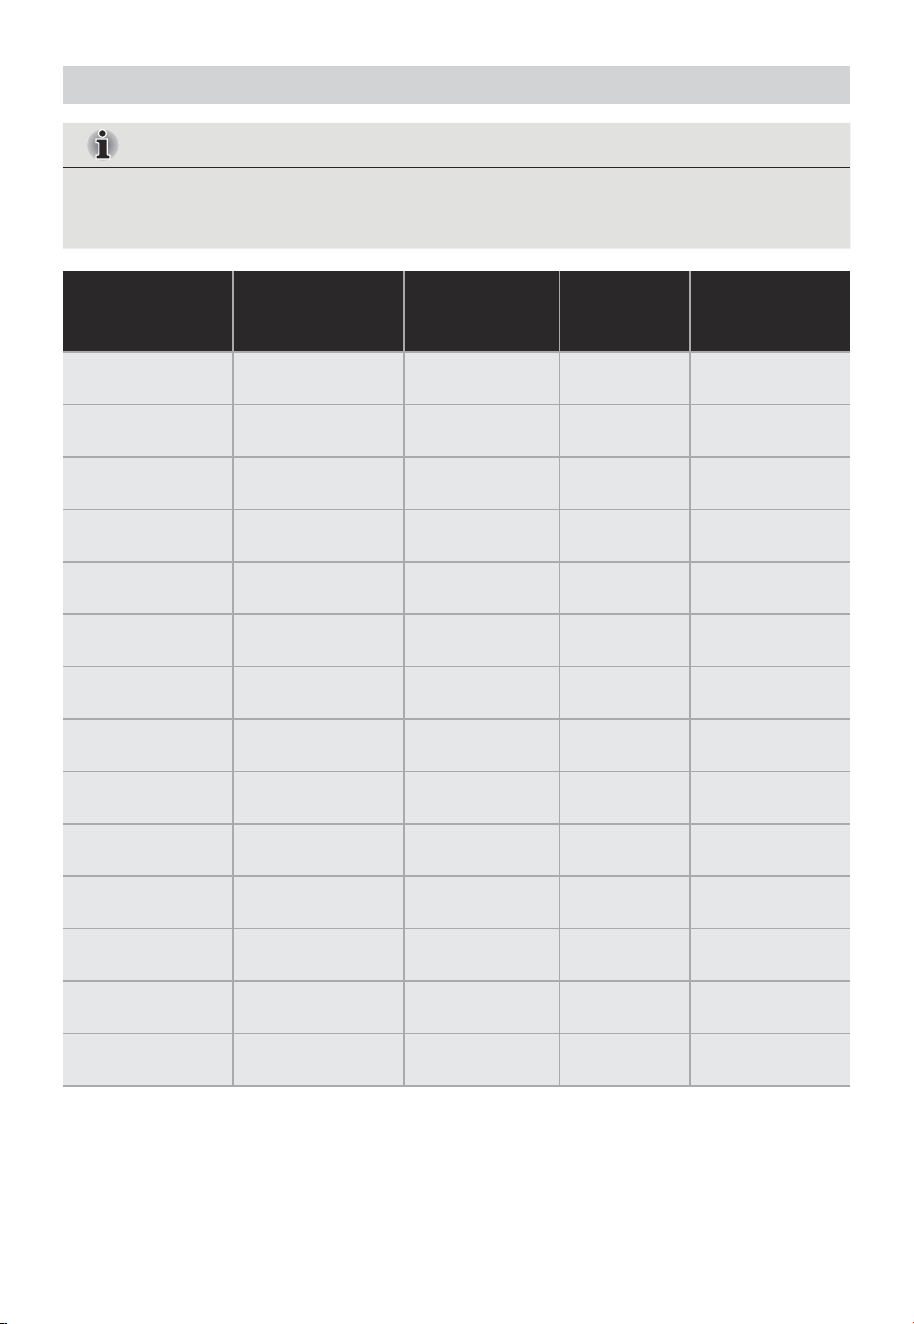
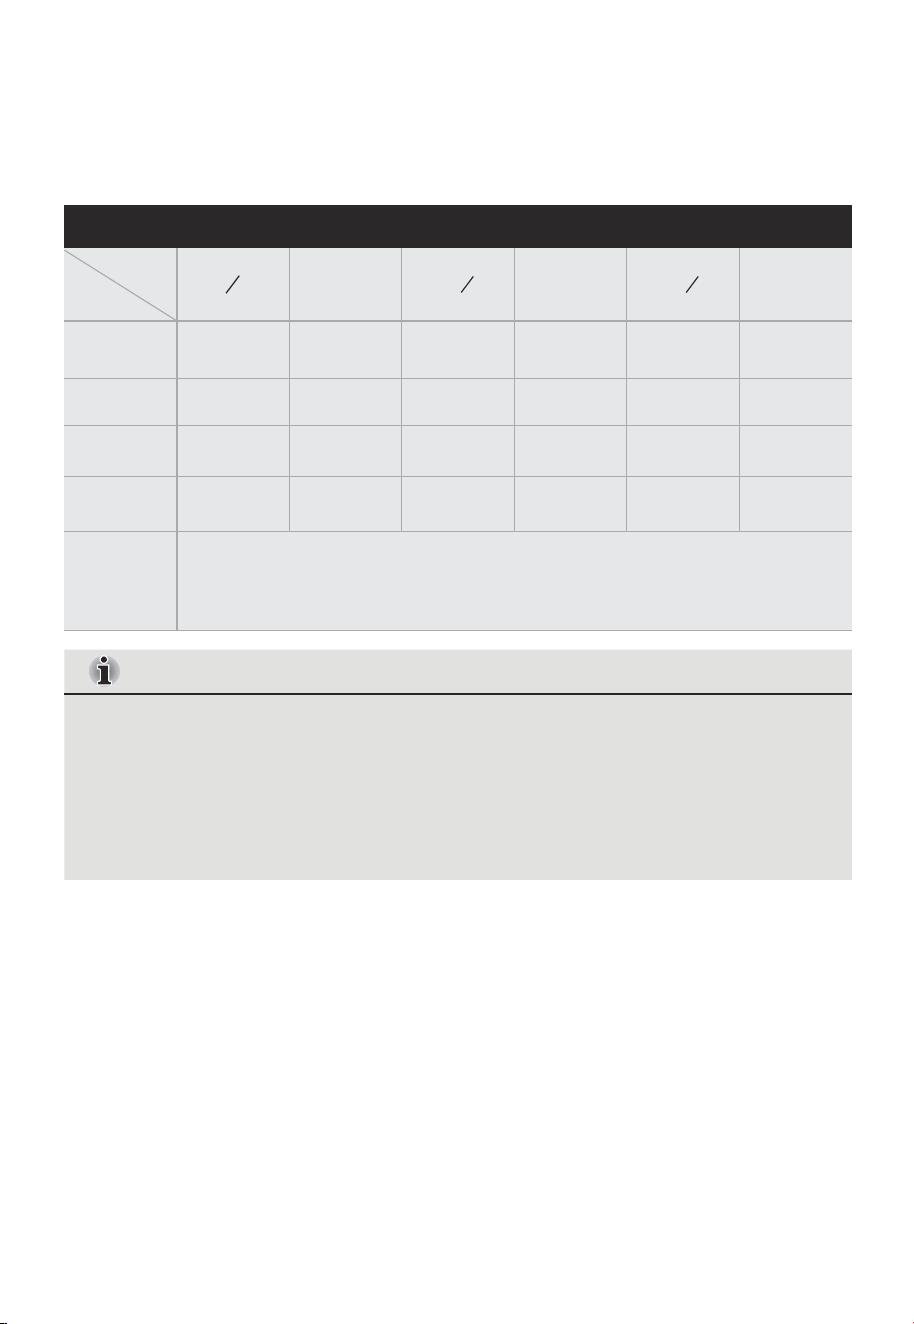
Ingredient to Water Ratio
11
NOTE
Cook time is an estimate. Actual cook time may vary depending on factors such as
amount of grain and water, room temperature, water temperature, and voltage.
Rice Type Menu Water Level
Estimated
Cooking
Time (minutes)
Cooking
Capacity
(cups)
WHITE RICE
BROWN RICE
JASMINE RICE
MIXED RICE
STEEL CUT OATMEAL
BASMATI
WHITE RICE
WHITE RICE
WHITE RICE
GABA RICE
SUSHI RICE
STICKY RICE
WHITE RICE
WHITE RICE
WHITE RICE
BROWN RICE
JASMINE RICE
MIXED RICE
STEEL CUT OATMEAL
BASMATI
PORRIDGE
SOUP/CONGEE
SWEET RICE
GABA
SUSHI RICE
STICKY RICE
ECO COOK
QUICK COOK
WHITE RICE
BROWN RICE
WHITE RICE
WHITE RICE
/
BROWN RICE
PORRIDGE
CONGEE
WHITE RICE
BROWN RICE
WHITE RICE
STICKY RICE
WHITE RICE
WHITE RICE
1-5.5
1-4
1-5.5
1-4
0.5-1
1-4
0.5-1.5
0.5
1-5.5
1-4
1-5.5
2-4
1-5.5
1-5.5
40-60(50)
60-90(80)
40-60(50)
60-90(70)
60
40-60(50)
60
90-240(90)
55-70(60)
230-260(240)
40-60(50)
40-60(50)
40-60(60)
25-50(30)

12
Set Current Time
The rice cooker has a built-in battery and displays a 24-hour clock in standby mode ( 0:00
[midnight] to 23: 59 [11:59 pm] ). The clock cannot be set while the rice cooker is being used
for cooking, keeping warm or reheating, or after the delay timer has been set.
1. Plug the power supply cord into a grounded 3-prong electrical outlet to turn on the rice
cooker.
2. Press and hold the button for more than 2 seconds until the time flickers on the display.
3. Press or to adjust the time.
4. When the current time-of-day appears on the display, quickly press START to set the time.
To select a cooking program, the rice cooker must first be plugged into a grounded
3 prong electrical outlet (ON).
Using the Rice Cooker
INTRODUCTION
The Toshiba Rice and Grain Cooker benefits from the use of Fuzzy Logic, a technology that
senses moisture levels and automatically adjusts heat level and cooking time to cook rice
without error. Cooking time and temperature are defined by the appliance. Our highly
intelligent Rice and Grain Multicooker automatically adjusts the heat and time for perfect
results every time.
• Do not place anything on or over the rice cooker lid, during use.
• Do not touch the steam vent during cooking.
• Do not place the inner pot on a cooktop burner; the high temperature will warp the
pot. The inner pot is designed to be used only in the rice cooker.
IMPORTANT
IMPORTANT
Electrical Shock Hazard
• Plug into a grounded 3 prong outlet.
• Do Not remove the ground prong.
• Do Not use an adapter.
• Do Not use an extension cord.
Failure to do so can result in death, fire or electrical shock.
WARNING
Measuring Rice
13
• Do not use a pot or container other than the inner pot (provided) in the rice cooker.
• Do not insert any foreign objects into the air vent or gaps at the bottom of the rice
cooker.
IMPORTANT
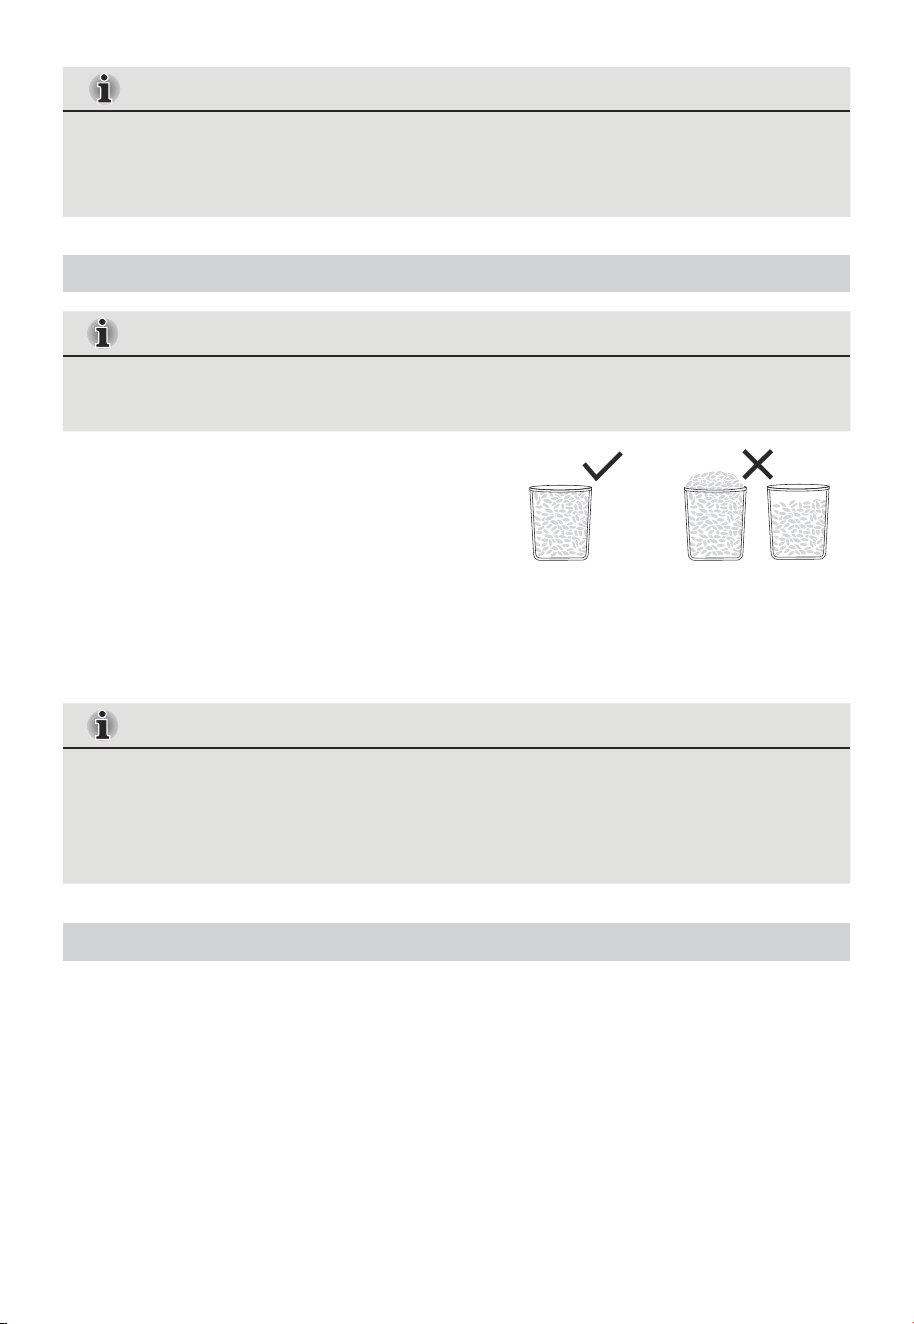
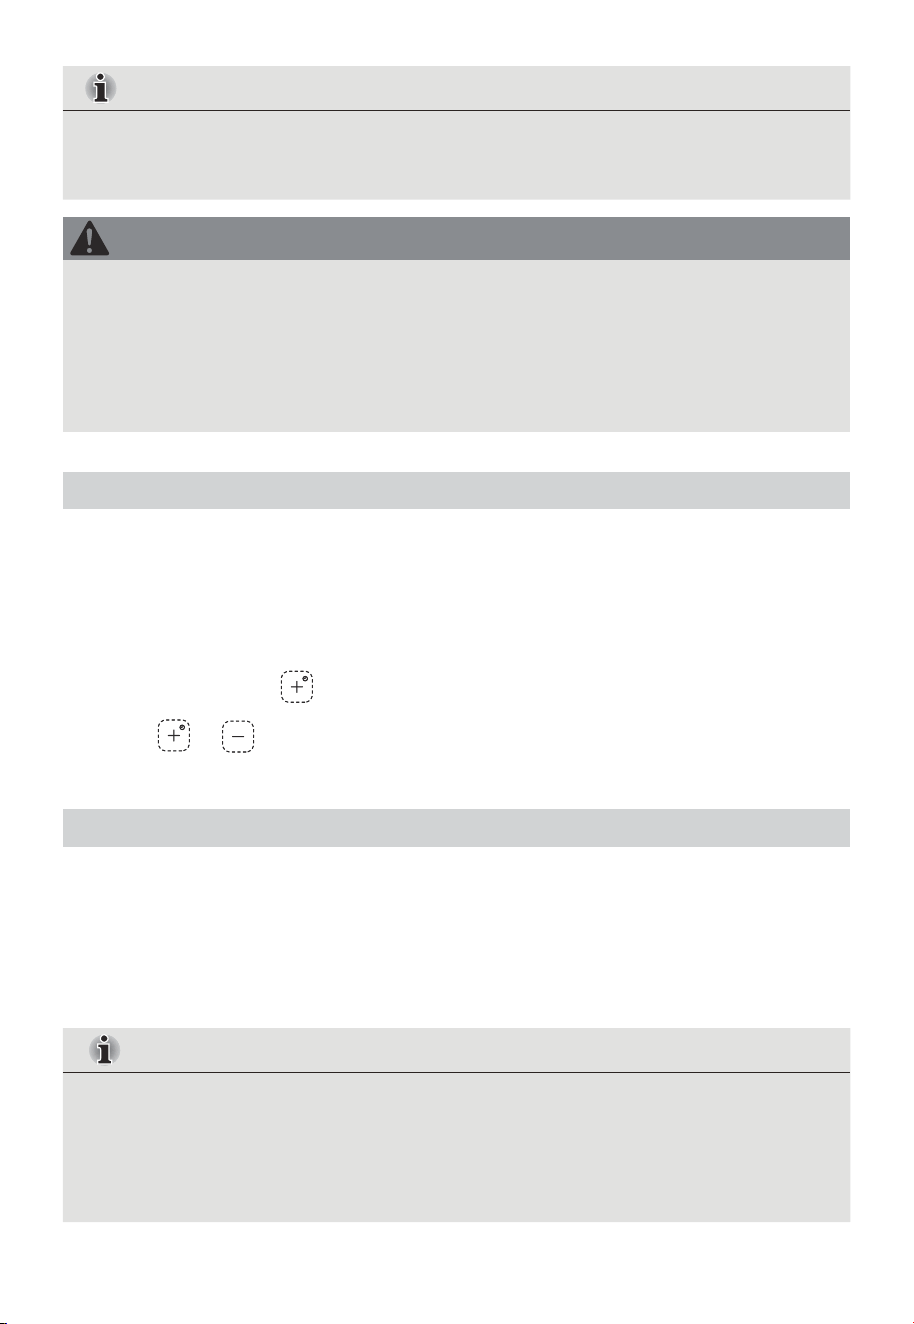
• To achieve the correct ratio of rice to water,
use ONLY the measuring cup (cup provided).
• Level the rice in the measuring cup so that it
is even with the top.
• For softer or firmer rice adjust the ratio of
water to rice accordingly.
• If the rice requires rinsing before cooking,
measure the rice before you rinse it, Follow
the rinsing directions for that specific type of
rice.
The provided measuring cup is a 6oz cup which is smaller than the standard U.S.cup
measure.
Rinsing Rice
Some types of rice are rinse-free and other types require rinsing before use to remove excess
starch which may make the rice sticky. Also, cooking rice with starchy water may result in the
rice burning or being improperly cooked.
If the water should turn white or cloudy, when added to rinse-free rice, drain and replace the
water before cooking. Many recipes recommend rinsing quickly so the rice does not absorb
water prior to cooking.
Correct
Rice should be level
with the rim of the
cup
Higher or lower than the rim
will make it unable to
accurately control the water
level
• Do not season rice while it is being kept warm in the inner pot. Seasonings left in
contact with the interior of the inner pot may damage the non-stick coating.
• Do not use metal cooking utensils. Metal utensils may scratch or damage the nonstick
coating.
IMPORTANT
NOTE
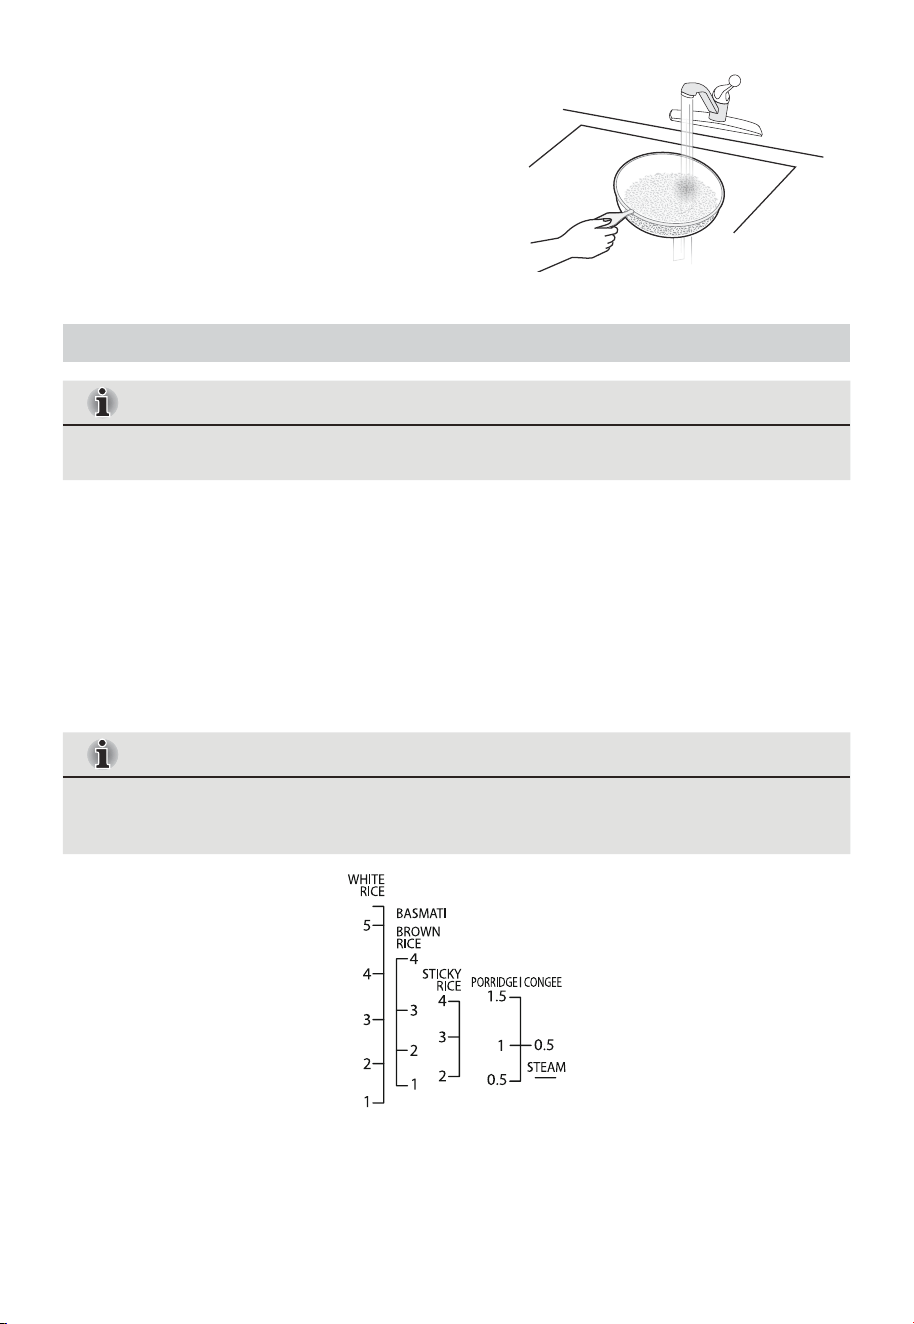
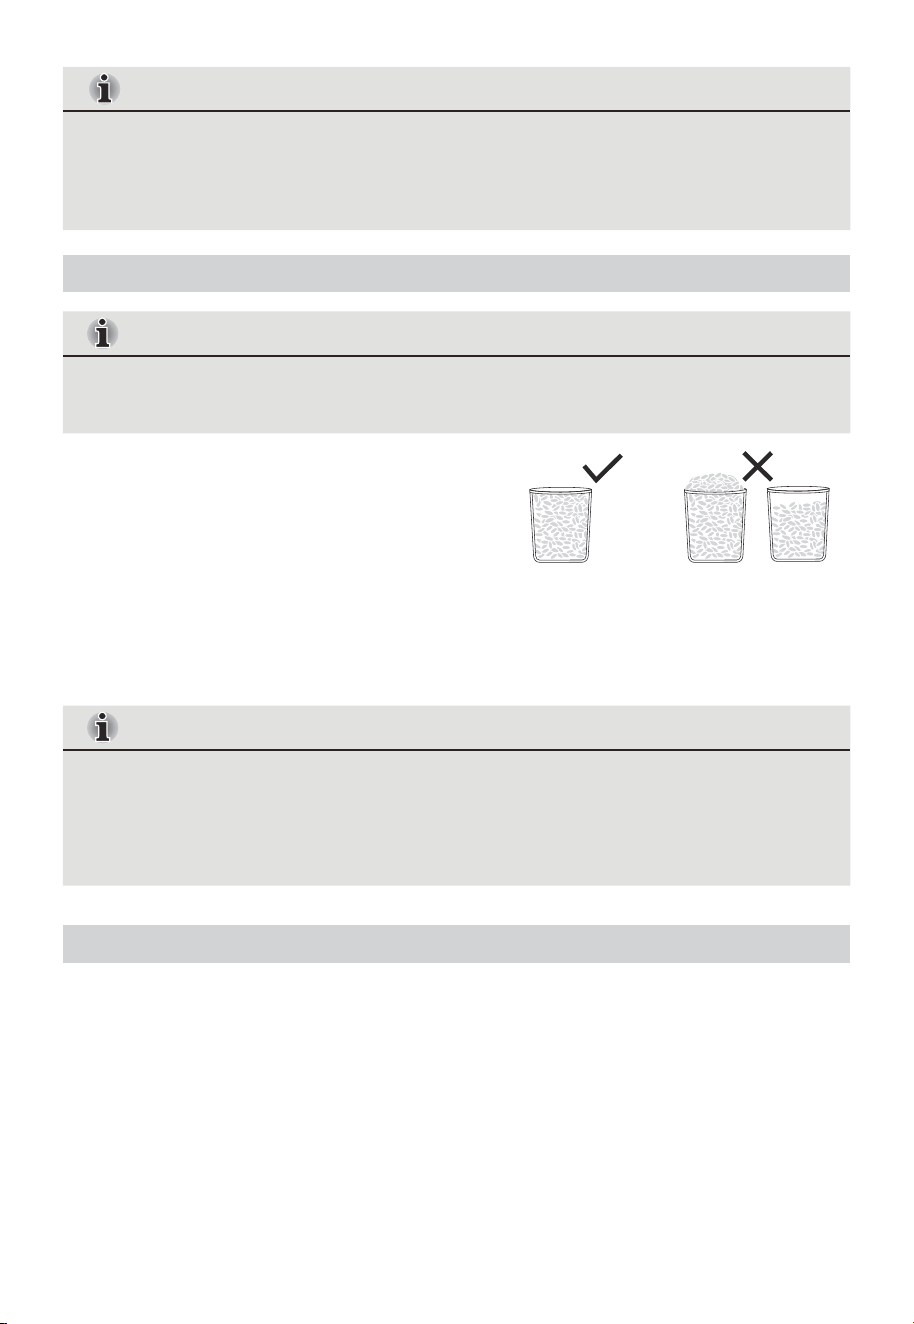
To Rinse Rice Quickly:
1. Place the rice in the mesh strainer and rinse
under cool running water. Rinsing rice in hot
water may prevent the rice from cooking
properly.
2. Using your hand stir the rice around 3 to 4
times to separate the grains.
3. Continue to rinse until the water is clear.
Cooking Rice
14
The total amount of rice and water should NOT exceed the 5.5 cup MAX level marked
inside the inner pot.
Cooking time will vary depending on the type of rice or grain being cooked.
1. Before using for the first time, wash the inner pot, inner lid, steam cap, other accessories
and attachments, and then dry each thoroughly.
2. Measure rice, and then rinse rice, if needed.
3. Add measured rice to the inner pot.
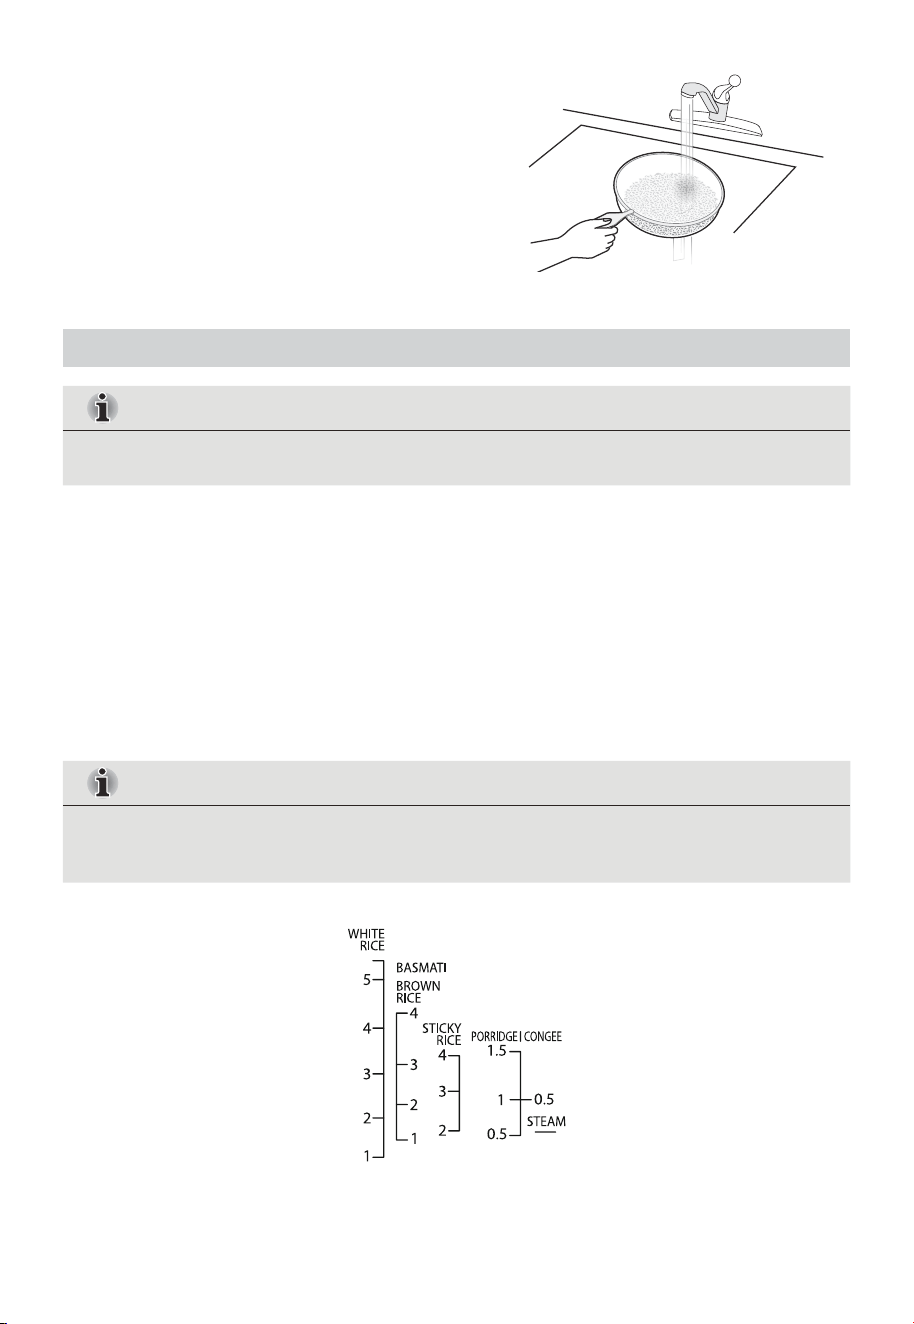
4. Add water until it reaches the corresponding numbered Water Line marked on the interior
of the inner pot. For example, when cooking 3 cups of white rice, add water to third line
from the bottom of the pot.
To suit your personal preference, the amount of liquid can be adjusted slightly (no more
than of the distance between the lines).
IMPORTANT
NOTE
15
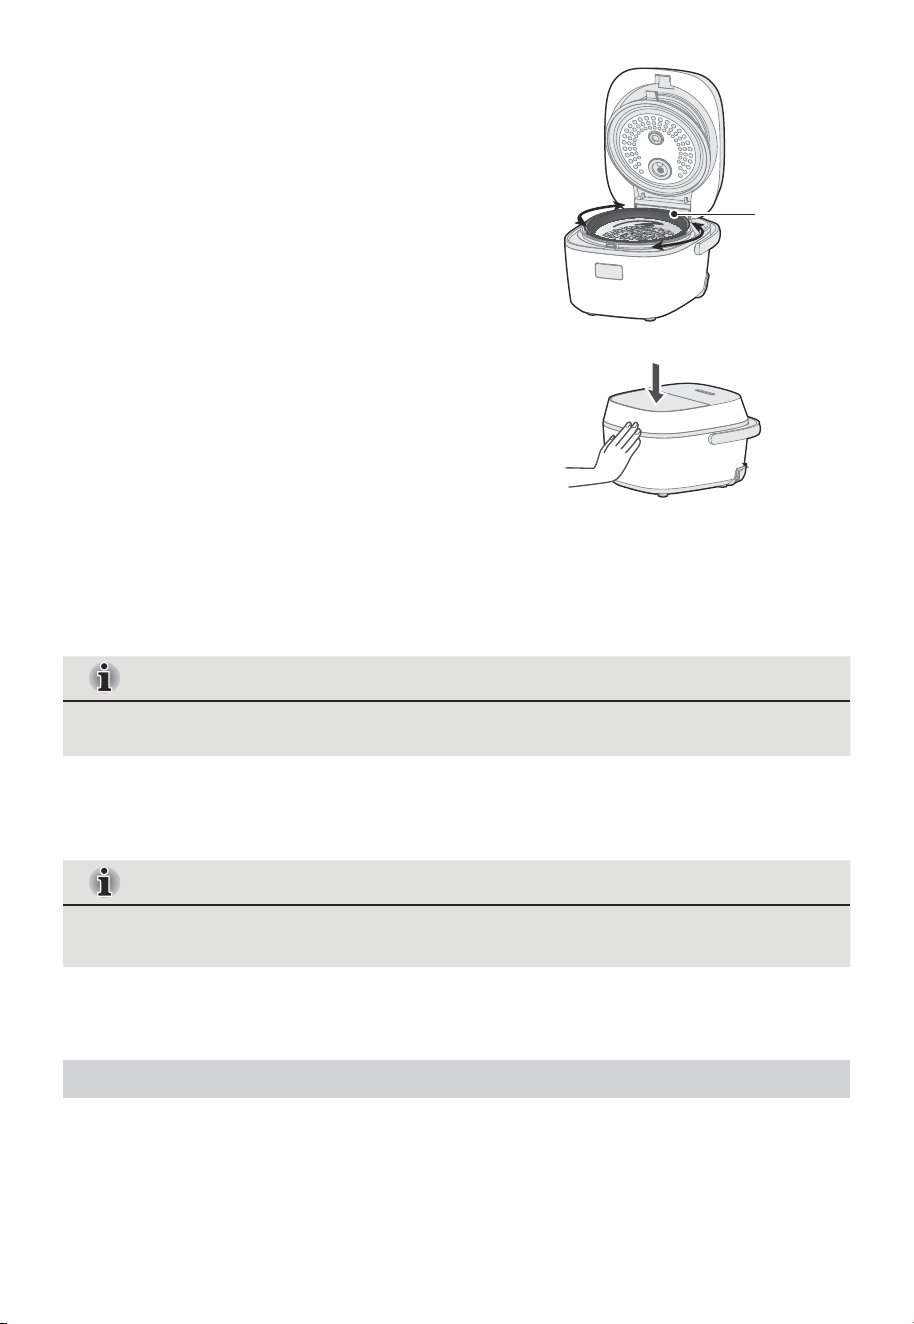
5. Stir the rice evenly in the water, so that each
grain is immersed in the water.
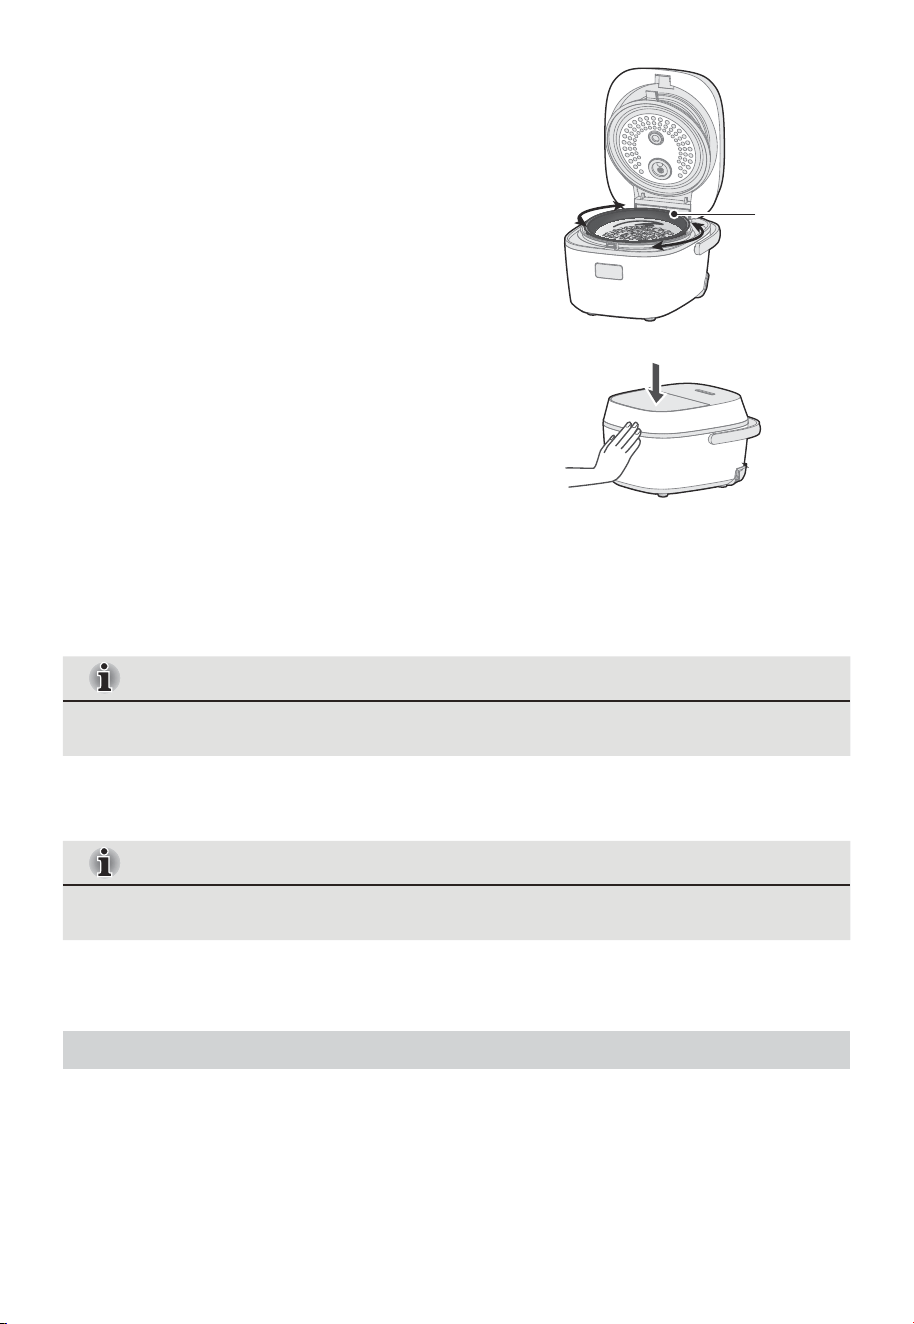
6. Place the inner pot into the rice cooker.
7. Rotate the pot two to three times to ensure a
solid contact between the bottom of the
inner pot and the heating plate.
8. Close the lid, and then press downward until
it clicks into place.
9. Plug the power supply cord into a grounded
3 prong electrical outlet.
The rice cooker is powered ON, but in standby mode (no heat).
10. Select desired cooking program. See "P16-P28" for explanation of options.
11. Press START.
Inner Pot
NOTE
During first use, there may be a plastic odor which will dissipate after first time use.
12. When cooking is completed, A tune will sound. The START indicator light will go out and
the Keep Warm/Reheat light will illuminate.
NOTE
Adding Other Ingredients
If you wish to add other ingredients or seasonings to the rice, do so AFTER adding the water.
The rice will not cook properly and be too firm if ingredients are added before the water.

4. The cooker beeps, the display shows the time, and the cooker starts cooking.
5. After cooking is completed, the cooker will beep and automatically enter the keep-warm
mode.
6. Open the lid and stir the rice using the included rice spatula to expel any remaining
moisture and make the rice fluffier.
16
QUICK RICE
1. Using the provided measuring cup, add the uncooked rice to be cooked into the inner pot.
2. Wash the rice, remove impurities, and pour away the water; repeat this at least 2 times
until the rice washing water becomes clear. Add appropriate amount of water according to
the amount of uncooked rice to be cooked (Refer to the water level of White Rice in the
inner pot : 1 cup of uncooked rice corresponds to 1 scale mark).
3. Press “QUICK RICE” button.
Operation Safety Tips
1. Wipe the moisture on the outer surface of the inner pot and place the
inner pot into the cooker. Make sure that there are no foreign objects
on the bottom where the cooker is in contact with the inner pot, and
then close the lid.
2. Plug the power cord into an available power outlet (120V~ 60Hz).
3. After taking out all the rice, unplug the power cord of the cooker.
17
1. The amount of rice and water used for cooking must not exceed the maximum water
line of the inner pot (WHITE RICE highest water line).
2. You can also adjust the ratio of rice to water for cooking according to your preference.
3. Do not leave rice in the rice cooker to keep it warm for more than 8 hours.
WHITE RICE
4. The cooker beeps, the display shows the time, and the cooker starts cooking.
5. After cooking is completed, the cooker will beep and automatically enter the keep-warm
mode.
6. Open the lid and stir the white rice using the included rice spatula to expel any remaining
moisture and make the white rice fluffier.
1. The amount of white rice and water used for cooking must not exceed the
maximum water line of the inner pot (WHITE RICE highest water line).
2. You can also adjust the ratio of rice to water for cooking according to your
preference.
3. Do not leave white rice in the rice cooker to keep it warm for more than 8 hours.
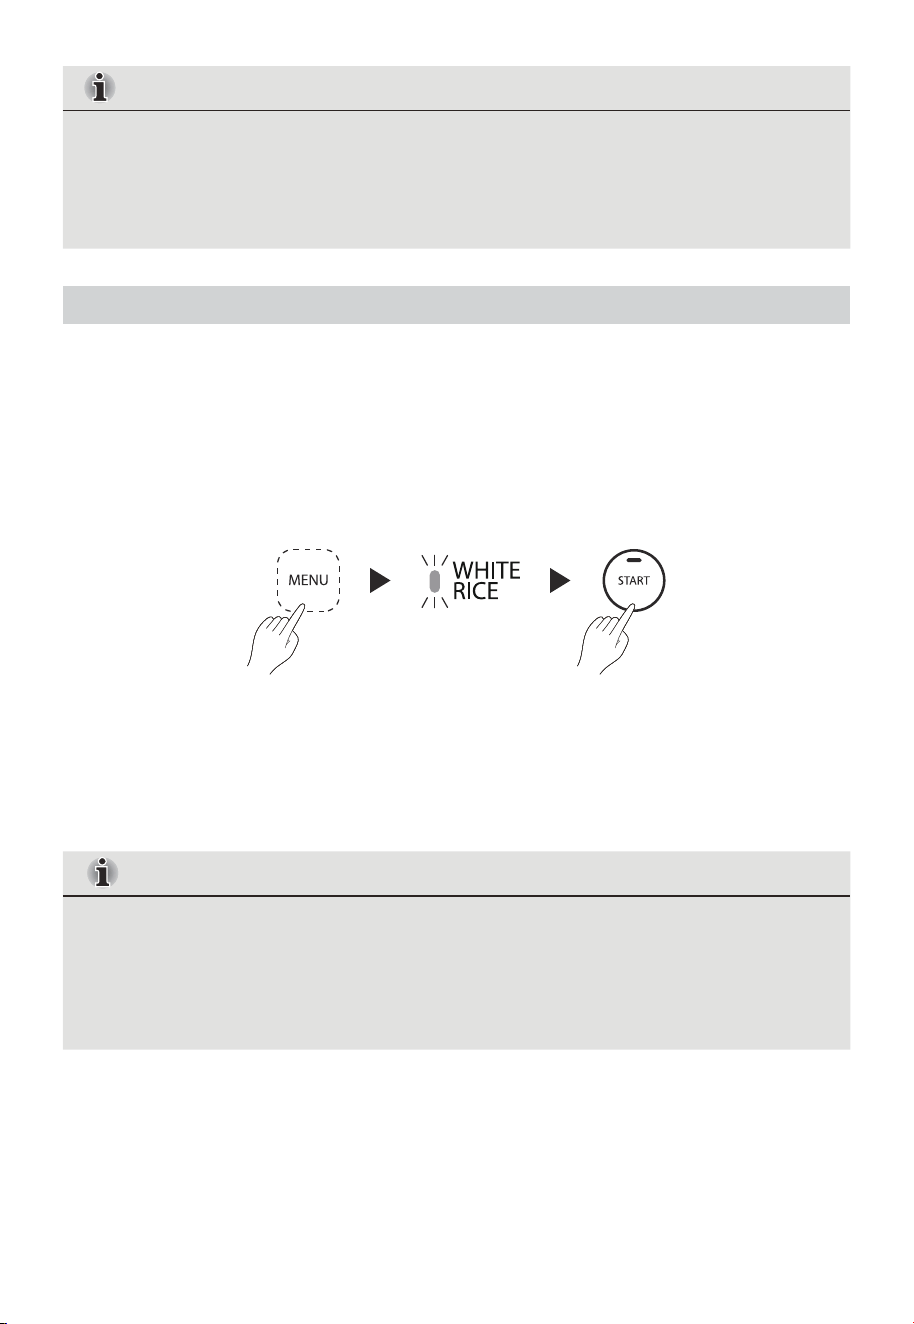
1. Using the provided measuring cup, add the uncooked rice to be cooked into the inner pot
2. Wash the white rice, remove impurities, and pour away the water; repeat this at least 2
times until the rice washing water becomes clear. Add appropriate amount of water
according to the amount of uncooked rice to be cooked (Refer to the water level of White
Rice in the inner pot: 1 cup of uncooked rice corresponds to 1 scale mark).
3. Press the “MENU” button, select the “WHITE RICE” function, and then press the START
button to start cooking.
NOTE
NOTE

18
BROWN RICE
1. Using the provided measuring cup, add the brown rice to be cooked into the inner pot.
2. Wash the brown rice, remove impurities, and pour away the water; repeat this at least 2
times until the rice washing water becomes clear. Add appropriate amount of water
according to the amount of brown rice to be cooked (refer to the water level of BROWN
RICE in the inner pot: 1 cup of brown rice corresponds to 1 scale mark).
3. Press the “MENU” button, select the “BROWN RICE” function, and then press the START
button to start cooking.
4. The cooker beeps, the display shows the time, and the cooker starts cooking.
5. After cooking is completed, the cooker will beep and automatically enter the keep-warm
mode.
6. Open the lid and stir the brown rice using the included rice spatula to expel any remaining
moisture and make the brown rice fluffier.
1. The amount of brown rice and water used for cooking must not exceed the
maximum water line of the inner pot (BROWN RICE highest water line).
2. You can also adjust the ratio of rice to water for cooking according to your
preference.
3. Do not leave brown rice in the rice cooker to keep it warm for more than 8 hours.
NOTE
JASMINE RICE
1. Using the provided measuring cup, add the uncooked rice to be cooked into the inner pot
2. Wash the jasmine rice, remove impurities, and pour away the water; repeat this at least
2 times until the rice washing water becomes clear. Add appropriate amount of water
according to the amount of uncooked rice to be cooked (Refer to the water level of WHITE
RICE in the inner pot: 1 cup of uncooked rice corresponds to 1 scale mark).

MIXED RICE
1. Prepare the required ingredients (rice, black rice, oatmeal, millet). (The rice proportion table
of mixed rice is shown in the figure below)
2. Add the amount of rice that needs to be cooked to the inner pot according to the weight
corresponding to the rice scale of the mixed rice.
3. Wash the mixed rice, remove impurities, and pour away the water; repeat this at least 2
times until the rice washing water becomes clear. Add appropriate amount of water
according to the amount of mixed rice to be cooked (refer to the water level of WHITE RICE
in the inner pot: 1 cup of mixed rice corresponds to 1 scale mark).
4. Press the “MENU” button, select the “MIXED RICE” function, and then press the START
button to start cooking.
19
3. Press the “MENU” button, select the “JASMINE RICE” function, and then press the START
button to start cooking.
4. The cooker beeps, the display shows the time, and the cooker starts cooking.
5. After cooking is completed, the cooker will beep and automatically enter the keep-warm
mode.
6. Open the lid and stir the jasmine rice using the included rice spatula to expel any remaining
moisture and make the jasmine rice fluffier.
1. The amount of jasmine rice and water used for cooking must not exceed the
maximum water line of the inner pot (WHITE RICE highest water line).
2. You can also adjust the ratio of rice to water for cooking according to your
preference.
3. Do not leave jasmine rice in the rice cooker to keep it warm for more than 8 hours.
NOTE
5. The cooker beeps, the display shows the time, and the cooker starts cooking.
6. After cooking is completed, the cooker will beep and automatically enter the keep-warm
mode.
7. Open the lid and stir the mixed rice using the included rice spatula to expel any remaining
moisture and make the mixed rice fluffier.
Remarks
Rice Type
White Rice
Black rice
Oatmeal
Millet
Cups(rice)
37.5g 75g 112.5g 150g 187.5g 225g
75g
75g
75g
62.5g
62.5g
62.5g
50g
50g
50g
37.5g
37.5g
37.5g
25g
25g
25g
12.5g
12.5g
12.5g
1 2 3
1. For example, 1 cup: consists of 75g of rice + 25g of black rice + 25g of oatmeal
+ 25g of millet.
2. Soak black rice and oatmeal in warm water for 2 hours.
1. The amount of mixed rice and water used for cooking must not exceed the
maximum water line of the inner pot (WHITE RICE 4-CUP water line).
2. You can also adjust the ratio of rice to water for cooking according to your
preference.
3. Do not leave mixed rice in the appliance to keep it warm for more than 8 hours.
4. For dry and hard grains, soak in warm water for 2 hours.
20
NOTE
1
1
2
2
1
2
1
2
Table of mixed rice rice proportion

21
STEEL CUT OATMEAL
1. Using the provided measuring cup, add the uncooked steel cut oats to be cooked into the
inner pot.
2. Add appropriate amount of water according to the amount of steel cut oat to be cooked.
Recommended grain to water ratio is 1:3.
3. Press the “MENU” button, select the “STEEL CUT OATMEAL” function, and then press the
START button to start cooking.
4. The cooker beeps, the display shows the time, and the cooker starts cooking.
5. After cooking is completed, the cooker will beep and automatically enter the keep-warm
mode.
6. Open the lid and stir using the included rice spatula to expel any remaining moisture.
1. The maximum amount of steel cut oat the rice cooker can cook is 1 cup (the
measuring cup provided). Recommended grain to water ratio is 1:3.
2. You can also adjust the ratio of rice to water for cooking according to your
preference.
3. Do not leave steel cut oatmeal in the rice cooker to keep it warm for more than
8 hours.
NOTE
22
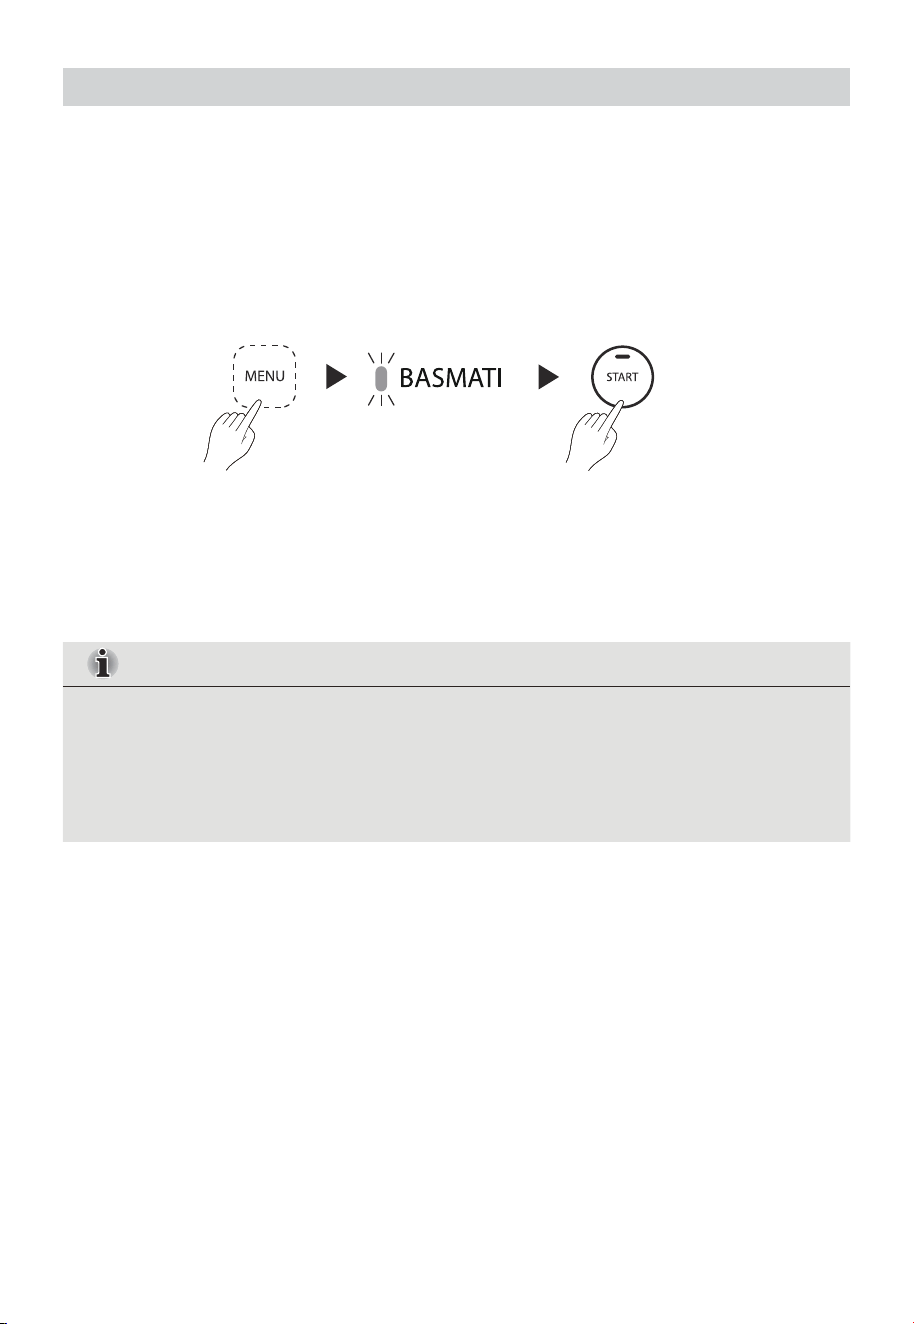
BASMATI
1. Using the provided measuring cup, add the uncooked basmati rice to be cooked into the
inner pot.
2. Wash the basmati rice, remove impurities, and pour away the water; repeat this at least
2 times until the rice washing water becomes clear.
3. Add appropriate amount of water according to the amount of rice to be cooked. You can
reference the Ingredient to Water Ratio chart.
4. Press the “MENU” button, select the “BASMATI” function, and then press the START
button to start cooking.
5. The cooker beeps, the display shows the time, and the cooker starts cooking.
6. After cooking is completed, the cooker will beep and automatically enter the keep-warm
mode.
7. Open the lid and stir the rice using the included rice spatula to expel any remaining
moisture and make the basmati rice fluffier.
1. The amount of basmati and water used for cooking must not exceed the maximum
BROWN RICE water line of the inner pot .
2. You can also adjust the ratio of rice to water for cooking according to your
preference.
3. Do not leave basmati in the rice cooker to keep it warm for more than 8 hours.
NOTE
23
4. The cooker beeps, the display shows the time, and the cooker starts cooking.
5. After cooking is completed, the cooker will beep and automatically enter the keep-warm
mode.
6. Open the lid and stir the porridge using the included rice spatula to expel any excessive
moisture.
1. The amount of rice and water used for cooking must not exceed the maximum
water line of the inner pot (PORRIDGE highest water line).
2. You can also adjust the ratio of rice to water for cooking according to your
preference.
3. Do not leave porridge in the rice cooker to keep it warm for more than 8 hours.
NOTE
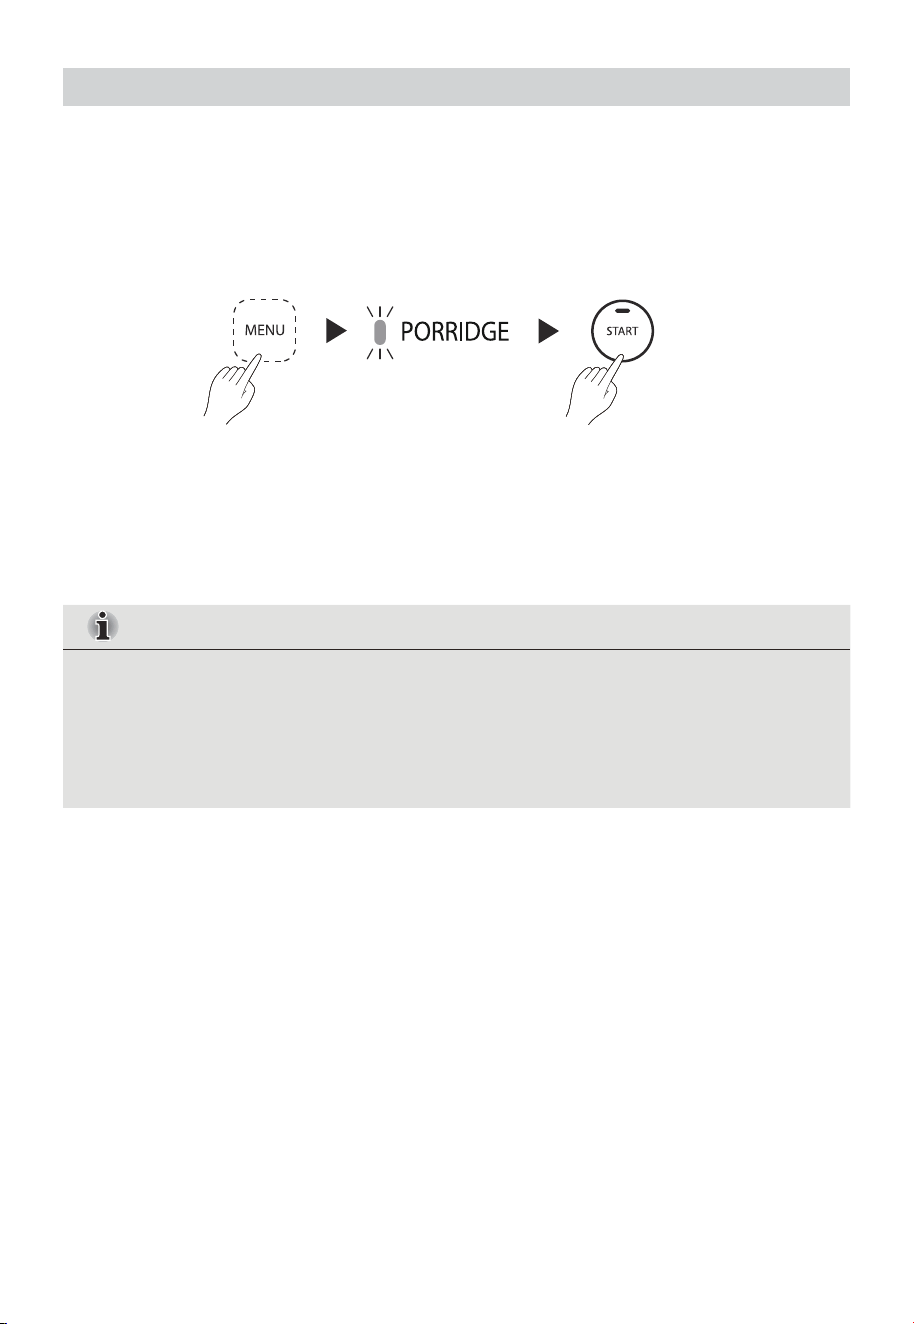
PORRIDGE
1. Using the provided measuring cup, add the uncooked rice to be cooked into the inner pot.
2. Add appropriate amount of water according to the amount of rice to be cooked. You can
reference the Ingredient to Water Ratio chart.
3. Press the “MENU” button, select the “PORRIDGE” function, and then press the START
button to start cooking.
Do not overfill the steam basket.
NOTE
Make sure that the inner lid and steam cap are properly installed.
NOTE
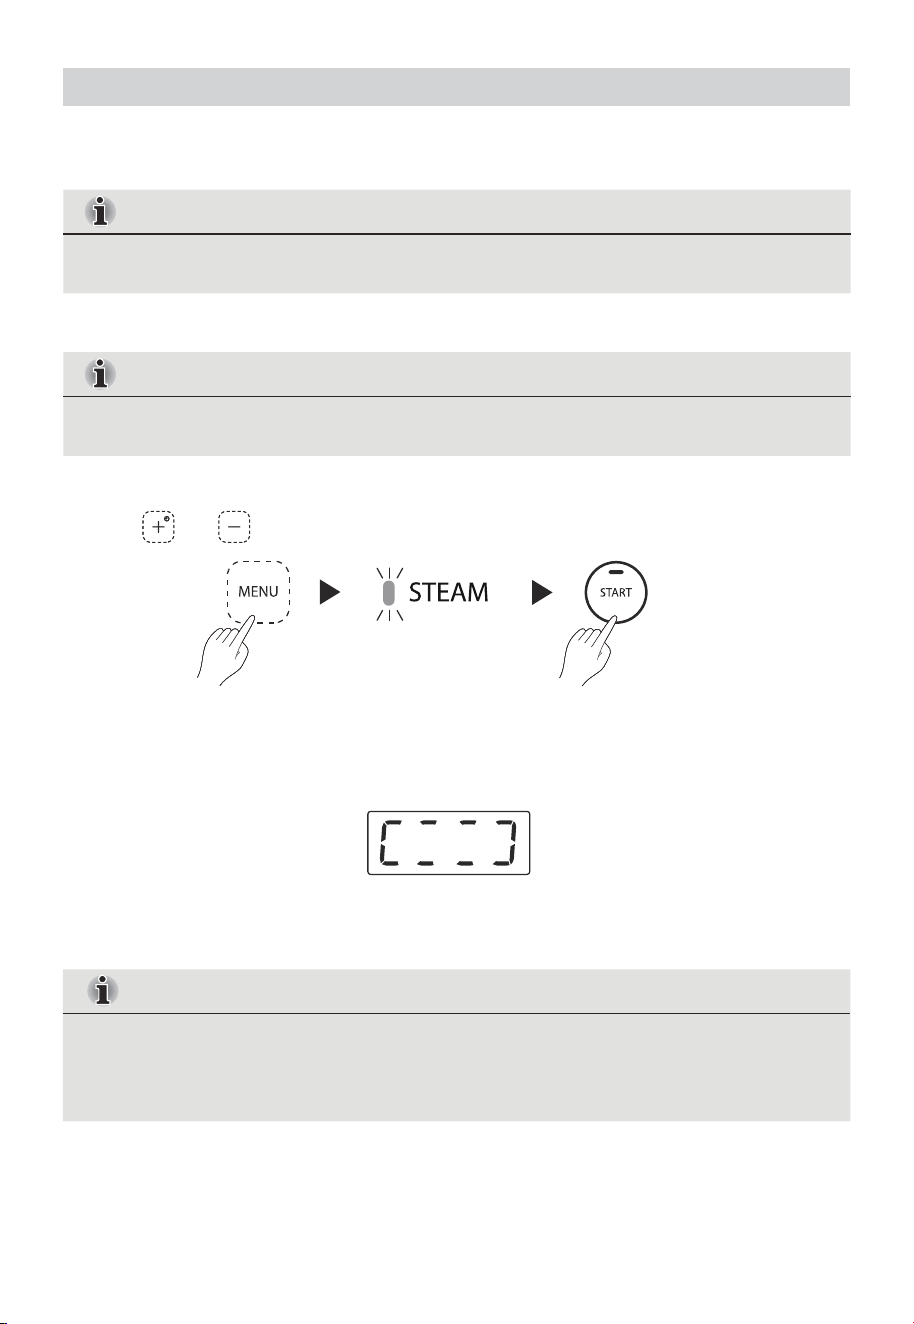
STEAM
1. Add water to the inner pot up to the “STEAM” water level marking.
2. Place food in the steam basket, then place the steam basket in the inner pot.
3. Place the inner pot in the rice cooker. Close the lid.
5. Press START to start the cooking function. A rotating symbol will show on the display and
the rice cooker will begin preheating. When preheating is finished, the display will show
the timer counting down.
6. The rice cooker will beep when finished and automatically switch to the Keep Warm
function.
1. The amount of rice and water used for cooking must not exceed the maximum
water line of the inner pot (STEAM highest water line).
2. Do not leave the food in the appliance to keep it warm for more than 8 hours.
NOTE
24
4. Plug in the rice cooker. Press the “MENU” button, select the “STEAM” function.
Press and to adjust the cook time.
1. The amount of rice and water used for cooking must not exceed the maximum
water line of the inner pot (CONGEE highest water line).
2. Do not leave the food in the appliance to keep it warm for more than 8 hours.
NOTE
Do not fill pass the 0.5-cup congee water line.
NOTE
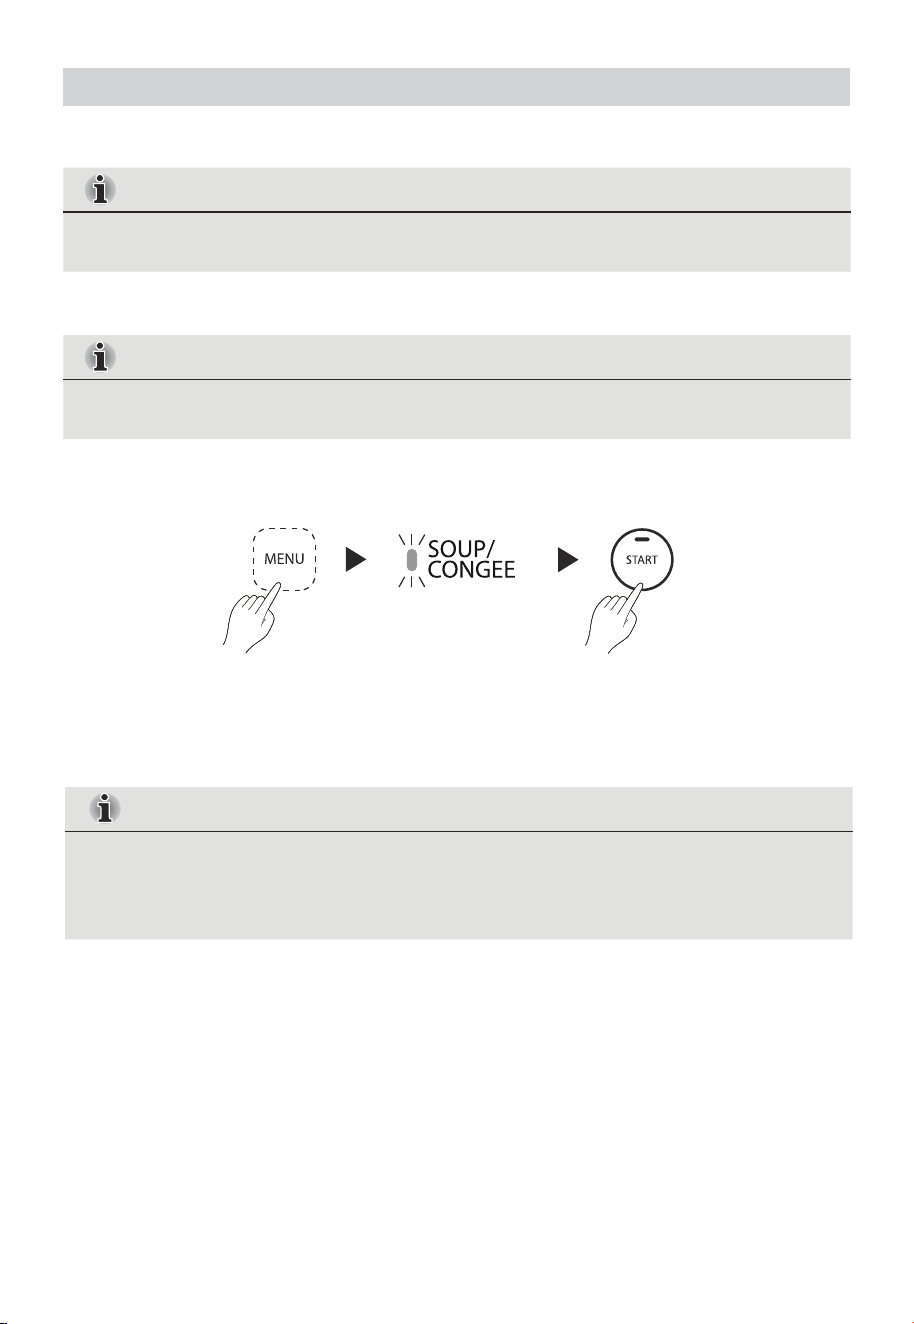
SOUP/CONGEE
1. Place ingredient and water in the inner pot.
Make sure that the inner lid and steam cap are properly installed.
NOTE
2. Place the inner pot in the rice cooker. Close the lid.
3. Plug in the rice cooker. Press the “MENU” button, select the “SOUP/CONGEE” function.
4. Press START to start the cooking function.
5. The rice cooker will beep times when finished and automatically switch to the Keep Warm
function.
25
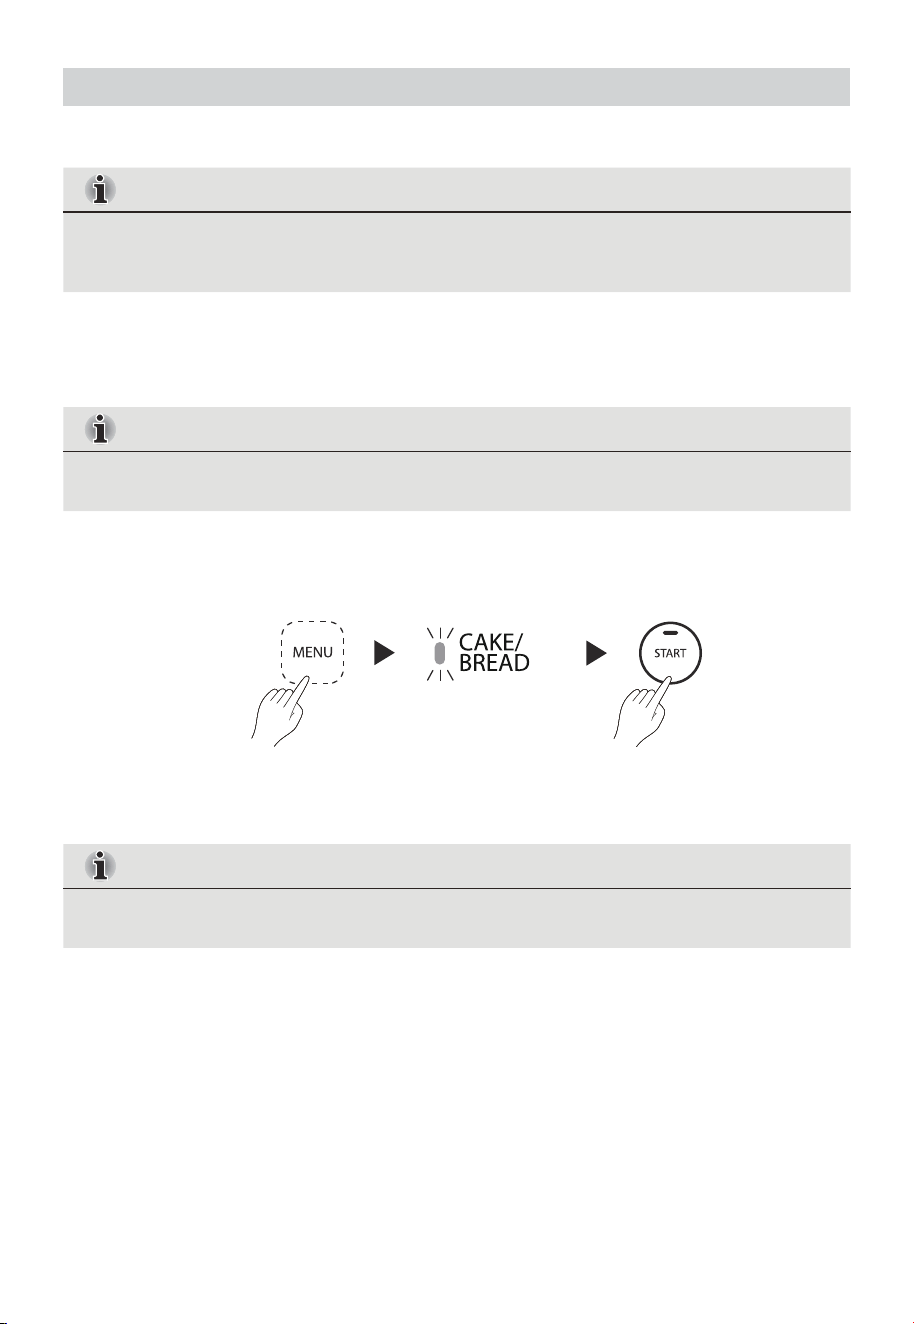
4. Plug in the rice cooker. Press the “MENU” button, select the “CAKE/BREAD” function.
5. Press START to start the cooking function.
CAKE/BREAD
1. Prepare ingredients according to TOSHIBA’s recommended recipe for cake and bread.
Using the rice cooker with recipes from other sources may result in unsatisfying
baking results.
NOTE
Make sure that the inner lid and steam cap are properly installed.
NOTE
Do not leave the cake in the rice cooker for more than 8 hours.
NOTE
2. Evenly grease the inner pot with butter or oil
3. Pour the cake batter or bread dough into the inner pot. Place the inner pot in the rice
cooker. Close the lid.
6. The rice cooker will beep times when finished and automatically switch to the Keep Warm
function.
26
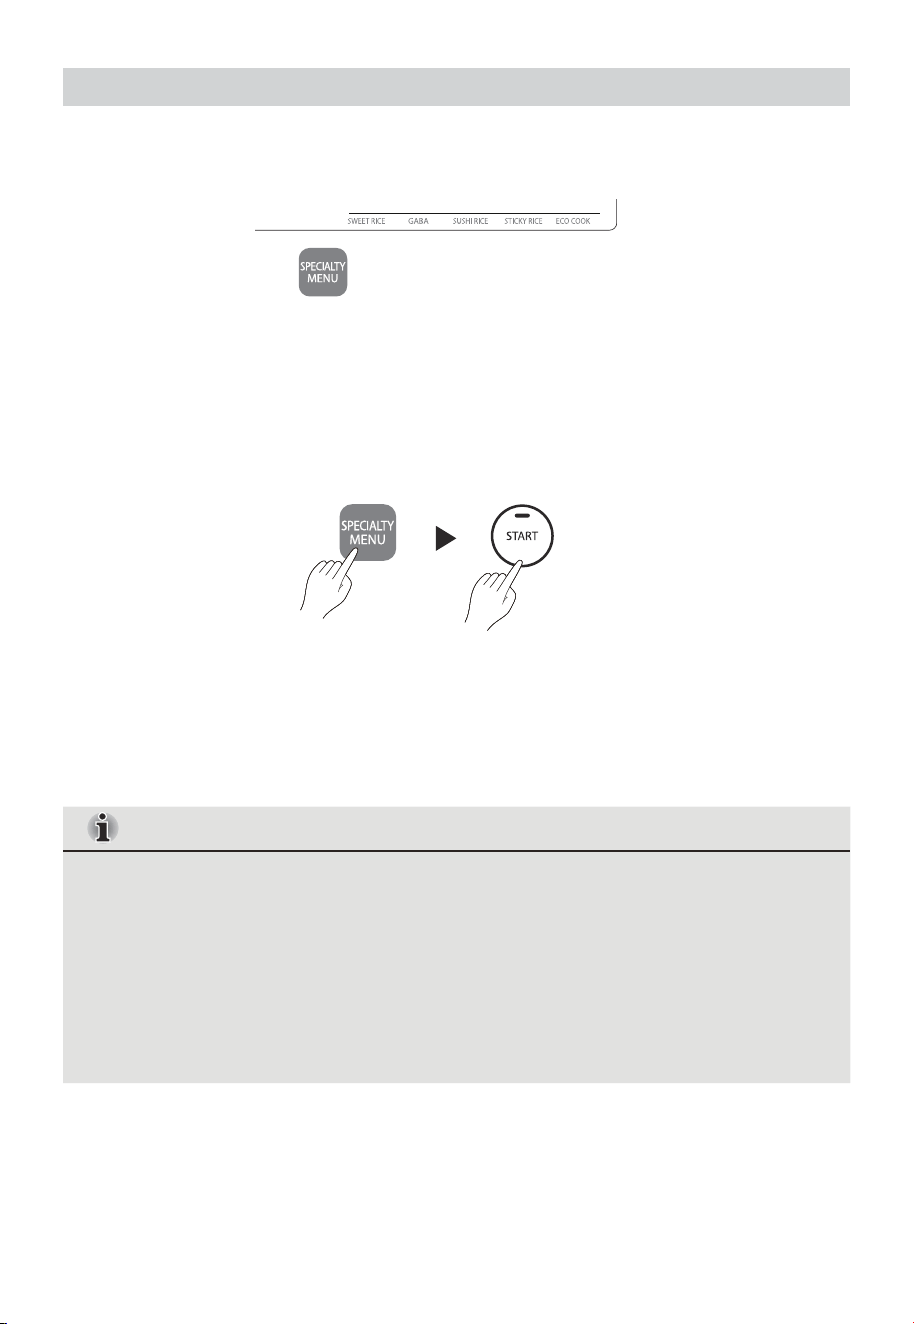
1. Using the provided measuring cup, add the rice to be cooked into the inner pot.
2. Add appropriate amount of water according to the amount of rice to be cooked. You can
reference the Ingredient to Water Ratio chart.
3. Press the “SPECIALTY MENU” button, select desired function, and then press the START
button to start cooking.
4. The cooker beeps, the display shows the time, and the cooker starts cooking.
5. After cooking is completed, the cooker will beep and automatically enter the keep-warm
mode.
6. Open the lid and stir the rice using the included rice spatula to expel any remaining
moisture.
SPECIALTY MENU
SPECIALTY MENU is a collection of Japanese style rice cooking functions that allows you to
dive into the world of Japanese rice cuisine.
1. The amount of rice and water used for cooking must not exceed the maximum
water line of the inner pot (For SWEET RICE/SUSHI RICE/ECO COOK refer to WHITE
RICE water line. For GABA refer to BROWN RICE water line. For STICKY RICE refer to
STICKY RICE water line.).
2. You can also adjust the ratio of rice to water for cooking according to your
preference.
3. Do not leave rice in the rice cooker to keep it warm for more than 8 hours.
NOTE
27

28
1. It is recommended that the amount of cold rice heated should not exceed half of
the capacity of the inner pot.
2. Do not leave the rice in the appliance to keep it warm for more than 8 hours.
KEEP WARM / REHEAT
KEEP WARM / REHEAT
1. Break up the remaining rice and evenly put it into the inner pot. Sprinkle with appropriate
amount of water.
2. Directly press the "KEEP WARM/REHEAT" shortcut button in the standby state to enter the
keep warm mode.
3. Press the "KEEP WARM/REHEAT" again,the "KEEP WARM/REHEAT" light flashes and the
display shows the time, indicating that the product begins to enter the reheat mode.
4. Open the lid and stir the rice using the included rice spatula to expel any remaining
moisture and make the rice fluffier.
1. Follow the standard operation procedures of any cooking programs
2. Before pressing START button, press TIMER button to configure delay timer.
3. Press or to adjust the required delay time, and the time shown on the display is the
time for the cooker to finish cooking.
How to Use TIMER
Delay Timer function is applicable for all cooking programs except for CAKE/BREAD
NOTE
1. This function sets the Rice Cooker to automatically finish cooking at a specific time.
2. The timer indicates the time of your day so that you do not have to do the math.
For example if you set the TIMER at 16:00, the Rice Cooker will finish cooking at 16:00
your day.
NOTE

4. Finally, press the "START" button to enter the delay cooking; When the reserved working
time is reached, the rice cooker will start heating.
5. After cooking is completed, the cooker will beep and automatically enter the keep-warm
mode.
6. Open the lid and stir the rice using the included rice spatula to expel any remaining
moisture and make the rice fluffier.
1. Press the "TIMER" button and then the "MENU" or "SPECIALTY MENU" or
"QUICK COOK" button to select the functions that need to be delayed. The display
shows the default delay cooking time.
2. Delay timer can be set up to 24 hours.
Function
WHITE RICE
BROWN RICE
JASMINE RICE
MIXED RICE
STEEL CUT OATMEAL
BASMATI
PORRIDGE
STEAM
SOUP/CONGEE
SWEET RICE
GABA
SUSHI RICE
STICKY RICE
ECO COOK
QUICK COOK
SUGGESTED MINIMUM
DELAY FINISHING TIME
50 minutes
Current Time + 60 minutes
Current Time + 80 minutes
Current Time + 60 minutes
Current Time + 80 minutes
Current Time + 60 minutes
Current Time + 60 minutes
Current Time + 60 minutes
Current Time + 60 minutes
Current Time + 240 minutes
Current Time + 70 minutes
Current Time + 270 minutes
Current Time + 55 minutes
Current Time + 65 minutes
Current Time + 60 minutes
Current Time + 50 minutes
NOTE
29
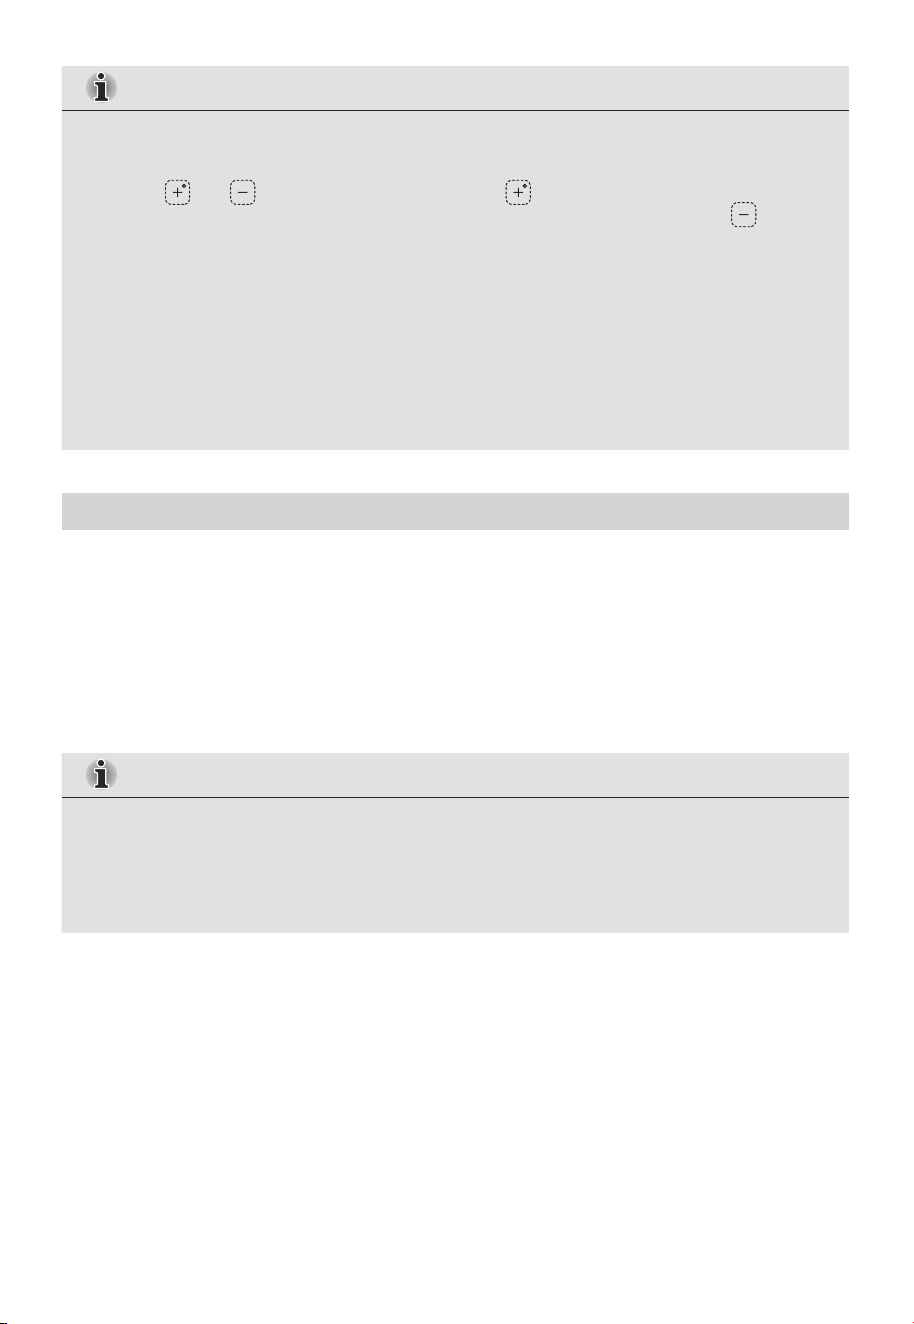
1. It is recommended that the delay time should not exceed 8 hours, or the rice may
have a peculiar smell.
2. Press and to add or subtract time. The " " button support short pressing
(the step is 10 minutes) and continuous pressing (the step is 1 hour); the " "
button support short pressing (the step is 10 minutes) and continuous pressing
(the step is 1 hour).
3. If the time difference between delay finishing time and current time is shorter than
the preset cooking time of a cooking function, the rice cooker will start running the
function immediately.
4. The minimum reserved cooking time for each function is shown as above.
For example, if you want to set a delay timer for QUICK COOK, the time difference
between delay finishing time and current time should be longer than 50 minutes.
CANCEL / START
CANCEL
To switch or cancel the current function during cooking, you can press the "CANCEL" button
and then select again.
START
In the non-cooking state, pressing the "START" button will automatically enter the default
cooking function (WHITE RICE).
1. In order to maintain the taste of food, the maximum keep-warm time is
recommended to be no more than 8 hours.
2. During the keep-warm process, the cooker will heat intermittently to keep the food
in the pot above 149°F.
NOTE
NOTE
30
CLEANING AND MAINTENANCE
Care and Cleaning
Unplug the rice cooker from the electrical outlet, allow it to cool, and then clean and dry the
cooker and all its parts after each use to avoid odors and poor performance.
General Care
The main body of the rice cooker is not dishwasher safe. Use only soft cloths with a mild
dish soap solution to clean the rice cooker. Do not wash either the rice cooker or its
interior inner pot in the dishwasher.
IMPORTANT
Do Not immerse the rice cooker in water.
Using a soft, damp cloth, clean the outer surfaces of the rice cooker.
Using a soft, dry cloth thoroughly dry the outer surfaces.
Cleaning the Cooker Exterior
IMPORTANT
Steam Cap
• Clean the steam valve frequently to ensure proper venting.
• The rice cooker should be cool to the touch before cleaning the steam valve.
IMPORTANT
• Wait until the rice cooker has cooled before cleaning.
Failure to do so may result in burns.
Burn Hazard
WARNING
31
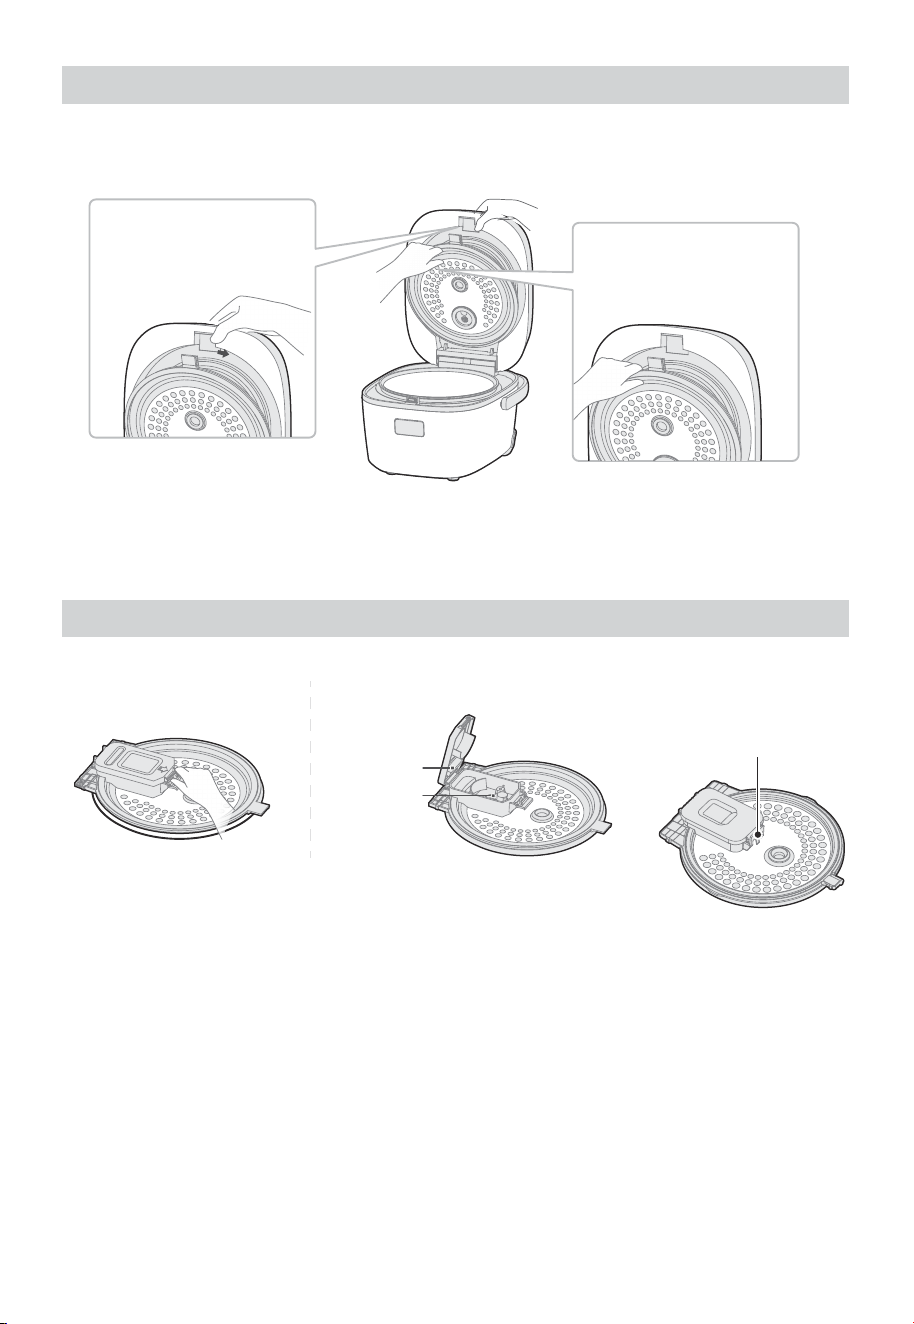
• Push the inner cover slider to the right according to the arrow.
• Grab the handle and pull up the removable inner lid.
Remove the Inner Lid
When the removable inner lid is removed, the upper housing cannot be closed to prevent you
from cooking without the removable inner lid.
Disassembly/Assembly of Steam Cap
1. Grasp the inner lid and
press the release button.
2. Insert the buckle of the steam valve seat into the small
hole of the steam cap and fasten the button.
Steam cap
Steam
valve seat
steam cap
release button
32
Step 1:
Push the inner cover
removal slider to the
right
Step 2:
Grasp the inner cover
and lift it out
1. Using a steel wool pad, remove any residue burned on the metal heating plate.
2. Using a soft, damp cloth, wipe the heating plate, and then dry thoroughly.
3. Do not clean the hot plate immediately after cooking to avoid burns.
1. Wash the inner pot, using a soft cloth and a nonabrasive cleanser or a mild solution of dish
soap and warm water.
2. Using a soft cloth, dry both the interior and exterior of the inner pot.
3. Any other servicing should be performed by an authorized service representative.
Inner Pot
Heating Plate
• The inside of the inner pot has a non-stick coating that can lose its non-stick
properties if it becomes scratched or damaged.
• Do not use abrasive cleansers, vinegar, bleaching agents, steel wool or other harsh
scrubbing brushes to clean the inner pot.
• Do not use metal cooking utensils.
• Wash the inner pot immediately after removing rice that has been seasoned.
Seasonings may damage the non-stick coating of the inner pot if left in contact for
long time.
• Do not clean the hot plate immediately after cooking to avoid burns.
NOTE
IMPORTANT
When the steam port sealing ring on the inside of the steam valve cover comes
out, press it in so that it does not protrude from the slot.
NOTE
33

TROUBLE SHOOTING
Possible Cause SolutionsProblem
Before calling for service, review the following tips. It may save you time and money. This list
includes common occurrences that are not the result of poor workmanship or defective
materials.
Rice cooker does
not operate.
Rice is mushy,
sticky or clumping.
The power supply cord is not
completely plugged into a working
3 prong electrical outlet.
There has been a power failure.
During a power failure, the time-
of-day, not the countdown time, will
appear in the display during a
cooking program.
Another appliance was plugged into
the same electrical outlet, which
tripped the circuit breaker or blown a
household fuse.
Plug the power supply cord into the
electrical outlet.
Rice was cooked with too much
water.
Rice was rinsed or soaked before
cooking.
Pre-rinsing can cause the rice to crack
and become mushy and sticky during
cooking.
Soaking before cooking softens the
texture of rice.
Use less water when cooking rice.
Once cooked, fluff rice immediately
using a fork to separate the grains.
If rinsing is required, rinse the rice
quickly and drain as much water as
possible. Do not allow rice to soak in
liquid prior to cooking.
Reset the circuit breaker or replace
the fuse once power is restored.
Rice is hard or dry.
Rice was not cooked with enough
water or it was cooked with mineral
water.
Use more water when cooking rice.
Soak the rice for a short time before
cooking.
Reset the circuit breaker or replace
the fuse. Plug power supply cord
into a separate, dedicated circuit.
Operation of your appliance can lead to errors and malfunctions. The following tables contain
possible causes and notes for resolving an error message or malfunction. It is recommended to
read the tables carefully below in order to save your time and money that may cost for calling
to the service center.
Electrical Shock Hazard
• Plug into a grounded 3 prong outlet.
• Do Not remove the ground prong.
• Do Not use an adapter.
• Do Not use an extension cord.
Failure to do so can result in death, fire or electrical shock.
WARNING
34

Possible Cause SolutionsProblem
35
Rice is scorched
NOTE: Rice turning
a light brown color
is not a result of
rice cooker failure.
Rice does not taste
good.
Dirt or a foreign substance is stuck to
the temperature sensor.
Other ingredients and/or seasonings
were added to the rice before
cooking.
Rice was soaked for too long.
Remove foreign substance and clean
well.
Cook only rice with the proper ratio
of water.
Rice is dry and has
turned color.
Rice has been reheated repeatedly.
Steam vent is not attached correctly.
Rice should be reheated only once
to maintain the quality. Sprinkle rice
with water to help keep it from
drying out during reheating.
After washing, attach the steam vent
correctly to the rice cooker. See
"CLEANING AND MAINTENANCE".
Soak rice for a shorter period of time.
The inner pot and inner cover are
warm or hot when cooking begins.
Dirt or a foreign substance is stuck to
the temperature sensor, inner lid, or
steam vent.
The inner lid or steam vent was not
attached to the rice cooker.
Used wrong ratio of ingredients to
water or wrong cooking program for.
Allow rice cooker to cool completely
before cooking a new batch.
Remove foreign substance and clean
well.
Accurately measure the correct ratio
of ingredients to water.
After cleaning replace both the inner
lid and steam vent into the rice
cooker. See "CLEANING AND
MAINTENANCE".
Unpleasant odor
NOTE: A plastic
odor is normal the
first few times the
cooker is used.
Keep Warm mode was used too long.
Rice left in the inner pot after Keep
Warm mode has turned off.
The rice was not rinsed thoroughly.
The inner pot, inner lid and/or steam
vent is dirty.
The plastic scoop was left in the inner
pot.
Do not allow rice to remain in Keep
Warm mode indefinitely. Serve rice
soon after the 10-minute resting
period.
Remove cooked rice from cooker.
Clean and dry parts thoroughly.
See "CLEANING AND MAINTENANCE".
Remove plastic scoop and all
accessories from the rice cooker
before using.
Rinse rice until the water runs clear.

Possible Cause SolutionsProblem
Possible cause SolutionsProblem
36
Steam escaping
from the rice
cooker.
Rice cooker boiling
over and spattering
NOTE: It is normal
for moisture to
appear on the inner
lid or inner pot and
drip when the lid is
opened.
Difficult to close
the cooker lid.
Film on interior of
inner pot.
The inner lid is not attached properly.
The inner lid and/or inner pot is
deformed.
Foreign substances are stuck to the
inner lid, inner pot rim or the frame of
the rice cooker.
Check the condition of the inner lid
and gasket. Confirm that the inner
lid is correctly seated in the cooker
cover.
The inner lid and/or steam vent are
not attached properly.
After cleaning replace both the inner
lid and steam vent into the rice
cooker. See "CLEANING AND
MAINTENANCE".
The steam vent and/or temperature
sensor is dirty.
Clean the steam vent and
temperature sensor.
The inner lid is not attached properly.
NOTE: The outer lid will not close
unless the inner lid is attached
correctly.
Replace the inner lid into the top
cover of the rice cooker. See
"CLEANING AND MAINTENANCE".
Foreign substances in the lid latch
well are preventing the outer lid from
latching.
Remove debris from the lid latch
well.
The starch in the rice will melt during
cooking and dry onto the interior of
the inner pot.
During washing, use a non- abrasive
plastic scouring pad or utensil to
gently remove the film.
Porridge program was
unintentionally used to cook rice.
Select the cooking program for the
ingredients you are cooking.
Clean both the inner pot and rice
cooker after each use.
Ε1, Ε2, Ε5,E6, EU
Circuit Board and Sensor Fault.
Immediately unplug rice cooker.
After error is resolved, plug in rice
cooker, and then press CANCEL to
remove error code from display.
Error Display

37
(U.S. AND CANADA ONLY)
Warranty Period:
This warranty is available to consumers only. You are a consumer if you own a Toshiba
Rice
and Grain Multicooker that was purchased at retail for personal, family or household use.
Except as otherwise required under applicable law, this warranty is not available to retailers or
other commercial purchasers or owners.
We warrant that your Toshiba Rice and Grain Multicooker will be free of defects in materials or
workmanship under normal home use for 1 year from the date of original purchase. However,
product registration does not eliminate the need for the consumer to maintain the original
proof of purchase in order to obtain the warranty benefits. In the event that you do not have
proof of purchase date, the purchase date for purposes of this warranty will be the date
of manufacture.
If your Toshiba Rice and Grain Multicooker should prove to be defective within the warranty
period, we will repair it, or if we think necessary, replace it. To obtain warranty service, simply
call our toll-free number 1-855-204-5313 for additional information from our Consumer
Service Representatives or send the defective product to Consumer Service at Toshiba,
5 Sylvan Way, Parsippany, NJ 07054.
NOTE:
For added protection and secure handling of any Toshiba product that is being returned,
we recommend you use a traceable, insured delivery service. Toshiba cannot be held
responsible for in-transit damage or for packages that are not delivered to us. Lost and/or
damaged products are not covered under warranty. Please be sure to include your return
address, daytime phone number, description of the product defect, product model number
(located on bottom of product), original date of purchase, and any other information pertinent
to the product's return.
CALIFORNIA RESIDENTS ONLY
California law provides that for In-Warranty Service California residents have the option of
returning a nonconforming product (A) to the store where it was purchased or (B) to another
retail store that sells Toshiba products of the same type. The retail store shall then, at its
discretion, either repair the product, refer the consumer to an independent repair facility,
replace the product, or refund the purchase price less the amount directly attributable to the
consumer's prior usage of the product. If the above two options do not result in the
appropriate relief to the consumer, the consumer may then take the product to an
independent repair facility if service or repair can be economically accomplished. Toshiba and
not the consumer will be responsible for the reasonable cost of such service, repair,
replacement, or refund for nonconforming products under warranty.
LIMITED ONE-YEAR WARRANTY

38
California residents may also, according to their preference, return nonconforming products
directly to Toshiba for repair, or if necessary, replacement, by calling our Consumer Service
Center toll-free at 1-855-204-5313.Toshiba will be responsible for the cost of the repair,
replacement, and shipping and handling for such products under warranty.
BEFORE RETURNING YOUR TOSHIBA PRODUCT
If you are experiencing problems with your Toshiba product, we suggest that you call our
Toshiba Service Center at 1-855-204-5313 before returning the product for service. If servicing
is needed, a Representative can confirm whether the product is under warranty and direct you
to the nearest service location. Your Toshiba Rice and Grain Multicooker has been
manufactured to the strictest specifications and has been designed for use only in 120-volt
outlets and only with authorized accessories and replacement parts. This warranty expressly
excludes any defects or damages caused by attempted use of this unit with a converter, as well
as by use with accessories, replacement parts or repair service other than those authorized by
Toshiba. This warranty does not damage caused by accident, misuse, shipment or other than
ordinary household use. This warranty excludes all incidental or consequential damages. Some
states do not allow the exclusion or limitation of these damages, so these exclusions may not
apply to you. This warranty gives you specific legal rights, and you may also have other rights,
which vary from state to state.
Important:
If the nonconforming product is to be serviced by someone other than Toshiba's Authorized
Service Center, please remind the servicer to call our Consumer Service Center at
1-855-204-5313 to ensure that the problem is properly diagnosed,the product is serviced with
the correct parts, and the product is still under warranty.
LIMITED ONE-YEAR WARRANTY

# MatterDetails
https://www.toshiba-lifestyle.com/us
RC-10DRUNA(W)
MANUEL DE
L’UTILISATEUR
CUISEUR À RIZ
NUMERIQUE

--------------------------------------------------------------------------------------------
------------------------------------------------------------------------------------------------------------
-----------------------------------------------------------------------------------
----------------------------------------------------------------------
---------------------------------------------------------------
------------------------------------------------------------------------------------------
------------------------------------------------------------------------------------------------------------------
----------------------------------------------------------------------------------------
01
SOMMAIRE
02
0 5
0 6
0 7
3 4
3 1
0 9
CONSIGNES DE SÉCURITÉ
SPÉCIFICATIONS
VUE D’ENSEMBLE DU PRODUIT
INSTRUCTIONS POUR L’INSTALLATION
INSTRUCTIONS SUR LE FONCTIONNEMENT
NETTOYAGE ET ENTRETIEN
DÉPANNAGE
3 7
GARANTIE LIMITEE D'UN AN
Lire Ce Manuel
CONSERVER CES INSTRUCTIONS
Vous y trouverez de nombreux conseils utiles sur l'utilisation et l'entretien de votre autocuiseur à riz.
Un peu d'attention préventive de votre part peut vous faire gagner beaucoup de temps et d'argent
pendant la durée de vie de votre autocuiseur à riz. Vous trouverez de nombreuses réponses aux
problèmes courants dans les conseils de dépannage. Vous devriez être en mesure de résoudre la
plupart d'entre eux rapidement avant d'appeler le service après-vente. Ces instructions ne couvrent
pas toutes les conditions d'utilisation possibles. Il convient donc de faire preuve de bon sens et
d'être attentif à la sécurité lors de l'utilisation et de l'entretien de ce produit.
CE PRODUIT EST CONCU POUR UN USAGE DOMESTIQUE
UNIQUEMENT.
CONSERVER L'APPAREIL HORS DE PORTEE DES ENFANTS.
Danger
Avertissement sur la tension électrique
Avertissement
Attention
Attention
Respecter les instructions
Usage prévu
Explication des symboles
CONSIGNES DE SÉCURITÉ
Les consignes de sécurité qui suivent ont pour but de prévenir les risques ou les dommages imprévus
résultant d'une utilisation dangereuse ou incorrecte de l'appareil. Merci de vérifier l'emballage et
l'appareil à réception afin de vous assurer que tout est intact, cela afin de garantir un fonctionnement sûr.
Si vous constatez des dommages, merci de contacter le détaillant ou le revendeur. Merci de noter que les
modifications ou altérations de l'appareil ne sont pas autorisées pour votre sécurité. Une utilisation non
prévue peut entraîner des risques et la perte des droits à la garantie.
Ce symbole signale la présence d’un risque potentiellement mortel pour la vie et la santé des
personnes en raison de la présence d'un gaz extrêmement inflammable.
Ce symbole signale la présence d’un risque potentiellement mortel pour la vie et la santé des
personnes en raison de la tension.
Ce symbole signale un danger avec un niveau de risque intermédiaire qui, s'il n'est pas évité, peut
entraîner la mort ou des blessures graves.
Ce symbole signale un danger avec un faible degré de risque qui, s'il n'est pas évité, peut entraîner
des blessures mineures ou modérées.
Ce symbole signale une information importante (par exemple, un dommage matériel), mais pas un
danger.
Ce symbole signale qu'un technicien de service ne doit utiliser et entretenir cet appareil que
conformément aux instructions d'utilisation.
Lire attentivement ce mode d'emploi avant d'utiliser/mettre en service l'appareil et le conserver à
proximité immédiate du lieu d'installation ou de l'appareil pour une utilisation ultérieure !
02

AVERTISSEMENT
03
AVERTISSEMENT : Ce symbole indique un risque de mort ou de blessure grave.
ATTENTION : Ce symbole indique la possibilité de blessures ou de dommages matériels.
INSTRUCTIONS IMPORTANTES DE SÉCURITÉ
PRÉCAUTIONS DE SÉCURITÉ
Les instructions suivantes doivent être respectées afin d'éviter toute blessure à l'utilisateur ou
à d'autres personnes, ainsi que tout dommage matériel. Un fonctionnement incorrect dû à
l'ignorance des instructions peut entraîner des dommages. Le niveau de risque est indiqué
par les indications suivantes.
Lors de l'utilisation d'appareils électriques, il convient de toujours respecter les mesures de
sécurité de base, notamment les suivantes :
• Lire toutes les instructions avant utilisation.
• Ne pas toucher les surfaces chaudes. Utiliser des maniques ou des gants de cuisine
lorsque vous manipulez le bol de cuisson ou le couvercle.
• Afin d’éviter tout choc électrique, ne pas immerger le cordon, les fiches ou le
boîtier du cuiseur à riz dans l'eau ou dans un autre liquide.
• Cet appareil n'est pas destiné à être utilisé par des personnes (y compris des
enfants) dont les capacités physiques, sensorielles ou mentales sont réduites, ou
qui manquent d'expérience et de connaissances, à moins qu'une personne
responsable de leur sécurité ne les ait surveillées ou leur ait donné des instructions
concernant l'utilisation de l'appareil.
• Une surveillance étroite est nécessaire lorsque l'appareil est utilisé par des enfants
ou à proximité de ceux-ci.
• Conserver l'appareil et le cordon hors de portée des enfants.
• Débrancher l'appareil lorsqu'il n'est pas utilisé et avant de le nettoyer.
• Laisser l'appareil refroidir avant de mettre en place ou de retirer des pièces.
• Ne pas faire fonctionner un appareil dont le cordon ou la fiche est endommagé, ou
si l'appareil fonctionne mal ou a été endommagé de quelque manière que ce soit.
Retourner l'appareil au centre de service agréé le plus proche pour examen,
réparation ou réglage.
• Ne pas démonter, réparer ou modifier le cuiseur à riz. Pour toute réparation,
consulter un Centre de Service agréé Toshiba.
• Ne pas utiliser le cuiseur à riz si une partie de l'appareil est endommagée.
• Ne pas utiliser à l'extérieur. Destiné uniquement à un usage domestique à
l'intérieur.
• Ne pas laisser le cordon pendre sur le bord du plan de travail ou toucher des
surfaces chaudes, y compris le dessus du cuiseur à riz. Ne jamais utiliser de prise de
courant en dessous du plan de travail, ni de rallonge.

AVERTISSEMENT
ATTENTION
04
CONSERVER CES INSTRUCTIONS
• Ne pas placer l'appareil sur ou à proximité d'un brûleur électrique ou à gaz chaud,
ni dans un four chauffé.
• Ne pas placer l’appareil à proximité de rideaux sensibles à la chaleur.
• La quantité totale d'aliments et d'eau ne doit PAS dépasser le niveau MAX indiqué
sur la casserole. Certains aliments, comme le riz, gonflent pendant la cuisson et ne
doivent pas remplir la marmite à plus de la moitié.
• Les aliments renversés peuvent provoquer de graves brûlures. Il convient d'être
extrêmement prudent lors du déplacement d'un appareil contenant des liquides
chauds ou de l'huile chaude.
• Ne pas utiliser l'appareil à d'autres fins que celles prévues.
• Un cordon d'alimentation court est utilisé pour réduire le risque qu'un enfant
l'attrape, s'emmêle ou trébuche sur un cordon plus long.
• Toujours fixer en premier lieu le cordon à l'appareil, puis brancher le cordon dans
une prise de courant.
• Pour débrancher l'appareil, régler toutes les commandes sur « off », puis retirer la
fiche de la prise murale.
• L'utilisation d'accessoires non recommandés par Toshiba peut entraîner des
blessures.
• Les poignées ne sont pas utilisées pour transporter des objets lourds. Les objets se
trouvant dans la cuisinière ne peuvent pas être déplacés à l'aide de la poignée.
• Il convient d'être extrêmement prudent(e) lors du déplacement d'un appareil
contenant de l'huile chaude ou d'autres liquides chauds.
• Ne pas utiliser l'appareil à d'autres fins que celles prévues.
• Débrancher l'appareil lorsqu'il n'est pas utilisé et avant de le nettoyer. Laisser
refroidir l'appareil avant de le mettre en place ou de le retirer.
• L'utilisation d'accessoires non recommandés par le fabricant de l'appareil peut
entraîner des blessures.
• Ne pas placer l'appareil sur ou à proximité d'un brûleur électrique ou à gaz chaud,
ni dans un four chauffé.
• Afin de réduire le risque de choc électrique, ne faire cuire les aliments que dans un
récipient amovible.
• Ne pas utiliser l'appareil à d'autres fins que celles prévues.
• Destiné à être utilisé sur un comptoir uniquement.
• AVERTISSEMENT : Les aliments renversés peuvent provoquer de graves brûlures.
Tenir l'appareil et le cordon hors de portée des enfants. Ne jamais faire glisser le
cordon sur le bord du comptoir, ne jamais utiliser la prise sous le comptoir et ne
jamais l'utiliser avec une rallonge.

SPÉCIFICATIONS
05
RC-10DRUNA(W)Nom du Modèle
Tension
Fréquence
120V~
60Hz
Capacité
3L/5,5 tasses de riz non cuit
Puissance
650W
VUE D’ENSEMBLE DU PRODUIT
Noms des Composants
Liste des Pièces
Toutes les illustrations de ce manuel sont fournies à titre d'explication uniquement.
Toute divergence entre l'objet réel et l'illustration du dessin sera soumise au sujet réel.
06
Pièces amovibles (à nettoyer avant utilisation)
Boîtier Supérieur
Poignée
Unité Principale Extérieure
Puissance
REMARQUE
Couvercle
Intérieur
Amovible
Marmite
Intérieure
Bouchon à Vapeur
Bouton d'Ouverture du
Bouchon à Vapeur
Spatule de
Service x 1
Louche à
Soupe x 1
Panier
Vapeur x 1
Gobelet de Mesure
6 onces x 1
Cordon
d’Alimentation x 1
INSTRUCTIONS POUR L’INSTALLATION
Déballage
Exigences en Matière d’Electricité
Cordon d’Alimentation
Risque de Choc Electrique
07
AVERTISSEMENT
Retirer tous les matériaux d'emballage.
Laver la marmite, le couvercle intérieur, le conduit de vapeur et les autres accessoires, puis
les sécher soigneusement avant de les utiliser.
Une alimentation électrique de 120 V avec mise à la terre est nécessaire. Il est recommandé
d'utiliser un circuit séparé desservant uniquement le cuiseur à riz. Le partage de
l'alimentation électrique avec d'autres appareils entraînera une surchauffe.
Un cordon d'alimentation court est utilisé pour réduire les risques d'enchevêtrement ou de
trébuchement sur un cordon plus long, ou de saisie du cordon par les enfants.
Si le cordon d'alimentation est trop court, demander à un électricien ou à un technicien
qualifié d'installer une prise à proximité de l'appareil. Ne PAS utiliser de rallonge.
Ce Cuiseur à Riz est équipé d'une fiche à 3 broches. Afin de réduire le risque
d'électrocution, la fiche ne peut être branchée dans une prise que dans un seul sens. Si la
fiche ne s'insère pas dans la prise, contacter un électricien qualifié. Ne pas modifier la fiche.
• Brancher dans une prise de courant à 3 broches reliée à la terre.
• Ne pas retirer la broche de mise à la terre.
• Ne pas utiliser un adaptateur
• Ne pas utiliser de rallonge électrique.
Le non-respect de cette consigne peut entraîner la mort, un incendie ou un choc
électrique.
REMARQUE
08
Au moins 12" (30,5 cm)
Exigences en Matière d'Emplacement
ESPACE LIBRE RECOMMANDE
A
A
AVERTISSEMENT
!
!
Ce cuiseur à riz est conçu pour un usage domestique uniquement ; il ne doit pas être utilisé à
des fins commerciales.
Utiliser à l'intérieur sur une surface stable, plane et non sensible à la chaleur, telle qu'un
comptoir, dans un endroit où le couvercle peut être complètement ouvert ; ne PAS utiliser à
l'extérieur.
Ne pas placer le cuiseur à riz sur un plan de travail exposé à la lumière directe du soleil ou à
des éclaboussures d'huile de cuisson.
La vapeur et la chaleur émises par le cuiseur à riz peuvent endommager ou décolorer les
murs ou les armoires situés à proximité. Il est recommandé de placer le cuiseur à riz à une
distance minimale de 30,5 cm (12") des murs ou des armoires.
a) Retirer et recycler immédiatement les piles usagées ou les mettre au rebut conformément
aux réglementations locales et les tenir hors de portée des enfants.
Ne PAS jeter les piles avec les ordures ménagères ni les incinérer.
b) Même les piles usagées peuvent provoquer des blessures graves, voire mortelles.
c) Appeler un centre antipoison local pour obtenir des informations sur le traitement.
d) Type de pile compatible : CR2477
e) Tension nominale de la pile : 3V
f) Ce produit contient des piles non rechargeables. Les piles non rechargeables ne doivent
pas être rechargées.
• RISQUE D'INGESTION : Ce produit contient une pile bouton.
• L'ingestion de cette pile peut entraîner la MORT ou des blessures
graves.
• Une pile bouton avalée peut provoquer des Brûlures Chimiques
Internes en seulement 2 heures.
• CONSERVER les piles neuves et usagées HORS DE LA PORTEE
DES ENFANTS.
• Consulter immédiatement un médecin si l'on soupçonne qu'une
pile a été avalée ou insérée à l'intérieur d'une partie du corps.
INSTRUCTIONS SUR LE FONCTIONNEMENT
Risque d'Incendie/de Brûlure
Débrancher immédiatement et ne pas utiliser le cuiseur à riz si :
Commandes
09
AVERTISSEMENT
1. ANNULER
Appuyer sur la touche CANCEL pour arrêter la cuisson et revenir en mode veille.
2. CUISSON RAPIDE
Appuyez sur la touche QUICK COOK pour obtenir plus rapidement un riz parfaitement cuit.
3. DEMARRER
Appuyer sur START pour commencer la cuisson. Le panneau de commande s'allume pour
indiquer le programme réglé.
4. MAINTIEN AU CHAUD/RECHAUFFER
Appuyer sur la touche KEEP WARM/REHEAT pour garder au chaud ou réchauffer le riz cuit.
• Le cordon d'alimentation devient anormalement chaud pendant l'utilisation.
• Le cuiseur à riz dégage de la fumée ou une odeur de brûlé.
• Le cuiseur à riz est fissuré ou des pièces se détachent ou s'entrechoquent
• Le récipient de cuisson, le couvercle extérieur ou le couvercle intérieur est cassé ou
déformé.
Le non-respect de cette consigne peut entraîner des incendies, des chocs électriques
ou des blessures.
9
8
5
14 6
5 832 7

9. Affichage HEURE
10
Messages de Statut
Message de statutAffichage
5. MENU SPECIALITE
Appuyer sur SPECIALTY MENU pour sélectionner les menus de riz japonais spéciaux, de
SWEET RICE à ECO COOK.
6. MINUTERIE
Appuyer sur la touche TIMER pour régler le temps de retardement souhaité.
7.
Appuyer sur les touches ou pour régler le temps de cuisson ou la temporisation.
8. MENU
Press MENU button select standard cooking menus from WHITE RICE to CAKE/BREAD.
L'écran affiche l'un des éléments suivants :
• Heure actuelle : Le cuiseur à riz affiche l'horloge qui indique l'heure actuelle (voir la
section Régler l'Heure Actuelle).
• Temps de cuisson par défaut : Après avoir sélectionné un programme de cuisson,
le temps de cuisson par défaut s'affiche.
• Temps de cuisson restant : Après le démarrage d'un programme de cuisson,
l'écran affiche le compte à rebours du temps programmé.
• Le compte à rebours de la minuterie: La cuisinière à riz est chaufféelorsque le délai
est réglé, l’affichage indique le temps pour la cuisinière de terminer la cuisson.
• Compte à rebours de la minuterie de maintien au chaud : Le cuiseur à riz est en
mode maintien au chaud et affiche la durée pendant laquelle les aliments ont été
maintenus au chaud, par exemple: 0h, 1h, 2h.
Le cuiseur à riz exécute un programme de cuisson et calcule le temps de cuisson
restant.
Le cuiseur à riz est en cours de préchauffage.

Rapport Ingrédients/Eau
11
Type de Riz Menu Niveau d’Eau
REMARQUE
/
40-60(50)
60-90(80)
40-60(50)
60-90(70)
60
40-60(50)
60
90-240(90)
55-70(60)
230-260(240)
40-60(50)
40-60(50)
40-60(60)
25-50(30)
Le temps de cuisson est une estimation. Le temps de cuisson réel peut varier en fonction
de facteurs tels que la quantité de céréales et d'eau, la température ambiante, la
température de l'eau et le voltage.
Capacité
de Cuisson
(tasses)
Temps de
Cuisson Estimé
(minutes)
RIZ BLANC
RIZ BRUN
RIZ JASMIN
RIZ MIXTE
BASMATI
RIZ BLANC
RIZ BLANC
RIZ BLANC
RIZ GABA
RIZ SUSHI
RIZ GLUANT
RIZ BLANC
RIZ BLANC
BASMATI
PORRIDGE
SOUPE/CONGEE
RIZ SUCRE
RIZ GABA
RIZ SUSHI
RIZ GLUANT
CUISSON ECO
CUISSON RAPIDE
RIZ BRUN
PORRIDGE
CONGEE
RIZ BLANC
RIZ BRUN
RIZ BLANC
RIZ GLUANT
RIZ BLANC
RIZ BLANC
RIZ BLANC
RIZ BRUN
RIZ JASMIN
RIZ MIXTE
RIZ BLANC
RIZ BRUN
RIZ BLANC
RIZ BLANC
FLOCONS D'AVOINE
COUPES EN ACIER
FLOCONS D'AVOINE
COUPES EN ACIER
1-5,5
1-4
1-5,5
1-4
0,5-1
1-4
0,5-1,5
0,5
1-5,5
1-4
1-5,5
2-4
1-5,5
1-5,5
12
Régler l'Heure Actuelle
Utilisation du Cuiseur à Riz
INTRODUCTION
IMPORTANT
IMPORTANT
Risque de Choc Electrique
AVERTISSEMENT
Pour sélectionner un programme de cuisson, le cuiseur à riz doit d'abord être branché sur
une prise de courant à 3 broches reliée à la terre (ON).
Le cuiseur à riz est équipé d'une batterie intégrée et affiche une horloge de 24 heures en
mode veille (de 0 :00 [minuit] à 23 :59 [11 :59 pm]). Il n'est pas possible de régler l'horloge
lorsque le cuiseur à riz est utilisé pour la cuisson, le maintien au chaud ou le réchauffage, ou
lorsque la minuterie de temporisation a été réglée.
Le Cuiseur à Riz et Céréales Toshiba® bénéficie de l'utilisation de la Logique Floue, une
technologie qui détecte les niveaux d'humidité et ajuste automatiquement le niveau de
chaleur et le temps de cuisson pour cuire le riz sans erreur. Le temps et la température de
cuisson sont définis par l'appareil. Notre Multi Cuiseur à Riz et à Céréales ultra intuitif ajuste
automatiquement la chaleur et le temps de cuisson pour des résultats parfaits à chaque fois.
1. Brancher le cordon d'alimentation dans une prise de courant à 3 broches reliée à la terre
pour mettre le cuiseur à riz en marche.
2. Maintenir le bouton + enfoncé pendant 2+ secondes jusqu'à ce que l'heure clignote
sur l'écran.
3. Utiliser ou pour régler l'heure.
4. Lorsque l'heure actuelle apparaît sur l'écran, appuyer rapidement sur START pour régler
l'heure.
• Brancher l'appareil dans une prise de courant à trois broches reliée à la terre.
• Ne Pas retirer la broche de terre.
• Ne Pas utiliser d'adaptateur.
• Ne Pas utiliser de rallonge.
Le non-respect de cette consigne peut entraîner la mort, un incendie ou un choc électrique.
• Ne rien placer sur ou au-dessus du couvercle du cuiseur à riz pendant l'utilisation.
• Ne pas toucher le conduit de vapeur pendant la cuisson.
• Ne pas placer la marmite intérieure sur un brûleur de table de cuisson ; la
température élevée déformerait la marmite. La marmite intérieure est conçue pour
être utilisée uniquement dans le cuiseur à riz.
Mesure du Riz
13
IMPORTANT
Rincer le Riz
IMPORTANT
REMARQUE
Le gobelet de mesure fourni est une tasse de 6 oz, ce qui est plus petit que le gobelet de
mesure américain standard.
Certains types de riz ne nécessitent pas de rinçage, tandis que d'autres doivent être rincés
avant d'être utilisés afin d'éliminer l'excès d'amidon qui peut rendre le riz collant. En outre, la
cuisson du riz avec de l'eau contenant de l'amidon peut brûler le riz ou le rendre mal cuit.
Si l'eau devient blanche ou trouble lorsqu'elle est ajoutée à du riz sans rinçage, l’égouttera et
la remplacer avant la cuisson. De nombreuses recettes recommandent un rinçage rapide
afin que le riz n'absorbe pas d'eau avant la cuisson.
• Pour obtenir le rapport correct entre le riz et
l'eau, utiliser UNIQUEMENT le gobelet gradué
(gobelet fourni).
• Placer le riz dans le gobelet gradué de manière à
ce qu'il soit à égalité avec le haut du gobelet.
• Pour un riz plus tendre ou plus ferme, ajuster le
rapport eau/riz en conséquence.
• Si le riz doit être rincé avant la cuisson, mesurer le
riz avant de le rincer. Suivre les instructions de
rinçage pour ce type de riz spécifique.
• Ne pas assaisonner le riz lorsqu'il est maintenu au chaud dans la marmite intérieure.
Les assaisonnements laissés en contact avec l'intérieur de la marmite intérieure
peuvent endommager le revêtement antiadhésif.
• Ne pas utiliser d'ustensiles de cuisine en métal. Les ustensiles en métal peuvent rayer
ou endommager le revêtement antiadhésif.
• Ne pas utiliser de marmite ou de récipient autre que la marmite intérieure (fournie)
dans le cuiseur à riz.
• Ne pas insérer d'objets étrangers dans les orifices d'aération ou les interstices situés
au fond du cuiseur à riz.
Correct
Le riz doit être au
même niveau que
le bord du gobelet
Plus haut ou plus bas que le
bord, il ne sera pas possible
de contrôler avec précision
le niveau de l'eau.
Pour Rincer le Riz Rapidement:
Cuisson du Riz
14
Le temps de cuisson varie en fonction du type de riz ou de grain à cuire.
IMPORTANT
REMARQUE
1. Placer le riz dans le tamis et le rincer à l'eau
froide. Rincer le riz à l'eau chaude peut
l'empêcher de cuire correctement.
2. Avec la main, remuer le riz 3 ou 4 fois pour
séparer les grains.
3. Continuez à rincer jusqu’à ce que l’eau soit
claire.
1. Avant la première utilisation, laver la marmite intérieure, le couvercle intérieur, le
bouchon à vapeur, les autres accessoires et les pièces complémentaires, puis les sécher
soigneusement.
2. Mesurer le riz, puis le rincer si nécessaire.
3. Ajouter le riz mesuré dans la marmite intérieure.
4. Ajouter de l'eau jusqu'à ce que le niveau atteigne la ligne d'eau numérotée correspondante
marquée à l'intérieur de la marmite intérieure. Par exemple, pour cuire 3 tasses de riz blanc,
ajouter de l'eau jusqu'à la troisième ligne à partir du fond de la casserole.
Selon vos préférences personnelles, la quantité de liquide peut être légèrement ajustée
(pas plus que la distance entre les lignes).
La quantité totale de riz et d'eau ne doit PAS dépasser le niveau MAX de 5.5 tasses
indiqué à l'intérieur de la marmite.
15
Le cuiseur à riz est sous tension, mais en mode veille (pas de chaleur).
REMARQUE
REMARQUE
Ajout d'Autres Ingrédients
Lors de la première utilisation, il peut y avoir une odeur de plastique qui se dissipera après
la première utilisation.
Si vous souhaitez ajouter d'autres ingrédients ou assaisonnements au riz, le faire APRES
avoir ajouté l'eau. Le riz ne cuira pas correctement et sera trop ferme si les ingrédients sont
ajoutés avant l'eau.
5. Remuer le riz uniformément, de manière à ce
que chaque grain soit immergé dans l'eau.
6. Placer la marmite intérieure dans le cuiseur à
riz.
7. Faire tourner la marmite deux ou trois fois
pour assurer un contact solide entre le fond
de la marmite intérieure et la plaque
chauffante.
8. Fermer le couvercle, puis presser vers le bas
jusqu'à ce qu'il s'enclenche.
9. Brancher le cordon d'alimentation sur une prise
électrique à trois broches reliée à la terre.
10. Sélectionner le programme de cuisson souhaité. Voir « P16-P28 » pour l'explication des
options.
11. Appuyer sur START.
12. Lorsque la cuisson est terminée, une mélodie retentit. Le témoin START s'éteint et le
témoin Keep Warm/Reheat s'allume.
Marmite
Intérieure
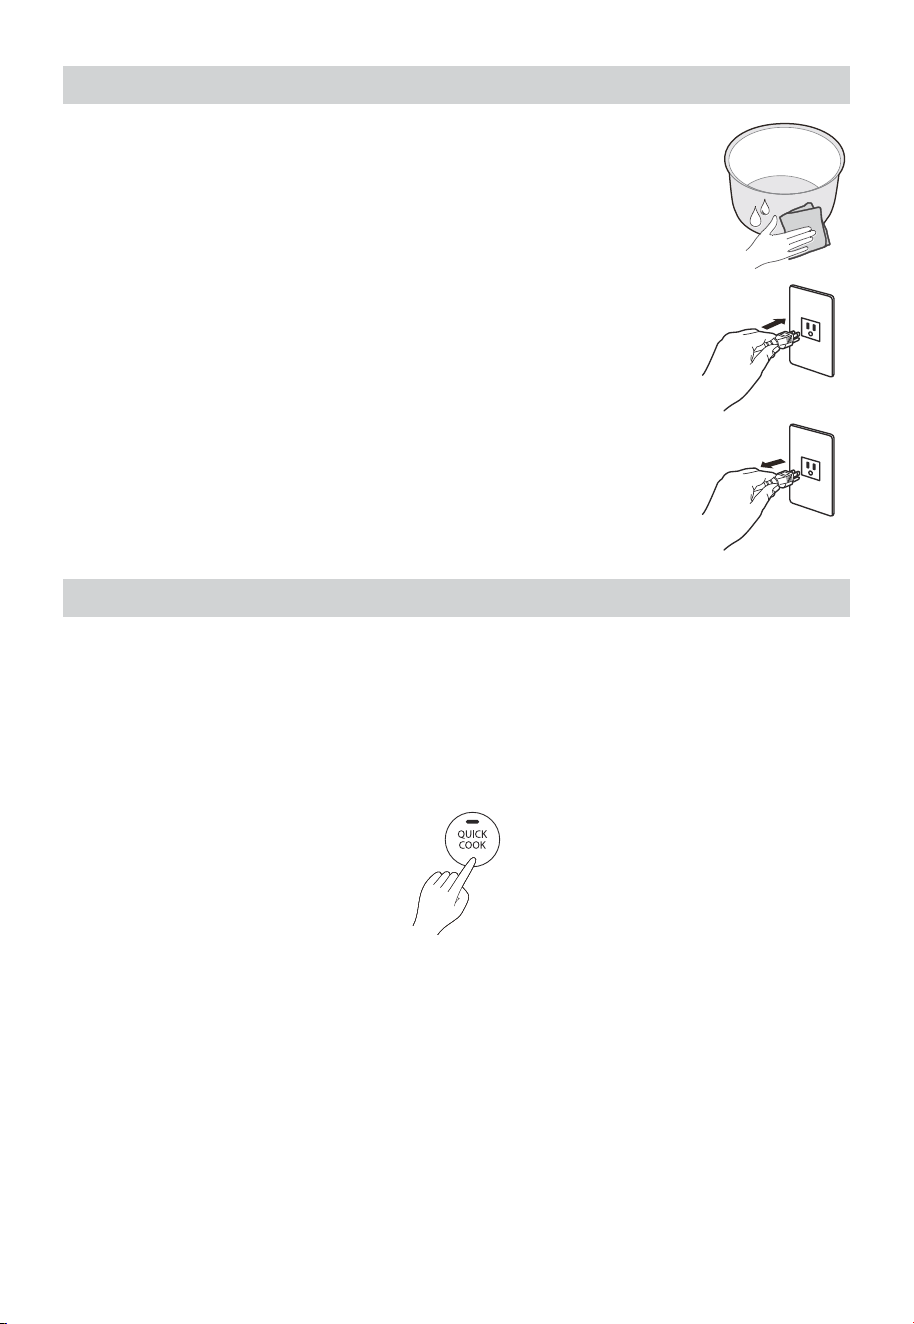
16
RIZ RAPIDE
Conseils de Sécurité pour le Fonctionnement
1. Essuyer l'humidité sur la surface extérieure de la marmite intérieure et
placer la marmite intérieure dans le cuiseur. Vérifier qu'il n'y a pas de
corps étrangers sur le fond, là où le cuiseur est en contact avec la
marmite intérieure, puis fermer le couvercle.
1. A l'aide du gobelet gradué fourni, verser le riz non cuit à cuire dans la marmite
intérieure.
2. Laver le riz, retirer les impuretés et verser l’eau ; répéter cette opération au moins 2 fois
jusqu'à ce que l'eau de lavage du riz devienne claire. Ajouter la quantité d'eau
appropriée en fonction de la quantité de riz non cuit à cuire (se référer au niveau d'eau
du riz blanc dans le pot intérieur : 1 tasse de riz non cuit correspond à 1 graduation).
3. Appuyer sur la touche “QUICK RICE”.
4. L'appareil émet un signal sonore, l'écran affiche l'heure et l'appareil commence à cuire.
5. Une fois la cuisson terminée, l'appareil émet un signal sonore et passe
automatiquement en mode maintien au chaud.
6. Ouvrir le couvercle et remuer le riz à l'aide de la spatule à riz incluse pour expulser
l'humidité restante et rendre le riz plus moelleux.
2. Brancher le cordon d'alimentation dans une prise de courant
disponible (120V~ 60Hz).
3. Après avoir retiré tout le riz, débrancher le cordon d'alimentation du
cuiseur.
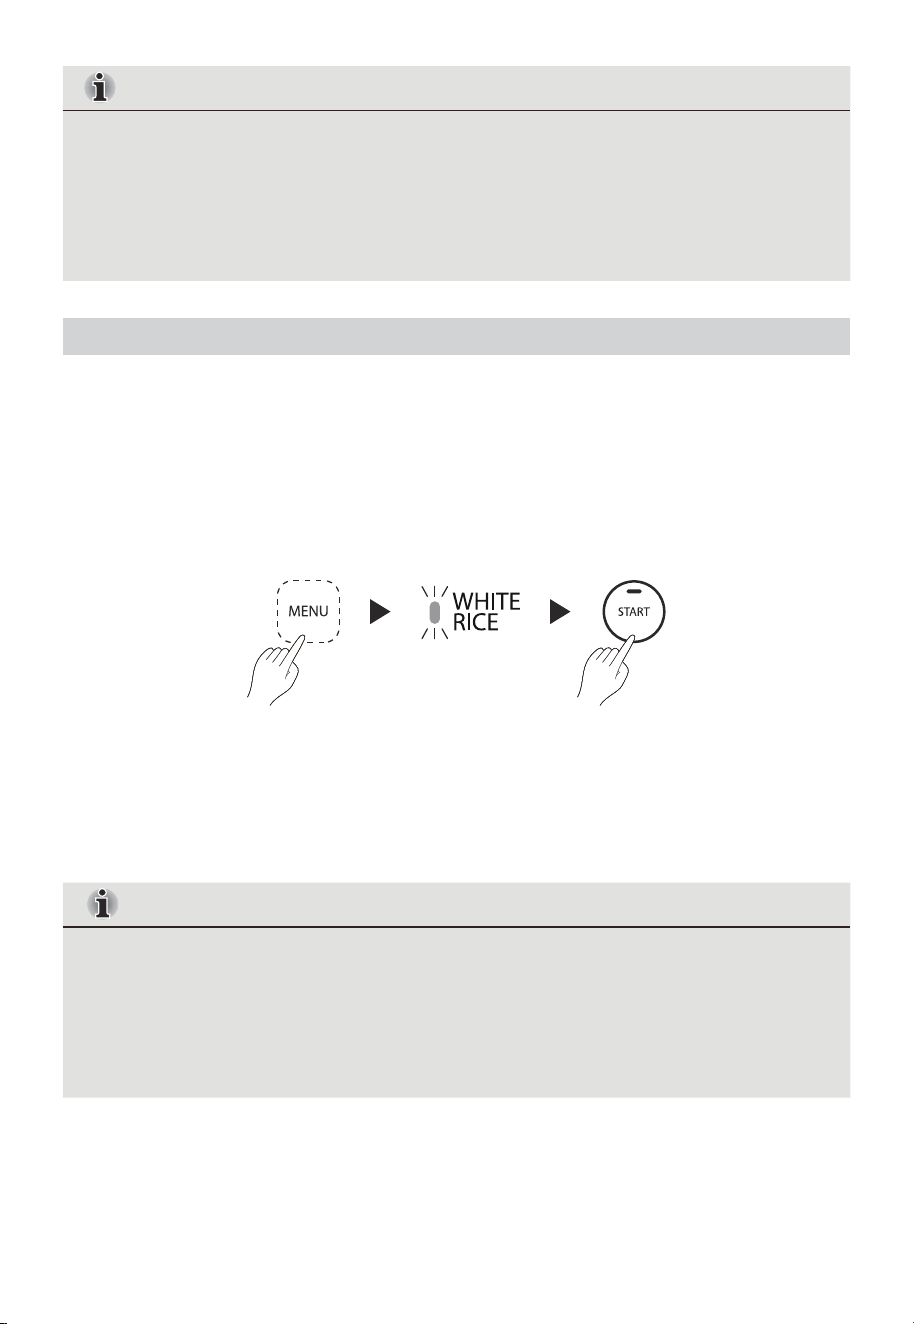
17
RIZ BLANC
REMARQUE
REMARQUE
1. A l'aide du gobelet gradué fourni, verser le riz non cuit à cuire dans la marmite intérieure.
2. Laver le riz blanc, enlever les impuretés et verser l'eau ; répéter cette opération au moins
2 fois jusqu'à ce que l'eau de lavage du riz devienne claire. Ajouter la quantité d'eau
appropriée en fonction de la quantité de riz non cuit à cuire (reportez-vous au niveau
d'eau RIZ BLANC dans la marmite intérieure : 1 tasse de riz non cuit correspond à 1
graduation).
3. Appuyer sur la touche « MENU », sélectionner la fonction « WHITE RICE », puis appuyer
sur la touche START pour démarrer la cuisson.
4. L'appareil émet un signal sonore, l'écran affiche l'heure et l'appareil commence à cuire.
5. Une fois la cuisson terminée, l'appareil émet un signal sonore et passe
automatiquement en mode maintien au chaud.
6. Ouvrir le couvercle et remuer le riz blanc à l'aide de la spatule à riz incluse pour expulser
l'humidité restante et rendre le riz blanc plus moelleux.
1. La quantité de riz et d'eau utilisée pour la cuisson ne doit pas dépasser la ligne d'eau
maximale de la marmite intérieure (RIZ BLANC ligne d'eau la plus élevée).
2. Vous pouvez également ajuster le rapport entre le riz et l'eau pour la cuisson selon vos
préférences.
3. Ne pas laisser le riz dans le cuiseur à riz pour le maintien au chaud pendant plus de 8
heures.
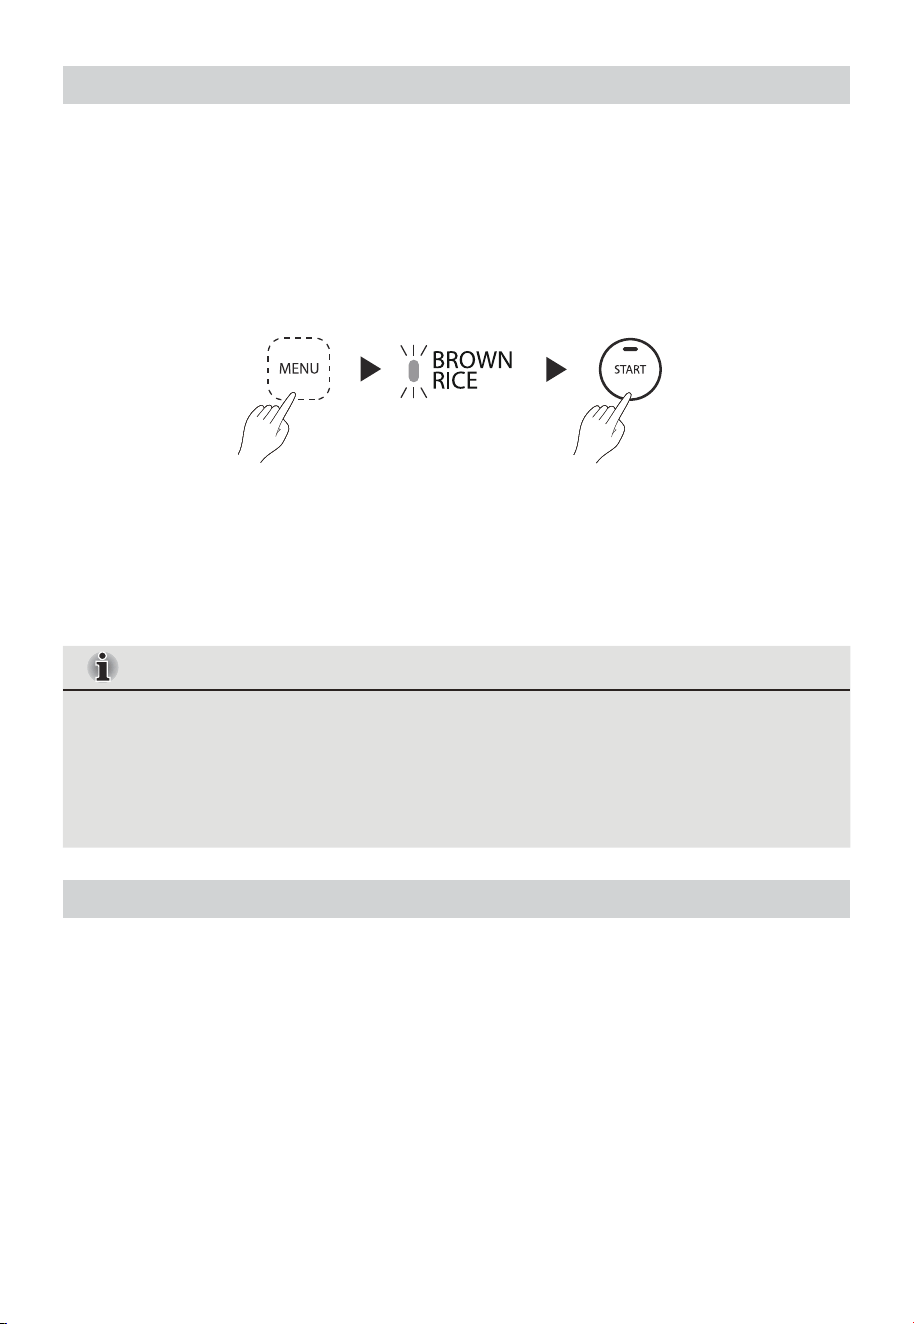
18
RIZ BRUN
REMARQUE
RIZ JASMIN
1. A l'aide du gobelet gradué fourni, verser le riz brun à cuire dans la marmite intérieure.
2. Laver le riz brun, enlever les impuretés et verser l'eau ; répéter cette opération au moins
2 fois jusqu'à ce que l'eau de lavage du riz devienne claire. Ajouter la quantité d'eau
appropriée en fonction de la quantité de riz brun à cuire (se référer au niveau d'eau RIZ
BRUN dans la marmite intérieure : 1 tasse de riz brun correspond à 1 graduation).
3. Appuyer sur la touche « MENU », sélectionner la fonction « BROWN RICE », puis
appuyer sur la touche START pour démarrer la cuisson.
4. L'appareil émet un signal sonore, l'écran affiche l'heure et l'appareil commence à cuire.
5. Une fois la cuisson terminée, l'appareil émet un signal sonore et passe
automatiquement en mode maintien au chaud.
6. Ouvrir le couvercle et remuer le riz brun à l'aide de la spatule à riz incluse pour expulser
l'humidité restante et rendre le riz brun plus moelleux.
1. A l'aide du gobelet gradué fourni, verser le riz non cuit à cuire dans la marmite
intérieure.
2. Laver le riz jasmin, enlever les impuretés et verser l'eau ; répéter cette opération au
moins 2 fois jusqu'à ce que l'eau de lavage du riz devienne claire. Ajouter la quantité
d'eau appropriée en fonction de la quantité de riz non cuit à cuire (se référer au niveau
d'eau RIZ BLANC dans la marmite intérieure : 1 tasse de riz non cuit correspond à 1
graduation).
1. La quantité de riz et d'eau utilisée pour la cuisson ne doit pas dépasser la ligne d'eau
maximale de la marmite intérieure (RIZ BRUN ligne d'eau la plus élevée).
2. Vous pouvez également ajuster le rapport entre le riz et l'eau pour la cuisson selon vos
préférences.
3. Ne pas laisser le riz dans le cuiseur à riz pour le maintien au chaud pendant plus de 8
heures.

RIZ MIXTE
19
REMARQUE
3. Appuyer sur la touche « MENU », sélectionner la fonction « JASMINE RICE », puis appuyer
sur la touche START pour démarrer la cuisson.
4. L'appareil émet un signal sonore, l'écran affiche l'heure et l'appareil commence à cuire.
5. Une fois la cuisson terminée, l'appareil émet un signal sonore et passe automatiquement
en mode maintien au chaud.
6. Ouvrir le couvercle et remuer le riz jasmin à l'aide de la spatule à riz incluse pour expulser
l'humidité restante et rendre le riz jasmin plus moelleux.
1. Préparer les ingrédients nécessaires (riz, riz noir, flocons d'avoine, millet). (Le tableau des
proportions de riz mixte est présenté dans l’illustration ci-dessous).
2. Ajouter la quantité de riz à cuire dans la marmite intérieure en fonction du poids
correspondant à la balance du riz mixte.
3. Laver le riz mixte, enlever les impuretés et verser l'eau ; répéter cette opération au moins
deux fois jusqu'à ce que l'eau de lavage du riz devienne claire. Ajouter la quantité d'eau
appropriée en fonction de la quantité de riz mixte à cuire (se référer au niveau d'eau du
RIZ BLANC dans la marmite intérieure : 1 tasse de riz mélangé correspond à 1 graduation).
4. Appuyer sur la touche « MENU », sélectionner la fonction « MIXED RICE », puis appuyer
sur la touche START pour démarrer la cuisson.
1. La quantité de riz et d'eau utilisée pour la cuisson ne doit pas dépasser la ligne d'eau
maximale de la marmite intérieure (RIZ BLANC ligne d'eau la plus élevée).
2. Vous pouvez également ajuster le rapport entre le riz et l'eau pour la cuisson selon vos
préférences.
3. Ne pas laisser le riz dans le cuiseur à riz pour le maintien au chaud pendant plus de 8
heures.
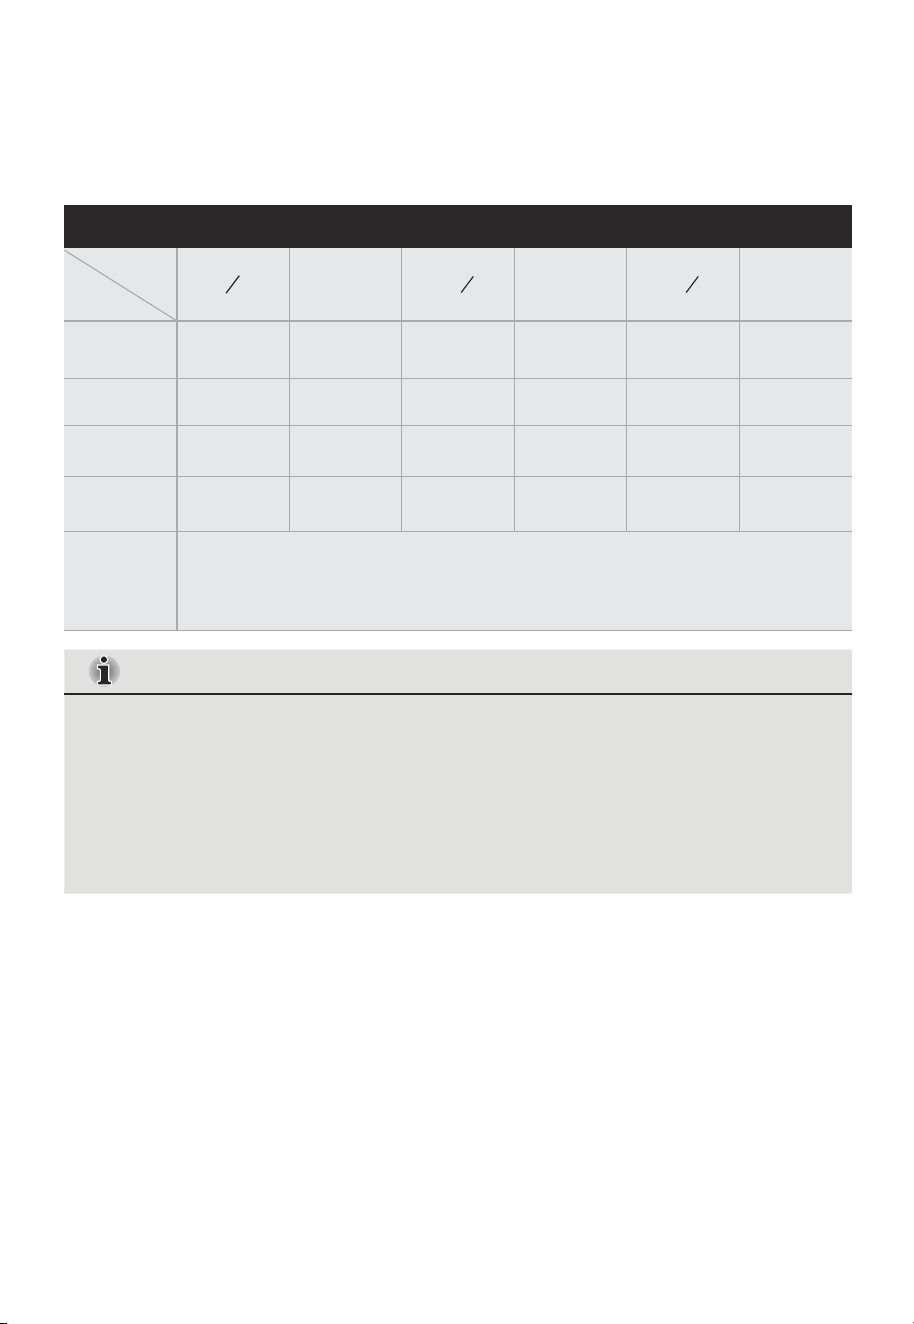
Type de Riz
Tasses(riz)
37,5g 75g 112,5g 150g 187,5g 225g
75g
75g
75g
62.5g
62.5g
62.5g
50g
50g
50g
37,5g
37,5g
37,5g
25g
25g
25g
12,5g
12,5g
12,5g
1 2 3
20
REMARQUE
1
1
2
2
1
2
1
2
Tableau des proportions pour le riz mixte
5. L'appareil émet un signal sonore, l'écran affiche l'heure et l'appareil commence à cuire.
6. Une fois la cuisson terminée, l'appareil émet un signal sonore et passe automatiquement
en mode maintien au chaud.
7. Ouvrir le couvercle et remuer le riz mixte à l'aide de la spatule à riz incluse pour expulser
l'humidité restante et rendre le riz mélangé plus fluide.
1. Par exemple, 1 tasse est composée de 75 g de riz + 25 g de riz noir + 25 g de flocons
d'avoine + 25 g de millet.
2. Faire tremper le riz noir et les flocons d'avoine dans de l'eau chaude pendant 2
heures.
1. La quantité de riz mixte et d'eau utilisée pour la cuisson ne doit pas dépasser la ligne
d'eau maximale de la marmite intérieure (ligne d'eau RIZ BLANC 4-TASSES).
2. Vous pouvez également ajuster le rapport entre le riz et l'eau pour la cuisson selon vos
préférences.
3. Ne pas laisser le riz mixte dans l'appareil pour le maintenir au chaud pendant plus de 8
heures.
4. Pour les grains secs et durs, les faire tremper dans de l'eau chaude pendant 2 heures.
Riz Blanc
Riz Noir
Flocons
d’avoine
Millet
Remarques
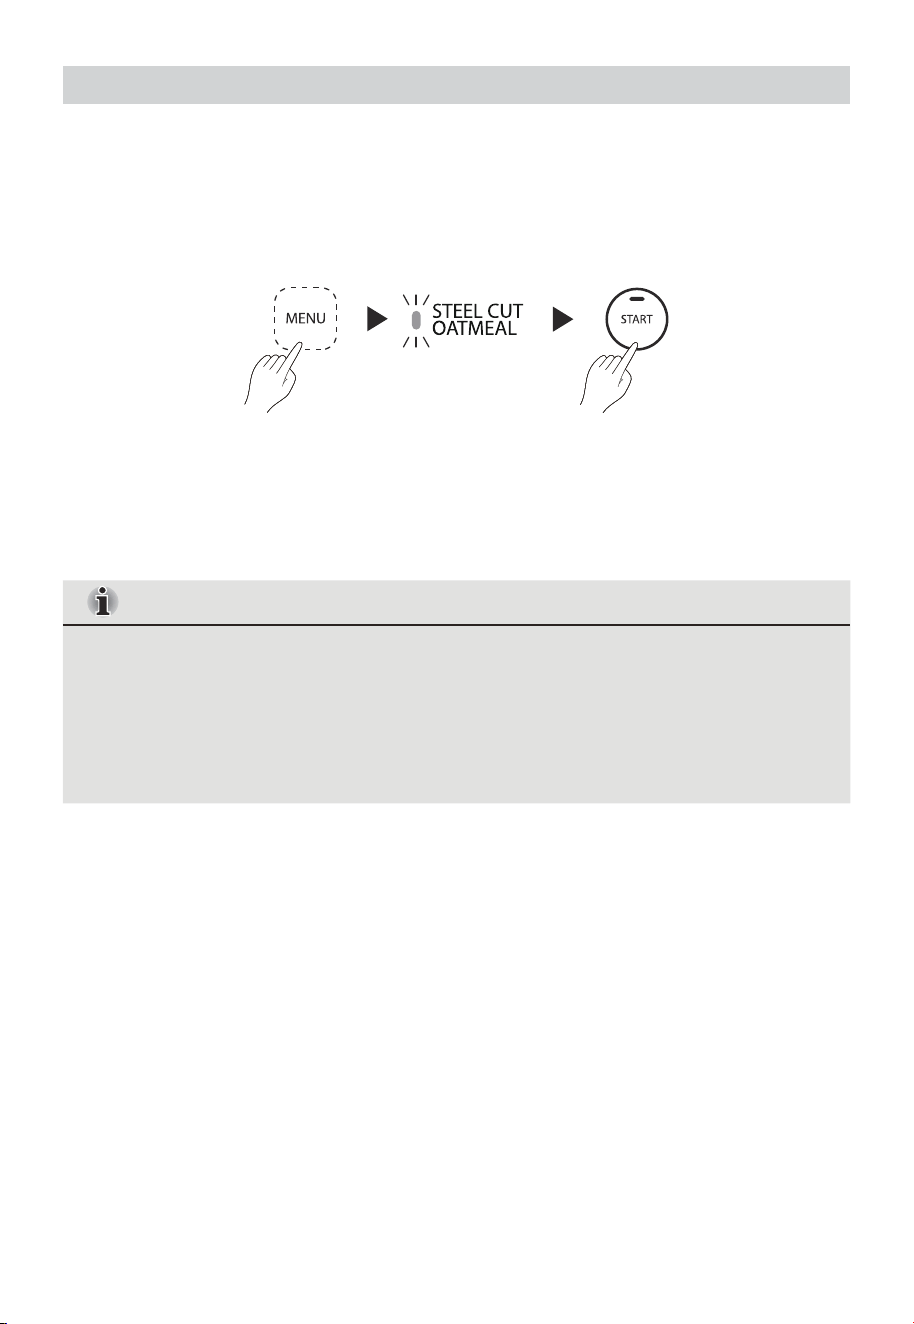
21
FLOCONS D'AVOINE COUPES EN ACIER
REMARQUE
1. A l'aide du gobelet gradué fourni, ajouter l'avoine non cuite à cuire dans la marmite
intérieure.
2. Ajouter la quantité d'eau appropriée en fonction de la quantité d'avoine coupée en acier
à cuire. Le rapport grains/eau recommandé est de 1 :3.
3. Appuyer sur la touche « MENU », sélectionner la fonction « STEEL CUT OATMEAL », puis
appuyer sur la touche START pour démarrer la cuisson.
4. L'appareil émet un signal sonore, l'écran affiche l'heure et l'appareil commence à cuire.
5. Une fois la cuisson terminée, l'appareil émet un signal sonore et passe automatiquement
en mode maintien au chaud.
6. Ouvrir le couvercle et remuer à l'aide de la spatule à riz incluse pour expulser l'humidité
restante.
1. La quantité maximale d'avoine coupée en acier que le cuiseur à riz peut cuire est de
1 tasse (le gobelet de mesure fourni). Le rapport grains/eau recommandé est de 1 :3.
2. Vous pouvez également ajuster le rapport riz/eau pour la cuisson selon vos
préférences.
3. Ne pas laisser les flocons d'avoine coupés en acier dans le cuiseur à riz pour les
maintenir au chaud pendant plus de 8 heures.
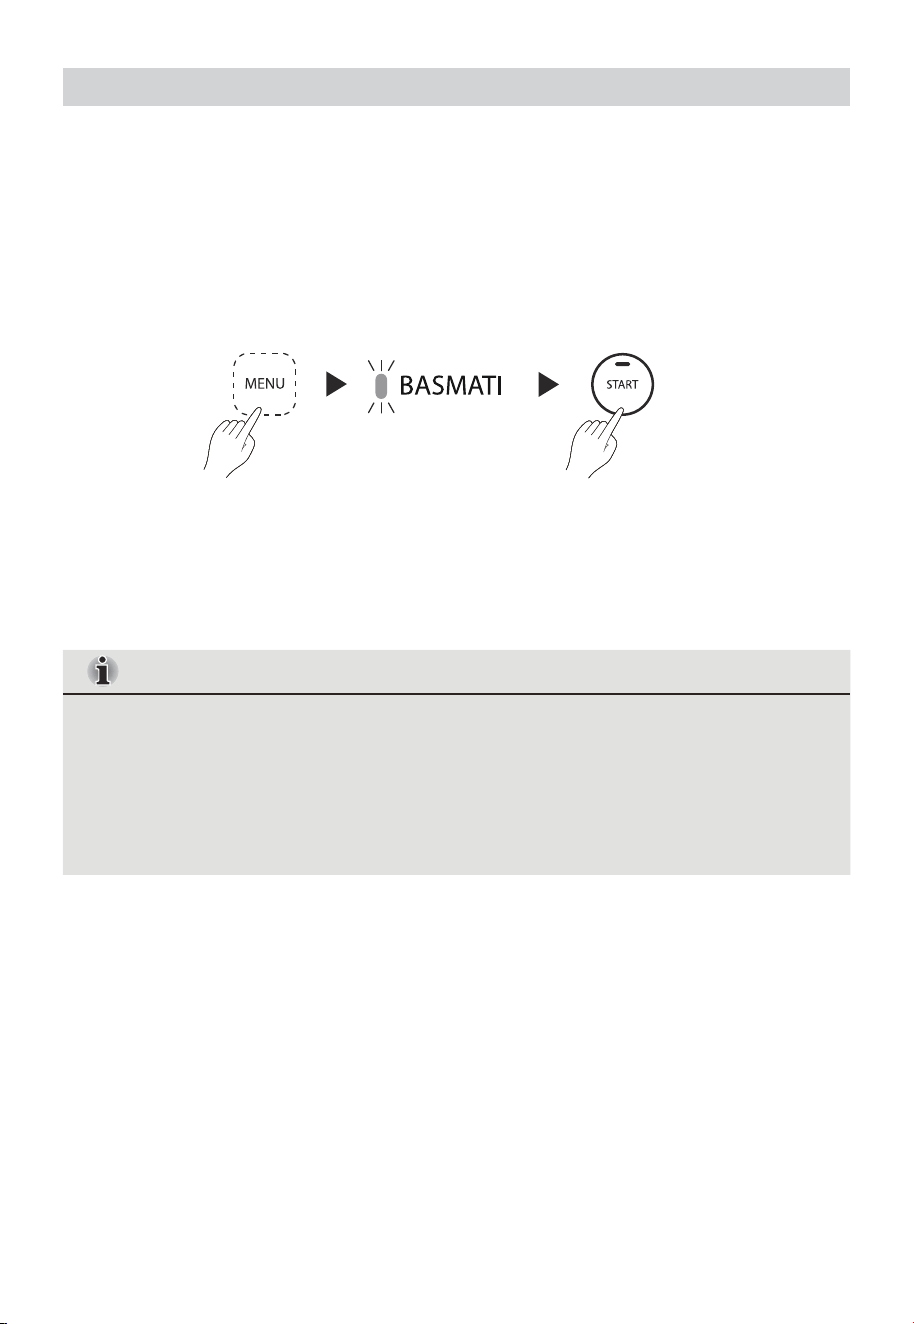
22
RIZ BASMATI
REMARQUE
1. A l'aide du gobelet gradué fourni, verser le riz basmati non cuit à cuire dans la marmite
intérieure.
2. Laver le riz basmati, retirer les impuretés et verser l'eau ; répéter cette opération au moins
deux fois jusqu'à ce que l'eau de lavage du riz devienne claire.
3. Ajouter la quantité d'eau appropriée en fonction de la quantité de riz à cuire. Vous pouvez
vous référer au tableau des proportions entre les ingrédients et l'eau.
4. Appuyer sur la touche « MENU », sélectionner la fonction « BASMATI », puis appuyer sur
la touche START pour démarrer la cuisson.
5. L'appareil émet un signal sonore, l'écran affiche l'heure et l'appareil commence à cuire.
6. Une fois la cuisson terminée, l'appareil émet un signal sonore et passe automatiquement
en mode maintien au chaud.
7. Ouvrir le couvercle et remuer le riz à l'aide de la spatule à riz incluse pour expulser
l'humidité restante et rendre le riz basmati plus moelleux.
1. La quantité de riz basmati et d'eau utilisée pour la cuisson ne doit pas dépasser la
ligne d'eau maximale de RIZ BRUN de la marmite intérieure.
2. Vous pouvez également ajuster le rapport entre le riz et l'eau pour la cuisson selon
vos préférences.
3. Ne pas laisser le basmati dans le cuiseur à riz pour le maintenir au chaud pendant
plus de 8 heures.
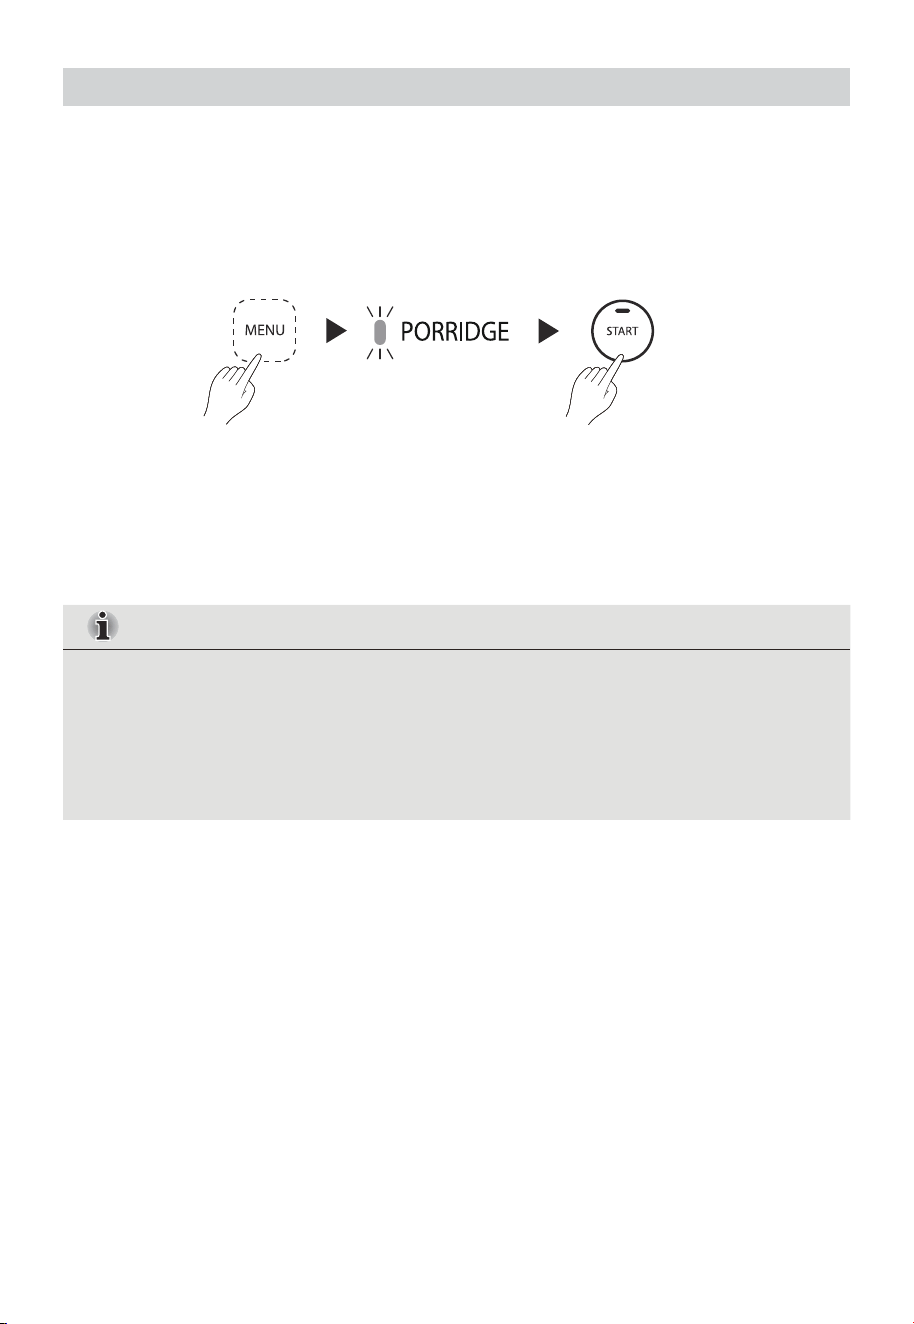
23
4.
L'appareil émet un signal sonore, l'écran affiche l'heure et l'appareil commence à cuire.
REMARQUE
PORRIDGE
1. A l'aide du gobelet gradué fourni, verser le riz non cuit à cuire dans la marmite
intérieure.
2. Ajouter la quantité d'eau appropriée en fonction de la quantité de riz à cuire. Vous
pouvez vous référer au tableau des proportions entre les ingrédients et l'eau.
3. Appuyer sur la touche « MENU », sélectionner la fonction « PORRIDGE », puis appuyer
sur la touche START pour démarrer la cuisson.
5. Une fois la cuisson terminée, l'appareil émet un signal sonore et passe
automatiquement en mode maintien au chaud.
6. Ouvrir le couvercle et remuer le porridge à l'aide de la spatule à riz incluse pour expulser
toute humidité excessive.
1. La quantité de riz et d'eau utilisée pour la cuisson ne doit pas dépasser la ligne d'eau
maximale de la marmite intérieure (ligne d'eau la plus élevée du PORRIDGE).
2. Vous pouvez également ajuster le rapport entre le riz et l'eau pour la cuisson en
fonction de vos préférences.
3. Ne pas laisser de porridge dans le cuiseur à riz pour le maintenir au chaud pendant
plus de 8 heures.
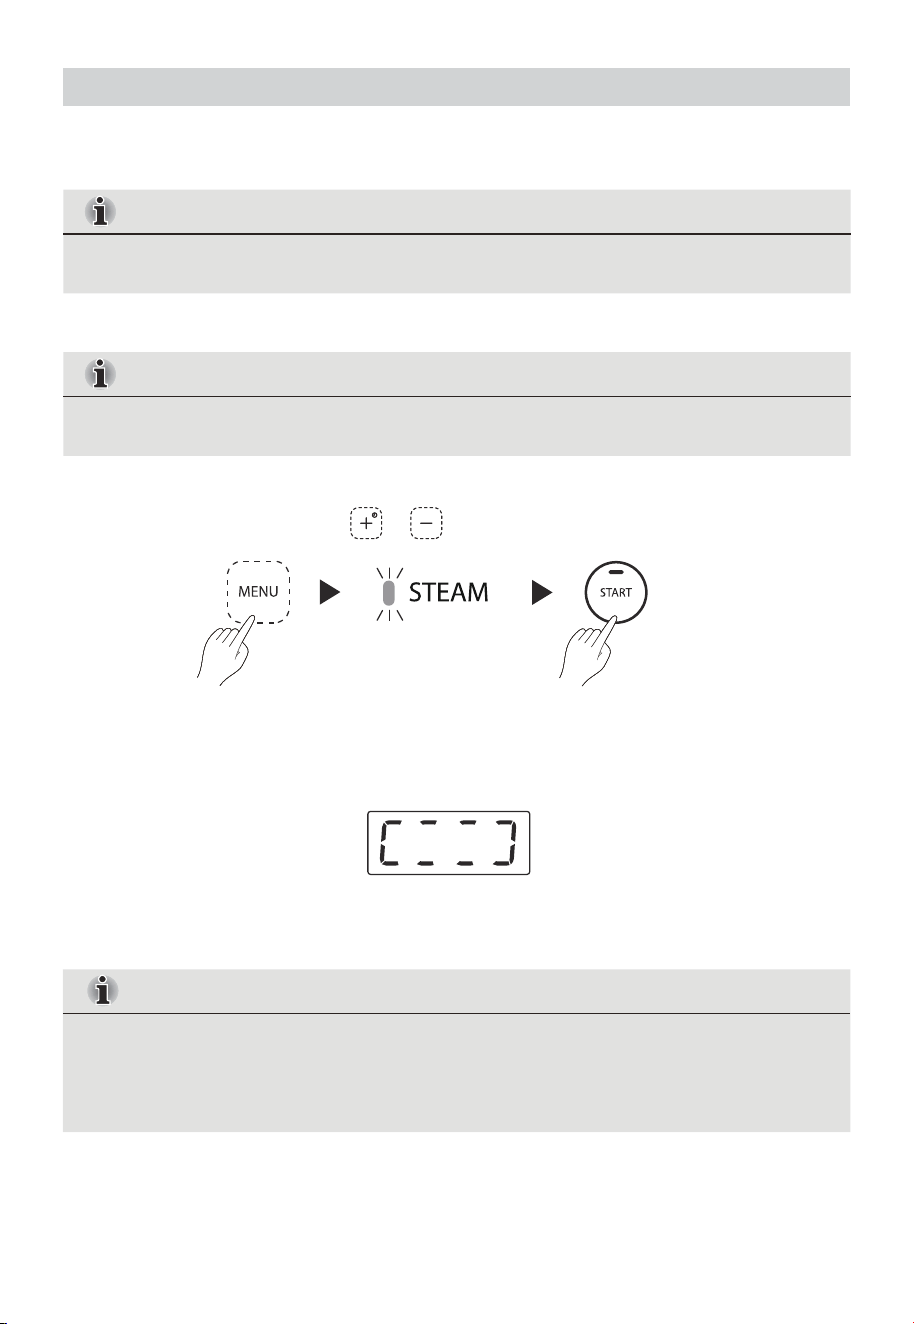
Ne pas trop remplir le panier à vapeur.
REMARQUE
Vérifier que le couvercle intérieur et le bouchon à vapeur sont correctement installés.
REMARQUE
VAPEUR
3. Placer la marmite intérieure dans le cuiseur à riz. Fermer le couvercle.
REMARQUE
24
1. Ajouter de l'eau dans la marmite intérieure jusqu'au repère de niveau d'eau « STEAM ».
2. Placer les aliments dans le panier vapeur, puis placer le panier vapeur dans la marmite intérieure.
4. Brancher le cuiseur à riz. Appuyer sur le bouton « MENU », sélectionner la fonction
« STEAM ». Utiliser les boutons et pour régler le temps de cuisson.
5. Appuyer sur START pour démarrer la fonction de cuisson. Un symbole de rotation
s'affiche à l'écran et le cuiseur à riz commence à préchauffer. Lorsque le
préchauffage est terminé, l'écran affiche le compte à rebours de la minuterie.
6. Le cuiseur à riz émet un signal sonore lorsqu'il a terminé et passe automatiquement
à la fonction de maintien au chaud.
1. La quantité de riz et d'eau utilisée pour la cuisson ne doit pas dépasser la ligne d'eau
maximale de la marmite intérieure (ligne d'eau maximale VAPEUR).
2. Ne pas laisser les aliments dans l'appareil pour les maintenir au chaud pendant plus
de 8 heures.
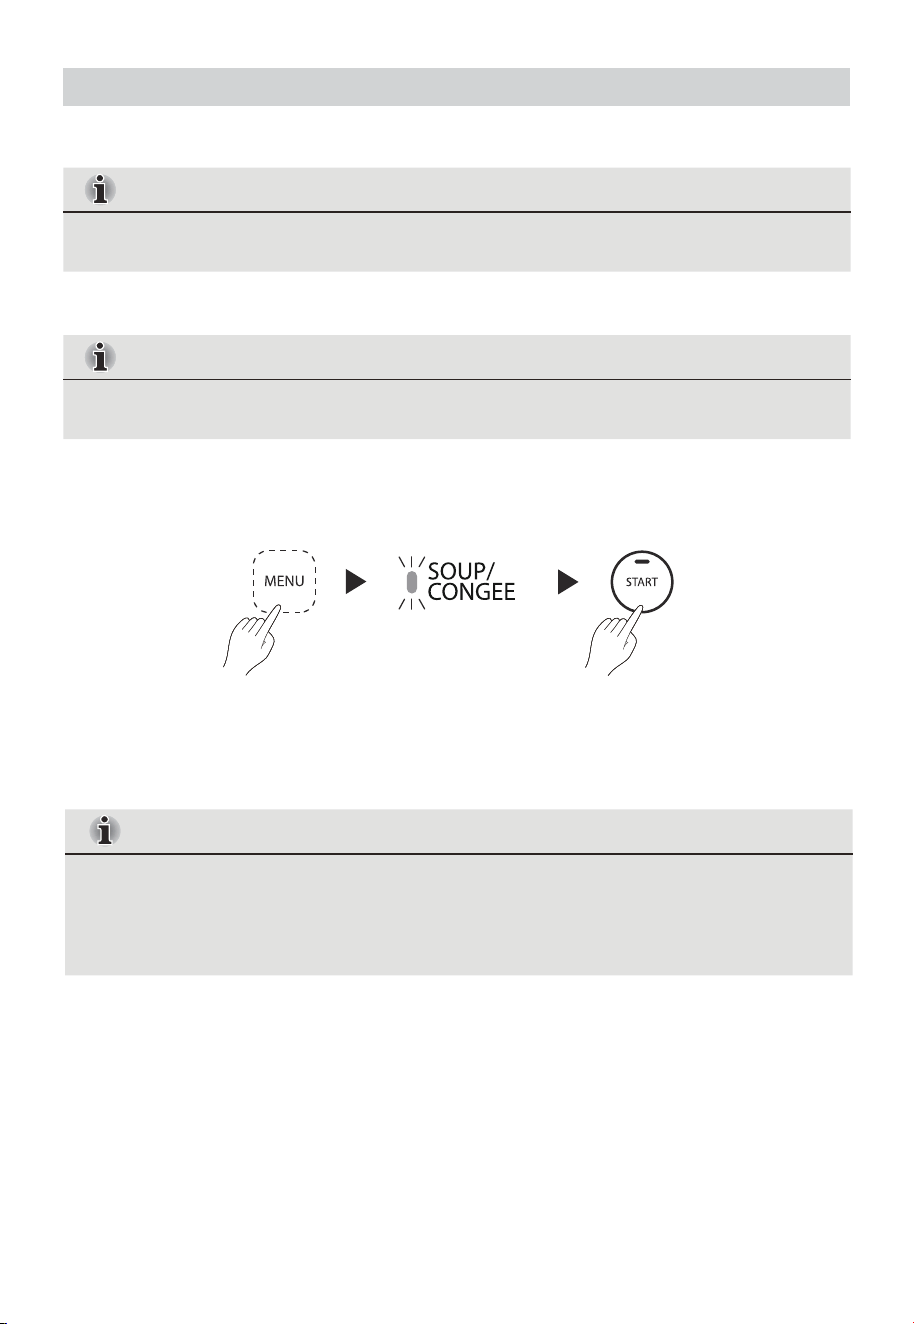
REMARQUE
Ne pas dépasser la ligne de 0,75 tasse d'eau de congee.
REMARQUE
SOUPE/CONGEE
1. Placer les ingrédients et l'eau dans la marmite intérieure.
Vérifier que le couvercle intérieur et le bouchon à vapeur sont correctement installés.
REMARQUE
2. Placer la marmite intérieure dans le cuiseur à riz. Fermer le couvercle.
25
3. Brancher le cuiseur à riz. Appuyer sur le bouton « MENU », sélectionner la fonction
« SOUP/CONGEE ».
4. Appuyer sur START pour démarrer la fonction de cuisson.
5. Le cuiseur de riz émet un bip sonore lorsqu'il a terminé et passe automatiquement à la
fonction de maintien au chaud.
1. La quantité de riz et d'eau utilisée pour la cuisson ne doit pas dépasser la ligne d'eau
maximale de la marmite intérieure (ligne d'eau maximale CONGEE).
2. Ne pas laisser les aliments dans l'appareil pour les maintenir au chaud pendant plus
de 8 heures.
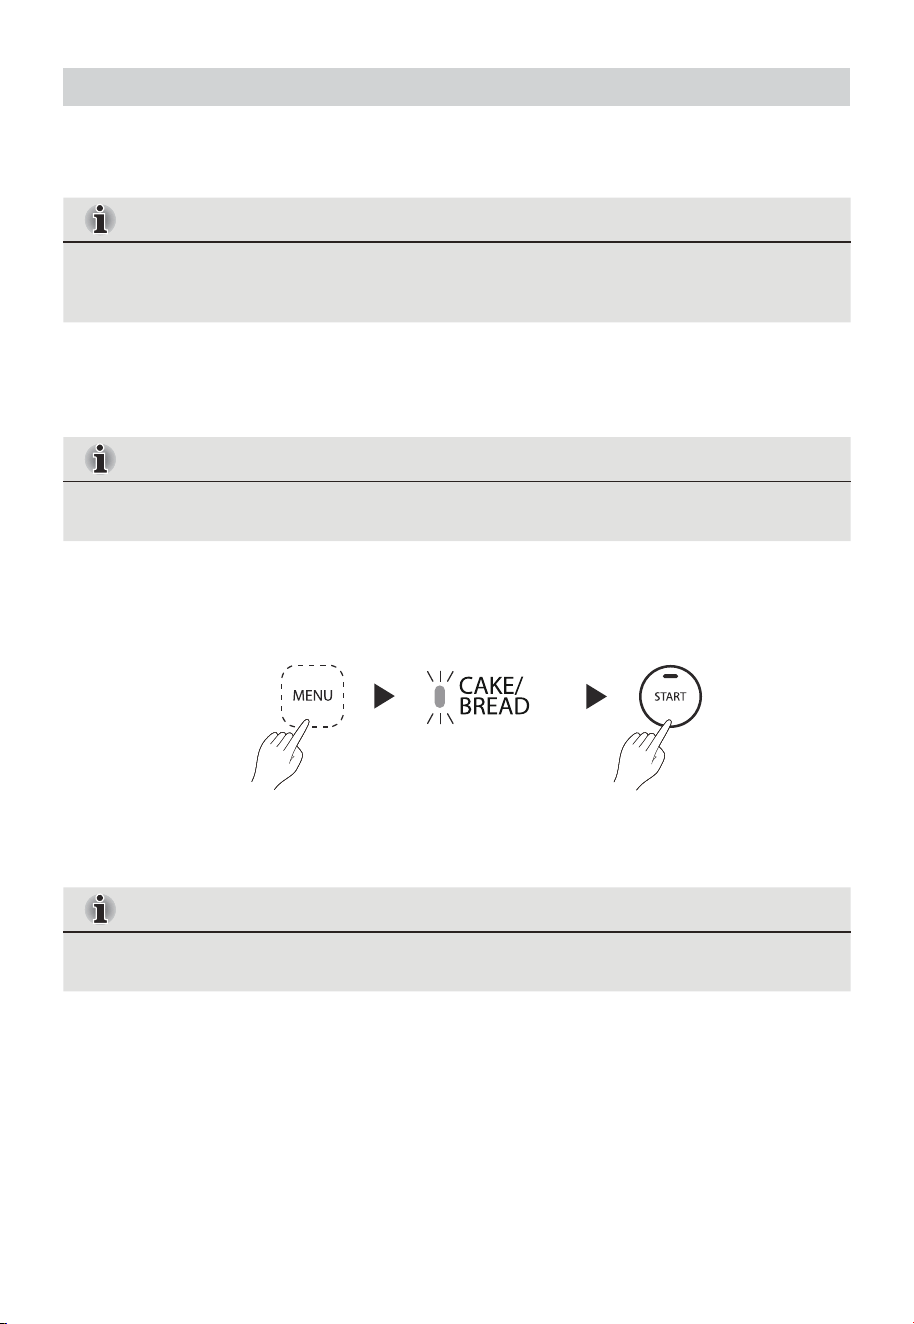
GATEAU/PAIN
REMARQUE
Vérifier que le couvercle intérieur et le bouchon à vapeur sont correctement installés.
REMARQUE
Ne pas laisser le gâteau dans le cuiseur à riz pendant plus de 8 heures.
REMARQUE
26
L'utilisation du cuiseur à riz avec des recettes provenant d'autres sources peut entraîner
des résultats de cuisson insatisfaisants.
1. Préparer les ingrédients selon la recette recommandée par TOSHIBA pour les gâteaux et
le pain.
2. Badigeonner uniformément l'intérieur de la marmite avec du beurre ou de l'huile.
3. Verser la pâte à gâteau ou à pain dans la marmite intérieure. Placer la marmite intérieure
dans le cuiseur à riz. Fermer le couvercle.
4. Brancher le cuiseur à riz. Appuyer sur le bouton « MENU », sélectionner la fonction
« CAKE/BREAD ».
5. Appuyer sur START pour démarrer la fonction de cuisson.
6. Le cuiseur à riz émet un bip sonore lorsqu'il a terminé et passe automatiquement à la
fonction de maintien au chaud.

MENU SPECIALITE
REMARQUE
27
1. La quantité de riz et d'eau utilisée pour la cuisson ne doit pas dépasser la ligne d'eau
maximale de la marmite intérieure (pour les RIZ SUCRE/RIZ SUSHI/CUISSON ECO, se
référer à la ligne d'eau RIZ BLANC. Pour le GABA, se référer à la ligne d'eau du RIZ
BRUN. Pour le RIZ COLLANT, se référer à la ligne d'eau du RIZ COLLANT).
2. Vous pouvez également ajuster le rapport entre le riz et l'eau pour la cuisson selon
vos préférences.
3. Ne pas laisser le riz dans le cuiseur à riz pour le maintenir au chaud pendant plus de
8 heures.
1. A l'aide du gobelet gradué fourni, verser le riz à cuire dans la marmite intérieure.
2. Ajouter la quantité d'eau appropriée en fonction de la quantité de riz à cuire. Vous pouvez
vous référer au tableau des proportions entre les ingrédients et l'eau.
3. Appuyer sur la touche « SPECIALTY MENU », sélectionner la fonction souhaitée, puis
appuyer sur la touche START pour lancer la cuisson.
4. L'appareil émet un signal sonore, l'écran affiche l'heure et l'appareil commence à cuire.
5. Une fois la cuisson terminée, l'appareil émet un signal sonore et passe automatiquement
en mode maintien au chaud.
6. Ouvrir le couvercle et remuer le riz à l'aide de la spatule à riz incluse pour expulser
l'humidité restante.
Le MENU SPECIALITE est une collection de fonctions de cuisson du riz à la japonaise qui
vous permet de plonger dans le monde de la cuisine japonaise du riz.
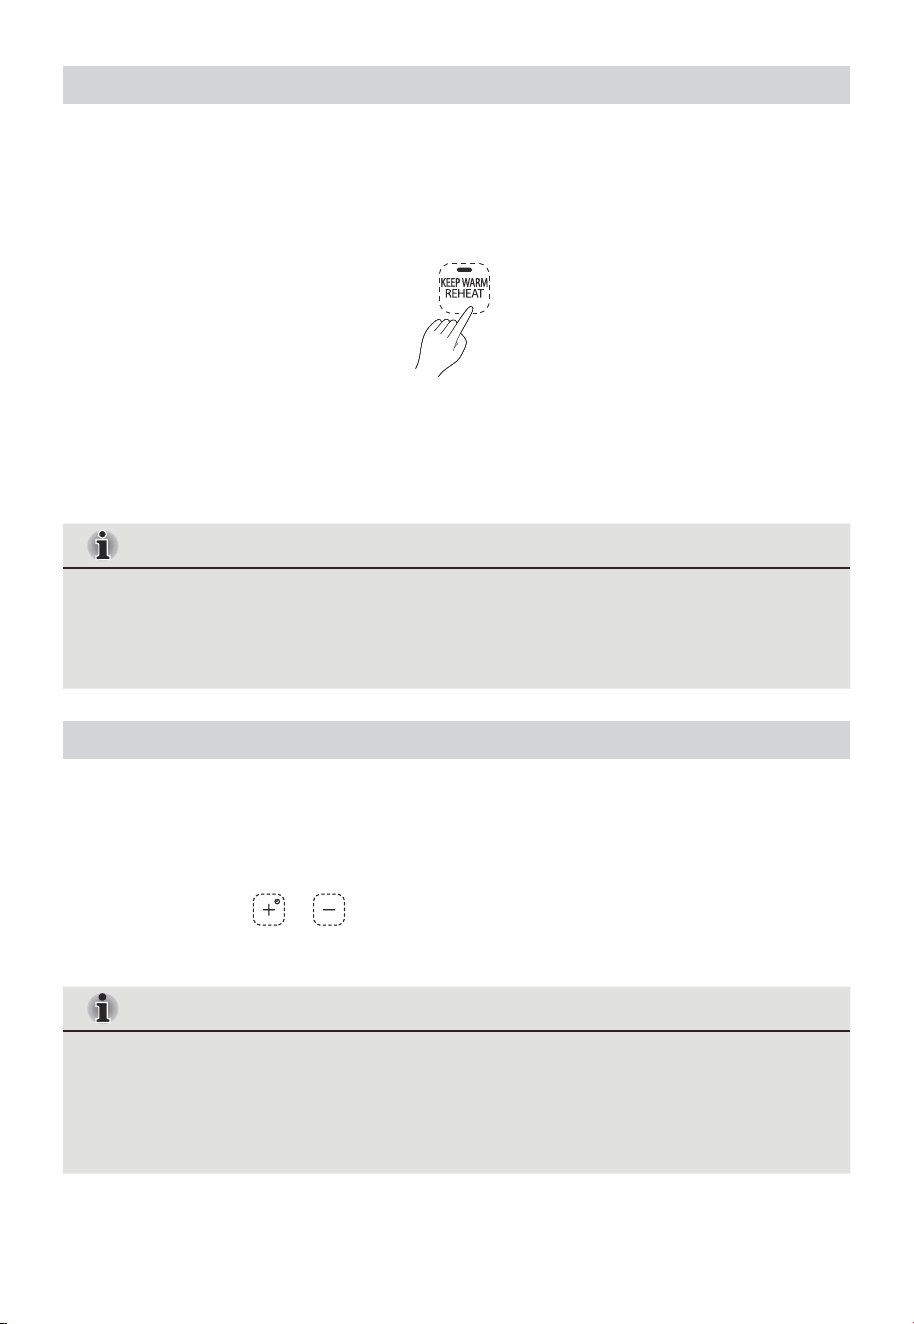
28
MAINTIEN AU CHAUD / RECHAUFFER
MAINTIEN AU CHAUD / RECHAUFFER
Comment utiliser la fonction MINUTERIE
REMARQUE
REMARQUE
1. Il est recommandé que la quantité de riz froid chauffé ne dépasse pas la moitié de la
capacité de la marmite intérieure.
2. Ne pas laisser le riz dans l'appareil pour le maintenir au chaud pendant plus de 8
heures.
1. Cette fonction permet de régler le cuiseur à riz pour qu'il termine automatiquement la
cuisson à une heure donnée.
2. La minuterie indique l'heure de votre journée afin que vous n'ayez pas à faire le calcul.
Par exemple, si vous réglez la fonction TIMER sur 16 :00, le cuiseur à riz terminera la
cuisson à 16:00.
1. Suivre les procédures opérationnelles standard de tout programme de cuisson.
2. Avant d'appuyer sur la touche START, appuyer sur la touche TIMER pour configurer la
minuterie.
3. Utiliser les boutons ou pour régler la durée de temporisation requise, le temps
indiqué sur l'écran correspondra au temps nécessaire pour que le cuiseur termine la
cuisson.
1. Briser le reste du riz et le répartir uniformément dans la marmite intérieure. Ajouter la
quantité d'eau nécessaire.
2. Appuyer directement sur la touche de raccourci « KEEP WARM/REHEAT » en mode veille
pour passer en mode maintien au chaud.
3. Appuyer à nouveau sur « KEEP WARM/REHEAT », le voyant « KEEP WARM/REHEAT »
clignote et l'écran affiche l'heure, ce qui indique que l'appareil commence à passer en
mode de chauffage.
4. Ouvrir le couvercle et remuer le riz à l'aide de la spatule à riz incluse pour expulser
l'humidité restante et rendre le riz plus fluide.
La fonction de Minuterie Différée s'applique à tous les programmes de cuisson, à
l'exception de CAKE/BREAD.
Fonctions
50 minutes
Heure Actuelle + 60 minutes
Heure Actuelle + 80 minutes
Heure Actuelle + 60 minutes
Heure Actuelle + 80 minutes
Heure Actuelle + 60 minutes
Heure Actuelle + 60 minutes
Heure Actuelle + 60 minutes
Heure Actuelle + 60 minutes
Heure Actuelle + 240 minutes
Heure Actuelle + 70 minutes
Heure Actuelle + 270 minutes
Heure Actuelle + 55 minutes
Heure Actuelle + 65 minutes
Heure Actuelle + 60 minutes
Heure Actuelle + 50 minutes
REMARQUE
29
4. Enfin, appuyer sur la touche « START » pour lancer la cuisson différée. Lorsque le temps de
temporisation est atteint, le cuiseur de riz commence à chauffer.
5. Une fois la cuisson terminée, le cuiseur émet un signal sonore et passe automatiquement
en mode maintien au chaud.
6. Ouvrir le couvercle et remuer le riz à l'aide de la spatule à riz incluse pour expulser
l'humidité restante et rendre le riz plus moelleux.
1. Appuyer sur la touche « TIMER » puis sur la touche « MENU » ou « SPECIALTY MENU »
ou « QUICK COOK » pour sélectionner les fonctions à différer. L'écran affiche le
temps de cuisson différée par défaut.
2. La minuterie peut être réglée jusqu'à 24 heures.
DELAI MINIMUM SUGGERE POUR
TEMPS DE FINITION
RIZ BLANC
RIZ BRUN
RIZ JASMIN
RIZ MIXTE
FLOCONS D’AVOINE COUPES EN ACIER
BASMATI
PORRIDGE
VAPEUR
SOUPE/CONGEE
RIZ SUCRE
GABA
RIZ SUSHI
RIZ GLUANT
CUISSON ECO
CUISSON RAPIDE

ANNULER / DEMARRER
ANNULER
DEMARRER
REMARQUE
REMARQUE
30
Pour changer ou annuler la fonction en cours de cuisson, vous pouvez appuyer sur la touche
« CANCEL », puis sélectionner à nouveau.
En l'absence de cuisson, une pression sur la touche « START » permet d'accéder
automatiquement à la fonction de cuisson par défaut (RIZ BLANC).
1. Afin de préserver le goût des aliments, il est recommandé de ne pas dépasser une
durée de maintien au chaud de 8 heures.
2. Pendant le processus de maintien au chaud, le cuiseur chauffe par intermittence
pour maintenir les aliments dans la marmite à une température supérieure à 149°F.
1. Il est recommandé de ne pas dépasser un délai de 8 heures, sinon le riz peut avoir
une odeur particulière.
2. Utiliser les boutons et pour ajouter ou soustraire du temps. Le bouton « »
permet une pression courte (palier de 10 minutes) et une pression continue (palier
de 1 heure); le bouton « » permet une pression courte (palier de 10 minutes) et
une pression continue (palier de 1 heure).
3. Si la différence de temps entre l'heure de fin du délai et l'heure actuelle est
inférieure au temps de cuisson prédéfini d'une fonction de cuisson, le cuiseur à riz
commencera à exécuter la fonction immédiatement.
4. Le temps de cuisson minimum réservé pour chaque fonction est indiqué comme
ci-dessus. Par exemple, si vous souhaitez régler une minuterie de retard pour la
fonction QUICK COOK, la différence de temps entre l'heure de fin de retard et
l'heure actuelle doit être supérieure à 50 minutes.

NETTOYAGE ET ENTRETIEN
Entretien et Nettoyage
Entretien Général
IMPORTANT
Ne pas immerger le cuiseur à riz dans l'eau.
Nettoyage de l'Extérieur du Cuiseur
IMPORTANT
Bouchon de Conduit de Vapeur
IMPORTANT
Risque de Brûlures
AVERTISSEMENT
31
L’unité principale du cuiseur à riz ne passe pas au lave-vaisselle. Utiliser uniquement
des chiffons doux avec une solution de savon à vaisselle doux pour nettoyer le cuiseur
à riz. Ne pas laver le cuiseur à riz ou sa marmite intérieure dans le lave-vaisselle.
• Nettoyer fréquemment le conduit de vapeur pour assurer une bonne ventilation.
• Le cuiseur à riz doit être froid au toucher avant de nettoyer le conduit de vapeur.
• Attendre que le cuiseur à riz ait refroidi avant de le nettoyer.
Le non-respect de cette consigne peut entraîner des brûlures.
Débrancher le cuiseur à riz de la prise électrique, le laisser refroidir, puis nettoyer et sécher le
cuiseur et toutes ses pièces après chaque utilisation afin d'éviter les odeurs et les mauvaises
performances.
Nettoyer les surfaces extérieures du cuiseur à riz à l'aide d'un chiffon doux et humide.
A l'aide d'un chiffon doux et sec, sécher soigneusement les surfaces extérieures.
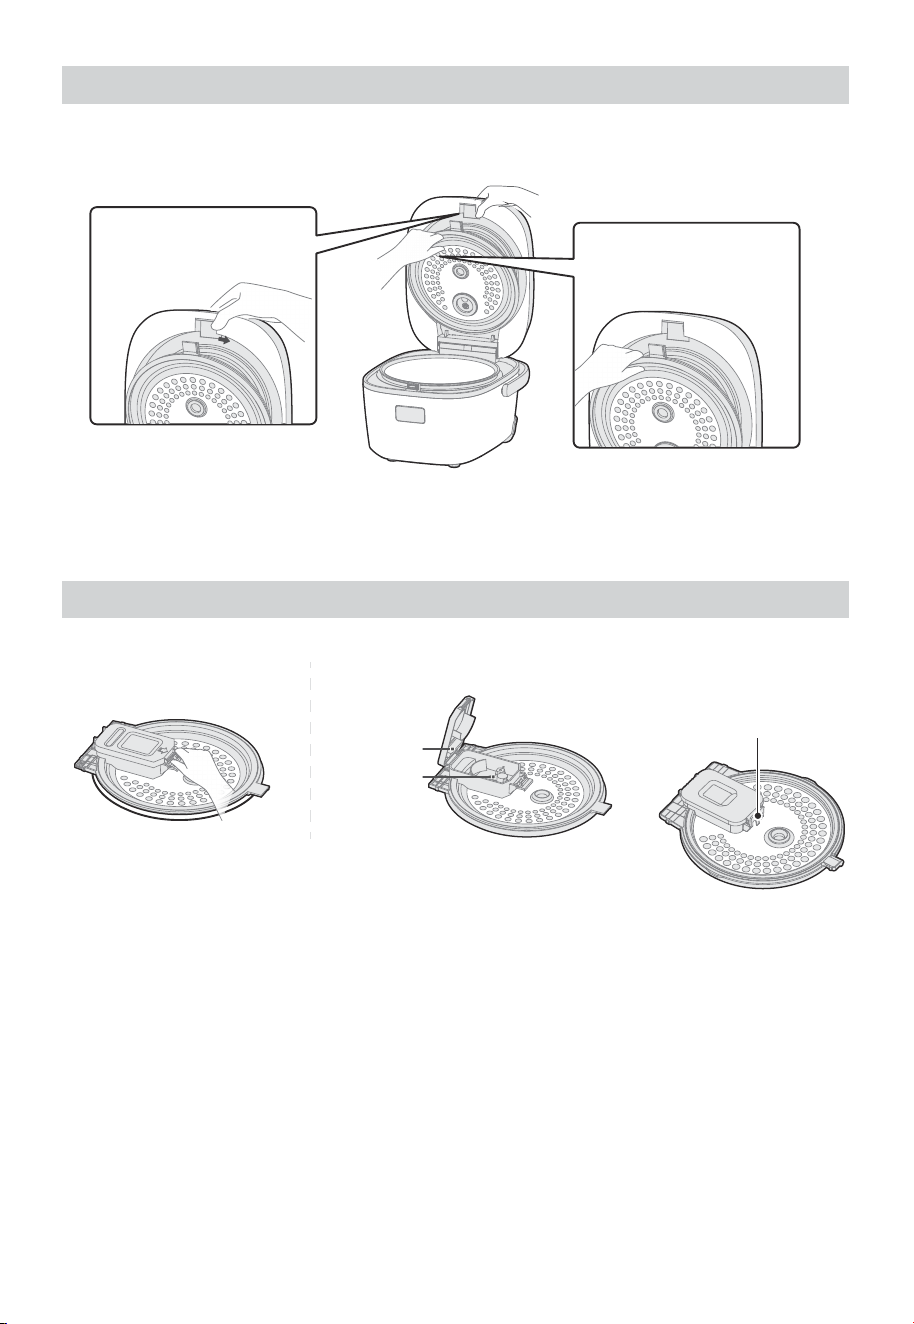
Retirer le Couvercle Intérieur
Démontage/Assemblage du Bouchon à Vapeur
32
Etape 1:
Etape 2 :
Lorsque le couvercle intérieur amovible est retiré, le boîtier supérieur ne peut pas être fermé
pour vous empêcher de cuisiner sans le couvercle intérieur amovible.
• Pousser la glissière du couvercle intérieur vers la droite en suivant la flèche.
• Saisir la poignée et tirer le couvercle intérieur amovible vers le haut.
Pousser la glissière de
retrait du couvercle
intérieur vers
la droite
Saisir le couvercle
intérieur et le soulever
pour l'extraire
1. Saisir le couvercle intérieur
et appuyer sur le bouton
de déverrouillage.
2. Insérer la boucle du siège du conduit de vapeur dans le
petit orifice du bouchon de vapeur et fixer le bouton.
Bouchon de
vapeur
Siège du
conduit de
vapeur
Bouton d'ouverture du
bouchon de vapeur
Marmite Intérieure
Plaque Chauffante
REMARQUE
IMPORTANT
REMARQUE
33
Lorsque le joint d'étanchéité de l'orifice de vapeur situé à l'intérieur du couvercle du
conduit de vapeur sort, appuyer dessus de manière à ce qu'il ne dépasse pas de la fente.
1. A l'aide d'un tampon de laine d'acier, éliminer les résidus brûlés sur la plaque chauffante
métallique.
2. A l'aide d'un chiffon doux et humide, essuyer la plaque chauffante, puis la sécher
soigneusement.
3. Ne pas nettoyer la plaque chauffante immédiatement après la cuisson pour éviter les
brûlures.
1. Laver la marmite intérieure à l'aide d'un chiffon doux et d'un produit nettoyant non
abrasif ou d'une solution douce de savon à vaisselle et d'eau chaude.
2. Sécher l'intérieur et l'extérieur de la marmite intérieure à l'aide d'un chiffon doux.
3. Toute autre opération d'entretien doit être confiée à un technicien agréé.
• Ne pas nettoyer la plaque chauffante immédiatement après la cuisson pour éviter
les brûlures.
• L'intérieur de la marmite est recouvert d'un revêtement antiadhésif qui peut perdre
ses propriétés antiadhésives s'il est rayé ou endommagé.
• Ne pas utiliser de produits abrasifs, de vinaigre, d'agents de blanchiment, de laine
d'acier ou d'autres brosses à récurer dures pour nettoyer l'intérieur de la marmite.
• Ne pas utiliser d'ustensiles de cuisine en métal.
• Laver la marmite intérieure immédiatement après avoir retiré le riz assaisonné. Les
assaisonnements peuvent endommager le revêtement antiadhésif de la marmite
intérieure s'ils restent longtemps en contact.

DÉPANNAGE
Cause Possible Solution Probleme
Risque de Choc Electrique
AVERTISSEMENT
34
L'utilisation de votre appareil peut entraîner des erreurs et des dysfonctionnements. Les
tableaux suivants contiennent les causes possibles et des conseils pour résoudre un message
d'erreur ou un dysfonctionnement. Il est recommandé de lire attentivement le tableau
ci-dessous afin d'économiser votre temps et l'argent que pourrait vous coûter un appel au
centre de service.
Avant de faire appel à un service d'assistance, lire les conseils suivants. Ils peuvent vous faire
gagner du temps et de l'argent. Cette liste comprend des situations courantes qui ne sont pas
le résultat d'une mauvaise exécution ou de matériaux défectueux.
• Branchez l'appareil sur une prise à 3 broches reliée à la terre.
• Ne retirez pas la broche de terre.
• Ne pas utiliser d'adaptateur.
• Ne pas utiliser de rallonge.
Le non-respect de cette consigne peut entraîner la mort, un incendie ou un choc
Électrique
L’autocuiseur à riz
ne fonctionne pas
Le cordon d'alimentation n'est pas
complètement branché dans une prise
de courant en état de marche.
Il y a eu une panne de courant.
Lors d'une panne de courant, l'heure
du jour, et non le compte à rebours,
apparaît à l'écran pendant un
programme de cuisson.
Un autre appareil a été branché sur la
même prise électrique, ce qui a
déclenché le disjoncteur ou fait sauter
un fusible domestique.
Le riz a été cuit avec trop d'eau
Le riz a été rincé ou trempé avant la
cuisson
Le rinçage préalable peut provoquer
des fissures dans le riz et le rendre
pâteux et collant pendant la cuisson.
Le trempage avant la cuisson adoucit
la texture du riz.
Le riz n'a pas été cuit avec
suffisamment d'eau ou a été cuit avec
de l'eau minérale.
Brancher le cordon d'alimentation
dans la prise électrique.
Réinitialiser le disjoncteur ou
remplacer le fusible une fois le
courant rétabli.
Réinitialiser le disjoncteur ou
remplacer le fusible. Brancher le
cordon d'alimentation sur un circuit
séparé et dédié.
Utiliser moins d'eau pour la cuisson
du riz. Une fois cuit, manipuler
immédiatement le riz à l'aide d'une
fourchette pour séparer les grains.
Si un rinçage est nécessaire, rincer le
riz rapidement et égoutter autant
d'eau que possible. Ne pas laisser le
riz tremper dans un liquide avant la
cuisson.
Utiliser plus d'eau pour la cuisson du riz.
Faire tremper le riz un peu avant de
le cuire.
Le riz est pâteux,
collant ou agglutiné
Le riz est dur ou sec

35
Le riz est brûlé
REMARQUE : le fait
que le riz prenne une
couleur brun clair
n'est pas le résultat
d'une défaillance de
l’autocuiseur à riz.
Des saletés ou une substance étrangère
sont collées au capteur de température.
D'autres ingrédients et/ou
assaisonnements ont été ajoutés au
riz avant la cuisson.
Le riz a été trempé trop longtemps.
La marmite et le couvercle intérieur
sont tièdes ou chauds au début de la
cuisson.
Des saletés ou une substance
étrangère sont collées au capteur de
température, au couvercle intérieur ou
à l'évacuation de vapeur.
Le couvercle intérieur ou l’évacuation
de vapeur n'étaient pas fixés à
l’autocuiseur à riz.
Utilisation d'un mauvais rapport entre
les ingrédients et l'eau ou d'un
mauvais programme de cuisson.
Le mode de Maintien au Chaud a été
utilisé trop longtemps.
Riz laissé dans la marmite de cuisson
après que le mode Maintien au Chaud
a été désactivé.
Le riz n'a pas été rincé complètement.
Le récipient de cuisson, le couvercle
intérieur et/ou l’évacuation de vapeur
sont sales.
La spatule en plastique a été laissée
dans la marmite.
Le riz a été réchauffé à plusieurs
reprises.
L'évacuation de vapeur n'est pas fixée
correctement.
Retirer les substances étrangères et
bien nettoyer.
Ne cuire que du riz avec la bonne
proportion d'eau.
Faire tremper le riz pendant une
période plus courte.
Laisser l’autocuiseur à riz refroidir
complètement avant de préparer
une nouvelle fournée.
Retirer les substances étrangères et
bien nettoyer.
Après le nettoyage, replacer le
couvercle intérieur et l’évacuation de
vapeur dans l’autocuiseur à riz. Voir
"Entretien et Nettoyage".
Mesurer avec précision le rapport
entre les ingrédients et l'eau.
Ne pas laisser le riz rester
indéfiniment en mode de Maintien
au Chaud. Servir le riz peu après la
période de repos de 10 minutes.
Retirer le riz cuit de l’autocuiseur.
Rincer le riz jusqu'à ce que l'eau soit
claire.
Nettoyer et sécher soigneusement
les pièces. Voir "Nettoyage".
Retirer la spatule en plastique et
tous les accessoires de l’autocuiseur
de riz avant de l'utiliser.
Le riz ne doit être réchauffé qu'une
seule fois pour conserver sa qualité.
Arroser le riz avec de l'eau afin
d’éviter qu'il ne se dessèche
pendant le réchauffage.
Après le lavage, fixer correctement
l’évacuation de vapeur à
l’autocuiseur à riz. Voir "Nettoyage".
Le riz n'a pas bon
goût
Odeur désagréable
REMARQUE: Une
odeur de plastique
est normale lors des
premières utilisations
de l’autocuiseur.
Le riz est sec et a
changé de couleur
Cause Possible Solution Probleme

36
Ε1, Ε2, Ε5,E6, EU
Affichage des erreurs
Le couvercle intérieur n'est pas
correctement fixé.
Le couvercle intérieur et/ou la marmite
de cuisson sont déformés.
Le couvercle intérieur et/ou
l'évacuation de vapeur ne sont pas
fixés correctement.
L'évacuation de vapeur et/ou le
capteur de température sont
encrassés.
Le programme Porridge a été utilisé
involontairement pour cuire du riz.
Le couvercle intérieur n'est pas
correctement fixé.
REMARQUE : Le couvercle extérieur ne
se fermera pas si le couvercle intérieur
n'est pas correctement fixé.
Des substances étrangères dans le
système de verrouillage du couvercle
empêchent le couvercle extérieur de
se verrouiller.
L'amidon du riz fondra pendant la
cuisson et séchera à l'intérieur de la
marmite de cuisson.
Des substances étrangères sont
collées sur le couvercle intérieur, le
bord de la marmite ou le cadre de
l’autocuiseur à riz.
Vérifier l'état du couvercle intérieur et
du joint. Confirmer que le couvercle
intérieur est correctement placé dans
le couvercle de l’autocuiseur.
Après le nettoyage, replacer le
couvercle intérieur et l'évacuation de
vapeur dans l’autocuiseur à riz. Voir
"Entretien et Nettoyage".
Nettoyer l'évacuation de vapeur et le
capteur de température.
Sélectionner le programme de
cuisson correspondant aux
ingrédients que vous cuisinez.
Replacer le couvercle intérieur dans le
couvercle supérieur de l’autocuiseur à
riz. Voir "Entretien et Nettoyage"
Retirer les débris du système de
verrouillage du couvercle.
Pendant le lavage, utiliser un tampon
à récurer en plastique non abrasif ou
un ustensile pour retirer
délicatement le film.
Nettoyer la marmite et l’autocuiseur à
riz après chaque utilisation.
Vapeur
s'échappant de
l’autocuiseur à riz
L’autocuiseur à riz
déborde et éclabousse
REMARQUE : il est
normal que de
l'humidité apparaisse
sur le couvercle
intérieur ou sur la
marmite et qu'elle
s'égoutte lorsque le
couvercle est ouvert.
Difficulté à fermer le
couvercle de
l’autocuiseur
Film sur l'intérieur de
la marmite de cuisson
Cause Possible Solution Probleme
Cause Possible Solution Probleme
Défaut au niveau de la
Carte de Circuit
Imprimé et du Capteur
Débrancher immédiatement le
cuiseur à riz.
Une fois l'erreur résolue, brancher
le cuiseur à riz, puis
appuyer sur CANCEL pour e-acer le
code d'erreur de l'écran.

37
(ETATS-UNIS ET CANADA UNIQUEMENT)
Période de Garantie :
GARANTIE LIMITEE D'UN AN
Cette garantie est réservée aux consommateurs. Vous êtes un consommateur si vous
possédez un Multicuiseur à Riz et à Céréales Toshiba® acheté au détail pour un usage
personnel, familial ou domestique. Sauf si la loi applicable l'exige, cette garantie n'est pas
disponible pour les détaillants ou autres acheteurs ou propriétaires commerciaux.
Nous garantissons que votre Multicuiseur à Riz et à Céréales Toshiba® est exempt de défauts
de matériaux ou de fabrication dans le cadre d'une utilisation domestique normale pendant 1
an à compter de la date d'achat d'origine. Toutefois, l'enregistrement du produit n'élimine
pas la nécessité pour le consommateur de conserver la preuve d'achat originale afin d'obtenir
les avantages de la garantie. Si vous ne disposez pas de la preuve de la date d'achat, la date
d'achat aux fins de la présente garantie sera la date de fabrication.
Si votre Multicuiseur à Riz et à Céréales Toshiba® s'avère défectueux pendant la période de
garantie, nous le réparerons ou, si nous le jugeons nécessaire, nous le remplacerons. Pour
bénéficier du service de garantie, il suffit d'appeler notre numéro gratuit 1-855-204-5313
pour obtenir des informations supplémentaires de la part de nos représentants du service
consommateurs ou d'envoyer le produit défectueux au service consommateurs de Toshiba, 5
Sylvan Way, Parsippany, NJ07054.
REMARQUE :
Pour une protection accrue et une manipulation sécurisée de tout produit Toshiba retourné,
nous vous recommandons d'utiliser un service de livraison traçable et assuré. Toshiba ne peut
être tenu responsable des dommages en cours de transport ou des colis qui ne nous sont pas
livrés. Les produits perdus et/ou endommagés ne sont pas couverts par la garantie. Veillez à
inclure votre adresse de retour, votre numéro de téléphone pendant la journée, la description
du défaut du produit, le numéro de modèle du produit (situé sur le dessous du produit), la
date d'achat originale et toute autre information pertinente pour le retour du produit.
RESIDENTS DE CALIFORNIE UNIQUEMENT
La loi californienne prévoit que pour le Service de Garantie, les résidents californiens ont la
possibilité de retourner un produit non conforme (A) au magasin où il a été acheté ou (B) à un
autre magasin de détail qui vend des produits Toshiba du même type. Le magasin de détail
devra alors, à sa discrétion, soit réparer le produit, soit diriger le consommateur vers un centre
de réparation indépendant, soit remplacer le produit, soit rembourser le prix d'achat moins le
montant directement attribuable à l'utilisation antérieure du produit par le consommateur. Si
les deux options ci-dessus n'apportent pas la solution appropriée au consommateur, ce
dernier peut alors apporter le produit à un centre de réparation indépendant si l'entretien ou
la réparation peut être réalisé de manière économique. Toshiba, et non le consommateur,
sera responsable du coût raisonnable de ce service, de cette réparation, de ce remplacement
ou de ce remboursement pour les produits non conformes sous garantie.

38
GARANTIE LIMITEE D'UN AN
Les résidents de Californie peuvent également, selon leur préférence, renvoyer les produits
non conformes directement à Toshiba pour réparation ou, si nécessaire, pour remplacement,
en appelant notre Centre de Service Clientèle au numéro gratuit 1-855-204-5313. Toshiba
sera responsable du coût de la réparation, du remplacement, de l'expédition et de la
manutention de ces produits sous garantie.
AVANT DE RENVOYER VOTRE PRODUIT TOSHIBA
Si vous rencontrez des problèmes avec votre produit Toshiba, nous vous suggérons d'appeler
notre Centre de Service Toshiba au 1-855-204-5313 avant de renvoyer le produit pour
réparation. Si une réparation est nécessaire, un représentant peut confirmer si le produit est
sous garantie et vous diriger vers le centre de service le plus proche. Votre Multicuiseur à Riz
et à Céréales Toshiba® a été fabriqué selon les spécifications les plus strictes et a été conçu
pour être utilisé uniquement dans des prises de courant de 120 volts et uniquement avec des
accessoires et des pièces de rechange autorisés. Cette garantie exclut expressément tout
défaut ou dommage causé par une tentative d'utilisation de cet appareil avec un
convertisseur, ainsi que par l'utilisation d'accessoires, de pièces de rechange ou de services de
réparation autres que ceux autorisés par Toshiba. Cette garantie ne couvre pas les dommages
causés par un accident, une mauvaise utilisation, une expédition ou une utilisation
domestique autre que normale. Cette garantie exclut tous les dommages accessoires ou
indirects. Certains états n'autorisent pas l'exclusion ou la limitation de ces dommages, de
sorte que ces exclusions peuvent ne pas s'appliquer à vous. Cette garantie vous donne des
droits légaux spécifiques, et vous pouvez également avoir d'autres droits, qui varient d'un
État à l'autre.
Important :
Si le produit non conforme doit être réparé par quelqu'un d'autre que le Centre de Service
Agréé Toshiba, veuillez rappeler au réparateur d'appeler notre Centre de Service Clientèle au
1-855-204-5313 pour s'assurer que le problème est correctement diagnostiqué, que le
produit est réparé avec les pièces correctes et que le produit est toujours sous garantie.

https://www.toshiba-lifestyle.com/ca
# MatterDetails
