Main Features:
- Full HD 1080P High-definition video
- Built-in HD camera with high resolution lens.
- Video format: 1920x1080P
- Motion detection record mode: 1080P
- High-speed data transmission USB port.
- The unit can record video and charge your cell phone simultaneously.
- Smart Charger MEE007s carries out high definition recording under low illumination.
- Maximum supported microSD card capacity is up to 256 GB (not included).
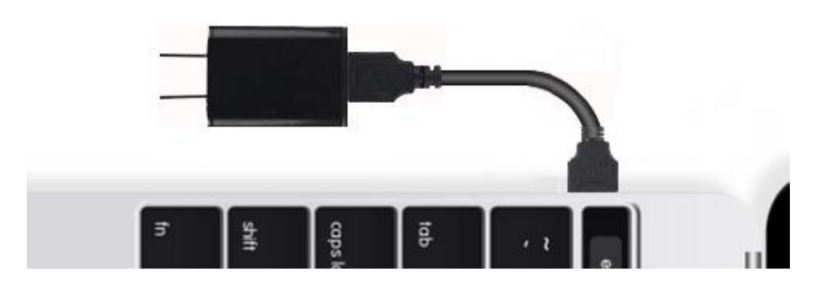
- The camera starts to record automatically when Smart Charger MEE007s is plugged into an outlet.
- The Smart Charger MEE007s has no sound recording function because US law prohibits the sale. owning and use of hidden voice recording devices.
WARNING: It is strongly advised not to keep loop recordings for more than 24h. For longer recording. use the MOTION DETECTION mode.
NOTE: To hide the memory card slot. L/M mode switch. reflections from LED lights. use the sticker panel. To view the recorded video. we advise to use a USB-USB cable but not remove the sticker panel every time.

Memory Card (not included in the scope of supply)
It is possible to change the micro SD memory card.
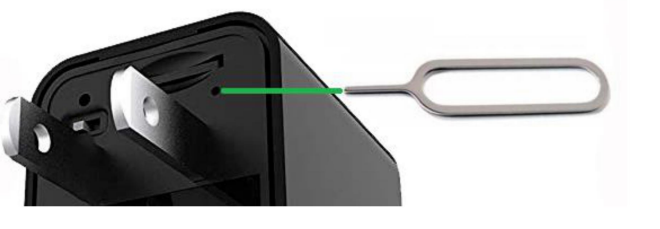
Disconnect the rear of the charger (over the electrical plug) with your fingernail or a thin sharp device.
You'll notice that this panel is a multilayered sticker (when first connected. it is applied to the device to hide the memory card).
Insert the micro SD card into the memory card slot.
Power and Reset
If the LED light of your Smart Charger comes on. this may indicate that you need to reset your device.
To restart your Smart Charger. insert the tip of a pointed object (such as a pin) into the hole above the “L” and “M” switch and push the reset button. The reset button is right above the mode selector. Hold the “Reset” button for 5 seconds to restore factory defaults. After you unplug your Smart Charger from the wall socket. the camera will save the recorded video and turn off automatically.
Operation: Recording mode and motion detection mode:
1. Recording mode: Turn the switch to the “L” position. This will set your charger to the loop recording mode. Then. when the device is plugged into the power supply. after the red light flashes 3 times. the camera will start recording automatically (no lights will flash during recording). The video will be recorded as a series of 3(5)-minute video files.
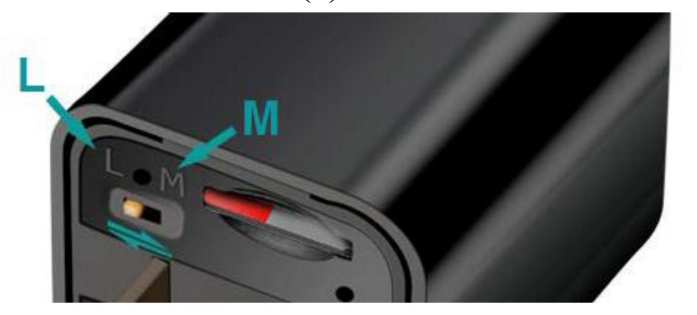
2. Motion detection mode: When Your Smart Charger is set to “M” position. and the device is plugged into the power supply. the blue LED indicator light will flash 3 times. In this case. the recorder is set to motion detection mode (the LED indicator light will turn off). The camera will automatically start recording when the sensor detects motion. The video will be recorded as a series of 3(5)-minute video files.
3. In both “L” and “M” settings. when Your Smart Charger has reached its maximum memory capacity (approx. 24 hours of video for 256GB micro SD-card). it will automatically record over the earliest video files in the looping mode.
Time setting:
When the device is turned on. it will set up a .TXT files box on the TF card automatically. After turning it off. you can connect the TF card to a computer and open the video files. You can set up the time on the time.txt’ as you want (for example. YEAR/MONTH/DAY/HOUR/MINUTE/SECOND: 2021-12-04 17:47:26.)

You need to set the current date and time. and then save. After setting it. when you turn it on again. the date and time will display on the video.
CAUTION: Always eject and disconnect USB camera charger from the outlet before connecting it to the computer. It is strictly forbidden to connect the camera via USB-USB cable to a PC. laptop. TV when the camera is connected to an outlet. Nonobservance of these instructions can cause damage to the device.
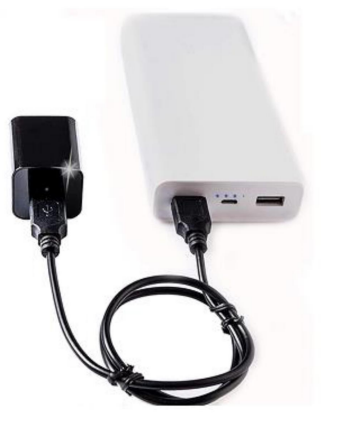
Portable Use. Wherever you go.
It works from any power source: Power Bank / Charger.
Just connect the camera to the power source by USB-USB cable.
NOTE: Always use the Windows Safely Remove Hardware feature.
CAUTION: Always use the USB-USB cable enclosed to the device to connect the USB camera charger to the computer. It is strictly forbidden to connect the camera to a PC. laptop. TV using other USB-USB cables.
Nonobservance of these instructions can cause damage to the device.

Connect to the computer:
When Smart Charger is connected via the USB port to your computer. the charger will pop up as Icon of Removable disk. A blue LED indicator light shows that the USB device is ready for data transmission. Now you can easily copy. cut. paste or delete files or format the external disk drive entirely.
Note: If the computer does not recognize the Smart Charger. or if the removable disk is not detected after 30 seconds. please reconnect device for a prompt response.
For best results. before playing the video files. it is recommended that you copy your files to a designated folder (internal or external). Video files played directly from the recorder may experience delays or intermittent pauses due to the large size of the HD format. Faster and smoother replays are possible when they play from files. which have been saved on your computer.
- Please ensure that the T-flash (Micro SD) card is inserted properly. If not. the charger will flash the red and blue LED lights simultaneously as a warning.
- A distance of at least 20 inches from the charger is recommended for perfect video and picture results!
Troubleshooting guide:
If something in the camera does not work (does not read video. does not read a memory card. does not record video or there are any other issues). try the following steps in the following order.
- We highly recommend using VLC Media Player. You can download VLC Player for free from their site or simply Google it.
- Restart the computer.
- Hold the “Reset” button with a sharp object for 5 seconds to restore the factory settings.
- Connect the camera to the PC or Mac using a USB-USB cable. Then remove the micro SD card from the camera and connect it to the PC through the card reader or USB adapter.
- Format to micro SD card. Windows users should use FAT32. but MAC users should use FAT format.
- Replace the micro SD memory card with another one (up to 256 GB. speed not less than 10).
WARNING!!! Please note before use:
Do not use the camera for illegal purposes.
Use it for lawful purposes only. Please strictly abide by relevant laws. as the product cannot be used for any illegal purposes. The manufacturer will not be held responsible if you break any laws using this device.
Do not open the back cover of the camera housing. as doing so may damage the inner wires and cause electric shock.
Make sure that the electric socket and the housing of this device are in good condition and gently insert/pull out the device from the electric socket to avoid electric shock.
WARNING: It is strongly prohibited to keep loop recording for more than 24hrs. For longer recordings. use the MOTION DETECTION mode.
Do not use the camera near an open flame or extreme heat source.
Do not throw this product into a fire as it may cause an explosion
Do not insert this into the human body!
External operating temperatures are from 40 to 100
Fahrenheit.
Temperature range deviation can lead to damage to the device.
Operation humidity: Smart Charger is no waterproof.
Please keep the device away from damp environments. rainwater. and do not pour water on its surface.
Light entering the lens: Please provide a sufficient light source in terms of use. Do not use the camera with a very strong light source—for example. directly in the sun—to avoid damaging the optical device.
Cleaning: Do not use in conditions of excessive dust density to avoid getting dust on the lens and other camera components as doing so can break down the camera.
Do not give this product to children under 16 years old.
Waste management: Follow all environmental protection laws and do not throw this away.
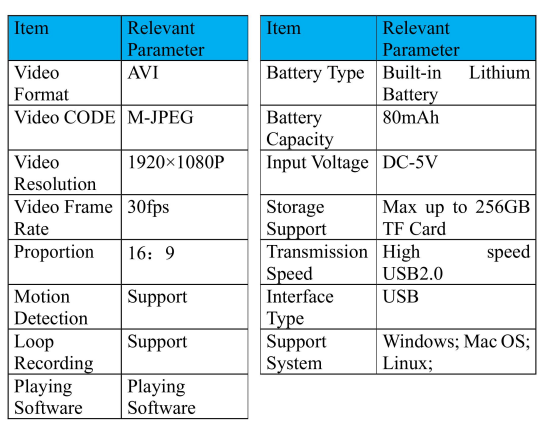
Relevant parameter