1080P Wi-Fi Deterrent Camera
User Manual
V 1.0.0

Table of Contents
Legal Statement................................................................................................. 2
Important Safeguards and Warnings........................................................ 3
Device Introduction.......................................................................................... 4
Physical Installation.......................................................................................... 6
Amcrest Smart Home App Setup................................................................ 7
Amcrest Smart Home Cloud........................................................................ 14
MicroSD Card Recording.............................................................................. 18
App Settings....................................................................................................... 19
Motion Detection Overview......................................................................... 21
Events Menu....................................................................................................... 34
Account Menu................................................................................................... 35
Adding to An Amcrest NVR/DVR.............................................................. 40
Adding to Amcrest View Pro........................................................................ 41
Adding to Amcrest Surveillance Pro......................................................... 42
Adding to Blue Iris............................................................................................ 43
.
Troubleshooting................................................................................................ 44

Legal Statement
Caution:
party responsible for compliance could void the user’s authority to operate the equipment.
Note: This equipment has been tested and found to comply with the limits for a Class B digital
device, pursuant to part 15 of the FCC Rules. These limits are designed to provide reasonable
protection against harmful interference in a residential installation. This equipment generates
uses and can radiate radio frequency energy and, if not installed and used in accordance with
the instructions, may cause harmful interference to radio communications. However, there is no
guarantee that interference will not occur in a particular installation. If this equipment does not
cause harmful interference to radio or television reception, which can be determined by turning
more of the following measures:
- Reorient or relocate the receiving antenna.
- Increase the separation between the equipment and receiver.
connected.
FCC RF Radiation Exposure Statement:
-
ment. This equipment should be installed and operated with a minimum distance of 20cm
between a radiator or any part of your body.
This device complies with Part 15 of the FCC Rules. Operation is subject to the following two
conditions:
( 1 ) This device may not cause harmful interference, and
( 2 ) This device must accept any interference received, including interterence that may cause
undesired operation.
About This Document
• This document is for reference purposes only.
• Amcrest reserves rights to revise any information in this document at anytime; and the revised
contents will be added to the new version without prior announcement. Some functions of the
• Working with electricity can be dangerous if proper safety precautions are not taken. If you are
recommend hiring a licensed electrician to install your device. Amcrest does not assume liabili
ty for any damage that result in improper use or installation of your device.
2

Important Safeguards and Warnings
1.Electrical Safety
All installation and operation of this device should conform to your local electrical safety codes. We
installation.
2.Transportation Security
and installation of the device.
3.Installation
Handle the device with care. This device operates on either a Wi-Fi connection or a direct connection
to your network with an Ethernet cable. This is not a power over ethernet (PoE) device and requires a
5V, 2.0A USB power connection to function. Please use only applicable voltage when installing.
device. This device is not waterproof, do not install with areas of high humidity ot moisture.
4. Additional Software
This device is designed to be used on the Amcrest Smart Home platform. Since Amcrest Smart Home
products operate on a cloud based system, adding the device to any additional software may result
in the degradation or loss of certain features.
5.Repair Professionals
6.Environment
environments as stated above. Do not aim the camera at a strong light source, as it may cause over-
well-ventilated area to prevent overheating.
7. Operation and Maintenance
Do not touch the camera sensor or lens directly. To clean dust or dirt from the lens, use an air blower
8. Accessories
Be sure to use only the accessories recommended by manufacturer. Before installation, please open
the package and check to ensure that all the components are present. Contact the retailer that you
purchased from, or Amcrest directly if anything is broken or missing in the package.
3
Device Introduction
4
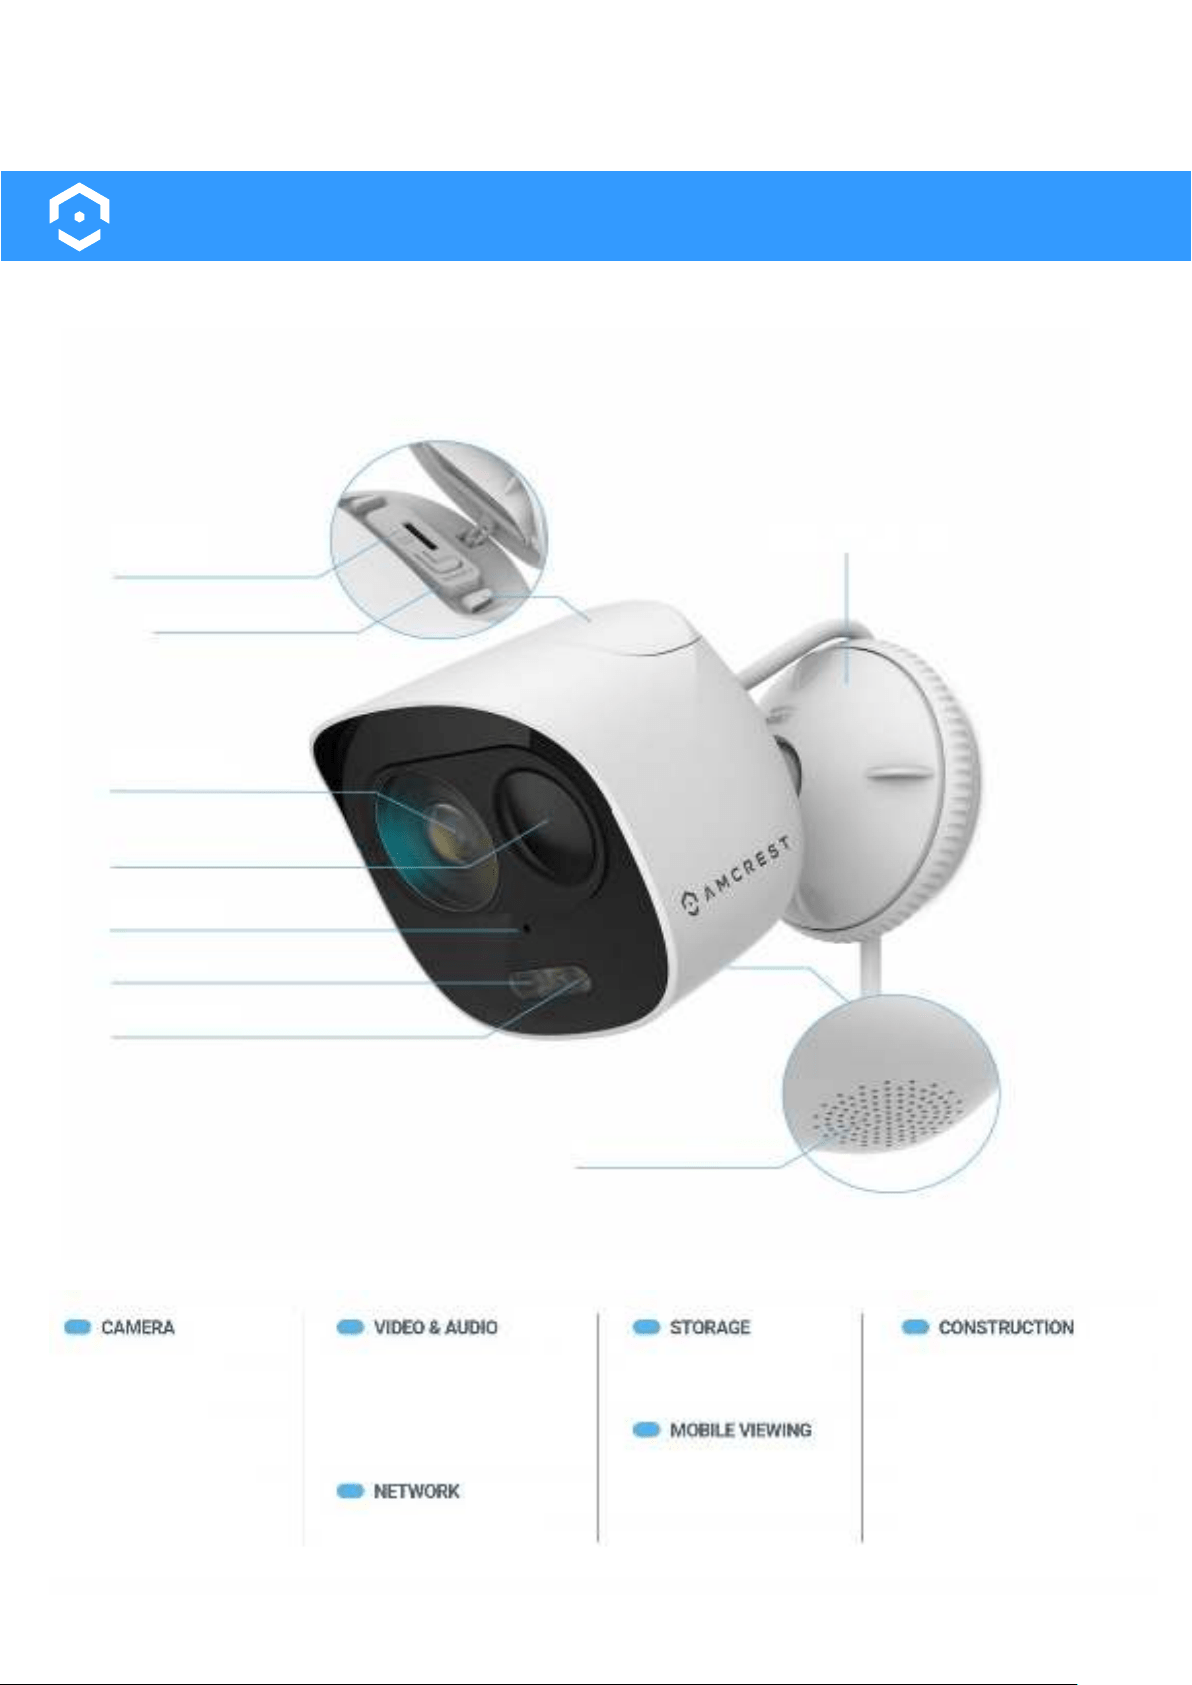
Device Overview
MicroSD Card Slot
Factory Reset Button
2.8mm Lens
PIR Detection
Built-in Microphone
Spotlight
LED Indicator
Built-in Speaker
Image Sensor: 1/2.7”
2MP CMOS
Resolution: Up to 2MP
Night Vision: Up to 33ft
Feild of View: 133°
(diagonal)
Compression: H.265 /
H.264
Frame Rate: Main stream:
Siren: 110dB
Wi-Fi: IEEE802.11b/g/n
MicroSD: Up to 128GB
Amcrest Smart Home
Cloud
iOS and Android
Devices
Smartphones and
Tablets
IP65 Waterproof
Operating Temperature
-4°F ~ 122°F
Dimensions:
Weight: 0.68lbs
5
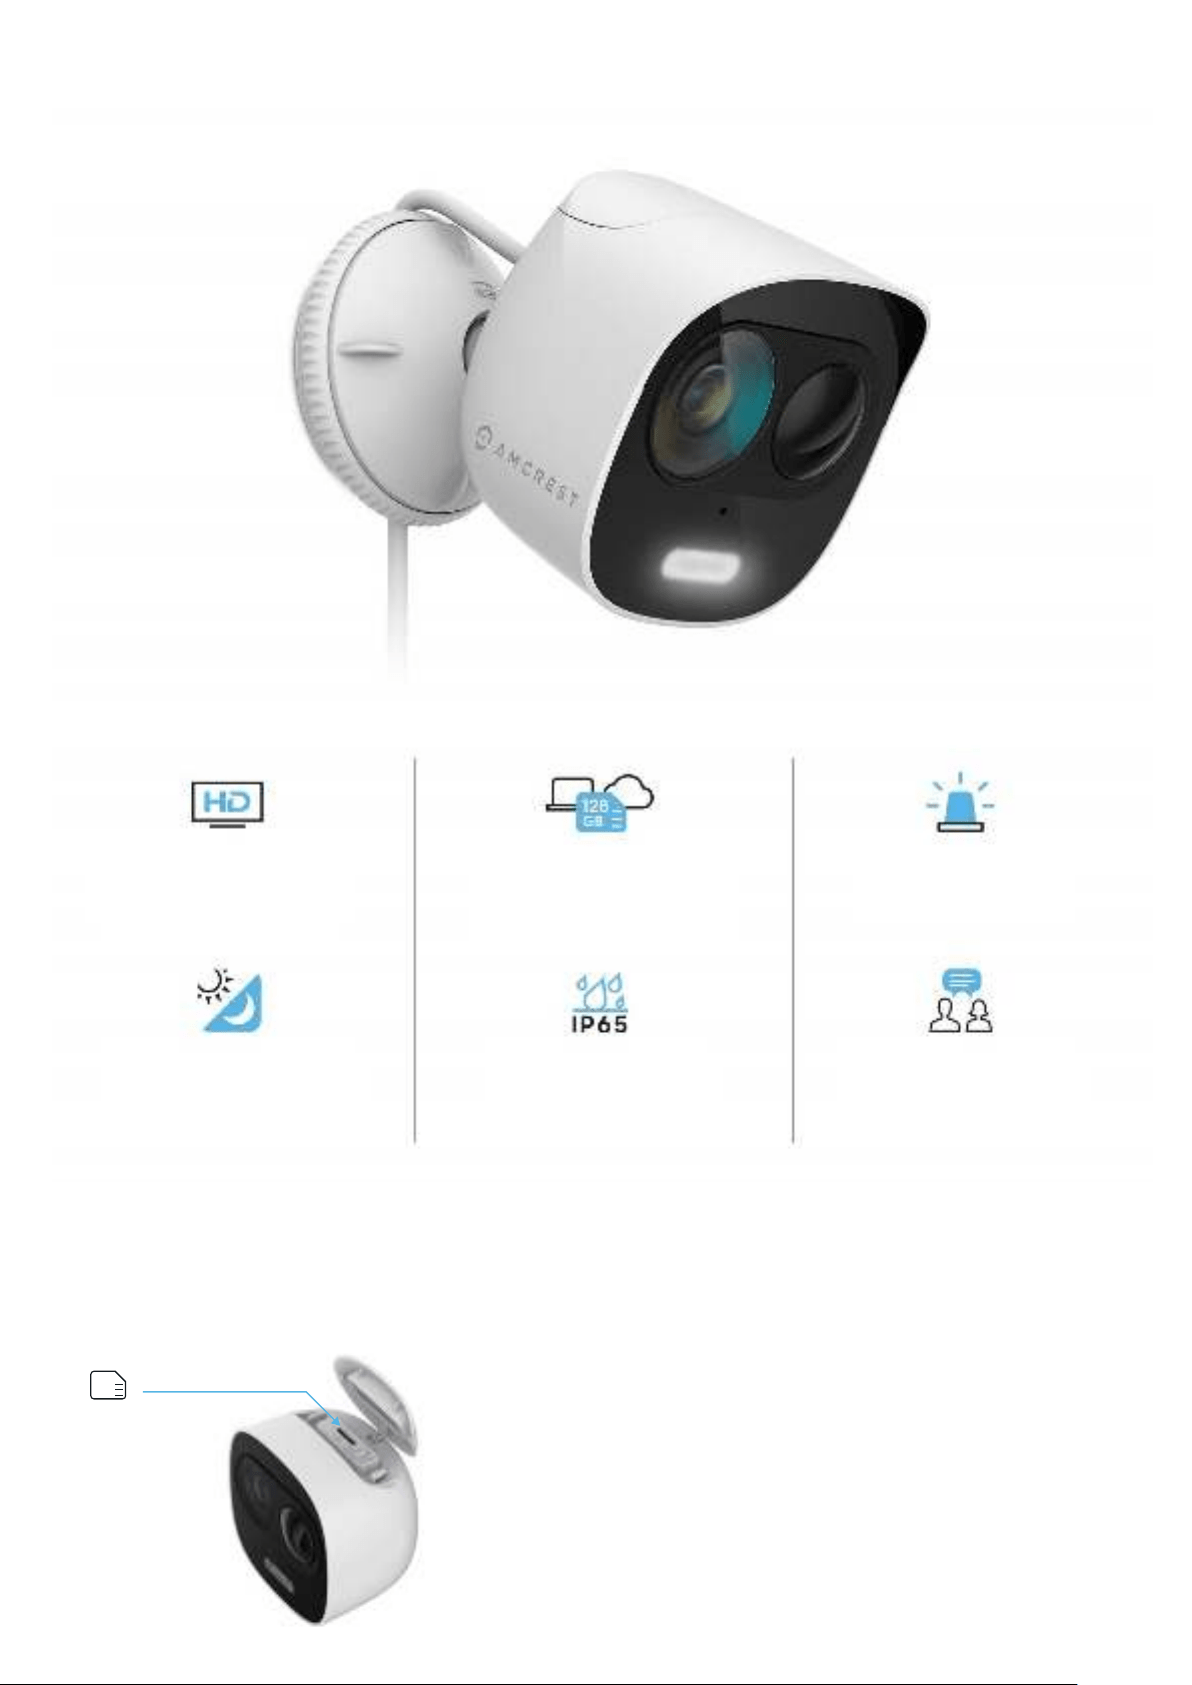
Device Features
Inserting a MicroSD card
HIGH RESOLUTION
Stream live video in 1080p HD
quality from anywhere.
STORAGE OPTIONS
Record on a microSD card or
Amcrest Cloud optional service.
*MicroSD card Not Included
ACTIVE DETERRENTS
Built-in spotlight, motion detec-
tion and 110dB siren.
NIGHT VISION
Never be left in the dark with
night vision up to 33ft away.
WEATHER RESISTANT
Mount the camera outside to
withstand harsh weather.
Listen and talk using the built-in
microphone & speaker.
WEATHER RESISTANT
To insert a microSD card, use the included pry bar to
pry open the security lid on the top of the camera.
button.
Insert your microSD card into the camera and press
in to secure it to the slot. Securely close the lid after
the microSD card has been inserted.
A microSD card is required to store events outside of the Amcrest Smart Home Cloud. The camera is
compatible up to 128GB and requires a Class 10 or higher microSD card to function. It is highly recom-
mended to ensure the microSD card is properly formatted to FAT32 before proceeding.
MicroSD
Card Slot
128
GB
6
Physical Installation
This device operates on either a Wi-Fi connection or direct connection to your network with an Ethernet
cable. This is not a power over ethernet (PoE) device and will require a 5V, 2.0A USB power connection
to function. Please use only applicable voltage when po
damage the integrity of the camera. It is highly recommended to use the included power cable and
adapter to power the camera.
The camera is waterproof and has a IP65 weatherproof rating which makes it suitable for outdoor installa-
tion. If you are using a microSD card for local storage, please ensure the microSD card is properly
installed before physically installing your camera. Before you begin, ensure the installation surface can
refer to the information below.
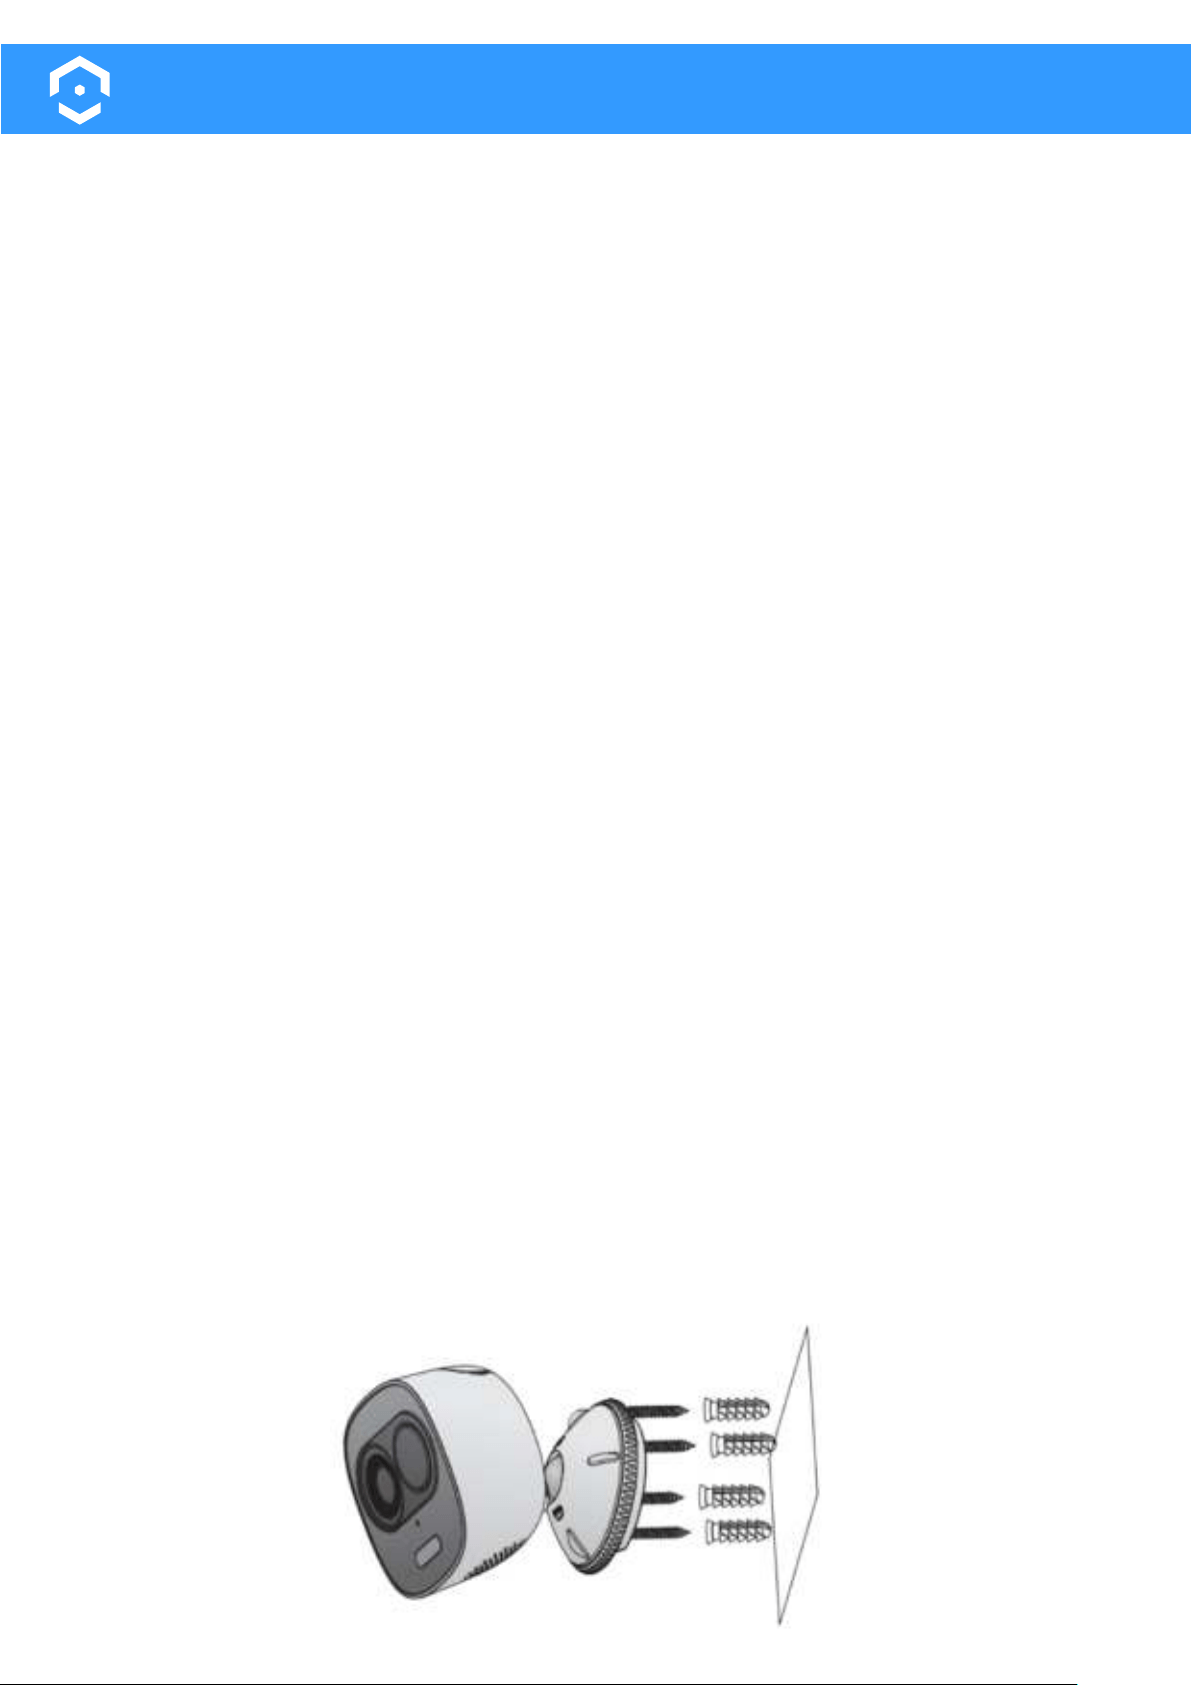
Provided with your camera is an installation/mounting plate which allows you to install the camera onto a
• Mounting Screws
• Wall Anchors
• Installation Mounting Bracket
• Installation Map Sticker
The physical installation of your camera will involve the following items.
SCREWDRIVER - A Phillips head screwdriver will be needed to mount your camera.
DRILL - A drill may be required if installing the camera on concrete, stucco, or a brick mounting surface.
INSTALLATION POSITION MAP -
physical installation of your camera.
WALL ANCHORS - Used to secure the mounting screws into the mounting surface.
MOUNTING SCREWS - Used to mount the camera to the mounting surface.
Note: A 15/64’s drill bit may be required to drill the holes for the wall anchors.
Installation Instructions
Place the installation position map onto the mounting surface and using a drill, drill the marked holes.
remove it from the camera. Then, remove the bottom bracket from the top bracket by twisting in a
counterclockwise motion.
Place the bottom bracket onto the installation map aligning the holes to the wall anchors. Secure the
bracket using a Phillips head screw driver and mounting screws. Place the camera back onto the securi-
ty screw of the top mounting bracket and turn in a clockwise motion to secure it to the camera. Place
the top bracket back onto the bottom bracket and turn in a clockwise motion to tighten and secure the
camera to the mounting surface.

7
Amcrest Smart Home App Setup
The Amcrest Smart Home app connects your Amcrest Smart Home device to your Android or iOS mobile device
ensuring you are always connected to what matters most.
To get the app, search for “Amcrest Smart Home” in the Google Play or App Store and download.
Open the Amcrest Smart
Home app and tap on
“Register” to register an
account. Log in and click on
“Add Device”.
Connecting to the App
Scan the QR Code
Scan the QR Code on your device
or manually enter the serial number
for the device by tapping “Manually
enter S/N”. The serial number can
be found on the serial tag located
on the camera.
Add Device Setup Method
To setup a WiFi connection
(recommended) Tap “WiFi
Setup” to continue.
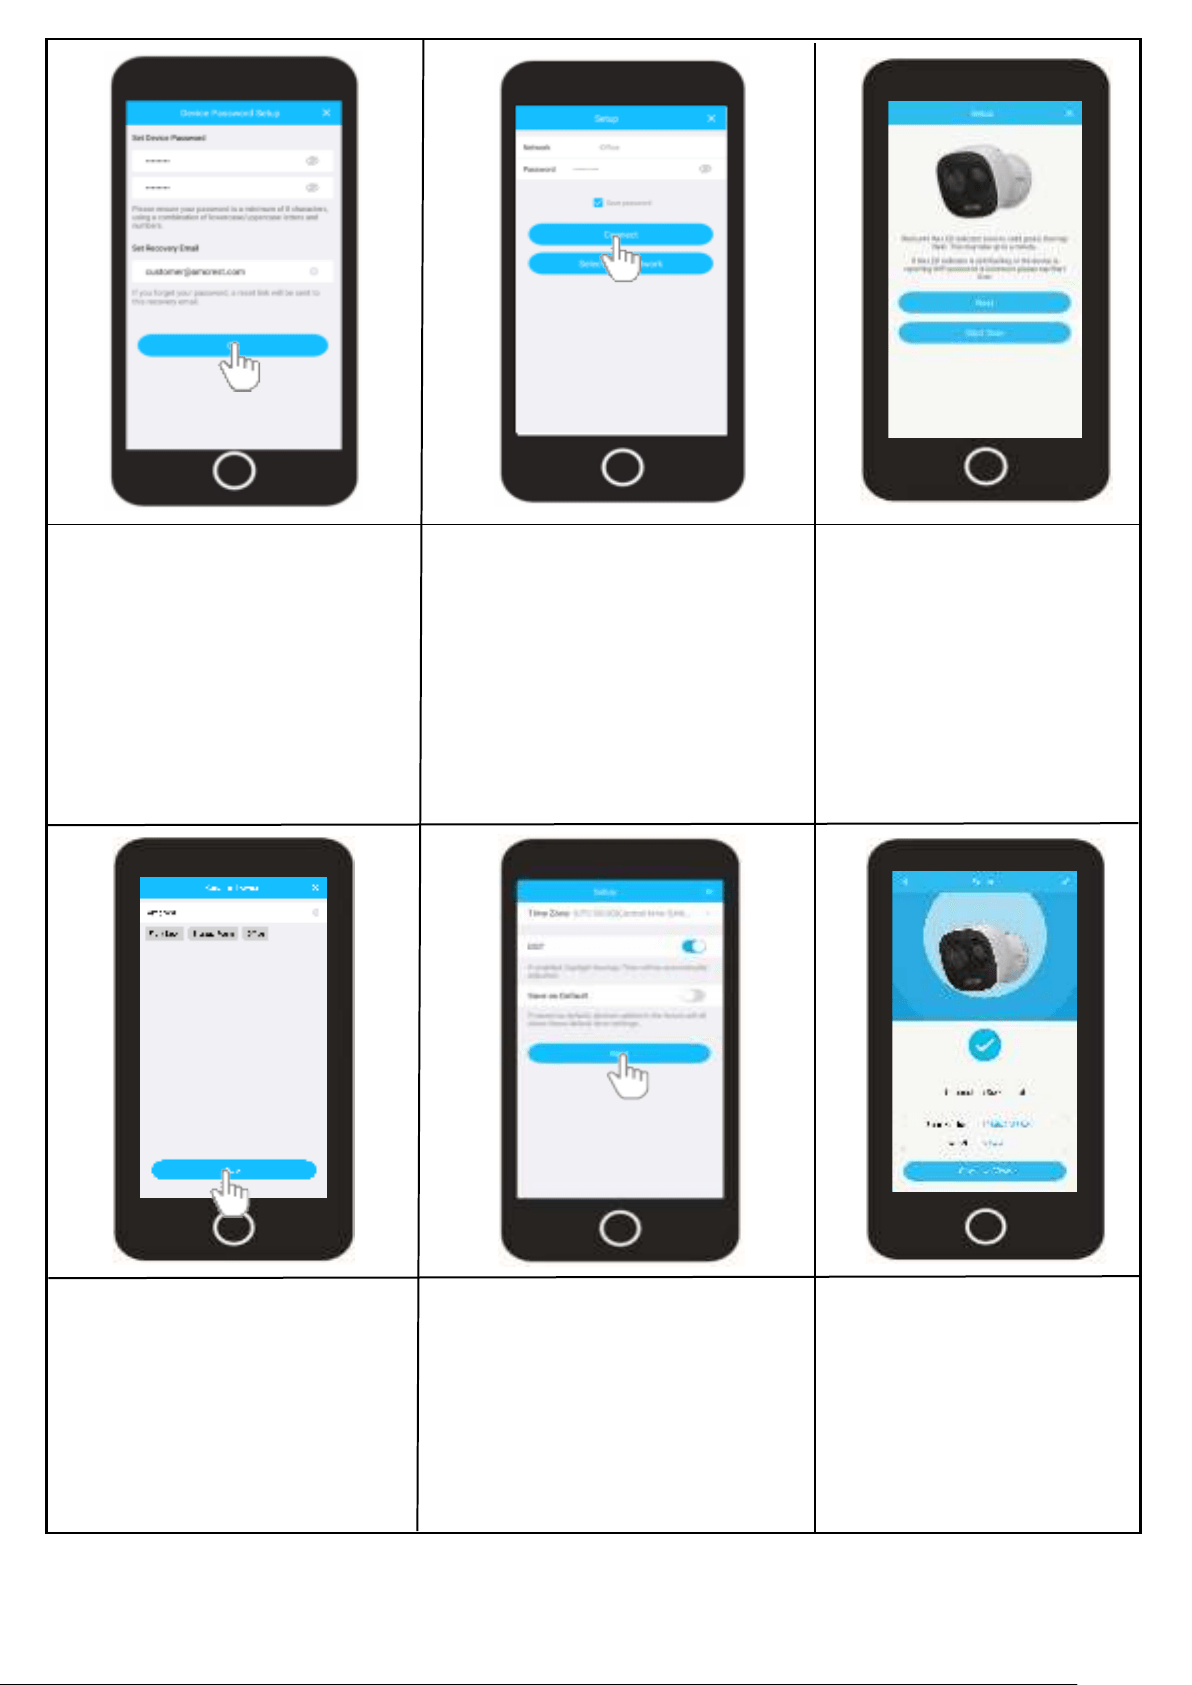
8
Type in a password you would
use a combination of letters,
numbers, and symbols between 8
- 32 characters long when setting
up a password.
Tap “OK” to continue.
Choose Your Wi-Fi Network
Select your Wi-Fi network from the
Wi-Fi network list. Enter the pass-
word for your home Wi-Fi network.
If you would like to save this pass-
word to the app, tap on “Save
Password”
Tap “Connect” to continue.
The LED on the front of
camera will turn solid green
when connected. If it does
not turn solid, tap on “Start
Over” to try again.
Tap “Next” to continue
Set the Time and Date
Set “Time Zone” to your current
time zone and set “DST” (Daylight
Savings Time) settings if applica-
ble.
Tap “Next” to continue.
Set a Password
Rename your device. A few
Front Door, Storage Room,
Tap “Save” to continue.
Name Your Device
Add Your Device
Tap Start Live View to view
the live feed.
Start Live View
9
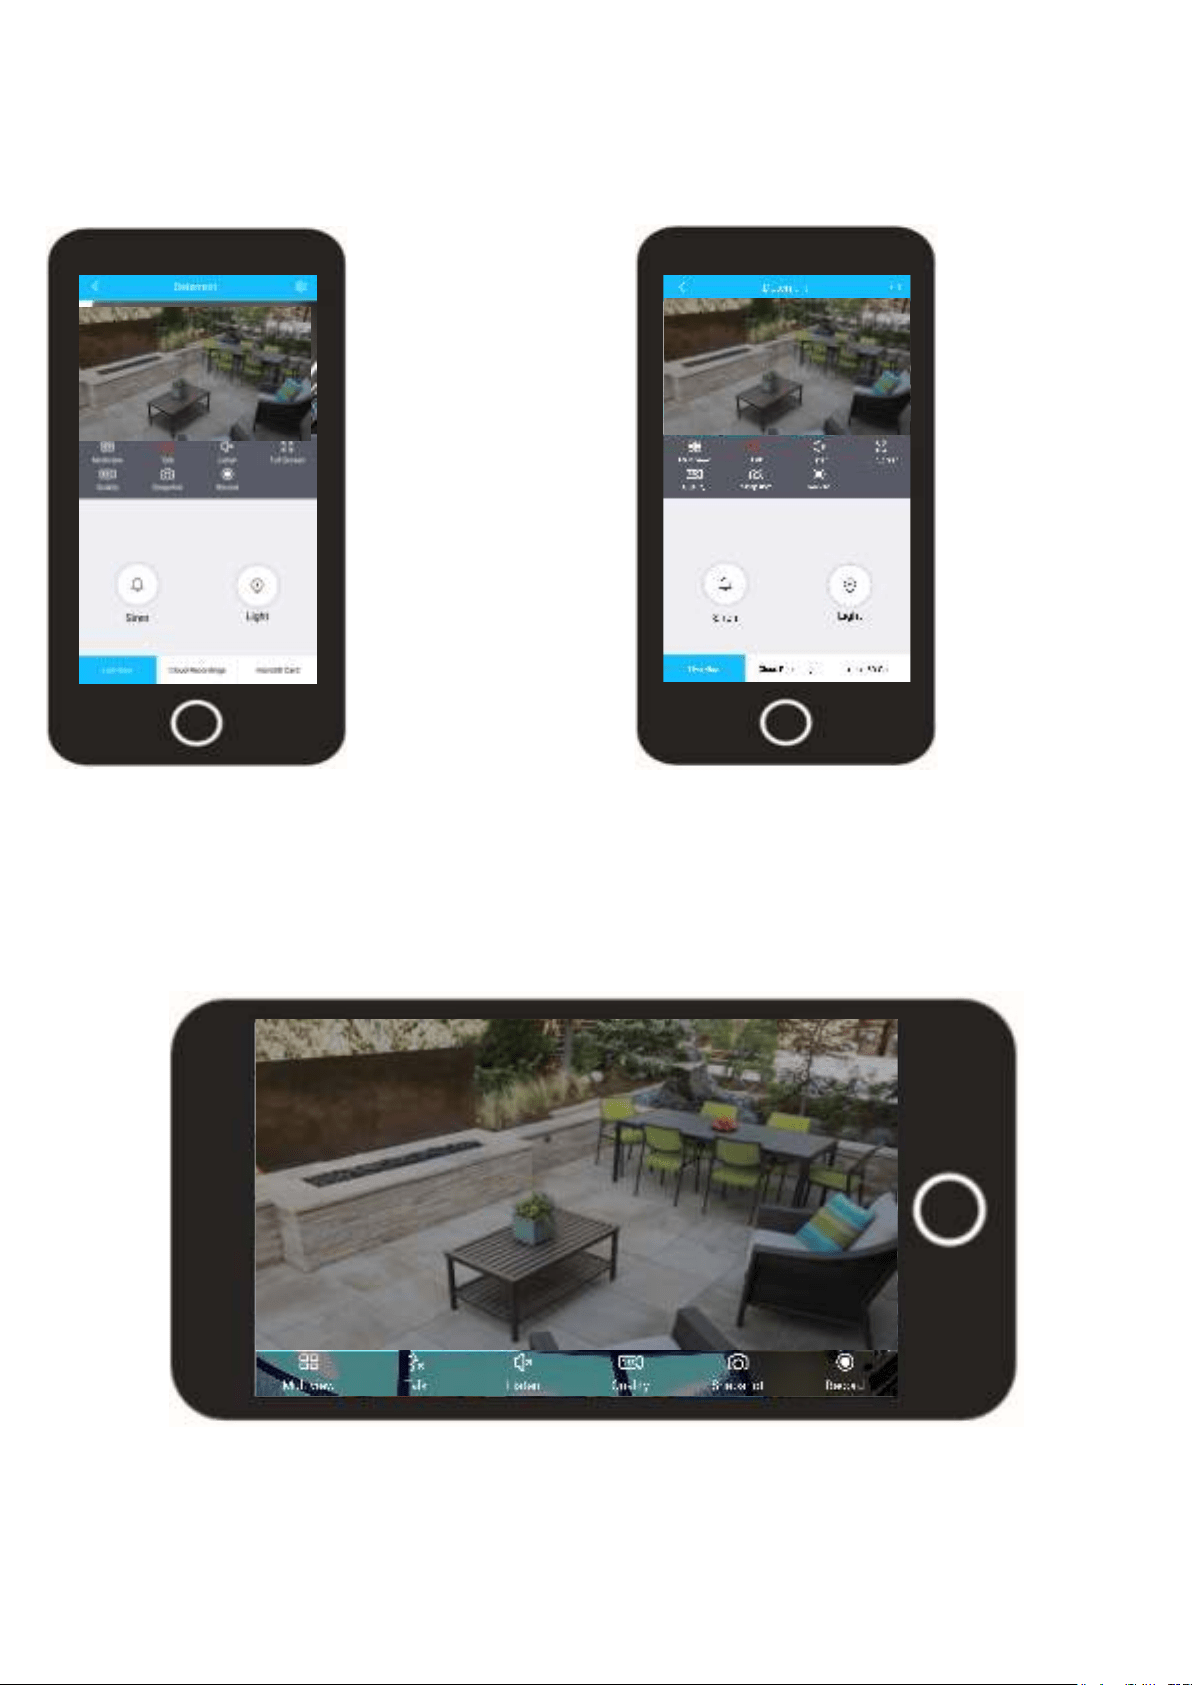
Live View
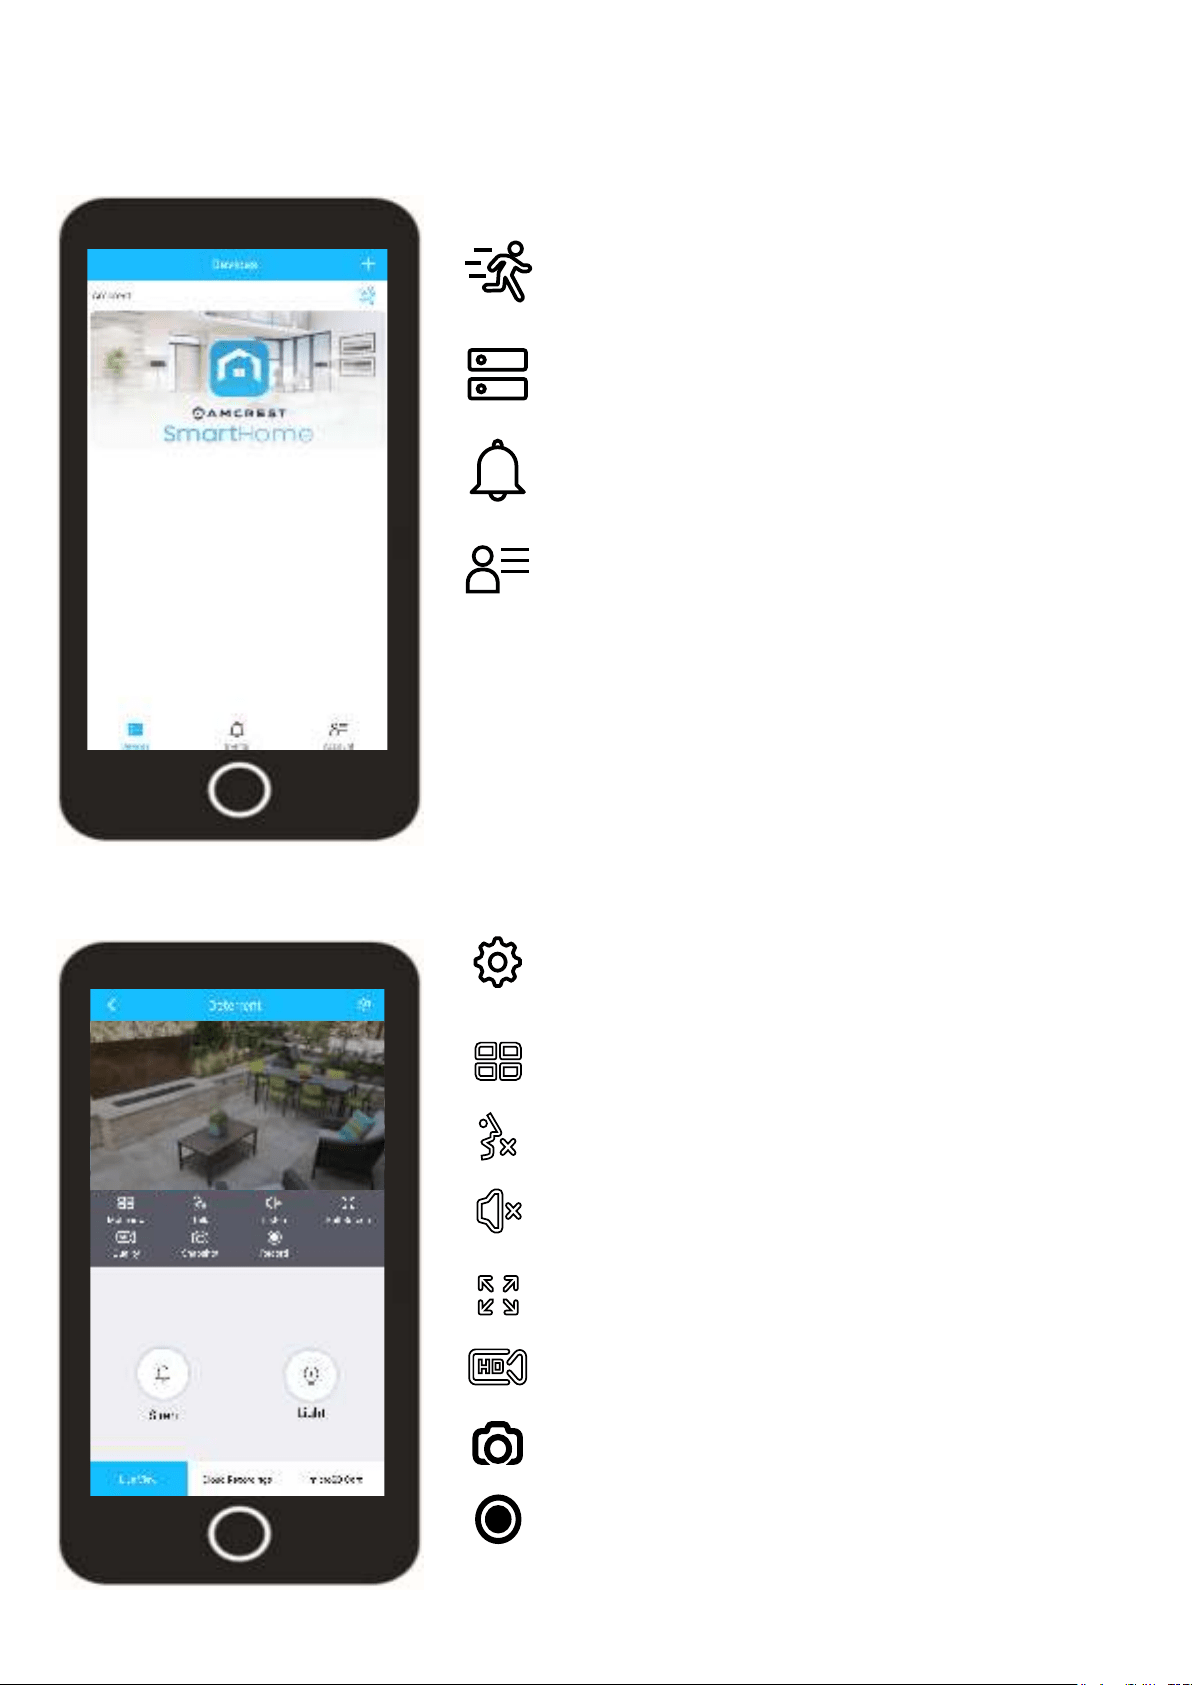
Devices Menu
The devices menu displays all connected devices on your Amcrest Smart Home account as well as direct
SETTINGS
Provides access to settings such as motion detection,
MULTIVIEW
View multiple devices on one screen.
TALK
Enables the microphone for two way communication
LISTEN
Enables the speaker for two way communication.
FULL SCREEN
View your feed in full screen mode.
SNAPSHOT
Manually take a photo.
RECORD
Manually record a video.
Tap on the device you would like to access to view the live view
screen.
MOTION ALERTS
DEVICES
Displays connected devices in the app.
EVENTS
Provides quick access to motion events and alerts.
ACCOUNT
Access to manage account settings and information.
10
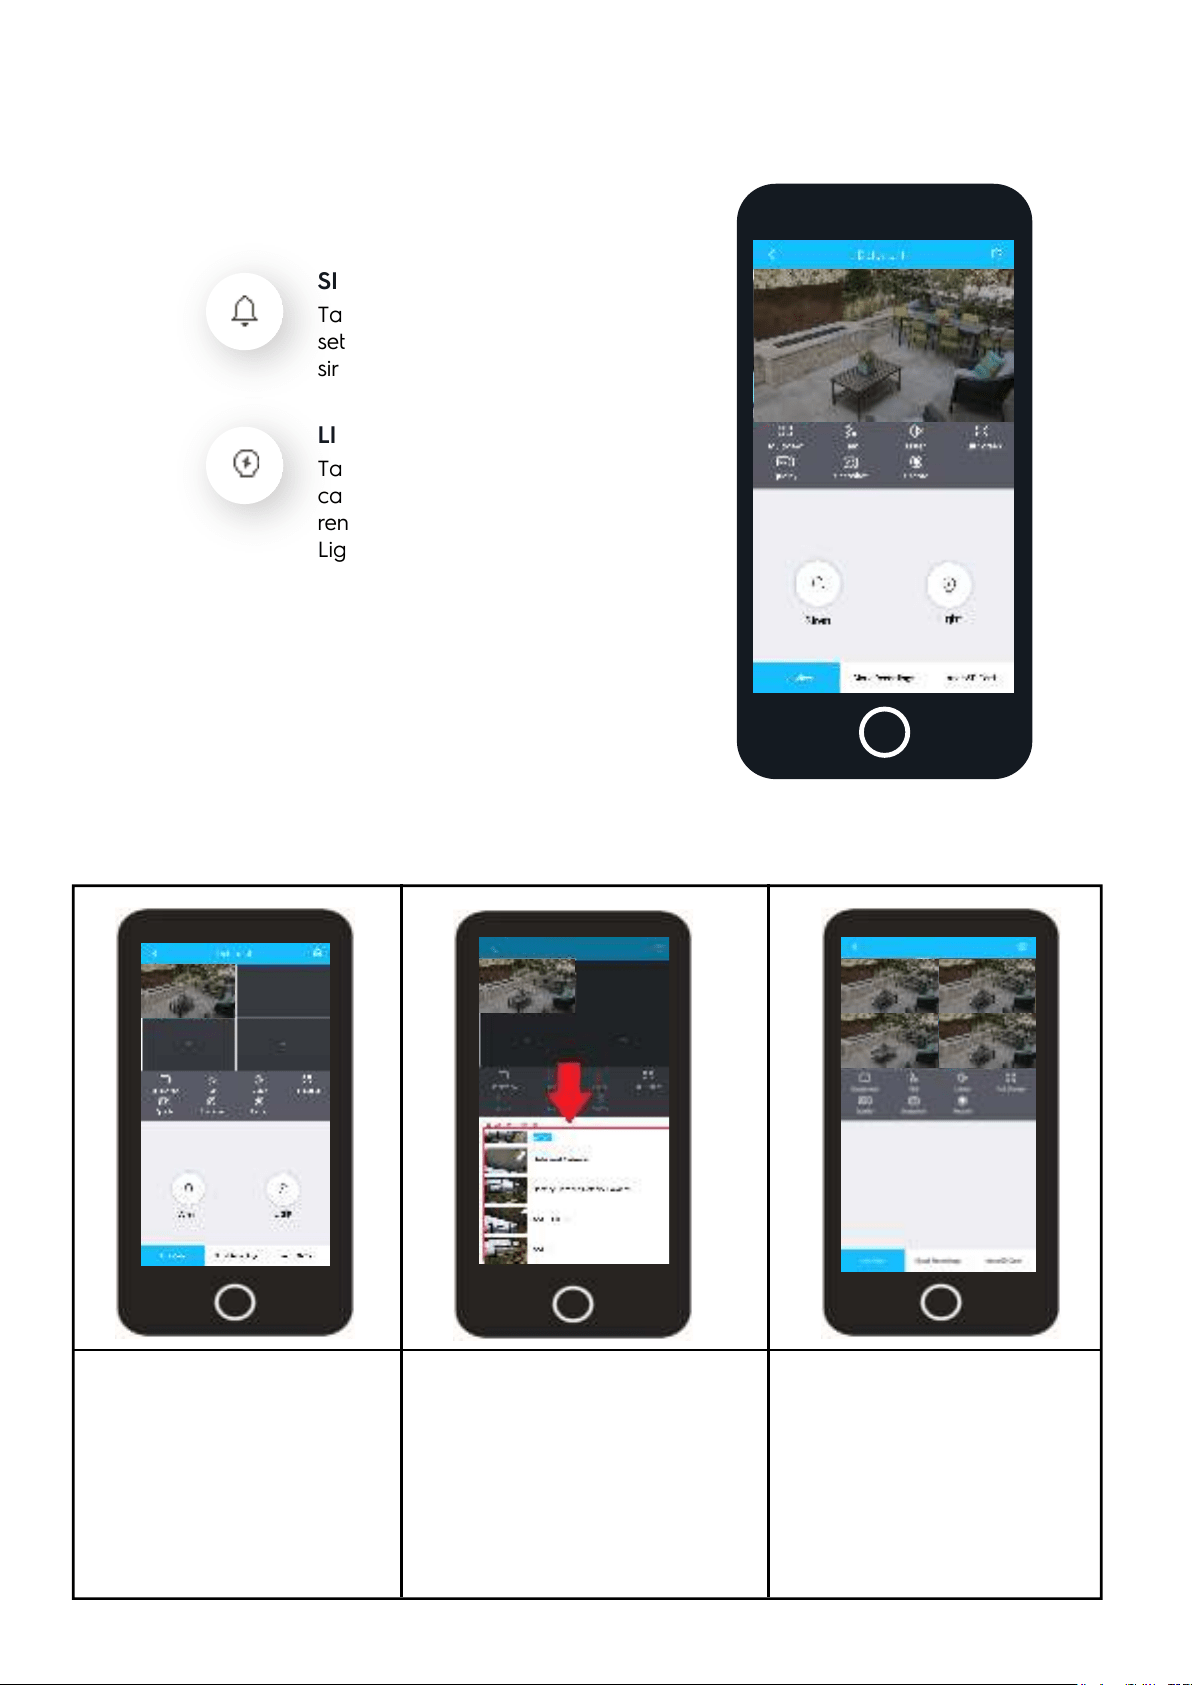
Multiview
The multiview option is used to view up to 4 devices simultaneously on the live view screen. To
access the multiview menu, tap on the Multiview icon located on the live view interface.
Tap on the ( + ) icon to begin
adding optional devices to
the live view screen.
Select your device from the
optional channels menu. The
interface can view up to 4
devices simultaneously.
Once added, a blue “Added”
the newly added device.
The added devices can now
be viewed simultaneously on
multiview, tap on the “Single
View” option located on the
live view interface.
Add a Device
Select your Device
View Your Devices
SIREN
Tap this button to manually
siren.
LIGHT
camera’s built in light deter-
rent. There are 3 functions;
Siren/Light
The siren and light options located in the live view interface allow you to manually turn the siren or
11
Full Screen
The fullscreen option allows you to view a full screen view of the live feed from your device. When in
screen mode, tap on the back arrow ( < ) to revert the live feed back it its original format.
Talk/Listen
The talk button allows you to activate the microphone on your smartphone device to talk to your
camera. The talk button can be used together with the listen button to enable two way audio.
Tap the talk button
to activate the
microphone on
your smartphone.
You will hear audio
from the device on
your smartphone.
Tap on the listen
button to activate
the speaker on
your device. This
will enable two
way audio when
activated with the
talk button.
12
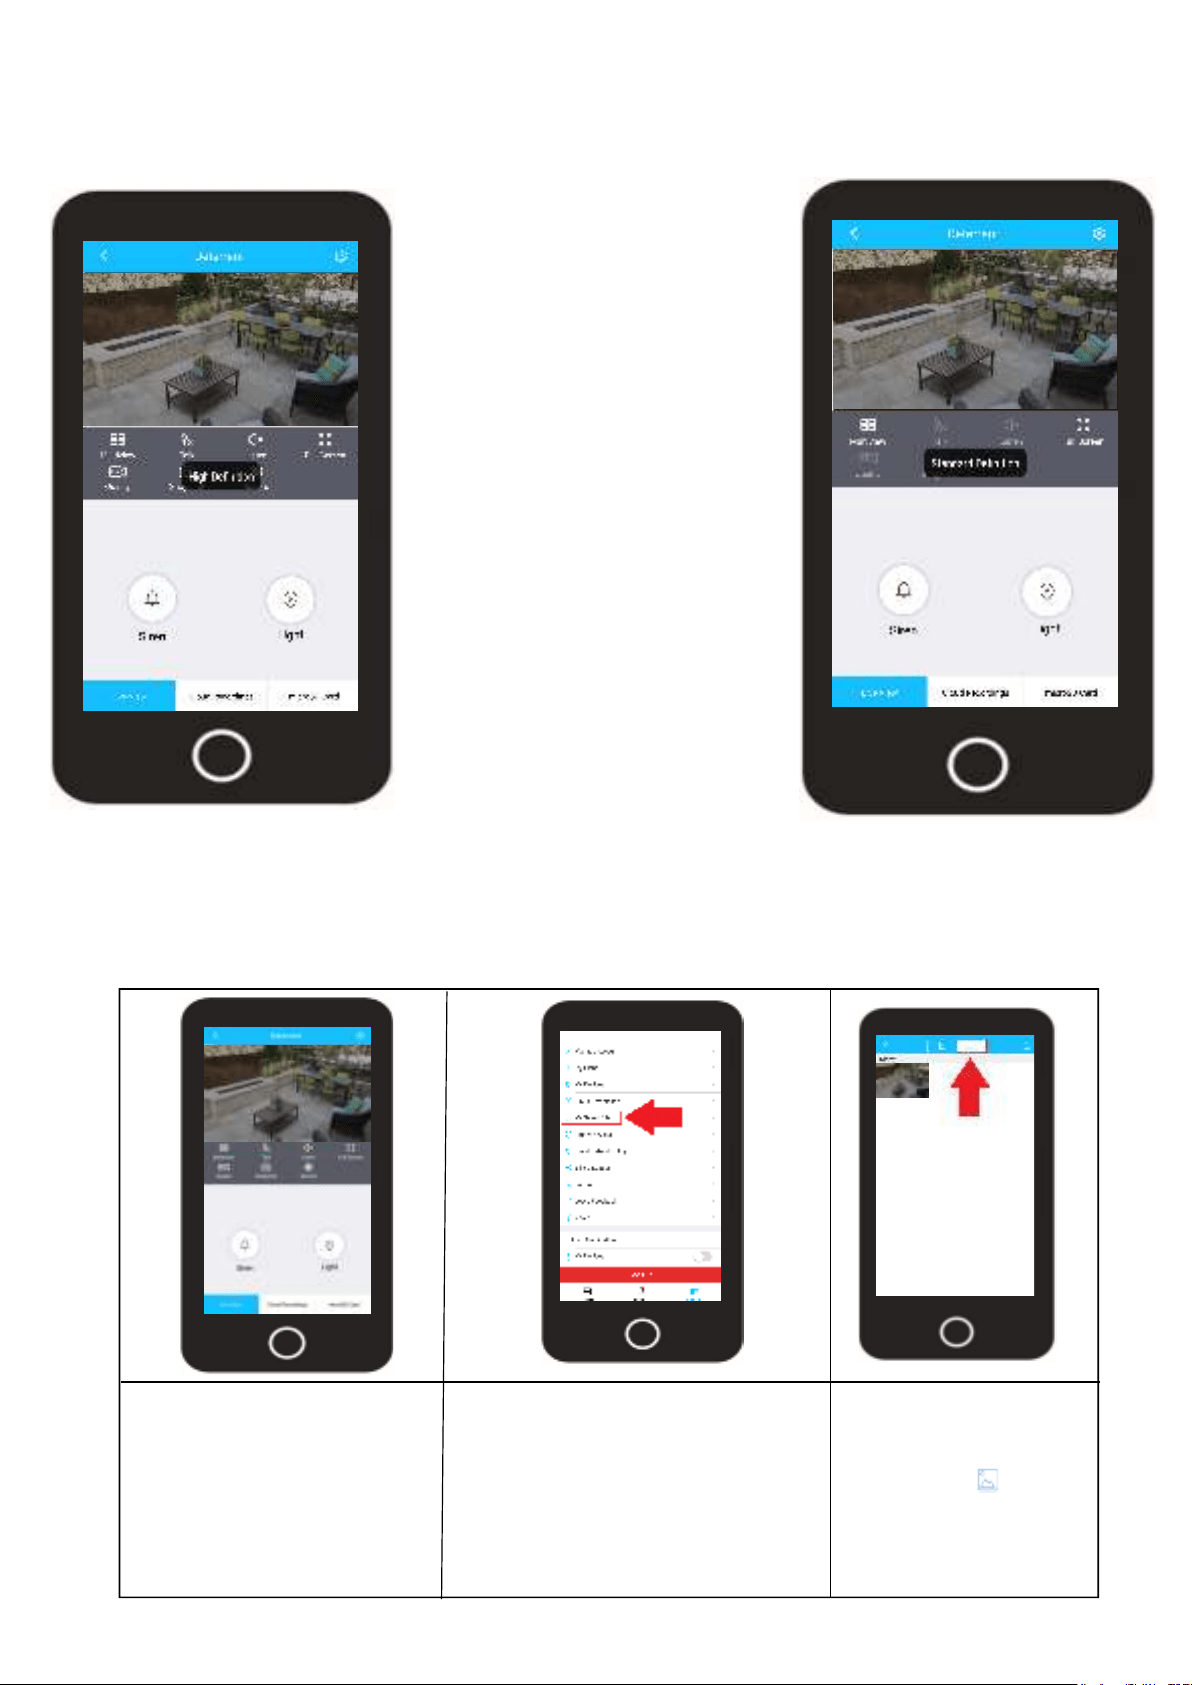
HD/SD
view resolution to its original factory resolution.
Tap the HD button to set the live
-
tion.
Tap on the SD button to revert the
live view of your device back to
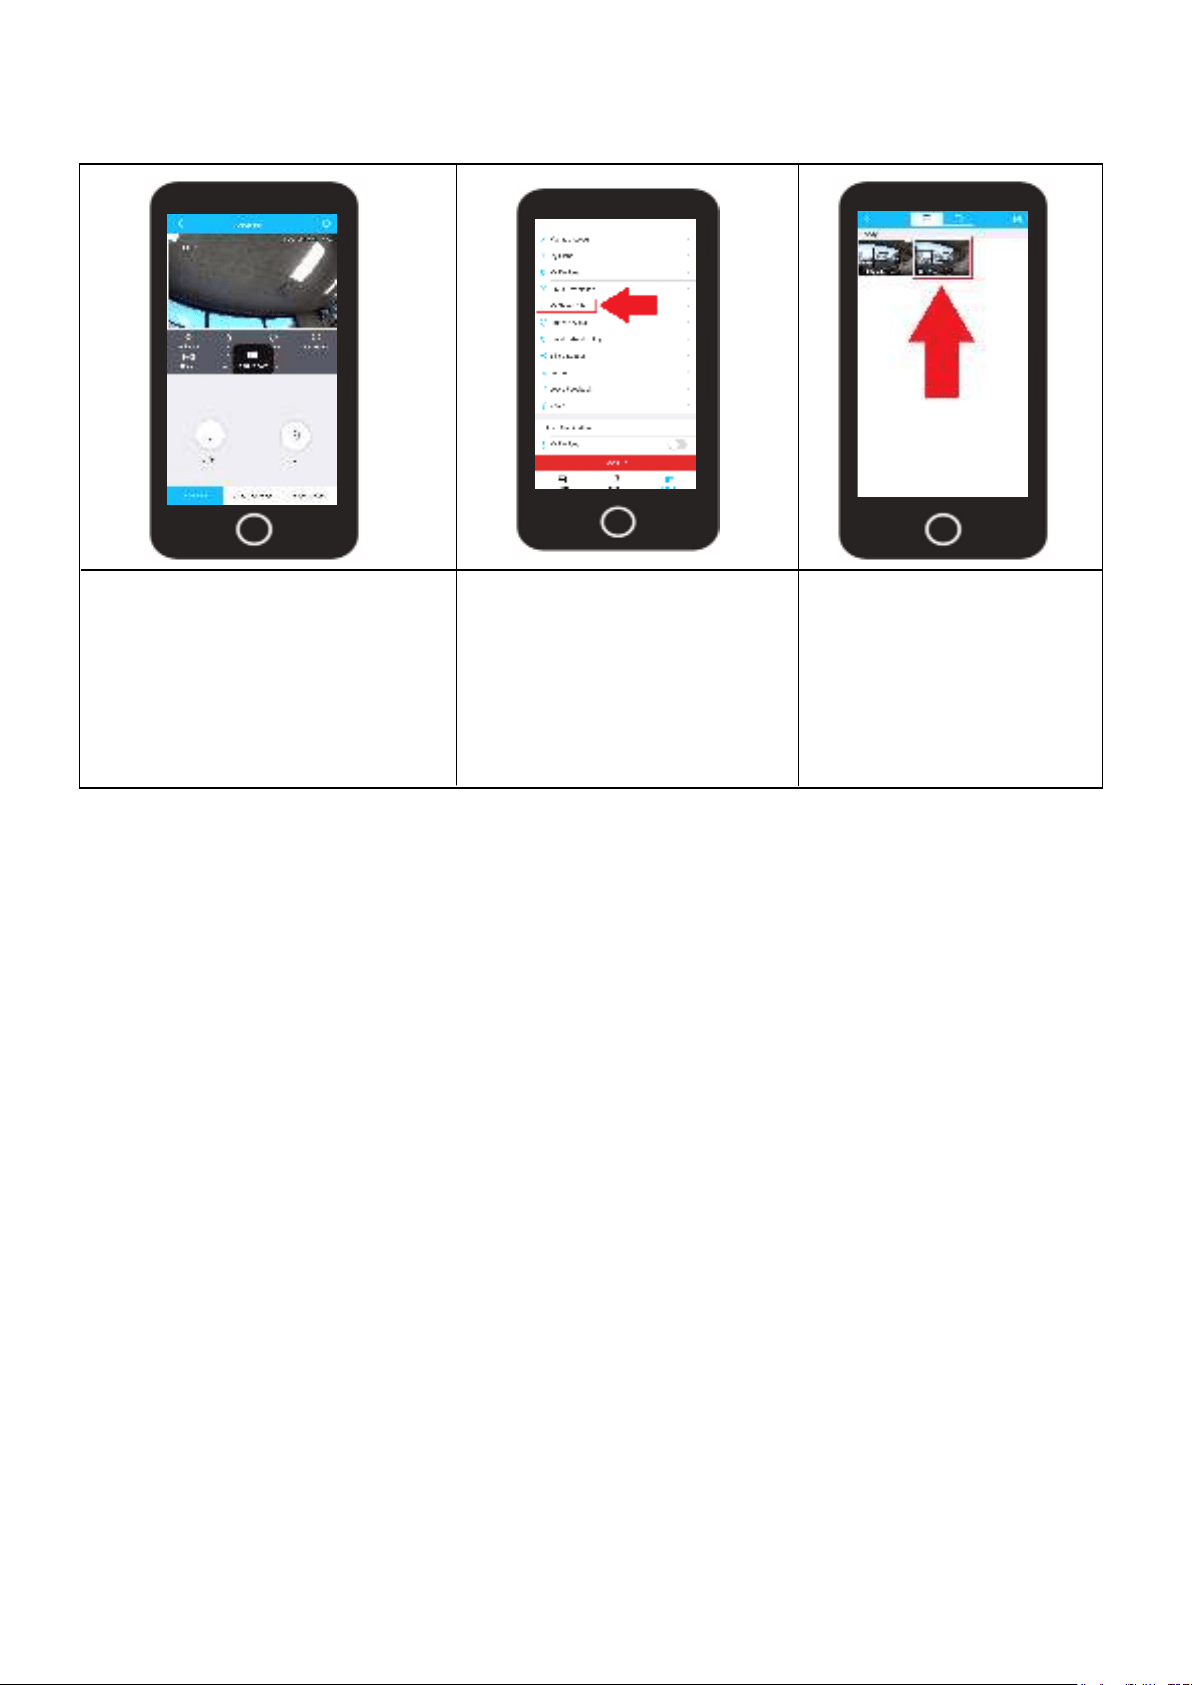
Manual Snapshot
The manual snapshot button allows you to manually take snapshots of the live feed. All manual
snapshots will be stored in the My Saved Files folder located in the Account section of the Amcrest
Smart Home app.
Tap on the Snapshot button
to manually take a snapshot
of the live view screen.
Take a Snapshot
To view the snapshot, use the
back arrow ( < ) to access the
devices menu. Tap on Account
and access the My Saved Files
folder.
My Saved Files
View your Photo
Tap on the snapshot
folder icon ( ) to
access snapshots. Tap
on the photo you want
to view in the interface.
13
Take a Video
Tap on the Record button to
manually take a video of the live
view screen.
To stop the recording, tap the
record button again.
To view the snapshot, use the
back arrow ( < ) to access the
devices menu. Tap on
Account and access the My
Saved Files folder.
My Saved Files View your Video
The interface will default
to the video folder. Tap on
view in the interface.
Manual Record
The manual record button allows you to manually take video of the live feed. All manual recordings will be
stored in the My Saved Files folder located in the Account section of the Amcrest Smart Home app.
14
Amcrest Smart Home Cloud
storage options for cloud users who wish to have secure cloud based options for their recordings. This is
devices and will not be compatible with other traditional or legacy Amcrest IP cameras or devices.
All cloud plans are available for purchase in the Amcrest Smart Home app once an account and device
cloud subscription active it is recommended to select "Auto Renewal" when checking out. For more infor-
mation on how to activate an Amcrest Smart Home Cloud storage plan, please refer to the information
provided below.
Note: Any plan changes made to your account will only take place at the end of your current billing cycle.
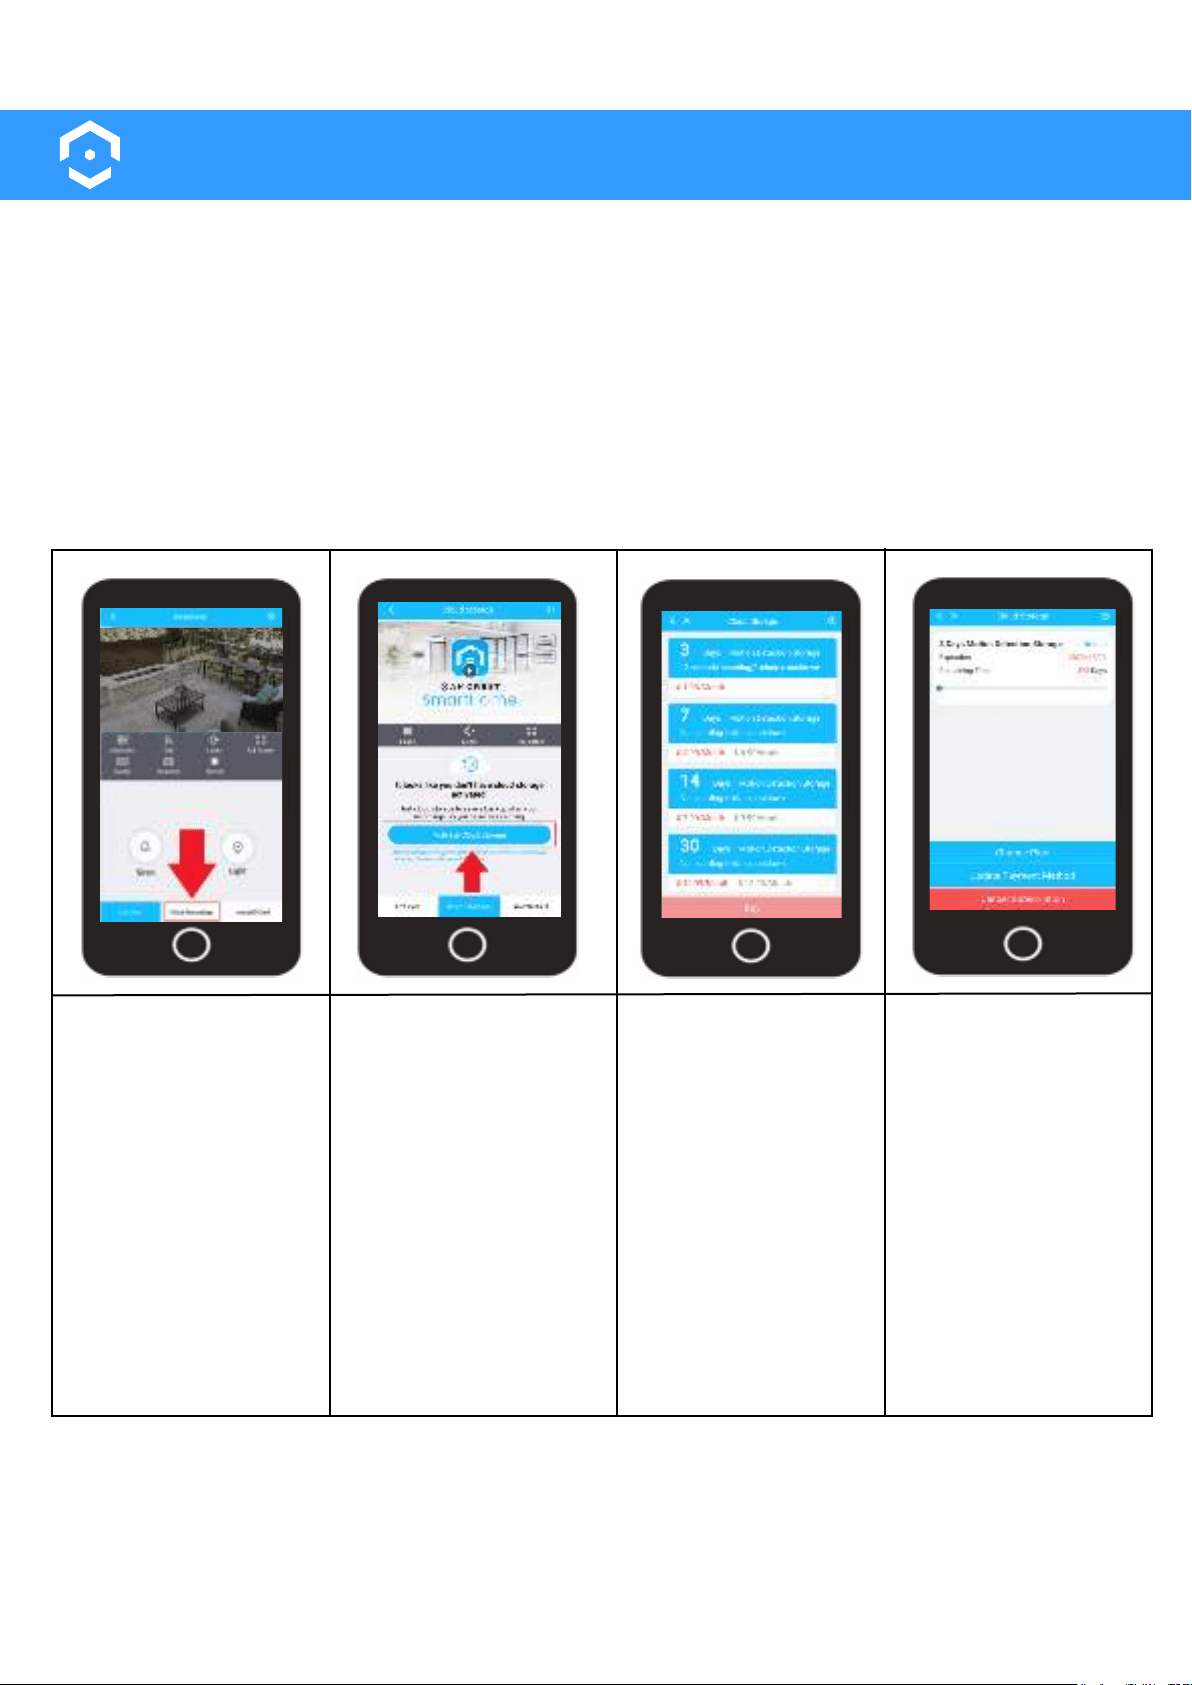
Log into your Amcrest
Smart Home app and
select the device you
wish to activate.
On the live view screen
tap on Cloud Record-
ings.
Tap on Activate Cloud
Storage.
Select a Cloud Storage
plan from the list of
cloud plans and tap
Buy.
Enter your billing infor-
mation into the billing
form. All plans will
require a credit card to
process the request.
After you have pur-
chased your Amcrest
Smart Home cloud plan
you will be able to store
and view your record-
ings all from the Cloud
Recordings menu.
Access Your Account
Activate Cloud Storage Choose Your Plan
View Cloud Plan
15
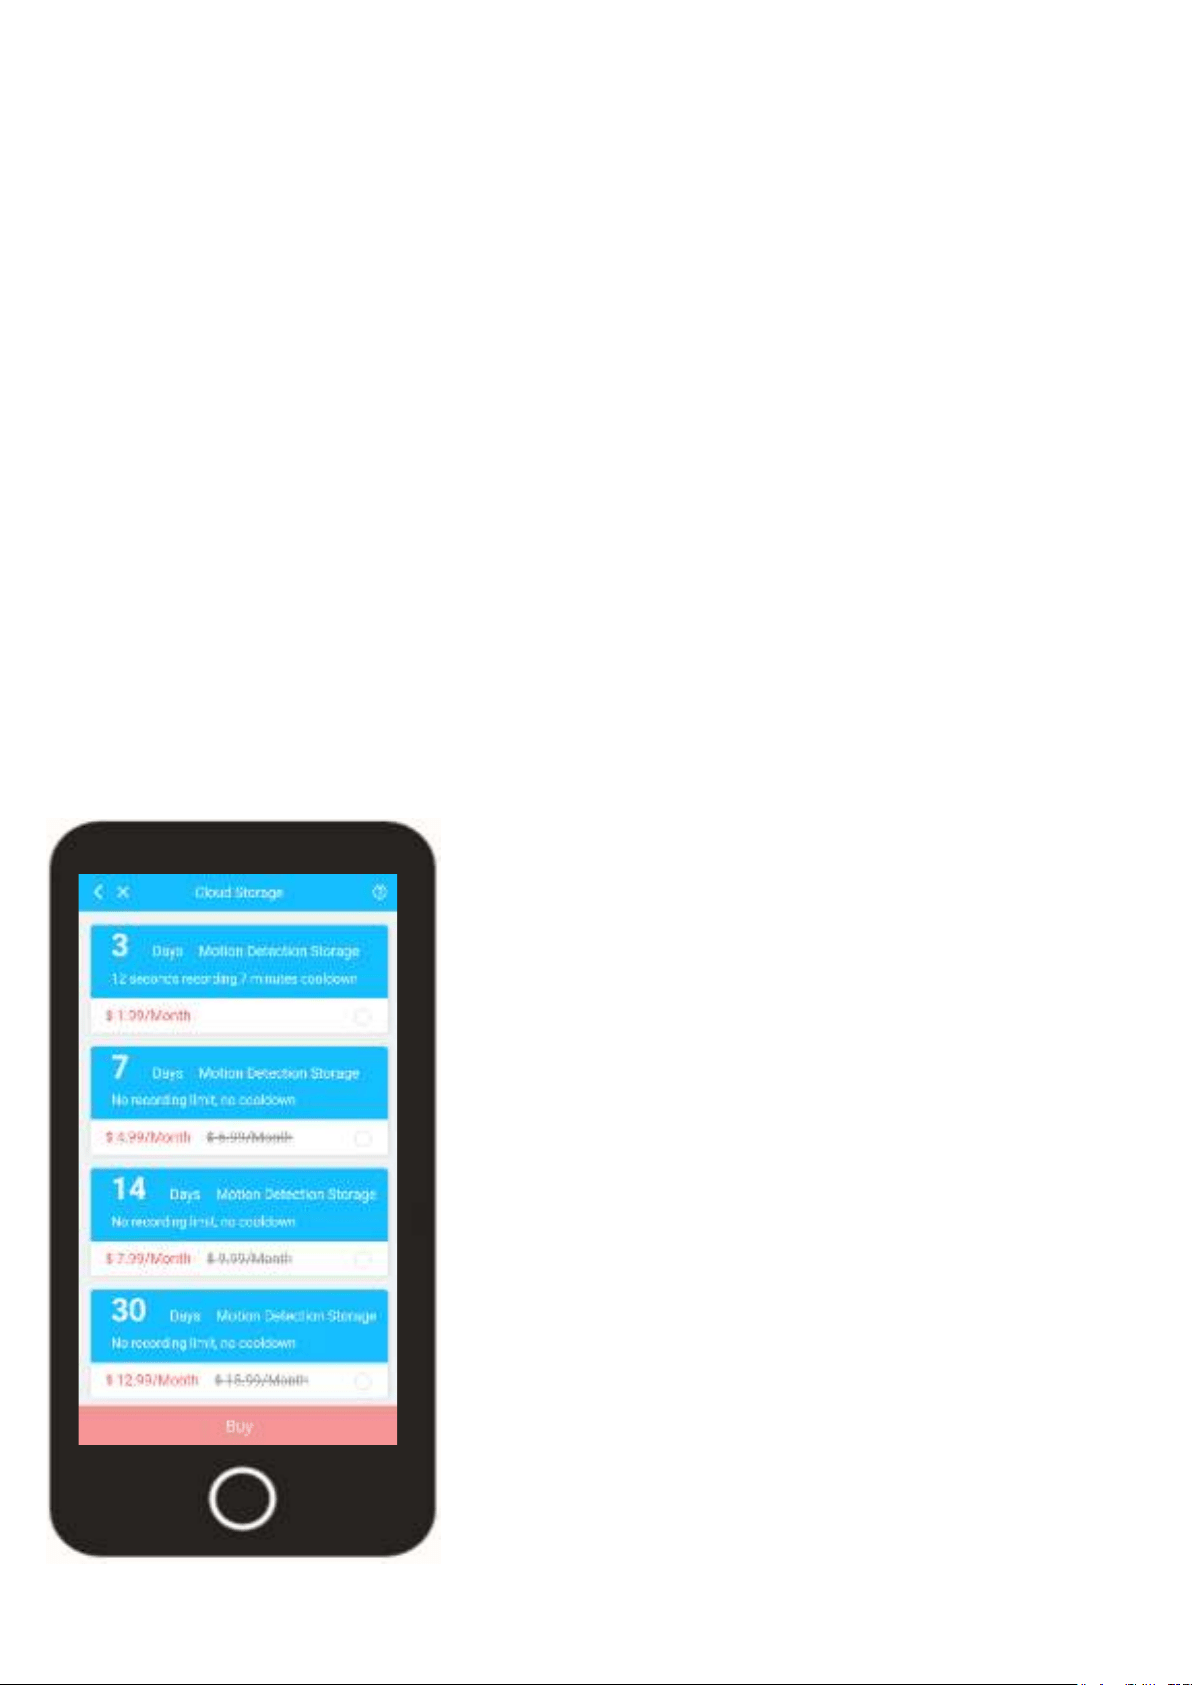
Amcrest Smart Home Cloud Plans Explained
with a 12 second record time and 7 minute cool down to a 30 day motion detection storage plan that
All cloud plans are available for purchase in the Amcrest Smart Home app once an account and device
starting from the minute you subscribed. To keep a cloud subscription active it is recommended to select
"Auto Renewal" when checking out.
What is Cloud Storage Time?
you select a 7 day storage plan, you will only have access to the last 7 days of recordings. Any recordings
from 8 days ago will have been automatically over-written and therefore in accessible.
How Does the 1 Year Free Cloud Plan Work?
per event as well as a 7 minute cool down in between events. A credit card is still required for the free trial
record time and 7 second cool down.
Other Amcrest Smart Home Cloud Storage Options
3 Days Motion Detection Storage - This is the default plan that is
placed on your account if you have signed up for a free 1 year
3 days of cloud storage with a 12 second record time and 7
minute cool down in between recordings.
7 Days Motion Detection Storage - This is a cloud storage plan
that will store motion recordings for 7 days. It is $4.99/month and
14 Days Motion Detection Storage - This is a cloud storage plan
that will store motion recordings for 14 days. It is $7.99/month and
30 Days Motion Detection Storage - This is a cloud storage plan
that will store motion recordings for 30 days. It is $12.99/month
16
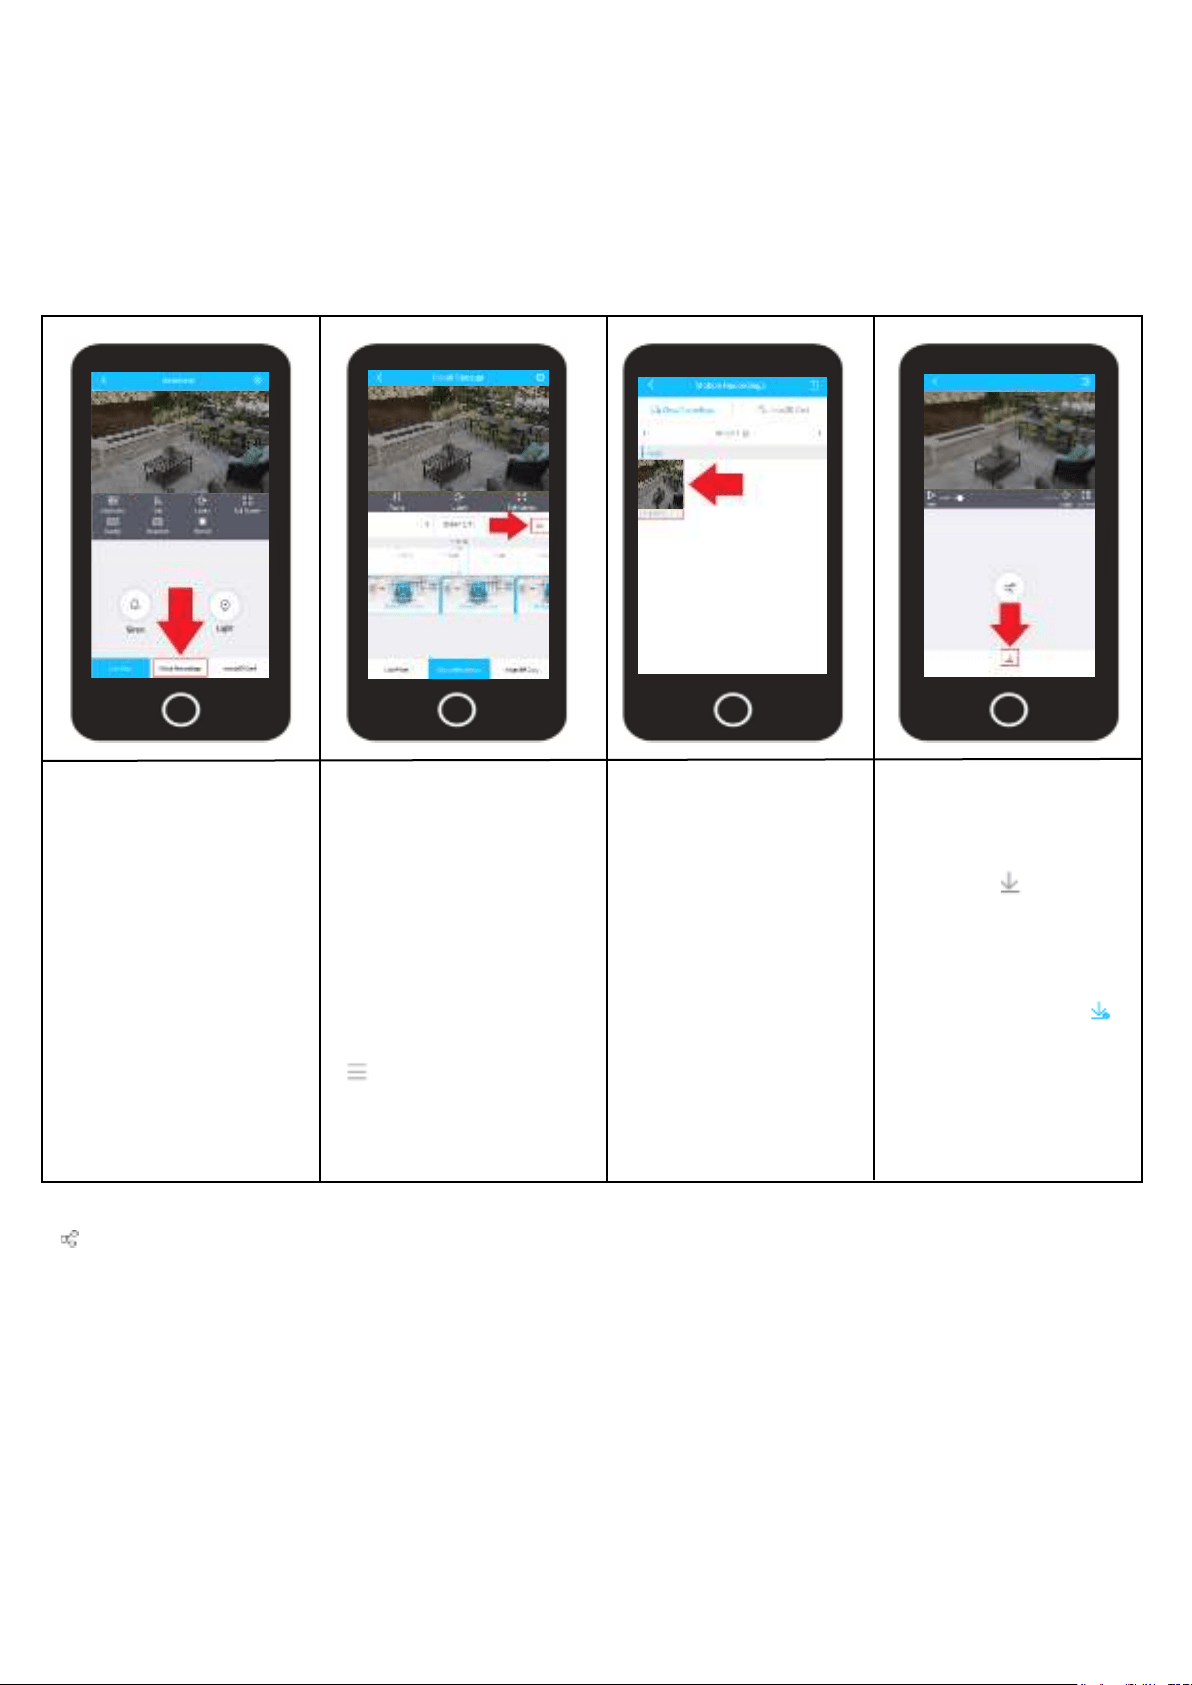
Downloading Recordings
Due to the current capabilities of the app recordings can only be downloaded via the Cloud Recordings
download interface. All recordings retained on a microSD card will have to be downloaded via a microSD
card adapter (sold separately) on a computer. For more information on microSD card recordings, please
refer to the microSD card section of this manual.
Tap the download icon
located at the bottom of
the menu ( ). The
recording will begin to
download to your
smartphone.
A blue check mark ( )
download icon once the
downloading.
Download
Log into your Amcrest
Smart Home app and
select the device you
wish to activate.
On the live view screen
tap on Cloud Record-
ings.
Select the recording
you wish to download
Access Your Account
Access File List Choose Your Clip
Playback/Download Cloud Recordings
Note: You can also share your recordings directly to other services on your smartphone via the share icon
( ) located in the middle of the download menu.
all cloud recordings. to
playback a cloud
recording, select the clip
from the time line. Tap
the date to choose
dates.
Tap on the File List icon
( ) located in the
Cloud playback inter-
face.
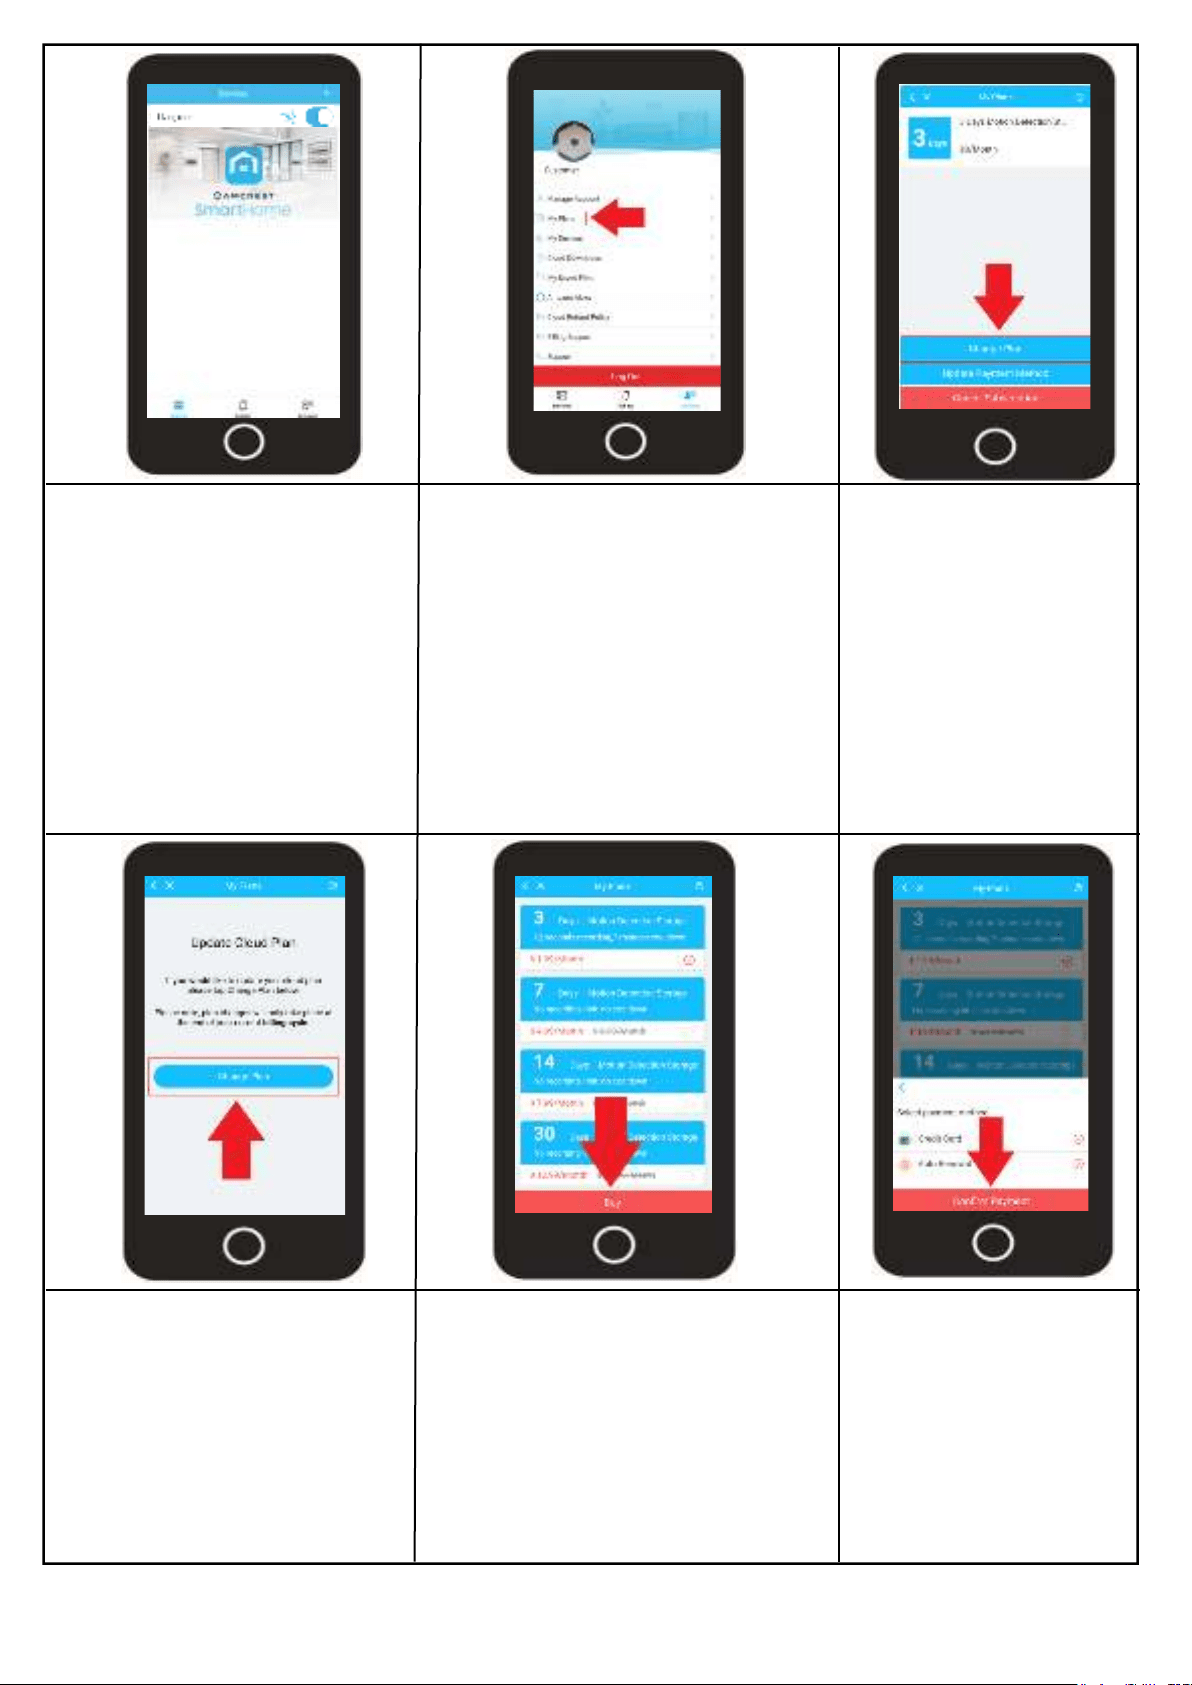
Changing Cloud Plans
cycle. Every Amcrest Smart Home cloud subscription is based on a 30 day cycle. All Amcrest Smart Home
Cloud plan changes are made via the Amcrest Smart Home app For more information on how to change
your Amcrest Smart Home Cloud plan, please refer to the information provided.
17
Access Your Account
Access Plan Details
Change Current Plan
Update Cloud Plan
Choose a New Plan
Open the Amcrest Smart Home
app and log into your account.
Tap on the Account tab.
Tap on My Plans.
Note: The My Plans menu will
display all past and present
Amcrest Smart Home Cloud plans,
unpaid, paid as well as cancelled
"Unpaid", "Paid", and "Cancelled”
tabs.
Select your current plan
from the My Plans menu.
Then tap on Change
Plan.
Read the provided information
on the screen and tap
"Change Plan" to continue.
Select which plan you would like to
change to from the Amcrest Smart
Home cloud plans provided. Tap Buy
to continue.
Choose whether you
would like to auto renew
your payment. Tap Con-
to continue.
Note: Enter your name, and billing information into the app. This will be the billing information used
for the new plan you have selected. Tap Pay to complete the process.
18
MicroSD Card Recordings
device. The microSD card must be formatted to FAT32. This may have to be done manually as most pro-
grams do not format to this allocation automatically.
When a microSD card is inserted into the device, all motion based recordings will be stored to it. Addition-
ally, if you have a Amcrest Smart Home Cloud account, recordings will be stored both on the cloud and
microSD card.
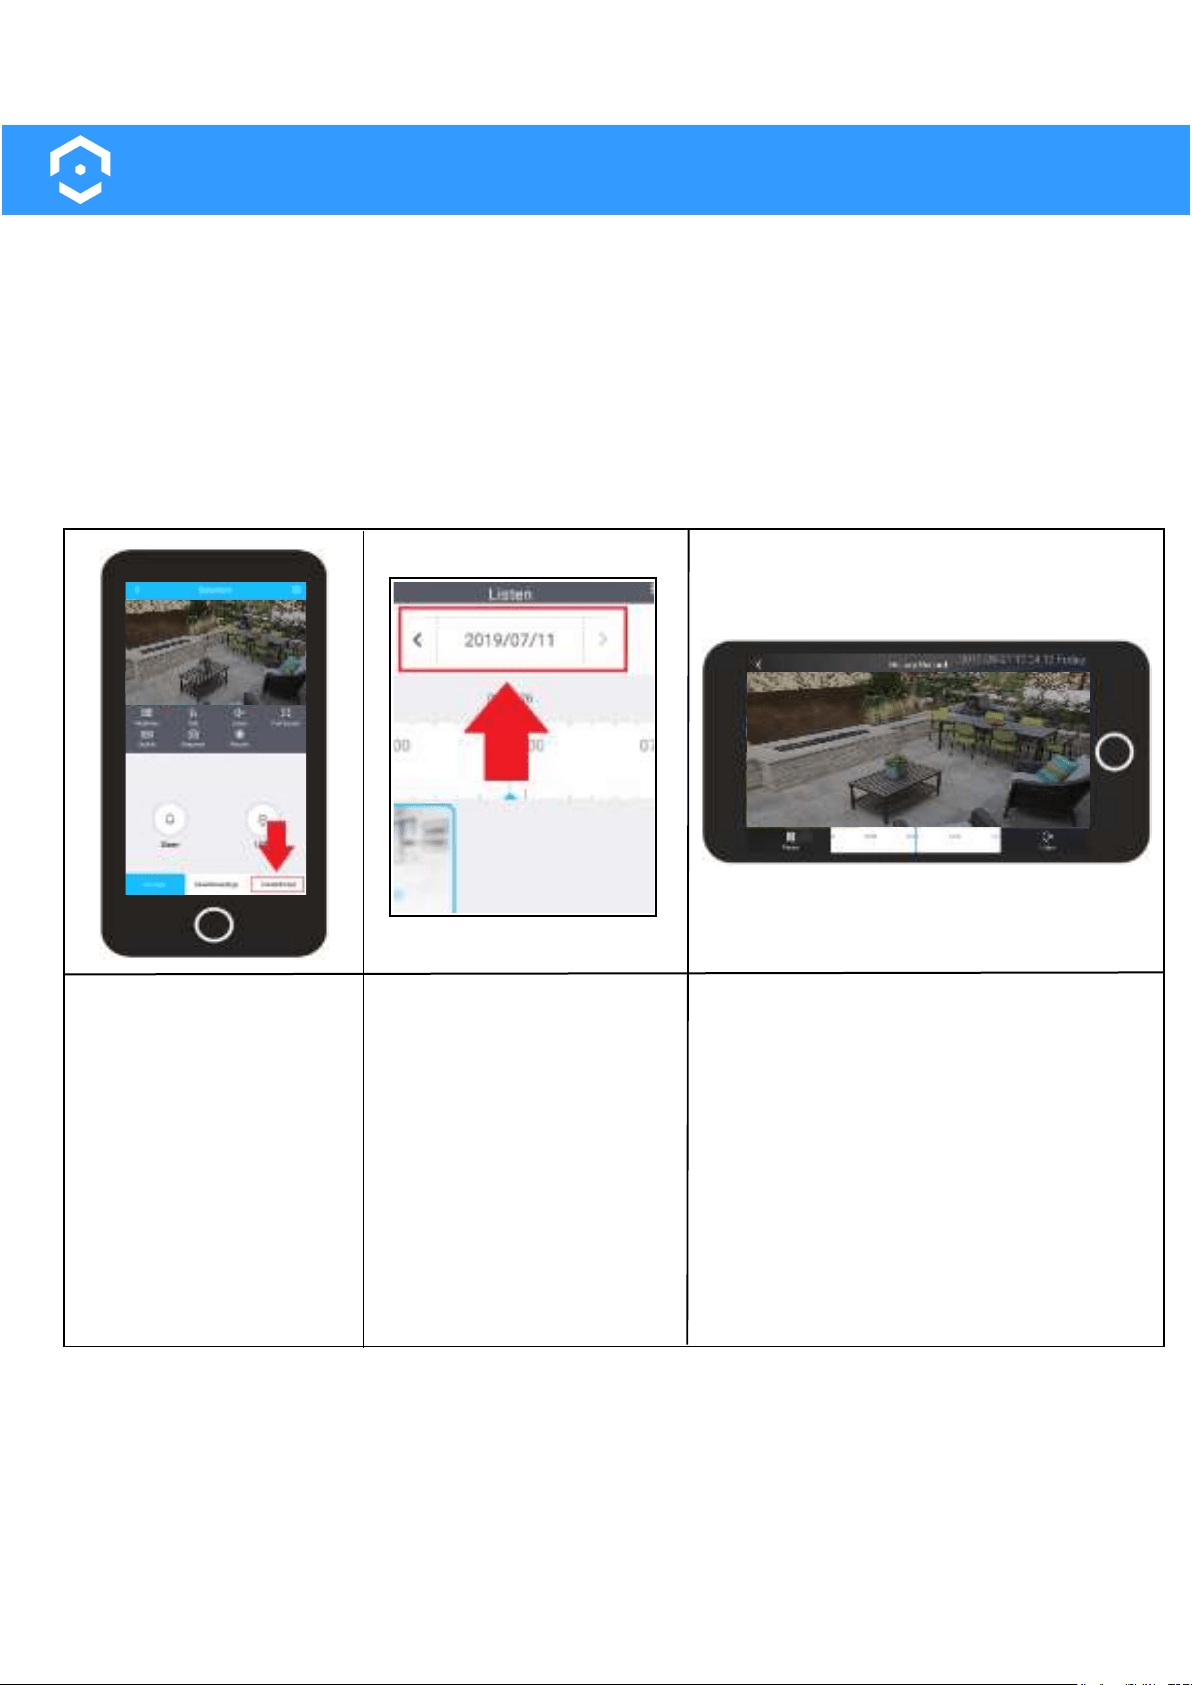
Playback MicroSD Card Recordings
Log into your account in
the app and select your
device.
On the live view screen,
tap on the "MicroSD Card"
menu located at the
bottom right of the screen.
Access MicroSD Menu
In the MicroSD card menu
you will notice a list of
recordings. Recordings can
be accessed and viewed
based on the date the motion
occurred and can be found
by tapping on the calendar
menu in the app.
recording.
Select Your Recording
Note: Recordings stored on a microSD card cannot be downloaded to your smartphone via the app. To
download the recordings, remove the microSD card from the device and use a SD card adapter to view
them on a computer.
Viewing a Recording
All motion detection recordings will occur
back to back in the interface which allows
the device to capture all events without
the use of a cool down period.
19
App Settings
motion detection, time zone, Wi-Fi and other related settings. All settings are based on the capbilities of the
on the settings available for your device.
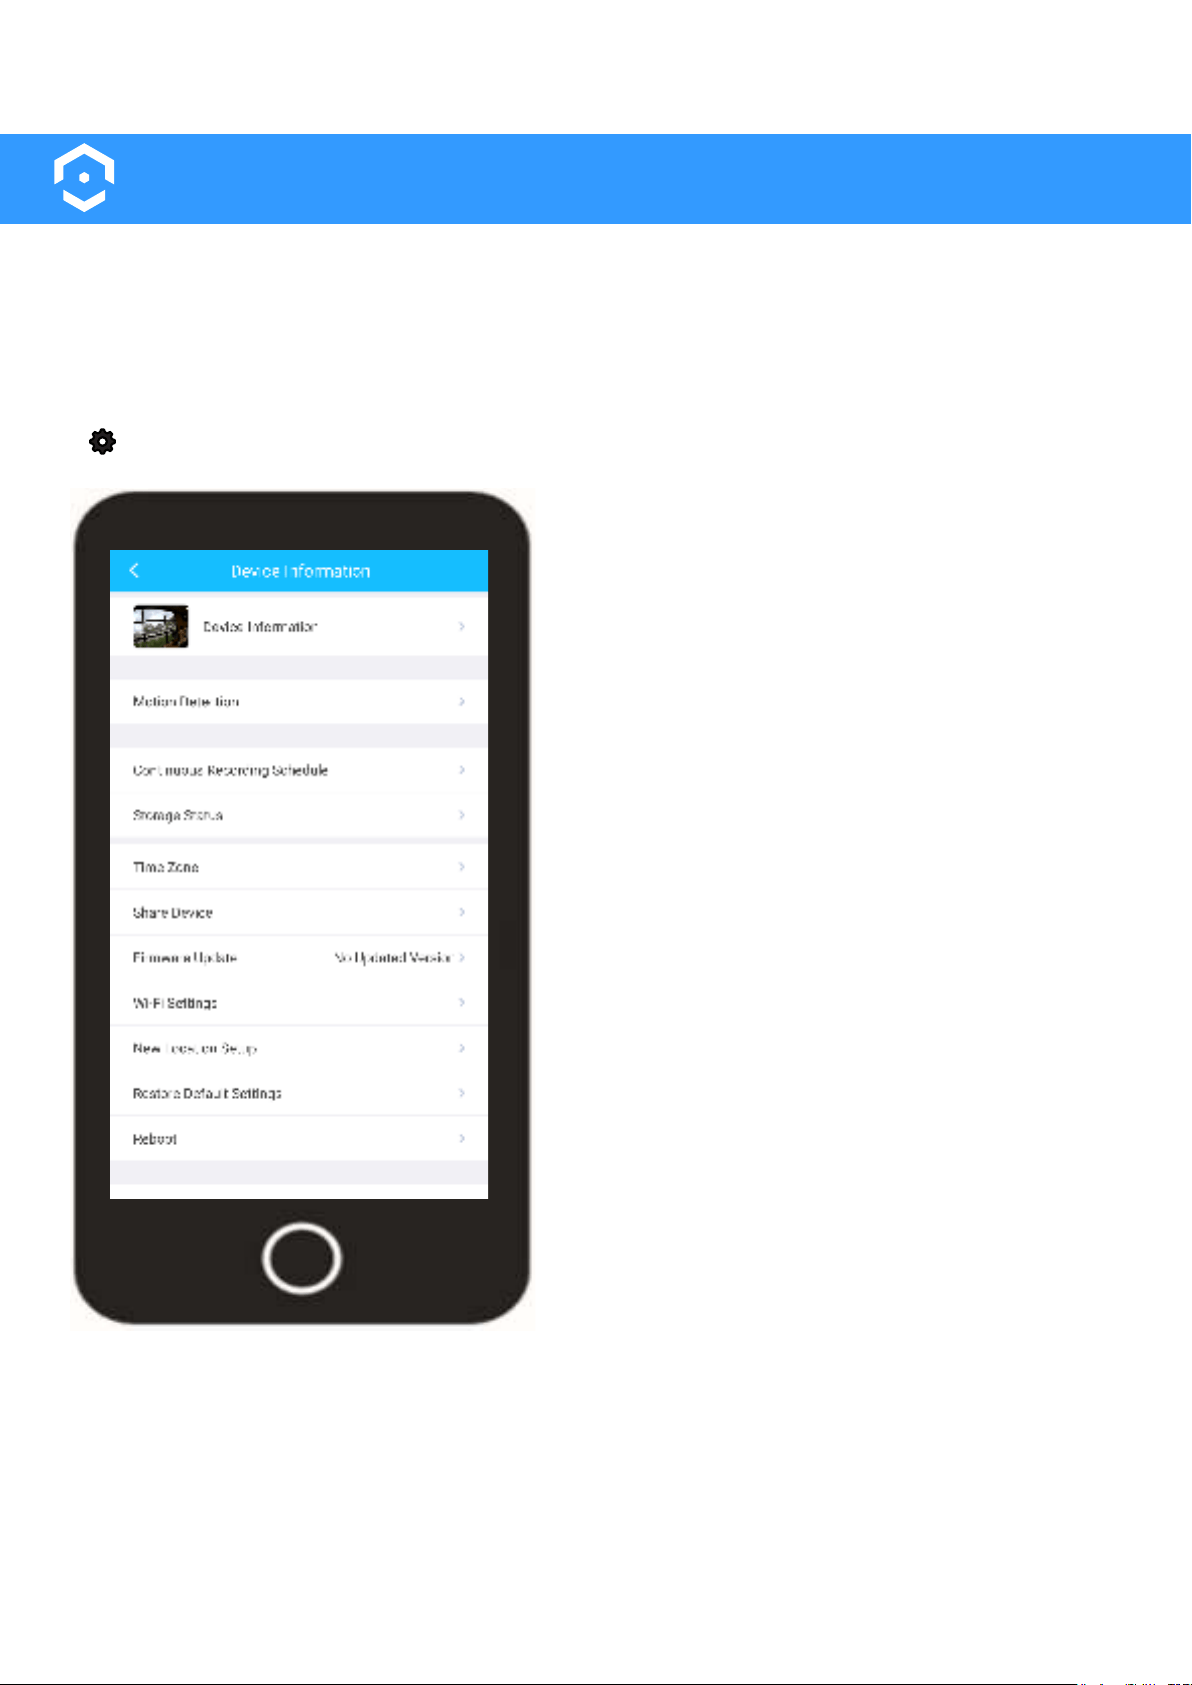
Accessing the Settings Menu
The settings menu for your device can be accessed via the live view menu. Tap on the settings icon
( ) to display the settings menu. The settings menu for your device is displayed below.
Device Information - This menu allows you to update
the thumbnail image, name, and password for your
device. The model number, serial number and other
useful information can be accessed via this menu.
Motion Detection - This menu allows you to customize,
adjust, and set motion detection schedules for your
device. When motion detection is enabled your device
will record video whenever motion is detected.
Continuous Recording Schedule- This menu allows you
to set your device to continously record video to a
microSD card. Note: Once the microSD card is full, old
footage will be overwritten on the card.
Storage Status - Displays any current cloud or microSD
card storage options applicable for your device. This
option also allows you to format a microSD card right
from your device.
Time Zone - This menu allows you to adjust and set any
time zone related information for your device. Enable
DST (daylight savings time) settings for your device if
needed.
Share Device - This menu allows you to share your
device with other people with established Amcrest Smart
Firmware Update - This menu allows you to update the
-
Wi-Fi Settings - This menu allows you to change Wi-Fi
networks for your device.
New Location Setup - Provides information on how to
setup your device in a new location.
Restore Default Settings - Restores your device to its
original default settings.
Reboot - This option allows you to restart your device from the Amcrest Smart Home app.
Video Settings - This menu provides access to general video settings related to your device.
an event is detected by your camera.
Delete Device - This option unbounds your device from your Amcrest Smart Home account.
20
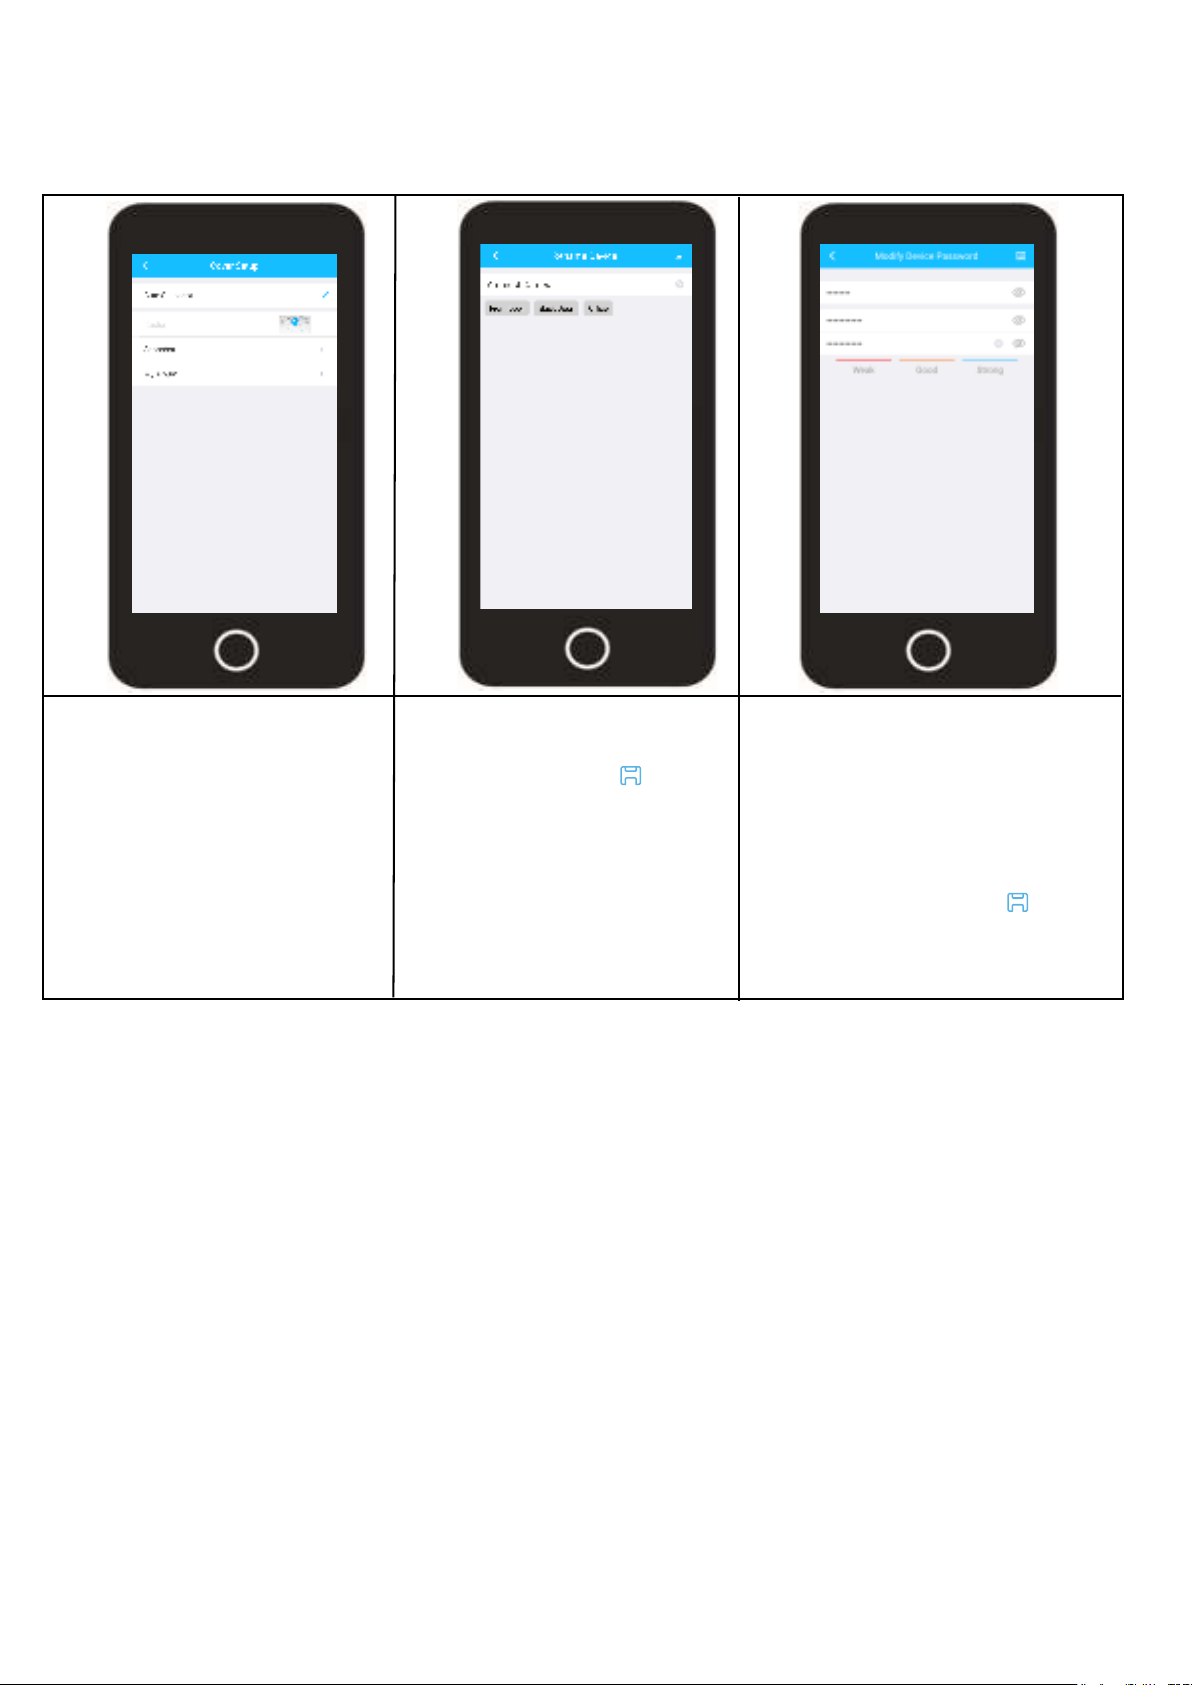
Device Information
This menu allows you to update the thumbnail image, name, and password for your device. The model
number, serial number and other useful information can be accessed via this menu.
Tap on Device Thumbnail to
update the thumbnail image
for your device.
The thumbnail can be default,
a manually taken snapshot, or
uploaded from your smart-
phone.
Tap on Device Name to edit
the name of your device. Tap
on the Save icon ( ) when
interface.
Tap on Password to modify
the password for your device.
This is not the password for
your Amcrest Smart Home
account, it is the password to
access your device.
Tap on the Save icon ( )
interface.
21
Motion Detection Overview
Amcrest Smart Home devices allow you to view motion detection recordings locally, using a microSD
card (sold separately) or via Amcrest Smart Home cloud which is a cloud based service where you
can remotely view and store motion detection recordings.
By default, motion detection is automatically enabled on all Amcrest Smart Home devices. All motion
detection settings are adjustable using the Amcrest Smart Home app. Having motion detection
enabled allows your device to record video clips whenever motion is detected. If you are accessing
recordings locally using a microSD card, a microSD card must be inserted in your device before use.
Note: If storing motion detection events locally on a microSD card, please make sure the microSD
card is class 10 or above and properly formatted to FAT32. This device is compatible up to 128GB.
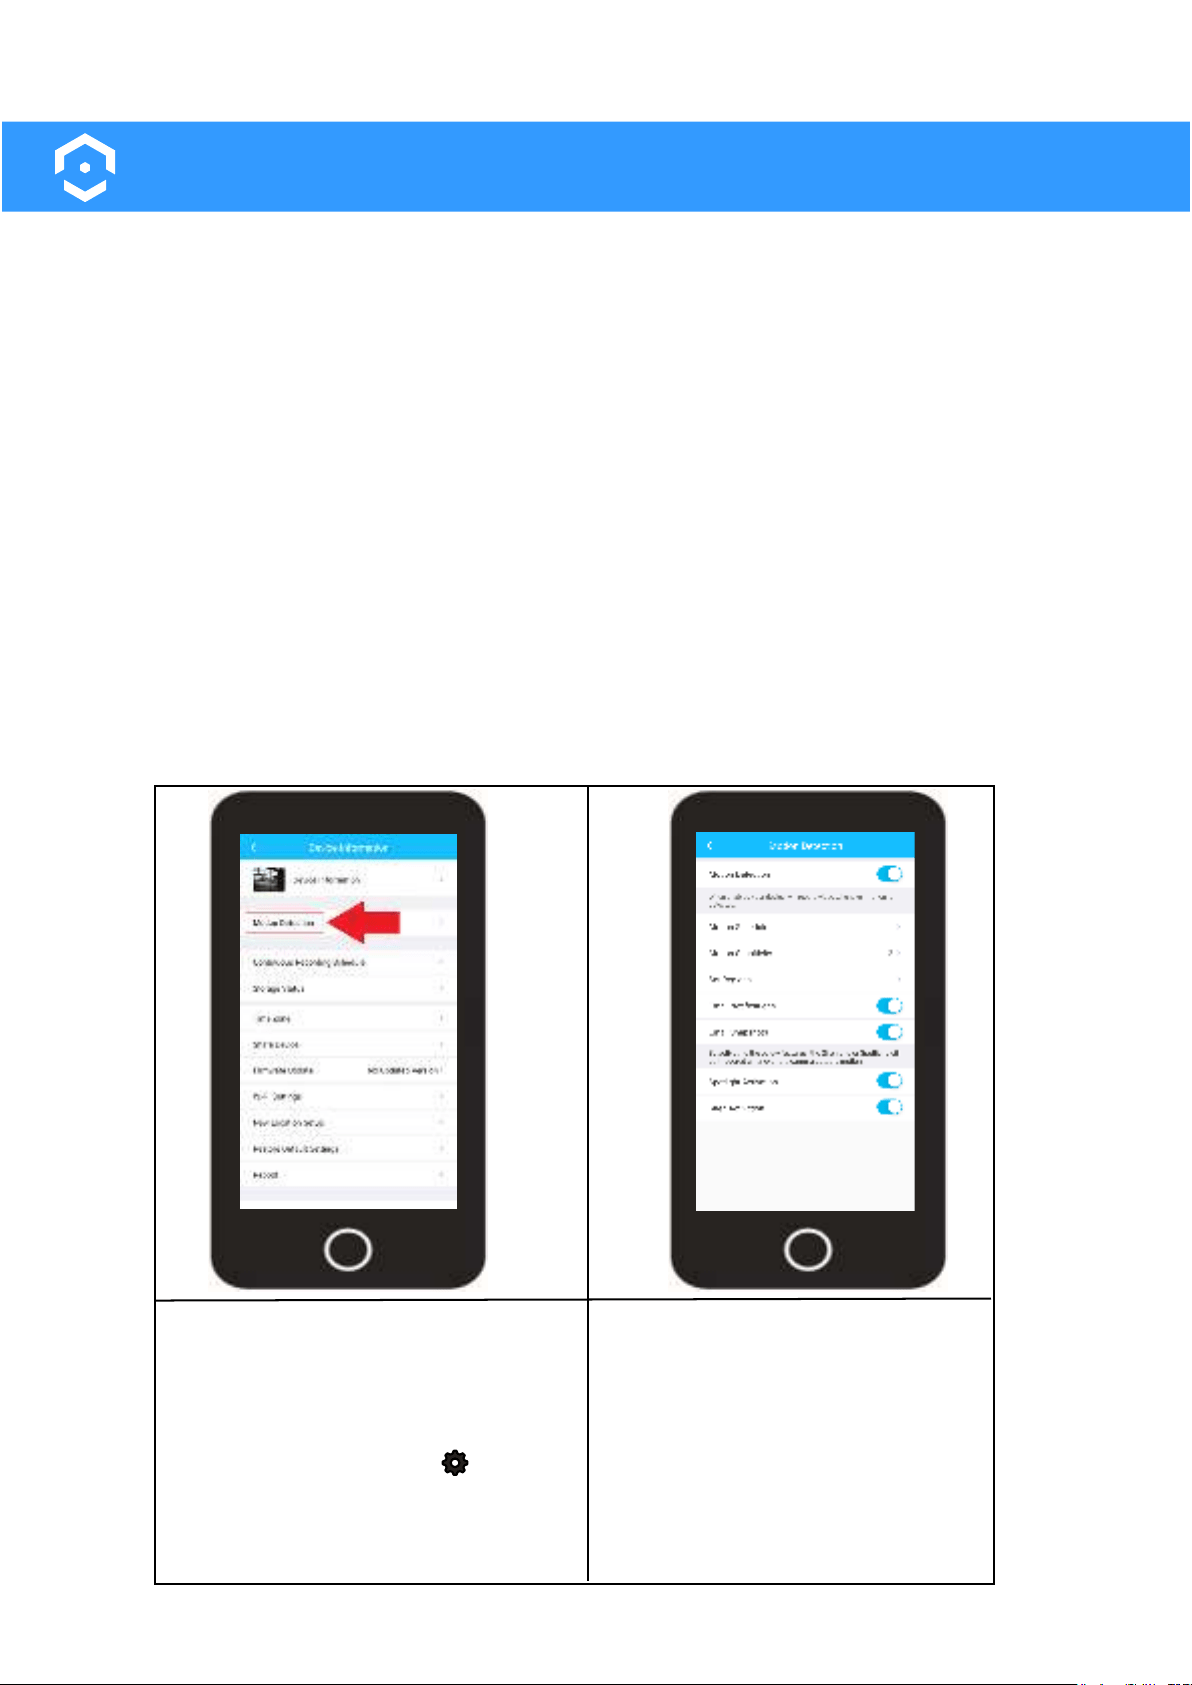
Motion Detection Settings
All motion detection settings for your device will be adjusted through the Amcrest Smart Home app.
motion sensors allows the camera to cover more distance and provides more accuracy when
detecting motion. For more information on accessing the motion detection settings, please refer to
the information provided below:
To access the motion detection
settings, open the Amcrest Smart
Home app and access the live view
screen for your device.
Tap on the settings icon ( ) and
select Motion Detection.
The motion detection settings for
your device will be displayed in
this menu which will allow you to
adjust and control motion settings
such as, motion schedules, sensi-
tivity, regions as well as enable
The Motion Detection toggle
switch must be enabled for motion
detection to work.
22
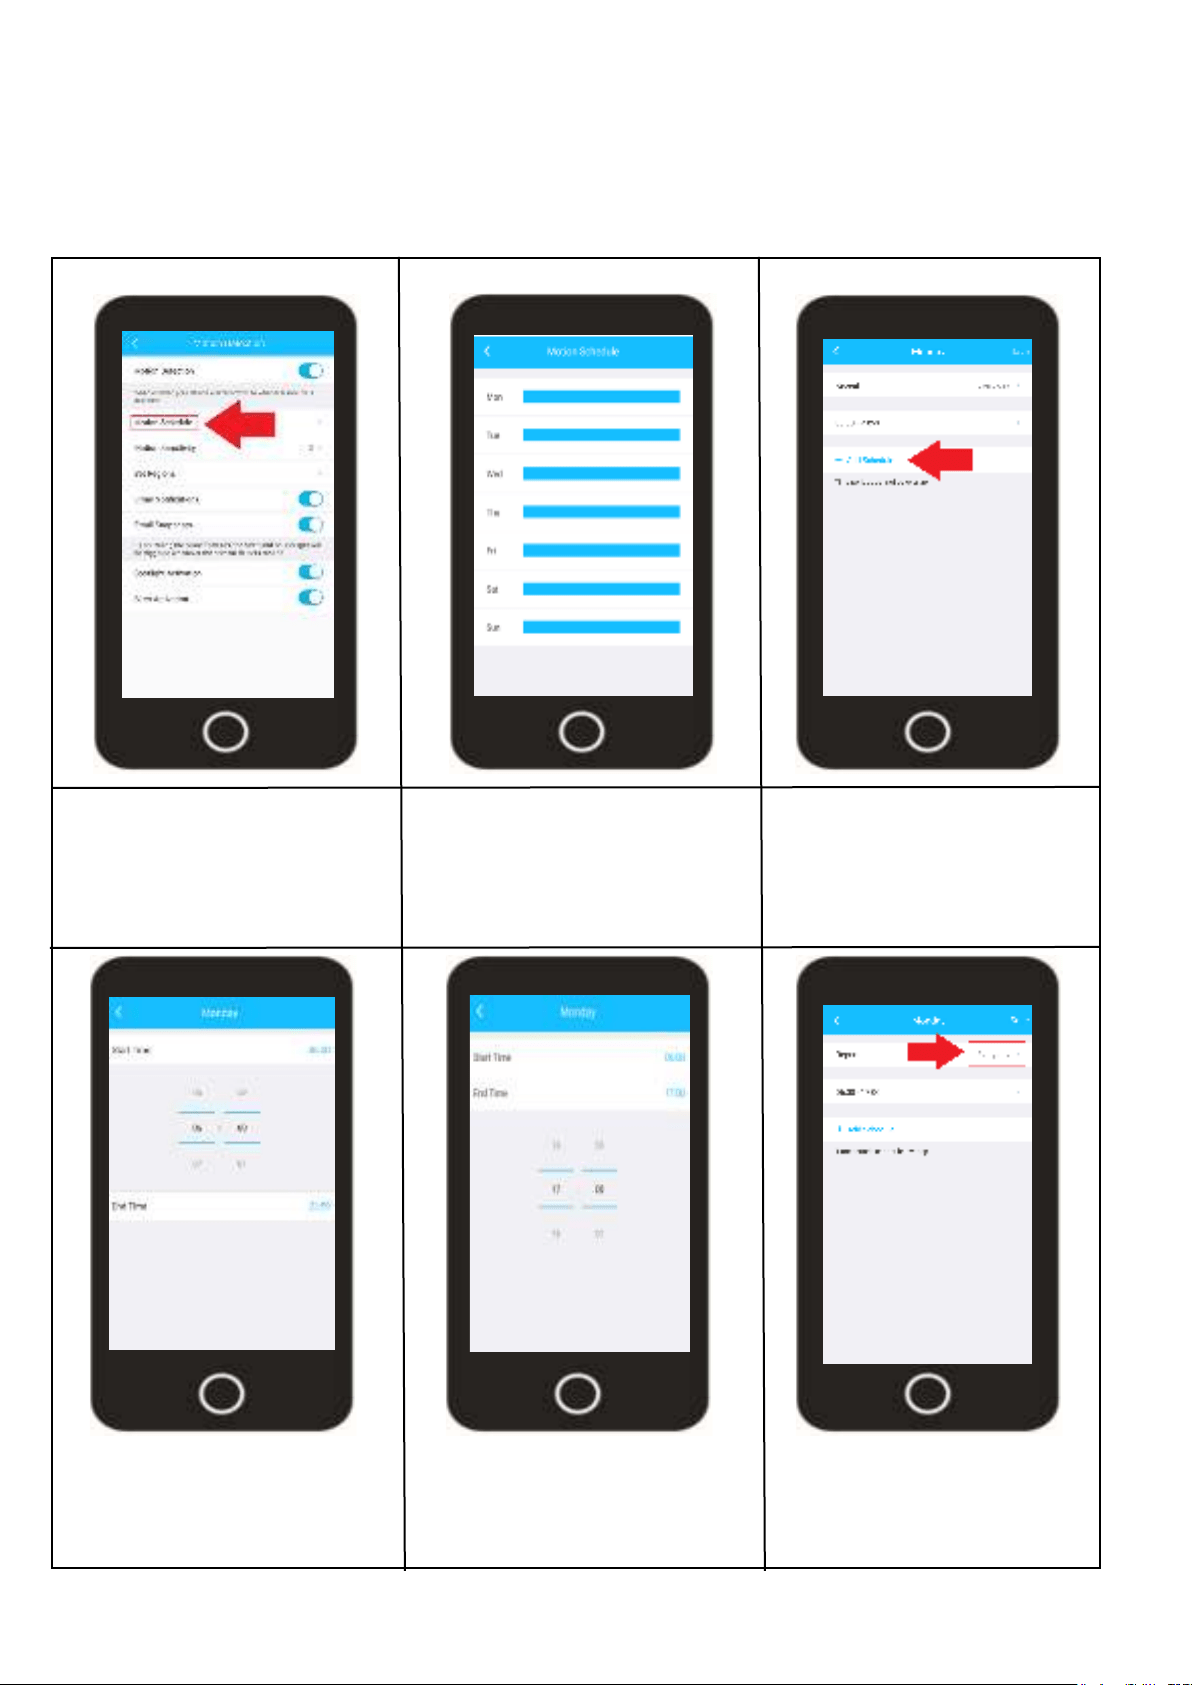
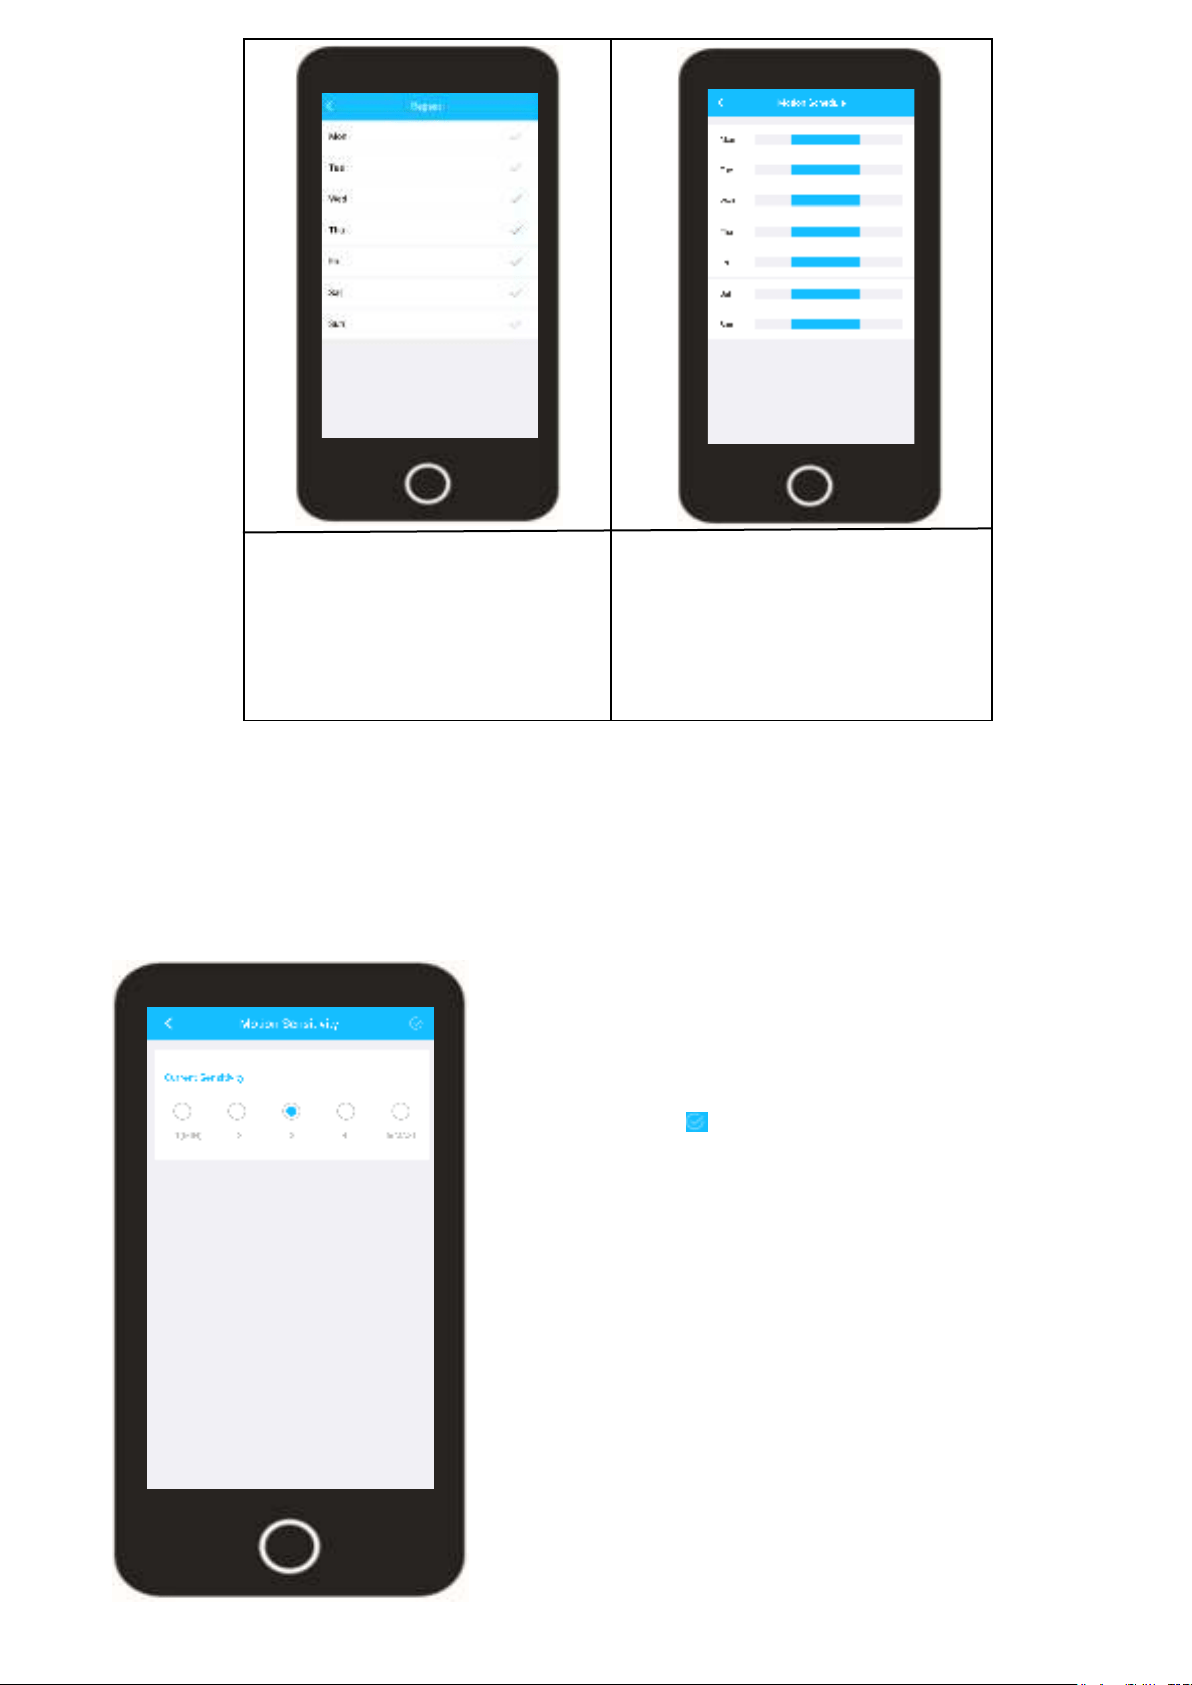
Motion Detection Schedules
A motion schedule allows you to set the device to begin recording motion detection events at a
designated time. This is useful if you would like the device to only start detecting motion during
schedule as default. However, for more information on how to set a motion schedule, please refer to
the information provided below.
Log into your Amcrest Smart
Home app and access the
Motion Detection menu.
Tap on Motion Schedule.
Tap on the day of the week
you wish to modify. If you are
setting a schedule for multiple
days of the week this can be
done later in the interface.
Tap on "Add Schedule".
Tap on “Start Time” and use the
scroll option to select a time
you want the motion schedule
to start.
Tap on “End Time” and use
the scroll option to select a
time you want the motion
schedule to stop. Tap on the
Note: Motion schedules cannot overlap.
Tap on “Repeat” to choose
which days of the week you
would like the motion sched-
ule to apply.
23
A blue check mark will be
days.
Tap on the “Save” button to save
your motion schedule. The motion
schedule is now applied to your
device.
Motion Sensitivity
Motion sensitivity allows you to adjust how sensitive the motion detection will be for your
-
ing the most accurate detection of your events.
The lower the sensitivity value is on your camera
the more activity the sensors need to retain an
recommended to leave the sensitivity at 3 however,
if you make any adjustements be sure to tap on the
blue check mark ( ) to save the motion sensitivity
setting.
24
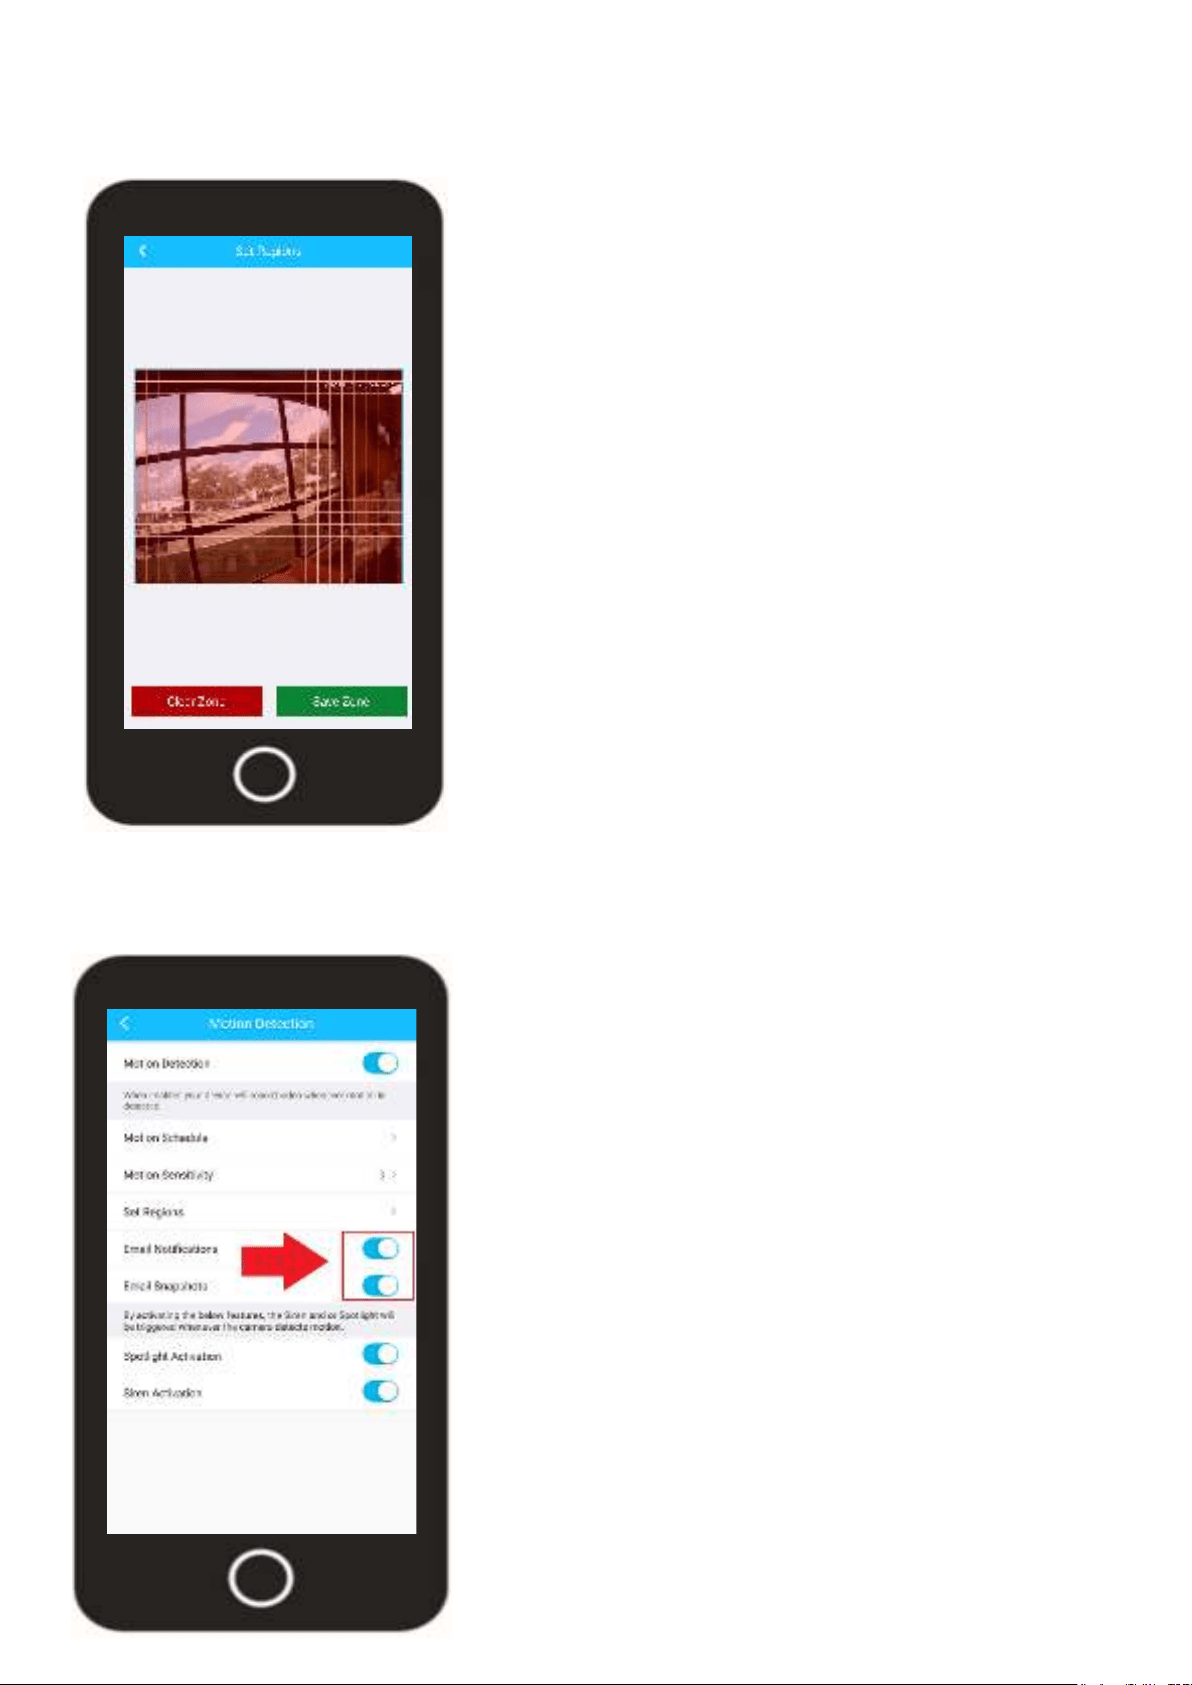
Set Regions
Setting motion detection regions allows you to customize activity zones for motion detection areas.
This helps to block out and avoid false motion events and is useful for blocking out areas such as
To set a motion detection region, tap on "Clear
Zone"
the screen that you would like to block motion
detection events. Tap on "Save Zone" to save
the motion detection region. Tap on the back
By default, these options will be enabled. If
they are disabled, the camera will not be
able to send email alerts even if your Email
credentials are entered in the app.
25
motion or other event has been detected. These options are enabled by default however can
the information provided.
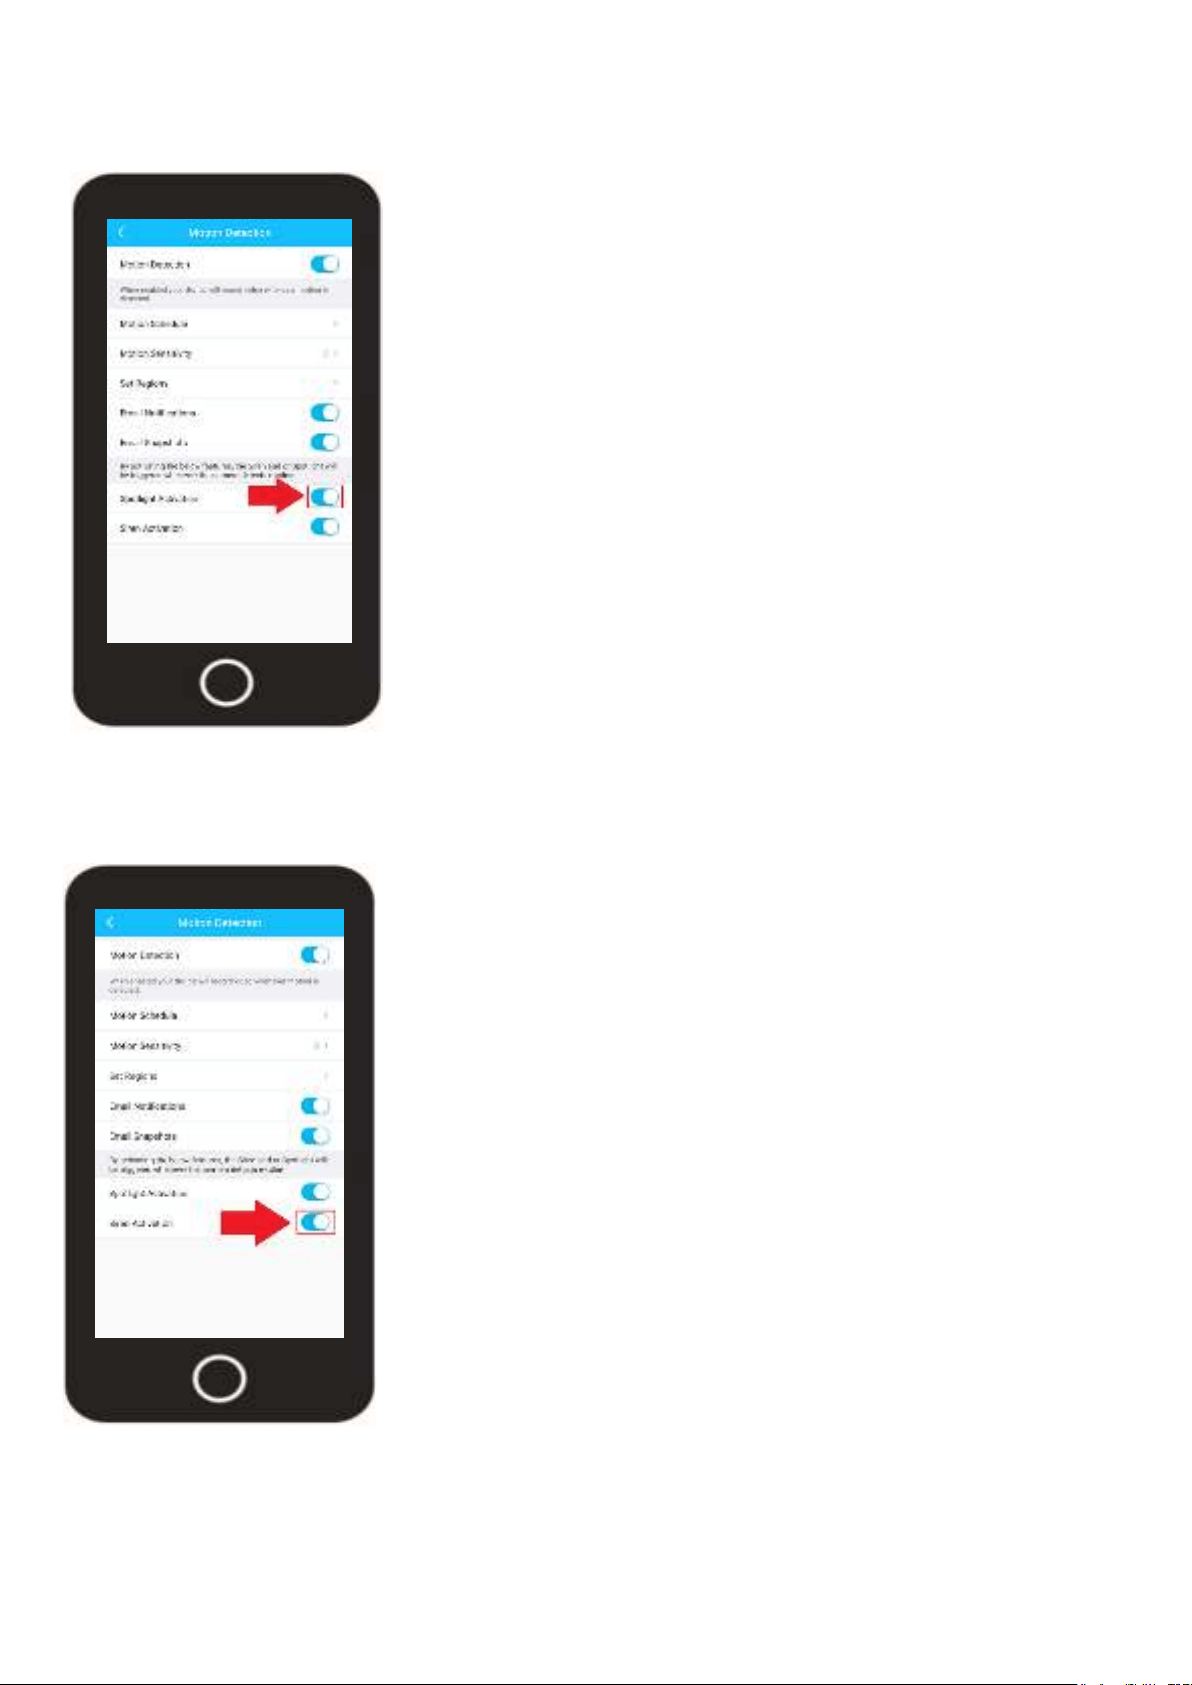
Spotlight Activation
The spotlight activation toggle switch enables or disables the spotlight on the front of your
camera. Once enabled, the spotlight on the front of your camera will turn on once a motion is
detected by the camera.
Siren Activation
The siren activation toggle switch enables or disables the siren on your camera. Once enabled, the
siren on the camera will turn on once a motion is detected by the camera.
Tap on the Spotlight Activation toggle switch to
enable or disable the spotlight on the front of
your camera.
Once enabled, the spotlight will activate once a
motion is detected.
Tap on the Siren Activation toggle switch to
enable or disable the siren on your camera.
Once enabled, the siren will activate once a
motion is detected.
26
using the Amcrest Smart
Home app. These
settings are account
based and not neces-
sarily based per device.
Amcrest Smart app and
tap on the Account menu.
In the account menu,
scroll down to the
menu. You will notice
2 toggle switches,
one for your devices
and one for shared
devices.
If you would like to turn
events you can based
on device in the Devices
events per device
toggle the "running
man" icon ( ) to the
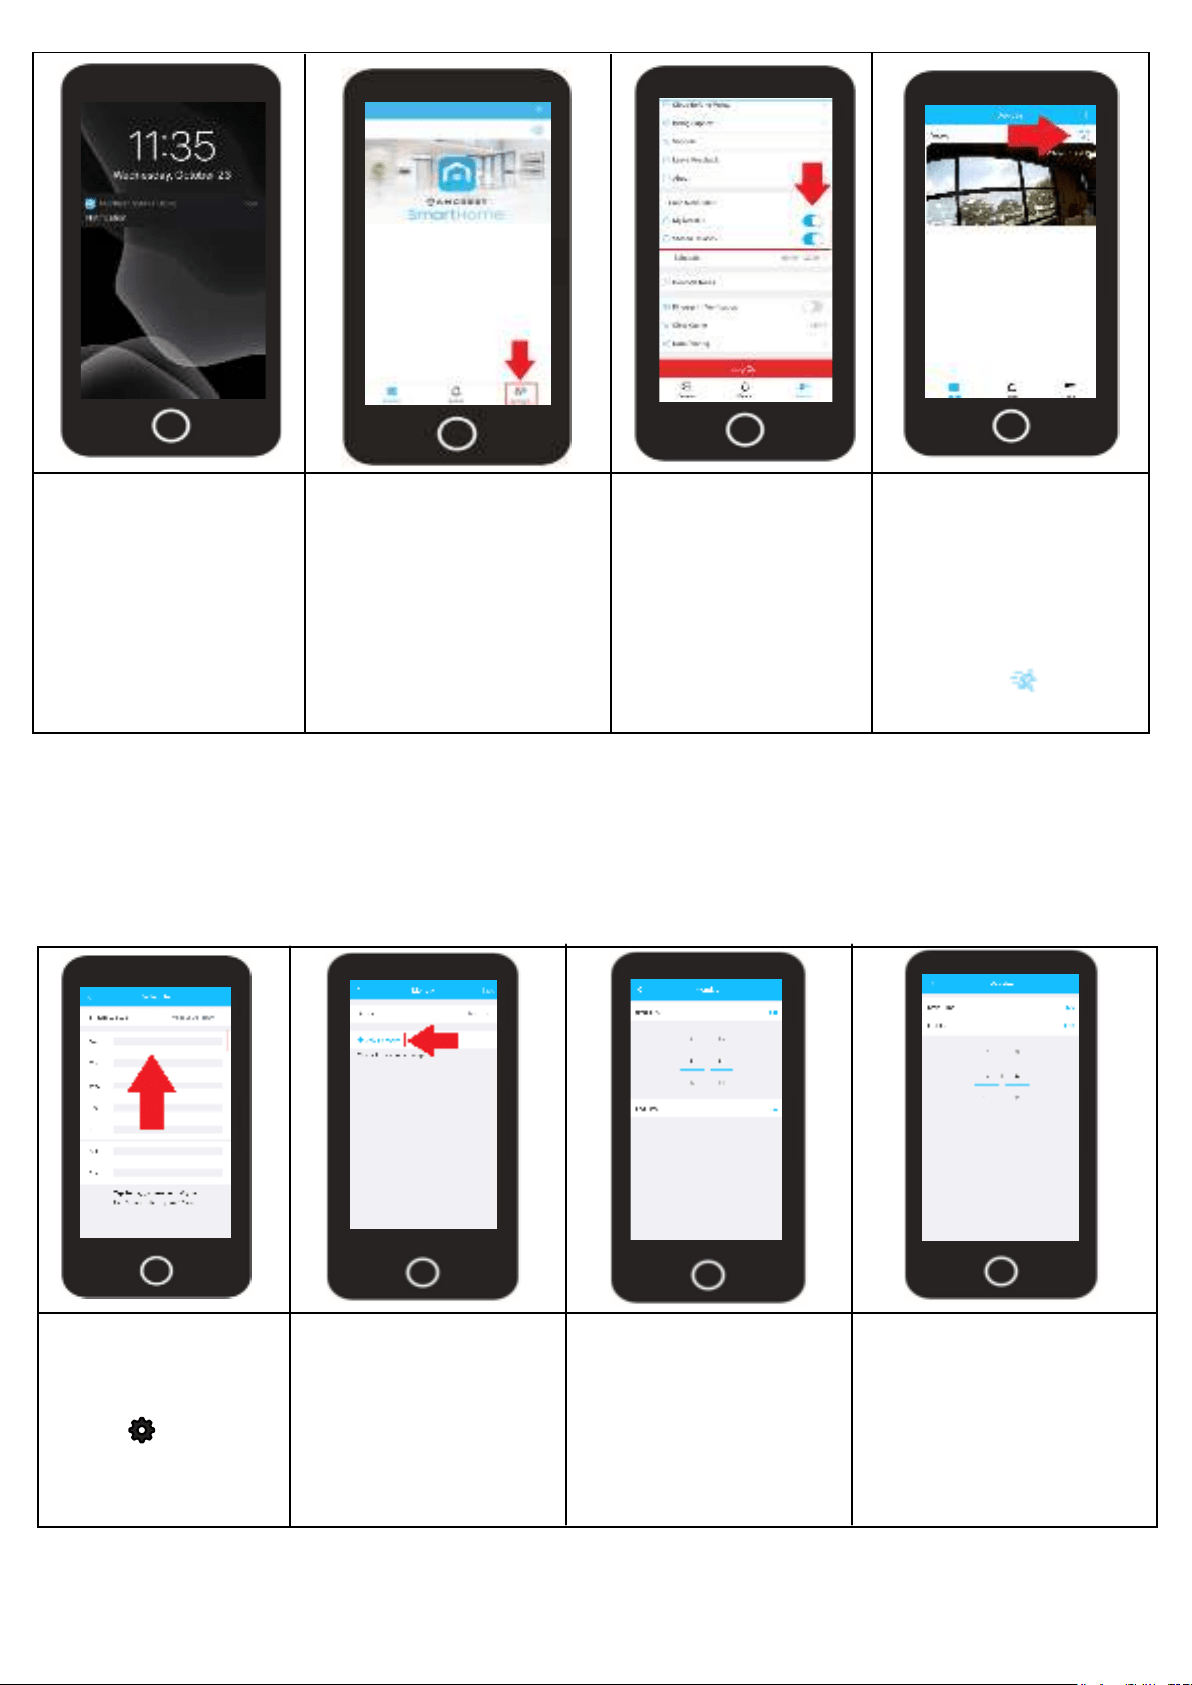
Continuous Recording Schedules
your camera to record video. Once a continuous recording schedule is created the camera will being
on by default and will need to be set manually in the app by the user.
Log into your Amcrest
Smart Home app and
select your device.
Tap on the Settings
menu ( ) and
select “Continuous
Recording Schedule”.
Note: A continuous recording schedule is only available if a microSD card is inserted in your
camera.
Tap on “Add Schedule”.
Tap on “Start Time” and
use the scroll option to
select a time you want
the continuous schedule
to start.
using 0600 (6am).
Tap on “End Time” and
use the scroll option to
select a time you want
the continuous schedule
to end.
using 1700 (5pm).
27
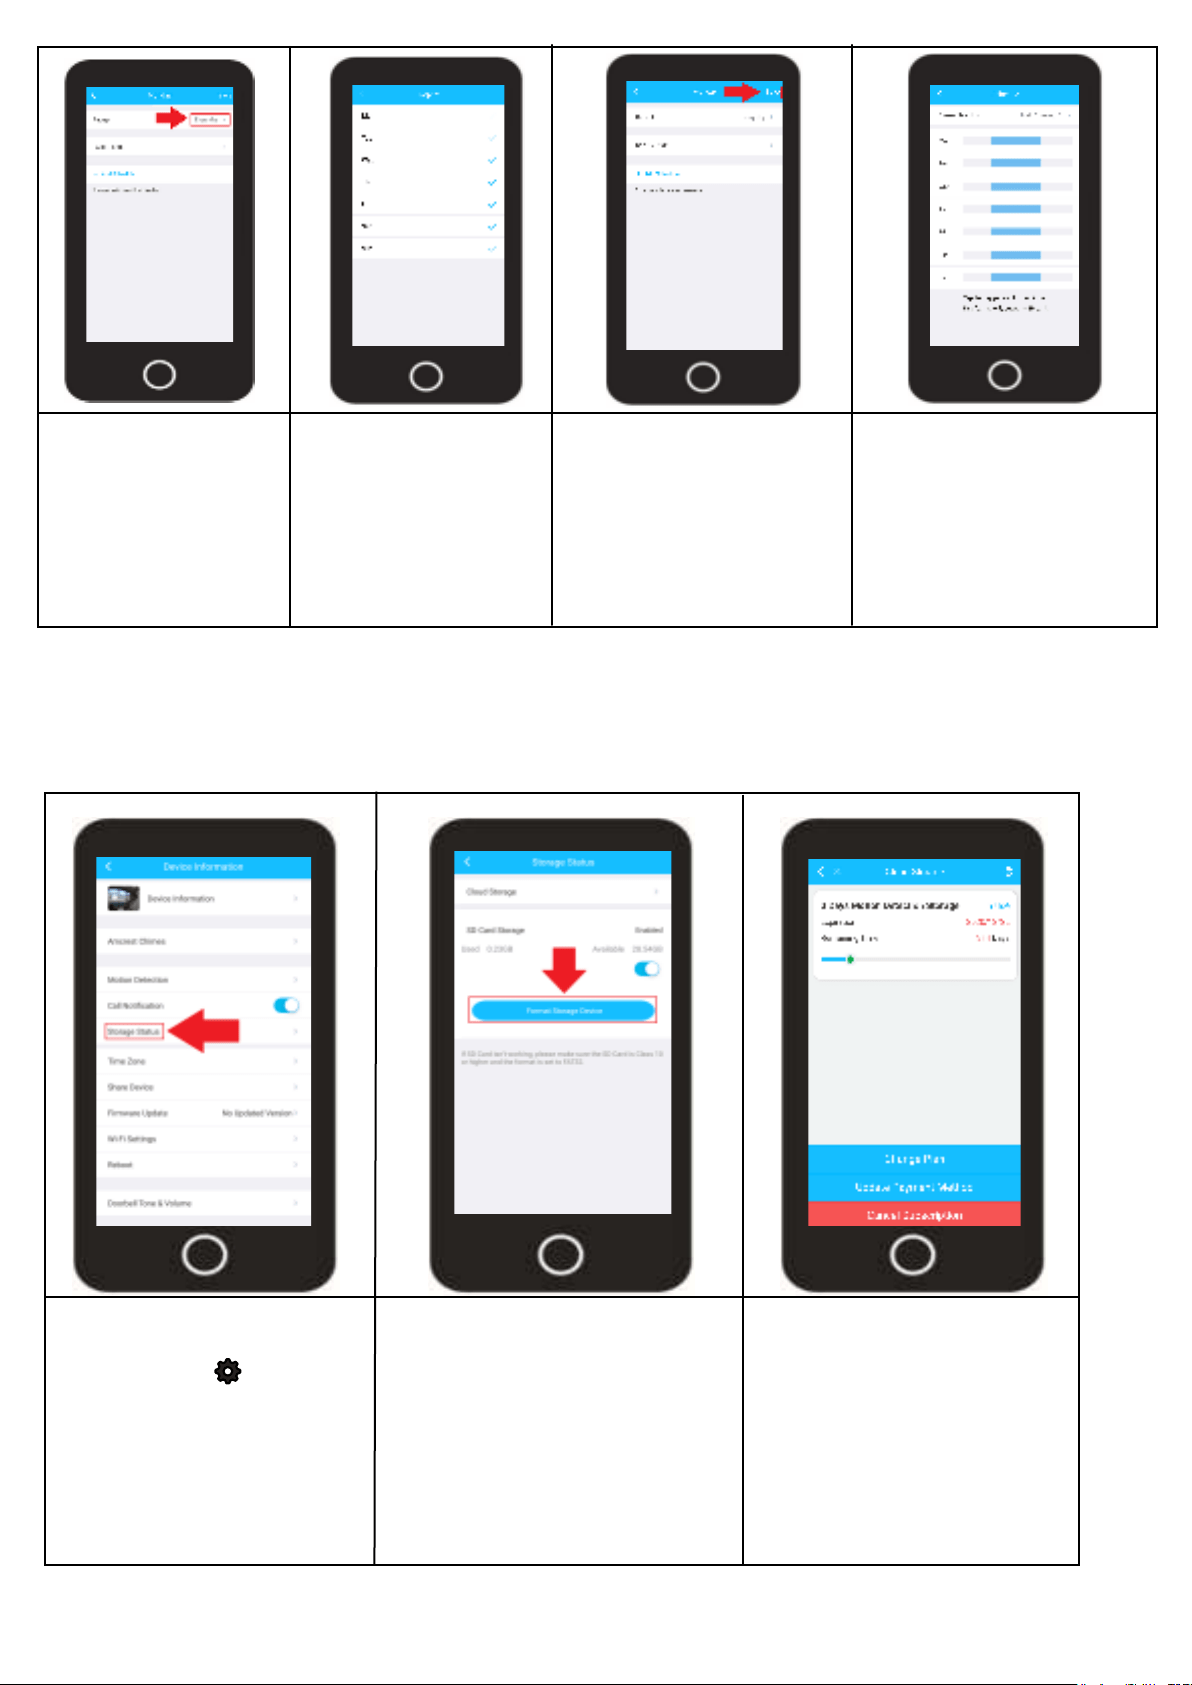
Storage Status
The storage status menu displays any current cloud or microSD card storage options applicable for
your device. This option also allows you view current cloud subscriptions applicable to your device as
well as format a microSD card right from your smartphone.
To access the Storage
Status menu, tap on the
settings icon ( ) on the
live view screen.
Tap on the Storage Status
option located in the
settings menu.
The microSD card storage
capacity will be displayed
in this menu. If no microSD
card is being read by the
device the status will be
“Disabled”
To format the microSD card,
tap on “Format Storage
Device”.
To access cloud storage
details, tap on “Cloud Storage”.
Then tap on “Active Cloud
Service”.
This menu allows you to
change a cloud plan, update
payment information, or cancel
a subscription.
Tap on “Repeat” to
choose which days
of the week you
would like the
continuous schedule
to apply.
A blue check mark will
the active days.
Tap the back arrow ( < )
Tap on Save.
The continuous record-
ing schedule is now
applied to your device.
Tap the back arrow ( < )
28
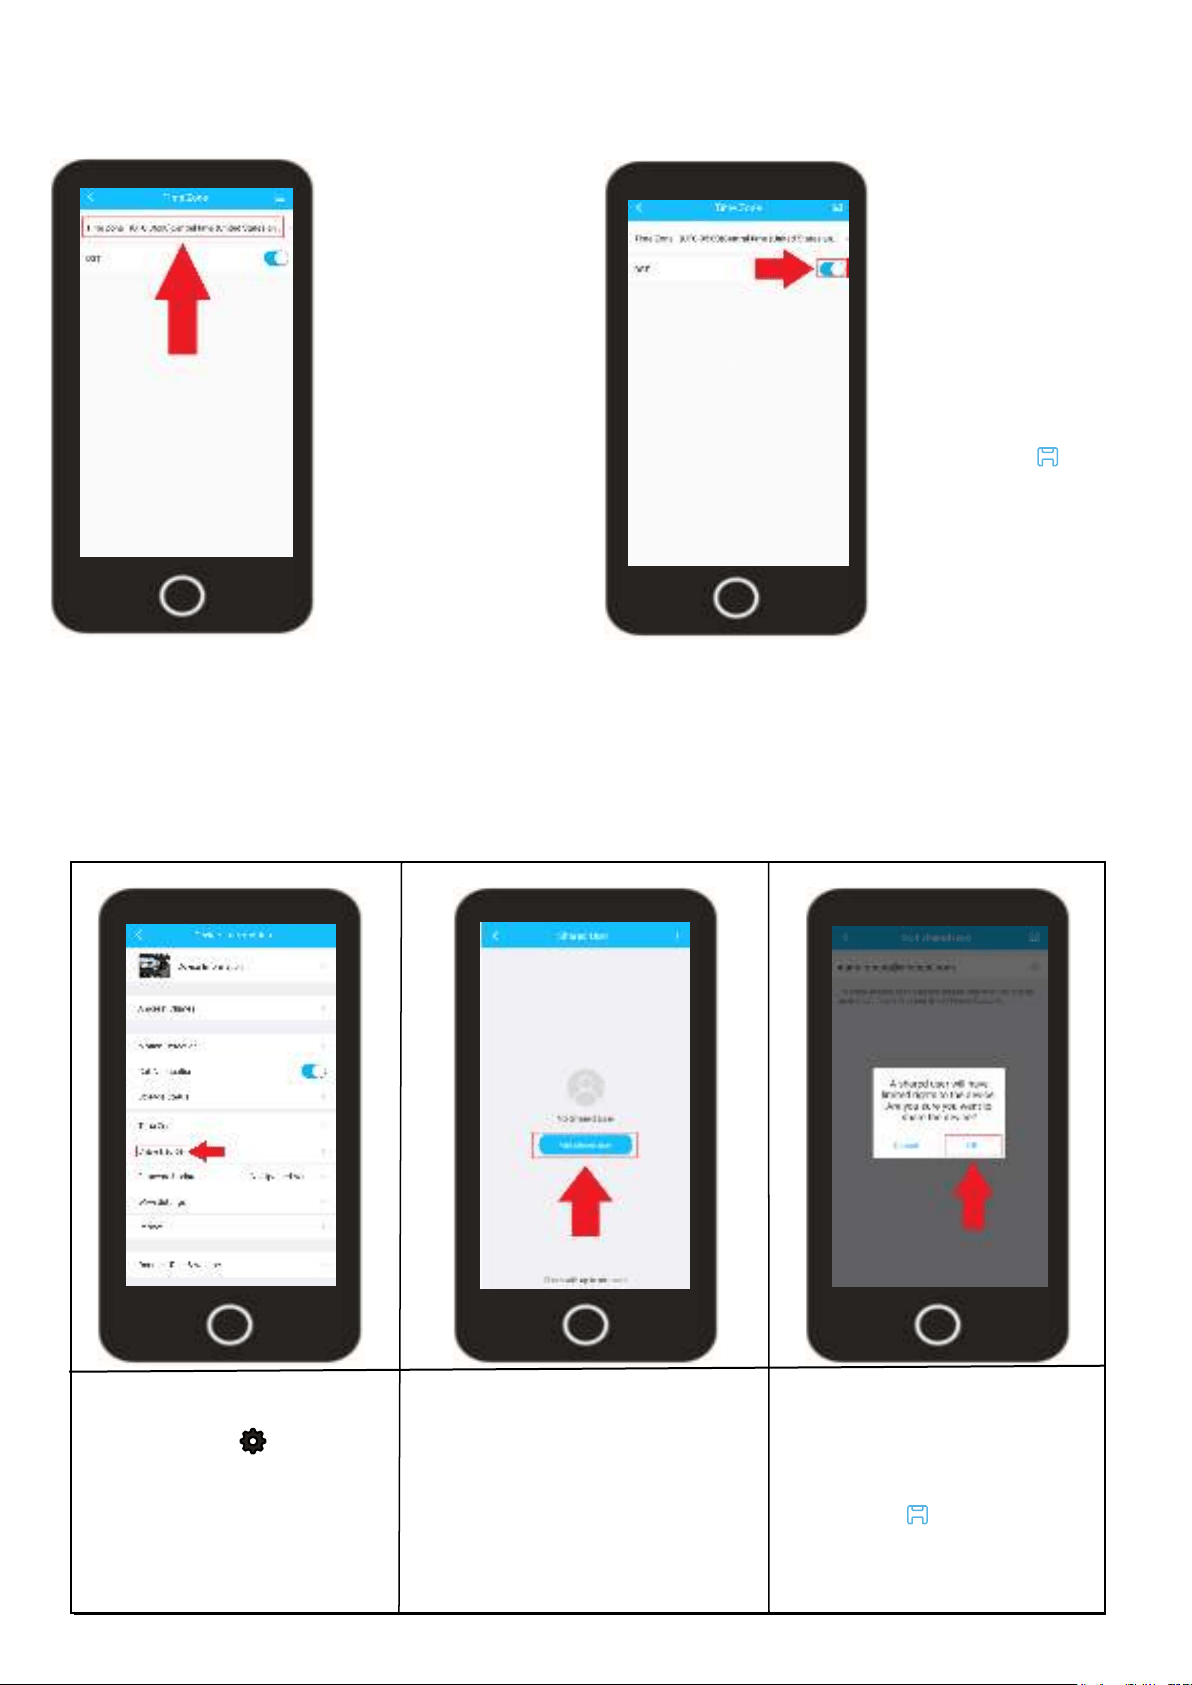
Time Zone
This menu allows you to adjust and set any time zone related information for your device. Enable
DST (daylight savings time) settings for your device if needed.
To change the time
zone for your device
tap on “Time Zone”
and select your time
zone from the provided
list.
Tap the back arrow ( < )
to return to the previous
menu
Daylight savings
time (DST) should be
enabled by default
however, if you
would like to
enable/disable it use
the provided DST
toggle switch.
Tap the Save ( )
icon to save your
time zone settings.
Share Device
added device. When you add a shared user, the shared user will have access to your camera and
features such as live viewing, recording, playback, and two-way audio.
Note:
To access the Share
Device menu, tap on the
settings icon ( ) on the
live view screen.
Tap on the Share Device
option located in the
settings menu.
Tap on, "Add a Shared User".
Enter a registered Amcrest
Smart Home account email
you would like to share your
device with. Once you have
entered the email press the
Save icon ( ).
Tap OK to add the shared
user.
29
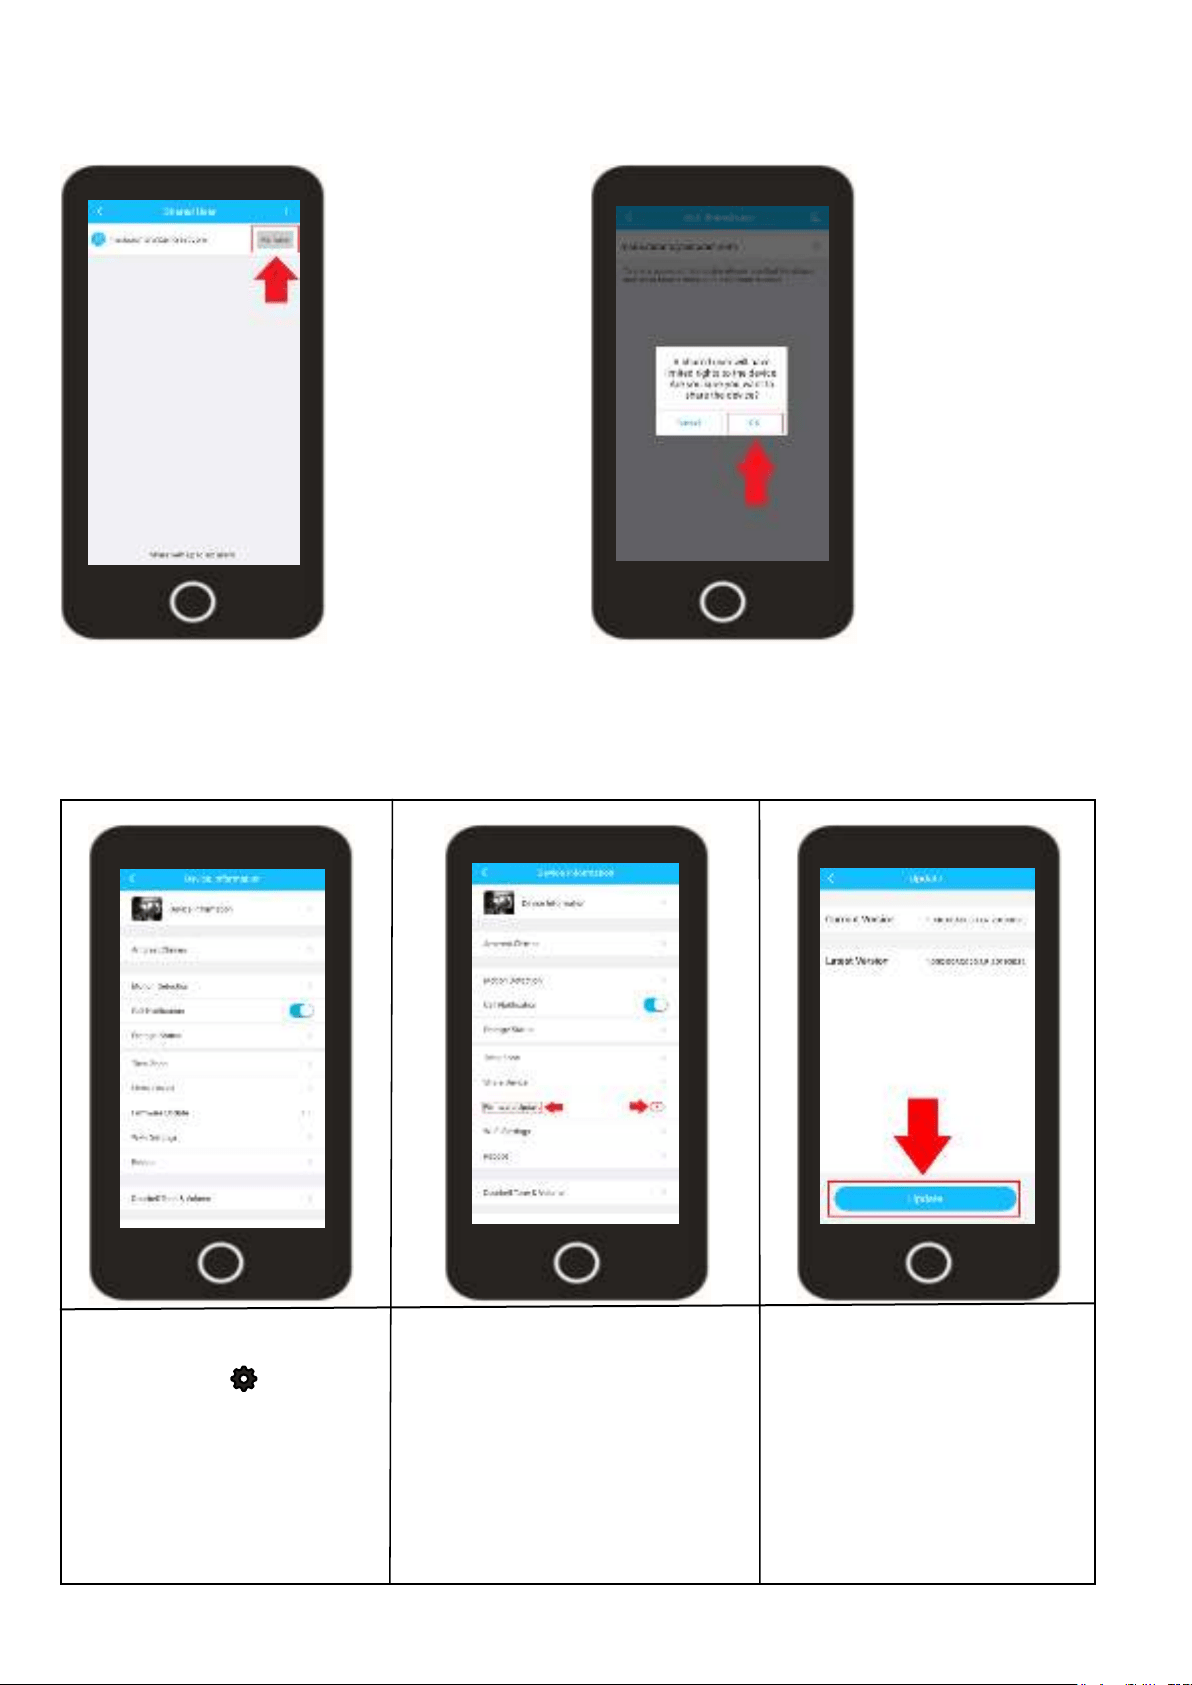
Removing a Shared Device
Removing a shared device from your account will revoke sharing permissions for added shared users.
You can remove a shared user in the Shared Device menu.
Access the Shared
Device menu and
locate the shared user
on your device.
Tap Remove to remove
the shared user.
Tap OK to remove the
shared user from your
device.
To access the Firmware
Update opton, tap on the
settings icon ( ) on the
live view screen.
Locate the Firmware
Update option.
upgrade is ready.
Tap on the "Firmware Update" tab
to proceed with the update if it is
available.
Firmware Update
date at all times.
you will notice the current
your camera, and the latest
downloaded to your camera.
To proceed with the update,
please click on "Update".
Tap “Cloud Upgrade”. and
allow the device to update.
30
Wi-Fi Settings
This menu allows you to change Wi-Fi networks for your device. Please note, this device is not a dual
band device, please make sure to connect to a 2.4GHz Wi-Fi network.
To access the Wi-Fi Settings
menu, tap on the settings
icon ( ) on the live view
screen.
Tap on the Wi-Fi Settings
option and select your Wi-Fi
network from the Wi-Fi list.
Enter the Wi-Fi password for
your network and tap the
save icon ( ) to save the
new Wi-Fi network to your
device.
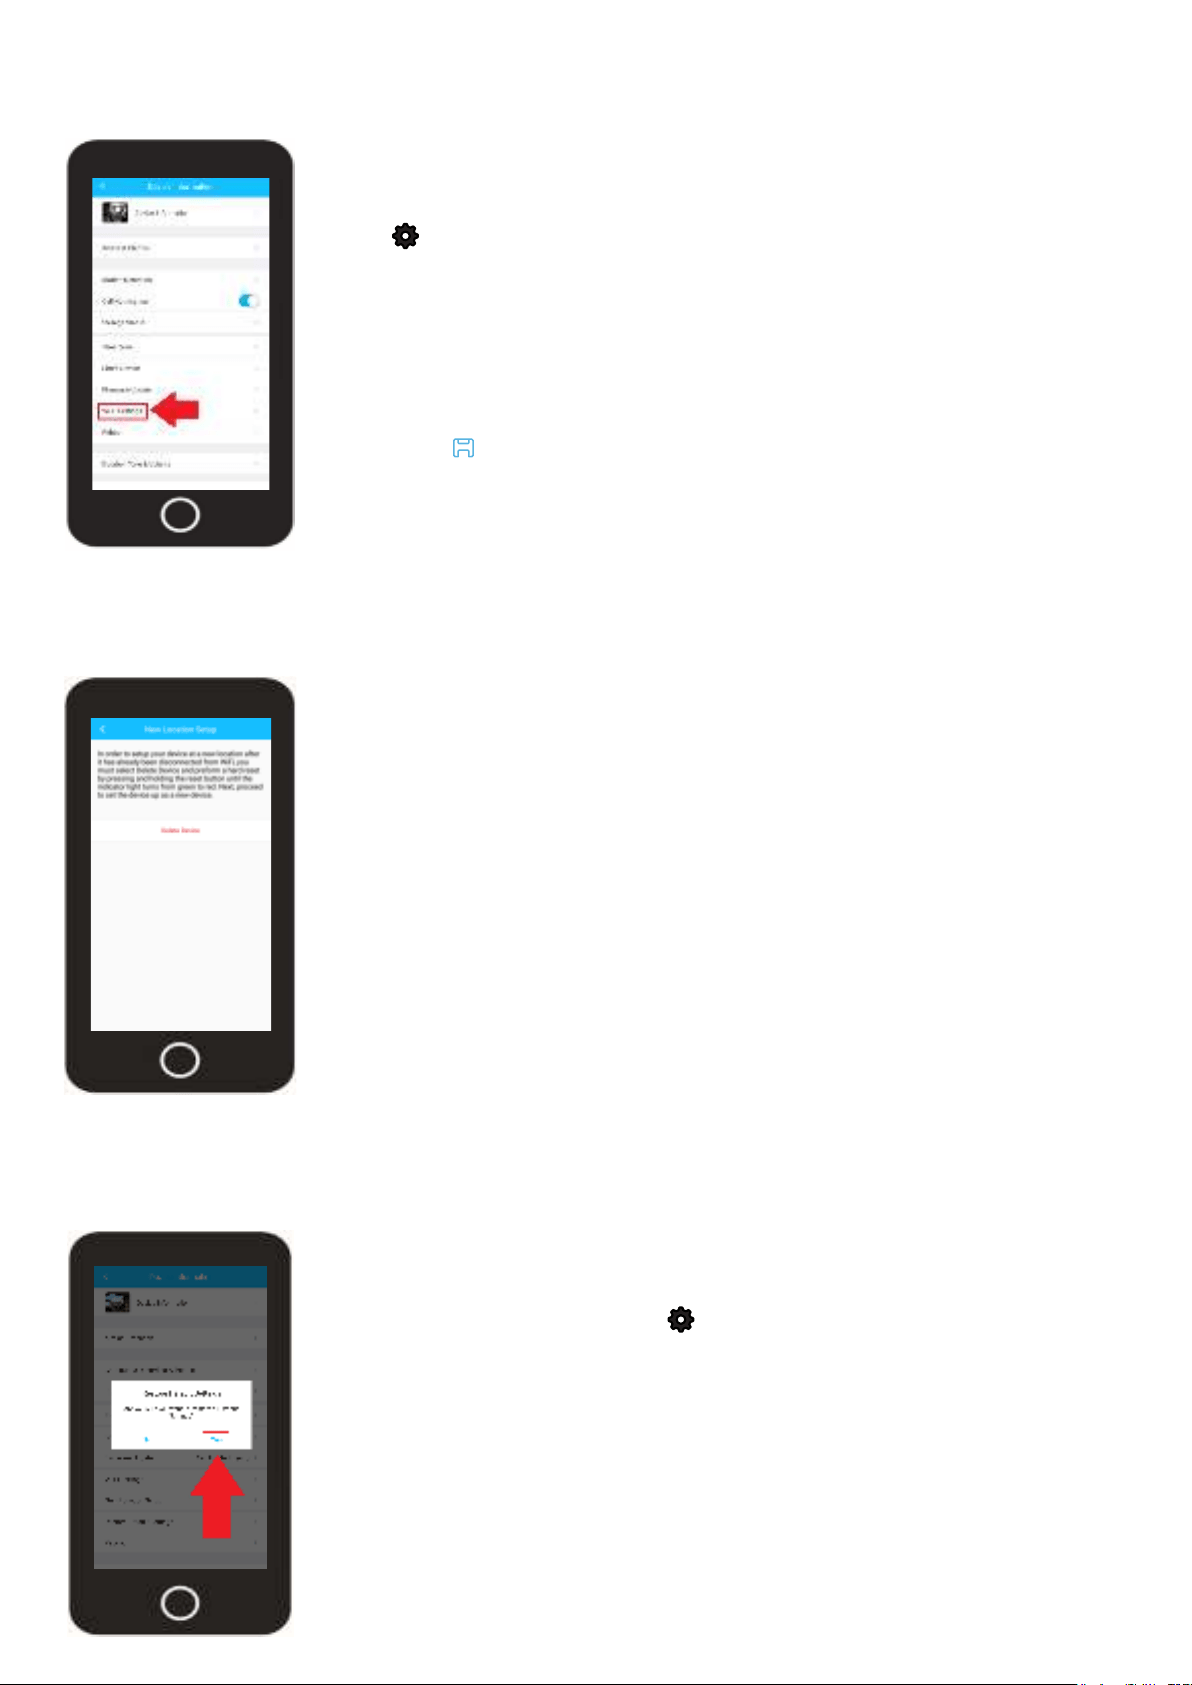
New Location Setup
The new location tab provides detailed information on how to setup your device in a new location.
For more information on new location setup, please refer to the information below.
If you are setting up your device in a new location, or on
from your Amcrest Smart Home account, perform a factory
reset, and add as a new device.
To remove the device from your account, press the Delete
Device option to remove the camera from your account,
then proceed with a factory reset. For more information on
how to perform a factory reset on your device, please refer
to the factory reset portion of this manual.
Restore Default Settings
The restore default settings option will reset all settings on your device back to its original factory
settings. This will not perform a full factory reset as your username and password for the device will
remain the same.
To access the Restore Default Settings
option, tap on the settings icon ( ) on the
live view screen.
Scroll down and tap on the Restore Default
Settings option. Tao on Yes to restore all
settings on your camera to default. To cancel
the process, press No.
31
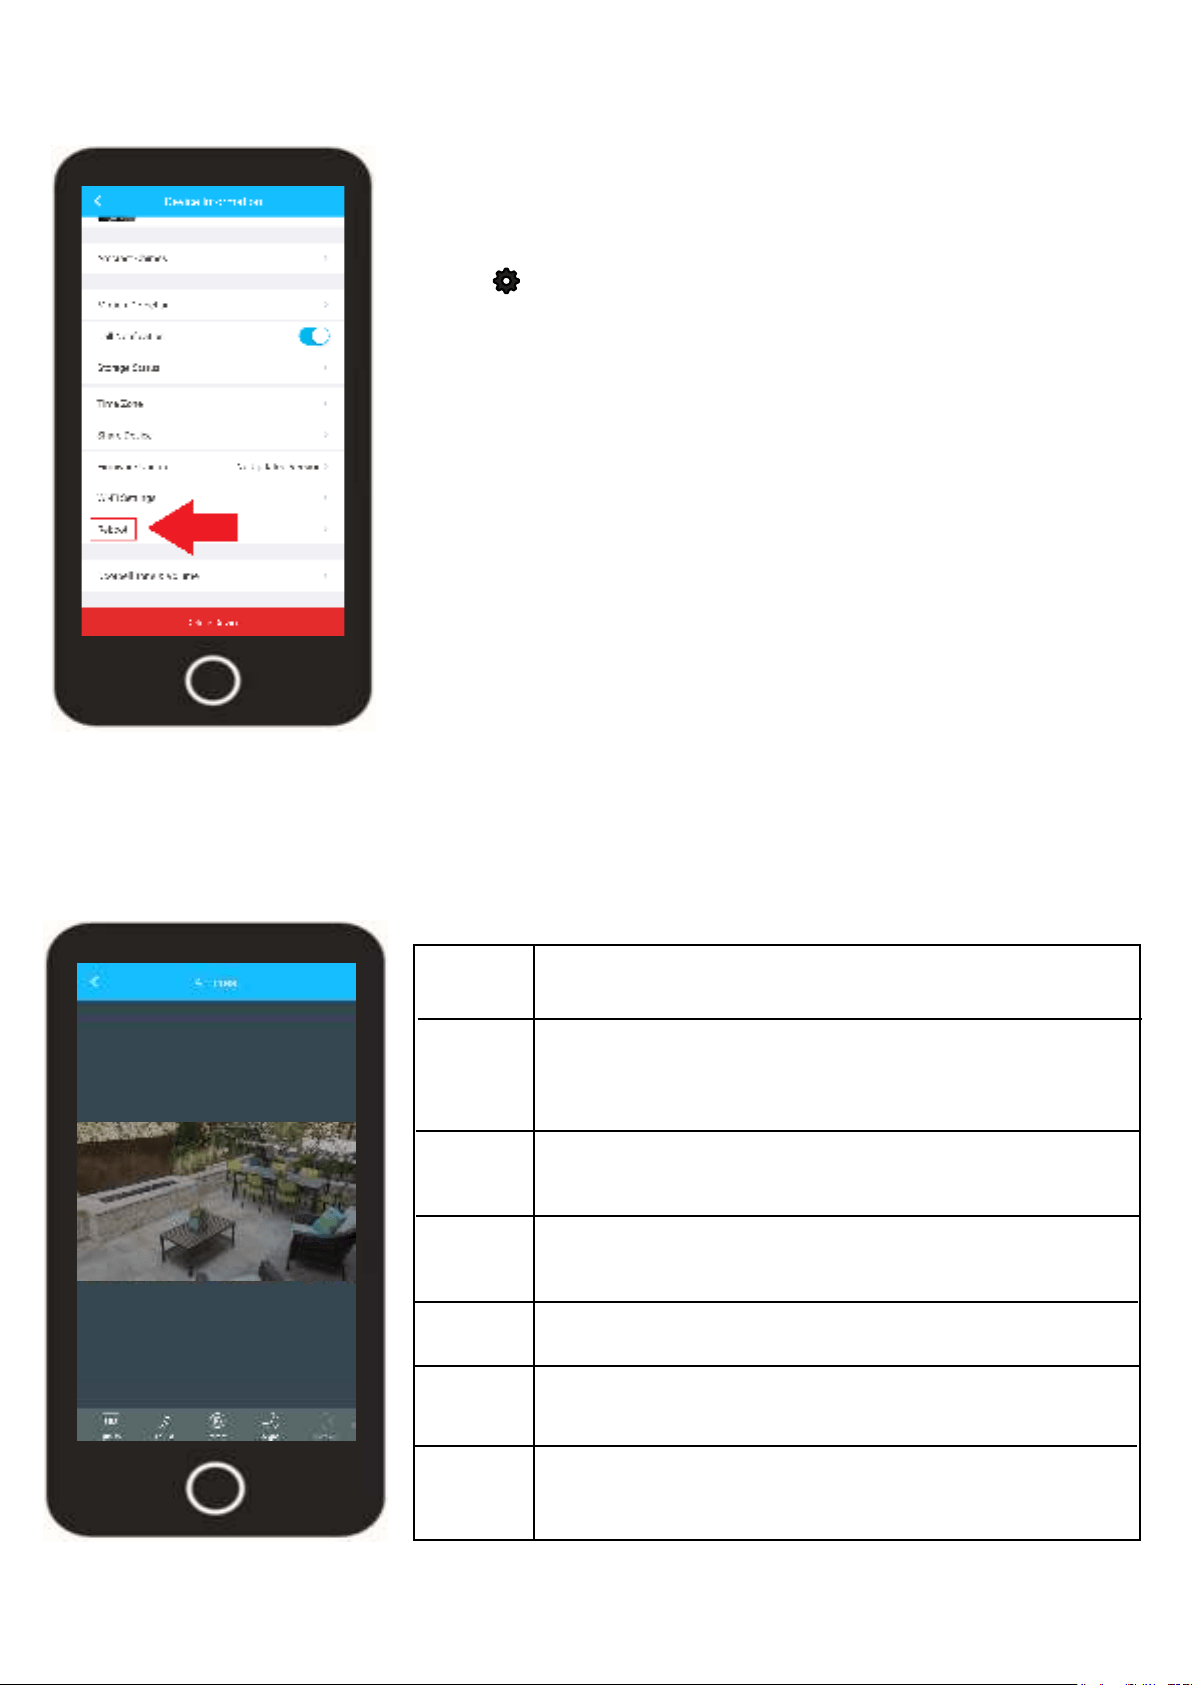
Reboot
The reboot option allows you to reboot your device from the Amcrest Smart Home app.
To access the Reboot option, tap on the settings
icon ( ) on the live view screen.
Tap on the Reboot option and tap “Yes” to continue.
The reboot process will take up to 3 - 5 minutes to
complete. Allow the device to reboot before access-
ing the live feed or other related options.
Video Settings
The video settings menu provides quick access to general settings for your device. These options
LEDs for night vision, and indicator lights. For more information on the features listed in this menu please
refer to the information provided below.
HD/SD Allows you to change resolution of the camera from
Adjust Allows you to adjust the brightness, contrast, color,
and saturation levels of the camera feed. Use the
Reset icon to restore the settings back to its original,
default color settings.
Rotate
Night Allows you to turn the IR LEDs on the front of the
disable night vision on your camera.
Indicator Allows you to turn the indicator LED on the device on
LED visible while the camera is powered on.
Speaker Allows you to adjust the volume of the speaker on the
camera.
Mic Allows you to adjust the volume of the microphone on
the camera.
32
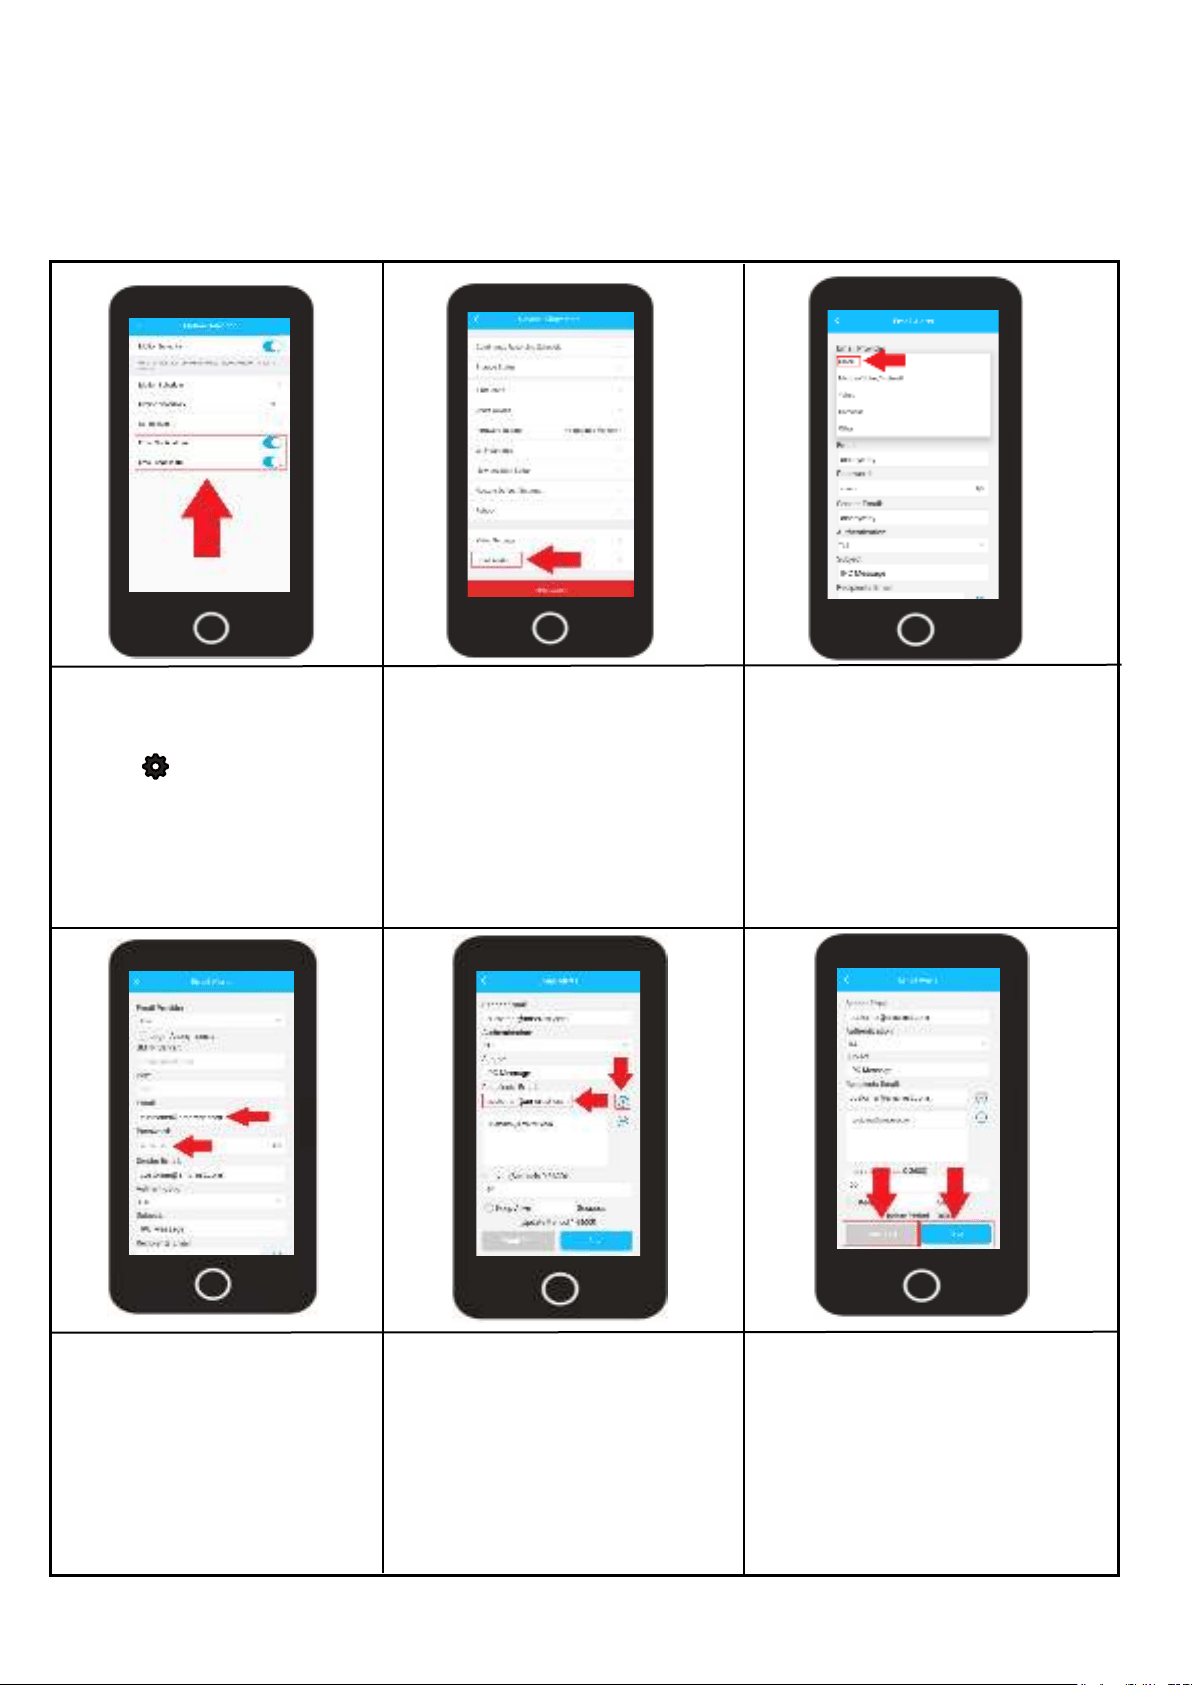
Email Alerts
Please also make sure that the and Email Snapshot toggle switches are enabled in
the motion detection menu.
For more information on how to setup email alerts using the Amcrest Smart Home app, refer to the
information provided below.
Log into your Amcrest Smart
Home app and select your
device. Tap on the Settings
menu ( ) and select
“Motion Detection”. Ensure
Email Snapshot toggle
switches are enabled. Use
Scroll down and tap on “Email
Alerts”.
In the Email Alerts menu, tap on
Email Provider and select your
email provider from the drop
down down list.
email address and enter the
password for that email
The email you entered will
automatically be added into
Enter the recipient's email
address into the Recipients Email
menu. Make sure to tap the (+)
icon to successfully add the
email address into the Recipients
Email menu.
Tap on the Save option to save
Email Test button to test the
email connection.
Note: Check you email and
-
cation went through properly
before proceeding.
33
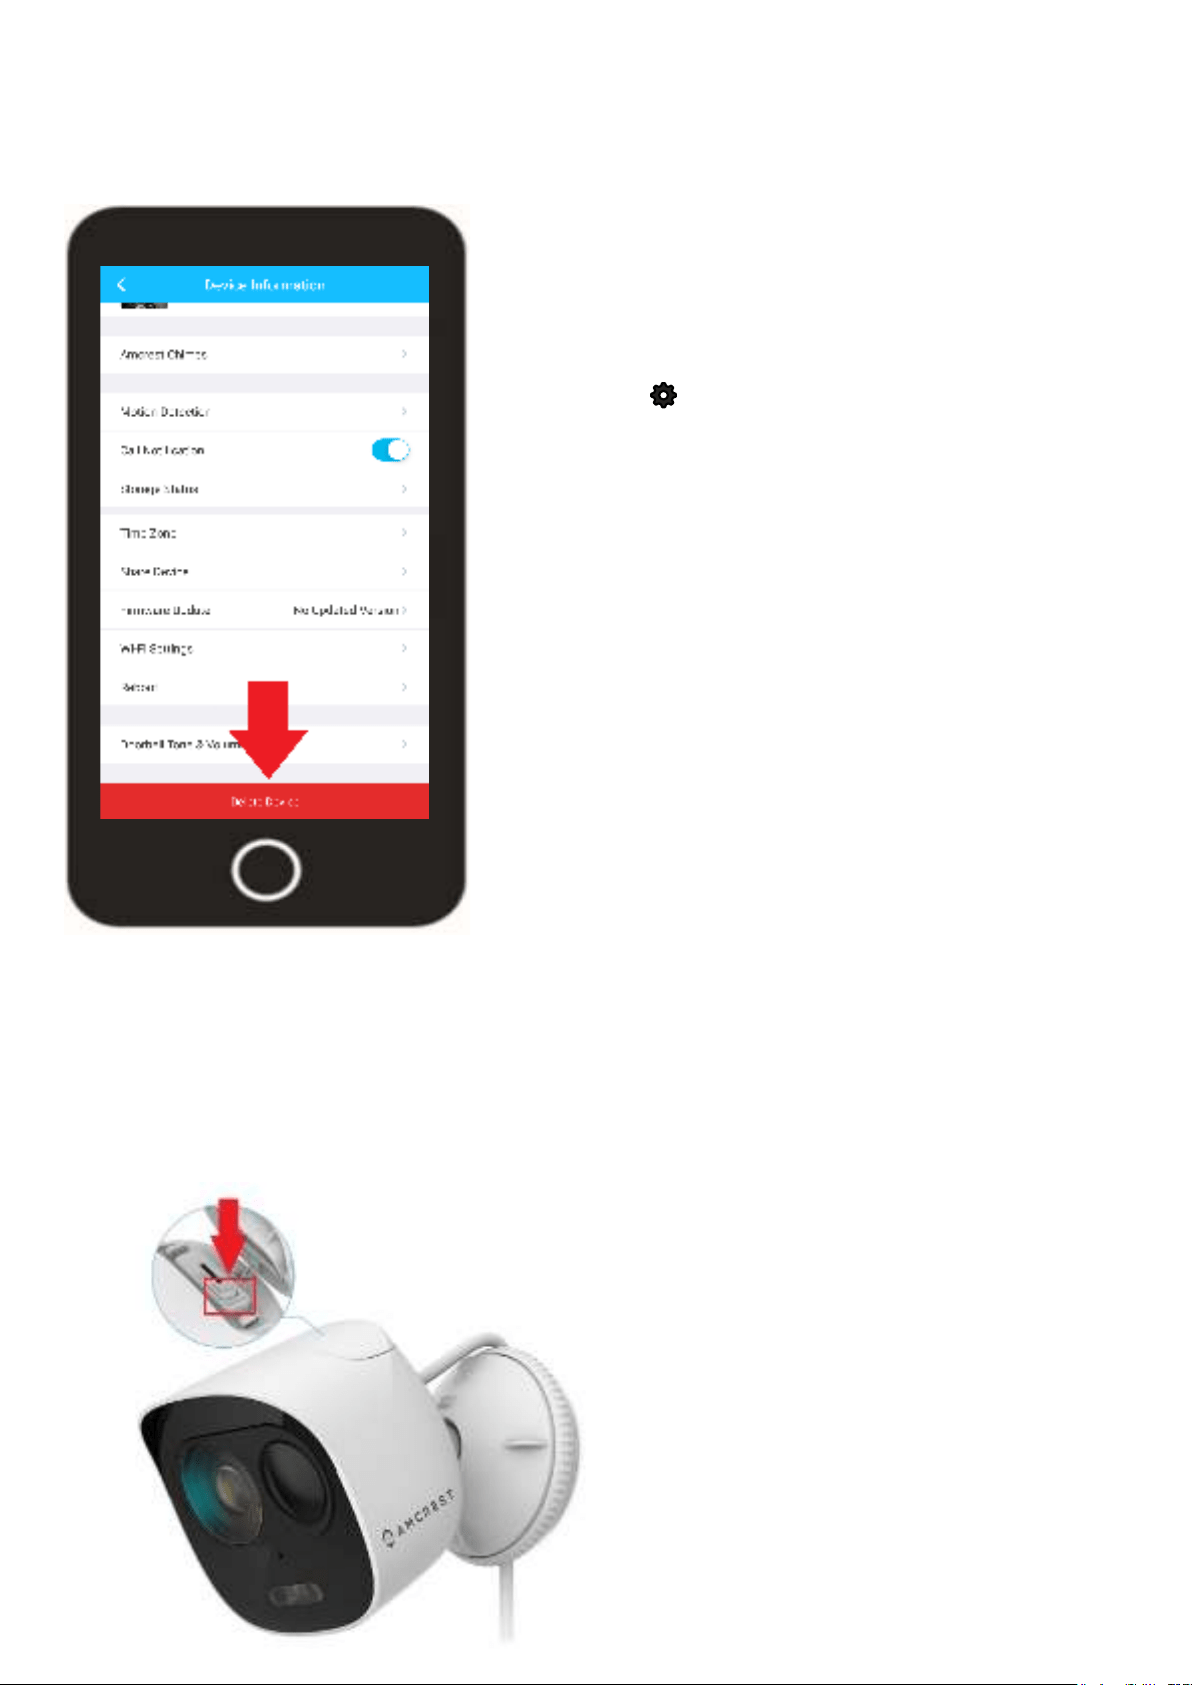
Delete Device
The delete device option allows you to unbound and remove the device from your Amcrest
Smarthome account. This option is useful if performing a factory reset on the device or setting up
the device in a new location.
To access the Delete Device option for your device, tap on the
settings icon ( ) on the live view screen.
Scroll down to the bottom of the settings menu and tap on the
Delete Device option. A prompt will appear asking if you are sure
you would like to delete the device. If any cloud recordings are
present on your accont for this device you can choose to keep
the recordings stored or remove them once the device is deleted.
By default, cloud recordings will be stored after the device is
deleted however, you can uncheck this option to delete cloud
recordings for this device.
Tap on Delete to delete the device from your account.
How to Perform a Factory Reset
Performing a factory reset on your camera will reset the device back to its original default settings.
Please make sure the camera is powered on while performing a factory reset. For more information on
how to factory reset your doorbell, please refer to the information provided below:
Note: It is highly recommended to delete your device from your Amcrest Smart Home account before
performing a factory reset.
To perform a factory reset on your camera,
use the included pry bar to pry the open the
security hatch on the top of the camera.
Locate the Reset button on the top of the
camera. Press and hold the reset button for
30 - 45 seconds allowing the camera to reset.
Note: Do not look at the front of the camera
as the deterrent light may still be triggered to
come on when it detects motion.
34
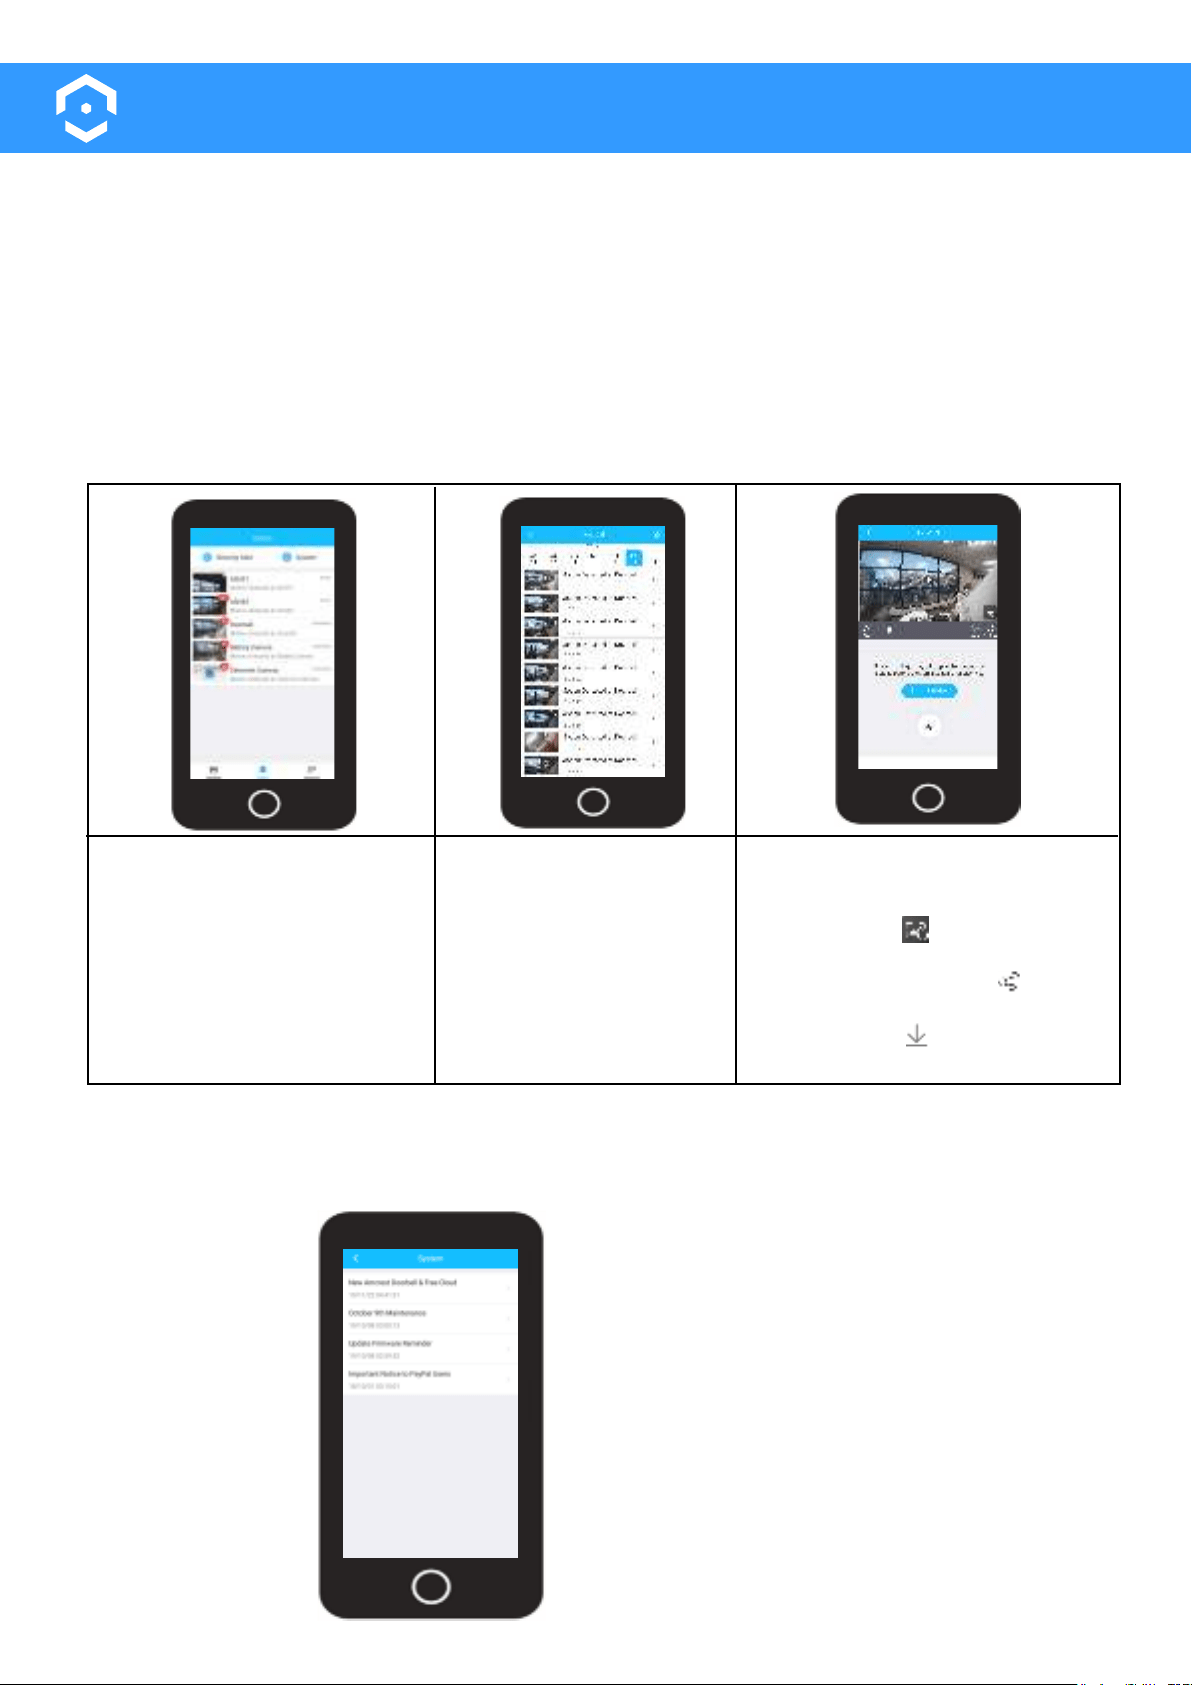
Events Menu
The events menu provides quick access to system and device related security and system alerts.
within a 7 day period.
on the information provided in the events menu, please refer to the information provided below.
Security Alert
within a 7 day period.
To access the events menu,
log into your account and
tap on the Events tab at the
bottom of the screen.
Select your device from the
interface.
A list of events will be
displayed. Use the
calendar to select
which days worth of
events you would like to
view.
Tap the play button to play the
event. Tap “Go to Live View” to
view the live feed. Tap the full
screen icon ( ) to view a
fullscreen view of the event.
Tap the share button ( ) to
share the event. Tap the down-
load button ( ) to download
the event to your smartphone.
System Alerts
To access the system alerts menu, access the
events menu and tap on System Alerts. All
system alert information will be displayed in
this menu.
Tap on a system alert to view the information
provided in the alert.
35
Account Menu
The accounts menu allows to view and update general account information as well as customize
account menu, please refer to the information provided below.
The Manage Account menu
picture, update the name on
your account, password, as
well as the Email address
the manage account menu,
tap on the back arrow ( < ).
The My Plans menu
allows you to view all
unpaid, paid, and
cancelled cloud storage
plans transactions
associated with your
Amcrest Smart Home
plans menu, tap on the
back arrow ( < ).
To access the Account menu, open the Amcrest
Smart Home app and log into your account.
Tap on the Account menu option located at the
bottom of the interface.
All account based options for your account will
scroll up and down the menu for more options.
The My Devices menu allows you
to view all connected devices as
well as add devices to your
Amcrest Smart Home account. To
add a device, tap on the ( + ) icon
and follow the in app instructions.
Tap on a already connected
device to access and adjust
device settings.

36
The Cloud Downloads menu
allows you to view, delete, or
download cloud recordings
that were downloaded from
the cloud recordings interface.
Tap on a clip to view the
recording, use the trash can
icon to delete it, tap on the
download button to download
the recording to your mobile
device.
The My Saved Files menu
allows you to view, delete,
manually recorded snap-
shots or videos. Use the
video/snapshot icons to
view the manually recorded
The Amazon Alexa option
provides a step by step break-
down on how to add your
Amcrest Smart Home device
implementing the Amcrest Smart
Home skill into your device.
Please refer to the information in
this menu for a detailed descrip-
tion of the process.
Amcrest Smart Home cloud
provides a 7-day no ques-
tions asked, money back
guarantee. There are no
refunds after 7 days of the
charge date.
For more any inquiry on cloud
billing , please visit:
https://amcrest.com/bill-
ng-support
The Billing Support tab
points you directly to the
Amcrest Smart Home
Cloud billing form. Use this
form for any questions
regarding cloud billing or
other related billing ques-
tions for your Amcrest
Smart Home cloud
account.
The Billing Support tab
points you directly to the
Amcrest Smart Home
Cloud billing form. Use this
form for any questions
regarding cloud billing or
other related billing ques-
tions for your Amcrest
Smart Home cloud
account.
The Support tab points you
directly to Amcrest knowledge
base. Use the knowledge base
to access important support
articles and online documenta-
tion for your device.
To access the support knowl-
edge base directly, please visit:
https://amcrest.com/support
37
The Leave Feedback allows
you to leave feedback to
of the Amcrest Smart Home
app.
We take this feedback serious-
ly and are always looking for
new ways to improve your
The About tab allows you to
view the current app version
you are using as well as a link
to our privacy policy.
your mobile device once an event has been detected.
Please note, the my devices toggle switch will disable or
devices toggle switch will only enable or disable push
Home account.
38
In the account menu, tap on the
Schedule option in the Push
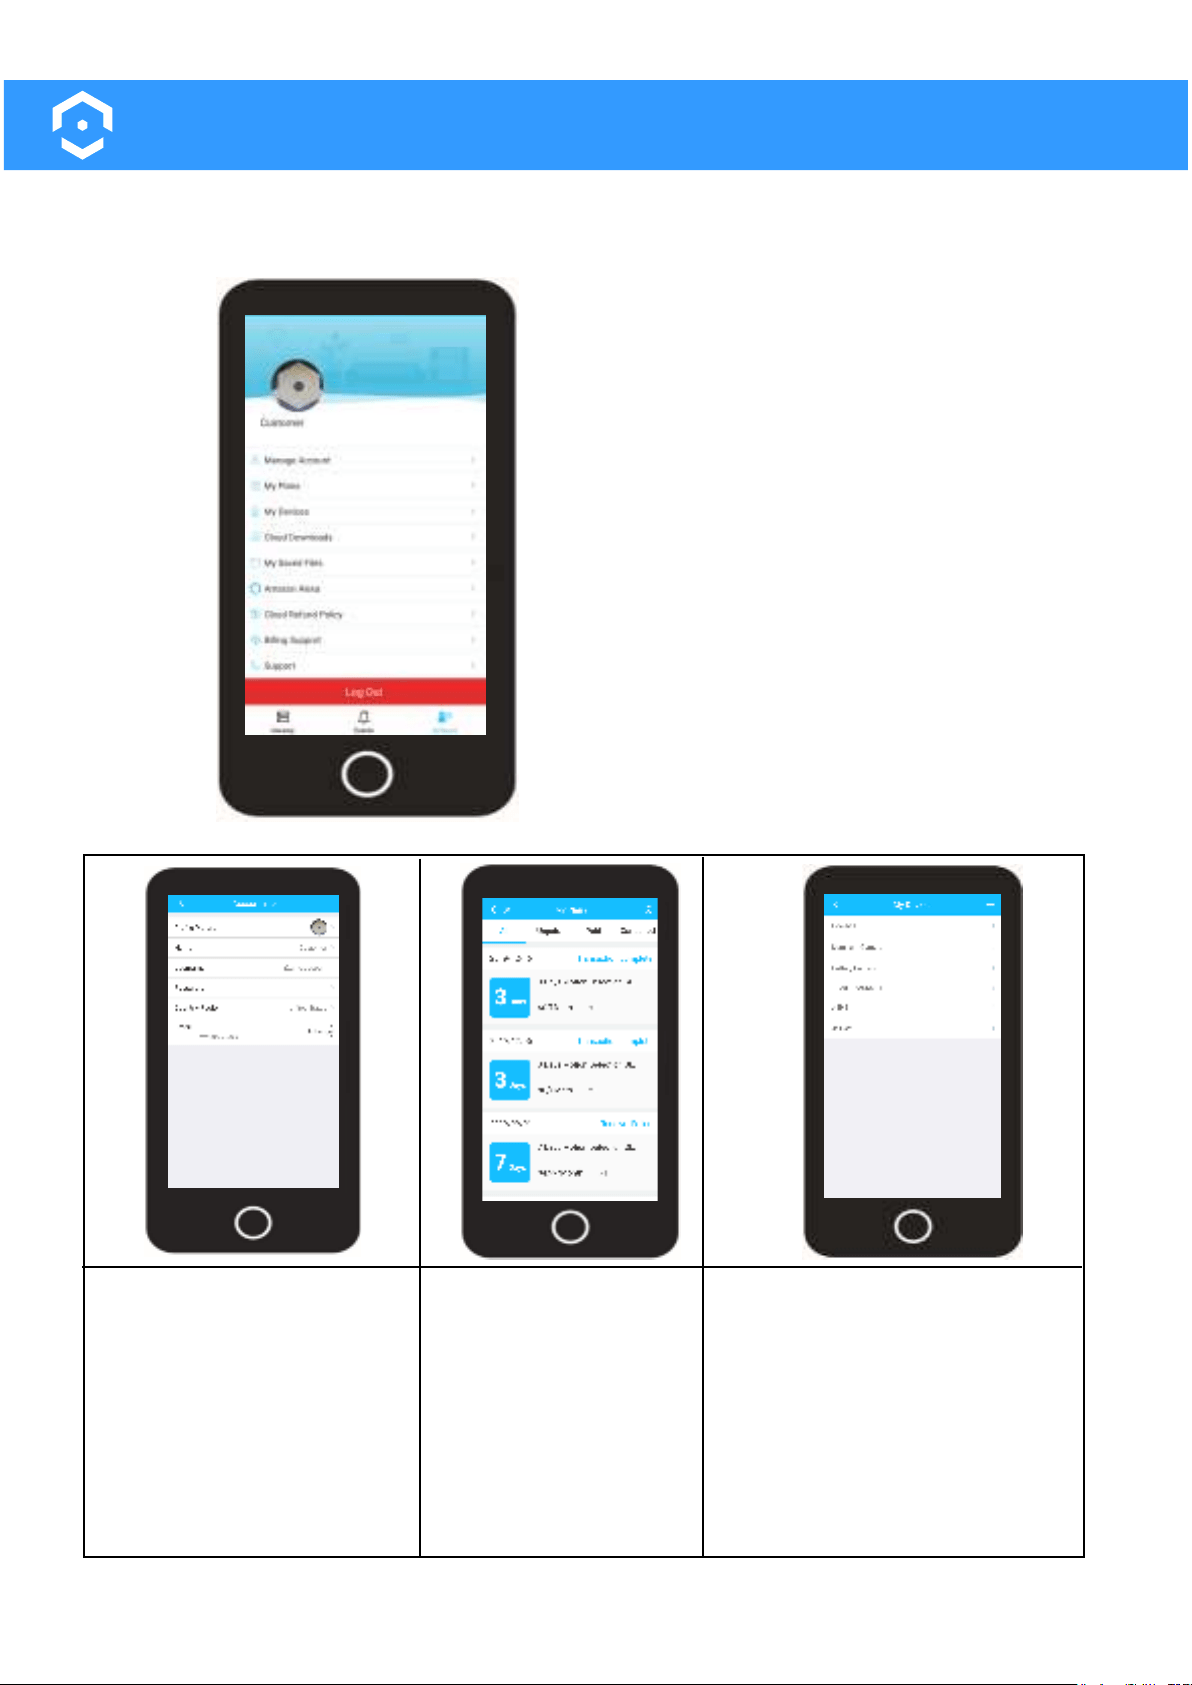
Tap on “Start Time” and
select a time you would
like your schedule to start.
setting it to 0600 (6am).
Tap on “Finish Time” and
select a time you would
like your schedule to end.
settting the end time to
be 1700(5pm).
Tap on the Save icon ( )
-
tion schedule to your
account.
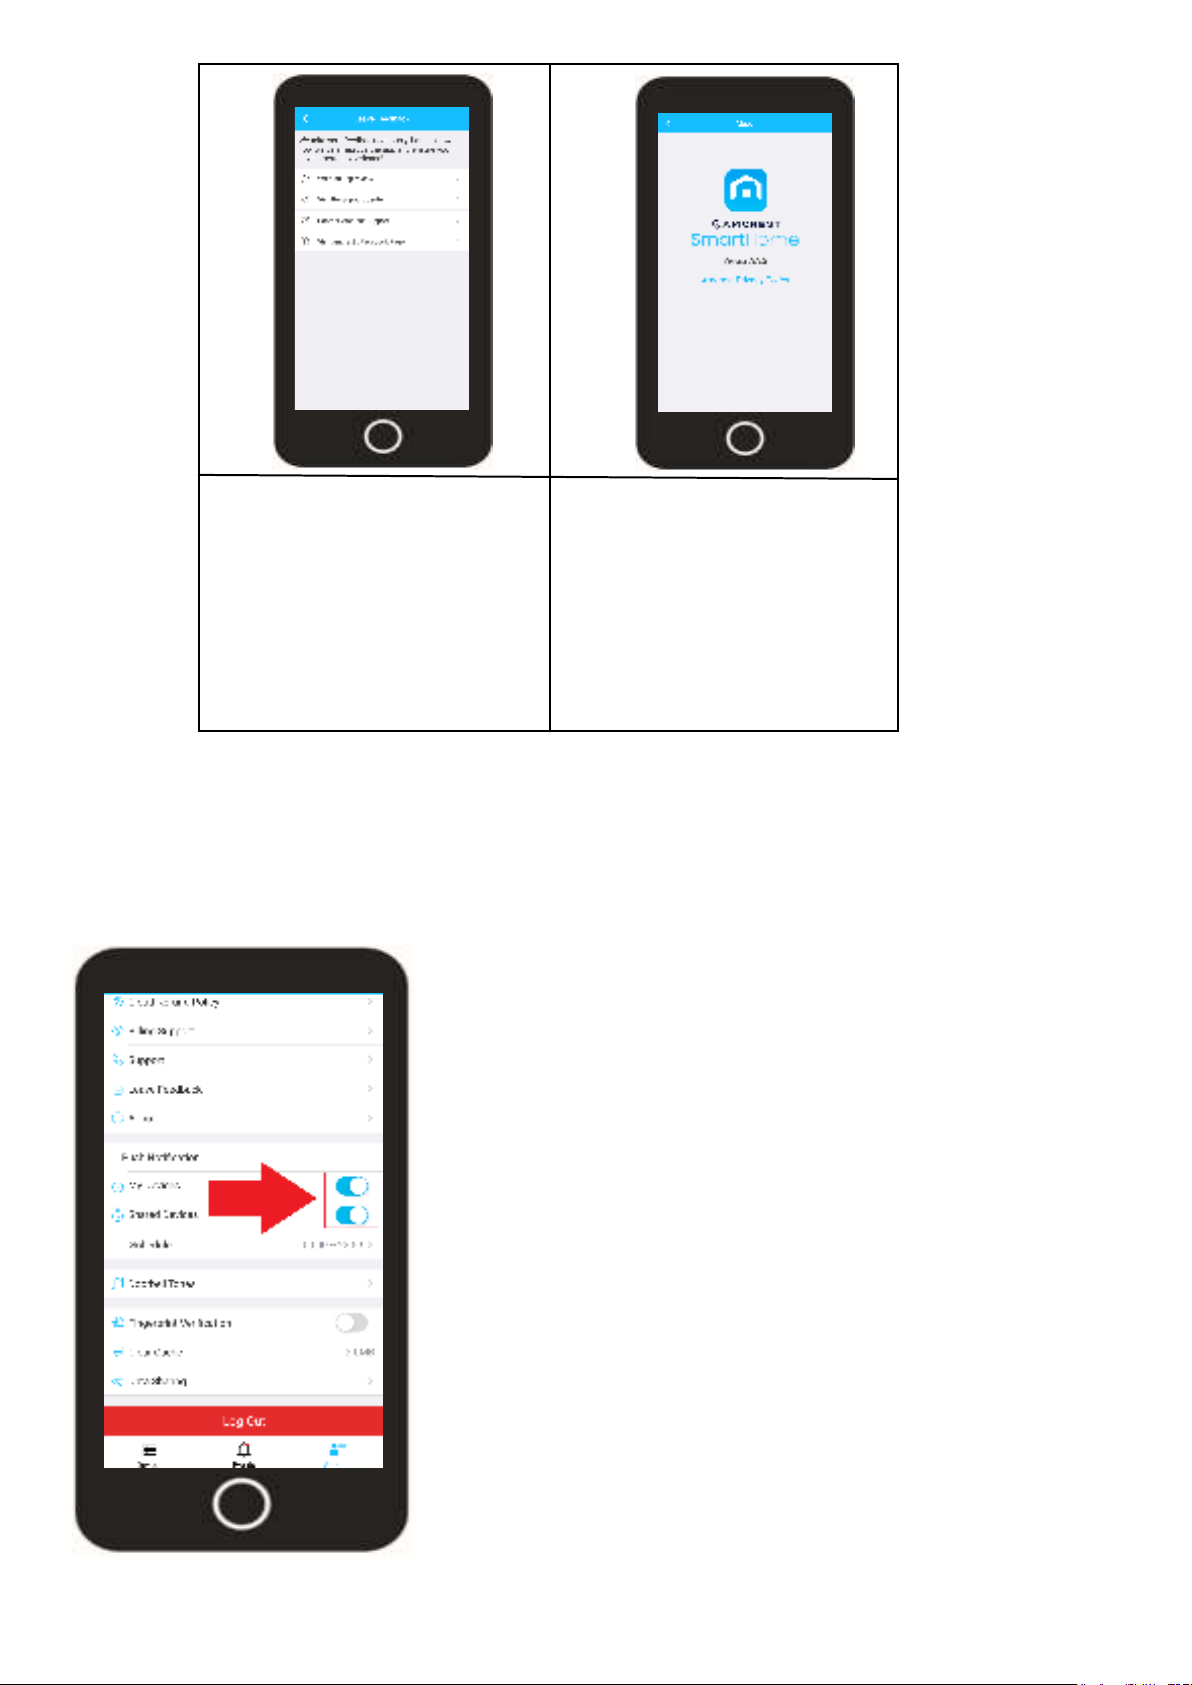
Doorbell Tones (Not Applicable)
In the account menu, tap on
“Doorbell Tones”. This menu
allows you to change motion
detection and call tones if you
have an Amcrest Wi-Fi Video
doorbell.
Tap on “Motion Detection”
to change the tone of a
-
tion. There are 4 tones to
choose from, select a tone
to save it to your account.
Tap on to
change the tone of a call
tones to choose from, select
a tone to save it to your
account.
39
In the accounts menu, tap on the
option can be enabled.
Amcrest Smart Home account.
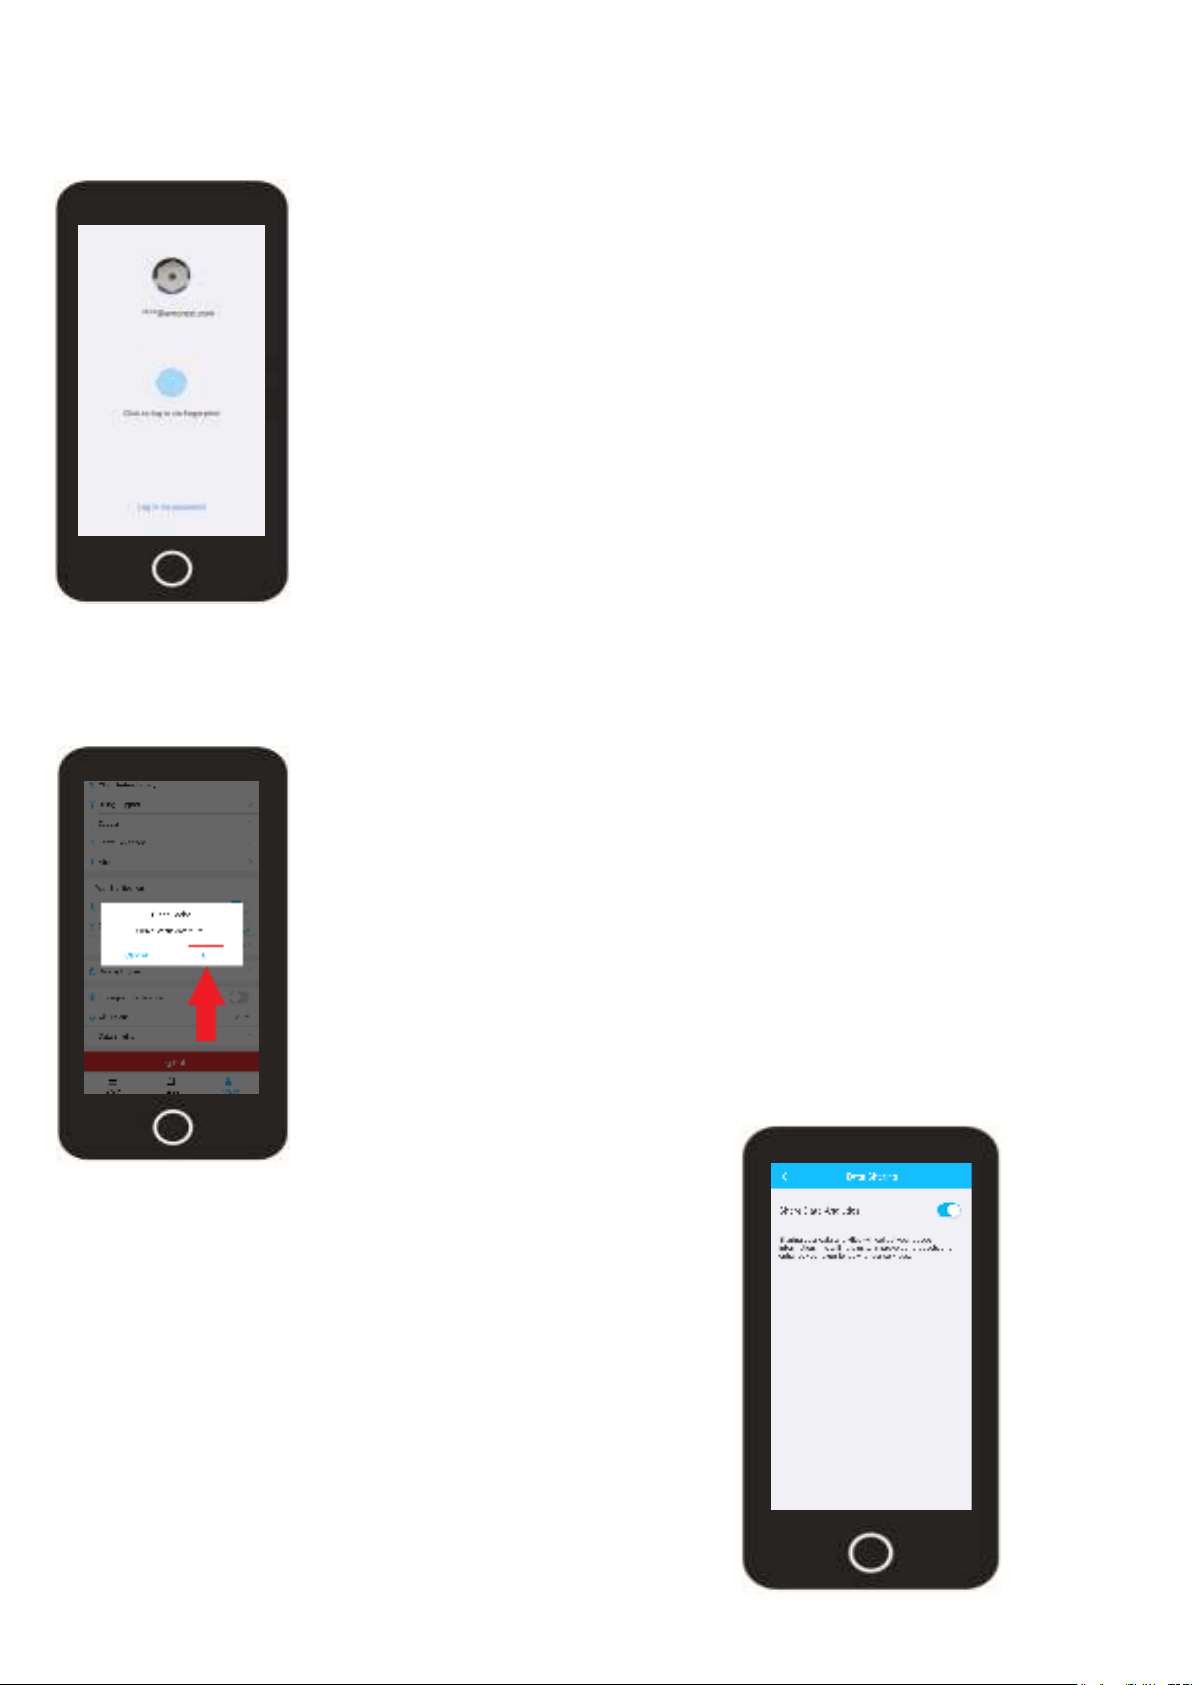
Clear Cache
The clear cache option allows you to remove cache from the app which helps to increase the
In the account menu, tap on the “Clear Cache”
option. A prompt will appear asking you if you would
like to clear cache.
Tap on OK to remove the cache from the app.
Data Sharing
The data sharing menu allows you enable or disable the
ability to share data analytics for your account.
Toggle the Share Data Analytics
ability to share data analytics.
This option is on by default and is
highly recommended to stay on to
40
Adding to Amcrest NVR/DVR
Amcrest DVR and Amcrest NVR. This is possible by obtaining the IP address of your device from your
network and adding it directly into your DVR or NVR. The DVR or NVR must be connected to the
same network as the Amcrest Smart Home device for this to work.
The device you are adding must be added to the Amcrest Smart Home app before adding it to
your device.
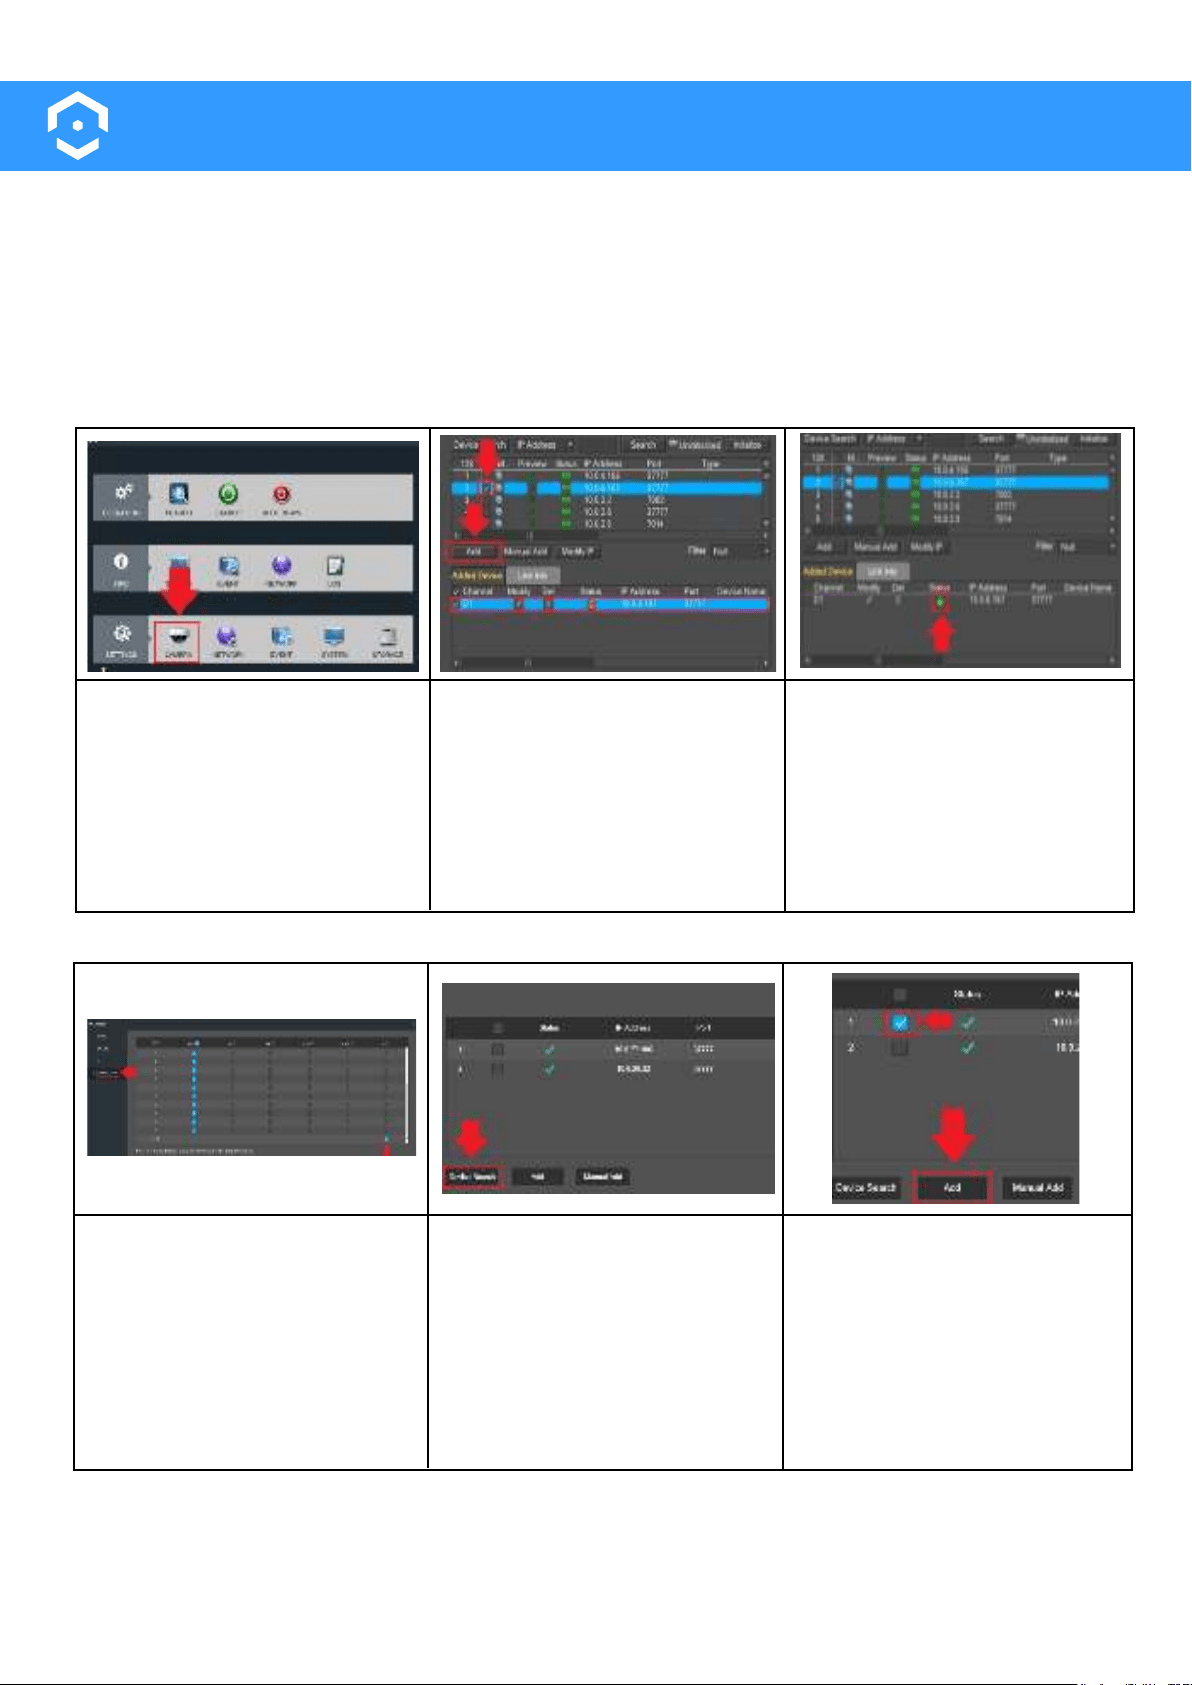
Adding to An Amcrest NVR
Log into your Amcrest NVR and
click on Camera. Then, click on
Device Search to locate the IP
address for your device that
should be connected to the
same network as your NVR.
A list of all connected devices
will appear. Select the device
from the list by clicking on the
Click Add to add the device into
the Added Devices menu.
The status of the device should
be green indicating the device
has been successfully added. If
it is red, click on Modify and
ensure the password for the
device is correct. When it has
been added, the device will be
ready to view on your NVR.
Adding to An Amcrest DVR
Log into your Amcrest DVR and
click on Camera located under
Management. Click on Channel
Type in the camera menu and
and IP channels if needed. Click
Save and allow the DVR to
reset
Note:
Log back into your DVR and
navigate back to the Camera
menu. Click on Registration to
access the registration menu
and click on Device Search.
Locate and click on the device
you are adding to your DVR.
Click Add to add the device to
the DVR. If the status is red, click
on Edit and ensure the pass-
word for the device is correct.
When it has been added, the
device will be ready to view on
your DVR.
41
Adding to Amcrest View Pro
Amcrest Smart Home devices such as the Amcrest Deterrent camera are capable of connecting to both
the Amcrest Smart Home app as well as the Amcrest View Pro app.
However, since Amcrest Smart Home devices function primarily on a cloud based platform setting up an
Amcrest Smart Home device to the Amcrest View Pro app will result in only live view being available and
If you would like to view your Amcrest Smart
Home devices using the Amcrest View Pro app, please refer to the information provided below.
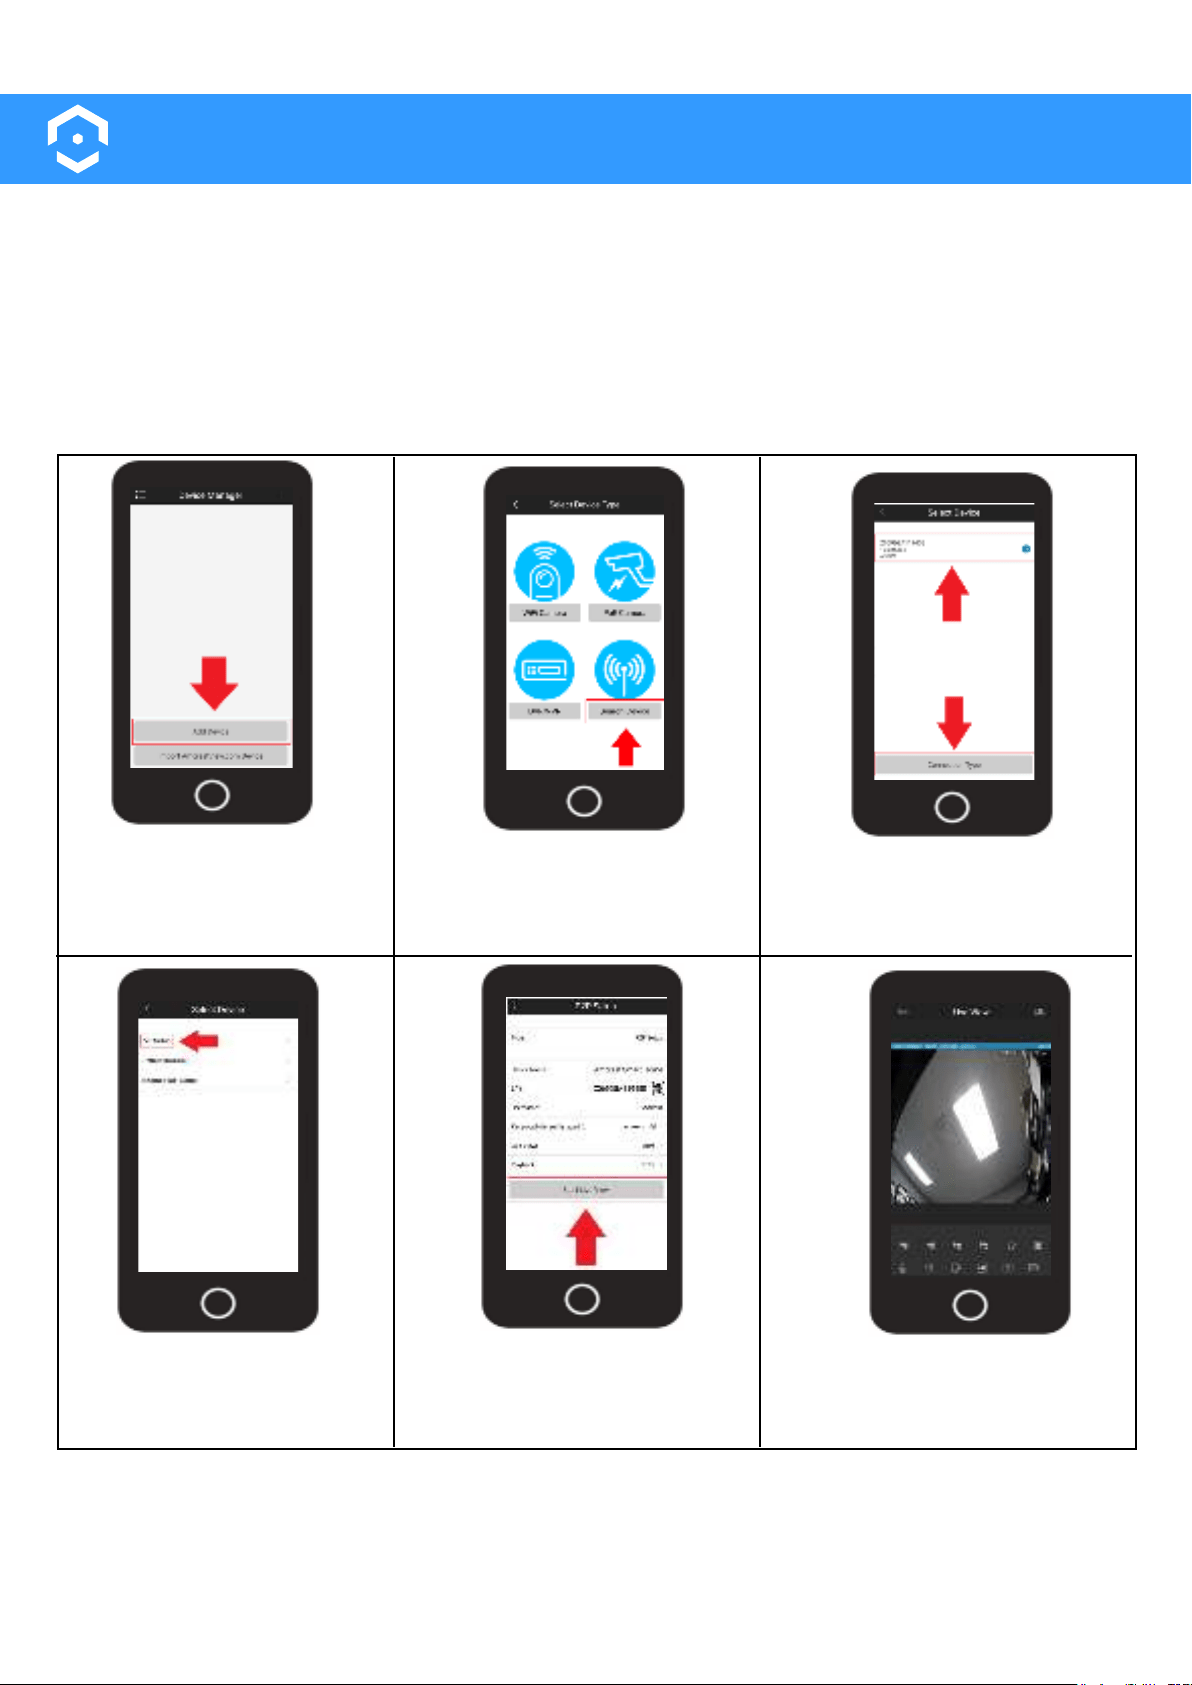
Adding to Amcrest View Pro
Tap on the Settings menu
and select Device Manager.
Tap on Add Device.
Tap on Search Device.
Select your Amcrest Smart Home
device from the Device List. Tap
on Connection Type.
Enter a name for your device
and the password. Tap “Start
Live View”.
Tap on P2P.
Your Amcrest Smart Home
device has now been added
to your Amcrest View Pro app.
Note: Live view features such as, microphone, speaker, etc will be available in the Amcrest View
and use these settings, please use the Amcrest Smart Home app.
42
Adding to Amcrest Surveillance Pro
Amcrest Smart Home devices, such as the Amcrest Deterrent camera, can be added into Amcrest Surveil-
lance Pro software. Amcrest Surveillance Pro is a free software, provided by Amcrest, which allows you to
access all your Amcrest devices in one central location on your PC or Mac computer. For more informa-
tion on how to download this free software please visit: amcrest.com/downloads
software. The camera and the computer you are using must be on the same network during setup. For
more information on adding your camera into Amcrest Surveillance Pro, please refer to the information
provided below.
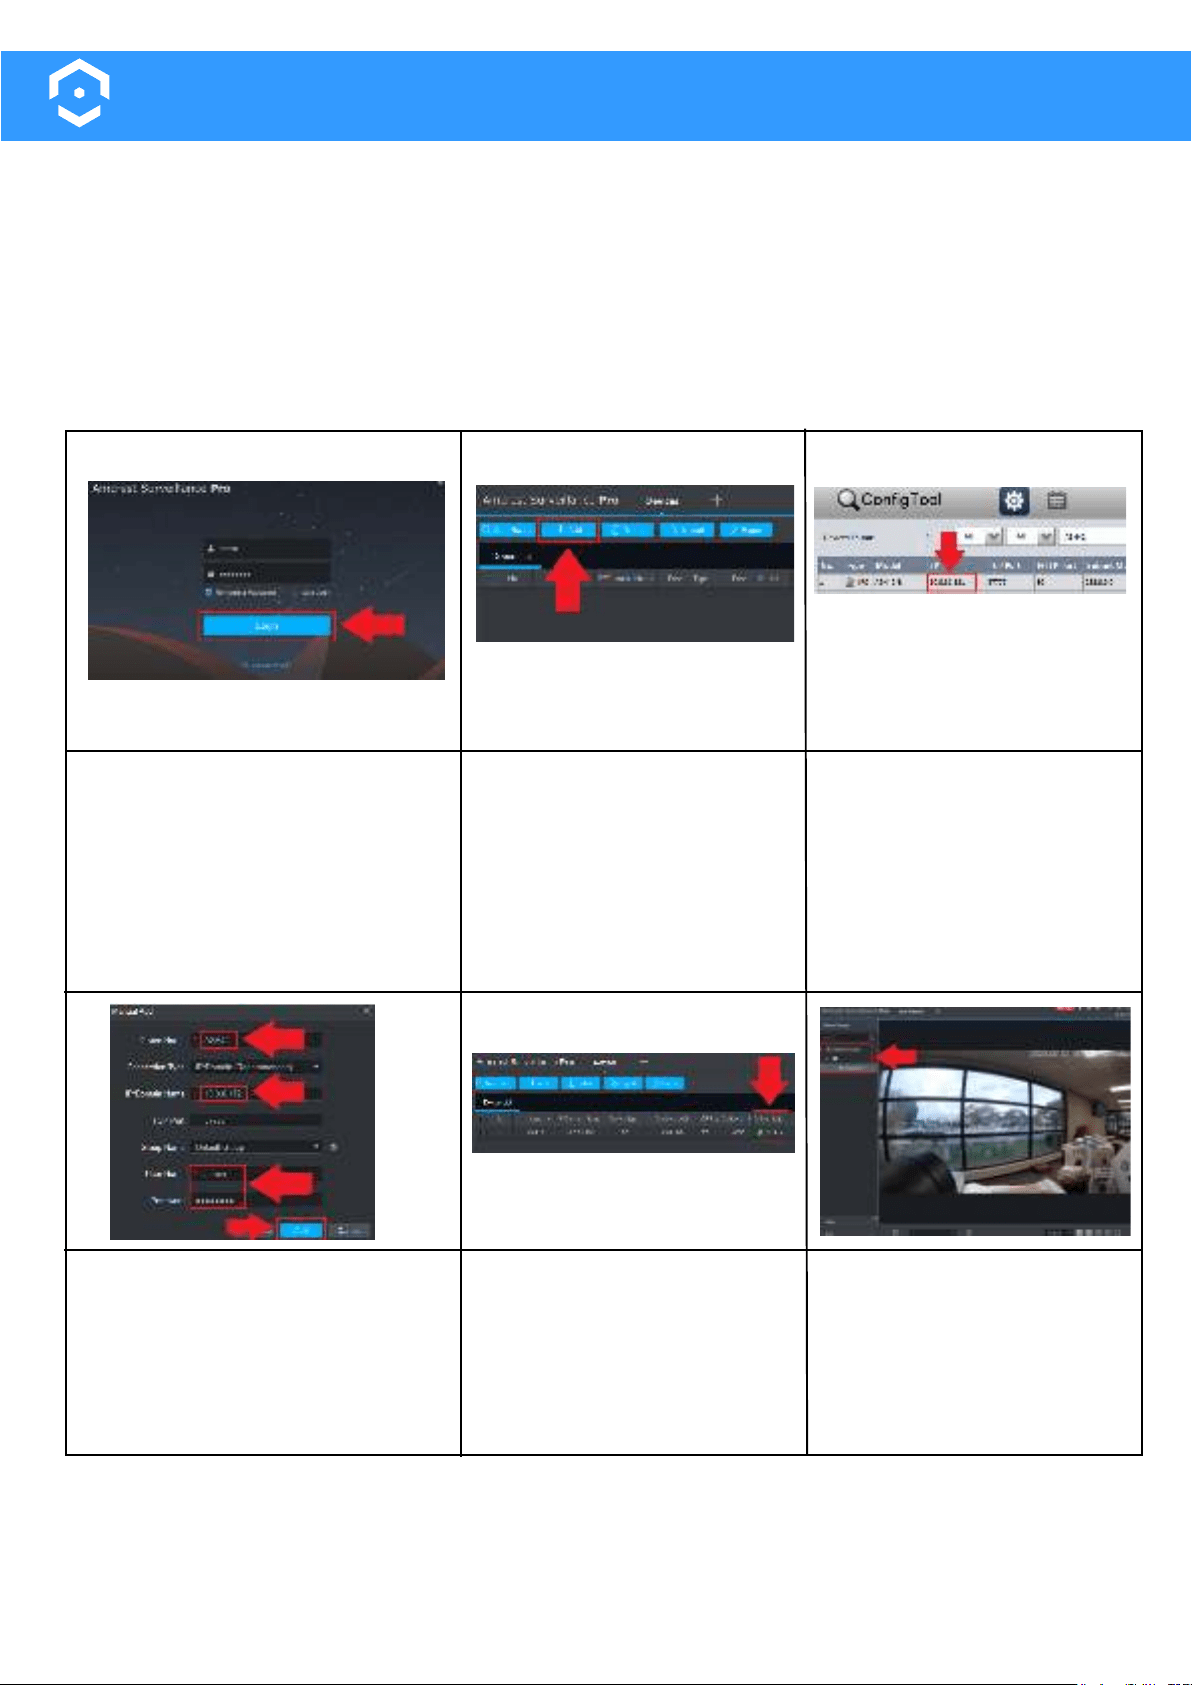
Open and log into your Amcrest
Surveillance Pro software.
Click on the Add button to
begin adding your device.
tool to locate the IP address
for your device from the
network.
To download the Amcrest IP
amcrest.com/downloads
Enter a name for your camera and
use the IP/Domain protocol. Enter
the IP address then enter the
username and password for your
camera. Click OK to continue.
The status of the device will be
displayed as green in the
status menu.
Navigate to the Live View
option and locate the newly
added device in the
assigned Group menu.
Double click the camera to
view the live feed.
43
Adding to Blue Iris
Amcrest Smart Home devices such as the Amcrest Deterrent camera can connect the Amcrest Smart
Home app as well as to Blue Iris. This is possible by obtaining the IP address of your device from your
network and adding it directly to the software.
software. Please note: The device and the computer you are using must be on the same network during
setup. For more information on how to setup your device to Blue Iris, please refer to the information
provided below.
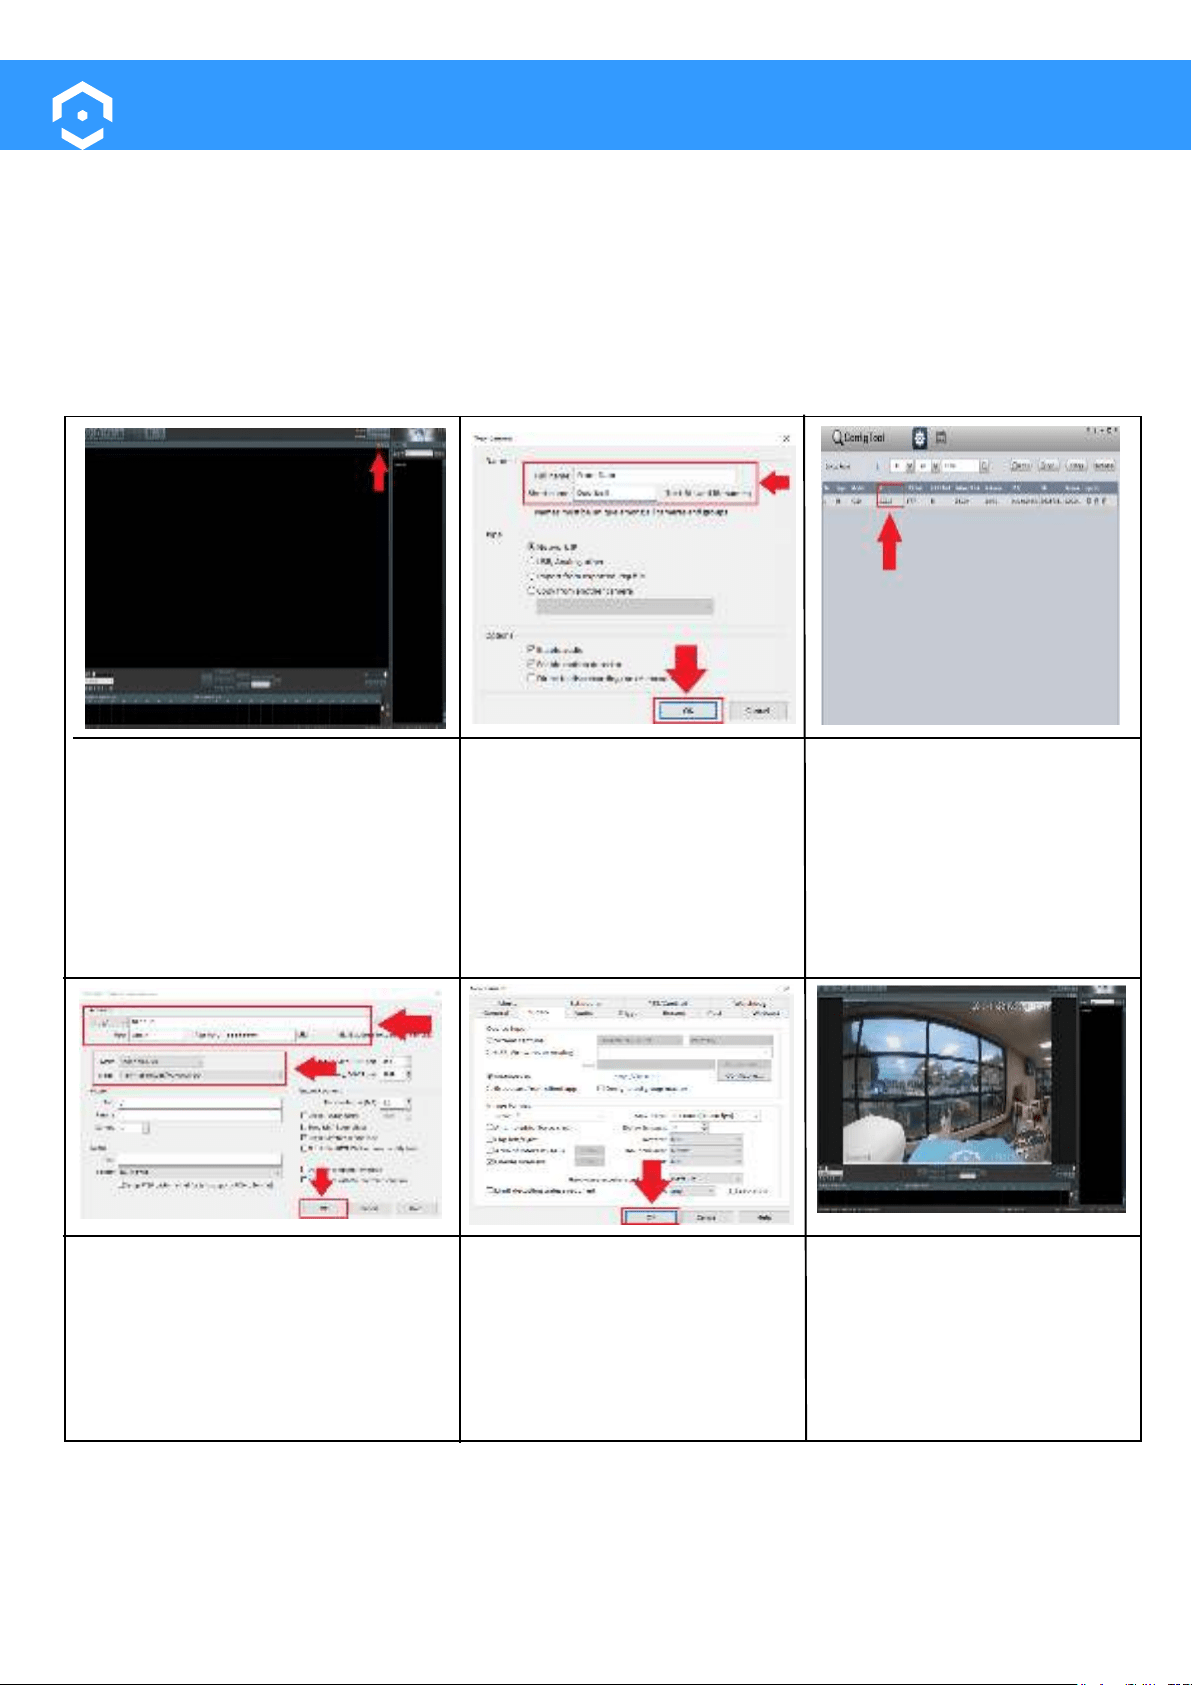
Open the Blue Iris Software and
click on the ( + ) icon to add a
camera.
Enter a Full name and Short
name for your device. Make
sure to also click on the "Enable
audio"
audio.
tool to locate the IP address
for your device from the
network.
To download the Amcrest IP
amcrest.com/downloads
Enter the IP Address for your
menu. Enter the username and
password as well you setup for
your device in the Amcrest Smart
Home app. Click OK.
Note: Leave the Make as Generic/ONVIF and the Model as RTSP H.264/H.265/MJPG/MPEG4.
Click OK.
Your device is now ready to
be viewed in the Blue Iris
software.

Unable to Locate an SSID?
If you are having issues obtaining an SSID when adding your device into the Amcrest Smart Home app
there may be a miscommunication happening between the app and your mobile device. This appears to
be a more common situation among iOS users and we are currently working with Apple to device a
issue, please refer to the information provided below.
If the SSID for your Wi-Fi network is not pulling up in the app when attempting to add your Amcrest
allowing it to restart.
Wi-Fi network, open the Amcrest Smart Home app and continue to add your device as normal. The SSID
for your network should populate allowing you to complete the setup process.
How Do I Verify/Update Firmware?
-
below.
• Log into your Amcrest Smart Home account and select your device from the Devices menu.
• Once you are logged in, tap on the settings ( ) icon.
Note:"Firmware Update" tab to proceed with the update.
on "Update".
Cloud Upgrade to begin. If you wish to cancel to
process tap Cancel.
How Do I Download Recordings?
Due to the current capabilities of the app recordings can only be downloaded via the Cloud Recordings
download interface. All recordings retained on a microSD card will have to be downloaded via a microSD
card adapter (sold separately) on a computer. For more information on downloading cloud recordings,
please refer to the information below.
• Log into your Amcrest Smart Home account and select your device from the Devices menu.
• Tap on Cloud Recordings.
• Tap on the File List icon located in the Cloud playback interface.
• Tap the download icon to download the recording.
to other services on your smartphone via the share icon located in the middle of the download menu.
Troubleshooting
44