Documents: Go to download!
User Manual
- User Manual - (English)
- User Guide - (English)
- Getting Started
- Connecting
- Operating
- Troubleshooting
- Appendix
Table of contents
OWNER’S MANUAL Streaming Blu-ray Disc™ / DVD Player
Getting Started
Introduction
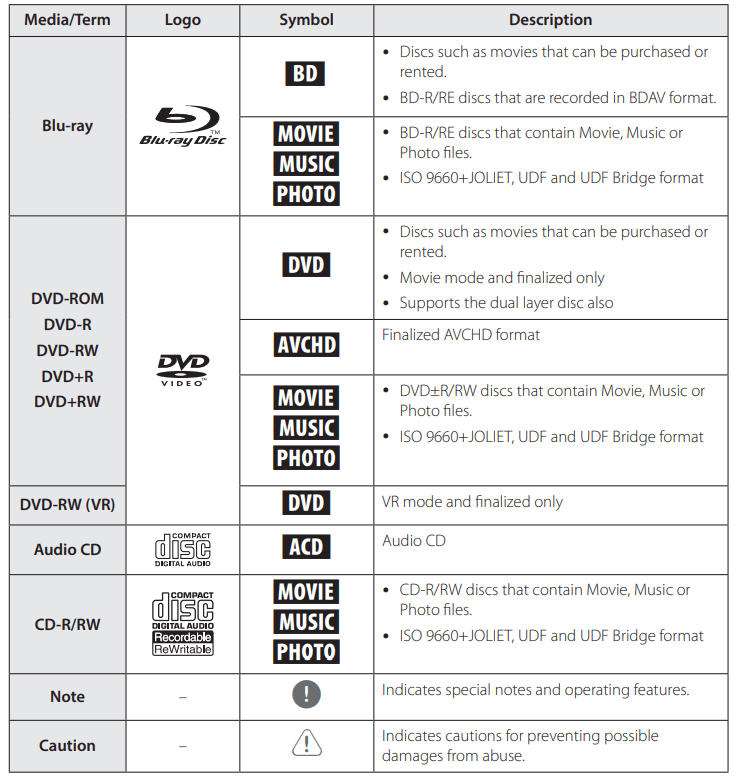
Playable Discs and symbols used in this manual
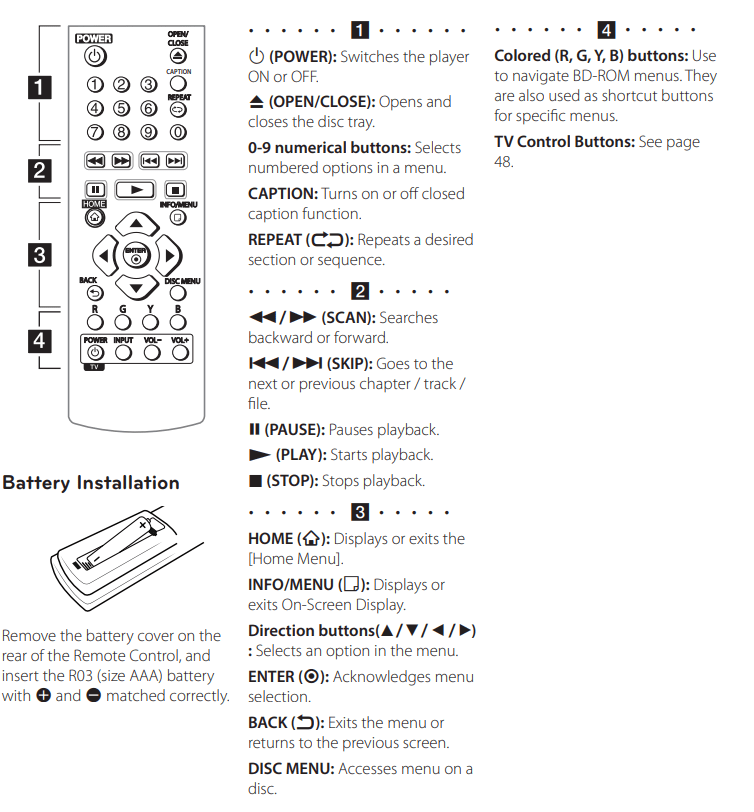
Remote Control
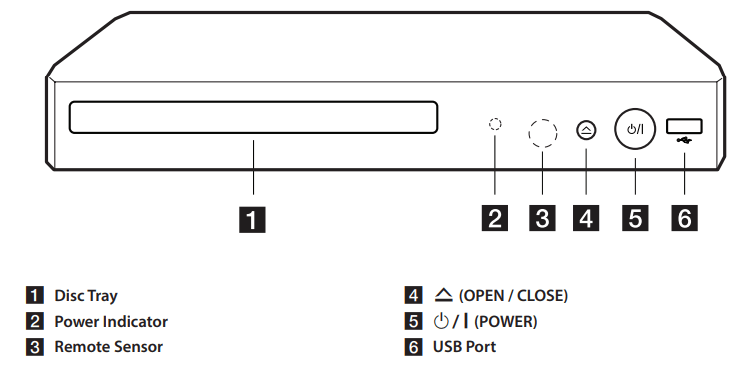
Front Panel
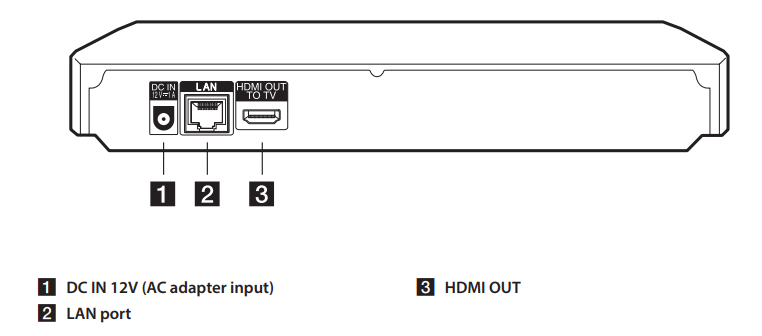
Rear Panel
Connecting
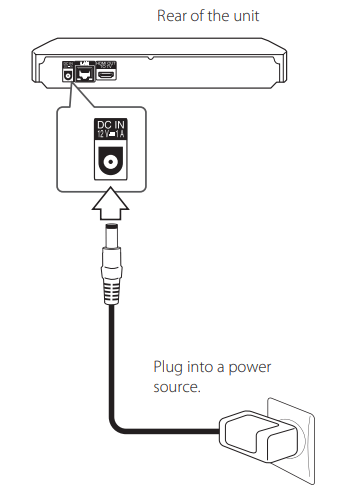
Connecting the AC Adapter
Connect the unit to the power supply with the supplied AC adapter.
- Contact an electrical parts distributor for assistance in selecting a suitable AC plug adapter or AC cord set.
Connecting to your TV
If you have an HDMI TV or monitor, you can connect it to this player using an HDMI cable (Type A, High Speed HDMI™ Cable). Connect the HDMI jack on the player to the HDMI jack on an HDMI compatible TV or monitor.
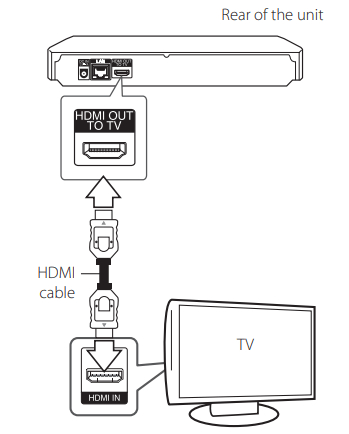
Set the TV’s source to HDMI (refer to TV’s Owner’s manual).
Note Please refer to the manuals of your TV, Stereo System or other devices as necessary to make the best connections.
Additional Information for HDMI
- When you connect an HDMI or DVI compatible device make sure of the following:
- Try switching off the HDMI/DVI device and this player. Next, switch on the HDMI/DVI device and leave it for around 30 seconds, then switch on this player.
- The connected device’s video input is set correctly for this unit.
- The connected device is compatible with x480p, 1280x720p, 1920x1080i or x1080p video input.
- Not all HDCP-compatible HDMI or DVI devices will work with this player.
- The picture will not be displayed properly with non-HDCP device.
What is SIMPLINK?

Some functions of this unit are controlled by the TV’s remote control when this unit and LG TV’s with SIMPLINK are connected through HDMI connection.
Controllable functions by LG TV’s remote control; Play, Pause, Scan, Skip, Stop, Power Off, etc.
Refer to the TV owner’s manual for the details of SIMPLINK function.
LG TV’s with SIMPLINK function has the logo as shown above.
Resolution setting
The player provides several output resolutions for
HDMI OUT jack. You can change the resolution using [Settings] menu.
- Press HOME (
 ).
). - Use
 to select the [Settings] and press ENTER (
 ). The [Settings] menu appears.
 - Use
 to select [DISPLAY] option then press
  to move to the second level.
 - Use
 to select the [Resolution] option then press ENTER (
 ) to move to the third level.
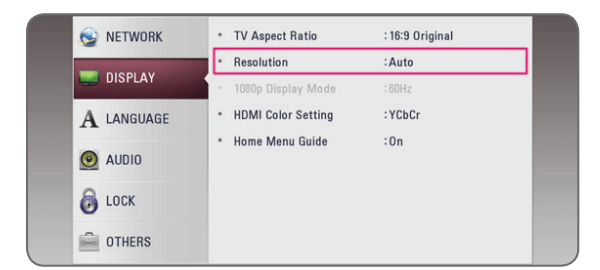
- Use
 to select the desired resolution then press ENTER (
 ) to confirm your selection.
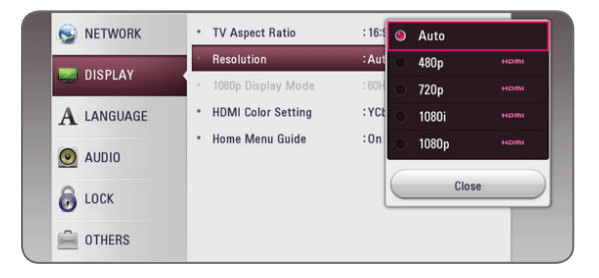
Note
- If your TV does not accept the resolution you have set on the player, you can set resolution to 480p as follows:
- Press
 to open the disc tray.
 - Press
 (STOP) for more than 5 seconds.
- Press
- If you select a resolution manually and then connect the HDMI jack to TV and your TV does not accept it, the resolution setting is set to [Auto].If you select a resolution that your TV does not accept, the warning message will appear. After resolution change, if you cannot see the screen, please wait 20 seconds and the resolution will automatically revert back to the previous resolution. y The 1080p video output frame rate may be automatically set to either 24 Hz or 60Hz depending both on the capability and preference of the connected TV and based on the native video frame rate of the content on the BD-ROM disc.
Connecting to an Amplifier
Since many factors affect the type of audio output, see “Audio Output Specifications” for details (page 54).
About Digital Multi-channel sound
A digital multi-channel connection provides the best sound quality. For this, you need a multichannel Audio/Video Receiver that supports one or more of the audio formats supported by your player. Check the logos on the front of the Audio/ Video receiver and the manual. (PCM Stereo, PCM Multi-Ch, Dolby Digital, Dolby Digital Plus, Dolby TrueHD, DTS and/or DTS-HD)
Connecting to an amplifier via HDMI Output
Connect the player’s HDMI OUT jack to the corresponding in jack on your amplifier using an HDMI cable.
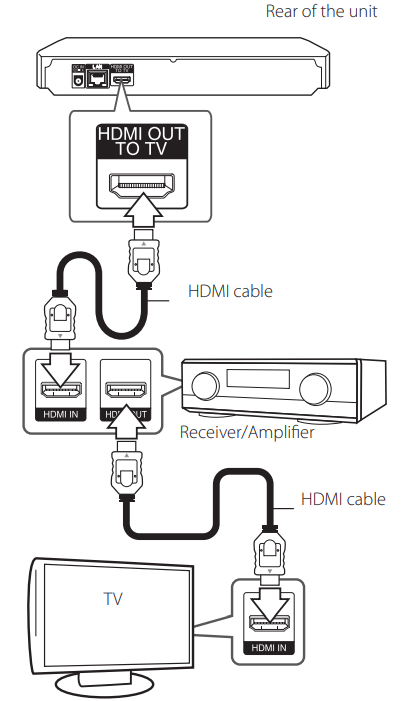
Connect the amplifier’s HDMI output jack to HDMI input jack on your TV using an HDMI cable if your amplifier has HDMI output jack. (Refer to amplifier’s owner’s manual) You will need to activate the player’s digital output. (See “[AUDIO] Menu” on page 23)
Connecting to your home network
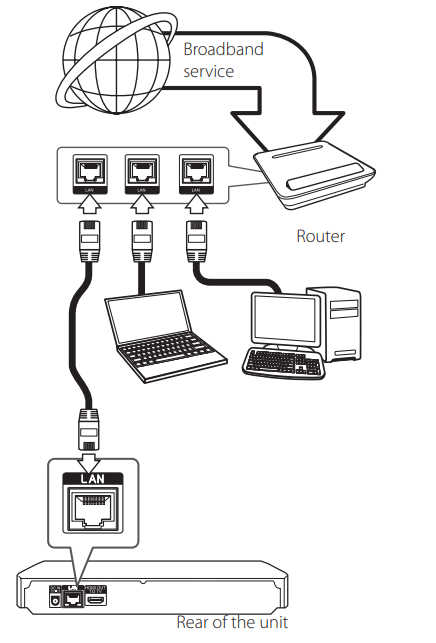
This player can be connected to a local area network (LAN) via the LAN port on the rear panel.
By connecting the unit to a broadband home network, you have access to services such as software updates, BD-Live interactivity and on-line content services.
Wired network connection
Using a wired network provides the best performance, because the attached devices connect directly to the network and are not subject to radio frequency interference.
Please refer to the documentation for your network device for further instructions.
Connect the player’s LAN port to the corresponding port on your Modem or Router using a commercially available LAN or Ethernet cable. y When plugging or unplugging the LAN cable, hold the plug portion of the cable.

- When unplugging, do not pull on the LAN cable but unplug while pressing down on the lock.
- Do not connect a modular phone cable to the LAN port. y Since there are various connection configurations, please follow the specifications of your telecommunication carrier or internet service provider.
- If you want to access content from DLNAcompatible digital media servers, this player must be connected to the same local area network with them via a router.
- To set your PC as a DLNA-compatible digital media server, install the SmartShare PC
Software on your PC. (page 31)
Wired network setup
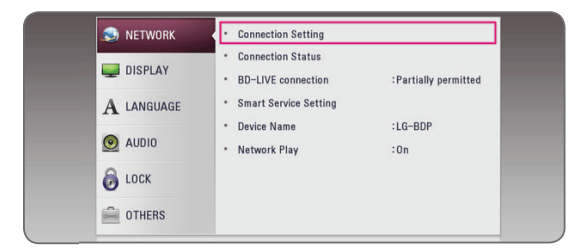
If there is a DHCP server on the local area network (LAN) via wired connection, this player will automatically be allocated an IP address. After making the physical connection, a small number of home networks may require the player’s network setting to be adjusted. Adjust the [NETWORK] setting as follow.
Preparation
Before setting the wired network, you need to connect the broadband internet to your home network.
- Select [Connection Setting] option in the [Setup] menu then press ENTER (
 ).
).
- Read the preparations for the network settings and then press ENTER (
 ) while [Start] is highlighted.
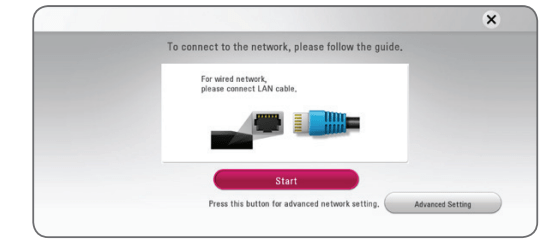
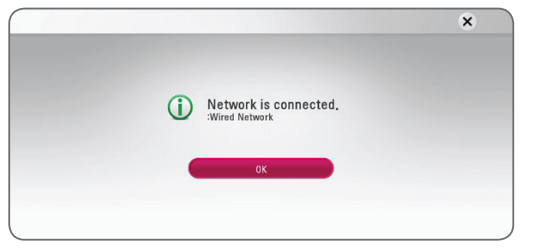
- Network will automatically be connected to the unit.
Advanced Setting
If you want to set the network settings manually, use  to select [Advanced Setting] on the[ Network Setting] menu and press ENTER (
 ).
).
- Use

 to select the IP mode between [Dynamic] and [Static].
Normally, select [Dynamic] to allocate an IP address automatically.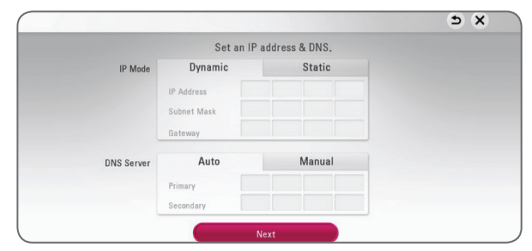
Note: If there is no DHCP server on the network and you want to set the IP address manually, select [Static] then set [IP Address], [Subnet Mask], [Gateway] and [DNS Server] using
 and numerical buttons.
 - Select [Next] and press ENTER (
 ) to apply network settings.
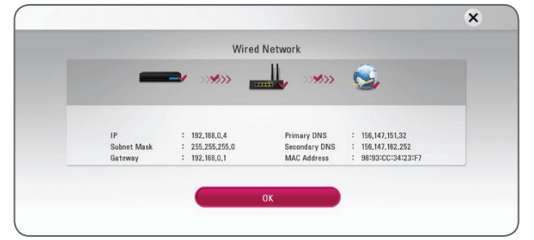
Network connection status is displayed on the screen. - Press ENTER (
 ) while [OK] is highlig
Notes on network connection
- Many network connection problems during set up can often be fixed by re-setting the router or modem. After connecting the player to the home network, quickly power off and/ or disconnect the power cable of the home network router or cable modem. Then power on and/or connect the power cable again.
- Depending on the internet service provider (ISP), the number of devices that can receive internet service may be limited by the applicable terms of service. For details, contact your ISP.
- Our company is not responsible for any malfunction of the player and/or the internet connection feature due to communication errors/malfunctions associated with your broadband internet connection, or other connected equipment.
- The features of BD-ROM discs made available through the Internet Connection feature are not created or provided by our company, and our company is not responsible for their functionality or continued availability. Some disc related material available by the Internet Connection may not be compatible with this player. If you have questions about such content, please contact the producer of the disc.
- Some internet contents may require a higher bandwidth connection.
- Even if the player is properly connected and configured, some internet contents may not operate properly because of internet congestion, the quality or bandwidth of your internet service, or problems at the provider of the content.
- Some internet connection operations may not be possible due to certain restrictions set by the
- Internet service provider (ISP) supplying your broadband Internet connection.
- Any fees charged by an ISP including, without limitation, connection charges are your responsibility. y A 10 Base-T or 100 Base-TX LAN port is required for wired connection to this player. If your internet service does not allow for such a connection, you will not be able to connect the player.
- You must use a Router to use xDSL service.
- A DSL modem is required to use DSL service and a cable modem is required to use cable modem service. Depending on the access method of and subscriber agreement with your ISP, you may not be able to use the internet connection feature contained in this player or you may be limited to the number of devices you can connect at the same time. (If your ISP limits subscription to one device, this player may not be allowed to connect when a PC is already connected.)
- The use of a “Router” may not be allowed or its usage may be limited depending on the policies and restrictions of your ISP. For details, contact your ISP directly.
Operating
Home Menu Display
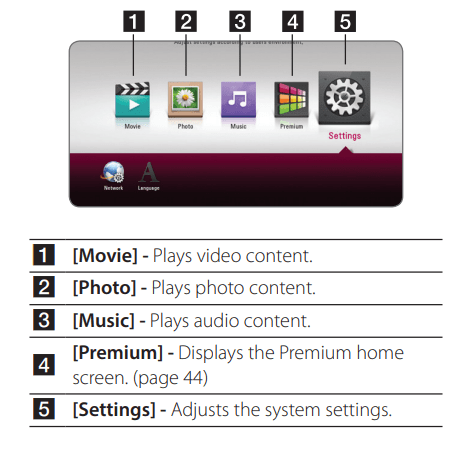
Using [HOME] menu
The home menu appears when you press HOME . Use
. Use  to select a category and press ENTER (
 )
)
Playing the Linked Devices
Playing a disc

- Press
 (OPEN/CLOSE), and place a disc on the disc tray.
 - Press
 (OPEN/CLOSE) to close the disc tray. For the most Audio CD, BD-ROM and DVD-ROM discs, playback starts automatically.
 - Press HOME (
 ).
). - Select [Movie] or [Music], and select disc icon.
Note
- Playback functions described in this manual are not always available in every files and media. Some functions can be restricted depending on many factors.
- Depending on the BD-ROM titles, a USB device connection may be needed for the proper playback.
- Unfinalized DVD-VR format discs may not be played in this player.
- Some DVD-VR discs are made with CPRM data by DVD RECORDER. This unit cannot support these kinds of discs.
Playing a file on disc/USB device

This player can play video, audio and photo files contained in the disc or USB device.
- Insert a data disc on the tray or connect a USB device.
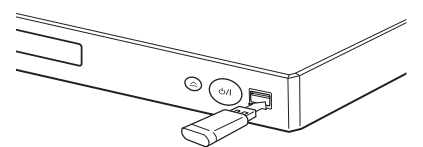
When you connect the USB device on the HOME menu, the player plays an audio file contained in the USB storage device automatically. If the USB storage device is containing various types of files, a menu for the file type selection will appear. File loading may take few minutes depending on the number of content stored in the USB storage device. Press ENTER ( ) while [Cancel] is selected to stop loading.
 - Press HOME (
 ).
). - Select [Movie], [Photo] or [Music] using
 , and press
  .
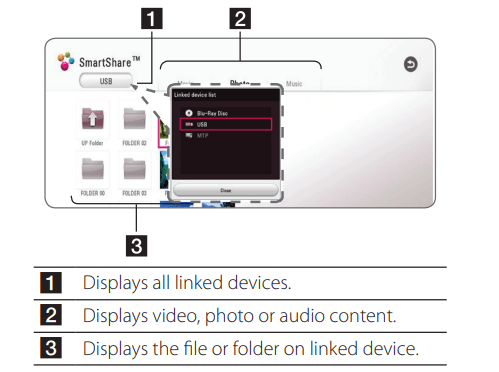
. - Select Disc or USB and press ENTER (
 ).
).
- Select a file using

 , and press z (PLAY) or ENTER (
 ) to play the file.
Notes on USB device
- This player supports USB flash drive/external HDD formatted in FAT32 and NTFS when accessing files (music, photo, movie). However, for BD-Live and Audio CD recording, use the USB flash drive / external HDD formatted in FAT32.
- This unit can support up to 4 partitions of the USB device.
- Do not extract the USB device during operation (play, etc.).
- A USB device which requires additional program installation when you have connected it to a computer, is not supported.
- USB device: USB device that supports USB1.1 and USB2.0.
- Video, audio and photo files can be played. For details of playing each file type, refer to the relevant pages.
- Regular back up is recommended to prevent data loss.
- If you use a USB extension cable, USB HUB or USB Multi-reader, the USB device may not be recognized.
- Some USB device may not work with this unit.
- Some digital cameras and mobile phones are not supported.
- USB Port of the unit cannot be connected to PC. The unit cannot be used as a storage device.
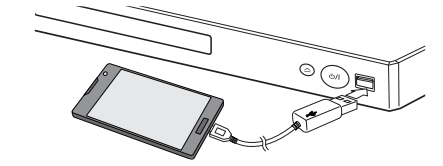
Playing a file on Android device

This player can play video, audio and photo files contained in Android device.
- Connect Android device to the unit with USB cable. Make sure that MTP is activated on Android device.
- Press HOME (
 ).
). - Select [Movie], [Photo] or [Music] using
 , and press
  .
. - Select [MTP] using a/d and press ENTER (
 ).
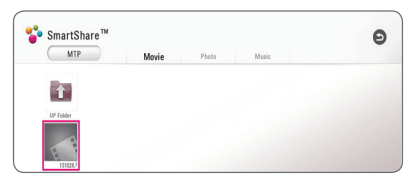
).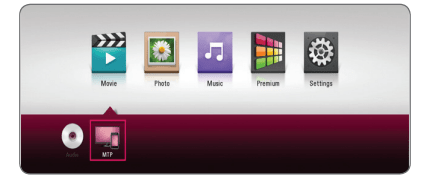 File loading may take few minutes depending on the number of content stored in Android device.
 - Select a file using

 , and press
  (PLAY) or ENTER (
 ) to play the file.
Playing a file on a network server

This player can play video, audio and photo files located in a DLNA-compatible digital media server through your home network.
- Check the network connection and settings (page 16).
- Press HOME (
 ).
). - Select [Movie], [Photo] or [Music] using
 , and press
  .
.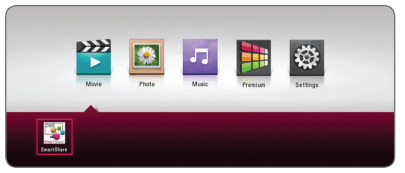
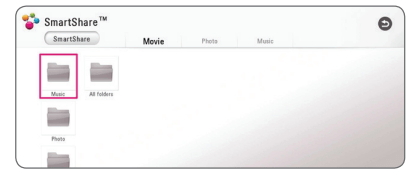
- Select a DLNA-compatible digital media server in the category using
 and press ENTER (
 )
)
- Select a file using

 , and press
  (PLAY) or ENTER (
 )to play the file.
Using Home Network Server for PC
Before connecting to PC to play a file, SmartShare PC Software should be installed on your PC.
About SmartShare PC Software
SmartShare PC Software is for sharing video, audio and photo files stored on your computer to this unit as a DLNA-compatible digital media server.
Downloading SmartShare PC Software
- Start up your computer, visit website. If necessary, select your region.
- Click support tab.
- Fill your model name on the cover of owner’s manual in search bar.
- Find and download the “SmartShare PC Software” file.
Installing SmartShare PC Software
- Before installation, close all running programs including firewall and Anti-Virus programs.
- Unzip and double-click “Setup.exe” to install SmartShare PC Software. The installation is prepared and the installation wizard appears.
- Follow the directions of the installation wizard displayed on the screen.
- Click the [Exit] button to complete the installation.
Sharing files and folders
On your computer, you must share the folder containing video, audio and/or photo content to play them on this player.
This part explains the procedure for selecting the shared folders on your computer.
- Double-click the “SmartShare” icon.
- Click [Movie], [Photo] or [Music] icon on the center, and then click [Settings] on the top right corner of the SmartShare PC Software. The [Settings] menu appears on the screen.
- Click [My Shared Contents] tab, and then click
 icon. The [Add/Remove Shared Folders] menu appears on the screen.
 - Click the folder containing the files you want to share and then click the [OK]. The checked folder is added to the [My Shared Contents] and then click the [OK] at the bottom of the [Settings] menu.
- Make sure that the SmartShare service turns on at the [Service] tab.
System requirements
Minimum System
- CPU : Intel® 2.0 GHz or AMD Sempron™ 2000+ processors
- Memory : 1 GB of free RAM
- Graphics card : 64 MB video memory, minimum resolution of 1024 x 768 pixels, and 16 bit color settings
- Free Disk Space : 200 MB
- Windows® XP (Service Pack 2 or higher),
- Windows Vista®, Windows® 7 or higher
- Windows® Media Player® 11.0 or higher
- Network environment : 100 Mb Ethernet, WLAN
Recommended System
- CPU : Intel® Core™ Duo or AMD Athlon™ 64X2, 1.7 GHz or better
- Memory : 2 GB of free RAM
- Graphics card : 128 MB video memory, minimum resolution of 1024 x 768 pixels, and 16 bit color settings
- Free Disk Space : 200 MB
- Windows® XP (Service Pack 2 or higher),
- Windows Vista®, Windows® 7 or higher
- Windows® Media Player® 11.0 or higher
- Network environment: 100 Mb Ethernet, WLAN
General Playback
Basic operations for video and audio content
To stop playback
Press  (STOP) during playback.
To pause playback
Press  (PAUSE) during playback.
Press  (PLAY) to resume playback.
To play frame-by-frame (Video)
Press  (PAUSE) during video playback.
Press  (PAUSE) repeatedly to play Frame-by-Frame playback.
To scan forward or backward
Press or
or  to play fast forward or fast reverse during playback.
You can change the various playback speeds by pressing  or
or  repeatedly.
To slow down the playing speed (Video)
While the playback is paused, press  repeatedly to play various speeds of slow motion.
To skip to the next/previous chapter/track/file
During playback, press  or
or  to go to the next chapter/track/file or to return to the beginning of the current chapter/track/file.
Press  twice briefly to step back to the previous chapter/track/file.
In the file list menu of a server, there may have many types of content in a folder together. In this case, press  or
or  to go to the previous or next content with same type.
Basic operations for photo content
To play a slide show
Press  (PLAY) to start slide show.
To stop a slide show
Press  (STOP) while slide show.
To pause a slide show
Press  (PAUSE) while slide show.
Press  (PLAY) to re-start the slide show.
To skip to the next/previous photo
While viewing a photo in full screen, press  or
or  to go to the previous or next photo.
Using the disc menu

To display the disc menu
The menu screen may be displayed first after loading a disc which contains a menu. If you want to display the disc menu during playback, press DISC MENU.
Use 
 buttons to navigate through menu items.
To display the Pop-up menu
Some BD-ROM discs contain Pop-up menu that appears during playback.
Press TITLE/POP-UP during playback, and use w/ s/a/d buttons to navigate through menu items.
Resume playback

The unit records the point where you pressed the  (STOP) depending on the disc.
If “
 (Resume Stop)” appears on the screen briefly, press
  (PLAY) to resume playback (from the scene point).
If you press  (STOP) twice or unload the disc, “Z
 (Complete Stop)” appears on the screen. The unit will clear the stopped point.
Last scene memory

This unit memorizes the last scene from the last disc that is viewed. The last scene remains in memory even if you remove the disc from the unit or switch off the unit. If you load a disc that has the scene memorized, the scene is automatically recalled.
On-Screen Display
You can display and adjust various information and settings about the content.
To control video playback '
You can control playback and set options while watching videos.
During playback, press INFO/MENU ( ).
).
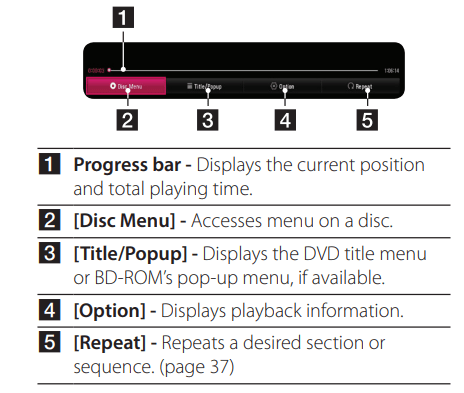
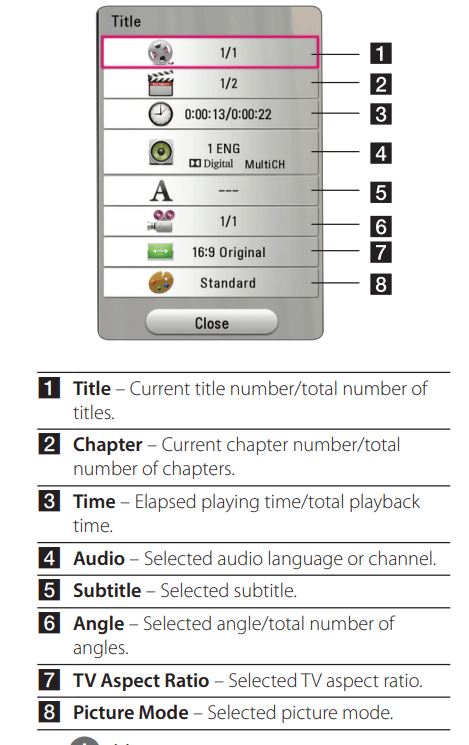
Displaying content information onscreen

- During playback, press INFO/MENU (
 ).
). - Select [Option] using
 , and press ENTER (
 ).
).
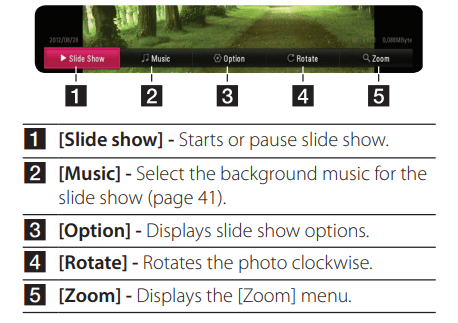
To control photo view
Controls playback and sets options while viewing pictures in full screen.
You can control playback and set options while viewing pictures in full screen.
While viewing pictures, press INFO/MENU ( )
)
Setting the slide show option
You can use various options during viewing a photo in full screen.
- While viewing pictures, press INFO/MENU (
 ).
). - Select [Option] using
 , and press ENTER
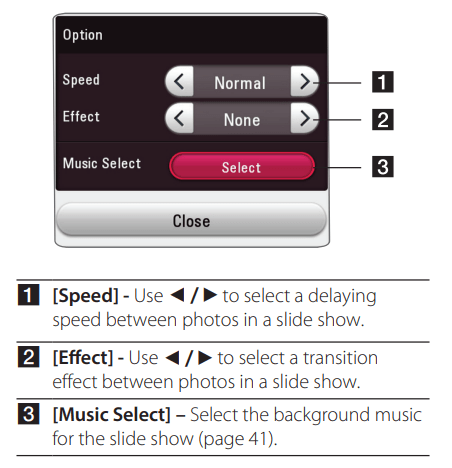
Advanced Playback
Repeat playback

Blu-ray Disc / DVD / Video files
During playback, press REPEAT ( ) to select a desired repeat mode.
A-B – Selected portion will be repeated continually.
Chapter – The current chapter will be played back repeatedly. (BD / DVD only)
Title – The current title will be played back repeatedly.
All – All the titles or files will be played back repeatedly. (Movie file only)
Off – Returns to normal playback.
Audio CDs/Audio files
During playback, press REPEAT ( ) repeatedly to select a desired repeat mode.
 – Selected portion will be repeated continually. (Audio CD only)
 Track – The current track or file will be played back repeatedly.
 All – All the tracks or files will be played back repeatedly.
 All – All the tracks or files will be played back repeatedly in random order.
 –The tracks or files will be played back in random order.
Note This function may not work on some disc or title.
Repeating a specific portion

This player can repeat a portion you have selected.
- During playback, press REPEAT (
 ).
). - Select [A-B], and press ENTER (
 ).
). - Press ENTER (
 at the beginning of the portion you wish to repeat.
 - Press ENTER (
 ) at the end of the portion. Your selected portion will be repeated continually.
Note
- You cannot select a portion less than 3 seconds.
- This function may not work on some disc or title.
Playing from selected time

- During playback, press INFO/MENU (
 .
. - Select [Option] using
 , and press ENTER (
 ).
). - Select the [Time] option and then input the required start time in hours, minutes, and seconds from left to right.
For example, to find a scene at 2 hours, 10 minutes, and 20 seconds, enter “21020”.
Press to skip the playback 60 seconds forward or backward.
 - Press ENTER
 ) to start playback from selected time.
Selecting a subtitle language

- During playback, press INFO/MENU (
 ).
). - Select [Option] using
 , and press ENTER (
 )
) - Use
 to select the [Subtitle] option.
 - Use
 to select desired subtitle language.
By pressing ENTER ( ), you can set various subtitle options.
 - Press BACK (
 ) to exit the On-Screen display.
Note Some discs allow you to change subtitle selections only via the disc menu. If this is the case, press TITLE/POP-UP or DISC MENU button and choose the appropriate subtitle from the selections on the disc menu.
Hearing a different audio

- During playback, press INFO/MENU (
 ).
). - Select [Option] using
 , and press ENTER
 - Use
 to select the [Audio] option.
 - Use
 to select desired audio language, audio track or audio channel.
 - Press BACK (
 ) to exit the On-Screen display.
Watching from a different angle

If the disc contains scenes recorded at different camera angles, you can change to a different camera angle during playback.
- During playback, press INFO/MENU (
 ).
). - Select [Option] using a/d, and press ENTER

- Use
 to select the [Angle] option.
 - Use
 to select desired angle.
 - Press BACK (
 ) to exit the On-Screen display.
Changing the TV Aspect Ratio

You can change the TV aspect ratio setting during playback.
- During playback, press INFO/MENU (
 ).
). - Select [Option] using a/d, and press ENTER (
 )
) - Use
 to select the [TV Aspect Ratio] option.
 - Use
 to select desired option.
 - Press BACK (
 ) to exit the On-Screen display
Changing subtitle Code Page

If the subtitle is displayed in broken letter, you can change the subtitle code page to view the subtitle file properly.
- During playback, press INFO/MENU (
 ).
). - Select [Option] using
 , and press ENTER
- Use
 to select the [Code Page] option.
 - Use
 to select desired code option.
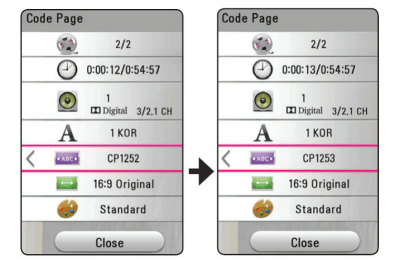
- Press BACK (
 ) to exit the On-Screen display.
Changing the Picture Mode

You can change the [Picture mode] option during playback.
- During playback, press INFO/MENU (
 ).
). - Select [Option] using
 , and press ENTER
- Use
 to select the [Picture Mode] option.
 - Use
 to select desired option.
 - Press BACK (
 ) to exit the On-Screen display.
Setting the [User setting] option
- During playback, press INFO/MENU (
 ).
). - Select [Option] using a/d, and press ENTER

- Use
 to select the [Picture Mode] option.
 - Use
 to select the [User setting] option, and press ENTER (
 ).
).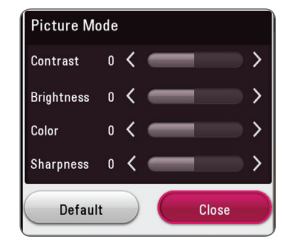
- Use

 to adjust the [Picture Mode] options.
Select [Default] option then press ENTER ( ) to reset the all video adjustments.
 - Use

 to select the [Close] option, and press ENTER (
 ) to finish setting
Viewing content information

The player can display the content information.
- Select a file using

 .
. - Press INFO/MENU (
 ). The file information appears on the screen.
During video playback, you can display the file information by pressing TITLE/POP-UP.
Note The information displayed on the screen may not correct comparing actual content information.
Changing content list view

In the [Movie], [Photo] or [Music] menu, you can change the content list view.
Press red (R) colored button repeatedly.
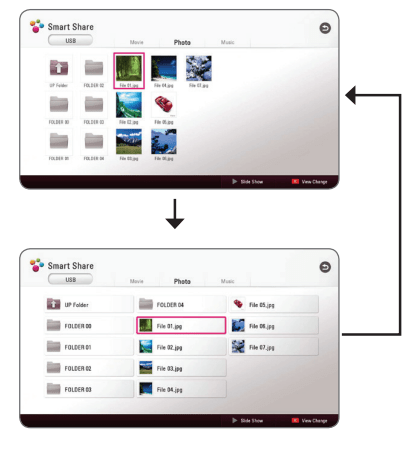
Selecting a subtitle file

If the subtitle file name is different from the video file name, you need to select the subtitle file in the [Movie] menu before playing the movie.
- Use

 to select the subtitle file you wish to play in the [Movie] menu.
 - Press ENTER (
 ).
).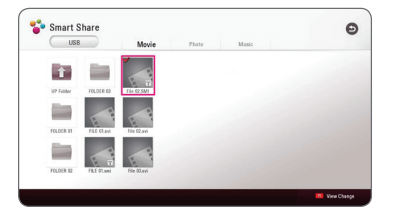
Press ENTER ( ) again to deselect the subtitle file. Selected subtitle file will be displayed when you play the video file.
Listening to music during slide show

You can display photo files while listening to audio files.
- While viewing a photo in full screen, press INFO/ MENU (
 ) to display the option menu.
 - Select [Option] using a/d, and press ENTER (
 ).
). - Use
 to select [Music Select] option, and press ENTER (
 b) to display the [Music Select] menu.
 - Use
 to select a device, and press ENTER (
 ).
).
Available device may differ depending on the location of the current photo file.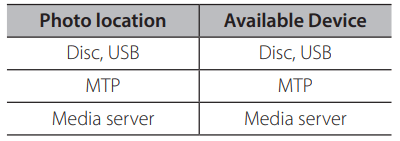
- Use
 to select a file or a folder you wish to play.
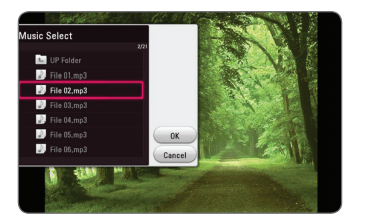
Select and press ENTER (
 ) to display the upper directory
 - Use
 to select [OK], and press ENTER (b) to complete music selection.
Advanced Features
Enjoying BD-Live™

BD-ROM supporting BD-Live that has a network extension function allows you to enjoy more functions such as downloading new movie trailers by connecting this unit to the internet.
- Check the network connection and settings (page 16).
- Insert a USB storage device to the USB port on the front panel.
A USB storage device is needed to download bonus content. - Press HOME (
 ), and set the [BD-LIVE connection] option on the [Settings] menu page 20).
Depending on a disc, the BD-Live function may not be operated if [BD-LIVE connection] option is set to [Partially Permitted]. - Insert a BD-ROM with BD-Live.
The operations may differ depending on the disc. Refer to the manual supplied with the disc.
Audio CD recording
You can record one desired track or all of the tracks in Audio CD to a USB storage device.
- Insert a USB storage device to the USB port on the front panel.
- Insert an Audio CD into the player. The playback starts automatically.
- Press red (R) colored button to start [CD Recording].
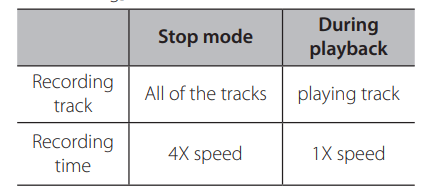
Using the Premium
You can use various content services via Internet with the Premium feature.
- Check the network connection and settings (page 16).
- Press HOME (
 ).
). - Select the [Premium] using a/d, and press ENTER (
 ).
). - The list of the apps you can use appears. When you use the app for the first time, you should install it before using. To install the app, select the app using w/s/a/d, and ENTER (b) and follow the directions on the screen.
Note
- For detailed information of each service, contact to the content provider or visit support link of the service.
- The content of Premium services and service related information, including user interface, is subject to changes. Please refer to the web site of each service for most upto-date information.
- For the first time to access [Premium], current country setting appears.
- If you want to change the country setting, go to [Settings] > [NETWORK] > [Smart Service Setting] > [Manual] on [Country Setting] tab and select desired country using

 , and ENTER (
 )
)
Enjoying with LG Multi-room Audio (LG Music Flow)

LG smart Hi-Fi audio system MUSIC flow allows you to enjoy music with the several speaker wirelessly.
Using MUSIC flow, you can enjoy audio contents being played by this unit with high quality.
- Check the network connection and settings (page 16). The player and speakers must be connected to the same network.
- During music playback, press green (G) colored button. Select speakers using
 and ENTER (
 . You can check multiple MUSIC flows you listen with. To change MUSIC flow’s channel, press
  during the checked speaker is highlighted and select the output option using
  and ENTER (
 ).
).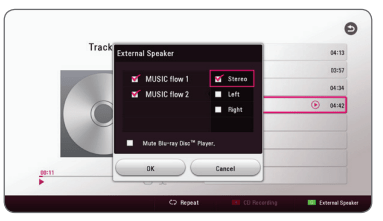
If you select [Mute Blu-ray Disc™ Player], you can listen using only MUSIC flow. - Select [OK], and press ENTER (
 ) to complete speaker selection.
Troubleshooting
General
Issue | Cause & Solution |
| The unit does not work properly |
|
| The power does not turn on |
|
| The unit does not start playback. |
|
| The connected USB storage device is not recognized. |
|
| The angle cannot be changed |
|
| Cannot play video, photo or audio files. |
|
| The remote control does not work properly. |
|
| The unit is plugged in, but the power will not turn on or off. | You can reset the unit as follows.
|
| The unit is not operating normally. |
Network
Symptom | Cause & Solution |
| BD-Live feature does not work. |
|
| Streaming video services (such as YouTube™, etc.) are often stopped or “buffer” during playback |
|
| Media servers are not displayed on the device list. |
|
Picture
Issue | Cause & Solution |
| There is no picture. |
|
| Picture noise appears. |
|
Appendix
Controlling a TV with the Supplied Remote Control
You can control your TV using the buttons below.
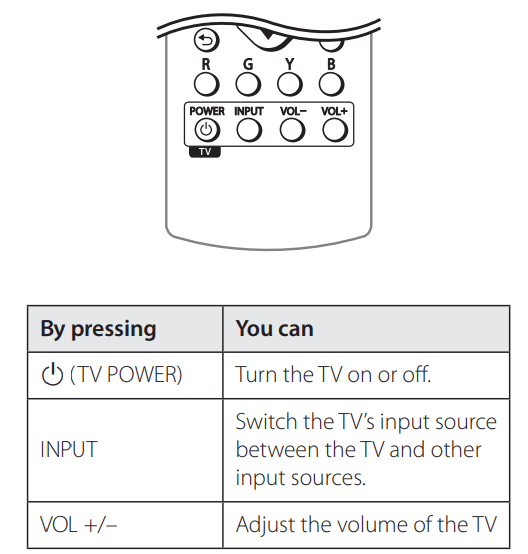
Setting up the remote to control your TV
You can operate your TV with the supplied remote control. If your TV is listed in the table below, set the appropriate manufacturer code.
1. While holding down (TV POWER) button, and press the manufacturer code for your TV with the numerical buttons (see the table below).
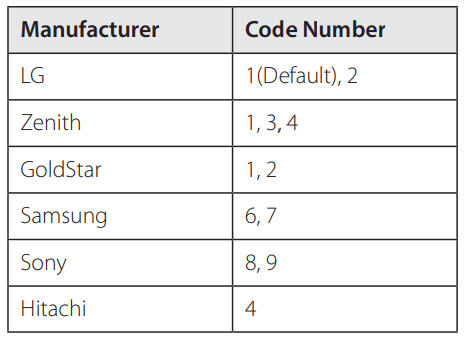
2. Release the  (TV POWER) button to complete setting. Depending on your TV, some or all buttons may not function on the TV, even after entering the correct manufacturer code. When you replace the battery of the remote, the code number you have set may be reset to the default setting. Set the appropriate code number again.
See other models: BPM36 86UP8770PUA OLED55A1PUA WD1408NCWWTP20Y GP08NU20.AYBE10B
