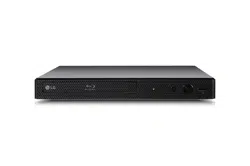
User manual Blu-ray Disc Player
Connecting
Connecting the AC Adapter
Connect the unit to the power supply with the supplied AC adapter.
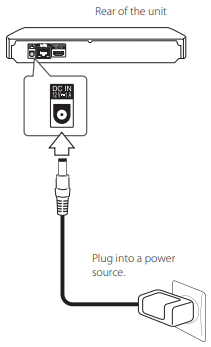
- Contact an electrical parts distributor for assistance in selecting a suitable AC plug adapter or AC cord set.
Connecting to your TV
If you have an HDMI TV or monitor, you can connect it to this player using an HDMI cable (Type A, High Speed HDMI™ Cable). Connect the HDMI jack on the player to the HDMI jack on an HDMI compatible TV or monitor.
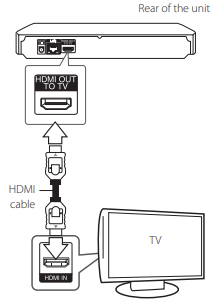
Set the TV’s source to HDMI (refer to TV’s Owner’s manual).
Note: Please refer to the manuals of your TV, Stereo System or other devices as necessary to make the best connections.
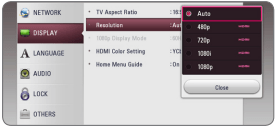
Resolution setting
The player provides several output resolutions for HDMI OUT jack. You can change the resolution using [Settings] menu.
1. Press HOME ( )
)
2. Use  to select the [Settings] and press ENTER (
 ). The [Settings] menu appears.
3. Use  to select [DISPLAY] option then press
  to move to the second level.
4. Use to select the [Resolution] option then press ENTER () to move to the third level.
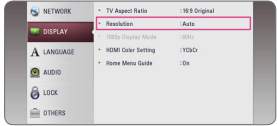
5. Use to select the desired resolution then press ENTER () to confirm your selection.
Note
- If your TV does not accept the resolution you have set on the player, you can set resolution to 480p as follows:
1. Press  to open the disc tray.
2. Press  (STOP) for more than 5 seconds.
- If you select a resolution manually and then connect the HDMI jack to TV and your TV does not accept it, the resolution setting is set to [Auto].
- If you select a resolution that your TV does not accept, the warning message will appear. After resolution change, if you cannot see the screen, please wait 20 seconds and the resolution will automatically revert back to the previous resolution.
- The 1080p video output frame rate may be automatically set to either 24 Hz or 60 Hz depending both on the capability and preference of the connected TV and based on the native video frame rate of the content on the BD-ROM disc.
Connecting to an Amplifier
Since many factors affect the type of audio output, see “Audio Output Specifications” for details (page 54).
About Digital Multi-channel sound
A digital multi-channel connection provides the best sound quality. For this, you need a multichannel Audio/Video Receiver that supports one or more of the audio formats supported by your player. Check the logos on the front of the Audio/ Video receiver and the manual. (PCM Stereo, PCM Multi-Ch, Dolby Digital, Dolby Digital Plus, Dolby TrueHD, DTS and/or DTS-HD).
Connecting to an amplifier via HDMI Output
Connect the player’s HDMI OUT jack to the corresponding in jack on your amplifier using an HDMI cable.
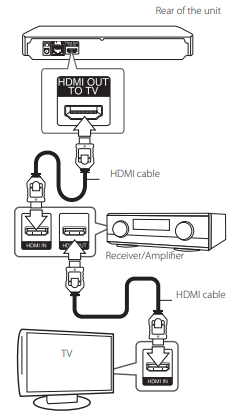
Connect the amplifier’s HDMI output jack to HDMI input jack on your TV using an HDMI cable if your amplifier has HDMI output jack. (Refer to amplifier’s owner’s manual)
You will need to activate the player’s digital output. (See “[AUDIO] Menu” on page 23)
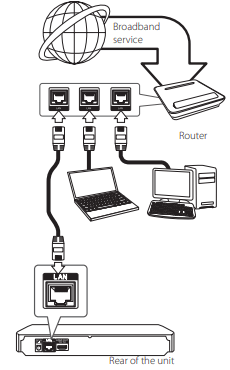
Connecting to your home network
This player can be connected to a local area network (LAN) via the LAN port on the rear panel. By connecting the unit to a broadband home network, you have access to services such as software updates, BD-Live interactivity and on-line content services.
Wired network connection
Using a wired network provides the best performance, because the attached devices connect directly to the network and are not subject to radio frequency interference.
Please refer to the documentation for your network device for further instructions.
Connect the player’s LAN port to the corresponding port on your Modem or Router using a commercially available LAN or Ethernet cable.
Note
- When plugging or unplugging the LAN cable, hold the plug portion of the cable. When unplugging, do not pull on the LAN cable but unplug while pressing down on the lock.
- Do not connect a modular phone cable to the LAN port.
- Since there are various connection configurations, please follow the specifications of your telecommunication carrier or internet service provider.
- If you want to access content from DLNAcompatible digital media servers, this player must be connected to the same local area network with them via a router.
- To set your PC as a DLNA-compatible digital media server, install the SmartShare PC Software on your PC. (page 31)
Notes on network connection
- Many network connection problems during set up can often be fixed by re-setting the router or modem. After connecting the player to the home network, quickly power off and/ or disconnect the power cable of the home network router or cable modem. Then power on and/or connect the power cable again.
- Depending on the internet service provider (ISP), the number of devices that can receive internet service may be limited by the applicable terms of service. For details, contact your ISP.
- Our company is not responsible for any malfunction of the player and/or the internet connection feature due to communication errors/malfunctions associated with your broadband internet connection, or other connected equipment.
- The features of BD-ROM discs made available through the Internet Connection feature are not created or provided by our company, and our company is not responsible for their functionality or continued availability. Some disc related material available by the Internet Connection may not be compatible with this player. If you have questions about such content, please contact the producer of the disc.
- Some internet contents may require a higher bandwidth connection.
- Even if the player is properly connected and configured, some internet contents may not operate properly because of internet congestion, the quality or bandwidth of your internet service, or problems at the provider of the content.
- Some internet connection operations may not be possible due to certain restrictions set by the
- Internet service provider (ISP) supplying your broadband Internet connection.
- Any fees charged by an ISP including, without limitation, connection charges are your responsibility.
- A 10 Base-T or 100 Base-TX LAN port is required for wired connection to this player. If your internet service does not allow for such a connection, you will not be able to connect the player.
- You must use a Router to use xDSL service.
- A DSL modem is required to use DSL service and a cable modem is required to use cable modem service. Depending on the access method of and subscriber agreement with your ISP, you may not be able to use the internet connection feature contained in this player or you may be limited to the number of devices you can connect at the same time. (If your ISP limits subscription to one device, this player may not be allowed to connect when a PC is already connected.)
- The use of a “Router” may not be allowed or its usage may be limited depending on the policies and restrictions of your ISP. For details, contact your ISP directly
Initial Setup
When you turn on the unit for the first time, the initial setup wizard appears on the screen. Set the display language and network settings on the initial setup wizard.
1. Press  (POWER). The initial setup wizard appears on the screen.
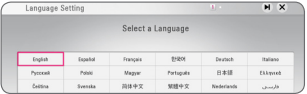
2. Use / to select a display language and press ENTER ().
3. After checking the Terms of Service, select [Agree] to use the Premium Service and SW Updates.
Read and prepare the preparations for the network settings and then press ENTER () while [Start] is highlighted.
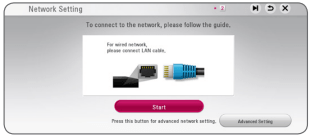
For details on network settings, refer to “Connecting to your Home Network” on 16.
4. Check all the settings that you have set in the previous steps.
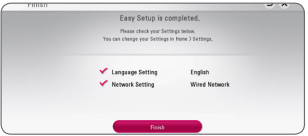
Press ENTER () while [Finish] is highlighted to finish the initial setup settings. If there is any settings to be changed, use / to select  and press ENTER ().
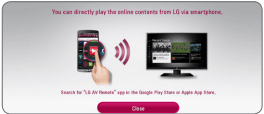
5. Displays the guide to enjoy online contents using LG AV Remote. Press ENTER ().
[LANGUAGE] menu
Display Menu
Select a language for the [Settings] menu and onscreen display
Disc Menu/Disc Audio/ Disc Subtitle
Select the language you prefer for the audio track (disc audio), subtitles, and the disc menu.
[Original]
- Refers to the original language in which the disc was recorded.
[Other]
- Press ENTER () to select another language. Use number buttons then press ENTER () to enter the corresponding 4-digit number according to the language code list on page 56.
[Off] (Disc Subtitle only)
Note Depending on the disc, your language setting may not work.
[AUDIO] menu
Each disc has a variety of audio output options. Set the player’s Audio options according to the type of audio system you use.
Note Since many factors affect the type of audio output, see “Audio Output Specifications” on page 54 for details.
Digital Output
[Auto]
- Select if you connect this unit’s HDMI OUT jack to a device with LPCM, Dolby Digital, Dolby Digital Plus, Dolby TrueHD, DTS and DTS-HD decoder.
[PCM]
- Select if you connect this unit’s HDMI OUT jack to a device with digital decoder.
[DTS Re-Encode]
- Select if you connect this unit’s HDMI OUT jack to a device with DTS decoder.
Note
- When [Digital Output] option is set to [Auto], the audio may output as bitstream. If the bitstream information is not detected from HDMI device with EDID, the audio may output as PCM.
- If the [Digital Output] option is set to [DTS Re-Encode], the DTS Re-Encode audio is outputted for BD-ROM discs with secondary audio and the original audio is outputted for the other discs (like [Auto]).
- If [Audio Guidance] is set to [On], the audio is output in PCM without reference to [Digital Output] option.
Operating
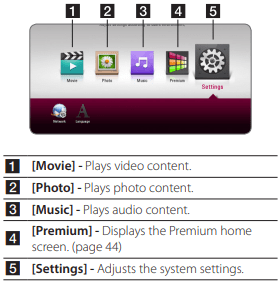
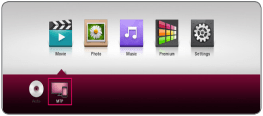
Home Menu Display
Using [HOME] menu
The home menu appears when you press HOME (). Use to select a category and press ENTER ()
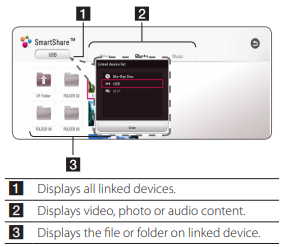
Playing the Linked Devices
Playing a disc

1. Press (OPEN/CLOSE), and place a disc on the disc tray.
2. Press (OPEN/CLOSE) to close the disc tray. For the most Audio CD, BD-ROM and DVD-ROM discs, playback starts automatically.
3. Press HOME ().
4. Select [Movie] or [Music], and select disc icon.
Note
- Playback functions described in this manual are not always available in every files and media. Some functions can be restricted depending on many factors.
- Depending on the BD-ROM titles, a USB device connection may be needed for the proper playback.
- Unfinalized DVD-VR format discs may not be played in this player.
- Some DVD-VR discs are made with CPRM data by DVD RECORDER. This unit cannot support these kinds of discs.
Playing a file on disc/USB device

This player can play video, audio and photo files contained in the disc or USB device.
1. Insert a data disc on the tray or connect a USB device.
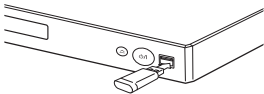
When you connect the USB device on the HOME menu, the player plays an audio file contained in the USB storage device automatically. If the USB storage device is containing various types of files, a menu for the file type selection will appear.
File loading may take few minutes depending on the number of content stored in the USB storage device. Press ENTER () while [Cancel] is selected to stop loading.
2. Press HOME ().
3. Select [Movie], [Photo] or [Music] using , and press  .
.
4. Select Disc or USB and press ENTER (b).
5. Select a file using / , and press  (PLAY) or ENTER () to play the file.
Notes on USB device
- This player supports USB flash drive/external HDD formatted in FAT32 and NTFS when accessing files (music, photo, movie). However, for BD-Live and Audio CD recording, use the USB flash drive / external HDD formatted in FAT32.
- This unit can support up to 4 partitions of the USB device.
- Do not extract the USB device during operation (play, etc.).
- A USB device which requires additional program installation when you have connected it to a computer, is not supported.
- USB device: USB device that supports USB1.1 and USB2.0.
- Video, audio and photo files can be played. For details of playing each file type, refer to the relevant pages.
- Regular back up is recommended to prevent data loss.
- If you use a USB extension cable, USB HUB or USB Multi-reader, the USB device may not be recognized.
- Some USB device may not work with this unit.
- Some digital cameras and mobile phones are not supported.
- USB Port of the unit cannot be connected to PC. The unit cannot be used as a storage device.
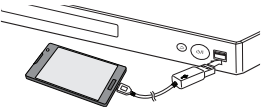
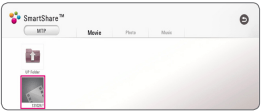
Playing a file on Android device

This player can play video, audio and photo files contained in Android device.
1. Connect Android device to the unit with USB cable. Make sure that MTP is activated on Android device.
2. Press HOME ().
3. Select [Movie], [Photo] or [Music] using , and press .
4. Select [MTP] using and press ENTER ().
File loading may take few minutes depending on the number of content stored in Android device.
5. Select a file using / , and press (PLAY) or ENTER () to play the file.
Notes on Connecting Android device
- This unit can support only MTP (Media Transfer Protocol) Android (4.0 or later is recommended) devices.
- Do not extract Android device during operation (play, etc.).
- Video, audio and photo files can be played. For details of playing each file type, refer to the relevant pages.
- Regular back up is recommended to prevent data loss.
- If you use a USB extension cable, USB HUB or USB Multi-reader, Android device may not be recognized.
- Some Android devices may not work with this unit.
- When you use MTP, playing some music, photo, movie, or subtitle files may not work depending on Android device.
Using Home Network Server for PC
Before connecting to PC to play a file, SmartShare PC Software should be installed on your PC.
About SmartShare PC Software
Software SmartShare PC Software is for sharing video, audio and photo files stored on your computer to this unit as a DLNA-compatible digital media server.
Downloading SmartShare PC Software
1. Start up your computer.
2. Click support tab.
3. Fill your model name on the cover of owner’s manual in search bar.
4. Find and download the “SmartShare PC Software” file.
Installing SmartShare PC Software
1. Before installation, close all running programs including firewall and Anti-Virus programs.
2. Unzip and double-click “Setup.exe” to install SmartShare PC Software. The installation is prepared and the installation wizard appears.
3. Follow the directions of the installation wizard displayed on the screen.
4. Click the [Exit] button to complete the installation.
Sharing files and folders
On your computer, you must share the folder containing video, audio and/or photo content to play them on this player.
This part explains the procedure for selecting the shared folders on your computer.
1. Double-click the “SmartShare” icon.
2. Click [Movie], [Photo] or [Music] icon on the center, and then click [Settings] on the top right corner of the SmartShare PC Software. The [Settings] menu appears on the screen.
3. Click [My Shared Contents] tab, and then click  icon. The [Add/Remove Shared Folders] menu appears on the screen.
4. Click the folder containing the files you want to share and then click the [OK]. The checked folder is added to the [My Shared Contents] and then click the [OK] at the bottom of the [Settings] menu.
5. Make sure that the SmartShare service turns on at the [Service] tab.
Note
- If the shared folders or files are not displayed on the player, click the [My Shared Contents] on the [Settings] menu, and then click
 icon.
icon.
- For more information, click [HELP] on the [Settings] menu.
Advanced Features
Enjoying BD-Live™

BD-ROM supporting BD-Live that has a network extension function allows you to enjoy more functions such as downloading new movie trailers by connecting this unit to the internet.
1. Check the network connection and settings (page 16).
2. Insert a USB storage device to the USB port on the front panel. A USB storage device is needed to download bonus content.
3. Press HOME (), and set the [BD-LIVE connection] option on the [Settings] menu (page 20). Depending on a disc, the BD-Live function may not be operated if [BD-LIVE connection] option is set to [Partially Permitted].
4. Insert a BD-ROM with BD-Live. The operations may differ depending on the disc. Refer to the manual supplied with the disc.
Caution Do not extract the connected USB device while content is being downloaded or a Bluray disc is still in the disc tray. Doing so may damage the connected USB device and BDLive features may not operate properly with the damaged USB device anymore. If the connected USB device seems damaged from such an action, you can format the connected USB device from the PC and reuse it with this player.
Note
- Some BD-Live content may be restrictively accessed in some territories by content provider’s own decision.
- It may take up to several minutes to load and start enjoying BD-Live content.
- For BD-Live, use the USB flash drive / external HDD formatted in FAT32 only
Troubleshooting
General
| Issue |
Cause & Solution |
| The unit does not work properly. |
- Turn off the power of this unit and the connected external device (TV, Woofer, DVD-player, Amplifier, etc.) and turn it on again.
- Disconnect the power cord of this unit and the connected external device (TV, Woofer, DVD-player, Amplifier, etc.) and then try connecting again.
|
| The power does not turn on. |
- Plug the power cord into the wall outlet securely.
- Be sure that the AC adaptor is connected to the unit securely.
|
| The unit does not start playback. |
- Insert a playable disc. (Check the disc type, color system, and regional code.)
- Place the disc with the playback side down.
- Place the disc on the disc tray correctly inside the guide.
- Clean the disc.
- Cancel the Rating function or change the rating level.
|
| The connected USB storage device is not recognized. |
- Try using a different USB cable, some USB cables may not support enough current for normal USB operation.
- If you use a USB extension cable or USB HUB, the USB devices may not be recognized.
- A USB device which requires additional program installation when you have connected it to a computer is not supported.
- This unit supports only USB Flash Drive and USB External HDD with FAT32 or NTFS format.
|
| The angle cannot be changed. |
- Multi-angles are not recorded on the DVD Video being played.
|
| Cannot play video, photo or audio files. |
- The files are not recorded in a format that the unit can play.
- The unit does not support the codec of the video file.
|
| The remote control does not work properly |
- The remote control is not pointed at the remote sensor of the unit.
- The remote control is too far from the unit.
- There is an obstacle in the path of the remote control and the unit.
- The batteries in the remote control are exhausted.
|
| The unit is plugged in, but the power will not turn on or off. |
You can reset the unit as follows.
- Unplug the power cord, wait at least five seconds, and then plug it in again.
|
| The unit is not operating normally |
Network
| Symptom |
Cause & Solution |
| BD-Live feature does not work. |
- The connected USB storage may not have enough space. Connect the USB storage with at least 1 GB free space.
- Ensure that the unit is correctly connected to the local area network and can access the internet (page 16).
- Your broadband speed may not fast enough to use the BD-Live features. Contact your Internet Service Provider (ISP) and increase the broadband speed is recommended.
- The [BD-LIVE connection] option in the [Settings] menu is set to [Prohibited]. Set the option to [Permitted].
|
| Streaming video services (such as YouTube™, etc.) are often stopped or “buffer” during playback. |
- Your broadband service speed may not be fast enough to stream video services. Contact your Internet Service Provider (ISP) and increase the broadband speed is recommended.
|
| Media servers are not displayed on the device list. |
- The firewall or anti-virus software on your media server is running. Turn off the firewall or anti-virus software running on your media server.
- The player is not connected to the local area network that your media server is connected.
|
Picture
| Issue |
Cause & Solution |
| There is no picture. |
- Select the appropriate video input mode on the TV so the picture from the unit appears on the TV screen.
- Connect the video connection securely.
- Check the [HDMI Color Setting] in the [Settings] menu is set to the appropriate item that conforms to your video connection.
- Your TV may not support the resolution you have set on the player. Change the resolution that your TV accepts.
- The player’s HDMI OUT jack is connected to a DVI device that does not support copyright protection.
|
| Picture noise appears. |
- You are playing a disc recorded in a color system that is different from your TV.
- Set the resolution which your TV accepts.
|