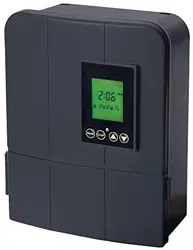
User manual Light Transformer
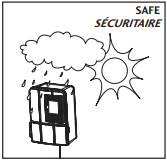
1.1 Outdoor use, weather proof.
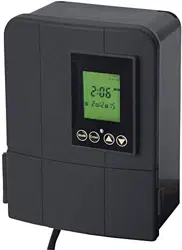
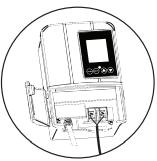
1.1a Carefully remove the plastic film covering the LCD display panel.
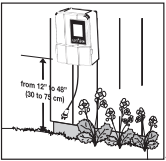
1.2 Install the transformer at a level where the controls are visible and accessible.
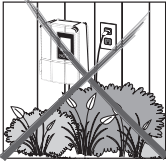
1.3 Only applies in AUTO mode. Do not install behind shrubs. It will affect photocell for Auto dusk-to-dawn mode

1.4 Only applies in AUTO mode. Photocell will not operate properly if installed too close to a nighttime light source.
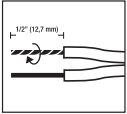
2.1 Remove the landscape wire insulation 1/2” from both wires and twist ends.
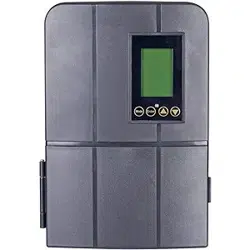
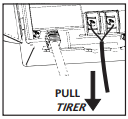
2.1a Open the front panel by pulling the right side below the screen.
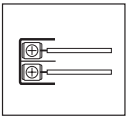
2.2 Remove the bottom plate by pulling on it for more space during installation. Insert wires under each terminal plate and tighten screws.
2.3 Gently pull on the landscape wire to verify if the connection is strong.
2.4 Verify that there are no loose cable strands.
2.5 Replace the bottom plate and close the front panel.
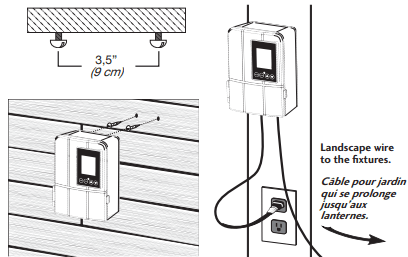
3.1 Option 1: Standard wall mounting
Insert the two (2) included support screws 3.5” (9 cm) apart in a wall near an electrical outlet and mount the transformer.
3.2 Option 2: Brick or cement wall mounting
Drill two (2) holes of 5/16” (8 mm), 3.5” (9 cm) apart from each other, in a wall near an electrical outlet and place the two (2) plastic anchors included. Insert the two (2) support screws in the anchors until they have about 1/4” (6 mm) of space left to mount the transformer
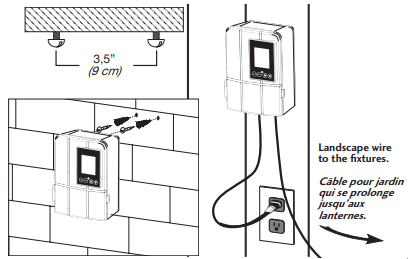
4. Run the Landscape Wire (Not Included)
The landscape wire should run from the transformer to each light without being cut. Do not run the landscape wire within 10 feet (3m) of a pool, spa or fountain. If the landscape wire is too long, cut it with a cable cutter.
The landscape wire should be protected by routing it close to proximity of the light fixture or next to a building, deck or fence. Use cable suitable for low voltage landscape lighting.
See chart below for recommended cable gauges.
*Suitable cable should be sized in accordance to the table, should be Type SPT-2W. If you cannot find this cable at your local hardware or home improvement store then please call customer service at 1-888-867-6095 or e-mail at [email protected] to order the cable needed.
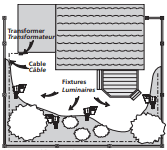
* llustration of fixtures is for example only.
* L’illustration des luminaires est à titre d’exemple seulement.

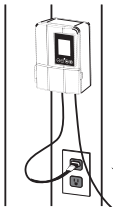
- Plug the transformer into a GFCI electrical receptacle.
- To test the fixtures, change the mode to “ON”.
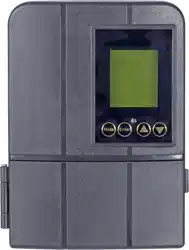
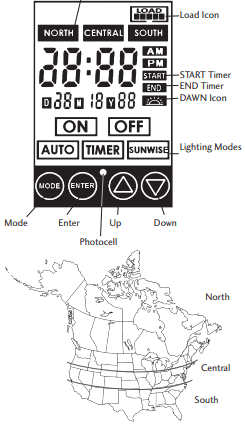
 Press to confirm a selection.
 Press to modify or change a mode. Press it to exit any settings without saving.
 Press these to select and go through the interface.
 Press at the same time to change time and date. *Necessary for Timer, Auto and Sunwise settings to work properly
 Press at the same time to change Sunwise time zone. *Necessary for optimal Sunwise mode.
 The time at which the lights will turn On. This step comes after selecting a Mode. (Shows up for Timer Mode only)
 The time at which the lights will turn Off. This step comes after selecting a Mode. (Auto, Timer and Sunwise only)
 Select this to close the lights at dawn. When selecting an end time, scroll using up and down until the icon shows up (Auto and Sunwise only)
 NORTH zone. Refers to locations from north of Chicago, IL
 CENTRAL zone. Refers to locations between Chicago, IL and southern Missouri.
 SOUTH zone. Refers to locations south of Missouri.

*The channels will only turn on at the exact start time selected for Timer and dusk for Sunwise.
7.1 Current time & date setting
This step is needed for the lighting modes Auto, Timer and Sunwise to work properly or else they won’t open/close at the right time.
1- Press both MODE  and ENTER
  at the same time quickly.
2- Use UP  and DOWN
  to select the date and ENTER to confirm. Apply the same procedure for the current time.
7.2 Location setting (for Sunwise mode only)
Sunwise is a feature that does not need a photocell to operate. Thanks to that, it can be installed indoor and it will still open the lights from dusk to dawn, following the seasons. All it needs is your local time and location to calculate the sun’s position to estimate your local dusk/dawn time. Here is how to set it up:
1- Press MODE and UP at the same time quickly.
2- According to the map at step #6, enter your location by selecting one of the three following options and pressing ENTER to confirm (if you live in Canada, select “North”):
 North zone
 Central zone
 South zone
7.3 Setting up a lighting timer schedule
This section will help you on how to setup a mode and program the opening/closing of the lights at the time you want.
1- Press MODE to access the timer mode settings. matches to which landscape wire.
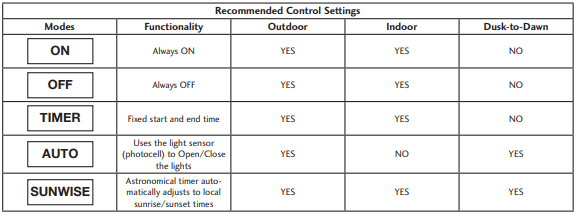
2- Refer to step #6: “Recommended Control Settings” and select one of the five lighting modes: On, Off, Auto, Timer, Sunwise.
3-  START time settings – ONLY FOR TIMER MODE. Select the hours and minutes at which you want the lights to turn ON.
4-  END time settings – ONLY FOR AUTO, TIMER AND SUNWISE LIGHTING MODES. Choose one of the two END time option:
a) Dawn END time: select this option to make the lights close at dawn automatically every day. It will use the photocell if you selected the mode Auto and your location if you selected Sunwise. Scroll the hours until you see the DAWN icon  and press ENTER to select it.
b) Fixed END time: select this option if you want the transformer to close the lights every day at the same hour. This type of END time will not adjust to the seasons, be it summer or winter, the END time will stay the same. To select this option, simply select the END time wanted.
8. Troubleshooting
All of the lights fail to work
- If the LOAD icon is flashing, make sure you are using less than 120 watts. If necessary, remove some fixtures and change the lighting mode to the desired one after.
- Check that the transformer power is on.
- Check if there is a loose connection at the transfomer screw terminal.
- Check that the current mode is not set to «OFF».
The lights are “ON” during the day
- The power unit is in a dark area which triggers the photocell to turn ON the lights.
The lights do not switch “ON” at dusk
- The power unit is in a area where there is too much light at night.
The lights are not turning on after selecting Timer or Sunwise mode.
- Timer and Sunwise mode only open up at their exact start time setting (Start for timer and dusk for Sunwise). Ex: if it is 8 PM at your location and you set the start time to 7 PM, the channel won’t turn on until 7 PM the next day
There is a significant delay in Sunwise mode.
- Make sure that you selected the right zone. If you live far to the north, or far to the south, Sunwise may not be optimal.
9. Maintenance
- To clean, wash with a damp soft cloth.