
Loading ...
Loading ...
Loading ...
11
We value your experience using Sunny Health and Fitness products. For assistance with parts or
troubleshooting, please contact us at [email protected] or 1-877-90SUNNY (877-907-
8669).
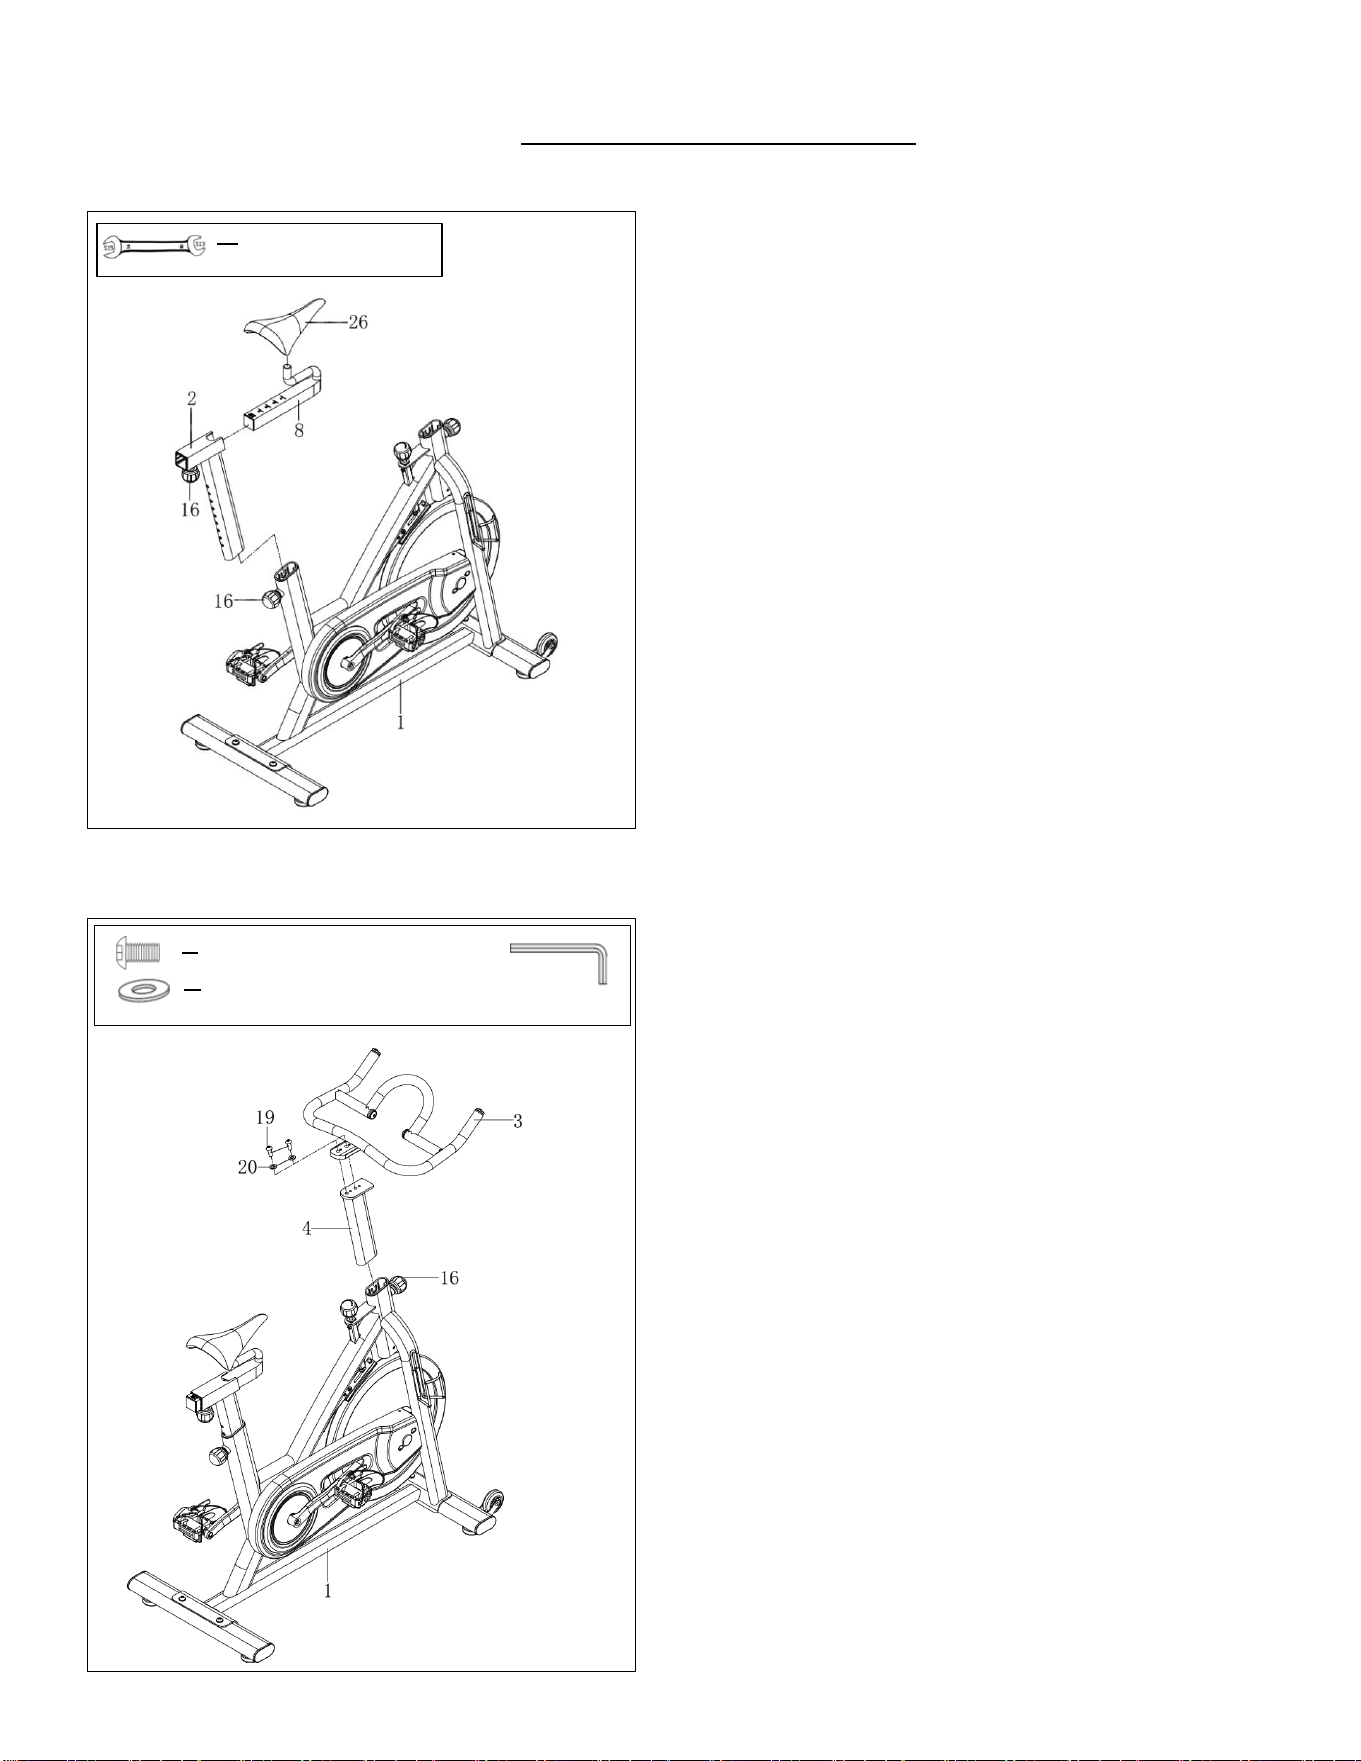
STEP 4:
Loosen and remove the [seat post] Adjustment
Knob (No. 16). Insert Seat Post (No. 2) into the
sleeve located on the back of the Main Frame
(No. 1). Adjust the Seat Post (No. 2) to the
desired position and reinsert and tighten
Adjustment Knob (No. 16) to secure the post
in place.
Loosen and remove the [seat slider]
Adjustment Knob (No. 16). Insert Seat Slider
(No. 8) into the Seat Post (No. 2). Adjust the
Seat Slider (No. 8) to the desired position and
reinsert and tighten Adjustment Knob (No. 16)
to secure the post in place.
Secure Seat (No. 26) to the Seat Slider (No.
8).
NOTE: Before you fully tighten the seat, you
can adjust the front of the seat higher or lower
to meet your needs.
STEP 5:
Loosen and remove the [handlebar]
Adjustment Knob (No. 16). Insert Handlebar
Post (No. 4) into the sleeve located on the front
of the Main Frame (No. 1). Adjust the
Handlebar Post (No. 4) to the desired position
and reinsert and tighten the Adjustment Knob
(No. 16) to secure the post in place.
Secure Handlebar (No. 3) to Handlebar Post
(No. 4) using 2 Screws (No. 19) and 2
Washers (No. 20). Tighten and secure with
Spanner (No. 77).
The assembly is complete!
#79 S13-15 1PC
STEP 4:
Loosen and remove the [seat post] Adjustment
Knob (No. 16). Insert Seat Post (No. 2) into the
sleeve located on the back of the Main Frame
(No. 1). Adjust the Seat Post (No. 2) to the
desired position and reinsert and tighten
Adjustment Knob (No. 16) to secure the post
in place.
Loosen and remove the [seat slider]
Adjustment Knob (No. 16). Insert Seat Slider
(No. 8) into the Seat Post (No. 2). Adjust the
Seat Slider (No. 8) to the desired position and
reinsert and tighten Adjustment Knob (No. 16)
to secure the post in place.
Secure Seat (No. 26) to the Seat Slider (No.
8).
NOTE: Before you fully tighten the seat, you
can adjust the front of the seat higher or lower
to meet your needs.
STEP 5:
Loosen and remove the [handlebar]
Adjustment Knob (No. 16). Insert Handlebar
Post (No. 4) into the sleeve located on the front
of the Main Frame (No. 1). Adjust the
Handlebar Post (No. 4) to the desired position
and reinsert and tighten the Adjustment Knob
(No. 16) to secure the post in place.
Secure Handlebar (No. 3) to Handlebar Post
(No. 4) using 2 Screws (No. 19) and 2
Washers (No. 20). Tighten and secure with
Spanner (No. 77).
The assembly is complete!
#20 d10*Φ20*1.5 2PCS
#77 S6 1PC
#19 M10*25*S6 2PCS
Loading ...
Loading ...
Loading ...