Loading ...
Loading ...
Loading ...
13
Parts List
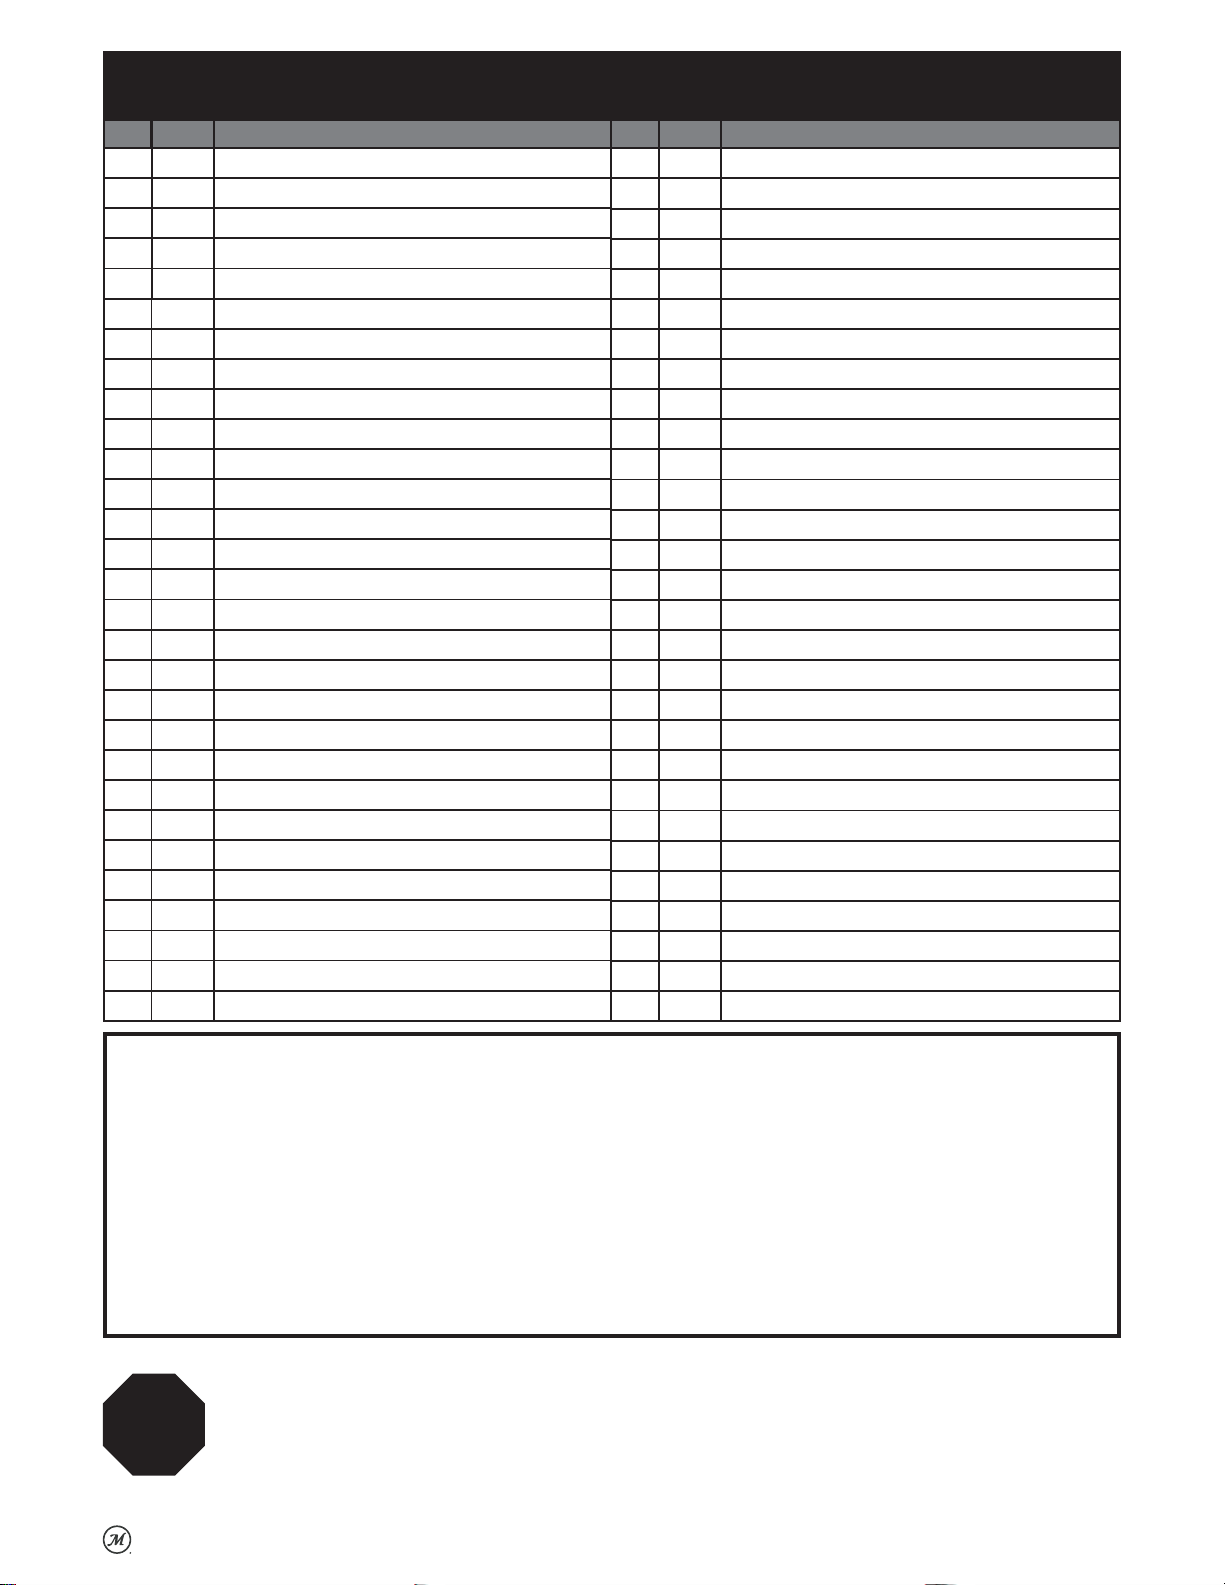
NO. QTY. DESCRIPTION
1 2 Smoking/Warming Racks
2 2 Smoke + Sear Grates
3 1 Temperature Gauge
4 1 Lid Assembly
5 1 Handle Mount, Left
6 1 Handle Mount, Right
7 1 Handle Tube
8 1 Heat Manifold Support
9 1 Temperature Probe Bracket
10 1 Temperature Probe
11 1 Heat Manifold Assembly
12 1 Body Assembly
13 3 Lid/Door Switch
14 1 Side Shelf Assembly
15 1 Controller Assembly
16 1 Bottom Tray Assembly
17 1 Left Rear Leg Assembly
18 1 Left Front Leg Assembly
19 1 Grease Tray
20 1 Hopper/Cart Support
21 1 Right Rear Leg
22 1 Right Front Leg
23 1 Wheel Axle with Lock Nut
24 2 8” Wheel
25 1 Bottom Shelf Assembly
26 2 3” Caster
27 1 Rear Inner Liner
28 1 Front Inner Liner
29 1 Hopper Lid Assembly
NO. QTY. DESCRIPTION
30 1 Hopper Lid Handle Washer
31 1 Hopper Lid Handle
32 1 Hopper Heat Shield - Top
33 1 Hopper Lid Latch
34 1 Hopper Assembly - Top
35 1 Hopper Gasket
36 2 Front/Rear Fire Brick
37 1 Left Fire Brick
38 1 Right Fire Brick
39 1 Hopper Assembly - Middle
40 1 Grill Heat Intake Fiber Spacer
41 1 Heat Intake Slide (Large)
42 1 Air Intake Slide (Small)
43 1 Hopper Door Latch
44 1 Charcoal Grate Assembly
45 1 Air Intake Flap/Bracket
46 1 Hopper Heat Shield - Bottom Rear
47 1 Hopper Door Assembly
48 1 Fan
49 1 Fan Guard
50 1 Hopper Assembly - Bottom
51 1 Hopper Heat Shield - Bottom Front
52 1 Grill Heat Intake Grate
53 1 Ash Tray Assembly
54 3 Tool Hanger
55 1 Antenna
1 Meat Probe -
not pictured
1 Power Cord/Plug - not pictured
DO NOT RETURN TO RETAILER for assembly assistance, missing or damaged parts. Please
contact MASTERBUILT Customer Service at 1-800-489-1581 or www.masterbuilt.com/pages/
support. Please have the model number and serial number available. These numbers are located
on the silver rating label on the grill.
STOP
•
BEFORE ASSEMBLY READ ALL INSTRUCTIONS CAREFULLY.
• Assemble on a clean flat surface.
• Recommend assembling on cardboard to avoid oil residue on floors or scratches.
• Gloves recommended for assembly. Hopper gasket is fiberglass and will irritate skin.
• Tools needed: Phillips head screwdriver, adjustable wrench, 19mm socket wrench.
• Approximate assembly time: 1 hour, 45 minutes.
• Recommend two people assemble to increase ease and reduce assembly time.
• Actual product may differ from picture shown.
• It is possible that some assembly steps have been completed in the factory.
• Remove all printed labels from the grill and hopper before use.
Loading ...
Loading ...
Loading ...