In US manufactured for: Philips Personal Health, a division of Philips
North America LLC, P.O. Box 10313, Stamford, CT 06904 / En EUA
manufacturado para: Philips Personal Health, una división de Philips
North America LLC, P.O. postal10313, Stanford, CT06904
In Canada imported by: Philips Electronics Ltd, 1875 Buckhorn Gate,
5th Floor, Mississauga, Ontario, L4W 5P1 / Au Canada importé par:
Philips Electronics Ltd., 1875 Buckhorn Gate, 5th Floor, Mississauga,
Ontario, L4W 5P1
This symbol on the product’s nameplate means it is
listed by Underwriters’ Laboratories, Inc.
Ce symbole apparaissant sur la plaque nominale du
produit signie qu’il est enregistré par Underwriter’s
Laboratories, Inc.
Este símbolo en la placa de características del
producto signica que está registrado por
Underwriters Laboratories, Inc.
PHILIPS and Philips shield are registered trademarks of Koninklijke
Philips N.V / PHILIPS et le blason Philips sont des marques déposées
de Koninklijke Philips N.V. / PHILIPS y Philips Shield son marcas
registradas de Koninklijke Philips N.V.
©2023 Philips North America LLC. All rights reserved / Tout droits
réservés / Todos los derechos reservados.
3000.051.7427.2 (05/08/2023)
BRE740-BRE700
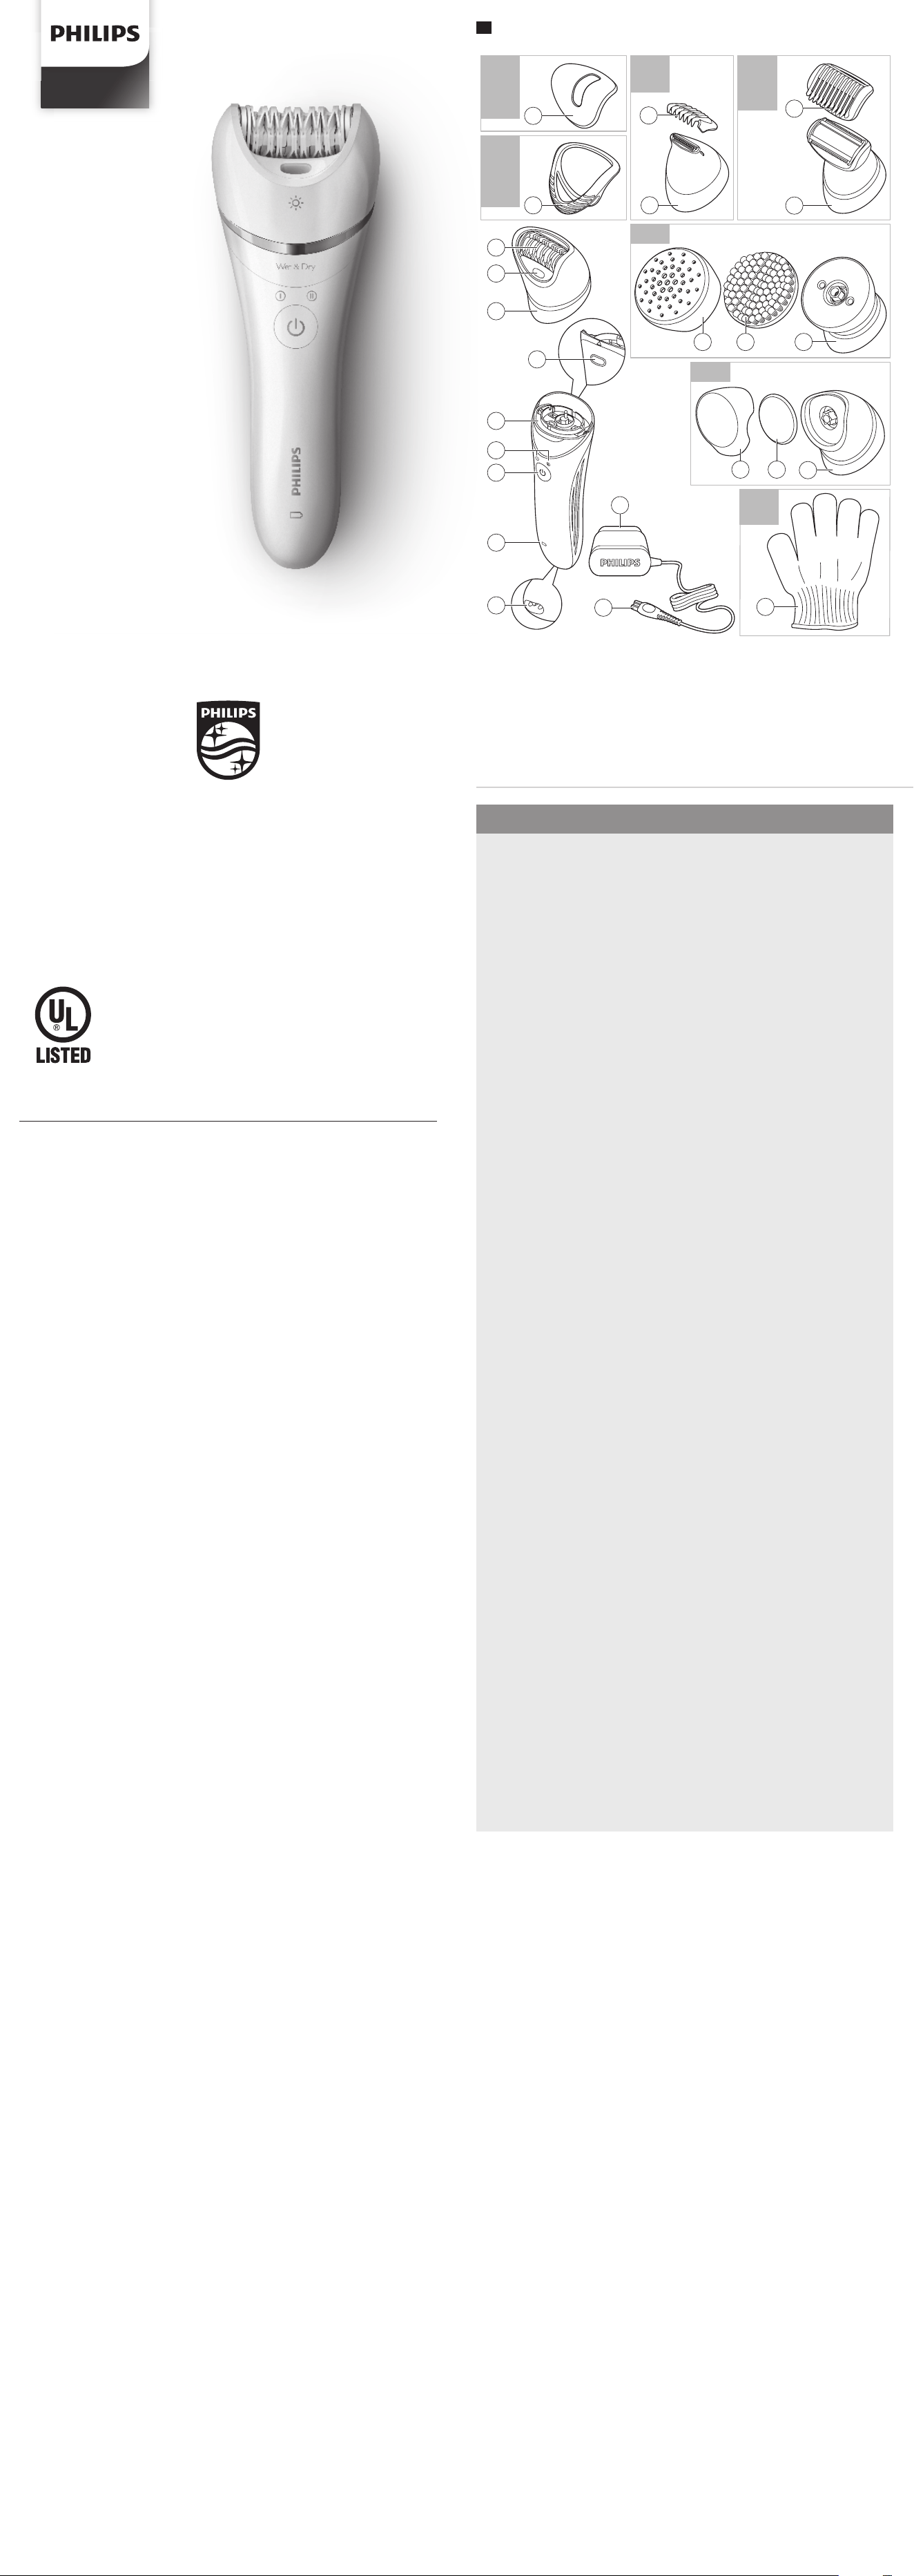
1
2
1 2
75°
1
2
14
6
22
2
18
10
26
30
15
7
23
3
19
11
27
31
16
8
24
4
20
12
28
32
17
9
25
5
21
13
29
33
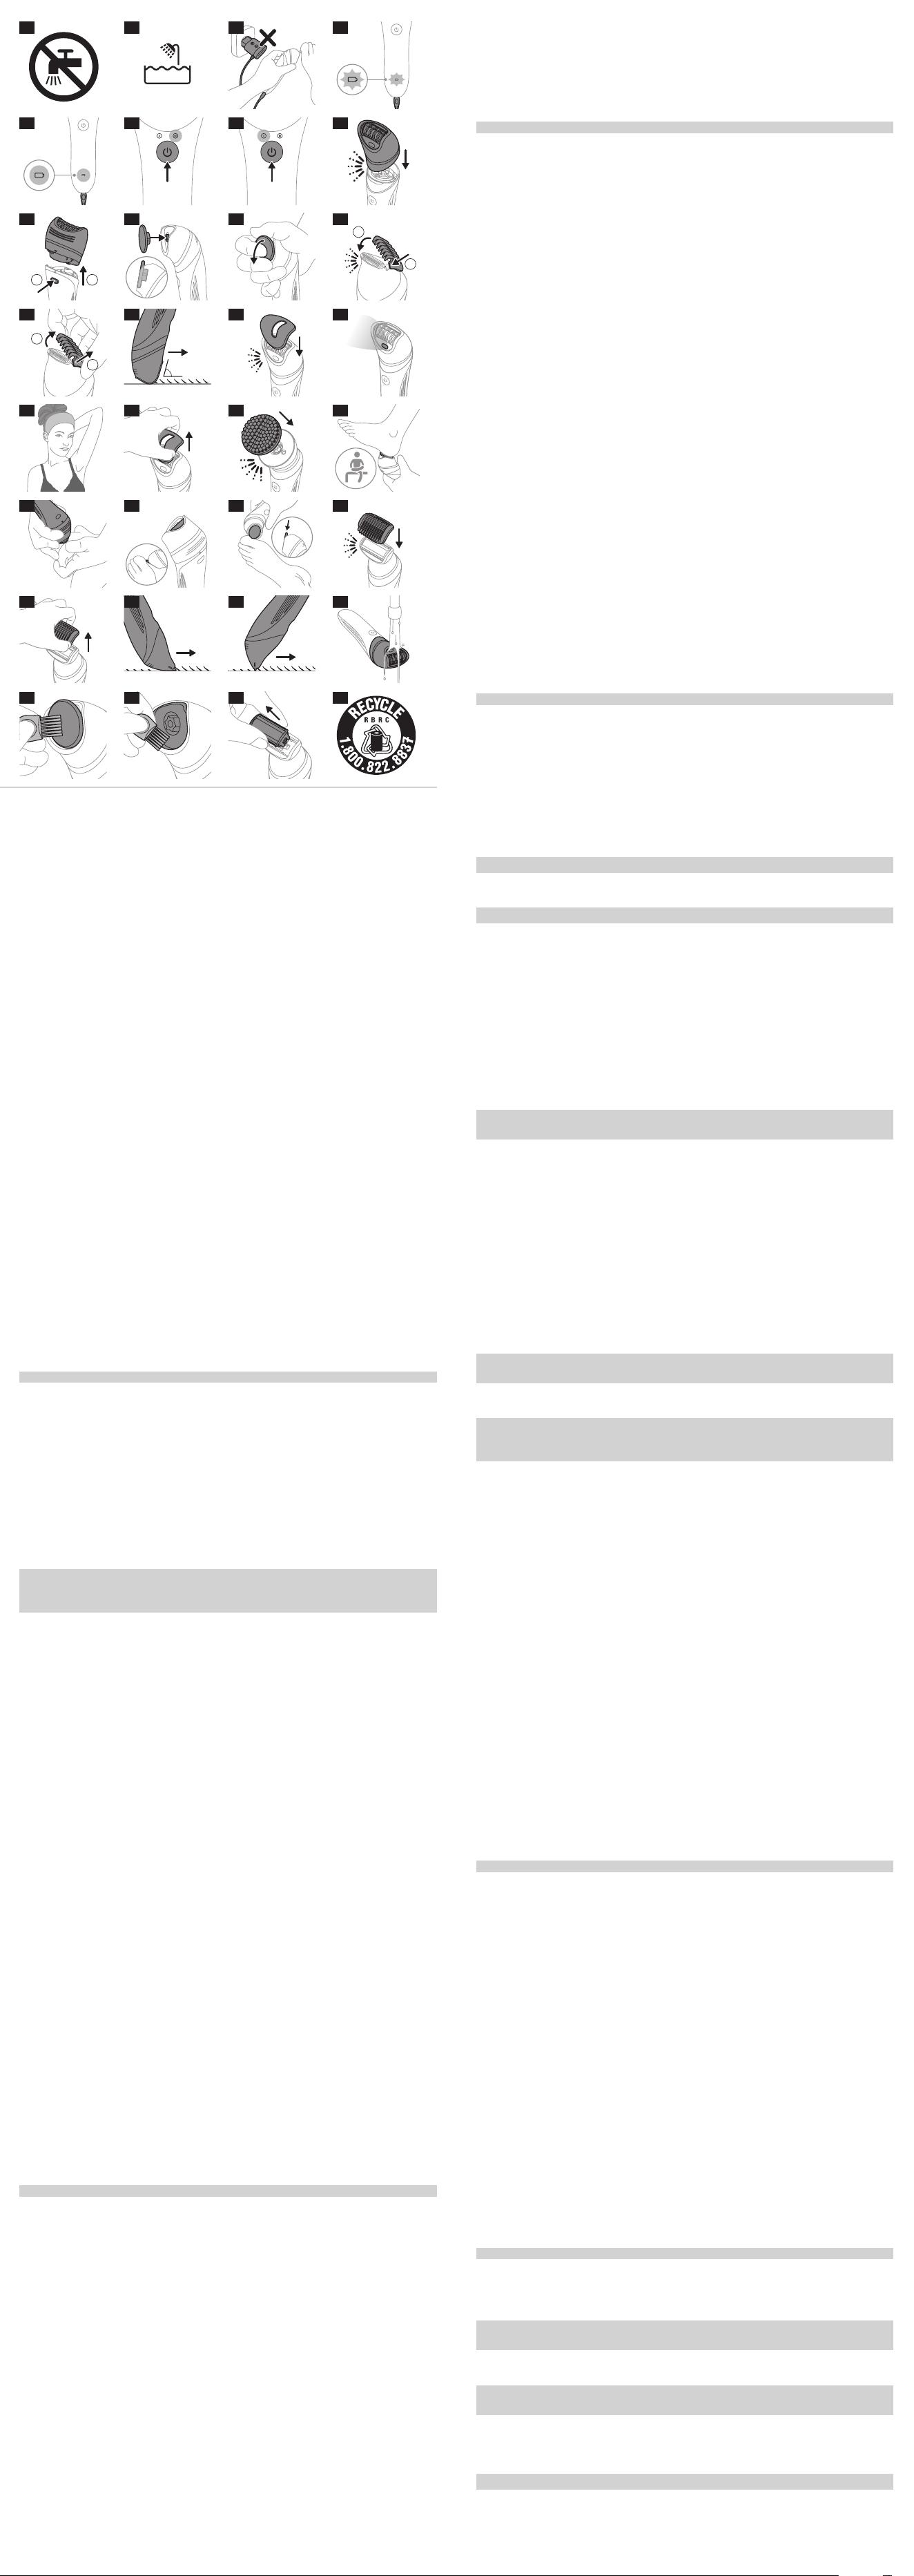
Introduction
Congratulations on your purchase and welcome to Philips! To fully
benet from the support that Philips oers, register your product at
www.philips.com/welcome.
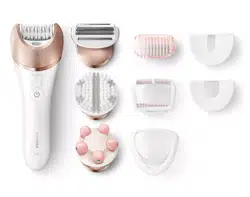
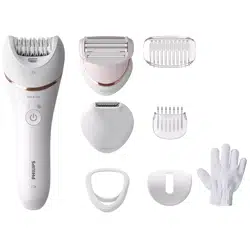
Features (Fig.1)
1 Handle
2 Speed lights (I and II)
3 On/o button
4 Battery indicator
5 Socket for small plug
6 Release button
7 Epilating head
8 Built-in light
9 Epilating discs
10 Eciency cap
11 Delicate area cap
12 Trimmer head
13 Trimmer comb
14 Shaving head
15 Shaving head comb
16 Coupling unit
17 Body exfoliation brush
18 Protection cap for body exfoliation brush
19 Callus removal head
20 Callus removal disk
21 Protection cap for callus removal head
22 Exfoliation glove
23 Power plug
24 Small plug
Not shown: Cleaning brush, Pouch
Note: The heads and accessories supplied vary for dierent model numbers.
Consult the overview illustration for the heads and accessories supplied with your
particular model.
Charging
- Fully charge product before using for the rst time or after non-use for a long
period of time.
- Charging or using the product at temperatures below 50°F (10°C) or higher
than 95°F (35°C) adversely aects the lifespan of the battery.
Note: This product can only be used without cord (Fig.4).
1 Be certain the product is OFF.
2 Insert the small plug into the product and put the power plug into any 120V
AC outlet. Use only the cord provided.
- When the battery indicator ashes white (Fig.5), the product is charging.
- After 1.5 hours of charging, the product has a cordless operating time of
up to 40 minutes.
- When the battery indicator lights up white continuously (Fig.6), the
product is fully charged.
- The battery indicator does not light up when the product is switched on:
the product contains enough energy to be used.
- When the battery indicator ashes orange (Fig.5), the battery is almost
empty and needs to be charged. Charge the product when you have
nished using it.
NOTE: If the product is fully charged and connected to the electrical outlet, the
battery indicator ashes a few times when you press the on/o button. This
reminds you to disconnect the product from the electrical outlet before using.
Quick charge
- When the battery is completely empty and you start charging it, the battery
indicator ashes white quickly.
- After approximately 15 minutes, the battery indicator starts ashing white
slowly. At this point, the battery contains enough energy for up to 10 minutes
of use.
Using the product
Switching the product on and o
1 To turn on the product, press the on/o button once (Fig.7).
2 If you want to select the low speed setting, press the on/o button again
(Fig.8).
3 To turn o the product, press the on/o button once more.
Attaching and detaching the epilating head
1 To attach the epilating head, press it onto the handle ('click') (Fig.9).
2 To detach the epilating head, press the release button on the back of the
product (Fig.10).
Note: You can attach and detach the callus removal head, the trimmer head, the
shaving head and the body exfoliation brush in the same way.
Attaching and detaching the callus removal disk
1 To attach the disk, push it onto the coupling in the head (Fig.11).
Look at the appliance from the side to check if the disk is level with the outer
rim of the head.
If the disk wobbles when you switch on the appliance, the disk is not placed
correctly. Remove the disk and attach it properly.
2 To remove the disk, put your thumb in the indent behind the disk and push it
forward until the disk detaches from the head (Fig.12).
Attaching and detaching the trimmer comb
To attach the trimmer comb onto the trimmer head:
1 Place the notch on one side of the comb in the indent in the trimmer head.
2 Press the comb onto the trimmer head until the notch on the other side of the
comb snaps into the indent on the other side of the trimmer head (Fig.13).
To detach the trimmer comb from the trimmer head:
3 On one side of the comb, place a ngernail between the comb and the
trimmer head.
4 Pull with your nail until the comb comes o the trimmer head (Fig.14).
Do not pull at the back or teeth of the comb to remove it.
How to use your epilator
- Use this epilator for its intended household use as described in this manual.
- For hygienic reasons, the epilator and attachments should only be used by
one person.
- Epilation is easier and more comfortable when the hair has the optimum
length of 1/8 - 5/32in/3-4mm. If the hairs are longer, pretrim them rst or
shave and epilate after 1 to 2 weeks.
- Make sure you hold the epilator handle at a 75° angle on the skin and move it
slowly against the direction of hair growth (Fig.15).
- It is normal to experience slight skin irritation (red skin or red dots) after
epilating. In this case, it is best to epilate in the evening as most skin irritation
disappears overnight. This eect will gradually lessen with each use.
- After each use, you may want to apply a non-alcohol based mild cream or
body lotion which will help reduce the possibility of skin irritation. Be certain it
does not contain alcohol as it may cause discomfort.
- Make sure the epilator is fully charged before using. This epilator will not
operate while the cord is connected to an electrical outlet.
Epilating
- Only use the epilator attachment to epilate areas below the neck such as your
legs, underarms and bikini line.
- Attach the delicate area cap if you want to epilate facial hair.
- For gentle, less painful epilation, epilate in the shower or bath on wet skin
with or without shower gel or soap.
- For dry epilating, make sure your skin is clean, and free from grease and
creams. Do not apply any cream before using. Hairs are easier to remove after
a bath or shower, but your skin should be completely dry before using your
epilator.
1 Before rst use, clean the epilating head (see 'Cleaning').
2 Press the epilating head onto the handle (Fig.9).
3 If desired, put an attachment on the epilating head (Fig.16).
NOTE: The attachment will only t onto the product in one direction.
4 Press the on/o button once to turn on the epilator (Fig.7).
- The epilator starts running at speed II which is the most ecient speed for
epilating. The speed II light lights up.
- If you want to use speed I, press the on/o button a second time. Speed I light
lights up (Fig.8).
- Select speed I for areas with little hair growth, for hard-to-reach places and
for areas with bones close to the skin's surface, such as knees and ankles.
- When you press the on/o button a third time, the epilator turns o.
Tip: For greater visibility of ne hairs, the built-in light goes on automatically
when epilating (Fig.17). To turn o, press the on/o button for 3 seconds
after turning on the product.
5 Hold the epilator perpendicular to your leg at a 75° angle with the on/o
button pointing in the direction you are going to move the product (Fig.15).
6 Gently press and move the epilator slowly over the skin against the direction
of hair growth. If you press too lightly or too hard, the epilator will not be able
to grasp and remove the hairs. Experiment until you nd the right settings
and right amount of pressure for your type of skin and hair.
Tip: When epilating sensitive areas, stretch the skin with your free hand. For
epilating underarms, put your hand on the back of your head to stretch the
skin (Fig.18).
7 Press the on/o button to turn the epilator OFF.
8 Pull the attachment o the epilating head and clean epilator and attachment
(see 'Cleaning').
IMPORTANT:
- After using the epilator, some redness or irritation may occur. This is normal
and should disappear quickly.
- Clean the product and attachments after each use (see 'Cleaning').
Using epilator attachments
- When using epilator attachments, always be sure you place the heads at
onto the skin at a 75° angle (Fig.15).
- Simply snap each attachment onto the epilator head ('click') (Fig.16).
- To remove an attachment, grasp its front and back and pull it up o the
epilator head (Fig.19).
Delicate area cap
- Attach the delicate area cap onto the epilating head for more comfortable
epilating of delicate areas such as underarms and bikini area.
- You can also use the delicate area cap for precise epilating of facial hair such
as upper lip.
Do not use the appliance to epilate eyelashes, eyebrows or scalp hair.
Eciency cap
- Attach the eciency cap onto the epilating head to keep skin tight and help
reduce pain while epilating.
Body exfoliation brush
- Remove the epilator head by pressing the release button on the back of the
appliance (Fig.10).
- Attach the body exfoliation brush to the coupling unit and then attach to the
appliance handle. (Fig.20) The body exfoliation brush helps remove dead skin
cells.
Do not use the body exfoliation brush on your face.
Callus removal
Note: The callus removal head is only intended for use on feet.
You can use the callus removal disk in 3 dierent ways, depending on the area or
callus you want to treat.
1 To treat a large, at area, use the entire disk (Fig.21). Make sure you place the
disk at onto the skin for good control during use.
2 For precision treatment of smaller areas and good visibility of the treated area
(Fig.22), use the top part of the disk that sticks out beyond the top of the
head (Fig.23).
3 For precision treatment and for bung away hard skin very quickly, use the
narrow edge of the protruding top part of the disk (Fig.24).
Move the disk back and forth gently over the skin you want to treat. Do not push
too hard. When you push too hard, the disk might stop rotating.
Shaving
Do not use the shaving head if the foil damaged or broken, as injury may
occur.
- Use the shaving head to shave your legs, underarms and bikini line.
- Attach the shaving head comb onto the shaving head to shave hairs to a
length of 1/8in/3mm (Fig.25). When you remove the comb, always grasp the
comb on the sides (Fig.26).
- To shave legs and bikini line, always move the appliance gently over the skin
against the direction of hair growth.
- To shave underarms, place one arm behind your head and move the
appliance up and down and from left to right.
Trimming
- Use the trimmer head to trim hard-to-reach areas in the bikini zone.
- Attach the trimmer head comb onto the trimmer head to trim hairs in the
bikini zone to a length of 1/8in/3mm (Fig.27).
- To create precise lines, place the trimmer head perpendicular onto the skin
(Fig.28).
Caution: Do not use the trimmer head without the comb on intimate areas
other than the bikini line as this could cause injury.
Overheat protection
Note: To avoid overheating of the product, do not press the product too hard
onto your skin. The product works best when you move it over your skin without
exerting any pressure.
1 If the overheat protection is activated, the product turns o automatically.
The speed lights start ashing.
2 Let the product cool down. The lights stop ashing after 4 seconds.
3 When the product has cooled down, you can turn it on again.
If the lights start ashing again, the product has not yet cooled down
completely.
Cleaning
IMPORTANT:
- Always clean the handle, heads and attachments after each use.
- Always turn the product OFF and remove power cord from electrical outlet
and product before cleaning.
- Never use compressed air, scouring pads, abrasive cleaning agents or
aggressive liquids such as gasoline or acetone to clean the product.
- Keep the power cord dry (Fig.2).
Cleaning the epilating head and epilating attachments
- It is essential for hygienic reasons and optimum performance that the
epilating head, attachments and rotating disks are cleaned after each use.
- It is strongly recommended to always rinse the epilating head with cold water
to help prevent bacterial growth.
- Never clean, remove, or replace epilating head or attachments while motor is
ON. The rotating disks are not removable from the epilating head.
- Do not apply pressure or touch rotating disks with hard objects as this may
dent or damage the disks. If damage occurs, discontinue use immediately.
1 Be certain the product is OFF.
2 Pull any attachment o the epilating head (Fig.19).
3 Remove loose hairs from the epilating disks and attachment with the brush.
Never try to detach the epilating disks from the product.
4 Rinse attachments thoroughly under warm tap water while turning.
5 Turn the product on and rinse the epilating head under cold tap water for 15
seconds (Fig.29).
6 Shake o excess water and dry the epilating head and attachments
completely with a soft towel or tissue, or allow to air-dry thoroughly.
7 To attach the epilating head, press it onto the handle ('click') (Fig.9).
Cleaning the callus removal head
To clean the callus removal head and disk (if supplied): clean the outside of the
head and disk with the cleaning brush supplied (Fig.30). Then remove the disk
o the head and clean the inside of the head with the cleaning brush supplied
(Fig.31).
If you prefer, you can rinse the callus removal head and disk under a running tap.
Let all parts dry completely.
Cleaning the shaving head
- Never clean or remove the shaving head or cutting unit while the motor is ON.
- Do not apply pressure to the shaving head. Do not touch the foil with hard
objects as this may dent or damage foil or cutters.
- Do not use the shaving head if the foil is damaged or broken, as this may
cause facial injury.
1 Be certain the product is OFF.
2 Press the release button and remove the shaving head from the handle.
3 Pull the cutting unit out of the shaving head (Fig.32).
4 Clean the cutting unit, foil, cutters and inside the shaving head with the
cleaning brush. Also brush away any hairs that have collected under the
trimmers.
To avoid damage, never use a brush to clean the shaving foil.
5 You can also rinse the cutting unit, inside the shaving head and accessories
under warm tap water.
6 Allow all parts to air-dry thoroughly.
7 Put the cutting unit back into the shaving head ('click').
For the best shaving performance, it is suggested to lightly oil shaving head every
six weeks by spreading a drop of mineral oil over the foil and cutters.
Replacing the shaving head cutting unit
If the foil and/or trimmers of the cutting are worn or damaged, do not
continue to use the shaving head.
A worn or damaged cutting unit should only be replaced with an original Philips
cutting unit which is available at www.philips.com/parts-and-accessories. You
can also call 1-800-243-7884 (in US only) or 1-866-800-9311 (in Canada only) for
assistance.
The cutting unit is a precision part. Handle with care.
1 Always turn the product OFF and remove power cord from the electrical
outlet and product before replacing the cutting unit.
2 Press the release button and remove the shaving head from the handle.
3 Pull the cutting unit out of the shaving head (Fig.32).
4 Place a new cutting unit into the shaving head ('click').
5 Reattach the shaving head to the handle.
6 After replacing the cutting unit, check to make sure the cutting unit and
shaving head are rmly attached before using the epilator.
Storage
- Be sure epilator is turned OFF. Remove power cord from the electrical outlet
and handle before storing product in a safe, dry location where it will not be
crushed, banged, or subject to damage.
- Do not wrap cord around epilator when storing.
- Store cord in a safe location where it will not be cut or damaged.
- Do not place or store epilator where it can fall or be pulled into a tub or sink,
water or other liquid while plugged in.
- Put the body exfoliation brush protective cap on the body exfoliation brush
after use.
- Store the epilator and attachments in the pouch provided.
Accessories
For maximum shaving performance, replace the shaving head
cutting unit once a year. This replacement part can be purchased
on www.philips.com/parts-and-accessories.
If you use the body exfoliation brush 2-3 times a week, replace it every 3 months.
This replacement parts can be purchased on www.philips.com/store.
Callus removal head (if supplied): Replace the callus removal disk with one of the
original type when its eectiveness decreases.
Assistance
For assistance, visit our website: www.philips.com/support or call toll free
1-800-243-7884 (in US only) or 1-866-800-9311 (in Canada only).
Disposal
- This product contains a rechargeable lithium-ion battery which must be
disposed of properly.
- Contact your local town or city ocials for battery disposal information. In
the US, you can also call 1-800-822-8837 or visit www.call2recycle.org
for battery drop-o locations (Fig.33). In Canada, you can also call
1-888-224-9764 or visit www.call2recycle.ca for battery drop-o locations.
- For assistance, visit our website www.philips.com/support or call toll-free
1-800-243-7884 (in US only) or 1-866-800-9311 (in Canada only).
- Your product is designed and manufactured with high quality materials
and components, which can be recycled and reused. For recycling
information, please contact your local waste management facilities or visit
www.recycle.philips.com.
Full Two-Year Warranty
Philips North America LLC (USA) and Philips Electronics Ltd (Canada) warrant this
new product against defects in materials or workmanship for a period of two
years from the date of purchase, and agree to repair or replace any defective
product without charge.
Cutting units, combs, the body exfoliation brush and the callus removal disk are
not covered by the terms of this warranty because they are subject to wear and
tear.
IMPORTANT: This warranty does not cover damage resulting from accident,
misuse or abuse, lack of reasonable care, the axing of any attachment not
provided with the product or loss of parts or subjecting the product to any but
the specied voltage.*
NO RESPONSIBILITY IS ASSUMED FOR ANY SPECIAL, INCIDENTAL OR
CONSEQUENTIAL DAMAGES.
In order to obtain warranty service, simply go to www.philips.com/support
for assistance. It is suggested that for your protection you return shipments of
product by insured mail, insurance prepaid. Damage occurring during shipment
is not covered by this warranty. NOTE: No other warranty, written or oral, is
authorized by Philips North America LLC and Philips Electronics Ltd (Canada).
This warranty gives you specic legal rights, and you may also have other rights
which vary from state to state, province to province or country to country. Some
states do not allow the exclusion or limitation of incidental or consequential
damages, so the above exclusion and limitations may not apply to you.
*Read enclosed instructions carefully.
45-Day Money-Back Guarantee
If you are not fully satised with your product send the product back and we’ll
refund you the full purchase price.
The product must be shipped prepaid by insured mail, insurance prepaid,
have the original sales receipt, indicating purchase price and date of purchase.
We cannot be responsible for lost mail.
The product must be postmarked no later than 45 days after the date of
purchase. Philips reserves the right to verify the purchase price of the
product and limit refunds not to exceed suggested retail price.
To obtain the money-back guarantee service, please go to
www.PhilipsMoneyBack.com and follow the simple 3-step process.
Delivery of refund check will occur 6–8 weeks after receipt of returned product.
Español
INSTRUCCIONES IMPORTANTES DE SEGURIDAD
Cuando utilice un producto eléctrico, siempre debe seguir las precauciones
básicas, incluidas las siguientes:
Lea todas las instrucciones antes de usar este producto.
PELIGRO
Para reducir el riesgo de descarga eléctrica:
- No intente agarrar un producto con cable que haya caído al agua.
Desconéctelo inmediatamente del enchufe de la pared.
- Mantenga el cable de alimentación seco (Fig.2).
- No coloque ni guarde el producto en un lugar desde donde pueda caerse a
una bañera o fregadero. No coloque el producto en un lugar desde donde
pueda caerse al agua o a cualquier otro líquido ni sumerja el producto en
ningún tipo de líquido.
- Este producto no funciona mientras está conectado al enchufe de pared.
Excepto cuando se esté cargando, siempre desenchufe este producto del
enchufe de pared.
- Desconecte el cable de alimentación del enchufe de pared y del producto
antes de limpiarlo.
ADVERTENCIA
Para reducir el riesgo de quemaduras, incendio, descarga eléctrica o
lesiones:
- Este producto no está destinado a personas (adultos o niños) con capacidades
física, sensorial o mental disminuidas, o que no tengan los conocimientos
o la experiencia necesarios, a menos que una persona responsable de su
seguridad los supervise o los instruya sobre el uso del producto. Evite que los
niños jueguen con este producto.
- Use este producto solo para el uso doméstico previsto como se describe en
este manual. El uso inadecuado puede causar posibles riesgos o lesiones
graves. No use accesorios que no estén recomendados por la corporación
Philips North America LLC. Los accesorios incluidos pueden variar según el
producto.
- Nunca utilice este producto si el cable o el enchufe de carga están dañados, si
no funciona correctamente, si se cayó, si está dañado o si se sumergió en agua
mientras estaba conectado a la alimentación eléctrica. Para solicitar asistencia,
llame al 1-800-243-7884 (EE. UU.) o 1-866-800-9311 (Canadá).
- Mantenga el cable de alimentación lejos de supercies calientes.
- No deje caer ni introduzca ningún objeto en ninguna abertura.
- No utilice el adaptador dentro o cerca de una salida de corriente que
contenga un ventilador de aire eléctrico para prevenir daño al adaptador.
- No use el producto a la intemperie ni lo use donde se estén usando productos
de aerosol (atomizador) o donde se esté administrando oxígeno.
- Antes de usar el producto, revise siempre los discos giratorios, la lámina
y los accesorios. No use el producto si los discos giratorios, la lámina y los
accesorios están dañados, ya que puede producirse una lesión.
- Siempre conecte la clavija al producto primero y, luego, al tomacorriente.
Para desconectar, gire el interruptor de encendido/apagado a la posición de
"APAGADO" y, luego, desenchufe la clavija del tomacorriente.
- Enchufe el cable de alimentación directamente en el toma corriente. No use
un cable de extensión.
- Desconecte el cable de alimentación antes de conectar o desconectar el
producto.
- Las baterías que se emplean en este producto pueden representar un riesgo
de incendio o de quemadura química si no se manipulan correctamente. No
desarme, incinere ni permita que la temperatura de las baterías supere los
100°C (212°F).
¡IMPORTANTE!: El enchufe eléctrico contiene un transformador. No corte el
enchufe eléctrico para reemplazarlo con otro ya que esto puede producir una
condición de peligro.
- Use únicamente accesorios o productos consumibles originales de Philips. Use
únicamente el cable de alimentación desmontable HQ8505.
- Cargue, utilice y guarde el producto a una temperatura entre 10°C y 35°C.
- Mantenga el producto y las baterías lejos del fuego y no los exponga a la luz
solar directa ni a altas temperaturas.
- Si el producto se pone anormalmente caliente, despide un olor extraño,
cambia de color o tarda más tiempo de lo normal en cargarse, deje de usarlo y
de cargarlo, y comuníquese con Philips.
- No coloque los productos y sus baterías en hornos microondas ni en ollas de
inducción.
- No abra, modique, perfore, dañe ni desarme el producto o la batería, para
evitar que las baterías se calienten o liberen sustancias tóxicas o peligrosas. No
provoque un cortocircuito, sobrecargue ni invierta la posición de las baterías.
- Si las baterías se dañan o tienen fugas, evite el contacto con la piel o los ojos.
Si esto sucede, enjuague bien inmediatamente con agua y busque atención
médica.
- Cuando manipule las baterías, asegúrese de que sus manos, el producto y las
baterías estén secas.
- Para evitar un cortocircuito en las baterías después de la extracción, no
permita que las terminales de las baterías entren en contacto con objetos
metálicos (p. ej., monedas, horquillas, anillos). No envuelva las baterías en
papel de aluminio. Cubra las terminales de las baterías con cinta o colóquelas
en una bolsa de plástico antes de desecharlas.
CONSERVE ESTAS INSTRUCCIONES
INFORMACIÓN IMPORTANTE
PRECAUCIÓN
- Por motivos de higiene, se recomienda que solo una persona utilice el
producto.
- Nunca use aire comprimido, bras, agentes de limpieza abrasivos ni líquidos
agresivos como gasolina o acetona para limpiar el producto.
- Apague el producto antes de retirar o colocar los accesorios y antes de
limpiarlo.
- Cuando enjuague el producto o los accesorios, asegúrese siempre de
revisar que el agua no esté demasiado caliente (100°F máximo) para evitar
quemarse las manos.
- Los métodos que eliminan el vello de raíz pueden causar vellos encarnados
y lesiones menores en la piel. Consulte a su médico si tiene alguna duda
respecto del uso de una depiladora.
- No use la depiladora si tiene venas varicosas, erupciones, manchas, así como
tampoco si la piel está irritada, si tiene vellos encarnados o una tendencia a
sufrir de vellos encarnados. Consulte primero a su médico.
- Cualquier lesión pequeña que se origine por la eliminación del vello puede
permitir que las bacterias penetren en el lugar de la lesión y, potencialmente,
causen pequeñas cicatrices o un cambio en la pigmentación de la piel. Se
puede minimizar el riesgo de infección al limpiar cuidadosamente los discos
giratorios antes o después de cada uso (ver 'Limpieza').
- La depiladora solo debe utilizarse después de una consulta previa con su
médico si tiene o si sufre:
- Heridas abiertas
- Eczema, psoriasis (eczema con escamas), reacciones cutáneas inamatorias
como foliculitis, erupciones cutáneas o la tendencia a alergias o a
reacciones alérgicas cutáneas
- Inmunodeciencia o trastornos inmunitarios
- Rosácea o venas varicosas
- Está embarazada
- Inmunidad cutánea reducida como consecuencia de diabetes, embarazo,
enfermedad de Raynaud, etc.
- Hemolia
- Lunares, protuberancias en la piel, etc.
- Si ha ingerido medicamentos hormonales o comenzará a hacerlo, o si ha
estado embarazada recientemente, el cambio en sus niveles de hormonas
puede afectar el grosor, el color o la cantidad de crecimiento de vello. Esto se
debe a cambios hormonales, no a este método de eliminación del vello.
- No utilice aceites de baño o ducha cuando depile piel húmeda, ya que esto
puede provocar irritación cutánea grave.
- Limpie el cabezal de depilación después de cada uso (ver 'Limpieza').
GENERAL
- Este producto es a prueba de agua (Fig.3). Es apropiado para su uso en el
baño o la ducha y puede lavarse en la llave.
- Limpie el producto después de cada uso (ver 'Limpieza').
- Este producto no contiene otras piezas que requieran mantenimiento. Para
solicitar asistencia, llame al 1-800-243-7884 (solo EE. UU.) o 1-866-800-9311
(solo Canadá).
Introducción
Enhorabuena por la adquisición de este producto, y bienvenido a Philips. Para
sacar el mayor partido a la asistencia que Philips le ofrece, registre el producto en
www.philips.com/welcome.
Características (Fig.1)
1 Mango
2 Luces indicadoras de velocidad (I y II)
3 Botón de encendido/apagado
4 Indicador de batería
5 Toma para clavija pequeña
6 Botón de liberación
7 Cabezal depilador
8 Luz incorporada
9 Discos depiladores
10 Cabezal para sistema de estiramiento de la piel
11 Cabezal para zonas delicadas
12 Cabezal recortador
13 Peine del cabezal recortador
14 Cabezal de afeitado
15 Peine para el cabezal de afeitado
16 Unidad de acoplamiento
17 Cepillo de exfoliación corporal
18 Tapa de protección del cepillo de exfoliación corporal
19 Cabezal de eliminación de callos
20 Disco de eliminación de callos
21 Tapa de protección del cabezal de eliminación de callos
22 Guante de exfoliación
23 Cable de alimentación
24 Conector pequeño
No se muestra: Cepillo de limpieza, Funda
Nota: Los cabezales y los accesorios suministrados pueden variar según los
diferentes números de modelos. Consulte la ilustración de descripción general
para ver los cabezales y los accesorios suministrados con este modelo en
particular.
Carga
- Cargue el producto completamente antes de usarlo por primera vez y después
de un largo periodo de no usarlo.
- La carga o el uso del producto a temperaturas por debajo de los 50°F (10°C)
o superiores a los de 95°F (35°C) afecta la vida útil de la batería.
Nota: Este producto solo se puede utilizar sin cable (Fig.4).
1 Asegúrese de que el producto esté APAGADO.
2 Inserte la clavija pequeña en el producto y conecte la clavija de alimentación
en cualquier toma de corriente de pared de 120 V CA. Use solo el cable
provisto.
- Cuando la luz del indicador de carga destelle en color blanco (Fig.5),
signica que el producto se está cargando.
- Después de cargarse durante 1.5 horas, el producto puede funcionar en
forma inalámbrica por hasta 40minutos.
- Cuando el indicador de carga de la batería muestra una luz blanca
continua (Fig.6), el producto está totalmente cargado.
- El indicador de batería no se ilumina cuando el producto está encendido:
el producto contiene suciente energía para ser usado.
- Cuando la luz del indicador de carga de la batería destelle en color naranja
(Fig.5), signica que la batería casi no tiene energía y necesita recargarse.
Cargue el producto cuando termine de usarlo.
NOTA: Si el producto está completamente cargado y conectado a una toma de
corriente eléctrica, el indicador de la batería destella unas cuantas veces cuando
se presiona el botón de encendido/apagado. Esto le recuerda desconectar el
producto de la toma de corriente eléctrica antes de usarlo.
Carga rápida
- Cuando la batería está casi agotada y se empieza a cargar, el indicador de
batería parpadea en color blanco rápidamente.
- Después de aproximadamente 15 minutos, el indicador de la batería
comienza a parpadear en blanco lentamente. A este punto, la batería tiene
suciente energía para hasta 10 minutos de uso.
Uso del producto
Siempre revise el producto y todos los accesorios antes de usarlo. No
use el producto ni ningún accesorio si está dañado, ya que esto puede
causar alguna lesión. Siempre reemplace una pieza dañada con una del
tipo original.
Encendido y apagado del producto
1 Para encender el producto, presione el botón de encendido/apagado una vez
(Fig.7).
2 Si desea seleccionar el ajuste de baja velocidad, vuelva a presionar el botón de
encendido/apagado (Fig.8).
3 Para apagar el producto, presione el botón de encendido/apagado
una vez más.
Cómo poner y quitar el cabezal depilador
1 Para colocar el cabezal depilador, presiónelo contra el mango ("clic") (Fig.9).
2 Para quitar el cabezal depilador, presione el botón de liberación en la parte
posterior del producto (Fig.10).
Nota: Puede poner y quitar el cabezal de eliminación de callos, el cabezal de
recorte, el cabezal de afeitado y el cepillo de exfoliación corporal de la misma
manera.
Poner y quitar el disco de eliminación de callos
1 Para colocar el disco, acóplelo en el cabezal (Fig.11).
Vea el electrodoméstico de lado para vericar que el disco esté nivelado con
el borde exterior del cabezal.
Si el disco se mueve cuando se enciende el electrodoméstico, este no está
bien colocado. Retire el disco y ajústelo correctamente.
2 Para quitar el disco, ponga el dedo pulgar en la ranura de atrás y empújelo
hacia delante hasta que se separe del cabezal (Fig.12).
Colocación y extracción del peine recortador
Para colocar el peine recortador en el cabezal de corte, siga los pasos a
continuación:
1 Coloque la muesca en un lado del peine en la hendidura en el cabezal de
corte.
2 Presione el peine en el cabezal de corte hasta que la muesca en el otro lado
del peine encaje en la hendidura del cabezal de corte (Fig.13).
Para quitar el peine recortador del cabezal de corte, siga los pasos a continuación:
3 En un lado del peine, coloque una uña entre el peine y el cabezal de corte.
4 Tire con la uña hasta que el peine se desprenda del cabezal de corte (Fig.14).
No tire de la parte posterior o de los dientes del peine para retirarlo.
Cómo utilizar la depiladora
- Use esta depiladora para su uso previsto en el hogar, según se describe en
este manual.
- Por motivos de higiene, solo una persona debe utilizar la depiladora y los
accesorios.
- La depilación es más fácil y más confortable cuando el vello tiene un largo
óptimo de 1/8 - 5/32in./3 - 4mm. Si el vello está más largo, recórtelo primero
o rasúrelo y, luego, depílese en 1 o 2semanas.
- Asegúrese de sostener el mango de la depiladora en un ángulo de 75° sobre
la piel y muévala lentamente a contrapelo (Fig.15).
- Después de la depilación, es normal tener una irritación leve de la piel
(enrojecimiento o puntos rojos sobre la piel). En este caso, es mejor depilarse
por la noche, para que la mayor parte de la irritación de la piel desaparezca
durante la noche. Este efecto se reducirá gradualmente con cada uso.
- Después de cada uso, se aconseja aplicar una crema o loción corporal suave,
sin alcohol, que ayudará a reducir la posibilidad de irritación de la piel.
Asegúrese de que no contenga alcohol ya que este podría provocar molestias.
- Asegúrese de que la depiladora esté completamente cargada antes de
utilizarla. La depiladora no funcionará mientras el cable está conectado a una
toma de corriente eléctrica.
Depilar
- Use el accesorio de depilación únicamente para las zonas que se encuentran
del cuello para abajo tal y como las piernas, las axilas o la línea del bikini.
- Coloque la protección para áreas delicadas si desea depilar el vello facial.
- Para una depilación más suave y menos dolorosa, depílese en la ducha o en la
tina con la piel mojada con gel para ducha o jabón o sin nada.
English
IMPORTANT SAFETY INSTRUCTIONS
When using an electric product, basic precautions should always be followed,
including the following:
Read all instructions before using this product.
DANGER
To reduce the risk of electric shock:
- Do not reach for a corded product that has fallen into water. Unplug
immediately from the power outlet.
- Keep the power cord dry (Fig.2).
- Do not place or store the product where it can fall or be pulled into a tub or
sink. Do not place or drop the product into water or other liquid.
- This product does not work while it is connected to the power outlet. Except
when charging, always unplug this product from the power outlet.
- Remove power cord from power outlet and product before cleaning.
WARNING
To reduce the risk of burns, re, electric shock, or injury to persons:
- This product is not intended for use by persons (including children) with
reduced physical, sensory or mental capabilities, or lack of experience and
knowledge, unless they have been given supervision or instruction concerning
use of the product by a person responsible for their safety. Children should be
supervised to ensure that they do not play with the product.
- Use this product only for its intended household use as described in
this manual. Misuse can lead to hazards or serious injuries. Do not use
attachments not recommended by Philips North America LLC. Accessories
supplied may vary for dierent products.
- Never operate this product if it has a damaged power cord, if it is not working
properly, after it has been dropped or damaged, or after the product or
power cord has been dropped into water. For assistance call 1-800-243-7884
(US) or 1-866-800-9311 (Canada).
- Keep the power cord away from heated surfaces.
- Never drop or insert any object into any opening.
- Do not use the power cord in or near a power outlet that contains an electric
air freshener to prevent damage to the power cord.
- Do not use product outdoors or operate where aerosol (spray) products are
being used or where oxygen is being administered.
- Always check rotating discs, foil and attachments before using the product.
Do not use the product if rotating discs, foil and attachments are damaged, as
injury may occur.
- Always attach power cord to product rst, then to power outlet. To
disconnect, set all controls to 'o' position. Then remove power cord from
power outlet.
- Plug power cord directly into power outlet. Do not use an extension cord.
- Unplug power cord before plugging in or unplugging the product.
- The batteries used in this product may present a re or chemical burn hazard
if mistreated. Do not disassemble, heat above 100°C (212°F) or incinerate.
IMPORTANT: The power plug contains a transformer. Do not cut o the power
plug to replace it with another plug as this will cause a hazardous condition.
- Only use original Philips accessories or consumables. Only use detachable
power cord HQ8505.
- Charge, use and store the product at a temperature between 10°C and 35°C.
- Keep product and batteries away from re and do not expose them to direct
sunlight or high temperatures.
- If the product becomes abnormally hot or smelly, changes color or if charging
takes longer than usual, stop using and charging the product and contact
Philips.
- Do not place products and their batteries in microwave ovens or on induction
cookers.
- Do not open, modify, pierce, damage or dismantle the product or battery to
prevent batteries from heating up or releasing toxic or hazardous substances.
Do not short-circuit, overcharge or reverse charge batteries.
- If batteries are damaged or leaking, avoid contact with the skin or eyes. If this
occurs, immediately rinse well with water and seek medical care.
- When you handle batteries, make sure that your hands, the product and the
batteries are dry.
- To avoid accidental short-circuiting of batteries after removal, do not let
battery terminals come into contact with metal objects (e.g. coins, hairpins,
rings). Do not wrap batteries in aluminum foil. Tape battery terminals or put
batteries in a plastic bag before you discard them.
SAVE THESE INSTRUCTIONS
IMPORTANT INFORMATION
CAUTION
- For hygienic reasons, it is recommended that the product be used by only one
person.
- Never use compressed air, scouring pads, abrasive cleaning agents or
aggressive liquids such as gasoline or acetone to clean the product.
- Turn the product o before removing or attaching attachments and before
cleaning.
- When rinsing the product or attachments, always check to make sure the
water is not too hot (maximum 100°F) to prevent your hands from getting
burnt.
- Methods of removing hair by the root can cause ingrown hairs and minor skin
injuries. Please consult your doctor if you have any questions about the use of
an epilator.
- Do not use the epilator if you suer from varicose veins, rashes, spots or
blemishes, or when the skin is irritated or if you have ingrown hairs or a
tendency to produce ingrown hairs. Consult your doctor rst.
- Any minor injury resulting from hair removal may allow bacteria to penetrate
the injury site, potentially causing small scars or a change in pigmentation of
the skin. The risk of infection may be minimized by thoroughly cleaning the
rotating discs before and/or after each use (see 'Cleaning').
- The epilator should only be used after prior consultation with your doctor if
you have or experience:
- Open wounds
- Eczema, psoriasis (scaly eczema), inamed skin reactions such as folliculitis,
skin rashes or the tendency to allergy or allergic skin reactions
- Immune deciency or disorders
- Couperose, rosacea, or varicose veins
- Pregnancy
- Reduced skin immunity as a result of diabetes, pregnancy, Raynaud’s
disease, etc.
- Hemophilia
- Moles, raised skin bumps, etc.
- If you have been or begin taking hormone medication, or if you have recently
been pregnant, a change in your hormone levels may inuence the thickness,
color or amount of hair growth. This is caused by hormonal changes, not by
this method of hair removal.
- Do not use bath or shower oils when you epilate wet skin, as this may cause
serious skin irritation.
- Clean the epilating head after each use (see 'Cleaning').
GENERAL
- This product is waterproof (Fig.3). It is suitable for use in the bath or shower
and for cleaning under the tap.
- Clean the product after each use (see 'Cleaning').
- This product has no other user-serviceable parts. For assistance call
1-800-243-7884 (US only) or 1-866-800-9311 (Canada only).
BRE700
BRE710
BRE715
BRE720
BRE730
BRE735
BRE740
BRE712
BRE715
BRE720
BRE730
BRE715
BRE720
BRE735
BRE740
11
10
12
14
16
15
13
7
6
3
2
8
9
BRE700
BRE710
BRE712
BRE715
BRE720
BRE730
BRE735
BRE740
BRE710
BRE712
BRE720
BRE730
BRE735
BRE740
4
5
24
1
1718
19
22
23
2021
BRE735
BRE740
BRE730
BRE740
1
In US manufactured for: Philips Personal Health, a division of Philips
North America LLC, P.O. Box 10313, Stamford, CT 06904 / En EUA
manufacturado para: Philips Personal Health, una división de Philips
North America LLC, P.O. postal10313, Stanford, CT06904
In Canada imported by: Philips Electronics Ltd, 1875 Buckhorn Gate,
5th Floor, Mississauga, Ontario, L4W 5P1 / Au Canada importé par:
Philips Electronics Ltd., 1875 Buckhorn Gate, 5th Floor, Mississauga,
Ontario, L4W 5P1
This symbol on the product’s nameplate means it is
listed by Underwriters’ Laboratories, Inc.
Ce symbole apparaissant sur la plaque nominale du
produit signie qu’il est enregistré par Underwriter’s
Laboratories, Inc.
Este símbolo en la placa de características del
producto signica que está registrado por
Underwriters Laboratories, Inc.
PHILIPS and Philips shield are registered trademarks of Koninklijke
Philips N.V / PHILIPS et le blason Philips sont des marques déposées
de Koninklijke Philips N.V. / PHILIPS y Philips Shield son marcas
registradas de Koninklijke Philips N.V.
©2023 Philips North America LLC. All rights reserved / Tout droits
réservés / Todos los derechos reservados.
3000.051.7427.2 (05/08/2023)
BRE740-BRE700
1
2
1 2
75°
1
2
14
6
22
2
18
10
26
30
15
7
23
3
19
11
27
31
16
8
24
4
20
12
28
32
17
9
25
5
21
13
29
33
Introduction
Congratulations on your purchase and welcome to Philips! To fully
benet from the support that Philips oers, register your product at
www.philips.com/welcome.
Features (Fig.1)
1 Handle
2 Speed lights (I and II)
3 On/o button
4 Battery indicator
5 Socket for small plug
6 Release button
7 Epilating head
8 Built-in light
9 Epilating discs
10 Eciency cap
11 Delicate area cap
12 Trimmer head
13 Trimmer comb
14 Shaving head
15 Shaving head comb
16 Coupling unit
17 Body exfoliation brush
18 Protection cap for body exfoliation brush
19 Callus removal head
20 Callus removal disk
21 Protection cap for callus removal head
22 Exfoliation glove
23 Power plug
24 Small plug
Not shown: Cleaning brush, Pouch
Note: The heads and accessories supplied vary for dierent model numbers.
Consult the overview illustration for the heads and accessories supplied with your
particular model.
Charging
- Fully charge product before using for the rst time or after non-use for a long
period of time.
- Charging or using the product at temperatures below 50°F (10°C) or higher
than 95°F (35°C) adversely aects the lifespan of the battery.
Note: This product can only be used without cord (Fig.4).
1 Be certain the product is OFF.
2 Insert the small plug into the product and put the power plug into any 120V
AC outlet. Use only the cord provided.
- When the battery indicator ashes white (Fig.5), the product is charging.
- After 1.5 hours of charging, the product has a cordless operating time of
up to 40 minutes.
- When the battery indicator lights up white continuously (Fig.6), the
product is fully charged.
- The battery indicator does not light up when the product is switched on:
the product contains enough energy to be used.
- When the battery indicator ashes orange (Fig.5), the battery is almost
empty and needs to be charged. Charge the product when you have
nished using it.
NOTE: If the product is fully charged and connected to the electrical outlet, the
battery indicator ashes a few times when you press the on/o button. This
reminds you to disconnect the product from the electrical outlet before using.
Quick charge
- When the battery is completely empty and you start charging it, the battery
indicator ashes white quickly.
- After approximately 15 minutes, the battery indicator starts ashing white
slowly. At this point, the battery contains enough energy for up to 10 minutes
of use.
Using the product
Switching the product on and o
1 To turn on the product, press the on/o button once (Fig.7).
2 If you want to select the low speed setting, press the on/o button again
(Fig.8).
3 To turn o the product, press the on/o button once more.
Attaching and detaching the epilating head
1 To attach the epilating head, press it onto the handle ('click') (Fig.9).
2 To detach the epilating head, press the release button on the back of the
product (Fig.10).
Note: You can attach and detach the callus removal head, the trimmer head, the
shaving head and the body exfoliation brush in the same way.
Attaching and detaching the callus removal disk
1 To attach the disk, push it onto the coupling in the head (Fig.11).
Look at the appliance from the side to check if the disk is level with the outer
rim of the head.
If the disk wobbles when you switch on the appliance, the disk is not placed
correctly. Remove the disk and attach it properly.
2 To remove the disk, put your thumb in the indent behind the disk and push it
forward until the disk detaches from the head (Fig.12).
Attaching and detaching the trimmer comb
To attach the trimmer comb onto the trimmer head:
1 Place the notch on one side of the comb in the indent in the trimmer head.
2 Press the comb onto the trimmer head until the notch on the other side of the
comb snaps into the indent on the other side of the trimmer head (Fig.13).
To detach the trimmer comb from the trimmer head:
3 On one side of the comb, place a ngernail between the comb and the
trimmer head.
4 Pull with your nail until the comb comes o the trimmer head (Fig.14).
Do not pull at the back or teeth of the comb to remove it.
How to use your epilator
- Use this epilator for its intended household use as described in this manual.
- For hygienic reasons, the epilator and attachments should only be used by
one person.
- Epilation is easier and more comfortable when the hair has the optimum
length of 1/8 - 5/32in/3-4mm. If the hairs are longer, pretrim them rst or
shave and epilate after 1 to 2 weeks.
- Make sure you hold the epilator handle at a 75° angle on the skin and move it
slowly against the direction of hair growth (Fig.15).
- It is normal to experience slight skin irritation (red skin or red dots) after
epilating. In this case, it is best to epilate in the evening as most skin irritation
disappears overnight. This eect will gradually lessen with each use.
- After each use, you may want to apply a non-alcohol based mild cream or
body lotion which will help reduce the possibility of skin irritation. Be certain it
does not contain alcohol as it may cause discomfort.
- Make sure the epilator is fully charged before using. This epilator will not
operate while the cord is connected to an electrical outlet.
Epilating
- Only use the epilator attachment to epilate areas below the neck such as your
legs, underarms and bikini line.
- Attach the delicate area cap if you want to epilate facial hair.
- For gentle, less painful epilation, epilate in the shower or bath on wet skin
with or without shower gel or soap.
- For dry epilating, make sure your skin is clean, and free from grease and
creams. Do not apply any cream before using. Hairs are easier to remove after
a bath or shower, but your skin should be completely dry before using your
epilator.
1 Before rst use, clean the epilating head (see 'Cleaning').
2 Press the epilating head onto the handle (Fig.9).
3 If desired, put an attachment on the epilating head (Fig.16).
NOTE: The attachment will only t onto the product in one direction.
4 Press the on/o button once to turn on the epilator (Fig.7).
- The epilator starts running at speed II which is the most ecient speed for
epilating. The speed II light lights up.
- If you want to use speed I, press the on/o button a second time. Speed I light
lights up (Fig.8).
- Select speed I for areas with little hair growth, for hard-to-reach places and
for areas with bones close to the skin's surface, such as knees and ankles.
- When you press the on/o button a third time, the epilator turns o.
Tip: For greater visibility of ne hairs, the built-in light goes on automatically
when epilating (Fig.17). To turn o, press the on/o button for 3 seconds
after turning on the product.
5 Hold the epilator perpendicular to your leg at a 75° angle with the on/o
button pointing in the direction you are going to move the product (Fig.15).
6 Gently press and move the epilator slowly over the skin against the direction
of hair growth. If you press too lightly or too hard, the epilator will not be able
to grasp and remove the hairs. Experiment until you nd the right settings
and right amount of pressure for your type of skin and hair.
Tip: When epilating sensitive areas, stretch the skin with your free hand. For
epilating underarms, put your hand on the back of your head to stretch the
skin (Fig.18).
7 Press the on/o button to turn the epilator OFF.
8 Pull the attachment o the epilating head and clean epilator and attachment
(see 'Cleaning').
IMPORTANT:
- After using the epilator, some redness or irritation may occur. This is normal
and should disappear quickly.
- Clean the product and attachments after each use (see 'Cleaning').
Using epilator attachments
- When using epilator attachments, always be sure you place the heads at
onto the skin at a 75° angle (Fig.15).
- Simply snap each attachment onto the epilator head ('click') (Fig.16).
- To remove an attachment, grasp its front and back and pull it up o the
epilator head (Fig.19).
Delicate area cap
- Attach the delicate area cap onto the epilating head for more comfortable
epilating of delicate areas such as underarms and bikini area.
- You can also use the delicate area cap for precise epilating of facial hair such
as upper lip.
Do not use the appliance to epilate eyelashes, eyebrows or scalp hair.
Eciency cap
- Attach the eciency cap onto the epilating head to keep skin tight and help
reduce pain while epilating.
Body exfoliation brush
- Remove the epilator head by pressing the release button on the back of the
appliance (Fig.10).
- Attach the body exfoliation brush to the coupling unit and then attach to the
appliance handle. (Fig.20) The body exfoliation brush helps remove dead skin
cells.
Do not use the body exfoliation brush on your face.
Callus removal
Note: The callus removal head is only intended for use on feet.
You can use the callus removal disk in 3 dierent ways, depending on the area or
callus you want to treat.
1 To treat a large, at area, use the entire disk (Fig.21). Make sure you place the
disk at onto the skin for good control during use.
2 For precision treatment of smaller areas and good visibility of the treated area
(Fig.22), use the top part of the disk that sticks out beyond the top of the
head (Fig.23).
3 For precision treatment and for bung away hard skin very quickly, use the
narrow edge of the protruding top part of the disk (Fig.24).
Move the disk back and forth gently over the skin you want to treat. Do not push
too hard. When you push too hard, the disk might stop rotating.
Shaving
Do not use the shaving head if the foil damaged or broken, as injury may
occur.
- Use the shaving head to shave your legs, underarms and bikini line.
- Attach the shaving head comb onto the shaving head to shave hairs to a
length of 1/8in/3mm (Fig.25). When you remove the comb, always grasp the
comb on the sides (Fig.26).
- To shave legs and bikini line, always move the appliance gently over the skin
against the direction of hair growth.
- To shave underarms, place one arm behind your head and move the
appliance up and down and from left to right.
Trimming
- Use the trimmer head to trim hard-to-reach areas in the bikini zone.
- Attach the trimmer head comb onto the trimmer head to trim hairs in the
bikini zone to a length of 1/8in/3mm (Fig.27).
- To create precise lines, place the trimmer head perpendicular onto the skin
(Fig.28).
Caution: Do not use the trimmer head without the comb on intimate areas
other than the bikini line as this could cause injury.
Overheat protection
Note: To avoid overheating of the product, do not press the product too hard
onto your skin. The product works best when you move it over your skin without
exerting any pressure.
1 If the overheat protection is activated, the product turns o automatically.
The speed lights start ashing.
2 Let the product cool down. The lights stop ashing after 4 seconds.
3 When the product has cooled down, you can turn it on again.
If the lights start ashing again, the product has not yet cooled down
completely.
Cleaning
IMPORTANT:
- Always clean the handle, heads and attachments after each use.
- Always turn the product OFF and remove power cord from electrical outlet
and product before cleaning.
- Never use compressed air, scouring pads, abrasive cleaning agents or
aggressive liquids such as gasoline or acetone to clean the product.
- Keep the power cord dry (Fig.2).
Cleaning the epilating head and epilating attachments
- It is essential for hygienic reasons and optimum performance that the
epilating head, attachments and rotating disks are cleaned after each use.
- It is strongly recommended to always rinse the epilating head with cold water
to help prevent bacterial growth.
- Never clean, remove, or replace epilating head or attachments while motor is
ON. The rotating disks are not removable from the epilating head.
- Do not apply pressure or touch rotating disks with hard objects as this may
dent or damage the disks. If damage occurs, discontinue use immediately.
1 Be certain the product is OFF.
2 Pull any attachment o the epilating head (Fig.19).
3 Remove loose hairs from the epilating disks and attachment with the brush.
Never try to detach the epilating disks from the product.
4 Rinse attachments thoroughly under warm tap water while turning.
5 Turn the product on and rinse the epilating head under cold tap water for 15
seconds (Fig.29).
6 Shake o excess water and dry the epilating head and attachments
completely with a soft towel or tissue, or allow to air-dry thoroughly.
7 To attach the epilating head, press it onto the handle ('click') (Fig.9).
Cleaning the callus removal head
To clean the callus removal head and disk (if supplied): clean the outside of the
head and disk with the cleaning brush supplied (Fig.30). Then remove the disk
o the head and clean the inside of the head with the cleaning brush supplied
(Fig.31).
If you prefer, you can rinse the callus removal head and disk under a running tap.
Let all parts dry completely.
Cleaning the shaving head
- Never clean or remove the shaving head or cutting unit while the motor is ON.
- Do not apply pressure to the shaving head. Do not touch the foil with hard
objects as this may dent or damage foil or cutters.
- Do not use the shaving head if the foil is damaged or broken, as this may
cause facial injury.
1 Be certain the product is OFF.
2 Press the release button and remove the shaving head from the handle.
3 Pull the cutting unit out of the shaving head (Fig.32).
4 Clean the cutting unit, foil, cutters and inside the shaving head with the
cleaning brush. Also brush away any hairs that have collected under the
trimmers.
To avoid damage, never use a brush to clean the shaving foil.
5 You can also rinse the cutting unit, inside the shaving head and accessories
under warm tap water.
6 Allow all parts to air-dry thoroughly.
7 Put the cutting unit back into the shaving head ('click').
For the best shaving performance, it is suggested to lightly oil shaving head every
six weeks by spreading a drop of mineral oil over the foil and cutters.
Replacing the shaving head cutting unit
If the foil and/or trimmers of the cutting are worn or damaged, do not
continue to use the shaving head.
A worn or damaged cutting unit should only be replaced with an original Philips
cutting unit which is available at www.philips.com/parts-and-accessories. You
can also call 1-800-243-7884 (in US only) or 1-866-800-9311 (in Canada only) for
assistance.
The cutting unit is a precision part. Handle with care.
1 Always turn the product OFF and remove power cord from the electrical
outlet and product before replacing the cutting unit.
2 Press the release button and remove the shaving head from the handle.
3 Pull the cutting unit out of the shaving head (Fig.32).
4 Place a new cutting unit into the shaving head ('click').
5 Reattach the shaving head to the handle.
6 After replacing the cutting unit, check to make sure the cutting unit and
shaving head are rmly attached before using the epilator.
Storage
- Be sure epilator is turned OFF. Remove power cord from the electrical outlet
and handle before storing product in a safe, dry location where it will not be
crushed, banged, or subject to damage.
- Do not wrap cord around epilator when storing.
- Store cord in a safe location where it will not be cut or damaged.
- Do not place or store epilator where it can fall or be pulled into a tub or sink,
water or other liquid while plugged in.
- Put the body exfoliation brush protective cap on the body exfoliation brush
after use.
- Store the epilator and attachments in the pouch provided.
Accessories
For maximum shaving performance, replace the shaving head
cutting unit once a year. This replacement part can be purchased
on www.philips.com/parts-and-accessories.
If you use the body exfoliation brush 2-3 times a week, replace it every 3 months.
This replacement parts can be purchased on www.philips.com/store.
Callus removal head (if supplied): Replace the callus removal disk with one of the
original type when its eectiveness decreases.
Assistance
For assistance, visit our website: www.philips.com/support or call toll free
1-800-243-7884 (in US only) or 1-866-800-9311 (in Canada only).
Disposal
- This product contains a rechargeable lithium-ion battery which must be
disposed of properly.
- Contact your local town or city ocials for battery disposal information. In
the US, you can also call 1-800-822-8837 or visit www.call2recycle.org
for battery drop-o locations (Fig.33). In Canada, you can also call
1-888-224-9764 or visit www.call2recycle.ca for battery drop-o locations.
- For assistance, visit our website www.philips.com/support or call toll-free
1-800-243-7884 (in US only) or 1-866-800-9311 (in Canada only).
- Your product is designed and manufactured with high quality materials
and components, which can be recycled and reused. For recycling
information, please contact your local waste management facilities or visit
www.recycle.philips.com.
Full Two-Year Warranty
Philips North America LLC (USA) and Philips Electronics Ltd (Canada) warrant this
new product against defects in materials or workmanship for a period of two
years from the date of purchase, and agree to repair or replace any defective
product without charge.
Cutting units, combs, the body exfoliation brush and the callus removal disk are
not covered by the terms of this warranty because they are subject to wear and
tear.
IMPORTANT: This warranty does not cover damage resulting from accident,
misuse or abuse, lack of reasonable care, the axing of any attachment not
provided with the product or loss of parts or subjecting the product to any but
the specied voltage.*
NO RESPONSIBILITY IS ASSUMED FOR ANY SPECIAL, INCIDENTAL OR
CONSEQUENTIAL DAMAGES.
In order to obtain warranty service, simply go to www.philips.com/support
for assistance. It is suggested that for your protection you return shipments of
product by insured mail, insurance prepaid. Damage occurring during shipment
is not covered by this warranty. NOTE: No other warranty, written or oral, is
authorized by Philips North America LLC and Philips Electronics Ltd (Canada).
This warranty gives you specic legal rights, and you may also have other rights
which vary from state to state, province to province or country to country. Some
states do not allow the exclusion or limitation of incidental or consequential
damages, so the above exclusion and limitations may not apply to you.
*Read enclosed instructions carefully.
45-Day Money-Back Guarantee
If you are not fully satised with your product send the product back and we’ll
refund you the full purchase price.
The product must be shipped prepaid by insured mail, insurance prepaid,
have the original sales receipt, indicating purchase price and date of purchase.
We cannot be responsible for lost mail.
The product must be postmarked no later than 45 days after the date of
purchase. Philips reserves the right to verify the purchase price of the
product and limit refunds not to exceed suggested retail price.
To obtain the money-back guarantee service, please go to
www.PhilipsMoneyBack.com and follow the simple 3-step process.
Delivery of refund check will occur 6–8 weeks after receipt of returned product.
Español
INSTRUCCIONES IMPORTANTES DE SEGURIDAD
Cuando utilice un producto eléctrico, siempre debe seguir las precauciones
básicas, incluidas las siguientes:
Lea todas las instrucciones antes de usar este producto.
PELIGRO
Para reducir el riesgo de descarga eléctrica:
- No intente agarrar un producto con cable que haya caído al agua.
Desconéctelo inmediatamente del enchufe de la pared.
- Mantenga el cable de alimentación seco (Fig.2).
- No coloque ni guarde el producto en un lugar desde donde pueda caerse a
una bañera o fregadero. No coloque el producto en un lugar desde donde
pueda caerse al agua o a cualquier otro líquido ni sumerja el producto en
ningún tipo de líquido.
- Este producto no funciona mientras está conectado al enchufe de pared.
Excepto cuando se esté cargando, siempre desenchufe este producto del
enchufe de pared.
- Desconecte el cable de alimentación del enchufe de pared y del producto
antes de limpiarlo.
ADVERTENCIA
Para reducir el riesgo de quemaduras, incendio, descarga eléctrica o
lesiones:
- Este producto no está destinado a personas (adultos o niños) con capacidades
física, sensorial o mental disminuidas, o que no tengan los conocimientos
o la experiencia necesarios, a menos que una persona responsable de su
seguridad los supervise o los instruya sobre el uso del producto. Evite que los
niños jueguen con este producto.
- Use este producto solo para el uso doméstico previsto como se describe en
este manual. El uso inadecuado puede causar posibles riesgos o lesiones
graves. No use accesorios que no estén recomendados por la corporación
Philips North America LLC. Los accesorios incluidos pueden variar según el
producto.
- Nunca utilice este producto si el cable o el enchufe de carga están dañados, si
no funciona correctamente, si se cayó, si está dañado o si se sumergió en agua
mientras estaba conectado a la alimentación eléctrica. Para solicitar asistencia,
llame al 1-800-243-7884 (EE. UU.) o 1-866-800-9311 (Canadá).
- Mantenga el cable de alimentación lejos de supercies calientes.
- No deje caer ni introduzca ningún objeto en ninguna abertura.
- No utilice el adaptador dentro o cerca de una salida de corriente que
contenga un ventilador de aire eléctrico para prevenir daño al adaptador.
- No use el producto a la intemperie ni lo use donde se estén usando productos
de aerosol (atomizador) o donde se esté administrando oxígeno.
- Antes de usar el producto, revise siempre los discos giratorios, la lámina
y los accesorios. No use el producto si los discos giratorios, la lámina y los
accesorios están dañados, ya que puede producirse una lesión.
- Siempre conecte la clavija al producto primero y, luego, al tomacorriente.
Para desconectar, gire el interruptor de encendido/apagado a la posición de
"APAGADO" y, luego, desenchufe la clavija del tomacorriente.
- Enchufe el cable de alimentación directamente en el toma corriente. No use
un cable de extensión.
- Desconecte el cable de alimentación antes de conectar o desconectar el
producto.
- Las baterías que se emplean en este producto pueden representar un riesgo
de incendio o de quemadura química si no se manipulan correctamente. No
desarme, incinere ni permita que la temperatura de las baterías supere los
100°C (212°F).
¡IMPORTANTE!: El enchufe eléctrico contiene un transformador. No corte el
enchufe eléctrico para reemplazarlo con otro ya que esto puede producir una
condición de peligro.
- Use únicamente accesorios o productos consumibles originales de Philips. Use
únicamente el cable de alimentación desmontable HQ8505.
- Cargue, utilice y guarde el producto a una temperatura entre 10°C y 35°C.
- Mantenga el producto y las baterías lejos del fuego y no los exponga a la luz
solar directa ni a altas temperaturas.
- Si el producto se pone anormalmente caliente, despide un olor extraño,
cambia de color o tarda más tiempo de lo normal en cargarse, deje de usarlo y
de cargarlo, y comuníquese con Philips.
- No coloque los productos y sus baterías en hornos microondas ni en ollas de
inducción.
- No abra, modique, perfore, dañe ni desarme el producto o la batería, para
evitar que las baterías se calienten o liberen sustancias tóxicas o peligrosas. No
provoque un cortocircuito, sobrecargue ni invierta la posición de las baterías.
- Si las baterías se dañan o tienen fugas, evite el contacto con la piel o los ojos.
Si esto sucede, enjuague bien inmediatamente con agua y busque atención
médica.
- Cuando manipule las baterías, asegúrese de que sus manos, el producto y las
baterías estén secas.
- Para evitar un cortocircuito en las baterías después de la extracción, no
permita que las terminales de las baterías entren en contacto con objetos
metálicos (p. ej., monedas, horquillas, anillos). No envuelva las baterías en
papel de aluminio. Cubra las terminales de las baterías con cinta o colóquelas
en una bolsa de plástico antes de desecharlas.
CONSERVE ESTAS INSTRUCCIONES
INFORMACIÓN IMPORTANTE
PRECAUCIÓN
- Por motivos de higiene, se recomienda que solo una persona utilice el
producto.
- Nunca use aire comprimido, bras, agentes de limpieza abrasivos ni líquidos
agresivos como gasolina o acetona para limpiar el producto.
- Apague el producto antes de retirar o colocar los accesorios y antes de
limpiarlo.
- Cuando enjuague el producto o los accesorios, asegúrese siempre de
revisar que el agua no esté demasiado caliente (100°F máximo) para evitar
quemarse las manos.
- Los métodos que eliminan el vello de raíz pueden causar vellos encarnados
y lesiones menores en la piel. Consulte a su médico si tiene alguna duda
respecto del uso de una depiladora.
- No use la depiladora si tiene venas varicosas, erupciones, manchas, así como
tampoco si la piel está irritada, si tiene vellos encarnados o una tendencia a
sufrir de vellos encarnados. Consulte primero a su médico.
- Cualquier lesión pequeña que se origine por la eliminación del vello puede
permitir que las bacterias penetren en el lugar de la lesión y, potencialmente,
causen pequeñas cicatrices o un cambio en la pigmentación de la piel. Se
puede minimizar el riesgo de infección al limpiar cuidadosamente los discos
giratorios antes o después de cada uso (ver 'Limpieza').
- La depiladora solo debe utilizarse después de una consulta previa con su
médico si tiene o si sufre:
- Heridas abiertas
- Eczema, psoriasis (eczema con escamas), reacciones cutáneas inamatorias
como foliculitis, erupciones cutáneas o la tendencia a alergias o a
reacciones alérgicas cutáneas
- Inmunodeciencia o trastornos inmunitarios
- Rosácea o venas varicosas
- Está embarazada
- Inmunidad cutánea reducida como consecuencia de diabetes, embarazo,
enfermedad de Raynaud, etc.
- Hemolia
- Lunares, protuberancias en la piel, etc.
- Si ha ingerido medicamentos hormonales o comenzará a hacerlo, o si ha
estado embarazada recientemente, el cambio en sus niveles de hormonas
puede afectar el grosor, el color o la cantidad de crecimiento de vello. Esto se
debe a cambios hormonales, no a este método de eliminación del vello.
- No utilice aceites de baño o ducha cuando depile piel húmeda, ya que esto
puede provocar irritación cutánea grave.
- Limpie el cabezal de depilación después de cada uso (ver 'Limpieza').
GENERAL
- Este producto es a prueba de agua (Fig.3). Es apropiado para su uso en el
baño o la ducha y puede lavarse en la llave.
- Limpie el producto después de cada uso (ver 'Limpieza').
- Este producto no contiene otras piezas que requieran mantenimiento. Para
solicitar asistencia, llame al 1-800-243-7884 (solo EE. UU.) o 1-866-800-9311
(solo Canadá).
Introducción
Enhorabuena por la adquisición de este producto, y bienvenido a Philips. Para
sacar el mayor partido a la asistencia que Philips le ofrece, registre el producto en
www.philips.com/welcome.
Características (Fig.1)
1 Mango
2 Luces indicadoras de velocidad (I y II)
3 Botón de encendido/apagado
4 Indicador de batería
5 Toma para clavija pequeña
6 Botón de liberación
7 Cabezal depilador
8 Luz incorporada
9 Discos depiladores
10 Cabezal para sistema de estiramiento de la piel
11 Cabezal para zonas delicadas
12 Cabezal recortador
13 Peine del cabezal recortador
14 Cabezal de afeitado
15 Peine para el cabezal de afeitado
16 Unidad de acoplamiento
17 Cepillo de exfoliación corporal
18 Tapa de protección del cepillo de exfoliación corporal
19 Cabezal de eliminación de callos
20 Disco de eliminación de callos
21 Tapa de protección del cabezal de eliminación de callos
22 Guante de exfoliación
23 Cable de alimentación
24 Conector pequeño
No se muestra: Cepillo de limpieza, Funda
Nota: Los cabezales y los accesorios suministrados pueden variar según los
diferentes números de modelos. Consulte la ilustración de descripción general
para ver los cabezales y los accesorios suministrados con este modelo en
particular.
Carga
- Cargue el producto completamente antes de usarlo por primera vez y después
de un largo periodo de no usarlo.
- La carga o el uso del producto a temperaturas por debajo de los 50°F (10°C)
o superiores a los de 95°F (35°C) afecta la vida útil de la batería.
Nota: Este producto solo se puede utilizar sin cable (Fig.4).
1 Asegúrese de que el producto esté APAGADO.
2 Inserte la clavija pequeña en el producto y conecte la clavija de alimentación
en cualquier toma de corriente de pared de 120 V CA. Use solo el cable
provisto.
- Cuando la luz del indicador de carga destelle en color blanco (Fig.5),
signica que el producto se está cargando.
- Después de cargarse durante 1.5 horas, el producto puede funcionar en
forma inalámbrica por hasta 40minutos.
- Cuando el indicador de carga de la batería muestra una luz blanca
continua (Fig.6), el producto está totalmente cargado.
- El indicador de batería no se ilumina cuando el producto está encendido:
el producto contiene suciente energía para ser usado.
- Cuando la luz del indicador de carga de la batería destelle en color naranja
(Fig.5), signica que la batería casi no tiene energía y necesita recargarse.
Cargue el producto cuando termine de usarlo.
NOTA: Si el producto está completamente cargado y conectado a una toma de
corriente eléctrica, el indicador de la batería destella unas cuantas veces cuando
se presiona el botón de encendido/apagado. Esto le recuerda desconectar el
producto de la toma de corriente eléctrica antes de usarlo.
Carga rápida
- Cuando la batería está casi agotada y se empieza a cargar, el indicador de
batería parpadea en color blanco rápidamente.
- Después de aproximadamente 15 minutos, el indicador de la batería
comienza a parpadear en blanco lentamente. A este punto, la batería tiene
suciente energía para hasta 10 minutos de uso.
Uso del producto
Siempre revise el producto y todos los accesorios antes de usarlo. No
use el producto ni ningún accesorio si está dañado, ya que esto puede
causar alguna lesión. Siempre reemplace una pieza dañada con una del
tipo original.
Encendido y apagado del producto
1 Para encender el producto, presione el botón de encendido/apagado una vez
(Fig.7).
2 Si desea seleccionar el ajuste de baja velocidad, vuelva a presionar el botón de
encendido/apagado (Fig.8).
3 Para apagar el producto, presione el botón de encendido/apagado
una vez más.
Cómo poner y quitar el cabezal depilador
1 Para colocar el cabezal depilador, presiónelo contra el mango ("clic") (Fig.9).
2 Para quitar el cabezal depilador, presione el botón de liberación en la parte
posterior del producto (Fig.10).
Nota: Puede poner y quitar el cabezal de eliminación de callos, el cabezal de
recorte, el cabezal de afeitado y el cepillo de exfoliación corporal de la misma
manera.
Poner y quitar el disco de eliminación de callos
1 Para colocar el disco, acóplelo en el cabezal (Fig.11).
Vea el electrodoméstico de lado para vericar que el disco esté nivelado con
el borde exterior del cabezal.
Si el disco se mueve cuando se enciende el electrodoméstico, este no está
bien colocado. Retire el disco y ajústelo correctamente.
2 Para quitar el disco, ponga el dedo pulgar en la ranura de atrás y empújelo
hacia delante hasta que se separe del cabezal (Fig.12).
Colocación y extracción del peine recortador
Para colocar el peine recortador en el cabezal de corte, siga los pasos a
continuación:
1 Coloque la muesca en un lado del peine en la hendidura en el cabezal de
corte.
2 Presione el peine en el cabezal de corte hasta que la muesca en el otro lado
del peine encaje en la hendidura del cabezal de corte (Fig.13).
Para quitar el peine recortador del cabezal de corte, siga los pasos a continuación:
3 En un lado del peine, coloque una uña entre el peine y el cabezal de corte.
4 Tire con la uña hasta que el peine se desprenda del cabezal de corte (Fig.14).
No tire de la parte posterior o de los dientes del peine para retirarlo.
Cómo utilizar la depiladora
- Use esta depiladora para su uso previsto en el hogar, según se describe en
este manual.
- Por motivos de higiene, solo una persona debe utilizar la depiladora y los
accesorios.
- La depilación es más fácil y más confortable cuando el vello tiene un largo
óptimo de 1/8 - 5/32in./3 - 4mm. Si el vello está más largo, recórtelo primero
o rasúrelo y, luego, depílese en 1 o 2semanas.
- Asegúrese de sostener el mango de la depiladora en un ángulo de 75° sobre
la piel y muévala lentamente a contrapelo (Fig.15).
- Después de la depilación, es normal tener una irritación leve de la piel
(enrojecimiento o puntos rojos sobre la piel). En este caso, es mejor depilarse
por la noche, para que la mayor parte de la irritación de la piel desaparezca
durante la noche. Este efecto se reducirá gradualmente con cada uso.
- Después de cada uso, se aconseja aplicar una crema o loción corporal suave,
sin alcohol, que ayudará a reducir la posibilidad de irritación de la piel.
Asegúrese de que no contenga alcohol ya que este podría provocar molestias.
- Asegúrese de que la depiladora esté completamente cargada antes de
utilizarla. La depiladora no funcionará mientras el cable está conectado a una
toma de corriente eléctrica.
Depilar
- Use el accesorio de depilación únicamente para las zonas que se encuentran
del cuello para abajo tal y como las piernas, las axilas o la línea del bikini.
- Coloque la protección para áreas delicadas si desea depilar el vello facial.
- Para una depilación más suave y menos dolorosa, depílese en la ducha o en la
tina con la piel mojada con gel para ducha o jabón o sin nada.
English
IMPORTANT SAFETY INSTRUCTIONS
When using an electric product, basic precautions should always be followed,
including the following:
Read all instructions before using this product.
DANGER
To reduce the risk of electric shock:
- Do not reach for a corded product that has fallen into water. Unplug
immediately from the power outlet.
- Keep the power cord dry (Fig.2).
- Do not place or store the product where it can fall or be pulled into a tub or
sink. Do not place or drop the product into water or other liquid.
- This product does not work while it is connected to the power outlet. Except
when charging, always unplug this product from the power outlet.
- Remove power cord from power outlet and product before cleaning.
WARNING
To reduce the risk of burns, re, electric shock, or injury to persons:
- This product is not intended for use by persons (including children) with
reduced physical, sensory or mental capabilities, or lack of experience and
knowledge, unless they have been given supervision or instruction concerning
use of the product by a person responsible for their safety. Children should be
supervised to ensure that they do not play with the product.
- Use this product only for its intended household use as described in
this manual. Misuse can lead to hazards or serious injuries. Do not use
attachments not recommended by Philips North America LLC. Accessories
supplied may vary for dierent products.
- Never operate this product if it has a damaged power cord, if it is not working
properly, after it has been dropped or damaged, or after the product or
power cord has been dropped into water. For assistance call 1-800-243-7884
(US) or 1-866-800-9311 (Canada).
- Keep the power cord away from heated surfaces.
- Never drop or insert any object into any opening.
- Do not use the power cord in or near a power outlet that contains an electric
air freshener to prevent damage to the power cord.
- Do not use product outdoors or operate where aerosol (spray) products are
being used or where oxygen is being administered.
- Always check rotating discs, foil and attachments before using the product.
Do not use the product if rotating discs, foil and attachments are damaged, as
injury may occur.
- Always attach power cord to product rst, then to power outlet. To
disconnect, set all controls to 'o' position. Then remove power cord from
power outlet.
- Plug power cord directly into power outlet. Do not use an extension cord.
- Unplug power cord before plugging in or unplugging the product.
- The batteries used in this product may present a re or chemical burn hazard
if mistreated. Do not disassemble, heat above 100°C (212°F) or incinerate.
IMPORTANT: The power plug contains a transformer. Do not cut o the power
plug to replace it with another plug as this will cause a hazardous condition.
- Only use original Philips accessories or consumables. Only use detachable
power cord HQ8505.
- Charge, use and store the product at a temperature between 10°C and 35°C.
- Keep product and batteries away from re and do not expose them to direct
sunlight or high temperatures.
- If the product becomes abnormally hot or smelly, changes color or if charging
takes longer than usual, stop using and charging the product and contact
Philips.
- Do not place products and their batteries in microwave ovens or on induction
cookers.
- Do not open, modify, pierce, damage or dismantle the product or battery to
prevent batteries from heating up or releasing toxic or hazardous substances.
Do not short-circuit, overcharge or reverse charge batteries.
- If batteries are damaged or leaking, avoid contact with the skin or eyes. If this
occurs, immediately rinse well with water and seek medical care.
- When you handle batteries, make sure that your hands, the product and the
batteries are dry.
- To avoid accidental short-circuiting of batteries after removal, do not let
battery terminals come into contact with metal objects (e.g. coins, hairpins,
rings). Do not wrap batteries in aluminum foil. Tape battery terminals or put
batteries in a plastic bag before you discard them.
SAVE THESE INSTRUCTIONS
IMPORTANT INFORMATION
CAUTION
- For hygienic reasons, it is recommended that the product be used by only one
person.
- Never use compressed air, scouring pads, abrasive cleaning agents or
aggressive liquids such as gasoline or acetone to clean the product.
- Turn the product o before removing or attaching attachments and before
cleaning.
- When rinsing the product or attachments, always check to make sure the
water is not too hot (maximum 100°F) to prevent your hands from getting
burnt.
- Methods of removing hair by the root can cause ingrown hairs and minor skin
injuries. Please consult your doctor if you have any questions about the use of
an epilator.
- Do not use the epilator if you suer from varicose veins, rashes, spots or
blemishes, or when the skin is irritated or if you have ingrown hairs or a
tendency to produce ingrown hairs. Consult your doctor rst.
- Any minor injury resulting from hair removal may allow bacteria to penetrate
the injury site, potentially causing small scars or a change in pigmentation of
the skin. The risk of infection may be minimized by thoroughly cleaning the
rotating discs before and/or after each use (see 'Cleaning').
- The epilator should only be used after prior consultation with your doctor if
you have or experience:
- Open wounds
- Eczema, psoriasis (scaly eczema), inamed skin reactions such as folliculitis,
skin rashes or the tendency to allergy or allergic skin reactions
- Immune deciency or disorders
- Couperose, rosacea, or varicose veins
- Pregnancy
- Reduced skin immunity as a result of diabetes, pregnancy, Raynaud’s
disease, etc.
- Hemophilia
- Moles, raised skin bumps, etc.
- If you have been or begin taking hormone medication, or if you have recently
been pregnant, a change in your hormone levels may inuence the thickness,
color or amount of hair growth. This is caused by hormonal changes, not by
this method of hair removal.
- Do not use bath or shower oils when you epilate wet skin, as this may cause
serious skin irritation.
- Clean the epilating head after each use (see 'Cleaning').
GENERAL
- This product is waterproof (Fig.3). It is suitable for use in the bath or shower
and for cleaning under the tap.
- Clean the product after each use (see 'Cleaning').
- This product has no other user-serviceable parts. For assistance call
1-800-243-7884 (US only) or 1-866-800-9311 (Canada only).
BRE700
BRE710
BRE715
BRE720
BRE730
BRE735
BRE740
BRE712
BRE715
BRE720
BRE730
BRE715
BRE720
BRE735
BRE740
11
10
12
14
16
15
13
7
6
3
2
8
9
BRE700
BRE710
BRE712
BRE715
BRE720
BRE730
BRE735
BRE740
BRE710
BRE712
BRE720
BRE730
BRE735
BRE740
4
5
24
1
1718
19
22
23
2021
BRE735
BRE740
BRE730
BRE740
1

- Para depilar en seco, asegúrese de que la piel esté limpia y libre de grasa y
cremas. No aplique ninguna crema antes de usarla. Es más fácil eliminar el
vello después de un baño o una ducha, pero la piel debe estar completamente
seca antes de usar la depiladora.
5 Antes del primer uso, limpie el cabezal de depilación (ver 'Limpieza').
6 Presione el cabezal de depilación sobre el mango (Fig.9).
7 Si lo desea, coloque un accesorio sobre el cabezal (Fig.16) de
depilación.
NOTA: El accesorio solo calzará en el producto en una sola dirección.
1 Presione el botón de encendido/apagado una vez para encender la
depiladora (Fig.7).
- La depiladora comienza a funcionar en la velocidad II la cual es la más
eciente para depilar. La luz de la velocidad II se enciende.
- Si desea usar la velocidad I, pulse el botón de encendido/apagado una
segunda vez. La luz de la velocidad I se enciende (Fig.8).
- Seleccione la velocidad I para las zonas donde crece poco vello, para lugares
difíciles de llegar y para zonas con huesos cerca de la supercie de la piel, tales
como las rodillas y los talones.
- Cuando presiona el botón de encendido/apagado por tercera vez, la
depiladora se apaga.
Sugerencia: Para una mayor visibilidad de vellos nos, la luz integrada se
enciende automáticamente al depilar (Fig.17). Para apagar, presione el botón
de encendido/apagado por 3 segundos después de encender el producto.
2 Sostenga la depiladora en forma perpendicular a su pierna, en un ángulo de
75°, con el botón de encendido/apagado orientado en la dirección hacia la
que va a mover el producto (Fig.15).
3 Presione y mueva la depiladora suavemente sobre la piel a contrapelo.
Si presiona muy suavemente o muy fuertemente, la depiladora no podrá
atrapar y eliminar el vello. Experimente hasta que encuentre los ajustes y la
cantidad de presión correctos para su tipo de piel y vello.
Sugerencia: Cuando depile las zonas sensibles, estire la piel con su mano libre.
Para depilar las axilas, coloque su mano en la parte posterior de su cabeza
para estirar la piel (Fig.18).
4 Presione el botón de encendido/apagado para APAGAR la depiladora.
5 Desprenda el accesorio del cabezal de depilación y limpie la
depiladora y el accesorio (ver 'Limpieza').
IMPORTANTE:
- Después de usar la depiladora, se pude producir un poco de irritación o
enrojecimiento Esto es normal y debiera desaparecer rápidamente.
- Limpie el producto y los accesorios después de cada uso (ver 'Limpieza').
Cómo usar los accesorios de la depiladora
- Cuando usa los accesorios de la depiladora, siempre asegúrese de colocar los
cabezales en forma plana sobre la piel, en un ángulo de 75° (Fig.15).
- Simplemente, coloque cada accesorio sobre el cabezal de depilación ("clic")
(Fig.16).
- Para retirar un accesorio, tómelo por la parte posterior y delantera y levántelo
del cabezal de depilación (Fig.19).
Cabezal para zonas delicadas
- Coloque el cabezal para áreas delicadas sobre el cabezal de depilación para
lograr una depilación más cómoda de áreas delicadas, como las axilas o la
zona del bikini.
- También puede usar la protección para áreas delicadas para lograr una
depilación precisa del vello facial, como en el labio superior.
No use el dispositivo para depilar los vellos de las pestañas, las cejas o el
cuerpo cabelludo.
Cabezal para sistema de estiramiento de la piel
- Coloque el cabezal para sistema de estiramiento de la piel sobre el cabezal de
depilación para mantener estirada la piel y ayudar a reducir el dolor durante
la depilación.
Cepillo de exfoliación corporal
- Para retirar el cabezal de depilación, presione el botón de liberación en la
parte posterior del dispositivo (Fig.10).
- Coloque el cepillo de exfoliación corporal en la unidad de acoplamiento y,
luego, conéctelo al mango del dispositivo (Fig.20). El cepillo de exfoliación
corporal ayuda a eliminar las células muertas de la piel.
No use el cepillo de exfoliación corporal sobre el rostro.
Eliminación de callos
Nota: El cabezal de eliminación de callos está diseñado para usarse solamente en
los pies.
Puede usar el disco de eliminación de callos de 3 diferentes maneras,
dependiendo del área o del callo que desee tratar.
1 Para tratar una zona plana y grande, use todo el disco (Fig.21). Asegúrese de
colocar el disco plano sobre la piel para tener un buen control durante el uso.
2 Para tratar las zonas pequeñas con precisión y tener buena visibilidad del área
tratada (Fig.22), use la parte superior del disco que sobresale por arriba del
cabezal (Fig.23).
3 Para un tratamiento de precisión y para limar y quitar la piel dura
rápidamente, use el borde angosto que sobresale de la parte superior del
disco (Fig.24).
Mueva el disco hacia delante y hacia atrás suavemente sobre la piel que desee
tratar. No presione demasiado fuerte. Cuando presiona demasiado fuerte, el
disco puede dejar de rotar.
Afeitado
No use el cabezal de afeitado si la lámina está dañada o rota, ya que podrían
producirse lesiones.
- Use el cabezal de afeitado para afeitar piernas, axilas y la línea del bikini.
- Coloque el peine del cabezal de afeitado sobre el cabezal de afeitado para
afeitar vellos que tengan 1/8pda./3mm de largo (Fig.25). Cuando retira el
peine, siempre tómelo por los bordes (Fig.26).
- Para afeitar las piernas y la línea del bikini, siempre mueva el dispositivo
suavemente sobre la piel a contrapelo.
- Para afeitar las axilas, coloque un brazo detrás de su cabeza y mueva el
dispositivo hacia arriba y hacia abajo y de izquierda a derecha.
Recorte
- Utilice el cabezal recortador para recortar áreas de difícil acceso en la zona del
bikini.
- Coloque el peine del cabezal recortador sobre el cabezal recortador para
recortar vellos en la zona del bikini que tengan 1/8pda./3mm de largo
(Fig.27).
- Para crear líneas precisas, coloque el cabezal recortador en forma
perpendicular sobre la piel (Fig.28).
Precaución: No use el cabezal recortador sin el peine en áreas íntimas
(excepto la línea del bikini) ya que podrían producirse lesiones.
Protección contra el sobrecalentamiento
Nota: Para evitar el sobrecalentamiento del producto, no lo presione demasiado
fuerte contra la piel. El producto funciona mejor cuando se mueve sobre la piel
sin ejercer ninguna presión.
1 Si se activa la protección contra sobrecalentamiento, el producto se apagará
automáticamente. Las luces de velocidad comienzan a destellar.
2 Deje que el producto se enfríe. Las luces dejan de destellar después de 4
segundos.
3 Cuando se haya enfriado el producto, puede volver a encenderlo.
Si las luces comienzan a destellar de nuevo, el producto no se ha enfriado por
completo
Limpieza
IMPORTANTE:
- Siempre limpie el mango, los cabezales y los accesorios después de cada uso.
- Siempre apague el producto y retire el cable de la toma de corriente eléctrica
y del producto antes de limpiarlo.
- Nunca use aire comprimido, bras, agentes de limpieza abrasivos ni líquidos
agresivos como gasolina o acetona para limpiar el producto.
- Mantenga el cable de alimentación seco (Fig.2).
Cómo limpiar el cabezal y los accesorios de depilación
- Por motivos de higiene y máximo rendimiento es importante limpiar el
cabezal depilador, los accesorios y los discos giratorios después de cada uso.
- Se recomienda encarecidamente enjuagar siempre el cabezal de depilación
con agua fría para ayudar a prevenir el crecimiento de bacterias.
- Nunca limpie, retire ni reemplace el cabezal depilador o los accesorios con el
motor en funcionamiento. Los discos giratorios no son removibles del cabezal
depilador.
- No ejerza presión ni toque los discos giratorios con objetos duros, ya que
podría dañarlos. Si ocurre un daño, descontinúe el uso inmediatamente.
1 Asegúrese de que el producto esté APAGADO.
2 Retire todos los accesorios del cabezal de depilación (Fig.19).
3 Retire los vellos sueltos de los discos depiladores y accesorio con un
cepillo.
Nunca intente remover los discos depiladores del producto.
4 Enjuague los accesorios concienzudamente con agua tibia de la llave mientras
los gira.
5 Encienda el producto y enjuague el cabezal de depilación debajo del
agua fría de la llave durante 15 segundos (Fig.29).
6 Sacuda el exceso de agua y seque el cabezal y los accesorios de
depilación completamente con una toalla o paño suave o deje secar al aire
por completo.
7 Para colocar el cabezal depilador, presiónelo contra el mango ("clic")
(Fig.9).
Limpieza del cabezal de eliminación de callos
Para limpiar el cabezal y el disco de eliminación de callos (si se suministra):
limpie la parte exterior del cabezal y del disco con el cepillo de limpieza incluido
(Fig.30). Luego, retire el disco del cabezal y limpie el interior del cabezal con el
cepillo de limpieza suministrado (Fig.31).
Si lo preere, puede enjuagar el cabezal y el disco de eliminación de callos bajo el
grifo de agua corriente.
Deje que las piezas se sequen por completo.
Limpieza del cabezal de afeitado
- Nunca limpie, retire el cabezal de afeitado ni la unidad de corte cuando el
motor está encendido..
- No aplique presión al cabezal de afeitado. No toque la lámina con objetos
sólidos ya que esto podría abollar o dañar la lámina o los cortadores.
- No use el cabezal de afeitado si la lámina está dañada o rota, ya que podrían
producirse lesiones faciales.
1 Asegúrese de que el producto esté APAGADO.
2 Presione el botón de liberación y retire el cabezal de afeitado del mango.
3 Extraiga la unidad de corte del cabezal de afeitado (Fig.32).
4 Limpie la unidad de corte, la lámina, las cuchillas y el interior del
cabezal de afeitado con un cepillo de limpieza. Con un cepillo, retire cualquier
vello que haya quedado atrapado debajo de las cuchillas.
Para evitar daños, nunca use un cepillo para limpiar la lámina de afeitado.
5 También puede enjuagar la unidad de corte, el interior del cabezal de
afeitado y los accesorios debajo del agua tibia de la llave.
6 Deje que todas las piezas se sequen completamente al aire.
7 Coloque la unidad de corte nuevamente en el cabezal de afeitado
('clic').
Para lograr el afeitado óptimo, se sugiere aceitar levemente el cabezal de
afeitado cada seis semanas al distribuir una gota de aceite mineral sobre la
lámina y las cuchillas.
Reemplazo de la unidad de corte del cabezal de afeitado
Si la lámina o las cuchillas del cabezal de corte están desgastadas o dañadas,
no siga usando el cabezal de afeitado.
La unidad de corte gastada o dañada solo debe reemplazarse
con una unidad de corte Philips original que está disponible
en www.philips.com/parts-and-accessories. También puede llamar al
1-800-243-7884 (en EE. UU. solamente) o al 1-866-800-9311 (en Canadá
solamente) para obtener asistencia.
La unidad de corte es una pieza de precisión. Manipúlela con cuidado.
1 Siempre apague el producto y retire el cable de la toma de corriente eléctrica
y del producto antes de reemplazar la unidad de corte.
2 Presione el botón de liberación y retire el cabezal de afeitado del mango.
3 Extraiga la unidad de corte del cabezal de afeitado (Fig.32).
4 Coloque una nueva unidad de corte en el cabezal de afeitado ('clic').
5 Vuelva a colocar el cabezal de afeitado en el mango.
6 Después de reemplazar la unidad de corte, revise para asegurarse que
la unidad de corte y el cabezal de afeitado estén bien conectados antes de
usar la depiladora.
Almacenamiento
- Asegúrese de que la depiladora esté APAGADA. Retire el cable de la toma de
corriente eléctrica y del mango antes de guardarlo en un lugar seguro y seco
donde no pueda aplastarse, golpearse ni dañarse.
- No enrolle el cable alrededor de la depiladora para guardarlo.
- Guarde el cable en un lugar seguro donde no sufra cortes ni daños.
- No coloque ni guarde la depiladora en un lugar desde donde pueda, de algún
modo, caer en una tina o lavabo u otro líquido mientras esté conectada.
- Coloque la tapa protectora del cepillo de exfoliación después de utilizarlo.
- Guarde la depiladora y los accesorios en la funda provista.
Accesorios
Para un rendimiento de afeitado óptimo, le aconsejamos que reemplace la
unidad del cabezal de corte una vez al año. Puede adquirir esta pieza de repuesto
en www.philips.com/parts-and-accessories.
Si usa el cepillo de exfoliación corporal entre 2 y 3 veces por semana, debe
reemplazarlo cada 3 meses. Estas piezas de repuesto se pueden adquirir en
www.philips.com/store.
Cabezal de eliminación de callos (si se suministra): Reemplace el disco de
eliminación de callos por otra pieza original cuando disminuya su efectividad.
Asistencia
Para asistencia, visite nuestro sitio web: www.philips.com/support o llame gratis
al 1-800-243-7884 (en EE. UU. solamente) o al 1-866-800-9311 (en Canadá
solamente).
Desecho
- Este producto posee una batería recargable de litio-ión que debe desecharse
apropiadamente.
- Contacte a sus funcionarios locales o de la ciudad para mayor información
acerca del manejo nal de la batería. En los Estados Unidos también puede
llamar al 1-800-822-8837 o visitar www.call2recycle.org para las ubicaciones
(Fig.33) donde se pueden desechar las baterías. En Canadá, también puede
llamar al 1-888-224-9764 o visite www.call2recycle.ca para las ubicaciones
donde se pueden desechar las baterías.
- Para recibir asistencia, visite nuestro sitio web www.philips.com/support o
comuníquese de manera gratuita al 1-800-243-7884 (únicamente en EE.UU.)
o al 1-866-800-9311 (únicamente en Canadá).
- Su producto está diseñado y fabricado con materiales y componentes de
alta calidad, que pueden ser reciclados y reusados. Para obtener información
sobre reciclado, comuníquese con las ocinas locales de manejo de desechos
o visite www.recycle.philips.com.
Garantía Total de Dos Años
Philips North America LLC (EE. UU.) y Philips Electronics Ltd (Canadá) garantizan
este nuevo producto contra defectos en los materiales o en la mano de obra por
un período de dos años desde la fecha de compra y acepta reparar o remplazar
cualquier producto defectuoso sin cargo.
Las unidades de corte, los peines, el cepillo de exfoliación corporal y los discos de
eliminación de callos no están cubiertos por los términos de esta garantía porque
están sujetos a desgaste y rotura.
¡IMPORTANTE!: Esta garantía no cubre ningún daño que surja como resultado
de un accidente, del uso indebido o abuso, de la falta de cuidado razonable, del
uso de cualquier accesorio no provisto con el producto, de la pérdida de piezas o
del uso del producto bajo un voltaje no especicado.*
NINGUNA RESPONSABILIDAD ES ASUMIDA POR CUALQUIER DAÑO,
INCIDENTAL O RESULTANTE.
Para obtener el servicio de garantía, simplemente vaya a
www.philips.com/support para asistencia. Para su protección, se sugiere que
el envío de las devoluciones del producto se realice por correo certicado con
seguro pagado. Cualquier daño que ocurra durante el envío no será cubierto
por esta garantía. NOTA: Philips North America LLC y Philips Electronics Ltd
(Canadá) no extienden ninguna otra garantía, escrita ni oral. Esta garantía le
brinda derechos legales especícos y usted también puede tener otros derechos
los cuales varían de estado a estado, de región en región o de país en país. En
algunos estados no se permite la exclusión o la limitación de los daños fortuitos
o resultantes, de modo que es posible que las limitaciones o exclusiones arriba
mencionadas no apliquen a su caso.
*Lea las instrucciones adjuntas atentamente.
Garantía de devolución del importe de 45 días
Si no está completamente satisfecho con su producto, envíelo de regreso y le
reembolsaremos el total de la compra.
El producto debe enviarse por correo certicado pago, con seguro prepago,
junto con el recibo original de compra, donde se indique el precio y la fecha
de compra.
No asumimos ninguna responsabilidad por los paquetes perdidos.
El paquete del producto debe contar con matasellos que no supere los
45días a partir de la fecha de compra. Philips se reserva el derecho a
vericar el precio de compra del producto y limita los reembolsos al precio
de venta minorista sugerido.
Para obtener el servicio de la garantía de devolución del dinero, diríjase a
www.PhilipsMoneyBack.com y siga el proceso sencillo de 3 pasos.
La entrega del cheque de reembolso ocurrirá de 6 a8 semanas después de la
recepción del producto devuelto.
Français (Canada)
IMPORTANTES CONSIGNES DE SÉCURITÉ
Lorsque vous utilisez un appareil électrique, suivez toujours les mesures de
sécurité élémentaires, notamment ce qui suit:
Lisez toutes les instructions avant d’utiliser cet appareil.
DANGER
An de réduire le risque d’électrocution:
- Ne touchez pas l’appareil branché s’il est tombé dans l’eau. Débranchez
immédiatement de la prise de courant.
- Gardez le cordon d’alimentation sec (Fig.2).
- Ne placez pas et ne rangez pas l’appareil à un endroit où il peut tomber dans
une baignoire ou un évier. N’immergez pas et ne laissez pas tomber l’appareil
dans l’eau ni dans aucun autre liquide.
- Le produit ne fonctionne pas lorsqu’il est branché sur la prise de courant. Sauf
lors de la recharge, gardez votre produit toujours débranché de la prise de
courant.
- Avant de procéder au nettoyage de l’appareil, retirez le cordon d’alimentation
de la prise de courant et de l’appareil.
AVERTISSEMENT
Pour réduire tout risque de brûlure, d’électrocution, d’incendie ou de
blessure:
- Cet appareil ne doit pas être utilisé par des personnes (incluant des enfants)
ayant des capacités physiques, sensorielles ou mentales réduites ou n’ayant
pas l’expérience et les connaissances nécessaires, à moins qu’elles ne soient
sous la surveillance d’une personne responsable de leur sécurité ou qu’elles
aient reçu de cette personne des directives concernant l’utilisation de
l’appareil. Les enfants doivent être surveillés pour s'assurer qu'ils ne s'amusent
pas avec le produit.
- L’appareil ne doit être utilisé qu’aux ns domestiques décrites dans ce mode
d’emploi. Une mauvaise utilisation peut entraîner des risques ou causer des
blessures graves. N’utilisez pas d’accessoires non recommandés par Philips
North America LLC. Les accessoires fournis peuvent varier selon les diérents
produits.
- N’utilisez jamais cet appareil si le cordon d’alimentation est endommagé,
si l’appareil ne fonctionne pas correctement, s’il est tombé par terre, s’il est
endommagé, ou si l’appareil ou le cordon d’alimentation sont tombés dans
l’eau. Pour obtenir de l'aide, appelez 1-800-243-7884 (US) ou 1-866-800-9311
(Canada).
- Tenez le cordon d’alimentation à l’écart des surfaces chauantes.
- Ne laissez jamais tomber d’objets et n’insérez pas d’objet dans une de ses
ouvertures.
- N’utilisez pas le cordon d’alimentation dans une prise de courant ou près
d’une prise de courant qui contient un désodorisant électrique an d’éviter
d’endommager le cordon d’alimentation.
- N’utilisez pas l’appareil à l’extérieur et ne le faites jamais fonctionner près de
produits en aérosol (vaporisateurs) ou dans un endroit où l’on administre de
l’oxygène.
- Vériez toujours les disques rotatifs, la grille et les accessoires avant d’utiliser
l’appareil. An d’éviter tout risque de blessure, n’utilisez pas l’appareil si les
disques rotatifs, la grille ou les accessoires sont endommagés.
- Commencez toujours par brancher le cordon d’alimentation à l’appareil puis
à la prise de courant. Pour débrancher l’appareil, réglez toutes les commandes
sur la position «arrêt». Ensuite, retirez le cordon d’alimentation de la prise de
courant.
- Branchez le cordon d’alimentation directement sur la prise de courant.
N’utilisez pas de rallonge avec cet appareil.
- Débranchez le cordon d’alimentation avant de brancher ou de débrancher
l’appareil.
- La batterie de cet appareil peut présenter un risque d’incendie ou de brûlure
chimique en cas de manipulation inappropriée. Ne la démontez pas, ne
l’exposez pas à une température supérieure à 100°C (212°F) et ne l’incinérez
pas.
IMPORTANT: La che d’alimentation contient un transformateur. Pour éviter
tout risque d’accident, ne coupez pas la che d’alimentation pour la remplacer
par une autre.
- N'utilisez que des accessoires ou des consommables Philipsoriginaux. Utilisez
uniquement le cordon d’alimentation détachable HQ8505.
- Chargez, utilisez et entreprosez le produit à une température comprise entre
10°C et 35°C.
- Gardez le produit et les piles éloignés du feu et ne les exposez pas aux rayons
directs du soleil ou à des températures élevées.
- Si le produit devient anormalement chaud, dégage une odeur, change de
couleur ou si la recharge prend beaucoup plus de temps que d’habitude,
communiquez avec Philips.
- Ne placez pas les appareils et leurs piles dans des fours à micro-ondes ou sur
des cuisinières à induction.
- An d’éviter la surchaue des piles ou la libération de substances toxiques
ou dangereuses, veillez à ne pas ouvrir, modier, percer, endommager ou
démonter le produit ou les piles. Évitez de court-circuiter, de surcharger ou de
recharger les piles en polarité inversée.
- Si les piles sont endommagées ou qu’elles fuient, évitez tout contact avec la
peau ou les yeux. Si cette situation se produit, rincez immédiatement à l’eau
et consultez un médecin.
- Lorsque vous manipulez des piles, assurez-vous que vos mains, l’appareil et les
piles sont secs.
- Pour éviter tout court-circuit accidentel des piles après leur retrait, ne laissez
pas les bornes des piles entrer en contact avec des objets métalliques (pièces
de monnaie, épingles à cheveux, bagues, etc.). Ne les enroulez pas dans
une feuille d’aluminium. Collez du ruban adhésif sur les bornes des piles ou
mettez-les dans un sac en plastique avant de les jeter.
CONSERVEZ CES INSTRUCTIONS
RENSEIGNEMENTS IMPORTANTS
ATTENTION
- Pour des raisons d’hygiène, il est recommandé que l’appareil ne soit utilisé
que par une seule et même personne.
- N’utilisez jamais d’air comprimé, de tampons à récurer, de produits abrasifs
ou puissants tels que de l’essence ou de l’acétone pour nettoyer l’appareil.
- Éteignez l’appareil avant de xer ou de retirer les accessoires et avant de le
nettoyer.
- Lorsque vous rincez l’appareil ou les accessoires, vériez toujours que l’eau
n’est pas trop chaude (38°C maximum) pour ne pas vous brûler les mains.
- Les méthodes de retrait des poils à la racine peuvent entraîner l’apparition de
poils incarnés et de lésions cutanées mineures. Si vous avez des questions sur
l’utilisation d’un épilateur, veuillez consulter votre médecin.
- N’utilisez pas l’épilateur si votre peau présente des varices, des éruptions
cutanées, des taches, des irritations, des poils incarnés ou une tendance à
produire des poils incarnés. Consultez d’abord votre médecin.
- En cas de lésion due à l’épilation, même mineure, des bactéries peuvent
pénétrer dans la plaie, ce qui peut causer de petites cicatrices ou un
changement de pigmentation de la peau. Pour limiter le plus possible le
risque d’infection, nettoyez soigneusement les disques rotatifs avant et/ou
après chaque utilisation (voir «Nettoyage»).
- L’épilateur ne doit être utilisé qu’après consultation préalable de votre
médecin en cas de:
- Plaie ouverte
- Eczéma, psoriasis, réactions cutanées inammatoires telles que folliculite,
éruptions cutanées ou tendance à l’allergie ou aux réactions cutanées
allergiques
- Décience ou troubles immunitaires
- Couperose, rosacée ou varices
- Grossesse
- Altération de l’immunité cutanée due au diabète, à la grossesse, à la
maladie de Raynaud, etc.
- Hémophilie
- Grains de beauté, peau bosselée, etc.
- Si vous avez déjà pris ou commencez à prendre des médicaments hormonaux,
ou si vous avez été enceinte récemment, une modication de vos taux
d’hormones peut inuer sur l’épaisseur, la couleur ou la densité de votre
pilosité. Ce phénomène s’explique par des changements hormonaux que
vous subissez, et non par cette méthode d’épilation.
- N’utilisez pas d’huiles de bain ou de douche lorsque vous vous épilez sur peau
humide an d’éviter toute irritation cutanée grave.
- Nettoyez la tête d’épilation après chaque utilisation (voir «Nettoyage»).
GÉNÉRALITÉS
- Cet appareil est étanche (Fig.3). Il peut être utilisé dans la baignoire ou sous la
douche, et peut être nettoyé sous l’eau du robinet.
- Nettoyez l’appareil après chaque utilisation (voir «Nettoyage»).
- Cet appareil ne contient aucune pièce réparable par l’utilisateur. Appelez
le 1-800-243-7884 (pour les États-Unis uniquement) ou le 1-866-800-9311
(pour le Canada uniquement) an d’obtenir de l’aide.
Introduction
Félicitations pour votre achat et bienvenue dans l’univers Philips! Pour proter
pleinement des avantages de l'assistance Philips, enregistrez votre produit à
l'adresse www.philips.com/welcome.
Caractéristiques (gure1)
1 Manche
2 Témoins de vitesse (I et II)
3 Bouton marche/arrêt
4 Témoin de charge
5 Prise pour miniche d’adaptateur
6 Bouton de déverrouillage
7 Tête d’épilation
8 Lumière intégrée
9 Disques rotatifs
10 Tête d'ecacité
11 Tête pour zones sensibles
12 Tête de tonte
13 Sabot de tonte
14 Tête de rasoir
15 Sabot pour tête de rasage
16 Unité d’assemblage
17 Brosse exfoliante pour le corps
18 Capuchon de protection pour la brosse exfoliante pour le corps
19 Tête d’aplanissement des callosités
20 Disque aplanisseur de callosités
21 Capuchon de protection de la tête d’aplanissement des callosités
22 Gant exfoliant
23 Prise d’alimentation
24 Petite che
Non illustré: Brosse de nettoyage, Étui
Remarque:Les têtes et les accessoires oerts varient selon les diérents numéros
de modèle. Consultez l’illustration de présentation pour connaître les têtes et les
accessoires qui sont oerts avec votre modèle.
Charge
- Chargez l’appareil complètement avant la première utilisation ou s’il n’a pas
été utilisé pendant une longue période.
- La charge ou l’utilisation de l’appareil à des températures inférieures à 10°C
ou supérieures à 35°C réduit la durée de vie de la batterie.
Remarque: Cet appareil est uniquement conçu pour une utilisation sans l
(Fig.4).
1 Assurez-vous que l’appareil est éteint.
2 Insérez la petite che dans l’appareil et branchez le cordon d’alimentation sur
une prise de courant de 120V c.a. Utilisez uniquement le cordon fourni.
- Lorsque le témoin de la pile clignote en blanc (Fig.5), l’appareil est en
cours de charge.
- Après 1,5heure de charge, l’appareil dispose d’une autonomie sans l
maximale de 40minutes.
- Lorsque le témoin de la pile s’allume en blanc de manière continue (Fig.6),
l’appareil est complètement chargé.
- Le témoin de la pile ne s’allume pas lorsque l’appareil est allumé:
l’appareil contient susamment d’énergie pour être utilisé.
- Lorsque le témoin de la pile clignote en orange (Fig.5), la batterie est
presque déchargée et a besoin d’être chargée. Chargez l’appareil lorsque
vous avez ni de l’utiliser.
REMARQUE: Si l’appareil est complètement chargé, mais reste branché sur
la prise de courant, le témoin de charge clignote plusieurs fois lorsque vous
appuyez sur le bouton marche/arrêt. pour vous rappeler de débrancher l’appareil
avant de l’utiliser.
Charge rapide
- Lorsque la batterie est complètement déchargée et que vous commencez la
charge, le témoin de la batterie clignote en blanc rapidement.
- Le témoin de la batterie se met à clignoter lentement en blanc après environ
15minutes. À ce stade, la batterie contient assez d’énergie pour un temps
d’utilisation de 10minutes maximum.
Utilisation de l’appareil
Mise en marche et arrêt de l’appareil
1 Pour allumer l’appareil, appuyez une fois (Fig.7) sur le bouton marche/arrêt.
2 Si vous souhaitez sélectionner la vitesse lente, appuyez sur le bouton marche/
arrêt de nouveau (Fig.8).
3 Pour éteindre l’appareil, appuyez une autre fois sur le bouton marche/
arrêt.
Fixation et retrait de la tête d’épilation
1 Pour xer la tête d’épilation, enfoncez-la sur la poignée (vous devez entendre
un clic). (Fig.9)
2 Pour retirer la tête d’épilation, appuyez sur le bouton de déverrouillage situé
à l’arrière de l’appareil (Fig.10).
Remarque:Vous pouvez xer et détacher la tête d’aplanissement des callosités, la
tête de tonte, la tête de rasage et la brosse exfoliante de la même manière.
Fixation et retrait du disque aplanisseur de callosités
1 Pour xer le disque, enfoncez-le sur le raccord de la tête (Fig.11).
Observez le côté de l’appareil pour vérier que le disque est bien aligné avec
la bague externe de la tête.
Si le disque vacille quand vous mettez l’appareil en marche, le disque est mal
placé. Retirez le disque et xez-le correctement.
2 Pour détacher le disque, placez le pouce dans le renfoncement situé derrière
le disque et appuyez jusqu’à ce que le disque se sépare de la tête (Fig.12).
Fixation et retrait du sabot de coupe
Pour xer le sabot de coupe à la tête d’épilation:
1 Insérez l’encoche située sur un des côtés du sabot dans la découpe de la tête
d’épilation.
2 Poussez le sabot sur la tête d’épilation jusqu’à ce que l’encoche située de
l’autre côté du sabot se clipse dans la découpe située de l’autre côté de la tête
d’épilation (Fig.13).
Pour retirer le sabot de la tête d’épilation:
3 Sur un des côtés du sabot, glissez votre ongle entre le sabot et la tête
d’épilation.
4 Tirez avec votre ongle jusqu’à ce que le sabot se détache de la tête de
d’épilation (Fig.14).
Ne tirez pas sur l’arrière ou les dents du sabot pour le retirer.
Comment utiliser votre épilateur
- Utilisez cet épilateur uniquement pour l’usage domestique auquel il est
destiné, tel que décrit dans le présent mode d’emploi.
- Pour des raisons d’hygiène, l’épilateur et ses accessoires doivent être utilisés
par une seule personne.
- L’épilation est plus facile et plus confortable lorsque les poils ont la longueur
optimale de 3 à 4mm (1/8 à 5/32po). Si les poils sont plus longs, prétraitez-
les d’abord ou rasez-les, puis épilez-vous après 1 à 2 semaines.
- Veillez à tenir le manche de l’épilateur avec un angle de 75degrés par rapport
à la peau et à le déplacer lentement dans le sens inverse de la pousse (Fig.15)
des poils.
- L’épilation provoque une légère irritation de la peau (rougeurs ou points
rouges). Il s’agit d’une réaction normale. Le cas échéant, il est préférable de
vous épiler le soir an que les irritations cutanées disparaissent en grande
partie durant la nuit. Ce phénomène diminue progressivement au l des
utilisations.
- Après chaque utilisation, vous pouvez appliquer une crème douce sans alcool
ou un lait corporel, ce qui aidera à limiter les risques d’irritation cutanée.
Prenez soin d’éviter les produits contenant de l’alcool, car ils peuvent
provoquer une sensation désagréable.
- Assurez-vous que l’épilateur est complètement chargé avant de l’utiliser.
L’épilateur ne fonctionne pas si le cordon reste branché sur une prise de
courant.
Épilation
- Utilisez la tête d’épilation uniquement pour épiler les zones situées en
dessous des épaules, comme les jambes, les aisselles et la ligne du maillot.
- Si vous souhaitez épiler les poils du visage, utilisez la tête pour zones sensibles.
- Pour une épilation moins douloureuse et en douceur, utilisez l’appareil sous la
douche ou dans le bain sur peau humide, avec ou sans savon ou gel douche.
- Pour l’épilation à sec, assurez-vous que votre peau est propre, sans corps gras
ni crème. N’appliquez aucune crème avant l’épilation. L’épilation est plus
facile après un bain ou une douche. Cependant, veillez à ce que votre peau
soit complètement sèche avant d’utiliser l’appareil.
1 Avant la première utilisation, nettoyez la tête (voir «Nettoyage») d’épilation.
2 Insérez la tête d’épilation sur le manche (Fig.9).
3 Si vous le souhaitez, placez un accessoire sur la tête (Fig.16)
d’épilation.
REMARQUE: Les accessoires ne peuvent se monter sur l’appareil que dans un
sens.
4 Mettez l’épilateur en marche en appuyant une fois sur le bouton marche/
arrêt (Fig.7).
- L’appareil démarre à la vitesseII, qui est la vitesse la plus ecace pour
l’épilation. Le témoin correspondant à la vitesseII s’allume.
- Si vous souhaitez utiliser la vitesseI, appuyez à nouveau sur le bouton
marche/arrêt. Le témoin correspondant à la vitesseI s’allume (Fig.8).
- Sélectionnez la vitesseI pour les zones où les poils sont épars, les zones
diciles à atteindre et les zones osseuses, comme les genoux et les chevilles.
- Si vous appuyez une troisième fois sur le bouton marche/arrêt, l’épilateur
s’éteint.
Suggestion: Pour vous aider à mieux voir les poils ns, la lumière intégrée
s’allume automatiquement lors de l’épilation (Fig.17). Pour éteindre
la lumière, appuyez sur le bouton marche/arrêt de l’appareil pendant
3secondes après avoir allumé l’appareil.
5 Placez l’épilateur perpendiculairement à la jambe, avec un angle de
75degrés, le bouton marche/arrêt étant orienté dans le sens de déplacement
de l’appareil (Fig.15).
6 Appuyez légèrement l’épilateur sur la peau et déplacez-le lentement
dans le sens inverse de la pousse des poils. Si vous appuyez trop légèrement
ou trop fort, l’épilateur ne parvient pas à saisir et retirer les poils. Faites des
essais pour trouver les bons réglages et la pression à exercer en fonction de
votre type de peau et de poils.
Suggestion: Pour épiler les zones sensibles, tendez la peau avec votre main
libre. Pour épiler l’aisselle, levez le bras et placez votre main à l’arrière de votre
tête pour étirer la peau (Fig.18).
7 Appuyez sur le bouton marche/arrêt pour éteindre l’épilateur.
8 Retirez l’accessoire de la tête d’épilation, puis nettoyez l’épilateur et
l’accessoire (voir «Nettoyage»).
IMPORTANT:
- L’utilisation de l’épilateur peut provoquer des rougeurs ou des irritations.
Cette réaction est normale et doit disparaître rapidement.
- Nettoyez l’appareil et les accessoires après chaque utilisation (voir
«Nettoyage»).
Utilisation des accessoires d’épilation
- Lorsque vous utilisez un accessoire de l’épilateur, assurez-vous toujours de
bien placer la tête à plat contre la peau avec un angle de 75degrés (Fig.15).
- Il sut d’enclencher l’accessoire sur la tête d’épilation (vous devez entendre
un clic) (Fig.16).
- Pour retirer un accessoire, saisissez-le par l’avant et l’arrière, puis retirez-le de
la tête (Fig.19) d’épilation.
Tête pour zones sensibles
- Fixez la tête pour zones sensibles sur la tête d’épilation an d’épiler plus
confortablement les zones sensibles telles que les aisselles et la ligne du
maillot.
- Vous pouvez aussi utiliser la tête pour zones sensibles pour une épilation
précise des poils du visage, par exemple, au-dessus de la lèvre supérieure.
Cet appareil ne convient ni à l’épilation des cils et des sourcils, ni à la
coupe des cheveux.
Tête d’ecacité
- Fixez la tête d’ecacité sur la tête d’épilation pour maintenir la peau tendue
et atténuer la douleur due à l’action de l’appareil.
Brosse exfoliante pour le corps
- Retirez la tête d’épilation en appuyant sur le bouton de déverrouillage à
l’arrière de l’appareil (Fig.10).
- Fixez la brosse exfoliante pour le corps sur l’unité d’assemblage, puis montez
l’ensemble sur le manche (Fig.20) de l’appareil. La brosse exfoliante pour le
corps facilite l’élimination de toutes les peaux mortes.
N’utilisez pas la brosse exfoliante sur le visage.
Aplanissement des callosités
Remarque: La tête d’aplanissement des callosités doit être utilisée sur les pieds
seulement.
Vous pouvez utiliser le disque aplanisseur de callosités de trois manières
diérentes, selon la zone ou la callosité que vous traitez.
1 Pour traiter une grande zone plate, utilisez le disque entier (Fig.21). Placez
l’appareil à plat sur la peau, an de conserver le contrôle pendant l’utilisation.
2 Pour traiter des zones restreintes avec précision et pour bien voir la zone
traitée (Fig.22), utilisez la partie supérieure du disque qui dépasse du dessus
de la tête (Fig.23).
3 Pour traiter avec précision et aplanir très rapidement une peau dure,
utilisez le côté mince de la partie supérieure saillante du disque (Fig.24).
Déplacez doucement le disque d’avant en arrière sur la peau que vous souhaitez
traiter. N’appuyez pas trop fort. Si vous appuyez trop fort, le disque pourrait
s’arrêter de tourner.
Rasage
N’utilisez pas la tête de rasage si la grille est endommagée ou cassée, car cela
peut causer des blessures.
- Utilisez la tête de rasage pour épiler vos jambes, vos aisselles et la ligne du
maillot.
- Fixez le sabot adéquat sur la tête de rasage pour couper les cheveux jusqu’à
une longueur de 3mm (1/8po) (Fig.25). Lorsque vous retirez le sabot,
saisissez-le toujours par les côtés (Fig.26).
- Pour vous raser les jambes et la ligne du maillot, déplacez toujours l’appareil
délicatement sur la peau dans le sens inverse de la pousse des poils.
- Pour vous raser les aisselles, placez un bras derrière votre tête et déplacez
l’appareil de haut en bas, de bas en haut et de gauche à droite.
Tonte
- Utilisez la tête de tonte pour couper les poils des zones diciles d’accès au
niveau du maillot.
- Fixez le sabot adéquat sur la tête de tonte pour couper les poils dans la zone
du maillot jusqu’à une longueur de 3mm (1/8po) (Fig.27).
- Pour obtenir un tracé de coupe précis, placez la tête de tonte
perpendiculairement à la peau (Fig.28).
Attention: N’utilisez pas la tête de tonte sans sabot sur les zones intimes
autres que la ligne du maillot, car vous pourriez vous blesser.
Protection contre les surchaues
Remarque: Pour empêcher l’épilateur de surchauer, ne l’appuyez pas trop
fortement contre la peau. L’appareil fonctionne mieux lorsque vous le déplacez
sur la peau sans exercer de pression.
1 Si la protection contre les surchaues se déclenche, l’appareil s’éteint
automatiquement. Les témoins de vitesse commencent à clignoter.
2 Laissez refroidir l’appareil. Les témoins de vitesse cessent de clignoter après
4secondes.
3 Une fois que l’appareil a refroidi, vous pouvez le remettre en marche.
Si les témoins recommencent à clignoter, l’appareil n’a pas eu le temps de
refroidir complètement.
Nettoyage
IMPORTANT:
- Nettoyez toujours le manche, les têtes et les accessoires après chaque
utilisation.
- Avant de procéder au nettoyage, éteignez toujours l’appareil et retirez le
cordon d’alimentation de la prise électrique et de l’appareil.
- N’utilisez jamais d’air comprimé, de tampons à récurer, de produits abrasifs
ou puissants tels que de l’essence ou de l’acétone pour nettoyer l’appareil.
- Gardez le cordon d’alimentation sec (Fig.2).
Nettoyage de la tête et des accessoires d’épilation
- Pour des questions d’hygiène et de performances optimales, il est essentiel de
nettoyer la tête d’épilation, les accessoires et les disques rotatifs après chaque
utilisation.
- Il est fortement recommandé de toujours rincer la tête d’épilation à l’eau
froide pour éviter la prolifération des bactéries.
- Vous ne devez jamais nettoyer, retirer ou remplacer la tête d’épilation ou les
accessoires lorsque le moteur est en marche. Les disques rotatifs ne peuvent
pas être retirés de la tête d’épilation.
- Ne touchez pas les disques rotatifs avec un objet dur, y compris pour exercer
une pression sur les disques, car cela pourrait les endommager. En cas de
dommage, cessez immédiatement d’utiliser l’épilateur.
1 Assurez-vous que l’appareil est éteint.
2 Retirez tout accessoire présent sur la tête (Fig.19) d’épilation.
3 Enlevez les poils coincés dans les disques épilatoires et les accessoires à
l’aide de la brosse de nettoyage.
N’essayez jamais de retirer les disques épilatoires de l’appareil.
4 Rincez soigneusement les accessoires sous l’eau chaude du robinet en les
retournant de tous les côtés.
5 Mettez l’appareil en marche et rincez la tête d’épilation sous l’eau
froide du robinet pendant 15secondes (Fig.29).
6 Secouez légèrement l’appareil pour en chasser l’excès d’eau et séchez
complètement la tête d’épilation et les accessoires avec une serviette ou un
linge doux, ou laissez-les sécher à l’air.
7 Pour xer la tête d’épilation, enfoncez-la sur la poignée (vous devez
entendre un clic). (Fig.9)
Nettoyage de la tête d’aplanissement des callosités
Pour nettoyer la tête d’aplanissement des callosités et le disque aplanisseur de
callosités (s’ils sont fournis): nettoyez l’extérieur de la tête et du disque à l’aide
de la brosse de nettoyage fournie (Fig.30). Retirez ensuite le disque de la tête et
nettoyez l’intérieur de la tête à l’aide de la brosse de nettoyage fournie (Fig.31).
Si vous préférez, vous pouvez rincer la tête d’aplanissement des callosités et le
disque aplanisseur de callosités sous l’eau du robinet.
Laissez toutes les pièces sécher complètement.
Nettoyage de la tête de rasoir
- Ne nettoyez ou ne retirez jamais la tête de rasage ou l’élément de coupe
lorsque le moteur est allumé..
- N’exercez pas de pression sur la tête de rasage. Ne touchez pas la grille avec
un objet dur, car cela pourrait endommager la grille ou les lames.
- N’utilisez pas la tête de rasage si la grille est endommagée ou cassée, car cela
pourrait causer des blessures au visage.
1 Assurez-vous que l’appareil est éteint.
2 Appuyez sur le bouton de déverrouillage et retirez la tête de rasage du
manche.
3 Retirez l’élément de coupe de la tête (Fig.32) de rasage.
4 Nettoyez l’élément de coupe, la grille, les lames et l’intérieur de la tête
de rasage à l’aide de la brosse de nettoyage. Utilisez également la brosse pour
éliminer les poils restés emprisonnés sous les peignes-guides.
Pour éviter tout dommage, n’utilisez jamais de brosse pour nettoyer la
grille de rasage.
5 Vous pouvez également rincer l’élément de coupe, l’intérieur de la tête de
rasage et les accessoires sous l’eau chaude du robinet.
6 Laissez toutes les pièces sécher à l’air.
7 Replacez l’élément de coupe sur la tête de rasage (vous devez
entendre un clic).
Pour assurer un rasage optimal, il est conseillé de lubrier légèrement la tête de
rasage toutes les six semaines en appliquant une goutte d’huile minérale sur la
grille et les lames.
Remplacement de l’élément de coupe sur la tête de
rasage
Si la grille ou les peignes-guides de coupe sont usés ou endommagés, cessez
d’utiliser la tête de rasage.
Si l’élément de coupe est usé ou endommagé, il ne doit être remplacé
que par un élément de coupe Philips d’origine, que vous trouverez
à l’adresse www.philips.com/parts-and-accessories. Composez le
1-800-243-7884 (aux États-Unis uniquement) ou le 1-866-800-9311 (au Canada
uniquement) pour obtenir de l’aide.
L’élément de coupe est une pièce de précision. Manipulez-le avec précaution.
1 Avant de remplacer l’élément de coupe, éteignez toujours l’appareil et retirez
le cordon d’alimentation de la prise électrique et de l’appareil.
2 Appuyez sur le bouton de déverrouillage et retirez la tête de rasage du
manche.
3 Retirez l’élément de coupe de la tête (Fig.32) de rasage.
4 Placez un élément de coupe neuf sur la tête de rasage (vous devez
entendre un clic).
5 Remettez la tête de rasage en place sur le manche.
6 Après le remplacement de l’élément de coupe, vériez que celui-ci et
la tête de rasage sont bien xés avant d’utiliser l’épilateur.
Rangement
- Assurez-vous que l’épilateur est à l’arrêt. Retirez le cordon d’alimentation de
la prise électrique et le manche avant de ranger l’appareil dans un endroit sûr
et sec, où il ne sera ni écrasé, ni cogné, ni endommagé.
- N’enroulez pas le câble d’alimentation autour de l’épilateur lorsque vous le
rangez.
- Rangez-le dans un endroit sûr où il ne pourra pas être ni coupé, ni
endommagé.
- Ne placez pas et ne rangez pas l’épilateur dans un endroit où il pourrait
tomber dans une baignoire, dans un évier, dans l’eau ou dans tout autre
liquide pendant qu’il est branché.
- Après l’utilisation, recouvrez la brosse d’exfoliation du corps avec son
capuchon de protection.
- Rangez l’épilateur et tous les accessoires dans la pochette fournie.
Accessoires
Pour obtenir un rasage optimal, remplacez l’élément de coupe de la tête de
rasage une fois par an. Vous pouvez vous procurer cette pièce de rechange à
l’adresse www.philips.com/parts-and-accessories.
Si vous utilisez la brosse exfoliante pour le corps 2 à 3fois par semaine,
remplacez-la tous les 3mois. Vous pouvez vous procurer ces pièces de rechange
sur www.philips.com/store.
Tête d’aplanissement des callosités (si elle est fournie): Remplacez le disque
aplanisseur de callosités par une pièce du même type dès que son ecacité
diminue.
Assistance
Pour obtenir de l’aide, visitez notre site Web: www.philips.com/support ou
composez le numéro sans frais 1800243-7884 (aux États-Unis uniquement) ou le
1866800-9311 (au Canada uniquement).
Mise au rebut
- Cet appareil contient une pile rechargeable au lithium-ion qui doit être mise
au rebut de façon appropriée.
- Communiquez avec les responsables locaux de votre ville pour obtenir des
renseignements sur la mise au rebut des piles. Aux États-Unis, vous pouvez
également appeler au 1800822-8837 ou visiter le site www.call2recycle.org
pour connaître les emplacements (Fig.33) où vous pouvez mettre la pile au
rebut. Au Canada, vous pouvez également appeler au 1888224-9764 ou
visiter le site www.call2recycle.ca pour connaître les emplacements où vous
pouvez mettre la pile au rebut.
- Pour obtenir de l’aide, visitez notre site Web: www.philips.com/support ou
téléphonez-nous sans frais au 1-800-243-7884 (aux États-Unis uniquement)
ou au 1-866-800-9311 (au Canada seulement).
- Votre produit a été conçu et fabriqué avec des matériaux et composants
de grande qualité, qui peuvent être recyclés et réutilisés. Pour obtenir des
informations sur le recyclage, contactez vos installations locales de gestion
des déchets ou visitez le site www.recycle.philips.com.
Garantie complète de deux ans
Philips North America LLC (États-Unis) et Philips Electronics Ltd (Canada)
garantissent cet appareil neuf contre les défauts de matériaux ou de main-
d’œuvre pour une période de deux ans à partir de la date d’achat, et acceptent
de réparer ou de remplacer sans frais tout appareil défectueux.
Sujets à l’usure, les éléments de coupe, les sabots, l’embout d’exfoliation pour le
corps et le disque anti-callosités ne sont pas couverts par cette garantie.
IMPORTANT: Cette garantie ne couvre pas les dommages causés par un
accident, un usage abusif, un manque d’entretien, l’ajout d’accessoires non
fournis avec le produit, la perte de pièces ou l’alimentation de l’appareil à une
tension autre que celle spéciée.*
L’ENTREPRISE NE POURRA EN AUCUN CAS ÊTRE TENUE RESPONSABLE DE
DOMMAGES SPÉCIFIQUES, ACCESSOIRES OU INDIRECTS.
Pour obtenir un service d’entretien couvert par cette garantie, il sut de visiter le
site www.philips.com/support an d’obtenir de l’aide. Pour votre protection,
nous vous recommandons d’eectuer vos envois de retour par courrier avec
assurance prépayée. Tout dommage résultant de l’expédition n’est pas couvert
par cette garantie. REMARQUE: Aucune autre garantie, écrite ou orale, n’est
autorisée par Philips Electronics North America LLC et Philips Electronics Ltd
(Canada). Cette garantie vous confère des droits légaux précis; il est possible
que vous ayez d’autres droits pouvant varier d’un État à l’autre, d’une province
à l’autre ou d’un pays à l’autre. Certains États et certaines provinces n’autorisent
pas l’exclusion ou la limitation des dommages indirects ou consécutifs; par
conséquent, il est possible que certaines limitations ou exclusions présentées ci-
dessus ne s’appliquent pas à votre cas.
*Veuillez lire attentivement les instructions fournies.
Garantie de remboursement de 45jours
Si vous n’êtes pas entièrement satisfait de l’appareil, retournez-le et nous vous
rembourserons le prix d’achat complet.
Le produit doit être expédié port payé par poste assurée avec assurance
prépayée, et l’envoi doit comprendre le reçu original indiquant le prix et la
date de l’achat.
Nous n’assumons aucune responsabilité en cas de perte par la poste.
L’envoi de l’appareil doit être fait au plus tard 45jours suivant la date
d’achat, le cachet de la poste en faisant foi. Philips se réserve le droit
de vérier le prix d’achat de l’appareil et de limiter le montant du
remboursement au prix de détail suggéré.
Pour obtenir le service de garantie de remboursement, visitez le site
www.PhilipsMoneyBack.com et suivez le processus simple en trois étapes.
Le chèque de remboursement sera envoyé 6à 8semaines après réception du
produit retourné.