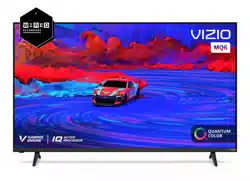
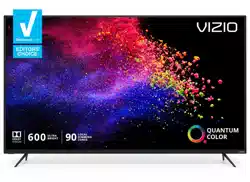
User manual Television
Getting to Know Your TV
FRONT PANEL
Remote Sensor and Power Indicator
When using the remote, aim it directly at this sensor.
The power indicator flashes on when the TV turns on, then goes out after several seconds. To keep the power indicator on, see Turning the Power Indicator On or Off on page .
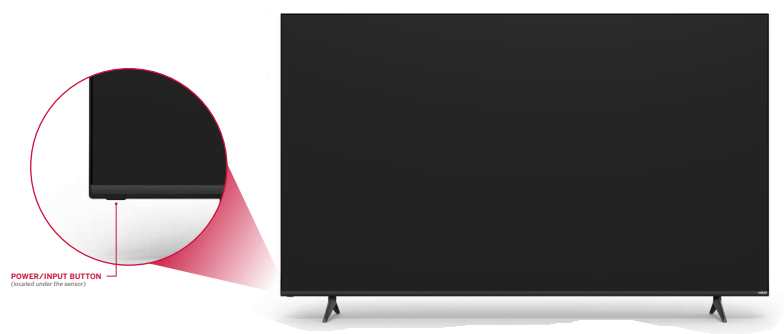
When TV is OFF:
Press to turn on the TV.
When TV is ON:
Press to change to the next input source.
Press, hold (3 seconds) and release to turn TV off.
Press and hold (12 seconds) to reset TV to default settings.
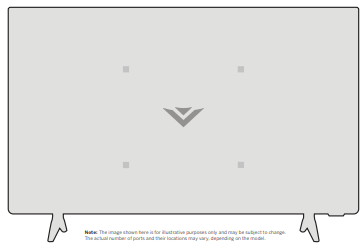
REAR PANEL


WALL-MOUNTING THE TV
First you will need a wall mount. Consult the provided table below to find the appropriate mount for your TV.
Be sure the mount you choose is capable of supporting the weight of the TV.
To install your TV on a wall:
- Disconnect any cables connected to your TV.
- Place the TV face-down on a clean, flat, stable surface. Be sure the surface is clear of debris that can scratch or damage the TV.
- If attached, remove the stands by loosening and removing the screws.
- Attach your TV and wall mount to the wall by carefully following the instructions that came with your mount. Use only with a UL-listed wall mount bracket rated for the weight/load of your TV.
 TIP: Installing a TV on a wall requires lifting. To prevent injury or damage to the TV, ask someone to help you.
 WARNING: Do not use the screws that are included inside the wall mount holes to mount TV.

Completing the First-Time Setup
Before you begin the first-time setup:
- Your TV should be installed and the power cord should be connected to an electrical outlet.
- If you have a wireless network, have the network password ready.
- If you are connecting to your network with an Ethernet cable, connect it to the Ethernet port on the TV.
The first time you turn on the TV, the on-screen instructions will guide you through each of the steps necessary to get your TV ready for use:
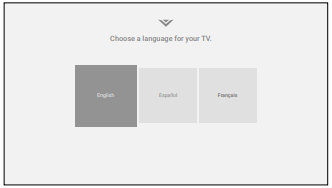
1. Choose your language.Pressing the CC button will enable TTS (text-to-speech) functionality.
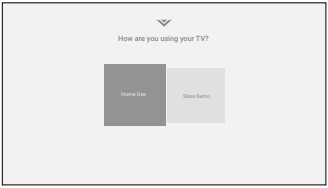
2. Choose home use.
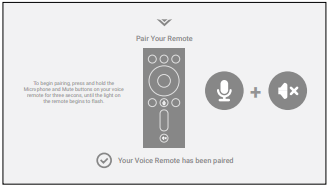
3. Pair your voice remote.
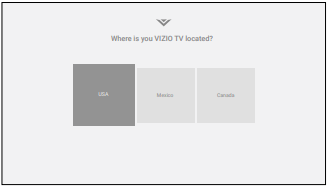
4. Choose your country.

5. Choose your Wi-Fi network and enter the password.

6. Name your TV.
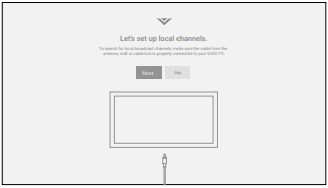
7. Scan for channels.

8. Accept the Terms & Conditions.
9. View and accept VIZIO Viewing Data Policy.
Your TV features an easy-to-use on-screen menu.
To open the on-screen menu, press the MENU button on the remote.
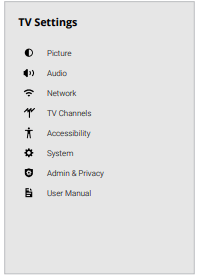
From this menu, you can:
- Adjust the picture settings
- Adjust the audio settings
- Adjust the network settings
- Adjust the TV channel settings
- Adjust accessibility settings
- Adjust TV system settings
- Access admin and privacy settings
- View the user manual
NAVIGATING THE ON-SCREEN MENU
To open the on-screen menu:
- Press the MENU button on the remote.
- Use the Navigation buttons to highlight a menu option, and press the OK button to select that option.
TIP: While navigating the on-screen menu, you can press the BACK button at any time to return to the previous menu screen.
CHANGING THE INPUT SOURCE
External devices, such as DVD players, Blu-ray players, and video game consoles, can be connected to your TV. To use one of these devices with your TV, you must first change the input source using the input menu.
To change the input sources:
- Press the INPUT button on the remote. The input menu is displayed.
- Use the Navigation buttons or the INPUT button on the remote to highlight the input you wish to view. The corresponding inputs are named on the back of your TV.
- Press OK or release the INPUT button. The selected input is displayed.
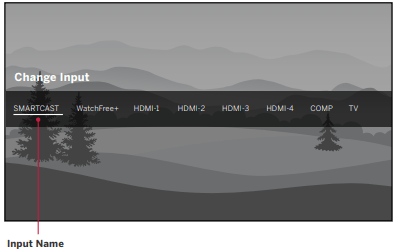
The underlined input on the left is the current input selected. Inputs may vary by TV.
TIP: You can change the input names that appear on the Input menu to make your devices easy to recognize. See Renaming Devices on the Input Menu on page 23.
ADJUSTING THE PICTURE SETTINGS
Your TV can be adjusted to suit your preferences and viewing conditions.
To adjust the picture mode settings:
Menu > Picture > Picture Mode
1. Use the Navigation buttons on the remote to highlight Picture Mode, then use the Left/Right Navigation buttons to change the picture mode:
- Vivid — Sets the picture settings to values that produce a brighter, more vivid picture.
- Bright — Great for viewing everyday TV, such as news and TV shows, that requires a brighter image with motion enhancements.
- Calibrated — Accurate colors intended for cinema content viewing in a bright room.
- Calibrated Dark — Accurate colors intended for cinema content viewing in a dark room or at nighttime.
- Game — Reduces throughput delays and optimizes the picture settings for displaying game console output. Also the preferred picture mode for computer mode.
- Sports — Sets the picture settings to values ideal for watching sport events with motion control setting.
2. To manually change each of the picture settings, use the Up/Down Navigation buttons on the remote to highlight that picture setting, then use the Left/Right Navigation buttons to adjust the setting:
- Ambient Light Sensor — Detects your room's light level and automatically adjusts the background. Select Low for the darkest picture or High for the brightest picture. Select Off for manual backlight control.
- Backlight (SDR content) or Tone Mapping (HDR content) — Adjusts the LED brightness to affect the overall brilliance of the picture.
- Brightness — Adjusts the black level of the picture. When this setting is too low, the picture may be too dark to distinguish details. When this setting is too high, the picture may appear faded or washed out.
- Contrast — Adjusts the white level of the picture. When this setting is too low, the picture may appear dark. When this setting is too high, the picture may appear faded or washed out. If the setting is too high or too low, detail may be difficult to distinguish in dark or bright areas of the picture.
- Color — Adjusts the intensity of the picture colors.
- Tint — Adjusts the hue of the picture. This setting is useful in adjusting the flesh tones in the picture. If flesh appears too orange, reduce the level of color before adjusting tint.
- Sharpness — Adjusts the edge sharpness of picture elements. It can be used to sharpen non-HD (high definition) content; however, it will not produce detail that does not otherwise exist.
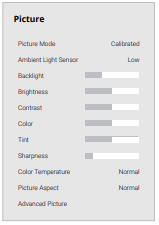
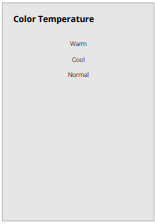
Adjusting the Color Temperature
Adjusting the color temperature changes the white balance of the picture.
To adjust the color temperature:
Menu > Picture > Color Temperature
Use the Navigation buttons on the remote to highlight a color temperature preset and then press OK.
- Warm — Produces an orange-hued picture.
- Cool — Produces a blue-hued picture.
- Normal — Optimized for television viewing.
Changing the Picture Aspect Ratio
To change the screen aspect ratio:
Use the Navigation buttons to highlight the aspect ratio you wish to view.
Your TV can display images in different modes:
- Normal (default) — No change to aspect ratio.
- Panoramic* — Stretches a 4:3 image to fill 16:9 screen with an algorithm so the center doesn’t look stretched.
- Wide — Stretches a 4:3 aspect ratio to fill 16:9 screen. If a 16:9 image, adds black bars to top and bottom.
- Zoom — Expands image both horizontally and vertically by 14%.
- Stretch* — When the 16:9 signal is a 4:3 image with black bars left and right, stretches to fill the screen.
Some programs have black bars on the top or sides of the screen so that the picture keeps its original shape. Examples include widescreen movies and older TV programs.
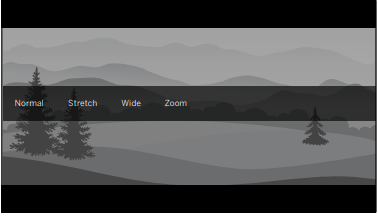
TIP: The aspect ratio cannot be changed for Ultra HD content or HDR content.
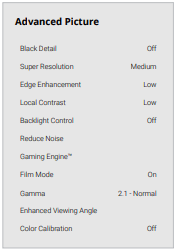
Adjusting Advanced Picture Settings
To adjust advanced picture settings:
Menu > Picture > Advanced Picture
Use the Navigation buttons to highlight the setting you wish to adjust, then press the Left/Right Navigation buttons to change the setting:
- Black Detail — Adjusts the average brightness of the picture to compensate for large areas of brightness.
- Super Resolution — Configures the resolution to enhance dim and blurred pictures resulting in a sharper image.
- Edge Enhancement — Increases the smoothness of edges.
- Local Contrast — Adjust the contrast of the picture locally.
- Backlight Control — Dynamically improves the constrast ratio of the picture by adjusting the backlight.
- Reduce Noise:
- Signal Noise: Reduces background picture noise when viewing analog sources. This function helps to correct "speckle" noise with a slight reduction in sharpness.
- Block Noise: Reduces the side effects of digital compression such as "blocking" and noise on sharp edges. The High setting will cause a slight reduction in sharpness.
- Contour Smoothing: Removes visible contour noise without loss of the complex detail.
- Gaming Engine™:
- Game Low Latency: Reduces video delay (lag) when gaming. When set to Auto and Automatic Low Latecy Mode (ALLM) is detected, ALLM will apply for the duration of the game.
- Game HDR: Optimizes picture quality for HDR game.
- Film Mode — Optimizes the picture for watching films. Select On or Off.
- Gamma — Set the shape of the Gamma curve. Use lower Gamma values for bright room conditions, and higher values when it’s dark.
- Color Calibration — Calibrate colors using HSB, gain, offset and 20 point white balance and test or reset colors to defaults.
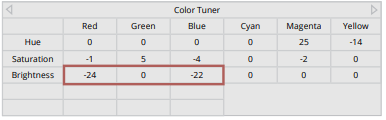
Adjusting the Color Tuner Settings
The Color Tuner settings allow you to adjust the color management system, 20 point white balance, turn color channels off for testing, and display SMPTE, flat, ramp, and uniformity analyzer test patterns.
To access the color tuner table:
Menu > Picture > Advanced Picture > Color Calibration > Color Tuner
To turn color channels off and on:
- Use the Navigation buttons on the remote to highlight Red, Green, or Blue.
- Press the OK button to turn the color channel off or on. An X appears over a color channel that has been turned off.
- Only two color channels can be turned off at the same time.
TIP: Any changes made affect the color temperature setting. Select the preferred color temperature setting first. See Adjusting the Color Temperature on page 9.
To adjust the color management system settings:
- Use the Navigation buttons on the remote to highlight the Hue, Saturation, Brightness, Offset, or Gain of the color you wish to adjust. Press the OK button.
- Use the Left/Right Navigation buttons to adjust the value. When you are finished press the OK button to save the setting.
To show or hide the SMPTE Test Pattern:
Menu > Picture > Advanced Picture > Color Calibration > Color Tuner > SMPTE Test Pattern
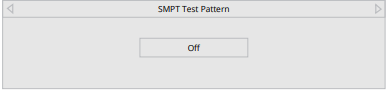
1. Use the Navigation buttons on the remote to highlight Off. Use the Left/Right Navigation buttons to select On to show the SMPTE Pattern.
—or—
2. To hide the SMPTE Test Pattern, use the Left/Right Navigation buttons to select Off.
Copy a Picture Mode
Custom picture mode settings can be copied to be applied to other inputs.
- Complete the desired changes for the selected picture mode. Select Save Picture Mode to save picture mode for all inputs.
- Select the input you want to copy your saved picture mode edits to.
- Change the picture mode to your custom saved mode: Menu > Picture > Picture Mode > select saved custom picture mode
- Copy your custom picture mode: Menu > Picture > Picture Mode Edit > Copy Picture Mode
- Select what picture mode you would like to copy over.
- A notification displays after the copy to your selected picture mode is completed. Now this picture mode will have your custom settings saved over it for the selected input.
- Repeat as needed to customize additional inputs.
Lock a Picture Mode
Custom picture modes can be locked/unlocked with a unique PIN to prevent accidental changes to their settings. If not previously set, you can set up your system PIN code here.
To lock all custom picture modes:
Menu > Picture > Picture Mode Edit > Lock Picture Mode > On > Enter Your PIN > Save
To unlock all custom picture modes:
Menu > Picture > Picture Mode Edit > Lock Picture Mode > Off > Enter Your PIN
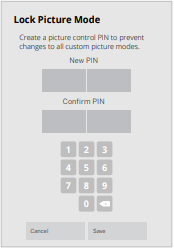
TIP: To set a custom PIN code, see Setting a System PIN Code on page 25.
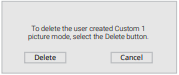
Deleting a Picture Mode
Custom picture modes that are no longer needed can be deleted.
TIP: Inputs assigned to deleted custom picture modes become assigned to the Calibration picture mode.
To delete a custom picture mode:
Menu > Picture > Picture Mode Edit > Delete Picture Mode > Delete
Resetting a Picture Mode
A preset picture mode that has been edited can be restored to the factory default settings.
To reset a customized preset picture mode:
Menu > Picture > Picture Mode Edit > Reset Picture Mode > Reset
ADJUSTING THE NETWORK SETTINGS
Your TV is Internet-ready, featuring both an Ethernet port and built-in high-speed wireless internet.
Connecting to a Wireless Network
Connecting to a Wireless Network
Menu > Network > Choose your network > Enter in the password > Connect
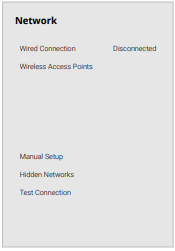
To forget a saved network:
Highlight a saved wireless access point > OK > Forget
If you do not see your wireless network displayed, click on:
More Access Points > Highlight your wireless network > Enter in the password > Connect
Changing the Manual Setup Settings
Advanced users can fine-tune the network settings using the Manual Setup feature. The security settings on your router may require you to enter the TV's MAC address.
To change advanced network settings:
Menu > Network > Manual Setup > DHCP > Of
1. Use the Navigation and OK buttons to adjust each setting:
- IP Address — The IP address assigned to the TV.
- Subnet Mask — The subnet Exit 2D.
- Default Gateway — Your network’s default gateway address.
- Pref. DNS Server — Your preferred domain name server address.
- Alt. DNS Server — Your alternate domain name server address.
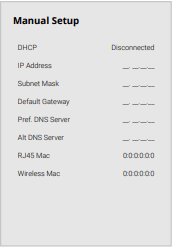
2. Use the Navigation buttons on the remote to highlight Save and press OK.
To find the TV’s MAC address:
Menu > Network > Manual Setup
You can find your TV's MAC address at the bottom of the list. The MAC addresses for the connections in use are displayed:
- RJ45 MAC — The Ethernet or RJ45 MAC address may be needed to set up your network when you have connected the TV to your network when you have connected the TV to your network with an Ethernet (Cat 5) cable.
- Wireless MAC — The Wireless (Wi-Fi) MAC address may be needed to connect your TV to your network with Wi-Fi.
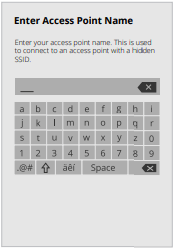
Connecting to a Hidden Network
To connect to a wireless network whose network name (SSID) is not being broadcast:
Menu > Network > Hidden Network > Enter the Access Point Name > Connect > Enter in the password
Testing Your Network Connection
To test your network connection:
Menu > Network > Test Connection
SETTING UP TV CHANNELS
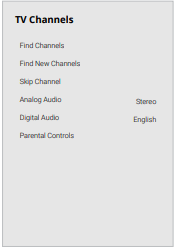
You can use the TV’s Channels menu to:
- Find channels
- Find new channels
- Select channels to skip
- Select analog audio mode
- Select the language for digital audio
- Set parental controls
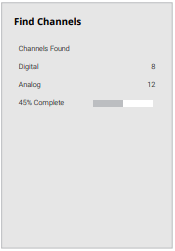
Scanning for TV Channels
The TV may need to scan for channels before it can display programs and their associated information. A channel scan is required for free over-the-air channels (using an antenna) and cable channels from an out-of-the-wall connection (without a cable box). Moving the TV to an area with different channels requires the TV to scan for channels again.
To perform an Auto Channel Scan:
Menu > TV Channels > Find Channels
Wait until the channel scan is 100% complete. Highlight Done and press OK.
- If the channel scan is canceled, the channels that were already discovered are retained.
To perform a New Channel Scan:
Menu > TV Channels > Find New Channels
A New Channel Scan saves the current channel map and scans for additional channels.
Using Parental Controls
The TV’s parental controls allow you to prevent the TV from displaying certain channels or programs unless a PIN is used.
Accessing the Parental Controls Menu
To access the Parental Controls menu you must first set up a system PIN:
Menu > TV Channels > Parental Controls > Enter in PIN
TIP: to set a custom PIN code, see Setting a System PIN Code on page 25.
The Parental Controls menu only appears when:
- You are using the tuner to receive your TV signals, such as when you are using an antenna for Over-the-Air signals or when connected to cable TV directly from the wall (no cable box).
- You have a device connected using a composite video cable or a coaxial cable, such as a VCR, satellite or cable box, or DVR.
Enabling or Disabling Program Ratings
To manage program content according to its rating, you must first enable the Program Rating feature.
To enable or disable the Program Rating feature:
Menu > TV Channels > Parental Controls > Locks > Off/On
Locking and Unlocking Channels
When a channel is locked, it cannot be accessed. Locking a channel is a good way to prevent children from viewing inappropriate material.
To lock or unlock a channel:
Menu > TV Channels > Parental Controls > Channel Locks
Highlight the channel you want to lock or unlock and press OK.
- When a channel is locked, the Lock icon appears
 locked. The channel is not accessible unless the system PIN is entered.
- When a channel is unlocked, the Lock icon appears
 unlocked.
Blocking and Unblocking Content by Rating
A channel may sometimes broadcast programs that are meant for a variety of audiences (some for children and some for adults). You might not want to block the channel completely using a channel lock, but you can block certain programs from being viewed.
You can use the TV’s Rating Block feature to block content based on its rating.
To block or unblock content by its rating:
1. From the Parental Controls menu, highlight the content type you want to adjust and press OK: USA TV — USA television program broadcasts.
- USA Movie — USA movie broadcasts.
- Canadian English — Canadian English television program broadcasts.
- Canadian French — Canadian French television program broadcasts.
TIP: For a list of content ratings and their definitions, please visit: www.tvguidelines.org.
2. For each rating type you want to block or unblock, use the Navigation buttons to highlight the rating type and press OK.
- When the rating type is blocked, the Lock icon appears locked. Content with this rating and all higher ratings cannot be viewed.
- When the rating type is unblocked, the Lock icon appears unlocked. Content with this rating and all lower ratings can be viewed.
- If you want to block all unrated content, highlight Block Unrated Shows and use the Navigation buttons on the remote to select On.
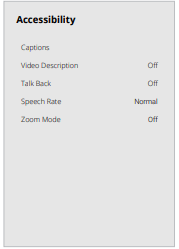
ACCESSIBILITY SETTINGS
VIZIO is committed to providing intuitive, user-friendly products. Your new VIZIO TV offers several accessibility features that can help you with easy navigation.
To access the Accessibility menu:
Menu > Accessibility
- Captions — Activate and customize analog and digital closed captions.
- Video Description — If included by the broadcaster, provides a narrated description of the action for the content.
- Talk Back* — Enables your TV to speak all settings changes and adjustments using the remote in English.
- Speech Rate — Adjusts the rate in which Text-to-Speech is spoken. Select Slow, Normal (default), or Fast.
- Zoom Mode — Enlarges a section of the screen by approximately 200%.
TIP: You can also enable/disable accessibility features using the included remote. See Using the Remote on page 5.
To access the Video Description menu:
Menu > Accessibility > Video Description > Off/On
Setting Up Closed Captioning
Your TV can display closed captions for programs that include them. Closed captions display a transcription of a program’s dialogue.
TIP: Closed Captioning is available for tuner, composite and streaming content (if supported by the app). Note that most apps will support their own CC from within the app.
To activate or deactivate Close Captions for current content:
Menu > Accessibility > Captions > Closed Captions > Off/On
Push the CC button  on the remote.
1. Use the Navigation buttons on the remote to highlight either Analog or Digital Closed Captions.
2. Use the Left/Right Navigation buttons on the remote to select the caption channel you wish to display

TIP: The Closed Captions menu does not appear when an HDMI input is selected. Close captions are available when using the tuner or a composite video cable.
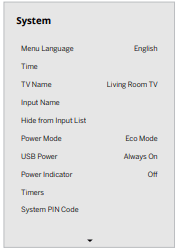
CHANGING THE SYSTEM SETTINGS
Using the System menu, you can:
- Change the on-screen menu language
- Set the time zone and local settings
- Name the TV
- Name an input
- Hide inputs not in use
- Adjust the power mode settings
- Set the USB power mode
- Turn the power indicator on or off
- Set up timers
- Set a system PIN code
- Adjust CEC settings
- Manage paired devices
- Manage a voice remote control
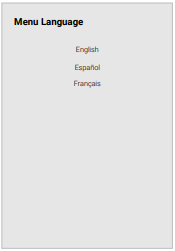
Changing the On-Screen Menu Language
Your TV can display the on-screen menu in different languages.
To change the on-screen menu language:
Menu > System > Menu Language
Highlight your preferred language (English, Español, or Français) and press OK.
Setting the Time
To ensure the correct time is displayed when you press the INFO button, set the TV’s time zone:
Menu > System > Time > Time Zone
To turn Daylight Saving Time on or off:
1. Highlight Daylight Saving Time and press OK. The Daylight Saving Time menu is displayed.
2. Choose On if it is currently Daylight Savings Time, Off if it is Standard Time, or Auto to have the system automatically detect Daylight Savings Settings.
To change Time Format:
1. Highlight Time Format and use the Left/Right Navigation buttons to change between a 12-hour format or 24-hour format.
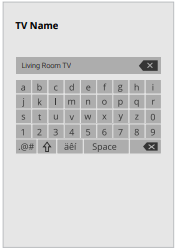
Changing the TV Name
Naming your TV helps differentiate it from other cast devices you may have in your home.
To edit your TV name:
Menu > System > TV Name > Enter a Name
Renaming Devices on the Input Menu
You can rename the inputs to make them easier to recognize on the Input menu. For example, if you have a DVD player connected to the HDMI-1 input, you can rename that input to display “DVD Player.”
See Changing the Input Source on page 8
To change the name of an input:
Menu > System > Input Name
To enter a custom name:
- Highlight the Name Input row and press OK.
- Enter your custom label using the on-screen keyboard and press OK.
TIP: The current input you are on will be the input name you are changing. You cannot change every input (i.e. WatchFree+ or SmartCast inputs).
To Hide an Input from the List:
Menu > System > Hide from Input List
- Highlight the input name you would like to hide. Hidden inputs will not be displayed in the input list.
- Use the Left/Right Navigation buttons to toggle from visible and hidden.
Adjusting the Power Mode
Your TV is set to Eco Mode by default. When the TV is powered off, the Eco Mode setting uses less than 0.5W of power. Quick Start Mode enables your display to power on faster and also to turn on when powered from another device (such as when you are casting onto the TV).
WARNING: Please note that by changing this setting the energy consumptions required to operate this device will change.
To switch between Eco Mode and Quick Start Mode:
Menu > System > Power Mode
Highlight either Eco Mode or Quick Start Mode and press OK.
TIP: If you want to use a voice assistant to turn your TV on, make sure Quick Start Mode is turned on.
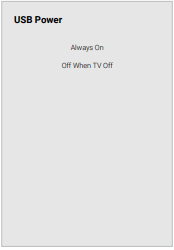
Using the USB Power Feature
The USB port can be used to charge devices.
The two options for this feature are:
- Always On — Power is always available.
- Off When TV Off — Power is only available with the TV is on.
Turning the Power Indicator On or Off
The power indicator on the front of your TV normally does not glow when the TV is on. You can change this setting if you prefer the light to be on.
To turn the Power Indicator Light On or Off:
Menu > System > Power Indicator > Off/On
Setting Timers
When activated, the TV’s timer will turn the TV off after a set period of time.
To setup a sleep timer:
Menu > System > Timers > Sleep Timer
Use the Left/Right Navigation buttons on the remote to highlight the period of time after which you want the TV to go to sleep: 30, 60, 90, 120, or 180 minutes. If you don’t want the sleep timer to activate, change the setting to Off.
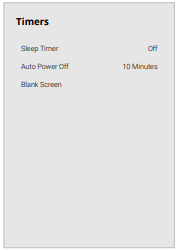
Setting the Auto Power Off Feature
To help save energy, your TV is set by default to turn off after 10 minutes without a video or audio signal. This feature can be deactivated.
To set the Auto Power Off feature:
Menu > System > Timers > Auto Power Off > Of
Using the Blank Screen Feature
To help save LED life, your TV screen can turn on or off while audio is streaming.
To use the Blank Screen feature:
Menu > System > Timers > Blank Screen
To exit Blank Screen, press any key (except the volume and mute keys).
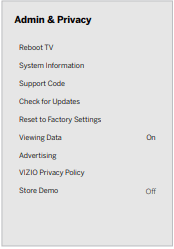
USING THE ADMIN & PRIVACY MENU
You can use the TV’s Admin & Privacy menu to restore the TV to its factory default settings as well as access other administrative settings.
Using the ADMIN & PRIVACY menu, you can:
- Force the system to power off and on
- View system information
- View a customer service support code
- Check for system updates
- Reset the TV to factory settings
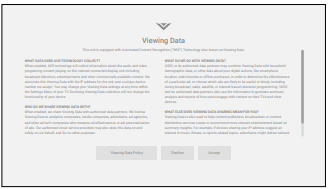
- Enable or disable viewing data
- Personalize advertising choices
- View the VIZIO Privacy Policy
- Start or stop the store demo mode
Performing a Reboot
A reboot forces the TV to turn off then on again.
To retrieve your reboot the TV:
Menu > Admin & Privacy > Reboot TV
Viewing System Information
To view technical data and status information about your TV and network connection:
Menu > Admin & Privacy > System Information
Accessing the Support Code
Retrieve a customer service support code/PIN or access basic TV information to assist in a customer service interaction.
To retrieve your support code:
Menu > Admin & Privacy > Support Code
Checking for System Updates
To check for a system update:
Menu > Admin & Privacy > Check for Updates
If an update is found, the TV will ask to confirm the update. If no update is found, the screen will note The TV is up-to-date.
Restoring the TV to Factory Default Settings
All of the on-screen menu settings can be reset to the factory defaults.
To restore the TV to its factory default settings:
Menu > Admin & Privacy > Reset to Factory Settings
- If you set a system PIN code, enter it now.
- The TV displays, “Select Reset to restore all TV settings to factory defaults."
- Highlight Reset and press OK.
- Wait for the TV to turn off. The TV will turn back on shortly afterward and the setup process will begin.
USING THE INFO WINDOW
Press the INFO button to display:
- TV name
- Current input or for tuner: current channel
- Picture resolution
- Picture aspect
- Audio type
- Network name
- Time
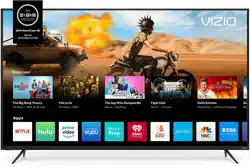
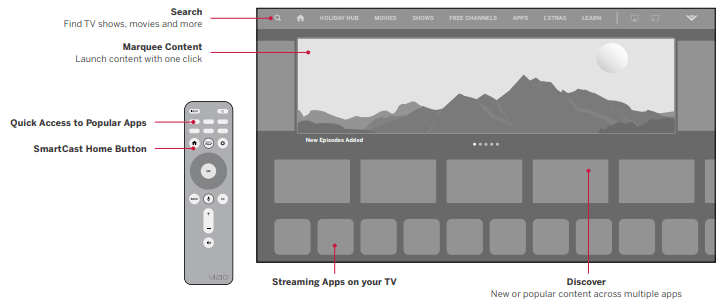
SmartCast Home™
What is SmartCast Home?
SmartCast Home lets you discover, stream, and control your content like never before! Access top apps, like Netflix, Disney+, and Hulu, by using the remote to easily browse and launch content directly from the home screen. SmartCast Home makes finding something to watch easy and fun.
How to Launch SmartCast Home
To begin streaming with SmartCast Home:
- Press the SmartCast Home button
 on your remote.
—or—
- Select SmartCast from the list of inputs.
What you can do with SmartCast Home
- Stream high quality entertainment.
- Launch top tier apps directly from the home screen.
- Access free channels to watch without a subscription through WatchFree+.
- Rearrange apps on your home screen just the way you like it.
- Mirror your laptop or mobile device onto your TV through Apple Airplay or Chromecast built-in™.

- Works with Google Assistant, Siri, and Alexa-enabled devices for hands-free voice control

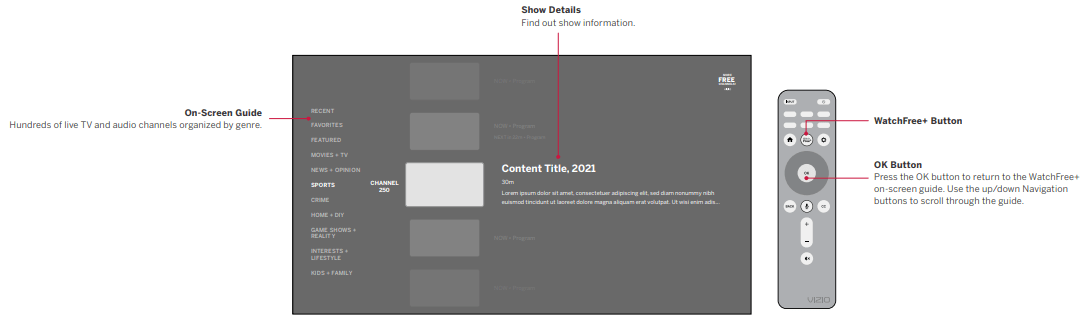
WatchFree+™
What is WatchFree+?
VIZIO WatchFree+ takes your cord-cutting entertainment experience one step further! With the simple press of a button, enjoy free streaming TV with hundres of live TV channels to choose from – news, movies, sports, comedy, music and more. A built-in on-screen guide makes finding something to watch easier than ever.
And it’s all FREE—no fees, no subscriptions, or logins.
What you can do with WatchFree+
- Stream hundreds of live TV channels absolutely free – news, movies, sports, comedy, music and more.
- Navigate through channels, organized by genre, with an intuitive on-screen guide.
- Watch the best of internet TV.
- No logins, subscriptions or transactions fees.
How to Launch WatchFree+
To launch and begin watching entertainment offered on WatchFree+:
- Press the WatchFree+
 button on your remote.
—or—
- Select WatchFree+ from the list of inputs or app row.
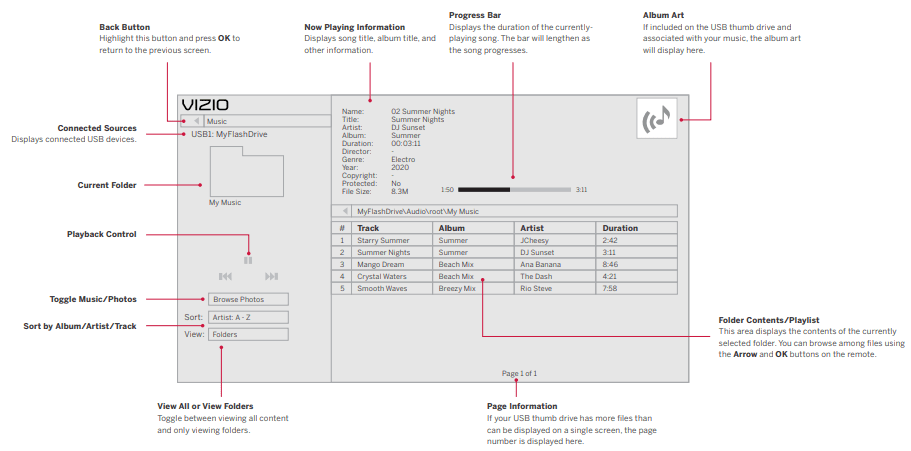
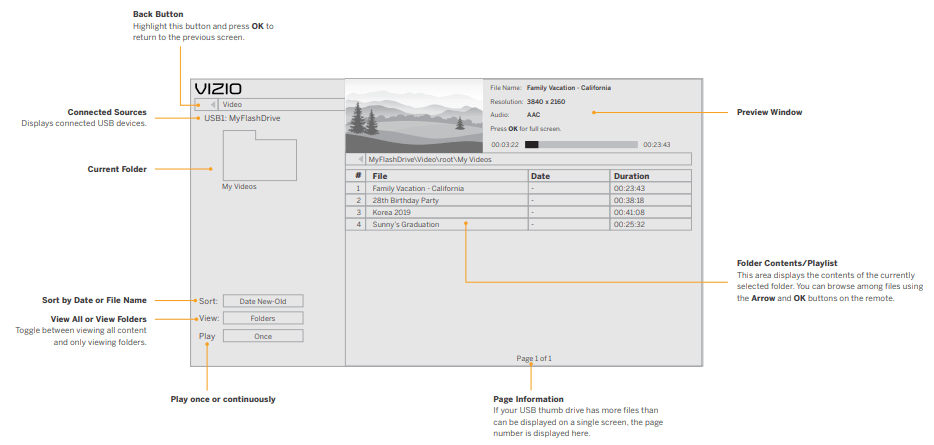
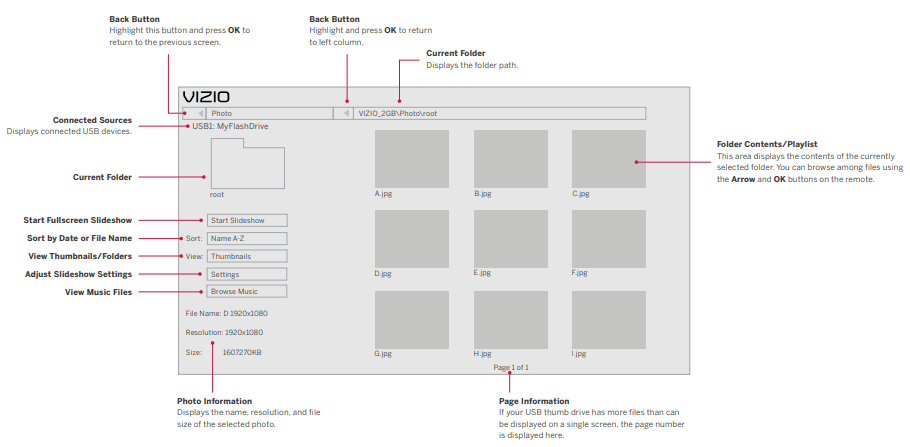
The USB Media Player allows you to connect a USB flash drive to your TV and play music, video, or photos.
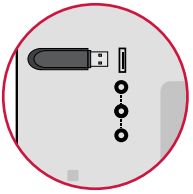
Preparing Your USB Drive to Play USB Media
To display USB media, you must first save your videos onto a USB flash drive:
- The USB flash drive must be formatted as FAT32.
- Files on the USB flash drive must end in a supported file extension ( .mp3, .jpg, etc).
- The player is not designed to play media from external hard drives, MP3 players, cameras, or smartphones.
Displaying USB Media
To display your USB media:
- Connect your USB flash drive to the USB port on the side of the TV.
- The TV will recognize the USB. Use the Navigation Keys on the remote to select the content you want to play.
—or—
- Select USB from the bottom streaming icons on the SmartCast Home™ page.
TIP: You can display your photos in Fullscreen. Select the photo, press OK, then highlight Fullscreen and press OK.
Removing the USB Drive from the TV
To safely remove your USB flash drive from the TV:
- Turn the TV off.
- Disconnect your USB flash drive from the USB port on the side of the TV
WARNING: Do not remove the USB drive while the TV is on. Doing so may damage the drive.
Help Topics
The remote is not responding.
- Make sure the batteries are properly inserted matching the - and + symbols.
- Replace the batteries with fresh ones.
The TV displays “No Signal.”
- Press INPUT button on the remote control to select a different input source.
- If you are using cable TV or antenna connected directly to the TV, scan for channels. See Scanning for TV Channels on page 16.
There is no power.
- Ensure the TV is plugged into a working electrical outlet.
- Ensure the power cable is securely attached to the TV.
- Press the Power/Standby button on the remote or on the back of the TV to turn the TV on.
The power is on, but there is no image on the screen.
- Ensure all cables are securely attached to the TV.
- Ensure all devices are connected correctly. Devices differ; see your device’s user manual for details.
- Adjust Brightness, Contrast, or Backlight. See Adjusting the Picture Settings on page 8.
- Press the INPUT button on the remote to select a different input source.
The sound is flat or dialog is not audible.
- Turn off Volume Leveling. See Adjusting the Audio Settings on page 15.
How do I stream apps like Netflix to my VIZIO SmartCast® TV?
- Popular apps are located on the SmartCast Home™ screen, so you can simply navigate to the app row on your SmartCast TV to start streaming.
- You can also use Apple AirPlay 2 or Chromecast built-in™ to stream content from your device directly to your SmartCast TV. For more information,.
The colors on the TV don’t look right.
- Adjust the Color and Tint settings in the Picture menu. See Adjusting the Picture Settings on page 8.
- Select a pre-set picture mode. VIZIO recommends selecting Calibrated.
- Check all cables to ensure they are securely attached.
The image quality is not good.
- For the best image quality, view high-definition programs using digital sources. Connect your devices with HDMI cables.
- If you are using an antenna, the signal strength of the channel may be low. Ensure your antenna is connected securely to the TV and move the antenna around the room or close to a window for the best signal.
The picture is distorted.
- Move the TV away from electrical appliances, cars, and fluorescent lights.
- Ensure all cables are securely attached.
The TV image does not cover the entire screen.
- If you are using TV, AV, or Component with 480i input, go to Menu > Picture > Picture Aspect.
The TV has pixels (dots) that are always dark.
- Your HD TV is precision-manufactured using an extremely high level of technology. However, sometimes pixels may not display correctly. These types of occurrences are inherent to this type of product and do not constitute a defective product.
The buttons on the remote aren’t working.
- Ensure you are only pressing one button at a time.
- Point the remote directly at the TV when pressing a button.
- Replace the remote batteries with new ones. See Replacing the Batteries on page 5.
There is no sound.
- Press Volume Up on the remote control.
- Press the MUTE button on the remote to ensure mute is off.
- Check the audio settings. See Adjusting the Audio Settings on page 15.
- Check the audio connections of external devices (Blu-ray player, game console, cable/satellite box) that are connected to the TV.
- If you are using an antenna, the signal strength of the channel may be low. Ensure your antenna is connected securely to the TV and move the antenna around the room or close to a window for the best signal.
- Set eARC to Off and use ARC mode.
I see “noise” or static on the screen.
- When your TV’s digital capabilities exceed a digital broadcast signal, the signal is up-converted (improved) to match your TV’s display capabilities. This upconverting can sometimes cause irregularities in the image.
- If you are using an antenna, the signal strength of the channel may be low. Ensure your antenna is connected securely to the TV and move the antenna around the room or close to a window for the best signal.
When I change input source, the TV image changes size.
- The TV remembers the viewing mode on each input source. If the viewing mode on the new input source differs from the one on the input source you switch from, the difference may be noticeable.
- See Changing the Picture Aspect Ratio on page 10.
How do I download the VIZIO SmartCast Mobile™ App?
- Make sure your phone or tablet is connected to a Wi-Fi network. Open a browser on your phone or tablet.
How do I change the Inputs?
- Press the INPUT button on the back of the TV to cycle through the Inputs.
- Press the INPUT button on the basic remote to cycle through the Inputs.
- Make sure the VIZIO SmartCast Mobile™ app is installed on your phone or tablet. Open the VIZIO SmartCast Mobile app. Tap on the Device list and select your TV. Tap on the Input key and select the Input of your choice.
How do I connect to my Wi-Fi network?
- On your TV remote, press the MENU button then go to Network > Select your Wi-Fi name > Enter password.
- Open the VIZIO SmartCast Mobile™ app on your phone or tablet. Tap on the Menu Tab > SmartCast Devices > Your TV/Device Name > Network
- Tap on the Settings icon > Network > Wireless Access Points. Select your Wi-Fi network from the list, enter the Wi-Fi password, and tap Connect.
How do I exit Demo Mode?
- Press and hold the INPUT button on the back of the TV to exit the demo mode.
How do I watch Cable/Antenna TV channels?
- If you subscribe to cable or satellite, simply connect an HDMI cable (not included) to the receiver.
- If you use external antennas to watch local broadcast channels, use a coaxial cable to connect.
Some of my Channels are missing.
- Press the MENU button on your TV remote and select the channels option. Then select Find Channels.
- Open the VIZIO SmartCast Mobile app on your phone or tablet.
- Click on: Menu Tab > SmartCast Devices > Your TV/Device Name > Channels > Find Channels.
How do I disable/enable Viewing Data?
- Press the MENU button on your remote and select ADMIN & PRIVACY. Then select Viewing Data to turn the feature on or off.
The television will not turn on using Alexa or Google Assistant.
- Ensure the television is in Quick Start Mode.
- Tap on Menu > System > Power Mode > Quick Start.
How do I know I am getting 4K resolution or HDR content such as Dolby Vision?
- As you are watching content on the television, press the INFO button on the remote or VIZIO SmartCast Mobile app. You will see the current resolution being displayed along with the version of video.
- HDR will show as a Dolby Vision icon, HDR10 or HLG.