User manual Television
Getting to Know Your TV
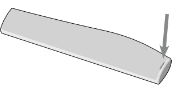
FRONT PANEL
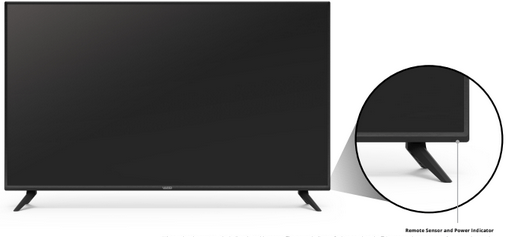
When using the remote, aim it directly at this sensor. The power indicator flashes on when the TV turns on, then goes out after several seconds.
To keep the power indicator on as long as the TV is on, see Turning the Power Indicator On or Off.
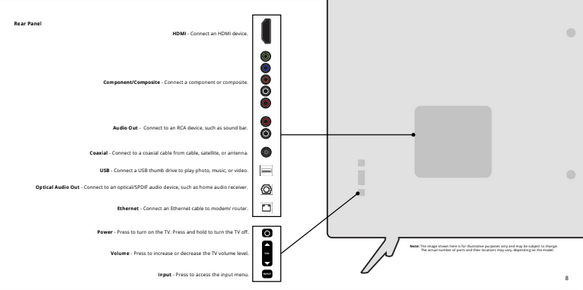
Connecting Your Devices
Connecting Your Devices
Your TV can be used to display output from most devices.
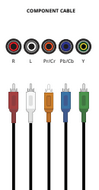
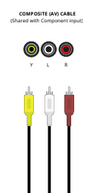
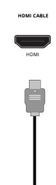
- Verify that your device has a video port that matches an available port on the TV (HDMI, Component, etc.).
- Connect the appropriate cable (not included) to the TV and the device.
- Turn the TV and your device on. Set the TV’s input to match the connection you used (HDMI-1, HDMI-2, etc.).
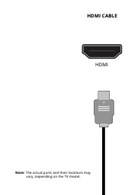
CONNECTING A DEVICE - AUDIO CABLE TYPES
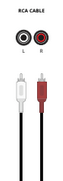
Your TV can be output sound to an audio device, such as a receiver or sound bar.
- Verify that your device has audio port that matches an available port on the TV (Optical, RCA, etc).
- Connect the appropriate cable (not included) to the TV and the device.
- Turn the TV and your device on.
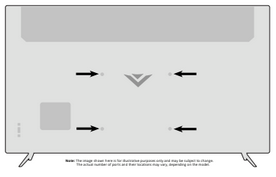
Note: The actual ports and their locations may vary, depending on the TV model.
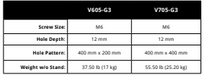
WALL-MOUNTING THE TV
To mount your TV on a wall, you will need a wall mount. Consult the information on this page to find the appropriate mount for your TV.
Be sure the mount you choose is capable of supporting the weight of the TV. After you have determined that you have the correct mount for your TV, you can begin the installation.
To install your TV on a wall:
- Disconnect any cables connected to your TV.
- Place the TV face-down on a clean, flat, stable surface. Be sure the surface is clear of debris that can scratch or damage the TV.
- If attached, remove the stands by loosening and removing the screws.
- Attach your TV and wall mount to the wall, carefully following the instructions that came with your mount. Use only with a UL-listed wall mount bracket rated for the weight/load of this TV.
 Installing a TV on a wall requires lifting. To prevent injury or damage to the TV, ask someone to help you.
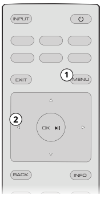
USING THE REMOTE
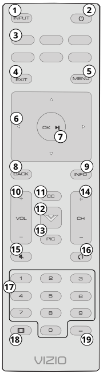
1. Input - Change the currently displayed input
2. Power - Turn Television on or off
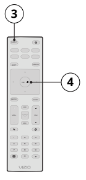
3. App Launcher - Quickly launch the pictured app
4. Exit - Close the on-screen menu
5. Menu - Display the settings menu
6. Arrow - Navigate the on-screen menus
7. OK/Play/Pause - Select the highlighted menu option and play or pause content
8. Back - Go to the previous on-screen menu
9. Info - Display the info window
10. Volume Up/Down - Increase or decrease the loudness of the audio
11. Closed Caption - Open the closed caption menu
12. V Button - Launch SmartCast HomeSM/Return to SmartCast Home Screen
13. Pic - Cycle through the different picture setting modes
14. Channel Up/Down- Change the channel
15. Mute - Turn the audio on or off
16. Last - Return to the channel last viewed
17. Number Pad - Manually enter a channel
18. Wide - Change the Television mode
19. Dash - Use with number pad to manually enter a digital sub-channel
(For example, 18-4 or 18-5)
Replacing the Batteries
- Find the notch on the back of the remote. Insert a coin and pry open the back cover.
- Insert two batteries into the remote control. Make sure that the (+) and (-) symbols on the batteries match the (+) and (-) symbols inside the battery compartment.
- Replace the battery cover.
In many places batteries cannot be thrown away or discarded with household waste. Please ensure you properly dispose of your batteries consistent with the laws and/or regulations where you live.
 WARNING: keep the remote control batteries away from children. It may cause choking and/or lead to a fire or chemical burn if mishandled. Do not dispose of batteries infire. Replace only with batteries of the correct type.
 When needed, VIZIO recommends replacing the batteries that came with this remote with two, new Duracell ‘AAA’ alkaline batteries.
Completing The First-Time Setup
The first time you turn on the TV, the on-screen instructions will guide you through each of the steps necessary to get your TV ready for use.
Before you begin the first-time setup:
- Your TV should be installed and the power cord should be connected to an electrical outlet.
- If you have a wireless network, have the network password ready.
- If you are connecting to your network with an Ethernet cable, connect it to the Ethernet port on the TV.
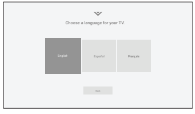
1. Choose your language.
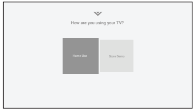
2. Choose home use.
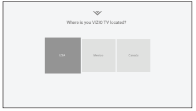
3. Choose your country.
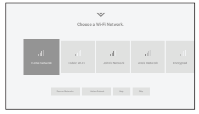
4. Choose your Wi-Fi and enter the password.
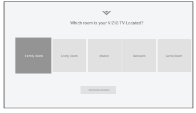
5. Name your TV.
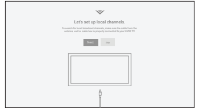
6. Scan for channels.
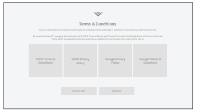
7. Accept the T&Cs and register your device.

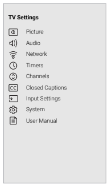
Your TV features an easy-to-use on-screen menu.
To open the on-screen menu, press the Menu button on the remote.
From this menu, you can:
- Adjust the Picture settings
- Adjust the Audio settings
- Adjust the Network settings
- Set up the Timers
- Adjust the Channel settings
- Set up Closed Captioning
- Name and adjust Inputs
- Adjust TV settings
- View the User Manual
NAVIGATING THE ON-SCREEN MENU
To open the on-screen menu:
- Press the Menu button on the remote.
- Use the Arrow buttons to highlight a menu option, and press the OK button to select that option.
 While navigating the on-screen menu, you can press the Back button at any time to return to the previous menu screen. The Exit button will close the on-screen menu.
CHANGING THE INPUT SOURCE
External devices, such as DVD players, Blu-ray Players, and video game consoles, can be connected to your TV. To use one of these devices with your TV, you must first change the input source using the Input menu.
To change the input sources:
- Press the Input button on the remote. The Input menu is displayed.
- Use the Right/Left Arrow buttons or the Input button on the remote to highlight the input you wish to view and press OK. The selected input is displayed.
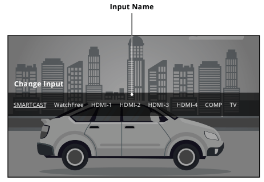
Note: Inputs may vary by TV.
 You can change the input names that appear on the Input menu to make your devices easy to recognize. See Renaming Devices on the Input Menu for more information.
CHANGING THE SCREEN ASPECT RATIO
To change the screen aspect ratio:
- Press the Wide button
 on the remote.
- Use the Arrow buttons to highlight the aspect ratio you wish to view and press OK.
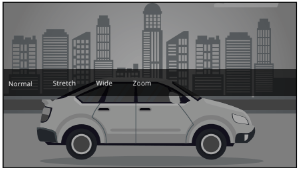
Your TV can display images in different modes: Normal, Stretch, Wide, Zoom, and Panoramic.
- Normal (default) – No change to aspect ratio.
- Stretch – When the 16:9 signal is a 4:3 image with black bars left and right, stretches to fill the screen.
- Wide – Stretches a 4:3 aspect ratio to fill 16:9 screen. If a 16:9 image, adds black bars to top and bottom.
- Zoom – Expands image both horizontally and vertically by 14%.
- Panoramic* - Stretches a 4:3 image to fill 16:9 screen with an algorithm so the center doesn’t look stretched.
Some programs have black bars on the top or sides of the picture so that the picture keeps its original shape. Examples include widescreen movies and older television programs.
 Tip: The aspect ratio cannot be changed for Ultra HD content or HDR content.
ADJUSTING THE PICTURE SETTINGS
Your TV can be adjusted to suit your preferences and viewing conditions.
If you save changes to the settings for a picture mode, an asterisk appears after its name (see Saving a Custom Picture Mode).
To adjust the picture settings:
1. Press the Menu button on the remote. The on-screen menu is displayed.
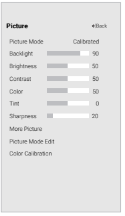
2. Use the Arrow buttons on the remote to highlight Picture and press OK. The Picture menu is displayed.
3. Use the Arrow buttons on the remote to highlight Picture Mode, then use the Left/Right Arrow buttons to change the picture mode:
- Standard mode sets the picture settings to the default settings.
- Calibrated mode sets the picture settings to values ideal for watching TV in a brightly-lit room.
- Calibrated Dark mode sets the picture settings to values ideal for watching TV in a dark room.
- Vivid mode sets the picture settings to values that produce a brighter, more vivid picture.
- Game mode reduces throughput delays and optimizes the picture settings for displaying game console output.
- Computer mode optimizes the picture settings for displaying computer output.
4. To manually change each of the picture settings, use the Up/ Down Arrow buttons on the remote to highlight that picture setting, then use the Left/Right Arrow buttons to adjust the setting:
- Backlight - Adjusts the LED brightness to affect the overall brilliance of the picture. Backlight cannot be adjusted when starting from some picture modes.
- Brightness - Adjusts the black level of the picture. When this setting is too low, the picture may be too dark to distinguish details. When this setting is too high, the picture may appear faded or washed out.
- Contrast - Adjusts the white level of the picture. When this setting is too low, the picture may appear dark. When this setting is too high, the picture may appear faded or washed out. If the setting is too high or too low, detail may be difficult to distinguish in dark or bright areas of the picture.
- Color - Adjusts the intensity of the picture colors.
- Tint - Adjusts the hue of the picture. This setting is useful in adjusting the flesh tones in the picture. If flesh appears too orange, reduce the level of color before adjusting tint.
- Sharpness - Adjusts the edge sharpness of picture elements. It can be used to sharpen non-HD (high definition) content; however, it will not produce detail that does not otherwise exist.
When you have finished adjusting the picture settings, press the Exit button on the remote.
Adjusting More Picture Settings
To adjust more picture settings:
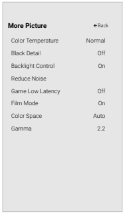
1. From the PICTURE menu, use the Arrow buttons to highlight More Picture, and then press OK.
2. Use the Arrow buttons to highlight the setting you wish to adjust, then press the Left/Right Arrow buttons to change the setting:
- Color Temperature - See Adjusting the Color Temperature.
- Black Detail - Adjusts the average brightness of the picture to compensate for large areas of brightness. Select Off, Low, Medium, or High.
- Backlight Control - When ON, it will improve the contrast ratio of the picture by adjusting backlight zones. Specific adjustments are based on content.
- Reduce Noise:
- Reduce Signal Noise - Diminishes artifacts in the image caused by the digitizing of image motion content. Select Off, Low, Medium, or High.
- Reduce Block Noise - Reduces pixelation and distortion for mpeg files. Select Off, Low, Medium, or High.
- Game Low Latency - Select On to reduce video delay (lag) when gaming.
- Film Mode - Optimizes the picture for watching film. Select Auto or Off.
- Color Space – Select color space for the source. Video sources use YCbCr, but PC uses RGB. Available for HDMI input only.
- Gamma - Set the shape of the Gamma curve. Use lower Gamma values for bright room conditions, and higher values when it’s dark.
3. When you have finished adjusting More Picture Settings, press the Exit button on the remote.
Adjusting the Color Temperature
Adjusting the color temperature changes the white balance of the picture.
To adjust the color temperature:
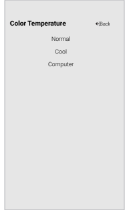
1. From the MORE PICTURE menu, use the Arrow buttons to highlight Color Temperature, and then press OK.
2. Use the Arrow buttons on the remote to highlight a color temperature preset and then press OK.
- Normal is optimized for television viewing.
- Cool produces a blue-hued picture.
- Computer optimizes the picture for use as a PC monitor.
3. When you have finished adjusting the color temperature, press the Exit button on the remote.
Adjusting the Picture Mode Edit Settings
Picture Mode Edit Settings allow you to make precise adjustments to the picture and to create picture modes to save groups of picture settings.
To adjust the Picture Mode Edit settings:
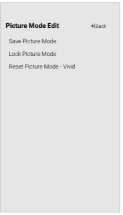
1. From the PICTURE menu, use the Arrow buttons to highlight Picture Mode Edit, and then press OK. The PICTURE MODE EDIT menu is displayed.
2. Use the Arrow buttons to highlight the setting you wish to adjust, then press OK to change the setting:
- Save Picture Mode - Save a custom picture mode.
- Lock Picture Mode - Prevent changes to custom picture modes. Choose between On or Off.
- Reset Picture Mode: Reset the picture mode settings to factory default values.
Saving a Custom Picture Mode
Custom picture modes allow you to save a group of custom settings for various viewing conditions and video sources.
- Changes made while on any preset picture mode will add an asterisk on the top right corner of the preset mode.
- The custom picture mode is not automatically saved.
To save a custom picture mode:
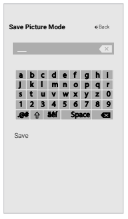
1. From the PICTURE MODE EDIT menu, use the Arrow buttons to highlight Save Picture Mode, and then press OK. The SAVE PICTURE MODE menu is displayed.
2. Use either on-screen keyboard to enter a name for your custom picture mode.
3. Highlight Save and press OK.
4. Press the Exit button to exit the menu screens.
WatchFreeTM
What is WatchFreeTM?
- VIZIO WatchFree takes your cord-cutting entertainment experience one step further! With the simple press of a button, enjoy free streaming TV with over 100 live TV channels to choose from – news, movies, sports, comedy, music and more. A built-in on-screen guide makes finding something to watch easier than ever. And it’s all FREE – no fees, no subscriptions, or logins.
What you can do with WatchFree:
- Stream over 100 live TV channels absolutely free – news, movies, sports, comedy, music and more.
- Navigate through channels, organized by genre, with an intuitive on-screen guide.
- Watch 1000’s of free movies from major studios.
- Watch the best of the internet TV.
- No logins, subscriptions or transactions fees.
How to Launch WatchFree:
To launch and begin watching entertainment offered on WatchFree:
- Press the Input button on your remote and select WatchFree
-or-
- Simply select the WatchFree app logo from the SmartCast Home app row.
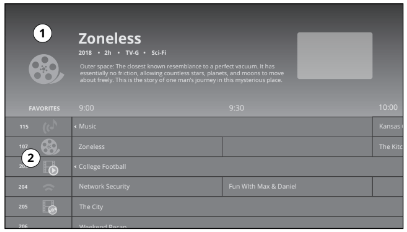
1. Show Details - Find out show information.
2. On-Screen Guide - Over 100 live TV and audio channels organized by genre.
3. Input Button- Press INPUT and select WatchFree.
4. OK Button - Press the OK button to return to the WatchFree on-screen guide. Use the up/down arrow buttons to scroll through the guide.
The USB Media Player allows you to connect a USB thumb drive to your TV and play music, video, or photos.
Note: The image shown here is for illustrative purposes only and may be subject to change. The actual number of ports and their locations may vary, depending on the model.
Preparing Your USB Drive to Play USB Media
To display USB media, you must first save your videos onto a USB thumb drive:
- The USB thumb drive must be formatted as FAT32.
- Files on the USB thumb drive must end in a supported file extension ( .mp3, .jpg, etc.)
- The player is not designed to play media from external hard drives, MP3 players, cameras, or smartphones.
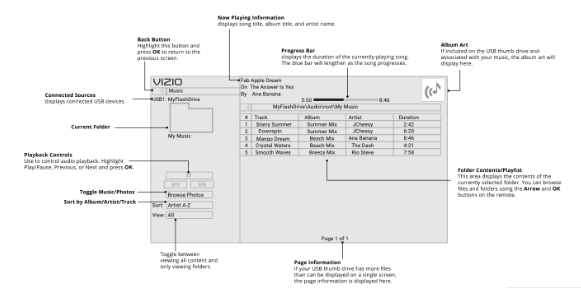
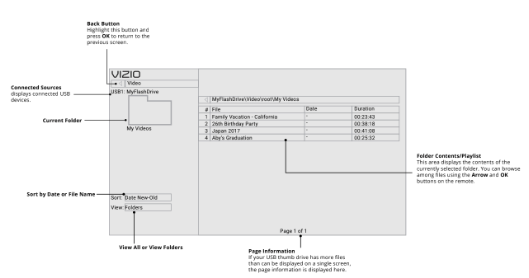
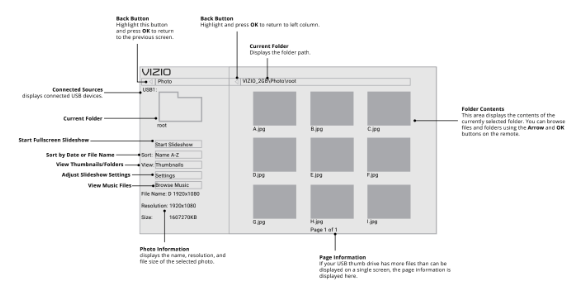
Displaying USB Media
To display your USB media:
- Connect your USB thumb drive to the USB port on the side of the TV.
- The TV will recognize the USB stick. Use the Arrow Keys on the remote to select the content you’d like to play.
-OR-
- Select USB from the bottom streaming icons on the SmartCast HomeSM page.
Removing the USB Drive from the TV
To safely remove your USB drive from the TV:
- Turn off the TV.
- Disconnect your USB thumb drive from the USB port on the side of the TV.
HELP TOPICS
The remote is not responding.
- Make sure the batteries are properly inserted matching the - and + symbols.
- Replace the batteries with fresh ones.
The TV displays “No Signal.”
- Press INPUT button on the remote control to select a different input source.
- If you are using cable TV or antenna connected directly to the TV, scan for channels. See Scanning for Channels.
There is no power.
- Ensure the TV is plugged into a working electrical outlet.
- Ensure the power cable is securely attached to the TV.
- Press the Power/Standby button on the remote or on the back of the TV to turn the TV on.
The power is on, but there is no image on the screen.
- Ensure all cables are securely attached to the TV.
- Ensure all devices are connected correctly. Devices differ; see your device’s user manual for details.
- Adjust Brightness, Contrast, or Backlight. See Adjusting the Picture Settings.
- Press the INPUT button on the remote to select a different input source.
The sound is flat or dialog is not audible.
- Turn off Volume Leveling. See Adjusting the Audio Settings.
There is no sound.
- Press Volume Up on the remote control.
- Press the MUTE button on the remote to ensure mute is off.
- Check the audio settings. See Adjusting the Audio Settings.
- Check the audio connections of external devices (Blu-ray player, game console, cable/satellite box) that are connected to the TV.
- If you are using an antenna, the signal strength of the channel may be low. Ensure your antenna is connected securely to the TV and move the antenna around the room or close to a window for the best signal.
The colors on the TV don’t look right.
- Adjust the Color and Tint settings in the Picture menu. See Adjusting the Picture Settings.
- Select a pre-set picture mode. See Adjusting the Picture Settings. VIZIO recommends selecting Calibrated.
- Check all cables to ensure they are securely attached.
The image quality is not good.
- For the best image quality, view high-definition programs using digital sources. Connect your devices with HDMI cables.
- If you are using an antenna, the signal strength of the channel may be low. Ensure your antenna is connected securely to the TV and move the antenna around the room or close to a window for the best signal.
The picture is distorted.
- Move the TV away from electrical appliances, cars, and fluorescent lights.
- Ensure all cables are securely attached.
The buttons on the remote aren’t working.
- Ensure you are only pressing one button at a time.
- Point the remote directly at the TV when pressing a button.
- Replace the remote batteries with new ones. See Replacing the Batteries.
How do I change the Inputs?
- Press the Input button on the back of the TV to cycle through the Inputs.
- Press the Input button on the basic remote to cycle through the Inputs.
- Make sure the VIZIO SmartCast MobileTM app is installed on your phone or tablet. Open the VIZIO SmartCast MobileTM app. Tap on the Device list and select your TV. Tap on the Input key and select the Input of your choice.
How do I connect to my Wi-Fi network?
- On your TV remote, press the Menu button then go to Network > Select your Wi-Fi name > Enter password.
- Open the VIZIO SmartCast MobileTM app on your phone or tablet. Tap on the device list and select your Display. Tap on the Settings icon > Network > Wireless Access Points. Select your Wi-Fi network from the list, enter the Wi-Fi password, and tap Connect
How do I exit Demo Mode
- Press and hold the Input button on the back of the TV to exit the demo mode.
How do I watch Cable/Antenna TV channels?
- If you subscribe to cable or satellite, simply connect an HDMI cable (not included) to the receiver.
- If you use external antennas to watch local broadcast channels, use a coaxial cable to connect.
Some of my Channels are missing.
- Press the MENU button on your TV remote and select the channels option. Then select Find Channels.
- Open the VIZIO SmartCast MobileTM app on your phone or tablet. Click on: Control > Your TV/Device Name > Settings Icon > Channels > Find Channels.
How do I disable/enable Viewing Data?
- Press the MENU button on your remote and select the System option. Select Reset & Admin. Then select Viewing Data to turn the feature on or off.
- Open the VIZIO SmartCast MobileTM app on your phone or tablet. Click on: Control > Your TV/Device Name > Settings Icon > System > Reset & Admin > Viewing Data Slider.
The television will not turn on using Google Assistant.
- Ensure the television is in Quick Start mode.
- Tap on Menu > System > Power Mode > Quick Start.
How do I know I am getting 4K resolution or HDR content such as Dolby Vision?
- As you are watching content on the television, press the INFO button on the remote or VIZIO SmartCast MobileTM app. You will see the current resolution being displayed along with the version of video.
- HDR will show as a Dolby Vision icon, HDR10 or HLG.