User Manual GE Profile PCHS920YMFS - 30" Slide-In Self-Clean Induction Range

Documents for GE - General Electric PCHS920YMFS

The following documents are available:
User Manual Specification Photos
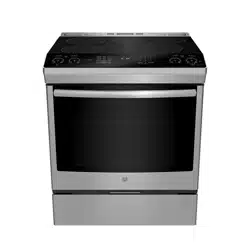
PCHS920YMFS photo
Write the model and serial
numbers here:
Model # _________________
Serial # _________________
You can
the rating label on
the front behind the range drawer.
OWNER’S MANUAL
RANGES
Electric Induction Slide-In
295D3313P011 Pub. Num. 29-6397
SAFETY INFORMATION .......... 3
USING THE RANGE
Surface Units . . . . . . . . . . . . . . . . . . . . . . . . . . . 8
Cookware for Induction Cooktop . . . . . . . . .10
Oven Controls . . . . . . . . . . . . . . . . . . . . . . . . . .12
Settings . . . . . . . . . . . . . . . . . . . . . . . . . . . . . . .13
Options . . . . . . . . . . . . . . . . . . . . . . . . . . . . . . .14
Sabbath Mode . . . . . . . . . . . . . . . . . . . . . . . . . .16
Oven Racks . . . . . . . . . . . . . . . . . . . . . . . . . . . .17
Aluminum Foil and Oven Liners ...........18
Cookware ..............................18
Cooking Modes . . . . . . . . . . . . . . . . . . . . . . . . .19
Probe . . . . . . . . . . . . . . . . . . . . . . . . . . . . . . . . .20
Cooking Guide . . . . . . . . . . . . . . . . . . . . . . . . .21
CARE AND CLEANING
Cleaning the Range – Exterior . . . . . . . . . . . 22
Cleaning the Range – Interior . . . . . . . . . . . 23
Cleaning the Glass Cooktop . . . . . . . . . . . . . 24
Probe . . . . . . . . . . . . . . . . . . . . . . . . . . . . . . . . 25
Oven Light . . . . . . . . . . . . . . . . . . . . . . . . . . . . 26
Oven Door . . . . . . . . . . . . . . . . . . . . . . . . . . . . 26
TROUBLESHOOTING TIPS....... 27
WARRANTY .......................30
ACCESSORIES .....................31
CONSUMER SUPPORT ........... 32
PCHS920
GE is a trademark of the General Electric Company. Manufactured under trademark license.
Loading ...
Loading ...
Loading ...
Specifications

GE - General Electric PCHS920YMFS Questions and Answers


#1 How to connect wifi?

Select Settings button and WiFi. It is necessary to turn on WiFi before using Remote Enable on your oven.

Connecting your WiFi Connect Enabled Oven.

What you will need.

Your GE Appliances oven uses your existing home WiFi network to communicate between the appliance and your smart device. In order to setup your GE Appliances oven, you will need to gather some information:

1. Each GE Appliances oven has a connected appliance information label that includes an Appliance Network.

Name and Password. These are the two important details that you will need to connect to the appliance.

The label is typically located inside the door of the oven or drawer.

2. Have your smart phone or tablet ready with the ability to access the internet and download apps.

3. You will need to know the password of your home.

WiFi router. Have this password ready while you are setting up your GE Appliances oven.

Read more https://manualsfile.com/product/pkr7zuafyo.html?page=14

#2 How to replace the door from oven?

To replace the door from oven:

1. Firmly grasp both sides of the door at the top.

2. Starting on the left side, with the door at the same angle as the removal position, seat the indentation of the hinge arm into the bottom edge of the hinge slot.

The notch in the hinge arm must be fully seated into the bottom of the slot. Repeat for right side.

3. Fully open the door. If the door will not fully open, the indentation is not seated correctly in the bottom edge of the slot.

4. Push the hinge locks up against the front frame of the oven cavity, to the locked position.

5. Close the oven door.
https://manualsfile.com/product/pkr7zuafyo.html?page=26

#3 How to remove the door from oven?

To remove the door from oven:

1. Fully open the door.

2. Pull the hinge locks down toward the door frame, to the unlocked position. A tool, such as a small flat- blade screwdriver, may be required.

3. Firmly grasp both sides of the door at the top.

4. Close door to the door removal position. The door should be open approximately 3" with no obstruction above the door.

5. Lift door up and out until both hinge arms are clear of the slots.
https://manualsfile.com/product/pkr7zuafyo.html?page=26