

What you can do with this unit
5
Accessories
10
Before using the remote control unit
11
Operating range of the remote control unit
12
Part names and functions
13
Sound bar
13
Remote control unit
17
Positioning
19
Positioning the sound bar
19
Connections
Connecting a TV
21
TV equipped with an HDMI connector and compatible with the
eARC (Enhanced Audio Return Channel) or ARC (Audio Return
Channel)
22
TV equipped with an HDMI connector and incompatible with the
eARC or ARC / TV equipped with an optical digital connector
23
TV equipped with an HDMI connector and incompatible with the
eARC or ARC / TV equipped with an analog connector
24
Connecting a playback device
25
Connecting an HDMI device
25
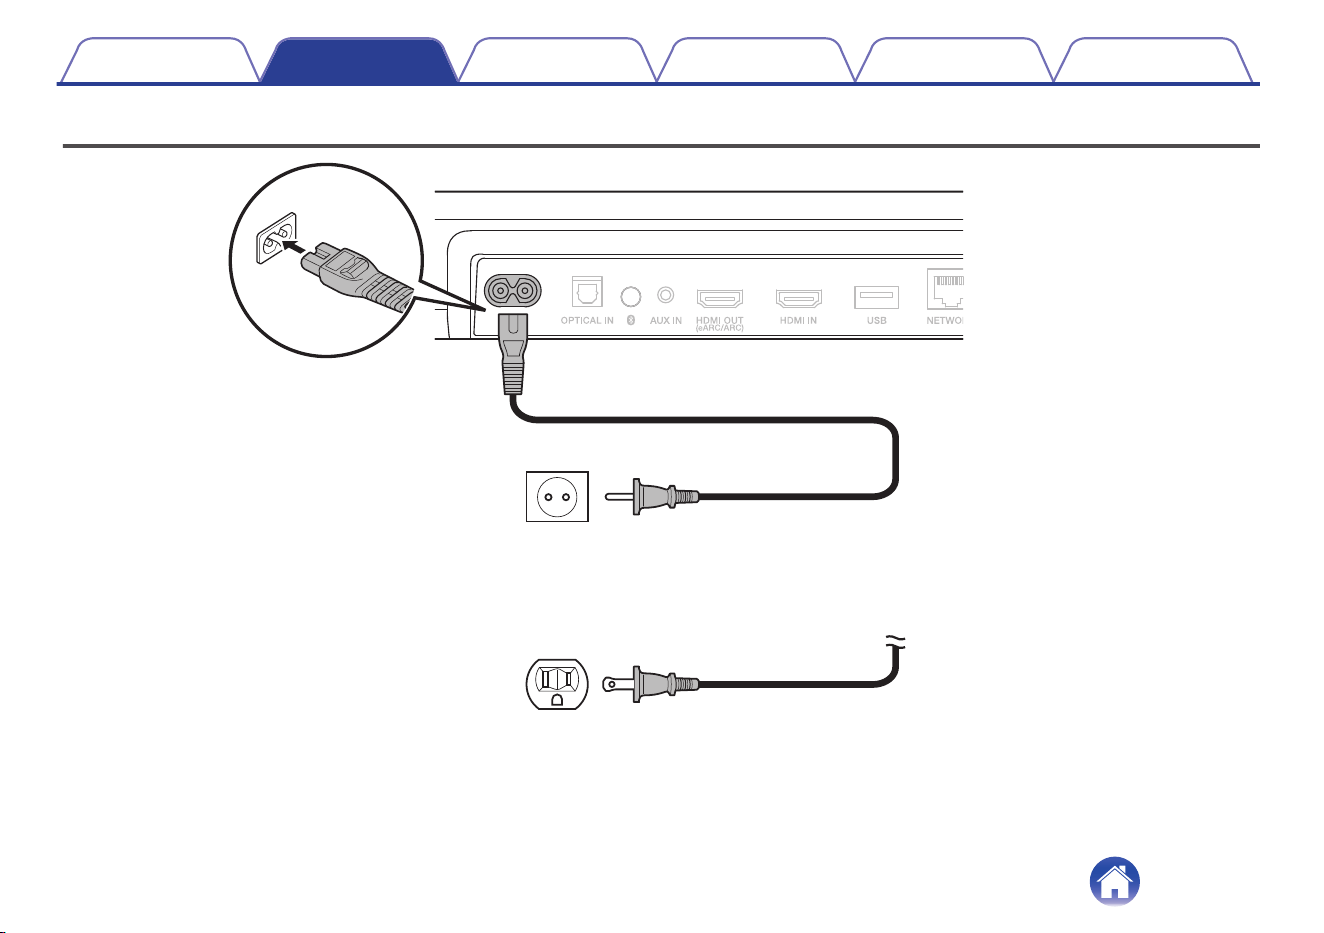
Connecting the power cords
26
Playback
Playing TV, movies and music
27
Adjusting the volume
28
Adjusting the bass volume
28
Turning off the sound temporarily (Muting)
28
Playing music on a Bluetooth device
29
Pairing a Bluetooth device for the first time
29
Pairing with other Bluetooth devices
30
Playing music with a paired Bluetooth device
30
Getting the HEOS App
31
Setting up first HEOS built-in device
32
Adding more HEOS built-in devices
33
HEOS Account
34
Playing from streaming music services
35
Listening to the same music in multiple rooms
38
Contents Connections Playback Settings Tips Appendix
2

Listening to Internet Radio
42
Playing music stored on your mobile
43
Playing back files stored on a PC or NAS
44
Playing music from a USB flash drive
45
AirPlay function
46
Playing songs from your iPhone, iPod touch or iPad
47
Playing iTunes music with this unit
47
Play a song from your iPhone, iPod touch or iPad on multiple
synced devices (AirPlay 2)
48
Spotify Connect function
49
Settings
Settings
50
Adjusting the audibility of dialog and vocals (Dialog enhancer)
50
Setting the night mode
50
Setting the sound mode
51
Quick select function
56
Operating this unit using the remote control of a TV
57
Wirelessly connecting the HEOS built-in speakers as surround
speakers
58
Operating this unit by voice with the Amazon Alexa function
59
Setting the input source to switch with the TV button on the
remote control unit
60
Tips
Troubleshooting
61
Power does not turn on / Power is turned off
62
Operations cannot be performed through the remote control unit
62
Trouble teaching this unit remote control commands
63
No sound comes out
63
Music cuts out or delays sometimes
64
The HDMI control function does not work
64
Audio can be heard coming from the TV’s speakers
64
I hear a delay when using the external input with my TV
65
Bluetooth playback does not work
65
Cannot connect the sound bar to the network
66
Connecting to a network using an iOS device
66
Connecting to a WPS network
67
This unit takes long time to turn on
67
Cannot operate the unit with Alexa
68
Alexa does not respond even if called
68
Resetting factory settings
69
Resetting the firmware to the default state
70
Contents Connections Playback Settings Tips Appendix
3


Thank you for purchasing this Denon product.
To ensure proper operation, please read this owner’s manual carefully before using the product.
After reading this manual, be sure to keep it for future reference.
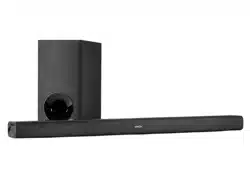
What you can do with this unit
This sound bar supports immersive surround sound and enables you to connect this unit to your TV to enjoy high-quality sound.
In addition to Dolby Atmos and DTS:X playback, traditional audio signals can also be enjoyed in virtual 3D audio.
This unit is equipped with an HDMI input/output connector that supports 4K and enables passthrough of 4K video signals to your TV, such as signals for
Blu-ray disc players and video game consoles.
Contents Connections Playback Settings Tips Appendix
5
o
Playing TV audio
[Related information]
0
“Connecting a TV” (v p. 21)
0
“Playing TV, movies and music” (v p. 27)
o
Connecting to a playback device such as a
Blu-ray disc player to perform playback
[Related information]
0
“Connecting a TV” (v p. 21)
0
“Connecting an HDMI device” (v p. 25)
0
“Playing TV, movies and music” (v p. 27)
Contents
Connections Playback Settings Tips Appendix
6
o
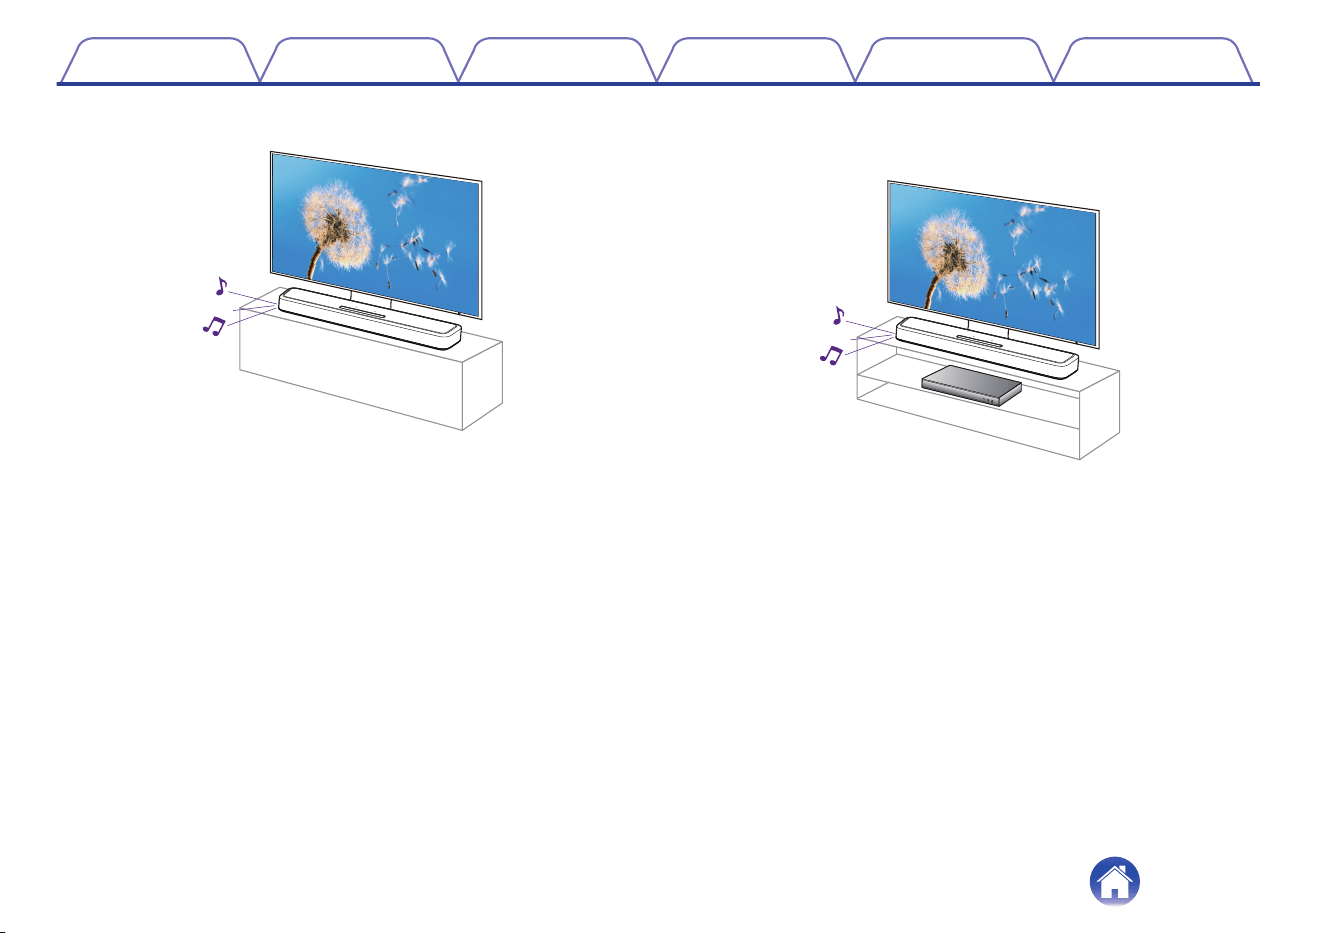
Operating by talking to Alexa
NOTE
0
Optional Alexa Built-in functionality will become available via a firmware update.
・ Alexa, turn up the volume
・Alexa, what’s the weather today?
0
Alexa isn’t available in certain languages and countries.
[Related information]
0
“Operating this unit by voice with the Amazon Alexa
function” (v p. 59)
o
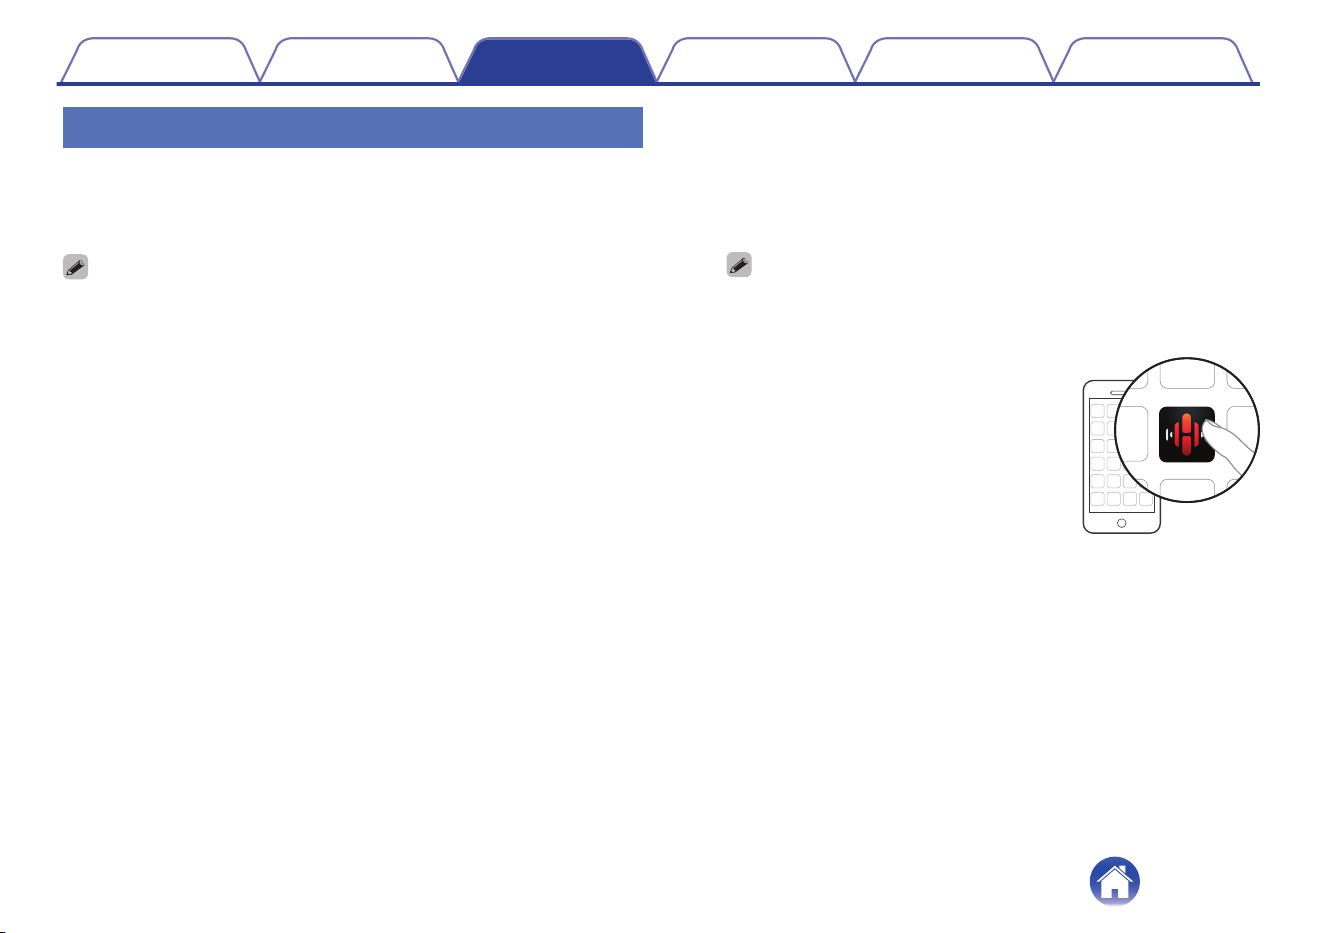
Using the app for smartphones/tablets (HEOS
App) for easy operation
HEOS
[Related information]
0
“Getting the HEOS App” (v p. 31)
Contents
Connections Playback Settings Tips Appendix
7
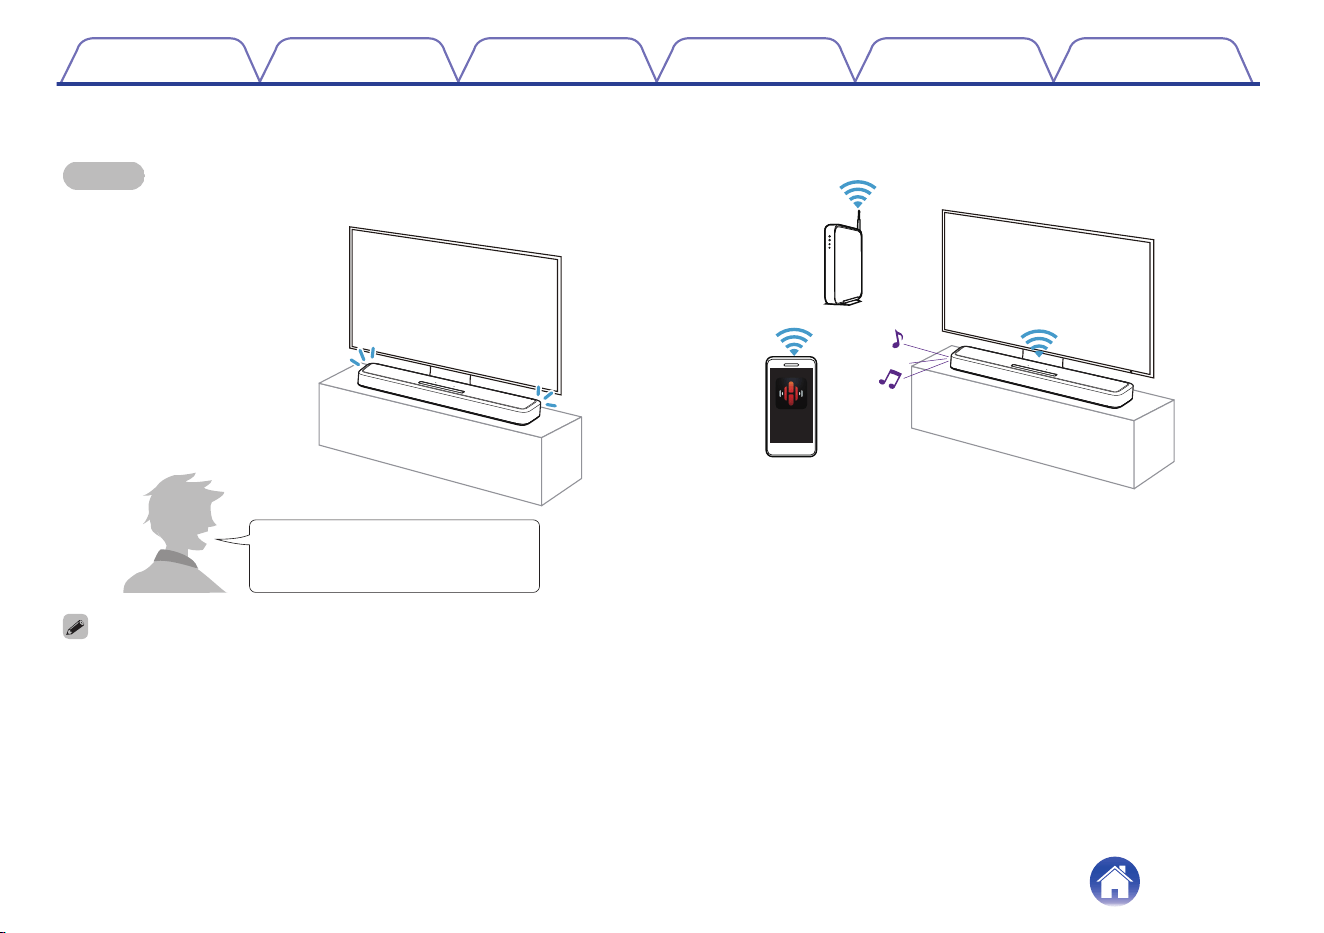
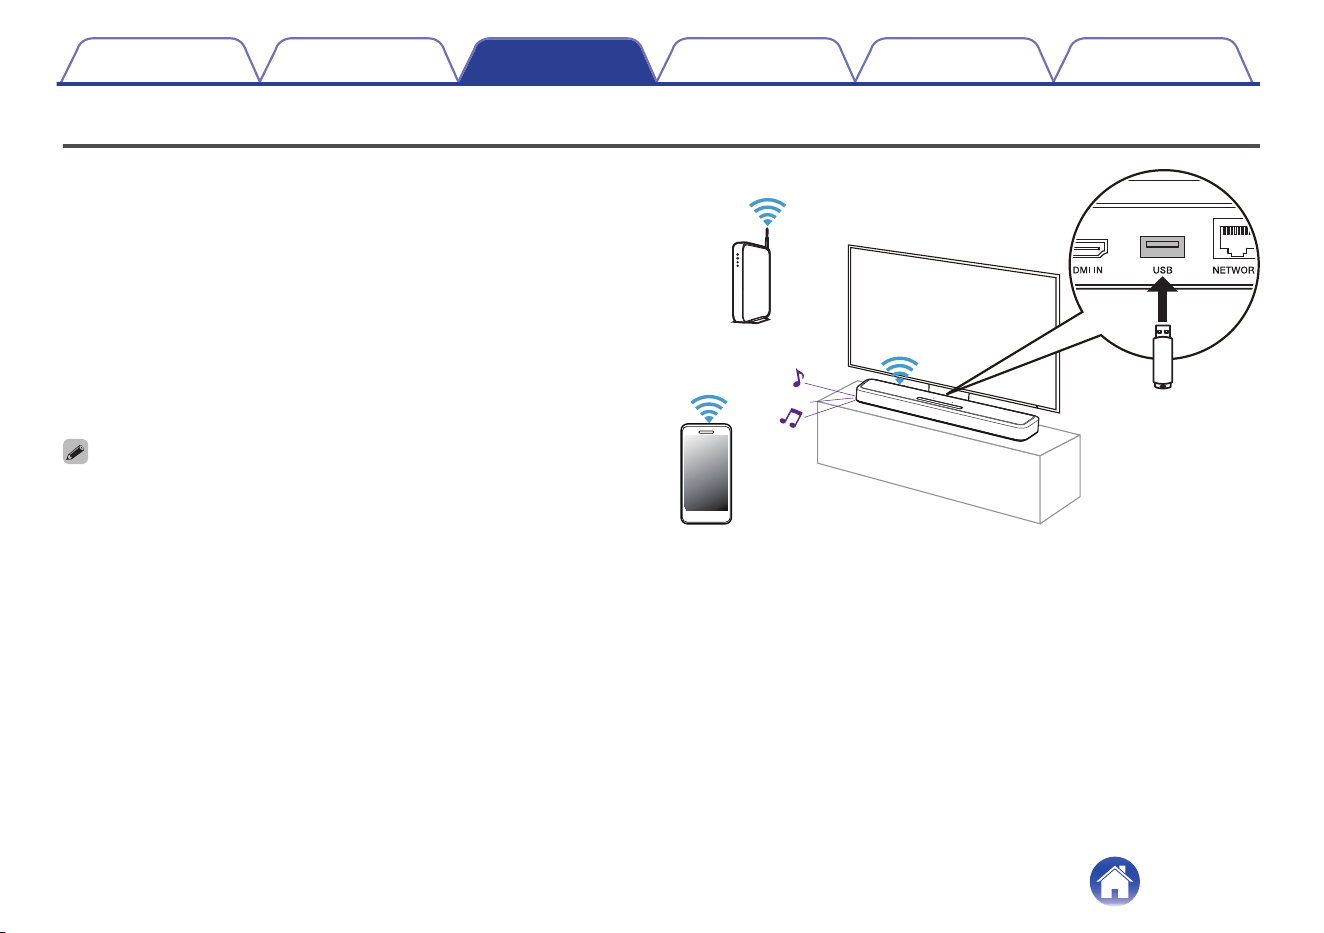
o
Playing streaming audio with Wi-Fi
PC
Streaming music service /
Internet radio
Internet
NAS
[Related information]
0
“Playing from streaming music services” (v p. 35)
0
“Listening to Internet Radio” (v p. 42)
0
“Playing music stored on your mobile” (v p. 43)
0
“Playing back files stored on a PC or NAS” (v p. 44)
0
“AirPlay function” (v p. 46)
0
“Spotify Connect function” (v p. 49)
Contents Connections Playback Settings Tips Appendix
8

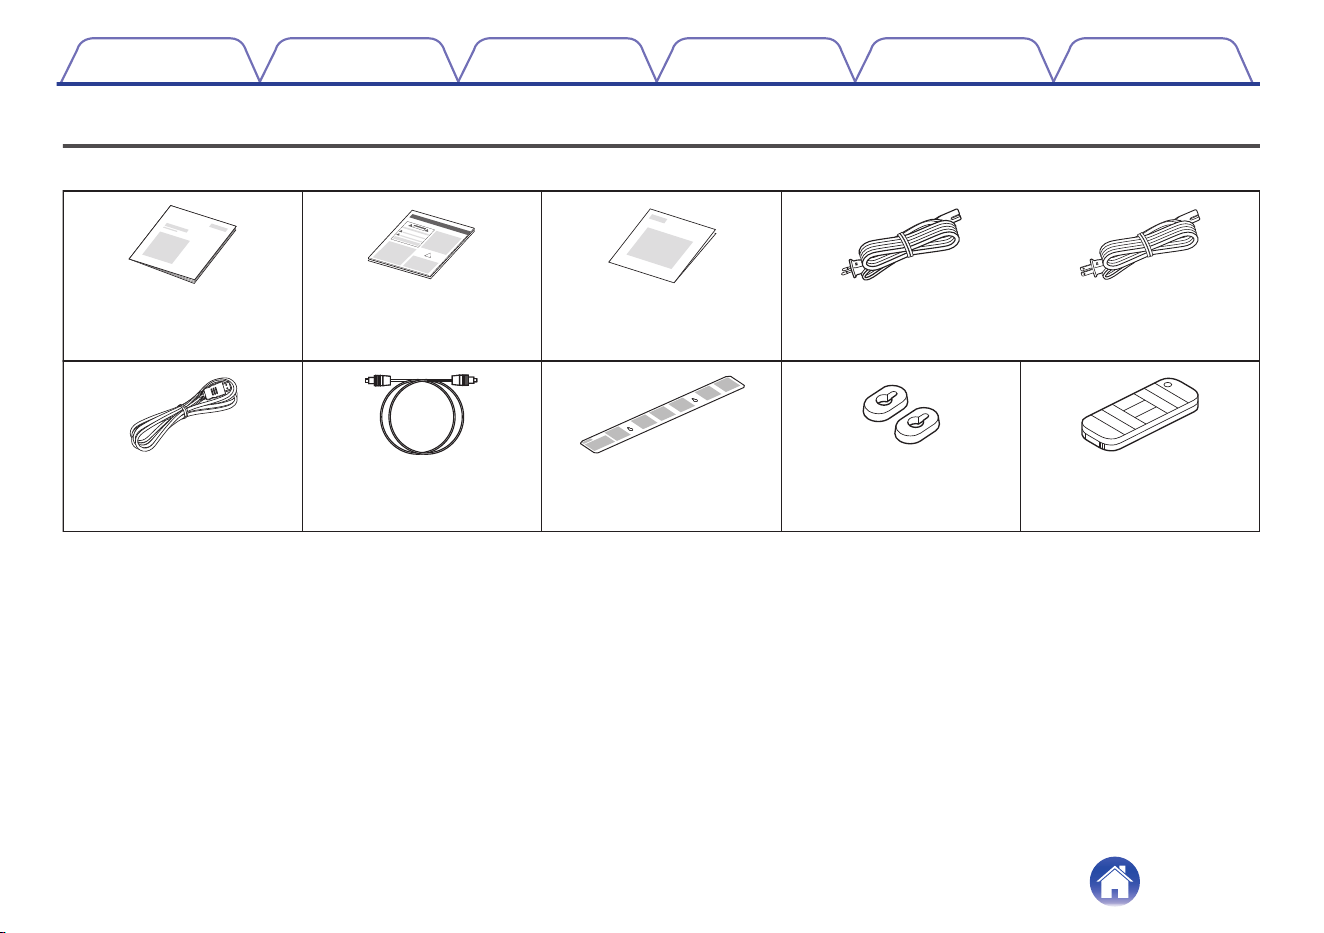
Accessories
Check that the following parts are included with the product.
Quick Start Guide Safety Instructions Warranty
(North America model only)
Wall mount templateOptical digital cableHDMI cable (4K)
Remote control unit
(RC-1241 / Built-in battery)
Power cord
(for North America model)
Wall mount spacers
Power cord
(for Europe model)
or
Contents Connections Playback Settings Tips Appendix
10
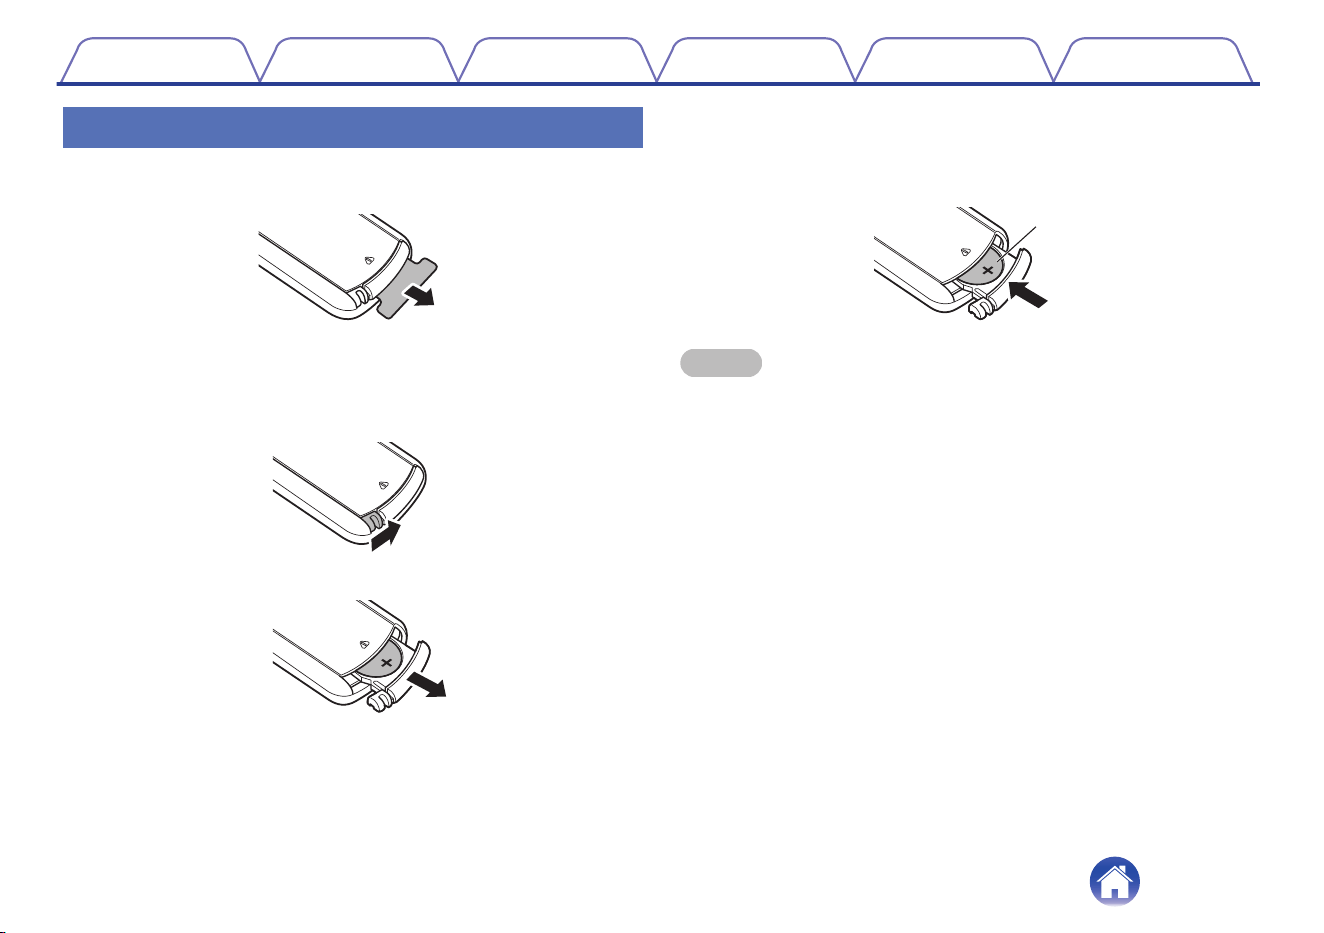
Before using the remote control unit
The remote control unit has a built-in lithium battery.
Pull out the insulation sheet before use.
o
Replacing the battery
1. Lightly slide the catch of the battery case on the back of the remote
control in the rightward direction.
2. While pushing the catch lightly to the right, pull out the battery case.
3. Remove the old battery, then insert a new coin-shaped lithium
battery (CR2025) into the battery compartment so that the + symbol
engraved on the battery faces upwards.
4. Replace the battery case in the original position.
CR2025
NOTE
0
If the battery should have a leakage, immediately replace and dispose of the
battery. In this case, there is a risk of burn when the liquid comes in contact with
skins or clothes, so a great care should be taken. If the liquid accidentally comes in
contact, wash with tap water and consult a doctor.
0
Remove the battery from the remote control unit if it will not be in use for long
periods.
Contents Connections Playback Settings Tips Appendix
11

Part names and functions
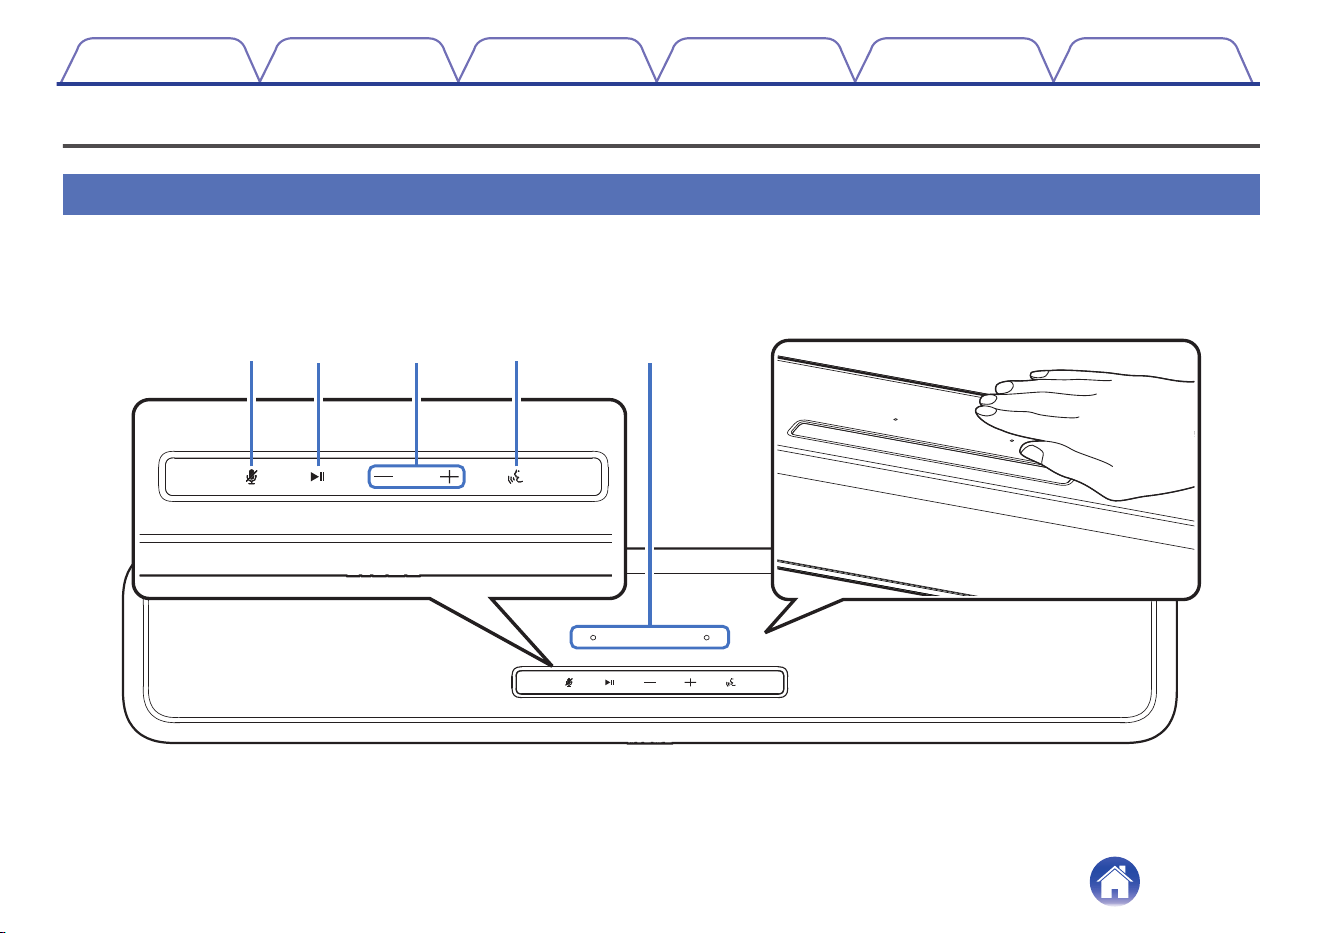
Sound bar
o
Top panel
Hold your hand over the top of the sound bar to show the operation panel keys. Touch these keys to perform operations. Moving your hand away from
the area hides the keys.
e
q
r
w
t
For details, see the next page.
Contents
Connections Playback Settings Tips Appendix
13
et
q
r
w
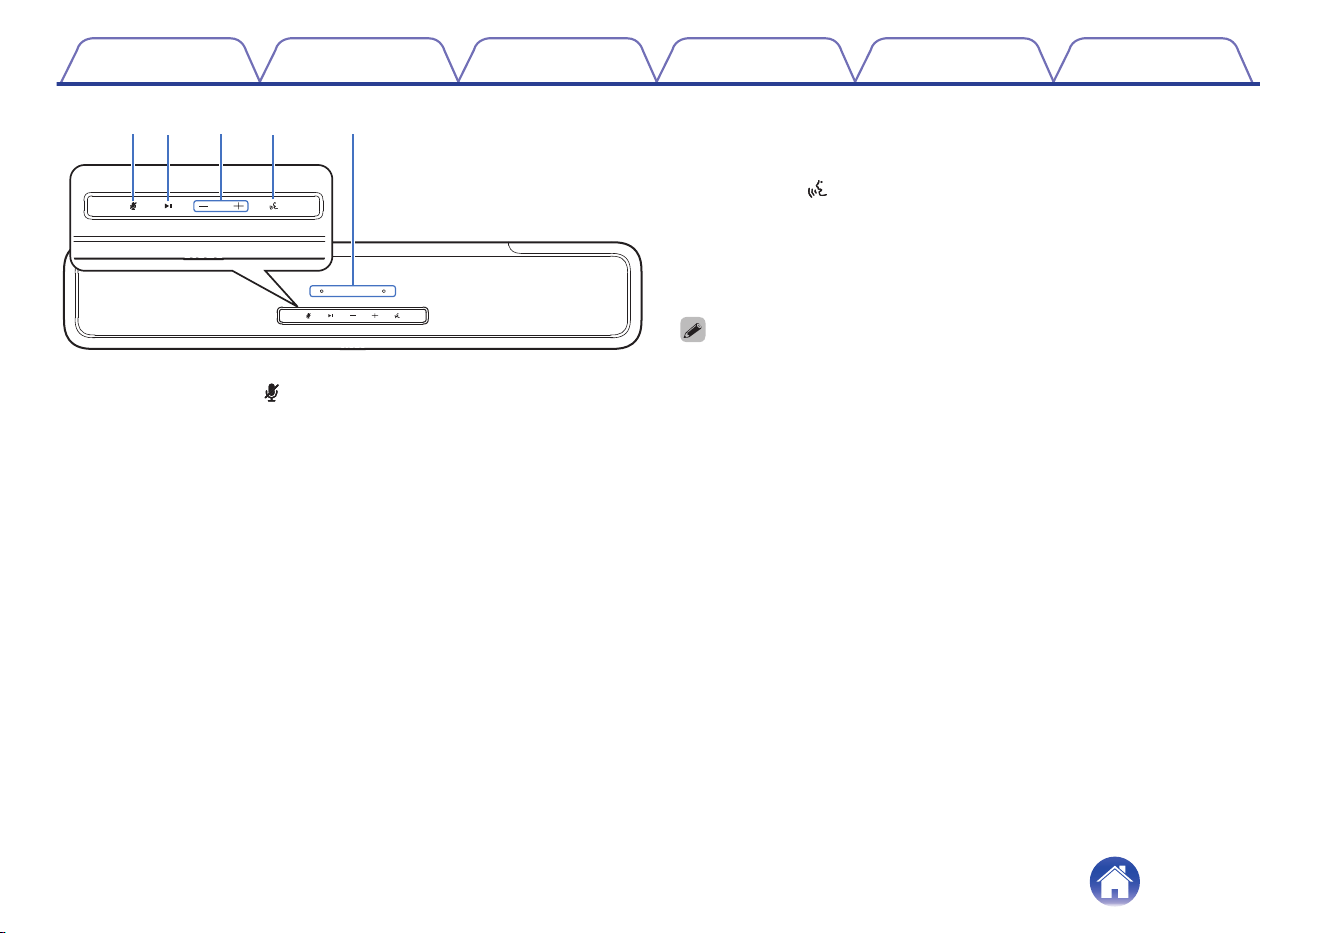
A
Microphone off key ( )
This disables the microphone function. In the state with the microphone
function disabled, Alexa does not respond even if called. Use this in
cases such as when you want to protect your privacy. (v p. 59)
B
Play/Pause key (1/3)
0
Press this key to pause during playback. If pressed while paused or
stopped, resumes playback from the last track played.
0
Press the key twice to play the next track.
0
Press the key three times to restart the current track or play the
previous track.
0
Press and hold the key for 5 seconds to enter deep standby mode.
(v p. 73)
C
Volume keys (+, –)
These adjust the volume level. (v p. 28)
D
Action key ( )
This calls Alexa. You can use voice control without saying “Alexa”.
(v p. 59)
E
Microphone
This is the microphone to talk to Alexa. (v p. 59)
0
Do not put anything on top of the sound bar. Doing so may lead accidental
operations.
0
The light of the operation panel keys is activated using a small amount of static
electricity from the human body. Due to the nature of this mechanism, the keys
may light up or blink due to noise from the surrounding environment or connection
cables, but it is not malfunctioning.
Contents Connections Playback Settings Tips Appendix
14
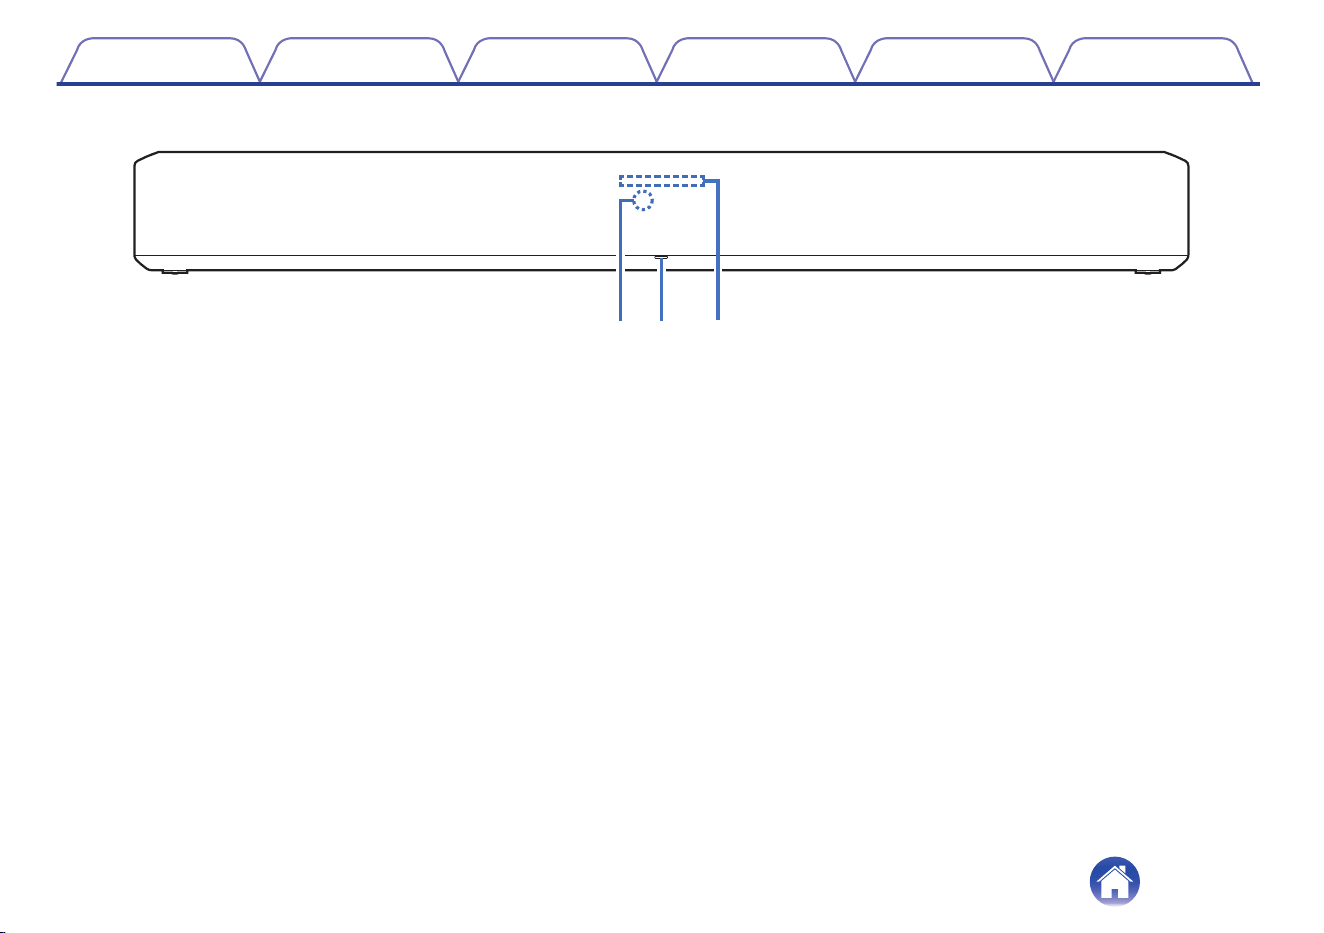
o
Front panel
q
w e
A
Remote control sensor
This receives signals from the remote control unit. (v p. 12)
B
Status LED
Please refer to the “Status LED table” (v p. 74) for LED color and
state meaning.
C
Light bar
While Alexa responds, the LED lights up. (v p. 59)
Contents Connections Playback Settings Tips Appendix
15
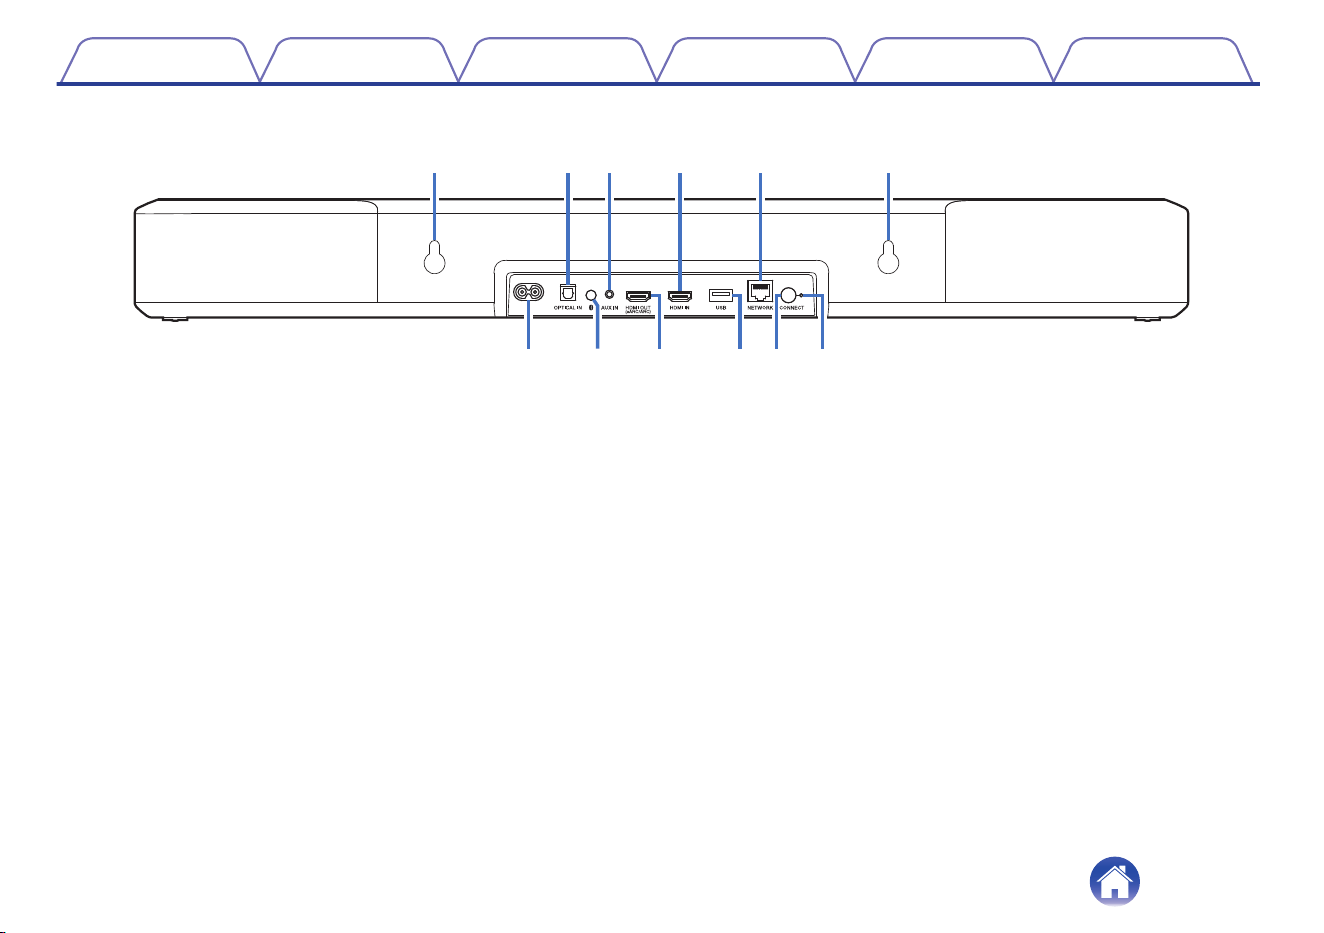
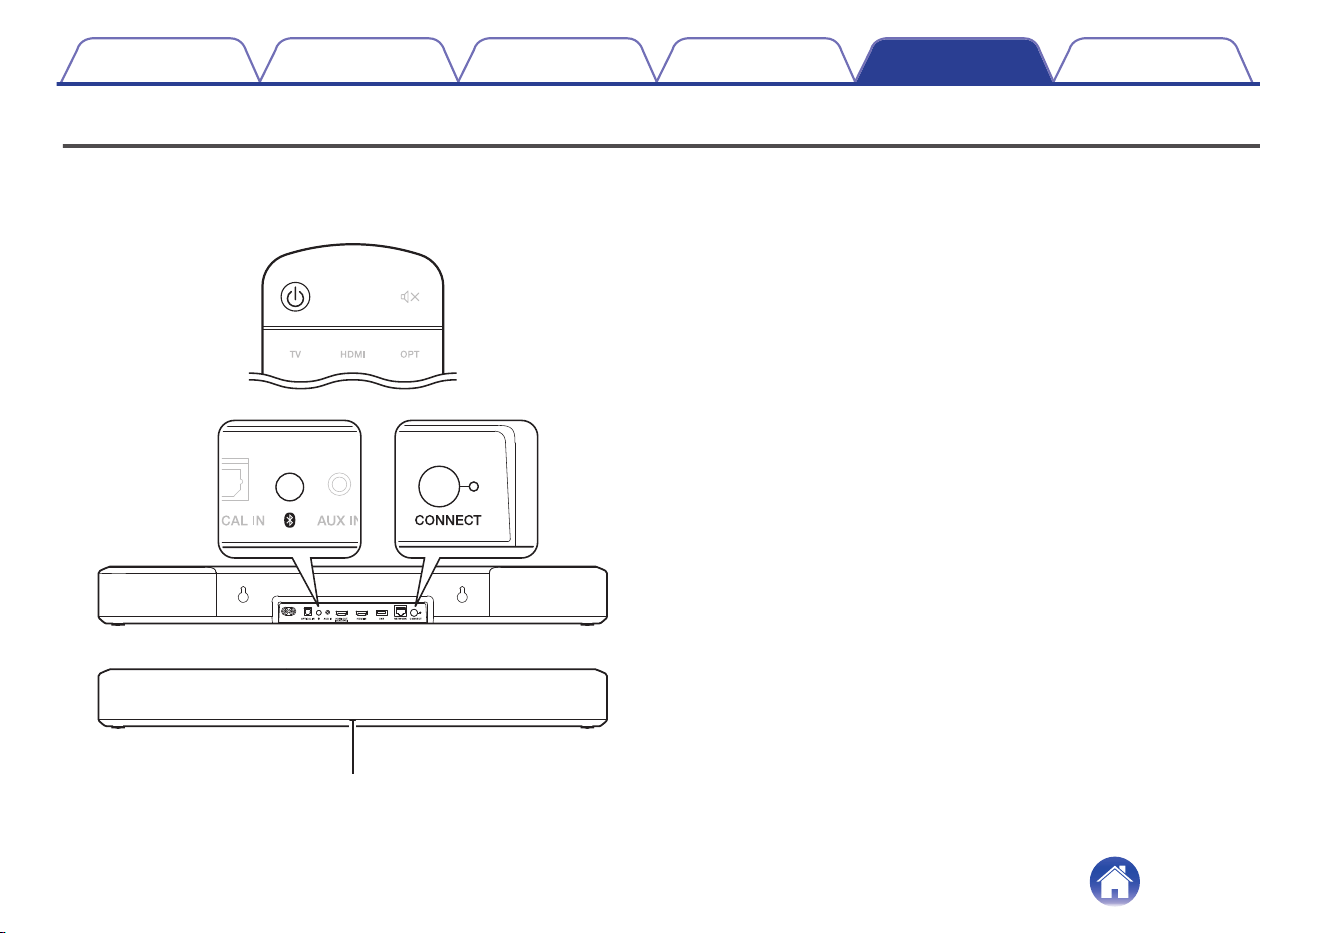
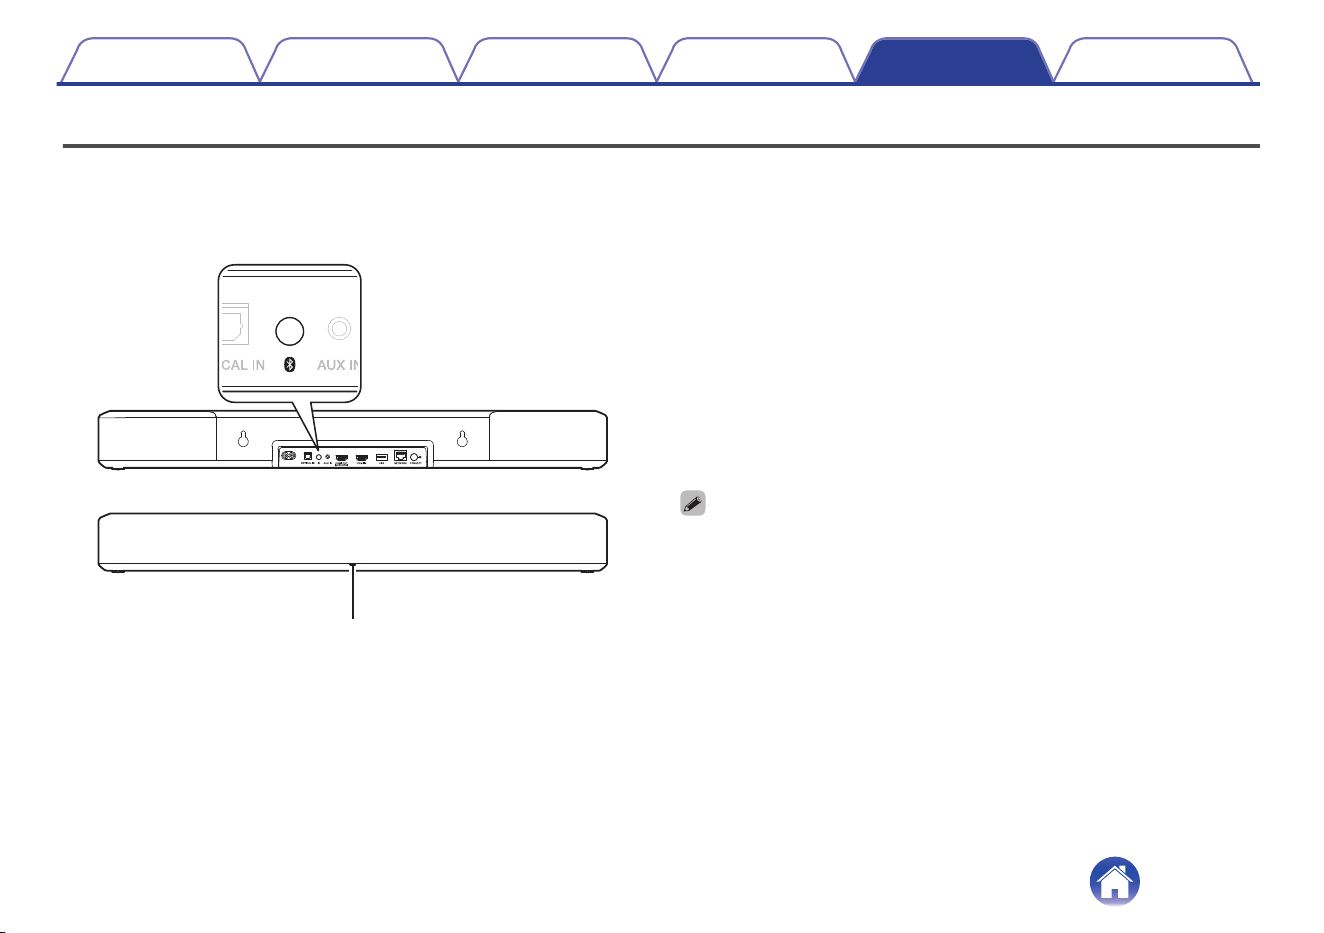
o
Rear panel
yiouQ
0
Q
1
qqtrew
A
Wall hook hole
Used to mount the sound bar on a wall. (v p. 20)
B
Optical digital input connector (OPTICAL IN)
Use the included optical cable to connect a TV with an optical digital
terminal. (v p. 23)
C
Analog audio input connector (AUX IN)
Use a commercially available 3.5 mm stereo audio cable to connect a
TV with an AUX audio output connector. (v p. 24)
D
HDMI IN connector
Used to connect to the HDMI equipment with an HDMI cable.
(v p. 25)
E
NETWORK connector
Used to connect this unit to a wired Ethernet network. (v p. 33)
F
Power inlet
Used to connect the power cord. (v p. 26)
G
Bluetooth button (g)
0
Switches the input source to “Bluetooth”. (v p. 29)
0
Used to pair with Bluetooth devices. (v p. 29)
H
HDMI OUT connector (eARC/ARC)
Use the included HDMI cable to connect an eARC or ARC function-
compatible TV. (v p. 21)
I
USB port
This is used to connect USB storages (such as USB flash drives).
(v p. 45)
J
CONNECT button
Used for Wi-Fi setup.
K
CONNECT LED
Indicates the status of this unit. (v p. 74)
Contents
Connections Playback Settings Tips Appendix
16
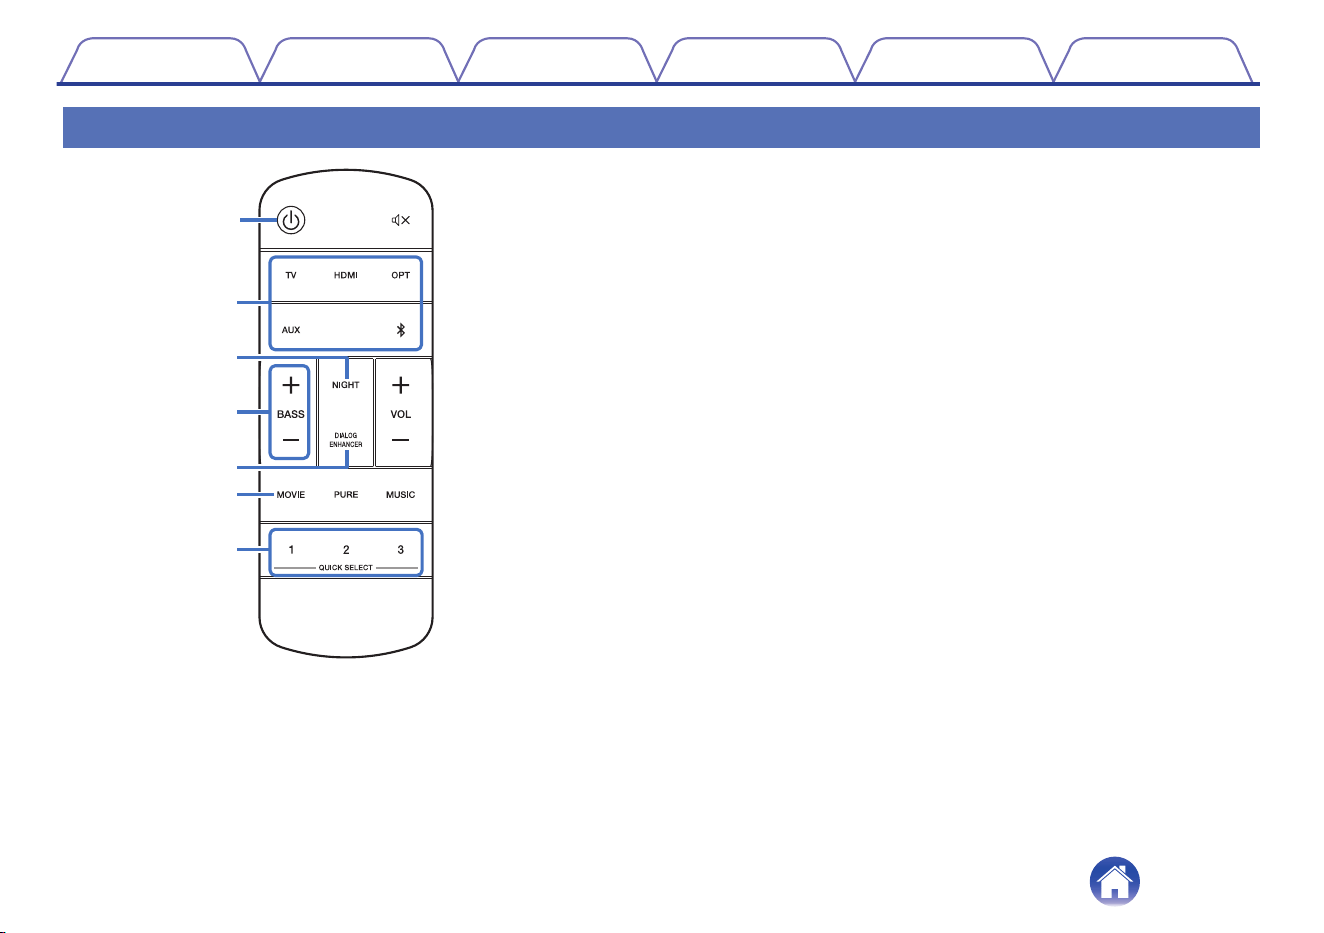
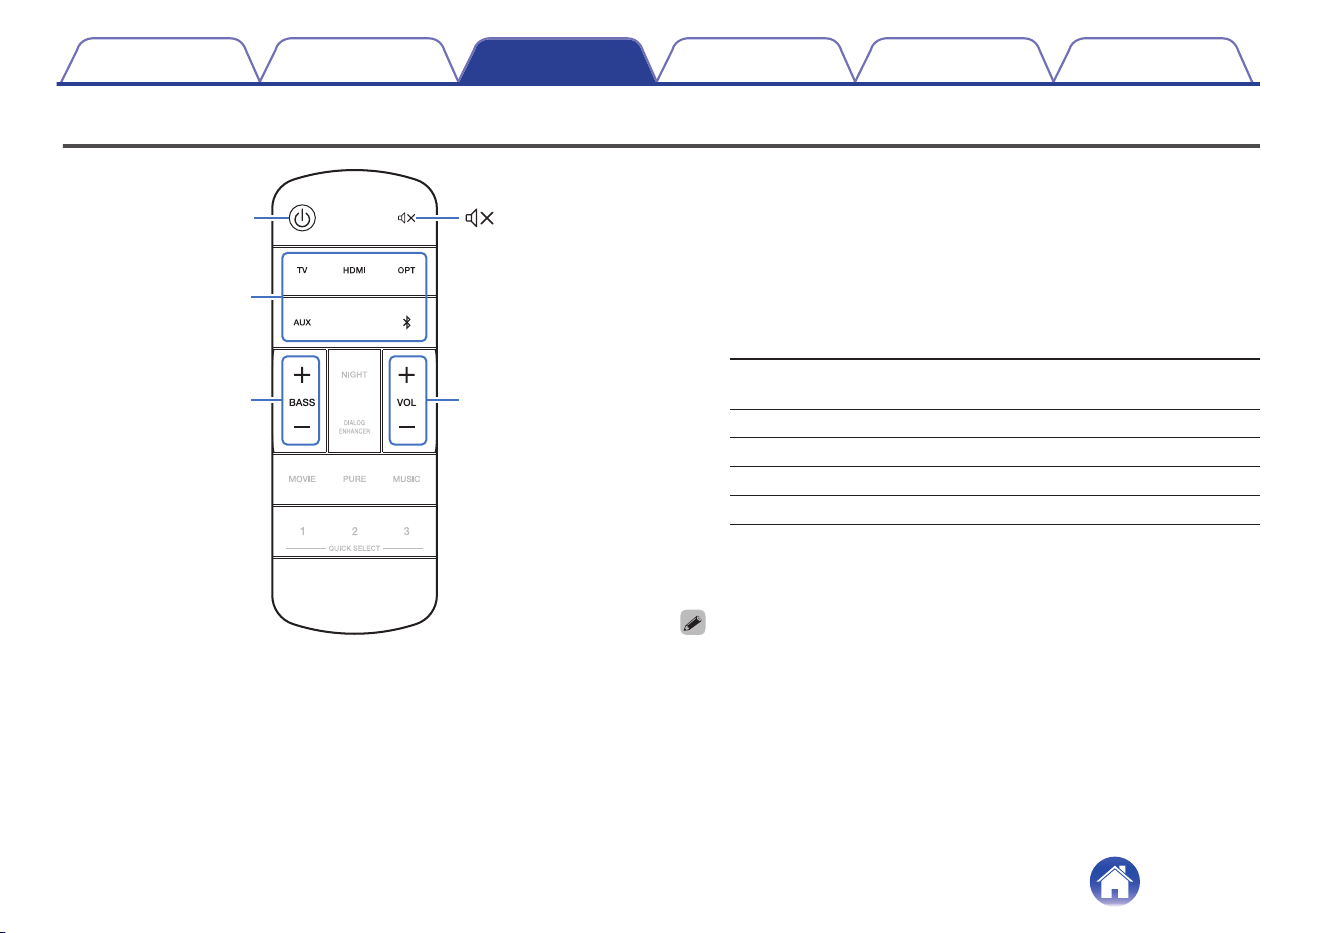
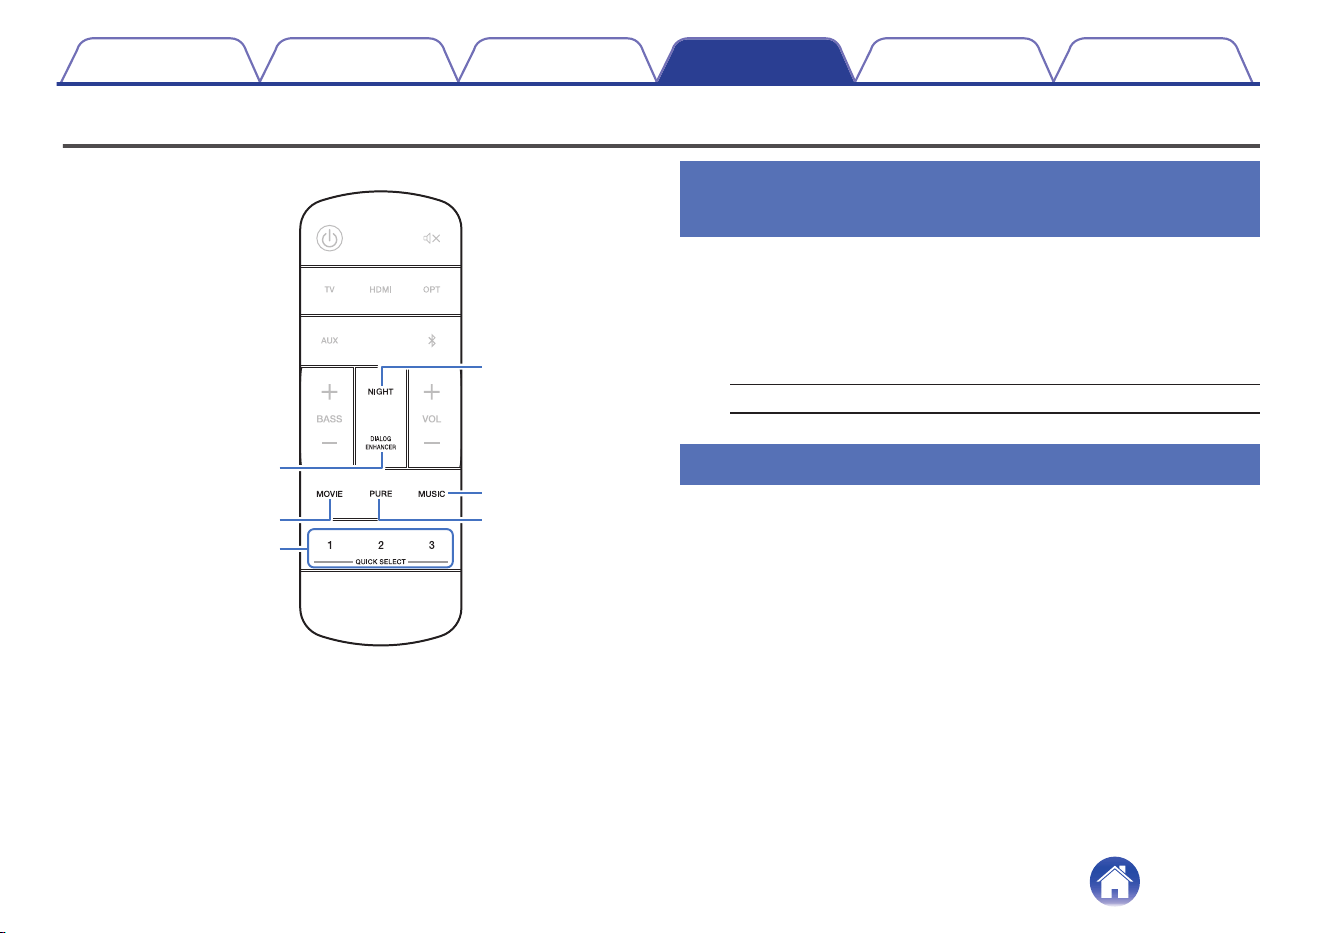
Remote control unit
q
w
r
y
e
t
u
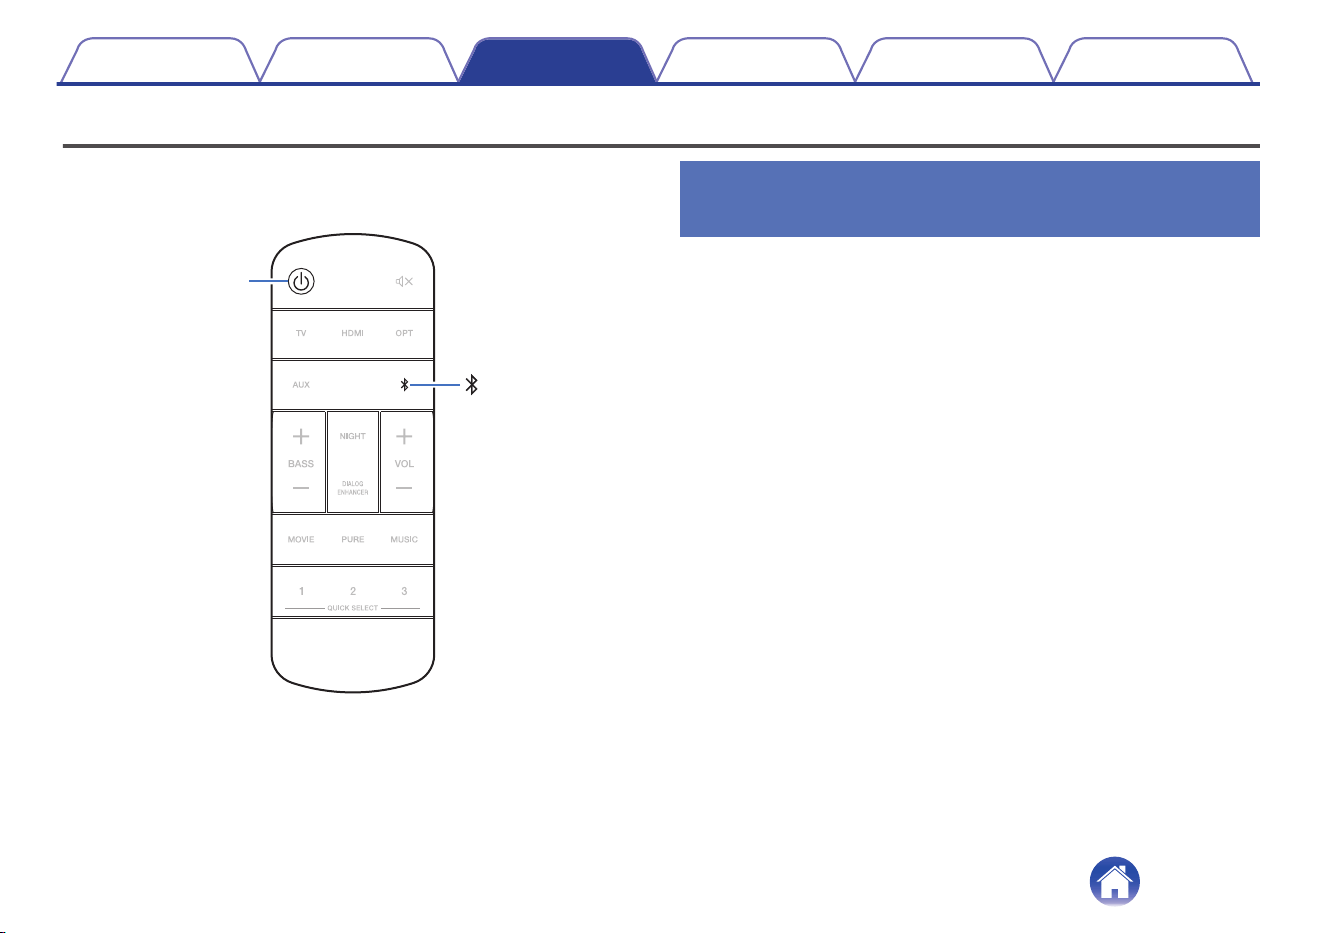
A
Power operation button (c)
0
Press the button to turn the sound bar power on/off (quick start
mode). (v p. 27)
0
Press and hold the button for 5 seconds to enter deep standby
mode. (v p. 73)
B
Input source buttons (TV, HDMI, OPT, AUX, g)
This selects the input source. (v p. 27)
C
Night mode button (NIGHT)
Compresses the dynamic range (difference between loud and soft
sounds) to make audio easier to hear at low volumes. (v p. 50)
D
Bass volume control buttons (BASS +, –)
This setting adjusts the volume level for the bass. (v p. 28)
E
Dialog enhancer button (DIALOG ENHANCER)
Adjust the volume of dialog in movies, vocals in music, etc. so these
can be heard more easily. (v p. 50)
F
Movie mode button (MOVIE)
Switches to the sound mode suitable for enjoying movies and TV
programs. (v p. 51)
G
Quick select buttons (QUICK SELECT 1 - 3)
Register input source, volume level and sound mode, night mode and
dialog enhancer settings to these buttons or recall those settings.
(v p. 56)
Contents
Connections Playback Settings Tips Appendix
17

Q2
Q1
i
Q0
o
H
Remote control signal transmitter
This transmits signals from the remote control unit. (v p. 12)
I
Mute button (h)
This mutes the output audio. Press again to unmute. (v p. 28)
J
Volume buttons (VOL +, –)
These adjust the volume level. (v p. 28)
K
Music mode button (MUSIC)
Switches to the sound mode suitable for enjoying music. (v p. 51)
L
Pure mode button (PURE)
Enjoy high quality sound that is faithful to the original source.
(v p. 51)
Contents Connections Playback Settings Tips Appendix
18
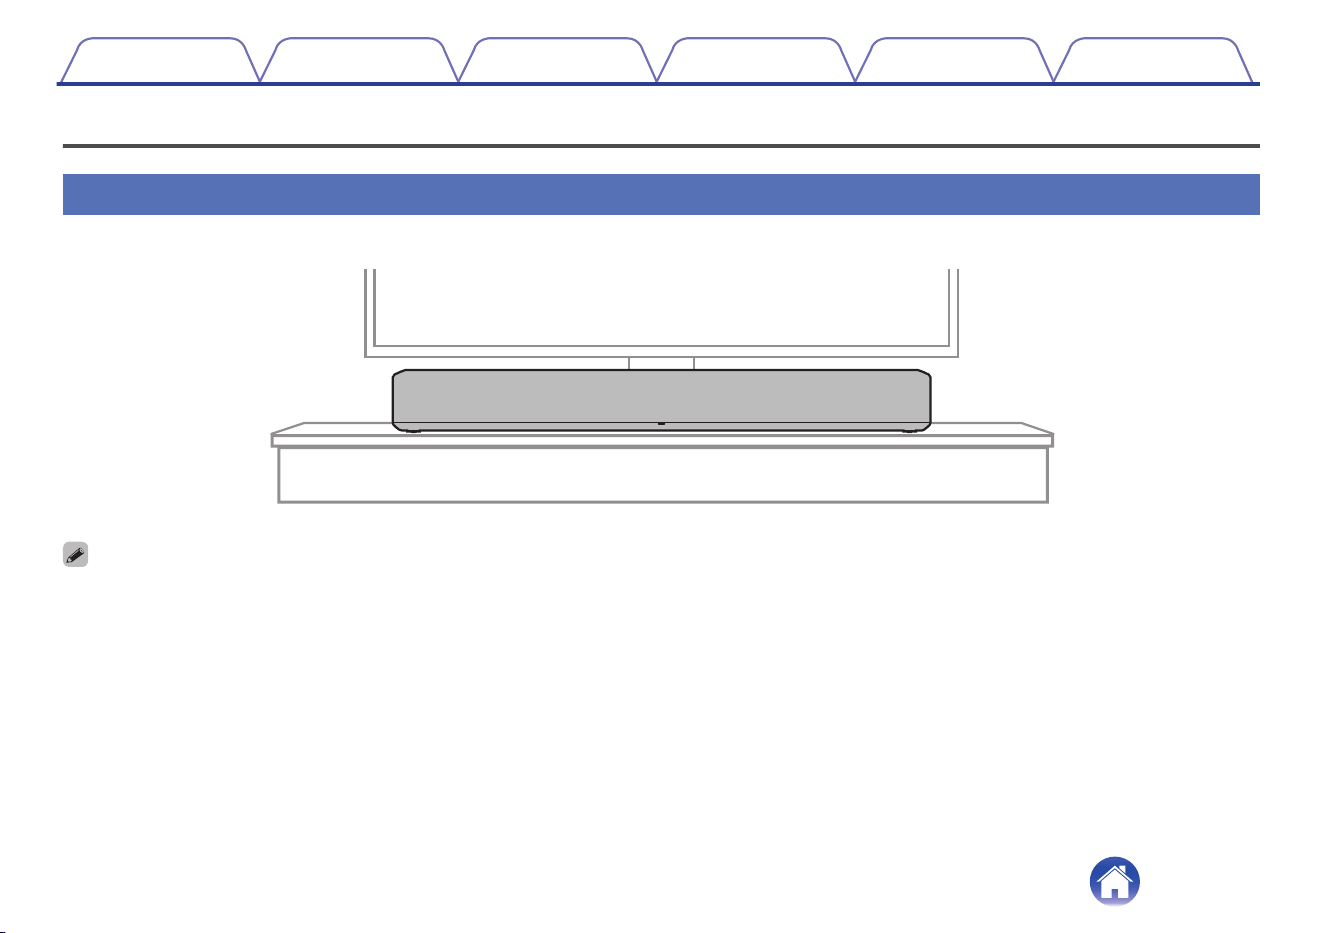
o
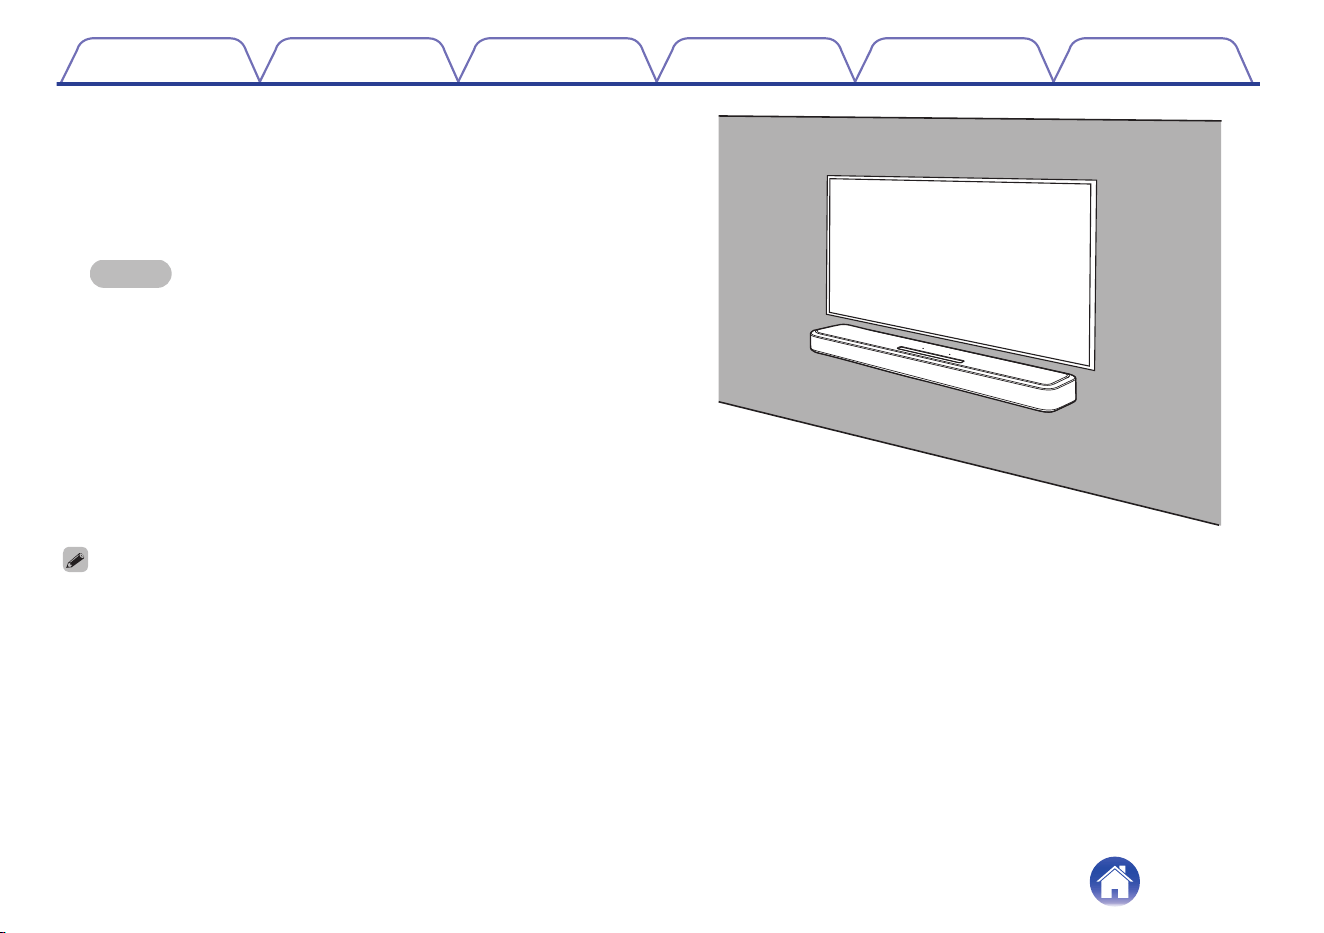
When hanging the sound bar on a wall
The sound bar has a wall hook hole to hang it on a wall. When hanging
it on a wall, position it in a flat, vertical position.
To ensure safety, request a contractor perform the mounting work
when mounting onto a wall.
NOTE
0
In order to use the unit safely, do not place items on or hang items from the
unit.
0
Be sure to fix connection cables to the wall to ensure that cannot be pulled or
tripped over causing this unit to fall. Check that the unit is mounted safely after
the mounting work is complete.
0
Also, periodically check the safety of this unit and whether there is a possibility
that the unit may fall.
0
Denon cannot accept any responsibility for damage, injury or accidents
caused by problems with the mounting location or mounting method.
0
When hanging it on a wall, use the included wall mount template.
[How to use the wall mount template]
A
Affix the template to the location you would like to mount the sound bar.
B
Screw in the wall mount screws by following the template.
Consult a construction professional about the proper wall mount screws for the material and strength of your wall.
C
Remove the template from the wall.
D
Mount the included wall mount spacer on the spine of the sound bar.
Mounting the wall mount spacer creates a space for cords to pass through between the sound bar and the wall.
E
Mount the sound bar on the wall.
Contents Connections Playback Settings Tips Appendix
20

Connecting a TV
How to connect a TV depends on the connectors and functions equipped on the TV.
0
Enable the TV’s HDMI control function when using an HDMI cable to connect this unit to your TV. (See the TV owner’s manual for details.)
0
Turn off the TV’s speaker or minimize the volume when using this unit.
Roku TV Ready™
0
The Soundbar is Roku TV Ready certified. Connect the Soundbar to a Roku TV™ with the included HDMI cable and follow the on-screen setup
instructions.
Contents Connections Playback Settings Tips Appendix
21
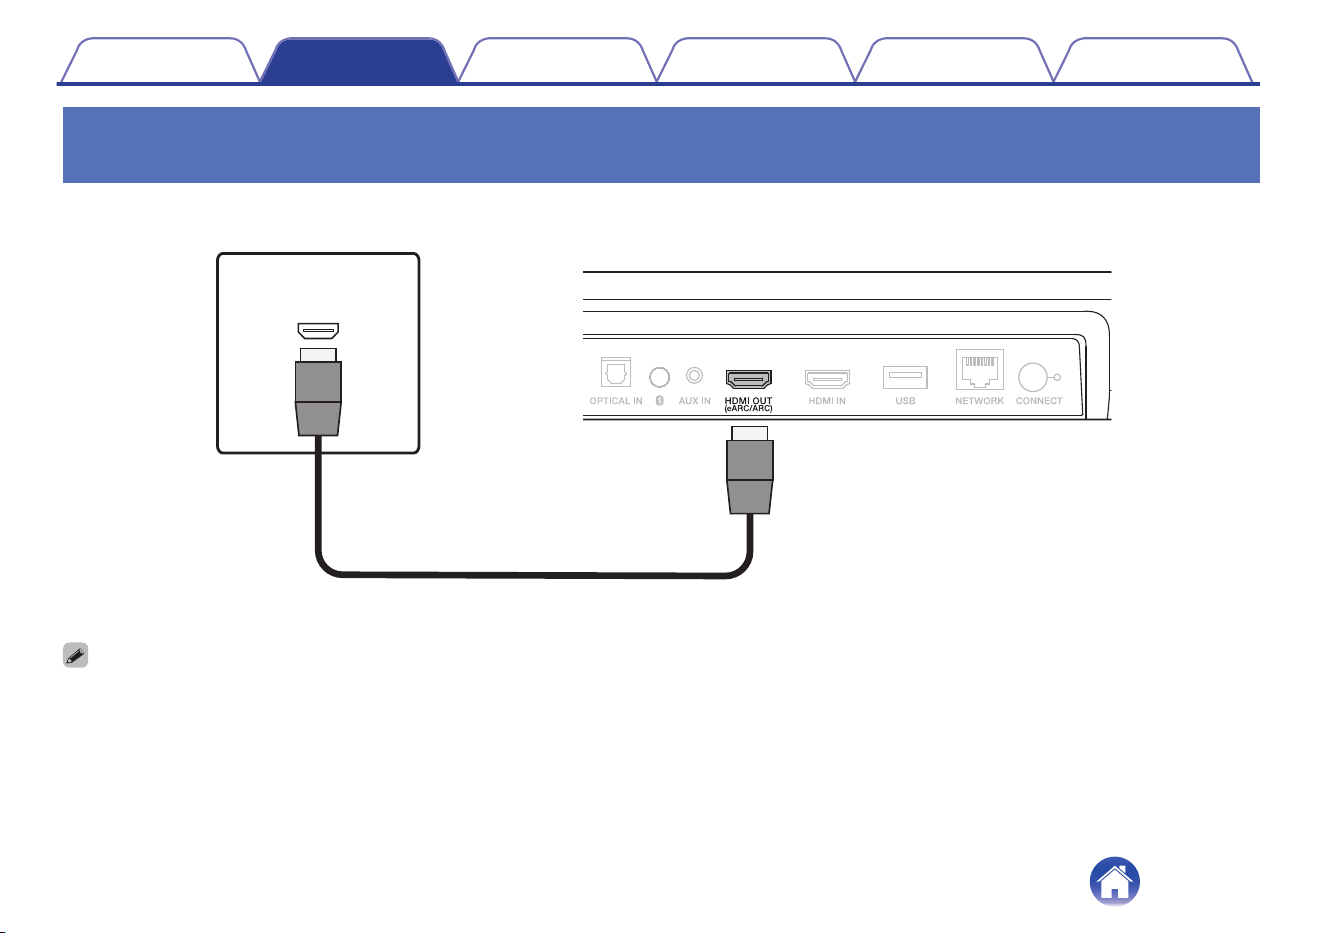
TV equipped with an HDMI connector and compatible with the eARC (Enhanced
Audio Return Channel) or ARC (Audio Return Channel)
Use the included HDMI cable to connect this unit to an eARC or ARC function-compatible TV.
Sound bar
HDMI INPUT
eARC/ARC
TV
HDMI cable (included)
0
The TV also needs to be compatible with the eARC or ARC function.
Contents Connections Playback Settings Tips Appendix
22
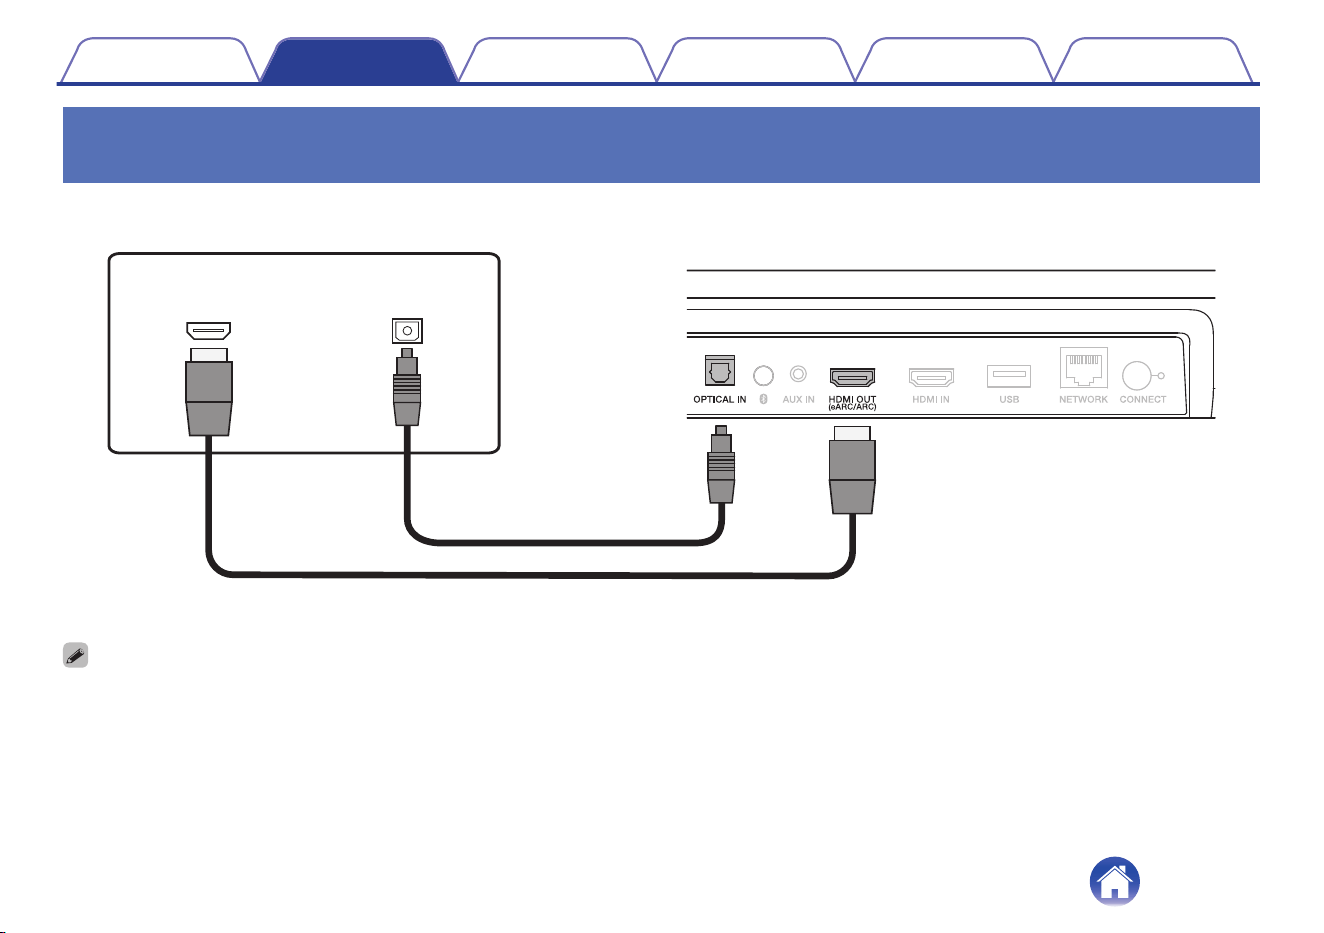
TV equipped with an HDMI connector and incompatible with the eARC or ARC / TV
equipped with an optical digital connector
Use the included HDMI and optical cables to connect this unit to your TV.
Sound bar
HDMI INPUT
DIGITAL AUDIO
OPTICAL OUTPUT
TV
HDMI cable (included)
Optical cable (included)
0
Line up the optical cable with the shape of the terminal to insert.
Contents Connections Playback Settings Tips Appendix
23
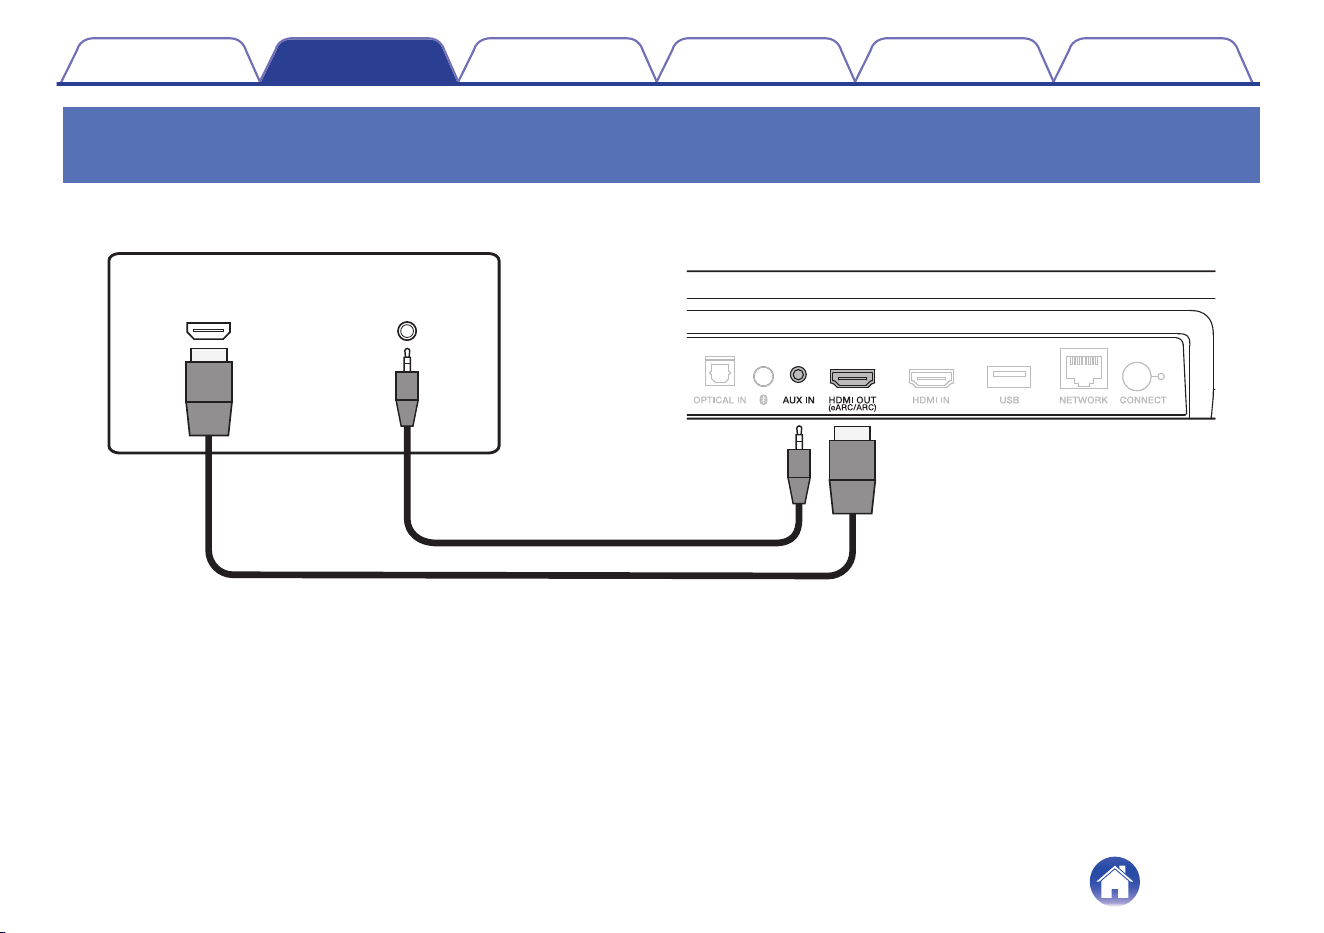
TV equipped with an HDMI connector and incompatible with the eARC or ARC / TV
equipped with an analog connector
Use the included HDMI cable and a commercially available 3.5 mm stereo audio cable to connect this unit to your TV.
Sound bar
HDMI INPUT
AUX AUDIO
OUTPUT
TV
HDMI cable (included)
3.5 mm stereo audio cable
(sold separately)
Contents Connections Playback Settings Tips Appendix
24
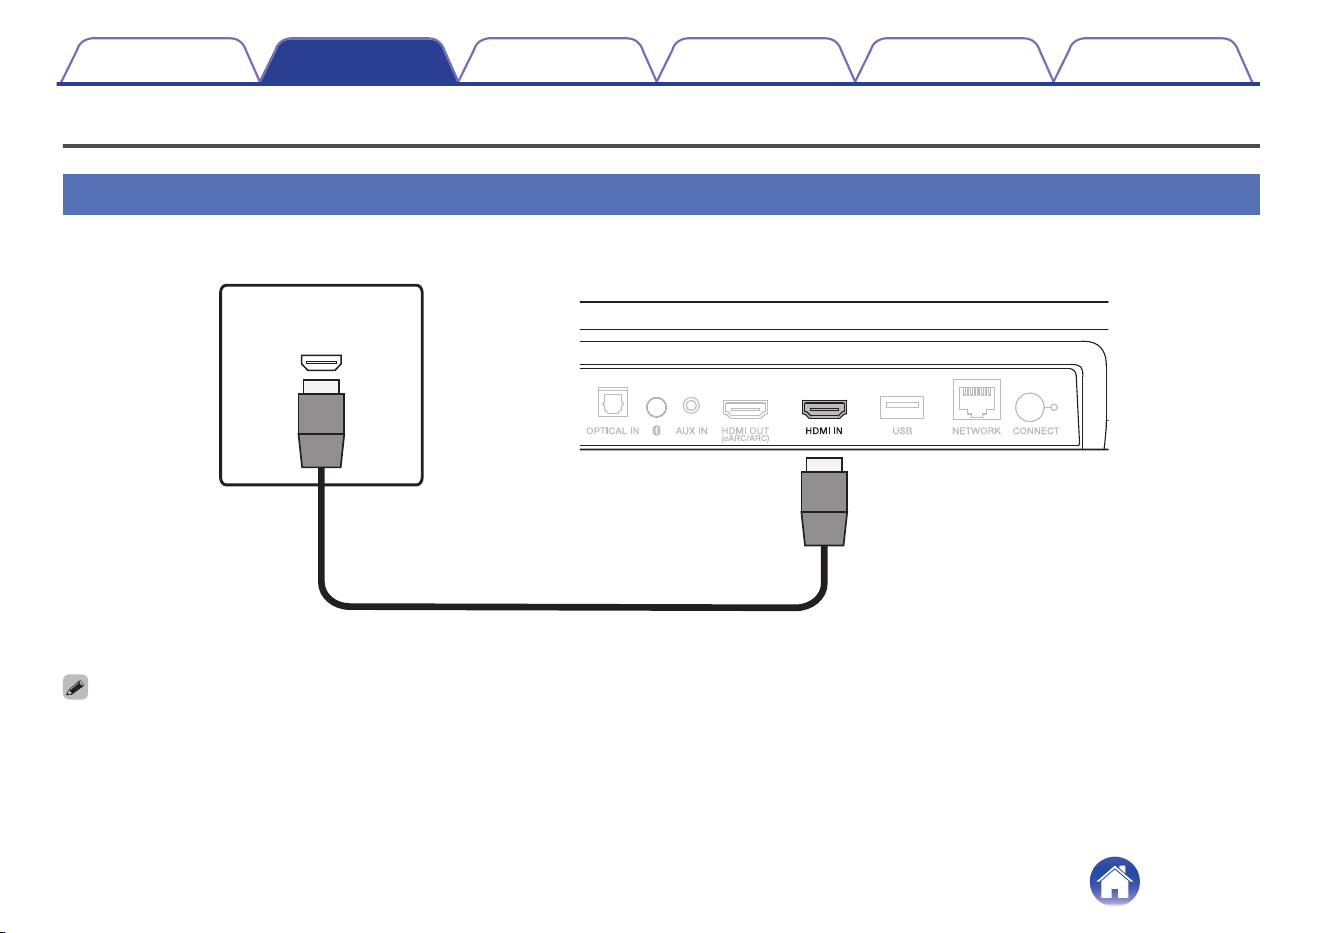
Connecting a playback device
Connecting an HDMI device
Use a commercially available HDMI cable to connect a Blu-ray disc player, game device or similar device to this unit.
Sound bar
HDMI
OUTPUT
HDMI device
HDMI cable (sold separately)
0
When connecting this unit to a device that is compatible with the 4K functions, use a “High Speed HDMI cable with Ethernet” that displays the HDMI logo.
Contents Connections Playback Settings Tips Appendix
25
Playing TV, movies and music
X
Input source
buttons
VOL
+
,
–
BASS
+
,
–
1
Turn on the power of the TV and connected devices.
2
Press c to turn on power to the sound bar.
3
Press the input source button.
When the button is pressed, the status LED blinks in blue, and the
input source switches.
TV:
Switches the input source to TV (Default:
HDMI OUT (eARC/ARC)).
HDMI: Switches the input source to HDMI IN.
OPT: Switches the input source to OPTICAL IN.
AUX: Switches the input source to AUX IN.
g:
Switches the input source to Bluetooth.
4
Play the device connected to this unit.
For details, see the relevant device manual.
0
Connect an HDMI control-compatible TV and this unit via HDMI and enable the
HDMI control to enable linked control from either device. (v p. 71)
Contents Connections Playback Settings Tips Appendix
27

Adjusting the volume
1
Use VOL + or VOL – to adjust the volume.
When the buttons are pressed, the status LED blinks in blue, and the
volume increases or decreases.
Adjusting the bass volume
1
Use BASS + or BASS – to adjust the bass volume.
When the buttons are pressed, the status LED blinks in blue, and the
bass volume increases or decreases.
Turning off the sound temporarily
(Muting)
1
Press h.
The status LED blinks slowly in blue.
0
To cancel mute, either adjust the sound volume or press h again.
Contents Connections Playback Settings Tips Appendix
28
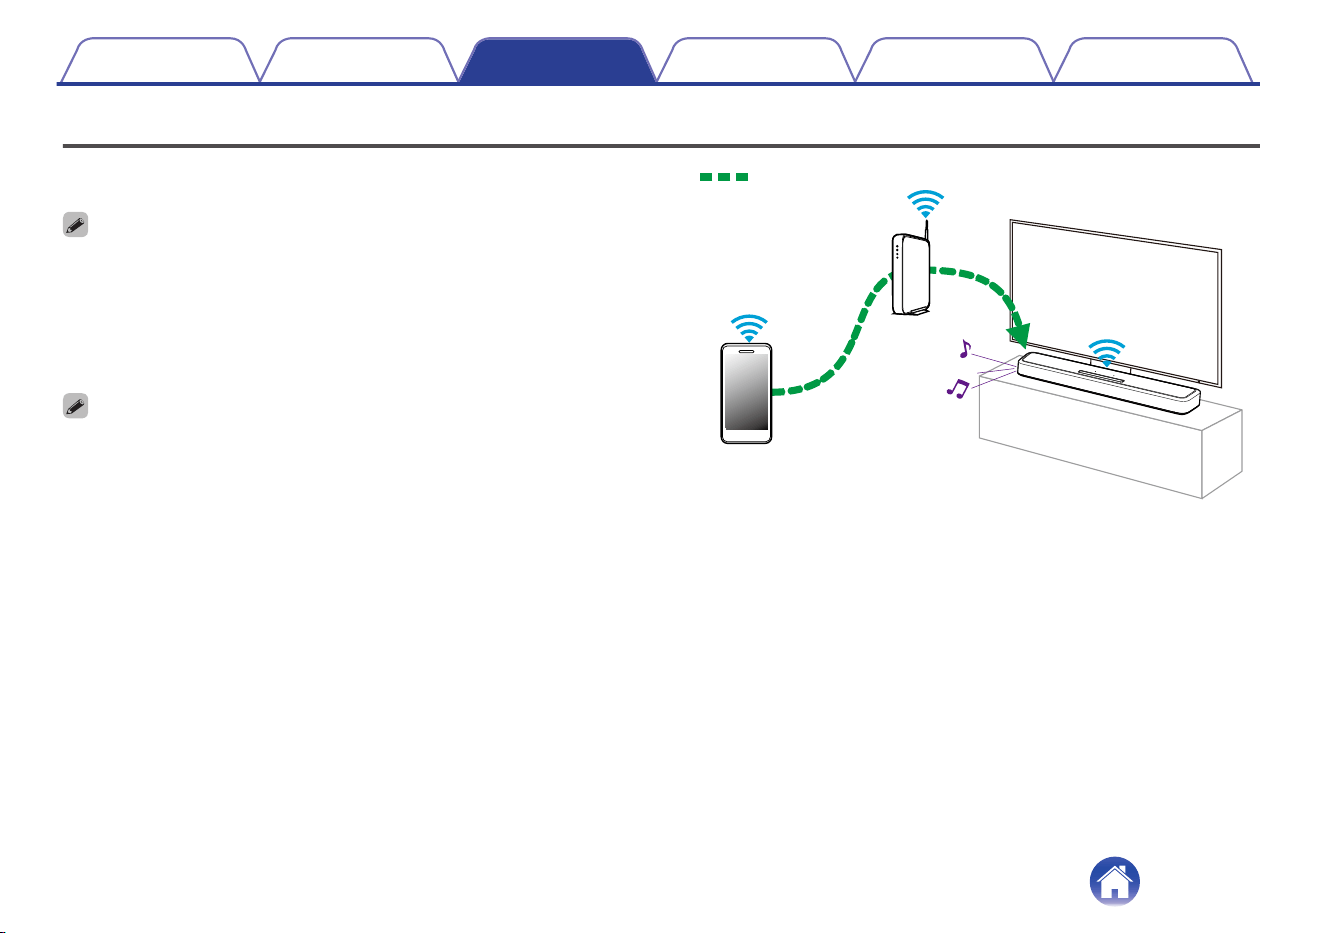
Playing music on a Bluetooth device
Music files stored on Bluetooth devices such as smartphones, digital
music players, etc. can be enjoyed on this unit by pairing and connecting
this unit with the Bluetooth device.
X
Pairing a Bluetooth device for the first
time
Pair a Bluetooth device with this unit.
Once the Bluetooth device has been paired, it does not need to be paired
again.
1
Press c to turn on power to the unit.
2
Press g to switch the input source to “Bluetooth”.
Automatically switches to pairing mode the first time it is used.
In pairing mode, the status LED repeatedly blinks 2 times in green.
3
Activate the Bluetooth settings on your Bluetooth
device.
4
Select “Denon Home Sound Bar 550” (Default) from the
list of devices displayed on the screen of the Bluetooth
device.
The status LED blinks in blue and this unit and the Bluetooth device
are paired.
Contents
Connections Playback Settings Tips Appendix
29

Pairing with other Bluetooth devices
1
Press c to turn on power to the unit.
2
Press g to switch the input source to “Bluetooth”.
3
Activate the Bluetooth settings on your Bluetooth
device.
4
Press and hold g for 3 seconds.
This unit enters pairing mode, and the status LED repeatedly blinks
2 times in green.
5
Select “Denon Home Sound Bar 550” (Default) from the
list of devices displayed on the screen of the Bluetooth
device.
The status LED blinks in blue and this unit and the Bluetooth device
are paired.
Playing music with a paired Bluetooth
device
1
Press c to turn on power to the unit.
2
Press g to switch the input source to “Bluetooth”.
3
Activate the Bluetooth settings on your Bluetooth
device.
The status LED blinks in blue and connects to the last Bluetooth
device connected. If the connection is cut, perform connection
again.
4
Play music using any app on your Bluetooth device.
Contents Connections Playback Settings Tips Appendix
30

Getting the HEOS App
You can use many online music streaming services from the HEOS App. Depending upon your geographical location, there are several options to choose
from.
Download the HEOS App for iOS or Android by searching App Store, Google Play store or Amazon Appstore for “HEOS”.
Contents Connections Playback Settings Tips Appendix
31
Setting up first HEOS built-in device
Once you have placed this unit in your listening room and have
downloaded the HEOS App, you are ready to configure this unit for music
playback. This involves following a few simple steps to get this unit
connected to your existing home network:
0
DO NOT connect the Ethernet cable if you are connecting this unit to a wireless
network. If you are connecting this unit to a wired network, use an Ethernet cable
sold separately to connect this unit to your network or router.
1
Make sure your mobile device is connected to your
wireless network (the same network this unit
connected to).
You can check this in the “Settings” - “Wi-Fi” menu of your iOS or
Android device.
0
Activate the Bluetooth setting on your mobile device.
0
If your wireless network is secure, make sure you know the password to join
your network.
2
Launch the HEOS App on your
mobile device.
3
Tap the “Setup Now” button at the top of the screen.
4
Follow the instructions to add this unit to your wireless
network and to select an input on this unit.
Contents Connections Playback Settings Tips Appendix
32
Adding more HEOS built-in devices
The HEOS system is a true multiroom audio system that automatically
synchronizes audio playback between multiple HEOS built-in devices so
that the audio coming from different rooms is perfectly in sync and always
sounds amazing! You can easily add up to 32 HEOS built-in devices to
your HEOS system.
o
Adding wired HEOS built-in devices
Just connect the HEOS built-in devices to your home network using an
Ethernet cable and the HEOS built-in device will appear on your HEOS
App as a new room in the Rooms screen.
At your convenience, you can assign a name to the HEOS built-in
device to indicate which room you have it placed in.
0
Use only a shielded STP or ScTP LAN cable which is easily available at
electronics stores (CAT-5 or greater recommended).
0
Do not connect a NETWORK connector directly to the LAN port/Ethernet
connector on your computer.
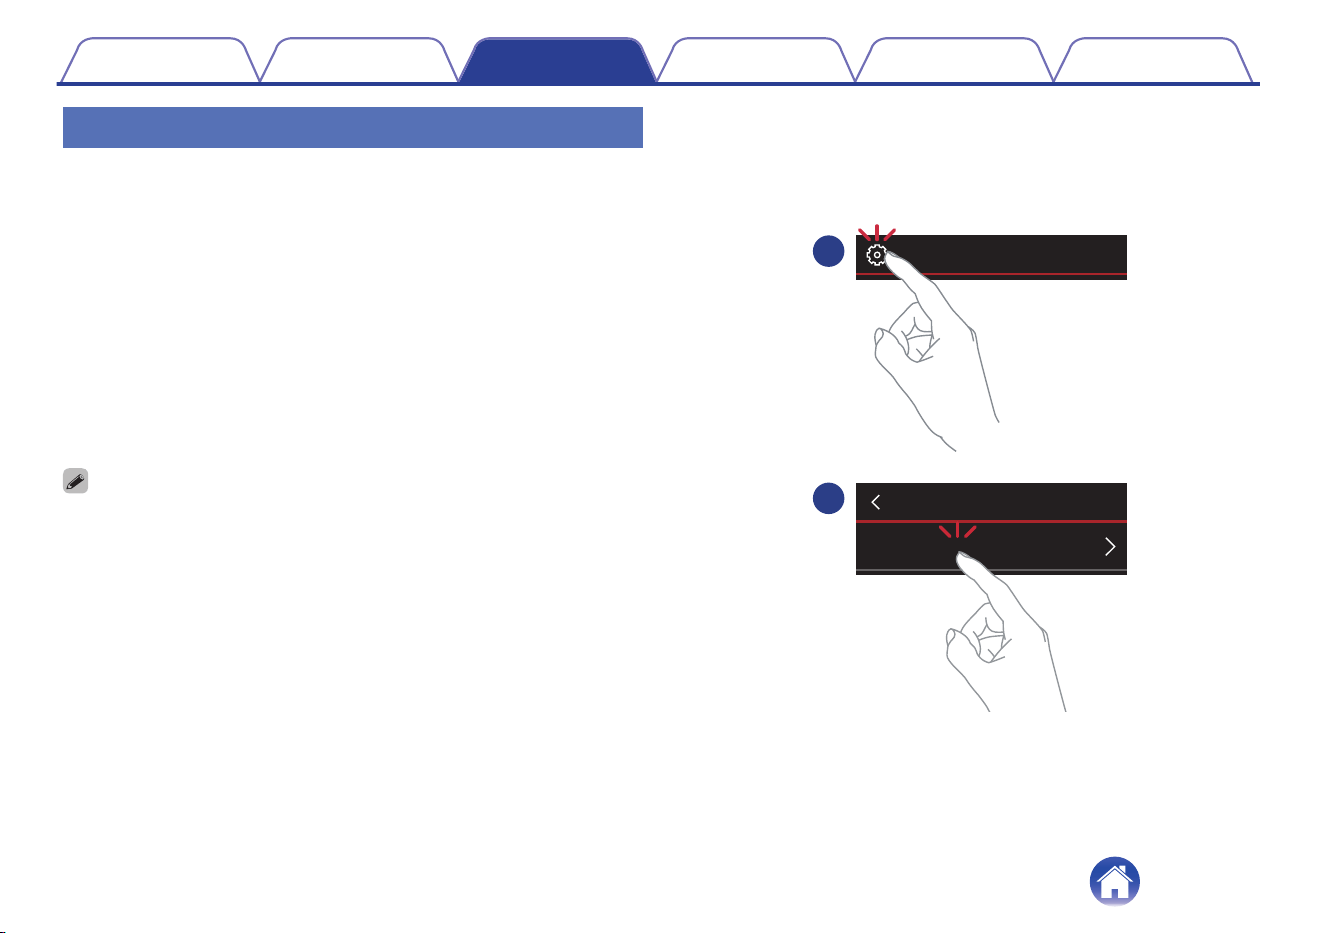
o
Adding wireless HEOS built-in devices
You can add additional wireless HEOS built-in devices to your HEOS
system by selecting “Add Device” from the HEOS App’s settings menu
and follow the instructions:
1
2
Add Device
Settings
Music
Contents Connections Playback Settings Tips Appendix
33

HEOS Account
HEOS Accounts can be registered by tapping “Music” tab - “Settings” icon
a in the HEOS App.
o
What is a HEOS Account?
A HEOS Account is master account or “keychain” for managing all of
your HEOS music services with one single username and password.
o
Why do I need a HEOS Account?
With the HEOS Account you just have to enter your music services
login names and passwords one time. This allows you to easily and
quickly use multiple controller apps on different devices.
You just log into your HEOS Account on any device and you will have
access to all of your associated music services, play history and
custom playlists, even if you are at a friend’s house listening to music
on their HEOS system.
o
Signing up for a HEOS Account
You will be instructed to signup for a HEOS Account the first time you
try to access any music service from the main “Music” menu of the
HEOS App.
o
Changing your HEOS Account
1
Tap the “Music” tab.
2
Select the Settings icon a in the upper left corner of
the screen.
3
Select “HEOS Account”.
4
Change your location, change your password, delete
your account or sign out of your account.
Contents Connections Playback Settings Tips Appendix
34
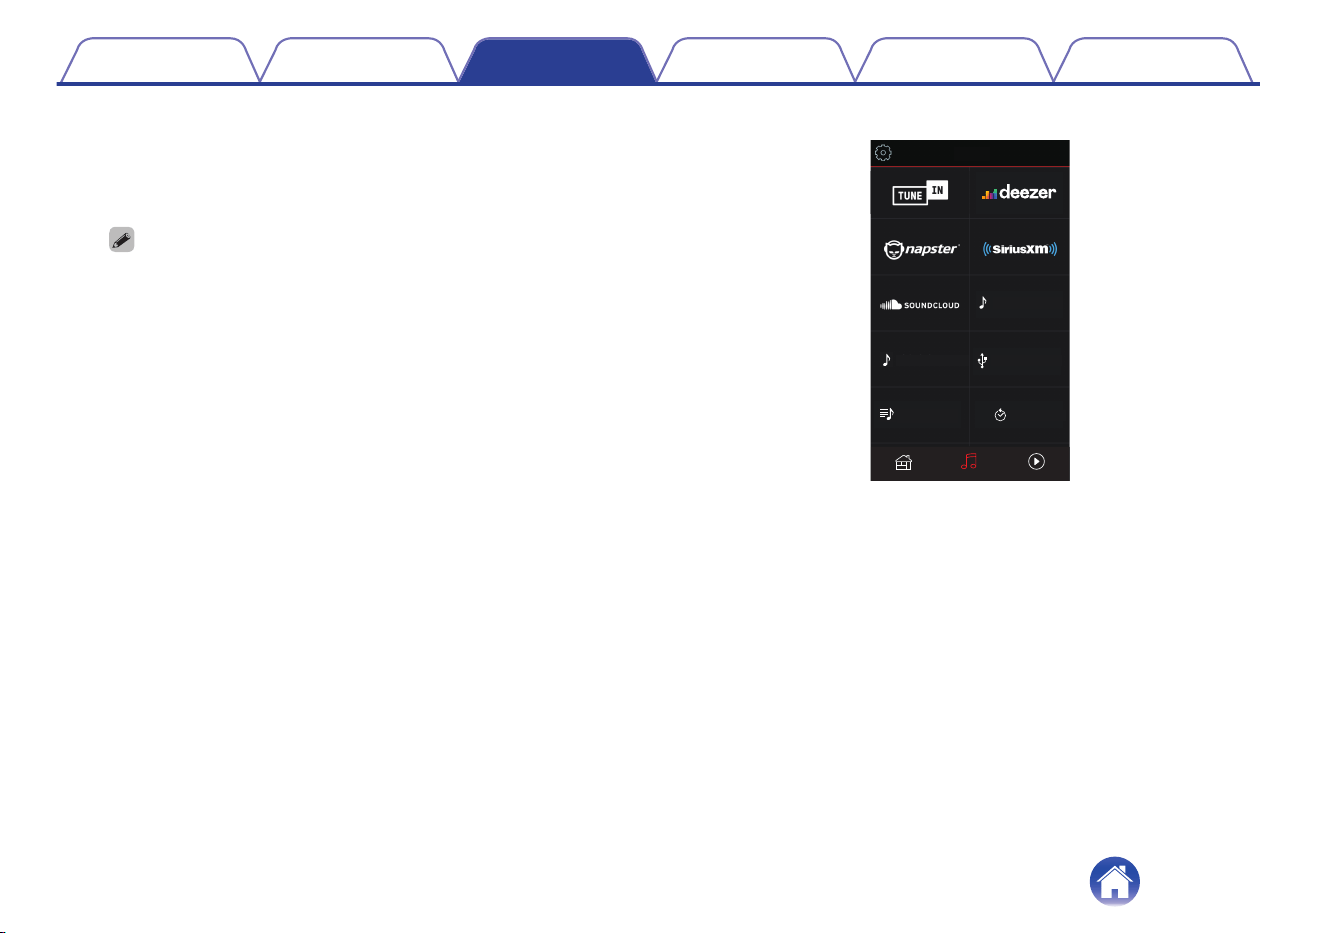
Playing from streaming music services
A music service is an online music company that provides access to vast
music collections via free and/or paid subscriptions. Depending upon your
geographical location, there are several options to choose from.
NOTE
0
The HEOS App and brand is not affiliated with any manufacturer of any mobile
device. Availability of music services may vary by region. Not all services may be
available at time of purchase. Some services may be added or discontinued from
time to time based on decisions of the music service providers or others.
o
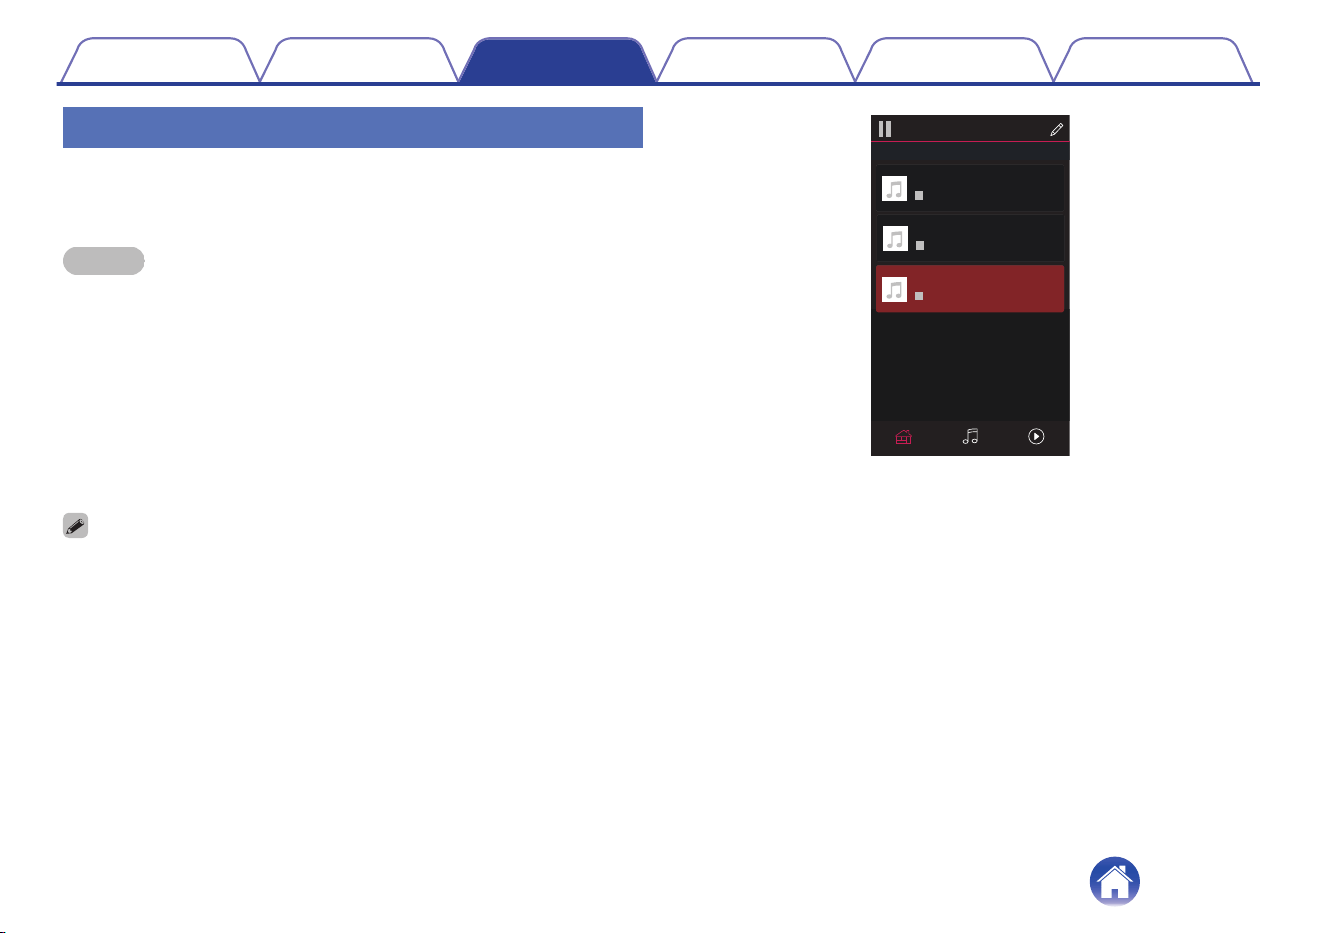
Selecting a room/device
1
Tap the “Rooms” tab, and select “Denon Home Sound
Bar 550” if there are multiple products with HEOS built-
in.
0
Tap the Pencil icon e at the top right to switch edit mode. You can change the
displayed name.
Rooms
Drag one room into another to group them
Rooms
Now PlayingMusic
Song Name 3
Denon Home Sound Bar 550
Song Name 1
Dining L + Dining R
Song Name 2
Kitchen
Contents Connections Playback Settings Tips Appendix
35
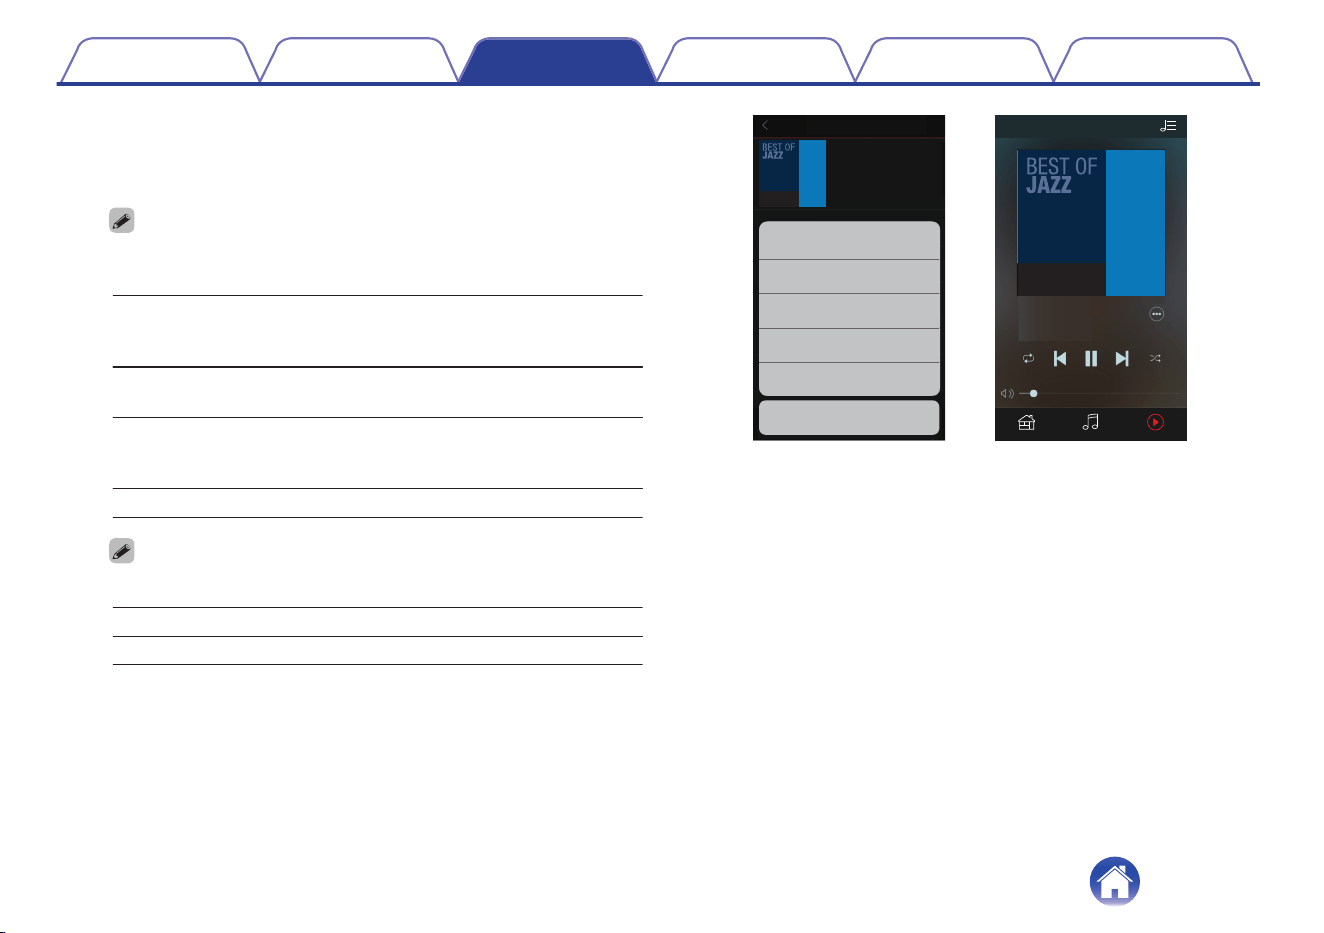
2
Browse the music to play.
After selecting a music track or radio station the app will
automatically change to the “Now Playing” screen.
0
When you select a music track to play you will be asked how you want to
queue up your music.
Play Now:
Inserts the item into the queue after the
currently playing track and plays the
selected item immediately.
Play Now & Replace
Queue:
Clears the queue and plays the
selected item immediately.
Play Next:
Inserts the item into the queue after the
current song and plays it when the
current song ends.
Add to End of Queue: Adds the item to the end of the queue.
0
When you select a radio station the following items are displayed.
Play Now: Plays the selected item immediately.
Add to HEOS Favorites: Adds to HEOS Favorites.
Music
Rooms Now Playing
Album
Album
Play Now
Cancel
Play Now & Replace Queue
Play Next
Add to End of Queue
Track 01
Rooms
10 Tracks,60 Mins.,2014
Artist
MusicRooms Now Playing
Track 01
Album
0:50
-
2:51
Artist
Now Playing
Contents Connections Playback Settings Tips Appendix
37
Listening to the same music in multiple
rooms
This system is a true multi-room audio system. You can create one or
more HEOS groups to automatically synchronize audio playback between
multiple products with HEOS built-in so that the music playing different
rooms is perfectly in sync and always sounds amazing! You can easily
add up to 32 products to your system in total. You can group up to 16
individual products to have them play the same song fully synchronized.
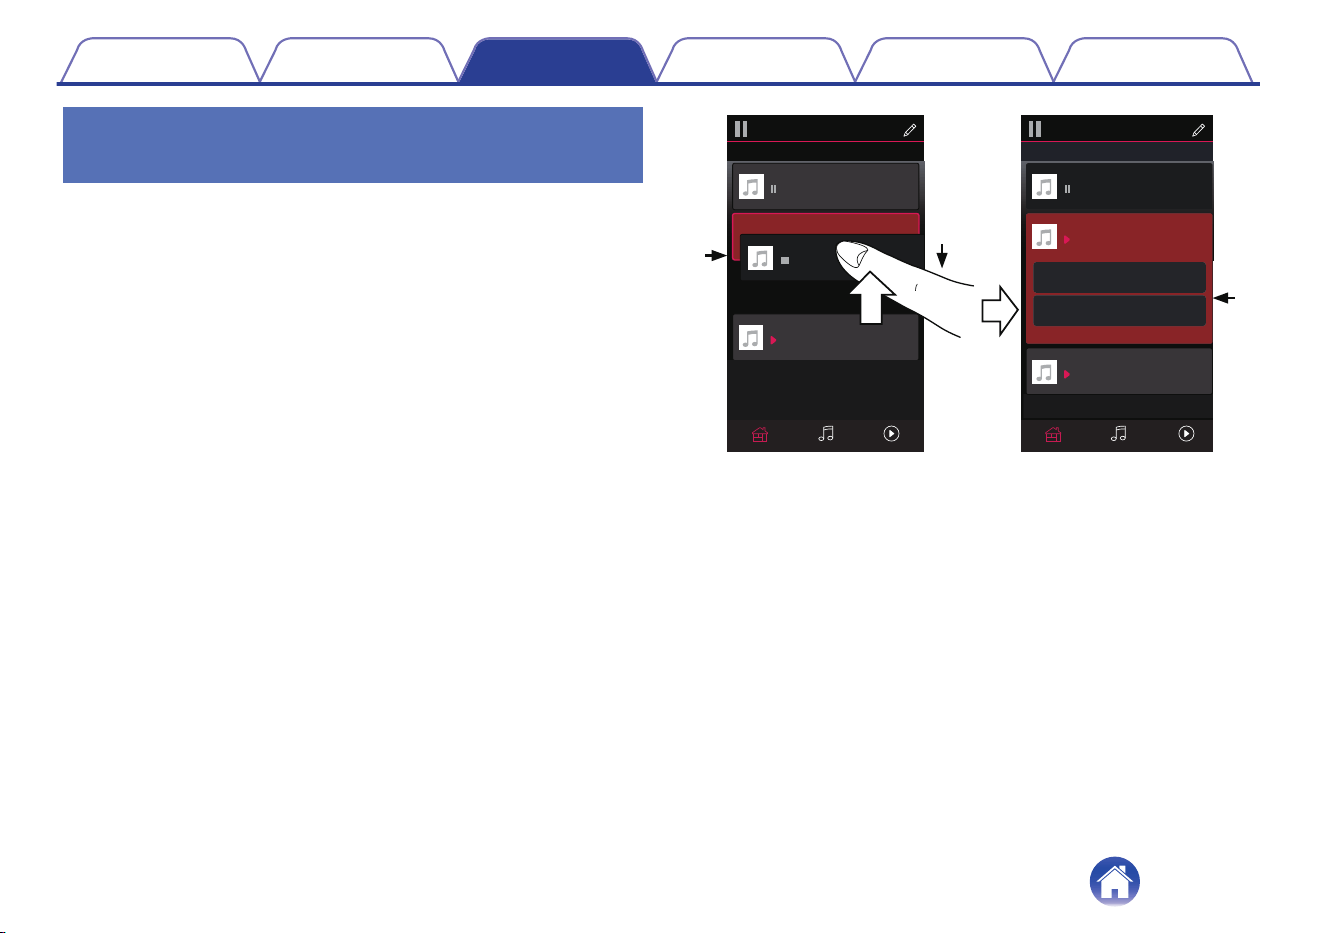
o
Grouping rooms
1
Press and hold your finger on room that is not playing
music.
2
Drag it into the room that is playing music (indicated by
the red outline) and lift your finger.
3
The two rooms will be grouped together into a single
device group and both rooms will be playing the same
music in perfect sync.
2
1
3
Now PlayingMusicRooms
Song Name 1
Dining
Kitchen
Drag one room into another to group them
Rooms
Now PlayingMusicRooms
Song Name 3
Song Name 3
Song Name 2
Song Name 2
Song Name 1
Bedroom
Bedroom
Dining
Living
Kitchen
Drag one room into another to group them
Rooms
Living
Drag a room out of this group to ungroup it
Living+Kitchen
Contents Connections Playback Settings Tips Appendix
38
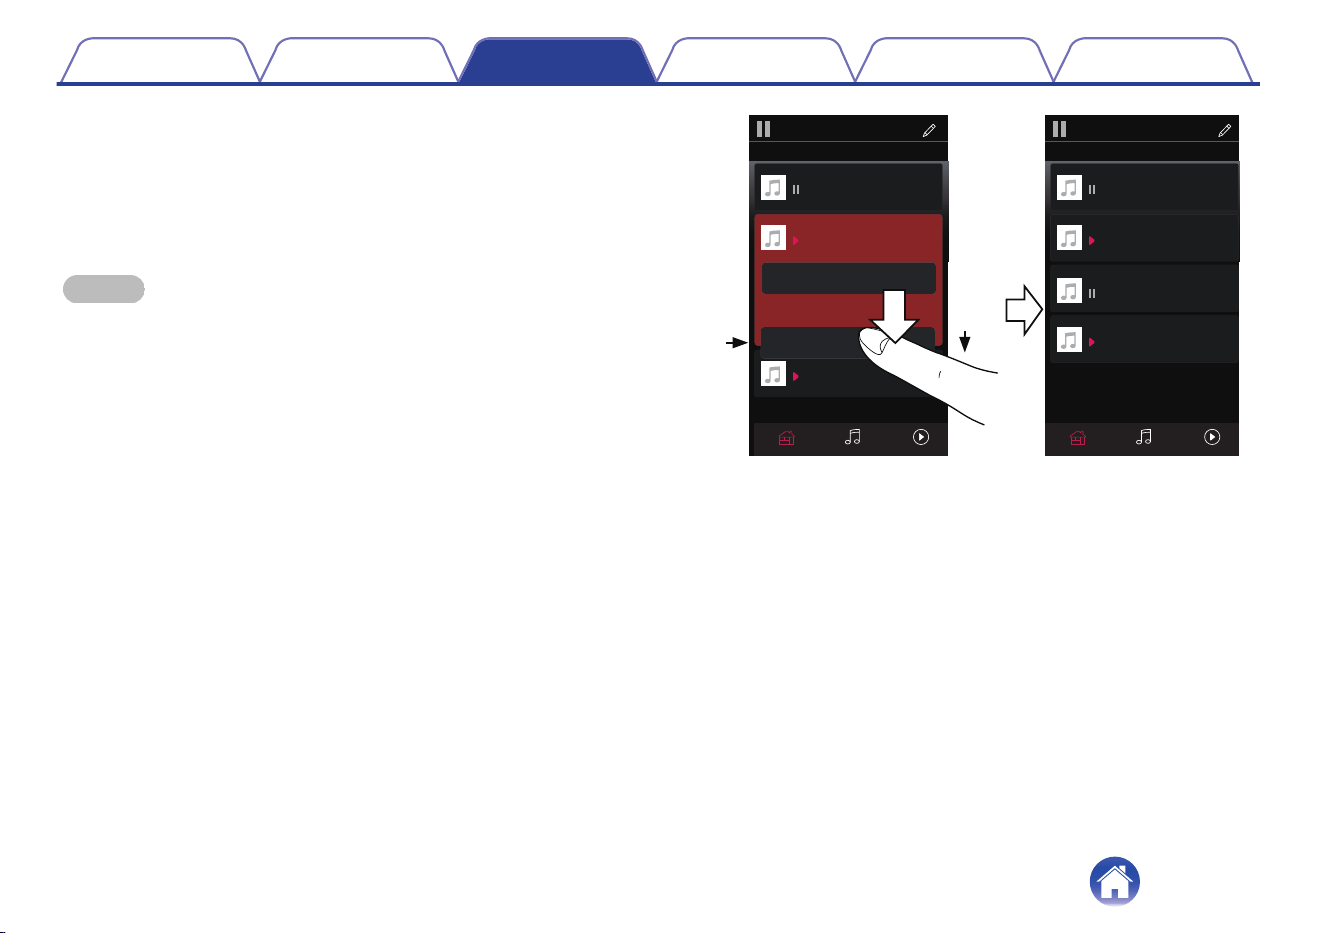
o
Ungrouping rooms
1
Press and hold your finger on room that you want to
remove from the group.
2
Drag it out of the group and lift your finger.
NOTE
0
You can not remove the first room that started playing the music before grouping.
2
1
Song Name 3
Song Name 2
Song Name 1
Bedroom
Dining
Living
Kitchen
Drag one room into another to group them
Rooms
Song Name 4
Song Name 3
Song Name 2
Song Name 1
Bedroom
Dining
Living
Kitchen
Drag one room into another to group them
Rooms
Living
Now PlayingMusicRoomsNow PlayingMusicRooms
Contents Connections Playback Settings Tips Appendix
39
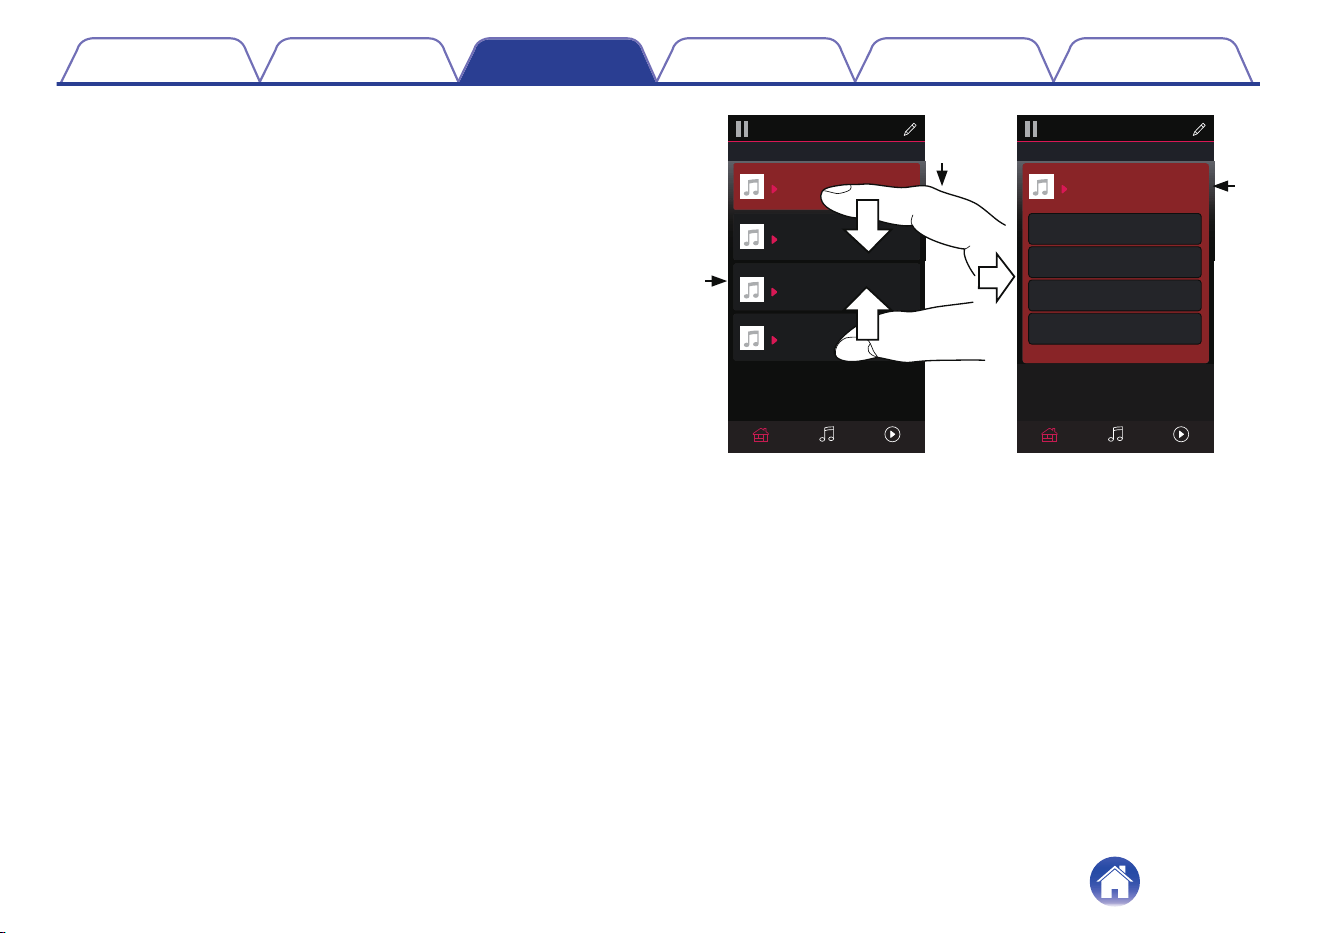
o
Grouping all rooms (party mode)
You can easily group 16 rooms together into Party Mode by using a
"pinch" gesture.
1
Place two fingers on the screen over the list of rooms.
2
Quickly pinch your two fingers together and release.
3
All of your rooms will be joined together and begin
playing the same music in perfect sync.
1
2
3
Song Name 1
Bedroom
Dining
Kitchen
Drag one room into another to group them
Rooms
Song Name 4
Song Name 3
Song Name 2
Song Name 1
Bedroom
Dining
Living
Kitchen
Drag one room into another to group them
Rooms
Living
Now PlayingMusicRooms Now PlayingMusicRooms
Drag a room out of this group to ungroup it
Dining+Living+...
Contents Connections Playback Settings Tips Appendix
40
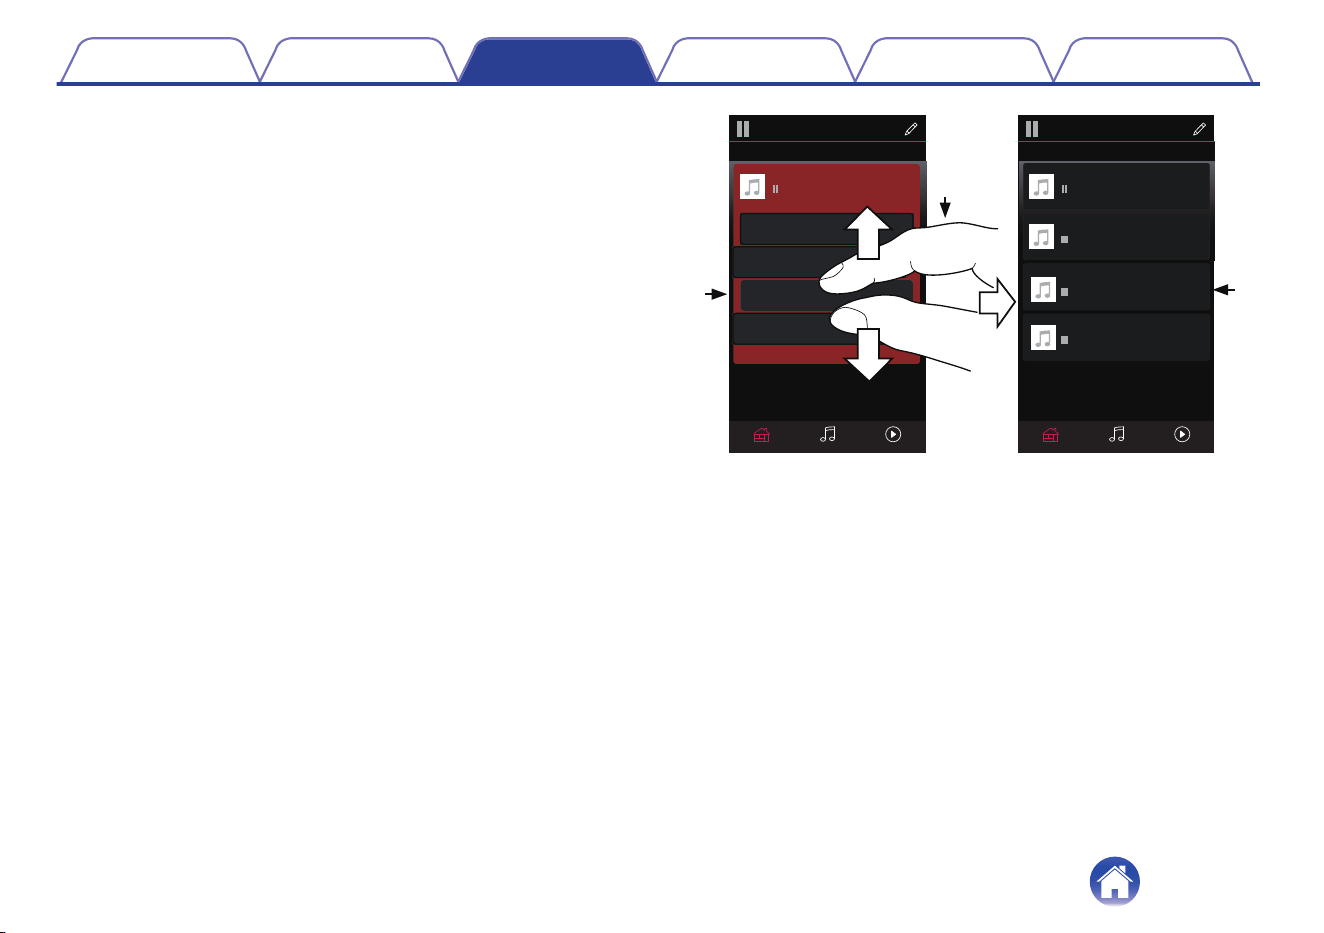
o
Ungrouping all rooms
You can easily ungroup all of your rooms and exit Party Mode by using
a "spread" gesture.
1
Place two fingers close together on the screen over list
of rooms.
2
Quickly spread your two fingers apart from each other
and release.
3
All of your rooms will be ungrouped.
1
2
3
Song Name 1
Bedroom
Dining
Dining
Kitchen
Drag one room into another to group them
Rooms
Song Name 4
Song Name 3
Song Name 2
Song Name 1
Bedroom
Dining
Living
Kitchen
Drag one room into another to group them
Rooms
Living
Now PlayingMusicRooms
Now PlayingMusicRooms
Drag a room out of this group to ungroup it
Contents Connections Playback Settings Tips Appendix
41
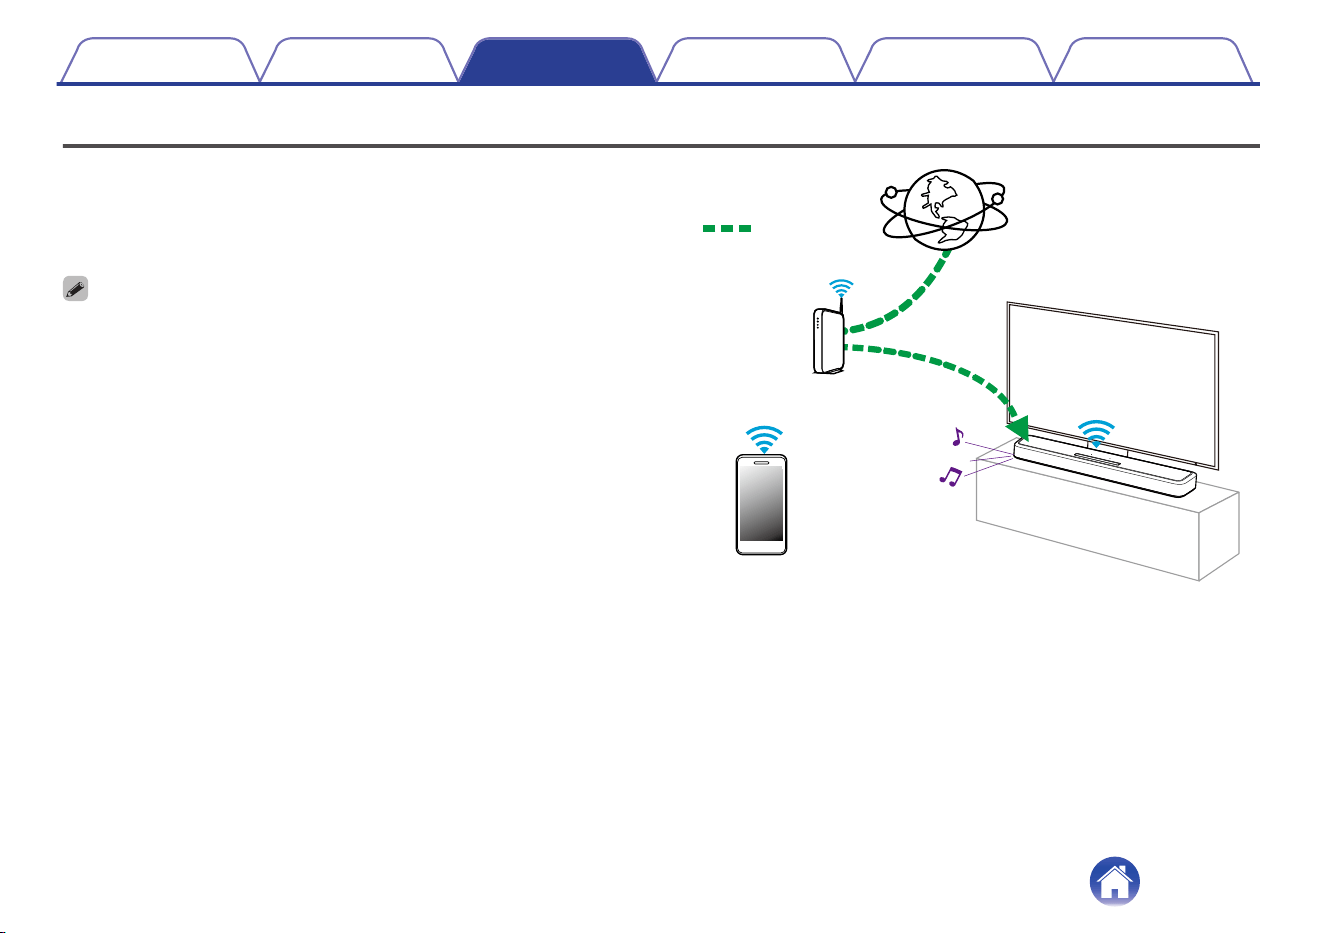
Listening to Internet Radio
The HEOS system includes access to more than 100,000 free internet
radio streams from all corners of the globe via the TuneIn radio service.
Just select the TuneIn logo from the main “Music” menu and browse
among the 100,000 stations neatly organized into popular categories and
select a station that appeals to your mood.
0
If you have a TuneIn account, you can sign into the TuneIn service under
“Settings” - “Music Sources” - “TuneIn”, and access all of your “My Favorites”
TuneIn stations.
Audio signal
Contents Connections Playback Settings Tips Appendix
42
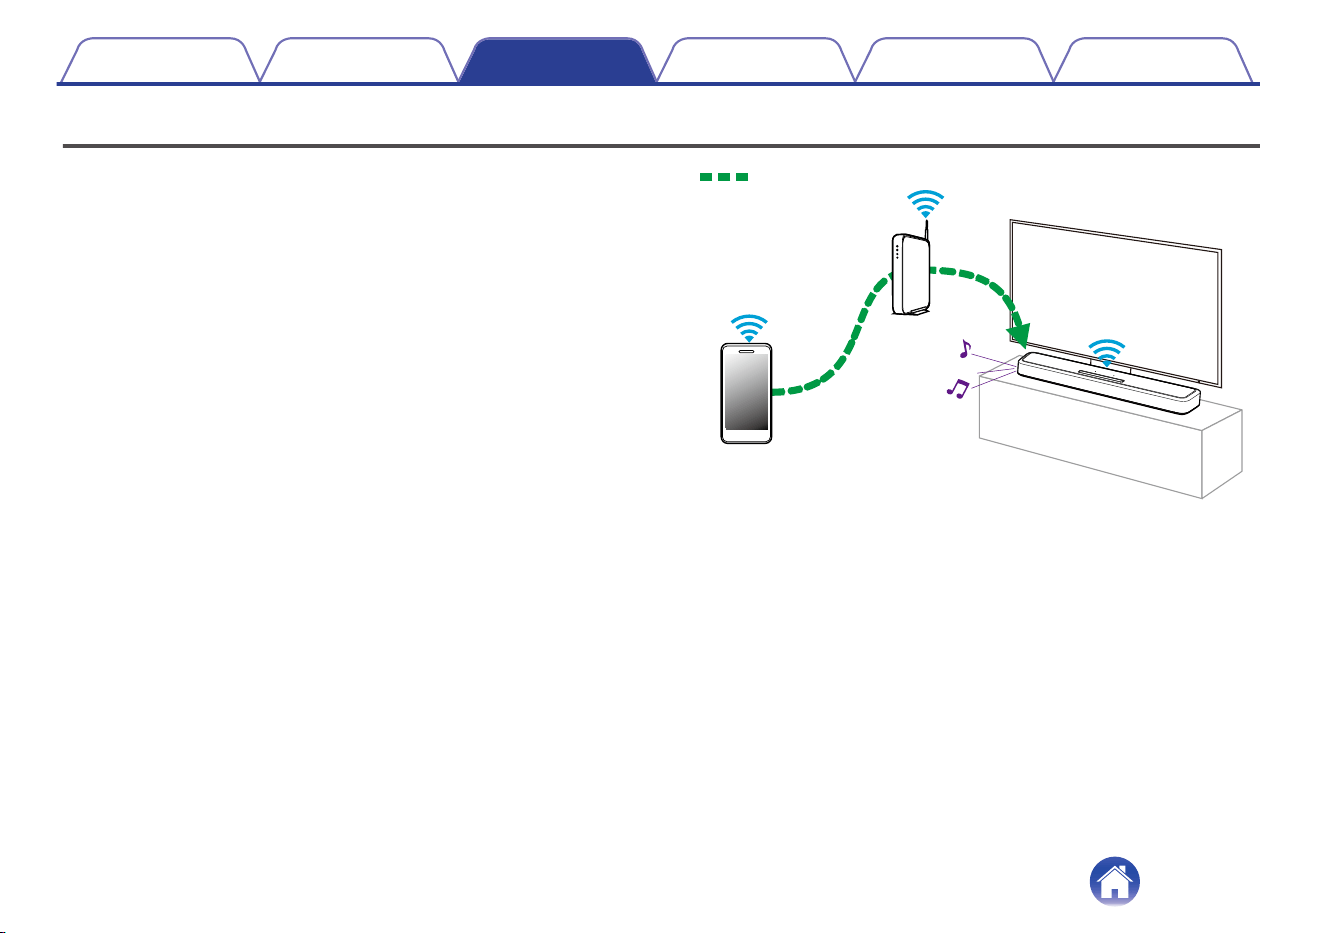
Playing music stored on your mobile
Perform this operation on the HEOS App. Download the HEOS App in
advance to your iOS or Android device. (v p. 31)
1
Tap the “Music” tab.
2
Select “This iPhone/iPod/iPad/Phone”.
3
Browse the local music on your phone and select
something to play.
Audio signal
Contents Connections Playback Settings Tips Appendix
43
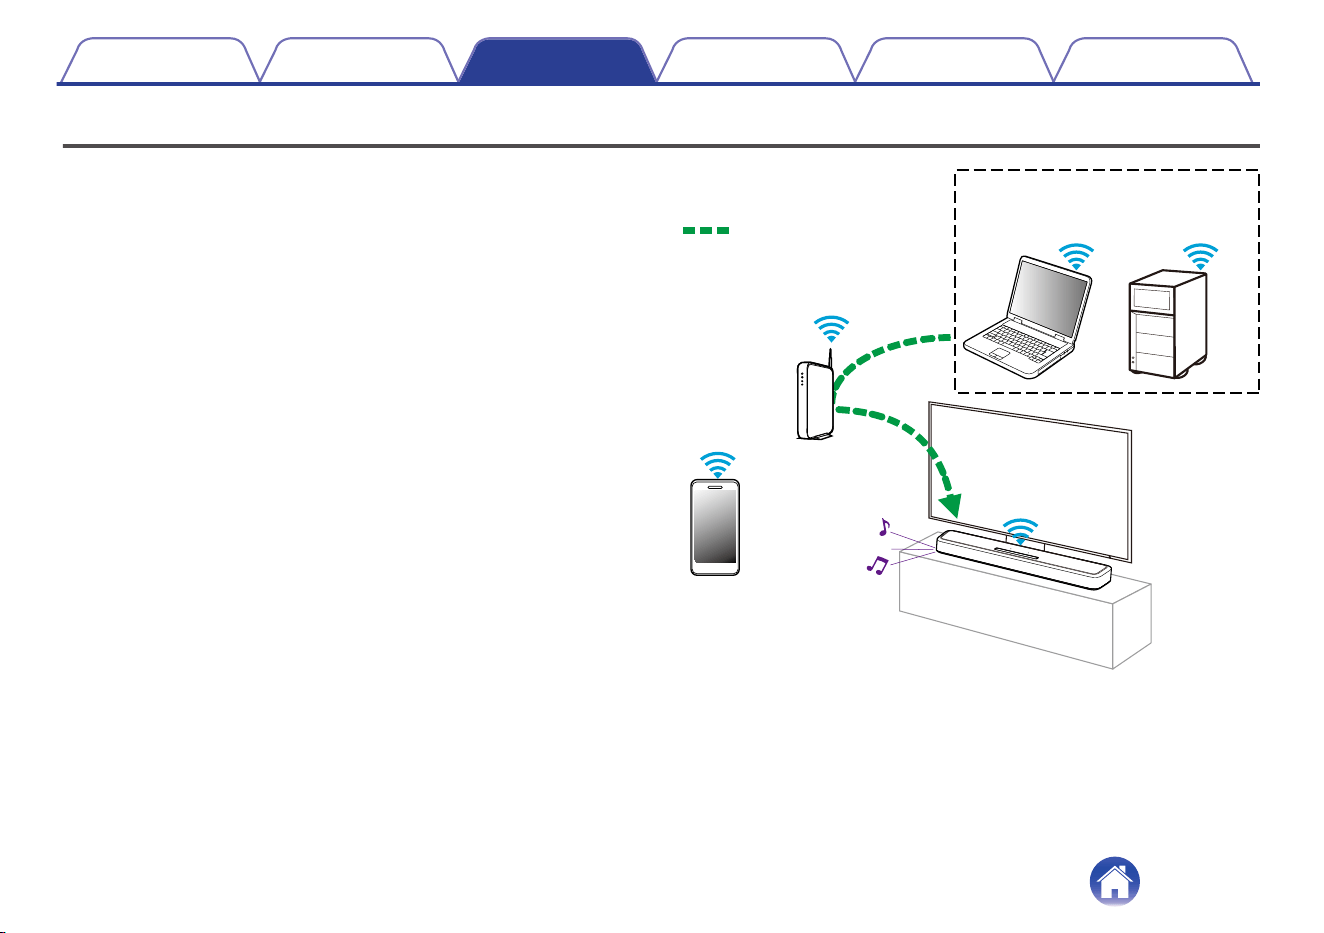
Playing back files stored on a PC or NAS
Perform this operation on the HEOS App. Download the HEOS App in
advance to your iOS or Android device. (v p. 31)
1
Select “Music Servers” from the “Music” tab.
2
Select the name of your networked PC or NAS
(Network Attached Storage) server.
3
Browse the music on your PC/NAS and select
something to play.
NAS
(Network Attached
PC Storage)
PC
Audio signal
Contents Connections Playback Settings Tips Appendix
44
Playing music from a USB flash drive
Perform this operation on the HEOS App. Download the HEOS App in
advance to your iOS or Android device. (v p. 31)
1
Insert a FAT32 or NTFS formatted USB flash drive into
the USB port on the rear panel of the sound bar.
2
Select “USB Music” from the “Music” tab.
3
Select the name of this unit.
4
Browse the music on your USB flash drive and select
something to play.
0
It may take several minutes for the name of this unit to appear in the “USB Music”
list if you have a large number of files on your USB flash drive.
0
It is not possible to connect and use a computer via the USB port of this unit using
a USB cable.
Contents
Connections Playback Settings Tips Appendix
45
AirPlay function
Music files stored on your iPhone, iPod touch, iPad or iTunes can be
played on this unit via the network.
0
The screen may differ depending on the OS and software versions.
This unit supports AirPlay 2
®
.
Sync multiple AirPlay 2 compatible devices/speakers for simultaneous
playback.
0
This unit supports AirPlay 2 and requires iOS 11.4 or later.
Audio signal
Contents Connections Playback Settings Tips Appendix
46
Playing songs from your iPhone, iPod
touch or iPad
If you update your “iPhone/iPod touch/iPad” to iOS 10.0.2 or later, you can
stream music stored in your “iPhone/iPod touch/iPad” directly to this unit.
1
Connect your iPhone, iPod touch or iPad Wi-Fi to the
same network as this unit.
0
For details, see your device’s manual.
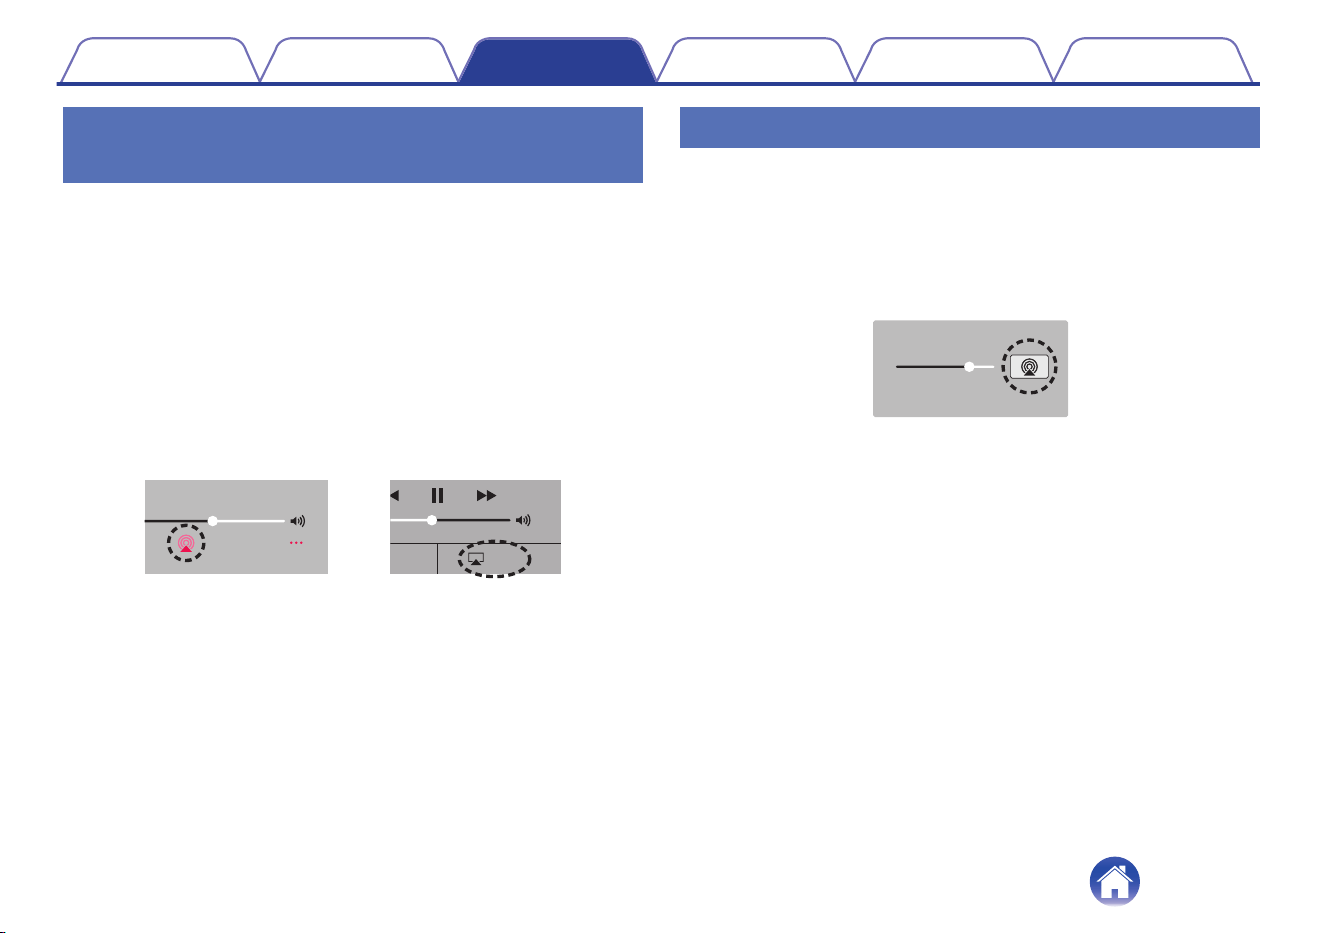
2
Play the song on your iPhone, iPod touch or iPad.
AirPlay icon is displayed on the iPhone, iPod touch or iPad screen.
3
Tap the AirPlay icon and select this unit.
AirPlay
AirPlay
D
rop:
AirDrop:
ryone
ryone
[Example] iOS 12
[Example] iOS 10
Playing iTunes music with this unit
1
Install iTunes 10, or later, on a Mac or Windows PC that
is connected to the same network as this unit.
2
Start iTunes and click the AirPlay icon to select this
unit.
[Example] iTunes
3
Choose a song and click play in iTunes.
The music will stream to this unit.
Contents
Connections Playback Settings Tips Appendix
47
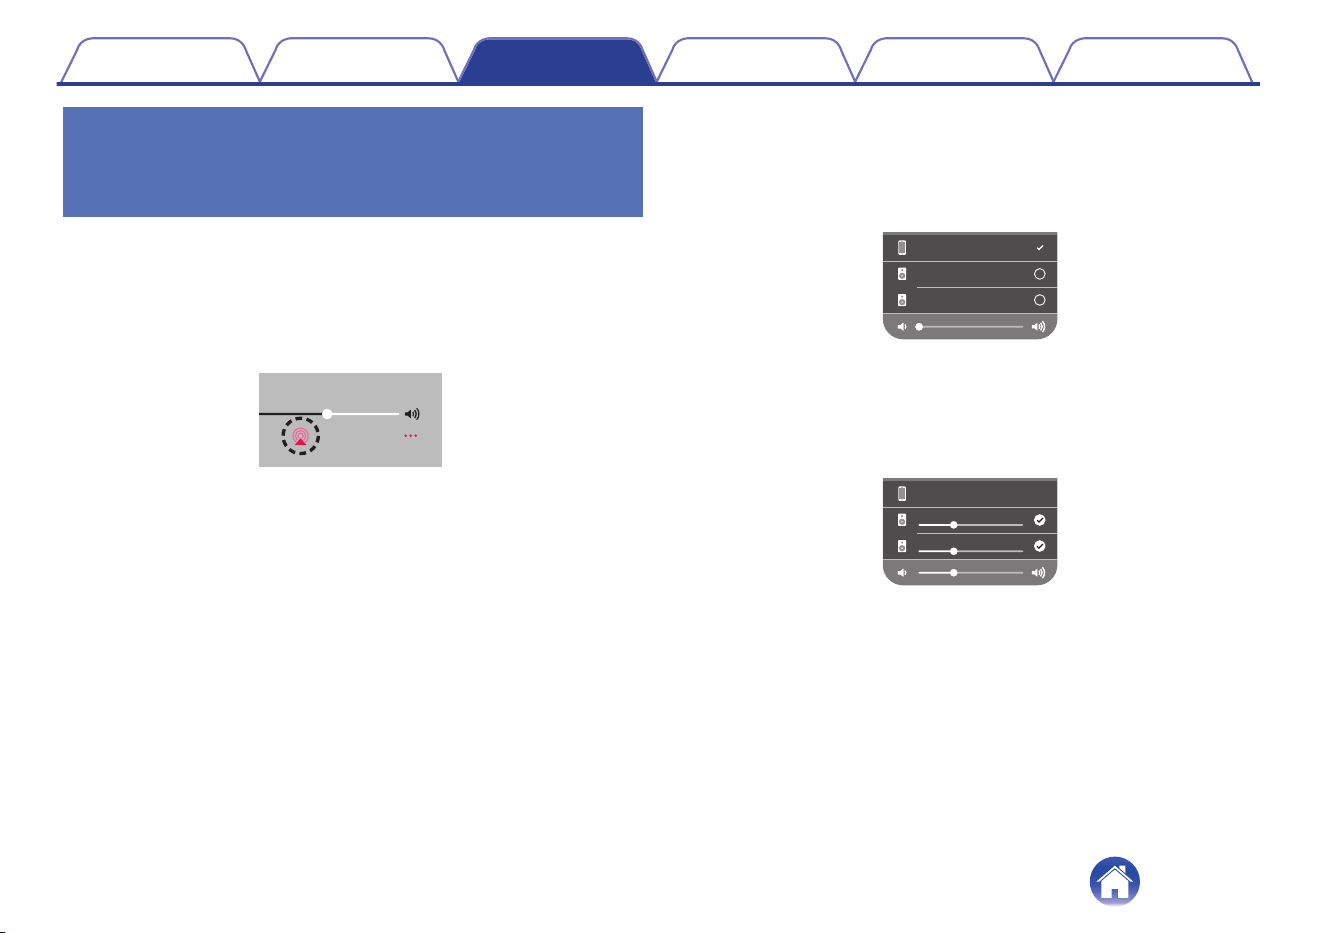
Play a song from your iPhone, iPod
touch or iPad on multiple synced
devices (AirPlay 2)
Songs from an iPhone, iPod touch or iPad operating iOS 11.4 or later can
be synced with multiple AirPlay 2 supported devices for simultaneous
playback.
1
Play the song on your iPhone, iPod touch or iPad.
AirPlay icon is displayed on the iPhone, iPod touch or iPad screen.
2
Tap the AirPlay icon.
Displays a list of devices/speakers that can be played back on the
same network.
0
A circle is displayed to the right of AirPlay 2 compatible devices.
Speakers
xxxxxx
iPhone
3
Tap the devices/speakers you want to use.
0
Multiple AirPlay 2 compatible devices can be selected.
0
Volume can be adjusted for each device individually or for all
synced devices simultaneously.
iPhone
Speakers
xxxxxx
Contents
Connections Playback Settings Tips Appendix
48

Spotify Connect function
Spotify is all the music you’ll ever need. Millions of songs available instantly. Just search for the music you love, or let Spotify play you something great.
Spotify works on your phone, tablet, computer and home speakers. So you’ll always have the perfect soundtrack for whatever you’re doing. Now you can
enjoy Spotify with your free account as well as Premium account.
Use your phone, tablet or computer as a remote control for Spotify.
Go to www.spotify.com/connect to learn how.
The Spotify software is subject to third party licenses found here:
www.spotify.com/connect/third-party-licenses
Contents Connections Playback Settings Tips Appendix
49
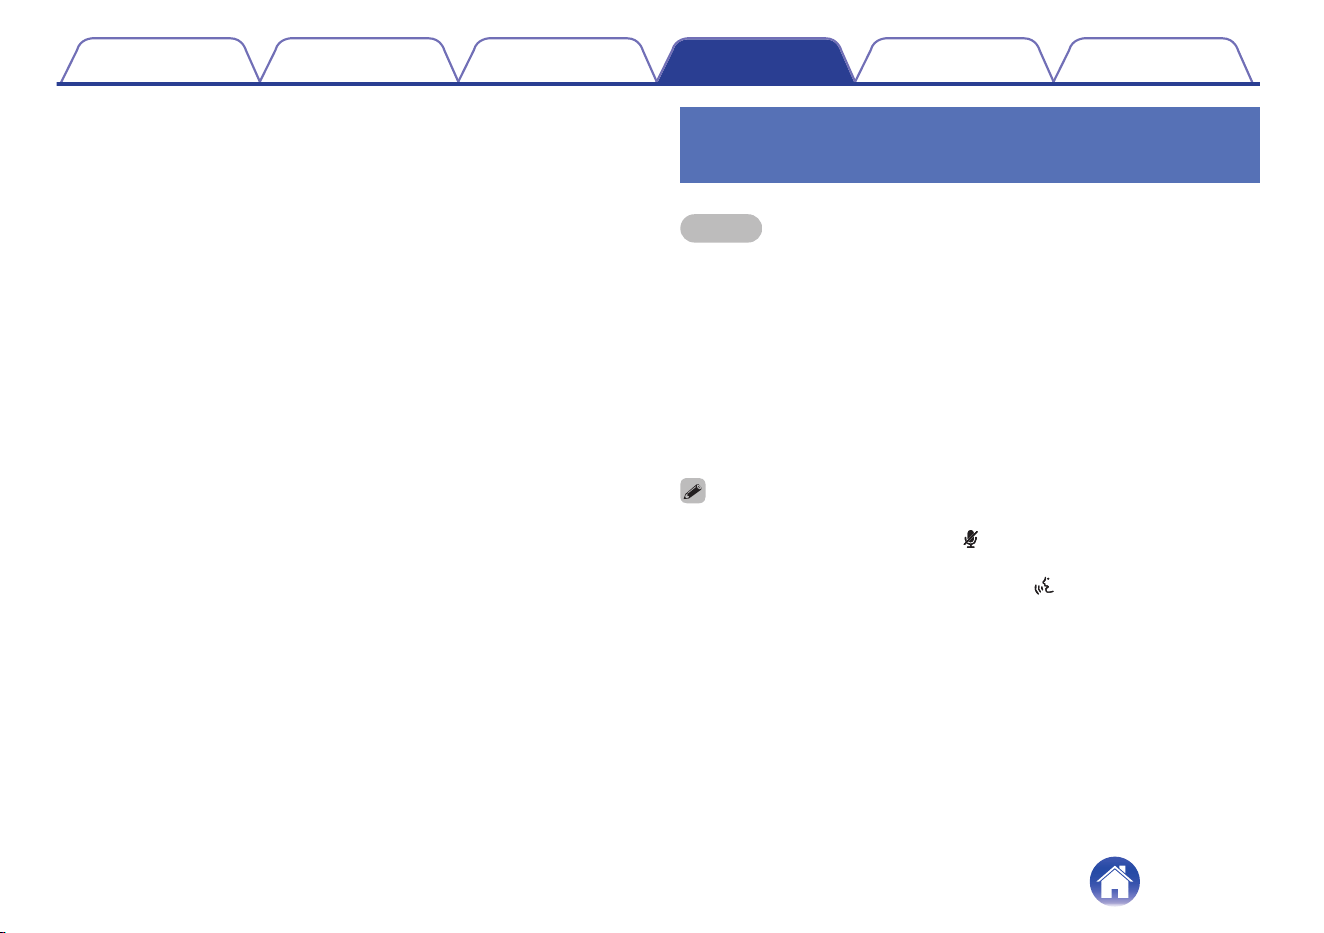
Settings
Perform the below operations and settings as needed.
PURE
MUSIC
QUICK SELECT 1 - 3
MOVIE
NIGHT
DIALOG
ENHANCER
Adjusting the audibility of dialog and
vocals (Dialog enhancer)
Adjust the volume of dialog in movies, vocals in music, etc. so these can
be heard more easily.
1
Press DIALOG ENHANCER.
When the button is pressed, the status LED blinks in blue, and the
settings switch.
Off / Low / Medium / High (Default: Off)
Setting the night mode
Compresses the dynamic range (difference between loud and soft
sounds) to make audio easier to hear at low volumes.
1
Press NIGHT.
When the button is pressed, the status LED blinks in blue, and night
mode switches between on/off.
Contents Connections Playback Settings Tips Appendix
50

Setting the sound mode
This unit allows you to enjoy various kinds of surround and stereo
playback modes.
Disc formats such as Blu-ray Disc and DVD, as well as being supported by
digital broadcasting, and even by streaming movies and music from
internet-based subscription services.
This unit supports playback of almost all of these multi-channel audio
formats. It also supports surround playback of audio formats other than
multi-channel audio such as 2-channel stereo audio.
0
For audio formats recorded on a disc, see the disc jacket or label.
o
Selecting a sound mode
1
Press MOVIE or MUSIC to select a sound mode.
When the button is pressed, the status LED blinks in blue, and the
sound mode switches.
MOVIE:
Switches to the sound mode suitable for
enjoying movies and TV programs.
MUSIC:
Switches to the sound mode suitable for
enjoying music.
0
If you use the HEOS App, you can manually select your favorite sound mode from
multiple options. Refer to “Sound mode that can be selected for each input
signal” (v p. 54) for sound modes that can be selected.
0
The MOVIE and MUSIC button memorizes the last sound mode selected for its
button. Pressing MOVIE or MUSIC recalls the same sound mode as the one
selected at the previous playback.
0
If the content played back does not support the previously selected sound mode,
the most appropriate sound mode for the content is automatically selected.
o
Pure mode playback
Enjoy sound that is faithful to the original source.
1
Press PURE.
When the button is pressed, the status LED blinks in blue, and
sound mode switches to “Pure”.
0
During pure mode playback, night mode and dialogue mode cannot be used. Each
of these settings is disabled.
Contents Connections Playback Settings Tips Appendix
51

o
Description of sound mode types
Dolby sound mode
Sound mode type Description
Dolby Atmos Please select this mode to play content encoded with Dolby Atmos. In Dolby Atmos playback, the Dolby Speaker
Virtualizer function operates automatically, and 3D playback is performed.
Dolby Atmos (Movie)
z
Dolby Atmos playback is performed using Dolby technology exclusively. This mode is optimal for enjoying movies.
Dolby Audio - Dolby
Surround
This mode uses Dolby Surround with Dolby virtual height and virtual surround sound processing to realize a three
dimensional sound field.
Dolby Audio - Dolby
Surround (Movie)
z
Dolby Surround playback is performed using Dolby technology exclusively. This mode is optimal for enjoying movies.
z
Night mode and dialog enhancer cannot be used. Each of these settings is disabled.
DTS sound mode
Sound mode type Description
DTS:X / DTS:X Master Audio This mode can be selected only when the input signal is DTS:X. In DTS:X playback, the Virtual:X function operates
automatically, and 3D playback is performed.
DTS Virtual:X This mode uses DTS Virtual:X with virtual height and virtual surround processing to realize a three-dimensional sound
field.
Contents Connections Playback Settings Tips Appendix
52

PCM multi-channel sound mode
Sound mode type Description
Multi PCM This mode can be selected for playback of PCM signals that are input in certain transmission formats.
Stereo sound mode
Sound mode type Description
Stereo This mode performs stereo playback of a 2-channel signal without performing virtual processing. This mode can be
selected for 2-channel signal input.
Direct sound mode
Sound mode type Description
Direct This mode performs playback of a multi-channel signal without performing virtual processing. This mode can be selected
for multi-channel signal input.
Pure sound mode
Sound mode type Description
Pure
z
Enjoy sound that is faithful to the original source.
z
Night mode and dialog enhancer cannot be used. Each of these settings is disabled.
Original sound mode
Sound mode type Description
Multi-Channel Stereo
z
This mode is for enjoying stereo sound from all speakers.
z This mode can be selected only when your HEOS built-in speakers are wirelessly connected as surround speakers. (v p. 58)
Contents
Connections Playback Settings Tips Appendix
53

o
Sound mode that can be selected for each input signal
The following sound modes can be selected with the MOVIE button, MUSIC button or PURE button.
S:Sound mode that can be selected when MOVIE button, MUSIC button or PURE button is pressed (F:Default sound mode)
Input signal Sound mode MOVIE button MUSIC button PURE button
2-channel Stereo
S
Pure
S
Dolby Surround
F
z
1
Dolby Surround (Movie)
S
z
2
DTS Virtual:X
F
z
1
Multi-Channel Stereo
S
z
3
Multi-channel Direct
S
Pure
S
Dolby Surround
F
z
1
Dolby Surround (Movie)
S
z
2
DTS Virtual:X
F
z
1
Multi-Channel Stereo
S
z
3
Dolby Atmos Direct
S
Pure
S
Dolby Atmos
F
Dolby Atmos (Movie)
S
Multi-Channel Stereo
S
z
3
Contents Connections Playback Settings Tips Appendix
54

Input signal Sound mode MOVIE button MUSIC button PURE button
DTS:X / DTS:X Master Audio Direct
S
Pure
S
DTS:X / DTS:X Master Audio
F
Multi-Channel Stereo
S
z
3
z1
The default sound mode for Dolby and PCM input signals is Dolby Surround, and the default sound mode for DTS input signals is DTS Virtual:X.
z2
Dolby Surround (Movie) can be selected when the input signal is a Dolby signal.
z3 This mode can be selected only when your HEOS built-in speakers are wirelessly connected as surround speakers. (v p. 58)
0
If you use the HEOS App, you can select any sound mode that supports the input signal.
0
If Dolby Surround or DTS Virtual: X is the last sound mode selected on the HEOS App, the sound mode that can be selected with the MOVIE button on the remote control unit
switches to the last one selected on the HEOS App (Dolby Surround or DTS Virtual: X).
Contents Connections Playback Settings Tips Appendix
55

Quick select function
Input source, volume level, sound mode, night mode and dialog enhancer settings can be registered to the QUICK SELECT buttons.
1
Press and hold down one of the QUICK SELECT buttons (1 - 3) for 3 seconds.
The current settings are registered to the selected button.
0
The status LED flashes once when registration is complete.
0
To recall the registered settings, press the QUICK SELECT button.
[Default settings]
Button Input source Volume Sound mode Night mode Dialog enhancer
Quick Select 1 TV 35
For Dolby audio signal input: Dolby Surround
For DTS audio signal input: DTS Virtual:X
For other audio signal input: Dolby Surround
Off Off
Quick Select 2 HDMI IN 35 Off Off
Quick Select 3 OPTICAL 35 Off Off
Quick Select 4
z
AUX 35 Stereo Off Off
Quick Select 5
z
– – – – –
Quick Select 6
z
– – – – –
z Registration and calling of Quick Select 4-6 can only be performed on the HEOS App. Download the HEOS App in advance to your iOS or Android device. (v p. 31)
0
In the default state, Quick Select 5 and 6 are not set. Your own settings can be registered and used.
Contents Connections Playback Settings Tips Appendix
56

Operating this unit using the remote
control of a TV
There are three ways to operate this unit using the remote control of a TV.
0
HDMI control function
Connect this unit to a TV that supports the HDMI control function with
an HDMI cable and enable the HDMI control setting on the TV to
perform basic operations on this unit (changing the input source, turning
the power on and off, adjusting the volume) with the remote control of
the TV.
Refer to “HDMI control function” for more information about the HDMI
control function. (v p. 71)
0
Remote control preset function
This unit is preset such that you can adjust the volume using the volume
adjustment button on the remote controls for the TVs of major
manufacturers. This is useful when the TV you are using does not
support HDMI control, or when you connect to a TV that does not have
an HDMI connector.
0
Remote control learning function
If your TV does not support the HDMI control function and remote
control preset function, use this unit’s remote control learning function.
This enables you to operate this unit with the remote control of a TV.
(“Using the remote control learning function” (v p. 57))
o
Using the remote control learning function
Perform this operation on the HEOS App. Download the HEOS App in
advance to your iOS or Android device. (v p. 31)
1
Tap the Settings icon a located in the upper left
corner of the main “Music” menu.
The setting menu screen is displayed.
2
Select “My Devices” to display a list of your HEOS
built-in devices.
3
Select this unit.
4
Select “Remote Control”.
The setup below is not required when device control by HDMI is
active. (A check mark will be displayed by “HDMI CEC” in this case)
5
Select “IR Control”.
6
Select a command of this unit you would like to control
by the remote control of your TV.
Follow the instructions on the screen to complete setup.
Contents
Connections Playback Settings Tips Appendix
57

Wirelessly connecting the HEOS built-
in speakers as surround speakers
You can use your own HEOS built-in speakers and subwoofer to create a
multi-channel surround system.
Perform this operation on the HEOS App. Download the HEOS App in
advance to your iOS or Android device. (v p. 31)
1
Tap the Settings icon a located in the upper left
corner of the main “Music” menu.
The setting menu screen is displayed.
2
Select “My Devices” to display a list of your HEOS
built-in devices.
3
Select this unit.
4
Select “Setup Assistant”.
The setup assistant menu screen is displayed.
0
A HEOS built-in subwoofer and surround speakers need to connect your wireless
network beforehand.
o
Connecting the HEOS built-in subwoofer
1
Select “Subwoofer”.
2
Follow the instructions on the HEOS App to connect
the HEOS built-in subwoofer.
0
Configure the HEOS built-in subwoofer settings after connecting is complete.
Select “Optimized for Denon Home Sound Bar 550” for normal configuration.
Settings are optimized for this unit.
o
Connecting the HEOS built-in surround
speakers
1
Select “Surrounds”.
2
Follow the instructions on the HEOS App to connect
the HEOS built-in speaker or HEOS Amp.
Select the device that you want to add and tap “Next”.
Contents Connections Playback Settings Tips Appendix
58
o
Disconnecting HEOS built-in subwoofer and
surround speakers
1
Tap the pencil e icon in the upper right from the
“Rooms” menu.
2
Select this unit.
3
Select the device that you want to disconnect from the
list.
Operating this unit by voice with the
Amazon Alexa function
NOTE
0
Optional Alexa Built-in functionality will become available via a firmware update.
With the Amazon Alexa built into this unit, you can enjoy the ability to
operate the unit and play music simply by speaking.
To use Alexa, the unit must be connected to the network. An Amazon
account is also required.
Download the HEOS App in advance to your iOS or Android device and
then connect this unit to the network. (v p. 31)
Next, use the HEOS App to enter your Amazon account information and
log in to the service.
0
In cases such as when you want to prevent accidental activation of Alexa or you
want to protect your privacy, touch the key on this unit to disable the
microphone.
0
Instead of saying “Alexa”, you can also touch the
key on this unit to initiate
voice control using Alexa.
0
Alexa isn’t available in certain languages and countries.
Contents Connections Playback Settings Tips Appendix
59
o
Examples of voice operation
For example, ask Alexa the following:
0
Alexa, play music
0
Alexa, pause
0
Alexa, turn up the volume
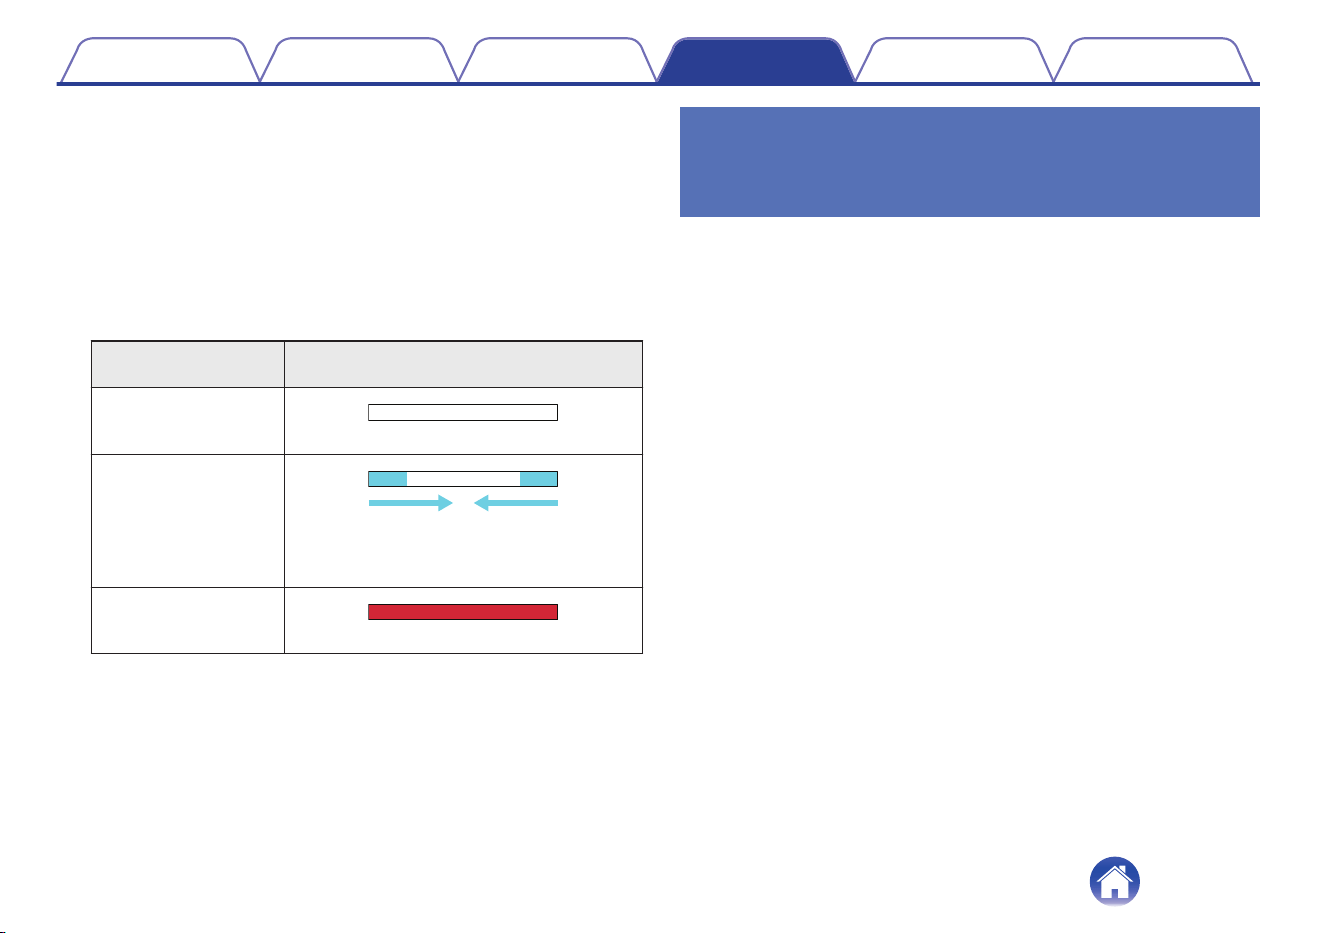
o
Example of light bar display
The light bar on the front panel of the unit lights up according to the
status of Alexa.
Status of Alexa
(examples)
Light bar display
While on standby
(Off)
When starting up
(The LED light moves from both sides to the
center in light-blue, and then the entire light
bar lights in blue)
While the microphone
is muted
(Lights in red)
Setting the input source to switch with
the TV button on the remote control
unit
In the default settings, pressing the TV button switches to the audio input
from the HDMI OUT (eARC/ARC) connector.
If you use the HEOS App, you can change the input source that is
switched to when the TV button is pressed.
1
Tap the Settings icon a located in the upper left
corner of the main “Music” menu.
The setting menu screen is displayed.
2
Select “My Devices” to display a list of your HEOS
built-in devices.
3
Select this unit.
4
Select “TV Input”.
5
Select “Default Input”.
6
Select an Input source you connect to your TV audio.
Contents Connections Playback Settings Tips Appendix
60

Troubleshooting
If a problem should arise, first check the following:
1. Are the connections correct?
2. Is the set being operated as described in the owner’s manual?
3. Are the other devices operating properly?
If this unit does not operate properly, check the corresponding symptoms in this section.
If the symptoms do not match any of those described here, consult your dealer as it could be due to a fault in this unit. In this case, disconnect the power
immediately and contact the store where you purchased this unit.
Contents Connections Playback Settings Tips Appendix
61

Power does not turn on / Power is turned off
Power does not turn on.
0
Check whether the power plug is correctly inserted into the power outlet. (v p. 26)
0
If the power of this unit cannot be turned on with the remote control for the TV, press the c button to turn on the power of this unit. (v p. 27)
0
Enable the TV’s HDMI control function when using an HDMI cable to connect this unit to your HDMI control-compatible TV. (See the TV owner’s manual
for details.)
Power automatically turns off.
0
If no operations have been performed for 20 minutes or more and audio is not being input, this unit automatically switches to quick start mode.
Turn this unit’s power on again. (v p. 72)
Operations cannot be performed through the remote control unit
Operations cannot be performed through the remote control unit.
0
Battery is worn out. Replace with new battery. (v p. 11)
0
Operate the remote control unit within a distance of about 23 ft/7 m from this unit and at an angle of within 30°. (v p. 12)
0
Remove any obstacle between this unit and the remote control unit.
0
The coin-shaped lithium battery (CR2025) is not positioned correctly. Correct the positioning so that the f symbol engraved on the battery faces
upwards. (v p. 11)
0
This unit’s remote control sensor is exposed to strong light (direct sunlight, inverter type fluorescent bulb light, etc.). Move this unit to a place in which
the remote control sensor will not be exposed to strong light.
Contents
Connections Playback Settings Tips Appendix
62

Trouble teaching this unit remote control commands
Trouble teaching this unit remote control commands.
0
Remember that while this unit can learn almost all IR (infrared) remote commands, there remain a few rare code formats that cannot be taught.
No sound comes out
No sound comes out.
0
Check the connections for all devices. (v p. 21)
0
Insert connection cables all the way in.
0
Check that input connectors and output connectors are not reversely connected.
0
Check cables for damage.
0
Check that a proper input source is selected. (v p. 27)
0
Adjust the volume. (v p. 28)
0
Make sure volume is not muted. (v p. 28)
Contents
Connections Playback Settings Tips Appendix
63

Music cuts out or delays sometimes
Music cuts out or delays sometimes.
0
Make sure your Internet connection is operating correctly. If you are sharing your network with other users or devices, they may be using most of your
bandwidth (especially if they are streaming video).
0
Make sure this unit is within range of your wireless network.
0
Make sure this unit is not located near other electronic devices that could interfere with it’s wireless connectivity (like microwave ovens, cordless
phones, TVs, etc…).
The HDMI control function does not work
The HDMI control function does not work.
0
You cannot operate devices that are not compatible with the HDMI control function. In addition, depending on the connected device or the settings, the
HDMI control function may not work. In this case, operate the external device directly.
0
Check that the HDMI control function setting is enabled on all devices connected to this unit.
Audio can be heard coming from the TV’s speakers
Audio can be heard coming from the TV’s speakers.
0
Disable the TV’s speakers (usually a setup-menu option, but a rear-panel switch on some TVs).
Contents
Connections Playback Settings Tips Appendix
64

I hear a delay when using the external input with my TV
I hear a delay when using the external input with my TV.
0
If you are connecting the external input with your cable or satellite box for enjoying TV audio through multiple HEOS built-in devices, you may hear a
delay between when you see someone speak and when you hear the audio. This is because the HEOS system must buffer the audio before it sends it
out to the HEOS built-in devices so that it arrives at all devices at the same time. You can avoid this delay by listening only to the device which is directly
connected to the set top box.
Bluetooth playback does not work
Cannot pair with a Bluetooth device.
0
It may be that Bluetooth is not enabled on the Bluetooth device. See the owner’s manual of the Bluetooth device to enable the Bluetooth function.
0
This unit may be paired with another Bluetooth device. Select this unit from the list of devices displayed on the screen of the Bluetooth device.
0
Bring the Bluetooth device near to this unit.
0
Turn the power of the Bluetooth device off and on again, and then try again.
0
Only 1 Bluetooth device can be connected at a time.
0
The connection from the Bluetooth mobile device is malfunctioning. Power cycle the mobile device, remove the pairing information and re-pair this unit
to the mobile device.
The sound is cut off.
0
Bring the Bluetooth device near to this unit.
0
Remove any obstacle between the Bluetooth device and this unit.
0
To prevent electromagnetic interference, locate this unit away from microwave ovens, wireless LAN devices and other Bluetooth devices.
0
Pair with the Bluetooth device again. (v p. 29)
Contents
Connections Playback Settings Tips Appendix
65

Cannot connect the sound bar to the network
Cannot connect the sound bar to the network.
0
Make sure your mobile device is connected to your wireless network before setting up your sound bar. (v p. 32)
0
You can connect your sound bar to your network router using an Ethernet cable sold separately. Once connected via Ethernet, the HEOS App should
recognize the sound bar and you can manually move it to your wireless network using “Settings” - “My Devices” - (“Device Name”) - “Advanced” -
“NETWORK SETTINGS”. (v p. 33)
Connecting to a network using an iOS device
Connecting to a network using an iOS device.
0
This unit supports Apple’s “WAC (Wireless Accessory Configuration)” setup mode. WAC setup mode allows you to connect this unit to your network
without requiring you to type in the network name and password.
1. The CONNECT LED on the rear of this unit will slowly blink amber to indicate that WAC setup mode is active. If the rear LED is not blinking amber,
press and hold volume down (-) and 1 / 3 button on the sound bar for 3 seconds until you see the LED blinking amber.
2. Go to the Wi-Fi menu under Settings on your iOS device.
3. Select “Denon Home Sound Bar 550” under “SET UP NEW AIRPLAY SPEAKER...” at the bottom of the list.
4. Select the network you want this unit to connect to and select “Next”.
5. Follow the instructions on the screen to complete setup.
6. When the connection is complete, the status LED on the front of this unit will turn solid blue.
0
This unit will stay in WAC setup mode for 15 minutes. If this unit is not setup within 15 minutes, it will revert back to its previous network connection.
Press the 1 / 3 button on the sound bar if you want to cancel WAC setup mode.
0
After running the December 2023 firmware update, network connection through WAC setup mode will no longer be available. After updating, perform
setup through the HEOS app.
Home → Settings → Add Device
Contents
Connections Playback Settings Tips Appendix
66

Connecting to a WPS network
Connecting to a WPS network.
0
If your wireless router support WPS (Wi-Fi Protected Setup™) this unit can optionally connect to your network using the push button method by
following these steps:
(Wi-Fi Protected Setup™ is trademarks of Wi-Fi Alliance.)
1. Press the WPS button on your router.
2. Within 2 minutes, press and hold the CONNECT button on the rear panel of the sound bar for 3 seconds.
3. The status LED on the front of the sound bar will flash green for several seconds as it connects to your WPS router.
4. When the connection is complete, the status LED on the front of the sound bar will turn solid green.
This unit takes long time to turn on
This unit takes long time to turn on.
0
In case this unit as in the deep standby mode, it may takes around 40 second to turn on.
Contents
Connections Playback Settings Tips Appendix
67

Cannot operate the unit with Alexa
Alexa is not configured correctly.
0
Download the HEOS App to your iOS or Android device, and use the HEOS App to configure the settings correctly. (v p. 31)
The unit is not connected to the network.
0
Download the HEOS App to your iOS or Android device, and use the HEOS App to connect to the network. (v p. 31)
NOTE
0
Optional Alexa Built-in functionality will become available via a firmware update.
Alexa does not respond even if called
The microphone is disabled.
0
Touch the key to enable the microphone.
NOTE
0
Optional Alexa Built-in functionality will become available via a firmware update.
Contents Connections Playback Settings Tips Appendix
68
Resetting factory settings
When the network function or this unit do not operate correctly, the problem may be solved by resetting factory settings.
Resetting this unit will clear out the wireless network info, EQ, and name but retain it’s current software. You will have to use “Settings” - “Add Device” from
the HEOS App to reconnect this unit to your home network before it can be used.
Status LED
1
Press c to turn on power to the unit.
2
Press and hold the CONNECT and g buttons on the
sound bar for 5 seconds.
The status LED blinks in amber and initiates a reset.
Contents Connections Playback Settings Tips Appendix
69
Resetting the firmware to the default state
When the network function or this unit do not operate correctly, the problem may be solved by resetting the firmware to the default state.
0
It is confirmed that the network connection has no problem, but the unit cannot connect to the Internet.
0
The solution described in “Resetting factory settings” does not work. (v p. 69)
For such cases, perform the following operation:
Status LED
1
Unplug the power cord from the power outlet.
2
Plug in the power cord while holding down the g
button.
3
Release the button after the status LED starts to blink
in amber.
When the status LED switches from blinking amber to solid, the
recovery process is complete.
0
Since this process includes a firmware recovery, it takes some time to complete.
0
This process will clear out all the information that you set.
0
Do not unplug the power cord until the entire process completes.
0
If the problem is not solved after performing this operation, contact our customer
service center.
Contents Connections Playback Settings Tips Appendix
70

About HDMI
This unit supports the following HDMI functions.
0
ARC (Audio Return Channel) function
Enjoy movies, music, etc., on your TV simply by connecting an ARC function-compatible TV to this unit via HDMI.
0
eARC (Enhanced Audio Return Channel) function
The eARC function is compatible with conventional ARC function compatible audio formats in addition to multichannel linear PCM, Dolby TrueHD,
Dolby Atmos, DTS-HD Master Audio, DTS:X and other audio formats a conventional ARC function cannot transmit. Additionally, connecting to an
eARC function-compatible TV enables enjoyment of higher-quality surround playback of the audio content played from your TV.
0
HDMI control function
Connect an HDMI control-compatible TV and this unit via HDMI and enable the HDMI control to enable linked control from either device.
0
Input source switching
If the TV is turned on, this unit automatically powers on and switches the input source.
0
Power off link
The TV power off operation is linked so this unit also turns off.
0
Volume adjustment
The volume of this unit can be adjusted using the TV remote control.
0
Audio output destination switching
If this unit is turned on, TV audio is output from this unit. If this unit is turned off, TV audio is output from the speakers of the TV.
0
Some functions may not operate depending on the connected TV.
Contents Connections Playback Settings Tips Appendix
71

Power management
Power modes
o
Quick start mode
This unit automatically enters quick start mode to save power in the
following cases. During quick start mode, this unit operations cause the
power to turn on.
During quick start mode, the status LED lights in dim blue or dim
amber.
n
Ethernet
After around 20 minutes of no operation and no network access after
playing music via Ethernet.
n
Wi-Fi
After around 20 minutes of no operation and no network access after
playing music via Wi-Fi.
n
USB
After around 20 minutes of no operation and no network access after
playing music from a USB flash drive.
n
Bluetooth
After the Bluetooth connection is disconnected and there is around 20
minutes of no operation and no network access after playing music via
Bluetooth.
n
AUX input
After around 20 minutes of no audio.
n
Optical input
After around 20 minutes of no operation after optical device is put into
standby.
n
HDMI input
Play the HDMI device, such as a Blu-ray player, connected to this unit.
Around 20 minutes after HDMI device and TV are put into standby.
n
HDMI output (eARC/ARC)
Connect this unit and the eARC/ARC compatible TV with HDMI cable
and play TV. Around 20 minutes after TV is put into standby.
0
You also press the c button on the remote control unit to switch to quick start
mode.
Contents Connections Playback Settings Tips Appendix
72

o
Deep Standby
The device also has the ability to automatically enter “Deep Standby”
whenever the wired or wireless network connection is removed for
more than 60 minutes in quick start mode.
The front panel LED will turn off during Deep Standby. To wake this
unit from Deep Standby,
0
Press any button on the sound bar or the included remote control
unit.
0
Input audio signal to Optical.
0
CEC (Consumer Electronics Control) command over HDMI/ARC
0
Use a TV remote control that has learned the operations of this unit
with the remote control learning function to operate this unit.
(v p. 57)
0
It may take around 40 seconds to wake up this unit from the deep standby.
0
You also press the c button on the remote control unit for 5 seconds, the
device enters the deep standby.
0
You also press the 1/3 key for 5 seconds, the device enters the deep
standby.
o
Off
To completely turn off the power to the device you must remove the
mains plug from the power outlet.
Contents
Connections Playback Settings Tips Appendix
73
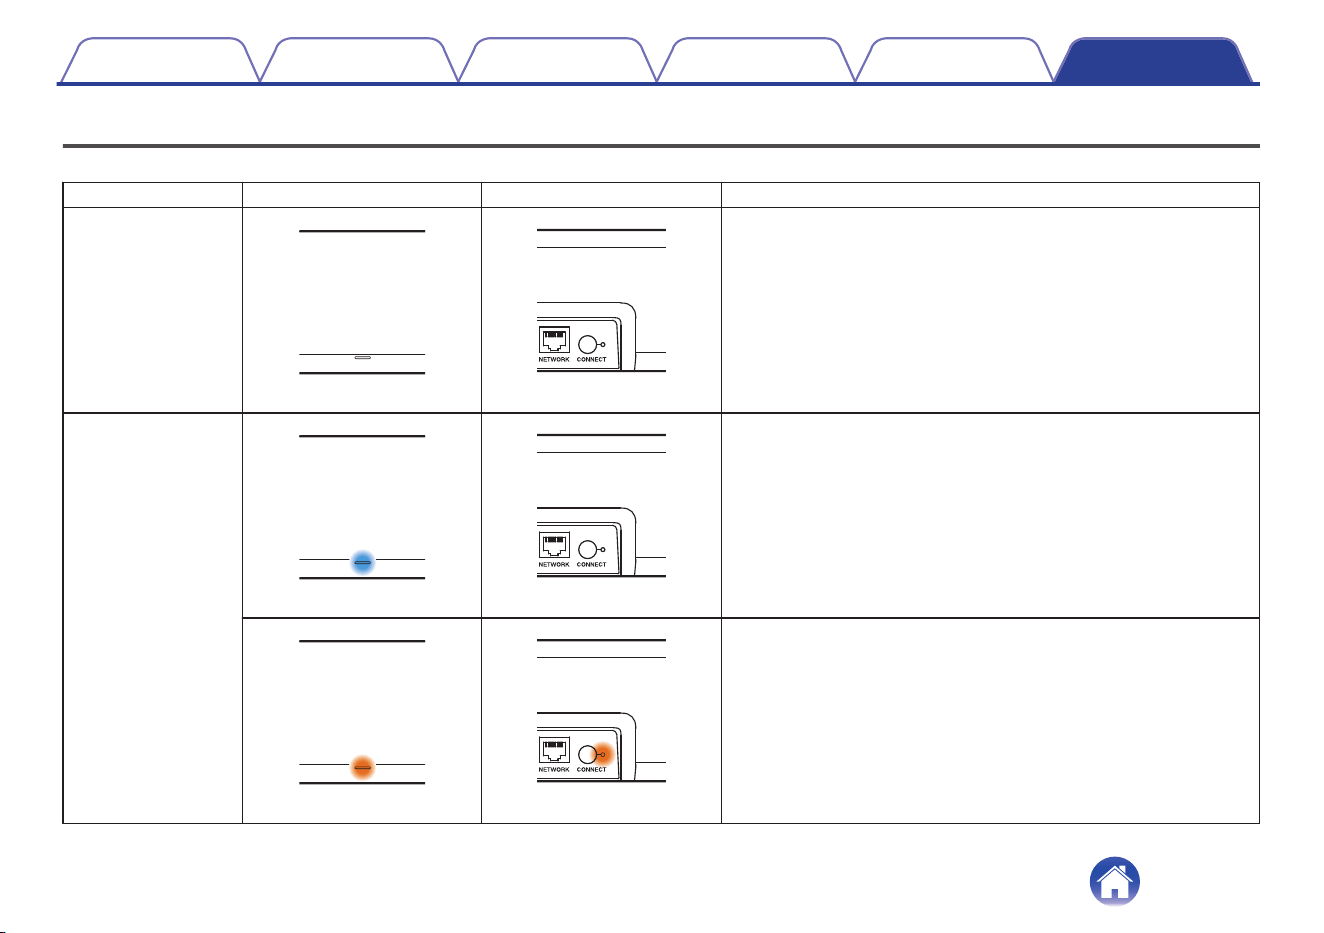
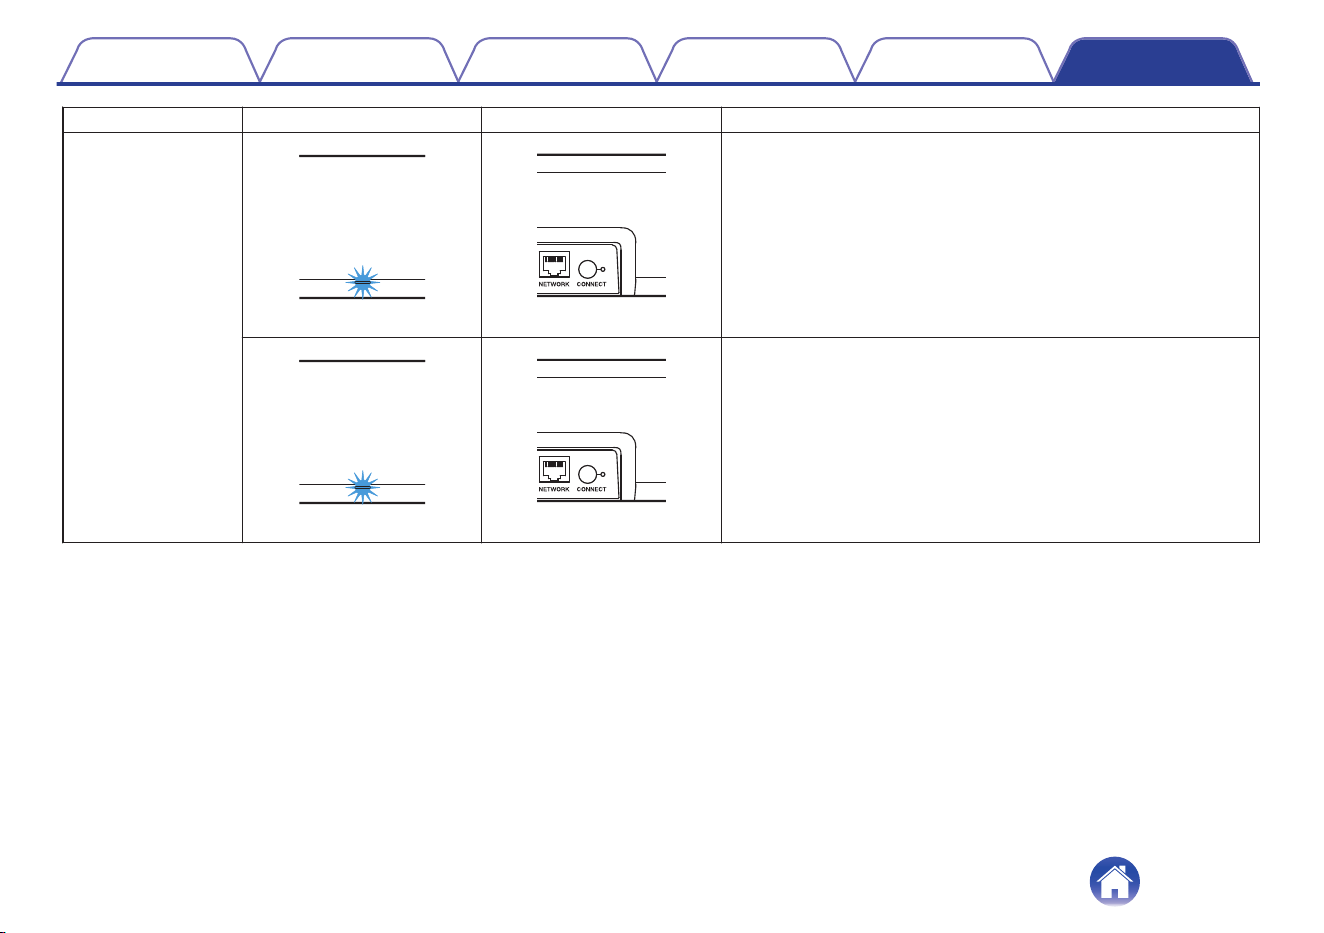
Status LED table
The LEDs on the front panel and rear panel change to indicate the current sound bar status.
Status Front LED action Rear LED action Description
Deep standby mode
(off) (off)
Power is off, or the sound bar is in deep standby mode. (v p. 73)
Quick start mode
(dimmed solid) (off)
Sound bar is in quick start mode (Connected to your network).
(v p. 72)
(dimmed solid) (dimmed solid)
Sound bar is in quick start mode (Not connected to your network).
(v p. 72)
Contents Connections Playback Settings Tips Appendix
74

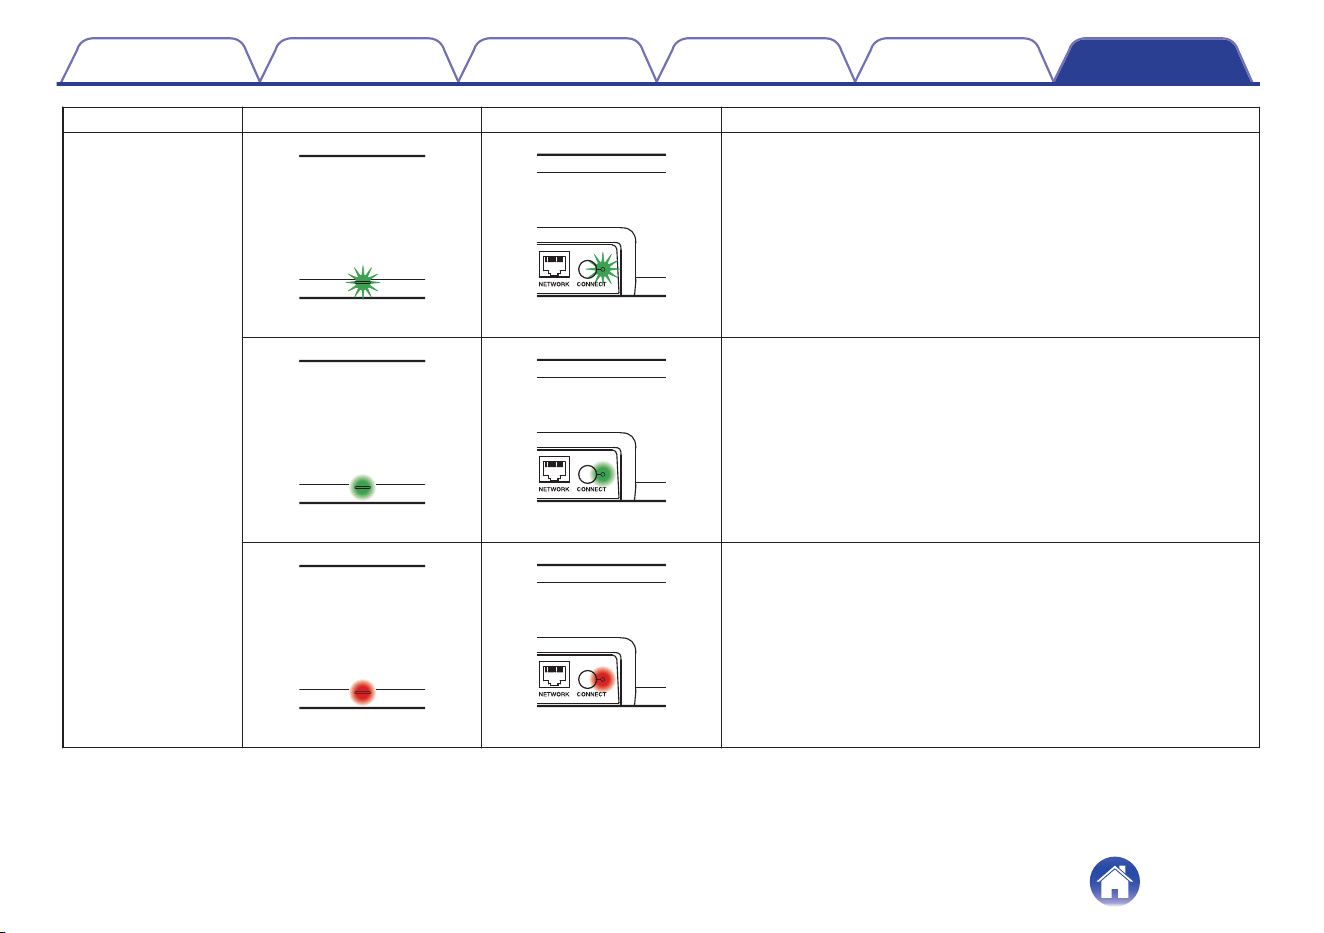
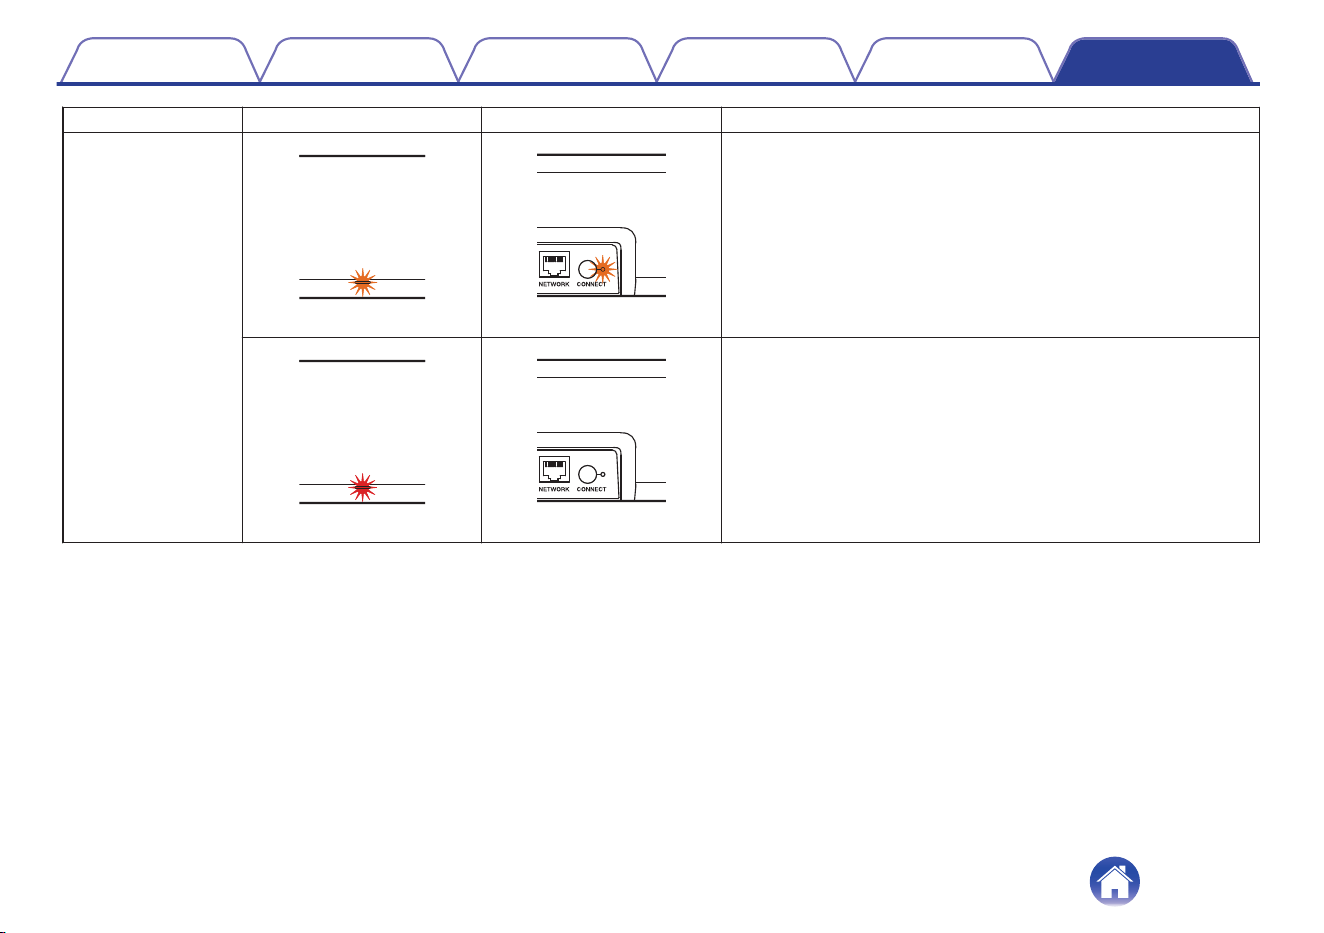
Status Front LED action Rear LED action Description
Power on
(blink) (off)
Sound bar is starting up or connecting to the network.
(solid) (off)
Sound bar is connected to the network.
(solid) (solid)
Sound bar is unable to connect to the network. Try to connect the
sound bar again.
Contents Connections Playback Settings Tips Appendix
75
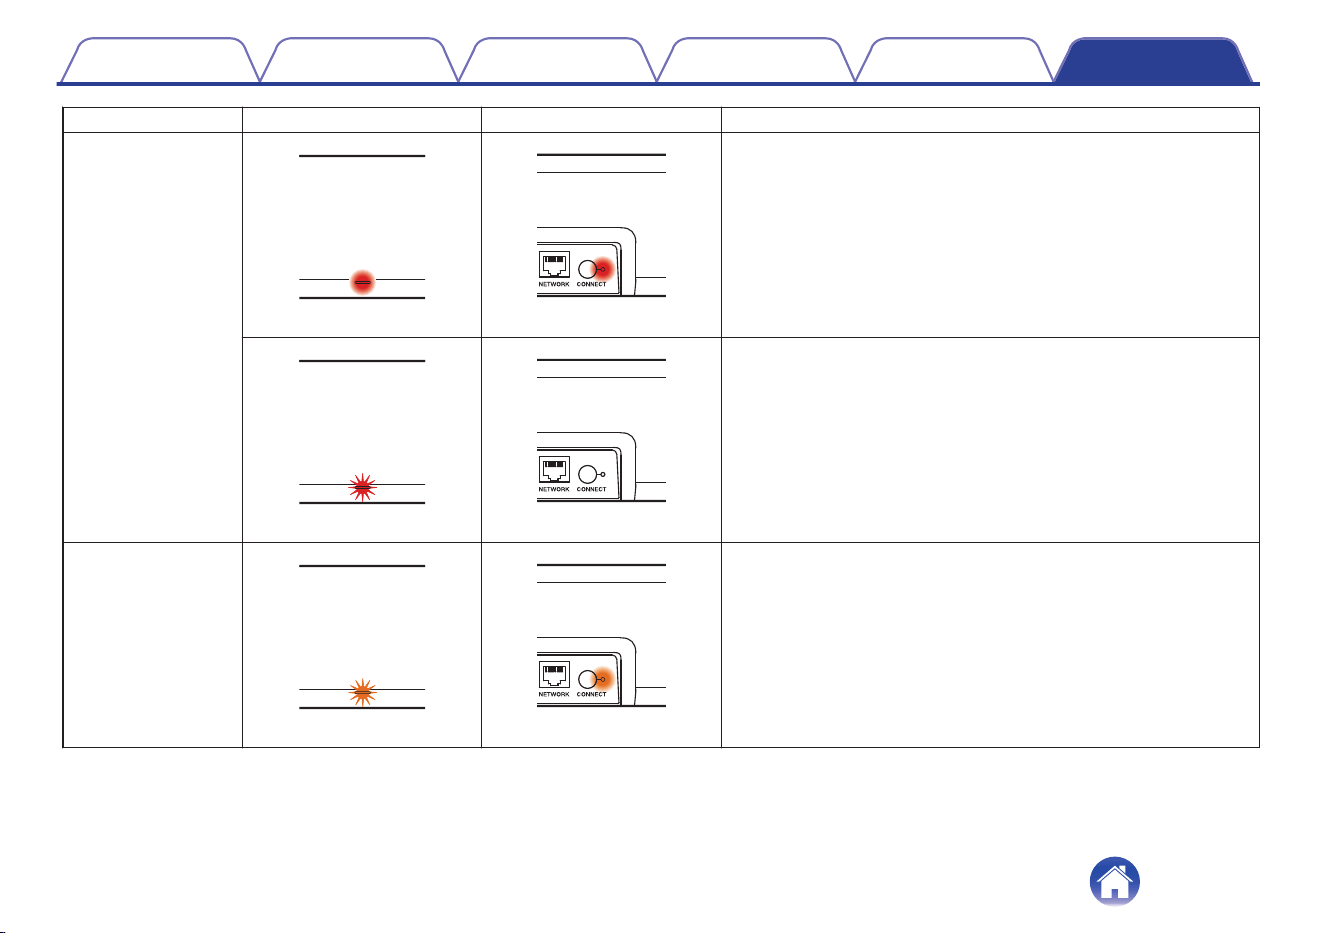
Status Front LED action Rear LED action Description
Bluetooth
(two blinks) (two blinks)
Sound bar is pairing via Bluetooth.
(one blink) (off)
Sound bar is paired via Bluetooth.
(for 3 sec. solid) (for 3 sec. solid)
Sound bar failed to pair to the Bluetooth device. Try to pair again.
(v p. 29)
Contents Connections Playback Settings Tips Appendix
77
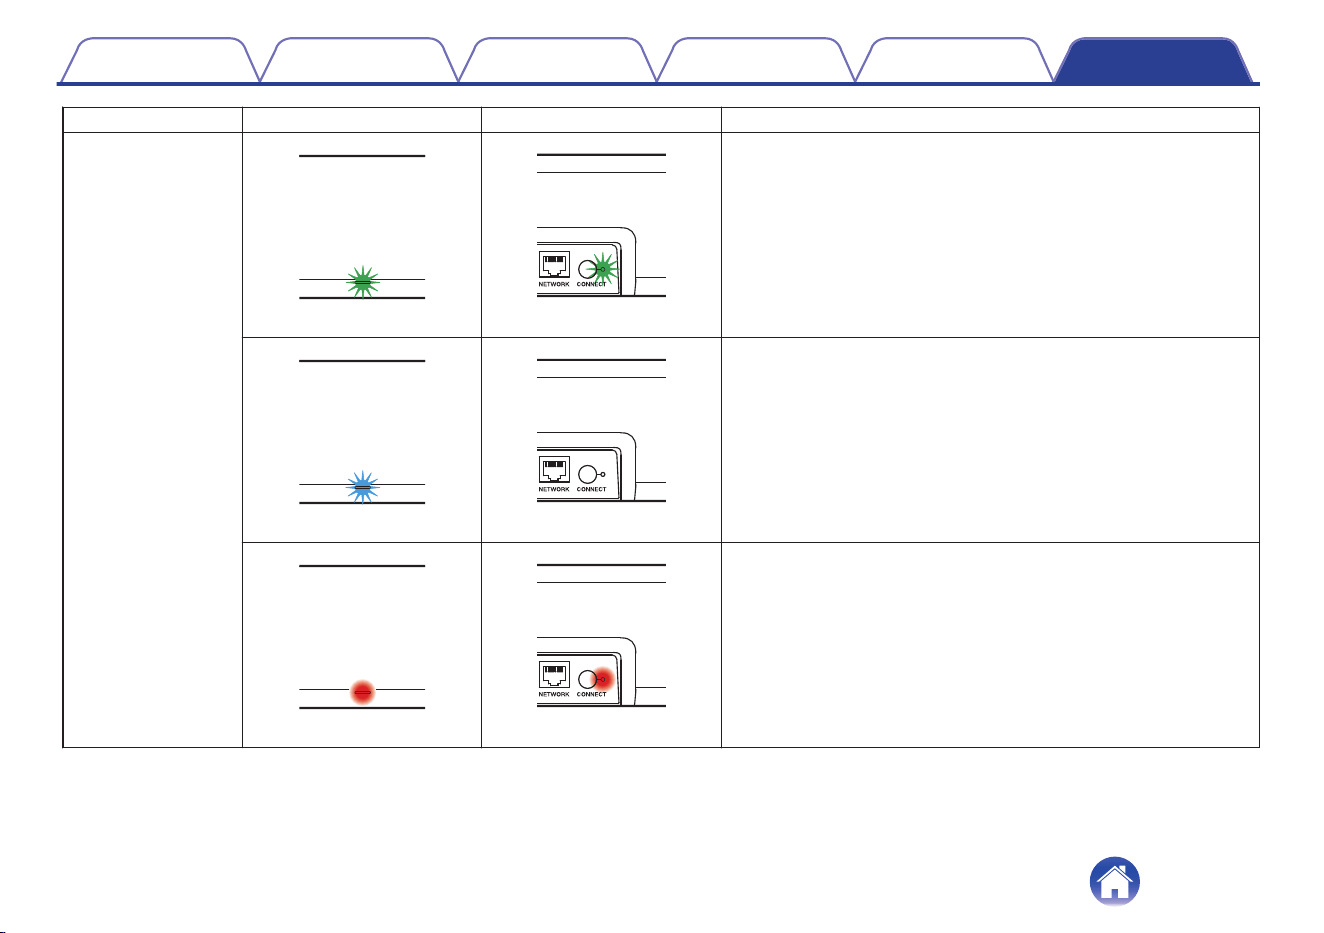
Status Front LED action Rear LED action Description
Firmware update
(blink) (blink)
Firmware is being updated.
(slow blink (Not fade)) (off)
There is a firmware error. Check your usage environment, relaunch
the app, then try to update the firmware again.
Contents Connections Playback Settings Tips Appendix
79
Status Front LED action Rear LED action Description
Error
(solid) (solid)
There was a setup error. Check your usage environment, then
follow the correct procedure to try setup again. If the error occurs
again, restore factory settings and try setup again. (v p. 69)
(fast blink) (off)
There is a hardware error. Unplug the power cord, wait a little while,
then plug the power cord back in.
Reset
(fast blink) (solid)
Factory settings have been restored.
Contents Connections Playback Settings Tips Appendix
80

Supported file types and codecs
Frequency Sample rate File extension Codec Bit rates
32/44.1/48/88.2/96/176.4/192 kHz 16/24 bit .wav PCM –
32/44.1/48 kHz 16 bit .mp3
MPEG-1 Audio Layer 3
CBR/VBR
32 - 320 kbps
32/44.1/48 kHz 16 bit .aac/.m4a AAC-LC 48 - 320 kbps
32/44.1/48 kHz 16 bit .wma
wma9
CBR
CBR:48 - 192 kbps
44.1/48/88.2/96/176.4/192 kHz 16/24 bit .flac flac –
44.1/48/88.2/96/176.4/192 kHz 16/24 bit .m4a ALAC –
2.8/5.6 MHz 1 bit .dff/.dsf
DSDIFF
DSF
–
0
For USB memory, the limited numbers of folders and files that can be played back on this unit are as follows.
0
Number of folder directory levels:8 levels (The limited number includes the root folder.)
0
Number of folders:500
0
Number of files:5000 (The allowable number of files may differ according to the USB flash drive capacity and the file size.)
0
Files protected by DRM such as Apple’s Fairplay DRM, are not supported.
0
The Apple Lossless Audio Codec (ALAC) decoder is distributed under the Apache License, Version 2.0 (http://www.apache.org/licenses/LICENSE-2.0).
Supported audio formats (Optical)
2-channel Linear PCM:2-channel, 32 kHz – 96 kHz, 16/20/24 bit
Bitstream:Dolby Digital, DTS
Contents
Connections Playback Settings Tips Appendix
81
Trademark information
Dolby, Dolby Vision, Dolby Atmos, and the double-D symbol are
registered trademarks of Dolby Laboratories Licensing Corporation.
Manufactured under license from Dolby Laboratories. Confidential
unpublished works. Copyright © 2012–2020 Dolby Laboratories. All
rights reserved.
For DTS patents, see http://patents.dts.com. Manufactured under
license from DTS, Inc. DTS, DTS:X, Virtual:X, and the DTS:X logo are
registered trademarks or trademarks of DTS, Inc. in the United States
and other countries. © 2020 DTS, Inc. ALL RIGHTS RESERVED.
The terms HDMI and HDMI High-Definition Multimedia Interface, and the
HDMI Logo are trademarks or registered trademarks of HDMI Licensing,
LLC in the United States and other countries.
Apple, AirPlay, iPad, iPad Air, iPad Pro and iPhone are trademarks of
Apple Inc., registered in the U.S. and other countries.
The trademark “iPhone” is used in Japan with a license from Aiphone
K.K.
Use of the Works with Apple badge means that an accessory has been
designed to work specifically with the technology identified in the badge
and has been certified by the developer to meet Apple performance
standards.
Contents Connections Playback Settings Tips Appendix
82
The Wi-Fi CERTIFIED logo is a registered trademark of the Wi-Fi
Alliance.
Wi-Fi Certification provides assurance that the device has passed the
interoperability test conducted by the Wi-Fi Alliance, a group that certifies
interoperability among wireless LAN devices.
The Bluetooth
®
word mark and logos are registered trademarks owned
by the Bluetooth SIG, Inc. and any use of such marks by D&M Holdings
Inc. is under license. Other trademarks and trade names are those of
their respective owners.
Roku TV, Roku TV Ready, and the Roku TV Ready logo are trademarks
of Roku, Inc.
Contents Connections Playback Settings Tips Appendix
83

Specifications
Sound bar
o
General
Operating temperature: 41 °F - 95 °F (5 °C - 35 °C)
Power supply: AC 100 – 240 V, 50/60 Hz (for Europe model)
AC 100 – 120 V, 50/60 Hz (for North America model)
Power consumption: 50 W
Power consumption in quick start mode:
(Voice service activated)
7.4 W (HDMI IN)
7.0 W (Wi-Fi)
7.2 W (Ethernet)
7.4 W (Bluetooth)
7.7 W (HDMI OUT(ARC))
7.7 W (USB+Wi-Fi)
7.0 W (OPTICAL IN)
Power consumption in deep standby mode: 0.4 W
Max analog input: 2 Vrms
Contents Connections Playback Settings Tips Appendix
84

o
Wireless LAN section
Network type (wireless LAN standard): Conforming to IEEE 802.11a/b/g/n/ac
(Wi-Fi
®
compliant)
z
1
Used frequency range: 2.4 GHz, 5 GHz
z1
The Wi-Fi
®
CERTIFIED Logo and the Wi-Fi CERTIFIED On-Product Logo are registered trademarks of the Wi-Fi Alliance.
o
Bluetooth section
Communications system: Bluetooth Version 5.4
Transmission power: Power Class 1
Maximum communication range:
Approx. 98.4 ft/30 m in line of sight
z
2
Used frequency range: 2.4 GHz band
Modulation scheme: FHSS (Frequency-Hopping Spread Spectrum)
Supported profiles: A2DP (Advanced Audio Distribution Profile)
AVRCP (Audio Video Remote Control Profile)
Corresponding codec: SBC
Transmission range (A2DP): 20 Hz – 20,000 Hz
z2
The actual communication range varies depending on the influence of such factors as obstructions between devices, electromagnetic waves from
microwave ovens, static electricity, cordless phones, reception sensitivity, antenna performance, operating system, application software, etc.
Contents
Connections Playback Settings Tips Appendix
85
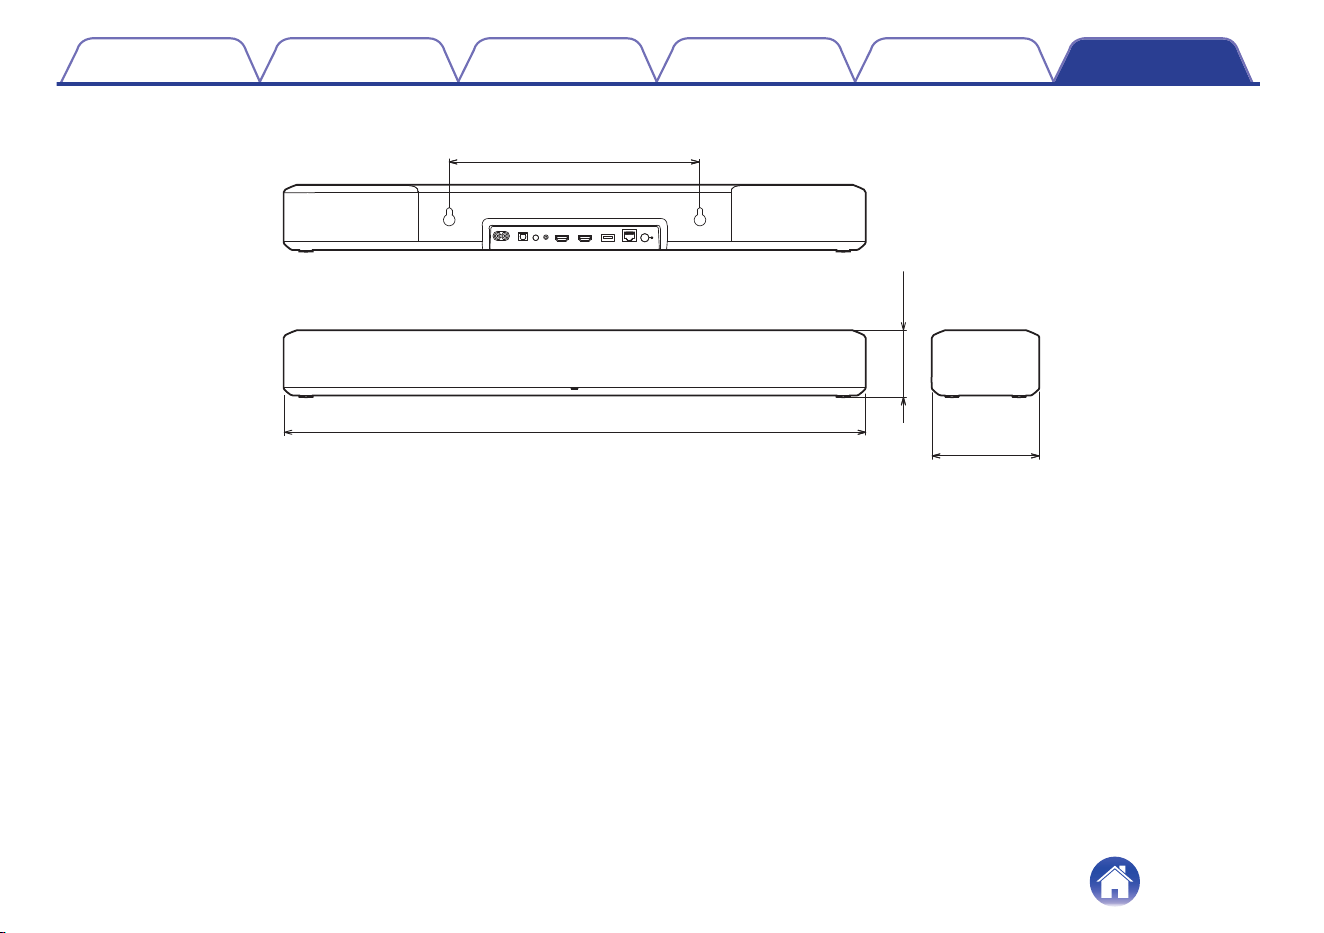


www.denon.com
3520 10797 00ASD
©2020 Sound United. All Rights Reserved.
88