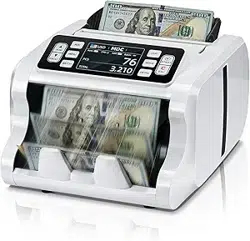
Owners' Guide Tools- Home Improvement
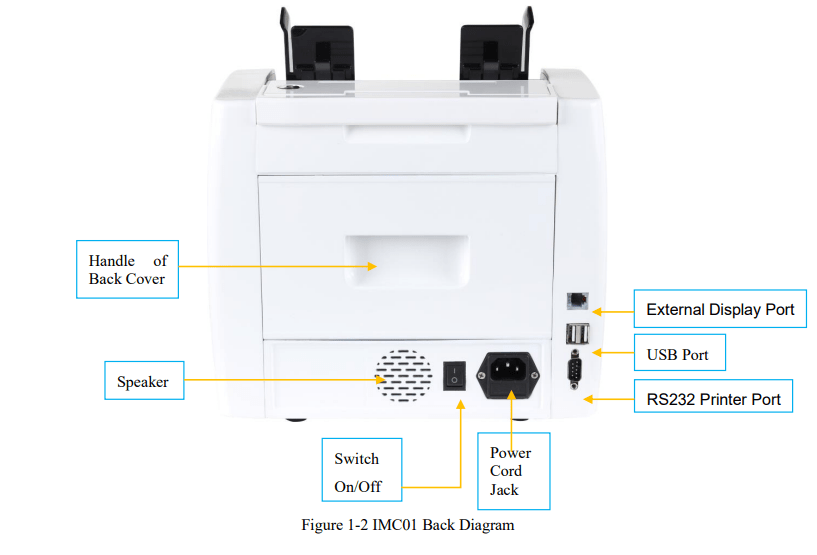
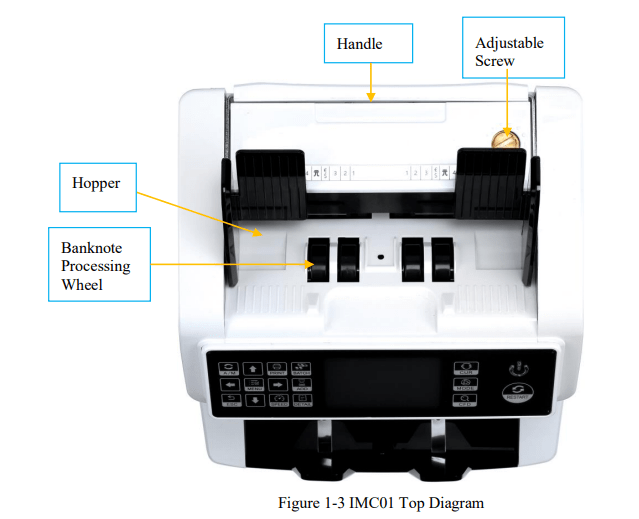
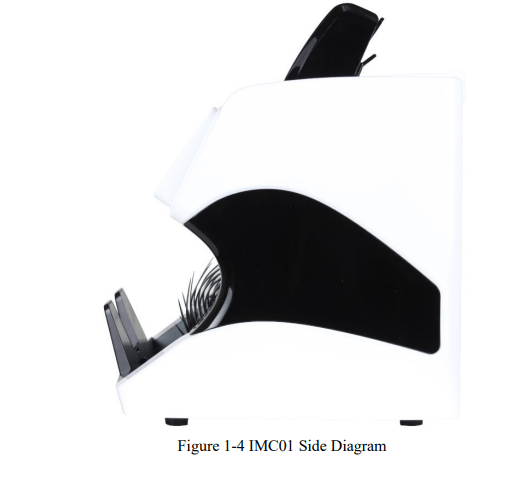
Machine Overview
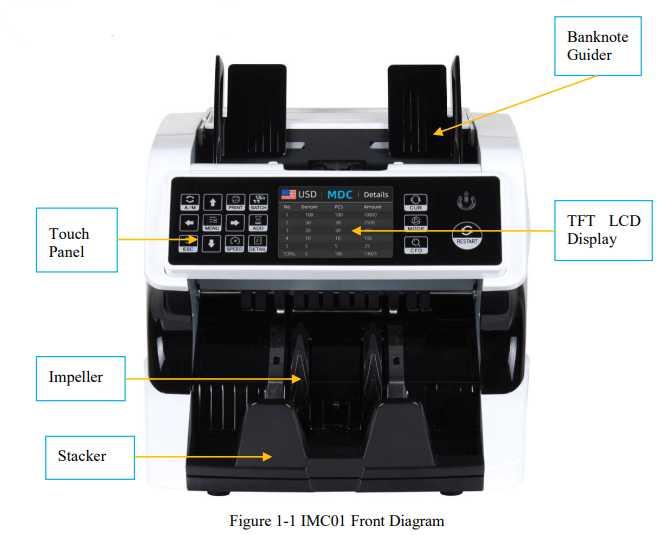
Display and Operation Interface
Display Appearance
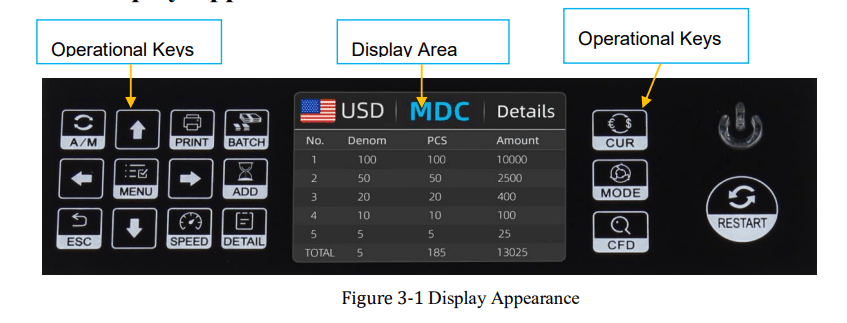
Operational Instructions for Function Keys
 Auto on key, to switch on/off the automatic operation. Auto: automatically counting as long as there is banknote on the hopper. Manual: manually counting by press the restart key.
 Direction keys
 Print key, to print the counted banknotes information.
 Batch key, to select the batch number.
 Menu key, to enter the menu interface by long pressing the key until a beep sound.
 Add key, to switch on/off the accumulation function.
 Return key, to return to the previous interface
 Speed key, to select the different available counting speeds.
 Detail key, to check the detail counted information
 Currency key, to select the one of currency, auto recognition or multi-currency mode for counting.
 Mode key, to select CNT mode, SDC mode or MDC mode for counting.
 CFD level key, to select the Counterfeit Detection Sensitivity level.
 Restart key, to start counting, or to start other operations
 Power key, long press to enter the standby mode, or press to resume to the working mode
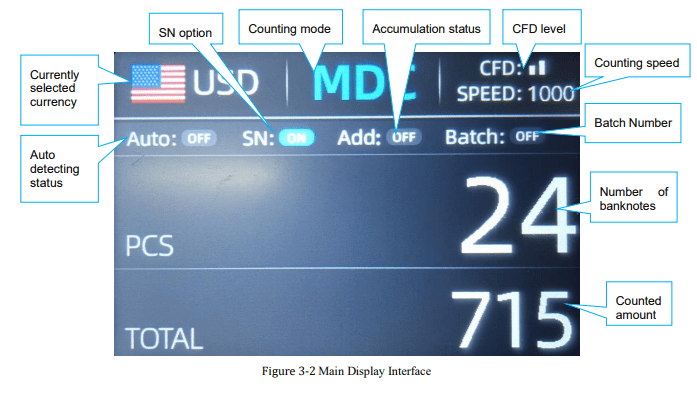
Display Interface
Operating Instructions
Start-up
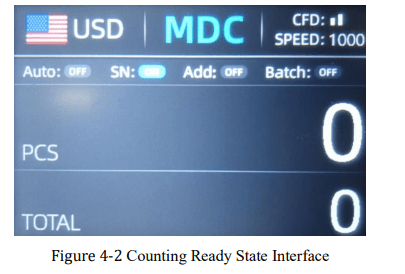
Turn on the switch after connecting the machine to power supply. First, the machine enters the self-checking interface, as shown in Figure 4-1.

Please wait patiently for about 20 seconds, and the machine will spin the banknote processing wheel several times to conduct a self-check, and then enter the main interface as shown in Figure 4-2.
Selection of Counting Mode
Single Currency Counting Mode
After the machine is turned on, the flag & currency graphic appears in the upper left corner, indicating that the machine is in the current currency counting mode.
The default mode is MDC mode. By pressing the key  of the control panel, three counting modes can be cyclically switched, and the 3 counting modes will be cyclically switched according to MDC-CNT-SDC sequence.
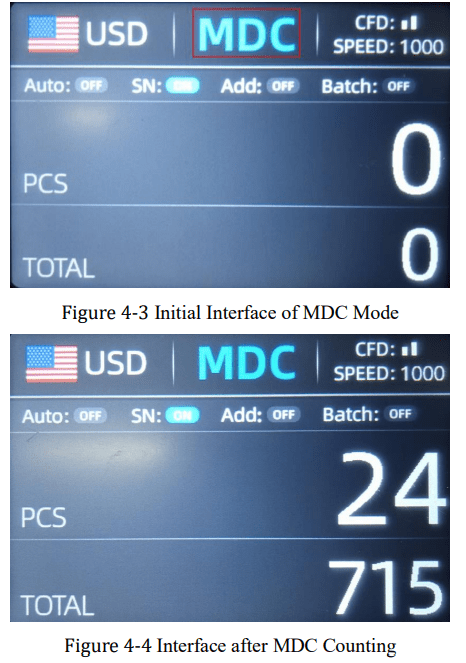
MDC Mode
As shown in Figure 4-3, the IMC01 is in MDC mode. In this mode, the IMC01 will count the banknotes of all denominations of the selected currency, and save the detail information of the counted banknotes at the same time, including the total amount and the total number of the banknotes in stacker, so as to facilitate users to check. In this mode, the IMC01 has 2 counting speed (800/1000 pcs/min) options.
SDC Mode
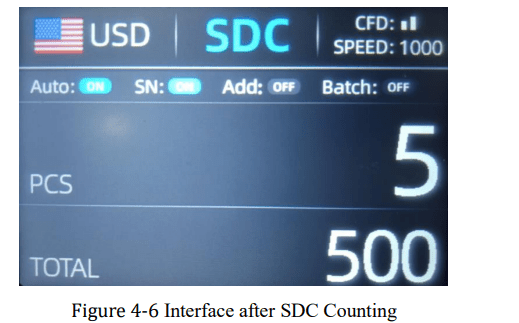
As shown in Figure 4-5, the IMC01 is in SDC mode. In this mode, the IMC01 will count the banknotes of the same denomination of the selected currency with the first banknote counted as a reference, and save the detail information of the counted banknotes at the same time, including the total amount and the total number of the banknotes in stacker, so as to facilitate users to check. In this mode, the IMC01 has 2 counting speed (800/1000/min) options.
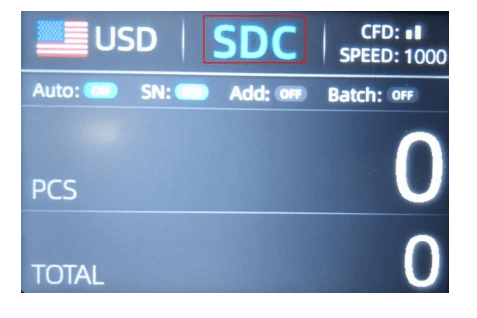
Figure 4-5 Initial Interface of SDC Mode
You can use this function to sort the mixed bill manually.
CNT Mode
As shown in Figure 4-7, the IMC01 is in CNT mode. This mode does not limit the currency, and only count the number of banknotes. It only works with double note detection function and no other counterfeit detection function. In this mode, the IMC01 has 4 counting speed (800/1000/1200/1500 pcs/min) options.
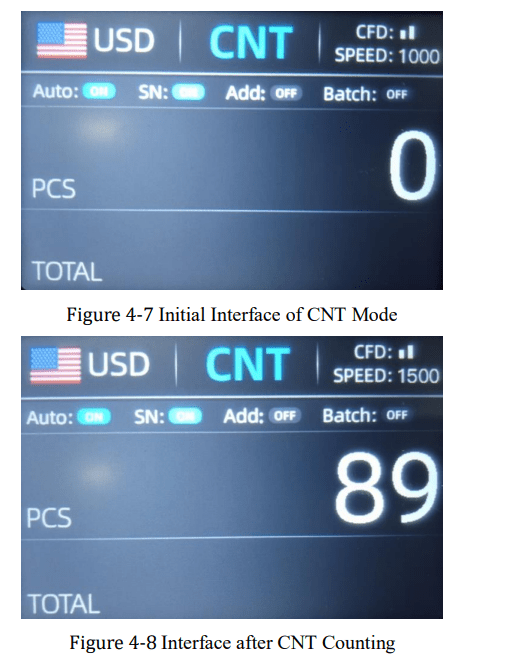
Note: In the MDC and SDC mode, the IMC has the functions of image acquisition, magnetic detection, ultraviolet detection and double note detection. While in the CNT mode, there is only a double note detection function.
Automatic Recognition Mode
In the process of counting banknotes, the IMC01 uses the first banknote passing through the sensor as the judgment rule to recognize the banknotes of all denominations of the same currency. When banknotes of other currencies are recognized, the machine will alarm and stop. At this time, banknotes from other currencies need to be taken out, and the machine will continue counting. The machine can only recognize all of the currencies displayed in the currency selection interface.
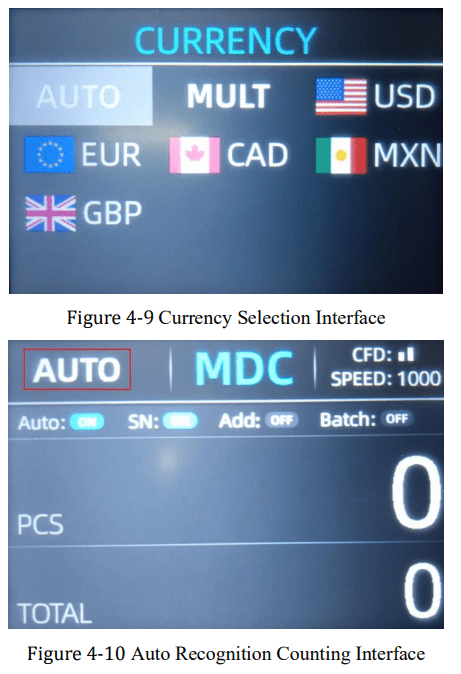
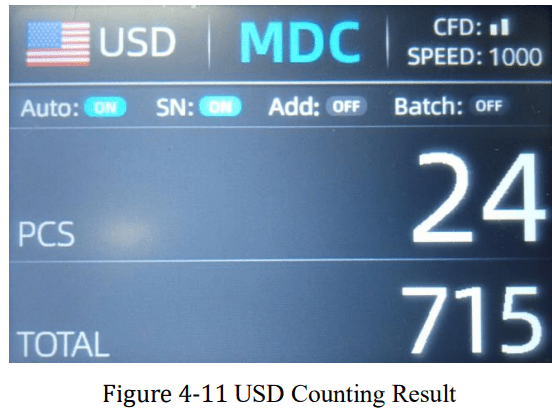
Press the key  , the currency selection interface is shown as Figure 4-9. Move the cursor to ‘AUTO’ by direction key (the default option is ‘AUTO’), and then press the menu key
  , the display screen will be automatically adjusted to the main interface, as shown in the Figure 4-10.
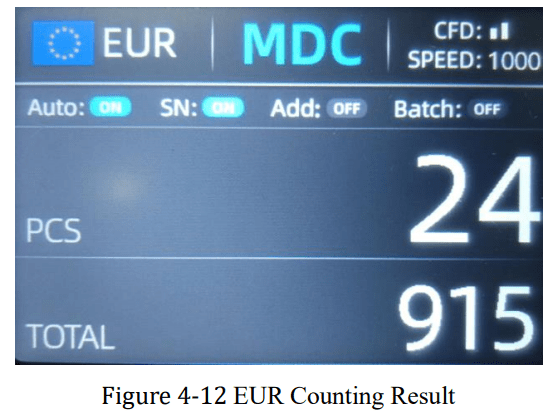
Example: Put a handful of USD into the IMC01 hopper to count. The interface of the IMC01 displays as Figure 4-11 at the end of counting. The currency in the upper left corner is identified as USD.
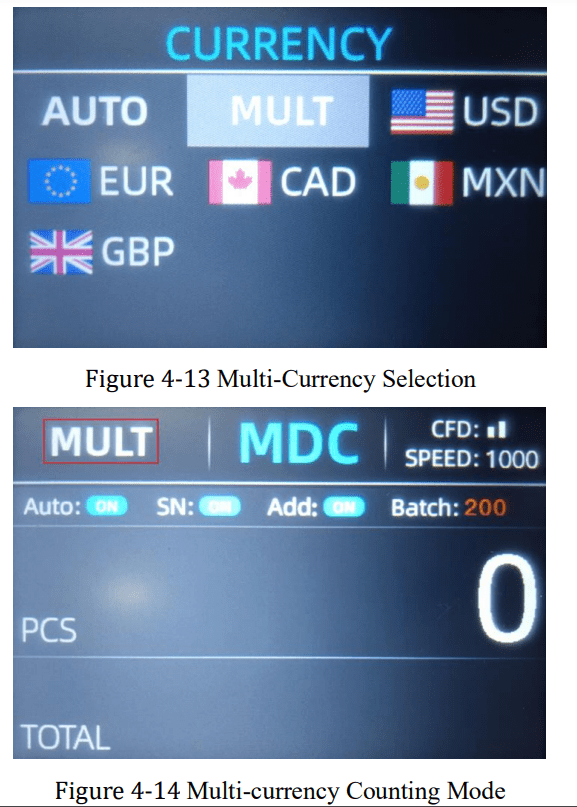
Take out the USD in the stacker, and then put the EUR into the machine to count. The display screen is showed as Figure 4-12.
Multi-currency Counting Mode
Multi-currency Mix Counting: Banknotes of multiple currencies are mixed together and put into the IMC01 to count. The IMC01 can recognize all the first 4 currencies displayed on the currency selection interface.
As shown in Figure 4-9, press the key  select ‘MULT’ shown in Figure 4-13, and then press the menu key
  , the display screen will be automatically adjusted to the main interface, as shown in the Figure 4-14.
Note: Only MDC mode is effective in the Multi-currency mode.
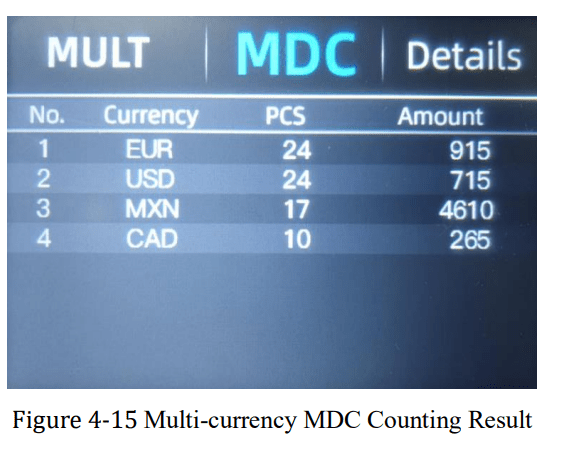
Example: Put a handful of banknotes (including USD, EUR, CAD, MXN) into the IMC01 hopper to count. The interface of the IMC01 displays as Figure 4-15 at the end of counting.
Non-Volatile Memory for Currency Mode
The currency mode setting is non-volatile. For example, if you set multi-currency counting mode before power down the IMC01, next time the IMC01 is in multi-currency counting mode after power on. It is very convenient that you don’t need to reselect the currency every time you power on the IMC01.
Counting Function Options
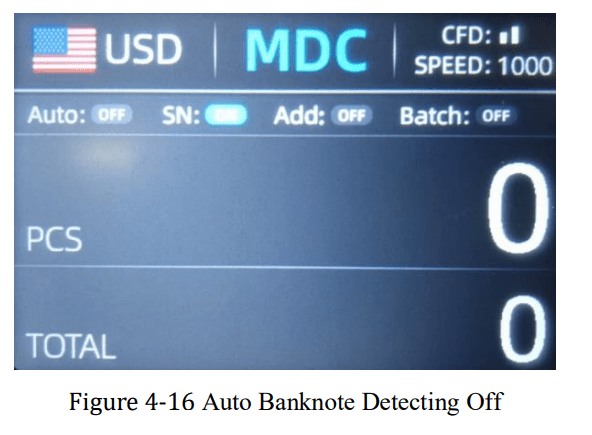
Automatic Banknote Counting
Press the key  to enable or disable the automatic banknote counting in the main interface. The default setting of automatic counting is on. Every time the IMC01 resets, the setting will be reset to be on state.
As shown in Figure 4-16, pressing the  key is needed every time when you put banknotes in the hopper to start counting.
SN Reading
The key  is used to enable or disable the SN reading function in the main interface. The default setting of SN reading is on. Every time the IMC01 resets, the setting is reset to be on state.
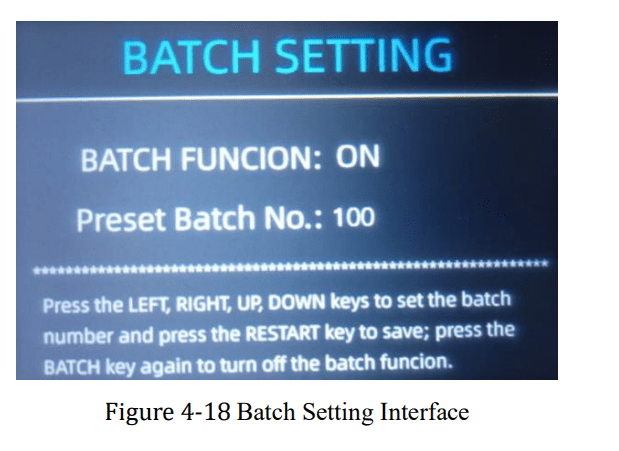
Batch Setting
Press the key  to select the batch number in the banknote counting interface, the screen display is shown in Figure 4-17. By pressing the key
  of the control panel, the batch number will be cyclically switched according to 100-50-0 sequence.
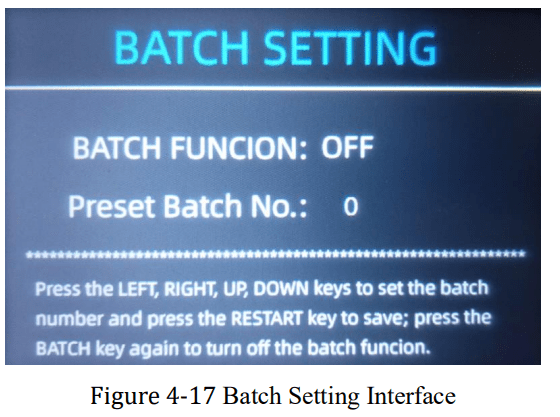
The batch number will be increased by 10 by pressing the key  , or decreased by 10 by pressing the key
  until it becomes 0. And it will be increased by 1 by pressing the key
  , or decreased by pressing the key
  .
.
Press the key  to return to the main interface if you confirm the batch number.
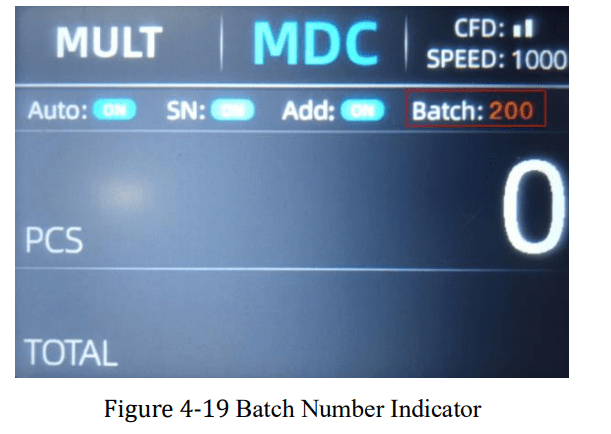
Note: the stacker maximum capacity is 200 bills, so the batch number should be less or equal to 200.
Accumulation
Press to enable the accumulation function.
In any counting mode, the accumulation function of the number of the banknotes can be enabled by pressing the key  .
.
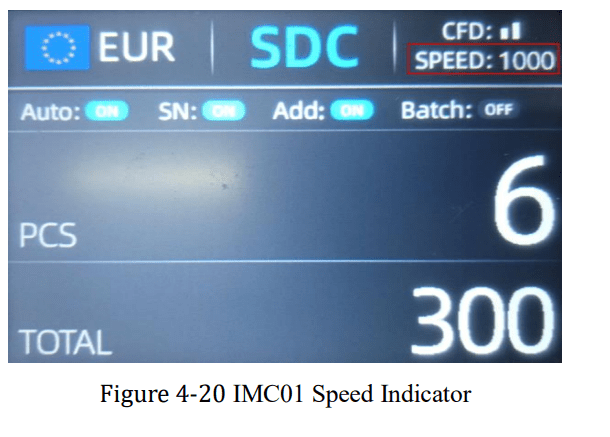
Counting Speed Setting
There are four counting speed options: 1500, 1200, 1000 and 800 (Note: 1500 and 1200 are the only optional in CNT mode). The default speed is 1000 in three modes. If setting is required, different counting speed can be switched by pressing the key  in any counting mode.
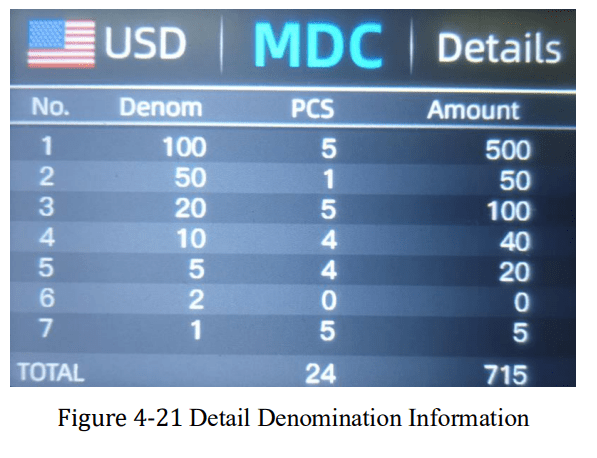
Check Detail of Counting
In the MDC or SDC mode, press the  key upon the completion of counting to enter the interface shown in the following figure to check the details of counting.
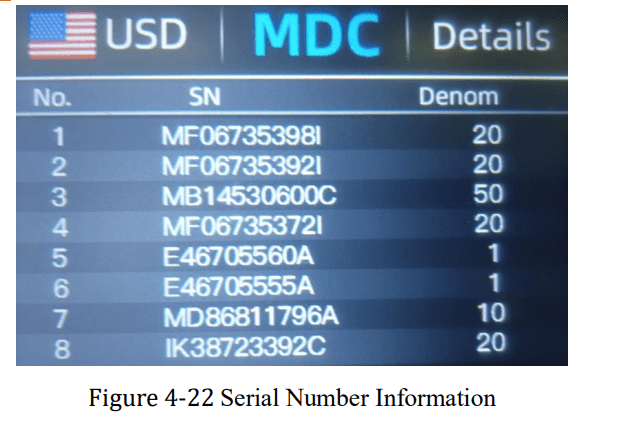
Check the Serial Number
As shown in Figure 4-21, if the SN reading is on, press the  key again, the banknote’s serial number will be shown in the following figure.
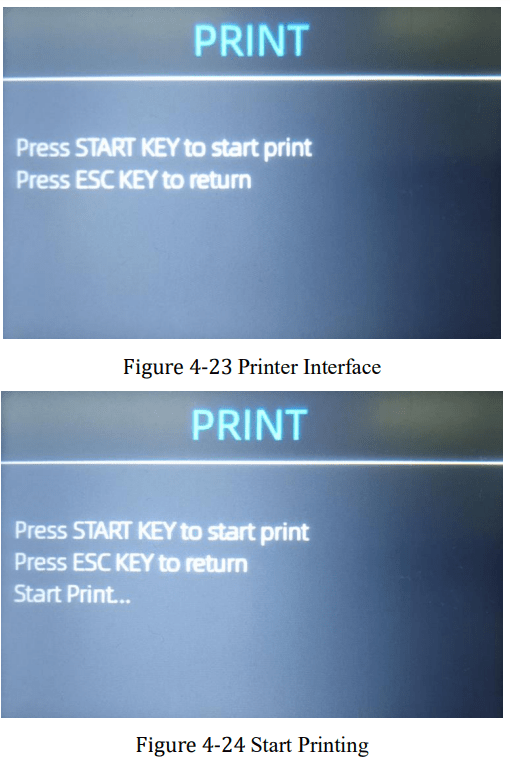
Print Information
When the external printer has been connected and can be printed, after counting, press the  key to enter the print interface shown in Figure 4-23, and then press the
  key, the printer starts print.
CFD Level
There are 3 adjustable CFD levels. By pressing the  key, the CFD level graphic appearing in the upper right corner will change.
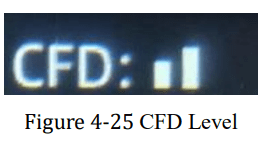
Note: CFD level 0, means no counterfeit detection, the most strictly detection is level 3
To enter the menu interface by long pressing the  key until a beep sound, as shown in the following figure.
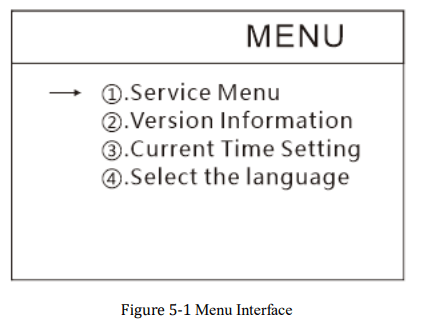
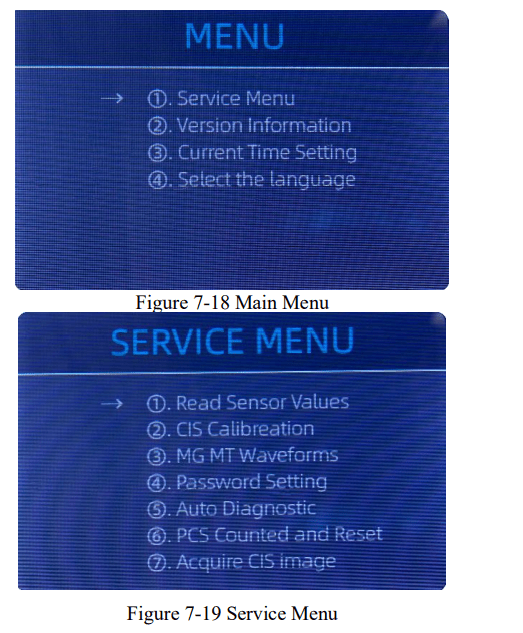
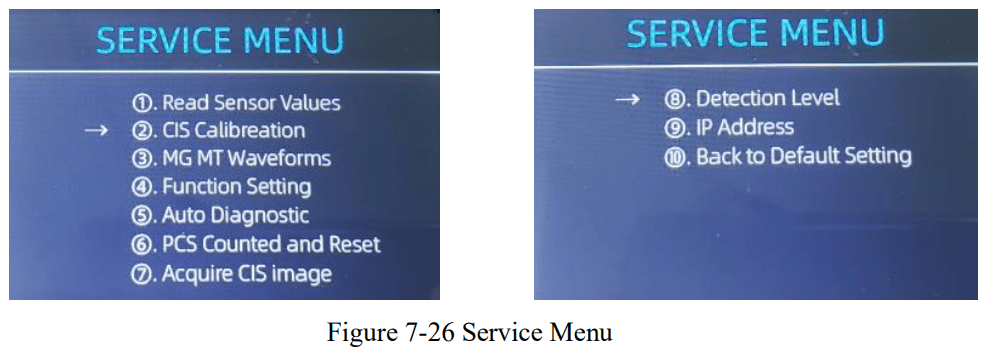
Service Menu
Press the  key to enter service menu, you will be requested to input a password with the following interface. The default password is 9999.

After input the password, the interface showed in Figure 5-3 will be displayed. Use the cursor to select with sub-menu you want to enter, and press MENU button to confirm, and press ESC button to quit.

Read Sensor Values
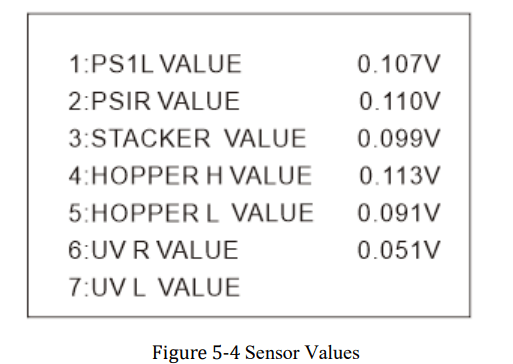
As shown in Figure 5-4, the sensors values are only for engineer to check whether any sensor has a malfunction. If you meet any problem about use, please take a photo of this page and contact us.
CIS Calibration
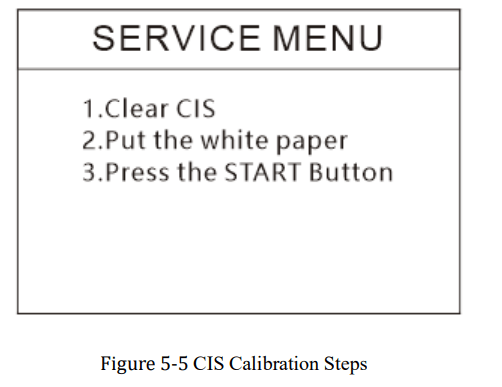
If you meet cases about banknote detection errors, please try to calibrate the CIS. The CIS calibration steps are shown in Figure 5-5. For more detail instruction, we recommend you to see the reference manual or watch the video
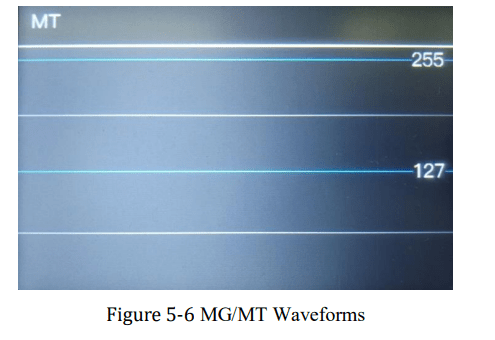
MG/MT Waveforms
Password Setting
The password cannot be changed by user now.
Auto Diagnostic
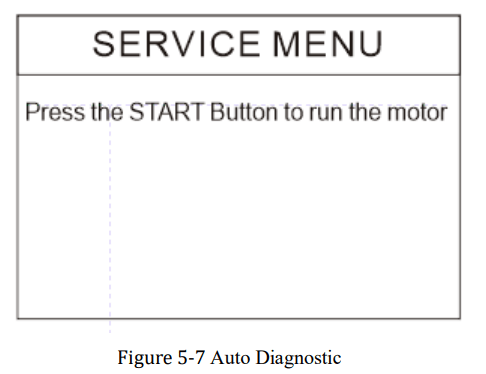
This is for production and professional servicing purpose.
PCS Counted and Reset
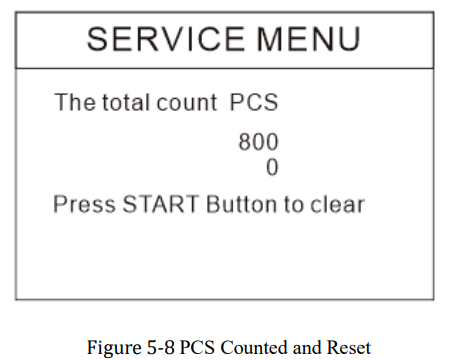
This is to tell you the total quantity of counted bills in this counter since last time clearing to zero.
Acquire CIS image
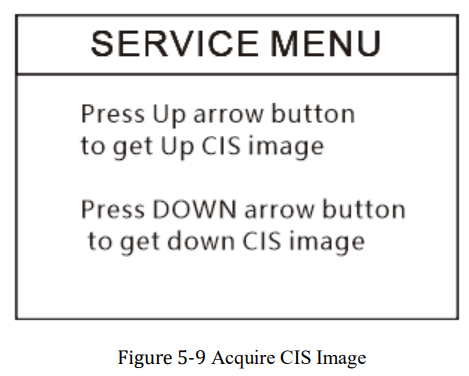
This is for servicing purpose.
Detection Level
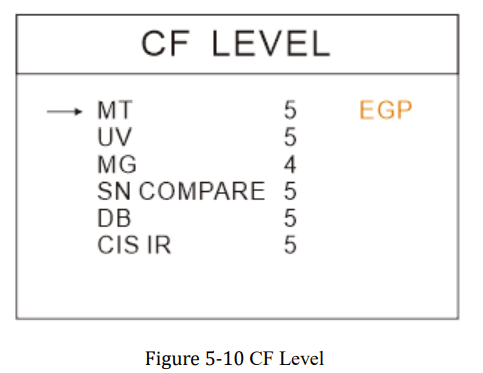
As shown in Figure 5-10, you can use the left and right direction key to select, and up and down direction key to change the sensitivity levels. The currency code in the right part is indicating for which currency you are operating.
Note: Please do not change without communicating with us.
IP Address
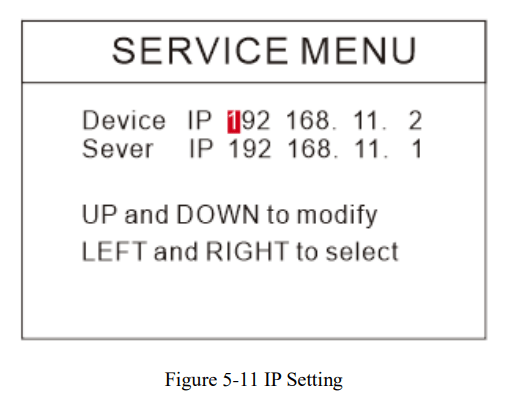
This is only for engineering use.
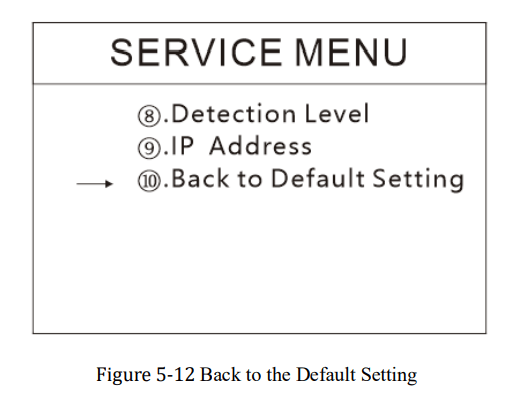
Back to Default setting
As shown in Figure 5-12, press the menu key to reset all of the settings you changed before.
Version Information
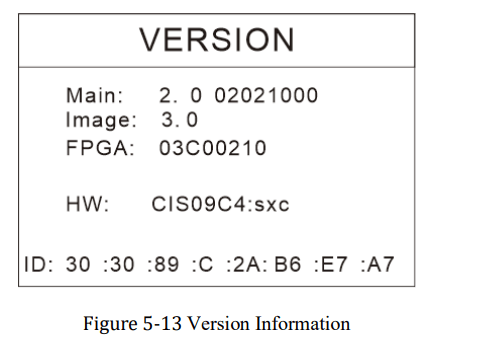
You are available to check the version information.
Time Setting
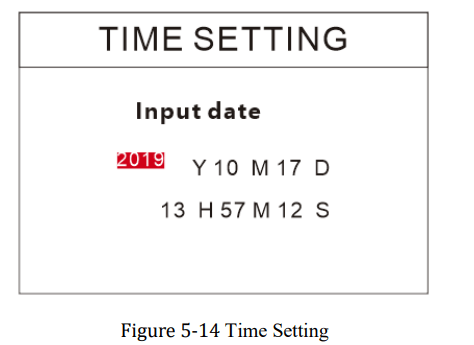
As shown in Figure 5-14, you can set the date or time according to your preference.
Language Selection
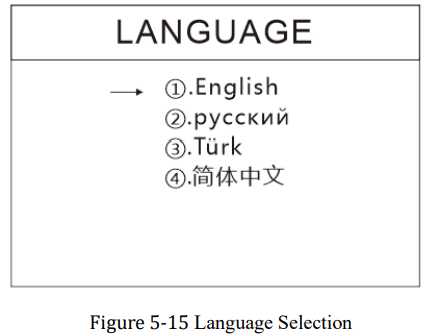
You are available to set the language you like.
Maintenance
After starting the machine, it will go on self-check automatically. If the preset window shows the error code or tell you to clean the sensors, generally speaking, it is because of dust on the surface or sensor blocked by notes. So please clear the dust on the surface with brush or soft cloth, or take the notes away. Then restart the machine.
This document describes the error handling guideline and the maintenance manual.
Cleaning the Machine
Any dust, dirt or other substances sticking to the sensor will interfere with the normal operation of the sensor and cause erroneous counting results. Therefore, the sensor and roller shaft shall be cleaned with the attached cleaning tools as necessary every day.
Please turn off the power switch before cleaning to prevent electric shock or other injury accidents.
Please do not use chemicals such as benzene, thinner or water.
Clean the Hopper
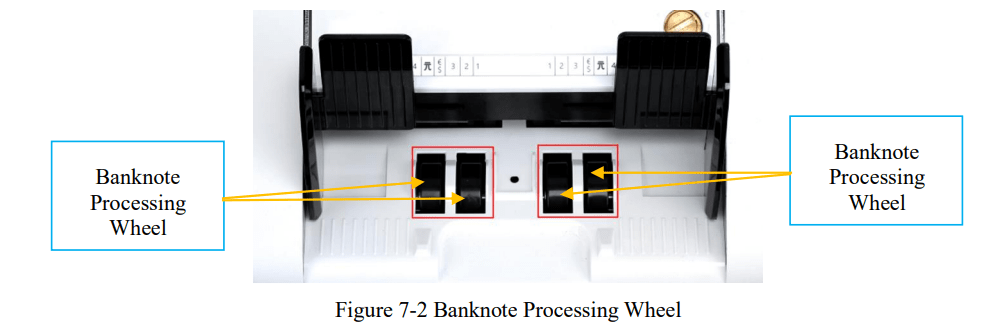
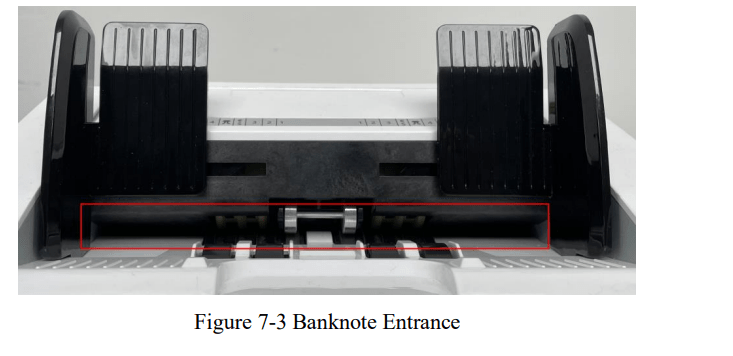
There are 3 parts need to be clean in the hopper: hopper sensor, banknote processing wheel and the banknote entrance.
- Hopper Sensor.
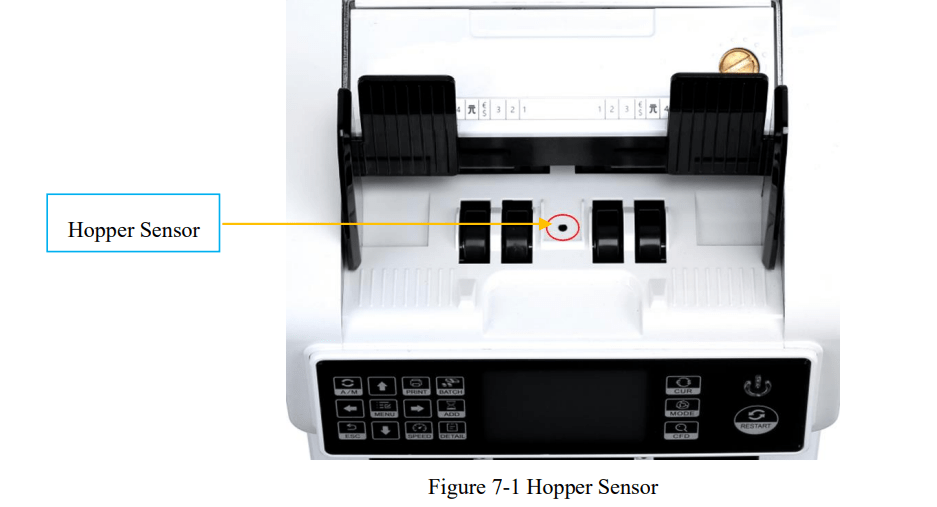
As shown at the above figure, clean the hopper sensor with nylon brush or cleaning cloth.
- Banknote processing wheel
As shown in the following figure, clean the banknote processing wheel with nylon brush or cleaning cloth.
- Banknote entrance
As shown in the following figure, clean the banknote entrance with nylon brush.
Clean the Stacker Sensors
As shown in the following figure, clean the stacker sensors with nylon brush or cleaning cloth.

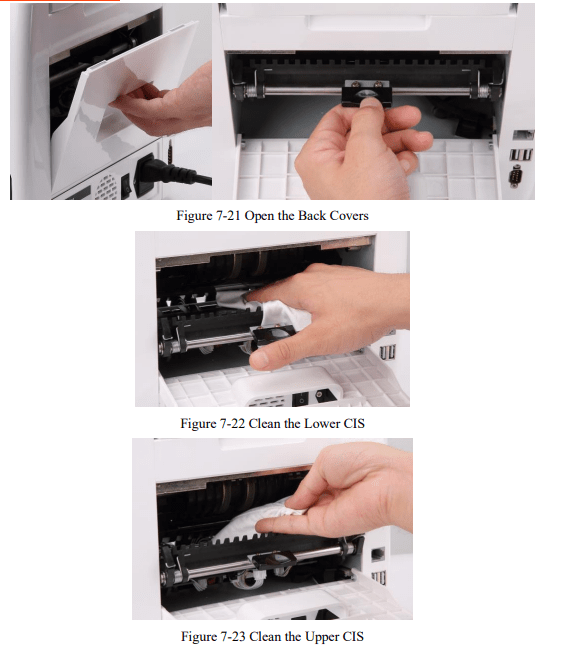
Clean the Internal Sensors
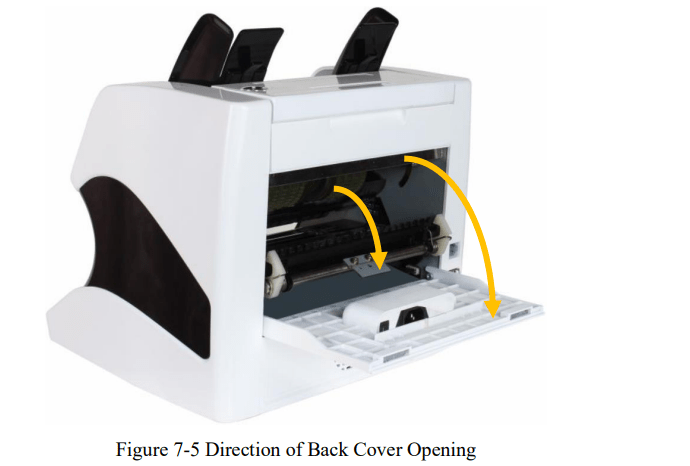
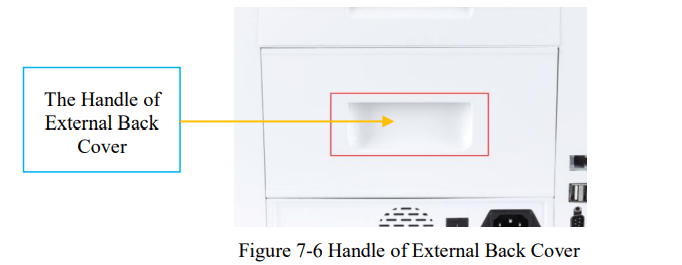
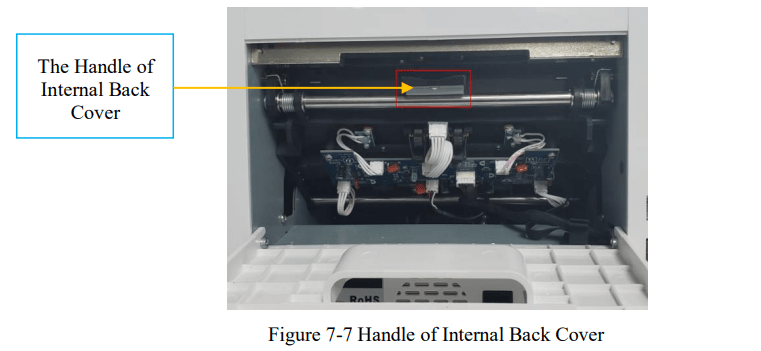
- Pull the handle of external back cover with the direction shown in Figure 7-5 to open the back cover.
- Pull the handle of internal back covering the direction shown in Figure 7-5 to open it.
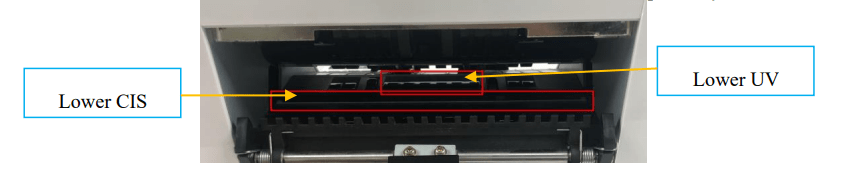
- Clean the lower CIS and Lower UV sensors with cleaning cloth or nylon brush respectively
- Clean the upper CIS with cleaning cloth.
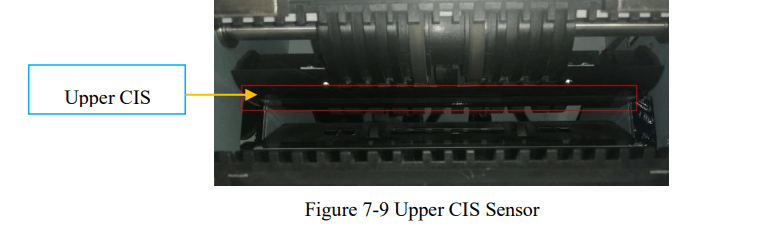
Note: For the CIS sensors, it is recommended to used cleaning cloth to clean them.
Error Code
| Code |
Error Message |
Handling Method (Recommendation) |
| E1 |
UV Fault |
Remove the banknote, clean the UV sensor |
| E2 |
Double Notes |
If the errors occur frequently, adjust the screw toward the anti-clockwise to decrease the feeding gap. |
| E3/E8 |
Chain Notes |
If the errors occur frequently, adjust the screw toward the anti-clockwise to decrease the feeding gap. |
| E4 |
Half Note |
Remove the banknote |
| E10 |
Image Error |
Clean the CIS sensor, and calibrate the CIS |
| E11/E12 |
Denomination Error |
Remove the banknote, clean the CIS sensor;
Perform the CIS sensor calibration;
Collect the data of the banknote.
|
| E13 |
Face Recognition Error |
Remove the banknote, clean the CIS sensor;
Perform the CIS sensor calibration;
Collect the data of the banknote.
|
| E14 |
Size Recognition Error |
Remove the banknote, clean the CIS sensor;
Perform the CIS sensor calibration;
Collect the data of the banknote.
|
| E15 |
Orientation Recognition Error |
Remove the banknote, clean the CIS sensor;
Perform the CIS sensor calibration;
Collect the data of the banknote.
|
| E20 |
MT Error |
Remove the banknote, clean or replace the MG sensors |
| E21 |
MG1 Error |
Remove the banknote, clean or replace the MG sensors |
| E22 |
MG2 Error |
Remove the banknote, clean or replace the MG sensors |
| E23 |
MG3 Error |
Remove the banknote, clean or replace the MG sensors |
| E24 |
MG4 error |
Remove the banknote, clean or replace the MG sensors |
| E30-E38 |
IR Error |
Remove the banknote, clean the CIS sensor;
Perform the CIS calibration;
Collect data of the banknote.
|
In the process of using the IMC01, the IMC01 may show abnormal state and display the error codes on the screen. The description of the error codes and the related handling method is shown in table 7-1.
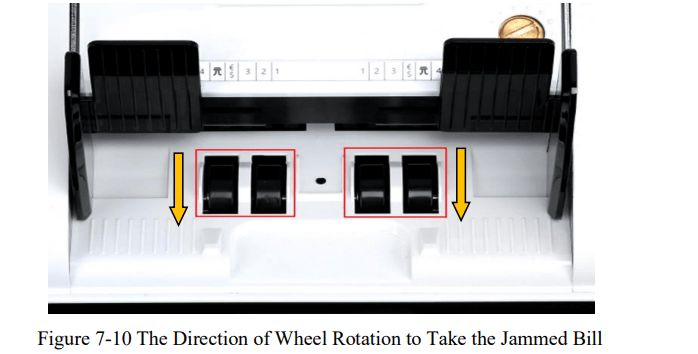
Bill Jam
If the bills are stuck inside the machine, please turn off the machine and rotate the banknote processing wheel by the direction of the following figure to take the jammed bills.
There are several conditions to make the bill jam happened.
- The bill size is out of the range according to IMC01 specification.
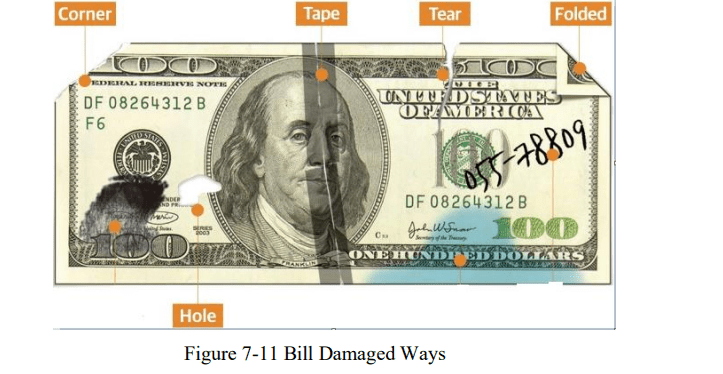
- The banknote is damaged with different ways such as lack of corner, tape, hole, tear and folded. As shown in Figure 7-11, it is not recommended to count this kind of bills.
- The banknote entrance is so small that the banknote cannot pass through it smoothly. In this case, you need to fine tune the screw by rotating it clockwise according to the following section
- Other abnormal operation or there is unknown thing inside the IMC01.If something inside the IMC01, you need to open the back cover to check, and clean the internal sensors.
Feeding Gap Calibration
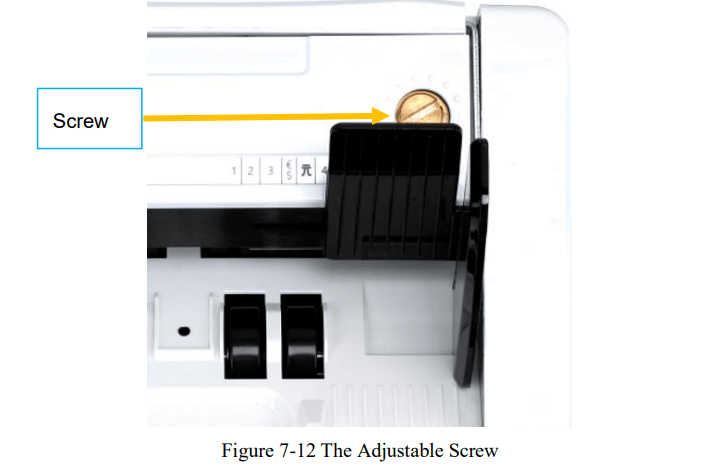
The screw is used to control the width of the feeding gap. The width will become smaller by rotating the screw toward the smallest dot, otherwise, it will become bigger.

Please fine tune the feeding gap by the following steps.
- Stop the auto counting first.
- Insert one banknote to the gap between the rollers to check if the banknote can be inserted smoothly, as shown in the following.
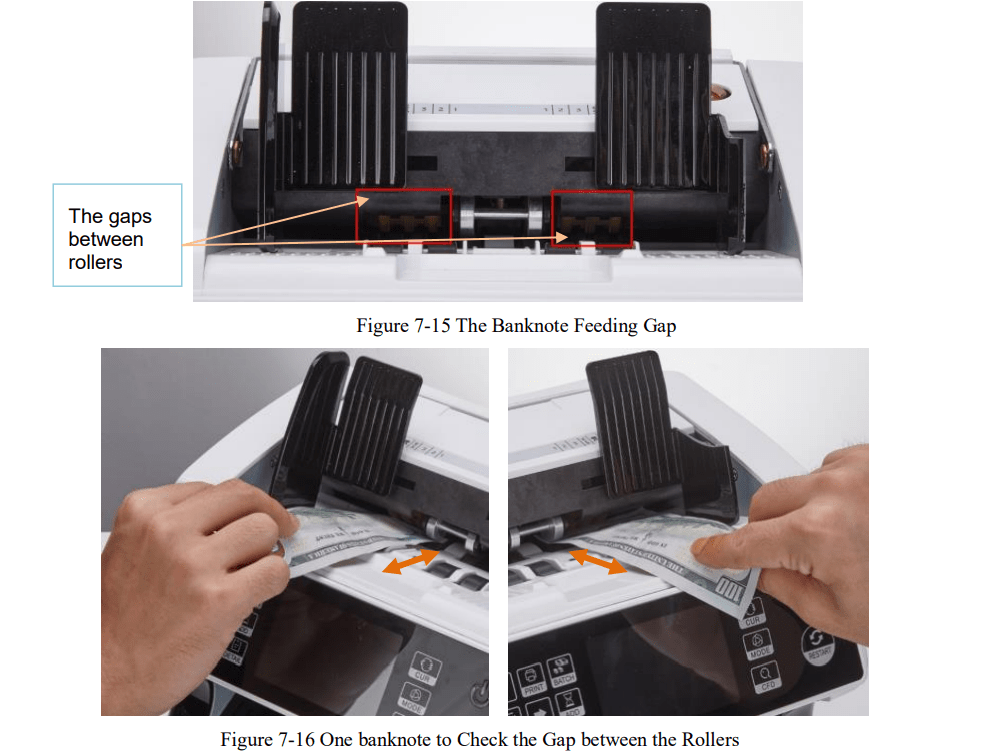
- If the banknote is hard to inserted, that means the feeding gap is too small, please rotate the screw clockwise until the banknote can be inserted smoothly. If the feeding gap is so large that two or more banknotes can be inserted to the feeding gap, please rotate the screw counterclockwise until the gap can just allow one banknote inserted.
- Use the banknote to check the other sides of the gap between rollers, to make sure the banknote can be inserted into both sides of the feeding gap smoothly.
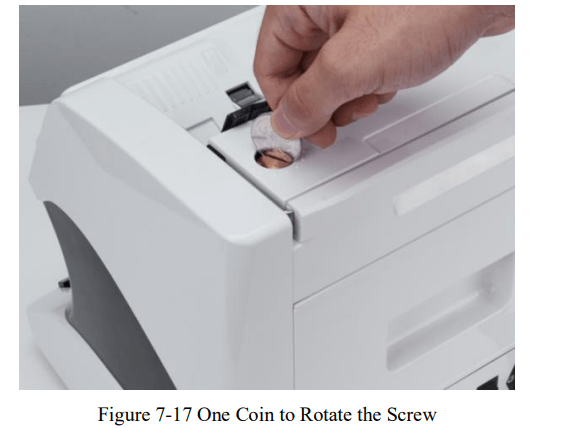
Tips: you can just use one coin to rotate the screw.
Having the correct feeding gap adjusted will ensure a smooth counting as well as a trouble-free operation. Trial and error attempts are recommended before you make the final adjustment and start the count. You may also perform this adjustment when the banknotes are not fed smoothly through the machine or several error messages are occurring too often like Bill Double Error, Chain Notes Error or Half Notes Error. Other reasons that might require to readjust the feeding gap are:
- The counting of new or mint condition notes
- The counting of poor or bad fitness condition notes
- Polymer notes and Paper-made notes counted together
CIS Calibration
CIS calibration is needed when there are many errors during the banknote counting process.
- Please enter the menu interface. And go to the service menu with the password “9999”, as shown in the following figures.
- Click the “CIS Calibration” option, the screen will be shown in the following figure.
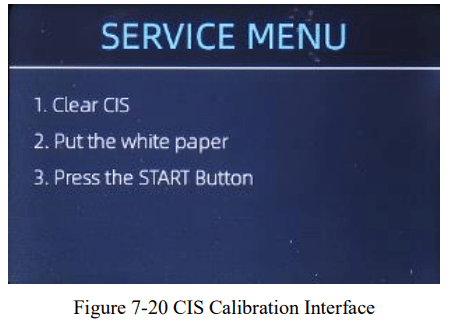
- Open the back cover to clean the CIS sensors with cleaning cloth.
- Put the CIS calibration paper (white paper) inside, and close the back covers.
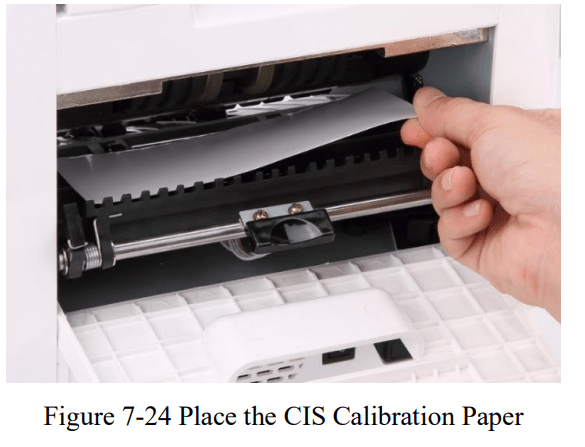
- Start CIS calibration by pressing the “RESTART” button.
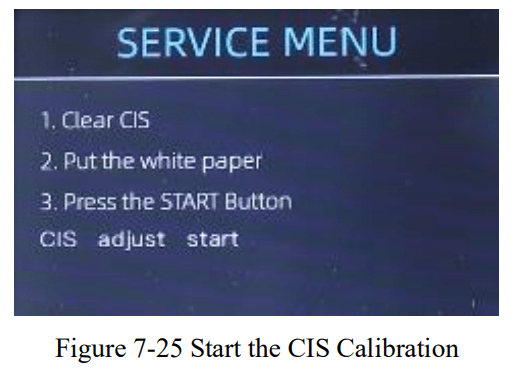
- After finish, just take the calibration paper out and close the covers, and then turn off the machine.
- Turn on the machine to finish the CIS calibration.
Back to Default
Setting After fine tuning the screw and CIS calibration, if there are still some errors or the counting is still not correct, returning to the factory default setting mode is required.
- Enter the menu interface, and go to the service menu with the password “9999”, as shown in the following figures.
- As shown in above figure, choose “⑩. Back to Default Setting” and enter the menu key. It will enter to the following display on the screen
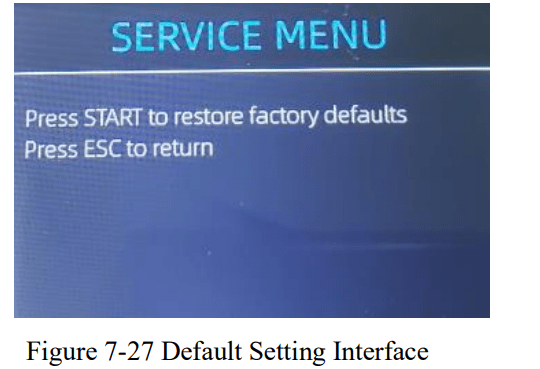
- Press the RESTART key, the IMC01 will reset all the changed settings before.
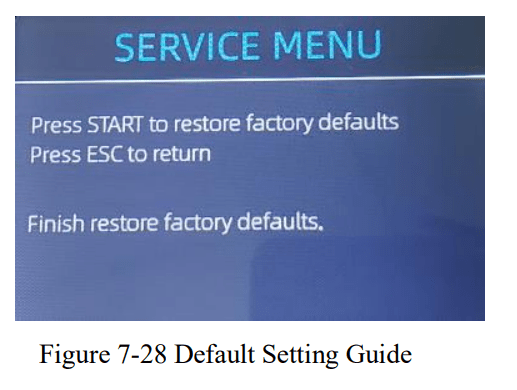
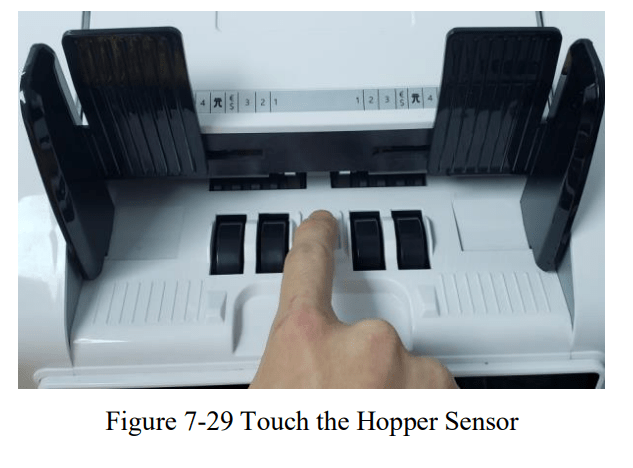
- Go back the main screen, and the use your finger to touch the hopper sensor. The processing wheels and rollers in the IMC01 will run for a while.
Sensor Errors
The IMC01 banknote counter will take a few seconds to conduct a self-check with spinning the counting wheels after power on. The IMC01 will check the sensors, the following errors may happen if the sensors have been blocked or damaged
Hopper Sensor Error
If the wheels in the hopper is always spinning, and then stop with the “hopper sensor error” or “main motor error” indicated on the screen, that means the hopper sensor is too sensitive.
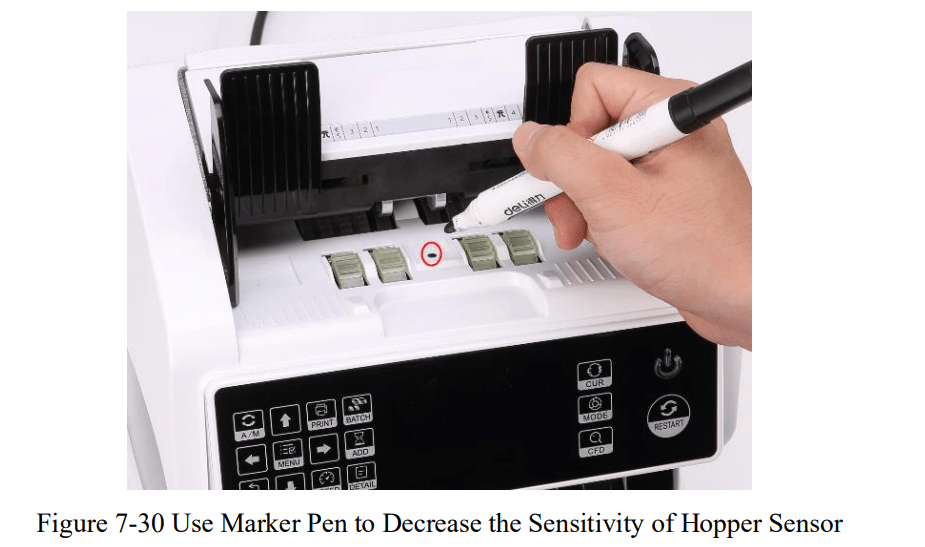
Please use the marker pen to paint a little on the hopper sensor as shown in the above figure.
If the wheels don’t move when you place the bill on the hopper by enabling the auto counting, that means the hopper sensor doesn’t work.
Stacker Sensor Error
If the impeller is always spinning, or the “stacker sensor error” indicated on the screen, that means the stacker sensor doesn’t work or too sensitive.
Counting Sensor Error
If the number of banknote counting is always not correct, or the “Main Motor Error” is shown on the screen, that means the counting sensor error doesn’t work. Please clean the machine first. If the error still happens, please contact us for machine repairment.
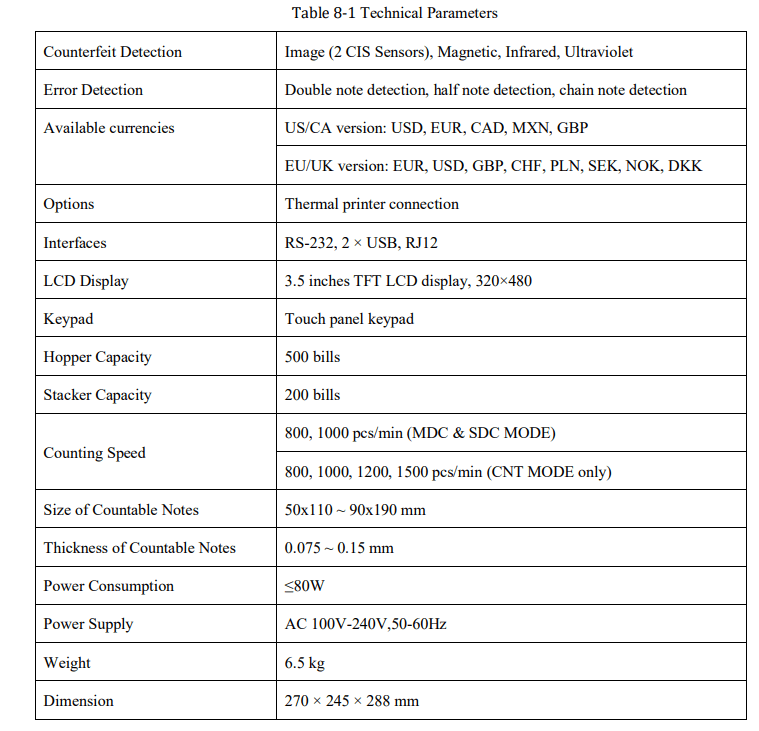
Technical Parameters