Owner's Guide Television
Connecting Devices to your TV
You have several options for connecting your TV to different devices. The method you choose will be based upon the type of cables you have and the available outputs on your device.
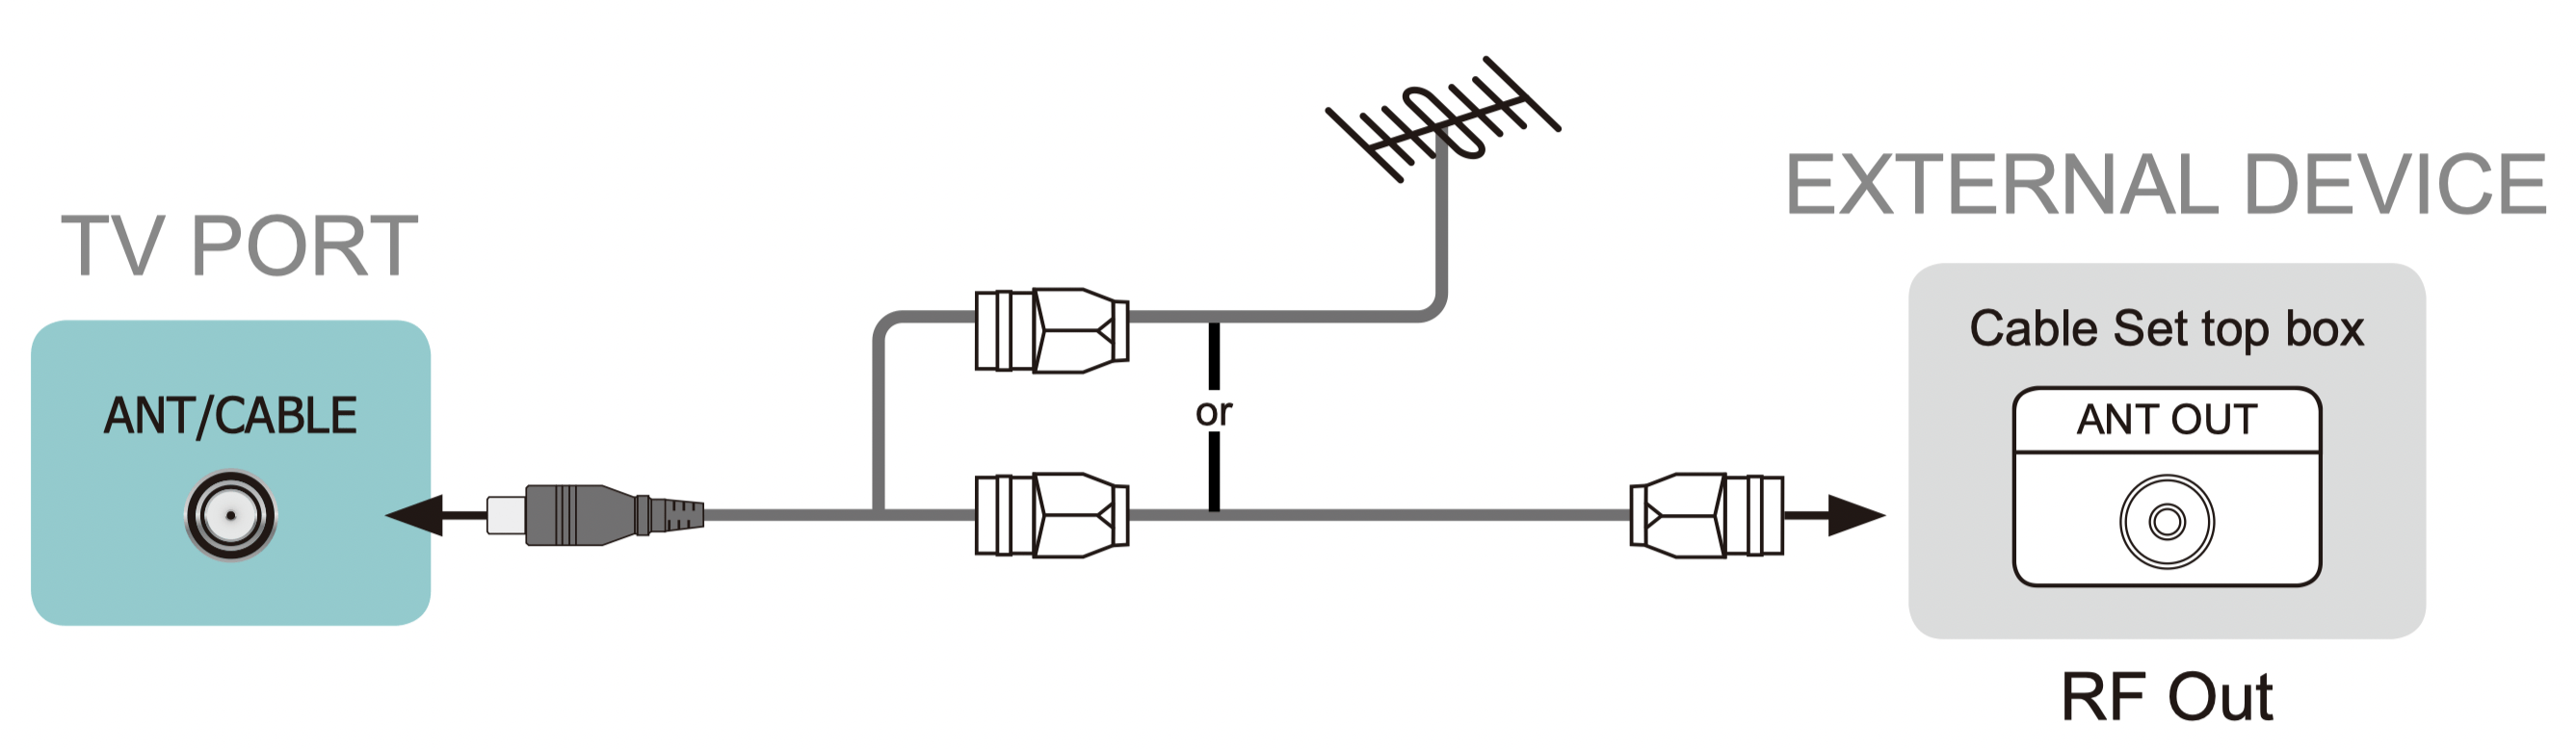
Connecting an antenna, cable set-top box or satellite receiver
To connect an antenna,cable set-top box or satellite receiver:
- Connect one end of a coaxial cable (not included) to the RF OUT port on the antenna, cable or satellite box. If you are using an antenna with twin-lead cable, you may need a 300-75 Ohm adapter (not provided) to connect it to the back of your TV. Likewise, if you are using several antennas, you may need a combiner (not provided).
- Connect the other end of the cable to the ANT/CABLE port on the side of TV.
- Using your remote, select the
 Inputs icon in Home screen and select Channels as the input source.
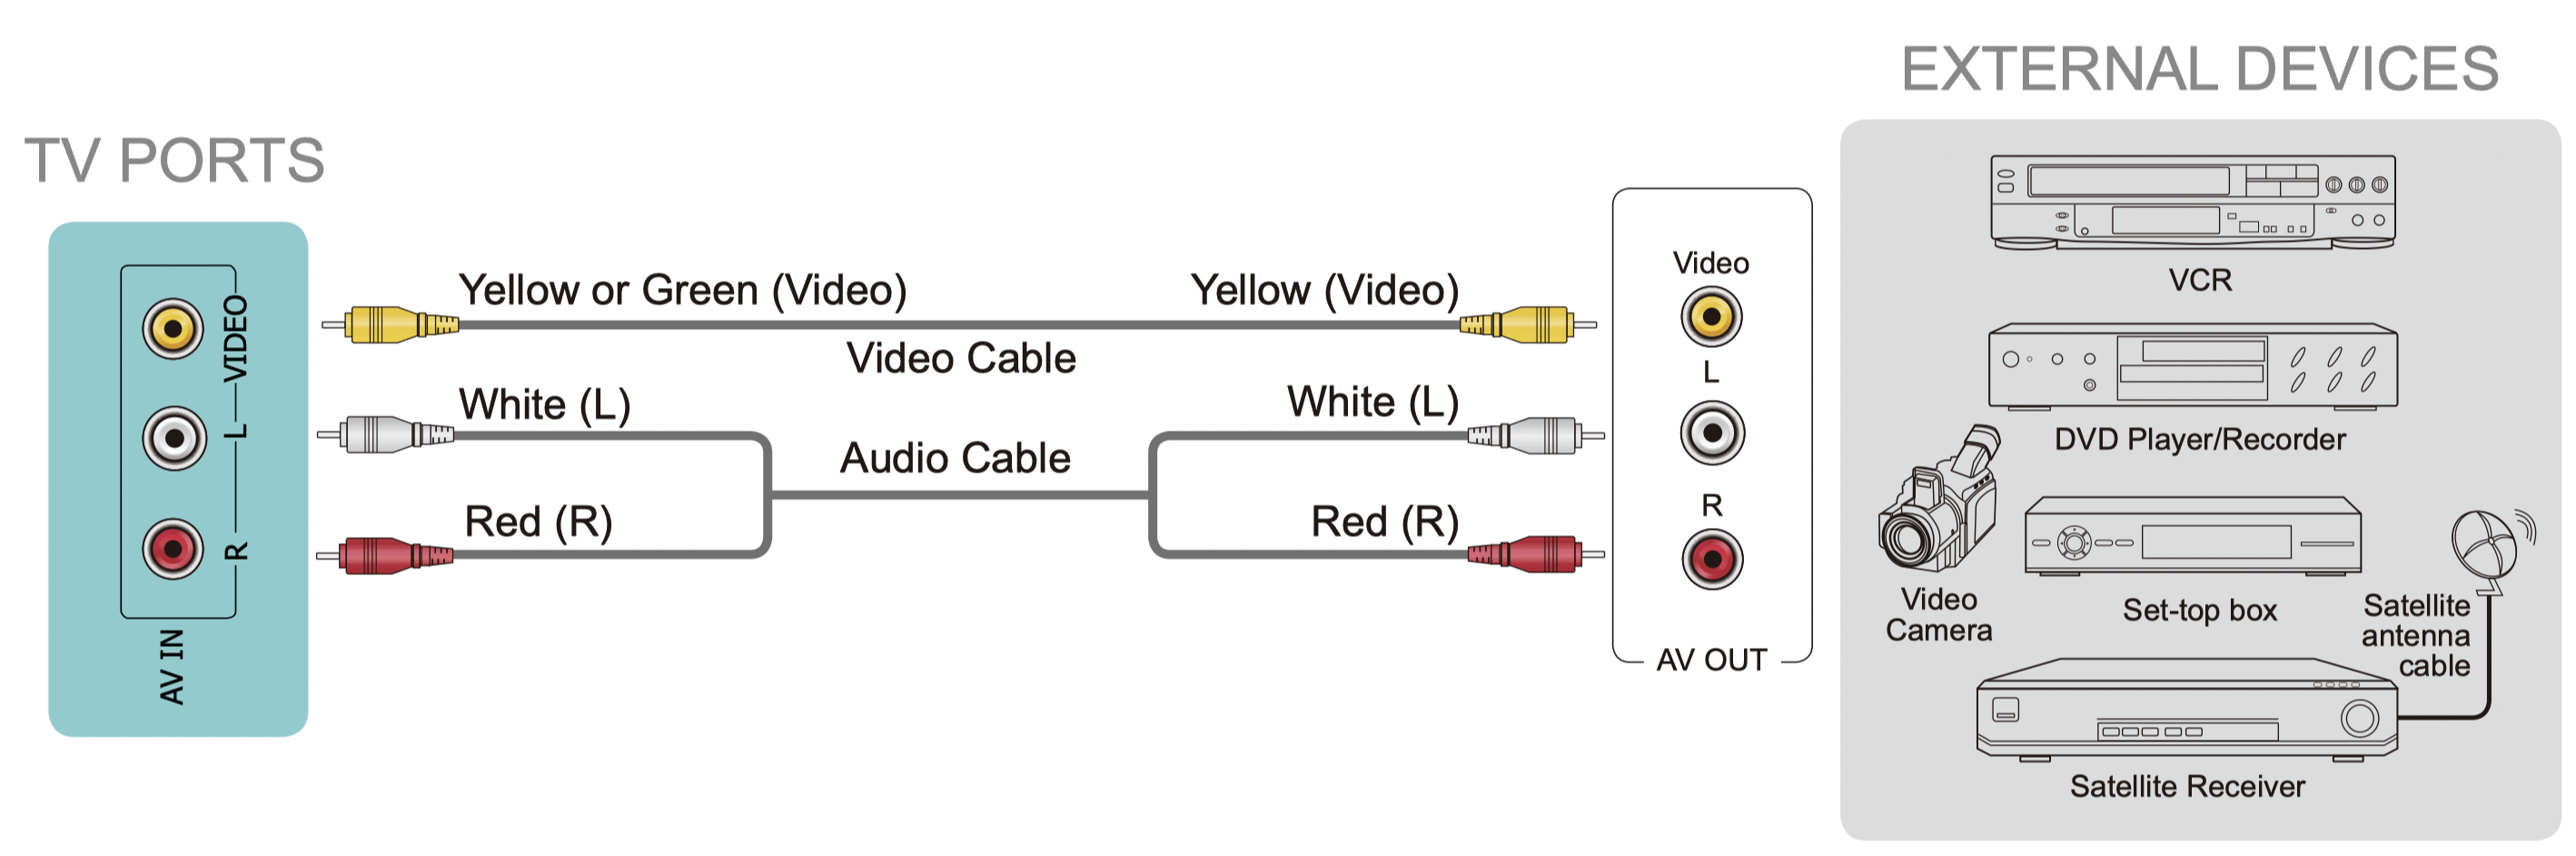
Connecting a satellite receiver, DVD player or other audio visual (AV) devices with a composite video cable (yellow/white/red)
To connect an AV device with a composite video cable (not provided):
- Use the audio and video cables to connect the composite video/audio ports of the external AV device to the AV IN ports of the TV. (Video = yellow, Audio Left = white, and Audio Right = red)
- Plug the connected devices into the AV connectors on the TV before switching it on.
- Using your remote, select the Inputs icon in Home screen and select Composite as the input source.
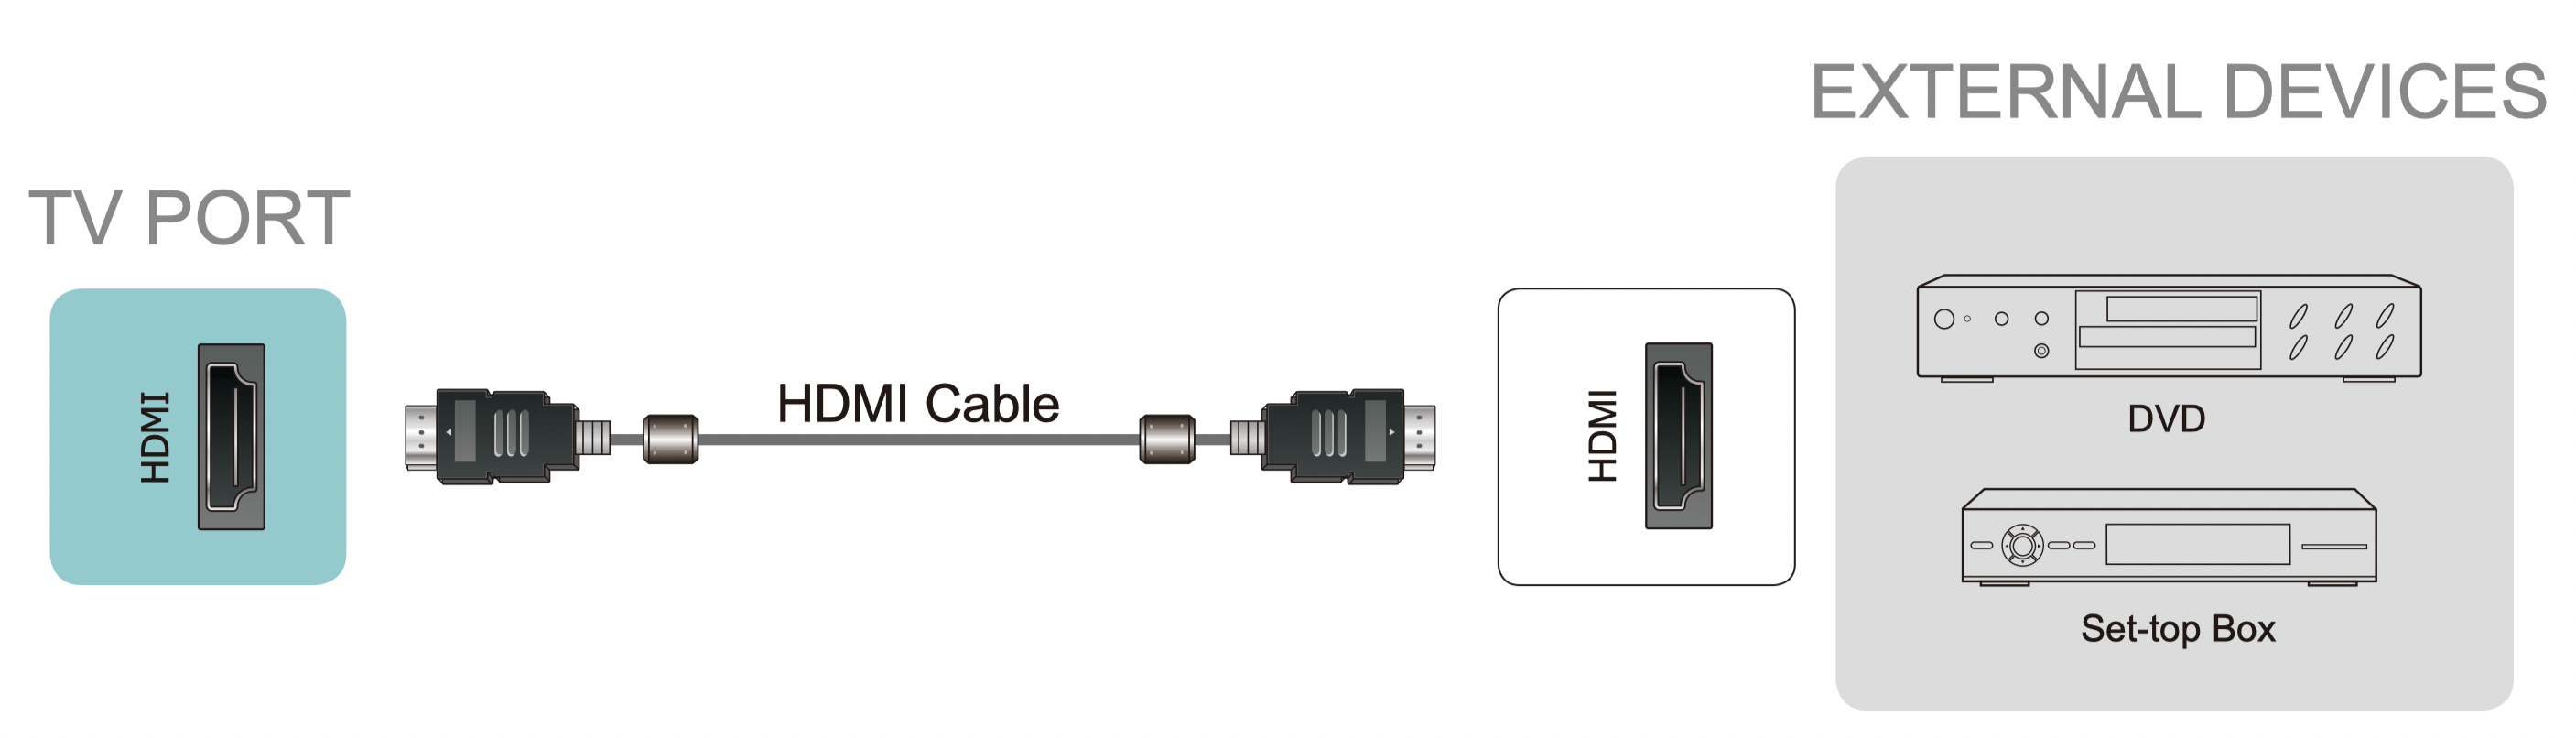
Connecting an AV device with an HDMI cable
The high-powered HDMI version 2.0 inputs enable you to connect 4K Ultra-HD external devices, and have a better experience when connected to the HDMI port. For example, if you have an X-box or Blu-ray player that supports the 2.0 standard, more details will be transmitted to the TV screen to maximize your entertainment experience.
Please refer to the User Manual that came with your device for step-by-step instructions.
To connect an AV device with an HDMI cable (not provided):
- Use an HDMI cable to connect the HDMI output port of the AV device to the HDMI port of the TV.
- Plug the connected devices into the HDMI port on the TV before switching it on.
- Using your remote, select the Inputs icon in Home screen and select the corresponding HDMI input.
NOTES
- Because the HDMI connector provides video and audio signals, it is not necessary to connect an audio cable.
- We strongly recommend to use HDMI Cable with 2 cores as shown in the figure.
Connecting Your TV to a Wireless or Wired Network
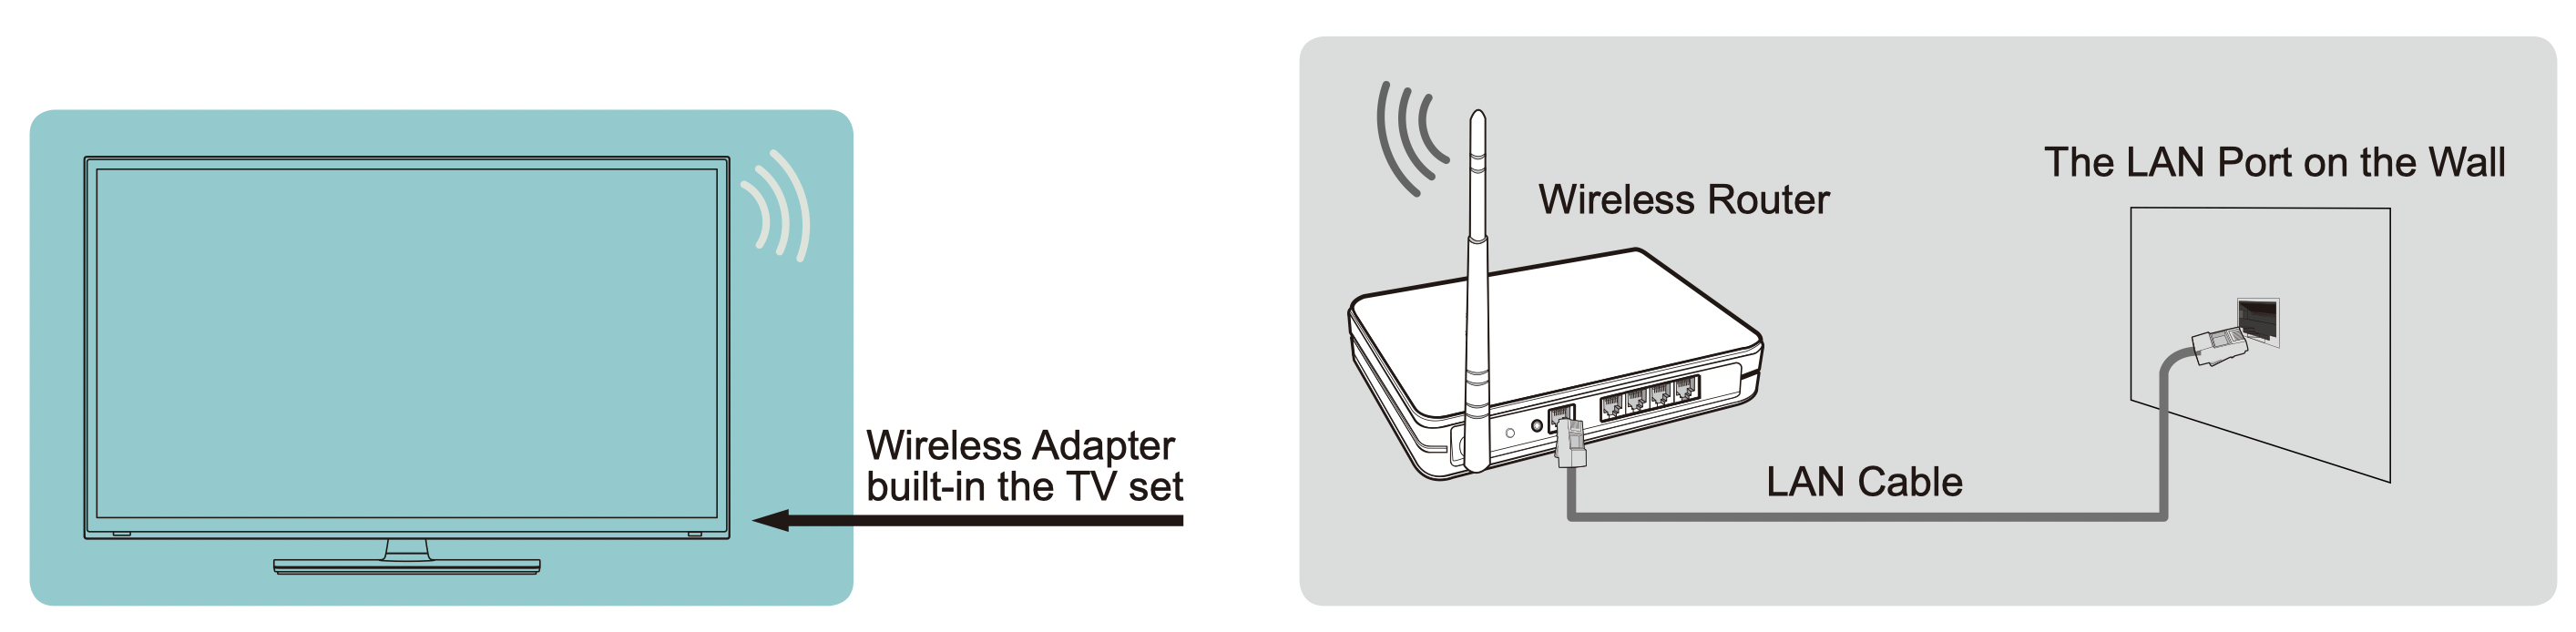
Connecting to a wireless network
Our built-in wireless LAN adapter supports the IEEE 802.11 ac/b/g/n communication protocols and we recommend that you use an IEEE 802.11n or IEEE 802.11ac router. When you play a video over an IEEE 802.11 b/g connection, the video may not play smoothly.
NOTES:
- You must use the built-in Wireless LAN Adapter to use a wireless network because the set does not support an external USB network adapter.
- To use a wireless network, your TV must be connected to a wireless IP sharer. If the wireless IP sharer supports Dynamic Host Configuration Protocol (DHCP), your TV can use a DHCP or static IP address to connect to the wireless network.
- Select a channel for the wireless IP sharer that is not currently being used. If the channel set for the wireless IP sharer is currently being used by another device nearby, this will result in interference and communication failure.
- If you apply a security system other than the systems listed below, it will not work with the TV.
- If Pure High-throughput (Greenfield) 802.11N mode is selected and the Encryption type is set to WEP, TKIP or TKIP-AES (WPS2 Mixed) for your Access Point (AP), then the TV will not support a connection in compliance with these Wi-Fi certification specifications.
- If your access point (AP) supports Wi-Fi Protected Setup (WPS), you can connect to the network via Push Button Configuration (PBC) or PIN (Personal Identification Number). WPS will automatically configure the SSID and WPA key in either mode.
Connecting to a wired (Ethernet) network
You can attach your TV to your LAN in one of the three following ways:
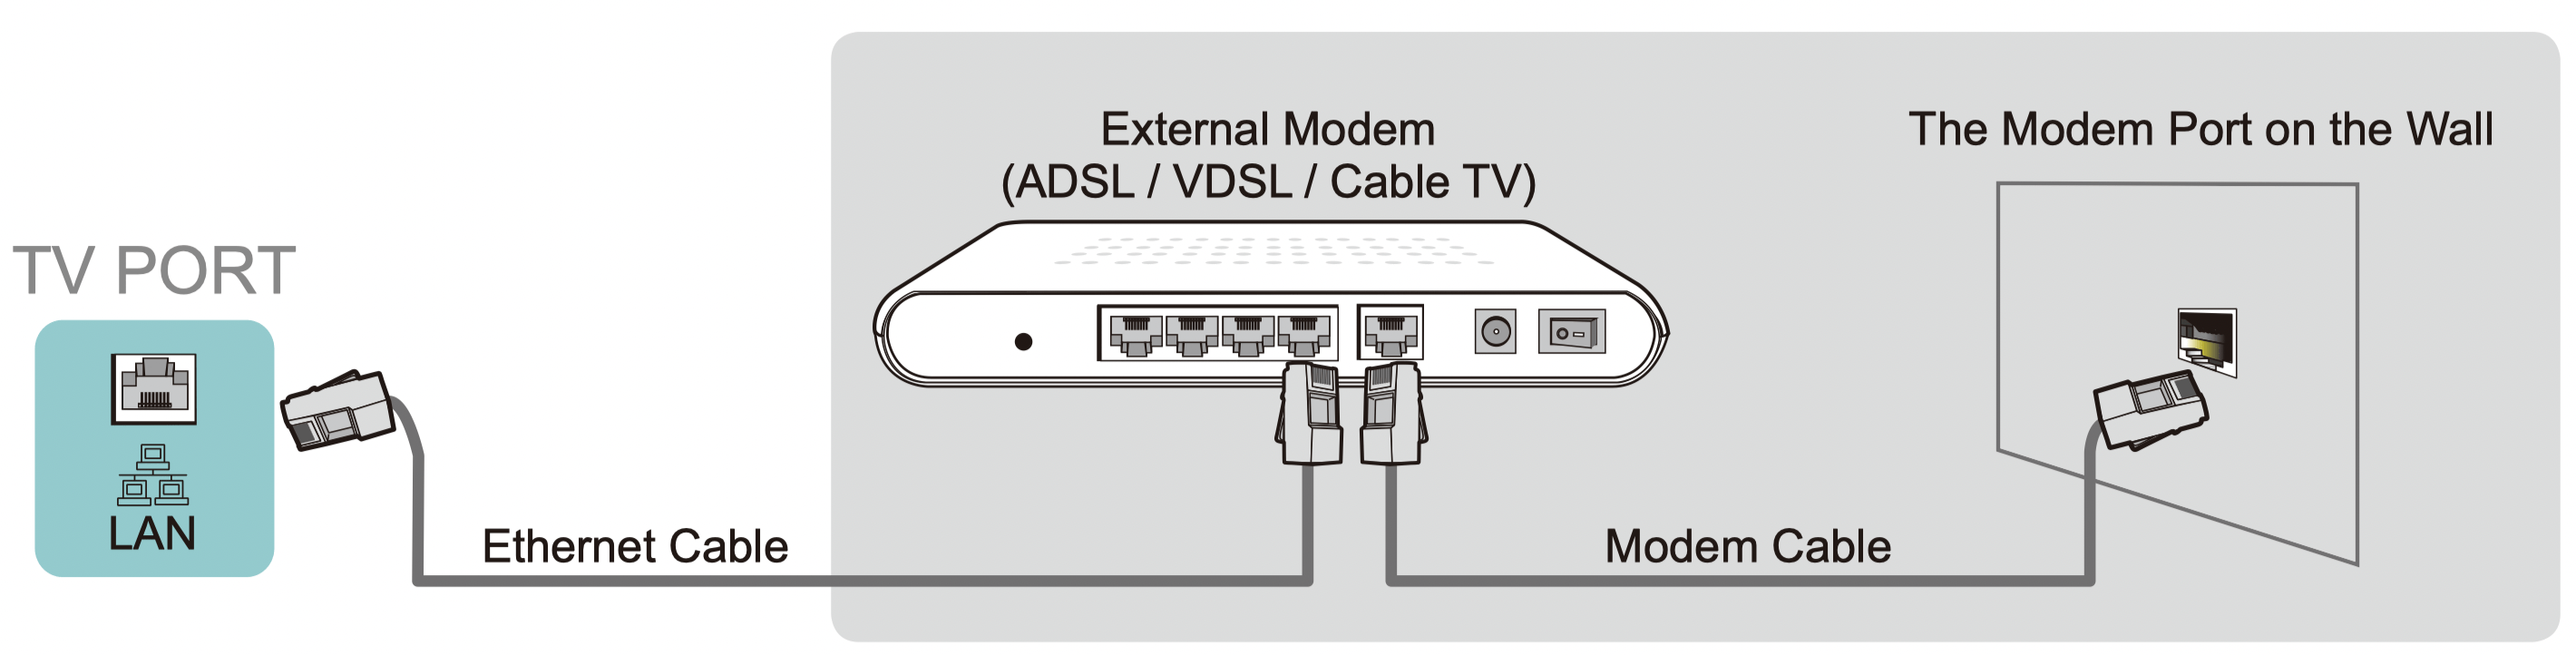
Option 1
You can attach your TV to your LAN by connecting the LAN port on the back of your TV to an external modem using a Cat 5 LAN cable. See the illustration below.
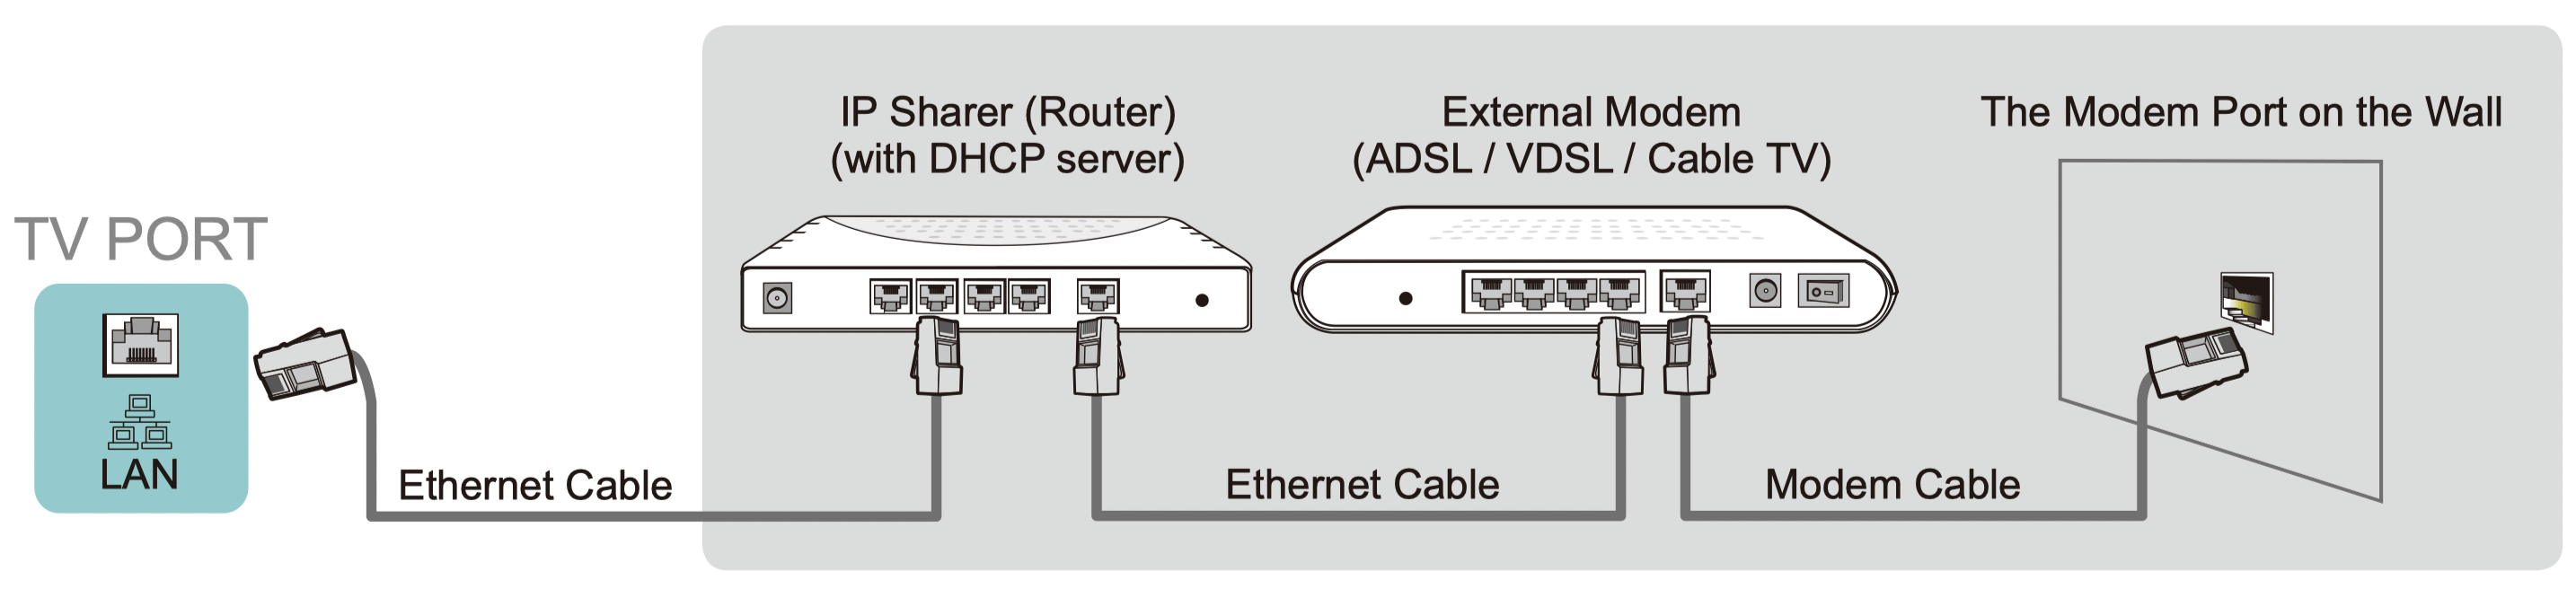
Option 2
You can attach your TV to your LAN by connecting the LAN port on the back of your TV to an IP Sharer which is connected to an external modem. Use an Ethernet cable for the connection. See the illustration below.
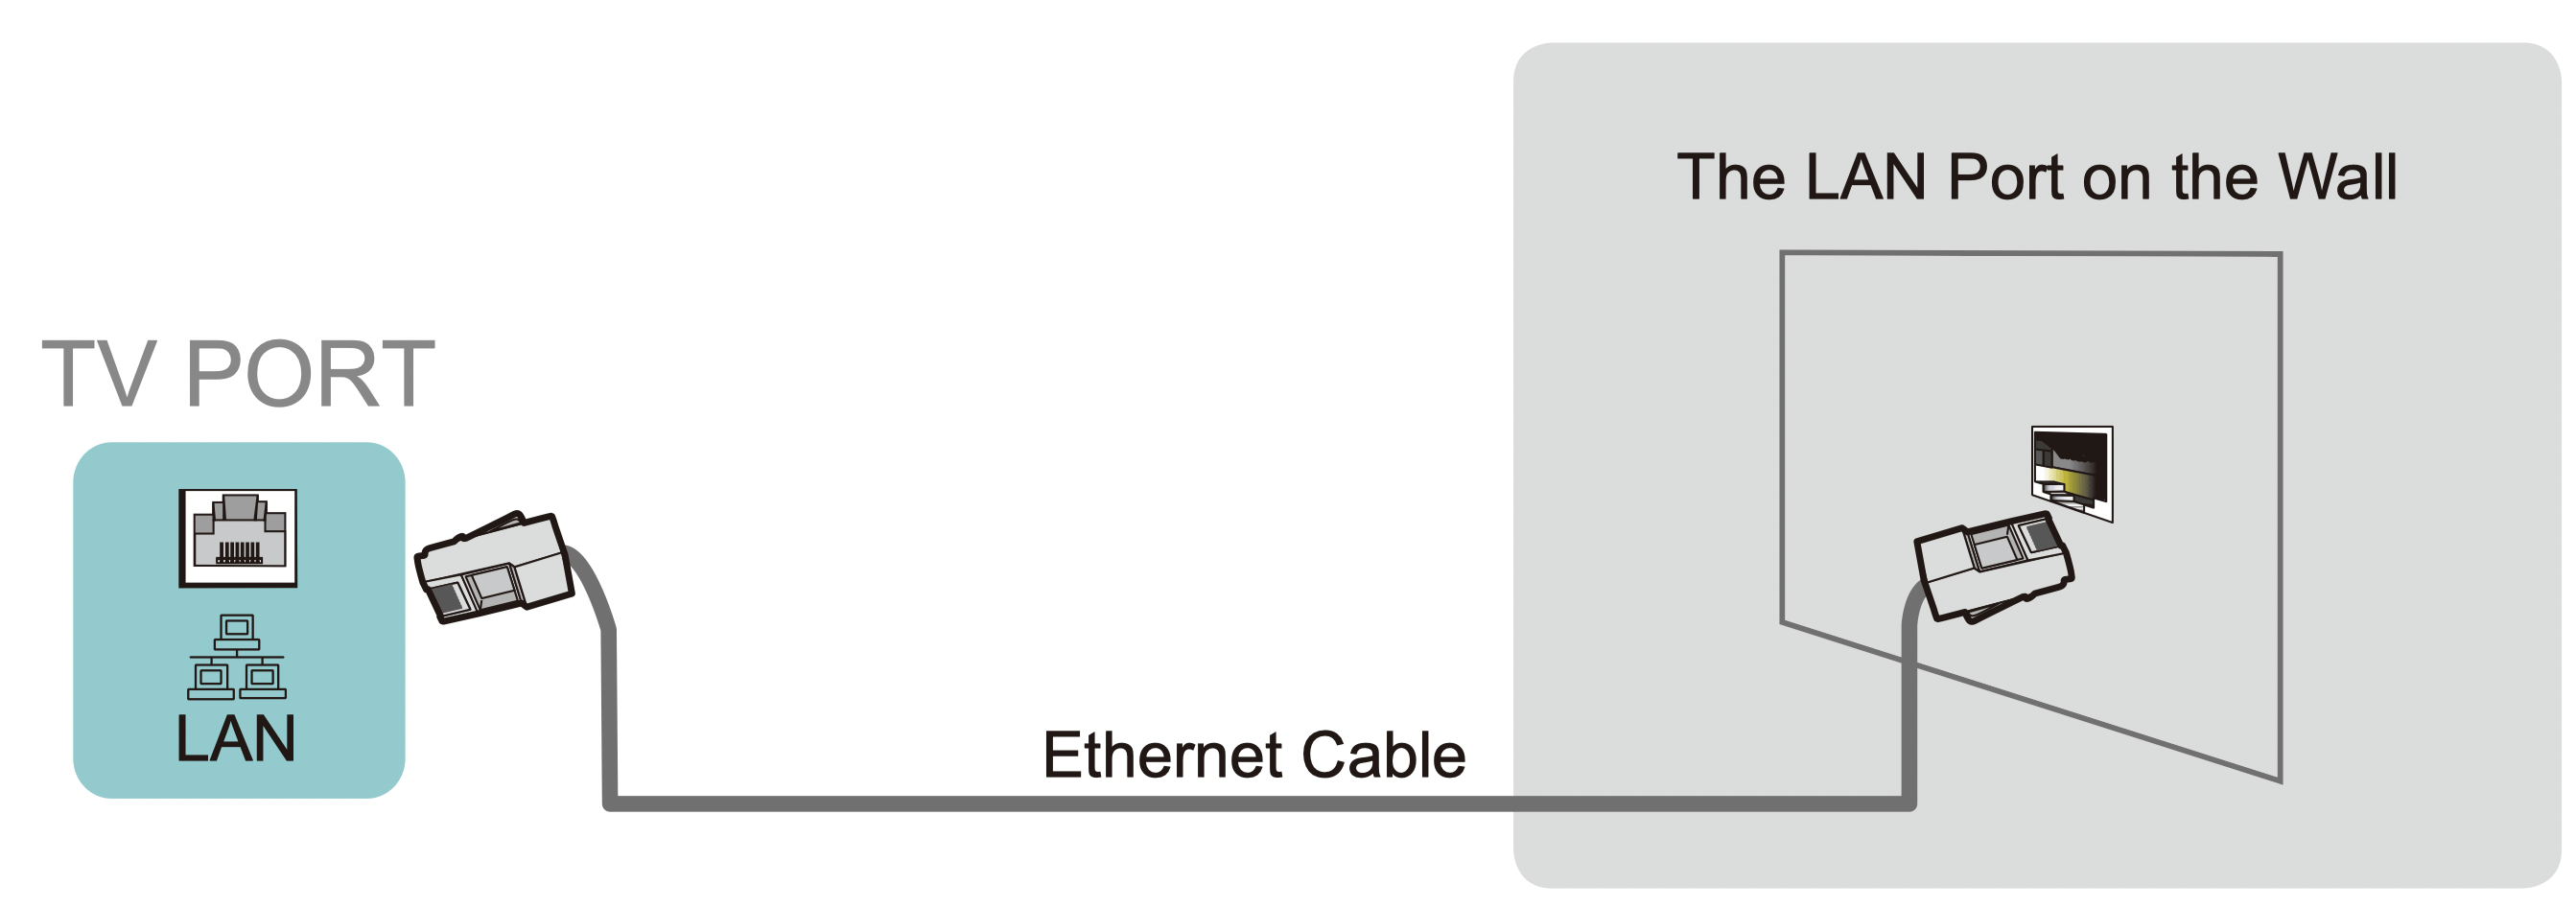
Option 3
Depending on how your network is configured, you may be able to attach your TV to your LAN by connecting the LAN port on the back of your TV directly to a network wall outlet with an Ethernet cable. See the diagram below.
If you have a Dynamic Network, you should use an ADSL modem or router that supports Dynamic Host Configuration Protocol (DHCP). Modems and routers that support DHCP automatically provide the IP address, subnet mask, gateway, and DNS, so you don’t have to enter them manually. Most home networks are Dynamic Networks.
Some networks require a Static IP address. If your network requires a Static IP address, you must enter the IP address, subnet mask, gateway, and DNS values manually on your TV’s Cable Setup Screen when you set up the network connection. To get the IP address, subnet mask, gateway and DNS values, contact your Internet Service Provider (ISP).
NOTE: You can use ADSL modems that support DHCP if your network requires a static IP address. ADSL modems that support DHCP also let you use static IP addresses.
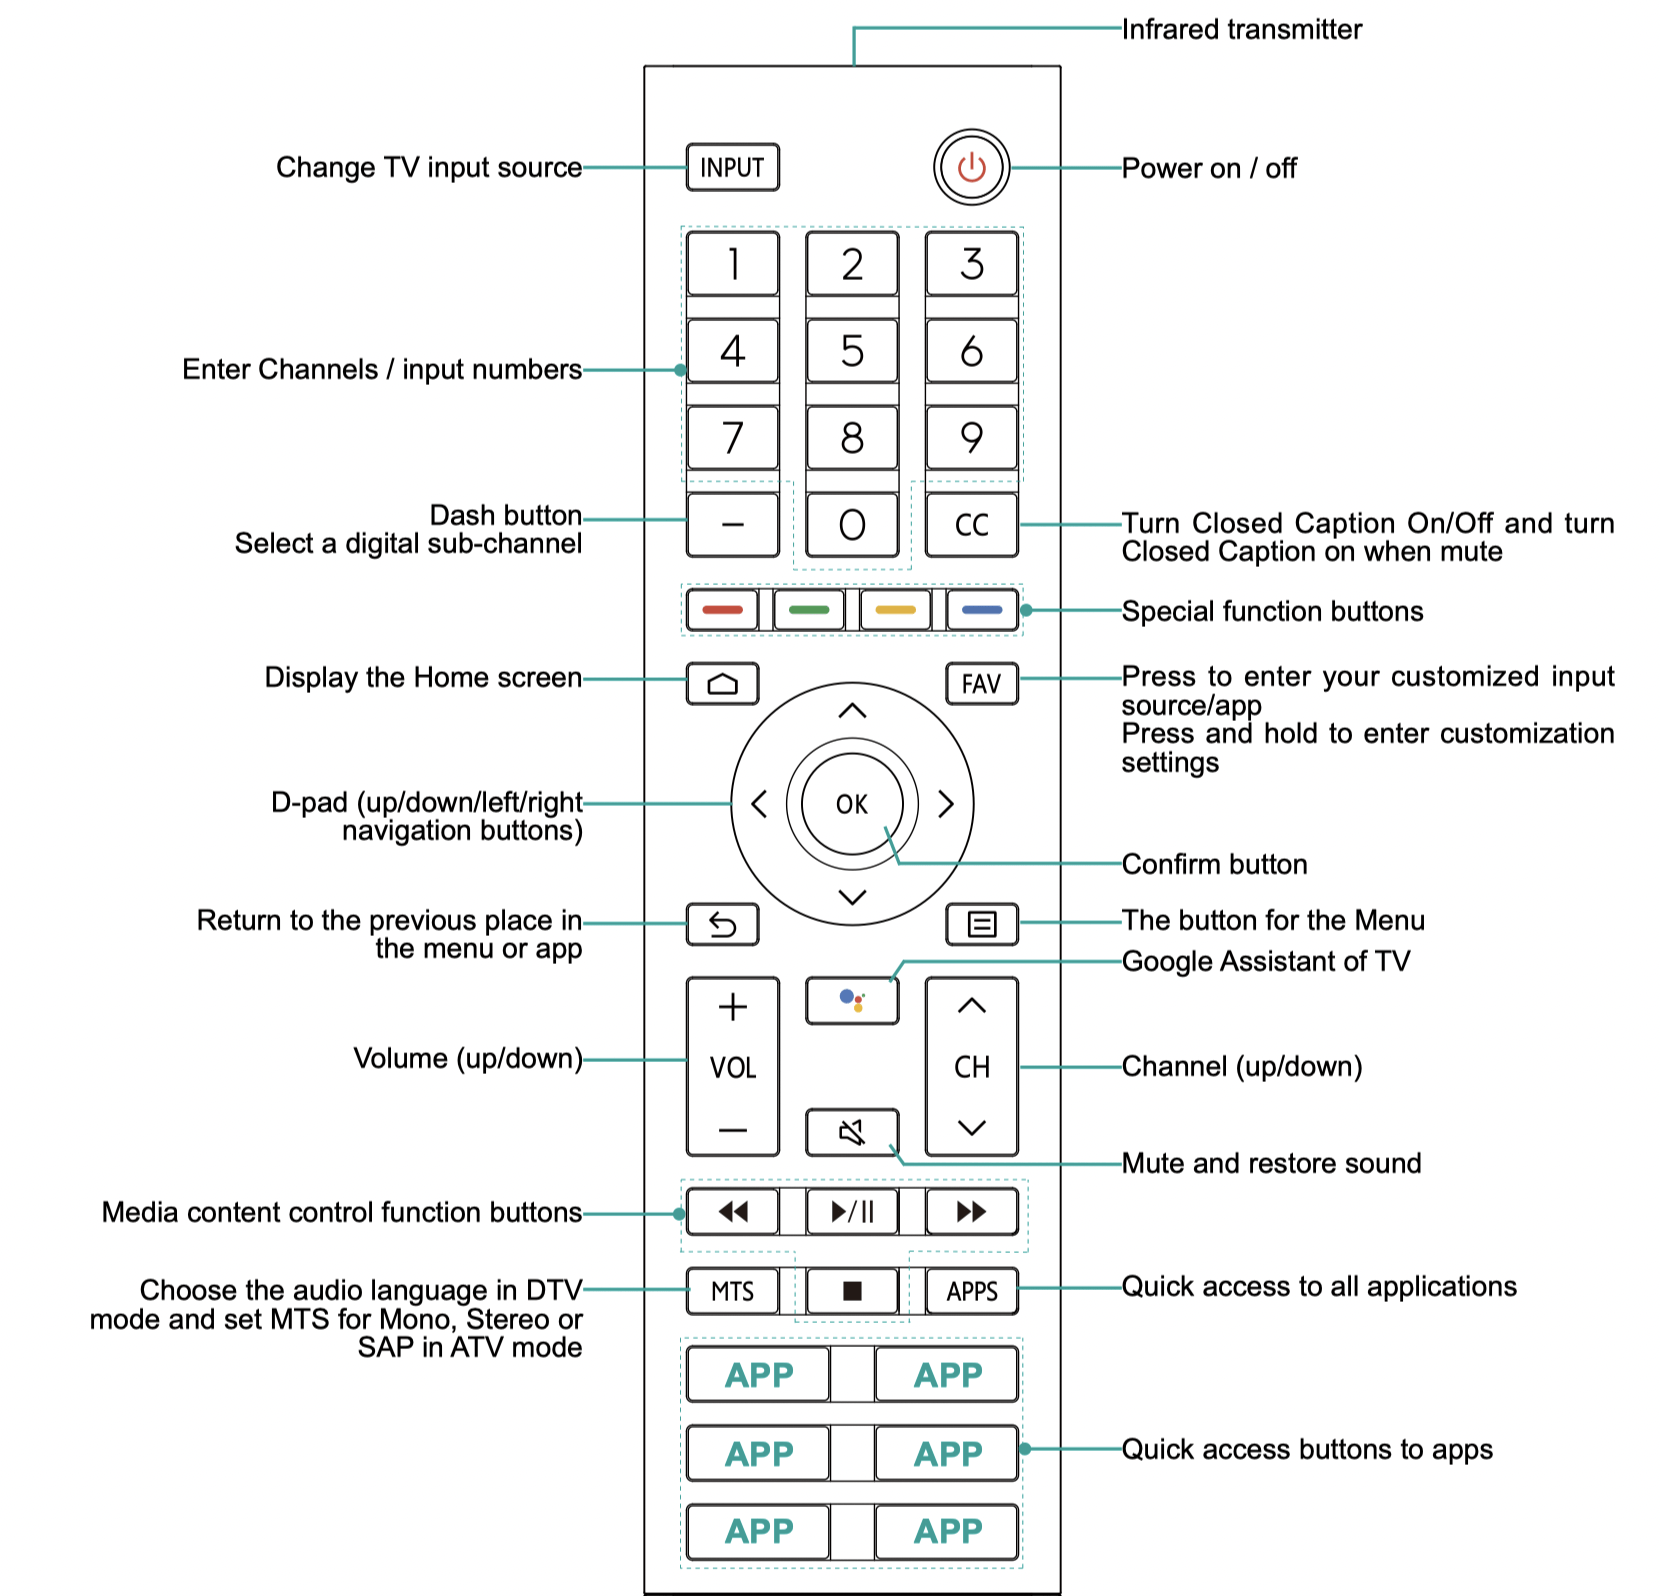
Using Your TV Remote Control
Buttons on your TV remote
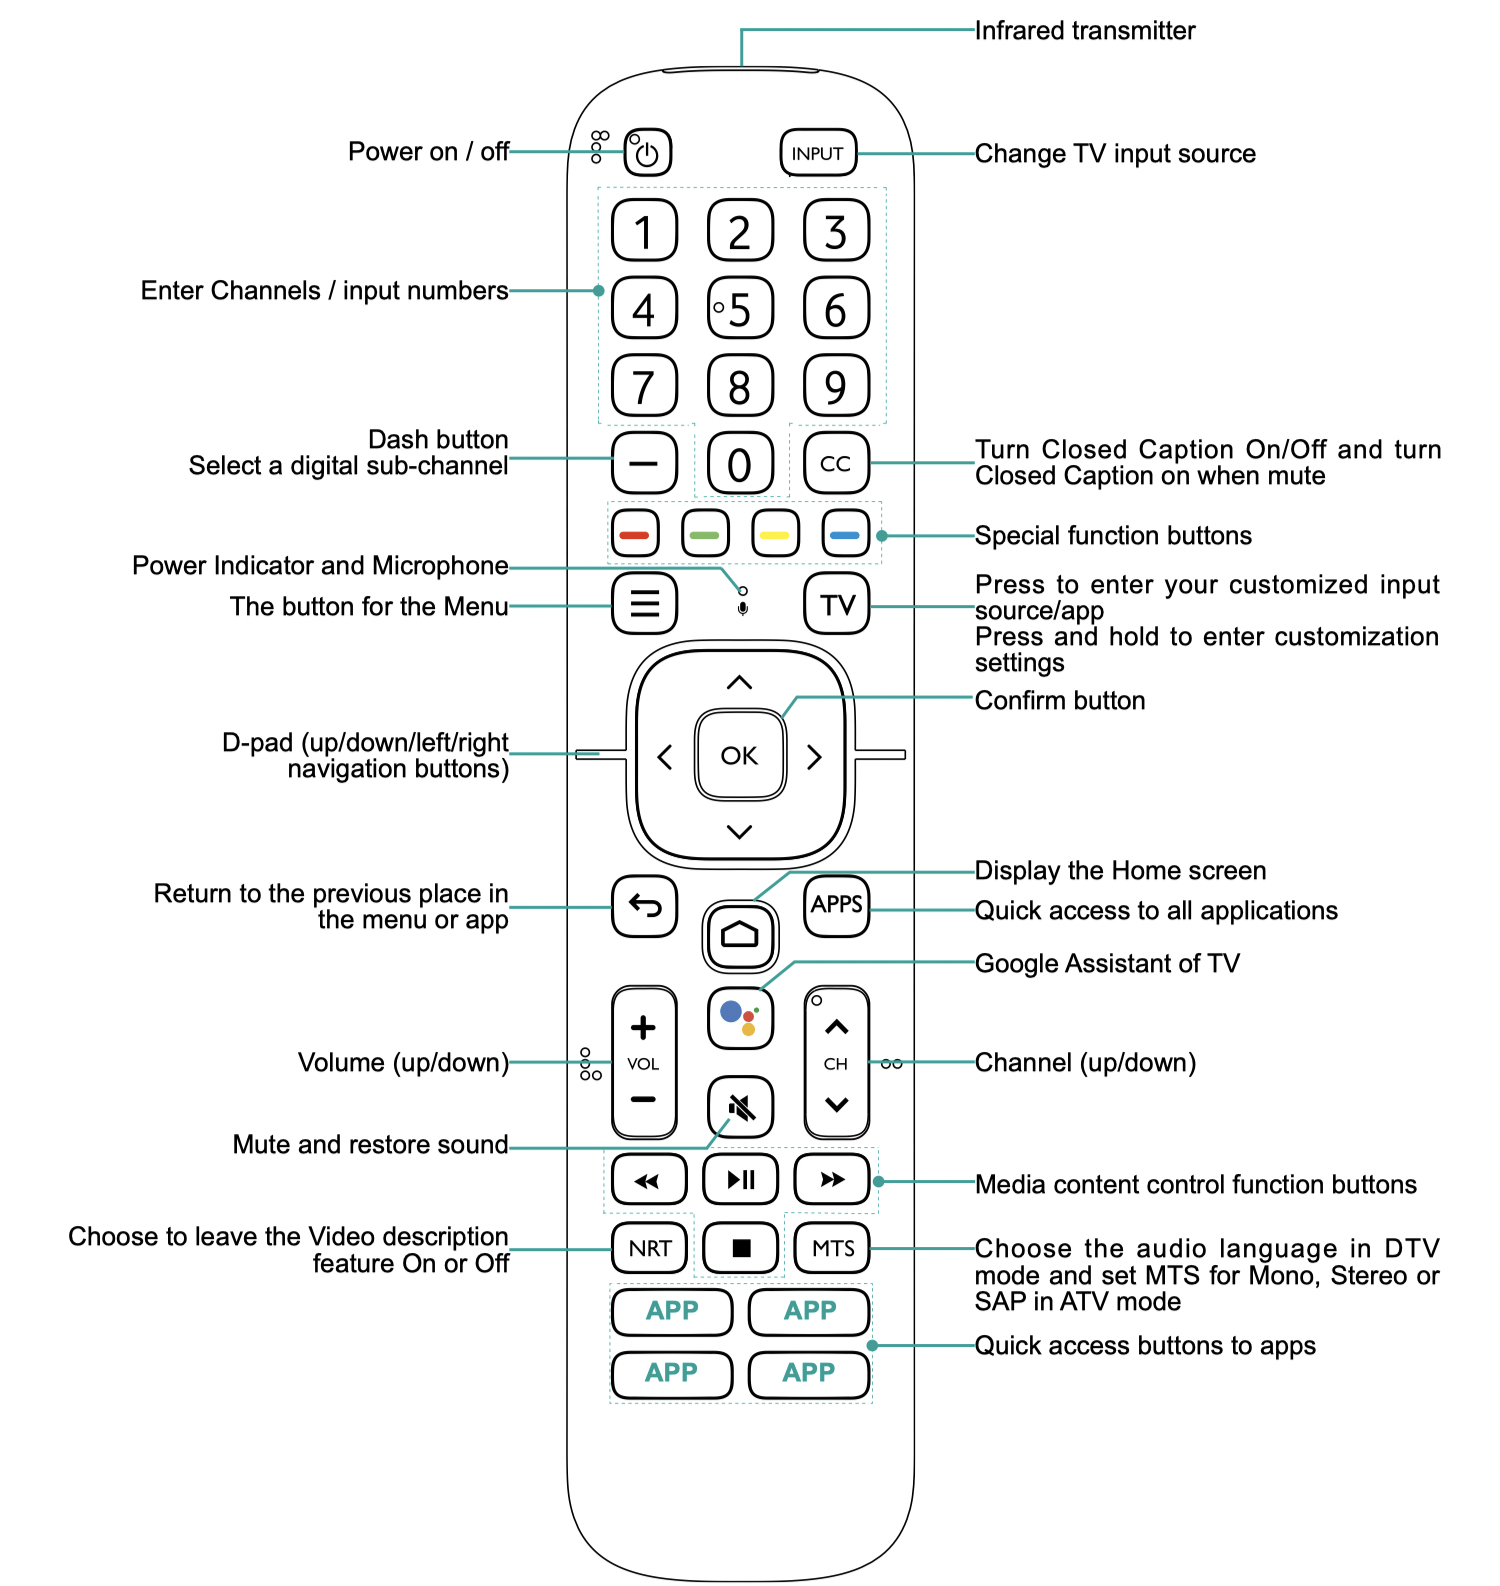
NOTE:
- The included remote may vary depending on models/countries/regions.
- The buttons are only for reference, and actual remote may vary in appearance.
- The remote supports both infrared and Bluetooth connection mode.
NOTE:
- The included remote may vary depending on models/countries/regions.
- The buttons are only for reference, and actual remote may vary in appearance.
- The remote supports both infrared and Bluetooth connection mode.
Remote control range information
- The remote control can work at a distance of up to 26 feet in front of the TV set.
- It can work at a 30 degree horizontal or vertical angle.
Begin using your remote
- Slide the back cover to open the battery compartment of the remote control.
- Insert two AAA size batteries. Make sure to match the (+) and (-) ends of the batteries with the (+) and (-) ends indicated in the battery compartment.
- Replace the battery compartment cover.
NOTES
- Discard batteries in a designated disposal area. Do not throw them into a fire.
- Remove old batteries immediately to prevent them from leaking into the battery compartment.
- If you do not intend to use the remote control for a long time, remove the batteries.
- Battery chemicals can cause a rash. If the batteries leak, clean the battery compartment with a cloth. If chemicals touch your skin then wash it immediately.
- Do not mix old and new batteries.
- Do not mix alkaline, standard (carbon-zinc) or rechargeable (NiCd, NiMH, etc.) batteries.
- Do not continue using the remote if it gets warm or hot.
- Call our Support Center immediately on the support website.
Pairing the Remote Control
- Pair the remote to the TV after you power it on. Keep the remote control within 10 feet from the TV. Press and hold the [
 /
/  ] button at least 3 seconds to start pairing.
- If the remote paired successfully then a confirmation will display on the screen. If it did not pair successfully then an unsuccessful message will display. Repeat step 1.
NOTES
- If an unknown error occurred with the remote then it could have been caused by interference. Try to remove what's causing the interference and pair it again.
- If an unknown error occurred in the remote control while the battery power is normal, you can take out the batteries and press any key for 1~2 seconds, then the remote control can work normally.
- The remote cannot be paired to the TV while the TV is in standby mode.
Your TV comes with many TV setting features to allow you to customize the picture based on your viewing preference and environment. As you navigate throughout different screens to access settings, some of the indicators appear as words On and Off.
Using the Menu
You can press the [ / ] button to access the Menu in TV mode.
The Menu consists of the following settings:
- Picture
- Sound
- Channels
- Parental Control
- Live TV Closed Captioning
- Audio Language (MTS)
- Audio Only
- Sleep Timer
- Settings
- Help
In each menu, you can:
- Press the [Up / Down] buttons to select an item.
- Press the [OK] buttons to enter the sub-menu or to set on or off. Press the [Left / Right] buttons to adjust the value.
- Press the [
 /
/  ] button to return to the previous menu.
Picture
- Backlight: Change the overall brightness of the screen.
- Dynamic Backlight Control: Enable the TV to automatically adjust the backlight by sections according to the changes in the image and increase the contrast. NOTE: Some models don’t support the function.
- Backlight Level: Adjust how bright you want images to appear, lower settings create darker images (only when Dynamic Backlight Control is off).
- Picture Mode: If you’d like to configure the settings for your picture, then there are seven types of picture modes available: Vivid, Standard, Energy Saving, Game, Sports, Theater Day, Theater Night and Auto Mode. Picture mode options may vary depending on models.
Low Blue Light
Theater Day and Theater Night are designed to reduce the level of blue light to protect your eyes.
You can press the [ / ] button to access the Menu in TV mode. Go to Picture > Picture Mode, and select Theater Day/Theater Night.
To reduce the eye strain and protect eyes when you watch TV for a period of time, you are suggested to:
- Take regular and frequent breaks to avoid watching TV for a long period of time. Long time of watching may cause you eye fatigue. It is not recommended to watch TV for more than one hour.
- Look away from the TV screen and look at distance objects during the breaks for at least 10 minutes for eye care.
- Relax yourself during a break by doing eye exercises or outdoor activities.
- The best recommended viewing distance is 3 times the vertical height of the TV screen. Proper breaks and exercises are proved excellent help to relieve eye strain and fatigue. This feature may not be applicable in some models/countries/regions. Low blue light certification may vary by model.
Once you choose the mode, you can adjust the picture based on the following settings:
- Contrast: Adjust the Contrast level to increase or decrease how bright images appear.
- Brightness: Adjust the Brightness level to generate lighter or darker images.
- Color: Adjust the color intensity of the picture for a more vibrant image.
- Tint: Adjust the colors from a green to magenta tint to view the natural skin tones of people on the screen. Sharpness: Adjust how sharp or soft edges of images appear.
- Picture Size: Adjust the Aspect Ratio to stretch or zoom in on your picture. You can choose from the following settings: Auto, Normal, Zoom, Wide, Direct, Dot-by-dot, Panoramic or Cinema.
- HDMI 2.0 Format: Match the connected device output format. You can select Standard format and Enhanced format in HDMI mode. Enhanced format for devices of 4K@50/60Hz (YCbCr4:4:4, YCbCr4:2:2).
- Advanced Settings: Adjust advanced picture settings based on your viewing preference.
- Overscan: Change the video size settings to slightly crop the edges of the displayed image.
- Color Temperature: Select a preset color temperature. Adjust how warm(red) or cool(blue) the white areas of an image appears.
- Noise Reduction: Improve how clear the picture appears by reducing noise.
- Digital Noise Reduction: Improve picture clarity by reducing video noise.
- HDMI Dynamic Range: Adjust the HDMI signal range to be more suitable for the content.
- Active Contrast: Automatically darken dark areas and lighten light areas of images to see more details.
- Color Space: Change the range of colors the TV displays. NOTE: Some models don’t support this function.
- Calibration Settings: Adjust the color space and Gamma to best suit the content you're viewing.
- Color Tuner: Adjust the Hue, Saturation and Brightness of color settings.
- White Balance: Adjust the intensity of red, green and blue lights to view the true colors of all images in the picture.
- Gamma: Adjust the Gamma to choose how the TV will respond to the content grayscale. In a dark room choose a Higher number like 2. In a brighter area select a Lower number like 0. In general, 1 is normally recommended. NOTE: Some models don’t support this function.
- Gamma Calibration: Adjust selected Gamma curve.
- RGB only: View images based on default settings or choose the color red,blue or green.
- Apply Picture Settings: Adjust current picture mode to apply to All Sources or just Current Source.
- Reset: Reset current picture settings to factory mode.
Sound
- System sounds: Open the default system sound.
- Sound Mode: Select a preset sound mode to suit the type of content you are listening to: Standard, Theater, Sports, Music, Speech, Late Night and Auto Mode. Sound mode options may vary depending on models.
Once you choose the mode, you can adjust the audio based on the following settings:
- Audio Output: Select the speakers which you want to use: TV Speaker, ARC or Bluetooth.
- TV Speaker: Turn on or off the TV speaker. If ARC or Bluetooth is selected in Audio Output, configuration here is unavailable.
- TruBass HDX: Optimizes overall sound quality by increasing bass, making dialog clear and natural, and widening the sound field.
- TruSurround: X: Provides surround sound experience with psycho-acoustic processing to place sounds beside, behind, and above the viewer. For best results use with Surround Sound.
- Dialog Clarity: Improve dialogue clarity .
- TruVolume HD: Maintains consistent loudness levels from wide dynamic range programs, loud commercials, and channel or input changes.
- Wall Mount Setup: Automatically optimize the sound based on the position of the TV.
- Advanced Settings: Tune the audio settings and quality of the TV.
- Balance: Adjust the left and right speaker strength to optimize audio for a specific location.
- Auto Volume Control: Turn Auto Volume Control on or off.
- Digital Audio Out: Select the digital audio output format that best suits the audio device type.
- Digital Audio Delay: Adjust the digital audio output delay time to sync sound from an external speaker with the images on the TV.
- Lip Sync: Synchronize the displayed image with the audio output.
- Equalizer: Boost the volume at different frequencies.
- Preferred Audio Language: Set the default audio output language for the type of digital broadcast content that you’re viewing.
- Headphone Mode: Disable the TV speaker when you are using a sound bar, ARC or any other external audio amplifiers.
- Headphone Volume: Change the way audio is sent through the type of device that's connected to your TV Audio Out port.
- Reset: Reset current audio settings to factory mode.
NOTE: This product does not support decoding of DTS CD bitstreams. Playback of this format may produce undesirable noise.
Channels
- Tuner Mode: Select if you receive TV channels over the air (antenna) or through a cable set top box.
- Auto Channel Scan: Automatically scan for channels.
- Manual Scan: Type in a channel to add it manually to your TV.
- Channel Skip: Skip selected channels from your Channel List.
- Favorite List: Add Channels to your Favorite List.
Parental Control
The Parental Control setting allows you to block content that is not appropriate for children to watch.
Turning Parental Control On
- Press the [OK] button on your remote to turn Parental Control on.
- Create PIN window displays. Using the number buttons on your remote, create the password.
You will see the other Parental Control settings change from a greyed out state to highlighted. When this occurs, begin adding other settings to the Scheduled Blocking, Channel Blocking, Program Blocking, Input Blocking, Change PIN or Reset features.
- Scheduled Blocking: Block all selected channels and programs during selected periods of time.
- Channel Blocking: Block selected channels.
- Program Blocking: Block programs by ratings. For more information about Ratings, See Description of U.S. TV Ratings on page 22.
- Block Unrated: Block or unblock unrated movies.
- Input Blocking: Block selected inputs.
- Change PIN: Change the PIN that you use to access Parental Control. NOTE: If you forget your password, call the Consumer Electronics Care Center.
- Reset: Reset Parental Control back to the factory setting.
Quick Problem-Solving Tips
When you experience an issue with your TV, turn it off and on again. If this does not resolve the problem, then refer to the tips below. If the problem is still not resolved, then contact us.
|
ISSUES
|
POSSIBLE SOLUTIONS
|
|
No sound or picture
|
- Check if the power cord is plugged into a powered AC outlet.
- Press the [
 ] button on the remote control to activate the unit from ‘Standby’ mode. ] button on the remote control to activate the unit from ‘Standby’ mode.
- Check to see if the LED light is on or not. If it is, then the TV is receiving power.
|
|
I have connected an external source to my TV and I get no pictureand/or sound
|
- Check for the correct output connection on the external source and for the correct inputconnection on the TV.
- Make sure you have made the correct selection for the input mode for the incomingsignal.
|
|
When I turn on my TV, there is a delay for a few seconds before thepicture appears. Is this normal?
|
- Yes, this is normal. The TV is initializing and searching for previous settinginformation.
|
|
The picture is normal but there is no sound
|
- Check the volume settings.
- Check if ‘Mute’ mode is set to On.
|
|
Sound but no picture or black and white picture
|
- If the picture is black and white, unplug the TV from the AC outlet and replug it after60 seconds.
- Check that the Color is set to 50 or higher.
- Try different TV channels.
|
|
The sound and/or picture is distorted or appears wavy
|
- An electric appliance may be affecting the TV. Turn off any appliances that are nearbyand move it farther away from the TV.
- Insert the power plug of the TV set into another power outlet.
|
|
The sound and picture is blurry or cuts out
|
- If using an external antenna, check the direction, position and connection of the antenna.
- Adjust the direction of your antenna or reset or fine tune the channel.
|
|
A horizontal or vertical stripe appears on the picture and/or the pictureis shaking
|
- Check if there is an appliance or electric tool nearby that is causing interference.
|
|
The plastic cabinet makes a “clicking” type of sound
|
- The ‘click’ sound can occur when the temperature of the television changes. This change causes the television cabinet to expand or contract, which makes the sound.This is normal and the TV is OK.
|
|
The remote control does not work
|
- Confirm that TV still has power and is operational.
- Change the batteries in the remote control.
- Check if the batteries are correctly installed.
|
NOTE: For usage in Mexico , operation of this equipment is subject to the following two conditions : 1 ) it is possible that this device doesn’t cause any detrimental interference and 2 ) this device must take any kind of interference, including that which may cause its malfunctioning.