Owner's Guide Television
Features of your new TV
Home Screen
In Home Screen, you can easily run the apps that have been used previously or frequently. The apps can also be moved or deleted in the screen.
* The image on your TV may differ from the image above depending on the model and geographical area.
e-Manual
Get help from a detailed, on-screen user's manual built into your TV.
Bixby
Access and control menu options and functions using Bixby.
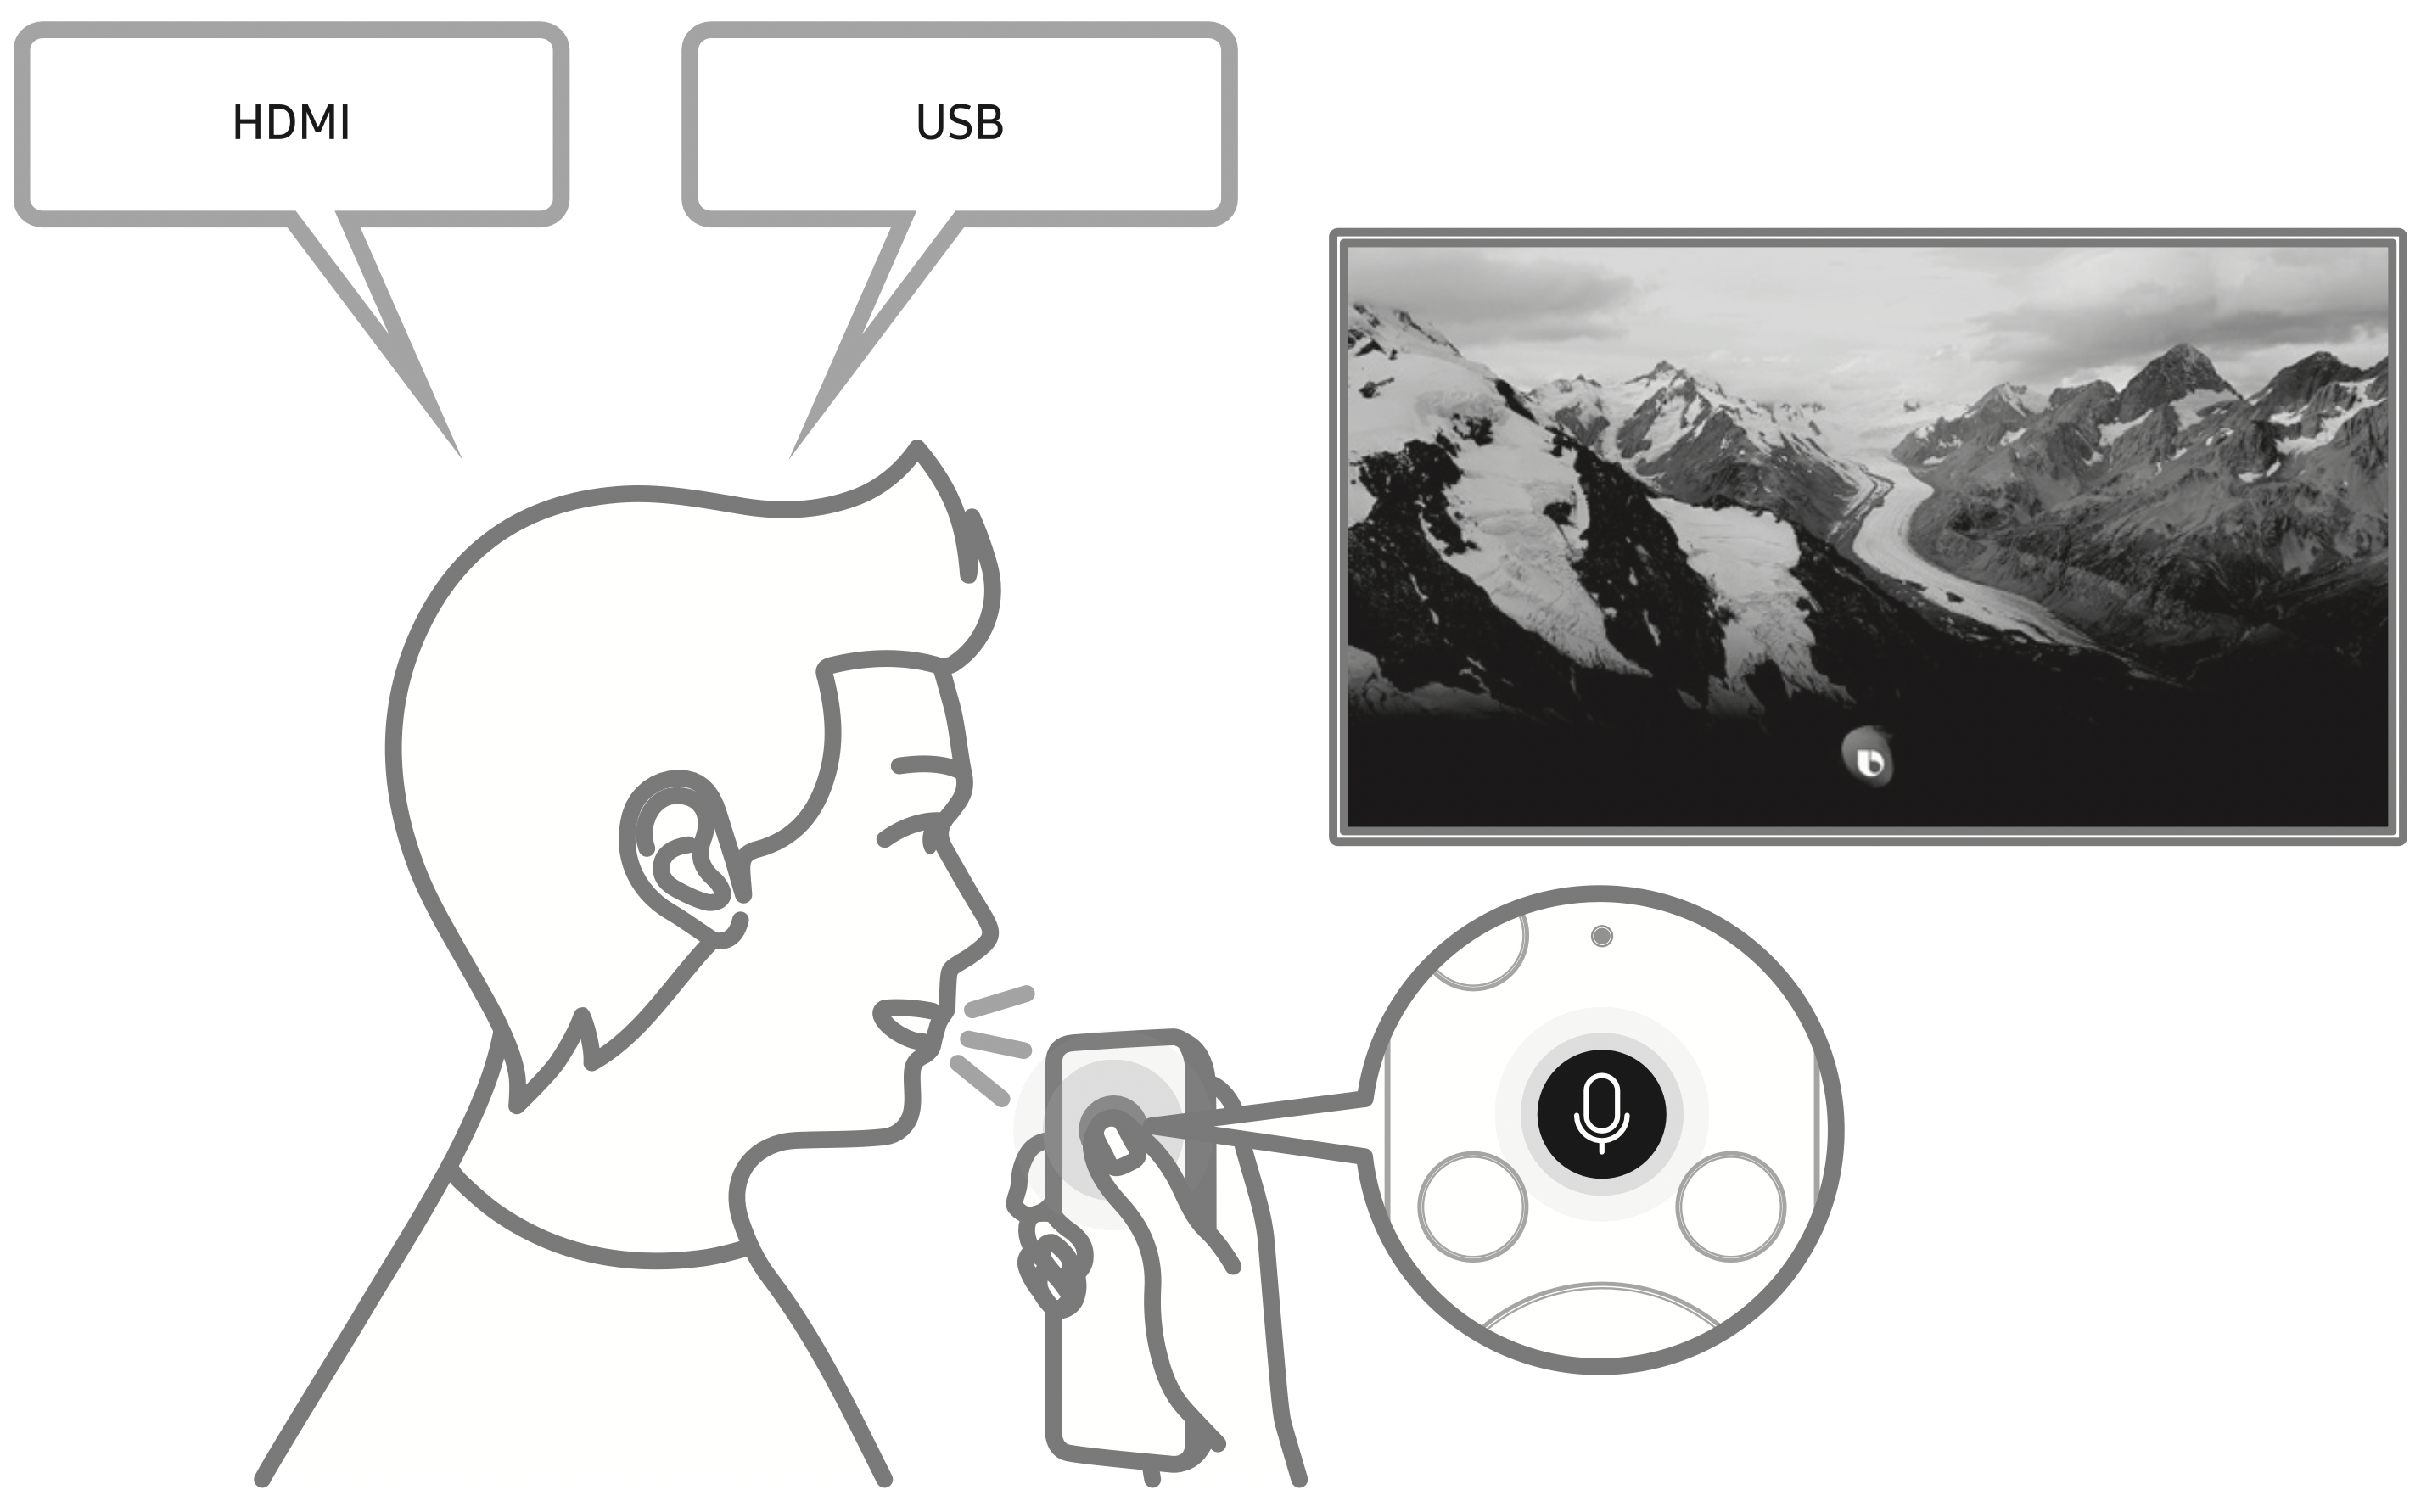
* The image on your TV may differ from the image above depending on the model and geographical area.
What's in the Box?
Make sure the following items are included with your TV. If any items are missing, contact your dealer.
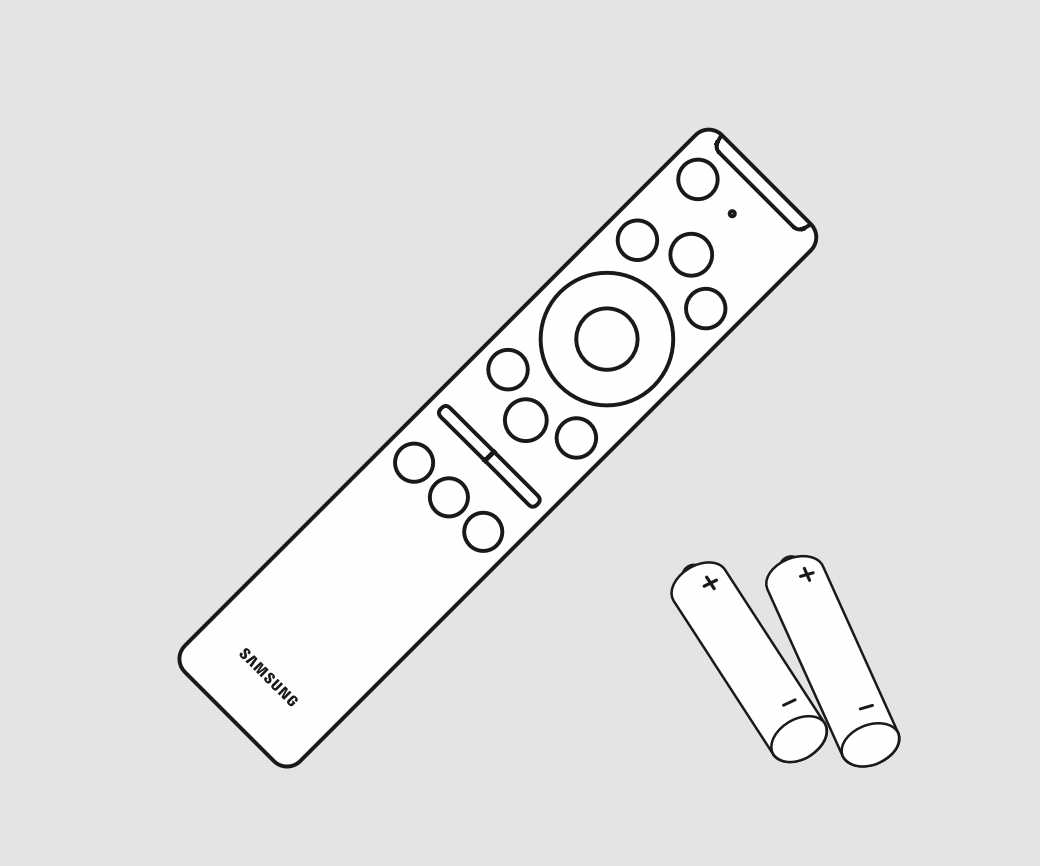
Samsung Smart Remote & Batteries (AA x 2)
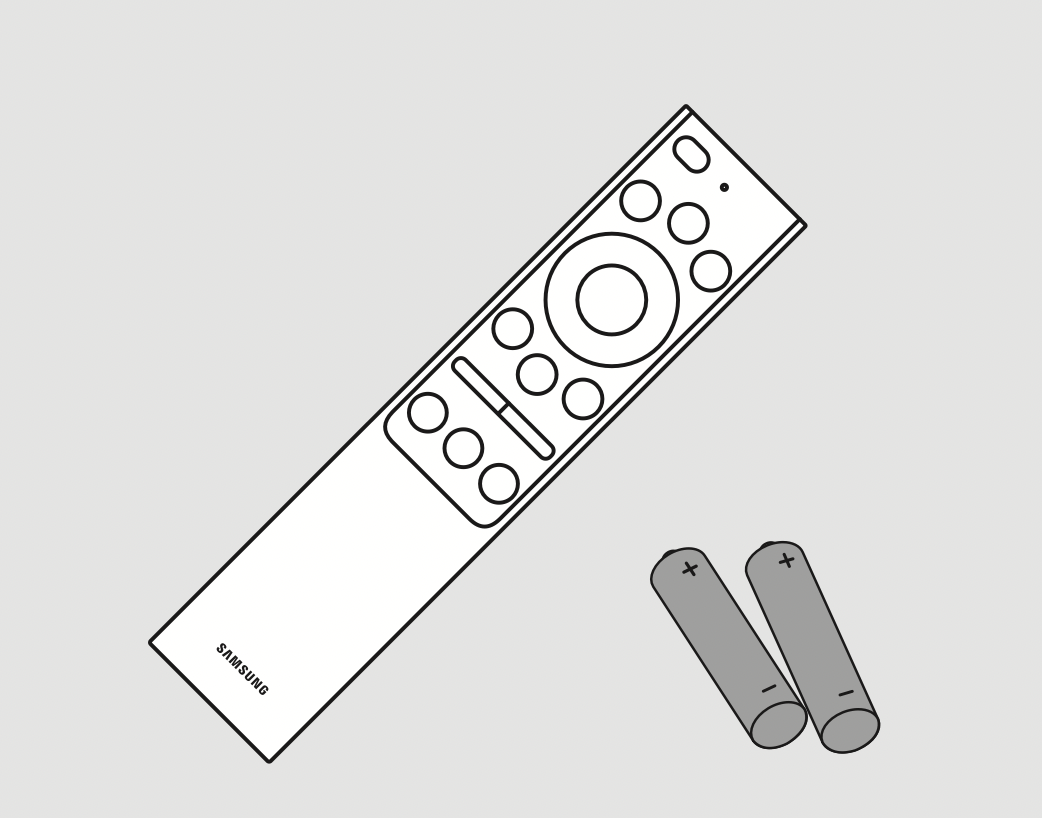
Samsung Smart Remote & Batteries (AAA x 2) (Only for Q85T model)
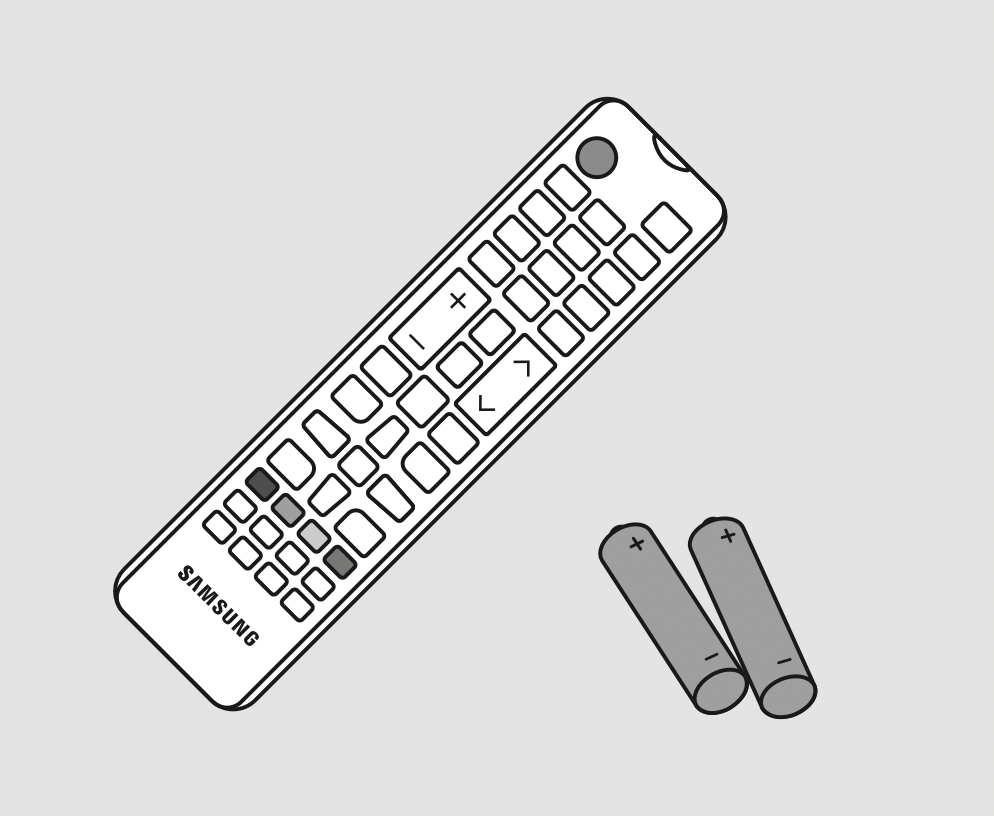
Remote Control & Batteries (AAA x 2)
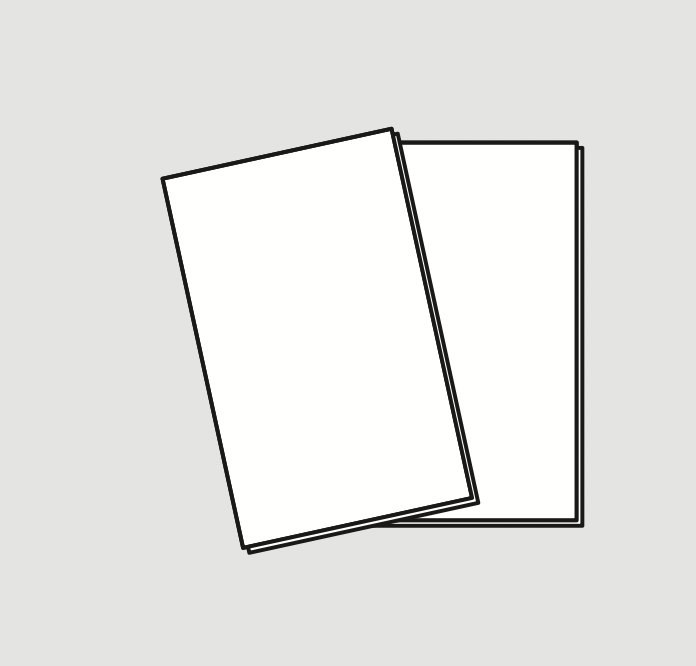
User Manual

Regulatory Guide
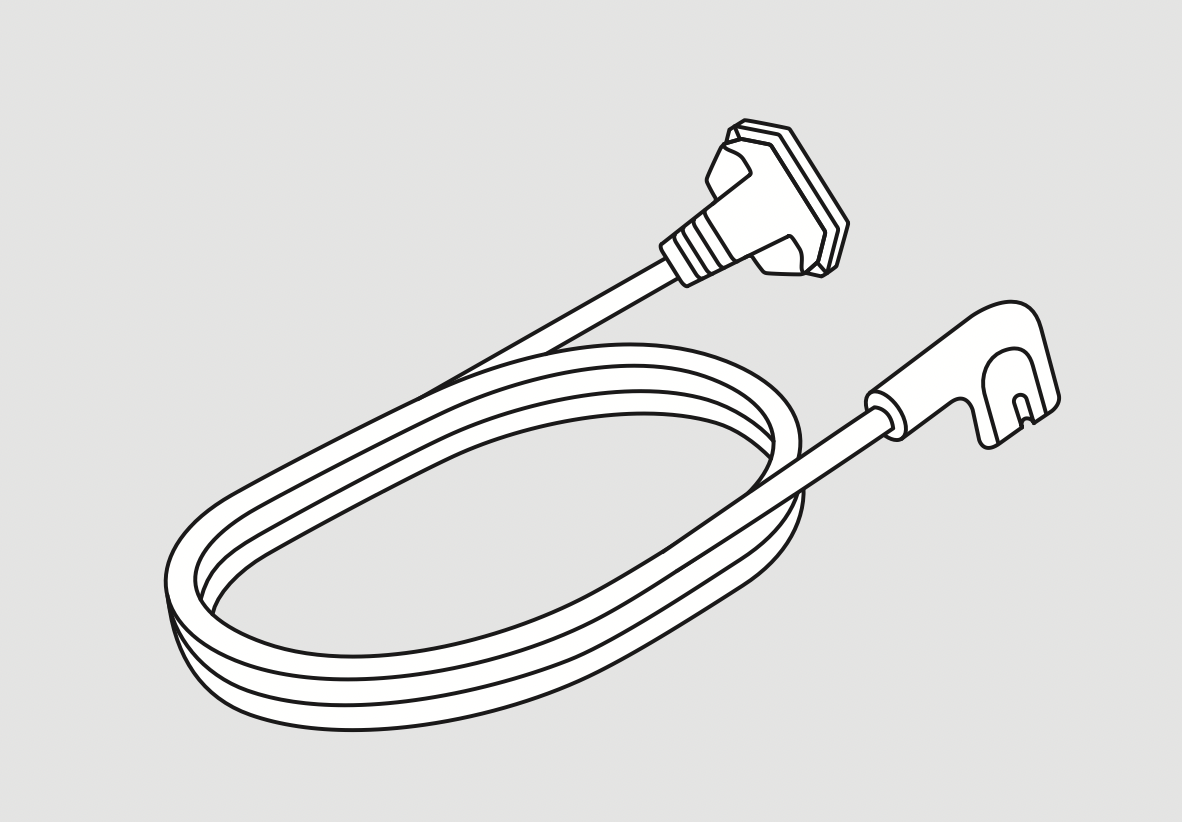
TV Power Cable
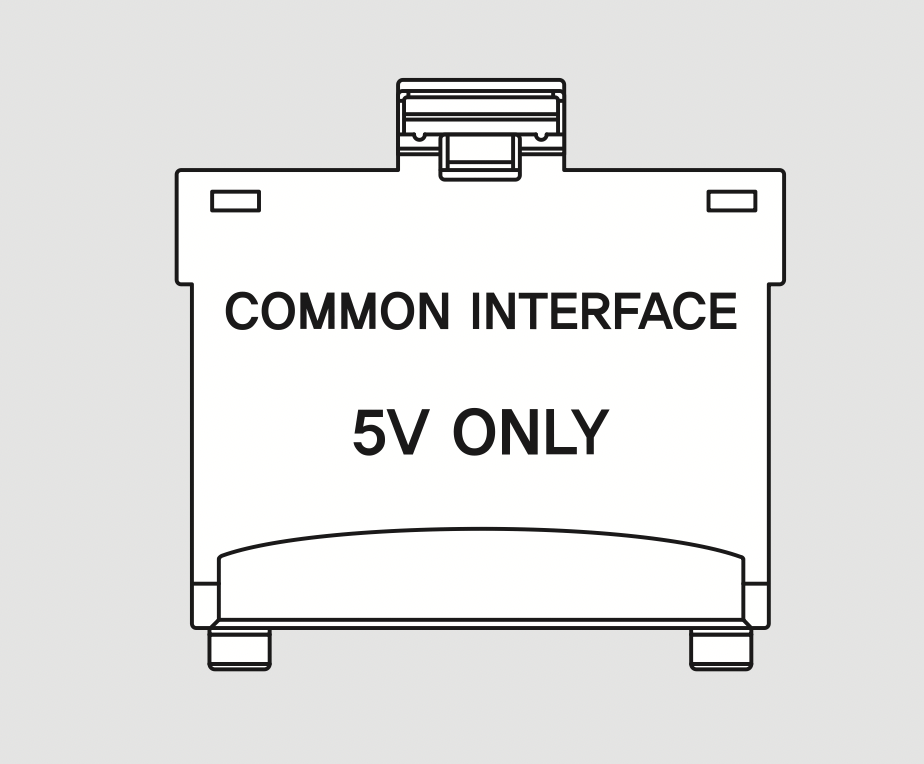
CI Card Adapter
- The items’ colours and shapes may vary depending on the models.
- Cables not included can be purchased separately.
- Check for any accessories hidden behind or in the packing materials when opening the box.
- The type of battery may vary depending on the model.
Assembling the TV
Attaching the TV to the Stand
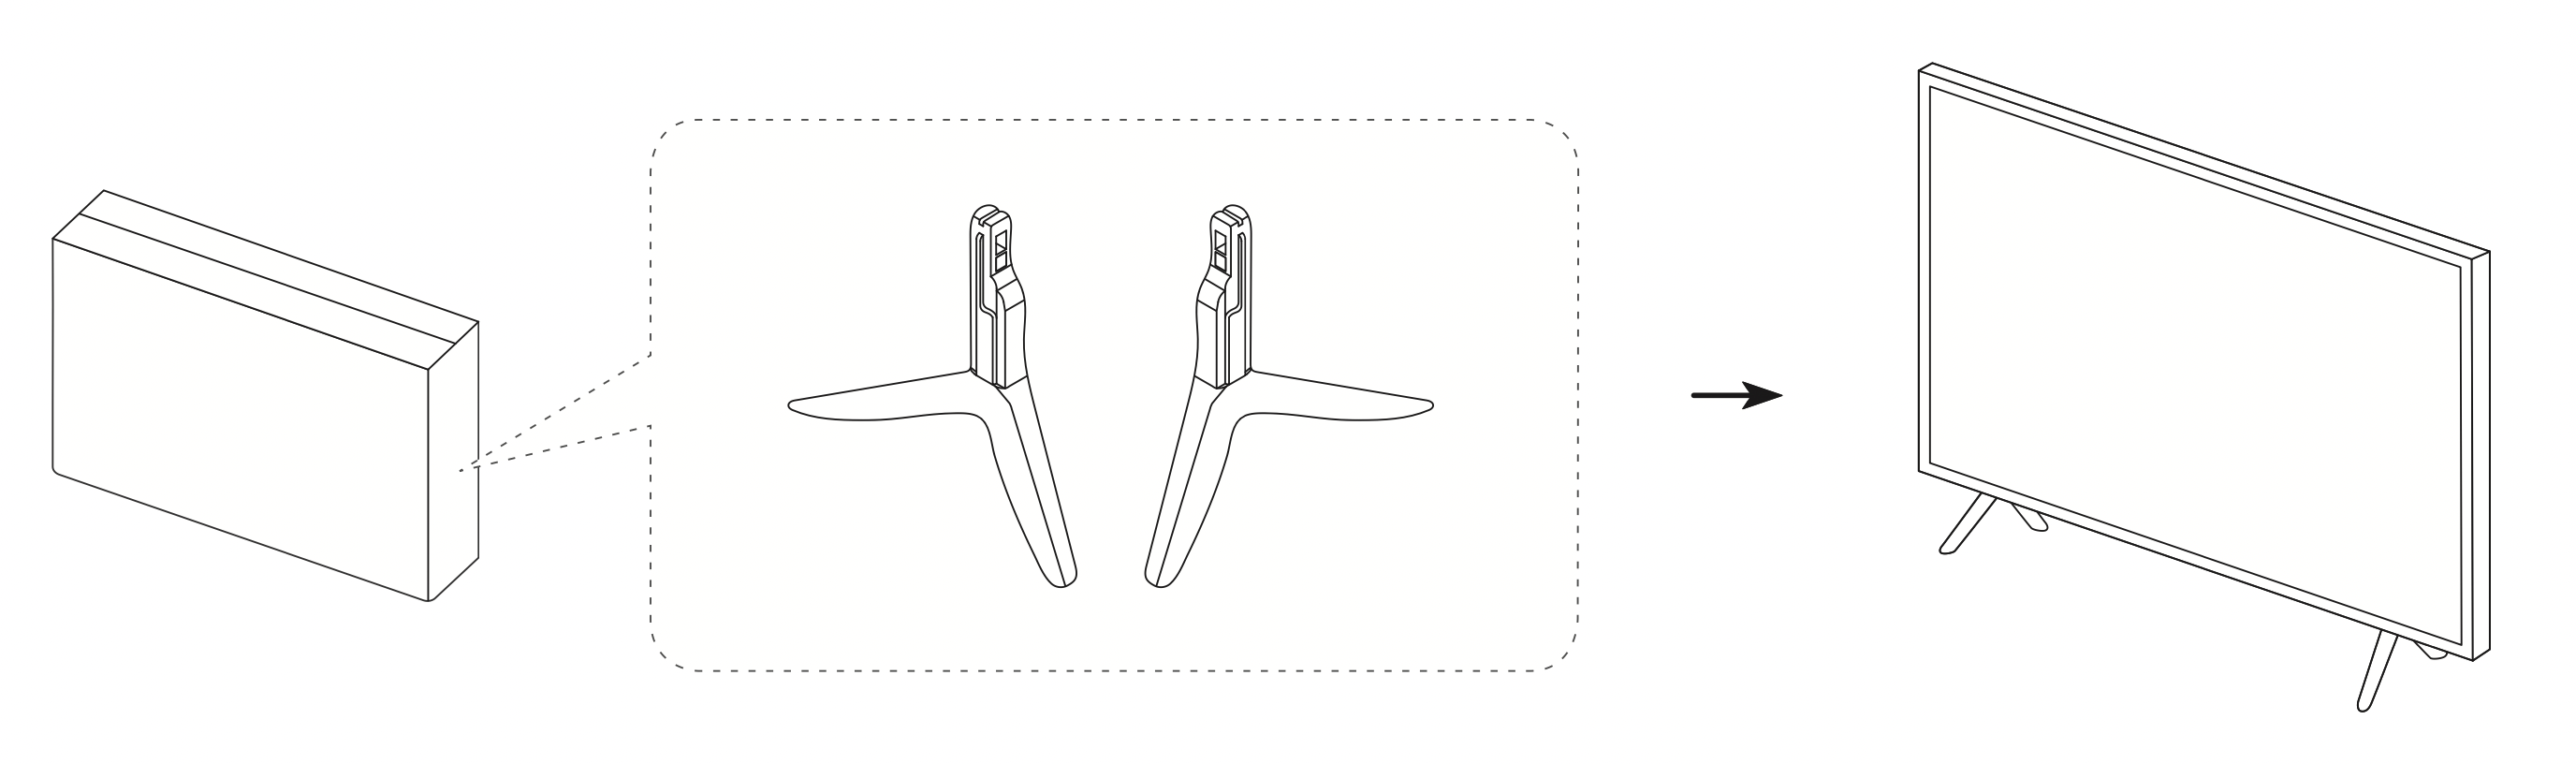
Make sure you have all the accessories shown, and that you assemble the stand following the provided assembly instructions.
- The product colour and shape may vary depending on the model.
- For the assembly method and stand components, refer to Quick Setup Guide.
Mounting the TV on a wall
Warning: If you mount this TV on a wall, follow the instructions exactly as set out by the manufacturer. Unless it is correctly mounted, the TV may slide or fall and cause serious injury to a child or adult and serious damage to the TV.
- You can mount the TV on the wall using a wall mount kit (sold separately).
- Refer to the installation manual included with the Samsung wall mount kit.
- Samsung Electronics is not responsible for any damage to the product or injury to yourself or others if you choose to install the wall mount on your own.
- You can install your wall mount on a solid wall perpendicular to the floor. Before attaching the wall mount to surfaces other than plaster board, contact your nearest dealer for additional information. If you install the TV on a ceiling or slanted wall, it may fall and result in severe personal injury.
- Standard dimensions for wall mount kits are shown in the table on the next page.
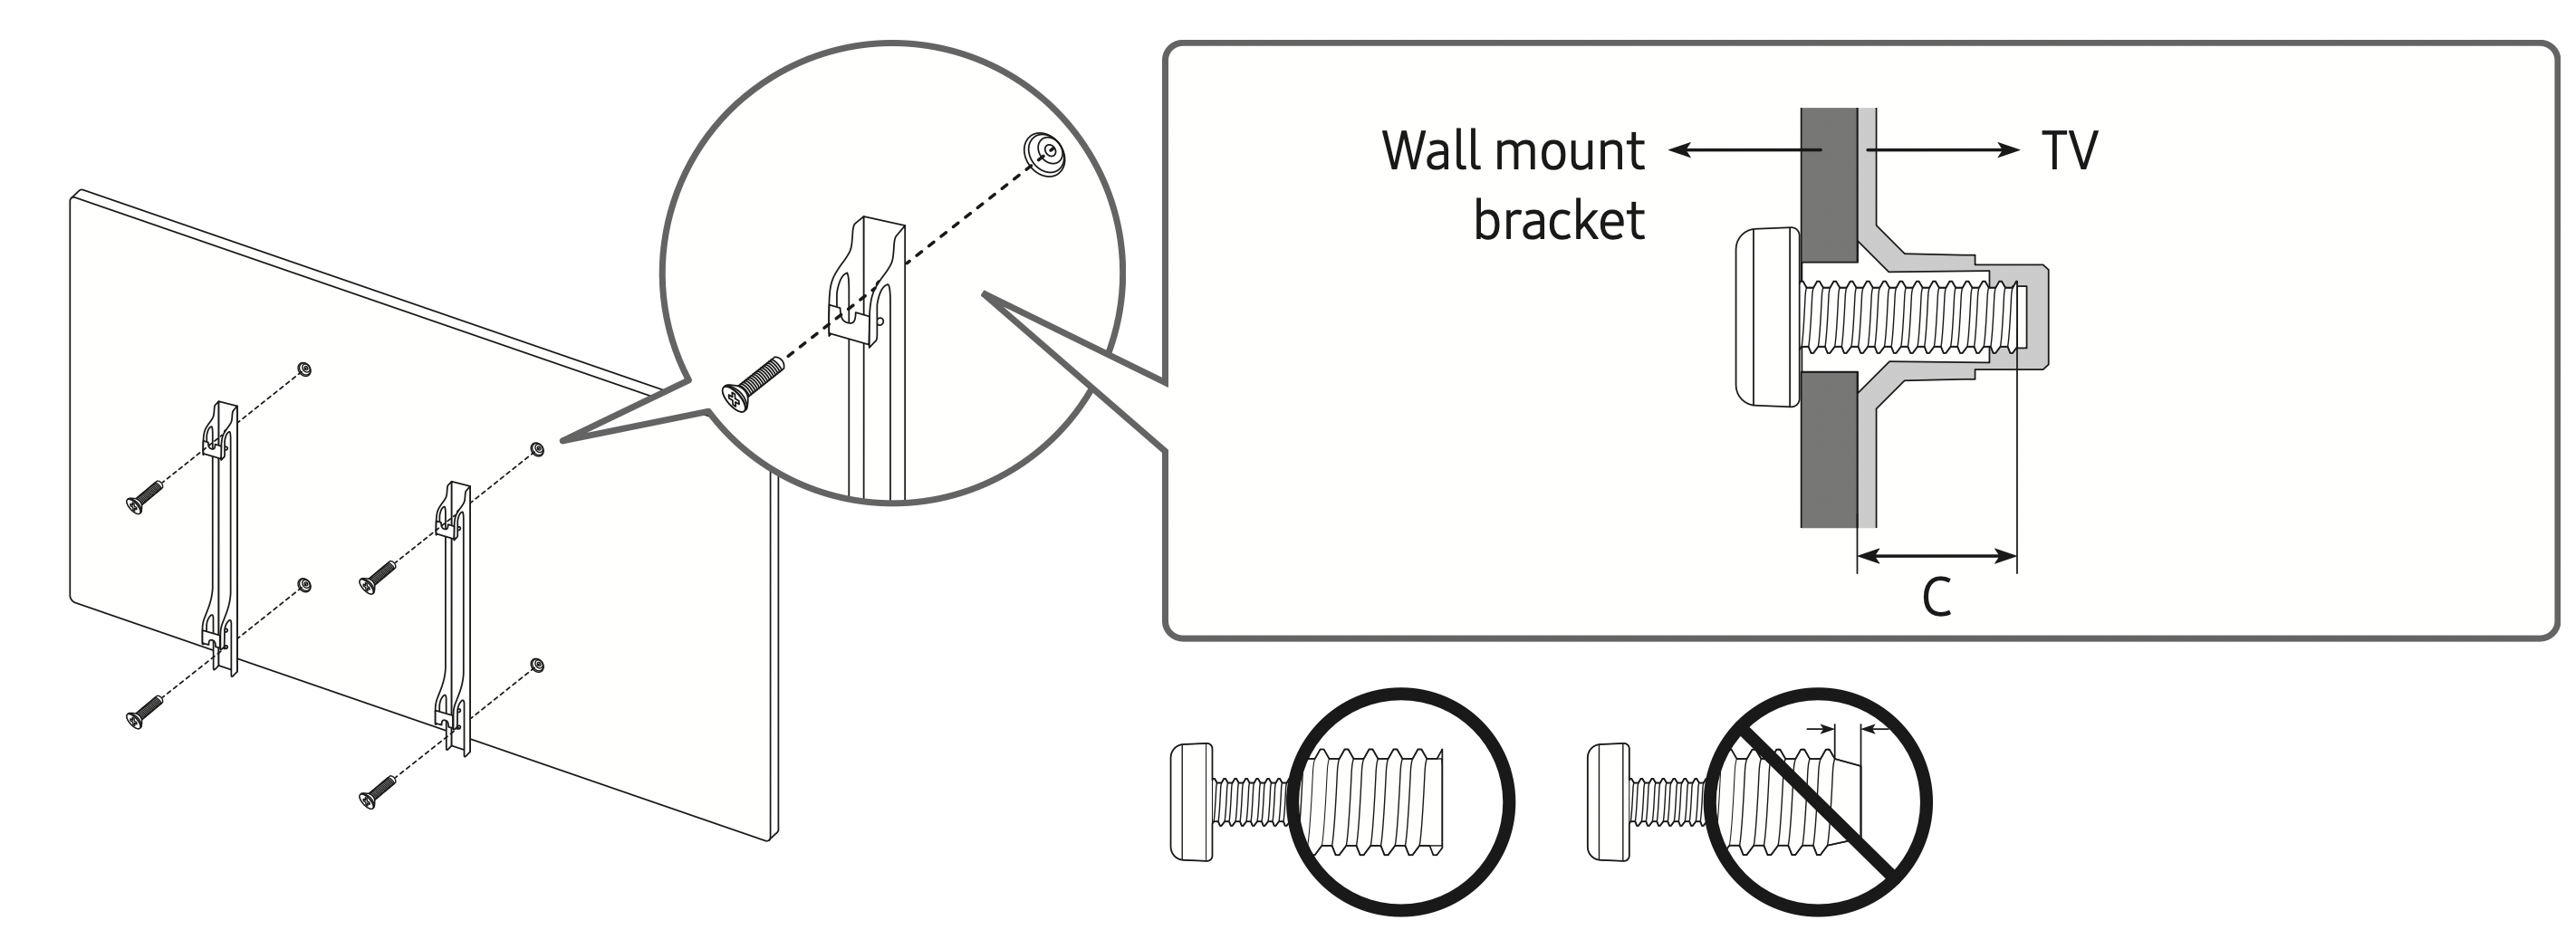
- If you are installing a third-party wall mount, note that the length of the screws you can use to attach the TV to the wall mount is shown in column C in the table on the next page.
- When installing a wall mount kit, we recommend you fasten all four VESA screws.
- If you want to install a wall mount kit that attaches to the wall using two top screws only, be sure to use a Samsung wall mount kit that supports this type of installation. (You may not be able to purchase this type of wall mount kit, depending on the geographical area).
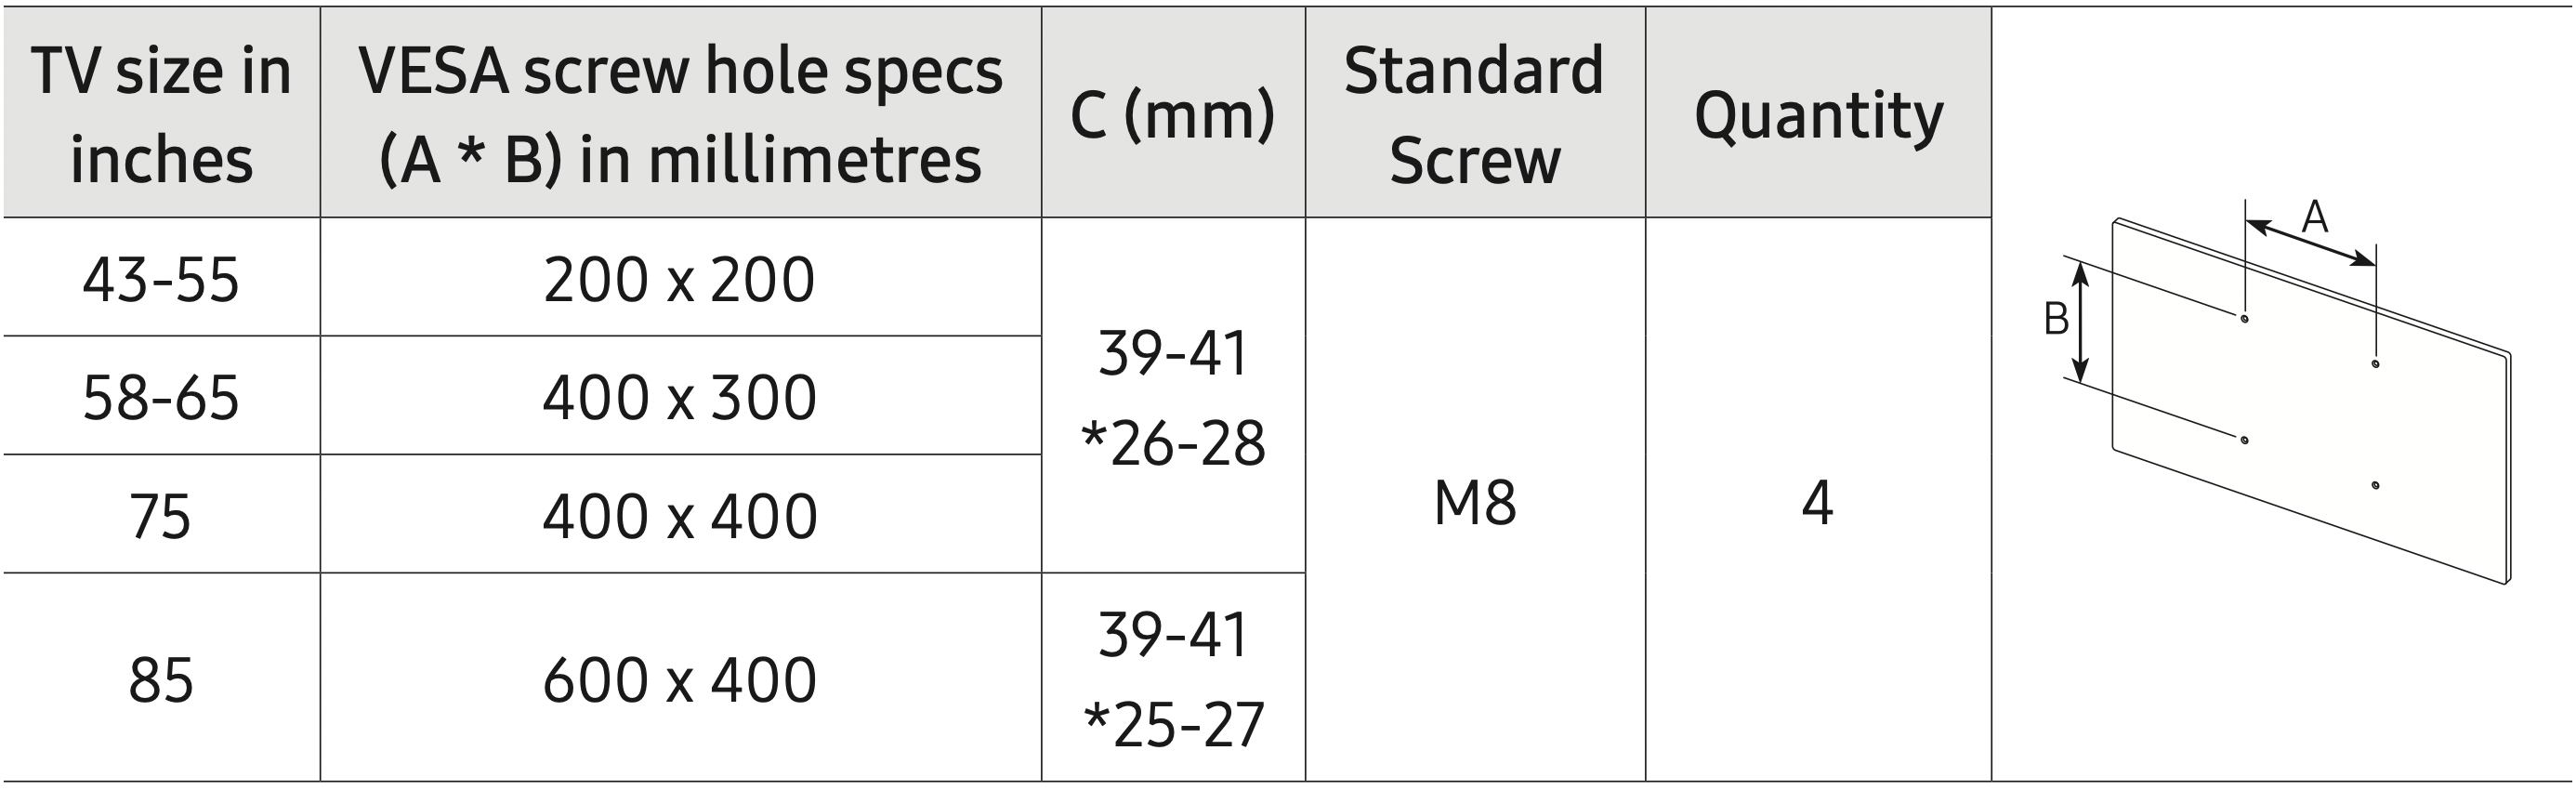
*: These specifications are supported by Q80T, Q85T.
Warning: Do not install your wall mount kit while your TV is turned on. This may result in personal injury from electric shock.
- Do not use screws that are longer than the standard dimension or do not comply with the VESA standard screw specifications. Screws that are too long may cause damage to the inside of the TV set.
- For wall mounts that do not comply with the VESA standard screw specifications, the length of the screws may differ depending on the wall mount specifications.
- Do not fasten the screws too firmly. This may damage the product or cause the product to fall, leading to personal injury. Samsung is not liable for these kinds of accidents.
- Samsung is not liable for product damage or personal injury when a non-VESA or nonspecified wall mount is used or when the consumer fails to follow the product installation instructions.
- Do not mount the TV at more than a 15 degree tilt.
- Always have two people mount the TV onto a wall.
- For 82 inch or larger models, have four people mount the TV onto a wall.
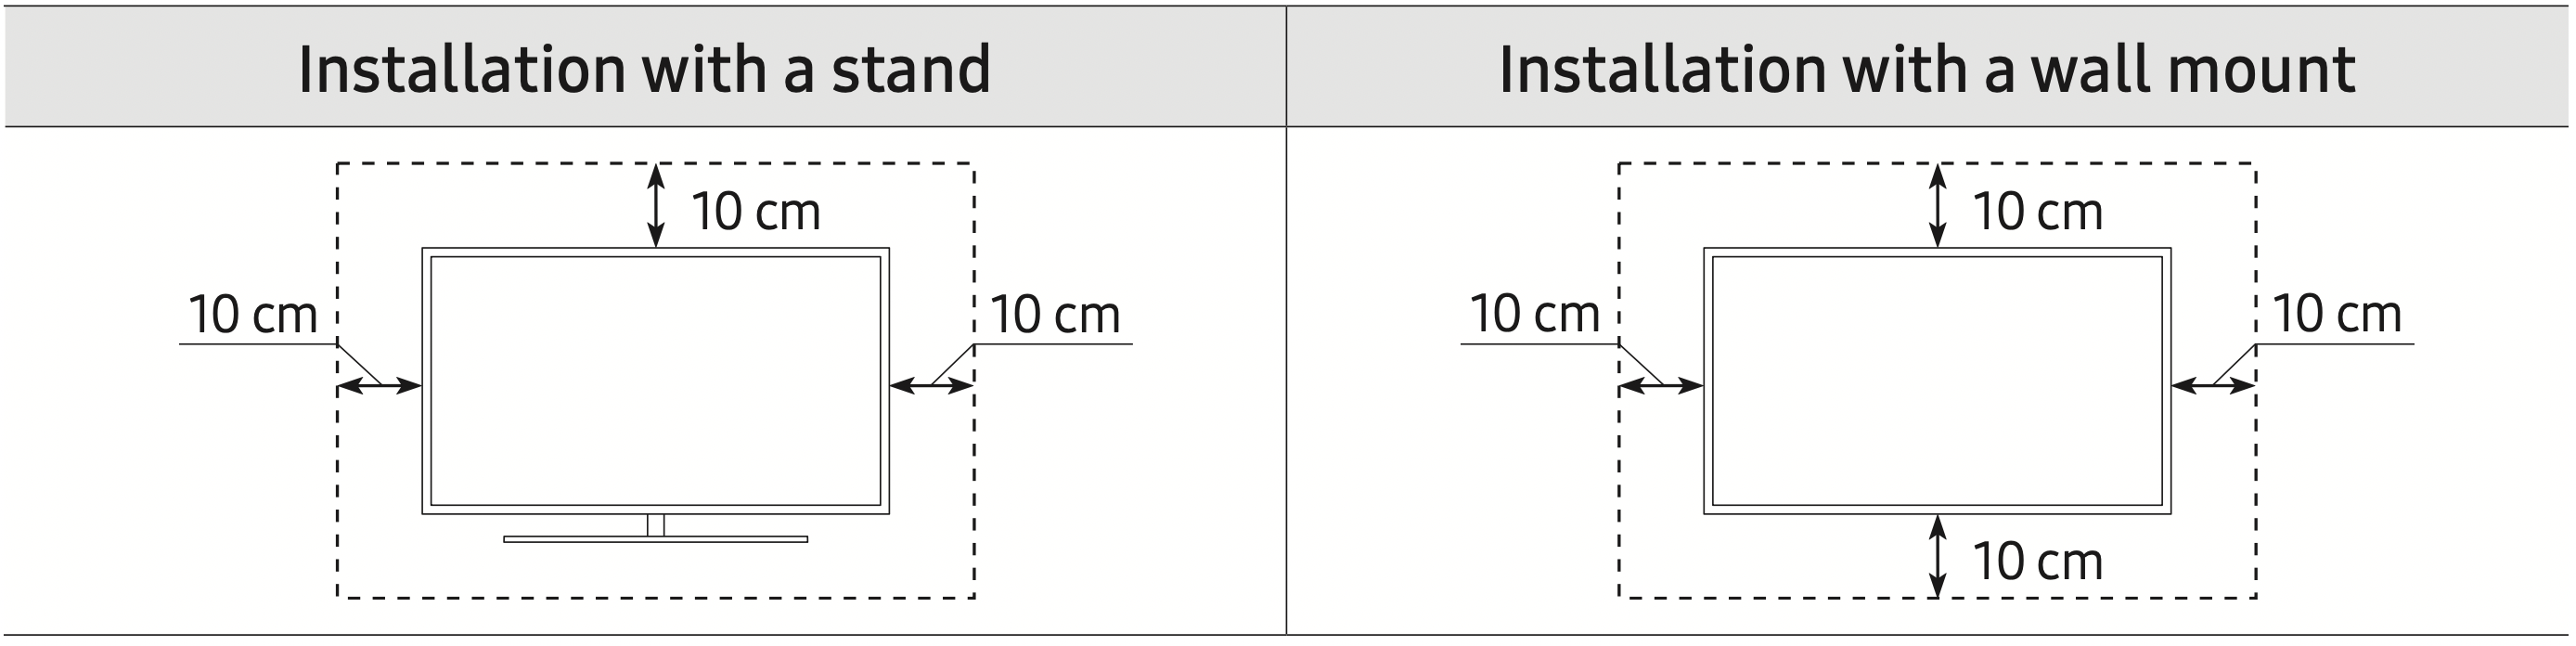
Providing proper ventilation for your TV
When you install your TV, maintain a distance of at least 10 cm between the TV and other objects (walls, cabinet sides, etc.) to ensure proper ventilation. Failing to maintain proper ventilation may result in a fire or a problem with the product caused by an increase in its internal temperature.
- When you install your TV with a stand or a wall mount, we strongly recommend you use parts provided by Samsung Electronics only. Using parts provided by another manufacturer may cause difficulties with the product or result in injury caused by the product falling.
Other Cautions
- The actual appearance of the TV may differ from the images in this manual, depending on the model.
- Be careful when you touch the TV. Some parts can be somewhat hot.
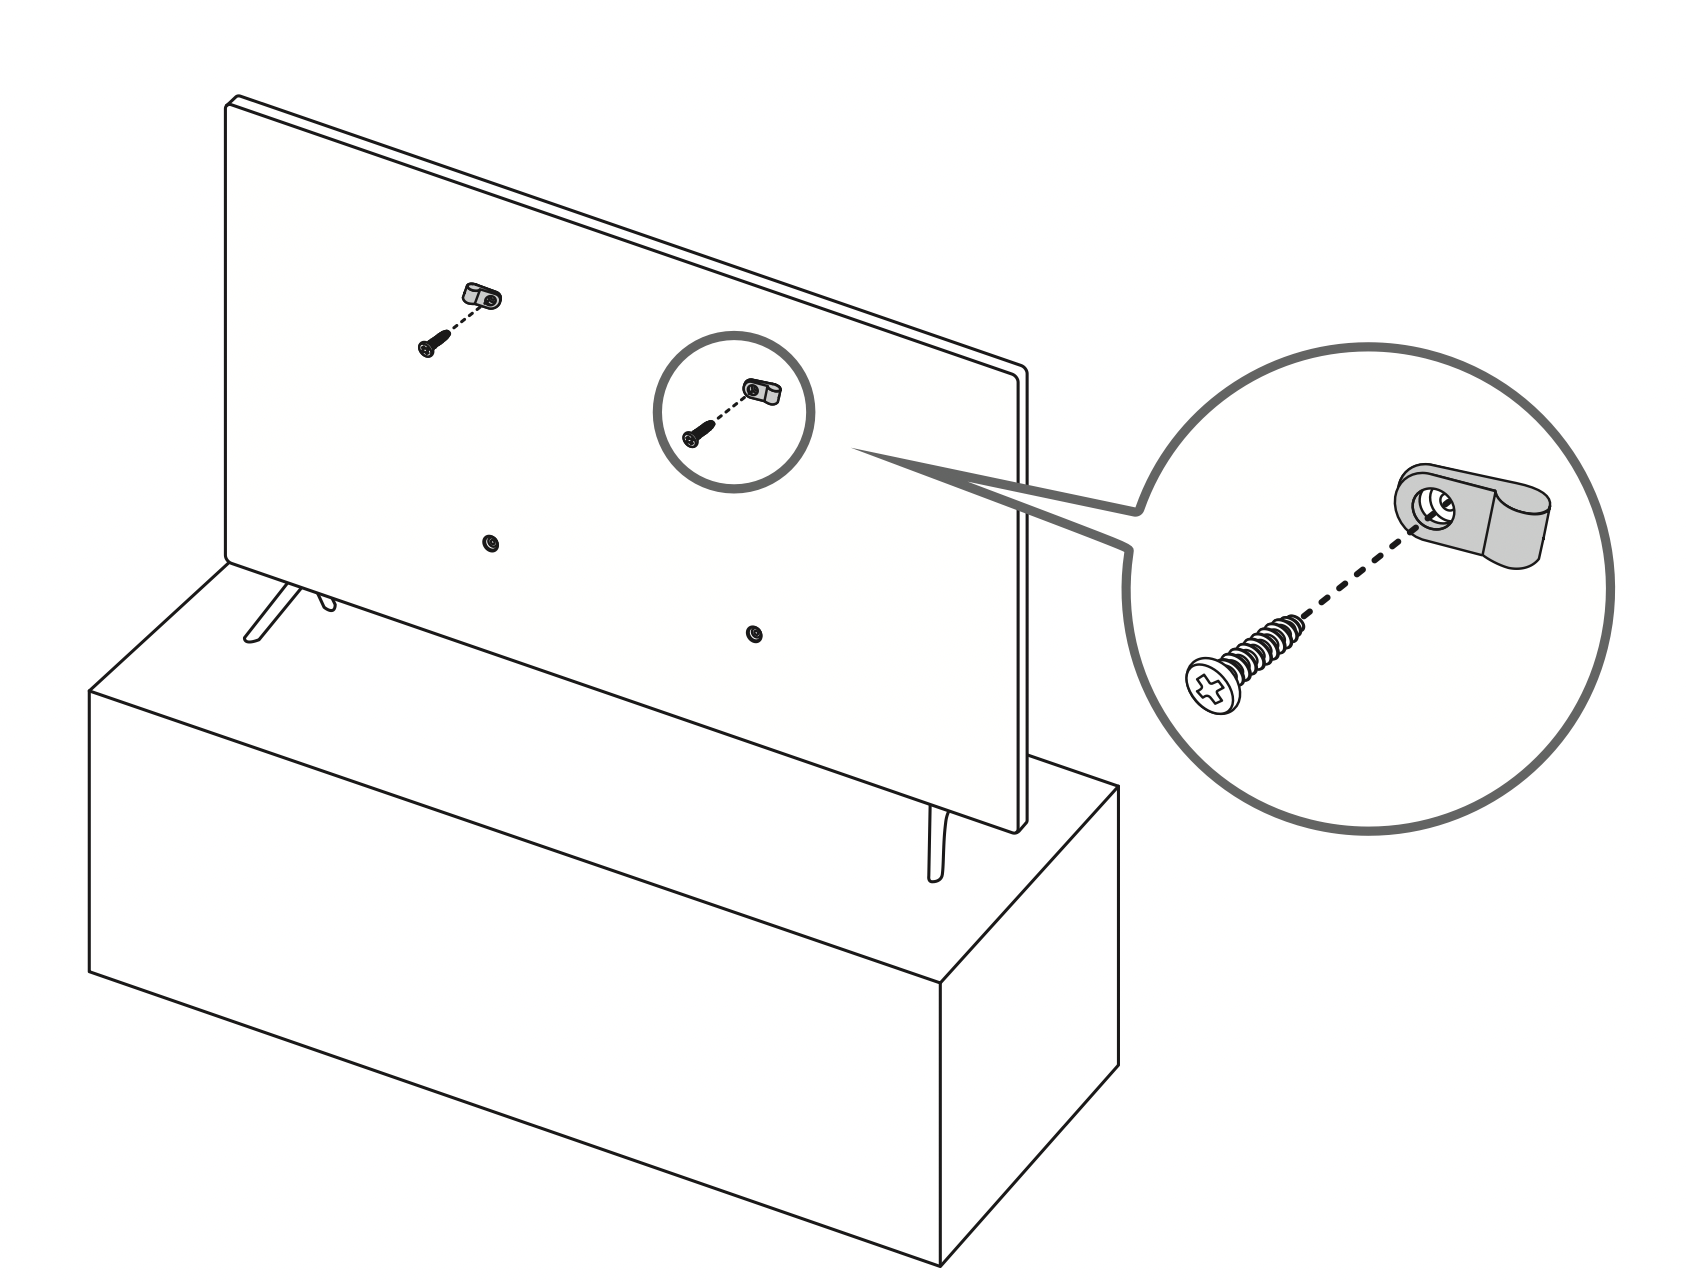
Preventing the TV from falling
- Using the appropriate screws, firmly fasten a set of brackets to the wall. Confirm that the screws are firmly attached to the wall.
You may need additional material such as wall anchors depending on the type of wall.
- Using the appropriately sized screws, firmly fasten a set of brackets to the TV.
For the screw specifications, refer to "Standard Screw" in the table on the previous page.
- Connect the brackets fixed to the TV and the brackets fixed to the wall with a durable, heavy-duty string, and then tie the string tightly.
Install the TV near the wall so that it does not fall backwards.
Connect the string so that the brackets fixed to the wall are at the same height as or lower than the brackets fixed to the TV.
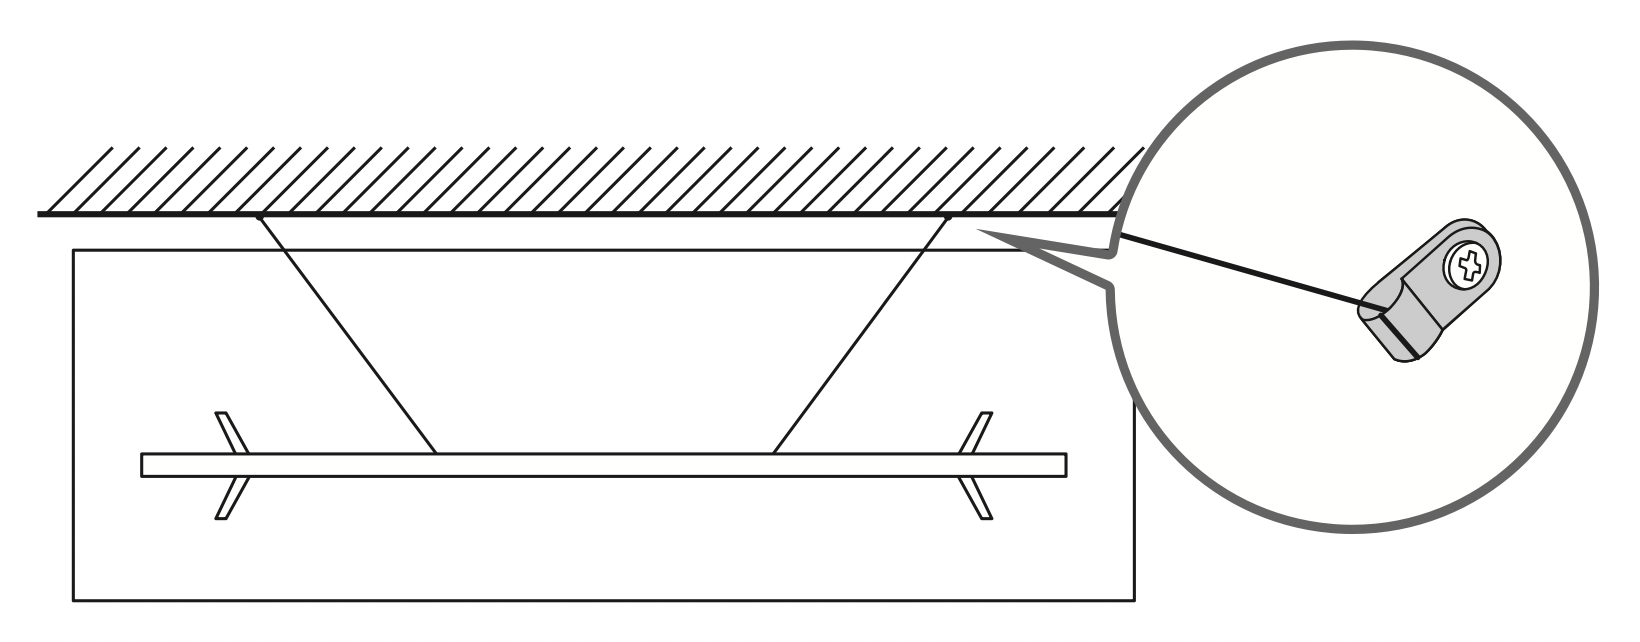
The product colour and shape may vary depending on the model.
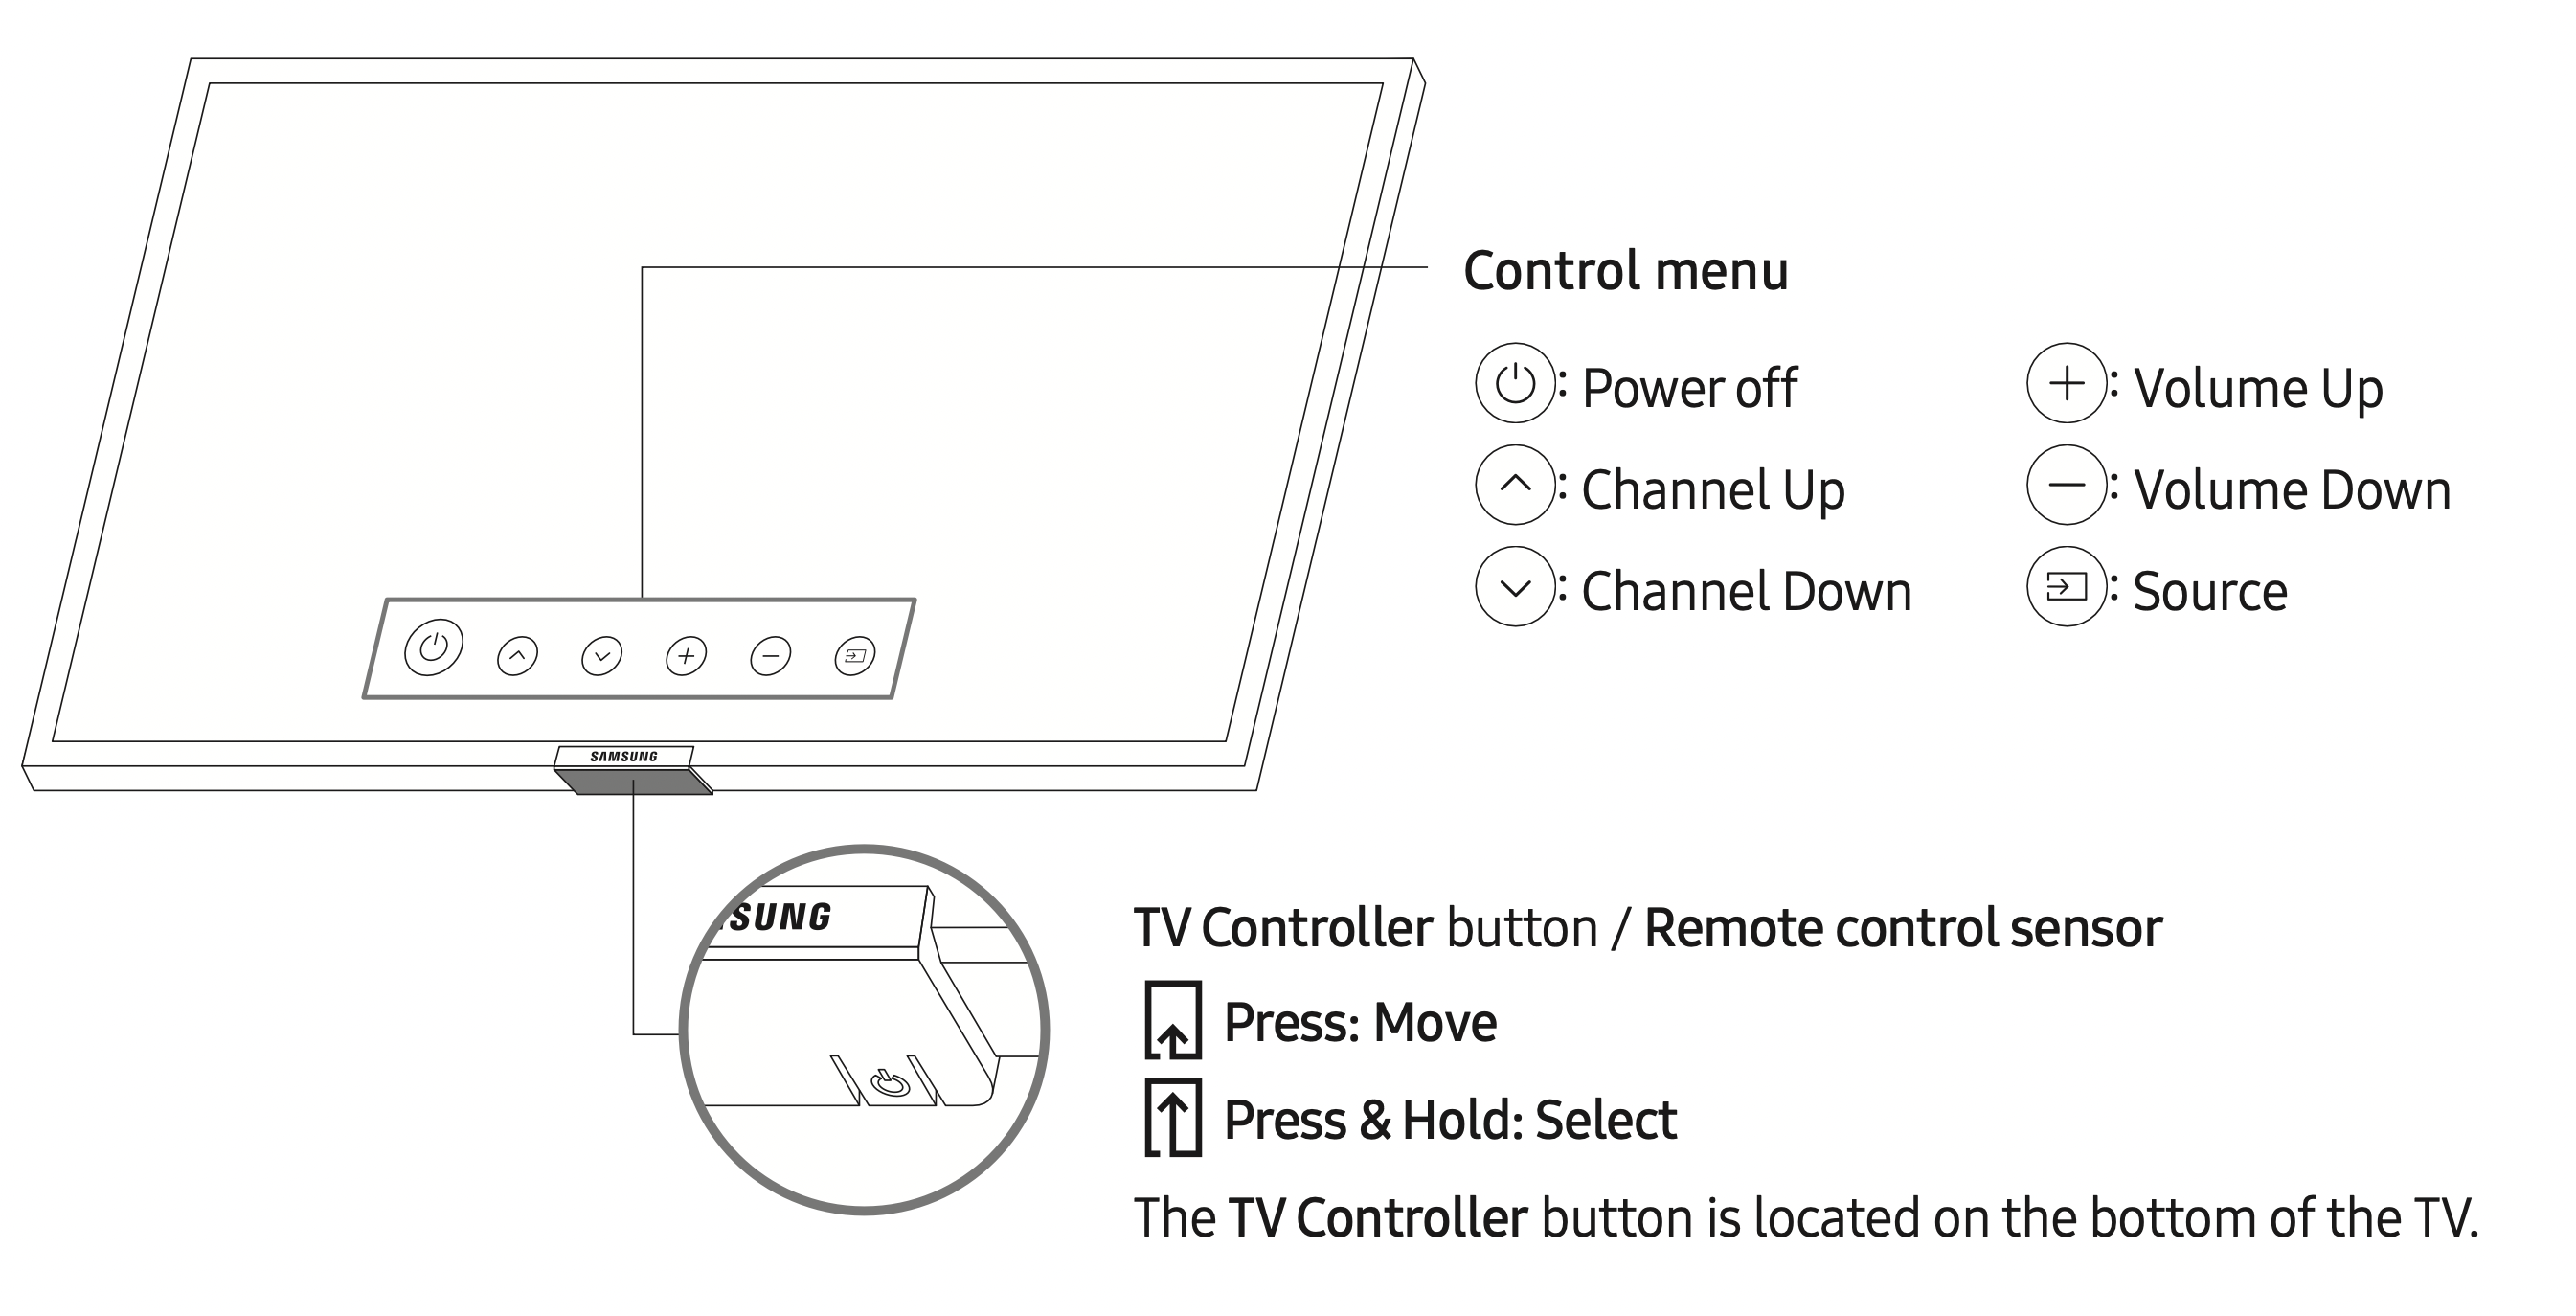
The TV Control Stick
Using the TV Controller
You can turn on the TV with the TV Controller button at the bottom of the TV, and then use the Control menu. The Control menu appears when the TV Controller button is pressed while the TV is On. For more information about its usage, refer to the figure below.
- The screen may dim if the protective film on the SAMSUNG logo or the bottom of the TV is not detached. Please remove the protective film.
Setting the sound sensor
- This function is supported by Q7, Q8 series.
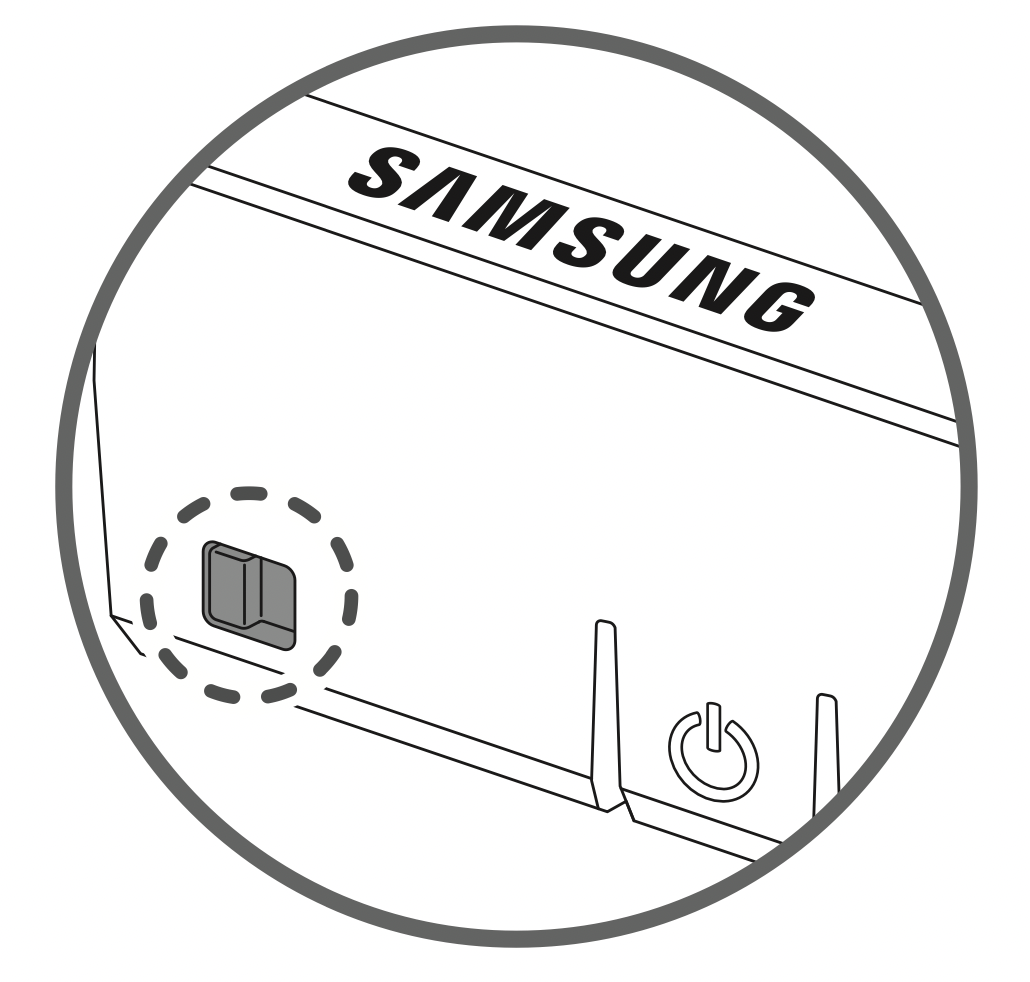
You can turn on or off the sound sensor by using its button at the bottom of the TV.
With the TV on, you can push the button to the left (or backward) to turn on the sound sensor or to the right (or forward) to turn off it.
See the pop-up window on the TV to check whether the sound sensor is turned on or off.
- The position and shape of the sound sensor may differ depending on the model.
- During analysis using data from the sound sensor, the data is not saved.
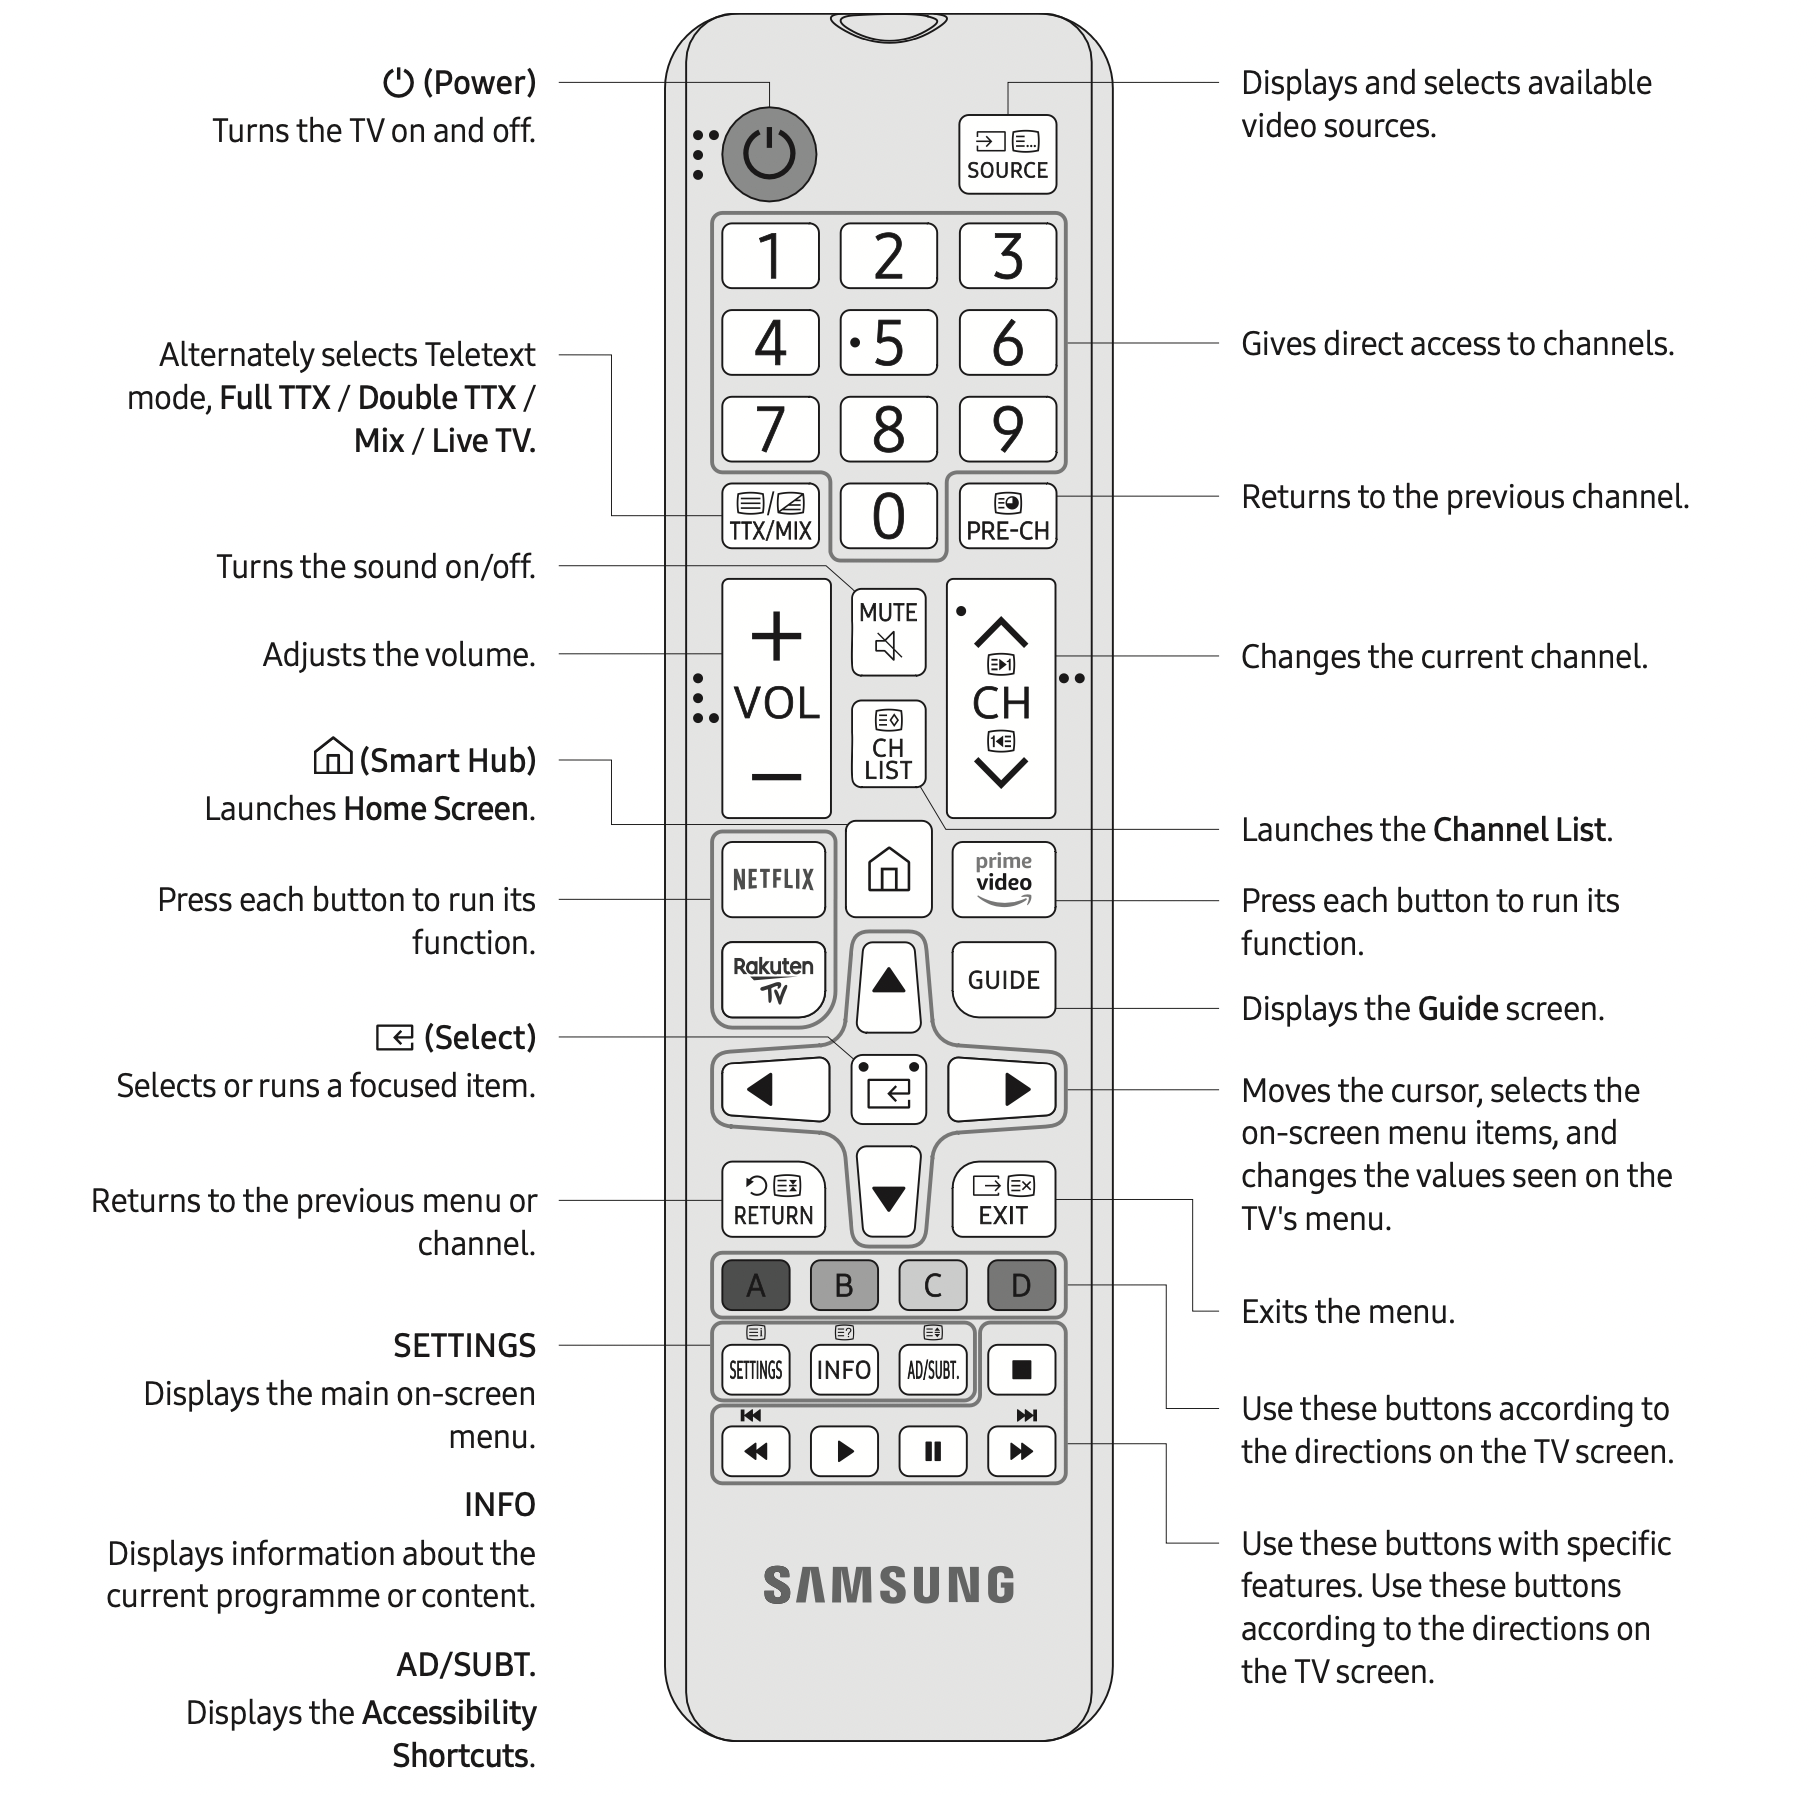
The Remote Control
About the Buttons on the Remote Control
- This remote control has Braille points on the Power, Channel, Volume, and Select buttons and can be used by visually impaired persons.
- The images, buttons, and functions of the remote control may differ depending on the model.
- If you use the remote control that comes with your TV to control another TV, some functions may not operate normally.
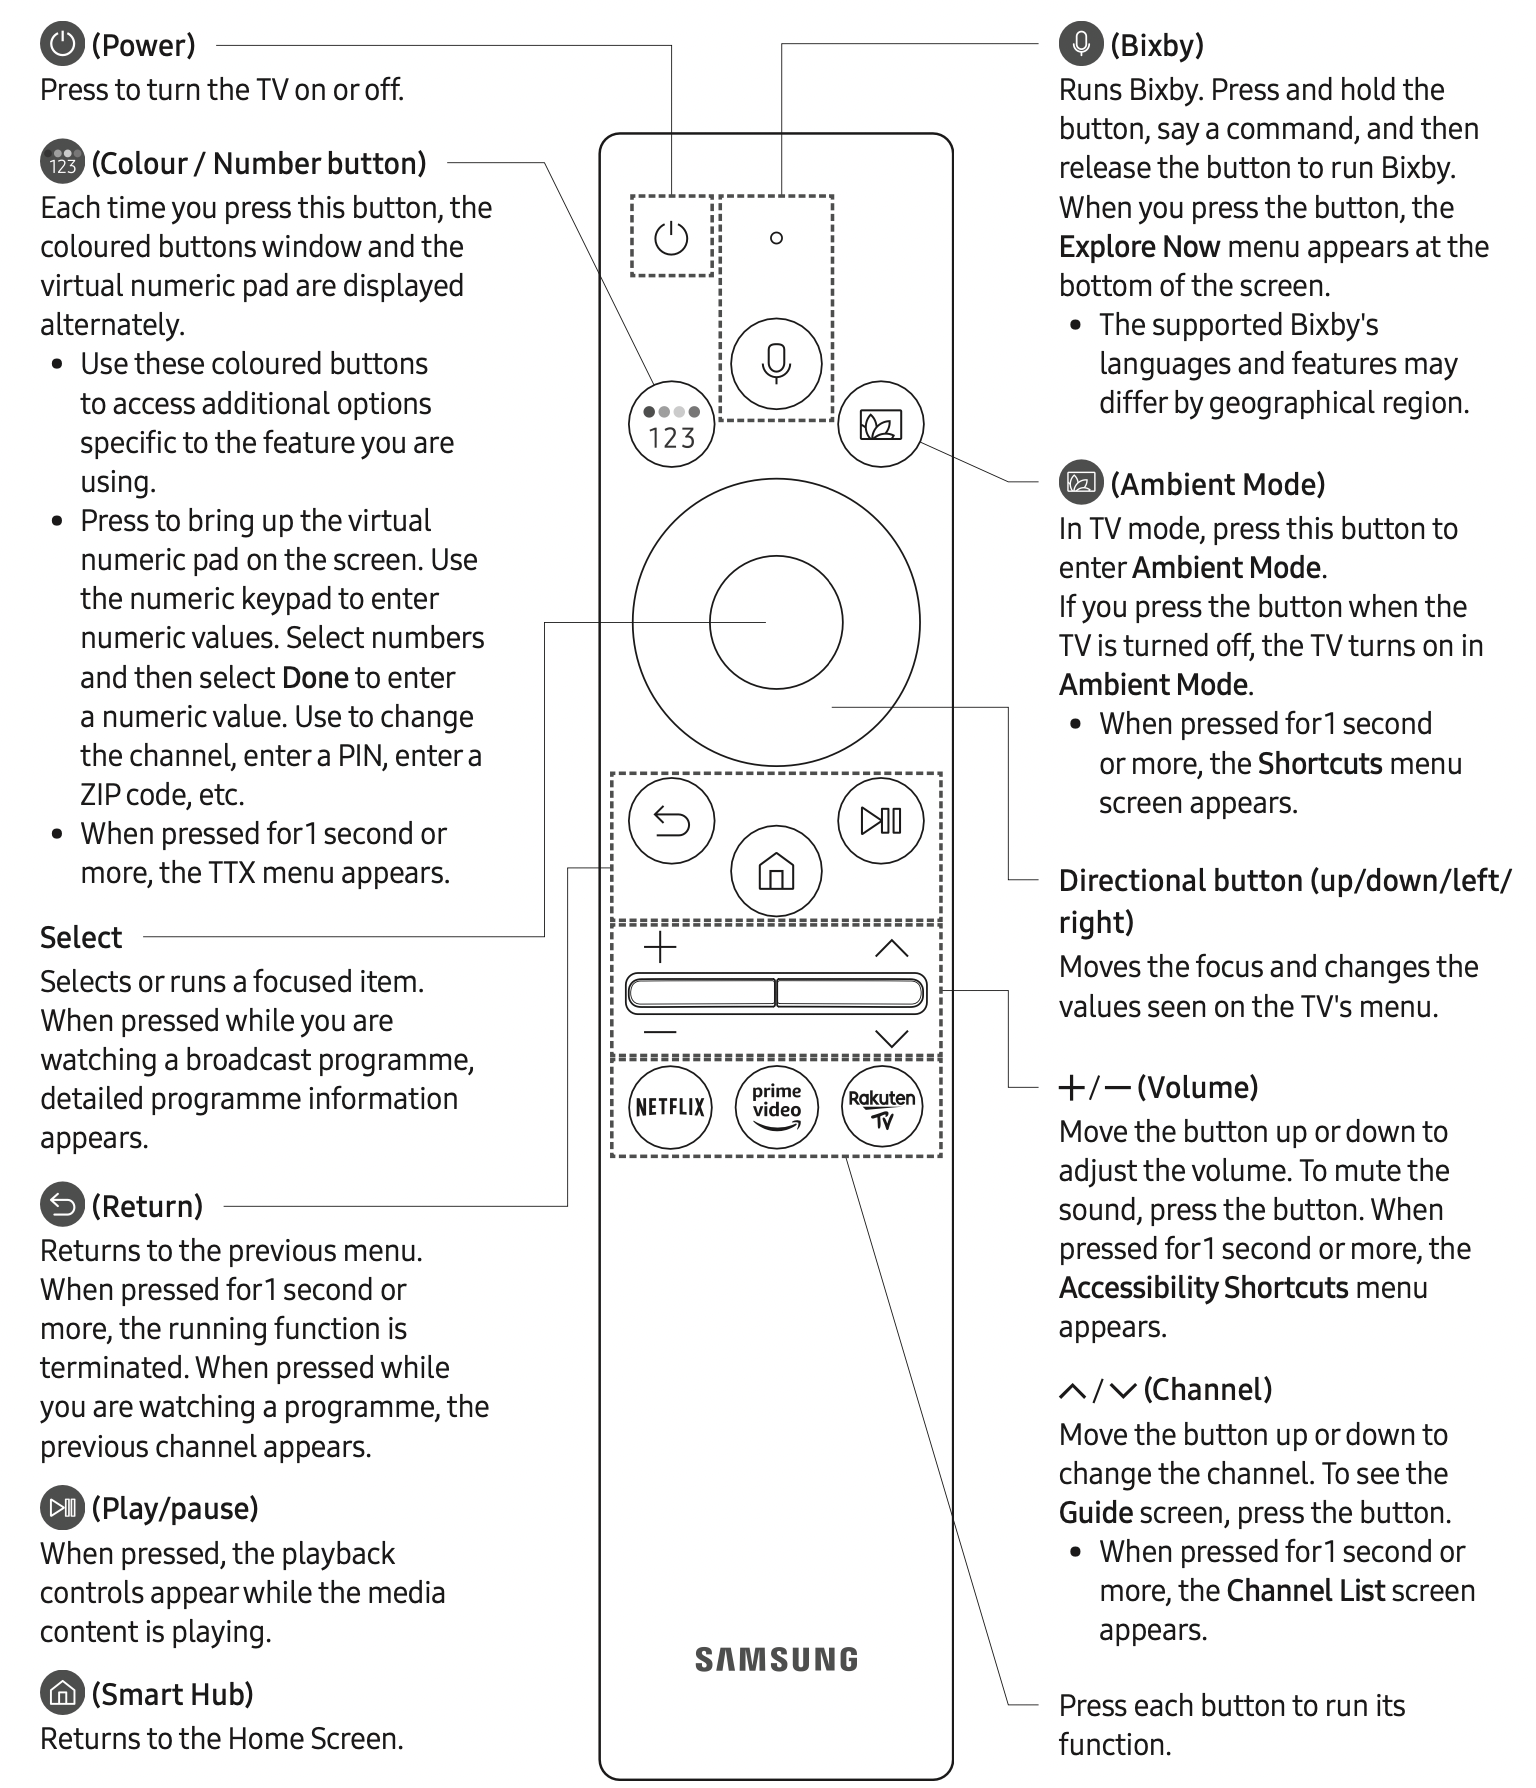
The Samsung Smart Remote
About the Buttons on the Samsung Smart Remote
- The images, buttons, and functions of the Samsung Smart Remote may differ depending on the model.
- The Universal Remote function operates normally only when you use the Samsung Smart Remote that comes with the TV.
About the Samsung Smart Remote
When you start the TV for the first time by pressing the  (Power) button on the Samsung Smart Remote, the TV automatically pairs with the Samsung Smart Remote. Once the TV and Samsung Smart Remote have paired, you can use the Samsung Smart Remote to operate the TV.
We recommend using Samsung Smart Remote at a distance of less than 6 m. A usable distance may differ depending on the wireless environmental conditions.
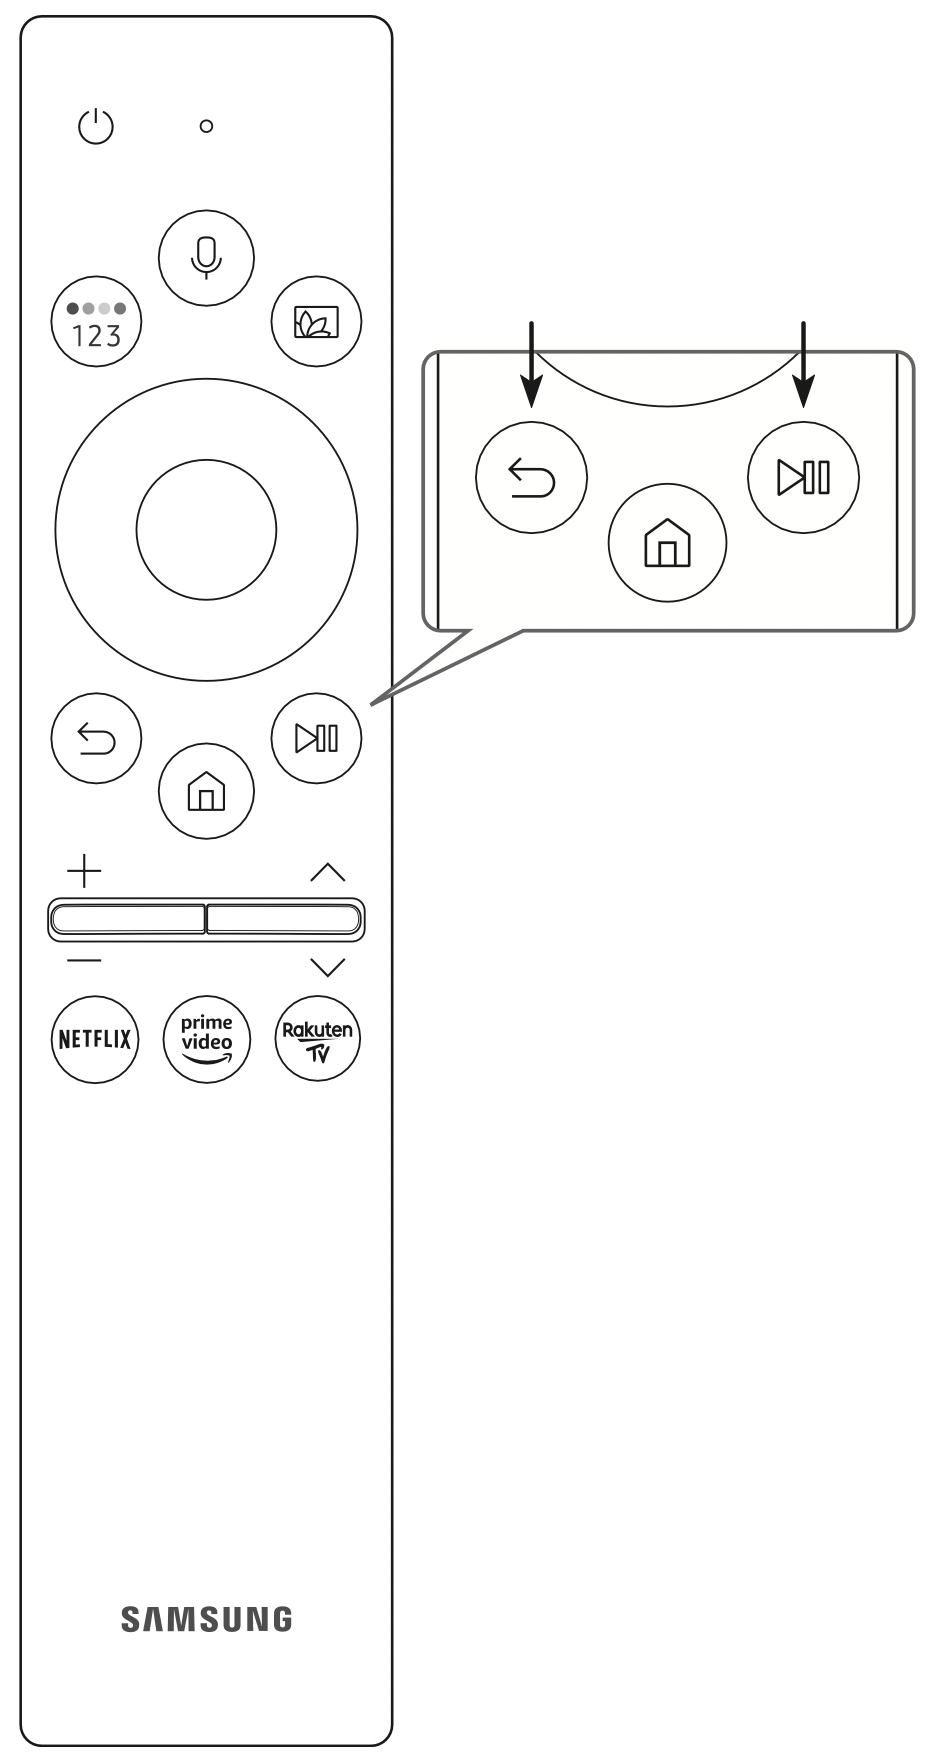
Pairing the TV to the Samsung Smart Remote
When you turn on the TV for the first time, the Samsung Smart Remote pairs to the TV automatically. If the Samsung Smart Remote does not pair to the TV automatically, point it at the remote control sensor of the TV, and then press and hold the  and
and  buttons simultaneously for 3 seconds or more.
- The Samsung Smart Remote can only be paired to one TV at a time.
Controlling External Devices with a Samsung Remote Control Using the Universal Remote
 >
>  Source > Universal Remote
You can control external devices connected to the TV using a Samsung remote control. To control external devices, register them by following the instructions on the screen.
- This function may not be supported depending on the model.
- You can also use the Anynet+ (HDMI-CEC) function to operate external Samsung devices with your TV's remote control without any additional setup.
- Certain external devices connected to the TV may not support the universal remote feature.
- Do not place any obstacles in front of an external device and TV's logo. It may cause signals from the remote control to be transmitted improperly.
- The TV memorises both the external device and its connection port (HDMI 1, HDMI 2, etc.).
- If you have difficulty controlling external devices with the Universal Remote, try adjusting the positions of the external devices.
- This function may not operate properly depending on the TV installation environment and the features of external devices.
- The initial setup differs from model to model.
- Turn on the TV using the button on the remote control or TV controller.
- Noise may occur temporarily when the TV communicates with mobile devices.
- The SmartThings app is available for mobile devices running Android 6.0 or higher or iOS 10 or higher.
- To perform Initial Setup using the SmartThings app, you must connect your mobile device via Wi-Fi.
- If the pop-up for setup does not appear automatically on the SmartThings app on your mobile device, continue setup manually after adding the TV using Add Device on the dashboard of the SmartThings app.
You can also start the Initial Setup using the TV's menu ( >  Settings > General > Reset). Follow the instructions displayed on the Initial Setup screen and configure the TV's basic settings to suit your viewing environment.
Initial setup
When you turn on your TV for the first time, it immediately starts the Initial Setup. The Initial Setup allows you to configure the basic settings for the TV to operate, such as broadcast reception, channel search, and network connection, at one time.
- Before starting the Initial Setup, be sure to connect external devices first.
- To use the TV's smart features, the TV must be connected to the Internet.
* The image on your TV may differ from the image above depending on the model and geographical area.
- If you connect any external device to HDMI IN (STB) before starting initial setup, the source of your live TV signal is set to STB. After finishing with this process, you will not be able to scan all channels and stores them in the TV’s memory.
- If you want to connect aerial cable to your TV, select Aerial. In this case, you will be able to scan all channels and stores them in the TV’s memory.
Connections
Connecting devices to your TV

You can connect various external devices using the connectors located at the back of the product. Check the connectors and then refer to the Quick Guide for more instructions on supported external devices.
For more information about connections, see the e-Manual chapter "Guide > Connections". Make sure you have the correct cable before plugging it in. Illustrations of common plugs and ports are shown below.
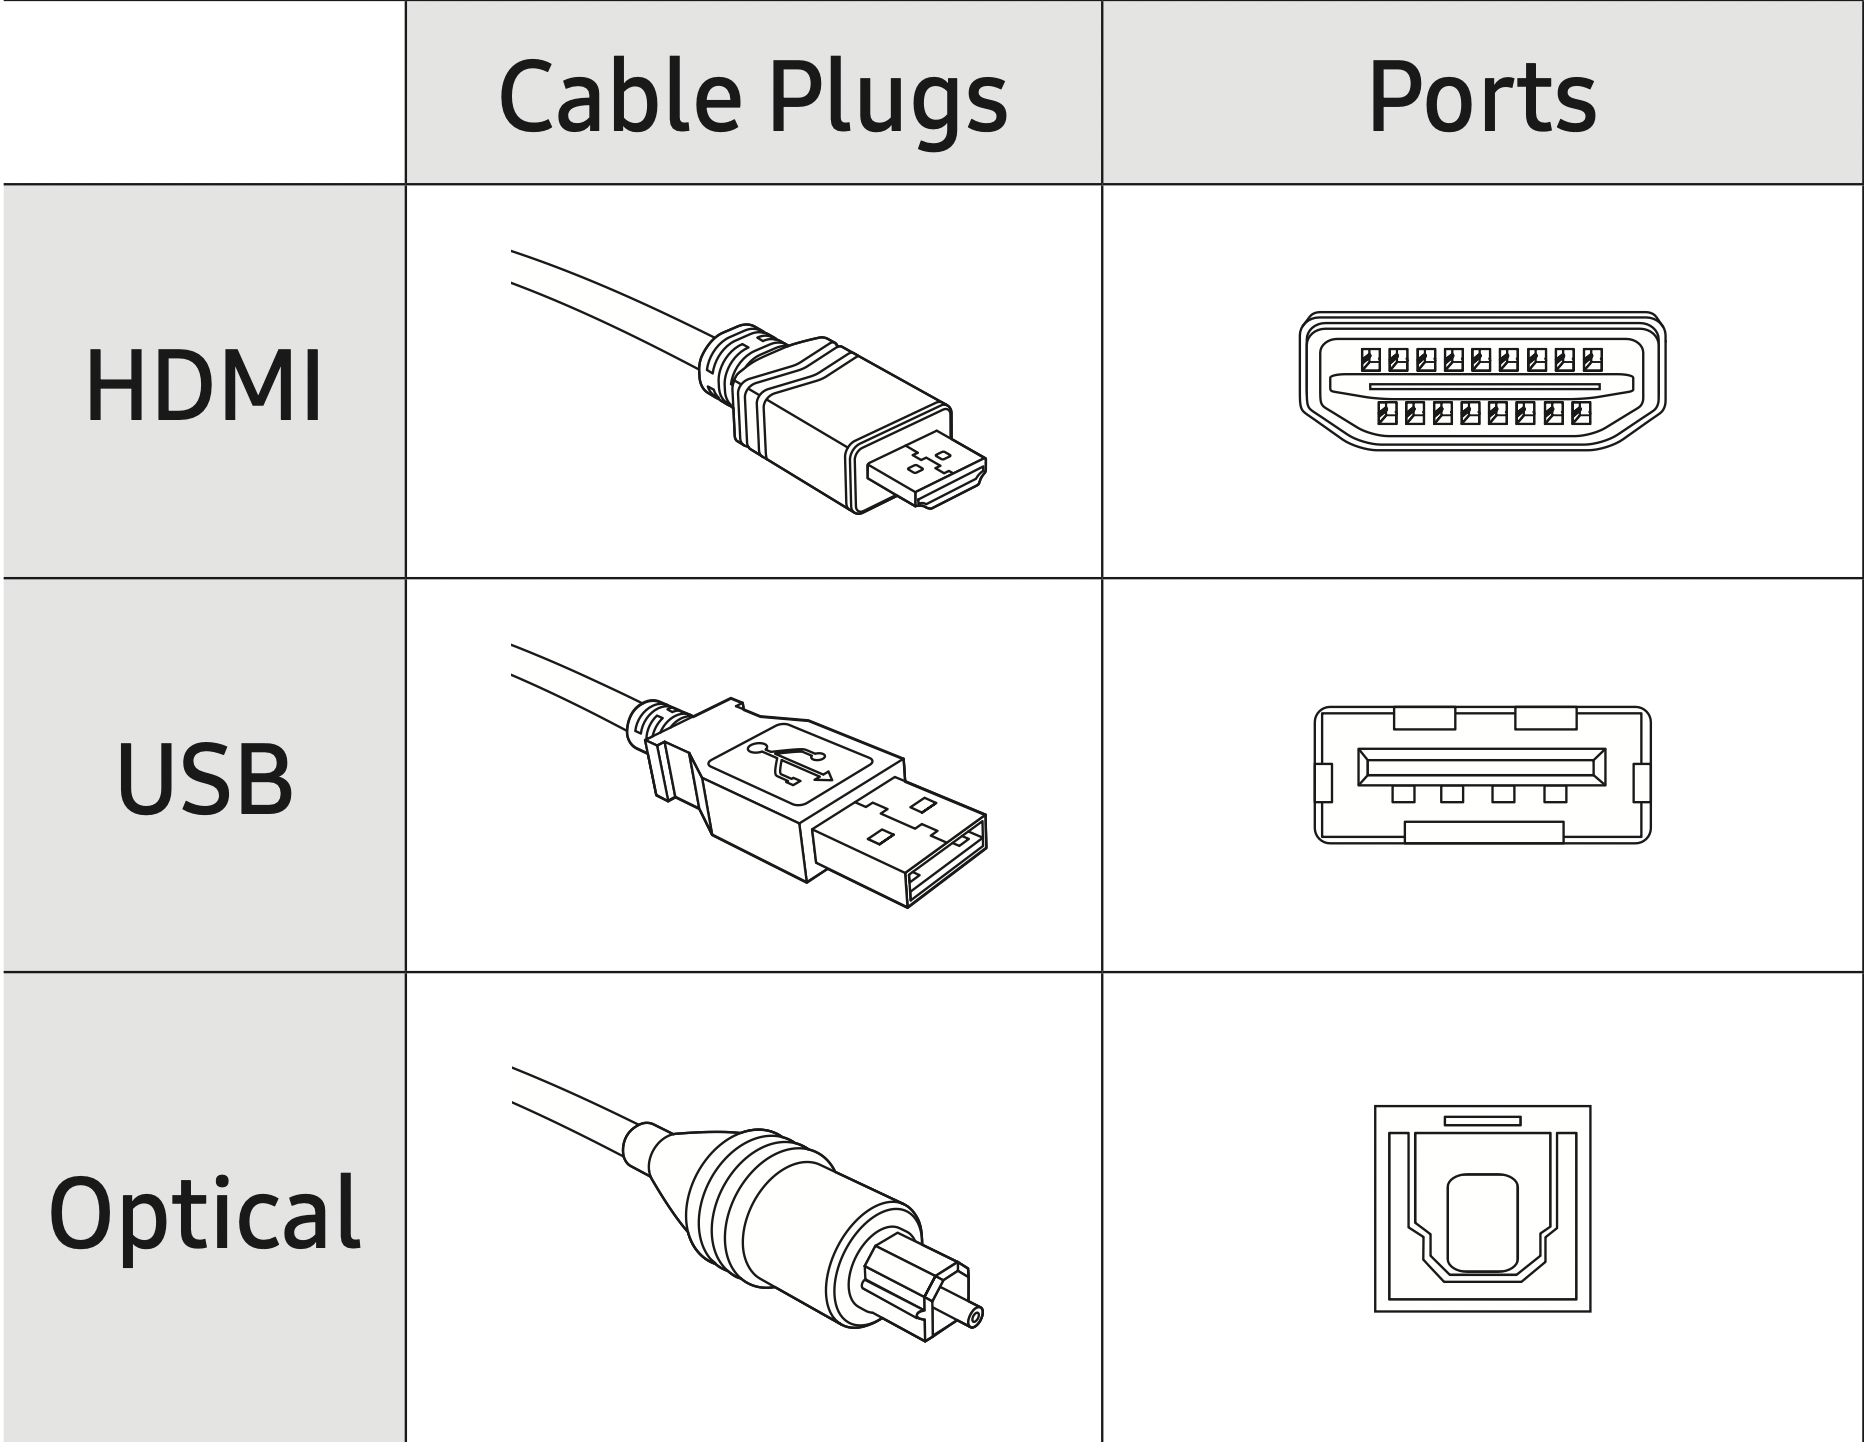
Warning: Do not plug cables in upside down. Be sure to check the orientation of the plug before plugging it in.

Connecting to the Internet
Connecting the TV to a network gives you access to online services such as the Smart Hub, as well as software updates.
- For more information about Smart Hub, see the e-Manual chapter, "Guide > Smart Features > Using Smart Hub".
- The shape of the rear panel differs among the models.
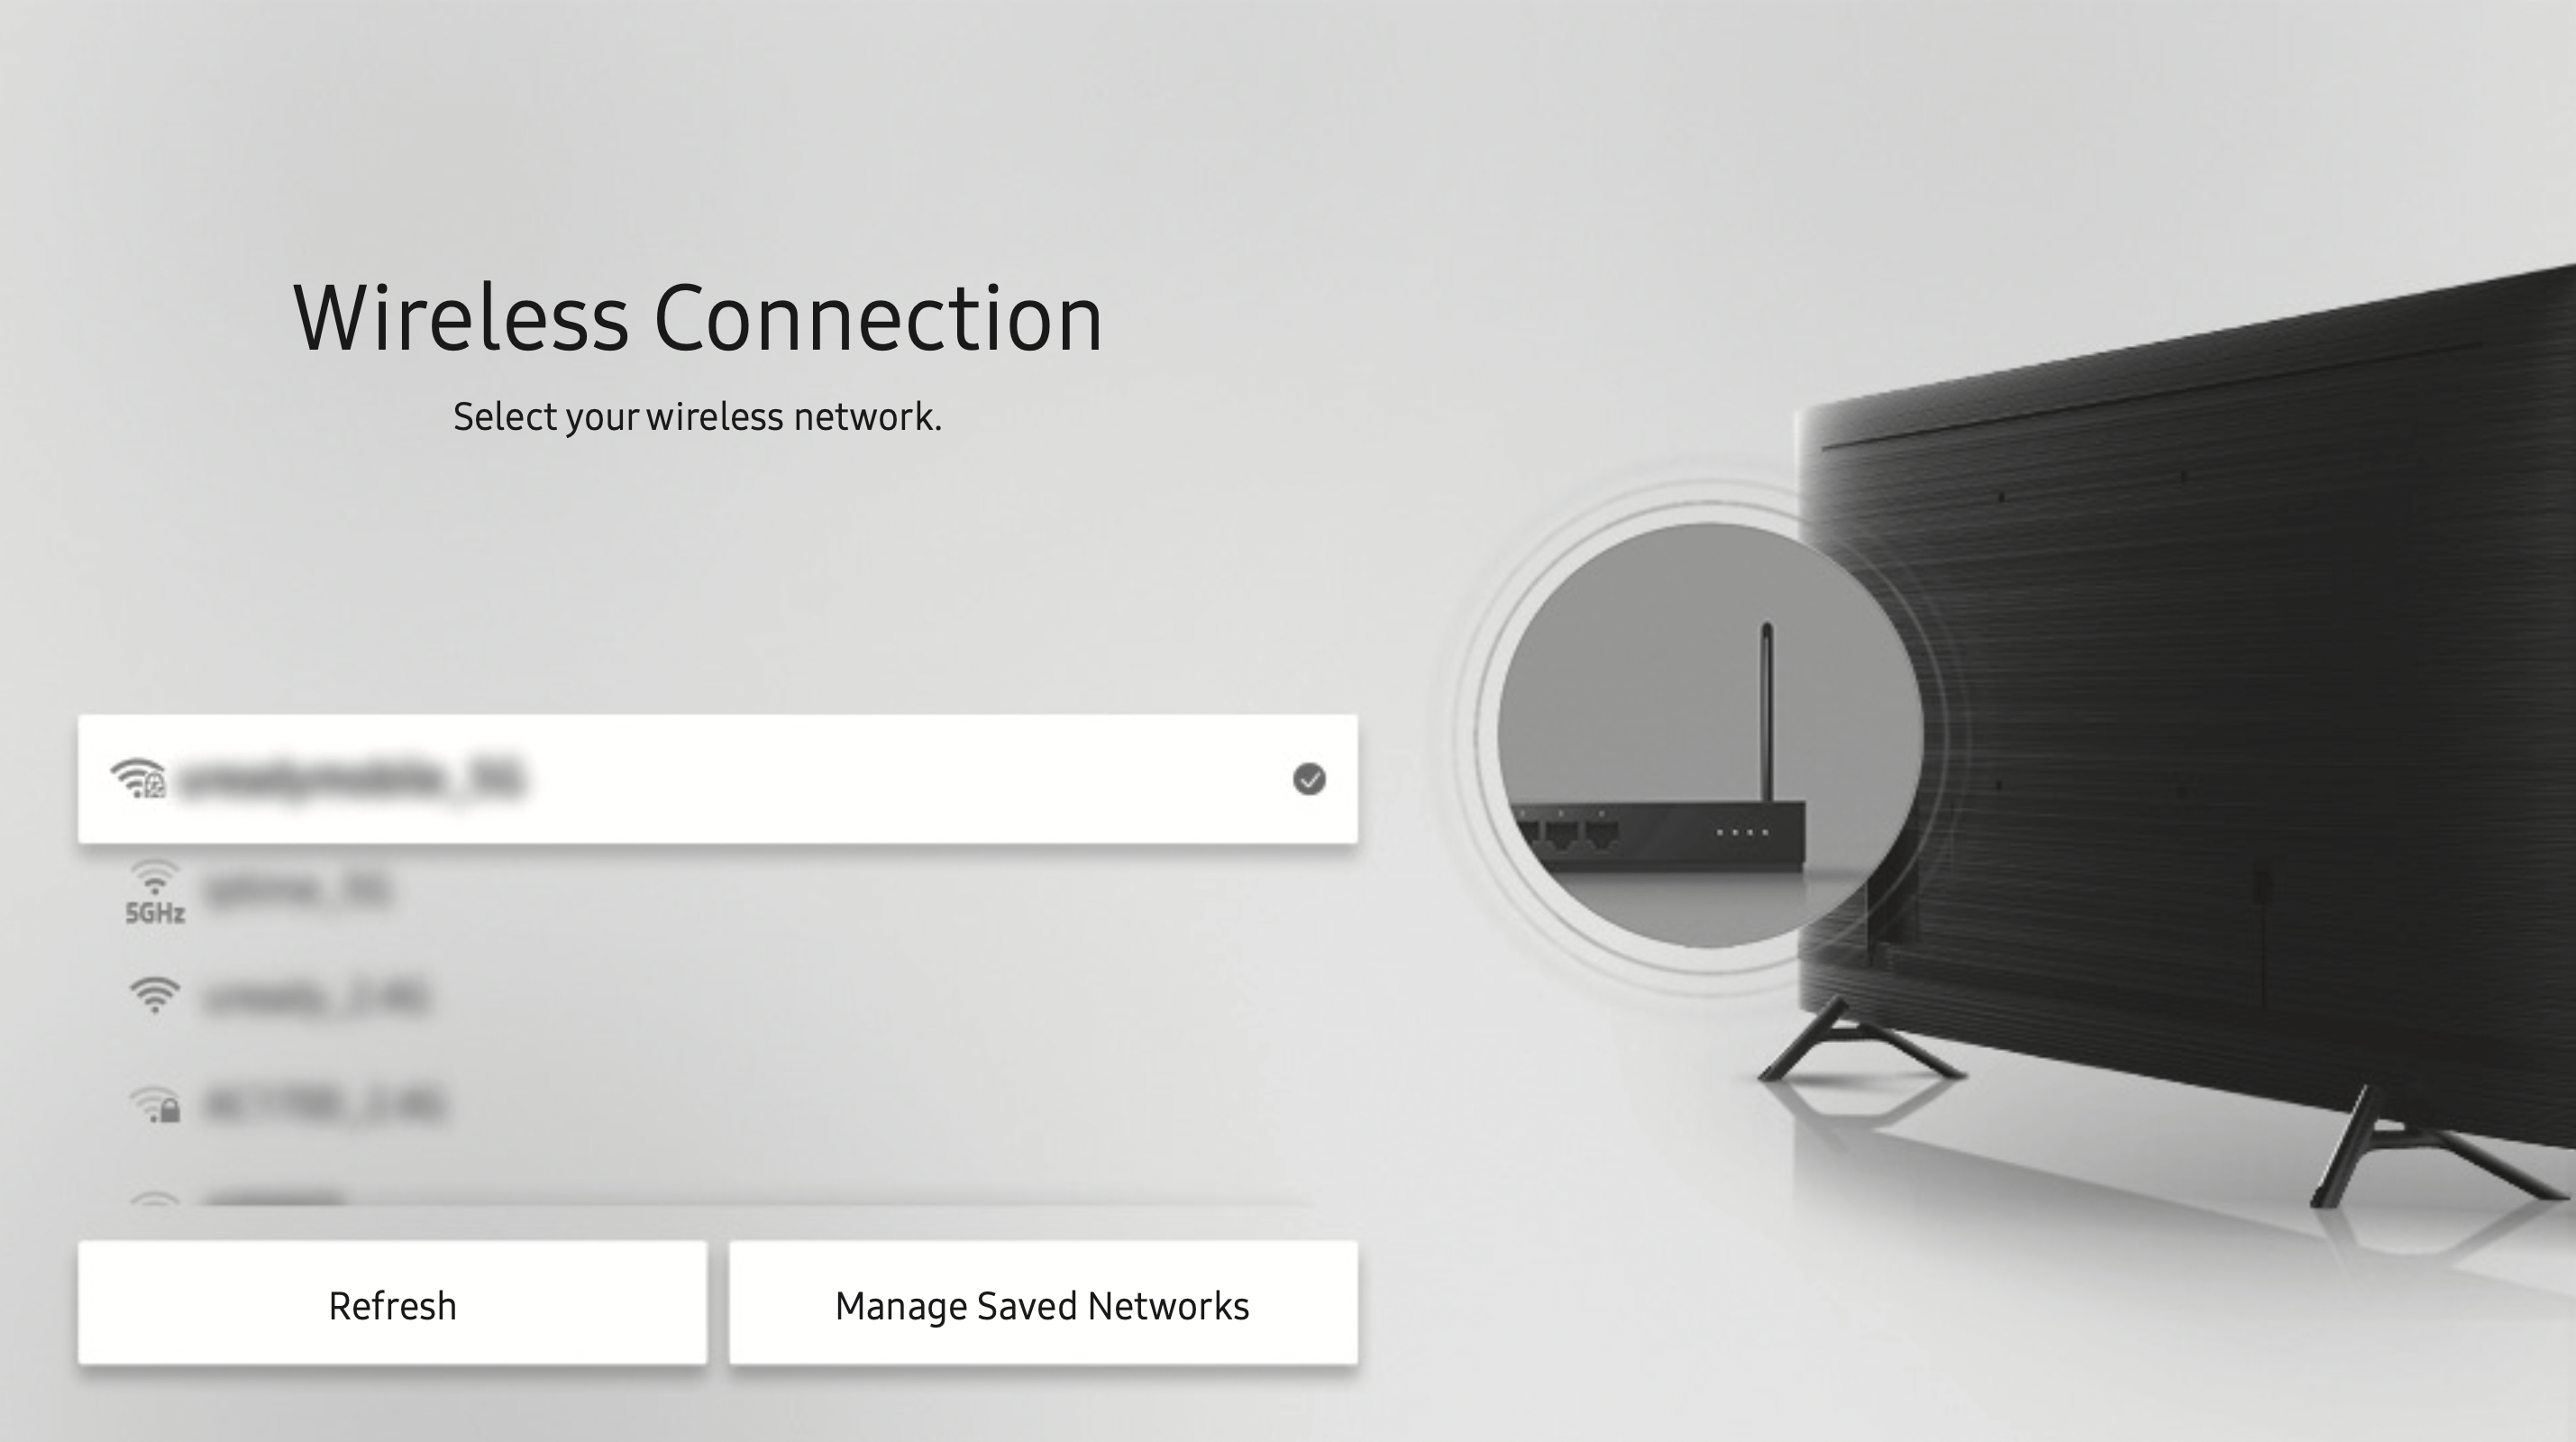
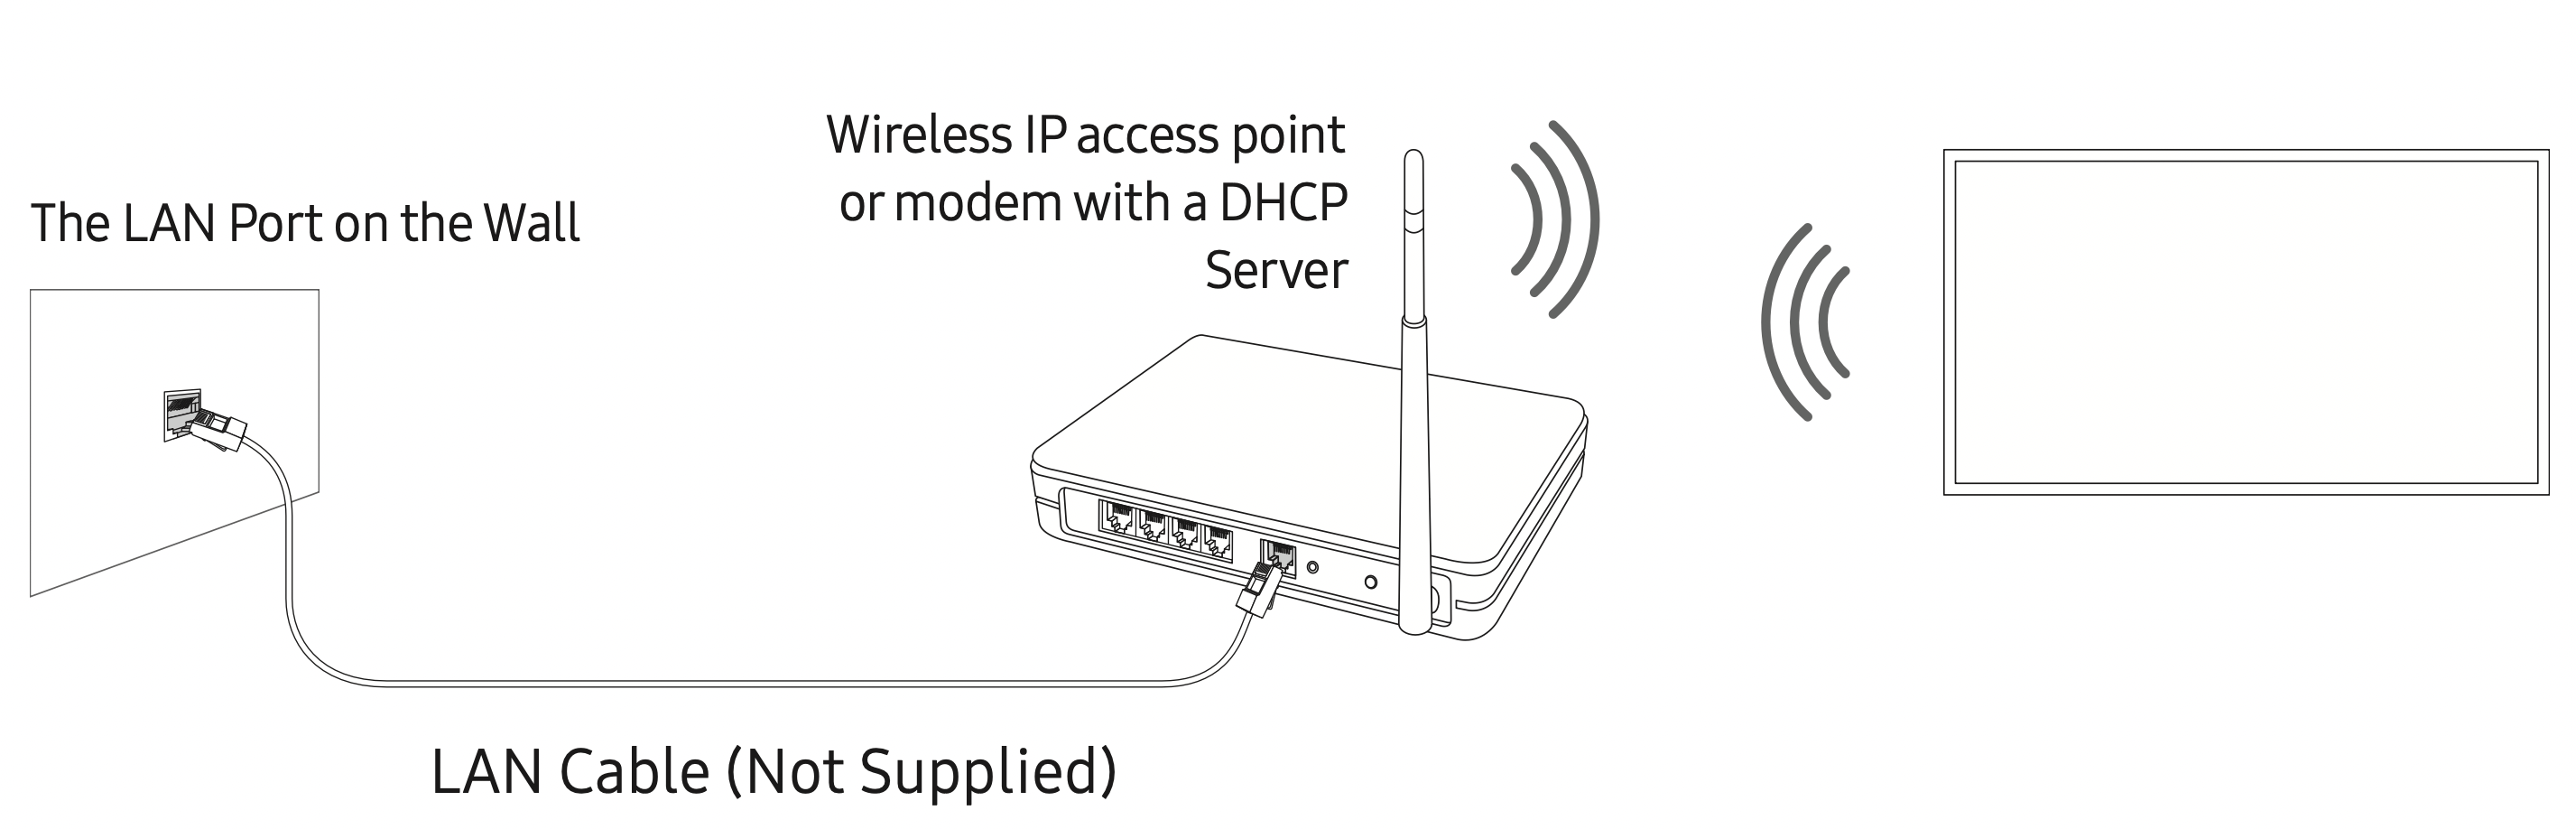
Network Connection - Wireless
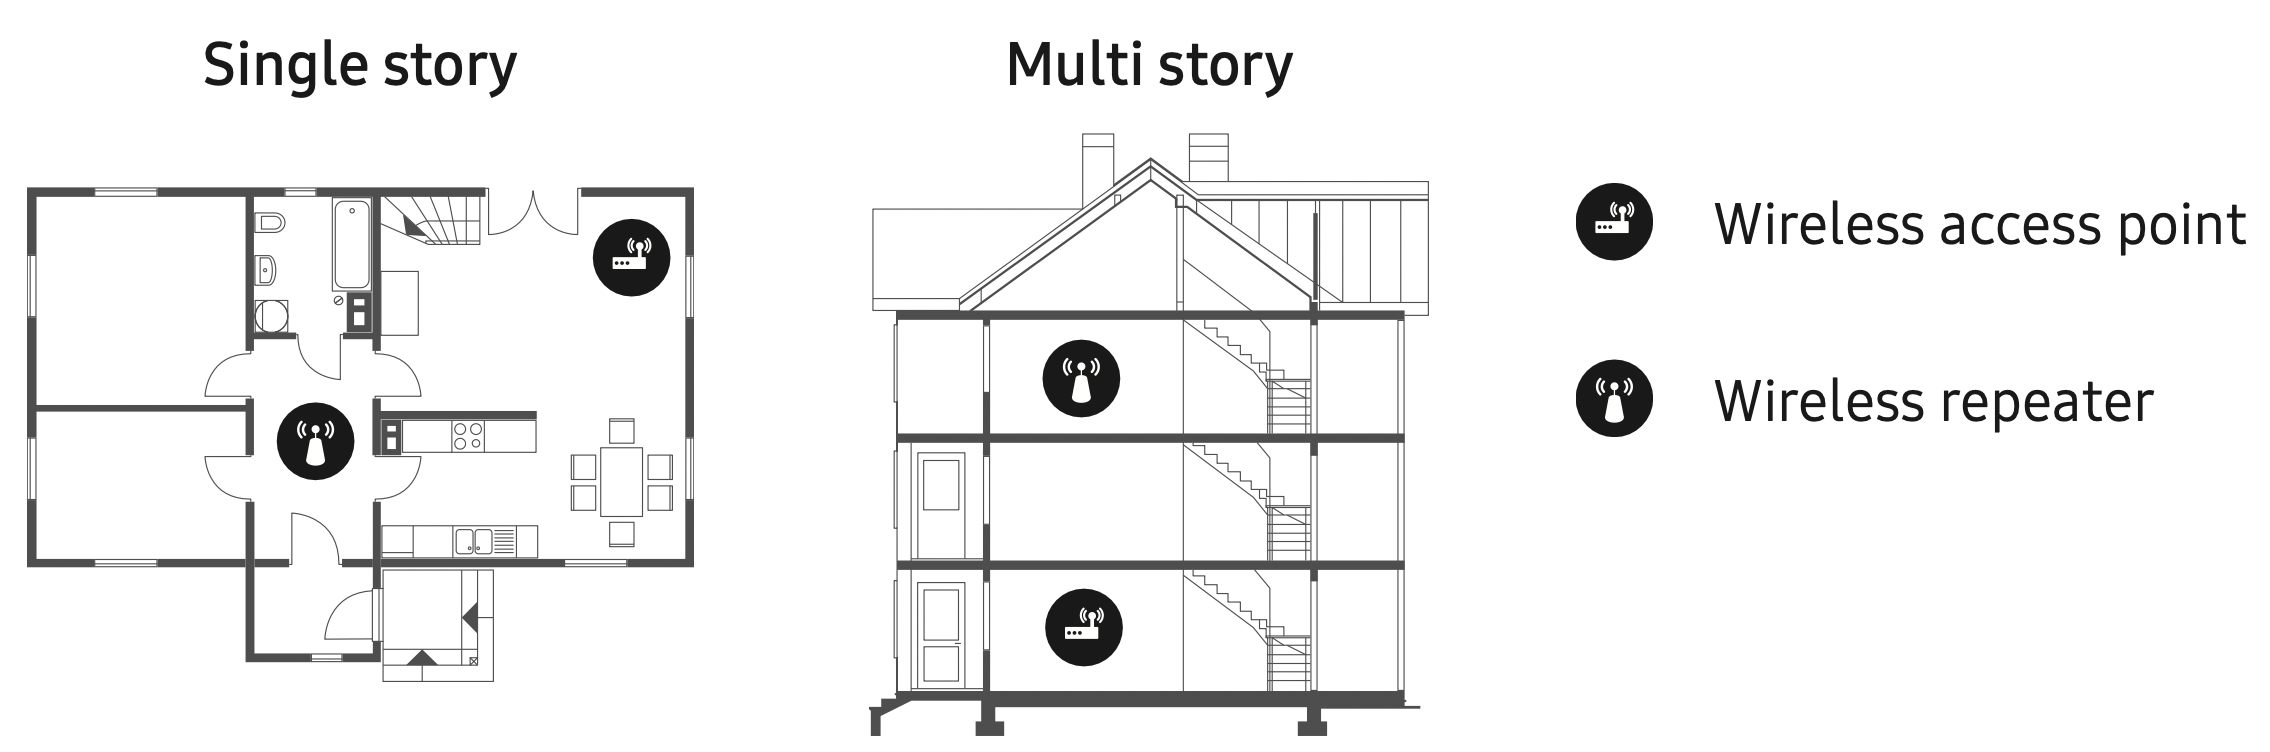
Connect the TV to the Internet using a wireless access point or modem.
Network Connection - Wired
There are three main ways to connect your TV to your network using cable, depending on your network setup. They are illustrated starting below:
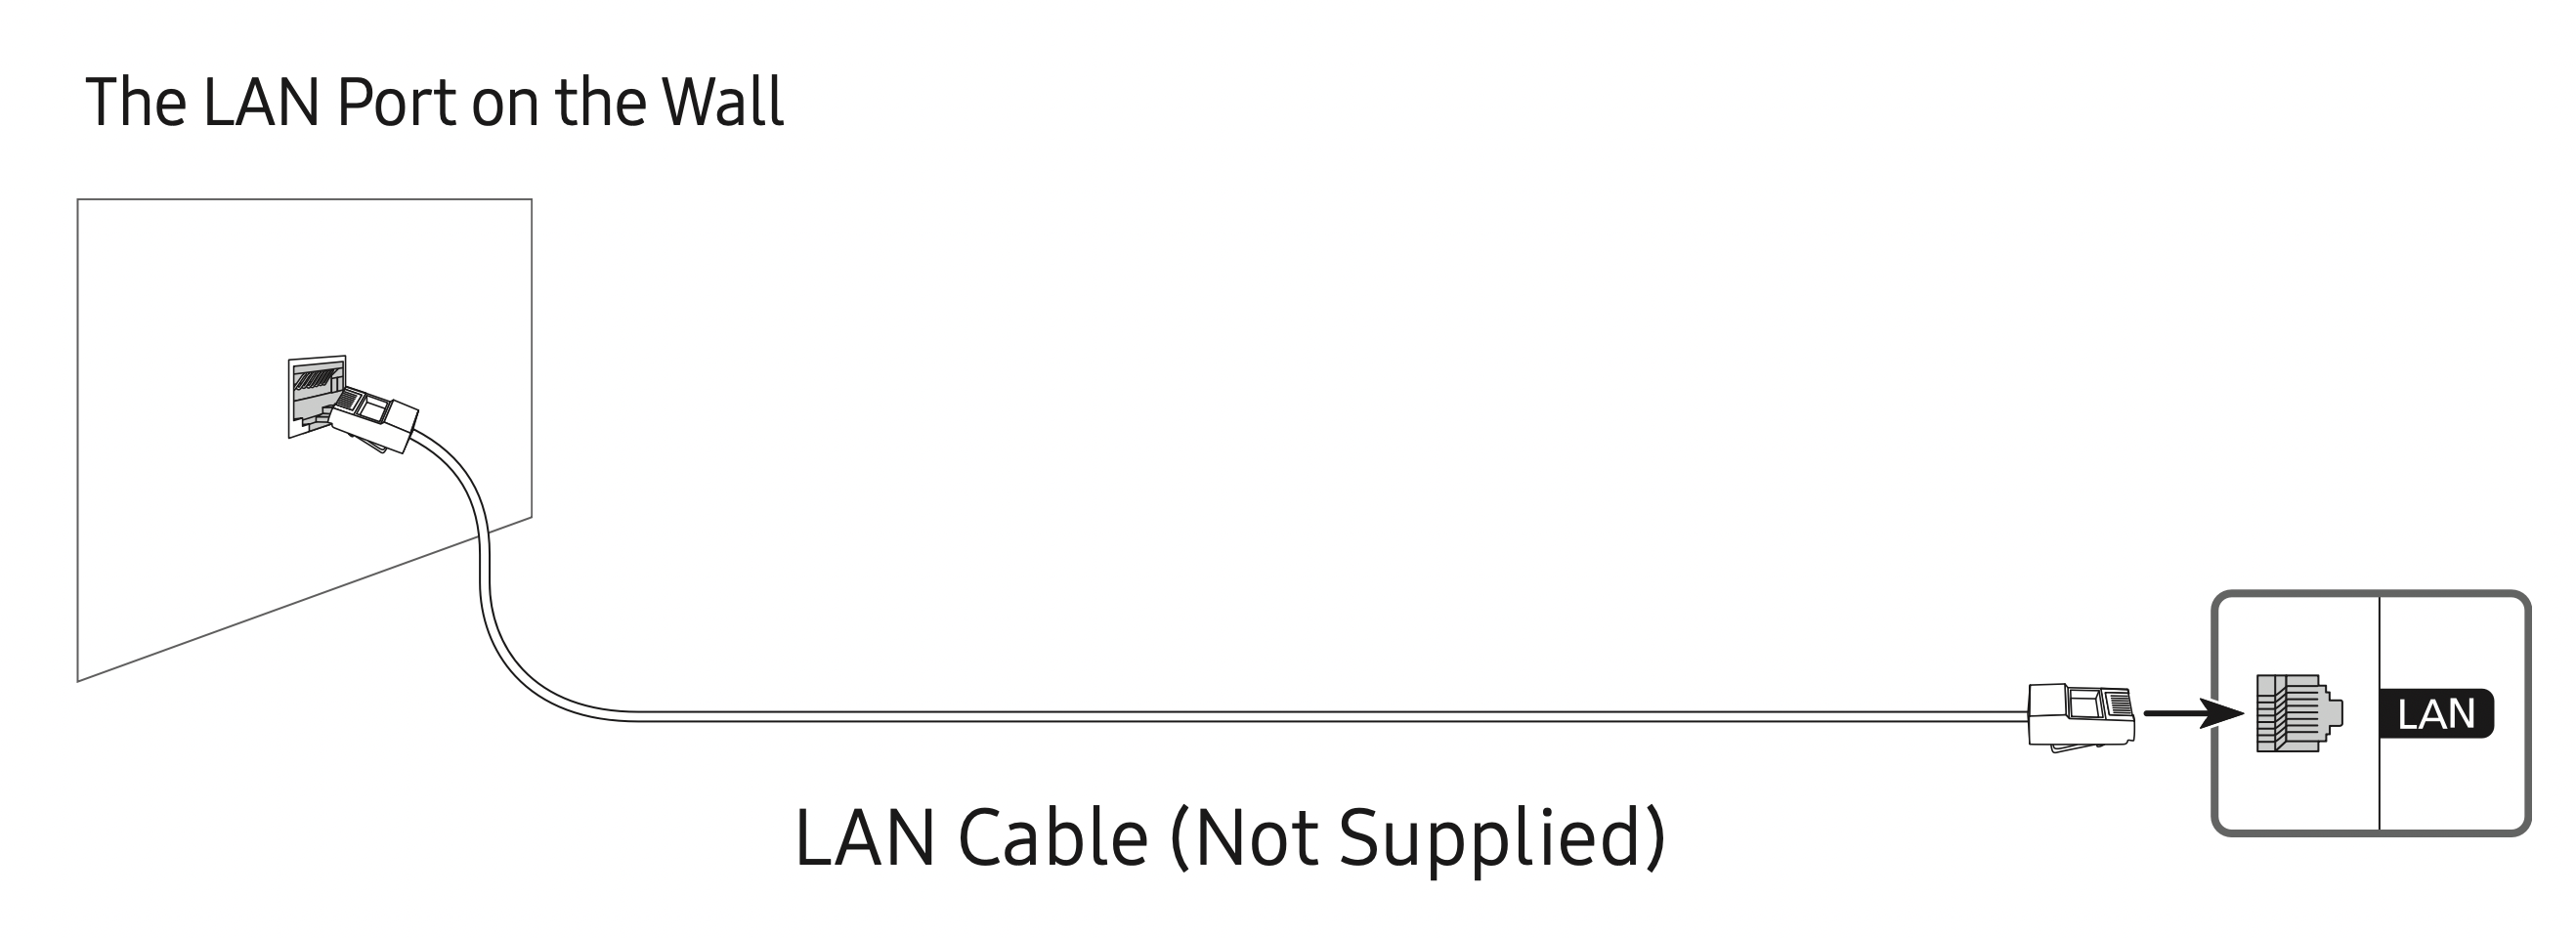
- The TV will not be able to connect to the Internet if your network speed is below 10 Mbps.
- Use Cat7 (*STP Type) cable for the connection.
* Shielded Twisted Pair
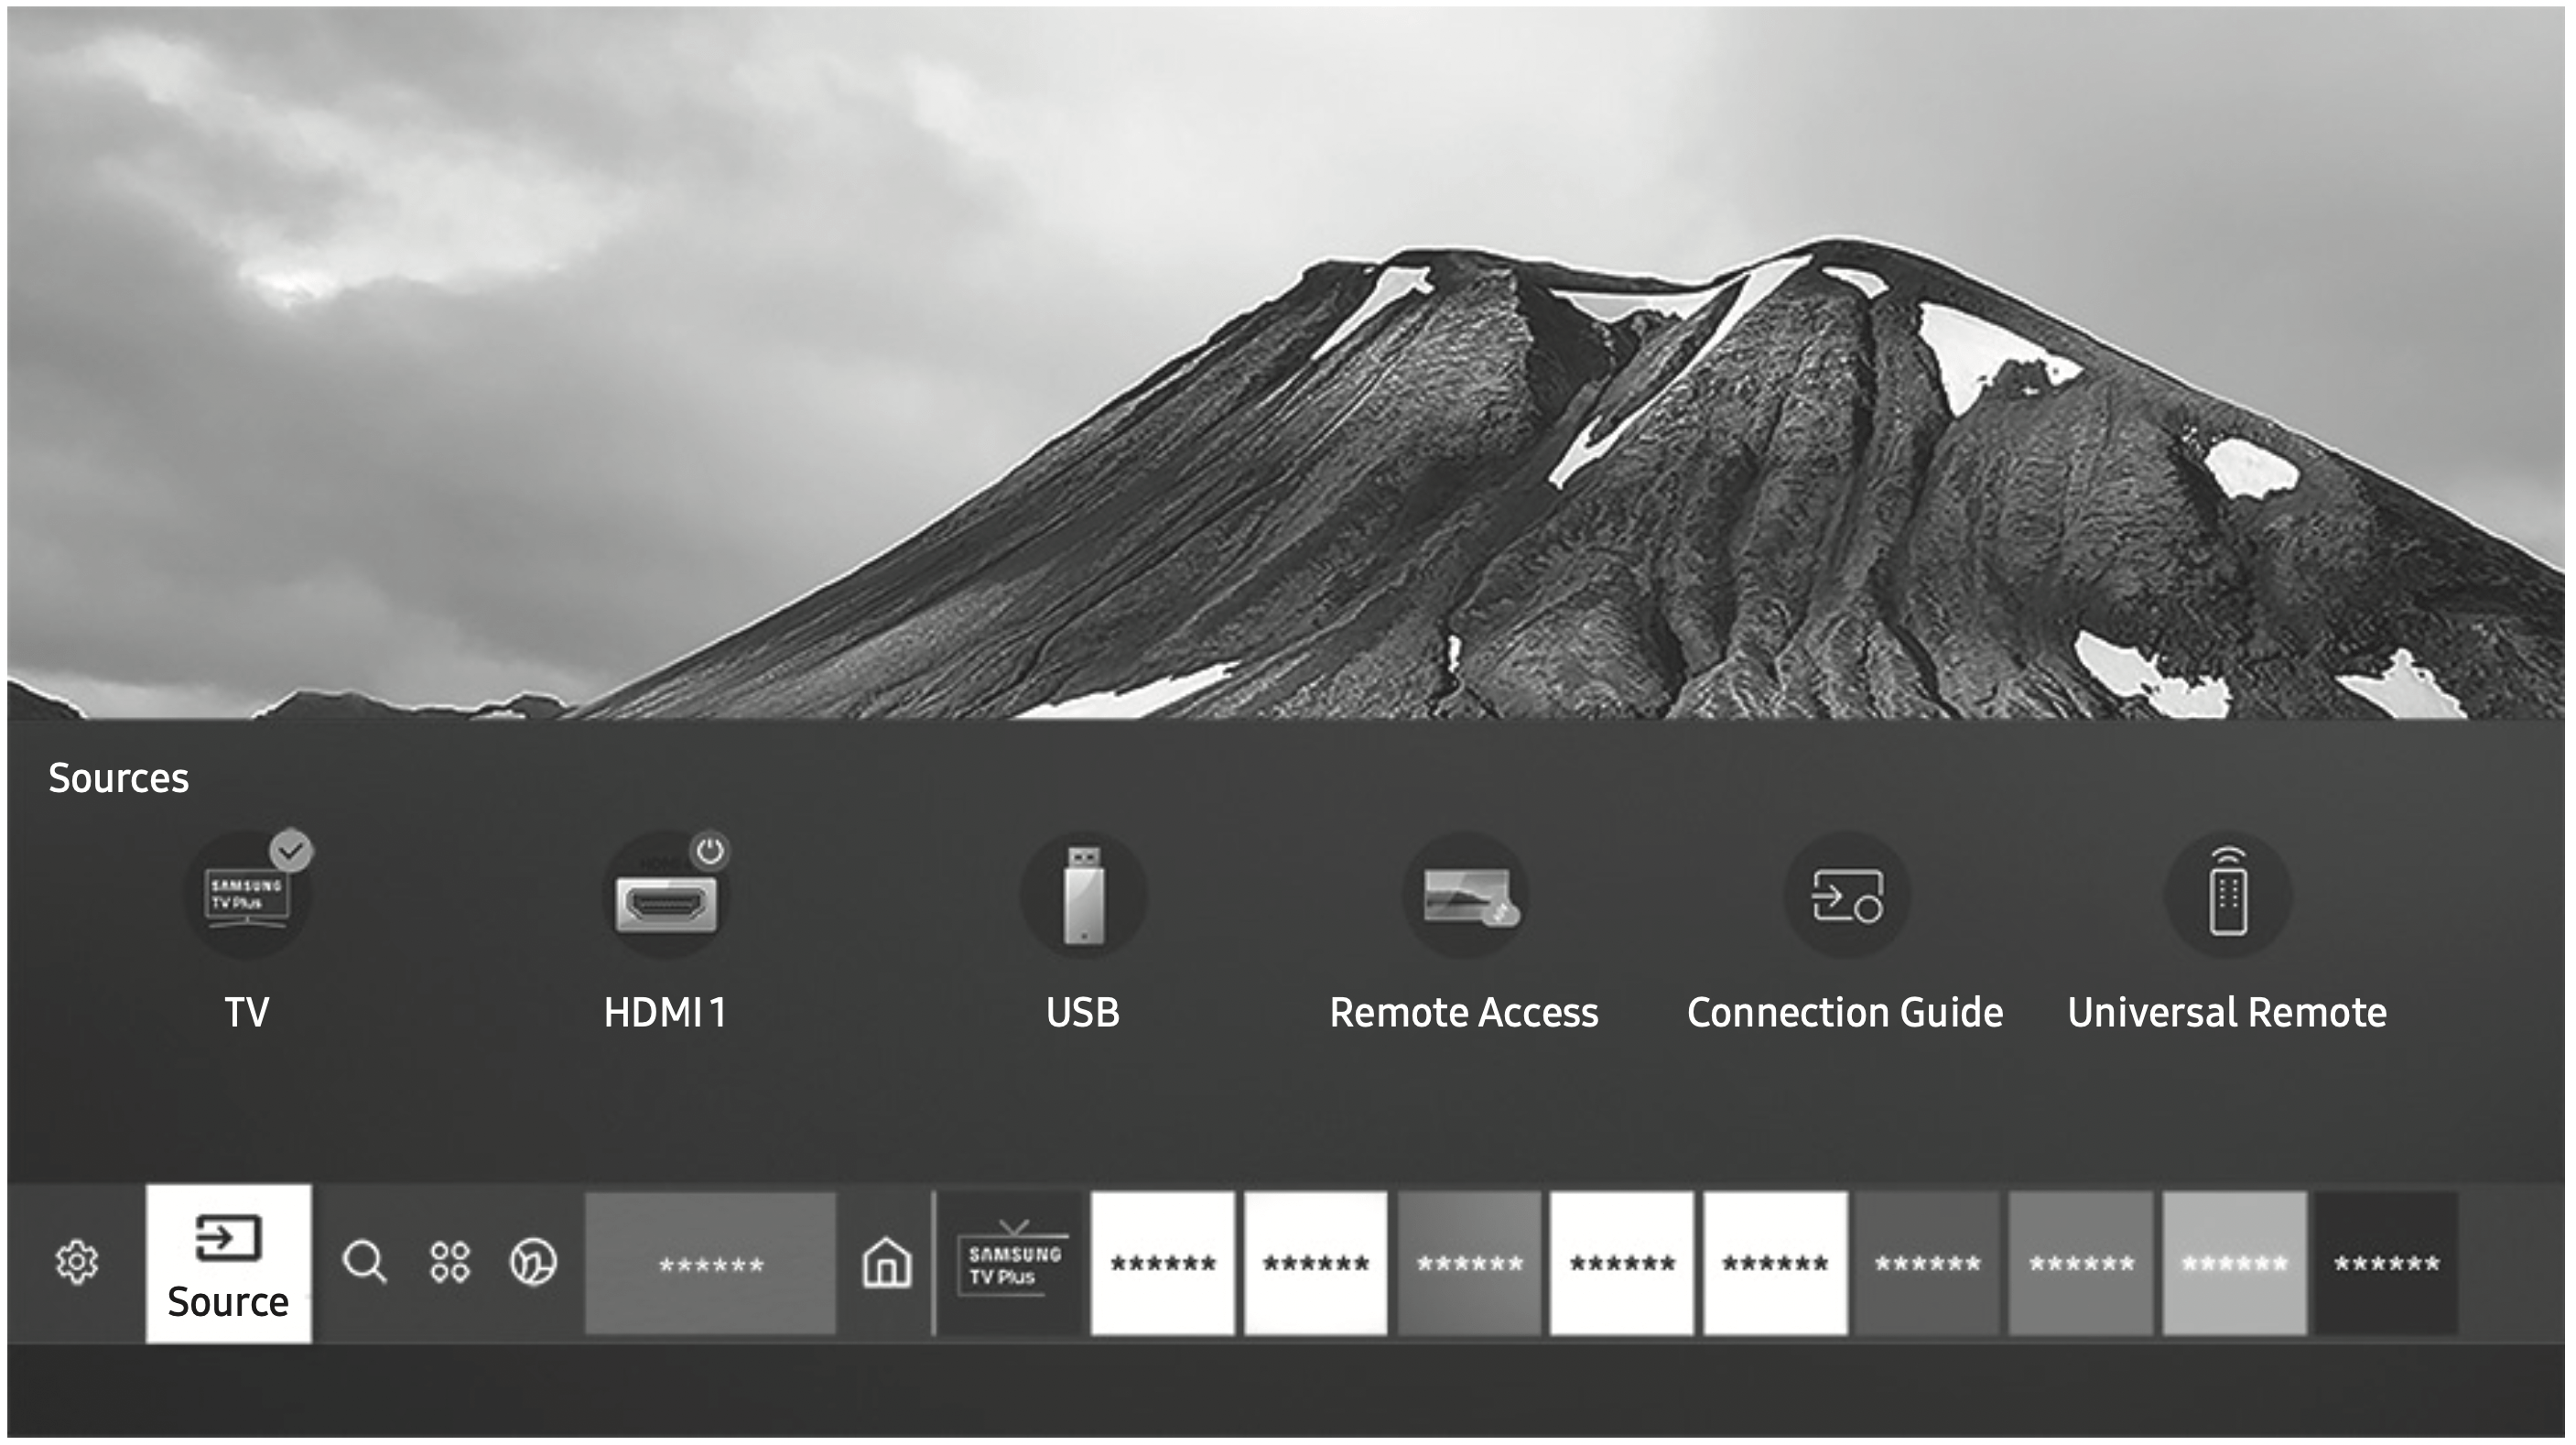
Selecting Connected Devices
Changing the input signal
> Source
When you select a connected external device on the Source screen, the output of the selected device is displayed on the TV's screen.
- For more information about selecting connected devices, see the e-Manual chapter "Guide > Connections > Switching between external devices connected to the TV".
Editing external devices
You can change the port name for a connected external device or add it to Home Screen.
- Move the focus to a connected external device.
- Press the Up directional button. The following functions become available.
- Available functions may differ depending on the port type.
- Universal Remote: You can control external devices connected to the TV using a Samsung remote control. To control external devices, register them by following the instructions on the screen.
- Edit: You can rename the input ports and change the device icons.
- Information: You can view the detailed information about the external devices connected to the TV.
- Add to Home: You can add the port of an external device to the Home Screen for quick switching.
Using additional functions
You can use the following features on the Source screen.
- Remote Access: Use the TV to access your PC via remote PC or Screen Sharing (Wireless).
- Connection Guide: The guide to device connections
- Universal Remote: Lets you register external devices to your Samsung remote control and control them using the Remote.
Troubleshooting and Maintenance
Troubleshooting
If the TV seems to have a problem, first review this list of possible problems and solutions. Alternatively, review the Troubleshooting or FAQ Section in the e-Manual. If none of these troubleshooting tips apply, please visit “www.samsung.com” and click on Support, or contact the Samsung service centre listed on the back cover of this manual.
- This TFT LED panel is made up of sub pixels which require sophisticated technology to produce. There may be, however, a few bright or dark pixels on the screen. These pixels will have no impact on the performance of the product.
- To keep your TV in optimum condition, upgrade to the latest software. Use the Update Now or Auto update functions on the TV's menu ( > Settings > Support > Software Update > Update Now or Auto update).
The TV won’t turn on.
- Make sure that the AC power cord is securely plugged in to the TV and the wall outlet.
- Make sure that the wall outlet is working and the remote control sensor at the bottom of the TV is lit and glowing a solid red.
- Try pressing the TV Controller button at the bottom of the TV to make sure that the problem is not with the remote control. If the TV turns on, refer to “The remote control does not work”.
There is no picture/video/sound, or a distorted picture/video/sound from an external device, or “ Weak or No Signal” is displayed on the TV, or you cannot find a channel.
- Make sure the connection to the device is correct and that all cables are fully inserted.
- Remove and reconnect all cables connected to the TV and the external devices. Try new cables if possible.
- Confirm that the correct input source has been selected ( > Source).
- Perform a TV self diagnosis to determine if the problem is caused by the TV or the device ( > Settings > Support > Device Care > Self Diagnosis > Picture Test or Sound Test).
- If the test results are normal, reboot the connected devices by unplugging each device's power cord and then plugging it in again. If the issue persists, refer to the connection guide in the user manual of the connected device.
- If you are not using a cable box or satellite box, and your TV is receiving TV signals from an antenna or a cable wall connector, run Auto Tuning to search for channels ( > Settings > Broadcasting > (Auto Tuning Settings) > Auto Tuning).
- The Auto Tuning Settings may not appear depending on the model or geographical area.
- If you are using a cable box or satellite box, please refer to the cable box or satellite box manual.
The CI+ does not work.
- Your Samsung TV conforms to the CI+ 1.4 standards.
- Where a CI+ Common Interface module is incompatible with this device, then please remove the module and contact the CI+ operator for assistance.
The remote control does not work.
- Check if the power indicator at the bottom of the TV blinks when you press the remote's Power button. If it does not, replace the remote control's batteries.
- Make sure that the batteries are installed with their poles (+/–) in the correct direction.
- Try pointing the remote directly at the TV from 1.5-1.8 m away.
- If your TV came with a Samsung Smart Remote (Bluetooth Remote), make sure to pair the remote to the TV.
The cable box or satellite box remote control doesn’t turn the TV on or off or adjust the volume.
- Programme the cable box or satellite box remote control to operate the TV. Refer to the cable box or satellite box user manual for the SAMSUNG TV code.
The TV settings are lost after 5 minutes.
- The TV is in the Retail Mode. Change the Usage Mode in the General Menu to Home Mode ( > Settings > General > System Manager > Usage Mode > Home Mode).
Intermittent Wi-Fi
- Make sure the TV has a network connection ( > Settings > General > Network > Network Status).
- Make sure the Wi-Fi password is entered correctly.
- Check the distance between the TV and the modem or access point. The distance should not exceed 15.2 m.
- Reduce interference by not using or turning off wireless devices. Also, verify that there are no obstacles between the TV and the modem or access point. (The Wi-Fi strength can be decreased by appliances, cordless phones, stone walls/fireplaces, etc.)
- Contact your Internet Service Provider (ISP) and ask them to reset your network circuit to re-register the MAC addresses of your modem or access point and the TV.
Video Apps problems (Youtube etc)
- Change the DNS to 8.8.8.8. Select > Settings > General > Network > Network Status > IP Settings > DNS setting > Enter manually > DNS Server > enter 8.8.8.8 > OK.
- Reset by selecting > Settings > Support > Device Care > Self Diagnosis > Reset Smart Hub.
What is Remote Support?
Samsung Remote Support service offers you one-on-one support with a Samsung Technician who can remotely:
- Diagnose your TV
- Adjust the TV settings for you
- Perform a factory reset on your TV
- Install recommended firmware updates
How does Remote Support work?
You can easily get Samsung Remote Support service for your TV:
- Call the Samsung service centre and ask for remote support.
- Open the menu on your TV and go to the Support menu. ( > Settings > Support)
- Select Remote Management, then read and agree to the service agreements. When the PIN screen appears, provide the PIN number to the technician.
- The technician will then access your TV.
Eco Sensor and screen brightness
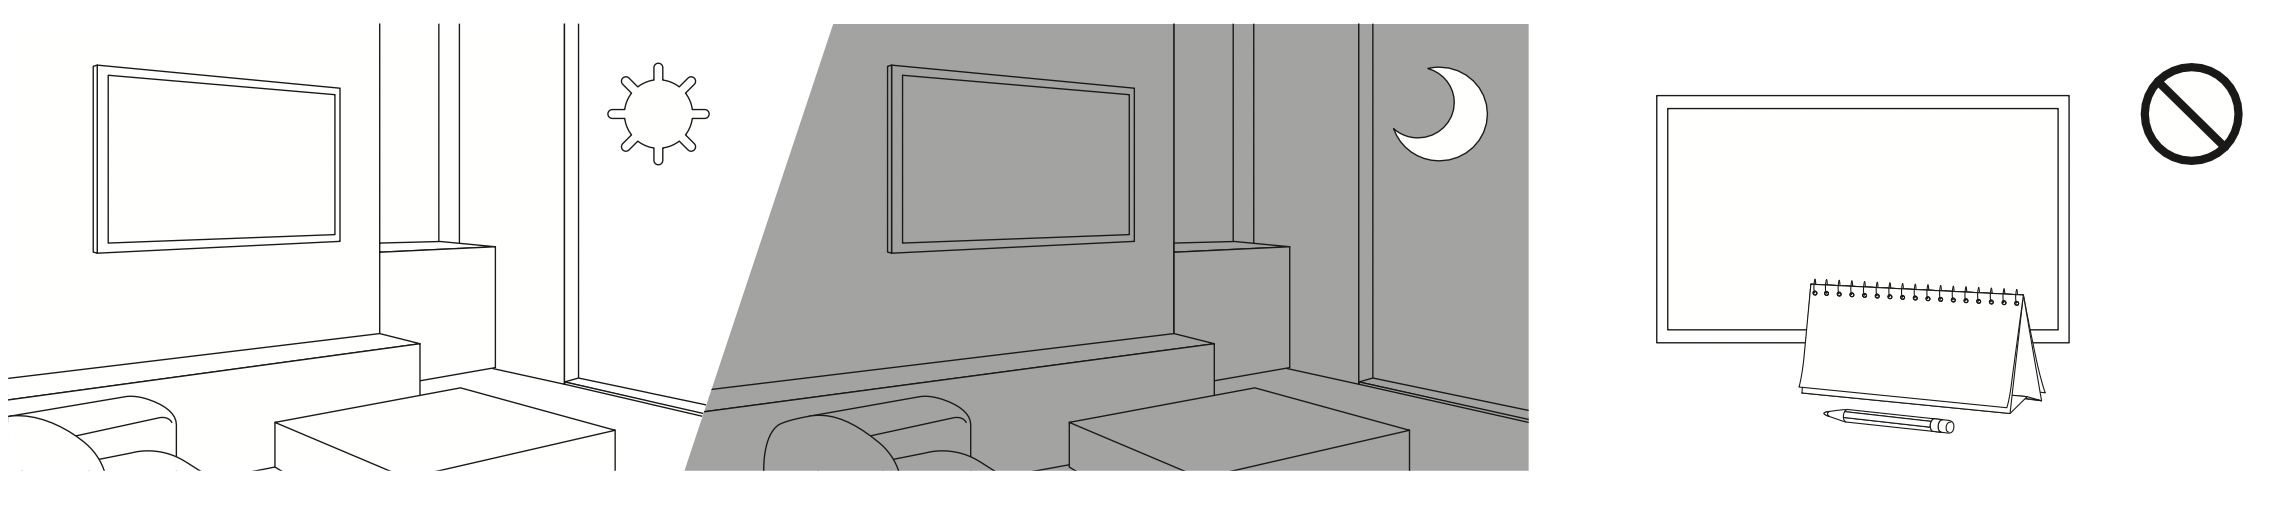
Eco Sensor adjusts the brightness of the TV automatically. This feature measures the light in your room and optimises the brightness of the TV automatically to reduce power consumption. If you want to turn this off, go to > Settings > General > Eco Solution > Ambient Light Detection.
- If the screen is too dark while you are watching TV in a dark environment, it may be due to the Ambient Light Detection function.
- The eco sensor is located at the bottom of the TV. Do not block the sensor with any object. This can decrease picture brightness.
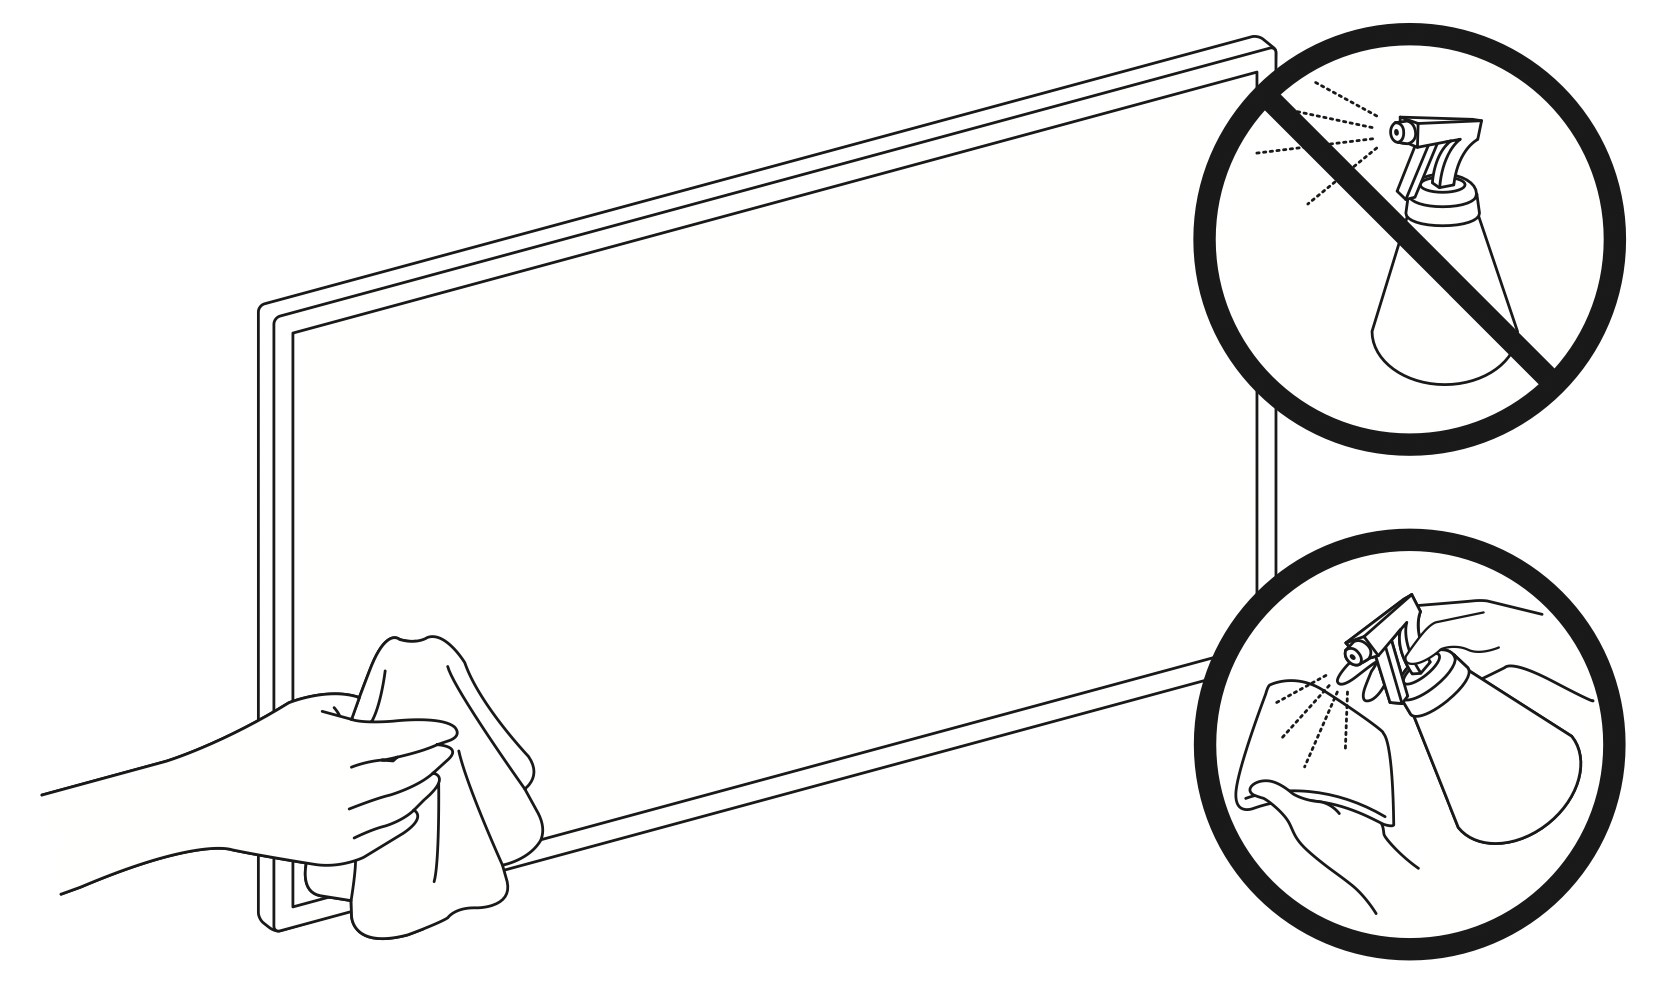
Caring for the TV
- If a sticker was attached to the TV screen, some debris can remain after you remove the sticker. Please clean the debris off before watching TV.
- The exterior and screen of the TV can get scratched during cleaning. Be sure to wipe the exterior and screen carefully using a soft cloth to prevent scratches.
- Do not spray water or any liquid directly onto the TV. Any liquid that goes into the product may cause a failure, fire, or electric shock.
- To clean the screen, turn off the TV, then gently wipe away smudges and fingerprints on the panel with a micro-fiber cloth. Clean the body or panel of the TV with a micro-fiber cloth dampened with a small amount of water. After that, remove the moisture with a dry cloth. While cleaning, do not apply strong force to the surface of the panel because it can damage the panel. Never use flammable liquids (benzene, thinner, etc.) or a cleaning agent. For stubborn smudges, spray a small amount of screen cleaner on a micro-fiber cloth, and then use the cloth to wipe away the smudges.