
Loading ...
Loading ...
Loading ...
en Home Connect
24
Activating remote start
1. Press the menu button.
2. Touch "Remote start".
C appears in the display.
Home Connect settings
You can adjust Home Connect to suit your
requirements at any time.
Note: You will find the Home Connect settings in your
appliance's basic settings. Which settings the display
shows will depend on whether Home Connect has been
set up and whether the appliance is connected to your
home network.
Remote diagnostics
Customer Service can use Remote Diagnostics to
access your appliance if you contact them, have your
appliance connected to the Home Connect server and if
Remote Diagnostics is available in the country in which
you are using the appliance.
Note: For further information and details about the
availability of Remote Diagnostics in your country,
please visit the service/support section of your local
website: www.home-connect.com
About data protection
When your appliance is connected for the first time to a
WLAN network, which is connected to the Internet, your
appliance transmits the following categories of data to
the Home Connect server (initial registration):
■ Unique appliance identification (consisting of
appliance codes as well as the MAC address of the
installed WiFi communication module).
■ Security certificate of the WiFi communication
module (to ensure a secure IT connection).
■ The current software and hardware version of your
domestic appliance.
■ Status of any previous resetting to factory settings.
This initial registration prepares the Home Connect
functions for use and is only required when you want to
use these Home Connect functions for the first time.
Note: Ensure that the Home Connect functions can be
used only in conjunction with the Home Connect app.
Information on data protection can be accessed in the
Home Connect app.
Declaration of Conformity
BSH Hausgeräte GmbH hereby declares that the
appliance which features Home Connect is in
accordance with the basic requirements and the other
relevant provisions of the directive 2014/53/EU.
A detailed RED Declaration of Conformity can be found
online at www.siemens-home.bsh-group.com on the
product page of your appliance with the additional
documents.
2.4 GHz band: max. 100 mW
5 GHz band: max. 100 mW
Basic setting Possible settings Explanation
WiFi Switching on/off You can switch the wireless module on and off. If WiFi is activated, you can use the Home
Connect function. The appliance requires max. 2 W in networked standby.
Network Connecting to the network/
disconnecting from the net-
work
Switch the network connection on or off as required (e.g. for holiday).
The network information will be retained after the appliance is switched off. After switch-
ing on the appliance, wait for a few seconds while it reconnects to the network.
Connect to app Start the connection process between the app and the appliance.
Remote control on/off Use the Home Connect app to access the appliance's functions. When it is deactivated,
only the operating statuses are displayed in the app.
Appliance information l The display shows the network and appliance information.
y
BE BG CZ DK DE EE IE EL
ES FR HR IT CY LV LT LU
HU MT NL AT PL PT RO SI
SK FI SE UK NO CH TR
5 GHz Wi-Fi: for indoor use only
Meat thermometer en
25
@Meat thermometer
Meat t her momet er
The meat thermometer Plus makes precise cooking
possible. It measures the temperature inside the food.
Once the set temperature has been reached, the
appliance automatically switches itself off.
Types of heating
Once you have placed the meat thermometer in the
cooking compartment, the following heating modes are
available for you to select.
Notes
■ The meat thermometer measures the temperature
on the inside of the food between 30 °C and 99 °C.
■ Use only the meat thermometer supplied. You can
purchase it as a spare part from the after-sales
service.
■ After use, always remove the meat thermometer
from the cooking compartment. Never store it inside
the cooking compartment.
Cooking compartment temperature
To prevent damage to the meat thermometer, do not
set temperatures higher than 250 °C.
The interior temperature set in the cooking
compartment must be at least 10 °C higher than the
core temperature that has been set.
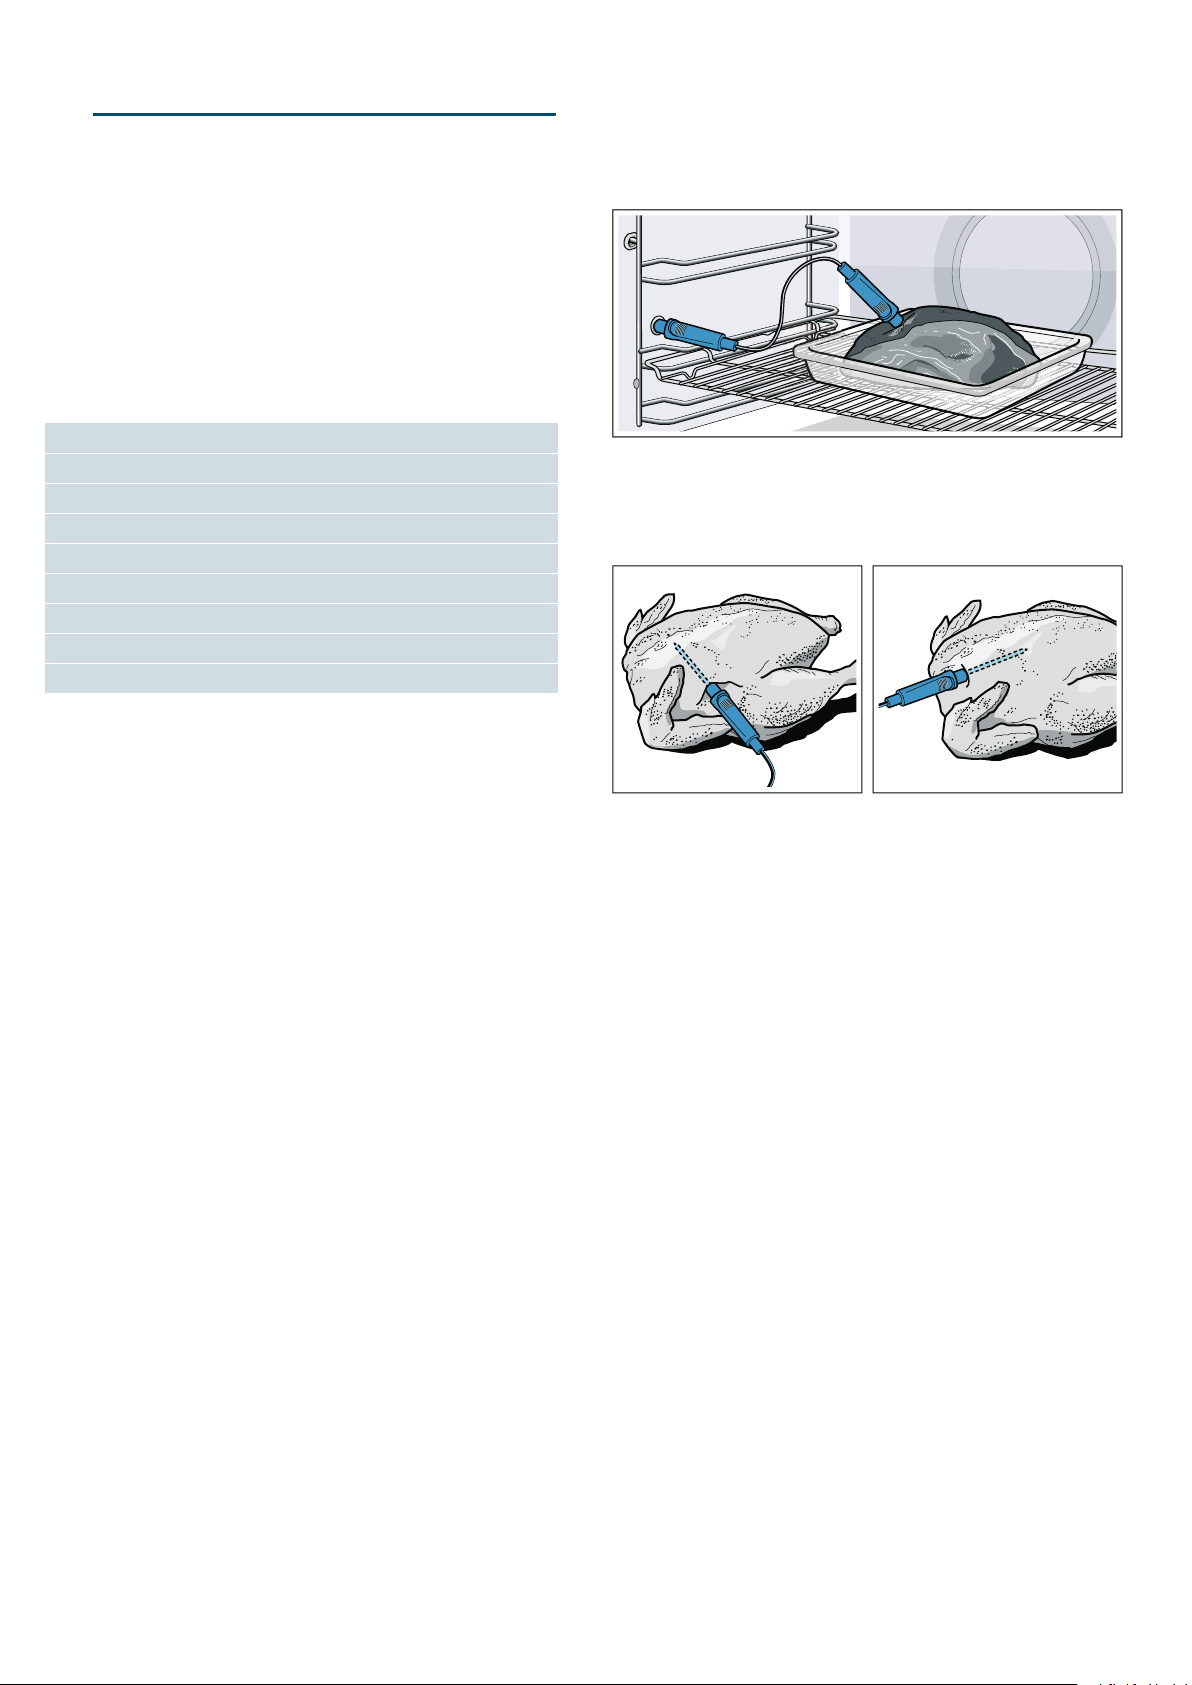
Inserting the meat probe into the food
Before placing your food into the cooking compartment,
insert the meat probe into the food.
The meat probe has three measuring points. Ensure
that the middle measuring point is inserted in the food.
Meat: For large pieces of meat, insert the meat probe at
an angle from above as far as it will go into the meat.
For relatively thin pieces of meat, insert the meat probe
from the side at the thickest point.
Poultry: Insert the meat probe as far as it will go into
the thickest point in the breast. Insert the meat probe
into the poultry crossways or lengthways depending on
its structure. Then turn the poultry and place it on the
wire rack breast-side down.
Turning the food: If you wish to turn the food, do not
remove the meat probe. Once you have turned the
food, check that the meat probe is correctly positioned
in the food.
If you remove the meat probe while the food is cooking,
all settings will be reset and you will have to apply them
again.
Caution!
Ensure that the meat probe's cable does not become
trapped.
To prevent the meat probe from being damaged by
excessive heat, there must be a gap of a few
centimetres between the grill element and the meat
probe. The meat may expand during the cooking
process.
Setting the core temperature
Types of heating
1. Switch on the appliance.
2. Insert the meat thermometer in the socket on the left-
hand side of the cooking compartment.
3. Use the rotary selector to select the type of heating.
4. Touch the suggested temperature and set the
temperature using the rotary selector.
5. Touch the "Core temperature" field and set the core
temperature using the rotary selector.
6. If necessary, touch the "Added steam" field and set
the steam intensity using the rotary selector.
7. Press the Start/Stop button to start.
The progress line shows the core temperature as it
rises.
: 4D hot air
‘ Hot air eco
% Top/bottom heating
+ Top/bottom heating eco
; Pizza setting
4 Hot air grilling
& Intensive heat
P Steaming
W Reheating
Loading ...
Loading ...
Loading ...