
Loading ...
Loading ...
Loading ...
en Steam
18
5. Touch the temperature and use the rotary selector to
set the temperature.
6. Touch the cooking time and use the rotary selector
to set the cooking time.
7. Press the start/stop button to start.
The appliance will begin heating up.
Once the cooking time has elapsed, an audible signal
will sound. The appliance will stop heating. The cooking
time 00 m 00 s will be shown on the display.
Cancelling
Touch the Start/Stop button to cancel the operation.
Finishing
Touch the On/Off button to switch off the appliance.
Sous-vide
Sous-vide is a type of low-temperature cooking during
which vacuum-sealed food is cooked at low
temperatures between 50-95 °C and 100% steam.
Sous-vide is suitable for meat, fish, vegetables and
desserts.
A chamber vacuum-packing machine is used to heat-
seal the food in special air-tight, heat-resistant cooking
bags. The protective envelope retains the nutrients and
flavours.
Notes
■ If the water tank runs dry while sous-vide cooking,
the operation is interrupted.
■ During sous-vide cooking, more condensate forms
on the cooking compartment floor than for other
cooking methods.
Starting
Caution!
Risk of damage to kitchen units
Only fill the water tank once for sous-vide cooking. Do
not fill the water tank a second time. If you do this, large
volumes of water will accumulate on the cooking
compartment floor. The water may leak out of the
cooking compartment.
1. Fill the water tank.
2. Touch the menu button.
3. Touch the "Steam" field.
4. Turn the rotary selector to "Sous-vide 3".
5. Touch the temperature and use the rotary selector to
set the temperature.
6. Touch the cooking time and use the rotary selector
to set the cooking time.
7. Press the start/stop button to start.
The appliance will begin heating up.
:Warning – Risk of scalding!
Hot water collects on the vacuum-sealing bag during
cooking. Use an oven cloth to carefully lift the vacuum-
sealing bag, so that the hot water runs off into the
universal pan or the cooking container. Then use the
oven cloth to carefully remove the vacuum-sealing bag.
Once the cooking time has elapsed, an audible signal
will sound. The appliance will stop heating. The cooking
time 00 m 00 s will be shown on the display.
Cancelling
Touch the Start/Stop button to cancel the operation.
Finishing
Touch the On/Off button to switch off the appliance.
Filling the water tank
The water tank is located behind the control panel.
Before starting an operation with steam, open the
control panel and fill the water tank with water.
Make sure that you have set the water hardness range
correctly. ~ "Basic settings" on page 22
:Warning – Risk of injury and risk of fire!
Only fill the water tank with water or with the descaling
solution that is recommended by us. Do not pour any
flammable liquids (e.g. alcoholic drinks) into the water
tank. Due to hot surfaces, vapours from flammable
liquids may catch fire in the cooking compartment
(explosion). The appliance door may spring open. Hot
steam and jets of flame may escape.
:Warning – Risk of burns!
The water tank may heat up while the appliance is in
operation. Wait until the water tank has cooled down
after the previous appliance operation. Remove the
water tank from the water tank recess.
Caution!
The appliance may become damaged due to the use of
unsuitable liquids.
Do not use distilled water, highly chlorinated tap water
(> 40 mg/l) or other liquids.
Only use cold, fresh tap water, softened water or
uncarbonated mineral water.
Caution!
Malfunctions may occur when using filtered or
demineralised water.
The appliance may request that you top up the water
tank even though it may be full, or operation with steam
is cancelled after approx. two minutes.
If required, mix filtered or demineralised water with the
bottled non-carbonated mineral water with a ratio of
one to one.
Notes
■ If your water is very hard, we recommend that you
use softened water.
■ If you use only softened water, you can set your
appliance to the "softened" water hardness range.
■ If you use mineral water, set the water hardness
range to "4 very hard".
■ If you use mineral water, you must only use non-
carbonated mineral water.
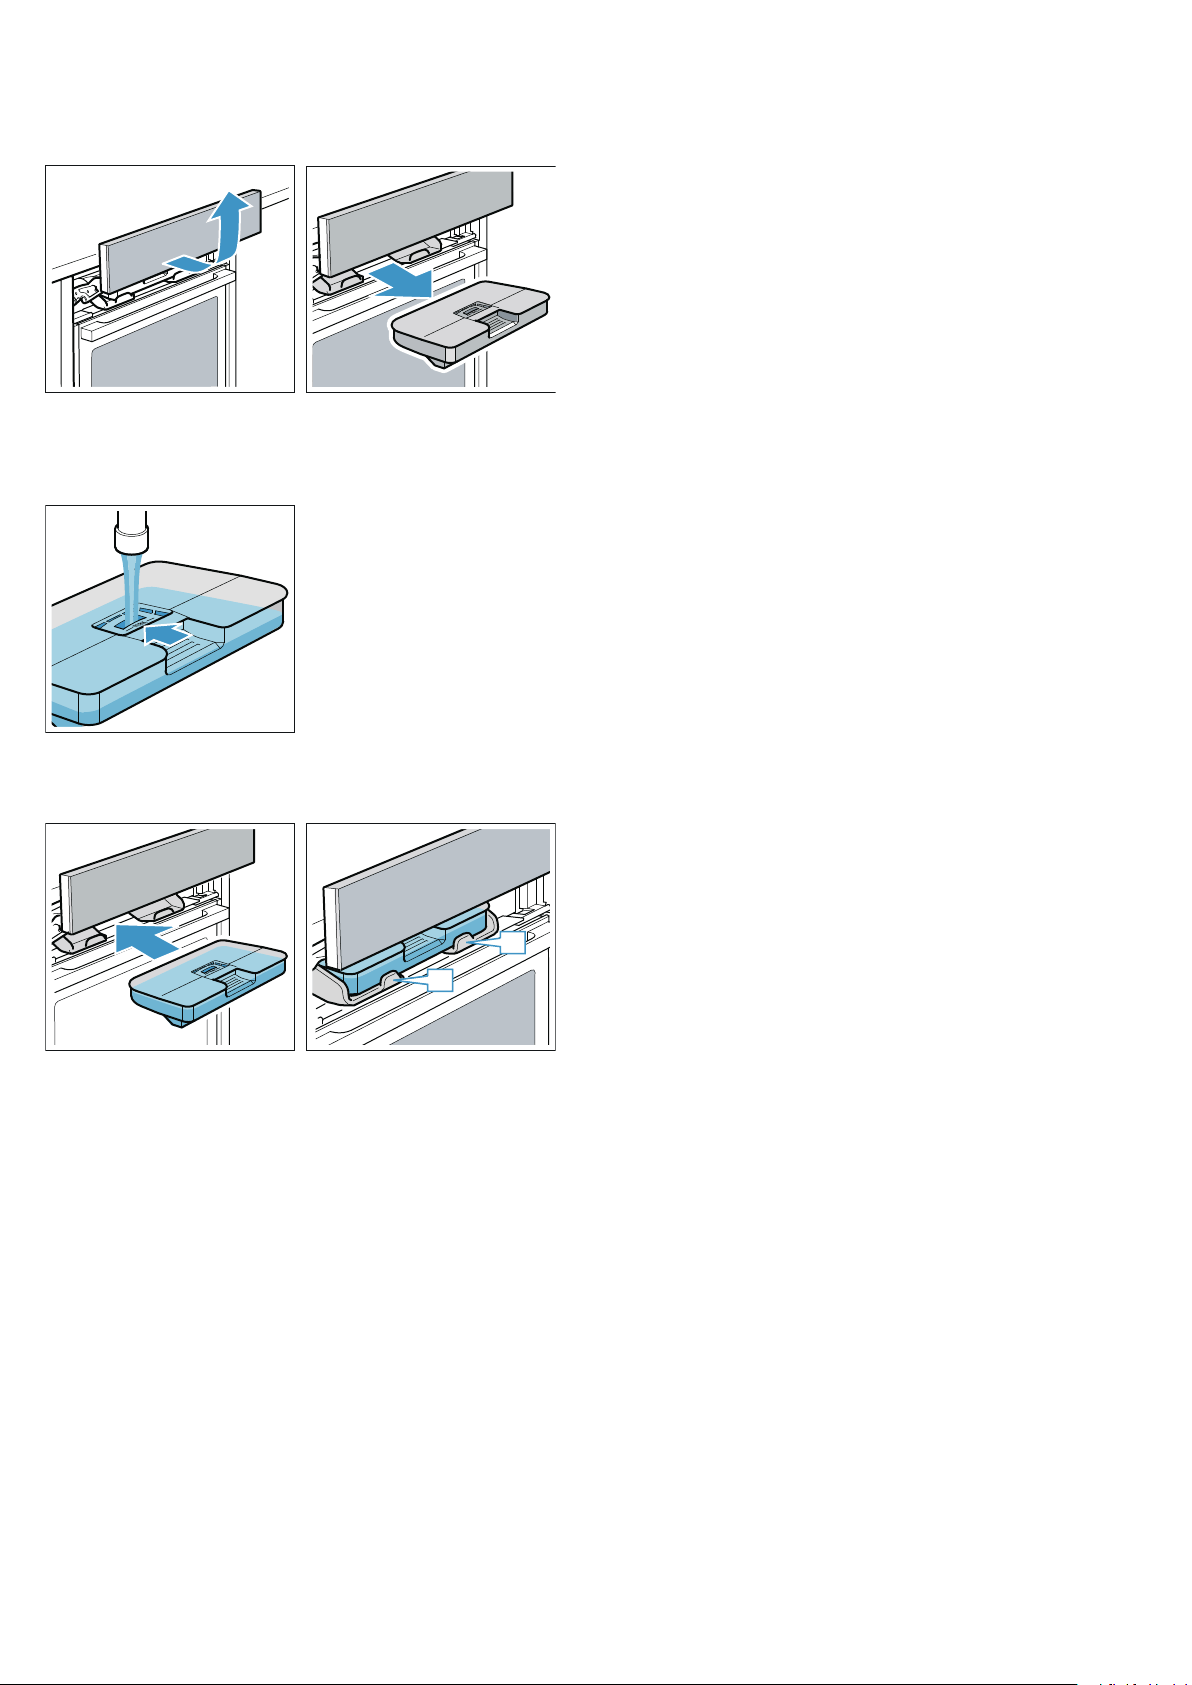
1. Touch the X field.
The control panel is pushed forwards automatically.
2. Pull the control panel forwards with both hands and
then push it upwards until it locks into place (Fig. !).
Steam en
19
3. Lift the water tank and remove it from the water tank
recess (Fig. ").
4. Press down on the cover along the seal to prevent
water from leaking out of the water tank.
5. Fill the water tank with cold water up to the "max."
mark (Fig. #).
6. Insert the filled water tank (Fig. $). Ensure that the
water tank locks into place behind both holders ‚
(Fig. %).
7. Slowly slide the control panel downwards and then
push it towards the rear until it is closed completely.
The water tank has been filled. You can start using
operating modes with steam.
Refilling the water tank
Notes
■ Steam-assisted operations continue without adding
steam.
■ If the water tank runs dry during the operation with
the Steaming, Dough proving, Reheating or
Defrosting settings, the operation is interrupted. Fill
the water tank.
1. Open the control panel.
2. Remove and refill the water tank.
3. Insert the filled water tank and close the control
panel.
After every steam operation
:Warning – Risk of scalding!
When you open the appliance door, hot steam can
escape. Steam may not be visible, depending on its
temperature. When opening, do not stand too close to
the appliance. Open the appliance door carefully. Keep
children away.
:Warning – Risk of burns!
The appliance becomes hot during operation. Allow the
appliance to cool down before cleaning.
Caution!
Enamel damage: Do not start any operations when
there is water on the cooking compartment floor. Before
operation, wipe away the water from the cooking
compartment floor.
The remaining water is pumped back into the water
tank after every operation with steam. Then empty and
dry the water tank. Moisture remains in the cooking
compartment. To dry the cooking compartment, you
can either use the "Drying function" operating mode or
dry the cooking compartment by hand.
Notes
■ Once the appliance has been switched off, the X
field remains lit for a little longer to remind you to
empty the water tank.
■ Remove limescale marks with a cloth soaked in
vinegar, then wipe with clean water and dry with a
soft cloth.
Emptying the water tank
Caution!
■ Do not dry the water tank in the hot cooking
compartment. This will damage the water tank.
■ Do not clean the water tank in the dishwasher. This
will damage the water tank.
1. Open the control panel.
2. Remove water tank.
3. Carefully remove the lid of the water tank.
4. Empty the water tank, clean it with detergent and
then rinse it thoroughly with clean water.
5. Dry all parts with a soft cloth.
6. Rub the seal on the lid until dry.
7. Leave to dry with the lid open.
8. Place the lid on the water tank and push it down.
9. Insert the water tank and close the control panel.
2I
1
D
D
Loading ...
Loading ...
Loading ...