
User Manual
Heritage Induction Pro Range
HIPR30S, HIPR36S
Part No. 113745 Rev A

2
Table of Contents
Before You Begin 5
Important Notes To the Owner 5
Energy-Saving Tips 5
About the Oven Vent 5
Regulatory Notice 6
Important Safety Instructions 7
Safety Symbols and Cautionary Information 7
Use-and-Care Safety Instructions 7
Consignes de sécurité importantes 10
Symboles de sécurité et informations de mise en garde 10
Consignes de sécurité d'utilisation et d'entretien 10
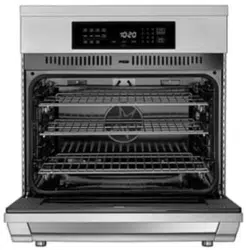
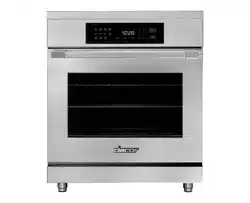
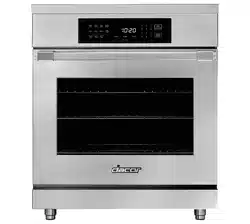
Product Overview 13
Included Accessories 13
External Features 13
Internal Features 14
Oven Control Panel 15
Oven Control-Panel Display 16
Operating the Cooktop 17
About Induction Cooking 17
Cooktop Layout 17
Getting Started 18
About the Cookware 18
Turning the Cooktop ON/OFF 19
Turning a Cook Zone ON/OFF 19
About Power Levels 20
Using Bridge Mode 21
About the Cooktop Timers 22
About Pause Mode 25
Using the Cooktop Lock System 26

3
Table of Contents
Operating the Oven 27
Control-Panel Settings 27
About the Control-Panel "Beep" 27
Before Cooking 28
Positioning the Oven Racks 28
Running a Cook Cycle 29
About the Cook Modes 30
Bake-Mode Troubleshooting 31
Cooking Tips: Cook Modes and Cookware 32
About Oven Temperatures 33
Using Control Lockout 33
Using the Timers 34
Using Time-Delay Cooking 35
Using the Meat-Temperature Probe 36
Dehydrating/Defrosting Food 38
Using Proof Mode 38
Using Sabbath Mode 38
Adjusting the Oven-Temperature Offset 39
Maintaining the Range 40
General Exterior Maintenance 40
Maintaining the Cooktop 40
Using Self-Cleaning Mode 42
Steam-Cleaning the Oven 43
Cleaning the Oven Accessories 44
Replacing the Oven Lights 45
Troubleshooting 46
Cooktop 46
Oven-Control Display 46
Oven 47
Warranty 48
What Is Covered 48
What Is Not Covered 49
Out-of-Warranty Products 49

4
To Our Valued Customer:
Congratulations on your purchase of the very latest in Dacor® products! Our unique combination of
features, style, and performance make us a great addition to your home.
To familiarize yourself with the controls, functions, and full potential of your new Dacor range, read
this manual thoroughly, starting with Before You Begin (pg. 5).
Dacor appliances are designed and manufactured with quality and pride, while working within the
Troubleshooting
service call.
Valuable customer input helps us continually improve our products and services, so feel free to
Dacor Customer Assurance
14425 Clark Avenue
City of Industry, CA 91745
Telephone:
Fax:
Hours of Operation:
Website:
Thanks for choosing Dacor for your home. We are a company built by families for families, and we
performance and enjoyment for decades to come.
Sincerely,
The Dacor Customer Assurance Team
5
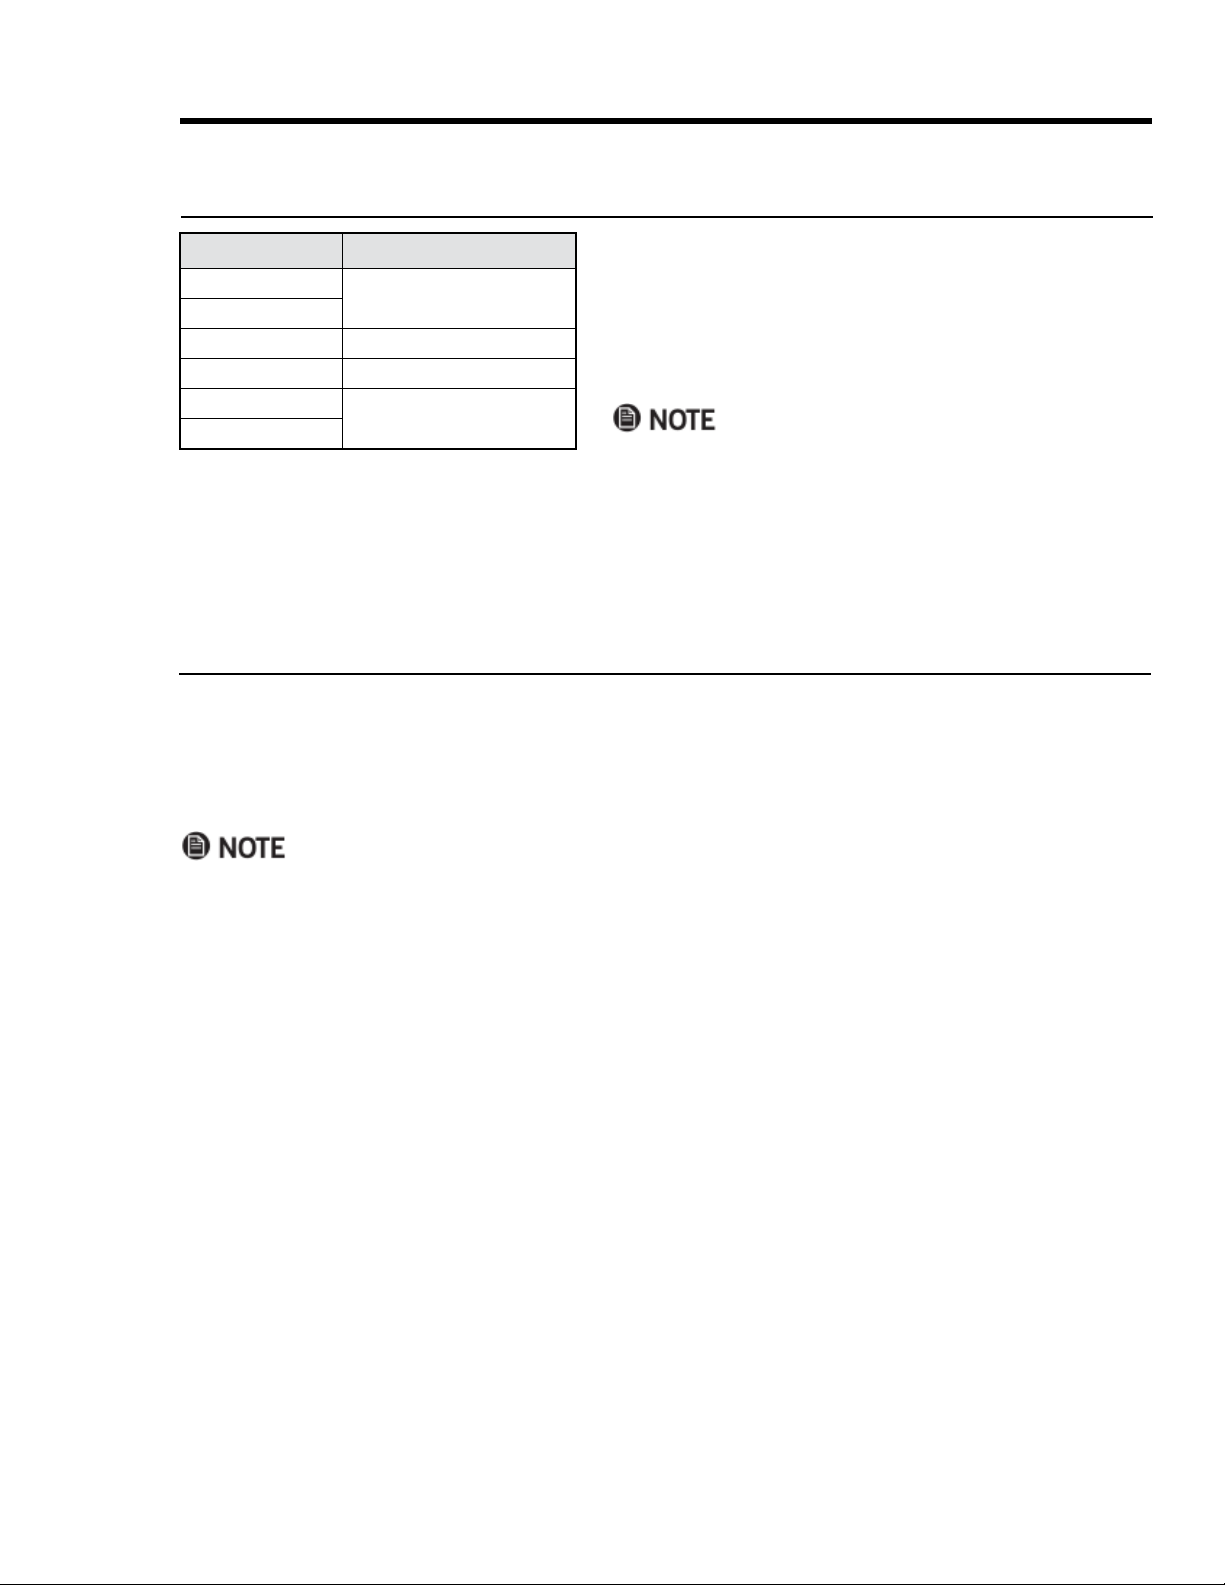
Before You Begin
Important Notes to the Owner
Energy-Saving Tips
•
tablishing the set cooking temp.
• If cooking ½ hour or longer, turn the oven off 5 – 10 minutes early to save electricity. Residual oven heat
• Plan oven use to avoid turning the oven off between cooking tasks.
• When possible, cook multiple items together.
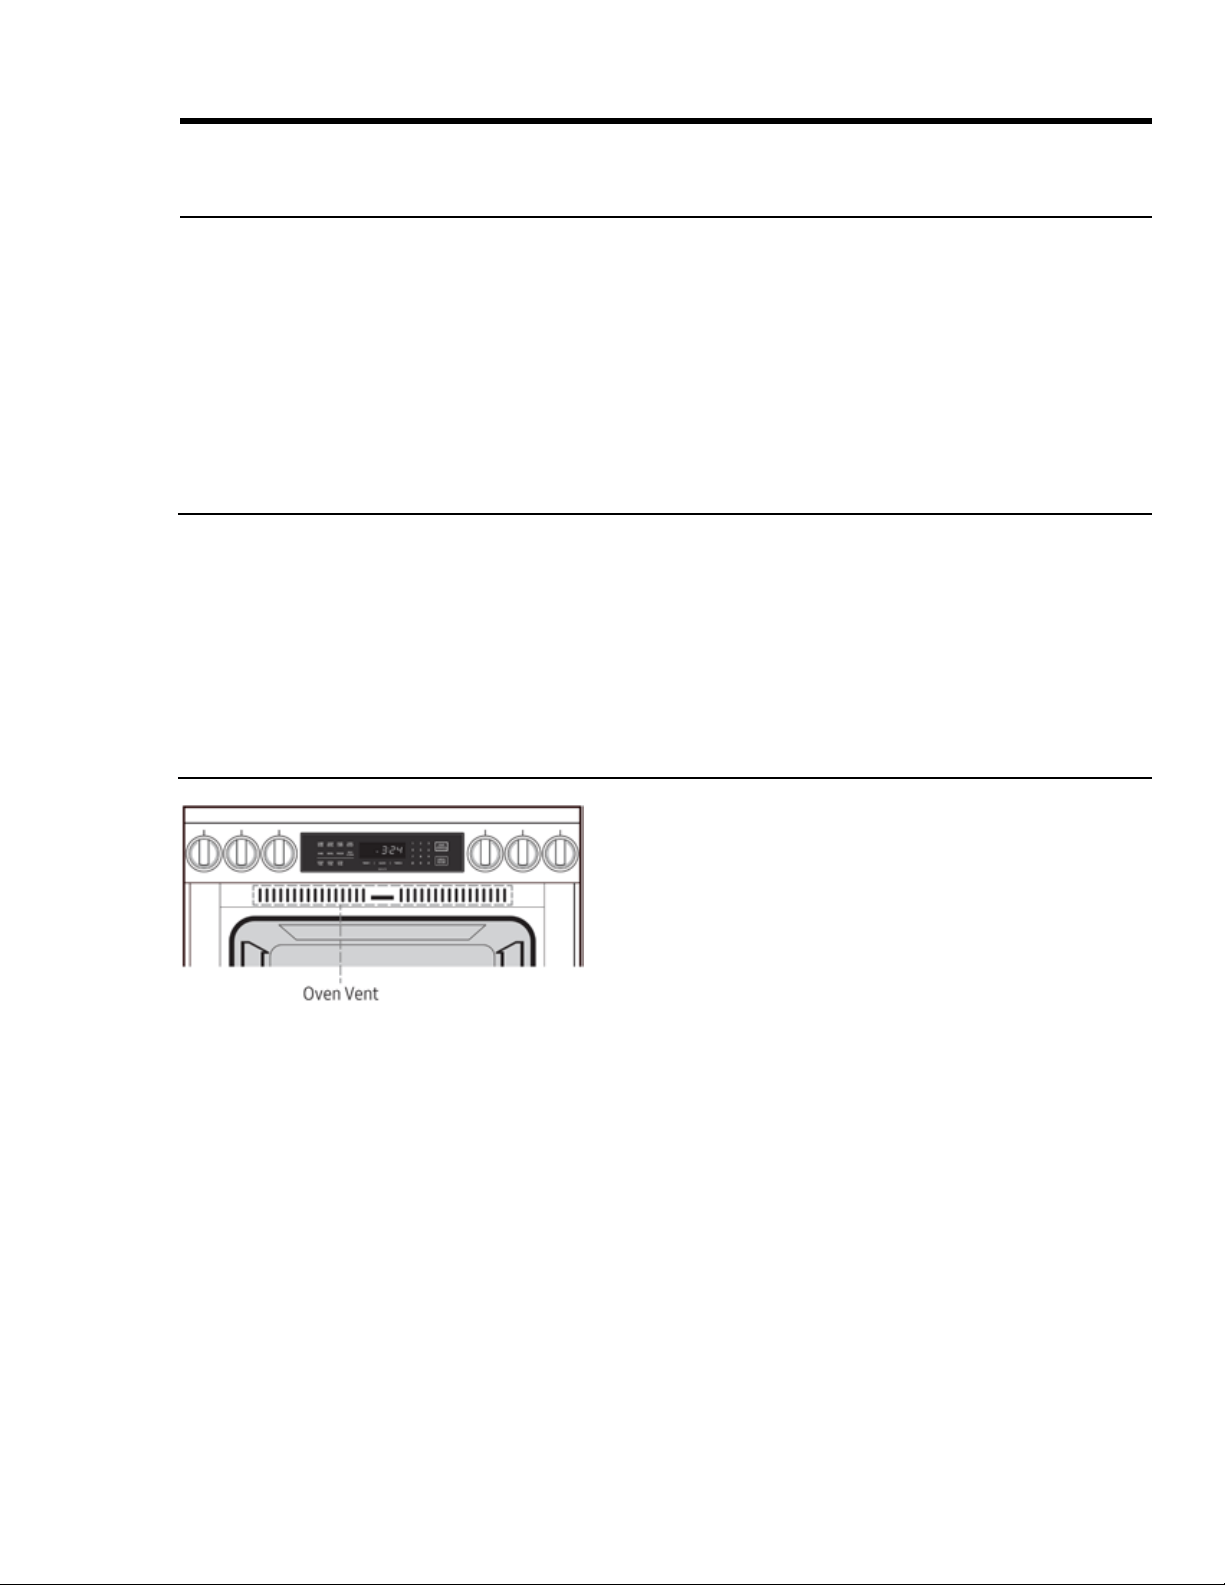
About the Oven Vent
• The oven vent is above the oven chamber. (Open the door
to view.) When the door is closed, air is drawn in through
a vent at the bottom of the door, up within the door, out
a corresponding vent in the top of the door into the vent
you see at left, to cool the cooktop interior.
• Good air circulation ensures proper cooktop performance.
Do not cover/block any part of the vent system.
• If the oven is on, be cautious near its door. Steam and hot
• Important Safety Instructions (Pgs. 7 – 9) to
minimize risk of property damage, personal injury, and death.
• Maintain the range as instructed in this manual.
• Keep this manual for personal and professional reference.
•
accessories from the oven chamber, and set the oven to Bake at 400°F (204°C) for 1 hour (see Pgs. 26, 31). A
distinct odor during this process is normal.

6
Regulatory Notice
authority to operate the equipment. This device complies with Part 15 of FCC Rules. Operation is subject
to two conditions: 1) This device may not cause harmful interference; and 2) this device must accept any
Canadian markets, only Channels 1 – 11 are available.
FCC STATEMENT
This equipment was tested and found compliant within the limits for a Class B digital device, pursuant to
Part 15 of FCC Rules. These limits are meant to reasonably protect against harmful interference in a res
installed and used as instructed, may disrupt radio communications. However, interference may still occur
in a given installation, which can be determined by turning the unit off and on. In case of disruption, the
user should try to correct the interference by one or more of these measures:
• Reorienting or relocating the receiving antenna
• Increasing the separation between the equipment and receiver
• Connecting the equipment to an outlet on a different circuit than the radio/TV
•
FCC RADIATION-EXPOSURE STATEMENT
should be installed/operated with at least 8" (20 cm) between the radiator and your body. This device and
2. IC (Industry Canada) Notice
Operation is subject to two conditions: 1) This device may not cause interference; and 2) this device must
accept any interference received, including that which causes undesired operation. This Class B digital
Channels 1 – 11 are available.
IC RADIATION-EXPOSURE STATEMENT
should be installed/operated so there is at least 8" (20 cm) between the radiator and your body. This device
General Safety Instructions
Testing found the range compliant with limits for a Class B digital device, pursuant to Part 18 of FCC rules.
These limits are meant to reasonably protect against harmful interference in a home installation. The
may harmfully impede radio communications; however, interference may still occur in a given installation.
In case of disruption, which can be determined by turning the unit off and on, the user should try to correct
the condition via one or more of these measures:
• Reorienting or relocating the receiving antenna
• Increasing the separation between the unit and receiver
• Connecting the equipment to an outlet on a different circuit than the radio/TV.
1. FCC (Federal Communications Commission) Notice
7
SAFETY SYMBOLS/ALERTS
Hazards/unsafe practices that may result
in severe personal injury or death.
Hazards/unsafe practices that may result
in personal injury or property damage.
Safety Symbols and Cautionary Information
Important Safety Instructions (Pgs. 7 – 9) are
meant to minimize the risk of property damage, personal injury, and death. Carefully follow these instructions.
Important Safety Instructions
Use-and-Care Safety Instructions
Read these instructions thoroughly to reduce the risk of property damage, personal injury, and death.
General Safety
• Do not touch any part of the range during or immediately after use.
•
• Do not leave children unattended near the active range or let children sit/stand on any part of the range.
• Do not keep objects of interest to children on/above/near the range.
• Do not operate the range if it is damaged, malfunctioning, or missing parts.
• Do not heat sealed food containers; pressure buildup may burst the container and cause injury.
• Do not use oven cleaners or liners in/around the oven.
• To avoid steam burns, use dry potholders; do not let the potholder touch hot heating elements; do not use a
towel or other bulky cloth as a potholder.
•
•
• In disposing of the range, remove the power cord and door to avoid a safety hazard.
• Cook meat to an internal temperature of 160°F (71°C) and poultry to an internal temp of 180°F (82°C).
• Keep volatile substances (e.g., gasoline, alcohol, benzene) away from the range.
Fire Safety
• Do not store/place/use combustible items (e.g., paper, plastic, fabrics, gasoline) near the range.
•
•
• Regularly clean the oven vents.
•
•
About the Symbols In This Manual
The icons at left alert you to potentially unsafe condi
tions or helpful information.
State of California Proposition 65 Warning
The range contains chemicals known to the State of
California to cause cancer, and birth defects or other
reproductive harm.

8
Important Safety Instructions
Use-and-Care Safety Instructions, cont.
Read these instructions thoroughly to reduce the risk of property damage, personal injury, and death.
Electrical and Grounding Safety
•
• Do not use a damaged plug, cord, or loose power outlet, and do not alter the plug/cord/outlet.
• Do not put a fuse in a neutral or ground circuit.
•
•
•
plastic utility lines/pipes.
•
• The owner shall ensure the range receives the proper electrical service.
Cooktop Safety
• Cooktop cook zones should only be on when in use and should never be unattended.
• Do not line any part of the cooktop with foil.
• Put only cookware on the cooktop.
• Do not drag or drop cookware on the cooktop.
•
•
•
•
• Fry with minimal oil, heat the oil slowly, and watch as it heats; stand at a safe distance, and monitor the oil
•
• Do not fry frozen, icy, or overly cold food.
•
• In case of a burn injury, immerse the scalded area in cool water for at least 10 minutes, then cover with a
clean, dry cloth; do not apply creams, oils, or lotions. Seek medical attention for severe burns.

9
Important Safety Instructions
Use-and-Care Safety Instructions, cont.
Read these instructions thoroughly to reduce the risk of property damage, personal injury, and death.
Oven Safety
•
• Do not spray water on the door glass while the oven is on or still hot; do not use abrasive cleansers or metal
scrapers to clean the glass.
• Do not clean the door gasket.
• Do not cover any part of the oven with foil or other material.
• Do not let grease build up in the oven.
• Always arrange oven racks when the oven is cool.
• Do not leave plastic in the oven.
• Keep the oven door closed while the oven is on.
•
•
• If power fails during cooking, turn the oven off.
•
•
•
service technician.
•
•
• Do not use commercial oven cleaner or protective coating in the oven.
10
Consignes de sécurité d'utilisation et d'entretien
Sécurité générale
•
•
• Do not leave children unattended near the active range or let children sit/stand on any part of the range.
•
•
•
•
•
•
•
•
•
•
La sécurité incendie
•
•
•
•
•
•
SYMBOLES DE SÉCURITÉ / ALERTES
Dangers/pratiques dangereuses pouvant en
traîner des blessures graves ou la mort.
Dangers/pratiques dangereuses pouvant en
traîner des blessures ou des dommages matériels.
Conseils utiles et instructions
Symboles de sécurité et informations de mise en garde
relles et de mort. Suivez attentivement ces instructions.
Consignes de sécurité importantes
À propos des symboles dans ce manuel
ditions potentiellement dangereuses ou des
informations utiles.

11
Consignes de sécurité importantes
Consignes de sécurité d'utilisation et d'entretien, suite
.
Sécurité électrique et de mise à la terre
•
•
•
•
•
•
•
•
Sécurité de la table de cuisson
•
•
• Mettez seulement des ustensiles de cuisson sur la table de cuisson.
•
•
•
• Seule une batterie de cuisine ferreuse (contenant du fer) fonctionnera sur la table de cuisson.
•
•
•
•
•
•

12
Consignes de sécurité importantes
Consignes de sécurité d'utilisation et d'entretien, suite
.
Sécurité du four
•
•
grattoirs métalliques pour nettoyer le verre.
•
•
•
• Toujours ranger les grilles du four lorsque le four est froid.
•
• Gardez la porte du four fermée lorsque le four est allumé.
•
•
• Si la puissance tombe en panne pendant la cuisson, éteignez le four.
•
supports.
•
•
•
éloignée et bien ventilée.
•
s'échapper en toute sécurité.
•
13
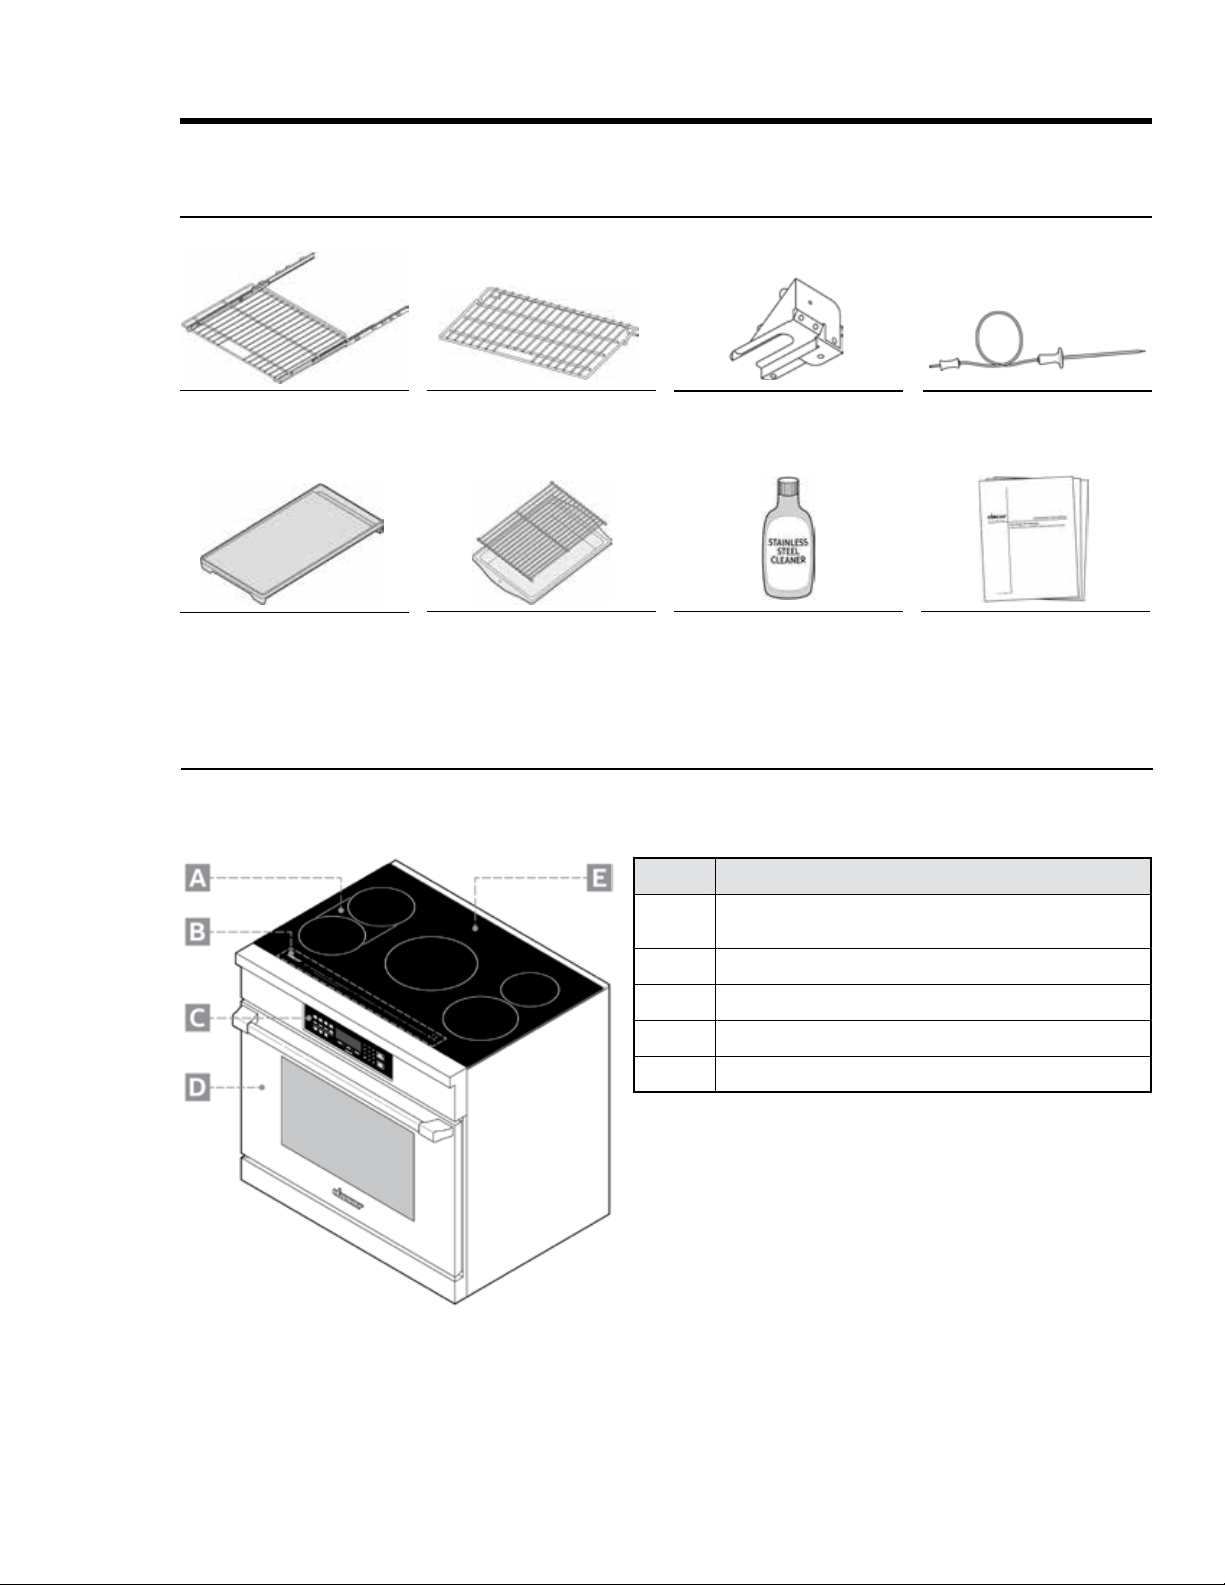
Product Overview
and Anchors
Broiler Pan and Grill
GlideRack
TM
Oven Rack (2)
Temperature Probe
Standard Oven Rack (1)
Griddle
Included Accessories
Callout Description
A
tandem for rectangular dishes and griddle)
B
Rangetop control panel
C
Oven control panel
D
Removable oven door
Induction rangetop
External Features
HIPR36S model shown
14
Product Overview
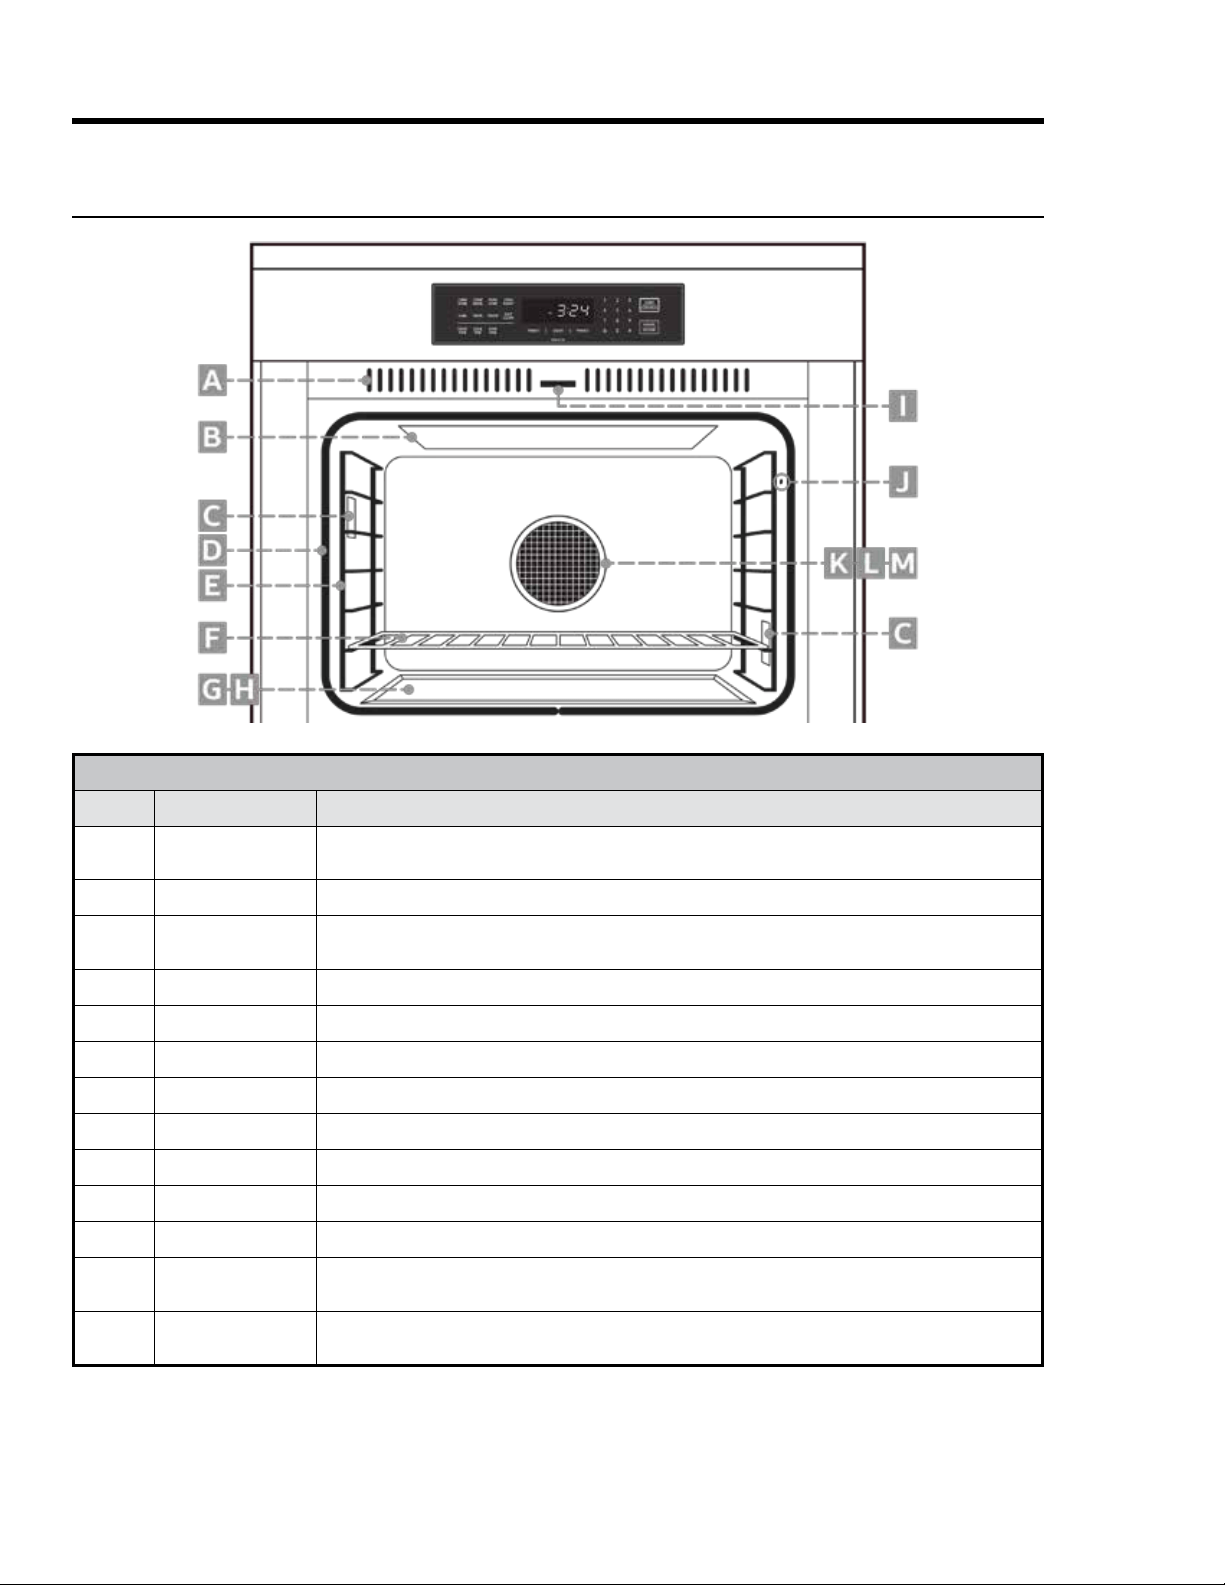
Internal Features
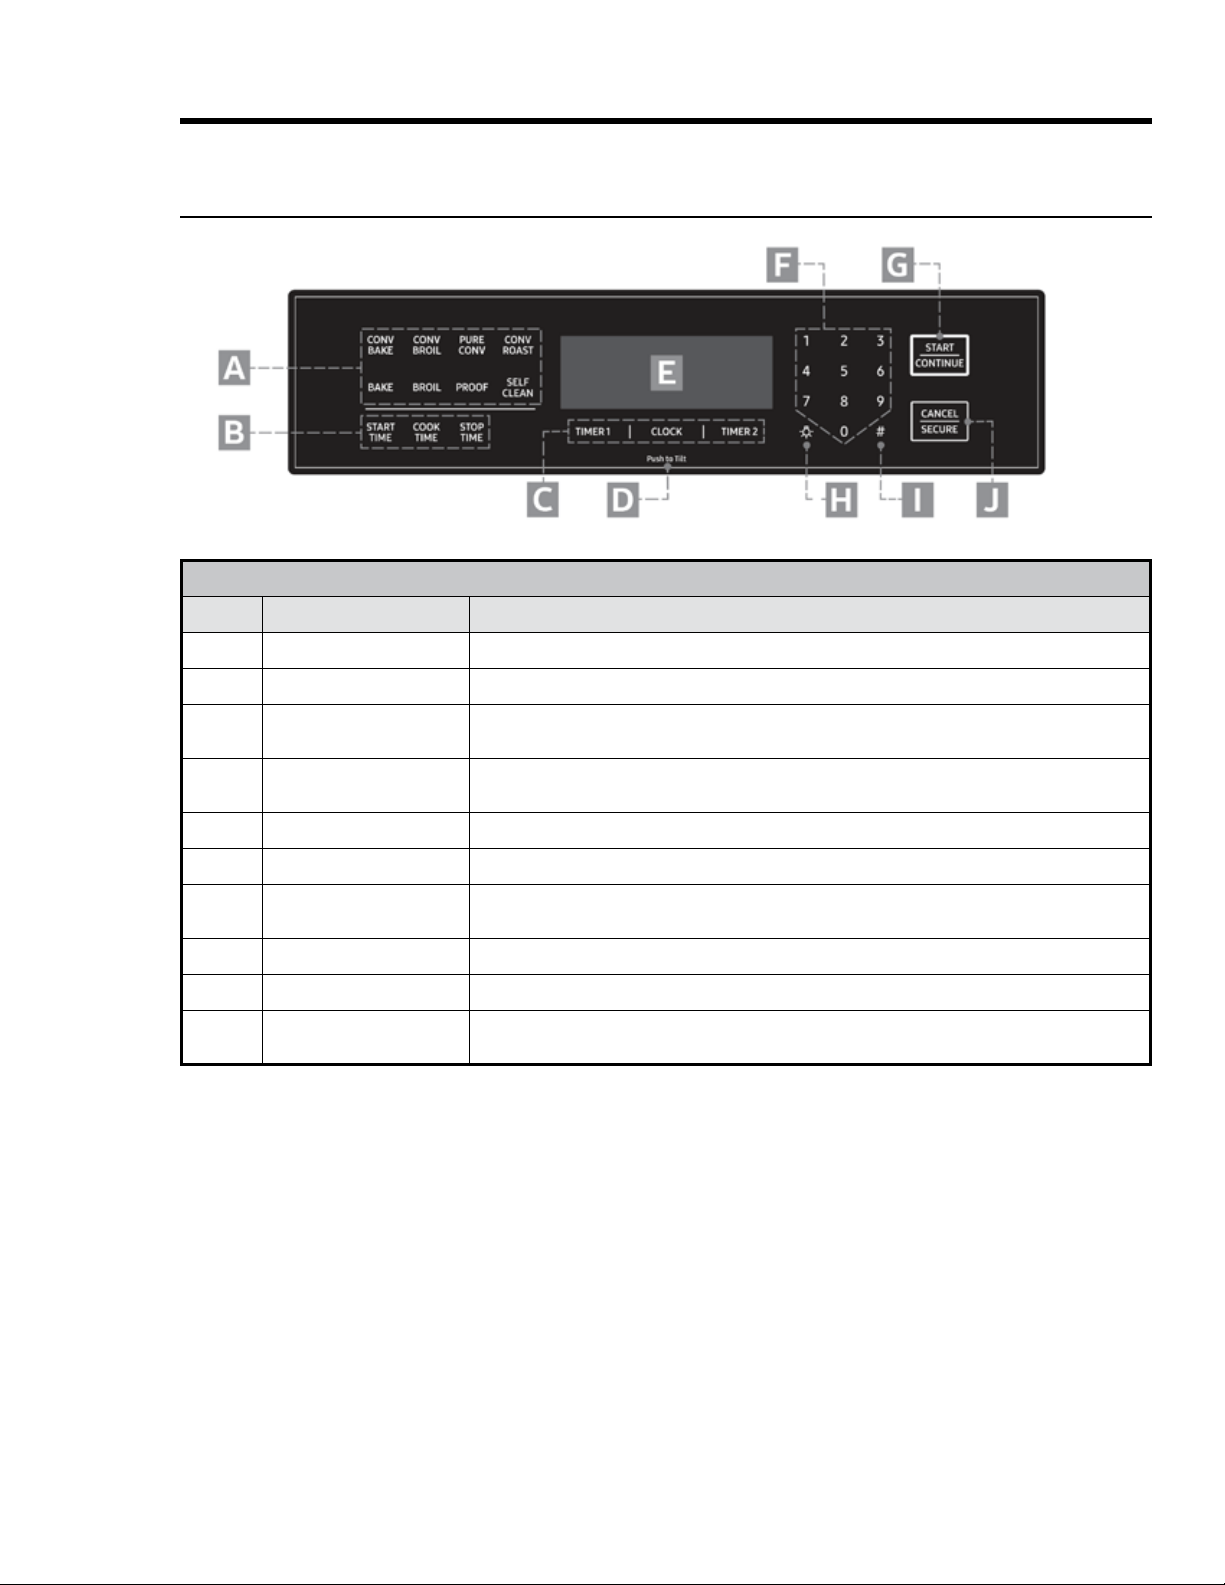
CONTROL-PANEL FEATURES
Callout Name Description
A
Air is drawn through horizontal slot (not shown) below door and up within door, then out grill at top
of door through this grill to cool internal cooktop parts; keep slot and grills clear.
B Inside oven ceiling behind glass panel; top heat source.
C
panel) to turn lights on/off.
D
Keeps heat from escaping when door is closed.
Rack Support
Install GlideRack and standard racks on these supports; rack levels 1 (bottom) to 7 (top)
F Oven Rack
2 GlideRack™ oven racks and 1 standard rack are provided. (See Pgs. 10, 25.)
G
H
I
J
K Convection Fan
(From behind filter) Heats air blown into oven by convection fan during convection cooking; rear
heat source.
M Convection Filter
Clips onto crossbar over hole in oven wall; keeps fan from blowing particulates into oven
chamber; keeps user safe from fan blades.
15
Product Overview
Oven Control Panel
OVEN CONTROL-PANEL FEATURES
Callout Name Description
A
B Set oven to turn on/off automatically (see Pg. 32).
C Clock/Timer Keys
independently; can be used when oven is off; timers do not turn oven on/off (see Pg. 31).
D Push to Tilt
push here again until panel clicks into its original position.
Display
F Sets cook temperature, cook time, time of day.
G
Select a cook mode (A), then tap this key to start cooking; this key starts timers after you set a
cook time and resumes cook time after a pause.
H Turns oven light on/off.
I Sabbath Mode Key Activates Sabbath mode (see Pg. 35).
J
16
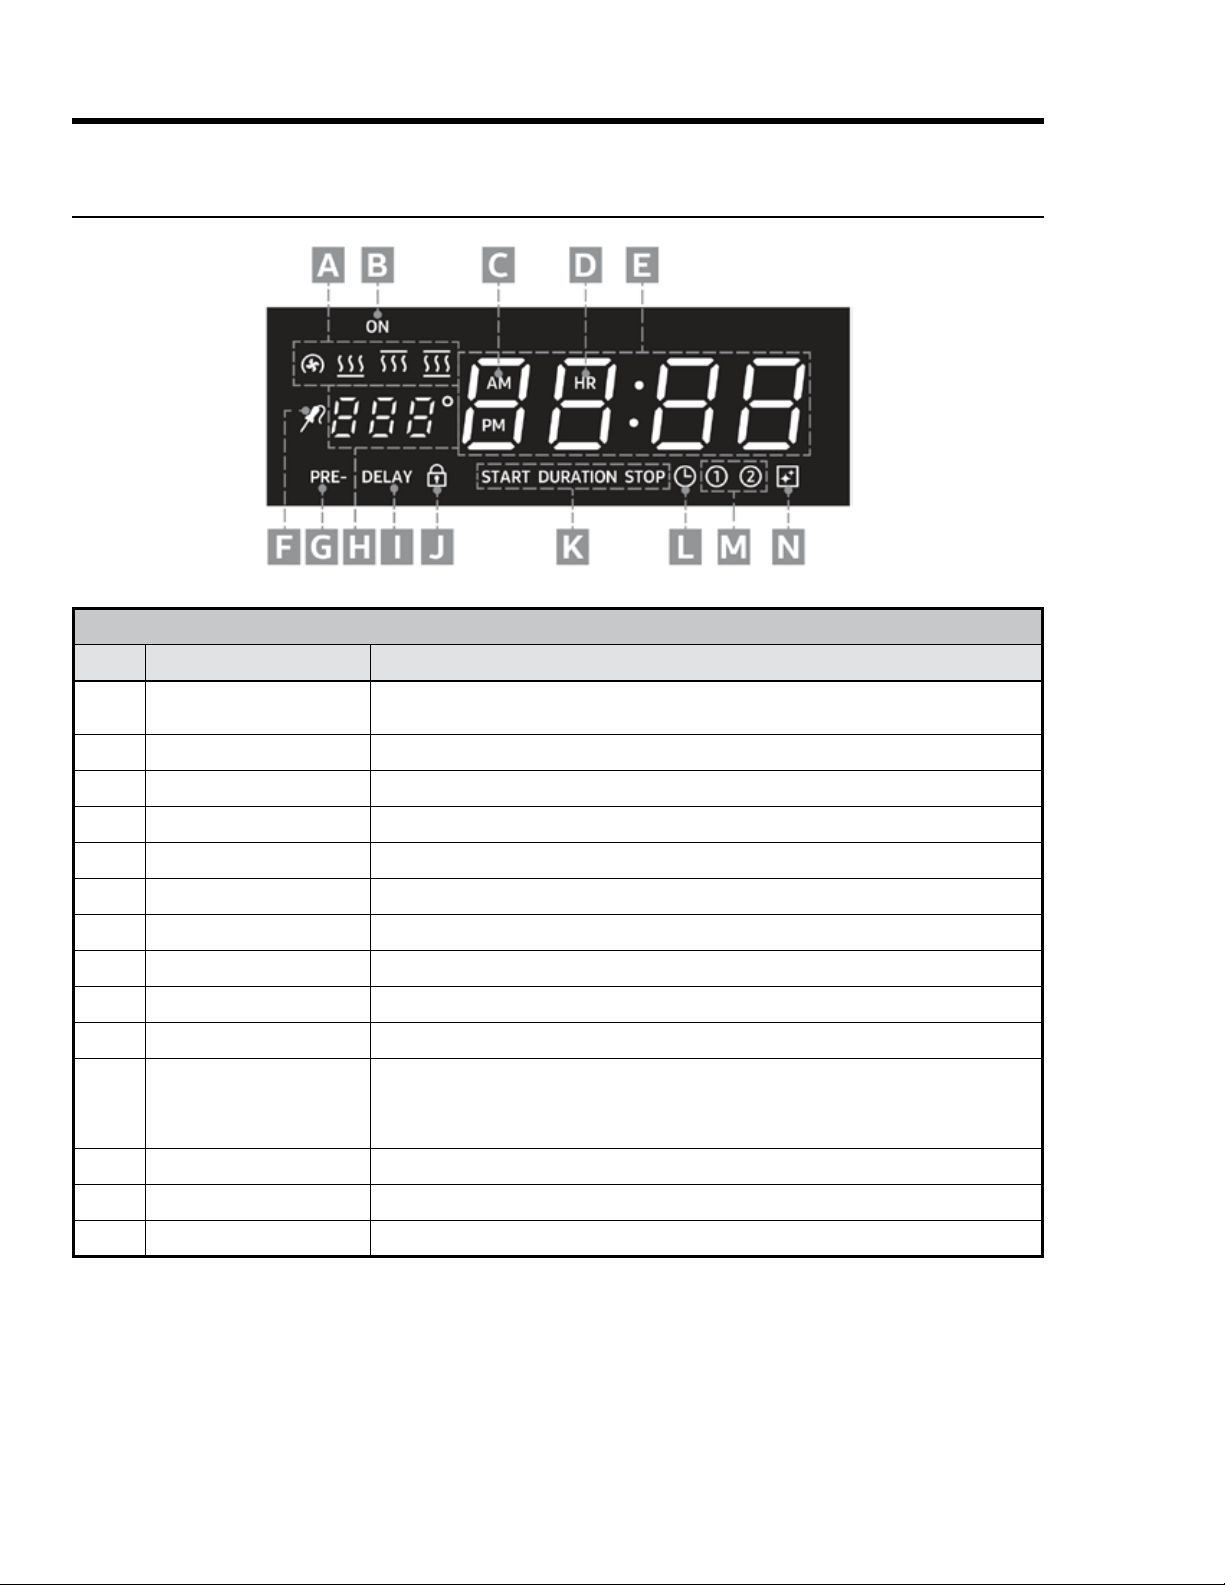
Product Overview
OVEN CONTROL-PANEL-DISPLAY FEATURES
Callout Name Description
A
From left: Convection, Bake, Broil, Roast; these appear, sometimes in combination, accord
ing to selected cook mode.
B
Oven On Indicator Appears when oven is in use.
C
One of these appears according to time of day.
D
Clock/Timer Readout
Shows time remaining on selected timer or time of day if no timer is selected.
F
G Preheating Indicator
H
I
J
K
M Timer Indicators
These appear depending on timer use; if both timers are active, both indicators appear.
Cleaning Icon
Oven Control-Panel Display
17
Operating the Cooktop
About Induction Cooking
The induction cooktop heats food via a magnetic reaction
between the cookware and cooktop heating element.
This
reaction is confined to the area directly under the pan, making
it the only part of the cooktop that gets hot; thus, induction
cooking is safer and more efficient than traditional thermal
conduction: 90% of induction energy is used to cook food
compared to 55% for gas and 65% for electricity.
Another advantage to induction cooking is the ability to
instantly and precisely change heating levels. This is
especially desirable for foods that are ruined if only slightly
conduction settings increase over time.
Cooktop Layout
COMPATIBLE/INCOMPATIBLE COOKWARE*
Compatible
Incompatible
Stainless Steel (for
induction)
Regular steel
Copper
Cast Iron
Aluminum
Cookware labeled
"Induction Compatible"
Glass
Ceramic
*
ble, touch a refrigerator magnet to its base. If the magnet
•
prevent overheating.
•

18
Operating the Cooktop
About the Cookware
Cookware diameter should be large enough to cover the
reduces heating efficiency.
• Only cookware constructed of magnetic material (see table,
previous page) can be used on the cooktop. Cookware
specifically designed for induction cooking is typically
marked with (on the bottom).
•
About Pan Detection, below.)
•
If you set a heat level at Simmer
readout, signalling that no cookware is detected.
1 to Boost but no pan is present, a
in Boost mode) on the readout, signalling that no cookware is detected.
•
•
•
About Pan Detection
a heat level, but: a) no cookware is present, b) the cookware is not centered in the zone, or c) you remove
the cookware you placed in the cook zone without turning OFF the zone, a certain symbol (depending on the
Getting Started
• After removing packing material,
wipe the cooktop with a damp sponge, then dry it with a soft cloth.
• Initially there may be a slight burning odor or light smoke. These conditions are normal and vanish quickly.
•
•
food may have slightly different cook times in similar cookware from different manufacturers.
19
Operating the Cooktop
• If you press the main power button and activate a cook zone but do not set a power level within 10 seconds, the
zone shuts off; if you take no further action within 10 seconds, the cooktop shuts off.
• If you mistakenly push the main power button while any cook zones are active, press it again within 5
seconds to restore all previous settings.
•
unchanged, the cooktop shuts off; the HOT indicator stays on until the cooktop is safe to touch.
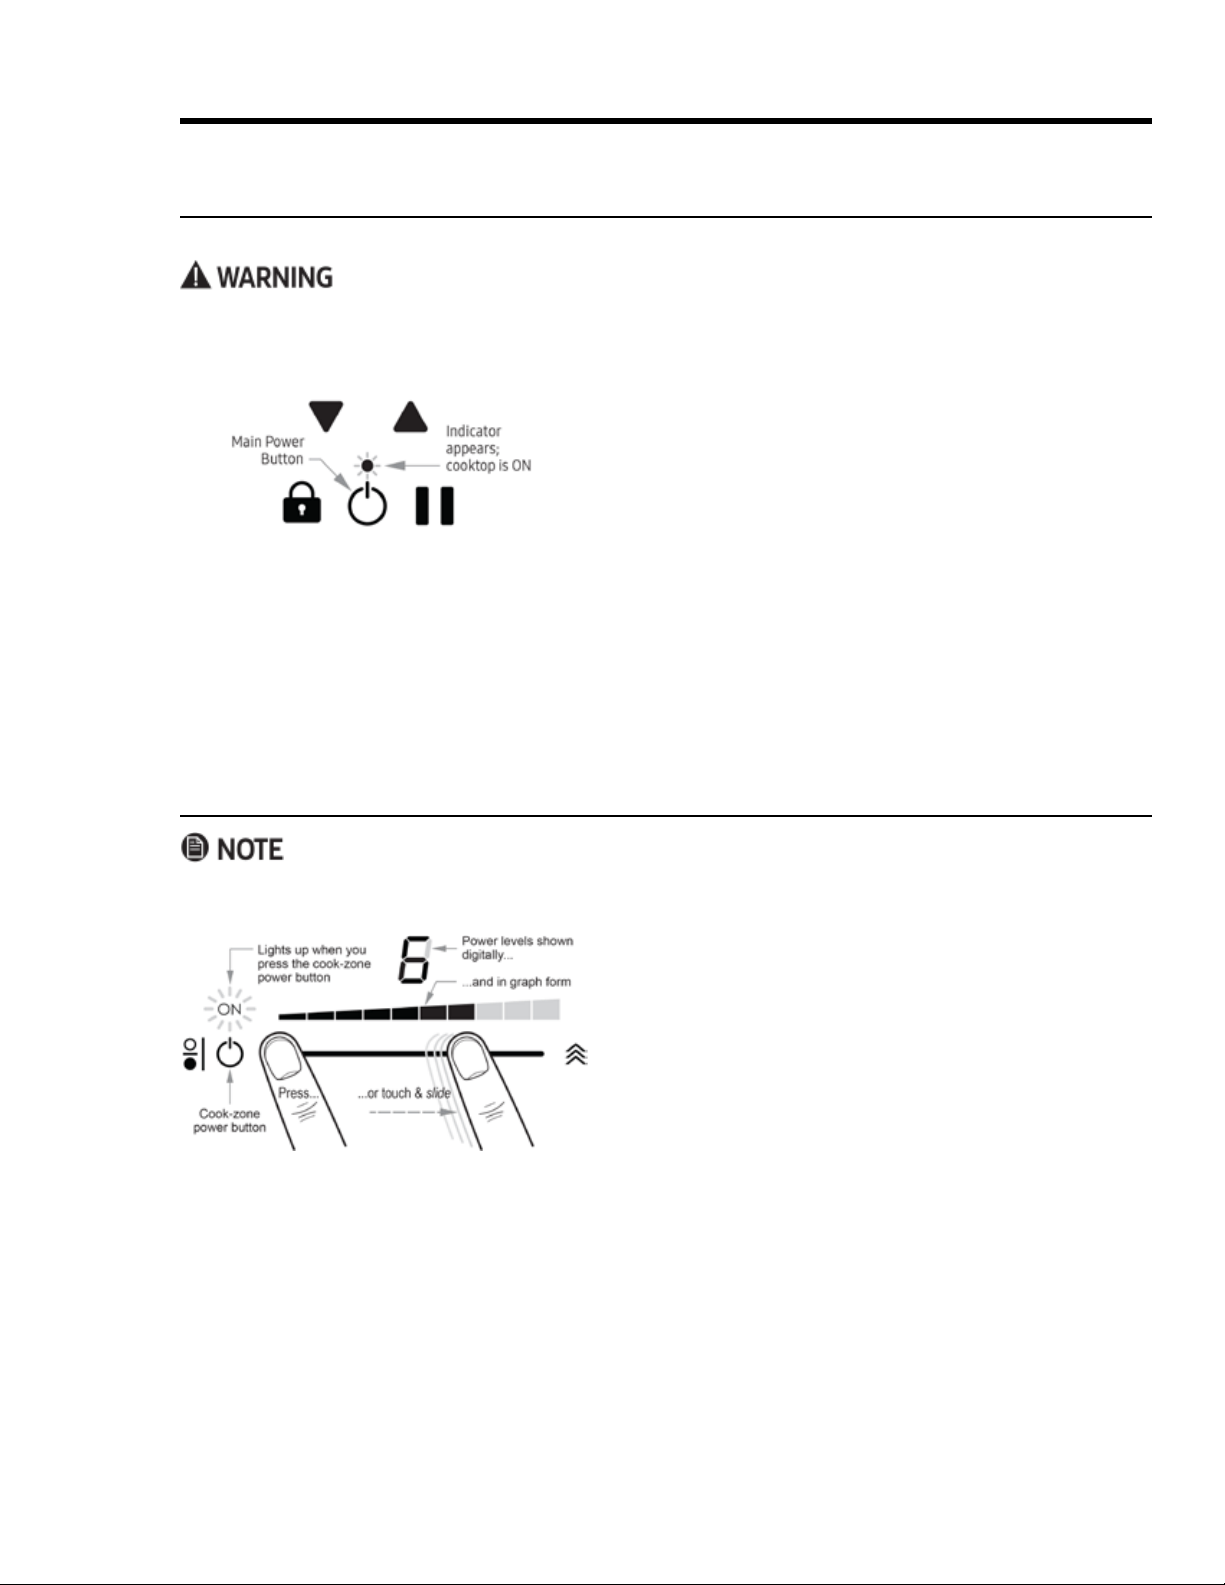
Turning the Cooktop ON/OFF
You can turn the cooktop on without cookware on a cook zone. Power is applied after the cookware is in place.
• Metallic objects (e.g., utensils, lids, cans) left on the cooktop can heat to unsafe temperatures and may warp.
• The glass around the cook zones cannot be heated by the cooktop controls; however, it can still heat to an
unsafe temperature if hot cookware is placed on it.
• Push the main power button to turn OFF all cook zones
simultaneously.
• If you press the main power button but do not activate a
cook zone within 10 seconds, the cooktop shuts off.
Turning a Cook Zone ON/OFF
• Before cooking, always clean the cooktop (especially the controls) to ensure proper function.
• While cooking, you can change the power level any time.
1. Center a pan on a cook zone (see About Pan Detection,
2.
3.
zone is unsafe to touch until the HOT indicator goes out.)
20
Operating the Cooktop
About Power Levels
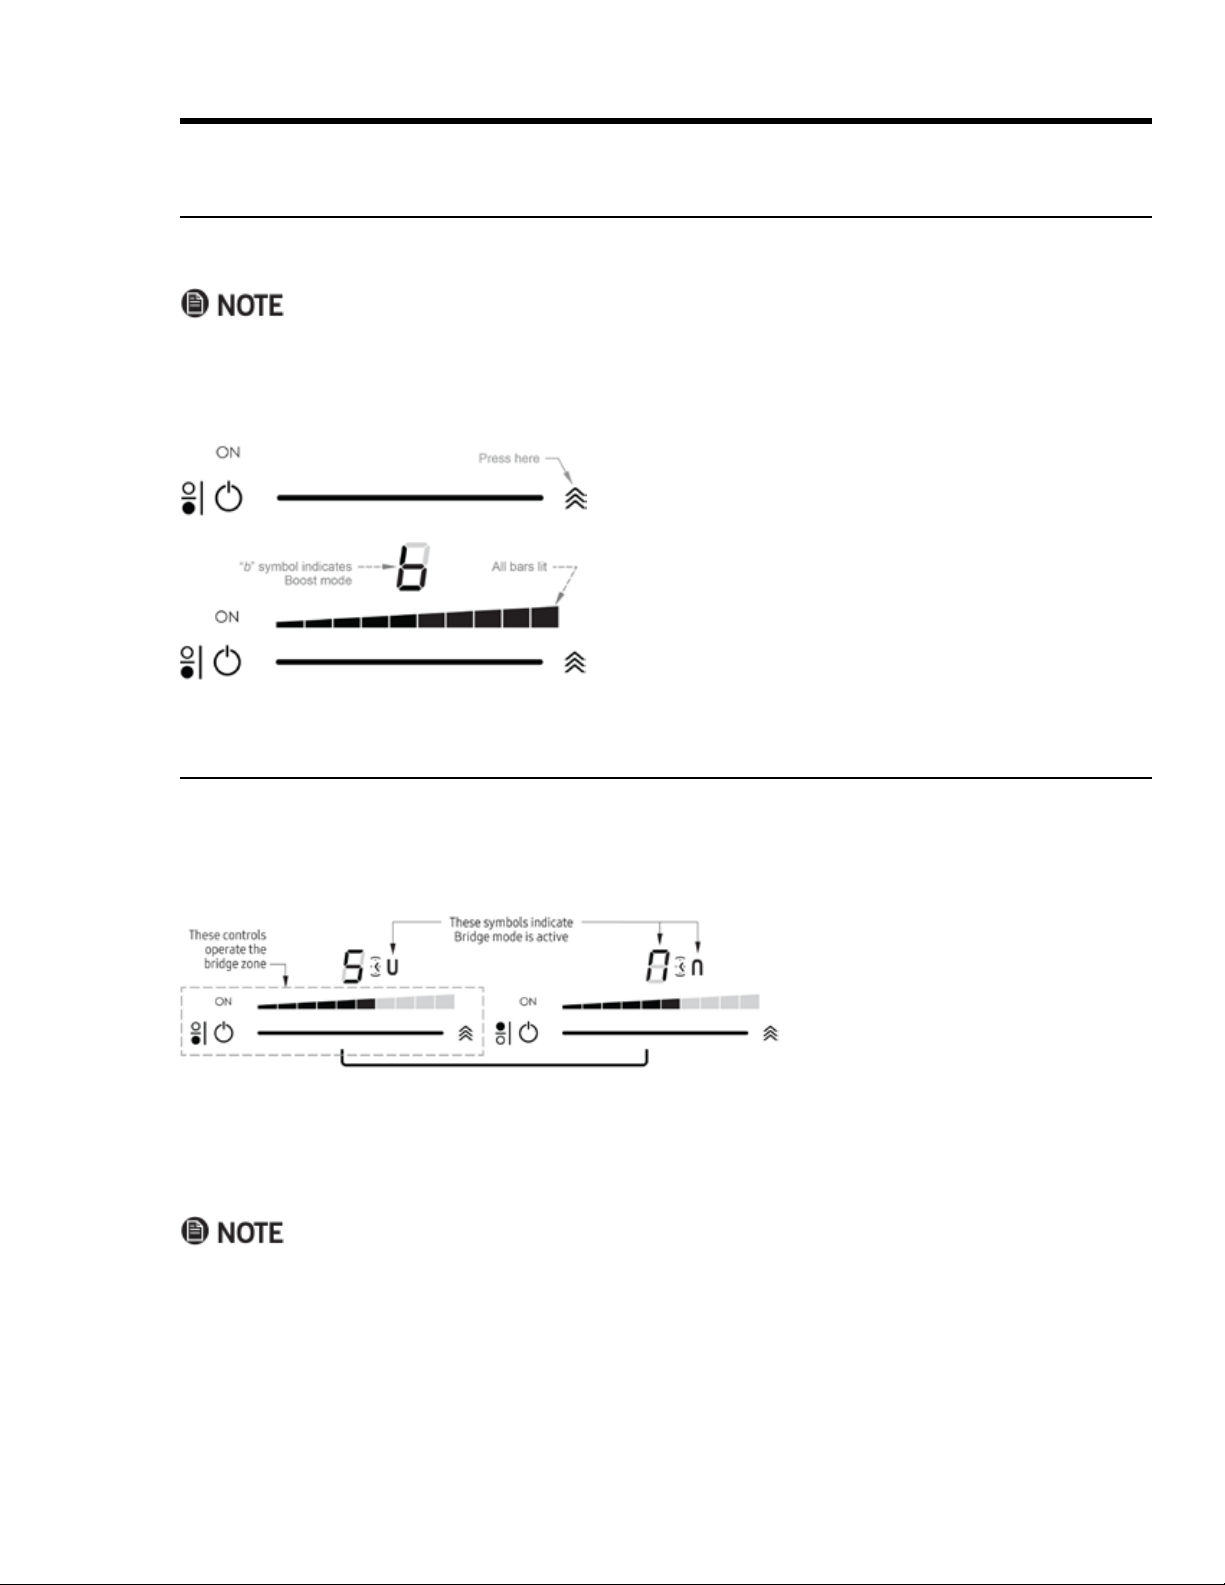
1.
2. Tap the left end of the slider.
pears on the panel, indicating the zone is at Simmer level.
Using Power Levels 1 – 9
These levels represent a graduated increase in cooking power from "low" to "medium" to "high" heat.
1. Place the cookware on a cook zone, and turn the zone on.
2.
desired power level.
The level appears digitally on the readout and in bar form
3.
A clicking sound signals that the zone is heating the food.
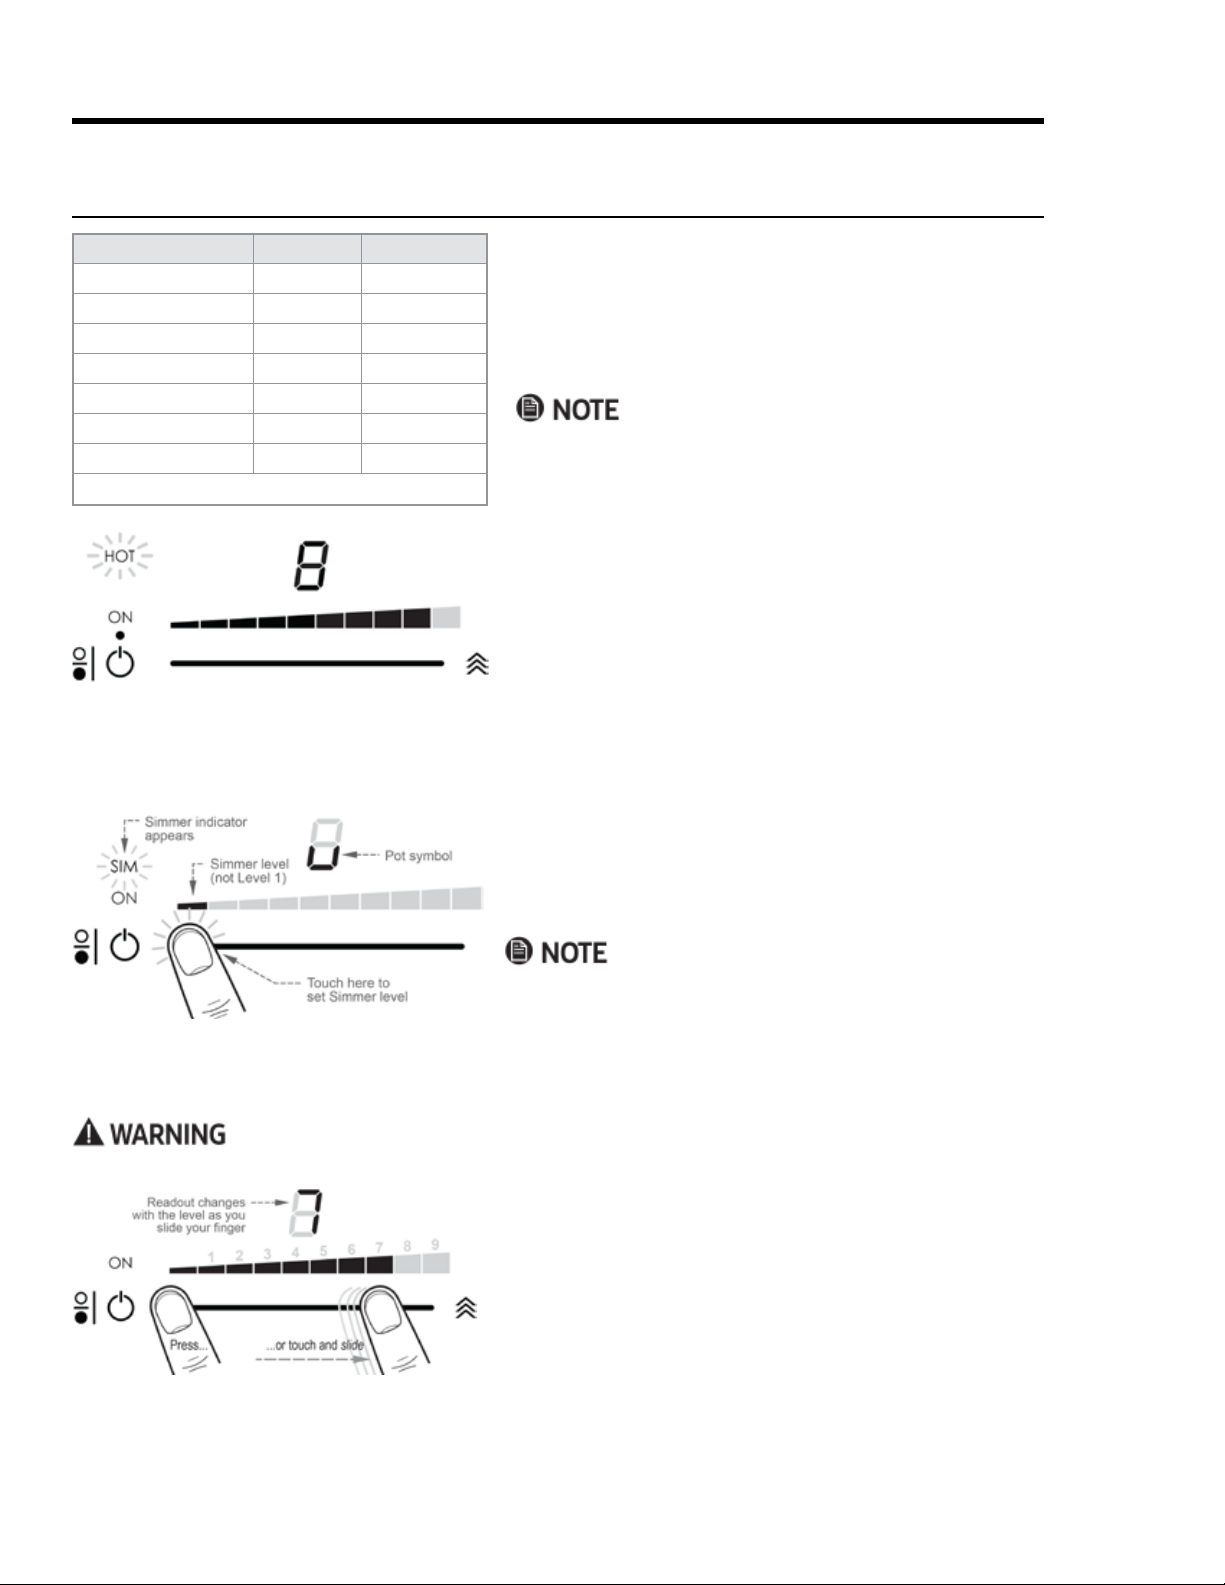
Using Simmer Level
About the HOT Designator
Once a cook zone becomes hot enough to burn skin, the
zone’s HOT designator appears and remains as long as the
cook zone is too hot to touch safely (even if you turn OFF the
cook zone).
Type of Cooking
Rapid heat/rolling boil Boost 10
4 to 9 5 to 10
Frying 5 and 6 6 or 7
General cook/sear 3 to 9 4 to 10
Keep warm* Simmer to 2 1 to 3
Melting chocolate 1 2
Simmer Simmer 1
*To avoid bacterial growth, keep temps above 140°F (60°C).
The induction cooktop cooks food based on power levels
models. A power level's effectiveness varies slightly with
the cookware brand, type, size, structure, and degree of
your own cookware.
peratures, temp equivalents for each power level are not
given.
21
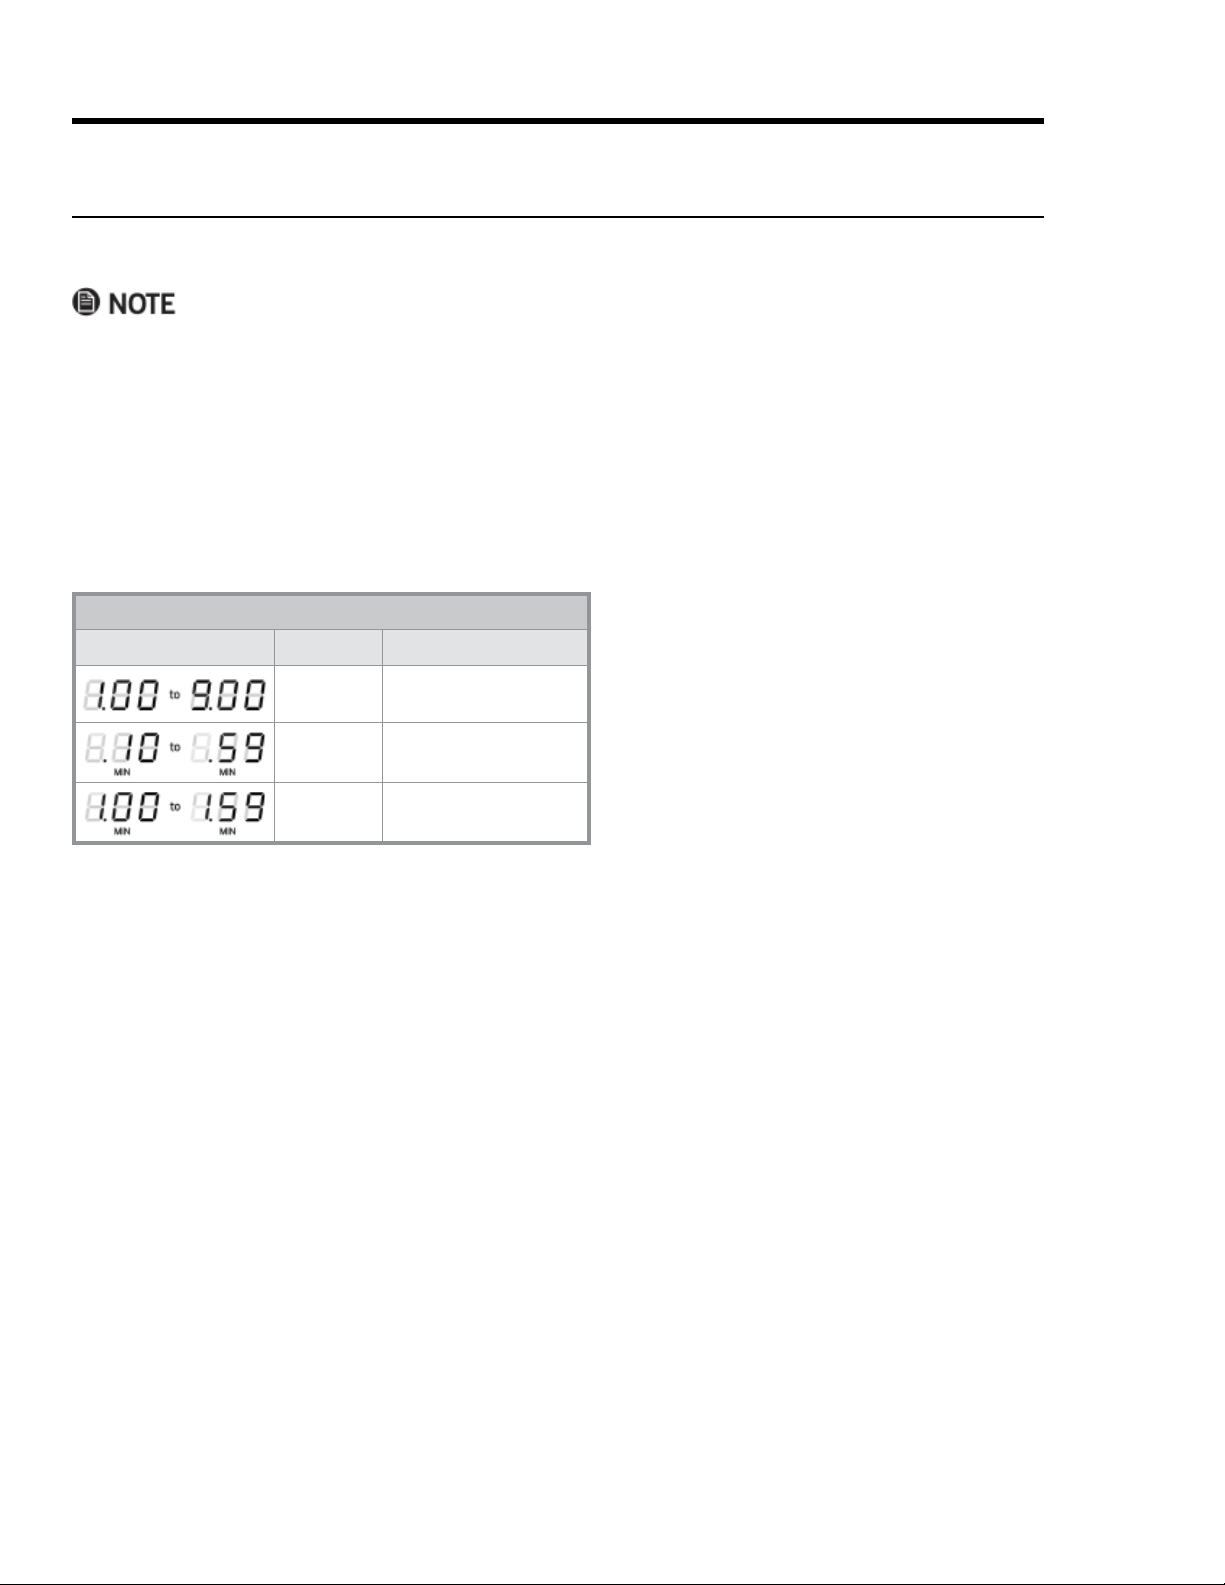
Operating the Cooktop
1.
2. Press the Boost button (right end of slider).
The display changes to "b"; all ramp bars are lit.
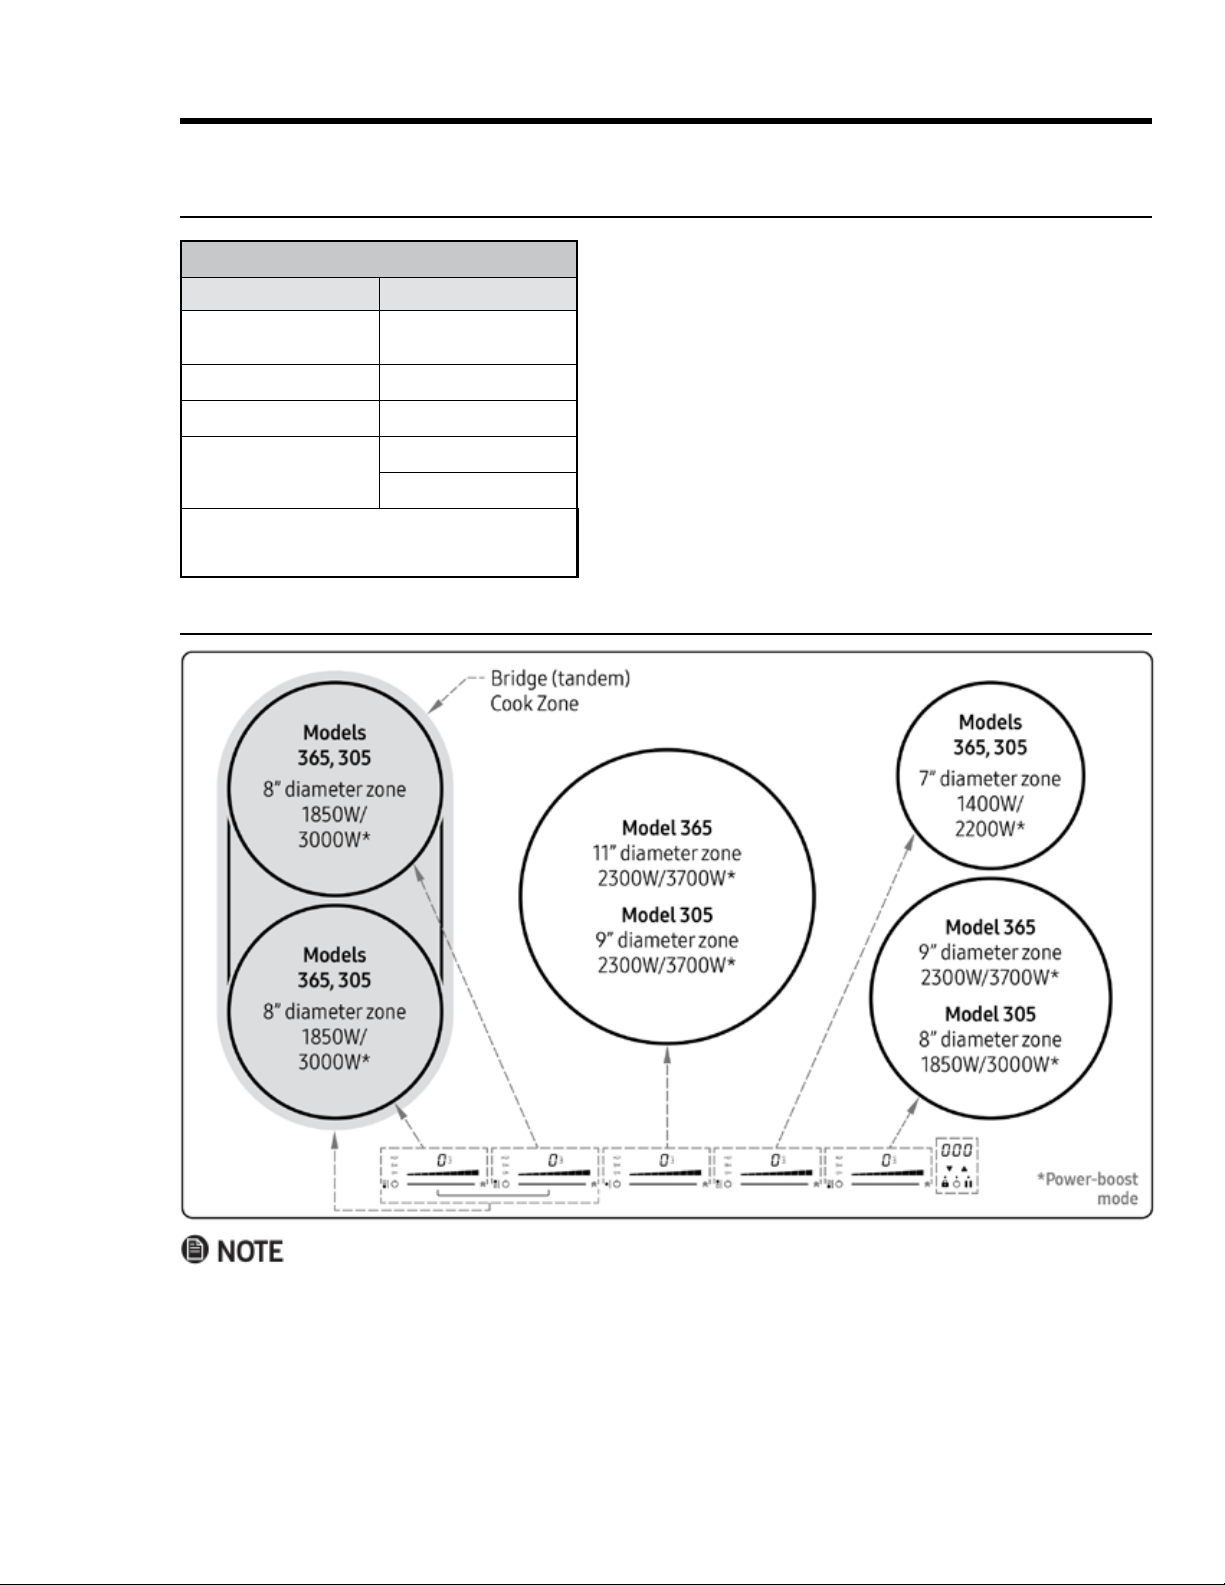
Using Bridge Mode
ware. On the cooktop, a horizontal bracket indicates which control panels combine for bridge mode.
About Power Levels, cont.
About Boost Mode
•
side zone; you cannot set both zones on either side at once (thus, bridging is not available in Boost mode).
•
prevent overheating. (You may restart Boost mode when the power condition allows.)
1.
the cooktop is on.
2.
3.
becomes the master bridge control. (See the above graphic.)
4.
• The timer icon displays on both bridge zones.
•
•
under the pot remains active at the set power level; the empty zone shuts off.)
• The Boost function is unavailable in Bridge mode.
22
Operating the Cooktop
on the time setting. The “dot” (Image column,
left) blinks to show time is counting down and
continues until the display goes out as the alarm
sounds. It divides min/sec (Image column, top
row) and hr/min (Image column, bottom row).
For settings of 10+ minutes, seconds do not
appear when the countdown falls below 10 min.)
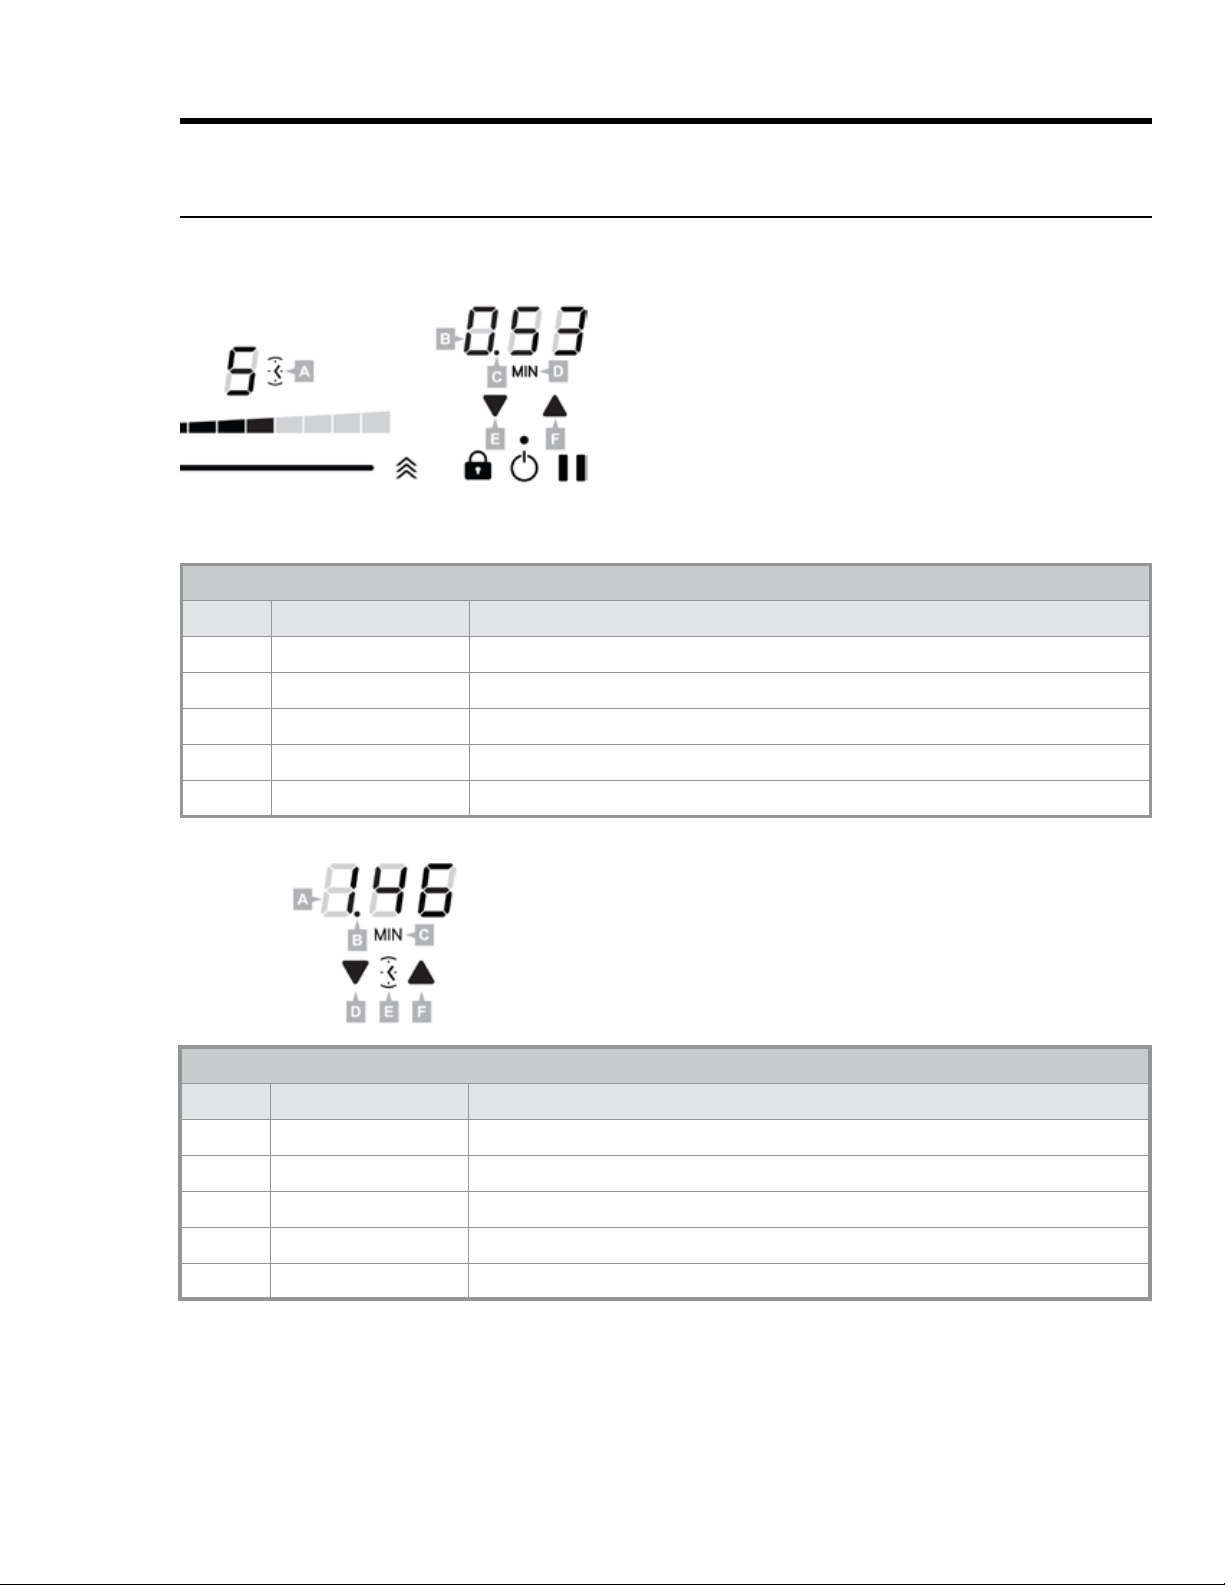
Timer Display Readings
Image Time Description
1 min to
9 min
Press p 1 to 9 times; each
press adds 1 minute
10 min to
59 min
Press-hold p to set
longer times
1 hr to
1 hr, 59 min
Press-hold p to set time
(max. time: 1 hr, 59 min.)
About the Cooktop Timers
The cooktop has seven alarm timers: one for each cook zone (including the bridge), and one timer unassociat
•
•
• Press the up/down arrow buttons simultaneously to pause the timer display; countdown resumes automat
ically in 5 seconds.
•
the alarm is not silenced manually, it shuts itself off two minutes later.
About the Main-Timer Display
23
Operating the Cooktop
1.
indicator appears).
2. Press the cook zone power button, and set the power level.
(If needed, see Turning a Cook Zone ON/OFF, Pg. 16)
3. q and p.
The timer display activates.
4. Tap
p repeatedly until the desired cook time appears.
Countdown starts 5 seconds after you stop tapping
p.
Cook-Zone Timer
Feature Name Description
A Cook Zone Timer Icon Appears while timer is active
B Timer Display Shows time remaining (in this case, 53 min.)
C Blinking Dot Blinks to indicate time is counting down; separates hr/min, min/sec
D MIN Indicator Appears for all time settings of 10+ minutes
E, F Down-/Up-Arrow Press simultaneously to activate timer; press either arrow repeatedly to set time
About the Cooktop Timers, cont.
Setting the Cooktop Timers
Press Pause to stop/resume timer countdown if needed. Countdown continues even if the pan is removed.
Independent Timer
Feature Name Description
A Timer Display Shows time remaining (in this case, 1 hr.-46 min.)
B Blinking Dot Blinks to indicate time is counting down; separates hr/min, min/sec
C MIN Indicator Appears for all set times of 10+ minutes
D, F Down-/Up-Arrow Press simultaneously to activate timer; press either arrow repeatedly to set time
E Independent Timer Icon Appears while timer is active
This timer is for timing kitchen tasks apart from cooktop use.
1.
q and p.
The timer display activates; the timer icon appears be
2. Tap
p repeatedly until the desired cook time appears.

24
Operating the Cooktop
Adjusting an Active Timer
Once you set a timer (for a cook zone or independent timing task), you can adjust the time as needed.
1. q and p.
2. Tap the appropriate arrow repeatedly, until you reach the desired time.
Countdown resumes from the newly set time.
If you have set cook times on multiple zones, the main control panel shows the time for the zone with the least
time remaining. This procedure instructs you how to check the time remaining on the other cook zones.
1.
q and p.
The displayed time changes to the zone with the most recently set time; that zone’s timer icon brightens.
(All other icon are dimmed.)
2.
q and p
The displayed time changes to that zone, and its timer icon brightens while all others are dimmed.
Manually Turning Off the Timer
1.
q and p.
The timer countdown pauses.
2.
q
About the Cooktop Timers, cont.
Setting the Cooktop Timers, cont.
25
Operating the Cooktop
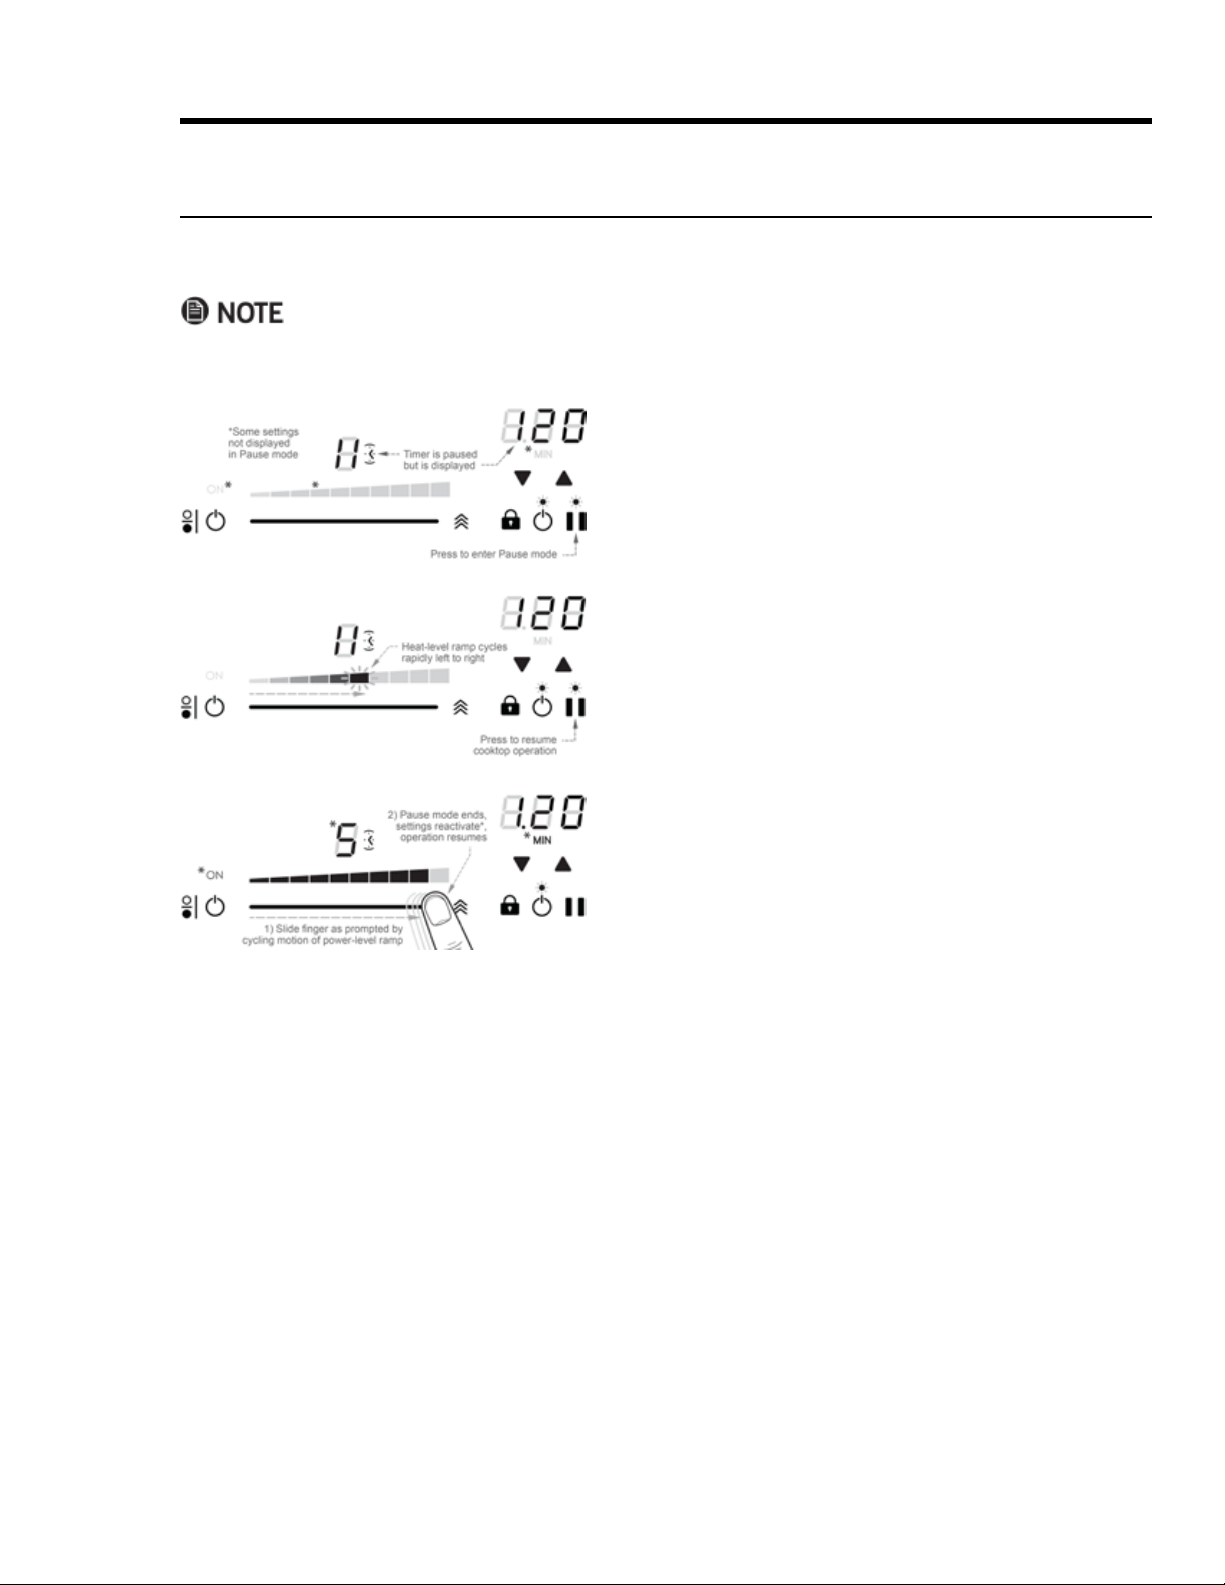
About Pause Mode
After setting the power level on one or more cook zones, you can interrupt operations via the Pause button on
the main control panel. (This procedure starts after you have set one or more cook zones.)
• After 10 minutes in Pause mode, the cooktop shuts off. (All previous settings are lost.)
• All alarm timers stop when you enter Pause mode and resume when you manually leave Pause mode.
1. (Main control panel) Tap Pause.
The Pause symbol appears on the digital readouts of all
cook zones (active or inactive); no heating occurs in any
cook zone.
2. Tap Pause again.
trol panel cycles rapidly left to right.
3.
slider as prompted by the ramp.
(If you do not perform Step 3 within 10 seconds of Step 2,
Pause mode remains active.)
26
Operating the Cooktop
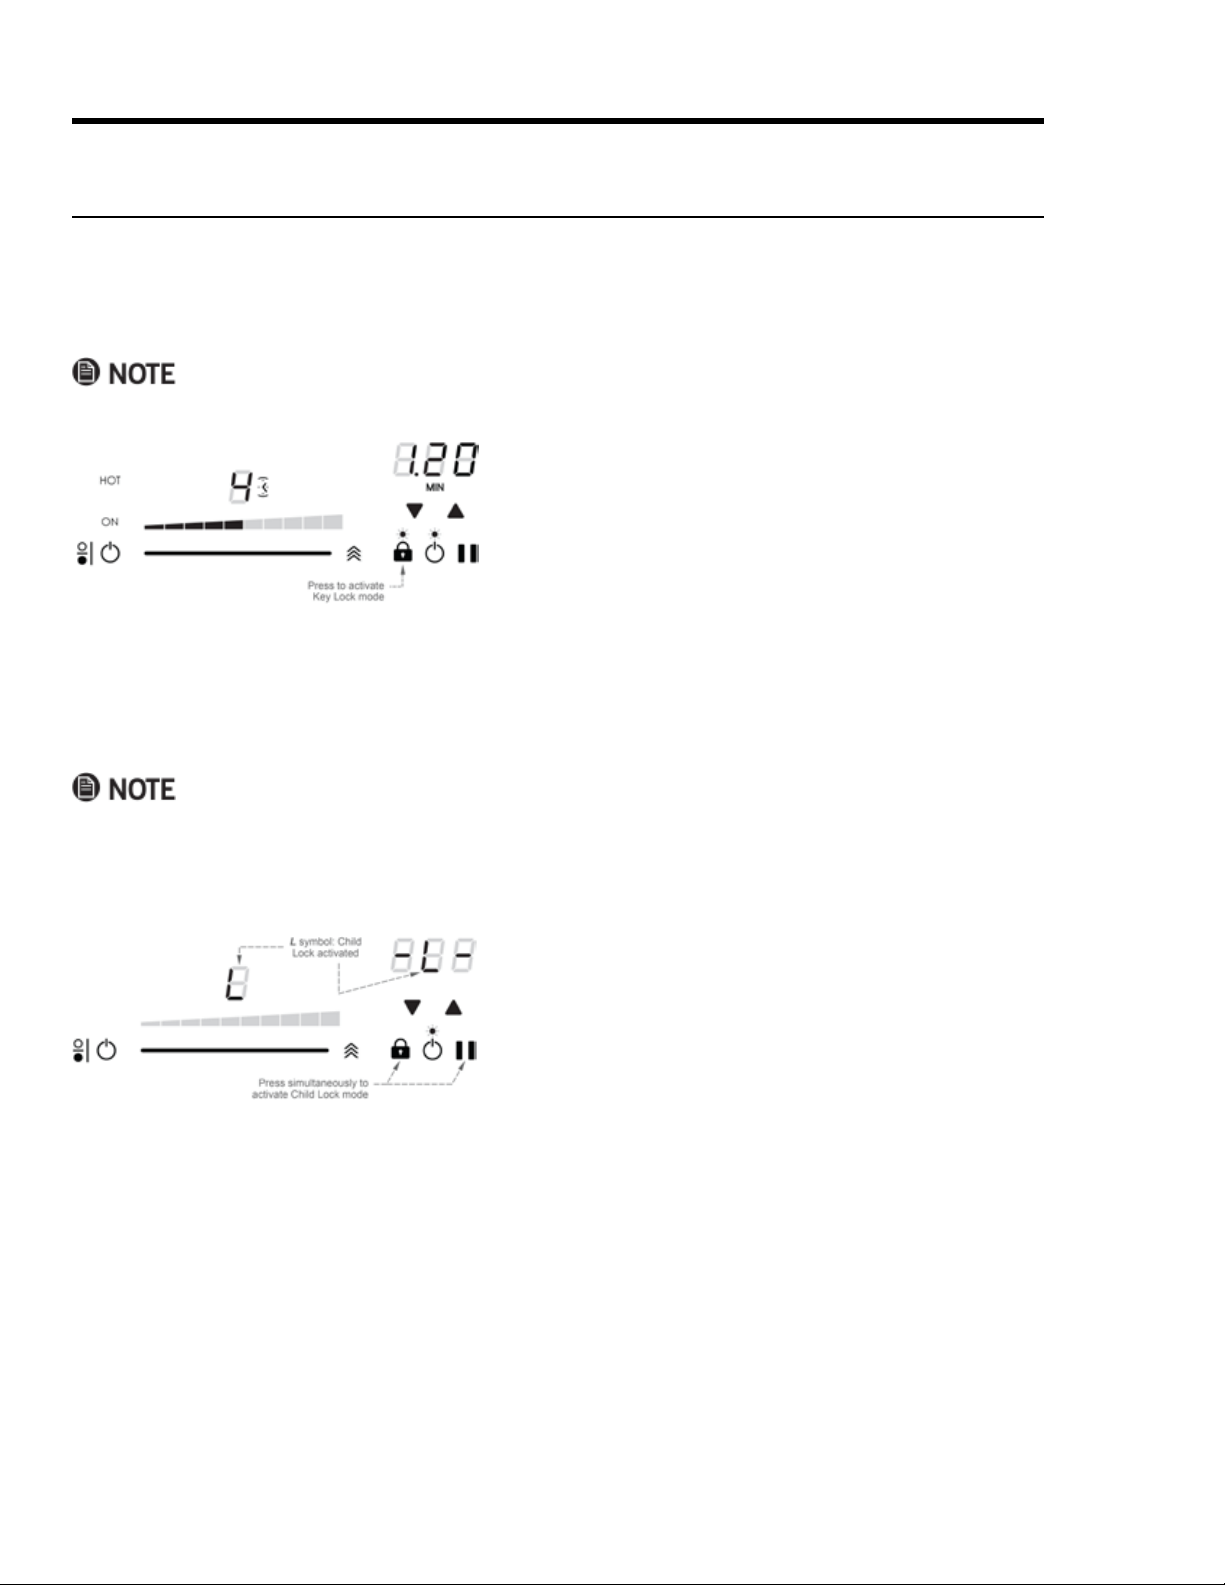
Using the Cooktop Lock System
Using Key Lock Mode
alarm (OFF) function are active.
1. Turn on and set the power levels of one or more cook zones.
2.
or change settings on active zones.
3.
and change settings on active zones.
1.
2.
inactive.
3.
Using Child Lock Mode
the main control but before activating any cook zones.
•
•
HOT indicators remain until the zones are safe to touch.
27
Operating the Oven
Control-Panel Settings
Setting the Clock
1. On the control panel, tap CLOCK.
The colon between the minutes and seconds blinks.
2. On the numeric pad, enter the current time.
3. Tap #, and set AM or PM.
4. Tap START or CLOCK.
The colon stops blinking; the time of day is set.
• After tapping CLOCK, perform Steps 2 – 4 within 6 seconds or the previously set time reappears.
•
•
Switching to Military Time (24-hr Clock)
1. CLOCK for 6 seconds.
The displays shows the time in standard mode.
2. On the numeric pad, tap #.
3. Tap CANCEL/SECURE.
The main display shows the time in military mode.
Setting the Temperature Scale
Fahrenheit (default) and Celsius are available.
1. BROIL for 6 seconds.
The current temp scale appears on the display.
2. On the numeric pad, tap #.
The display shows the selected temperature scale (F or C).
3. Tap CANCEL/SECURE.
The selected temperature scale is set.
About the Control-Panel "Beep"
The control panel beeps: 1) if you tap a key, 2) when a timer reaches zero, 3) if there is an error, and 4) when the
oven performs certain set functions. You can silence/activate the beep as desired.
1. START TIME for 6 seconds.
"Beep" appears on the display.
2. On the numeric pad, tap # > CANCEL/SECURE.
The beep is enabled/disabled.
28
Operating the Oven
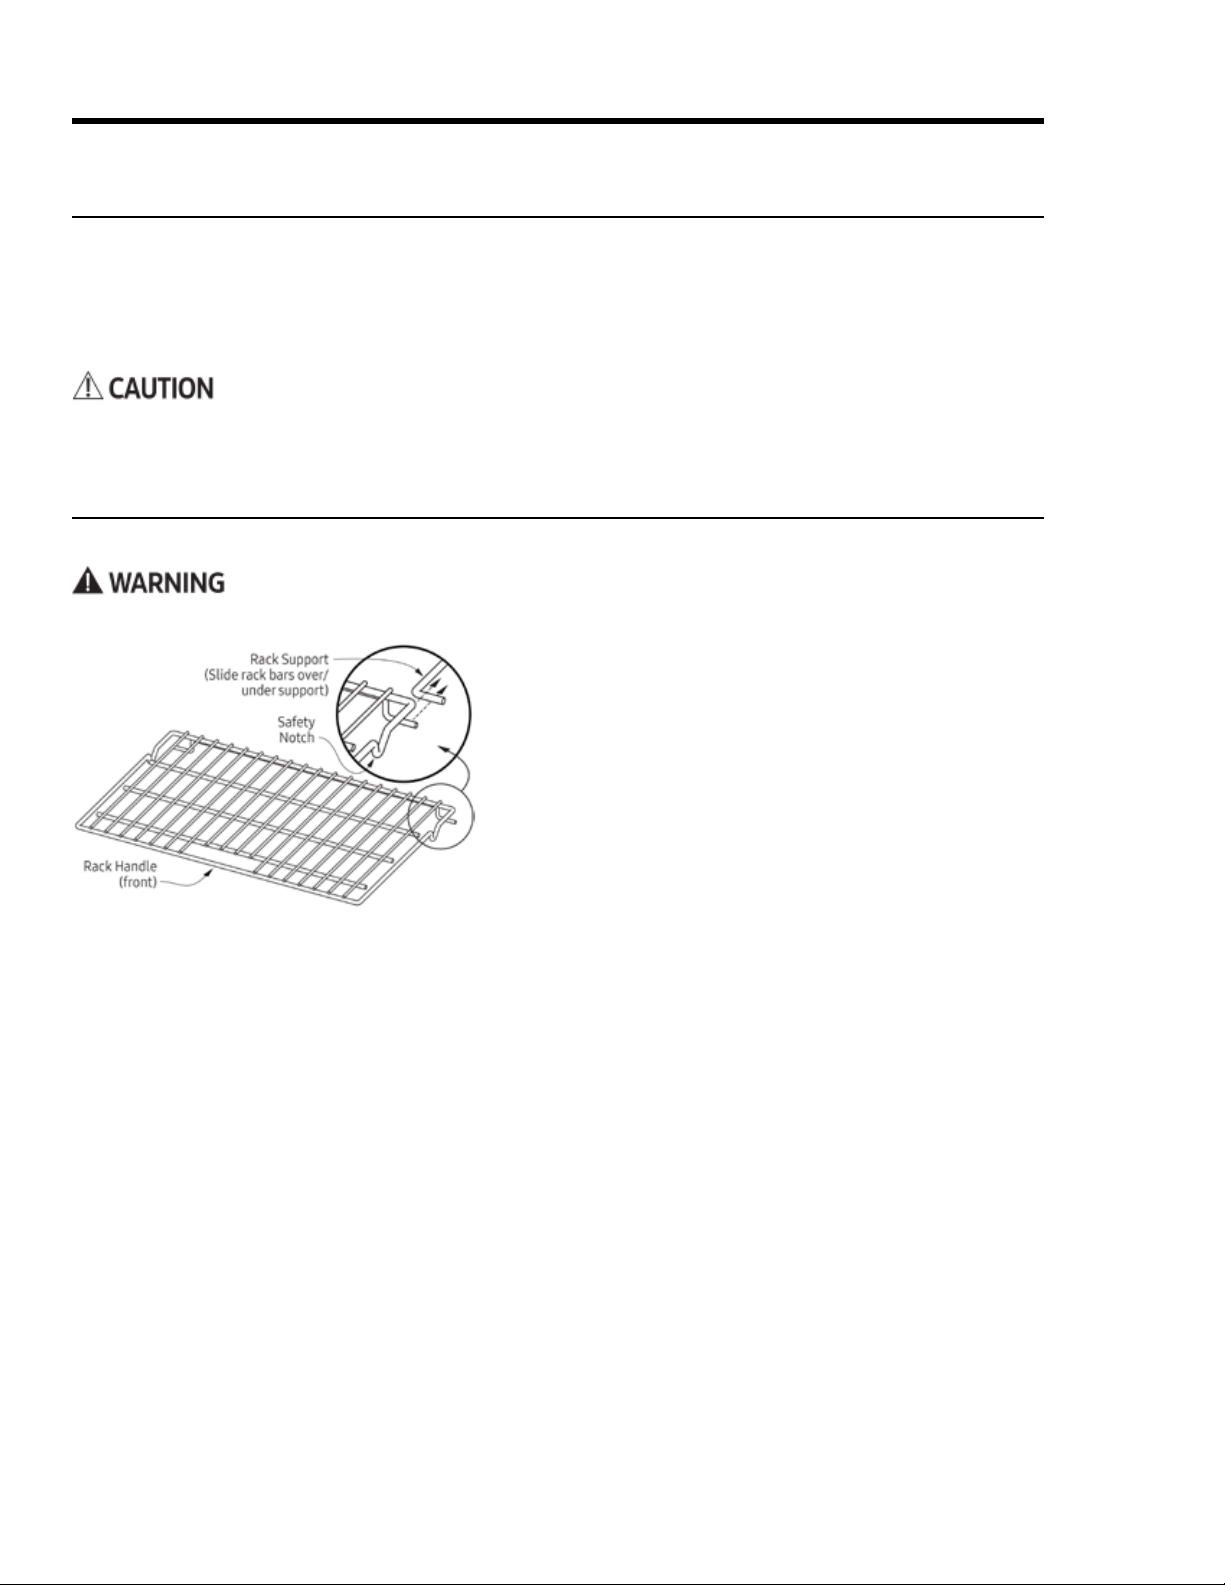
Inserting/Removing a Standard Oven Rack
1. Grasp the rack by the front corners, and slide it onto the
2. Start sliding the rack in, then tilt the front up so the safety
notches clear the ends of the rack supports.
3. Push the rack fully in.
4. Grasp the handle area at front of the rack, and pull gently
until the rack stops at the safety notches.
5. Tilt the front of the rack up so the safety notches clear the
ends of the rack supports, and pull the rack fully out.
Handle the racks only when the oven is cool. If you must reposition a rack when the oven is hot, use oven mitts.
Before Cooking
•
and set it to Bake at 400°F (204°C) for 1 hour (see Pgs. 26, 31). This process burns off manufacturing residue
• When baking/roasting, the oven preheats automatically. Preheating time varies with the temperature set
ting and your home’s electrical supply. Preheating cannot be used for broiling.
Positioning the Oven Racks
You may use either rack type (standard or GlideRack
TM
) on any rack level.
29
1. Tap a cook mode.
2. (To cook at the default temp) Tap START/CONTINUE.
START/CONTINUE.
• Available temps: 100°F – 555°F (37°C – 291°C); suggested broil temp: 555°F.
• In Pure Convection/bake/roast modes: PRE- (Preheating) and the current oven temp appear on the dis
play until the oven reaches the set temp (15 – 20 min), then a chime sounds, and PRE- disappears.
3. When the preheat chime sounds, carefully put your food in the oven.
Putting food in the oven during preheating will overcook the food.
4. CANCEL/SECURE.
Operating the Oven
Positioning the Oven Racks, cont.
Inserting/Removing a GlideRack
TM
Oven Rack
Dacor baking stone.
Running A Cook Cycle
This procedure includes selecting a cook mode, preheating the oven, inserting the food, and turning off the oven.
1. Align the left and right safety clips on the back of the rack
guides with the rack supports.
2. Push and lift the front safety clips over the front of the
rack supports.
3. Push the rack fully in.
4. Grasp the rack handle, and pull.
The safety clips keep the rack from coming off the guides.
5. Grasp the rack at the front corners, and pull gently until
the rack stops.
6. Tilt up until the front safety clips just clear the front of the
rack supports, and pull the rack fully out.
Jiggling the rack side to side as you pull eases removal.
Changing the Cook Mode While Cooking
You can change the cook mode without interrupting the cook cycle.
On the control panel, tap the new cook mode, then tap START/CONTINUE.
30
Cook Mode Description
Convection Bake
•
•
• Best for baking food in a deep ceramic dish or clay pot.
• Most items require browning on top and bottom.
Convection Broil
•
cuts of meat).
• See Broil (below) for cooking tips.
Pure Convection
•
–
–
•
•
• Many foods (e.g., pizza, cake, cookies, rolls, frozen dinners) can be cooked on multiple racks.
• Good for whole roasted duck, lamb shoulder, and short leg of lamb.
Convection Roast
Convection fan with top and bottom heat sources; rib roasts, whole turkeys and chickens, et al.
Bake
• Follow recipe cook time and temperature; use oven timers to set cook time.
• Avoid opening oven door to check progress.
• Check food at shortest recommended cook time. (Cake is done if toothpick poked in center emerges clean.)
Broil
•
•
•
• Set the timer when broiling.
•
•
• Do not use fork or knife to turn/remove meat; doing so releases natural juices, drying the meat.
•
•
Operating the Oven
About the Cook Modes
31
Operating the Oven
Bake-Mode Troubleshooting
Issue Possible Cause Solution
Cookies burnt on bottom
Oven door opened too often
Set timer to shortest suggested cook time; check food
when timer beeps; check doneness through door window
Wrong rack level Reposition rack
Cookies too dark on top
Rack level too high
Dough put in oven during preheat Put cookie dough in oven when preheating is done
Cake burnt on sides/center
not done
Oven temperature too high Reduce oven temperature
Cake cracked on top Oven temperature too high Reduce oven temperature
Cake not level Range/rack not level
Pie burnt on edges/center
not done
Oven temperature too high Reduce oven temperature
Oven/rack overcrowded
32
Operating the Oven
Subject Tip
Bake,
Convection
Bake, Pure
Convection
•
• Time all baking tasks.
• Check doneness at the shortest suggested cook time (for cake/brownies, a toothpick/skewer poked into the
center should emerge clean).
• Measure ingredients carefully and follow proven recipes.
Convection
Bake
•
• Some conventional recipes, especially homemade, may need testing and adjusting when converting to convection
baking; prepare a proven conventional recipe using the above convection time/temp guidelines; if results need
another variable, continuing this method until results are satisfactory.
Broil
• Always set a timer.
•
•
•
•
• To ease cleanup, remove broil pan and grill with food; discard grease, and soak cookware until ready to clean.
Roast
•
• Insert temperature probe halfway into center of thickest part of meat; (poultry) insert probe between body and leg
into thickest part of inner thigh; for accurate readings, probe should not touch bone/fat/gristle; check meat temp
second reading is lower, keep cooking.
•
• Roast times vary with size/shape/quality of meat and poultry; less tender cuts are best prepared in Bake mode
Bakeware
•
•
•
•
• Bake most frozen foods in their original foil containers on a cookie sheet. Follow package directions.
•
• Follow standard recipe bake time for pies and yeast breads.
•
• Set pans gently on oven racks with long sides running left to right.
Baking
•
frozen prepared foods can be cooked on two or three racks at once.
•
•
Baking
The higher the altitude, the longer foods take
ally, rising baked goods need no adjustment,
but letting the dough rise twice before the
work best, and mark your recipes accordingly.
Altitude
(ft)
Baking Powder
(ea. tsp, reduce
amt. by %)
Sugar
(ea. tsp, reduce
amt. by %)
Liquid
(for ea. cup,
add %)
3000 5 – 10 10 – 25 5 – 10
5000 10 10 20
7000 25 20 20 –25
Cooking Tips: Cook Modes and Cookware
33
Operating the Oven
Mode Temperature
Convection Bake
325°F (163°C)
Pure Convection
Bake
350°F (177°C)
Convection Roast
375°F (191°C)
Broil
555°F (291°C)
Convection Broil
without interrupting the cook cycle.
1. Tap the selected cook mode.
The icon for that mode appears on the display.
2.
tap START/CONTINUE.
• If you increase the temp by 50°F (28°C) or more, the oven
enters Preheat mode to raise the temp rapidly to the new
setting (PRE- appears on the display). You should remove
the food, and return it when PRE- disappears.
• If you lower the temp, it is best to remove the food until
the new temperature appears.
About Oven Temperatures
Using Control Lockout
CANCEL/SECURE and the oven light.
1. CANCEL/SECURE for 6 seconds.
OFF appears on the display.
2. CANCEL/SECURE for 3 seconds.
Activating control lockout turns off all active timers.

34
Using the Timers
Enabling the 12-Hr. Oven Shut-Off Timer
use. This timer automatically resets if you change the cook temperature or mode, and is automatically disabled
1. TIMER 1 for 10 seconds.
The control panel beeps, and 12Hr appears on the display, then ON appears on the display.
2. Tap #.
3. Tap CANCEL/SECURE.
The changes are saved; the clock appears on the display.
Using the Oven's Cook Timers
tor (1 or 2) appears on the display if one timer is active. Both indicators appear if both timers are active.
• When a timer goes off, it does not turn the oven off. To automatically turn the oven off when the timer goes
off, see Using Time-Delay Cooking (Pg. 32).
• Tapping CANCEL/SECURE does not reset/stop the timers.
1. On the control panel, tap TIMER 1 or TIMER 2.
2.
3. Tap START/CONTINUE.
– The cook time appears on the display; countdown starts.
– When the countdown ends, the timer indicator blinks on the display, and a beep sounds. The timers have
– Silence the alarm by tapping the blinking timer indicator, then tap CLOCK to return to the main display.
Viewing Oven Settings As the Timer Counts
While a timer is active, you can check the clock or the other timer without interrupting other settings.
Tap CLOCK to view the time of day.
Tap TIMER 1 or TIMER 2 to view either's time.
Changing the Time On An Active Timer
1. Tap the timer indicator (Timer 1 or Timer 2).
2. On the numeric pad, enter the new time, and tap START.
Stopping an Active Timer
1. Tap the timer indicator twice.
The timer zeroes out.
2. Tap CLOCK to return to the main display.
Operating the Oven
35
Using Time-Delay Cooking
About Time-Delay Cooking
• You can set the oven to turn itself on/off.
•
•
• CANCEL/SECURE.
•
– CLOCK to view the time
– START TIME
– STOP TIME
– COOK TIME
•
• Do not leave food in an inactive oven. Bacteria develops when the temperature drops below 140°F (60°C).
•
in the oven no more than 2 hours before cooking starts.)
About the Time-Delay-Cooking Keys
• START TIME: The time of day when the oven starts cooking.
• COOK TIME: The amount of time the oven cooks before entering Hold mode.
• STOP TIME: The time of day when the oven turns off and enters Hold mode.
• If you use COOK TIME or STOP TIME, the oven enters Hold mode (HLd appears on the display) when it
reaches the end of the set cook time. Oven temperature "holds" at 150°F (66°C) for 2 hours.
• Tap CANCEL/SECURE to turn the oven completely off.
• Do not leave food in the oven after Hold mode turns off.
three ways to use these keys:
• Tap START TIME, and set a time for the oven to turn on, then tap COOK TIME or STOP TIME, and set a time
for the oven to turn off.
• Set START TIME only, then turn the oven off manually when cooking is done.
• Turn the oven on manually, then tap COOK TIME or STOP TIME, and set a time for the oven to turn off.
Operating the Oven
36
Using Time-Delay Cooking, cont.
Setting a Time-Delay-Cooking Cycle
1.
2.
If you want the oven to turn on immediately and turn off automatically later, skip to Step 6.
3. Tap START TIME
time up to 22 hr 59 min beyond the present time).
4. Tap #, and select AM or PM.
If you want to set a stop time or a cook time, proceed with Step 5; otherwise, skip to Step 6.
5. Tap either COOK TIME or STOP TIME.
stop cooking. Whichever key you select, the result is the same.
be added to the cook time, which increases with the cooking temperature and amount of food.
6. Tap START/CONTINUE.
If you set a cook time or a stop time, the oven cooks until the set time, and enters Hold mode.
Operating the Oven
Using the Meat-Temperature Probe
probe registers temperatures from 100 – 200°F (38 – 93°C).
• To avoid injury, use hot pads or oven mitts to handle the probe when the oven is hot.
• Always grasp the probe by its handle. (Pulling on the cable could damage the probe.)
• Only insert the skewer into fully thawed food.
• Always remove the probe from the oven after use.
•
• The probe does not work in Broil and Sabbath modes. If you plug in the probe when in these modes, the
probe icon blinks, indicating an error.
• If you unplug the probe after tapping PROBE, the probe icon blinks, and OPn appears on the display.
• If you tap PROBE but do not plug in the probe, the mode cancels itself after 30 seconds.
•
temp reaches the selected probe temp regardless of the stop time/cook time, then enters Hold mode.
37
Operating the Oven
Using the Meat-Temperature Probe, cont.
Changing Cook Modes In Probe Mode
1. Tap CANCEL/SECURE, then tap the desired cook mode.
2. (If you also want to change the cook temp) On the numeric pad, enter the new temp.
3. Tap START/CONTINUE.
Canceling Probe Mode While Cooking
Tap PROBE twice, and unplug the temperature probe.
The oven reverts to its original settings.
When the meat reaches the set temp, the oven enters Hold mode, in which the temp lowers to 150°F (66°C) for
beyond Hold mode. Tap CANCEL/SECURE to cancel Hold mode and turn the oven completely off.
1. (With the meat ready to cook) Insert the probe skewer in the
thickest part of the meat away from fat and bone.
With fowl, hold the skewer parallel to the pan, and insert
it into the deepest part of the breast until the tip is ¾ in.
from the body cavity.
2. On the control panel, set a cook mode.
The mode’s preset temperature appears on the display; to
change the temp, see Pg. 30.
3. Tap START/CONTINUE.
PRE- appears on the display; the oven starts heating.
4. (When the oven chimes and PRE- disappears) Put on oven
mitts, and put the meat in the oven.
5. Grasping its handle, plug the probe in the outlet on the
oven chamber's right wall.
6. On the control panel, tap PROBE.
• The preset probe temp (160°F/71°C) and the probe icon
appear on the display.
• To change the probe temp, enter the new temp via the
7. Tap START/CONTINUE.
If you skip this step, Probe mode will not activate.
USDA SAFE INTERNAL MINIMUM TEMP'S
Ground Meat, Meat Combinations
Beef, pork, veal, lamb
160°F (71°C)
Turkey, chicken
165°F (74°C)
Fresh Beef, Veal, Lamb
Steaks, roasts, chops
145°F (63°C)
Poultry
Whole bird (temp taken in thigh)
165°F (74°C)
Breasts, roasts
Thighs, legs, wings
Duck, goose
Ham
160°F (71°C)
Reheat (whole or half)
140°F (60°C)
NOTE: If bacteria evolve, the temp’s needed to eliminate them

38
Operating the Oven
1. Center the food on a rack, and tap PURE CONV.
2.
(If dehydrating) Place the prepared food on a drying rack;
use the table at left to set the temp.
3. Tap START/CONTINUE.
Food Type Dehydrating Temp
Fruit
100°F (38°C)
Vegetable
125°F (52°C)
Meat
150°F (66°C)
Using Sabbath Mode
This mode complies with Jewish law for Sabbath and Holy Day use.
• Cook modes: Only Bake and Pure Convection are available.
•
• Control panel: Only the oven light and CANCEL/SECURE, START/CONTINUE, 0, 2 keys are available.
• When Sabbath mode is active, SAb appears on the display.
• After a power outage, the oven returns to Sabbath mode at the previous temperature setting.
•
mometer to track oven temp).
• While cooking, tap 2 > START/CONTINUE to raise the oven temp 25°F (15°C); tap 0 > START/CONTINUE to
lower the temp 25°F (15°C). Per Jewish law, the bake elements are adjusted randomly when these keys are
tapped, and the display is unchanged.
Activating Sabbath Mode
Tap each successive key within 6 seconds of the previous, or the process cancels itself.
1. Tap #.
2. Tap BAKE or PURE CONV.
3. Tap 0 (decrease) or 2 (increase) repeatedly to change the preset oven temperature on the display.
4. Tap START/CONTINUE.
Sabbath mode is active; the oven cooks in the mode you selected in Step 2.
Dehydrating/Defrosting Food
You can dehydrate or defrost food at low heat settings in Pure Convection mode.
Cook meats immediately after defrosting.
Using Proof Mode
1. Put the dough in a greased bowl, and cover with a damp cloth or with plastic wrap coated with nonstick spray.
2. On the control panel, tap PROOF.
3. Put the dough in the oven, and turn on the oven light.
4. Set the timer for the suggested rise time.

39
Operating the Oven
Adjusting the Oven-Temperature Offset
may vary from your previous oven. If cooking results on this oven differ from those of your previous oven, you
and the temperature varies as heating elements cycle on and off.
1. 0 and #.
Momentarily, PASS appears on the display.
2. 6428, and tap START/CONTINUE.
SLCt (Select) appears on the display.
3. Select a cook mode.
The mode's current offset temp appears on the display. (00 appears if you have never adjusted the temp.)
4. On the numeric pad, enter the desired increase/decrease in temperature.
– To enter a decrease, tap #, then the amount; to enter an increase, simply enter the amount.
– Edit appears on the
display as you start entering the offset amount.)
5. Tap START/CONTINUE.
The setting is saved.
6.
7. Tap CANCEL/SECURE.
40
Maintaining the Cooktop
Cleaning Stainless-Steel Surfaces
To prevent scratching, wipe “with” the grain, and do not clean with abrasive cleaners/scrubbers.
1.
2. Clean one small area at a time.
3. With a soft, dry cloth, wipe the metal dry.
Cleaning the Oven-Door Glass
1. Clean the door glass (inside and out) with a mild glass cleaner (per manufacturer instructions).
2. With a clean, soft cloth moistened with clean water, wipe the glass.
3.
Cleaning the Control Panel
1. CANCEL/SECURE for 6 seconds.
OFF appears on the display; the oven cannot be activated.
2.
3.
4. CANCEL/SECURE for 6 seconds.
The control panel is enabled.
Maintaining the Range
• Turn off power, and let all surfaces cool before cleaning the range.
• Wear rubber gloves, and do not use abrasive cleaners/scouring pads anywhere on the range.
• Do not spray liquids anywhere on the range. (Spray the cloth or paper towel.)
General Exterior Maintenance
•
•
cleaners/scrubbers may permanently damage the cooktop.
•
spatula, or similar tool may damage the cooktop.
Cleaners to Avoid
These types of cleaners can discolor, scratch, stain, etch, or otherwise mar the cooktop glass:
•
• Caustic cleaners (e.g., oven cleaners)
• Abrasive pads (e.g., metal or nylon scouring pads, Scotch Brite pads, SOS pads, certain sponges)
• Powder/liquid cleaners containing chlorine bleach or abrasives/cleaners
• Flammable liquids (e.g., paint thinner, turpentine, acetone, rubbing alcohol); some of these may not harm
the glass but are not wise to use on a cooktop.
41
Maintaining the Cooktop, cont.
Performing Special Cleaning Tasks
Maintaining the Range
area, then apply Dacor Cooktop Cleaning Creme to the cooktop. (See the section below.)
Cookware Marks
1.
soiled area, and gently scrub with a wet dishcloth.
2. Wipe the area with clean water, then dry the cooktop, and apply Dacor Cooktop Cleaning Creme.
Water Spots
1. Apply undiluted white vinegar to the affected area, then wipe the area with clean water.
2. Dry the cooktop surface, and apply Dacor Cooktop Cleaning Creme.
Scratches
• Surface scratches do not compromise cooking ability.
• Avoid scratches by using clean, smooth cookware and removing gritty food spills quickly.
• Keep the cooktop clean, and regularly apply Dacor Cooktop Cleaning Creme.
Using Dacor Cooktop Cleaning Creme
touch beforehand.
1. With a clean, damp cloth, apply ¼ tsp of cleaning creme to the glass.
2. With a second clean, damp cloth, remove residual cleaning creme.
3. With a clean, dry cloth, dry the cooktop.
Sugar, Syrup, Tomato Spills
Remove these while the cooktop is hot
the provided scraper, let the cooking surface cool, then with a
dry towel/sponge, wipe up the residue.
1. Clear away all items, and via the main power button, turn
OFF the cooktop.
2. Holding the scraper slightly angled with the blade at
against the surface, push the spill out of the cook zone. (Do
not let the corner of the blade scratch the cooktop.)
3.
4. Apply Dacor Cooktop Cleaning Creme. (See the section below.)
42
Using Self-Cleaning Mode
About Self-Clean Mode
•
surface deposits.
•
•
reminding you to remove the probe.
Self-Cleaning the Oven
•
•
1.
2.
plastic scouring pad on heavily soiled surfaces.)
3. Gently clean the door gasket (see Pg. 41).
4. Ventilate the kitchen well.
5. Shut the oven door, and tap SELF CLEAN > START/CONTINUE.
– The cleaning icon ( ) appears on the display.
– The lock icon ( ) appears, indicating the oven door is locked (to prevent injury from the intense heat
generated during the cycle). If you do not shut the door, an error message appears; tap CANCEL/SE-
CURE, wait 1 minute, and close the door. When the error clears, retry Step 5.
– ON appears on the display, indicating the oven's heating elements are on.
• CANCEL/SECURE. The oven door remains locked until the oven chamber has
•
–
–
–
Maintaining the Range
43
Maintaining the Range
Using Self-Cleaning Mode, cont.
Setting Delayed Self-Cleaning
1.
2. Tap SELF CLEAN > START TIME.
3.
4. Tap START/CONTINUE.
DELAY
• CLOCK to view the time of day; with the clock displayed,
you can push START TIMEDELAY disap
pears from the display, and ON appears.)
• CANCEL/SECURE.
–
–
Steam-Cleaning the Oven
This function cleans light soil from the oven chamber. Always start with a cool oven.
• To avoid steam burns, do not pour water into a hot oven.
•
1. Remove the racks and all foreign items from the oven chamber.
2.
3.
hangs the front between the door and door gasket (to catch water that may seep out), and close the door.
4. Tap BAKE, and set the oven no higher than 185°F (85°C), then tap START/CONTINUE.
5. Set the timer (see Pg. 31) to 20 min.
6. When time is up, tap CANCEL/SECURE, and 10 minutes later, open the door.
7.
8. Dry all interior surfaces with paper towels, and leave the door ajar to let moist air escape.
44
Cleaning the Oven Accessories
Cleaning the Convection Filter
Maintaining the Range
1.
and gently push up with your thumb(s) to release the clips.
2.
3.
4. With the clips parallel with and facing the crossbar, center
ing the clips onto the crossbar.
Cleaning the Oven-Door Gasket
This gasket traps hot air in the oven by sealing the seam around the front of the oven chamber when the door
is closed. Clean the gasket occasionally so residue does not compromise the seal around the oven door.
1.
2. Dab the gasket with a soft cloth moistened with clean water.
Cleaning the Oven-Rack Supports
Using Self-Cleaning Mode, Pg. 39.)
Cleaning the Oven Racks
•
• You may immerse a standard oven rack in water; do not immerse a GlideRack; doing so can foul the glide
mechanism. Carefully wipe a GlideRack mechanism with a damp cloth.
• For heavy soil, use a scouring pad with soap and water, or a solution of ½ cup ammonia to 1 gallon water.
45
Maintaining the Range
1. Turn off power to the oven at the power source.
2.
knife, and pull the cover straight out.
3. Pull the spent bulb straight out of the socket.
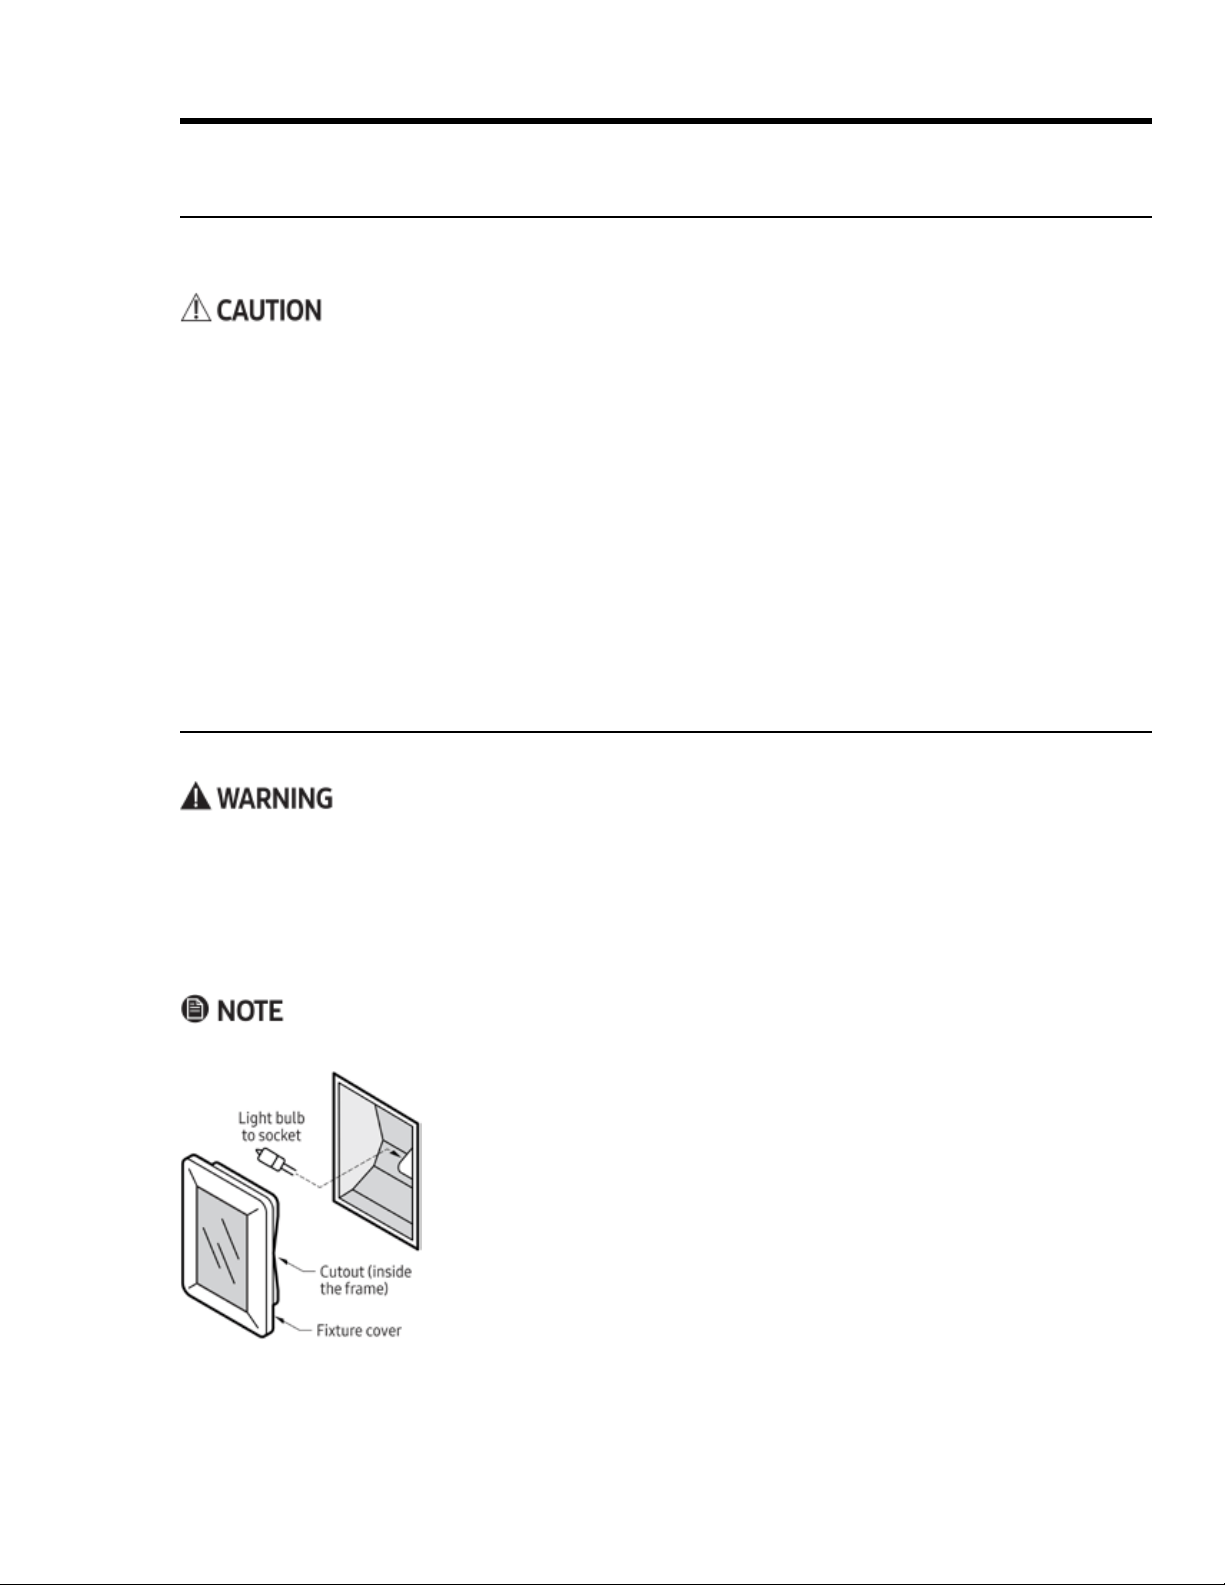
4. Wearing a glove, take the new bulb, and insert it in the socket.
5.
gently press the cover into place.
6. Return power to the oven, and reset the clock (Pg. 24).
Replacing the Oven Lights
If no lights work, see Troubleshooting, Pg. 44, before replacing them.
• Perform this procedure only if the oven and bulbs are cool.
•
without the covers in place.
•
•
•
Cleaning the Oven Accessories, cont.
Cleaning the Meat-Temperature Probe
Do not immerse the probe in water. Doing so will likely damage the probe's electronic circuitry.
1. Clean the skewer with a plastic scouring pad and hot, soapy water.
2. Gently wipe the cable with a cloth moistened with soapy water.
3. Wipe the handles and plug with a soft sponge soaked with warm, soapy water.
4. Carefully wipe off soap with a damp cloth, keeping water away from the probe's electrical circuitry.
5. Thoroughly dry all parts of the probe with a clean, soft cloth.
Cleaning the Oven-Light Lens
1.
2. With a clean, soft cloth moistened with clean water, rinse the lens.
3.
46
Troubleshooting
Review this section for solutions to various operational/maintenance issues, which may help you avoid a ser
Cooktop
Issue Possible Cause Solution
Display is blank
Bad fuse/tripped circuit breaker.
Replace fuse/reset circuit breaker.
Controls unre-
sponsive
Moisture/residue on panel.
Wipe away moisture/residue.
Control lockout active.
Disable control lockout (Pg. 27).
Oven-Control Display
Issue Possible Cause Solution
Nothing works
Range not connected to power source
Have licensed electrician connect cooktop to home power supply.
Power supply is off Check for tripped breaker/blown fuse.
Power failure Call power company.
Cooktop interior overheating
Inexplicable
malfunction
Spills or items on/near controls Clean/dry the area, reset control(s); keep controls clean/clear.
Power surge has shut off cooktop
Do not put empty cookware on cooktop or let pans boil dry.
Cook zone cycles
rapidly on/off
Cookware off center Reposition cookware.
Cookware bottom not flat
Cookware too small for cook zone
Cookware/cooktop
vibrates/buzzes
Cooktop/cookware is wet/greasy Before use, ensure cooktop/cookware is clean/dry.
No Pan Detected
designator
flashes
• Cook zone empty
•
• Cookware bottom not flat
Cookware off center Center cookware on cook zone (see Pg. 15).
Cookware too small for cook zone Move cookware to smaller cook zone.
Food does not
heat or heats too
slowly
• Cookware on wrong cook zone
•
• Cookware bottom not flat
Cookware off center Center cookware on cook zone (see Pg. 15).
Cookware too small for cook zone Move cookware to smaller cook zone.
Voltage weak Have licensed electrician check voltage supply.
E2 error code
appears
Cook zone element overheated
Turn off cook zone, let element cool; remove unneeded items from cooktop,
clear the chassis vents; if element still does not work properly, call for service.
Spills or items on/near controls Clean up spills; move items away from controls.
Reset cooktop Turn off cooktop for 10 sec's, restore power; if error persists, call for service.
47
Troubleshooting
Issue Possible Cause Solution
Oven not turning on
Oven not fully plugged in.
Verify that plug is properly inserted in outlet.
Bad fuse/tripped circuit breaker.
Replace fuse/reset circuit breaker.
Oven too hot.
Incomplete service wiring.
Call for service.
Power outage.
Check house lights; call service provider if needed.
Oven light not turning
on
Tighten/replace light; call for service if light stays off.
Broken light switch.
Call for service.
Excessive smoke during
broiling
Meat too close to broil element.
Meat not properly prepared.
Grease buildup in oven chamber.
Clean the oven; check oven regularly for cleanliness.
Food not cooking
properly
Mispositioned/unlevel rack.
See Positioning the Oven Racks (Pg. 25).
Oven temp improperly set.
See About Oven Temperatures (Pg. 30).
Cook temp too hot/cold
Adjust oven temp.
See Adjusting the Oven-Temperature Offset (Pg. 36).
• Water is dripping
• Steam from door seam
• Residual water in oven
Type of food being cooked.
Oven will not self-clean
Oven is too hot.
Oven controls incorrectly set.
See Using Self-Cleaning Mode (Pg. 39).
Control lockout is enabled.
Disable control lockout (Pg. 30).
Excessive smoke when
self-cleaning
Oven door stays locked
after self-cleaning
Oven is too hot.
Oven still dirty after
self-cleaning
Oven controls incorrectly set.
See Using Self-Cleaning Mode (Pg. 39).
Oven too heavily soiled.
two cycles or longer cycles.
Steam from oven vent
Burning or oily odor
emits from oven vent
Using
Self-Cleaning Mode (Pg. 39).
Strong odor
Insulation in new oven.
Run oven empty on Bake at 400°F for 1 hr.
Fan noise
Convection fan cycling on/off.
Oven racks hard to slide
Chrome racks were left in oven
Oven door is locked
Tripped circuit breaker or power
outage while door was locked.
Using Control Lockout (Pg. 30).
Oven

48
Warranty
What Is Covered
CERTIFICATE OF WARRANTIES: DACOR RANGES WITHIN THE 50 STATES OF THE USA, THE DISTRICT OF CO-
LUMBIA, AND CANADA:
Full 1-Year Warranty
The warranty applies only to Dacor Heritage appliances sold to the original purchaser, starting from the origi
nal retail purchase date or closing date for new construction, whichever period is longer. The warranty is valid
If, within 1 year of the original purchase date, your Dacor Heritage product malfunctions due to material or
manufacturing defect, Dacor will restore the appliance to its proper function at no charge to you.
All cosmetic damage (e.g., scratches on stainless steel, paint/porcelain blemishes) to the appliance or includ
ed accessories must be reported to Dacor within 60 days of the original purchase date to qualify for warranty
coverage.
Limitations of Coverage
products with a production date greater than 5 years, products sold “As Is,” and products
the purchaser's responsibility.
The warranty is null and void:
• on any product whose serial numbers and tags have been altered/defaced/removed.
•
The owner must provide proof of purchase or closing statement for new construction upon request.
All Dacor products must be accessible for service.
OUTSIDE THE 50 STATES OF THE USA, THE DISTRICT OF COLUMBIA, AND CANADA:
Limited First-Year Warranty
If your Dacor product malfunctions within 1 year of the original purchase date due to a defect in material or
workmanship, Dacor will furnish a new part, FOB factory to replace the defective part.
Delivery, installation, labor costs, and other service fees are the purchaser's responsibility.

49
Warranty
What Is Not Covered
• Slight color variations due to differences in painted parts, ambient lighting, product location, other factors.
• Service calls to educate the owner on product use and care.
• Service fees for travel to islands and remote areas (including but not limited to ferries, toll roads, and other
• Consequential or incidental damage (including but not limited to food or medicine loss, lost work time, or
restaurant meals).
•
• Product failure due to improper installation.
•
•
•
•
•
due to abuse, neglect, improper use/care.
Out-of-Warranty Products
Assurance nonetheless. Dacor reviews each issue and customer concern to provide the best possible solution
for the customer under the individual circumstances.

Notes
fold here
DACOR
ATTN WARRANTY PROCESSING DEPT
PO BOX 90070
CITY OF INDUSTRY CA 91715-9907
NO POSTAGE
NECESSARY
IF MAILED
IN THE
UNITED STATES
BUSINESS REPLY MAIL
FIRST-CLASS MAIL CITY OF INDUSTRY CAPERMIT NO 1600
POSTAGE WILL BE PAID BY ADDRESSEE
Website: www.dacor.com/customer-care/contact-us Customer Assurance: 833-353-5483
WARRANTY INFORMATION
IMPORTANT:
Your warranty will not be activated until you activate it online or return this form to Dacor. If you have purchased more
than one Dacor product, please return all forms in one envelope, or activate the warranty online for each product.
Your willingness to take a few seconds to complete the section below will be sincerely appreciated. Thank you.
1. How were you first exposed to Dacor products? (Please check one.)
A. T.V. Cooking Show F Builder
B. Magazine G. Architect/Designer
C. Appliance Dealer Showroom H. Another Dacor Owner
D. Kitchen Dealer Showroom I. Model Home
E. Home Show J. Other
2. Where did you buy your Dacor appliances?
A. Appliance Dealer D. Builder
B. Kitchen Dealer E. Other
C. Builder Supplier
3. For what purpose was the product purchased?
A. Replacement only C. New Home
B. Part of a Remodel D. Other
4. What is your household income?
A. Under $75,000 D. $150,000 – $200,000
B. $75,000 – $100,000 E. $200,000 – $250,000
C. $100,000 – $150,000 F. Over $250,000
5. What other brands of appliances do you have in your kitchen?
A. Cooktop C. Dishwasher
B. Oven D. Refrigerator
6. Would you buy or recommend another Dacor product?
Yes No
Comments
Owner Last Name (please print) First Middle Init.
Street
City State Zip
Purchase Date Email Phone
Dealer
City State Zip
cut herecut here
Please visit www.dacor.com to activate your warranty online.
Thank you very much for your assistance. The information you
have provided will be extremely valuable in helping us plan
for the future and in giving you the support you deserve.
Please be assured that Dacor will never sell your name or any information on this form for mailing-list purposes, as we do not
consider it a proper way of expressing our gratitude for your having chosen Dacor products for your kitchen!