
User Manual
Heritage Pro Range
HDPR30S, HDPR36S, HDPR48S, HDER30S, HDER36S, HDER48S
Part No. 113429 Rev A
2 English
Table of Contents
Before You Begin 5
Important Notes To the Owner 5
Energy-Saving Tips 5
About the Oven Vent 5
Regulatory Notice 6
Important Safety Instructions 7
Safety Symbols and Cautionary Information 7
Use-and-Care Safety Instructions 8
Product Overview 12
Included Accessories: 30" HDPRS/HDERS 12
Included Accessories: 36" and 48" HDPRS/HDERS 13
HDPRS/HDERS External Features 14
HDPRS/HDERS Internal Features 15
HDPRS/HDERS Control Panel 16
HDPRS/HDERS Control-Panel Display 17
Operating the Cooktop 18
Assembling the Burners 18
Using the Griddle 19
Before Using the Cooktop 20
Selecting the Cookware 20
Lighting a Burner 20
Operating the Oven 21
Control-Panel Settings 21
About the Control-Panel "Beep" 22
Before Cooking 22
Positioning the Oven Racks 22
Running a Cook Cycle 23
About the Cook Modes 24
Cooking Tips 25
About Oven Temperatures 27
Using Control Lockout 27

3English
Table of Contents
Operating the Oven, cont.
Using the Timers 28
Using Time-Delay Cooking 29
Using the Meat-Temperature Probe 30
Dehydrating/Defrosting Foods 32
Using Proof Mode 32
Using Sabbath Mode 32
Adjusting the Oven-Temperature Offset 33
Maintaining the Range 34
General External Maintenance 34
Maintaining the Cooktop 34
Using Self-Clean Mode 36
Steam-Cleaning the Oven 38
Cleaning the Oven Accessories 38
Replacing the Oven Lights 40
Troubleshooting 41
Gas Safety 41
Surface Burners 41
Control Display 41
Oven 42
Warranty 43
What Is Covered 43
What Is Not Covered 44
Out-of-Warranty Products 44

4 English
To Our Valued Customer:
Congratulations on your purchase of the very latest in Dacor® products! Our unique combination of
features, style, and performance make us a great addition to your home.
To familiarize yourself with the controls, functions, and full potential of your new Dacor range, read
this manual thoroughly, starting at the Before You Begin section (pg. 5).
Dacor appliances are designed and manufactured with quality and pride, while working within the
framework of our company values. Should you ever have an issue with your range, rst consult the
Troubleshooting section (Pgs. 41 – 42), which gives suggestions and remedies that may pre-empt a
call for service.
Valuable customer input helps us continually improve our products and services, so feel free to
contact our Customer Assurance Team for assistance with all your product-support needs.
Dacor Customer Assurance
14425 Clark Avenue
City of Industry, CA 91745
Telephone:
833-35-ELITE (833-353-5483) USA, Canada
Fax: (626) 403-3130
Hours of Operation:
Mon – Fri, 5:00 a.m. to 5:00 p.m. Pacic Time
Website: www.dacor.com/customer-care/contact-us
Thanks for choosing Dacor for your home. We are a company built by families for families, and we
are dedicated to serving yours. We are condent that your new Dacor range will deliver a top-level
performance and enjoyment for decades to come.
Sincerely,
The Dacor Customer Assurance Team
5English
Before You Begin
Important Notes to the Owner
Energy-Saving Tips
• During cooking, the oven door should be closed except when you turn food. Leaving the door closed also
maintains oven temperature, which saves energy.
• If cooking longer than 30 minutes, you can switch the oven off 5-10 minutes before the cooking is done. The
residual heat nishes cooking the food.
• Plan oven use to avoid turning the oven off between cooking tasks.
• When possible, cook multiple items simultaneously.
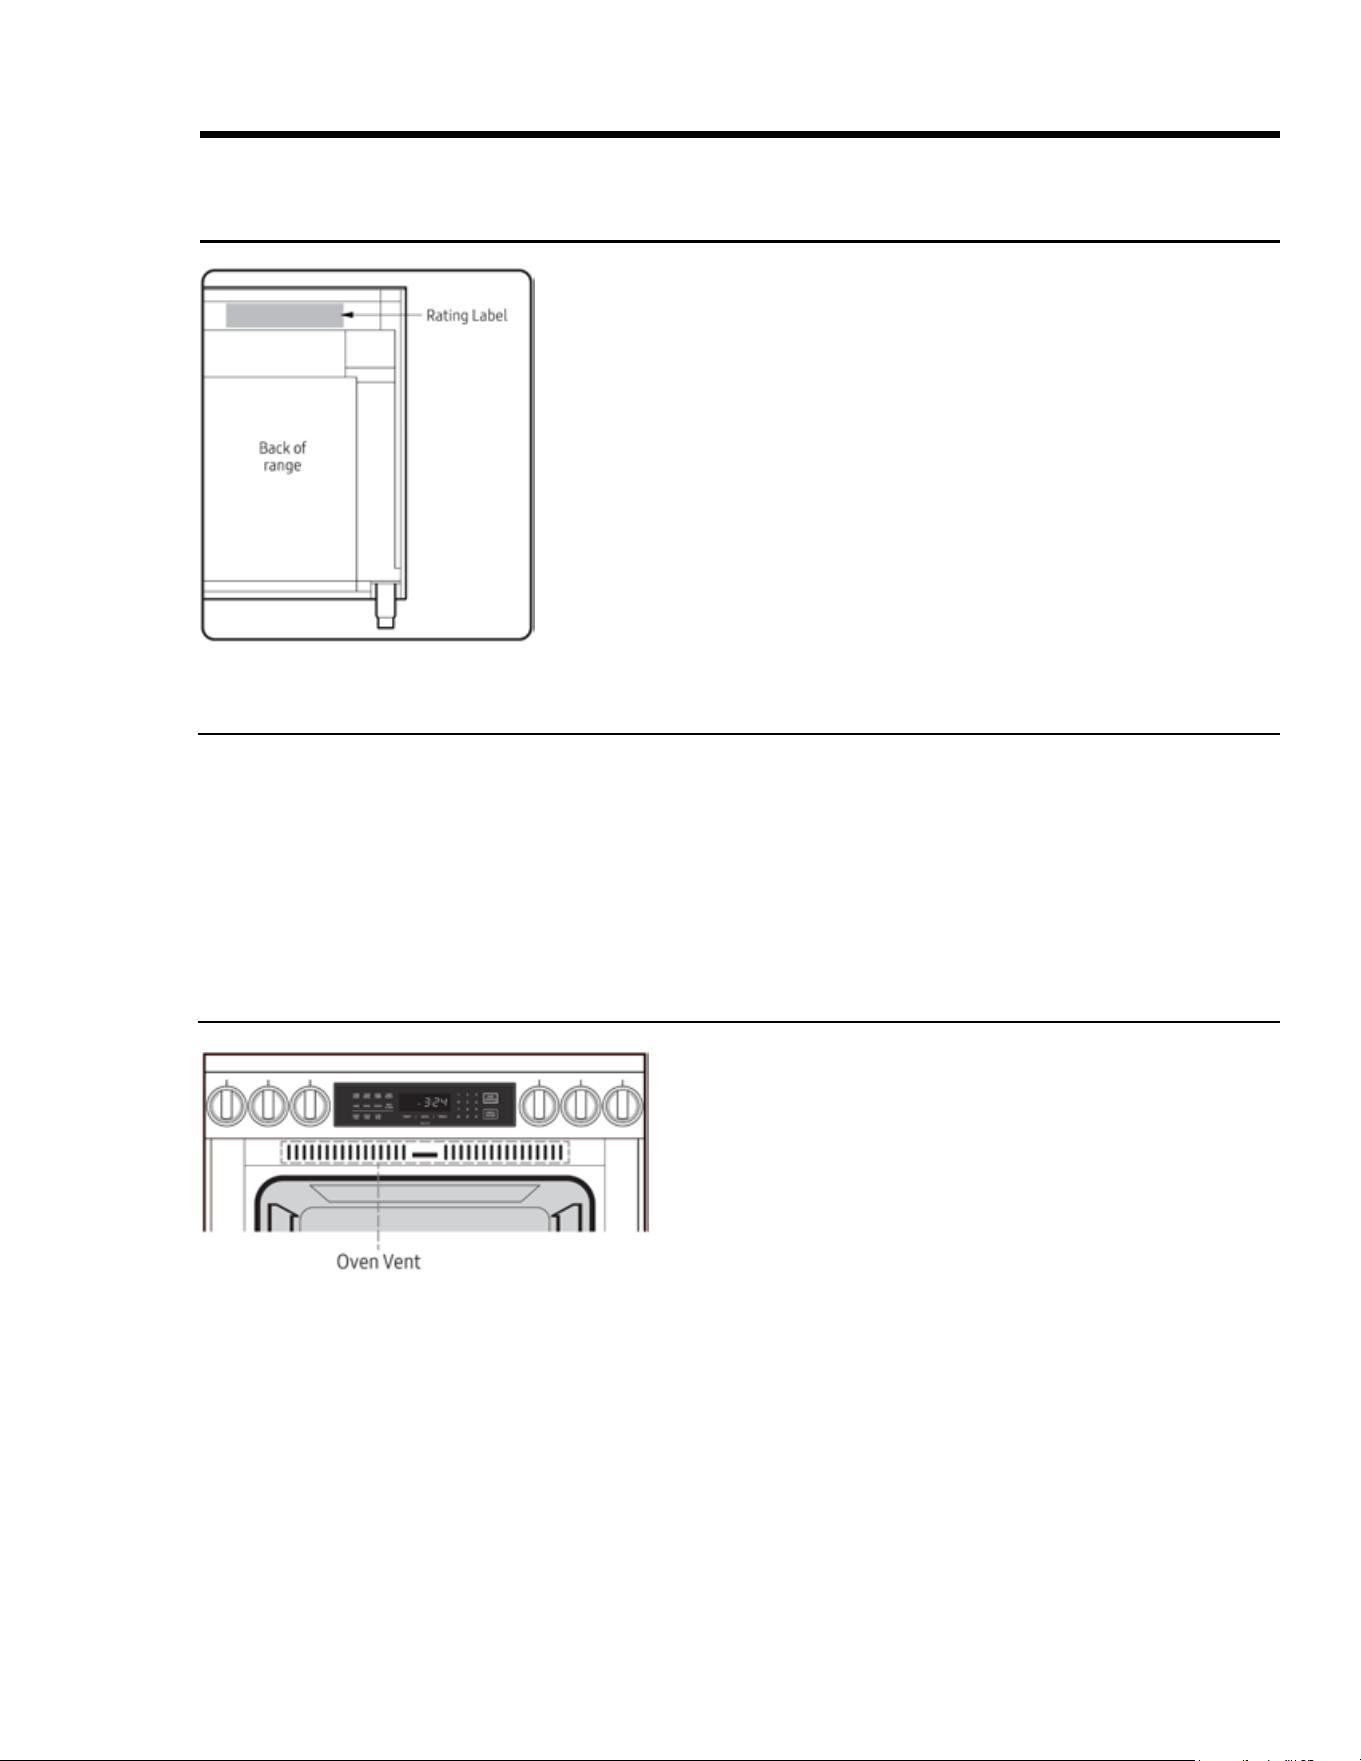
About the Oven Vent
• Electrical and gas equipment with moving parts can be
dangerous. Read and follow closely the Important Safety
Instructions section (Pgs. 8 – 11) to minimize risk of prop-
erty damage, personal injury, and death.
• For best results, maintain the range as instructed in this
manual.
• Keep this manual handy for personal and professional
reference.
• Wipe down the range's exterior surfaces before its rst
use. Then, ventilate the kitchen well, remove the accesso-
ries from the oven chamber, and set the oven to bake at
400°F (204°C) for 1 hour. There will be a distinct odor; this
is normal.
• The oven vent is above the oven chamber and can be
seen when you open the door. When the door is closed,
air is drawn in through a vent at the bottom of the door,
up through the door, out a corresponding vent in the top
of the door through the vent you see at left, and into the
cooktop to cool internal components.
• Proper air circulation promotes burner combustion prob-
lems and ensures good performance. Do not cover/block
any part of the oven's vent system.
• When the oven is in use, be cautious near its door. Steam
and hot air emitted through the vent system can burn
skin and melt certain items.

6 English
Regulatory Notice
Any modications not expressly approved by the party responsible for compliance could void the user's
authority to operate the equipment. This device complies with Part 15 of FCC Rules. Operation is subject
to two conditions: 1) This device may not cause harmful interference; and 2) this device must accept any
interference received, including that which causes undesired operation. For products available in the US/
Canadian markets, only Channels 1 – 11 are available.
FCC STATEMENT
This equipment was tested and found compliant within the limits for a Class B digital device, pursuant to
Part 15 of FCC Rules. These limits are meant to reasonably protect against harmful interference in a res-
idential installation. This equipment generates, uses, and can radiate radio-frequency energy, and, if not
installed and used as instructed, may disrupt radio communications. However, interference may still occur
in a given installation, which can be determined by turning the unit off and on. In case of disruption, the
user should try to correct the interference by one or more of these measures:
• Reorienting or relocating the receiving antenna
• Increasing the separation between the equipment and receiver
• Connecting the equipment to an outlet on a different circuit than the radio/TV
• Consulting the dealer or an experienced radio/TV technician for help.
FCC RADIATION-EXPOSURE STATEMENT
This equipment complies with FCC radiation-exposure limits set forth for an uncontrolled environment and
should be installed/operated with at least 8" (20 cm) between the radiator and your body. This device and
its antenna(s) must not be co-located or operated in conjunction with any other antenna or transmitter.
2. IC (Industry Canada) Notice
“IC” before the radio certication number signies that Industry Canada technical specications were met.
Operation is subject to two conditions: 1) This device may not cause interference; and 2) this device must
accept any interference received, including that which causes undesired operation. This Class B digital
apparatus complies with Canadian ICES-003. For products available in the US/Canadian markets, only
Channels 1 – 11 are available.
IC RADIATION-EXPOSURE STATEMENT
The range complies with IC RSS-102 radiation-exposure limits set for an uncontrolled environment and
should be installed/operated so there is at least 8" (20 cm) between the radiator and your body. This device
and its antenna(s) must not be co-located or operated in conjunction with any other antenna or transmitter.
General Safety Instructions
Testing found the range compliant with limits for a Class B digital device, pursuant to Part 18 of FCC rules.
These limits are meant to reasonably protect against harmful interference in a home installation. The
range generates, uses, and can radiate radio-frequency energy and, if not installed and used as directed,
may harmfully impede radio communications; however, interference may still occur in a given installation.
In case of disruption, which can be determined by turning the unit off and on, the user should try to correct
the condition via one or more of these measures:
• Reorienting or relocating the receiving antenna
• Increasing the separation between the unit and receiver
• Connecting the equipment to an outlet on a different circuit than the radio/TV.
1. FCC (Federal Communications Commission) Notice
7English
Safety Symbols and Cautionary Information
Electrical and gas equipment can be dangerous if not handled properly. The Important Safety Instructions in
this manual are intended to minimize the risk of property damage, personal injury, and death. Carefully follow
the instructions in this manual.
Important Safety Instructions
About the Symbols In This Manual
These icons alert you to potentially unsafe conditions or helpful information.
Hazards or unsafe practices that may result in severe personal injury or death.
Hazards or unsafe practices that may result in electric shock, personal injury, or property damage.
Useful tips and instructions.
State of California Proposition 65 Warning
• The range contains chemicals known to the State of California to cause cancer and birth defects or other
reproductive harm.
• Gas appliances can cause low-level exposure to Proposition 65-listed substances (carbon monixide, formal-
dehyde, soot, etc) caused by the incomplete combustion of LP (liquid propane) or natural gas.
Commonwealth of Massachusetts
• The range must be installed by a plumber or gas tter qualied or licensed by the State of Massachusetts.
• If using ball-type gas shut-off valves, you must use the T-handle type.
• Flexible gas lines must not be connected in series.

8 English
Important Safety Instructions
Use-and-Care Safety Instructions
Read these instructions thoroughly to reduce the risk of property damage, re, personal injury, and death, and
to ensure proper installation.
General Safety
• Do not touch any part of the range during or immediately after cooking.
• Learn where the gas-supply valve is and how to open/close it.
• When returning the range to its operating position, make sure it engages the anti-tip bracket.
• Do not leave children alone – Children should not be left alone or unattended in area where appliance is in
use. They should never be allowed to sit or stand on any part of the appliance.
• Do not keep objects of interest to children on/above/around the range.
• Do not operate the range if it is damaged, if it malfunctions, or is missing parts.
• Do Not Heat Unopened Food Containers – Buildup of pressure may cause container to burst and result in
injury.
• Do not use oven cleaners or liners in/around the oven.
• Use only dry pot holders – Moist or damp potholders on hot surfaces may result in burns from steam. Do
not let potholder touch hot heating elements. Do not use a towel or other bulky cloth.
• Do not use the range to heat sealed containers.
• Do not repair/replace any part of the range except as instructed in this manual; all other service must be
performed by a qualied technician.
• Do not strike the oven-door glass.
• In disposing of the range, remove the power cord and door to avoid a safety hazard.
• Cook meat to an internal temp of 160°F (71°C) and poultry to an internal temp of 180°F (82°C).
• Do not manually ignite the cooktop burners during a power outage.
• Keep combustible material (e.g., gasoline, alcohol, benzene) away from the range.
• An air curtain or range hood that blows air onto the range, shall not be used unless the hood and range
comply with the Standard for Domestic Gas Ranges, ANSI Z21.1 • CSA1.1, and are listed by an independent
testing lab for combination use.
Fire Safety
• Do not store/place/use combustible items (e.g., paper, plastic, fabrics, gasoline) near the range.
• Do not wear loose-tting or hanging garments or accessories while using the range.
• Keep ammable items away from the cooktop burners.
• Regularly clean the oven vents.
• Do not use a towel or other bulky cloth as a pot holder.
• Do not douse a grease re with water but turn off the burner, and if needed, use a multi-purpose,
dry-chemical, or foam extinguisher.
• (Oven res) Keep the door closed, and turn off the oven. Do not open the door until the re is out. If needed,
use a multipurpose, dry-chemical, or foam extinguisher.
• Do not heat sealed containers.

9English
Important Safety Instructions
Use-and-Care Safety Instructions, cont.
Read these instructions thoroughly to reduce the risk of property damage, re, personal injury, and death, and
to ensure proper installation.
Gas Safety
If you smell gas:
• close the range's gas-supply valve and evacuate the building
• do not use a ame or sparking device (e.g., match, butane lighter or clicker, arc lighter)
• do not turn on any gas or electric appliances
• do not plug in a power cord or touch an electrical switch
• do not use any phone in your building
• immediately call your gas supplier from a neighbor's home, and follow the supplier’s directions (if unable to
reach the gas supplier, call the re department).
Checking For Gas Leaks
Do not use a ame to check for leaks. With a brush, spread a soap-and-water solution around the area in ques-
tion. If there is a gas leak, small bubbles will appear in the solution. If unsure, call for professional help.
Electrical and Grounding Safety
• Do not use an adapter or extension cord.
• Do not use a damaged plug, cord, or loose power outlet, and do not alter the plug, cord, or outlet.
• Do not put a fuse in a neutral or ground circuit.
• Use a dedicated 240 Vac, 60 Hz, 50 Amp breaker for the 48” range, a 40 Amp breaker for the 36” range, and
a 40 Amp breaker for the 30" range. A time-delay fuse or circuit breaker should be used. Plug only the range
into this circuit.
• Proper Installation – Be sure your appliance is properly installed and grounded by a qualied electrician.
• The range's grounded, 3-prong plug must be inserted in a grounded, 3-prong outlet that meets all local
ordinances. If codes allow a separate ground wire, a qualied electrician should determine its path. Do not
connect the ground wire to plastic plumbing/gas lines, or hot-water pipes.
• Electrical service to the range must follow local codes, or in their absence, the US National Electrical code/
NFPA No. 70 – Latest Revision or, in Canada, the Canadian Electrical Code CSA C22.1 or Latest Revisions.
• The owner shall ensure the range receives the proper electrical service.

10 English
Important Safety Instructions
Use-and-Care Safety Instructions, cont.
Read these instructions thoroughly to reduce the risk of property damage, re, personal injury, and death, and
to ensure proper installation.
Cooktop Safety
• Burners should only be on when in use and should never be unattended.
• Do not line the grates or any part of the cooktop with foil.
• Before turning on a burner, ensure its components are properly seated.
• If a burner ignites but does not stay lit, turn it off, wait 5 minutes for the gas to dissipate, and retry.
• When setting a burner to simmer, turn the knob slowly; ensure the burner stays lit.
• Place only cookware on the cooktop.
• Do not drag cookware across the grates; lift to reposition cookware.
• Do not drop cookware on the grates.
• Do not use rough-bottomed cookware.
• Food should only be amed under an active ventilation hood.
• Do not let burner ames extend beyond the base of the cookware.
• When nished cooking, turn off the burner before removing the cookware.
• Burners should be off and all surfaces cool before disassembling cooktop components.
• Glazed Cooking Utensils – Only certain types of glass, glass/ceramic, ceramic, earthenware, or other glazed
utensils are suitable for rangetop service without breaking due to the sudden change in temperature.
• Do not pour water or other liquids on the cooktop.
• After cleaning cooktop components, dry them thoroughly before reassembly.
• Use Proper Pan Size – This appliance is equipped with one or more surface units of different size. Select
utensils having at bottoms large enough to cover the surface unit heating element. The use of undersized
utensils will expose a portion of the heating element to direct contact and may result in ignition of clothing.
Proper relationship of utensil to burner will also improve efciency.
• Utensil handles Should Be Turned Inward and Not Extend Over Adjacent Surface Units – To reduce the
risk of burns, ignition of ammable materials, and spillage due to unintentional contact with the utensil,
the handle of a utensil should be positioned so that it is turned inward, and does not extend over adjacent
surface units.
• Fry with minimal oil, heat the oil slowly, and watch as it heats; stand at a safe distance, and monitor the oil
constantly; if combining oils, mix them before heating.
• Know the oil's smoke point, and use a deep-fry thermometer to monitor the oil's temperature.
• Do not fry frozen, icy, or overly cold food.
• Let the oil cool to room temperature before moving the cookware.
• Do not turn a burner-control knob past the ignition point until the burner is lit.
• Do not light a burner with a match or other open ame.
• Do not touch any part of a burner while the igniter is sparking.
• If a burner does not ignite within 4 seconds, or if the ame goes after ignition, turn the burner off, open a
window, wait at least 5 minutes for the gas to dissipate, then try igniting the burner.
• In case of a burn injury:
– Immerse the scalded area in cool water for at least 10 minutes, then cover with a clean, dry cloth.
– Do not apply creams, oils, or lotions.
– Seek medical attention for severe burns.

11English
Important Safety Instructions
Use-and-Care Safety Instructions, cont.
Read these instructions thoroughly to reduce the risk of property damage, re, personal injury, and death, and
to ensure proper installation.
Oven Safety
• Do not use the oven for non-cooking purposes (e.g., drying clothes, storage).
• Do not spray water on the oven glass while the oven is on or still hot.
• Do not clean the door gasket.
• Do not cover/line any part of the oven with foil or other material.
• When the oven is on, stand to one side when opening the door.
• Do not let grease build up in the oven.
• Placement of Oven Racks – Always place oven racks in desired location while oven is cool. If rack must be
moved while oven is hot, do not let potholder contact hot heating element in oven.
• Do not leave plastic in the oven.
• Keep the oven door closed while the oven is on.
• Do not put meat too close to the broil element; trim excess fat before cooking.
• Use cooking bags as directed by the bag manufacturer.
• Do not use abrasive cleaners or metal scrapers to clean the door glass.
• Do not try to use the oven during a power failure; if power fails, turn the oven off.
• Before self-cleaning, wipe excess residue from the oven, and remove all racks, cookware, and utensils.
• During self-cleaning, clean only the components listed in the manual.
• During self-cleaning, the oven operates at about 800°F (427°C); do not touch any part of the range during
self-cleaning, and keep children away.
• If the oven malfunctions during self-cleaning, turn off the oven and circuit breaker, and contact a qualied
service technician.
• Fumes released during self-cleaning can harm/kill pet birds. Move birds to a distant, well-ventilated room.
• After using the oven, stand aside when opening the oven door to let steam/hot air escape safely.
• Do not use commercial oven cleaner or protective coating in/on the oven.
12 English
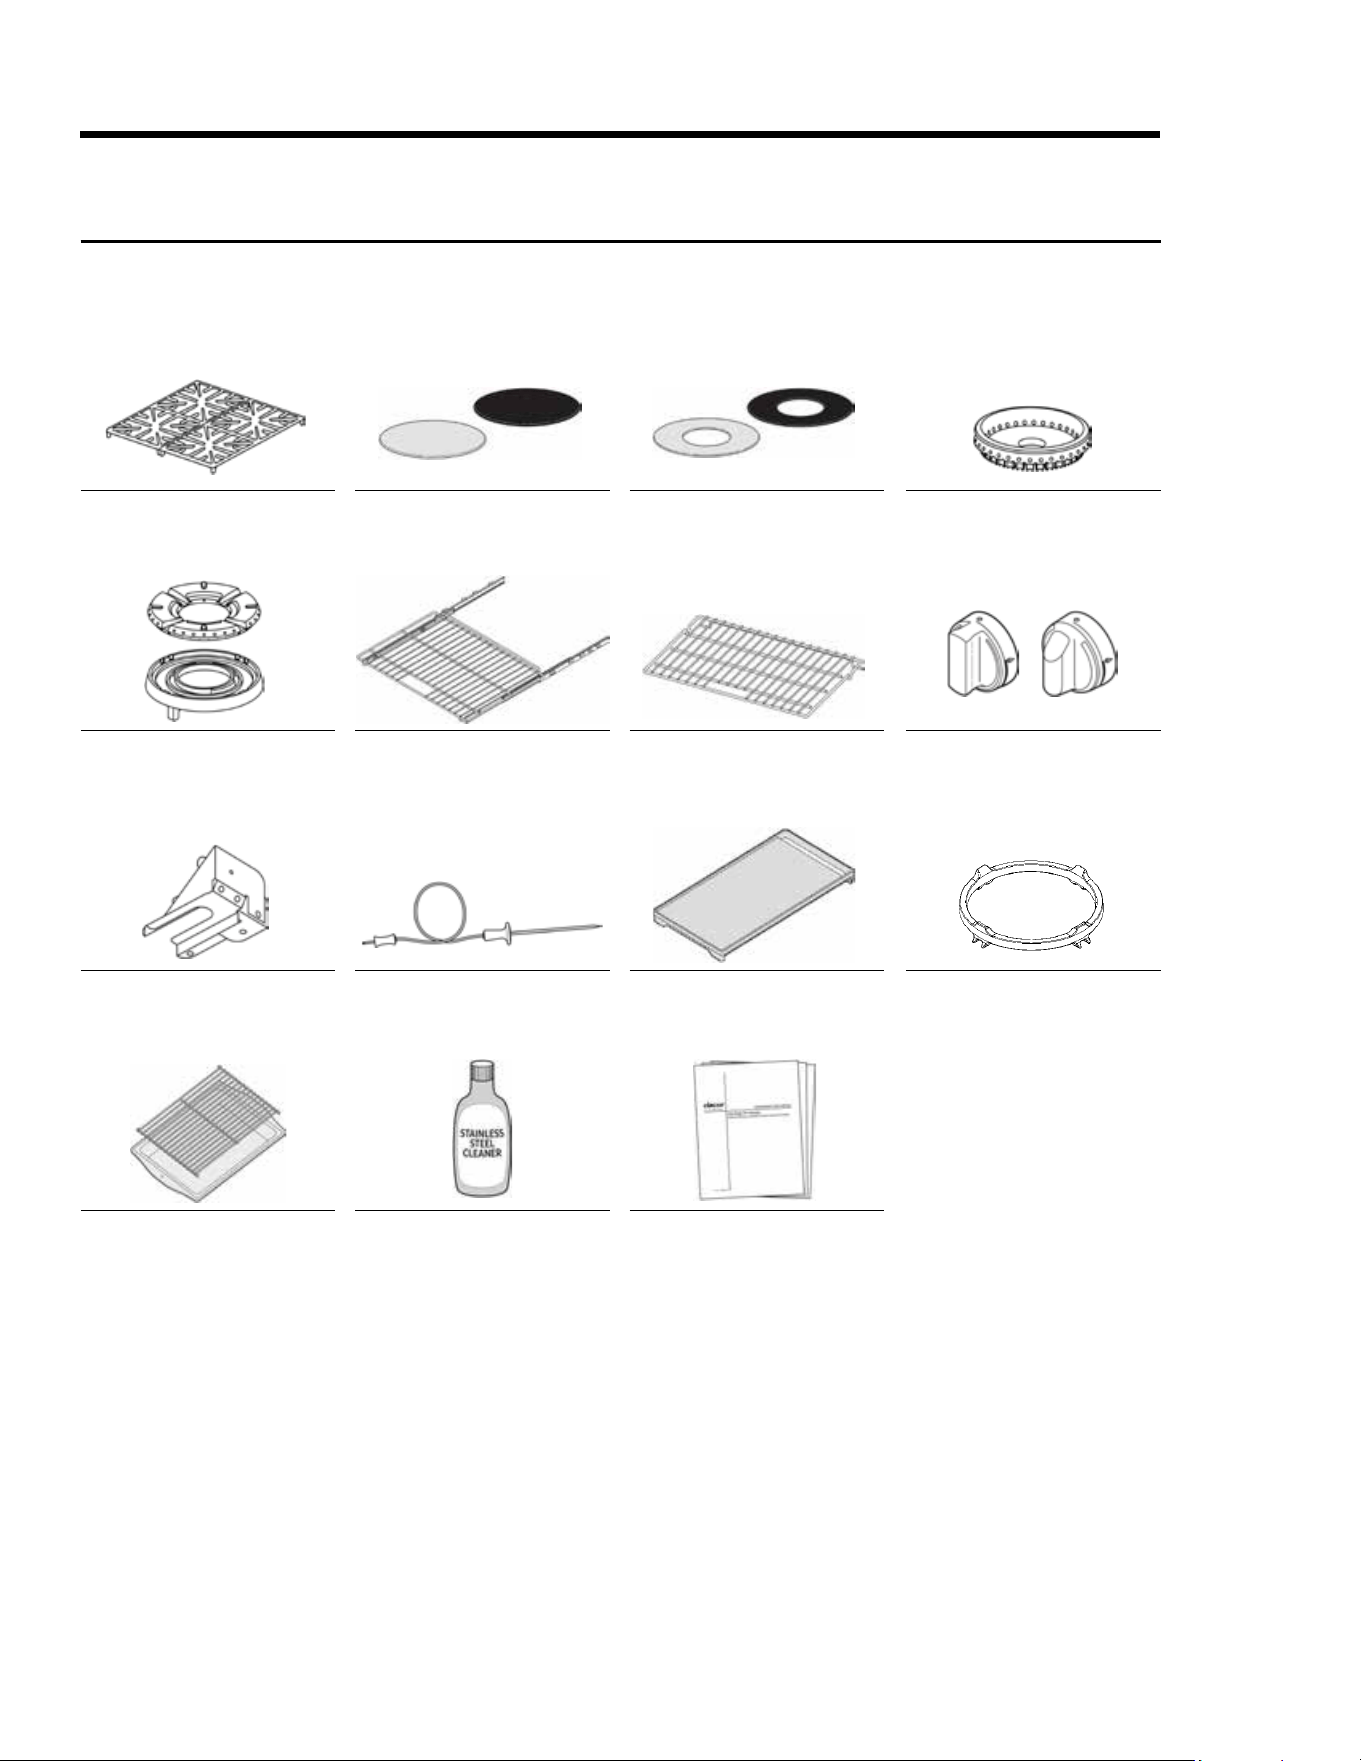
Grates (2)
SimmerSear Burner Ring (1),
Burner Head (1)
Anti-Tip Bracket w/Screws
and Anchors
Broiler Pan and Grill
Standard Burner Caps*:
Porcelain (3), Brass (3)
GlideRack
TM
Oven Rack (2)
Temperature Probe (1)
Stainless-Steel Cleaner
SimmerSear Burner Caps*:
Porcelain (1), Brass (1)
Standard Oven Rack (1)
Griddle (1)
Literature Kit
Standard Burner Rings (3)
Burner-Control Knobs (4—
2 standard, 2 MAX GRIDDLE)
Wok Ring (1)
Product Overview
Included Accessories: 30” HDPRS/HDERS
*The range comes with brass and porcelain burner caps to suit customer preference.
Porcelain Porcelain
Brass Brass
HDERHDPR
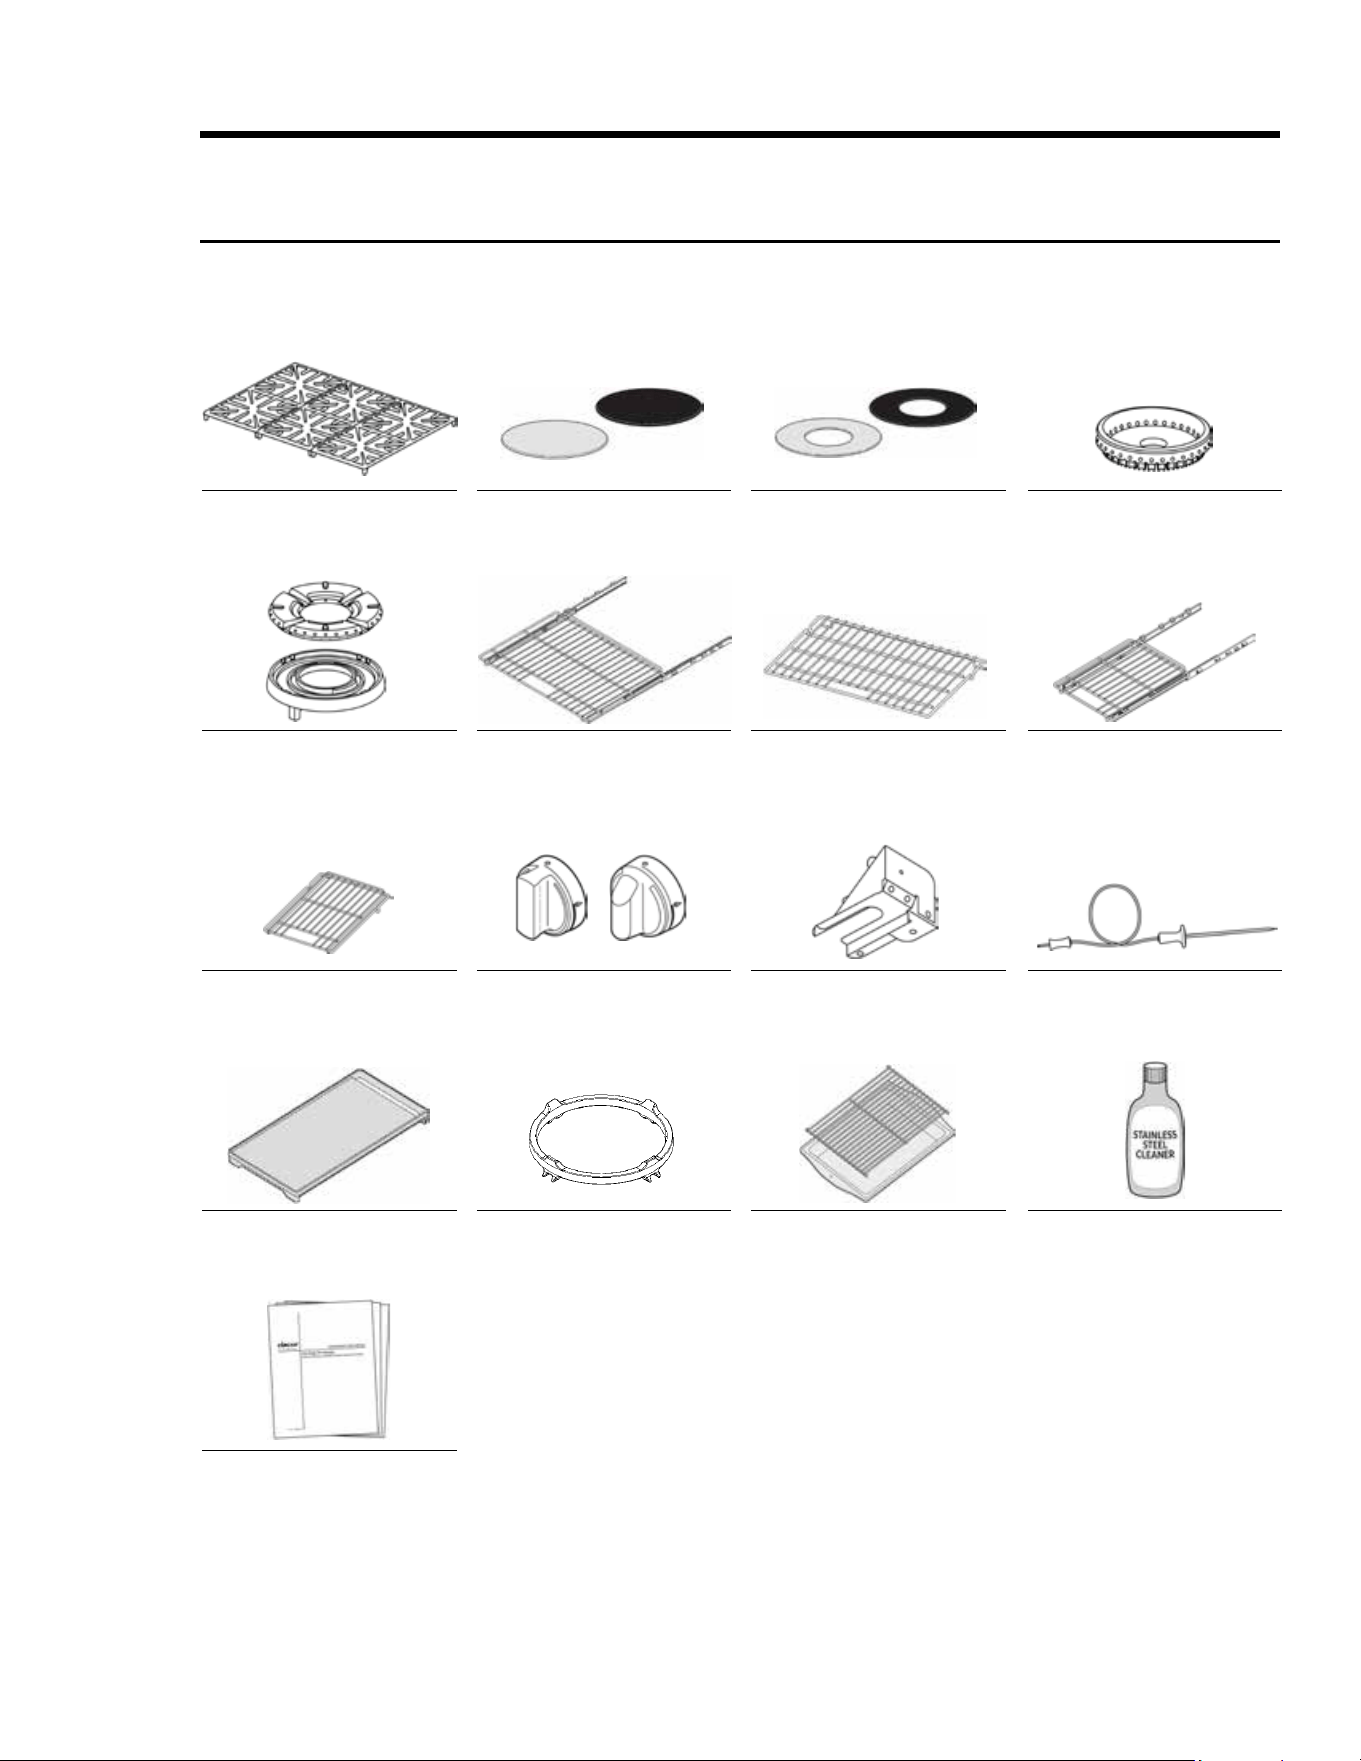
13English
Grates (3)
SimmerSear Burner Rings (2),
Burner Heads (2)
18” Standard Oven Rack (1)
HDRP/HDER 48” only
Griddle (1)
Literature Kit
Standard Burner Caps*:
Porcelain (4), Brass (4)
GlideRack
TM
Oven Rack (2)
Burner-Control Knobs (6—
4 standard, 2 MAX GRIDDLE)
Wok Ring (1)
SimmerSear Burner Caps*:
Porcelain (2), Brass (2)
Standard Oven Rack (1)
Anti-Tip Bracket w/Screws
and Anchors
Broiler Pan and Grill
Standard Burner Rings (4)
18” GlideRack
TM
Oven Rack (2)
HDRP/HDER 48” only
Temperature Probe (1)
Stainless-Steel Cleaner
Product Overview
Included Accessories: 36” and 48” HDPRS/HDERS
*The range comes with brass and porcelain burner caps to suit customer preference.
Porcelain Porcelain
Brass Brass
HDERHDPR
14 English
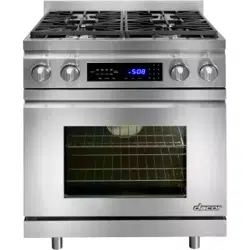
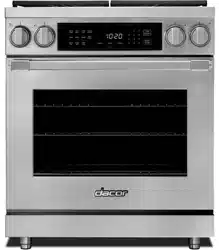
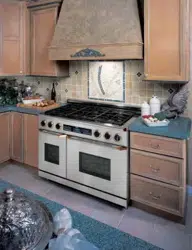
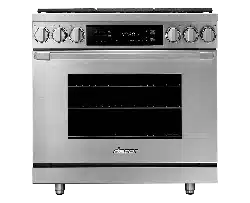
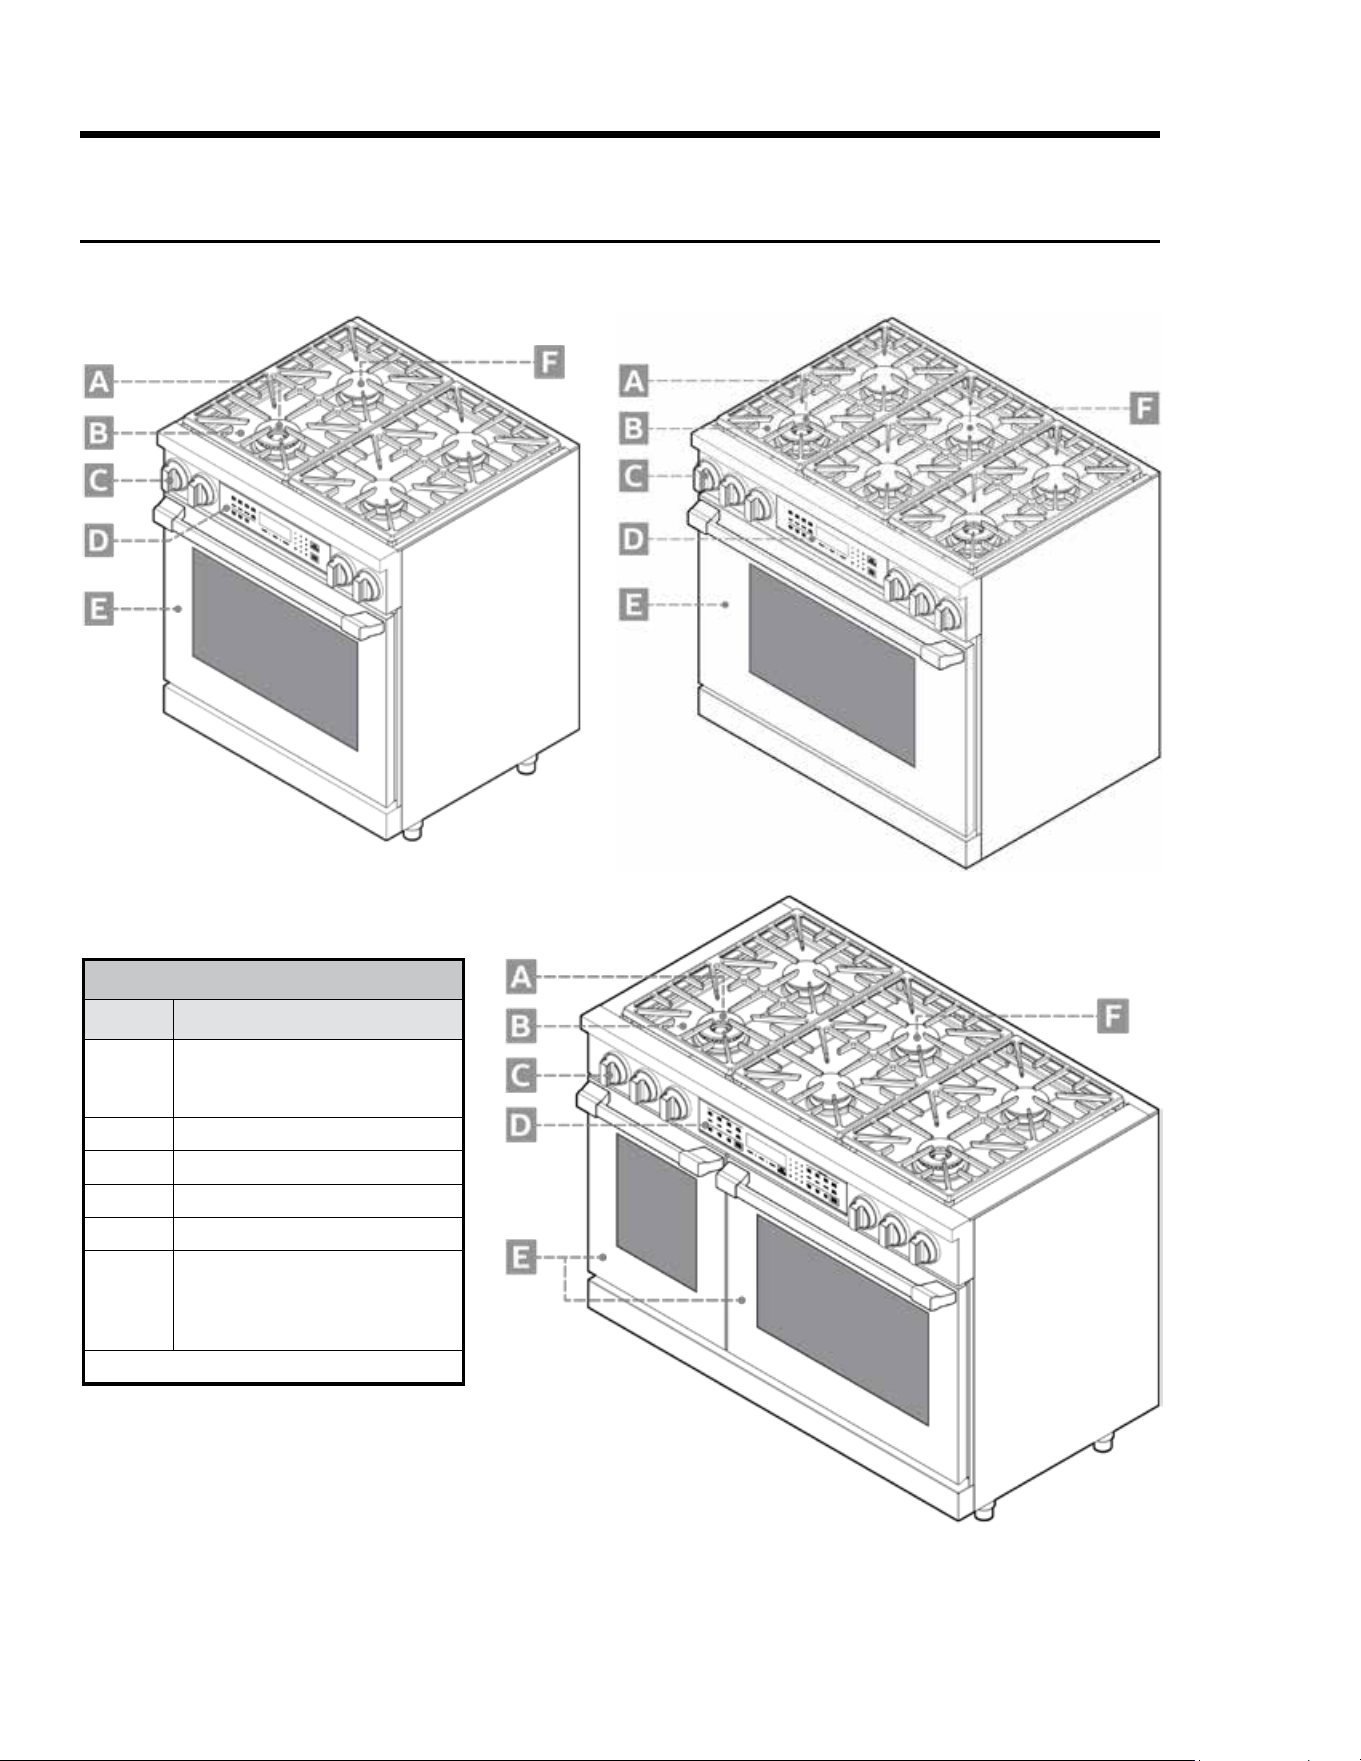
Product Overview
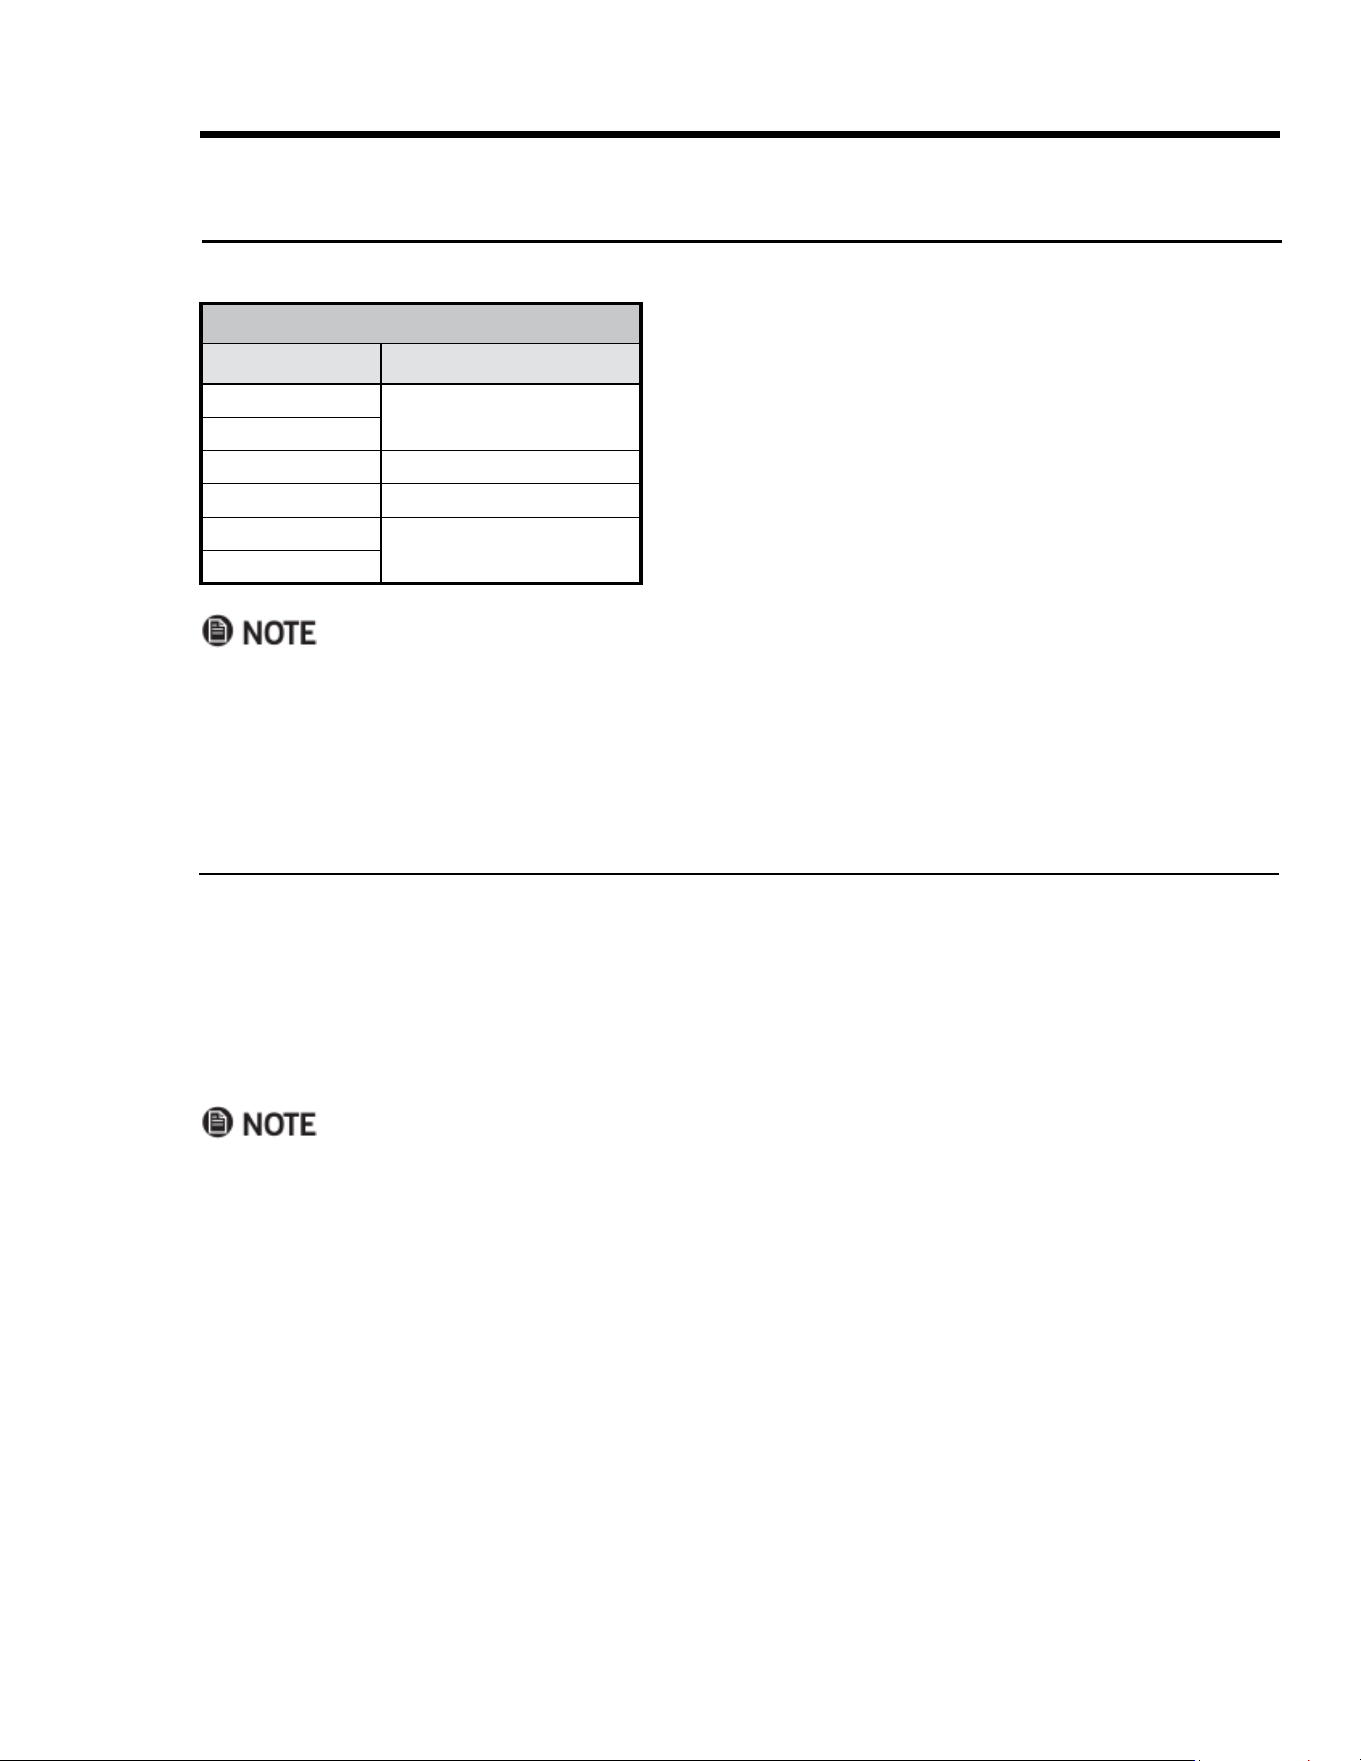
EXTERNAL FEATURES
Callout Description
A
SimmerSear Burner (800* – 15,000
BTU); left-/right-front (36", 48");
left-front (30")
B
Spill Tray
C
Burner-Control Knob
D
Control Panel
E
Removable Oven Door
F
Standard Burner (800* – 18,000
BTU); left-/right-rear, center-front/
rear (36", 48"); left-/right-rear,
right-front (30")
*Effective
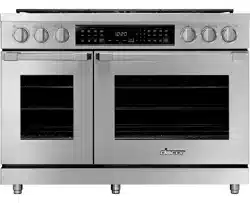
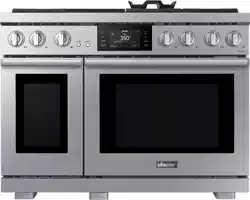
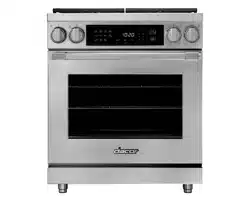
48" HDPRS
30" HDPRS 36" HDPRS
HDPRS/HDERS External Features
HDPRS models shown (door handle and bullnose are the only variations between HDPRS and HDERS models)
15English
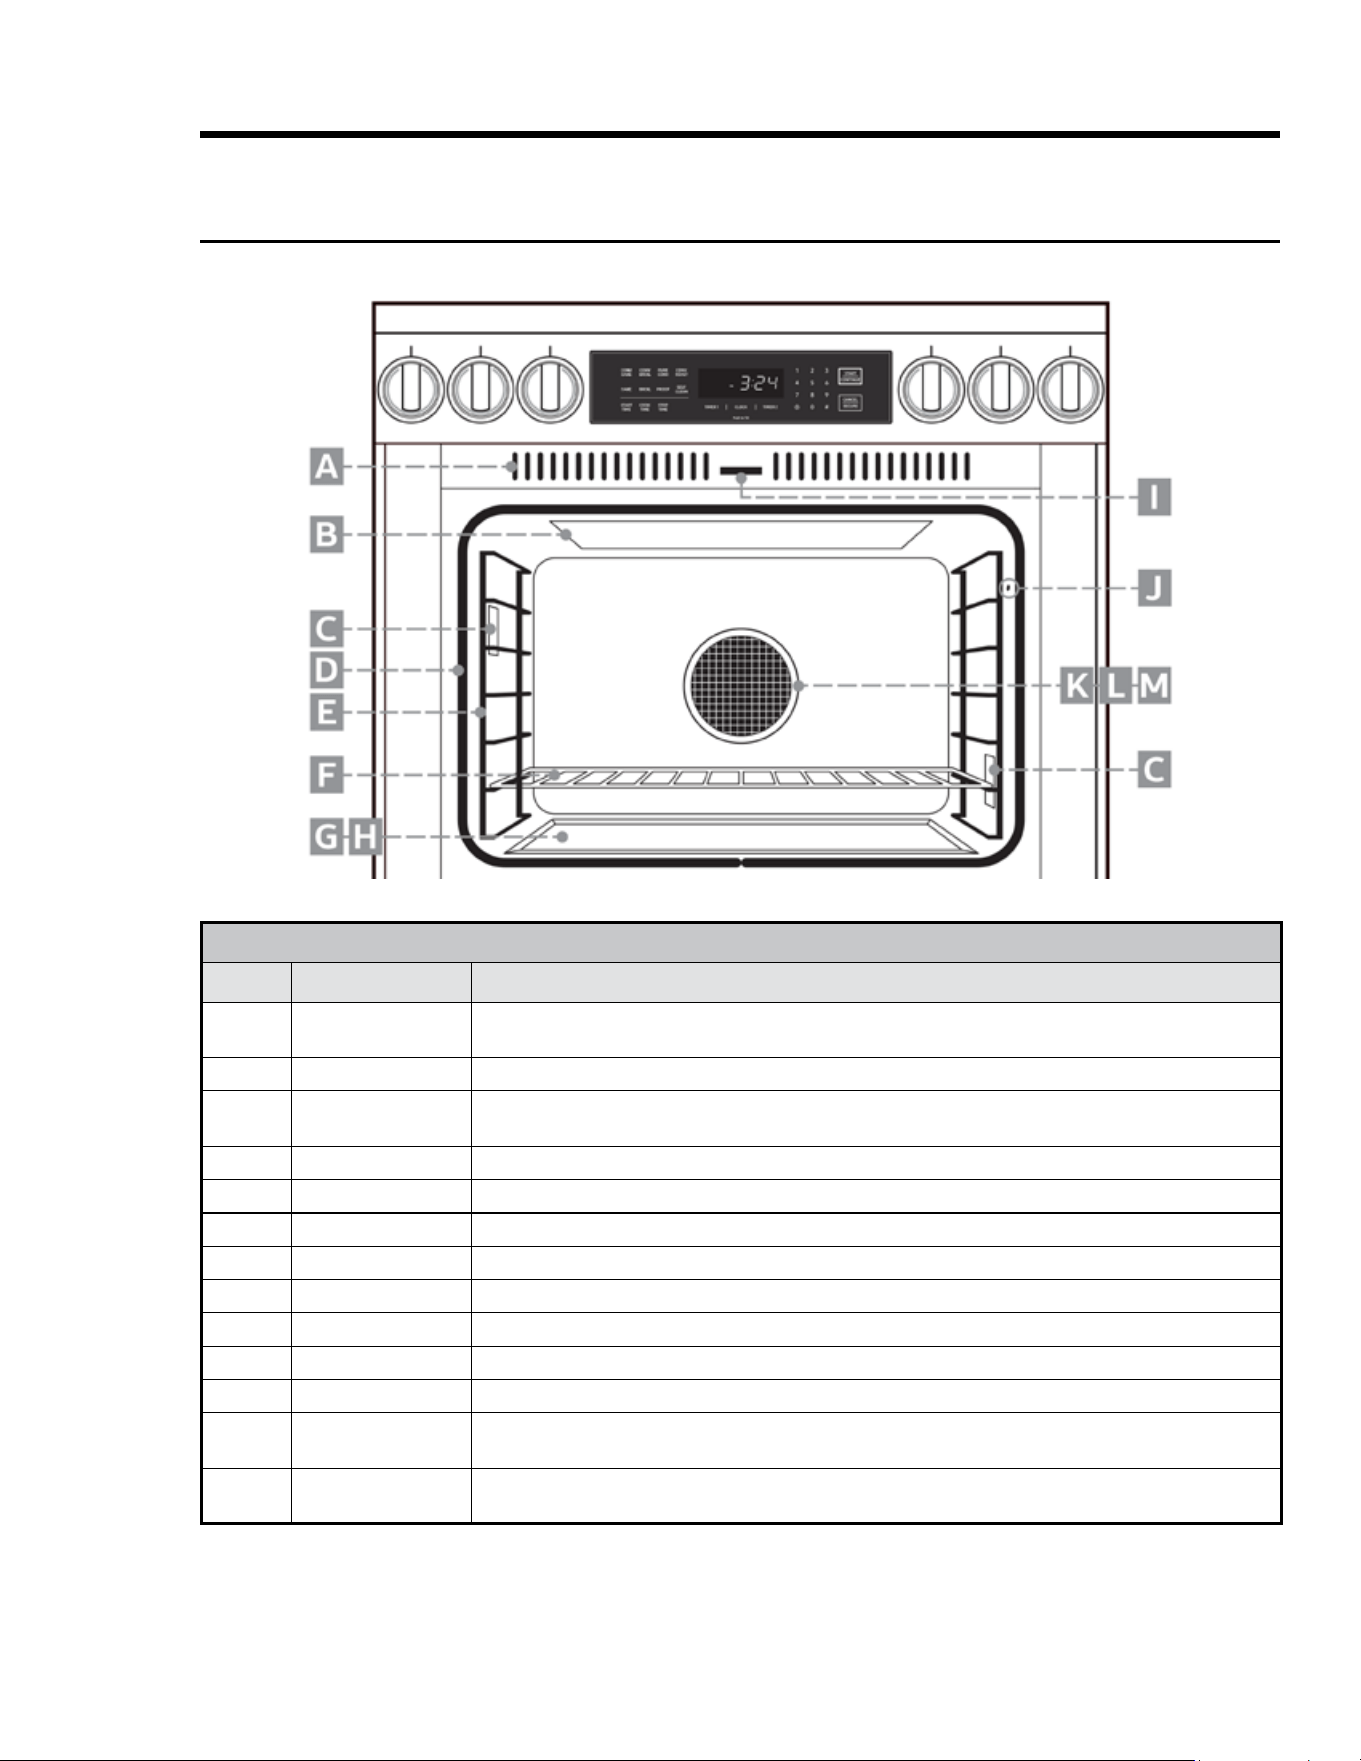
Product Overview
HDPRS/HDERS Internal Features
HDPRS model shown
CONTROL-PANEL FEATURES
Callout Name Description
A Air Intake Grill
Air is drawn through horizontal slot (not shown) below door and up within door, then out grill at top
of door through this grill to cool internal cooktop parts; keep slot and grills clear.
B Broil Element Inside oven ceiling behind glass panel; top heat source.
C Oven Lights
Two 12V, 20W halogen bulbs illuminate oven chamber from left/right sides; tap Light key (control
panel) to turn lights on/off.
D Oven-Door Gasket
Keeps heat from escaping when door is closed.
E Rack Support
Install GlideRack and standard racks on these supports; rack levels 1 (bottom) – 7 (top)
F Oven Rack
2 GlideRack™ oven racks and 1 standard rack per oven chamber are provided. (See Pg. 21.)
G Bake Element
Below oven-chamber oor; bottom-heat source.
H Oven-Floor Recess
Water collects here during 30-minute steam-clean cycle. (See Pg. 38.)
I Self-Cleaning Latch
During self-cleaning, the latch keeps oven door from being opened.
J Temp-Probe Outlet
Insert temperature probe here; double ovens: outlet is in large oven only. (See Pg. 29.)
K Convection Fan
(From behind the lter) Circulates air in oven chamber during convection cooking.
L Convection Element
(From behind the filter) Heats air blown into oven chamber by convection fan during convection
cooking; rear heat source.
M Convection Filter
Clips onto crossbar over hole in oven-chamber wall; keeps fan from blowing particulates into oven
chamber; keeps users safe from fan blades.
16 English
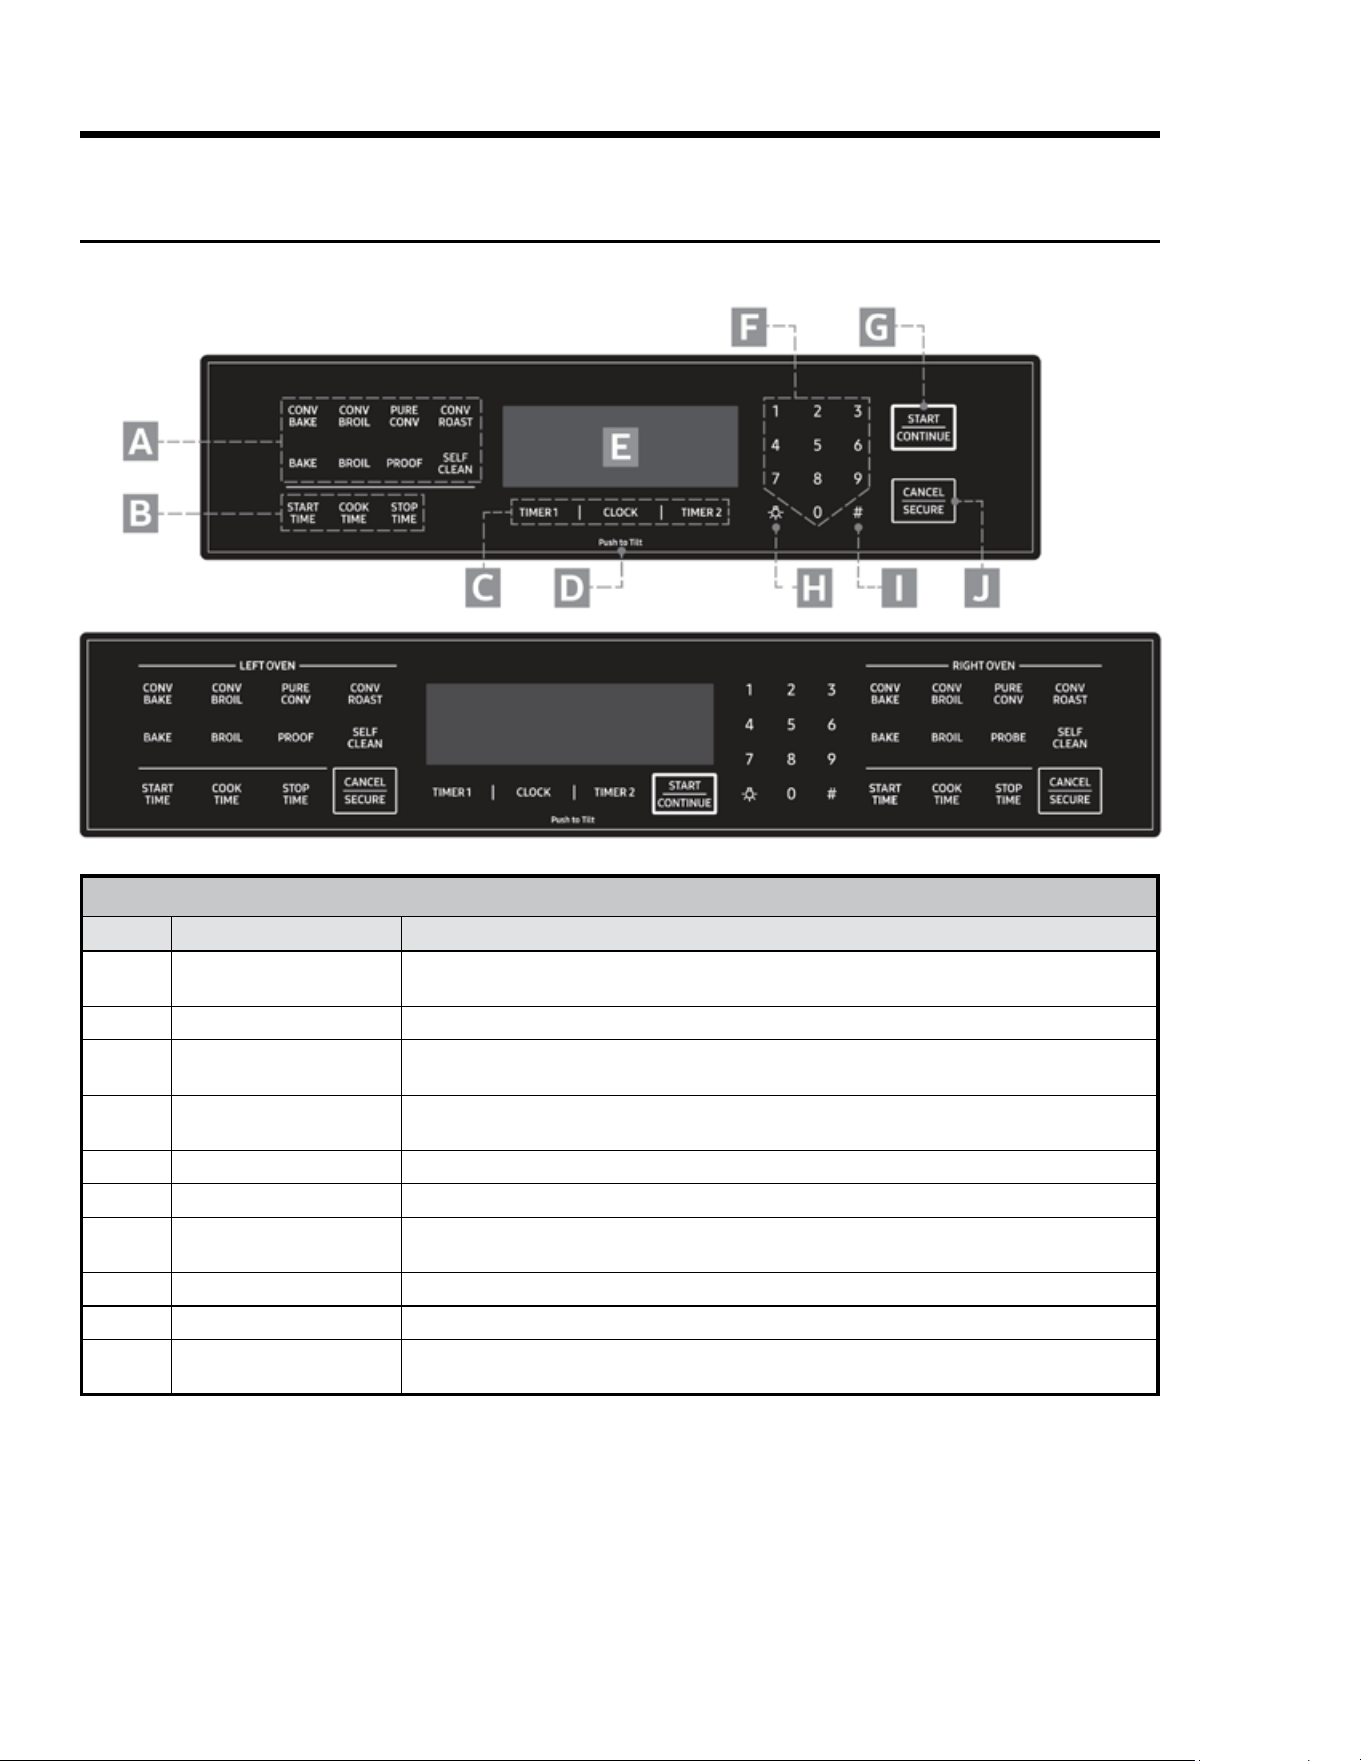
Product Overview
HDPRS/HDERS Control Panel
30", 36" Single Oven (top), 48" Double Oven (bottom)
CONTROL-PANEL FEATURES
Callout Name Description
A Operation-Mode Keys
Tap a key to select an operation mode (e.g., cooking, bread proong, self-cleaning; double
ovens: one op-mode keypad per oven with all above modes and temperature-probe mode.
B Time-Delay Cooking Keys Set oven to turn on/off automatically; 48" model: one set of keys per oven (see Pg. 29).
C Clock/Timer Keys
Clock: Sets clock (see Pg. 21); TIMER 1, 2: Use timing a food prep/cooking task; timers work
independently; can be used when oven is off; timers do not turn oven on/off (see Pg. 28).
D Push to Tilt
Press here, and spring-loaded control panel slowly rotates upward 50° for easier viewing;
push here again until panel clicks into its original position.
E Display Shows time of day and oven operations (e.g., cook temperature, remaining cook time).
F Numeric Keypad Sets cook temperature, cook time, time of day.
G START/CONTINUE
Select a cook mode (A), then tap this key to start cooking; this key starts timers after you set a
cook time and resumes cook time after a pause.
H Oven-Light Key Turns oven light on/off.
I Sabbath Mode Key Activates Sabbath mode (see Pg. 32).
J CANCEL/SECURE
Turns off oven, zeroes out all temperature settings, turns off active features (except timer),
activates control lock-out; 48" model: one key per oven.
17English
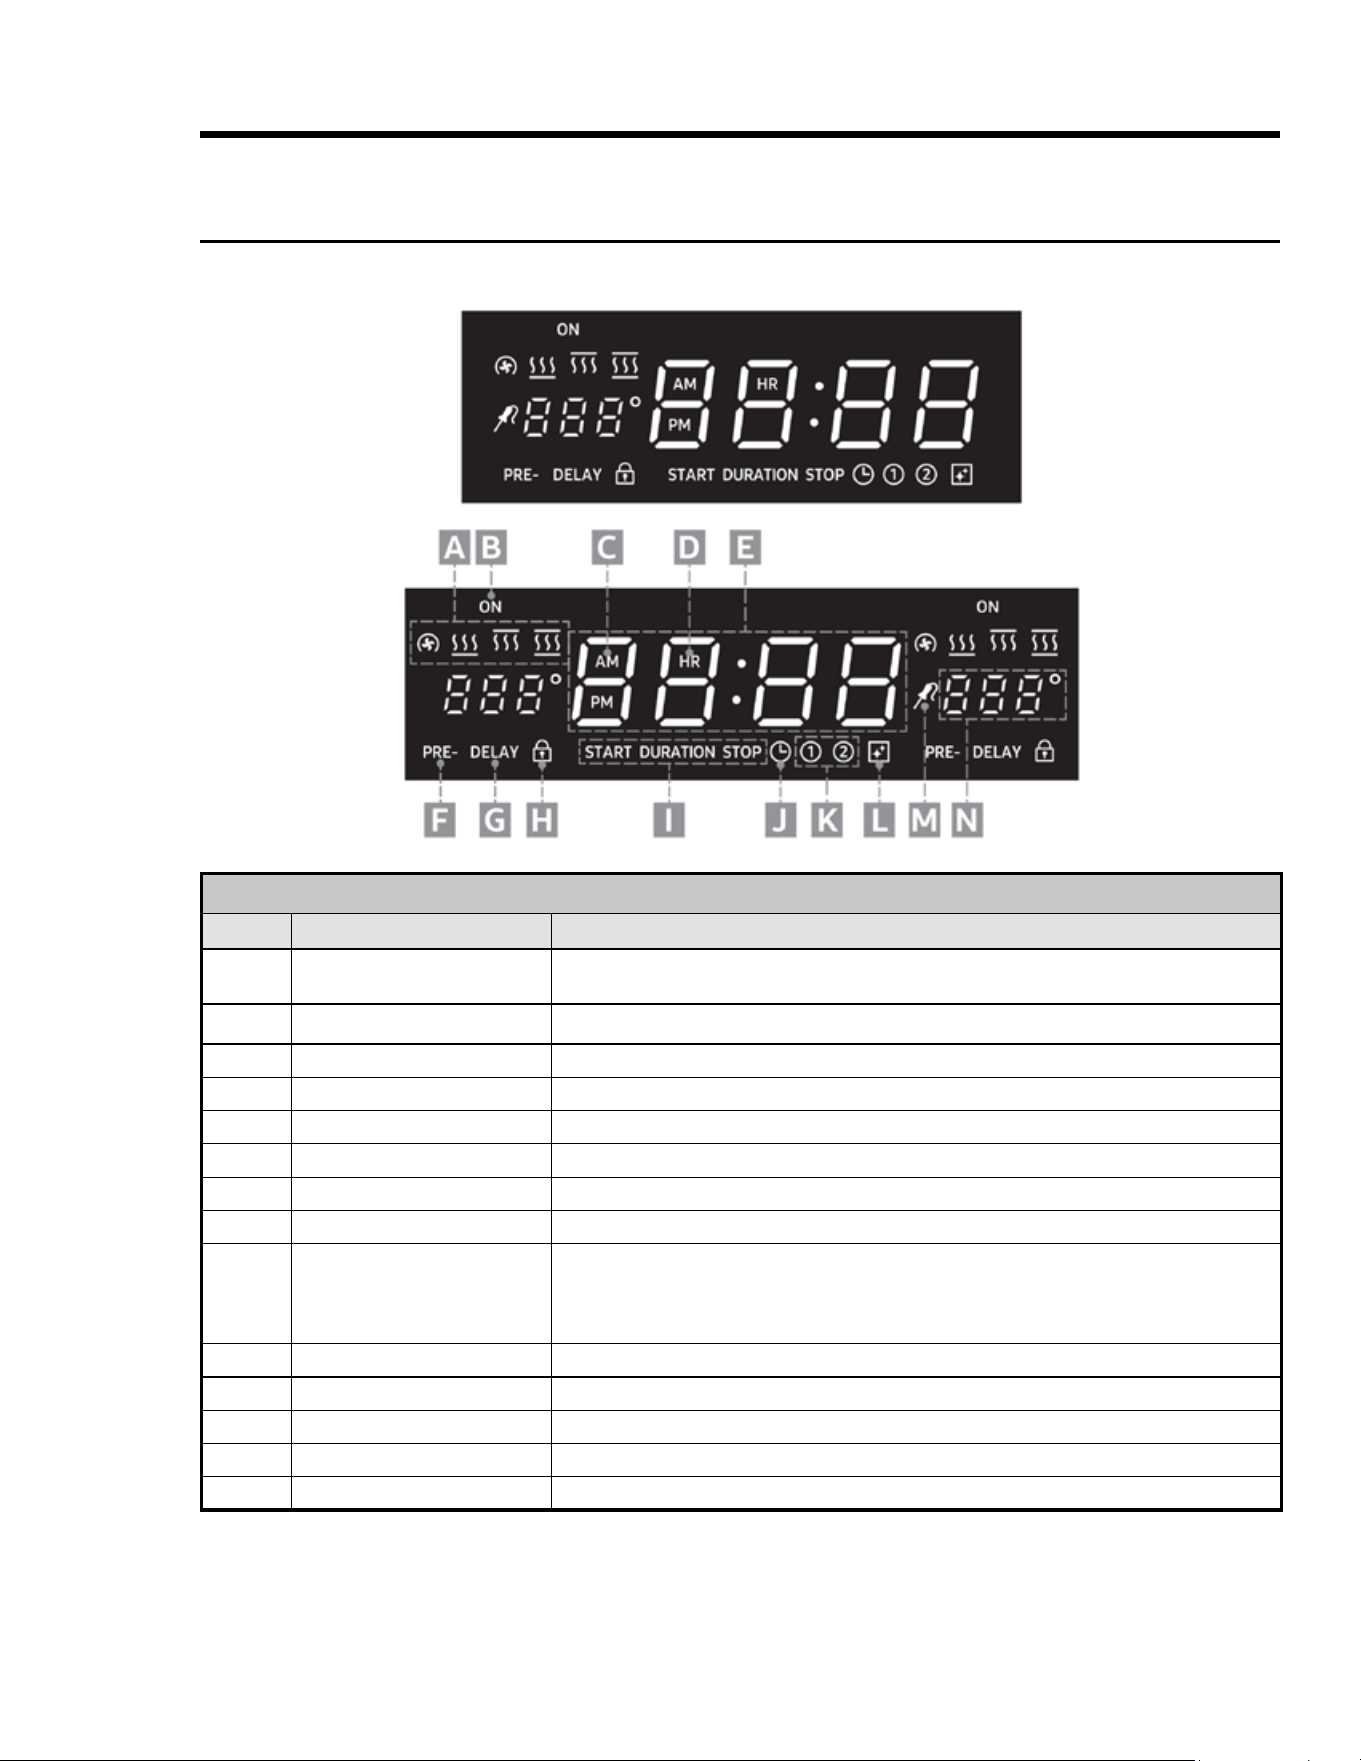
Product Overview
HDPRS/HDERS Control-Panel Display
30", 36" Single Oven (top), 48" Double Oven (bottom)
CONTROL-PANEL FEATURES
Callout Name Description
A Cook-Mode Icons
From left: Convection, Bake, Broil, Roast; these appear, sometimes in combination,
according to selected cook mode.
B
Oven-On Indicator Appears when oven is in use.
C AM-PM Indicator
One of these appears according to time of day.
D Clock-Mode Indicator
Appears when military-time mode is selected (absent when standard mode is selected).
E Clock/Timer Readout
Shows time remaining on selected timer or time of day when no timer is selected.
F Preheating Indicator
Appears when oven is preheating (disappears when set oven temp is reached).
G Time-Delay Indicator
Appears when delay-time cooking is active.
H Control-Lockout Icon
Appears when control-lockout is active.
I Cook-Time Indicators
START: Appears if a start time is set for a cook task; readout (E) shows time of day when
oven will start cooking; DURATION: Appears if you tap COOK TIME after setting a stop
time for a cook task; readout (E) shows cook-time countdown; STOP: Appears if a stop
time is set for a cook task; readout (E) shows time of day when cooking will stop.
J Clock-Set Icon
Appears when CLOCK key is pressed for setting the current time.
K Timer Indicators
These appear depending on use; if both timers are active, both indicators appear.
L Cleaning Icon
Appears when the oven is in Self-Clean or Steam-Clean mode.
M
Meat-Temperature-Probe Icon
Appears when temperature-probe mode is active.
N Oven-Temperature Readout
Shows oven temperature in °F or °C, depending on user setting.
18 English
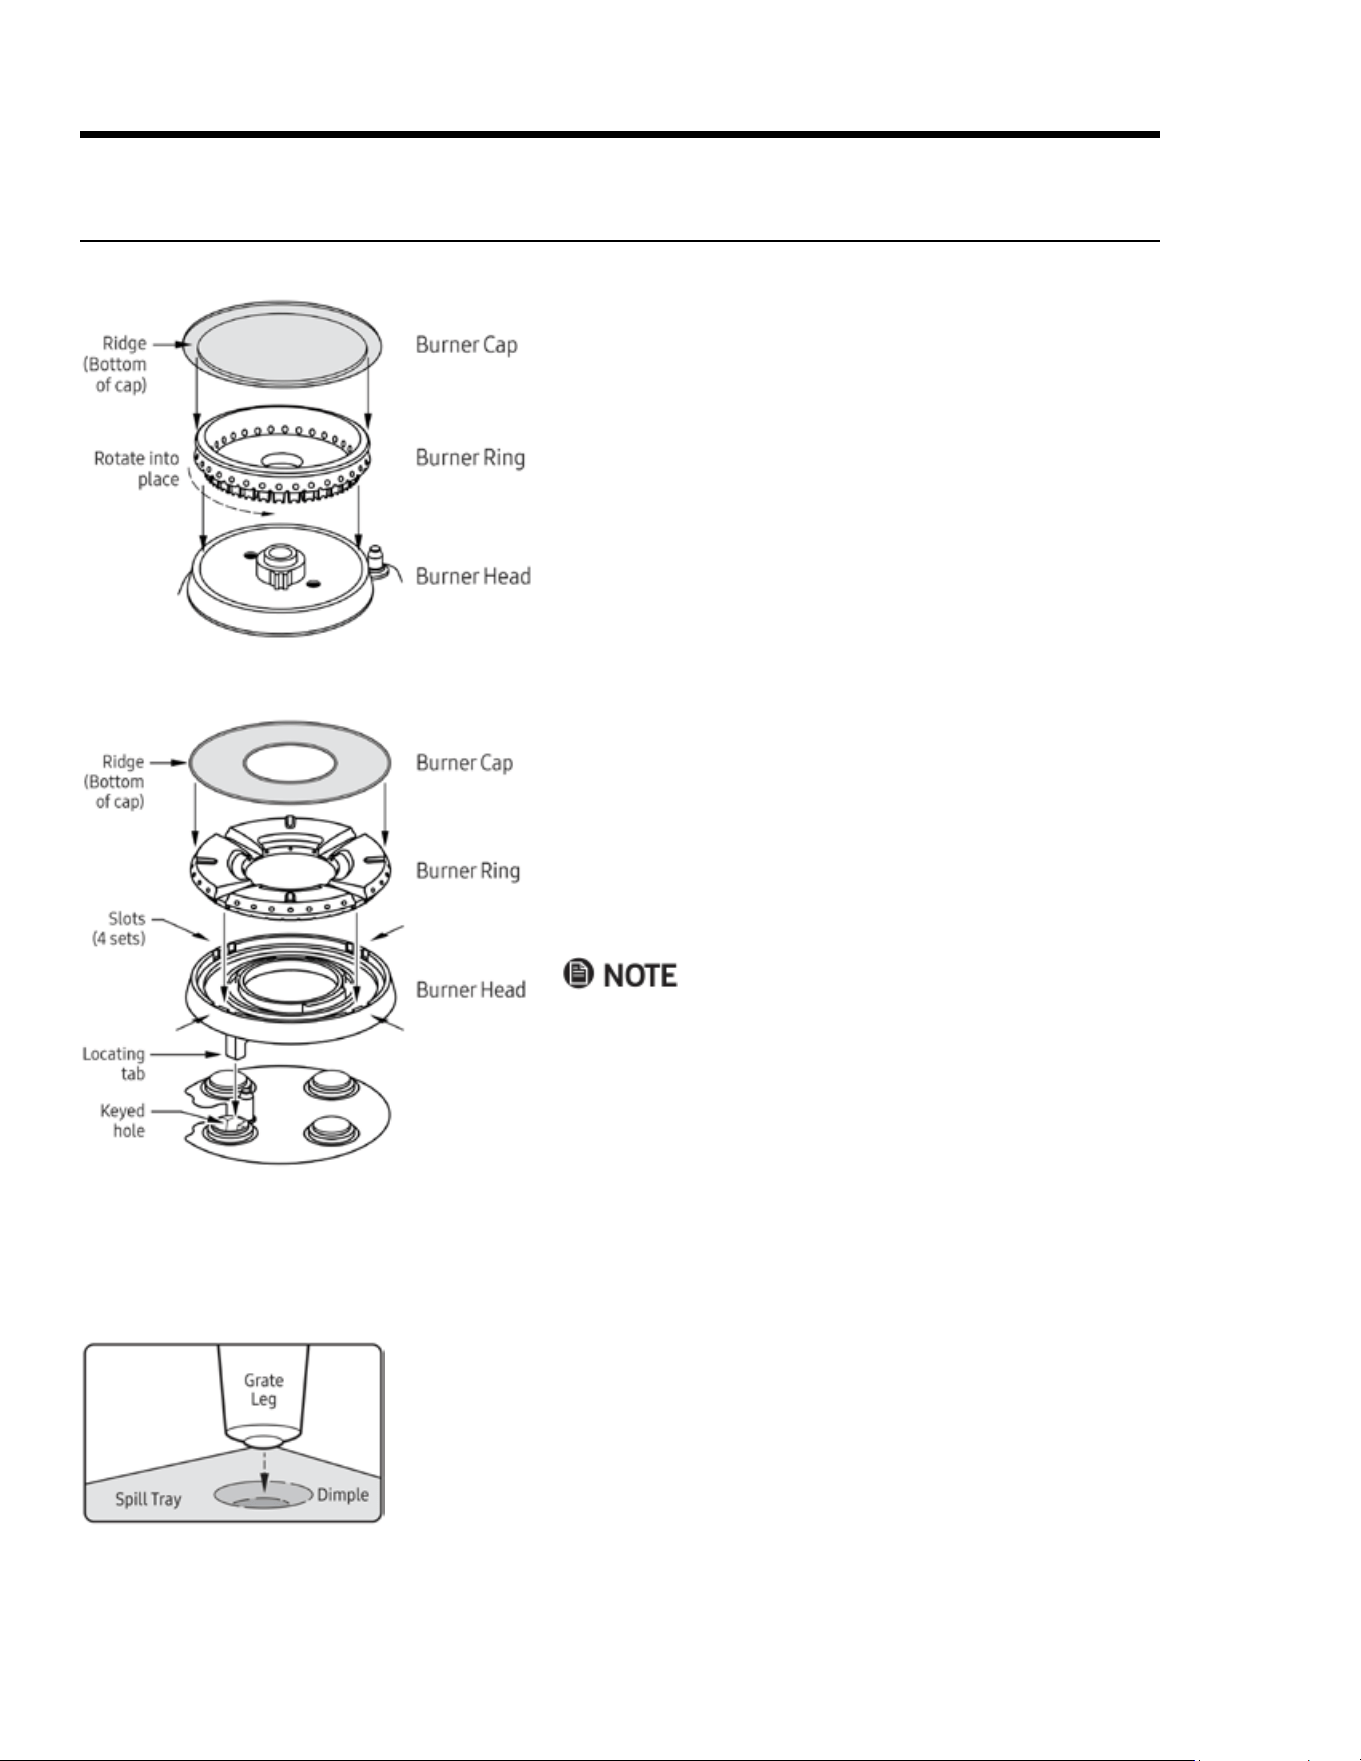
Operating the Cooktop
1. Place the burner ring so its base ts within the ridge
around the burner head, and rotate the ring until it
drops into place.
2. Place the burner cap so the ridge on the bottom of the
cap ts over the perimeter of the ring.
Assembling the Burners
Assembling a Standard Burner
• After assembly, always test the burners for proper func-
tion. Improperly assembled parts cause faulty ignition and
uneven ames.
• If the ame is excessively yellow, shut off the burner, and
let it cool. Adjust the caps, and reignite the burner. A good
ame is blue and consistent around the burner.
Assembling a SimmerSear
TM
Burner
1. Place the burner head so its locating tab is in the
base’s keyed hole.
2. Place the burner ring so the its tabs t into the slots in
the head.
3. Place the burner cap so the ridge on the bottom of the
cap ts over the perimeter of the ring.
1. With two hands, grasp a grate with the short sides
oriented at the front and rear of the cooktop.
2. Gently set the grate on the cooktop so the grate's feet
rest in their corresponding dimples in the spill tray.
3. Repeat Step 2 for the remaining grate(s).
Placing the Cooktop Grates
The grates are identical, so you can place them in the left, center, or right position but always with the short
side toward the front/rear of the cooktop.
For ease of placement, each grate has rubber-tipped feet that t in "dimples" formed into the cooktop spill
tray.
19English
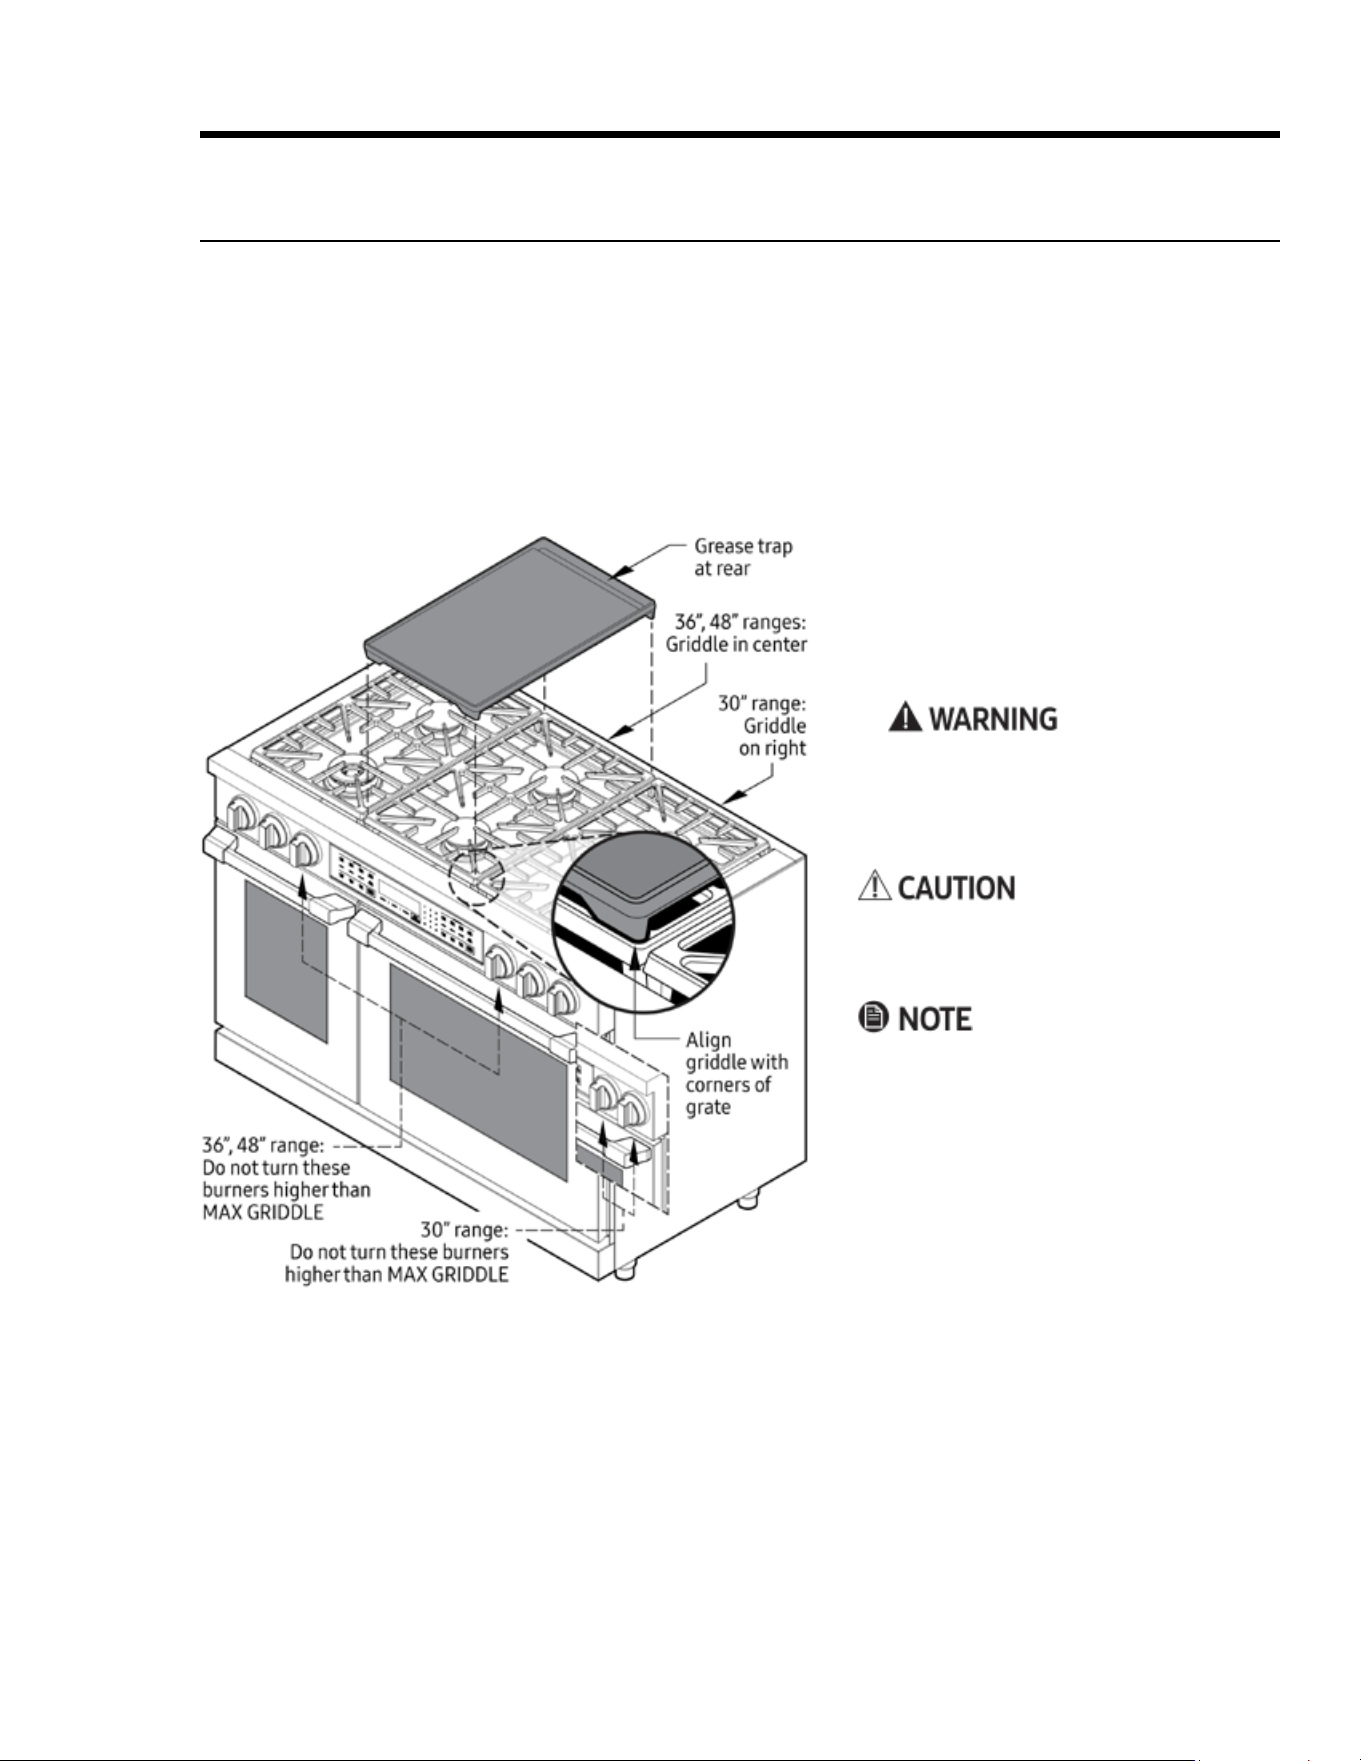
Operating the Cooktop
Using the Griddle
• Before using the griddle for the rst time, wash it in hot, soapy water, then rinse, and let it dry fully.
• For best results, preheat the griddle for 10 minutes.
• Orient the griddle's grease trap at the rear of the cooktop.
2. Push-turn the center-front burner knob
to the Ignite (ame) setting.
The burner ignites.
3. Adjust the knob to MAX GRIDDLE (or
lower if desired).
To avoid harming the griddle, do not set
the burner higher than MAX GRIDDLE.
4. Repeat Steps 2 and 3 for the center-rear
burner.
Avoid using metal utensils on the surface
because they can scratch the non-stick
coating.
Clean the griddle after each use. (See Pg.
35 for instructions.)
1. With all burners off and the range cool to the touch, place the griddle on the cooktop's center-front/rear
grates. (30" models: Place the griddle on the right-front/rear burners.)
– The specied burners are the same size, which ensures even cooking front and rear.
– Fit the tabs on the bottom of the feet into the inside corners of the grate. Correctly installed, the griddle
rests securely about ½” above the grate. Slight rocking is normal.
HDPRS
48" model shown
20 English
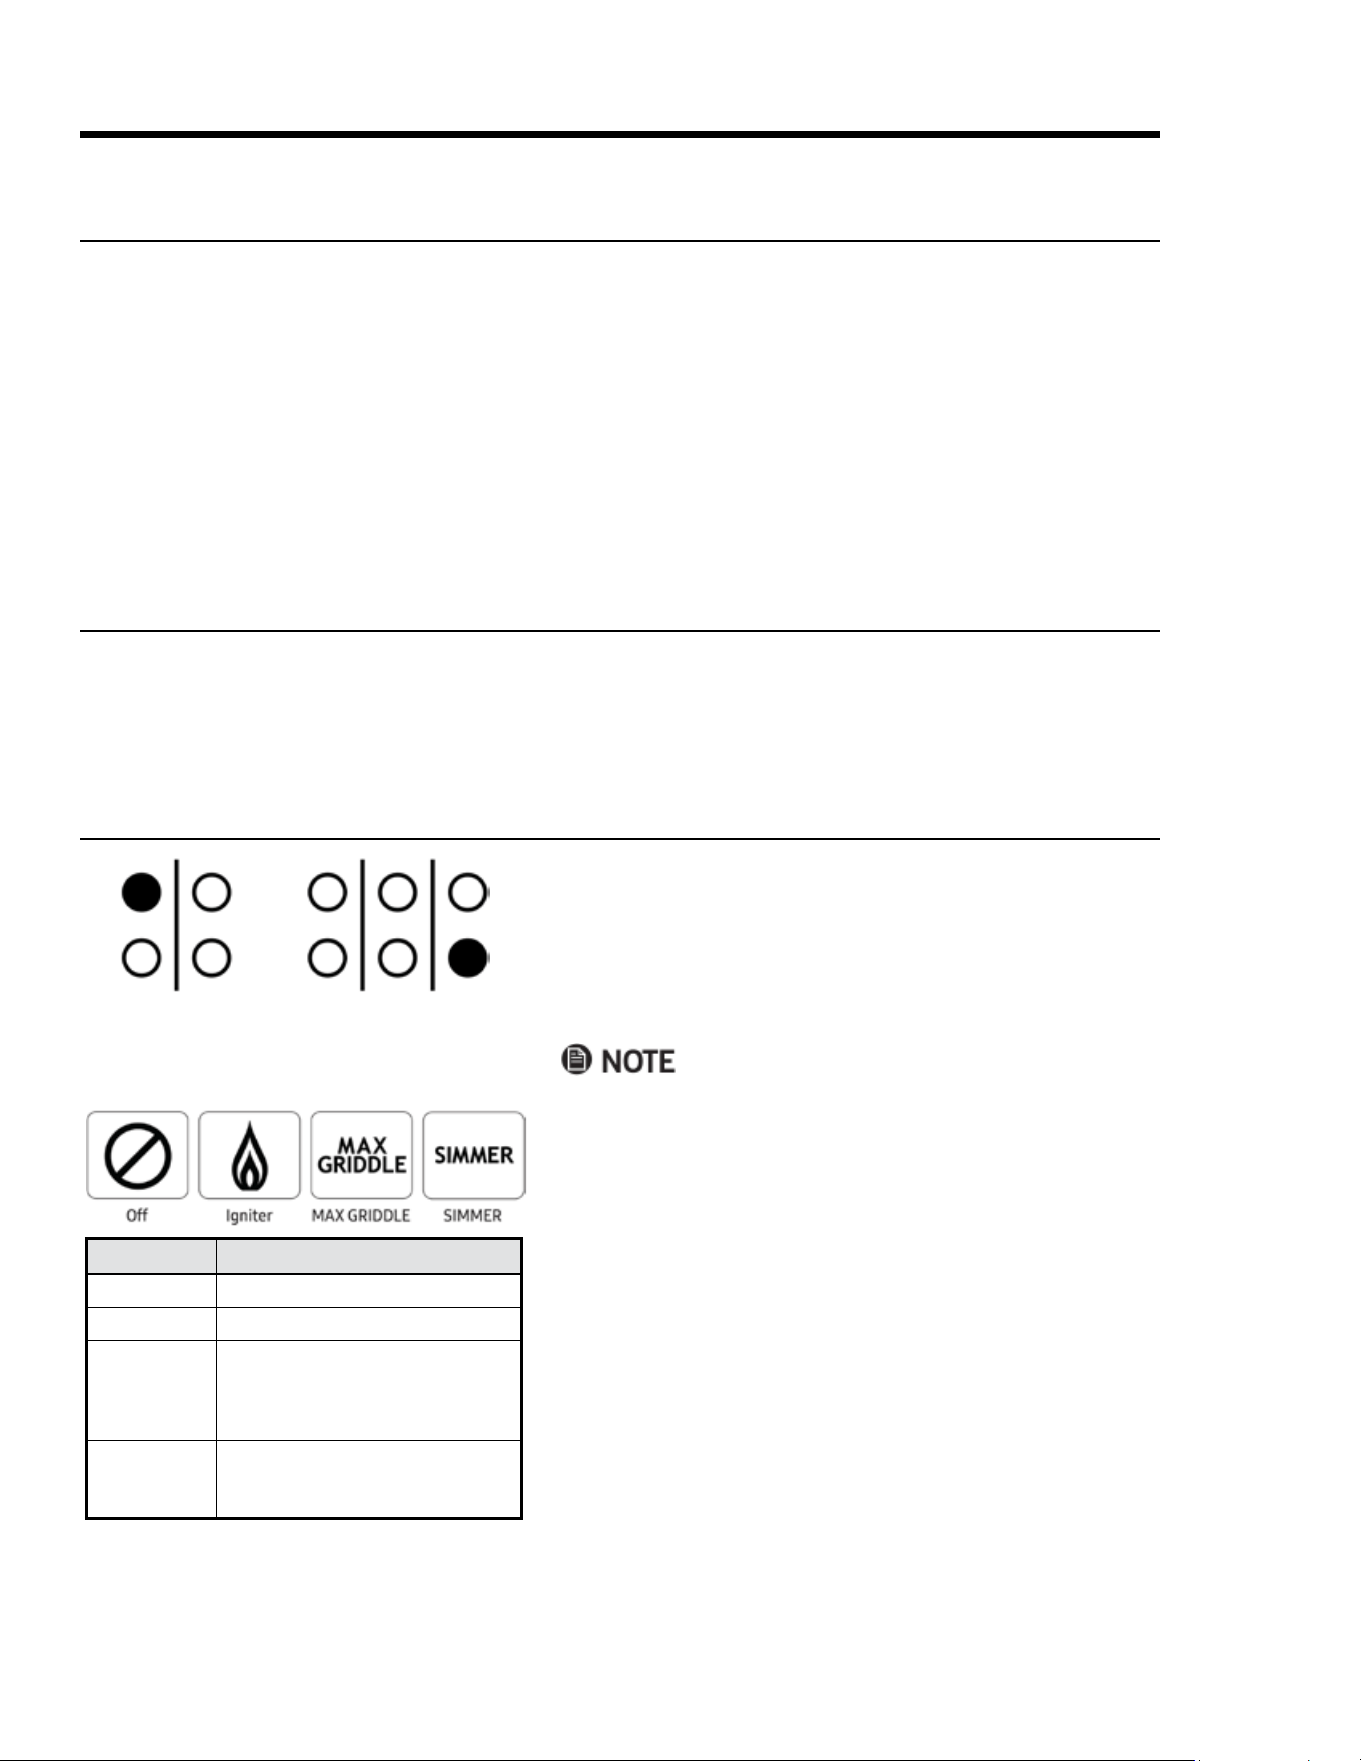
Operating the Cooktop
Each burner-control knob has a small diagram next to it that
indicates which burner the knob ignites.
1. Push-turn the knob counter-clockwise to the Igniter
(ame) icon (see left-bottom graphic).
The knob illuminates, and the burner's igniter sparks for
about 4 seconds until the burner ignites.
• The ame should burn evenly around the burner,
except below each grate support nger, where ame
height is reduced by Dacor’s Smart Flame feature.
• If the burner does not ignite within 4 seconds, or if the
ame goes out, turn off the burner immediately. Ven
-
tilate the kitchen for 5 minutes, and try re-igniting the
burner.
• If the burner still does not ignite, the igniter keeps
sparking, or if the ame is uneven, see Troubleshoot-
ing, Pgs. 41 – 42.
2. Place the cookware on the grate.
3. Adjust the ame to the cook task.
30" Range
Rear-left burner
knob
36"/48" Range
Front-right burner
knob
Setting Description
Off
The burner is off
Igniter (ame)
Ignites the burner
MAX
GRIDDLE
Highest-temp griddle setting; 30":
right-front/rear burners; 36", 48":
center-front/rear burners; higher
settings may damage the griddle
SIMMER
Very low heat setting; 30": left-front
burner; 36", 48": left-/right-front
burners
Before Using the Cooktop
• A normal ame is steady and blue. Foreign matter in the gas line, especially a new line, may cause an or-
ange ame that disappears with use. Yellow-tipped ames are normal when using LP gas.
• See Page 14 for the heat ranges of the different burners.
• Food cooks just as quickly at a gentle boil as at a vigorous boil. Maintain a gentle boil to conserve energy
and food moisture/avor/nutrients.
• Use a low or medium ame when using poor-heat-conducting cookware (glass, ceramic, cast iron). Set the
ame to cover of the cookware diameter to ensure even heating and reduce the risk of burning the food.
• Dacor’s SimmerSear feature allows you precision control of the ame on the SimmerSear burner, from low
to high heat.
Selecting the Cookware
• For overall safety and best performance, select the correct cooking utensil for the food being cooked. Im-
proper cookware will not cook evenly and efciently.
• Use well-balanced cookware with at, smooth bottoms and snug lids.
Lighting a Burner

21English
Operating the Oven
Control-Panel Settings
Setting the Clock
Switching to Military Time (24-hr Clock)
The range's default time setting is standard, 12-hr time. Military time is a 24-hr time-keeping system.
1. On the control panel, tap CLOCK.
The colon between the minutes and seconds blinks.
2. On the numeric keypad, enter the current time.
Example: If the time is 12:08, tap 1-2-0-8.
3. Tap #, and set AM or PM.
4. Tap START or CLOCK.
The colon stops blinking; the time of day is set.
1. Tap-hold CLOCK for 6 seconds.
The displays shows the time in standard mode.
2. On the numeric keypad, tap #.
The clock display switches to military (24-hr) mode.
3. Tap CANCEL/SECURE.
The main display appears, showing the time in military (24-hr) mode.
1. On the control panel, tap-hold BROIL for 6 seconds (double ovens, tap-hold RIGHT OVEN > BROIL).
The current temp scale appears on the display.
2. On the numeric keypad, tap #.
The display shows the selected temperature mode (F or C).
3. Tap CANCEL/SECURE.
The selected temp scale is set.
• During time-delay cooking, the clock cannot be set if a timer, Self-Clean mode, or Sabbath mode is active.
• When power resumes after an outage, the time display ashes, reminding you to reset the time.
• After tapping CLOCK, you must enter the time and tap START within 6 seconds, or the previously set time
reappears.
Setting the Temperature Scale
Fahrenheit (default) and Celsius are available.
22 English
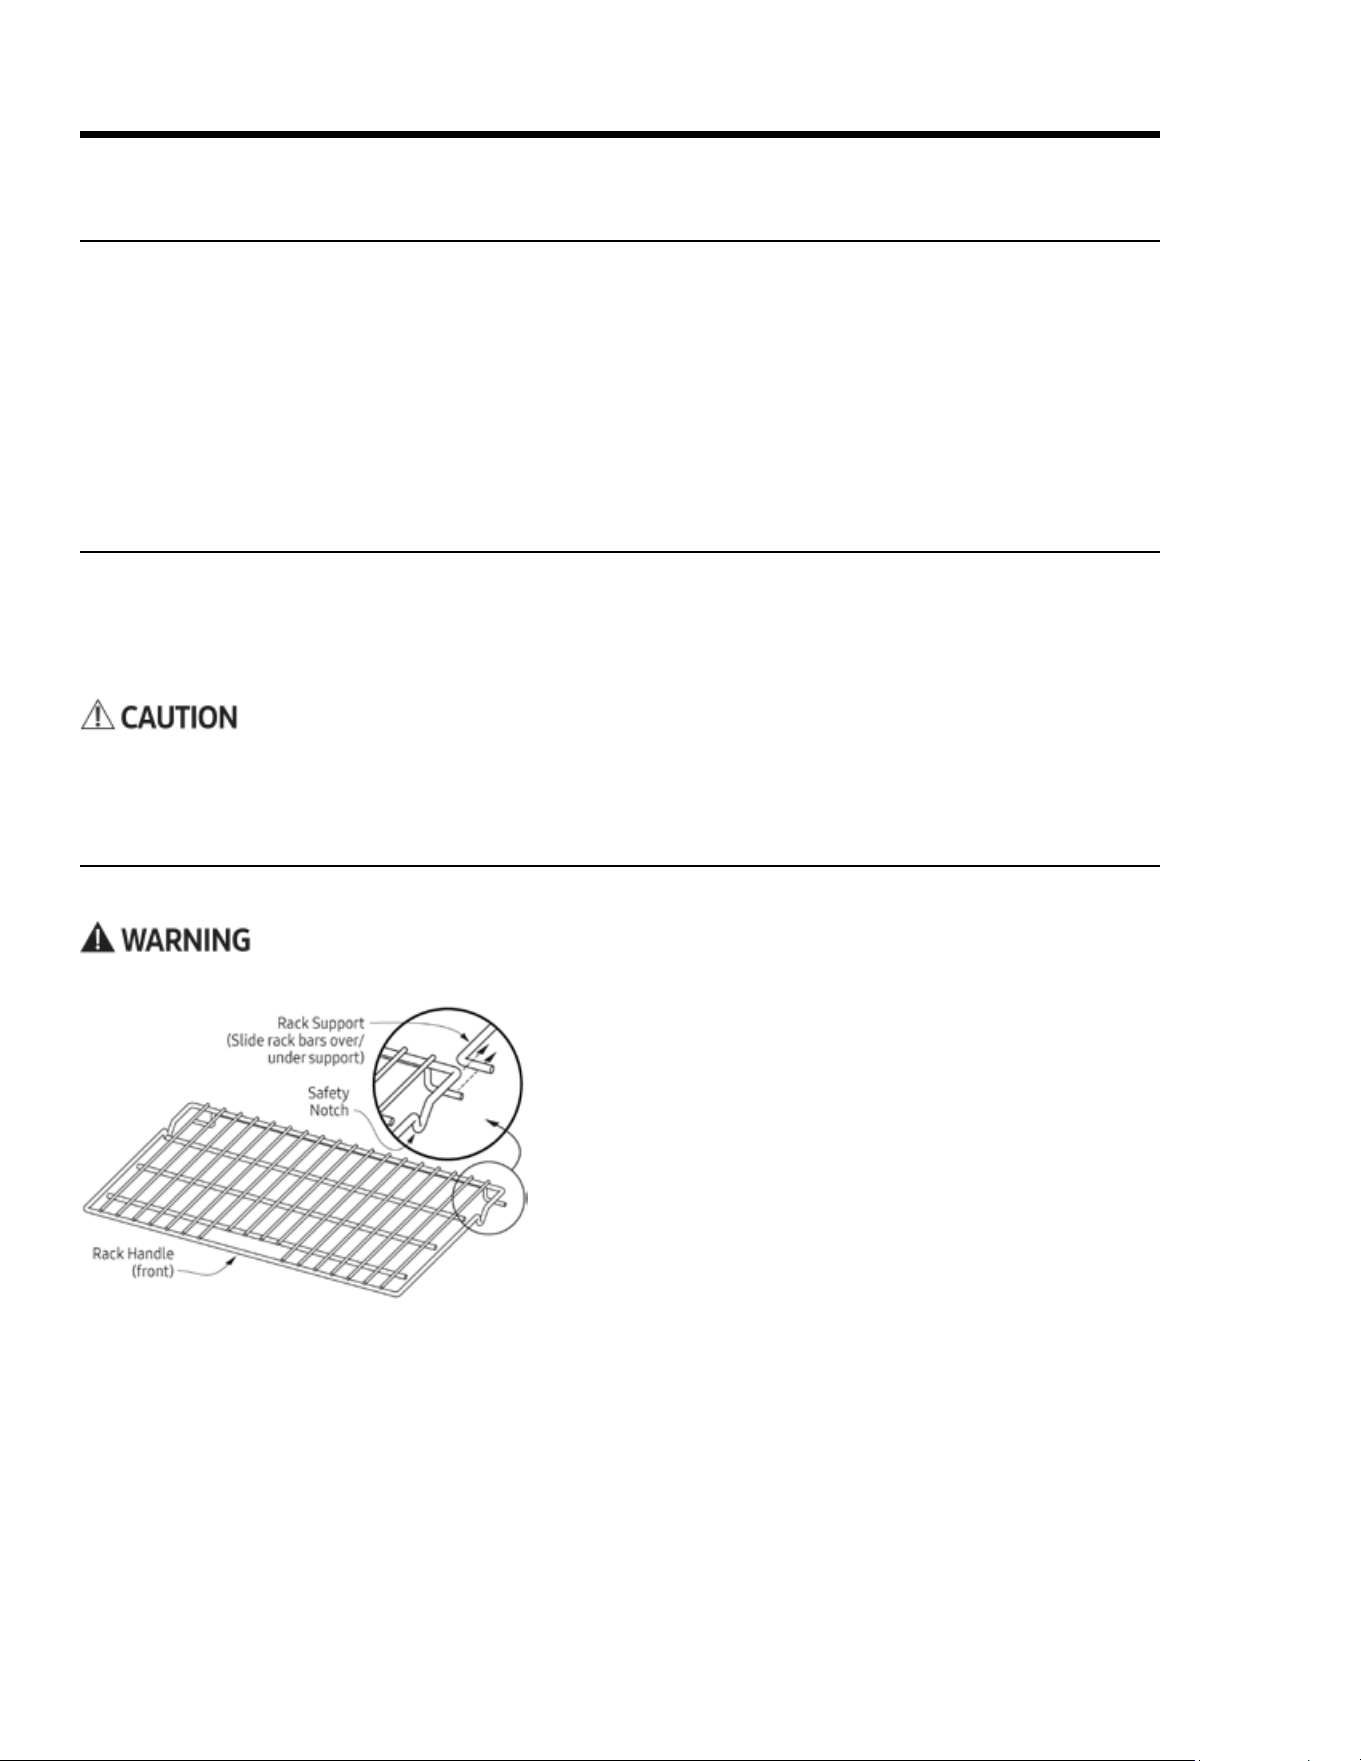
Operating the Oven
Inserting a Standard Oven Rack
1. Grasp the handle area at front of the rack, and slide the
rack onto the left-/right-side supports.
2. Begin sliding the rack in, then lift up so the safety notches
clear the ends of the rack supports.
3. With both hands, push the rack all the way in.
Removing a Standard Oven Rack
1. Grasp the handle area at front of the rack, and pull gently
until the rack stops at the safety notches.
2. Lift the front of the rack 6 inches to clear the safety notch-
es, and pull the rack completely out.
1. On the control panel, tap-hold START TIME for 6 seconds.
"Beep" appears on the display.
2. On the numeric keypad, tap #, then tap CANCEL/SECURE.
The beep is enabled/disabled.
To avoid marring the oven’s porcelain nish, quickly wipe up acidic foods (e.g., citrus, tomato, pineapple).
Handle the racks only when the oven is cool. If you must reposition a rack when the oven is hot, use potholders.
Before Cooking
• Before its rst use, turn the oven on for 1 hour at 500°F to burn off manufacturing residueand remove un-
desirable odors that the oven would otherwise emit the rst few times it is used.
• When baking/roasting, the oven preheats automatically. Preheating time varies with the temperature set-
ting and your home’s type of electrical supply. Preheating cannot be used for broiling.
Positioning the Oven Racks
You may use either rack type on any level inside the ove.
About the Control-Panel "Beep"
The control panel beeps: 1) when you tap a key, 2) when a timer reaches zero, 3) when there is an error, and 4)
when the oven performs certain set functions. You can silence/activate this tone as desired.
23English
1. Tap a cook mode. (Double ovens: Tap the mode under LEFT OVEN or RIGHT OVEN.)
The preset temperature appears on the display with icons for the cook mode. (See Pg. 20 for details about
cook modes).
2. (To cook at the preset temp) Tap START/CONTINUE. (To change the temp) On the numeric pad, tap a tem-
perature (ex. 4-2-5), then tap START/CONTINUE.
• Available temps range from 100°F – 555°F (37°C – 291°C). Suggested broil temp is 555°F. Double ovens
have one START key (below the display) for both ovens.
• When using Pure Convection or a bake or roast mode: PRE- (Preheating) and the current oven temp
appear on the display until the oven reaches the set temperature (15 – 20 min), then the chime sounds,
and PRE- disappears.
3. When the preheat chime sounds, carefully put your food in the oven.
Putting food in the oven during preheating overcooks the food.
4. When nished cooking, tap CANCEL/SECURE. (Double ovens: Tap CANCEL/SECURE for the oven in use.)
Operating the Oven
Positioning the Oven Racks, cont.
The oven comes with a set of Dacor GlideRack oven racks. These racks can be pulled out further than a stan-
dard rack and still support pots and pans or an optional Dacor baking stone.
Running A Cook Cycle
This procedure includes selecting a cook mode, preheating the oven, inserting the food, and turning off the oven.
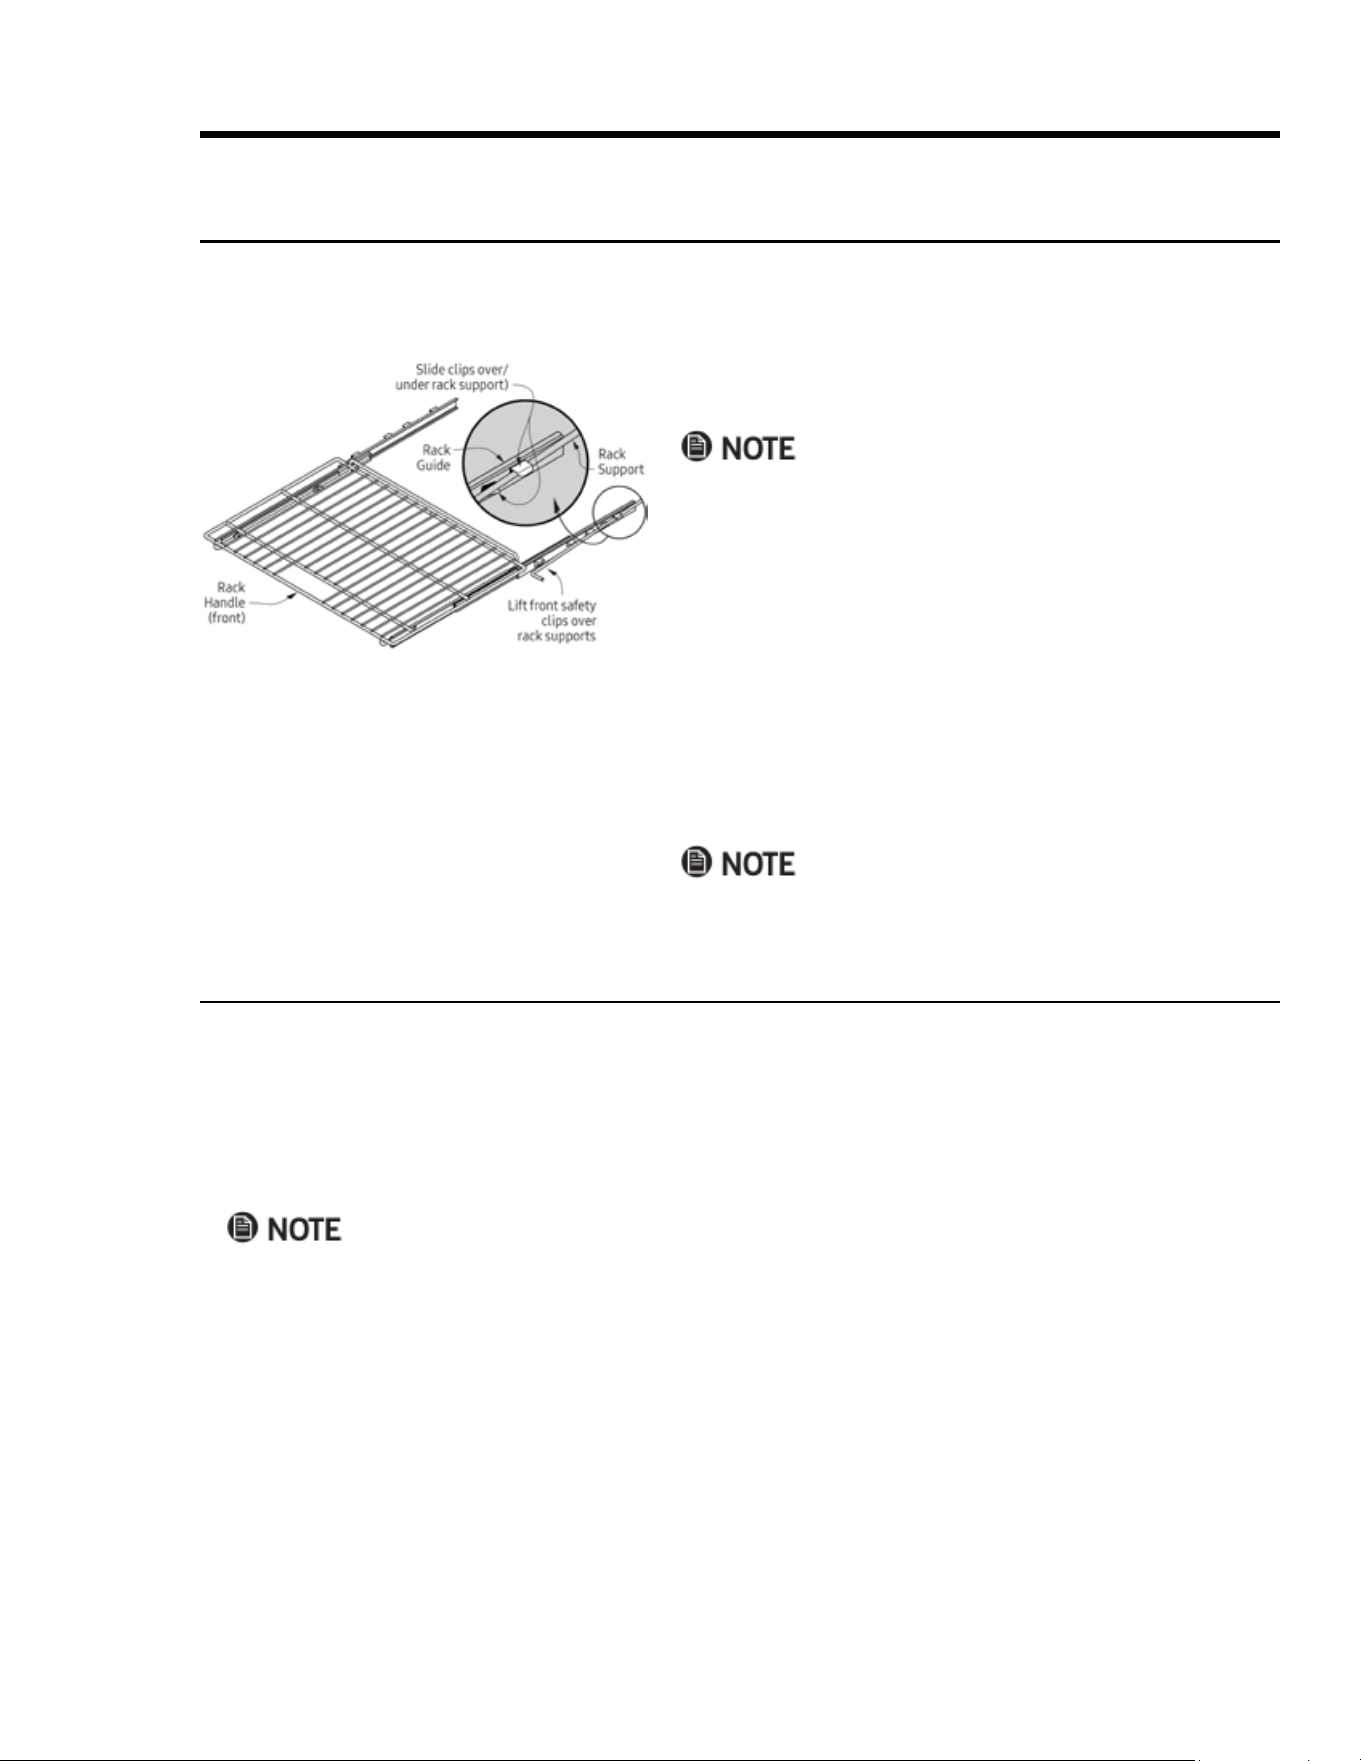
Inserting a GlideRack
TM
Oven Rack
1. Align the left and right safety clips on the back of the rack
guides with the rack supports (see left).
You can insert the rack with the guides extended or retracted.
2. Push the rack in, lifting the front safety clips over the front
of the oven-rack supports.
3. Push the rack all the way in.
4. Grasp the rack handle, and pull.
The safety clips keep the rack from coming off the guides.
Removing a GlideRack
TM
Oven Rack
1. Grasp the front of the rack near each side, and pull gently
until the rack stops.
2. Lift until the front safety clips just clear the front of the
rack supports, and pull the rack completely out.
Jiggling the rack side to side as you pull eases removal.
24 English
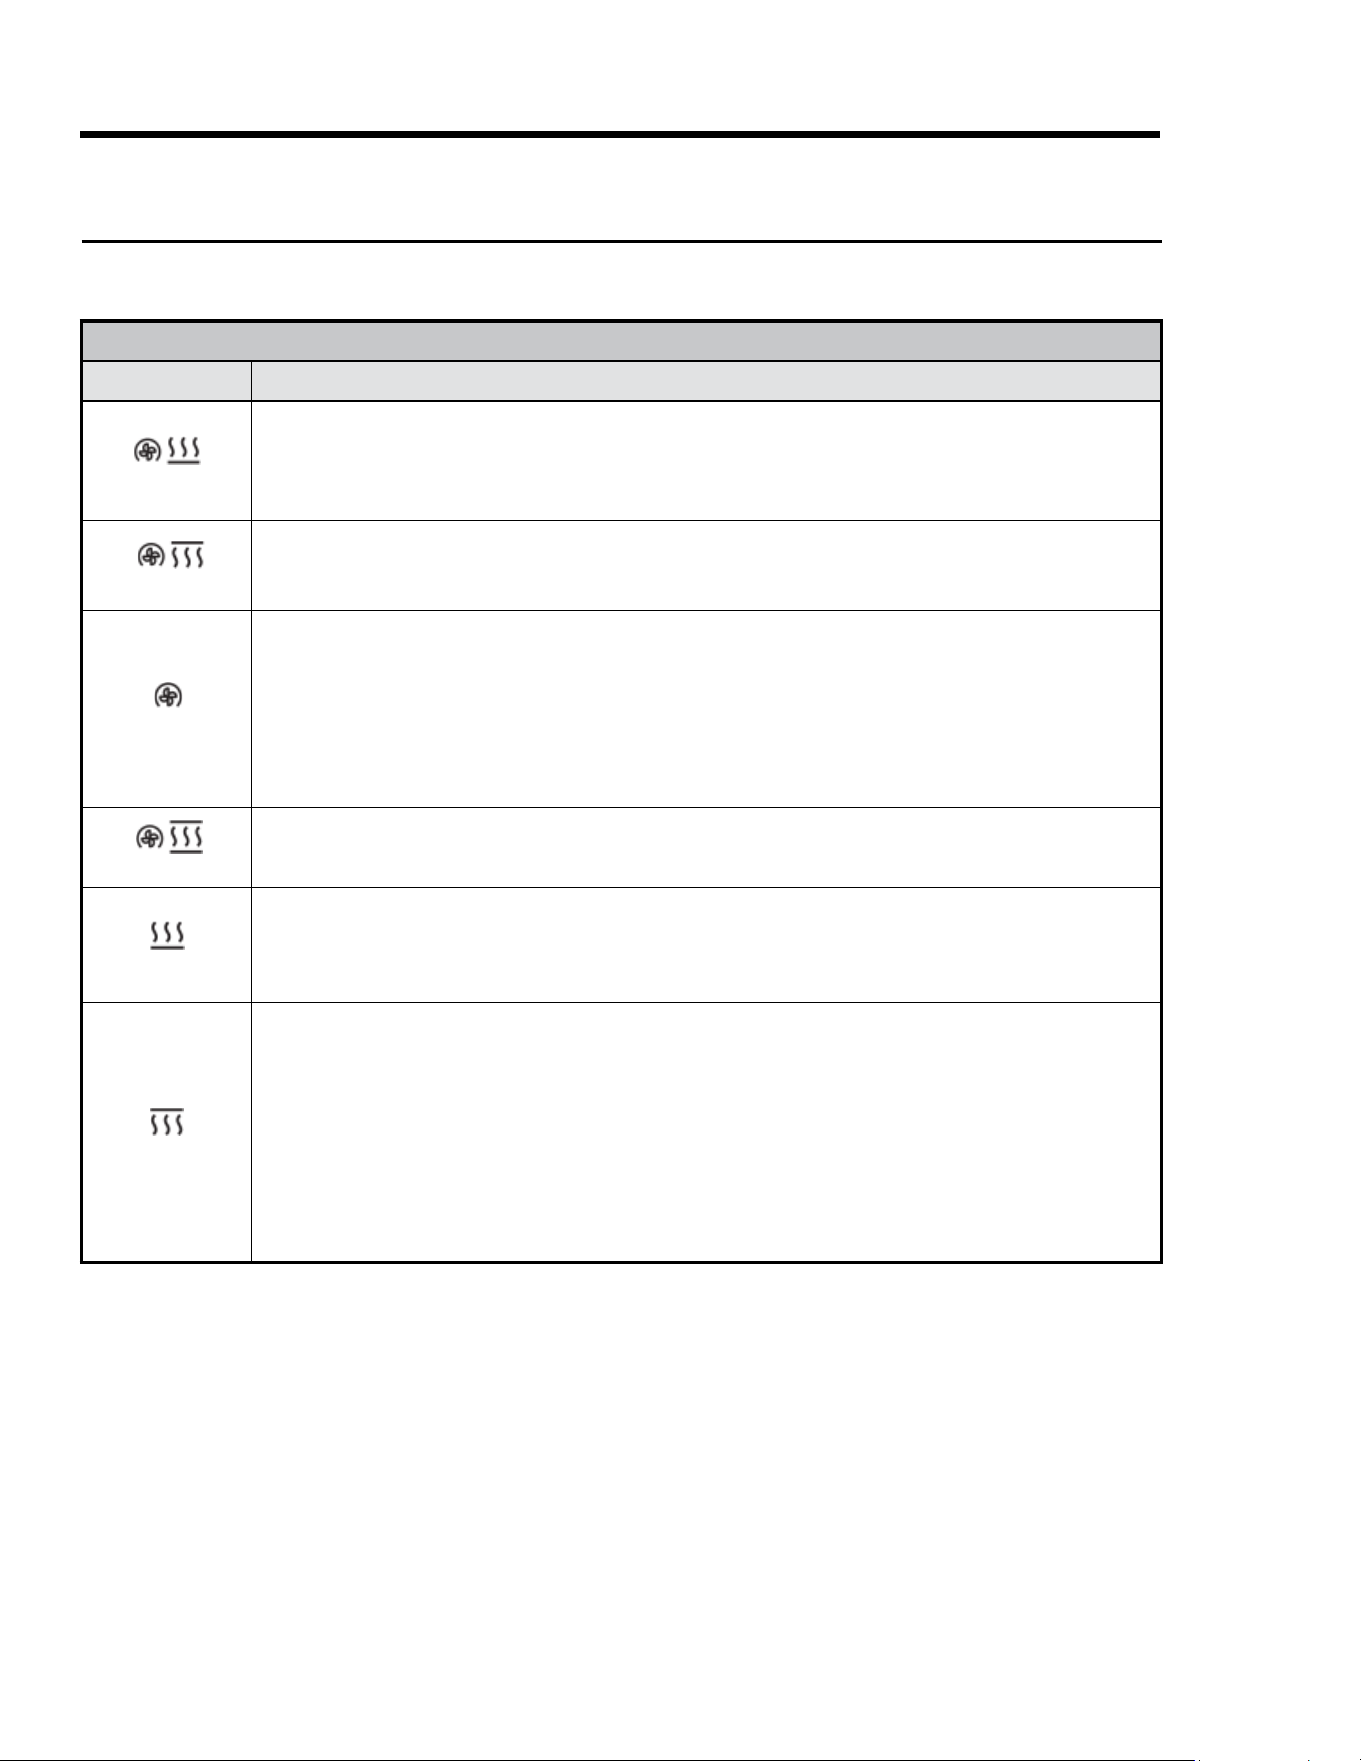
HDPRS-HDERS OVEN COOK MODES
Cook Mode Description
Convection Bake
• Convection fan with bottom heat source; for single-rack cooking in a deep pan.
• Best for fruit crisps, custard pies, double-crusted fruit pies, quiche, yeast bread, and popovers.
• Best for food baked in a deep ceramic dish or clay pot.
• Most items require browning on top and bottom.
Convection Broil
• Convection fan with top heat source; for food that does not need to be turned (e.g., sh, garlic bread, thinner
cuts of meat).
• See Broil (below) for cooking tips.
Pure Convection
• Convection fan only; for multi-rack baking.
– Typically, for two racks, cook on Levels 3 and 5 (counting from bottom up); for three racks, use Levels 2, 4, 6.
– You may need to lengthen single-rack cook times for multi-rack baking due to greater mass of food in oven.
• Uniform air circulation allows use of more oven space.
• For single- and multi-rack preparation of complete meals.
• Many foods (e.g., pizza, cake, cookies, rolls, frozen dinners) can be cooked on multiple racks.
• Good for whole roasted duck, lamb shoulder, and short leg of lamb.
Convection Roast
Convection fan with top and bottom heat sources; for rib roasts, whole turkeys and chickens, et al.
Bake
Bottom heat source; for single-rack cooking of common, basic recipes. Most cook times reect Bake mode.
• Follow recipe cook time and temperature; use oven timers to set cook time.
• Avoid opening oven door to check progress.
• Check food at shortest recommended cook time. (Cake is done if a toothpick poked in center emerges clean.)
Broil
• Top heat source; for single-rack cooking of small amounts of food, smaller cuts of meat, or toasting bread.
• To reduce risk of overcooking, use rack Levels 1 – 4; results depend on the rack level and type of food broiled.
• Some smoke is normal and necessary for a broiled avor.
• Set the timer when broiling.
• Use a grill over a broil pan so fat/grease drains, reducing spatter, excess smoke, and are-ups.
• Start with a room-temp broil pan for even cooking.
• Do not use a fork or knife to turn/remove meat; doing so lets natural juices escape, drying the meat.
• Broil meat just over half the specied time before seasoning and turning; season again just before removal.
• Lightly grease broiler grill to prevent sticking; to ease cleaning, remove broiler pan and grill with the meat.
Operating the Oven
About Cook Modes
The oven operates in three basic cook modes: Baking—Gentle cooking of dry foods (e.g., cookies, cakes, souf-
és); Roasting—Long-term cooking of meat/vegetables; Broiling—Short-term cooking under intense heat.
Changing the Cook Mode While Cooking
You can change the cook mode without interrupting the cook cycle.
⁕ On the control panel, tap the new cook mode, then tap START/CONTINUE.
(Double ovens) Be sure the cook mode key you tap is for the oven you are using.
25English
Operating the Oven
Cooking Tips
This section provides suggestions and information that will help with various aspects of oven cooking, includ-
ing baking, broiling, and roasting, proper cookware, and high-altitude cooking.
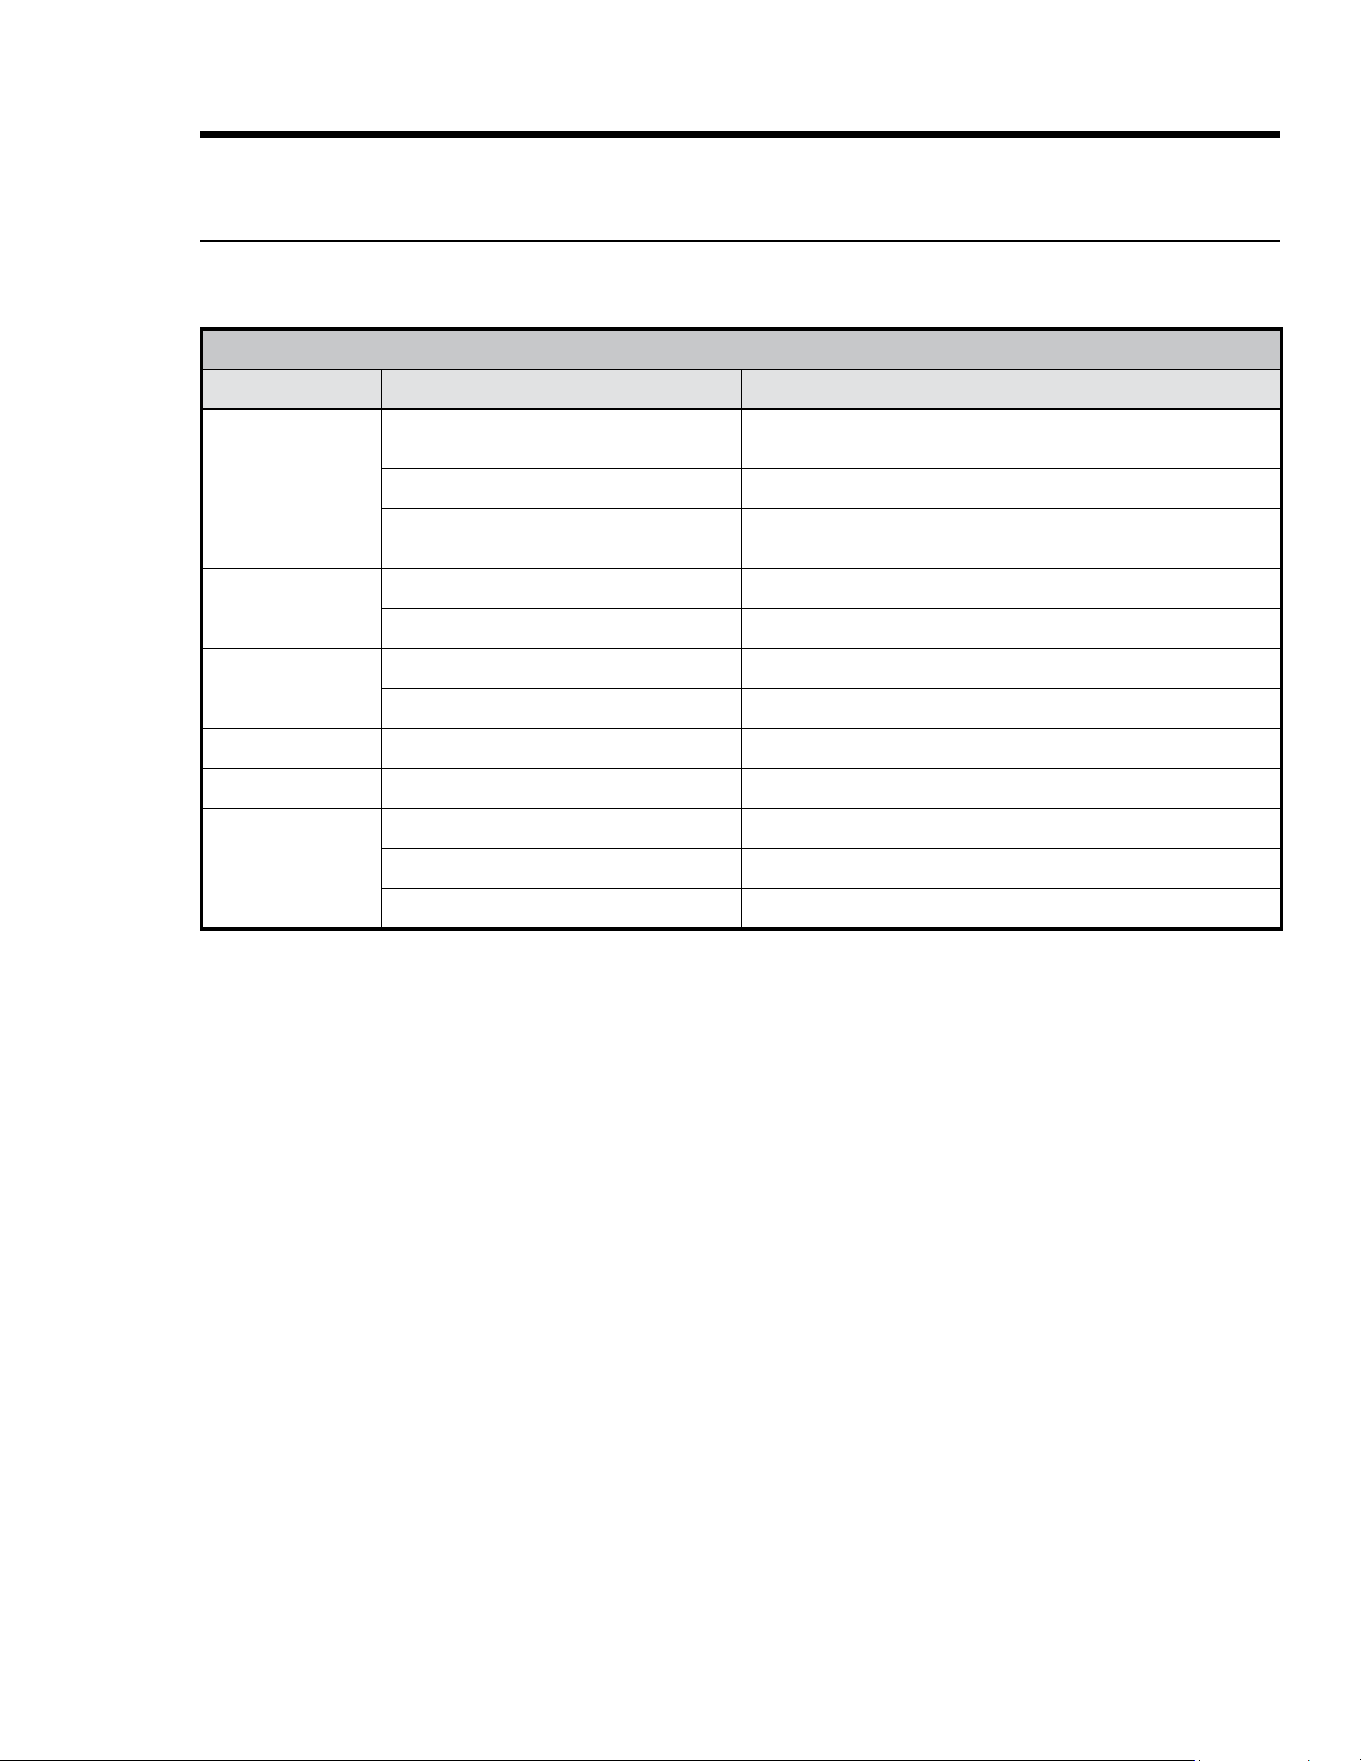
COMMON ISSUES—STANDARD BAKE MODE
Issue Possible Cause Solution
Cookies burnt on
bottom
Oven door opened to often
Set timer to shortest suggested cook time, and check food when
timer beeps; check cookie doneness through door window
Wrong rack level Change rack level
Darkened, heat-absorbing cookie sheet
used
Use bright, reective cookie sheet
Cookies too brown
on top
Rack level too high Use lower rack level
Dough put in oven during preheat Put cookie dough in oven when preheating is done
Cake burnt on sides
or center not done
Oven temperature too high Reduce oven temperature
Darkened, heat-absorbing pans used Use bright, reective pan
Cake cracked on top Oven temperature too high Reduce oven temperature
Cake not level Oven/rack not level Level oven/rack.
Pie burnt on edges
or center not done
Oven temperature too high Reduce oven temperature
Darkened, heat-absorbing pan used Use bright, reective pan
Oven/rack overcrowded Use fewer pans
26 English
Operating the Oven
Cooking Tips, cont.
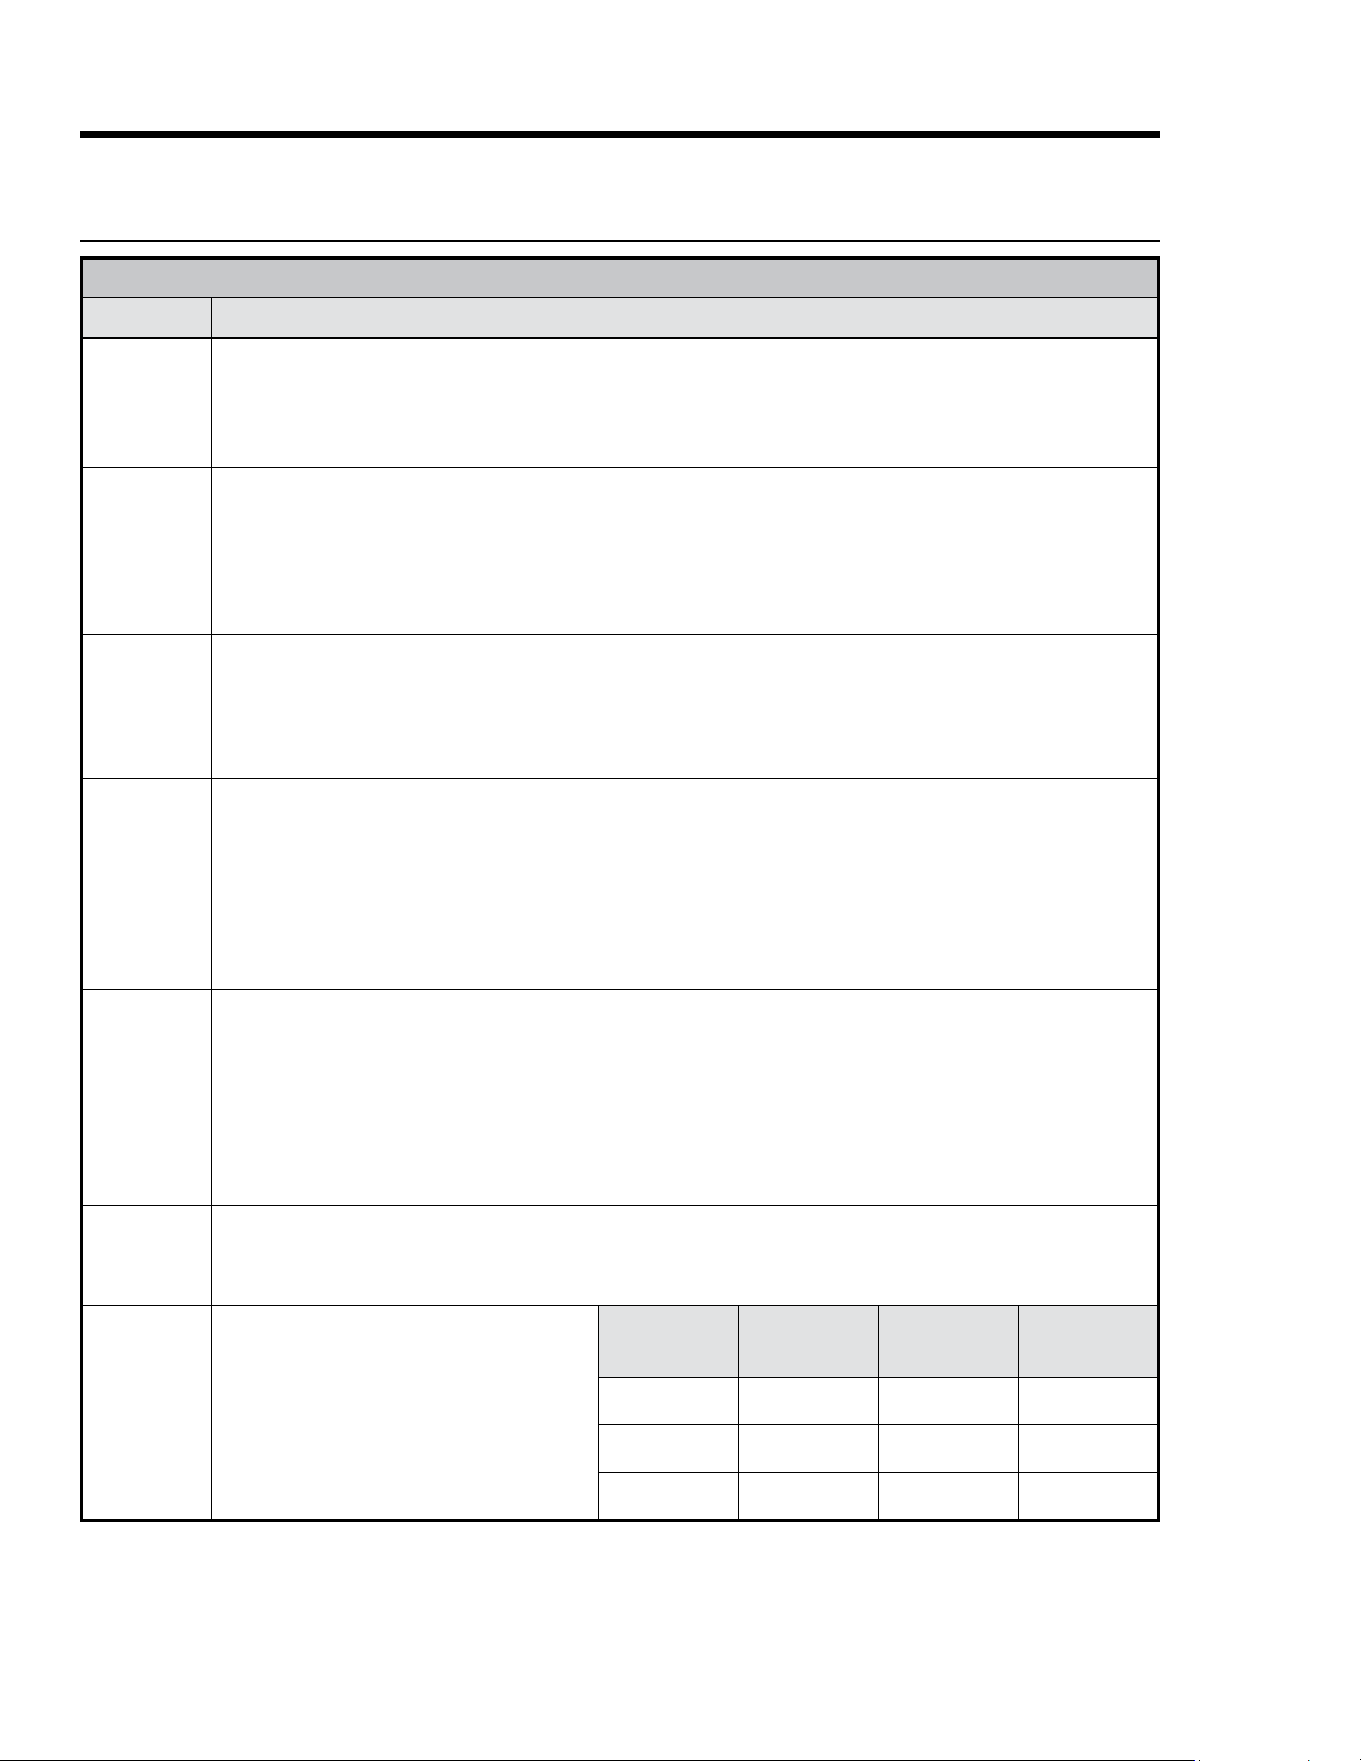
COOK MODE AND COOKWARE
Subject Tip
Bake,
Convection
Bake, Pure
Convection
• Do not open the oven door frequently; check doneness through the door window when possible.
• Use a timer to time baking functions.
• Check doneness at the shortest suggested cook time; for cake/brownies, a wooden toothpick/skewer poked
through the center should emerge clean.
• For best results, measure ingredients carefully and follow proven recipes.
Convection
Bake
• This mode cooks most foods at lower temperatures for shorter periods of time, while producing superior results.
• Typically, you can reduce temp by 25°F and cook for 10% less time; baked goods have golden-brown crusts with
aky textures, and meats have crispy exteriors with succulent juices sealed inside.
• Some conventional recipes, especially homemade, may need testing and adjusting when converting to con-
vection baking; prepare a proven conventional recipe using the above convection time/temp guidelines; if the
results are unsatisfactory, adjust one variable (e.g., cook time, rack level, temperature), and repeat the test; if
needed, adjust one more variable, continuing this method until you achieve satisfactory results.
Broil
• Always set a timer when broiling.
• For even cooking, start with a room-temperature broil pan.
• Use tongs or spatula to turn/remove meats; piercing meat lets juices escape, leading to less desirable results.
• Broil rst side for just over half suggested time, then season and turn; season second side just before removal.
• Lightly grease broiler grill; excess grease causes excessive smoke.
• To ease cleanup, remove broil pan and grill with food; discard grease, and soak cookware until ready to clean.
Roast
• Dacor’s optional roasting pan offers excellent results.
• Dacor’s optional “V” shaped rack (placed in the roast pan) allow air circulation around food.
• Insert temperature probe halfway into center of thickest part of meat; (poultry) Insert probe between body and leg
into thickest part of inner thigh; for accurate readings, probe should not touch bone/fat/gristle; check meat temp
into suggested roast time; after reading probe once, insert it " further into meat, and take another reading; if
second reading is lower, keep cooking.
• Let roast stand 15 – 20 min's after removal to ease carving.
• Roast times vary with size/shape/quality of meats and poultry; less tender cuts are best prepared in Bake mode
and may need moist-cooking techniques; follow your favorite cookbook recipes.
Bakeware
• Dacor full-sized cookie sheets take best advantage of rack space; (see Pg. 4, Customer Assurance info to order).
For best results, use recipe's suggested pan size/type.
• For best results, cakes, quick breads, mufns, and cookies should be baked in bright, reective pans.
• Use medium-gauge-aluminum baking sheets when preparing cookies, biscuits, and cream puffs.
• Bake most frozen foods in their original foil containers on a cookie sheet. Follow package directions.
• Glass bakeware: Reduce recipe temperature by 25°F (except for pies or yeast breads).
• Follow standard recipe bake time for pies and yeast breads.
• Warped, dented, stainless-steel, and tin-coated pans do not give uniform baking results.
• Place pans carefully on the oven racks with long sides running left to right.
Multi-Rack
Baking
• Standard Bake mode is best for multi-rack baking. Many foods (e.g., pizza, cake, cookies, biscuits, mufns, rolls,
and frozen prepared foods can be cooked on two or three racks simultaneously.
• Typically, when baking on two racks, choose from Levels 2, 4, and 6.
• When adapting a single-rack recipe to multi-rack baking, cook times may be longer due to greater volume of food.
High-Altitude
Baking
The higher the altitude, the longer foods take
to cook, so some recipes need adjusting. (Usu
-
ally, rising baked goods need no adjustment,
but letting the dough rise twice before the
nal pan rise develops better avor. Try the
adjustments at right. Note the changes that
work best, and mark your recipes accordingly.
You may also consult a cookbook on high-alti
-
tude cooking for specic recommendations.
Altitude
(ft)
Baking Powder
(ea. tsp, reduce
amt. by %)
Sugar
(ea. tsp, reduce
amt. by %)
Liquid
(for ea. cup,
add %)
3000 5 – 10 10 – 25 5 – 10
5000 10 10 20
7000 25 20 20 –25
27English
Operating the Oven
• If you increase the temp by 50°F (28°C) or more, the oven enters Preheat mode to raise the temperature
rapidly to the new setting. (PRE- appears on the display.) To prevent excessive browning, remove the food
during preheating, and return the food when PRE- disappears.
• If you lower the temp, it is best to remove the food until the new temperature appears.
Changing the Oven Temperature While Cooking
You can change the oven temperature without interrupting
the cook cycle.
1. Tap the selected cook mode.
The symbol for that cook mode appears on the display.
2. Using the numeric keypad, enter the new temperature (ex:
3-7-5), and touch START/CONTINUE.
COOK-MODE TEMP PRESETS
Mode Temperature
Convection Bake
325°F (163°C)
Pure Convection
Bake
350°F (177°C)
Convection Roast
375°F (191°C)
Broil
555°F (291°C)
Convection Broil
Default cook-mode temperatures are set at the factory so
you do not need to enter the temperature manually.
About Oven Temperatures
About Cook-Mode Temperature Presets
Using Control Lockout
This feature disables all control-panel keys except CANCEL/SECURE and the oven light.
1. Tap-hold CANCEL/SECURE for 6 seconds.
The control-panel keys stop working; OFF appears on the display.
(Double ovens: Tap-holding either oven's CANCEL/SECURE key locks the control panel for both ovens.)
2. Tap-hold CANCEL/SECURE for 3 seconds.
All control-panel keys are enabled.
(Double ovens: Tap-holding either oven's CANCEL/SECURE key unlocks the control panel for both ovens.)
Activating control lockout turns off all active timers.

28 English
Using the Timers
Enabling the 12-Hr. Oven Shut-Off Timer
The oven has a factory-programmed timer that automatically turns the oven off after 12 hours of continuous
use. This timer automatically resets if you change the cook temperature or mode, and is automatically disabled
when you activate Sabbath mode.
You can use this same procedure to disable the 12-hr. timer.
1. With the oven off, tap-hold TIMER 1 for about 10 seconds.
The control panel beeps, and 12Hr appears on the display, then ON appears on the display.
2. Tap #.
The 12-hr. timer is enabled.
3. Tap CANCEL/SECURE.
The changes are saved; the clock appears on the display.
Using the Range's Cook Timers
You can use the oven’s two timers individually/simultaneously and set them from 1 min. to 99 hrs-59 min. One
indicator (1 or 2) appears on the display if one timer is active. Both indicators appear if both timers are active.
• The timers do not turn the oven off. To turn the oven off automatically, see Using Time-Delay Cooking.
• Tapping CANCEL/SECURE does not reset of stop the timers.
1. On the control panel, tap TIMER 1 or TIMER 2.
2. On the numeric keypad, enter a cook time. (Ex. To enter 11 hrs, 30 mins, tap 1-1-3-0; for 25 mins, tap 2-5.
3. Tap START/CONTINUE.
– The cook time appears on the display and begins counting down.
– When the countdown ends, the timer indicator blinks on the display, and a beep sounds. The timers have
unique cadences (Timer 1: 1 sec on, 1 sec off, repeat; Timer 2: 1 sec on, 1 sec off, 2 sec's on, 1 sec off, repeat).
– Silence the alarm by tapping the blinking timer indicator, then tap CLOCK to return to the main display.
Viewing Oven Settings As the Timer Counts
While a timer is active, you can check the clock or the other timer without interrupting other settings.
⁕ Tap CLOCK to view the current time.
⁕ Touch TIMER 1 to view its time.
⁕ Touch TIMER 2 to view its time.
Changing the Time On An Active Timer
1. Tap Timer 1 or Timer 2.
2. On the numeric pad, enter the new time, and tap START.
Stopping an Active Timer
1. Tap the timer key twice.
The timer zeroes out.
2. Tap CLOCK to return to the main display.
Operating the Oven
29English
Using Time-Delay Cooking
About Time-Delay Cooking
• You can set the oven to turn itself on/off.
• Time-delay can be used for all but Broil and Convection Broil modes.
• You can use the timers while using time-delay cooking.
• You can cancel a time-delay cycle any time by tapping CANCEL/SECURE.
• Time-delay cooking cannot be used if Sabbath mode is active.
• When the oven is in Time-Delay mode, you can tap:
– CLOCK to view the time
– START TIME to view the set cook-start time
– STOP TIME to view the set cook-stop time
– COOK TIME to view the cook-duration time.
Food safety is a critical consideration in time-delay cooking. To avoid food-related problems:
• Do not use foods that will spoil before the oven turns on (e.g., eggs, dairy products, cream soups, meat).
• Do not leave food in an inactive oven. Bacteria develops when the temperature drops below 140°F (60°C).
• For long-term delay starts, place only very cold or frozen food in the oven. (Most unfrozen foods should rest
in the oven no more than two hours before cooking begins.)
Using the Time-Delay-Cooking Keys
• START TIME: The time of day when the oven starts cooking.
• COOK TIME: The amount of time the oven cooks before entering Hold mode.
• STOP TIME: The time of day when the oven turns off and enters Hold mode.
About Hold Mode
• If you use COOK TIME or STOP TIME, the oven enters Hold mode (HLd appears on the display) when it
reaches the end of the set cook time. Oven temperature "holds" at 150°F (66°C) for 2 hours.
• Touch CANCEL/SECURE to turn the oven completely off.
• Do not leave foods in the oven after Hold mode turns off.
When you set two of the time-delay keys, the oven automatically calculates the third time. There are three
ways to use these keys:
• Tap START TIME, and set a time for the oven to turn on, then tap COOK TIME or STOP TIME, and set a time
for the oven to turn off.
• Set START TIME only, then turn the oven off manually when you are done cooking.
• Turn the oven on manually, then tap COOK TIME or STOP TIME, and set a time for the oven to turn off.
Operating the Oven
30 English
Using Time-Delay Cooking, cont.
Setting a Time-Delay-Cooking Cycle
1. Adjust the racks as needed, and place the food in the oven.
2. Select a cook mode (except BROIL or CONVECTION BROIL).
3. Enter a cook temperature.
If you want the oven to turn on immediately and turn off automatically later, skip to Step 6.
4. Tap START TIME, and enter the time of day you want cooking to start. (Ex: 12:35, tap 1-2-3-5. You may enter a
time up to 22 hr 59 min beyond the present time.)
5. Tap # to select AM or PM.
If you want to set a stop time or a cook time, proceed with Step 6; otherwise, skip to Step 7.
6. Tap either COOK TIME or STOP TIME.
COOK TIME sets the amount of time the oven will cook; STOP TIME sets the time of day when the oven will
stop cooking. Whichever key you select, the result is the same.
Pre-heating is unavailable for time-delay cooking. The time needed to reach the cooking temperature must be
added to the cook time, which increases with the cooking temperature and amount of food.
7. Tap START.
If you set a cook time or a stop time, the oven cooks until the set time, and enters Hold mode.
Operating the Oven
Using the Meat-Temperature Probe
The doneness of bulky meats (e.g., roasts, whole turkey and chicken) is best determined by taking the internal
temperature. The oven's temperature probe lets you cook food to the exact desired temperature. The probe
registers temperatures from 100 – 200°F (38 – 93°C).
• To avoid injuries, use hot pads or oven mitts to handle the probe when the oven is hot.
• Always grasp the probe by its handle. (Pulling on the cable could damage the probe.)
• Only insert the skewer into fully thawed food.
• Always remove the probe from the oven after use.
• Do not use a 3rd-party probe; you risk damaging the probe and the oven.
• The probe does not work in Broil and Sabbath modes. If you plug in the probe when in these modes, the
probe icon blinks, indicating an error.
• If you detach the probe after tapping PROBE, the probe icon blinks, and OPn appears on the display.
• If you tap Probe but do not plug in the probe, the mode cancels itself after 30 seconds.
• Probe mode takes precedence over time-delay cooking. The oven keeps cooking until the meat's internal
temp reaches the selected probe temp regardless of the stop time/cook time, then enters Hold mode.

31English
Operating the Oven
Using the Meat-Temperature Probe, cont.
Changing Cook Modes In Probe Mode
1. Tap CANCEL/SECURE.
2. Tap the desired cook-mode key.
3. (If you also want to change the cook temp) Using the numeric keypad, enter the new temp.
4. Tap START/CONTINUE.
Canceling Probe Mode While Cooking
⁕ Tap PROBE twice, and unplug the temperature probe.
The oven reverts to its original settings.
When you use the meat-temp probe, the oven controls the cook time and shows the meat temp on the display.
When the meat reaches the set temp, the oven enters Hold mode, in which the temp lowers to 150°F (66°C) for
2 hours to keep the meat warm and safe to eat. To prevent food-related illness, do not leave food in the oven
beyond Hold mode. Touch CANCEL/SECURE to cancel Hold mode and turn the oven completely off.
USDA SAFE INTERNAL MINIMUM TEMP'S
Ground Meat, Meat Combinations
Beef, pork, veal, lamb
160°F (71°C)
Turkey, chicken
165°F (74°C)
Fresh Beef, Veal, Lamb
Steaks, roasts, chops
145°F (63°C)
Poultry
Whole bird (temp taken in thigh)
165°F (74°C)
Breasts, roasts
Thighs, legs, wings
Duck, goose
Stufng (cooked alone or in bird)
Ham
Uncooked
160°F (71°C)
Reheat (whole or half)
140°F (60°C)
NOTE: Minimum safe internal cooking temp’s are subject to
change. If bacteria change, so do the temp’s needed to elim-
inate them. For current info, call the USDA Meat and Poultry
Hot Line: (800) 535-4355 or visit www.fsis.usdagov
2. On the control panel, set a cook mode.
The mode’s preset temperature appears on the display.
(To change the temp, use the numeric pad.)
3. Tap START/CONTINUE.
PRE- appears on the display; the oven starts heating to
the set temperature.
4. (When the oven chimes and PRE- disappears) Put on oven
mitts, and put the meat in the oven.
5. Grasping its handle, plug the probe in the outlet on the
oven chamber's right wall.
6. On the control panel, tap PROBE. (Double oven: PROBE is
among the RIGHT OVEN controls.)
• The preset probe temp (160°F/71°C) and the probe icon
appear on the display.
• To change the probe temp: Enter the new temp via the
numeric pad. (Use the chart at left as a guide.)
7. Tap START/CONTINUE.
If you skip this step, Probe mode will not activate.
1. (With the meat read to cook) Insert the probe skewer in the thickest part of the meat away from fat and bone.
With fowl, hold the skewer parallel to the pan, and insert it into the deepest part of the breast until the tip
is ¾ in. from the body cavity.

32 English
Operating the Oven
Dehydrating/Defrosting Foods
You can dehydrate or defrost foods at low heat settings in Pure Convection mode.
Using Proof Mode
1. Put the dough in a greased bowl, and cover it with a damp cloth or plastic wrap coated with nonstick spray.
2. On the control panel, tap PROOF.
• (Double ovens) The PROOF key is among the LEFT OVEN cook modes, meaning that the dough must be
placed in the left oven to use this mode.
• The Proof mode temperature is factory-set and cannot be changed.
3. Put the dough in the oven, and turn on the oven light.
4. Set the timer for the recipe’s rise time.
Cook meats immediately after defrosting.
1. Position the racks, and center the food on the rack.
(If dehydrating) Place prepared food on a drying rack.
2. Tap PURE CONV.
3. (If defrosting) Enter a temperature up to 150°F (66°C).
(If dehydrating) Use the table at left to set the temp, and
raise it as needed.
4. Tap START/CONTINUE.
FOOD TYPE DEHYDRATIMG TEMP
Fruit
100°F (38°C)
Vegetable
125°F (52°C)
Meat
150°F (66°C)
Using Sabbath Mode
This mode complies with Jewish law for Sabbath and Holy Day use. When active, only Bake and Pure Convec-
tion modes are available, and the oven light and only CANCEL/SECURE, START/CONTINUE, 0, 2 are available.
• When Sabbath mode is active, SAb appears on the display.
• Sabbath mode will not work if the meat-temp probe is connected; the probe icon blinks, indicating an error.
• Time-delay cooking cannot be used.
• After a power outage, the oven returns to Sabbath mode at the previous temperature setting.
• Active oven timers are automatically canceled when Sabbath mode is selected.
• You should use an oven-rack thermometer to track the oven temp.
• During Sabbath mode, CANCEL/SECURE is active so you can cancel Sabbath mode and turn off the oven.
(Double ovens: both CANCEL/SECURE keys are active.)
• When the oven is cooking, tap 2 > START/CONTINUE to raise the oven temp 25°F (15°C); tap 0 > START/
CONTINUE to lower the temp 25°F (15°C). Per Jewish law, the bake elements are adjusted randomly when
these keys are touched, and the display is unchanged. (Double ovens: Before tapping 0 or 2, tap BAKE or
PURE CONV for the oven on which you want to change the temperature.
33English
Operating the Oven
Adjusting the Oven-Temperature Offset
The oven-temp offset is the factory-calibrated heat level at which a given cook mode cooks food; cook times
may vary from your previous oven. If cooking results on this oven differ from those of your previous oven, you
can adjust the oven-temp offset.
To ensure proper operation, do not adjust the meat-temperature probe or self-clean offset temperatures.
Do not measure oven-chamber temperature with a thermometer. Opening the door compromises the reading,
and the temperature varies as heating elements cycle on and off.
1. (With the oven off) On the numeric keypad, simultaneously press-hold 0 and #.
Momentarily, PASS appears on the display.
2. Enter 6428, and tap START/CONTINUE.
SLCt (Select) appears on the display.
3. Select a cook mode.
The mode's current offset temp appears on the display. (00 appears if you have never adjusted the temp.)
4. On the numeric keypad, enter the desired increase/decrease in temperature.
– To decrease the temp by the amount entered, tap # for a minus sign; otherwise, the temp increases by
the amount entered.
– You may enter a number from -35°F to 35°F (-18°C to 18°C). Edit appears on the display as you start
entering the offset value.
5. Tap START/CONTINUE.
The setting is saved.
6. Repeat Steps 3 – 5 for other cook-mode temps you want to offset.
7. Tap CANCEL/SECURE.
The oven exits Offset mode; the main display appears.
Using Sabbath Mode, cont.
Activating Sabbath Mode
• Double ovens: perform this procedure for one oven, then use Steps 2 – 4 to activate Sabbath mode on the
other oven.
• Tap each successive key within 6 seconds of the previous, or the process cancels itself.
1. Tap #.
2. Tap BAKE or PURE CONV. (Double ovens: Tap the mode key for LEFT OVEN or RIGHT OVEN.)
3. Tap 0 (decrease) or 2 (increase) repeatedly to change the preset oven temperature on the display.
4. Tap START.
Sabbath mode is active (double ovens: Sabbath mode is active for the selected oven); the oven cooks in the
mode you selected in Step 2.
34 English
Maintaining the Cooktop
About the Cooktop Spill Tray
1. Remove the grates.
2. Clean the spill tray with a soft, damp cloth.
3. If spills run into gaps in the burners, remove the burner parts, and wipe the spills.
4. Assemble the burners, and install the grates.
• Do not try to remove the spill tray. Gas lines can be damaged, perhaps causing a re/malfunction.
• Do not pour water on the spill tray. Water entering the mechanisms below is an electric-shock hazard and
high levels of carbon monoxide may be emitted from corroded gas valves/ports.
• Do not spray cleanser into the manifold holes. The ignition system inside them must remain dry.
Cleaning Stainless-Steel Surfaces
To prevent scratching, wipe stainless steel “with” the grain, and do not clean with abrasive cleaners/scrubbers.
1. Apply (per bottle instructions) the provided Dacor stainless-steel cleaner to a cloth or paper towel.
2. Clean one small area then another, rubbing with the grain.
3. Dry the surface with a soft, dry cloth.
Cleaning the Oven-Door Glass
1. Clean the door glass (inside and out) with a mild glass cleaner (per manufacturer instructions).
2. With a clean, soft cloth moistened with clean water, rinse the glass.
3. With a soft, lint-free cloth, fully dry the glass.
Cleaning the Control Knobs
1. Pull the knobs off their valve stems.
2. Clean the knobs in warm, soapy water (not the dishwasher), then rinse and dry them thoroughly.
3. Re-attach the knobs.
Cleaning the Control Panel
1. On the control panel, tap-hold CANCEL/SECURE for 6 seconds.
OFF appears on the display; the oven cannot be activated.
2. With a sponge dampened with a mild-soap and warm-water solution, clean the control panel.
3. With a soft, lint-free cloth, fully dry the panel.
4. Press-hold CANCEL/SECURE for 6 seconds.
The control panel is enabled.
Maintaining the Range
• Turn off power, and let all surfaces cool before cleaning the range.
• Wear rubber gloves, and do not use abrasive cleaners/scouring pads anywhere on the range.
• Do not spray liquids anywhere on the range; when using sprays, spray the cloth or paper towel.
General External Maintenance
35English
Maintaining the Cooktop, cont.
About Burner Caps and Heads
• Burner parts are not dishwasher-safe. Clean them in hot, soapy water with a sponge or plastic scouring pad.
(Do not use steel wool or scouring powders.)
• Use a pin to unclog the holes in the burner heads if needed.
• The brass parts will discolor with use; discoloration does not affect performance.
• During cleaning, ensure that all burner ports are unclogged.
• You may use either set of burner caps (brass or porcelain).
• To remove burned-on residue from brass caps, soak them in a solution of 1 cup water and 1 tbsp of either
white vinegar or lemon juice. Do not clean with a metallic brush or scouring pad.
• After reassembling the burner heads/rings/caps, test burner function.
About Burner Bases
• Burner bases are not removable.
• Do not let water into the burner bases and brass gas orices.
• With a damp cloth, gently clean the bases, then dry them fully before using the cooktop.
About the Cooktop Grates
Wash the grates regularly and after spillovers.
Burners should be off and all cooktop components and accessories cool before handling the grates.
• Do not put the grates in the dishwasher.
• Wash the grates in hot, soapy water, then rinse and dry them fully.
• Reposition the grates as instructed in this manual.
About the Griddle
• Burners should be off and all cooktop components and accessories cool before handling the griddle.
• Do not put the griddle in the dishwasher.
• Do not clean the griddle with metal scrouring pads or abrasive cleansers or chemicals.
• Clean the griddle with a sponge or plastic scouring pad in hot, soapy water, then rinse under the tap, and
dry the griddle fully before using it.
About Electrodes
Do not turn on a burner while touching its electrode; do not try to remove the electrode.
• Wipe the electrode metal tip and ceramic stem with a dry, soft cloth.
• Do not clean the electrodes with water.
Maintaining the Range
36 English
Turn off power, and let all surfaces cool before cleaning the cooktop. Wear rubber gloves, and be mindful of
sharp edges. Clean the cooktop as instructed in this manual.
Using Self-Clean Mode
About Self-Clean Mode
• For best results, clean the oven chamber regularly. Self-cleaning, which takes about 2 ½ hours, heats the
oven to very high temperatures to burn off surface deposits in the oven chamber.
• Smoke from the oven chamber is normal during the rst few self-clean cycles. The oven also normally
makes popping sounds during self-cleaning due to metal expanding/contracting.
• Self-clean mode will not function if the meat-temperature probe is connected; the probe icon blinks, re-
minding you to remove the probe.
• For less smoke and more efcient self-cleaning, wipe up cooking residue with a damp cloth beforehand.
• Exterior range surfaces will be very hot during self-cleaning.
• Remove all accessories and foreign items from the oven chamber during self-cleaning.
Before Self-Cleaning the Oven
• 48" range: You can self-clean one oven at a time; when one oven is in self-clean mode, the other is unusable.
• The oven light is inactive during self-cleaning.
• Self-cleaning will not work if the meat-temperature probe is connected. (If you try to start self-cleaning and
the probe is connected, the control panel probe icon blinks to alert you to remove the probe.)
1. Remove racks, convection lter, cookware, temp probe, and any other foreign items from the oven.
2. Wipe the surfaces around the door gasket with a vinegar-water solution, then wipe the surfaces dry. (Clean
heavily soiled areas with a plastic scouring pad.)
3. Gently clean the door gasket (see Pg. 39).
Maintaining the Range
Self-Cleaning the Oven
1. Ventilate the kitchen well to help remove odors during self-clean cycle.
2. Shut the oven door, and tap SELF CLEAN.
3. Tap START/CONTINUE.
– The cleaning icon ( ) appears on the display.
– The lock icon ( ) appears, indicating that the oven door cannot be opened. The oven door locks auto-
matically to prevent personal injury from the high temperature generated during self-cleaning. If the
door is ajar, an error message appears on the display. To clear the error, touch CANCEL/SECURE, wait 1
minute, and close the door. When the error clears, restart the process at Step 2.
– ON appears on the display, indicating that the oven's heating elements are on.
• To stop self-cleaning: Tap CANCEL/SECURE. The oven door remains locked until the oven chamber has
cooled sufciently. (The lock symbol disappears from the display). The oven may still be hot, so be cautious.

37English
Maintaining the Range
Using Self-Cleaning Mode, cont.
Self-Cleaning the Oven, cont.
• When self-cleaning is done:
– the door latch releases when the oven chamber has cooled sufciently. The cleaning icon, lock icon, and
ON indicator disappear from the display. The oven is still hot.
– reinstall the convection lter before using the oven.
– a powdery residue normally coats the oven oor after self-cleaning. When the oven is cool, wipe the
residue with a damp cloth or sponge; run another cycle as needed to remove any residue that cannot be
wiped away with a cloth.
Setting Delayed Self-Cleaning
1. Prepare the oven for self-cleaning as instructed in the previous procedure, and close the oven door.
2. Tap SELF CLEAN > START TIME.
3. Enter a start time (e.g., for 12:30, tap 1-2-3-0). Maximum delay: 22 hr, 59 min.
4. Tap START/CONTINUE.
DELAY appears on the display; the oven door locks. The oven will start self-cleaning at the set time.
• When you set the oven for delayed self-cleaning, you can push CLOCK to view the time of day; with the
clock displayed, you can push START TIME to check when self-cleaning will start. (When self-cleaning
starts, DELAY disappears from the display, and ON appears.
• To cancel time-delay self-cleaning, tap CANCEL/SECURE.
– If self-cleaning has not begun, the door will unlock 1 minute later.
– If self-cleaning has begun, the door unlocks when the oven chamber has cooled to about 400°F (205°C).
38 English
Maintaining the Range
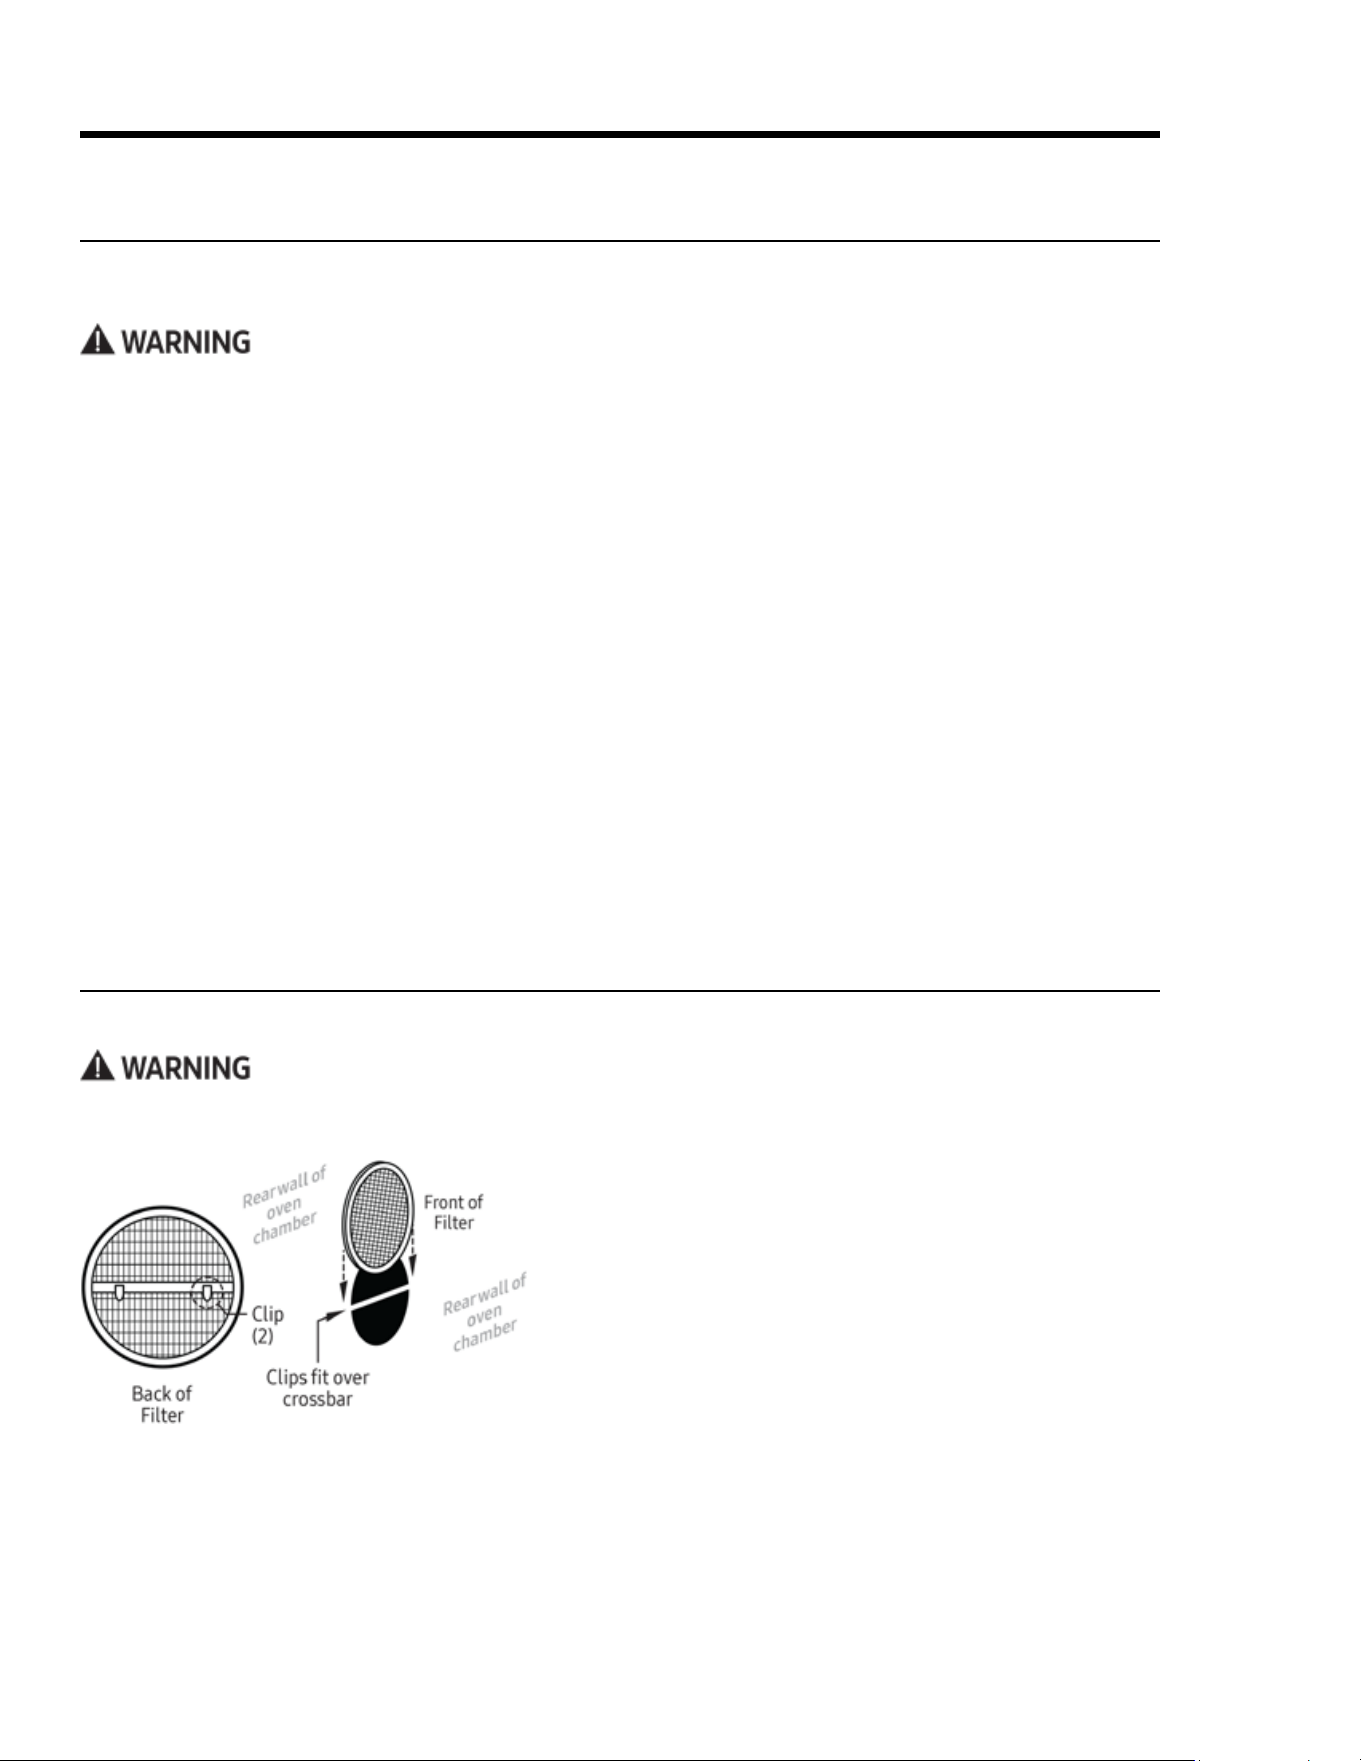
The convection lter is on the oven’s rear wall. Clean the
lter regularly so air circulates freely within the oven and the
convection modes work properly.
1. When the oven is cool, grasp the lter around the edges,
and gently push up with your thumb to release the clips.
2. Soak the lter in hot, soapy water.
3. Rinse the lter under the tap, and dry it fully.
4. With the clips parallel with and facing the crossbar, center
the lter over the fan hole, and carefully push down, hook-
ing the clips onto the crossbar.
Steam-Cleaning the Oven
This is a convenient way to clean light soil from the oven. (Double ovens: Both ovens may be steam cleaned at
once.) Run a steam-clean cycle when you see soil accumulating in the oven chamber.
• To avoid steam burns, do not pour water into a hot oven.
• Do not touch the water in the oven chamber immediately after steam-cleaning.
1. Remove the racks and all foreign items from the oven chamber.
2. In the cool oven chamber, pour 1 cups water (preferably distilled) into the recess in the oor.
For slightly heavier buildup, mix the water with a teaspoon of dish soap, then pour.
3. Fold a dish towel in half lengthwise, and lay it along the oven-chamber oor so the towel’s front edge over-
hangs the front between the door and door gasket (to any water that seeps out).
4. Close the oven door, and tap BAKE.
5. Set the oven no higher than 185°F (85°C), and tap START/CONTINUE.
6. Set the timer (see Pg. 28) to 20 minutes.
7. When time is up, tap CANCEL/SECURE, and 10 minutes later, open the door.
(Stand aside to let steam billow out safely; water will be on the oven walls and oor.)
8. With a soapy sponge:
a. wipe the interior door glass
b. carefully wipe up the water in the oven chamber.
c. wipe the oven chamber until all surfaces are clean. (Remove any lime with a vinegar-soaked cloth.)
9. Dry all interior surfaces with paper towels, and leave the door ajar to let moist air escape.
Cleaning the Oven Accessories
Cleaning the Convection Filter
After cleaning the convection lter and before using the oven, re-install the lter for proper oven function and
safety from fan blades. Take care not to mar the oven porcelain when removing/reinstalling the lter.

39English
Maintaining the Range
Cleaning the Oven Accessories, cont.
Cleaning the Oven-Door Gasket
This gasket helps trap hot air in the oven by sealing the seam around the front of the oven chamber when the
door is closed. The gasket needs occasional cleaning to remove cooking residue that may compromise the seal
and reduce cooking efciency.
• Be extremely careful in cleaning the fragile gasket to avoid compromising its ability to form a tight seal
around the front of the oven chamber.
• Do not rub, scrub, or pinch the gasket; do not use harsh or abrasive cleaners and cleaning tools.
1. Dab the door gasket with a soft cloth moistened with a mild-soap and water solution.
2. Rinse the gasket with a soft cloth moistened with clean water.
Cleaning the Oven-Rack Supports
• The oven-rack supports are screwed to the oven walls and should not be removed for cleaning.
• The supports will be cleaned during self-cleaning. Wipe them as you would the oven-chamber walls after a
self-cleaning cycle. (See Using Self-Clean Mode, Pg. 36.)
Cleaning the Oven Racks
• Do not self-clean the oven racks. Self-cleaning discolors the racks and makes them hard to slide.
• You may immerse a standard oven rack in water; immersing a GlideRack in water, however, can foul the
glide mechanism. Carefully wipe a GlideRack mechanism with a damp cloth.
• For heavy soil, use a scouring pad. (Clean with soap and water, or a solution of ½ cup of ammonia to 1 gallon
of water.)
Cleaning the Meat-Temperature Probe
The probe has silicone handles, a wire cable, a plug, and a stainless-steel skewer.
Do not immerse the probe in water. Doing so will likely damage the probe's electronic circuitry.
1. Clean the skewer with a plastic scouring pad and hot, soapy water.
2. Gently wipe the cable with a cloth moistened with soapy water.
3. Wipe the handles and plug with a soft sponge soaked with warm, soapy water.
4. Carefully wipe soap with a damp cloth, keeping water away from the probe's electrical circuitry.
5. Thoroughly dry all parts of the probe with a clean, soft cloth.
Cleaning the Oven-Light Lens
1. Softly rub the oven-light lens with the plastic-scrubber side of a sponge moistened with warm, soapy water.
2. With a clean, soft cloth moistened with clean water, rinse the lens.
3. With a soft, lint-free cloth, fully dry the lens.
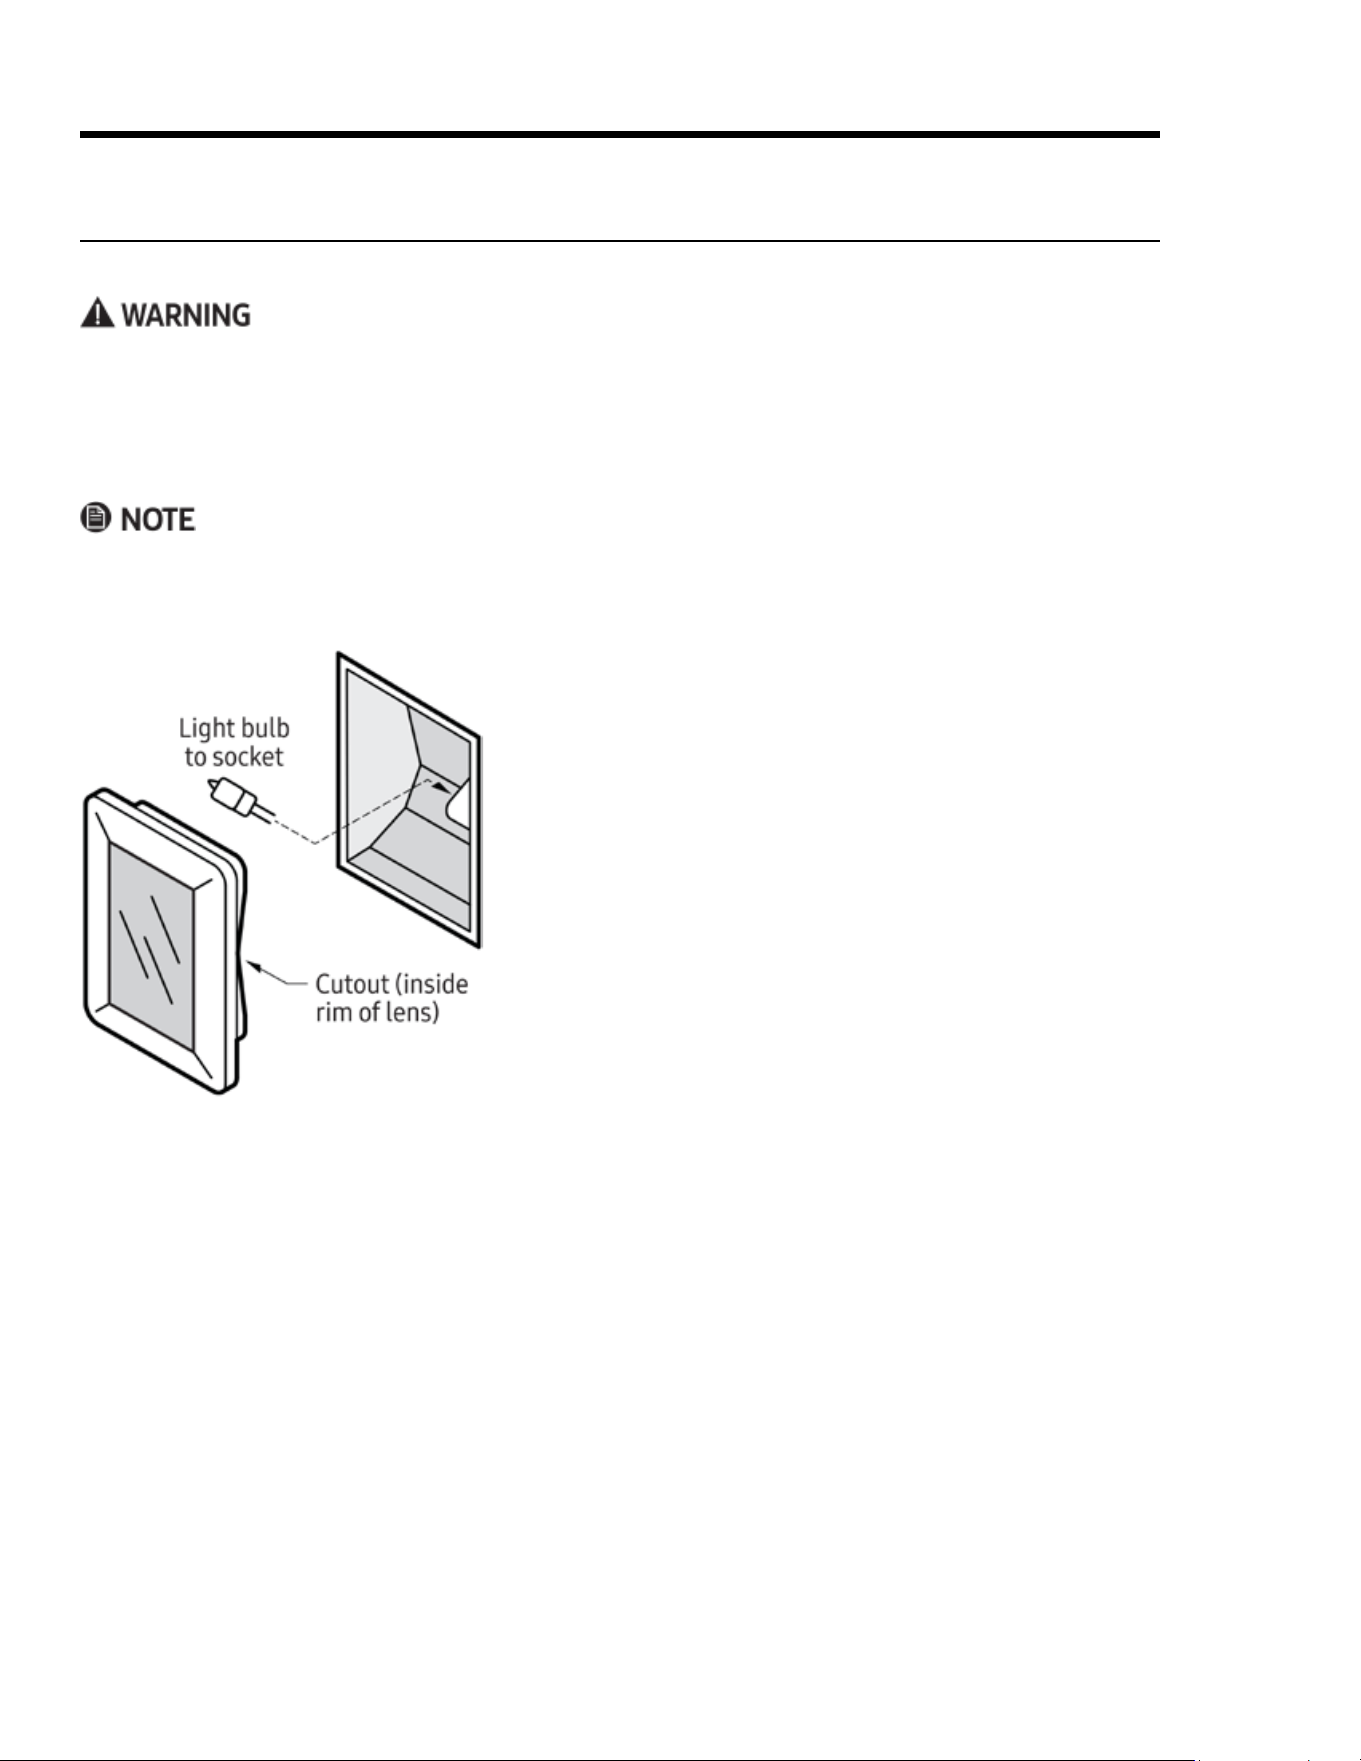
40 English
Maintaining the Range
1. Turn off power to the oven at the circuit breaker/fuse box.
2. Supporting the lens from below, gently pry it loose with a
table knife, and pull the lens cover straight out.
3. Pull the old bulb straight out of the socket.
4. Wearing a glove, take the new bulb, and insert it in the
socket.
5. In reinstalling the lens cover, line up the cutout on the
inside rim with the light socket, and gently press it into
place.
6. Return power to the oven, and reset the clock (Pg. 21).
Replacing the Oven Lights
If no lights work, see Troubleshooting, Pg. 42, before replacing them.
• To prevent electric shock, turn off power to the oven, and ensure the oven and bulbs are cool.
• Use the oven only with the lens covers installed. The covers protect the bulbs from high temperatures and
mechanical shock.
• Replacing the lens cover without lining up the cutout with the light socket will damage the light xture.
• Do not use a screwdriver to remove the lens.
• Do not touch the replacement halogen bulb with bare ngers. Hand oil shortens the life of the bulb.
• Replace the light bulb only with Dacor bulb PN 100429, 12V 20W. (See Pg. 4 for Dacor Customer Assurance
contact information.)
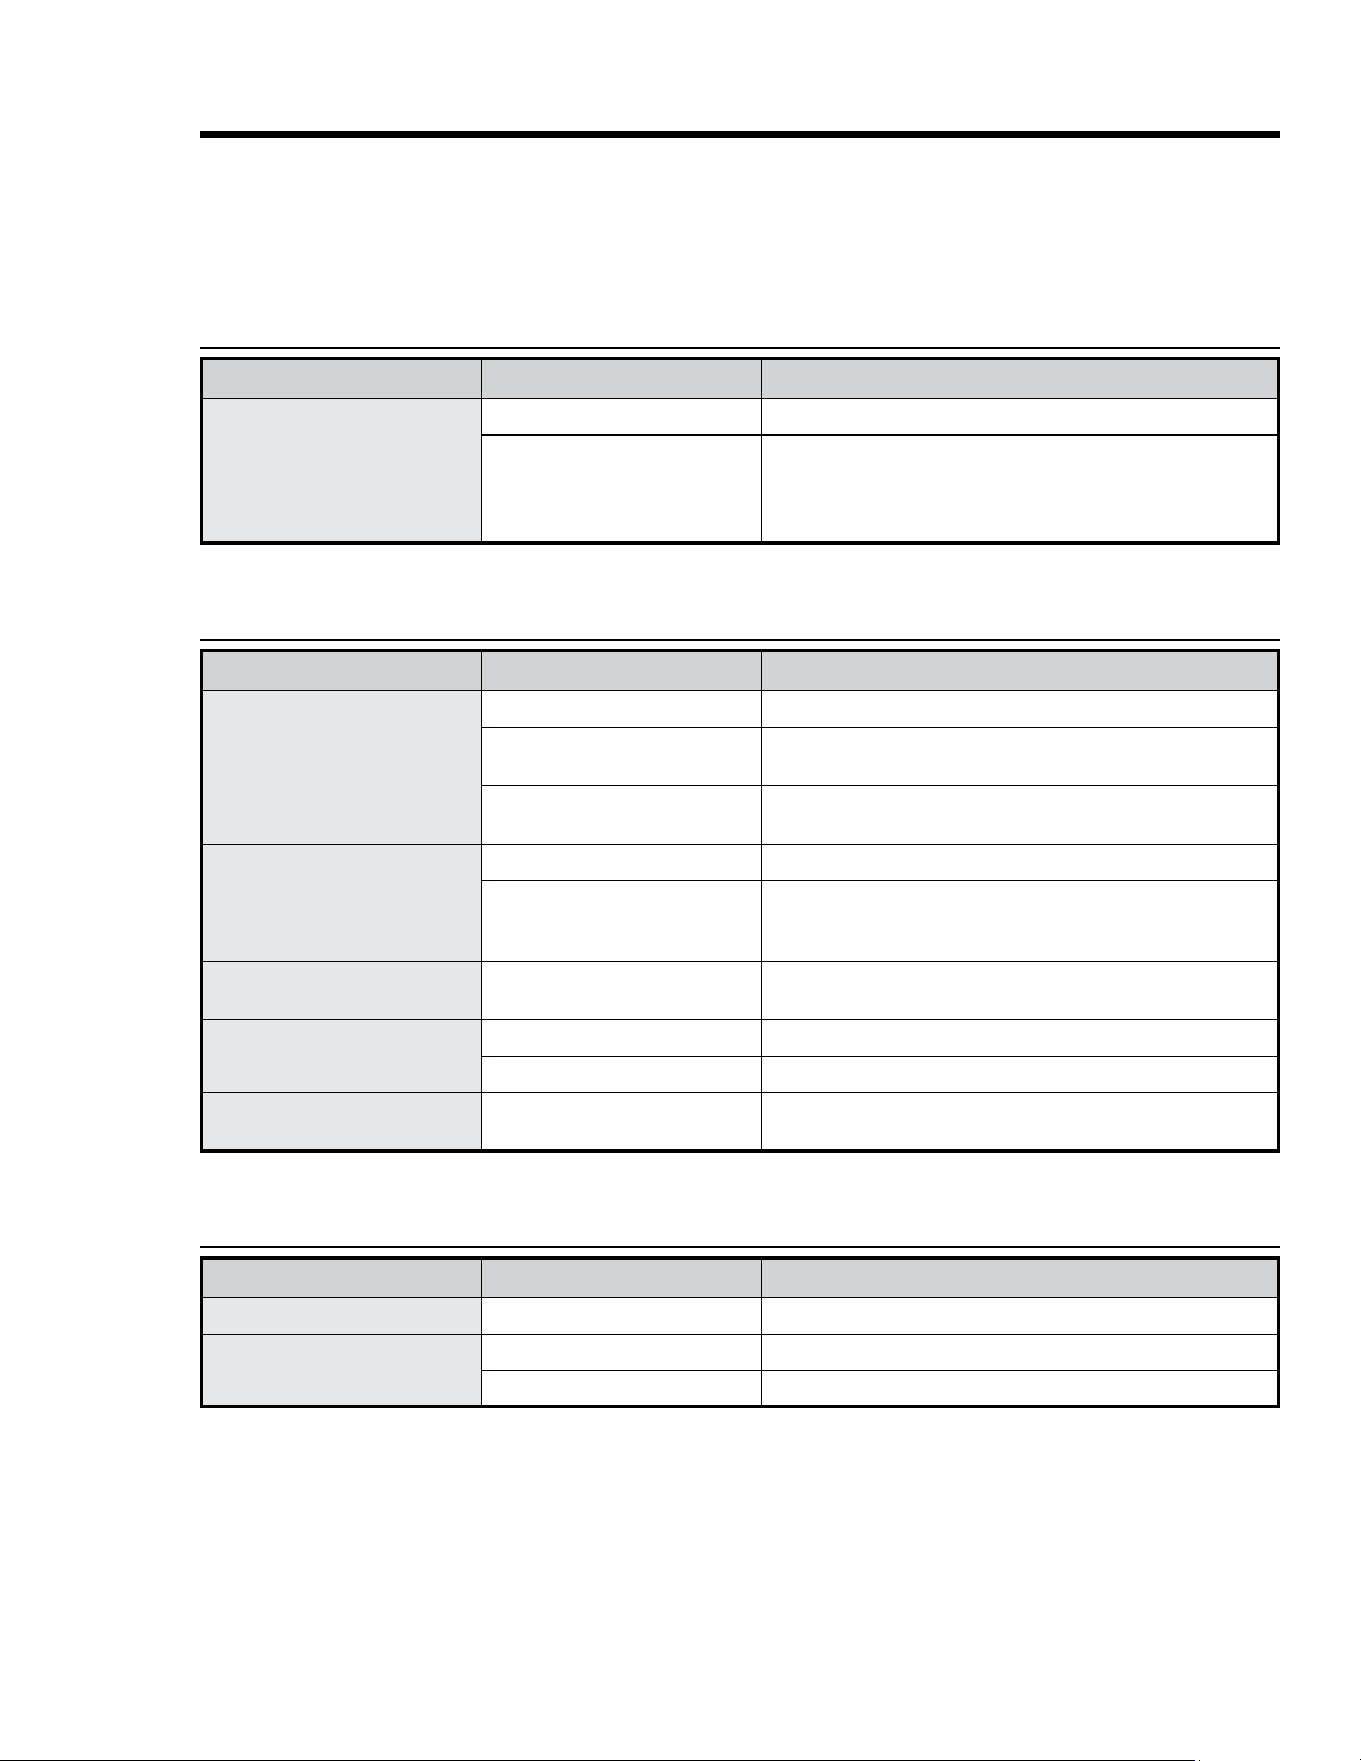
41English
Troubleshooting
This section offers solutions to various operational and maintenance issues, which may help you avoid a
service call. If, after reviewing this table, you are unable to resolve the issue, call Dacor Customer Assurance:
833-35-ELITE (833-353-5483).
Gas Safety
Issue Possible Cause Solution
You smell gas
Burner is on but is not lit.
Turner burner-control knob off.
Gas leak
• Evacuate building.
• From a neighbor home (your phone may cause a spark that
ignites gas), quickly call gas supplier, and follow their direc-
tions. (If you cannot reach your gas supplier, call re dept.)
Issue Possible Cause Solution
No burners light
Cooktop is unplugged.
Ensure power cord is plugged into a live, grounded outlet.
Blown fuse/tripped circuit
breaker.
Replace fuse/reset circuit breaker.
Gas supply is off or improperly
connected.
See the Installation Instructions.
Burner does not light
Control knob improperly set.
Push in knob and turn to Lite position.
Burner caps not in place or burn-
er base misaligned.
• Clean the electrodes.
• Put burner cap on burner head.
• Align burner base.
Burner clicks during operation
Control knob set on ignite.
After burner ignites, turn knob to desired setting; if burner still
clicks, contact service technician.
Uneven burner ames
Burner improperly assembled.
See Pg. 18.
Dirty burners.
Clean the burner components (Pg. 35).
Very large or yellow burner
ames
Wrong burner orice installed.
Check orice size; contact installer if you have wrong orice (LP
gas, natural gas, or vice versa).
Issue Possible Cause Solution
Display goes blank
Bad fuse/tripped circuit breaker.
Replace fuse/reset circuit breaker.
Control not responding
Moisture/residue on panel.
Wipe away moisture/residue.
Control lockout active.
Disable control lockout (Pg. 27).
Surface Burners
Control Display
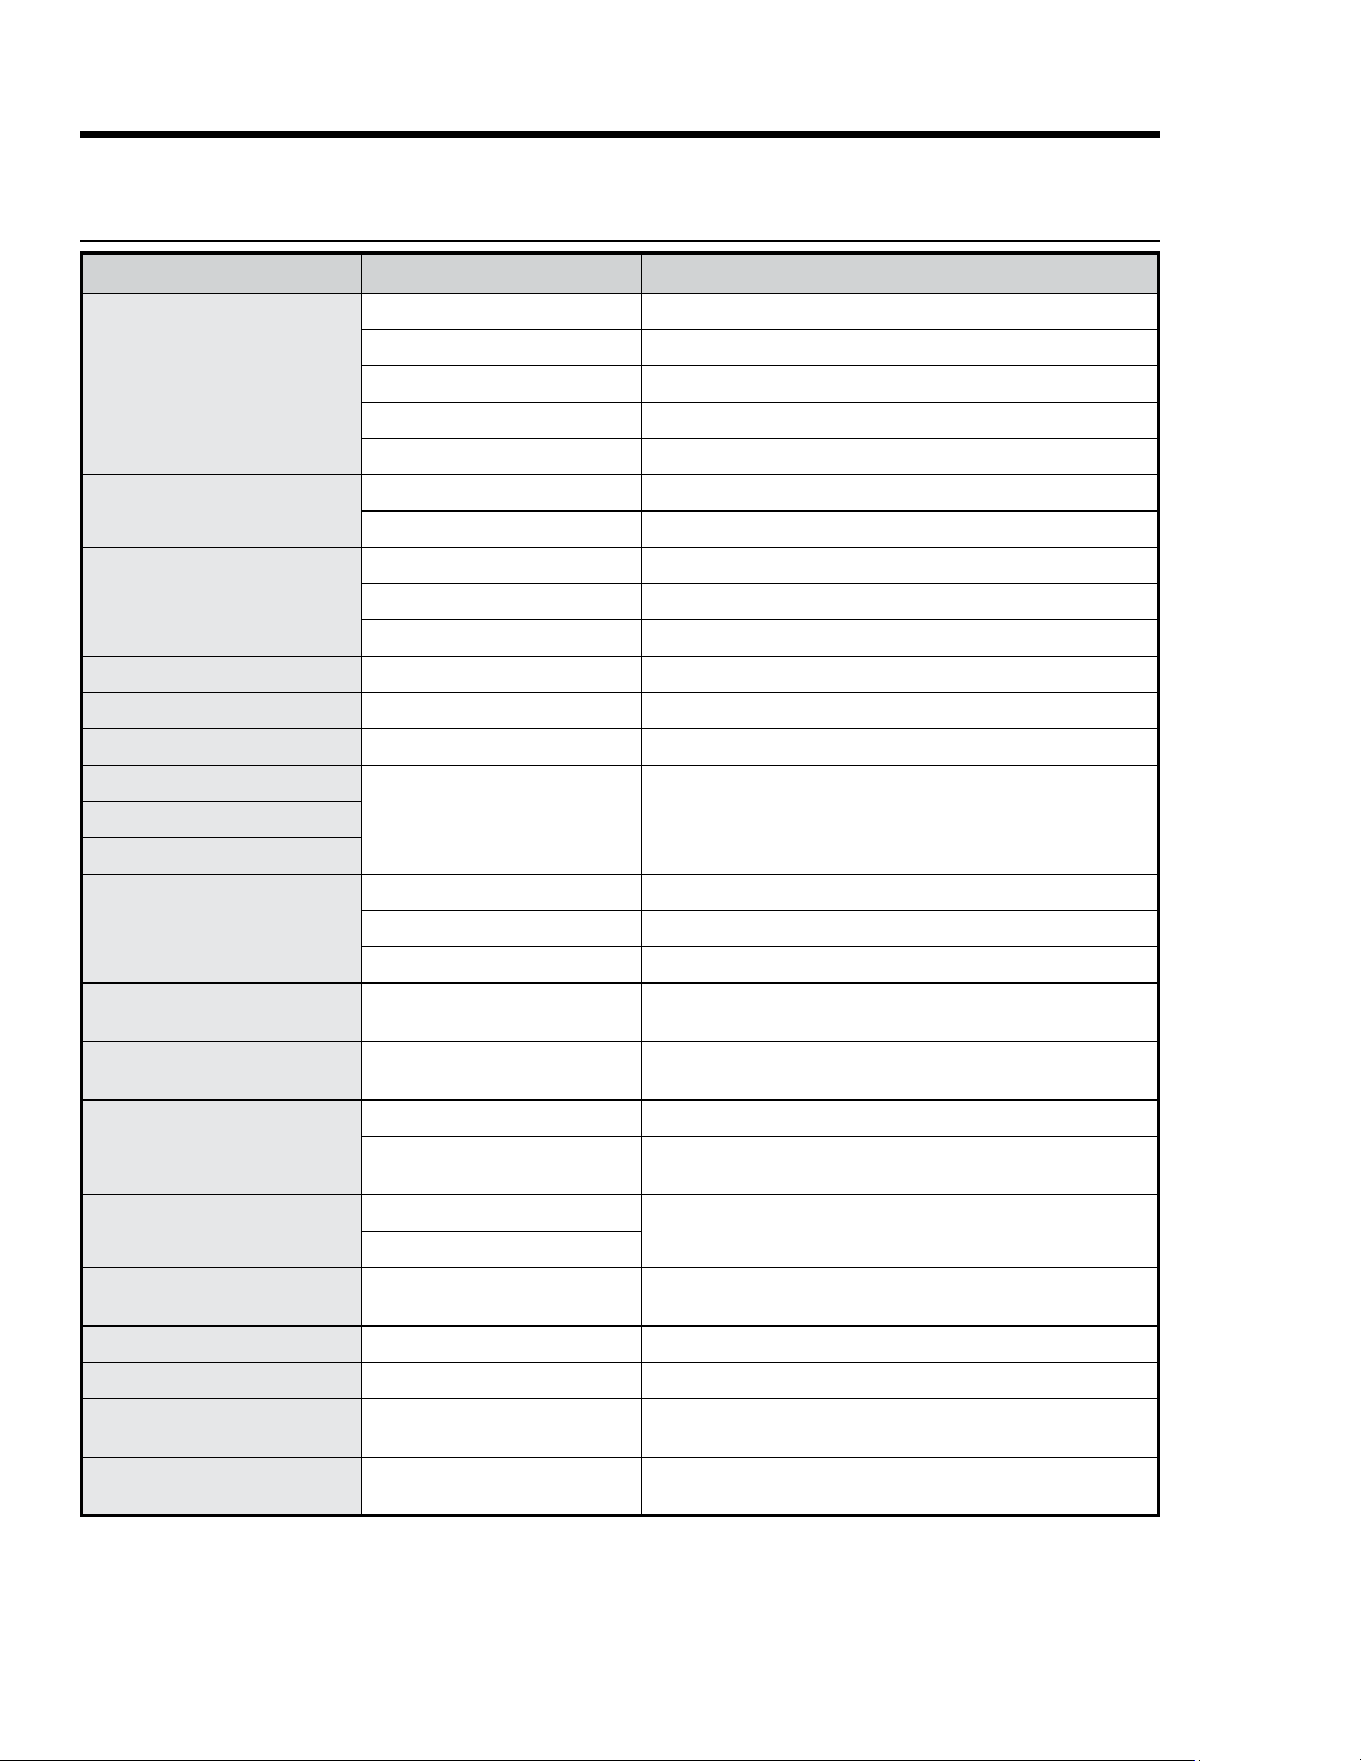
42 Engl ish
Troubleshooting
Issue Possible Cause Solution
Oven not turning on
Oven not fully plugged in.
Verify that plug is properly inserted in outlet.
Bad fuse/tripped circuit breaker.
Replace fuse/reset circuit breaker.
Oven too hot.
Let oven cool.
Incomplete service wiring.
Call for service.
Power outage.
Check house lights; call service provider if needed.
Oven light not turning on
Light is loose/defective.
Tighten/replace light; call for service if light stays off.
Broken light switch.
Call for service.
Excessive smoke during
broiling
Meat too close to broil element.
Lower the rack one level.
Meat not properly prepared.
Trim excess fat from meat.
Grease buildup in oven chamber.
Clean the oven; check oven regularly for cleanliness.
Food not cooking properly
Mispositioned/unlevel rack.
See Positioning the Oven Racks (Pg. 22).
Oven temp improperly set.
See About Oven Temperatures (Pg. 27).
Cook temp too hot/cold
Adjust oven temperature.
See Adjusting the Oven-Temperature Offset (Pg. 33).
Water is dripping
Type of food being cooked
Not a malfunction; let oven cool, then wipe with dry towel.Steam emitted from door seam
Residual water in oven chamber
Oven will not self-clean
Oven is too hot.
Let oven cool, then reset controls (Pgs. 27, 33).
Oven controls incorrectly set.
See Using Self-Clean Mode (Pg. 36).
Control lockout is enabled.
Disable control lockout (Pg. 27).
Excessive smoke when
self-cleaning
Excessive residue in oven.
Press OFF; ventilate kitchen; wait for self-cleaning to cancel;
wipe up excess soil, restart self-cleaning.
Oven door stays locked after
self-cleaning
Oven is too hot.
Door will open when oven cools sufciently.
Oven still dirty after self-clean-
ing
Oven controls incorrectly set.
See Using Self-Clean Mode (Pg. 36).
Oven too heavily soiled.
Wipe up food residue, then start self-cleaning; very dirty
ovens may need two cycles or longer cycles.
Steam emitted from oven vent.
Normal when using convection.
Normal operation.
Large amount of food in oven.
Burning or oily odor emitted
from oven vent.
New oven.
To eliminate the smell faster, set self-cleaning to 3+ hrs; see
Using Self-Clean Mode (Pg. 36).
Strong odor.
Insulation in new oven.
Run oven empty on Bake at 400°F for 1 hr.
Fan noise.
Convection fan cycling on/off.
Normal operation.
Oven racks hard to slide.
Chromes racks were left in oven
during self-cleaning.
Apply dab of vegetable oil to paper towel, and wipe oven-rack
edges.
Oven door is locked.
Tripped circuit breaker of power
outage while door was locked.
Enable Control Lockout, then unlock the control; see Using
Control Lockout (Pg. 27).
Oven

43English
Warranty
What Is Covered
CERTIFICATE OF WARRANTIES: DACOR RANGES WITHIN THE 50 STATES OF THE USA, THE DISTRICT OF CO-
LUMBIA, AND CANADA:
Full 1-Year Warranty
The warranty applies only to Dacor Heritage appliances sold to the original purchaser, starting from the origi-
nal retail purchase date or closing date for new construction, whichever period is longer. The warranty is valid
on Modernist products purchased new from a Dacor Authorized Dealer or other Dacor-authorized seller.
If, within 1 year of the original purchase date, your Dacor Heritage product malfunctions due to material or
manufacturing defect, Dacor will restore the appliance to its proper function at no charge to you.
All cosmetic damage (e.g., scratches on stainless steel, paint/porcelain blemishes) to the appliance or includ-
ed accessories must be reported to Dacor within 60 days of the original purchase date to qualify for warranty
coverage.
Limitations of Coverage
Service will be provided by a Dacor-designated service company during regular business hours.
These providers are independent entities and not Dacor agents. Dealer display and model-homedisplay
products with a production date greater than 5 years, products sold “As Is,” and products
installed for non-residential use (religious organizations, re stations, bed & breakfast, spas, etc.)
carry a 1-year parts warranty only. All delivery, installation, labor costs, and other service fees are
the purchaser's responsibility.
The warranty is null and void:
• on any product whose serial numbers and tags have been altered/defaced/removed.
• if a non-ETL-/non-CUL-approved product is transported from the USA.
The owner must provide proof of purchase or closing statement for new construction upon request.
All Dacor products must be accessible for service.
OUTSIDE THE 50 STATES OF THE USA, THE DISTRICT OF COLUMBIA, AND CANADA:
Limited First-Year Warranty
If your Dacor product malfunctions within 1 year of the original purchase date due to a defect in material or
workmanship, Dacor will furnish a new part, FOB factory to replace the defective part.
Delivery, installation, labor costs, and other service fees are the purchaser's responsibility.

44 English
Warranty
What Is Not Covered
• Slight color variations due to differences in painted parts, ambient lighting, product location, other factors.
• Service calls to educate the owner on product use and care.
• Service fees for travel to islands and remote areas (including but not limited to ferries, toll roads, and other
travel expenses).
• Consequential or incidental damage (including but not limited to food or medicine loss, lost work time, or
restaurant meals).
• Product failure under non-residential use (e.g., commercial, industrial, b&b, religious organization).
• Product failure due to improper installation.
• Consumable parts (e.g., lters, light bulbs).
• Replacement of house fuses, fuse boxes, or resetting of circuit breakers.
• Damage due to so-called "acts of God" (e.g., re, ood, power outage/surge).
• Liability for damage to surrounding property (e.g., cabinetry, oors, ceilings, countertops).
• Breakage/discoloration/damage to glass, metal surfaces, plastic parts, trim, paint, or other cosmetic nish
due to abuse, neglect, improper use/care.
Out-of-Warranty Products
Should you experience a service issue after the standard warranty period expires, contact Dacor Customer
Assurance nonetheless. Dacor reviews each issue and customer concern to provide the best possible solution
for the customer under the individual circumstances.
THE REMEDIES IN THE ABOVE EXPRESS WARRANTIES ARE THE SOLE AND EXCLUSIVE REMEDIES; THUS,
NO OTHER EXPRESS WARRANTIES ARE MADE, AND OUTSIDE THE 50 STATES OF THE UNITED STATES, THE
DISTRICT OF COLUMBIA AND CANADA, ALL IMPLIED WARRANTIES, INCLUDING BUT NOT LIMITED TO, ANY
IMPLIED WARRANTY OF MERCHANTABILITY OR FITNESS FOR A PARTICULAR USE OR PURPOSE, ARE LIMITED
IN DURATION TO 1 YEAR FROM THE ORIGINAL PURCHASE DATE. DACOR SHALL NOT BE LIABLE FOR INCIDEN-
TAL EXPENSE OR CONSEQUENTIAL DAMAGES. SHOULD DACOR PREVAIL IN ANY LAWSUIT, DACOR SHALL BE
ENTITLED TO REIMBURSEMENT OF ALL COSTS AND EXPENSES, INCLUDING ATTORNEY’S FEES, FROM THE
DACOR CUSTOMER. NO WARRANTIES, EXPRESS OR IMPLIED, ARE MADE TO ANY BUYER FOR RESALE.
Some states do not allow limitations on how long an implied warranty lasts, or do not allow the exclusion or
limitation of inconsequential damages; therefore, the above limitations or exclusions may not apply to you.
This warranty gives you specic legal rights, and you may also have other rights that vary from state to state.

45English
Notes

46 English
Notes
Website: www.dacor.com/customer-care/contact-us Customer Assurance: 833-353-5483
WARRANTY INFORMATION
IMPORTANT:
Your warranty will not be activated until you activate it online or return this form to Dacor. If you have purchased more
than one Dacor product, please return all forms in one envelope, or activate the warranty online for each product.
Your willingness to take a few seconds to complete the section below will be sincerely appreciated. Thank you.
1. How were you first exposed to Dacor products? (Please check one.)
A. T.V. Cooking Show F Builder
B. Magazine G. Architect/Designer
C. Appliance Dealer Showroom H. Another Dacor Owner
D. Kitchen Dealer Showroom I. Model Home
E. Home Show J. Other
2. Where did you buy your Dacor appliances?
A. Appliance Dealer D. Builder
B. Kitchen Dealer E. Other
C. Builder Supplier
3. For what purpose was the product purchased?
A. Replacement only C. New Home
B. Part of a Remodel D. Other
4. What is your household income?
A. Under $75,000 D. $150,000 – $200,000
B. $75,000 – $100,000 E. $200,000 – $250,000
C. $100,000 – $150,000 F. Over $250,000
5. What other brands of appliances do you have in your kitchen?
A. Cooktop C. Dishwasher
B. Oven D. Refrigerator
6. Would you buy or recommend another Dacor product?
Yes No
Comments
Owner Last Name (please print) First Middle Init.
Street
City State Zip
Purchase Date Email Phone
Dealer
City State Zip
cut herecut here
Please visit www.dacor.com to activate your warranty online.
Thank you very much for your assistance. The information you
have provided will be extremely valuable in helping us plan
for the future and in giving you the support you deserve.
Please be assured that Dacor will never sell your name or any information on this form for mailing-list purposes, as we do not
consider it a proper way of expressing our gratitude for your having chosen Dacor products for your kitchen!
fold here
DACOR
ATTN WARRANTY PROCESSING DEPT
PO BOX 90070
CITY OF INDUSTRY CA 91715-9907
NO POSTAGE
NECESSARY
IF MAILED
IN THE
UNITED STATES
BUSINESS REPLY MAIL
FIRST-CLASS MAIL CITY OF INDUSTRY CAPERMIT NO 1600
POSTAGE WILL BE PAID BY ADDRESSEE