Owners' Guide Dishwashers
Setting up your dishwasher
Be sure to have your installer follow these instructions closely so that your new dishwasher works properly and that you’re not at risk of injury when washing dishes.
UNPACKING YOUR DISHWASHER
- Once your new dishwasher has been delivered to you, carefully unpack it and check for any damage.
- If the dishwasher has been damaged, make note of it on the waybill and keep a copy. Do not install the dishwasher, and contact Samsung Customer Service at the number listed below. If there is no damage to the product, you can proceed with the installation. If you are going to install it yourself, make sure to read through the installation guide and follow the directions inside.
- After unpacking your dishwasher, keep the packaging out of the reach of children to ensure their safety
CHECKING PARTS
When your dishwasher has been unpacked, make sure you’ve received all the parts shown below. If your dishwasher was damaged during shipping, or if you do not have all the parts, contact Samsung Customer Service at 1-800-SAMSUNG (726-7864)
Accessory parts - User/Installation manual, Installation Kit.
WARNING
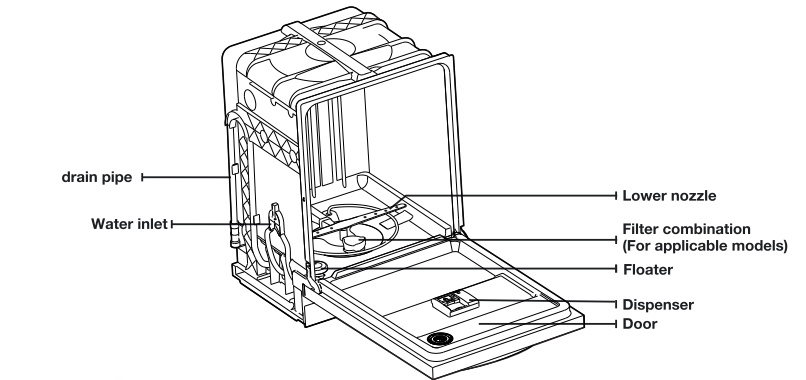
- The floater is very important for the operation of your dishwasher.
- Please do not tamper with, damage, or remove the floater.
CONTROL PANEL

| 1 Power |
When you press the Power button, the entire display turns on and off, and then the light of the most recently finished cycle lights up. When the selected cycle is complete, the dishwasher powers off automatically |
| 2 Cycle Selector |
Select the appropriate wash cycle depending on the soil level of your dishes. After you select a cycle, the Cycle On light for that cycle lights up
If a proble occurs during an operation, (Control Lock) / m specific LEDS blink, indicating the cause of the problem. The blinking is accompanied by a warning tone. For more information, refer to "Information Codes" on page 26
|
| 3 Hi-Temp Steam Wash |
Raises the main wash temperature to improve cleaning for loads containing tough, baked-on food.
Hi-Temp Steam Wash is not available for the Express 60 cycle.
|
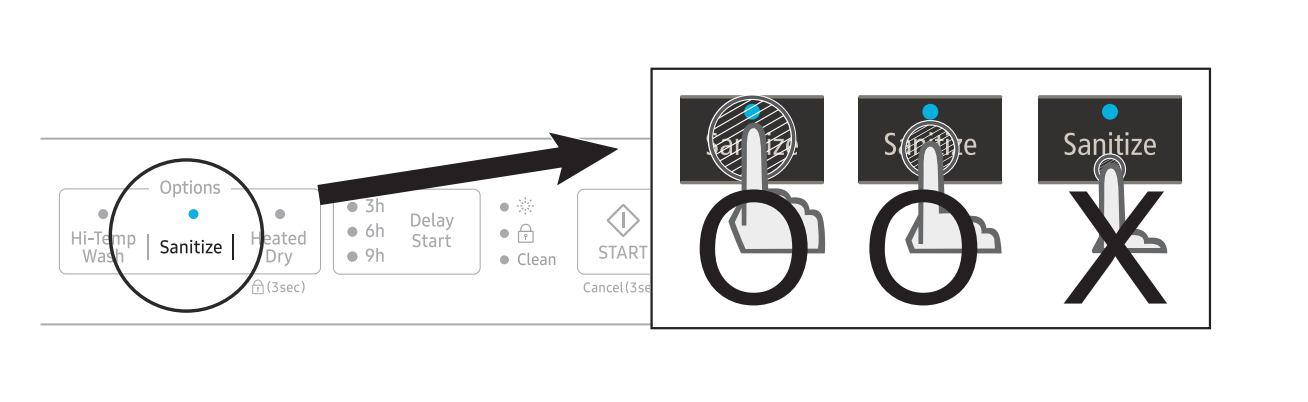
| 4 Sanitize |
The temperature rises to 15 °F ( °C) in the final rinse cycle for high temperature sanitization.
If you select the Sanitize option, the “Sanitize” lamp blinks when the water temperature reaches the sanitary temperature (over 156 °F (69 °C)), and then remains illuminated until the Sanitize option ends. When you press the Power button, the “Sanitize” lamp turns off.
The Normal Cycle with the Sanitize option selected is NSF certified.
The Sanitize feature operates in accordance with NSF/ANSI Standard 184 for Residential Dishwashers. Certifiedresidential dishwashers are not intended for licensed food establishments.
|
5 Heated Dry/ (Control Lock) (Control Lock) |
When the “Heated Dry” function is selected,the heater will work during the drying process.
Control Lock allows you to lock the buttons on the control panel so children cannot accidently start the dishwasher by pressing the buttons on the panel.
To lock and unlock the buttons on the control panel, hold the Heated Dry button down for three (3) seconds when power is On.
|
| 6 Delay Start |
Delay a cycle for 3, 6, or 9 hours , The hour displayed indicates the time at which the dishwasher will start. |
| 7 Clean |
Indicates that the operation is over and that your dishes are clean |
| 8 Start |
To start a cycle, press the Start button before closing the door. To cancel the cycle, press and hold the Start button for 3 seconds or press the Power button to power off the dishwasher . |
You can select options (Hi-Temp Steam Wash , Sanitize,Heated Dry) before starting a cycle. If you change the cycle after selecting an option, the original cycle is reset.
To prevent the touchpad from losing response sensitivity, follow these instructions:
- Touch the center of each keypad using one finger. Do not push.
- Clean the touch control’s surface regularly with a soft, damp cloth.
- Be careful not to touch more than one touch key pad at a time, except as directed.
When you pause a cycle by opening the door, press the Start button before closing the door to continue the cycle.
Push the door firmly closed within 3 seconds of pressing the Start button. If the door is not closed within 3 seconds, the cycle will not start.
CYCLE SELECTOR
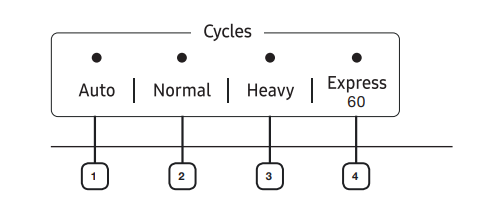
| 1 Auto |
This cycle detects the level of soil and automatically initiates the optimal cycle after a few minutes of operation. |
| 2 Normal |
Use this cycle for normally soiled dinner dishes. |
| 3 Heavy |
Use this cycle for heavily soiled dishes and dishes with heavy soil. |
| 4 Express 60 |
Use this cycle for lightly soiled dishes. |
MEETING INSTALLATION REQUIREMENTS
Electrical supply and grounding
To prevent the risk of fire, electric shock, or personal injury, all wiring and grounding must be done in accordance with the National Electrical Code ANSI/FNPA, No. 70 Latest Revision and local codes and ordinances. It is the personal responsibility of the appliance owner to provide adequate electrical service for this appliance.
CAUTION:
Never use an extension cord.
When preparing for installation, ensure that you provide:
- An individual branch circuit with a 120 V, 60Hz, 15 AMP fuse or circuit breaker that serves only your dishwasher .
Your dishwasher must be grounded. If your dishwasher malfunctions or breaks down, grounding will reduce the risk of electric shock by providing a path of least resistance for the electric current.
WARNING: Never connect the ground wire to plastic plumbing lines, gas lines, or hot water pipes.
GROUNDING INSTRUCTIONS
For a permanently connected appliance: This appliance must be connected to a grounded metal, permanent wiring system, or an equipment-grounding conductor must be run with the circuit conductors and then connected to the equipment-grounding terminal or lead on the appliance.
Water supply
The hot water supply line pressure must be between 20-120 psi (140-830 kPa). Adjust the water heater to deliver water between 120 °F (49 °C) - 149 °F (65 °C).
Most plumbing supply stores sell water supply lines of various lengths up to 10 feet (305 cm) long.
You can reduce the risk of leaks and water damage by:
- Making water faucets easily accessible.
- Turning off faucets when the dishwasher is not in use.
- Periodically checking for leaks at water supply line fittings.
WARNING: Before using your dishwasher for the first time, check all connections at the water supply valve and faucets for leaks.
Flooring
For safety, your dishwasher must be installed on a solidly constructed floor. Never install your dishwasher on a platform or poorly supported structure.
Using your dishwasher
BASIC GUIDELINES
- Open the door and load your dishes (see page 14).
- Place dishes into the upper and lower racks, unless you have selected Lower Rack.
- Remove any food remains from the dishes before placing them in the rack(s).
- After placing the dishes into the racks, rotate the nozzles by hand to check whether any of the dishes will interfere with them.
- Make sure the dishes will not prevent the detergent dispenser from opening.
- Add detergent to the dispenser (see page 17)
- Make sure to use only automatic dishwasher detergent and rinse aid.
- Refer to “Using detergent” on page 17 for instructions explaining how to add detergent and rinse aid.
- Press the Power button.
- When you press the Power button, the entire display turns on and off, and then the indicator of the most recently finished cycle lights up.
- Select an appropriate cleaning cycle depending on the soil level of the dishes. (See pages 9 and 22)
- Press the appropriate cycle button.
- When you press a cycle button, the cycle indicator lights up.
- Press the Start button, and then close the door within 3 seconds.
- The dishwasher will start draining after a few seconds, and then start the selected cycle.
- Make sure to close the door firmly. If the door is not closed properly, the selected cycle will not start automatically.
- When the wash cycle is completed.
- The light illuminates and the dishwasher sounds a chime.
- The dishwasher powers off automatically
CAUTION:
- If you want to load more dishes or pause the dishwasher while it is already running, make sure to open the door slowly and carefully as there is a possibility of injury from the hot steam inside the dishwasher.
- If the door is opened while the dishwasher is running, a safety mechanism is activated and stops the cycle.
- To resume operation, press the Start button, and then close the door within 3 seconds.
- Adding dishes several minutes after the dishwasher starts operating may affect its performance.
- If you open the door while the dishwasher is running at high temperature, it will drain the hot water automatically to protect you from scalding.
You should use rinse aids for better drying performance. You can further improve drying performance by also selecting the Sanitize and Heated Dry option.
Touch controls
Touch controls allow you to operate the dishwasher easily. They:
- Are convenient to operate, requiring only a soft touch.
- Have a simple and stylish design.
- Are easy to clean.
If you have children or you want to clean the Control Interface, we recommend activating the Control Lock feature to lock the control buttons. See page 7.
- Children will not be able to accidently start the dishwasher by touching the controls with this option selected.
- If a cycle is running, the buttons will not respond. (except the P ower button)
- If dishwasher is off, only the P ower button responds.
Do not touch the VENT ELEMENT during or immediately after use
Delay start
When you select the Delay Start option, your dishwasher will:
- Start draining to remove remaining water at once (pre-drain).
Your dishwasher will operate the selected cycle when the delay time expires
WARNING: When using the dishwasher, try to arrange the dishes properly as described on page 14 to 16.
- You should remove food remains such as bones, fruit seeds, etc. and any other waste such as toothpicks, paper, etc. from the dishes as these may cause damage to the dishes, create noise, or cause the dishwasher to malfunction.
- Select the appropriate cycle depending on the level of soil and the type of dishes.
- Use only the proper amount of detergent and rinsing agent.
WARNING: Do not wash the following items in your dishwasher
- Acrylic or Aluminum items: Dishes with printed gold rim decoration may become discolored.
- Dishes treated with adhesive: Treated plastics, wood, ivory, copper, and tin may come loose.
- Plastics with a temperature tolerance less than 194 °F (90 °C): Thin plastics wash and dry poorly, and may be damaged due to elevated wash temperatures.
- Tin: Tin items should be washed by hand and dried immediately as they rust.
- Wooden utensils: Wooden items may crack.
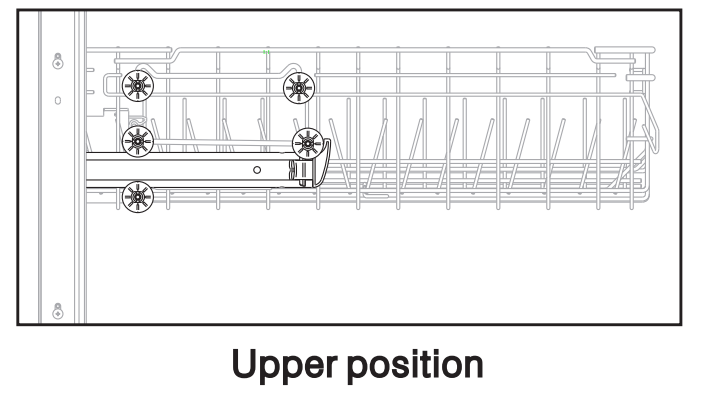
ADJUSTING THE HEIGHT OF THE UPPER RACK
You can adjust the height of the upper rack in your Samsung dishwasher so that the lower rack can accommodate larger sized dishes. With the upper rack set at the highest position, the lower rack can accommodate plates up to 12 in. (30 cm) in diameter and the upper rack can accommodated plates up to 8 in. (20 cm) in diameter
- To lower the upper rack by 2 in. (5 cm), remove the upper rack as shown in Removing the Upper Rack below. Then, reinsert the rack so that the uper four wheels on each side of the rack are above and below the guide rail. See the Lower position illustration to the right.
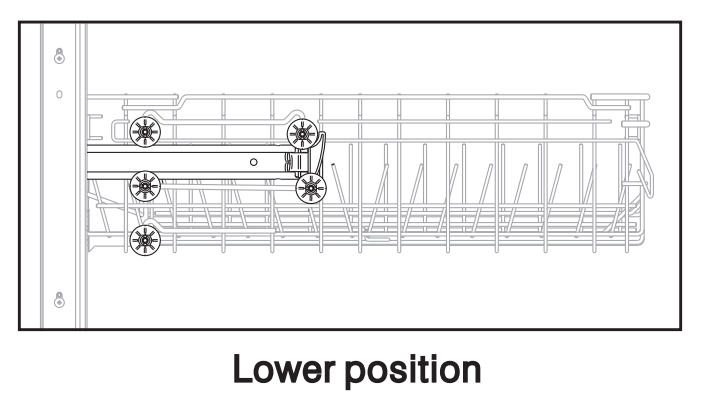
- To raise the upper rack, remove the upper rack as shown Removing the Upper Rack below. Then, reinsert the rack so that the lower three wheels on each side of the rack are above and below the guide rail. See the Upper position illustration to the right.
CAUTION: We recommend adjusting the height of the upper rack before loading dishes into the rack. If you adjust the rack after loading the dishes, you may damage the dishes.
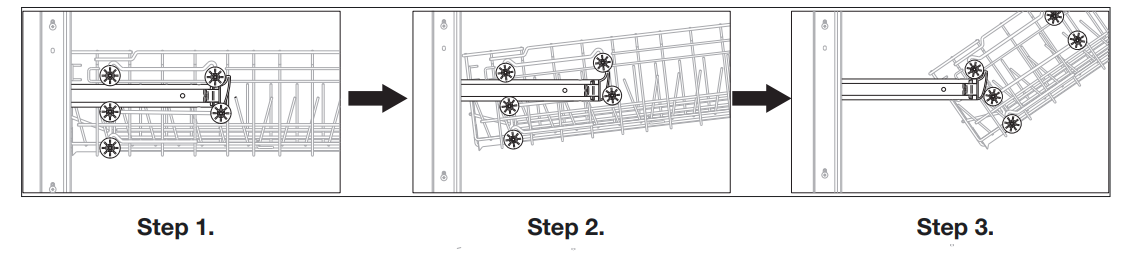
REMOVING THE UPPER RACK
Pull the upper rack towards the front and then remove it by lifting it up slightly and pulling it towards the front. See the illustrations below.
CAUTION: While the upper rack is removable, it must be installed for the dishwasher to operate properly. If you attempt to operate the dishwasher without the rack, noise will occur and the dishwasher will perform poorly
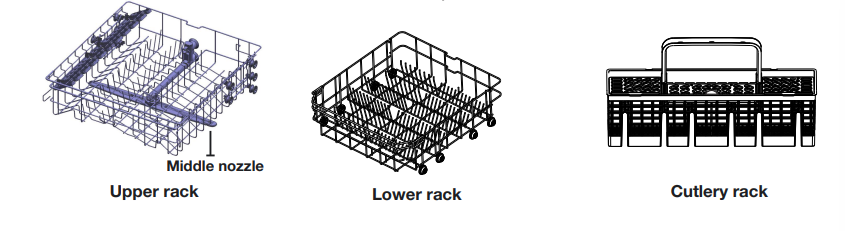
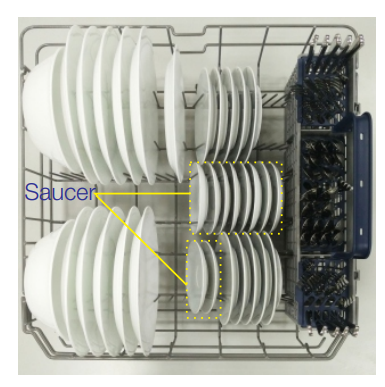
LOADING THE LOWER RACK
The lower rack has been especially designed for dinner dishes, soup bowls, plates, pots, lids, casserole dishes, and plates.
Load large items such as pans and pots into the dishwasher so their open sides face downwards. We recommend loading cups, stemware, and small plates into the upper rack.
See the recommended loading patterns below.
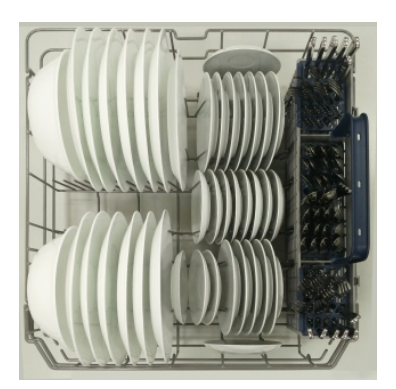
10 place setting
12 place setting
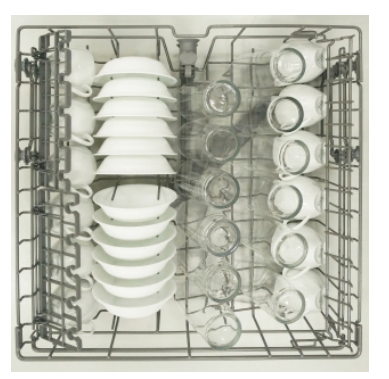
LOADING THE UPPER RACK
The upper rack has been designed for small plates, mugs, glasses, and plastic items marked “dishwasher safe”. Load your plates into the dishwasher in two half rows, so that the front of each plate faces the back of the plate in front of it, and the open sides of the plates at the center of the dishwasher face each other. See the illustrations below.
Make sure the loaded dishes do not interfere with the rotation of the nozzle which is located at the bottom of the upper rack. (Check this by rotating the nozzle by hand.)
When loading dishes, pull the upper rack out suficiently so you can load it without striking the counter above.
10 place setting

12 place setting
USING THE CUTLERY RACK
You can place each knife, spoon, or fork separately into the spoon stands in the basket’s covers to prevent chipping and discoloration.
You can use the cutlery rack with the cover open. Refer to the illustration to the right.

10 place setting
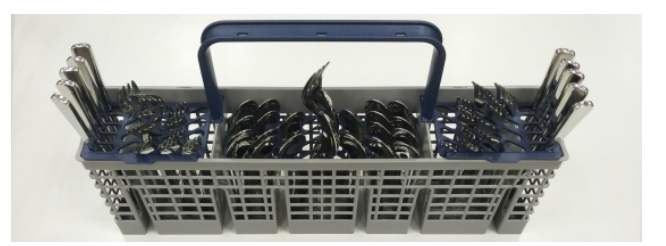
12 place setting

The spoon stands as seen from above with the suggested placement of cutlery items. Match the numbers in the diagram to the numbers in the list of cutlery items below.
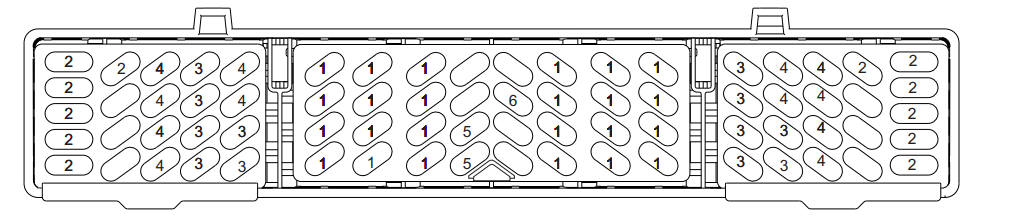
DO NOT let any item extend through the bottom.
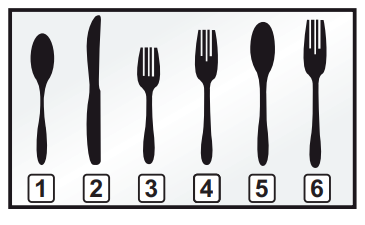
- Spoons
- Knives
- Salad forks
- Forks
- Serving spoons
- Serving forks
USING DETERGENT
All dishwasher cycles require detergent in the detergent compartment.
Add the correct amount of detergent for the selected cycle to ensure the best performance.
CAUTION: Use dishwasher detergent only. Regular detergent produces too much foam, which may decrease the dishwasher’s performance or cause it to malfunction.
WARNING: Do not swallow dishwasher detergent. Avoid breathing in the fumes. Dishwasher detergent contains irritants and caustic chemicals that can induce respiratory conditions. If you have swallowed dishwasher detergent or inhaled the fumes, seek medical attention immediately
WARNING: Keep dishwasher detergent out of the reach of children.
Filling the detergent dispenser
- Open the detergent dispenser cap by pushing the detergent dispenser release catch.
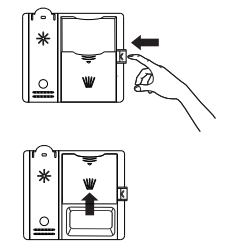
The flap is always open at the end of a dishwashing cycle.
- Add the recommended amount of detergent to the main wash detergent compartment.
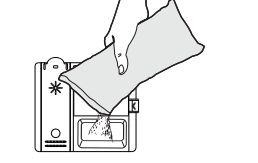
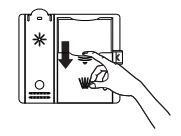
- Close the flap by sliding it to the down and then pressing it down.
- For better cleaning result, especially if you have very dirt items, pour a small amount (about 15 g) of detergent onto the door
The additional detergent will activate during the pre-wash phase.
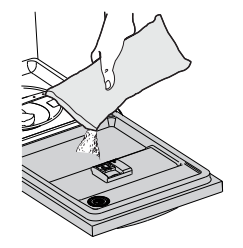
The cover opens automatically to dispense the detergent during the wash.

The numbers inside the dispenser refer to grams.
Filling the rinse aid reservoir
Your dishwasher has been designed to use liquid rinse aid only.
Using a powdered rinse aid will clog the reservoir opening and cause the dishwasher to malfuction.
Rinse aid improves the drying performance of the dishwasher.
CAUTION: Do not add regular detergent to the rinse aid reservoir.
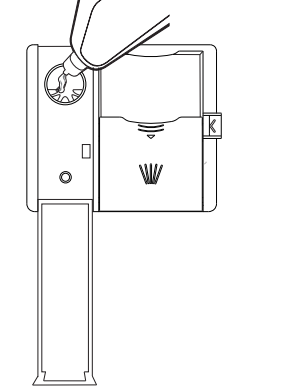
- Open the rinse aid reservoir cap.
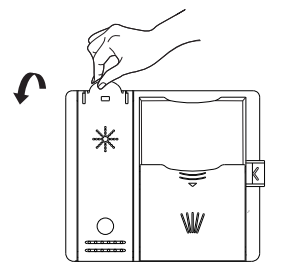
- Fill the rinse aid reservoir with rinse aid.
Use the viewing port when filling the rinse aid reservoir.
CAUTION: Do not fill the reservoir above the full level indicator.
Excess rinse aid can over flow during the wash cycle.
- View the amount of rinse aid in the reservoir through the clear viewing port. Stop adding when the reservoir reaches the full level.
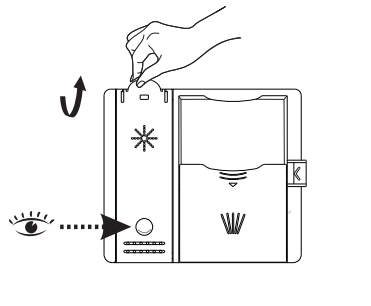
- Close the rinse aid reservoir cap.
Cleaning and maintaining your dishwasher
Keeping your dishwasher clean improves its performance, reduces unnecessary repairs, and lengthens its life
CLEANING THE EXTERIOR
It’s best to clean spills on the outside of your dishwasher as they occur. Use a soft, damp cloth on the control panel to gently wipe away spills and dust. Do not use benzene, wax, thinner, chlorine bleach, or alcohol. These materials may discolor the inner walls and cause stains. Do not clean the dishwasher by sprinkling water over it and avoid letting water come into contact with any of the electrical parts.
If your dishwasher has a stainless steel door panel, you can clean it with a stainless steel cleaner for Home Appliances or a similar product using a clean, soft cloth.
CLEANING THE INTERIOR
Clean the interior of your dishwasher periodically to remove any dirt or food particles. Wipe the inside of the dishwasher and the inner part of the door with a wet dishcloth. We recommend filling the detergent dispenser with dish detergent, and then running the dishwasher empty periodically using either the Normal or Express 60 cycle with the sanitize option. This will keep your dishwasher clean. If white spots and odor are still present in your dishwasher, run the Normal cycle with the dishwasher empty and without detergent until it flushes. Then, interrupt the cycle and put an 8 ounce cup of white vinegar into the lower basket. Close the dishwasher and let the cycle finish.
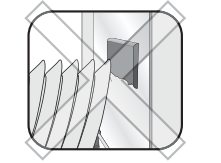
CAUTION: Do not remove the tub front seal (the long rubber seal enclosing the opening of the dishwasher).
WARNING: Do not touch the HEATING ELEMENT during or immediately after use.
CLEANING THE FILTERS
- Turn off the dishwasher.
- Rotate the filter insert counterclockwise to unfasten and then detach the filter insert.
- Remove the fine filter (flat, rectangular).
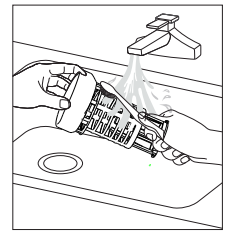
- Remove any dirt or other remains from the filter, and then rinse under running water.
- Reassemble the f ilter in the reverse order of the dissasembly, re-insert the filter insert, and then rotate clockwise as shown until closed .

CAUTION: If the filter insert is not closed properly, its performance will be decreased.
CLEANING THE NOZZLES
If your dishwasher does not seem to be cleaning adequately or the nozzles seem clogged, you can clean each of the nozzles. When removing the nozzles, take care as they may break.
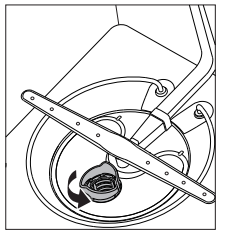
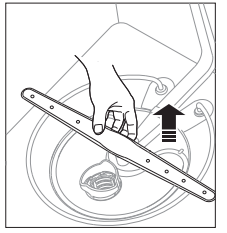
Lower nozzle
- Check whether the nozzle holes are clogged by food particles.
- If cleaning is needed, remove the nozzle by pulling it upwards.
- Clean the nozzle, and then push it back into place.
- Check whether the nozzle is engaged correctly by rotating it by hand.
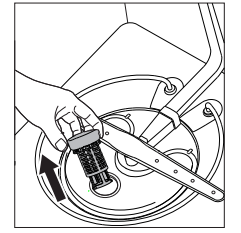
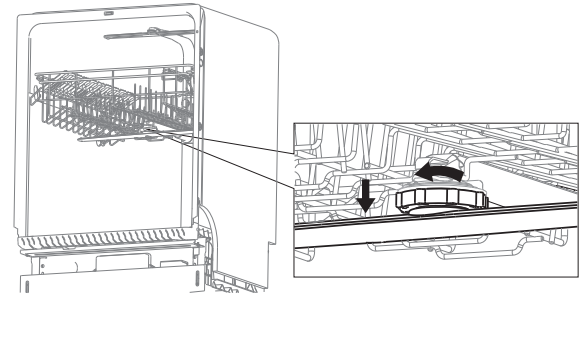
Middle nozzle
- Pull the upper rack towards the front and remove it.
- Check whether the nozzle holes are clogged by food particles.
- If cleaning is needed, remove the nozzle
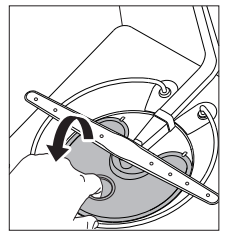
- To remove the nozzle, unfasten and remove the nut, and then remove the nozzle.
- Clean the nozzle, re-insert it, and fasten the nut.
- When fastening the nut, turn it firmly by hand.
- Check whether the nozzle is engaged correctly by rotating it by hand.
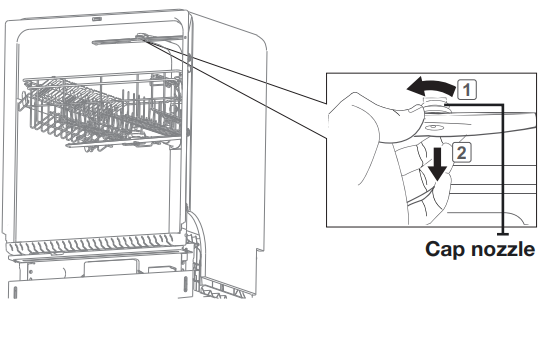
Upper nozzle
- Check whether the nozzle holes are clogged by food particles
- If cleaning is needed, remove the nozzle.
- To remove the nozzle, pull out the upper rack first, unfasten the nozzle cap by turning it counterclockwise, and then remove the upper nozzle
- Clean the nozzle, re-insert it, and then fasten the nozzle cap to the nozzle by turning the cap clockwise
- Check whether the nozzle is engaged correctly by rotating it by hand.
STORING YOUR DISHWASHER
If you need to store your dishwasher for an extended period of time, first drain and disconnect it. If you leave water in the hoses and internal components, you can damage the dishwasher. After draining and disconnecting the dishwasher, be sure to turn off the water supply valve and circuit breaker.
Cycles
CYCLE CHART
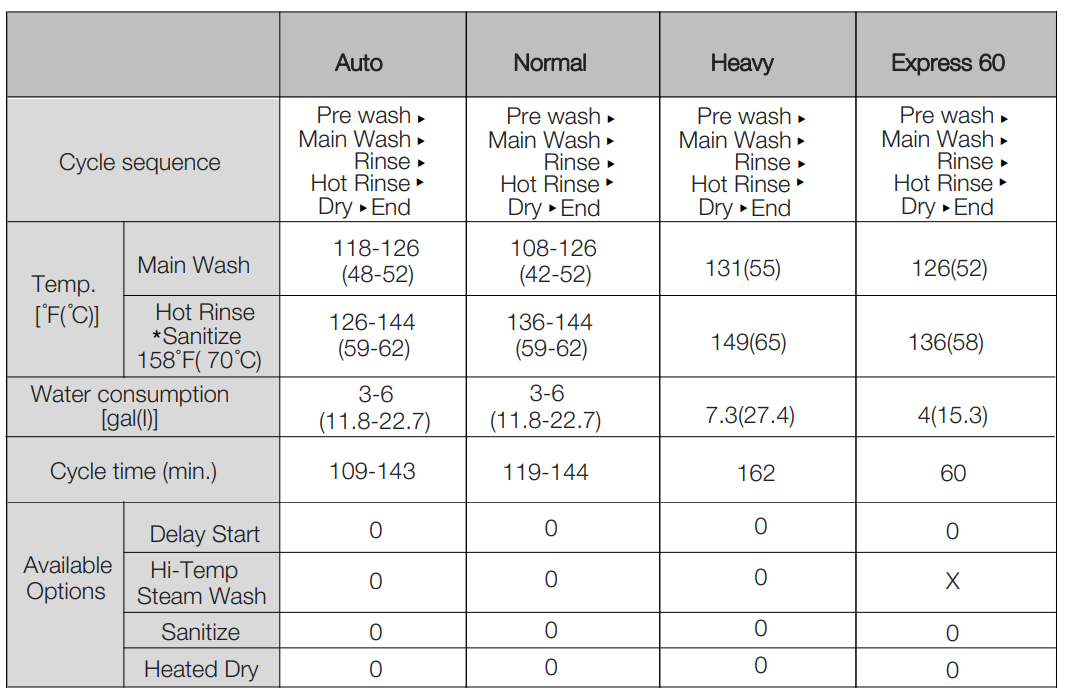
- When you select the Auto or Normal cycle, you can eliminate optional steps depending on the soil level of the dishes.
- The water consumption and wash time varies depending on the steps or options you add, and on the pressure and temperature of the supplied water.
- When you select any options, the cycle time can be changed.
- When the Rinse Aid is empty, wash time and Last Rinse temperature can increase a little.
Troubleshooting
CHECK THESE POINTS IF YOUR DISHWASHER…
| PROBLEM |
POSSIBLE CAUSE |
SOLUTION |
| Will not start. |
The door is not closed completely. |
Check if the door is latched and closed completely |
| No cycle is selected. |
Select a proper cycle |
| The power cable is not connected. |
Connect the power cable properly |
| The Control Panel is locked. |
Unlock the child lock |
| A circuit breaker is open |
Reset the circuit breaker |
| Is taking too long with an operation or cycle. |
Cold water is being supplied. |
Make sure the Water supply line is connected Remains food to a hot water supply (Additional time is required to heat cold water.) |
| Remains food particles on dishes. (Not cleaning properly.) |
You selected an inappropriate cycle. |
Select a cycle according to the number and soil level of the dishes, as directed in this manual. |
| The water temperature is low. |
Connect the water supply line to a hot water supply.
For best performance, the temperature of the supplied water should be 120 °F (49 °C ).
|
| Low water pressure. |
The water pressure should be between 20 and 120 psi (140 - 830 kPa). |
| The water is too hard. |
Use high-quality, fresh detergent with rinse aid. |
| Dishwasher detergent was not used. |
Use automatic dishwasher detergent. We recommend a powder or gel type dishwasher detergent. |
|
Detergent remains in the dispenser.
|
Make sure large items such as cookie sheets, cutting boards, or contaners, etc. are not blocking the detergent dispenser and preventing it from opening properly. Rearrange the dishes so they do not interfere with detergent dispenser operation. |
| There is no rinse aid. |
Check the dispenser and add rinse aid. Use liquid type rinse aid. |
| A nozzle is clogged. |
Clean the nozzle ee page 20. |
| The dishes are improperly loaded. Too many dishes have been loaded. |
Rearrange the dishes so they do not interfere with nozzle rotation and detergent dispenser operation.
Load only an appropriate number of dishes.
Load your dishes as recommended. (See page 14.)
|
| Leaves glasses with a dull film. |
The water supplied is soft and too much detergent was used. |
Underload the dishwasher and use a rinse aid to minimize this |
| Aluminum dishes were included in the wash load. |
Remove the marks on the dishes using a low sensitivity cleaner. |
| Leaves a yellow or brown film on the inside of the dishwasher. |
This is caused by coffee and tea soils. |
Remove the soils using a spot cleaner. |
| Does not dry dishes well. |
There is no rinse aid in the dispenser. |
Check the dispenser and add rinse aid. Use a liquid type rinse aid. |
| The temperature of the water is low when the dishwasher is running. |
Make sure that the water supply line is connected to a hot water supply
Use rinse aid with the Sanitize option
|
| Too many dishes have been loaded. |
Proper loading of items can affect drying. Load your dishes as recommended. (See page 14.) |
| Glasses and cups with concave bottoms hold water. This water may spill onto other items when you are unloading. |
After the cycle finishes, empty the lower rack first and then the upper rack. This will prevent water from dripping from the upper rack onto the dishes in the lower rack. |
| Has a bad odor. |
Water was left over from an incomplete cycle. |
With the dishwasher empty, add detergent to the dispenser, and then run the Normal cycle to clean the dishwash. |
| The Drain Hose is obstructed. |
Contact a qualified service technician to remove any obstruction from the drain hose. |
| The dishwasher is not used daily or soiled dishes are left in unit too long. |
With the dishwasher empty and no detergent in the dispenser, place a glass with 8 ounces of vinegar upright into the lower rack, and then run a Normal cycle. |
| Is too noisy. |
Sound is generated when the dispenser cover is open and the drain pump is operating in an early stage. |
This is normal operation. |
| The dishwasher is not level. |
Ensure the dishwasher is level. |
| Foreign material (a screw, a plastic piece) is in the pump chamber. |
Contact a qualified service technician to remove foreign material from the pump chamber. |
| There is a ‘chopping’ sound because a nozzle is bumping against the dishes. |
Rearrange the dishes. |
| Nozzel does not rotate smoothly |
Nozzel holes are clogged with food particles |
Clean the nozzle hole . See page 20. |
| The nozzle is blocked by a dish or pot and cannot rotate. |
After placing the dishes into the racks, rotate the nozzles by hand to check whether any of the dishes interfere with them. |
| Water won’t pump out of the dishwasher. |
The drain is clogged. |
Contact a qualified service technician to remove any obstruction from the drain hose and check the drain pump operation. |
| Has a bent upper rack after loading dishes |
The dishes are not loaded properly. |
Load your dishes as recommended. (See page 14.) |
INFORMATION CODES
The Control Panel displays information codes to help you understand what is occurring with your dishwasher.
If your dishwasher has a problem, the CODE SYMBOL lights blink as shown below.

For any codes not listed above, call 1-800-SAMSUNG (726-7864)
WARNING:
- If an overflow occurs, turn off the main water supply before calling for service.
- If there is water in the base pan because of an overfill or small leak, the water should be removed before restarting the dishwasher.