
HW-A530
FULL MANUAL
Imagine the possibilities
Thank you for purchasing this Samsung product.
To receive more complete service, please register
your product at www.samsung.com/register
ENG - ii
SAFETY INFORMATION
SAFETY WARNINGS
TO REDUCE THE RISK OF ELECTRIC SHOCK, DO
NOT REMOVE THE COVER (OR BACK).
NO USER-SERVICEABLE PARTS ARE INSIDE.
REFER SERVICING TO QUALIFIED SERVICE
PERSONNEL.
Refer to the table below for an explanation of
symbols which may be on your Samsung product.
CAUTION
RISK OF ELECTRIC SHOCK.
DO NOT OPEN.
This symbol indicates that high voltage
is present inside. It is dangerous to
make any kind of contact with any
internal part of this product.
This symbol indicates that this product
has included important literature
concerning operation and maintenance.
Class II product : This symbol indicates
that it does not require a safety
connection to electrical earth (ground).
If this symbol is not present on a
product with a power cord, the product
MUST have a reliable connection to
protective earth (ground).
AC voltage : This symbol indicates that
the rated voltage marked with the
symbol is AC voltage.
DC voltage : This symbol indicates that
the rated voltage marked with the
symbol is DC voltage.
Caution, Consult instructions for use :
This symbol instructs the user to
consult the user manual for further
safety related information.
WARNING
• To reduce the risk of re or electric shock, do
not expose this appliance to rain or moisture.
CAUTION
• TO PREVENT ELECTRIC SHOCK, MATCH WIDE
BLADE OF PLUG TO WIDE SLOT, FULLY INSERT.
• This apparatus shall always be connected to a
AC outlet with a protective grounding
connection.
• To disconnect the apparatus from the mains,
the plug must be pulled out from the mains
socket, therefore the mains plug shall be
readily operable.
• Do not expose this apparatus to dripping or
splashing. Do not put objects lled with
liquids, such as vases on the apparatus.
• To turn this apparatus off completely, you
must pull the power plug out of the wall
socket. Consequently, the power plug must
be easily and readily accessible at all times.
Wiring the Main Power Supply
Plug (UK Only)
IMPORTANT NOTICE
The mains lead on this equipment is supplied with
a moulded plug incorporating a fuse. The value of
the fuse is indicated on the pin face of the plug
and if it requires replacing, a fuse approved to
BS1362 of the same rating must be used.
Never use the plug with the fuse cover removed.
If the cover is detachable and a replacement is
required, it must be of the same colour as the fuse
tted in the plug. Replacement covers are
available from your dealer. If the tted plug is not
suitable for the power points in your house or the
cable is not long enough to reach a power point,
you should obtain a suitable safety approved
extension lead or consult your dealer for assistance.

ENG - iii
However, if there is no alternative to cutting off the
plug, remove the fuse and then safely dispose of
the plug. Do not connect the plug to a mains
socket as there is a risk of shock hazard from the
bared exible cord. Never attempt to insert bare
wires directly into a mains socket. A plug and fuse
must be used at all times.
IMPORTANT
The wires in the mains lead are coloured in
accordance with the following code:– BLUE =
NEUTRAL BROWN = LIVE As these colours may not
correspond to the coloured markings identifying
the terminals in your plug, proceed as follows:– The
wire coloured BLUE must be connected to the
terminal marked with the letter N or coloured
BLUE or BLACK. The wire coloured BROWN must
be connected to the terminal marked with the
letter L or coloured BROWN or RED.
WARNING : DO NOT CONNECT EITHER WIRE TO
THE EARTH TERMINAL WHICH IS MARKED WITH
THE LETTER E OR BY THE EARTH SYMBOL
,
OR COLOURED GREEN OR GREEN AND YELLOW.
PRECAUTIONS
1. Ensure that the AC power supply in your
house complies with the power
requirements listed on the identication
sticker located on the bottom of your
product. Install your product horizontally, on
a suitable base (furniture), with enough
space around it for ventilation (7~10 cm).
Make sure the ventilation slots are not
covered. Do not place the unit on ampliers
or other equipment which may become hot.
This unit is designed for continuous use. To
fully turn off the unit, disconnect the AC plug
from the wall outlet. Unplug the unit if you
intend to leave it unused for a long period of
time.
2. During thunderstorms, disconnect the AC
plug from the wall outlet. Voltage peaks due
to lightning could damage the unit.
3. Do not expose the unit to direct sunlight or
other heat sources. This could lead to
overheating and cause the unit to
malfunction.
4. Protect the product from moisture (i.e.
vases), and excess heat (e.g. a replace) or
equipment creating strong magnetic or
electric elds. Unplug the power cable from
the AC wall socket if the unit malfunctions.
Your product is not intended for industrial
use. It is for personal use only. Condensation
may occur if your product has been stored in
cold temperatures. If transporting the unit
during the winter, wait approximately
2 hours until the unit has reached room
temperature before using.
5. The battery used with this product contains
chemicals that are harmful to the
environment. Do not dispose of the battery
in the general household trash. Do not
expose the battery to excess heat, direct
sunlight, or re. Do not short circuit,
disassemble, or overheat the battery.
CAUTION : Danger of explosion if the battery
is replaced incorrectly. Replace only with the
same or equivalent type.
ENG - iv
CONTENTS
01 Checking the Components 2
Inserting Batteries before using the Remote Control (AA batteries X 2) ------------------------- 2
02 Product Overview 3
Front Panel / Top Panel of the Soundbar ------------------------- 3
Bottom Panel of the Soundbar
------------------------- 4
03 Connecting the Soundbar 5
Connecting Electrical Power
-------------------------
5
Connecting the Soundbar to the Subwoofer
-------------------------
6
– Automatic connection between the Subwoofer and the Soundbar
-------------------------
6
– Manually connecting the Subwoofer if automatic connection fails
-------------------------
7
Connecting an SWA-9100S (Sold Separately) to your Soundbar
-------------------------
9
04 Connecting to your TV 11
Method 1. Connecting with a Cable
-------------------------
11
– Connecting a TV using an HDMI Cable
-------------------------
11
– Connecting using an Optical Cable
-------------------------
13
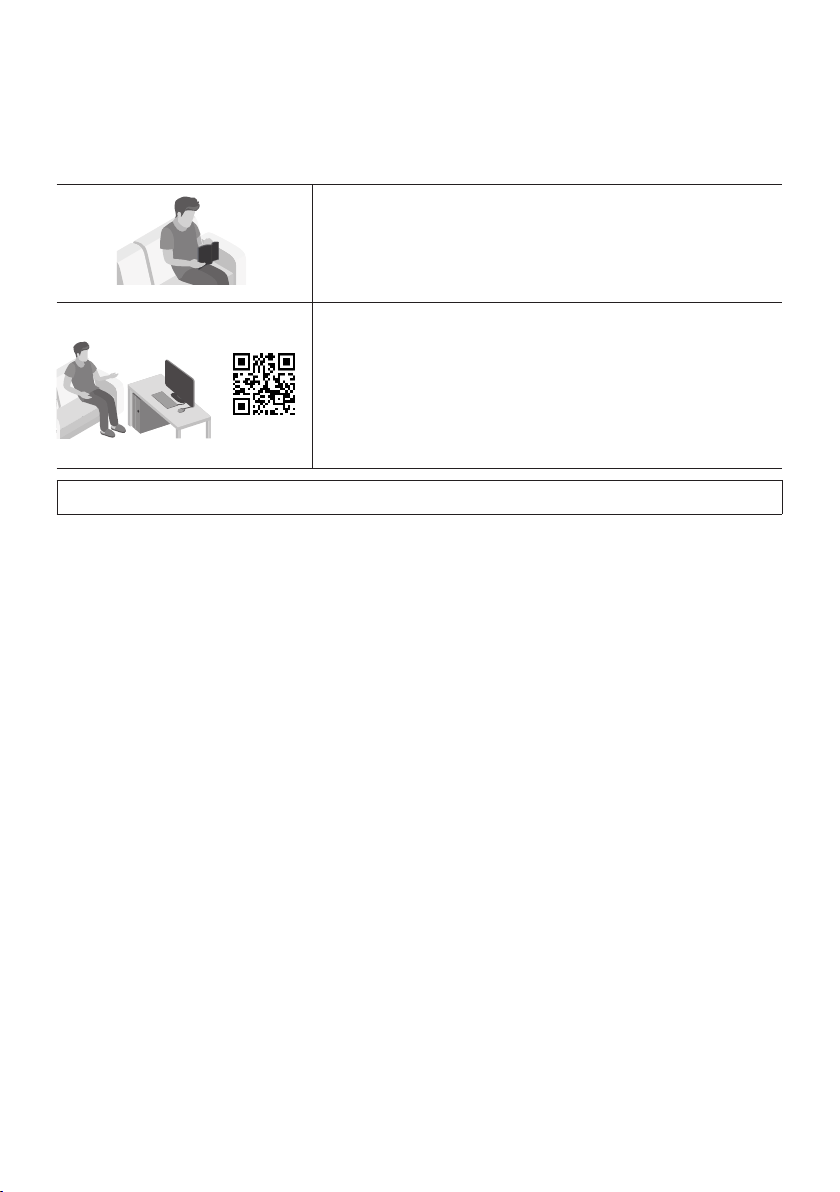
ABOUT THIS MANUAL
The user manual has two parts: simple paper USER MANUAL and a detailed FULL MANUAL you can
download.
USER MANUAL
See this manual for safety instructions, product installation,
components, connections, and product specications.
FULL MANUAL
You can access the FULL MANUAL on Samsung’s on-line
customer support centre by scanning the QR code.
To see the manual on your PC or mobile device, download the
manual in document format from Samsung’s website.
(http://www.samsung.com/support)
Design and specications are subject to change without prior notice.

ENG - v
Method 2. Connecting Wirelessly
-------------------------
14
– Connecting a TV via Bluetooth
-------------------------
14
05 Connecting an External Device 16
Connecting using an HDMI Cable
-------------------------
16
Connecting using an Optical Cable
-------------------------
17
06 Connecting a USB Storage Device 18
07 Connecting a Mobile Device 19
Connecting via Bluetooth
-------------------------
19
08 Using the Remote Control 23
How to Use the Remote Control
-------------------------
23
Adjusting the Soundbar volume with a TV remote control
------------------------- 26
Using the Hidden Buttons (Buttons with more than one function)
-------------------------
27
Output specications for the different sound effect modes
-------------------------
27
09 Installing the Wall Mount 28
Installation Precautions
-------------------------
28
Wallmount Components
-------------------------
28
10 Software Update 30
How to check the Firmware version
-------------------------
30
Update Procedure
-------------------------
31
If UPDATE is not displayed
-------------------------
31
11 Troubleshooting 32
12 Licence 34
13 Open Source Licence Notice 35
14 Important Notes About Service 35
15 SpecicationsandGuide 36
Specications
-------------------------
36
ENG - 2
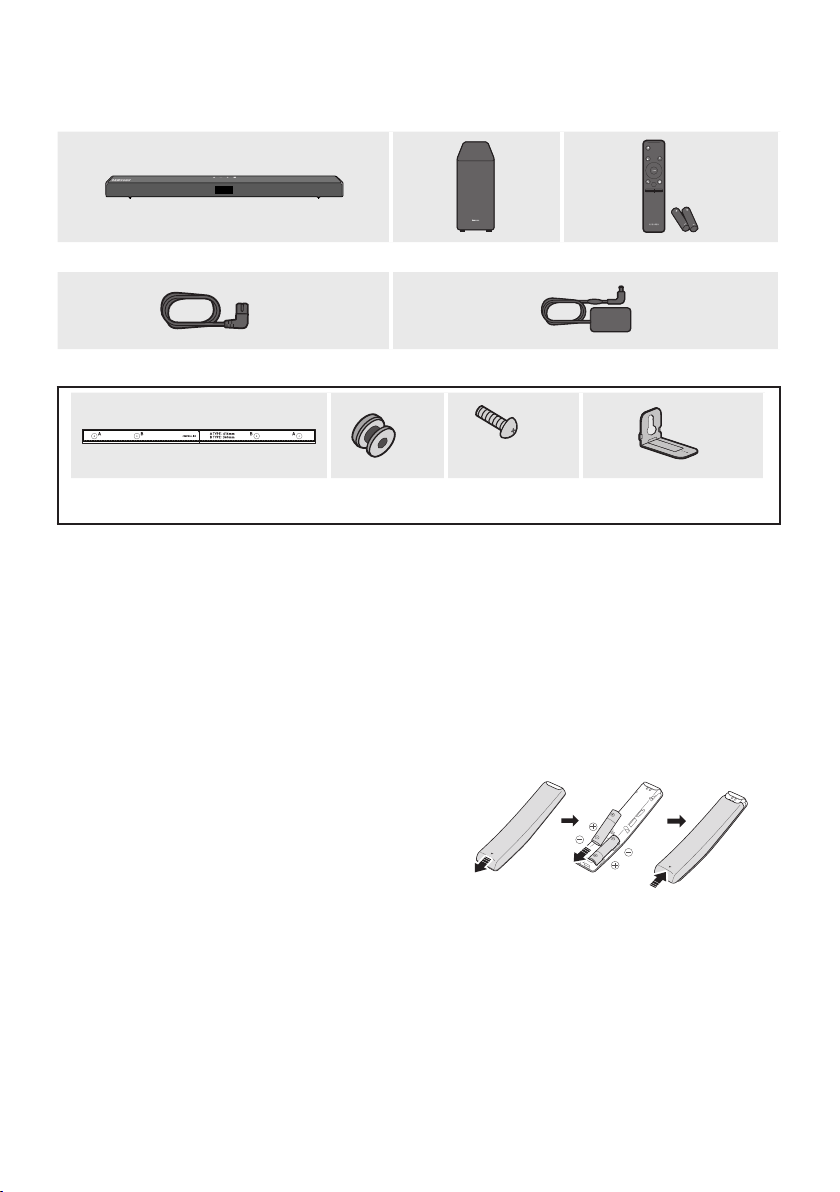
01 CHECKING THE COMPONENTS
VOL WOOFER
SOUNDBAR
SOUND
MODE
PAIR
Soundbar Main Unit Subwoofer Remote Control / Batteries
x 2
Power Cord (Subwoofer, Soundbar) AC/DC Adapter (Soundbar)
x 2
(M4 x L10)
x 2
x 2
Wall Mount Guide Holder-Screw Screw Bracket-Wall Mount
• For more information about the power supply and power consumption, refer to the label attached
to the product. (Label: Bottom of the Soundbar Main Unit)
• To purchase additional components or optional cables, contact a Samsung Service Centre or
Samsung Customer Care.
• Depending on the region, the appearance of the AC plug may differ from the plug displayed above,
or it may be supplied integrated with the AC/DC adapter.
• The appearance of the accessories may differ slightly from the illustrations above.
Inserting Batteries before using the Remote Control (AA batteries X 2)
Slide the back cover in the direction of the arrow
until it is completely removed. Insert 2 AA batteries
(1.5V) oriented so that their polarity is correct. Slide
the back cover back into position.
ENG - 3
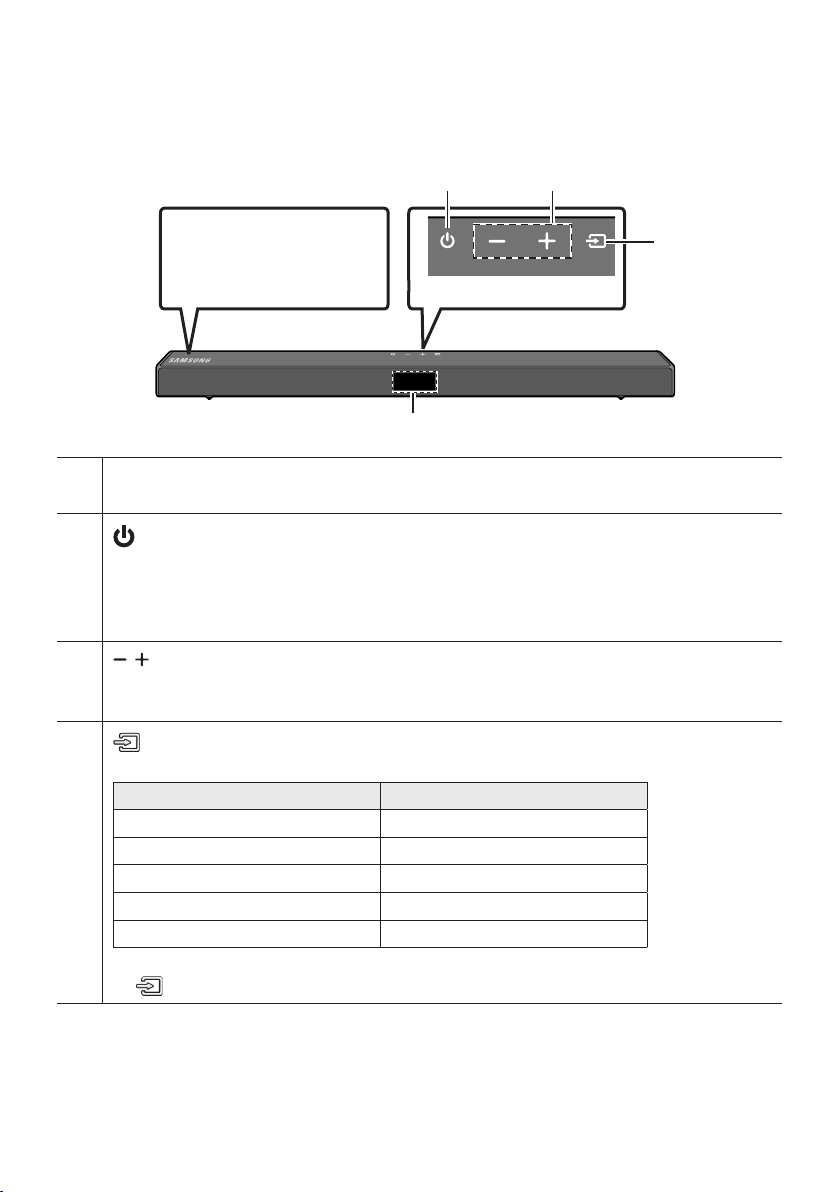
02 PRODUCT OVERVIEW
Front Panel / Top Panel of the Soundbar
Position the product so that
the SAMSUNG logo is
located on the top.
Top Panel
Display
Displays the product’s status and current mode.
(Power) Button
Turns the power on and off.
• Auto Power Down Function
The unit turns off automatically in the following situations:
– In D.IN / HDMI / BT / USB Mode : If there is no audio signal for 20 minutes.
(Volume) Button
Adjusts the volume.
• When adjusted, the volume level appears on the Soundbar’s front display.
(Source) Button
Selects the source input mode.
Input mode Display
Optical Digital input D.IN
ARC (HDMI OUT) input D.IN TV ARC (Auto conversion)
HDMI input HDMI
BLUETOOTH mode BT
USB mode USB
• To turn on “BT PAIRING” mode, change the source to “BT” mode, and then press and hold the
(Source) button for more than 5 seconds.
• When you plug in the AC cord, the power button will begin working in 4 to 6 seconds.
• When you turn on this unit, there will be a 4 to 5 second delay before it produces sound.
• If you want to enjoy sound only from the Soundbar, you must turn off the TV’s speakers in the Audio
Setup menu of your TV. Refer to the owner’s manual supplied with your TV.
ENG - 4
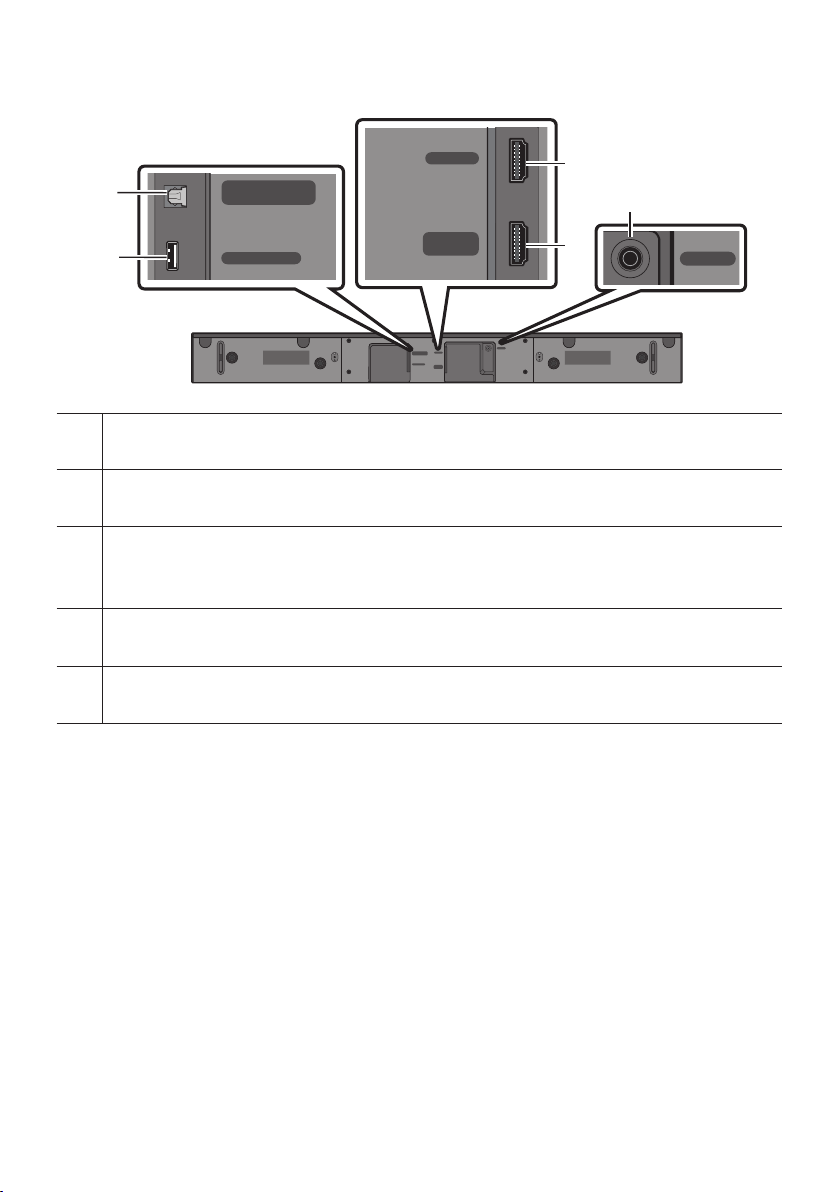
Bottom Panel of the Soundbar
DC 24V
HDMI
USB (5V 0.5A)
DIGITAL AUDIO IN
(OPTICAL)
HDMI TO TV
(ARC)
DC 24V
HDMI OUT
(TV-ARC)
AUX IN
HDMI IN
USB (5V 0.5A)
DIGITAL AUDIO IN
(OPTICAL)
HDMI
HDMI TO TV
(ARC)
DIGITAL AUDIO IN (OPTICAL)
Connect to the digital (optical) output of an external device.
USB (5V 0.5A)
Connect a USB device here to play music les stored on the USB device through the Soundbar.
HDMI
Inputs digital video and audio signals simultaneously using an HDMI cable.
Connect to the HDMI output of an external device.
HDMI TO TV (ARC)
Connect to the HDMI (ARC) jack on a TV.
DC 24V (Power Supply In)
Connect the AC/DC power adapter.
• When disconnecting the power cable of the AC/DC power adapter from a wall outlet, pull the plug.
Do not pull the cable.
• Do not connect this unit or other components to an AC outlet until all connections between
components are complete.
ENG - 5
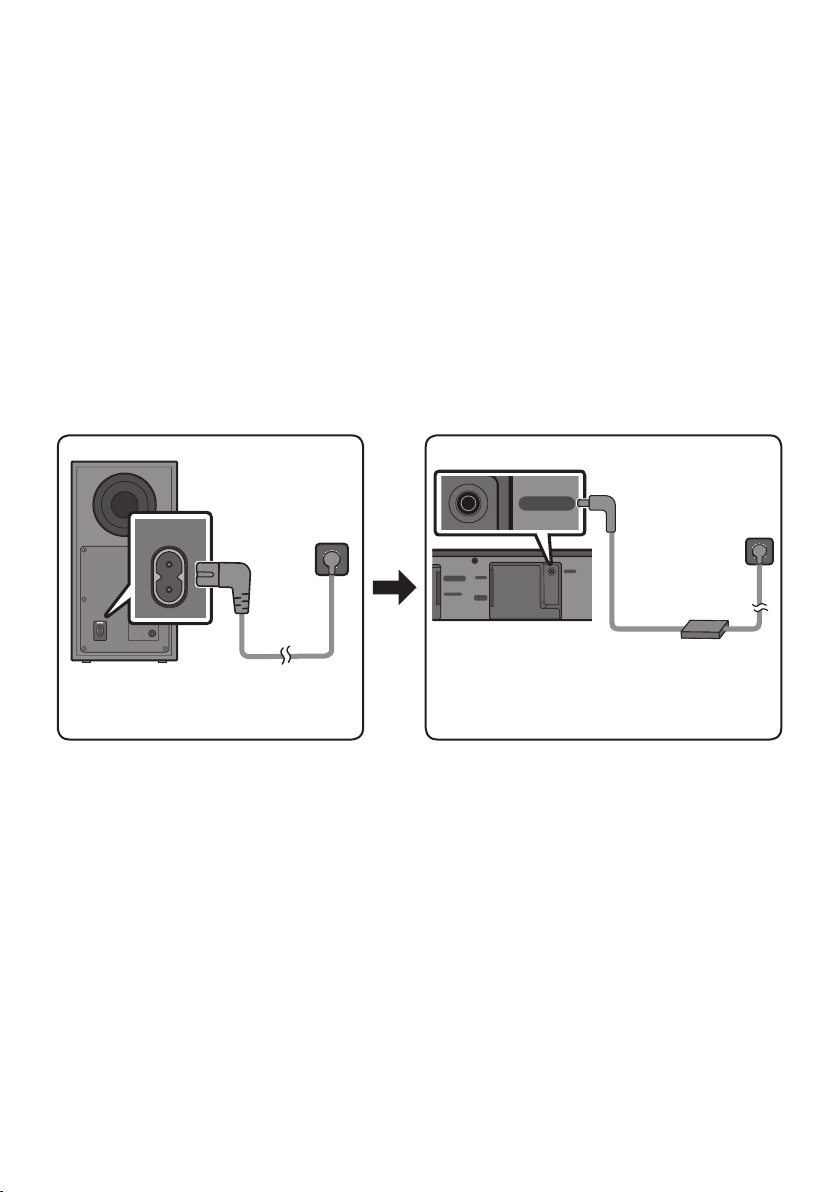
03 CONNECTING THE SOUNDBAR
Connecting Electrical Power
Use the power components to connect the Subwoofer and Soundbar to an electrical outlet in the following
order:
1. Connect the power cord to the Subwoofer.
2. Connect the power output cable to the power adapter, and then to the Soundbar.
3. Connect the power cord to a wall socket.
See the illustrations below.
• For more information about the required electrical power and power consumption, refer to the
label attached to the product. (Label: Bottom of the Soundbar Main Unit)
POWER
Rear of Subwoofer
Power Cord
Connecting
Electrical Power
Bottom of the
Soundbar Main Unit
AC/DC Adapter
Connecting
Electrical Power
DC 24V
USB (5V 0.5A)
DIGITAL AUDIO IN
(OPTICAL)
DC 24V
HDMI
HDMI TO TV
(ARC)
Power Cord
• Make sure to rest the AC/DC Adapter at on a table or the oor. If you place the AC/DC Adapter so
that it is hanging with the AC cord input facing upwards, water or other foreign substances could
enter the Adapter and cause the Adapter to malfunction.

ENG - 6
Connecting the Soundbar to the Subwoofer
When the subwoofer is connected, you can enjoy rich bass sound.
Automatic connection between the Subwoofer and the Soundbar
When you turn the power on after connecting the power cables to the Soundbar and subwoofer, the
subwoofer is automatically connected to the Soundbar.
• When auto pairing is complete, the blue indicator at the rear of the subwoofer turn on.
LED Indicator Lights on the Rear of Subwoofer
LED Status Description Resolution
Blue
On
Successfully connected
(normal operation)
-
Blinking Recovering the connection
Check if the power cable attached to the
main Soundbar unit is connected properly
or wait about 5 minutes. If blinking persists,
try manually connecting the subwoofer.
See page 7.
Red On
Standby (with the Soundbar
main unit turned off)
Check if the power cable attached to the
main Soundbar unit is connected properly.
Connection failed
Connect again. See the instructions for
manual connection on page 7.
Red and
blue
Blinking Malfunction
See the contact information for the
Samsung Service Centre in this manual.
ENG - 7
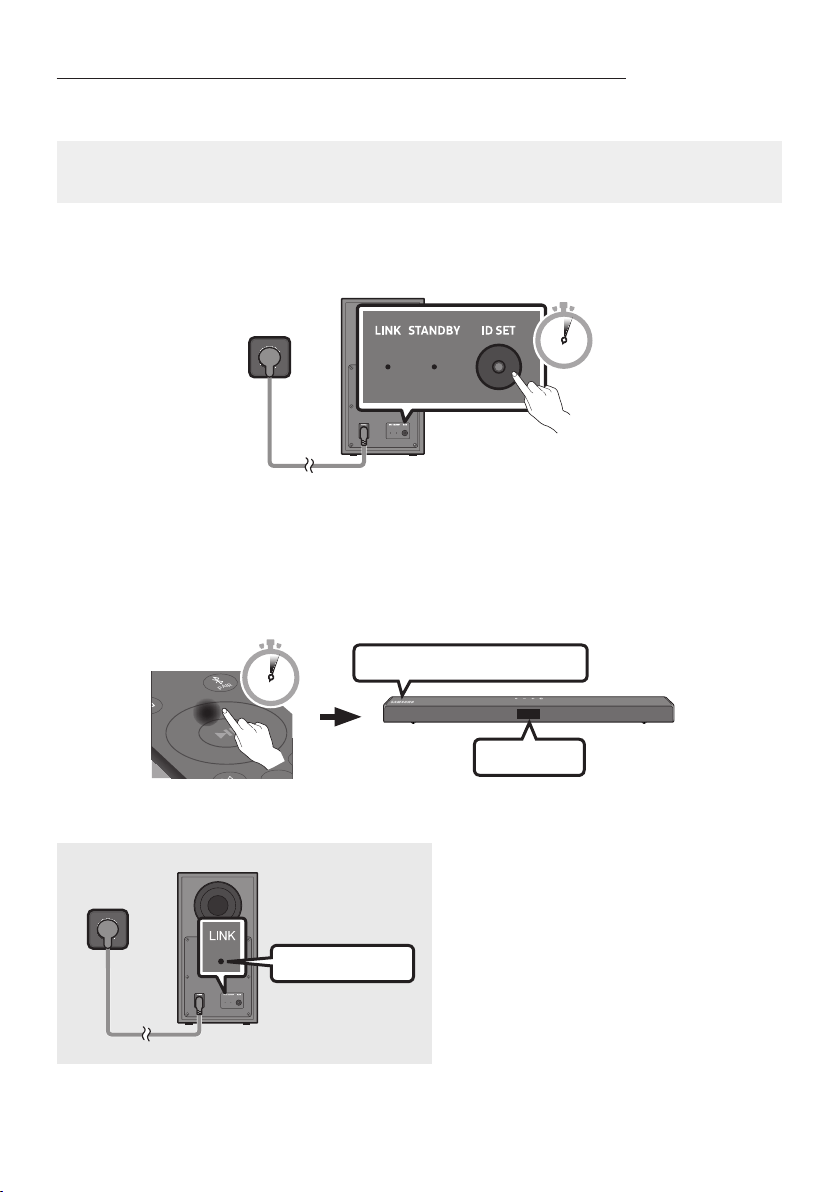
Manually connecting the Subwoofer if automatic connection fails
Before performing the manual connection procedure below:
• Check whether the power cables for the Soundbar and subwoofer are connected properly.
• Make sure that the Soundbar is turned on.
1. Press and hold ID SET on the rear of the subwoofer for at least 5 seconds.
• The red indicator on the rear of the subwoofer turns off and the blue indicator blinks.
5 Sec
Rear of Subwoofer
2. Press and hold the Up button on the remote control for at least 5 seconds.
• The ID SET message appears on the display of the Soundbar for a moment, and then it
disappears.
• The Soundbar will automatically power on when ID SET is complete.
ID SET
SOUND
MODE
PAIR
5 Sec
SAMSUNG logo is on the top
3. Check if the LINK LED is solid blue (connection complete).
Blue is On
The LINK LED indicator stops blinking and
glows a solid blue when a connection is
established between the Soundbar and the
Wireless Subwoofer.

ENG - 8
NOTES
• Do not connect the power cord of this product or your TV to a wall outlet until all connections
between components are complete.
• Before moving or installing this product, be sure to turn off the power and disconnect the power cord.
• If the main unit is powered off, the wireless subwoofer will go into stand-by mode and the
STANDBY LED on the rear of the sub-woofer will turn red after blinking blue several times.
• If you use a device that uses the same frequency (5.8GHz) as the Soundbar near the Soundbar,
interference may cause some sound interruption.
• The maximum transmission distance of the main unit’s wireless signal is about 10 meters, but may
vary depending on your operating environment. If a steel-concrete or metallic wall is between the
main unit and the wireless subwoofer, the system may not operate at all because the wireless
signal cannot penetrate metal.
PRECAUTIONS
• Wireless receiving antennas are built into the wireless subwoofer. Keep the unit away from water
and moisture.
• For optimal listening performance, make sure that the area around the wireless subwoofer and the
Wireless Receiver Module (sold separately) is clear of any obstructions.

ENG - 9
Connecting an SWA-9100S (Sold Separately) to your Soundbar
Expand to true wireless surround sound by connecting the Samsung Wireless Rear Speaker Kit
(SWA-9100S, sold separately) to your Soundbar.
1. Connect the Wireless Receiver Module to 2 Surround Speakers.
– When connecting the speaker cable, connect the core wire to the speaker.
SURROUND-RIGHT
SURROUND-RIGHT
– The speaker cables are colour coded.
SURROUND-LEFT
ID SET
L
R
SURROUND SPEAKERS OUT
SPEAKER IMPEDANCE : 3Ω
POWER
ID SET
L
R
SURROUND SPEAKERS OUT
SPEAKER IMPEDANCE : 3Ω
SURROUND-RIGHT
SURROUND-LEFT SURROUND-RIGHT
2. Check the standby status of the Wireless Receiver Module after plugging it into an electrical outlet.
• The LINK LED indicator (blue LED) on the Wireless Receiver Module blinks. If the LED does not
blink, press the ID SET button on the back of the Wireless Receiver Module with a pen tip for
5~6 seconds until the LINK LED indicator blinks (in Blue). For more about the LED, please refer
to the SWA-9100S user manual.
ID SET
L
R
SURROUND SPEAKERS OUT
SPEAKER IMPEDANCE : 3Ω
POWER
POWER
ID SET
SURROUND SPEAKERS OUT
SPEAKER IMPEDANCE : 3Ω
STANDBY
LINK
STANDBY
LINK
Blue blinking
5 Sec
ENG - 10
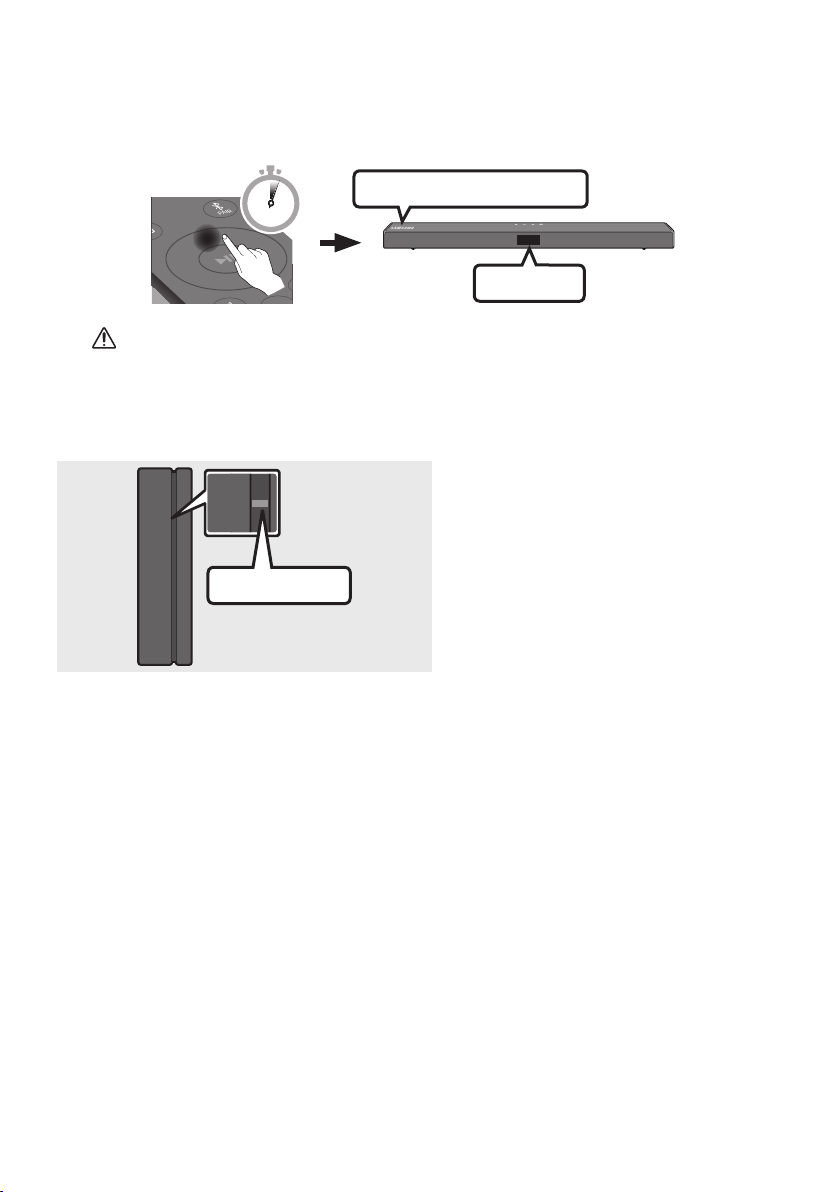
3. Press and hold the Up button on the remote control for at least 5 seconds.
• The ID SET message appears on the display of the Soundbar for a moment, and then it
disappears.
• The Soundbar will automatically power on when ID SET is complete.
ID SET
SOUND
MODE
PAIR
5 Sec
SAMSUNG logo is on the top
CAUTION
• If your Soundbar was playing music when it connects to the SWA-9100S, you may hear some
stuttering from the woofer as the connection nalises.
4. Check if the LINK LED is solid blue (connection complete).
STANDBY
LINK
STANDBY
LINK
Blue is On
The LINK LED indicator stops blinking and
glows a solid blue when a connection is
established between the Soundbar and the
Wireless Receiver Module.
5. If the SWA-9100S is not connected, repeat the procedure from Step 2.

ENG - 11
04 CONNECTING TO YOUR TV
Hear TV sound from your Soundbar through wired or wireless connections.
• When the Soundbar is connected to selected Samsung TVs, the Soundbar can be controlled using
the TV’s remote control.
– This feature is supported by 2017 and later Samsung Smart TVs that support Bluetooth when
you connect the Soundbar to the TV using an optical cable.
– This function also allows you to use the TV menu to adjust the sound eld and various settings
as well as the volume and mute.
Method 1. Connecting with a Cable
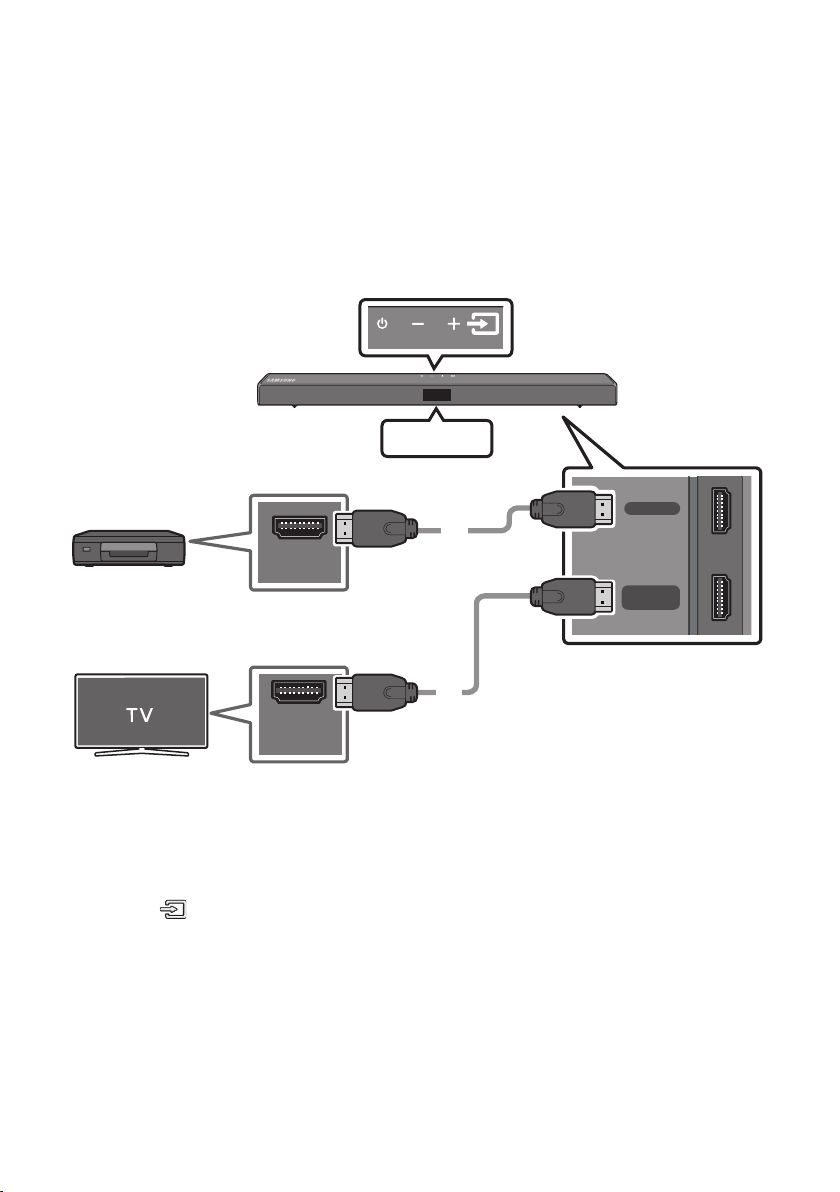
Connecting a TV using an HDMI Cable
CAUTION
• When both the HDMI cable and optical cable are connected, the HDMI signal is received rst.
• To connect the HDMI cable between the TV and Soundbar, be sure to connect the terminals
marked ARC. Otherwise, the TV sound may not be output.
• The recommended cable is High Speed HDMI Cable with Ethernet.
HDMI TO TV
(ARC)
HDMI IN
(ARC)
Connect to the HDMI IN
(ARC) port of your TV.
Bottom of the Soundbar
Connect to the HDMI TO TV (ARC) port
of the Soundbar main unit.
Top of the Soundbar
HDMI Cable
(not supplied)
TV ARC
1. With the Soundbar and TV turned on, connect the HDMI cable (not supplied) as shown in the gure.
2. “TV ARC” appears in the display window of the Soundbar main unit and the Soundbar plays TV
sound.

ENG - 12
• If TV sound is inaudible, press the (Source) button on the remote control or on the top of
the Soundbar to switch to “D.IN” mode. The screen displays “D.IN” and “TV ARC” in sequence,
and TV sound is played.
• If “TV ARC” does not appear in the display window of the Soundbar main unit, conrm that the
HDMI cable (not supplied) is connected to the correct port.
• Use the volume buttons on the TV’s remote control to change the volume on the Soundbar.
NOTES
• HDMI is an interface that enables the digital transmission of video and audio data with just a single
connector.
• If the TV provides an ARC port, connect the HDMI cable to the HDMI IN (ARC) port.
• We recommend you use a coreless HDMI cable if possible. If you use a cored HDMI cable, use one
whose diameter is less than 14 mm.
• This function is not available if the HDMI cable does not support ARC
• When the audio in a broadcast is encoded in Dolby Digital and the “Digital Output Audio Format” on
your TV is set to PCM, we recommend that you change the setting to Dolby Digital. When the
setting on the TV is changed, you will experience better sound quality. (The TV menu may use
different words for Dolby Digital and PCM depending on the TV manufacturer.).
ENG - 13
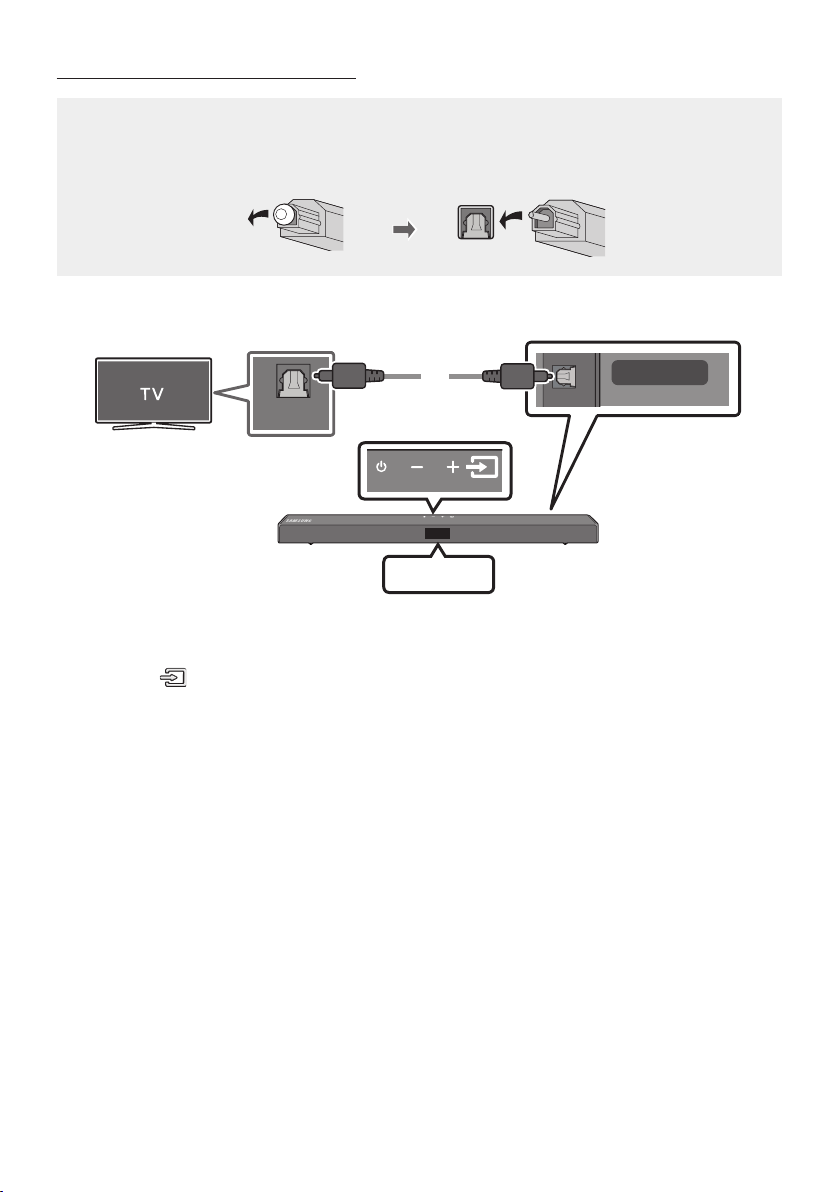
Connecting using an Optical Cable
Pre-connection Checklist
• When both the HDMI cable and optical cable are connected, the HDMI signal is received rst.
• When you use an optical cable and the terminals have covers, be sure to remove the covers.
AUX IN
USB (5V 0.5A)
DIGITAL AUDIO IN
(OPTICAL)
OPTICAL OUT
Optical Cable
(not supplied)
Bottom of the Soundbar
Top of the Soundbar
D.IN
1. Connect the DIGITAL AUDIO IN (OPTICAL) port on the Soundbar to the OPTICAL OUT port of the
TV with a digital Optical Cable (not supplied).
2. Press the (Source) button on the top panel or remote control, and then select the “D.IN” mode.
ENG - 14
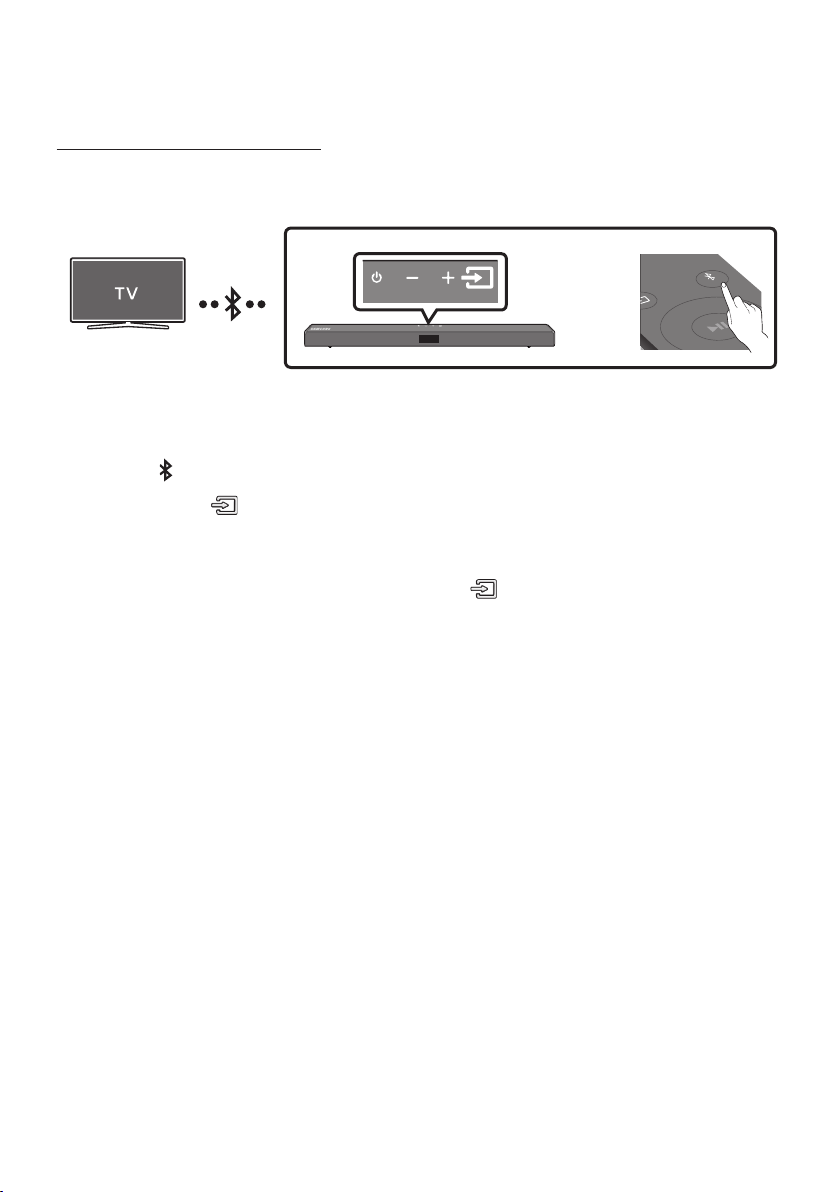
Method 2. Connecting Wirelessly
Connecting a TV via Bluetooth
When a TV is connected using Bluetooth, you can hear stereo sound without the hassle of cabling.
• Only one TV can be connected at a time.
SOUND
MODE
PAIR
OR
The initial connection
1. Press the PAIR button on the remote control to enter the “BT PAIRING” mode.
(OR)
a. Press the (Source) button on the top panel and then select “BT”.
“BT” changes to “BT PAIRING” in a few seconds automatically or changes to “BT READY” if
there is a connect record.
b. When “BT READY” appears, press and hold the (Source) button on the top panel of the
Soundbar for more than 5 seconds to display “BT PAIRING”.
2. Select Bluetooth mode on the TV. (For more information, see the TV’s manual.)
3. Select “[AV] Samsung Soundbar A5-Series” from the list on TV’s screen.
An available Soundbar is indicated with “Need Pairing” or “Paired” on the TV’s Bluetooth device
list. To connect the TV to the Soundbar, select the message, and then establish a connection.
• When the TV is connected, [TV Name] → “BT” appears on the Soundbar’s front display.
4. You can now hear TV sound from the Soundbar.
If the device fails to connect
• If a previously connected Soundbar listing (e.g. “[AV] Samsung Soundbar A5-Series”) appears in
the list, delete it.
• Then repeat steps 1 through 3.
NOTE
• After you have connected the Soundbar to your TV the rst time, use the “BT READY” mode to
reconnect.

ENG - 15
Disconnecting the Soundbar from the TV
Press the (Source) button on the top panel or on the remote control and switch to any mode but “BT”.
• Disconnecting takes time because the TV must receive a response from the Soundbar.
(The time required may differ, depending on the TV model.)
• To cancel the automatic Bluetooth connection between the Soundbar and TV, press the
Left button
on the remote control for 5 seconds with the Soundbar in “BT READY” status. (Toggle On → Off)
What is the difference between BT READY and BT PAIRING?
• BT READY : In this mode, you can search for previously connected TVs or connect a previously
connected mobile device to the Soundbar.
• BT PAIRING : In this mode, you can connect a new device to the Soundbar. (Press the PAIR button
on the remote control or press and hold the
(Source) button on the top of the Soundbar for
more than 5 seconds while the Soundbar is in “BT” mode.)
NOTES
• If asked for a PIN code when connecting a Bluetooth device, enter <0000>.
• In Bluetooth connection mode, the Bluetooth connection will be lost if the distance between the
Soundbar and the Bluetooth device exceeds 10 meters.
• The Soundbar automatically turns off after 20 minutes in the Ready state.
• The Soundbar may not perform Bluetooth search or connection correctly under the following
circumstances:
– If there is a strong electrical eld around the Soundbar.
– If two or more Bluetooth devices are simultaneously paired with the Soundbar.
– If the Bluetooth device is turned off, not in place, or malfunctions.
• Electronic devices may cause radio interference. Devices that generate electromagnetic waves
must be kept away from the Soundbar main unit - e.g., microwaves, wireless LAN devices, etc.
ENG - 16
05 CONNECTING AN EXTERNAL DEVICE
Connect to an external device via a wired connection or Bluetooth connection to play the external
device’s sound through the Soundbar.
Connecting using an HDMI Cable
HDMI
HDMI TO TV
(ARC)
HDMI OUT
HDMI IN
(ARC)
HDMI Cable
(not supplied)
HDMI Cable
(not supplied)
Bottom of the Soundbar
External Device
Top of the Soundbar
HDMI
1. Connect an HDMI cable (not supplied) from the HDMI port on the back of the product to the HDMI
OUT port on your digital device.
2. Connect an HDMI cable (not supplied) from the HDMI TO TV (ARC) port on the back of the product
to the HDMI IN port on your TV.
3. Press the (Source) button on the top panel or on the remote control, and then select “HDMI”.
4. “HDMI” mode is displayed on the Soundbar display panel and sound plays.
ENG - 17
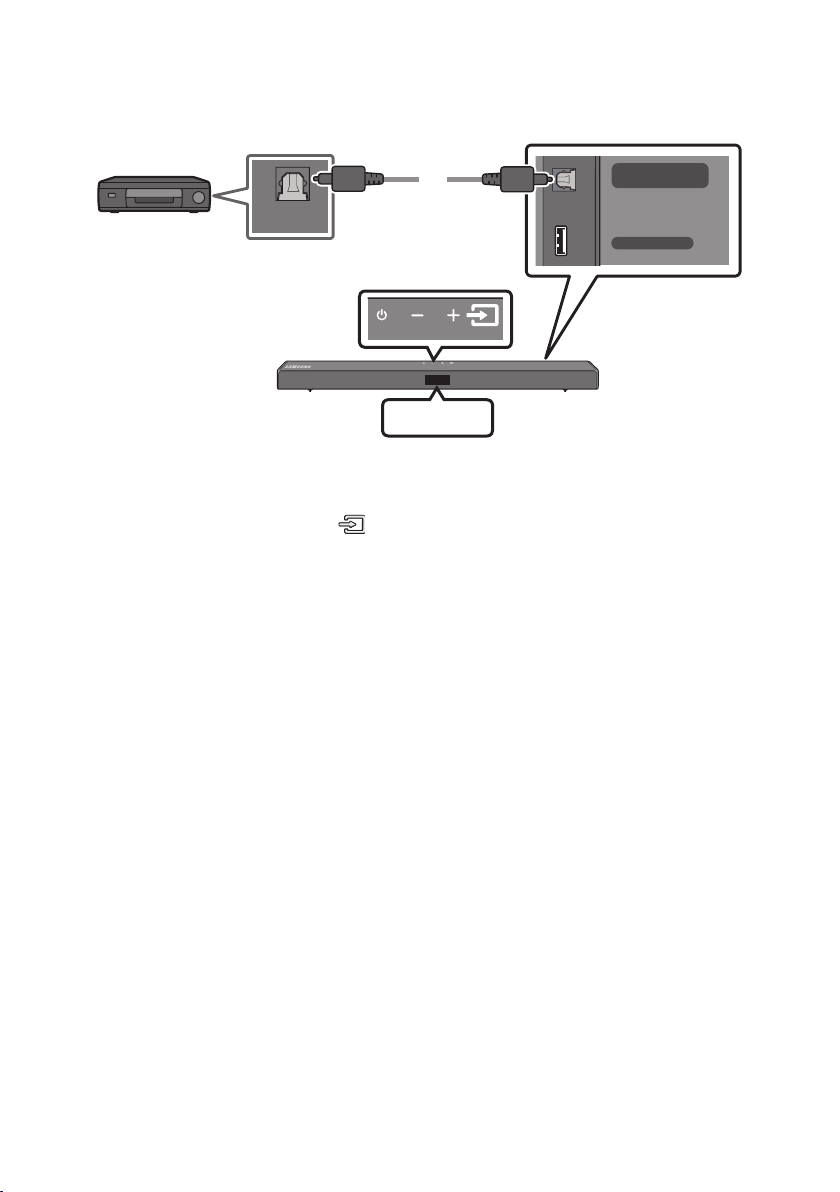
Connecting using an Optical Cable
AUX IN
USB (5V 0.5A)
DIGITAL AUDIO IN
(OPTICAL)
OPTICAL OUT
Optical Cable
(not supplied)
Bottom of the Soundbar
Top of the Soundbar
BD / DVD player / Set-top box /
Game console
D.IN
1. Connect DIGITAL AUDIO IN (OPTICAL) on the main unit to the OPTICAL OUT port of the Source
Device using a digital Optical Cable (not supplied).
2. Select “D.IN” mode by pressing the (Source) button on the top panel or on the remote control.

ENG - 18
06 CONNECTING A USB STORAGE DEVICE
You can play music les located on USB storage devices through the Soundbar.
USB port
DC 24V
HDMI
USB (5V 0.5A)
DIGITAL AUDIO IN
(OPTICAL)
HDMI TO TV
(ARC)
HDMI IN
USB (5V 0.5A)
DIGITAL AUDIO IN
(OPTICAL)
USB
1. Connect the USB device to the USB port on the bottom of the product.
2. Press the (Source) button on the top panel or on the remote control, and then select “USB”.
3. “USB” appears in the display screen.
4. Play music les from the USB storage device through the Soundbar.
• The Soundbar automatically turns off (Auto Power Down) if no USB device has been connected
for more than 20 minutes.
File Format Type Compatibility list
Extension Codec Sampling Rate Bitrate
*.mp3 MPEG 1 Layer2 16kHz ~ 48kHz 80kbps~320kbps
MPEG 1 Layer3 16kHz ~ 48kHz 80kbps~320kbps
MPEG 2 Layer3 16kHz ~ 48kHz 80kbps~320kbps
MPEG 2.5 Layer3 16kHz ~ 48kHz 80kbps~320kbps
*.wma Wave_Format_MSAudio1 16kHz ~ 48kHz 56kbps~128kbps
Wave_Format_MSAudio2 16kHz ~ 48kHz 56kbps~128kbps
*.aac AAC 16kHz ~ 96kHz 48kbps~320kbps
A AC- LC 16kHz ~ 96kHz
128kbps~192kbps
5.1ch 320kbps
HE-AAC 24kHz ~ 96kHz
48kbps~64kbps
5.1ch 160kbps
*.wav - 16kHz ~ 48kHz up to 3000kbps
*.ac FLAC 32kHz ~ 192kHz 162kbps ~ 8,100kbps
*.aiff AIFF 32kHz ~ 192kHz 1,024kbps ~ 9,216kbps
*.ogg OGG 1.1.0 16kHz ~ 48kHz 50kbps~500kbps
• If there are too many folders (about 200) and les (about 2000) stored on the USB device, it may
take the Soundbar some time to access and play les.
ENG - 19
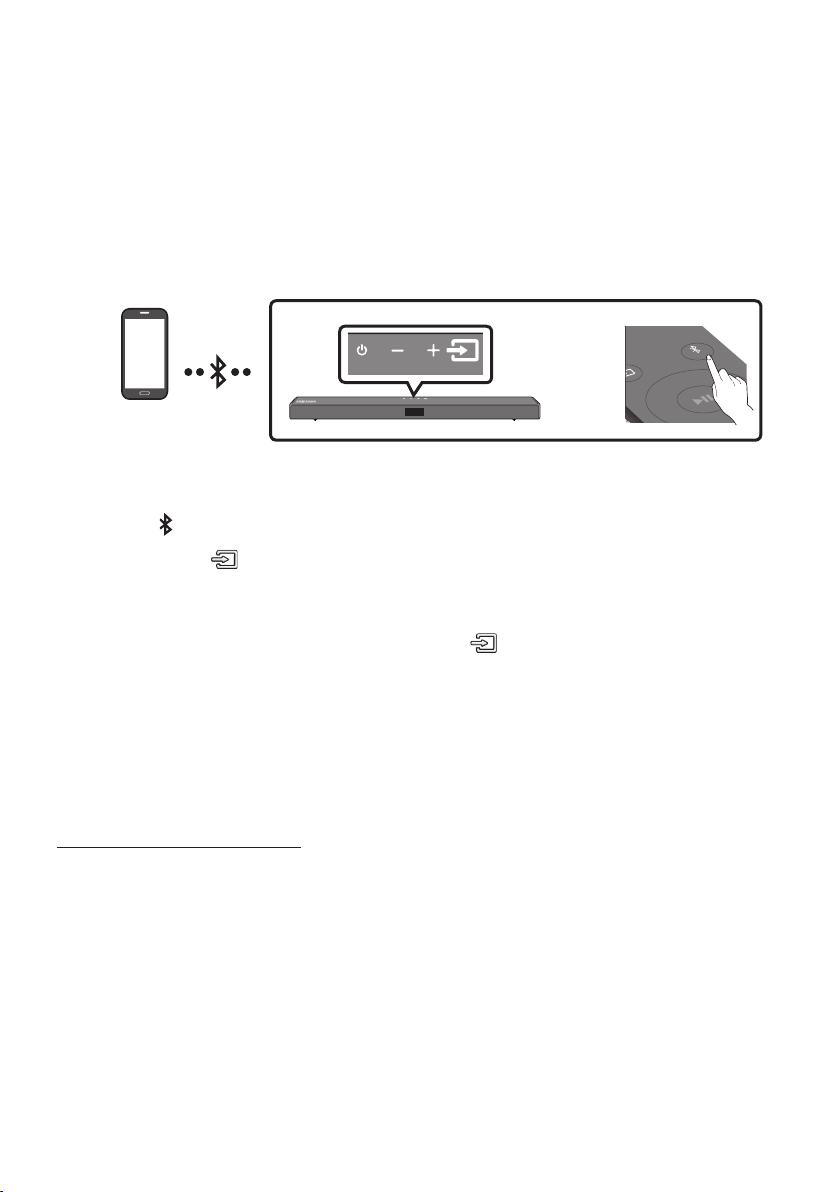
07 CONNECTING A MOBILE DEVICE
Connecting via Bluetooth
When a mobile device is connected using Bluetooth, you can hear stereo sound without the hassle of
cabling.
• The connection is limited to one TV or two Bluetooth devices at the same time.
SOUND
MODE
PAIR
OR
Bluetooth device
The initial connection
1. Press the PAIR button on the remote control to enter the “BT PAIRING” mode.
(OR)
a. Press the (Source) button on the top panel and then select “BT”.
“BT” changes to “BT PAIRING” in a few seconds automatically or changes to “BT READY” if
there is a connect record.
b. When “BT READY” appears, press and hold the (Source) button on the top panel of the
Soundbar for more than 5 seconds to display “BT PAIRING”.
2. On your device, select “[AV] Samsung Soundbar A5-Series” from the list that appears.
• When the Soundbar is connected to the Bluetooth device, [Bluetooth Device Name] → “BT”
appears in the front display.
3. Play music les from the device connected via Bluetooth through the Soundbar.
If the device fails to connect
• If a previously connected Soundbar listing (e.g. “[AV] Samsung Soundbar A5-Series”) appears in
the list, delete it.
• Then repeat steps 1 and 2.
NOTE
• After you have connected the Soundbar to your mobile device the rst time, use the “BT READY”
mode to reconnect.

ENG - 20
What is the difference between BT READY and BT PAIRING?
• BT READY : In this mode, you can search for previously connected TVs or connect a previously
connected mobile device to the Soundbar.
• BT PAIRING : In this mode, you can connect a new device to the Soundbar. (Press the PAIR button
on the remote control or press and hold the
(Source) button on the top of the Soundbar for
more than 5 seconds while the Soundbar is in “BT” mode.)
NOTES
• If asked for a PIN code when connecting a Bluetooth device, enter <0000>.
• In Bluetooth connection mode, the Bluetooth connection will be lost if the distance between the
Soundbar and the Bluetooth device exceeds 10 meters.
• The Soundbar automatically turns off after 20 minutes in the Ready state.
• The Soundbar may not perform Bluetooth search or connection correctly under the following
circumstances:
– If there is a strong electrical eld around the Soundbar.
– If several Bluetooth devices are simultaneously paired with the Soundbar.
– If the Bluetooth device is turned off, not in place, or malfunctions.
• Electronic devices may cause radio interference. Devices that generate electromagnetic waves
must be kept away from the Soundbar main unit - e.g., microwaves, wireless LAN devices, etc.
• The Soundbar supports SBC data (44.1kHz, 48kHz).
• Connect only to a Bluetooth device that supports the A2DP (AV) function.
• You cannot connect the Soundbar to a Bluetooth device that supports only the HF (Hands Free)
function.
• Once you have paired the Soundbar to a Bluetooth device, selecting “[AV] Samsung Soundbar
A5-Series” from the device’s scanned devices list will automatically change the Soundbar to “BT”
mode.
– Available only if the Soundbar is listed among the Bluetooth device’s paired devices.
(The Bluetooth device and the Soundbar must have been previously paired at least once.)
• The Soundbar will appear in the Bluetooth device’s searched devices list only when the Soundbar is
displaying “BT READY”.
Bluetooth Power On (SOUND MODE)
If a previously paired Bluetooth device tries to pair with the Soundbar when the Bluetooth Power On
function is on and the Soundbar is turned off, the Soundbar turns on automatically.
1. Press and hold the SOUND MODE button for more than 5 seconds on the remote while the
Soundbar is turned on.
2. “ON-BLUETOOTH POWER” appears on the Soundbar’s display.

ENG - 21
Disconnecting the Bluetooth device from a Soundbar
You can disconnect a Bluetooth device from the Soundbar. For instructions, see the Bluetooth device’s
user manual.
• The Soundbar will be disconnected.
• When the Soundbar is disconnected from the Bluetooth device, the Soundbar will display
“BT DISCONNECTED” on the front display.
Disconnecting the Soundbar from the Bluetooth device
Press the (Source) button on the top panel or on the remote control, and then change to any mode
except “BT”.
• Disconnecting takes time because the Bluetooth device must receive a response from the
Soundbar. (Disconnection time may differ, depending on the Bluetooth device)
• When the Soundbar is disconnected from the Bluetooth device, the Soundbar will display
“BT DISCONNECTED” on the front display.
NOTES
• In Bluetooth connection mode, the Bluetooth connection will be lost if the distance between the
Soundbar and the Bluetooth device exceeds 10 meters.
• The Soundbar automatically turns off after 20 minutes in the Ready state.
More About Bluetooth
Bluetooth is a technology that enables Bluetooth-compliant devices to interconnect easily with each
other using a short wireless connection.
• A Bluetooth device may cause noise or malfunction, depending on usage, if:
– A part of your body is in contact with the receiving/transmitting system of the Bluetooth
device or the Soundbar.
– It is subject to electrical variation from obstructions caused by a wall, corner, or ofce partition.
– It is exposed to electrical interference from same frequency-band devices including medical
equipment, microwave ovens, and wireless LANs.
• Pair the Soundbar with the Bluetooth device while they are close together.
• The further the distance between the Soundbar and Bluetooth device, the worse the quality is.
If the distance exceeds the Bluetooth operational range, the connection is lost.
• In poor reception areas, the Bluetooth connection may not work properly.
• The Bluetooth connection only works when it is close to the unit. The connection will be
automatically cut off if the Bluetooth device is out of range. Even within range, the sound quality
may be degraded by obstacles such as walls or doors.
• This wireless device may cause electric interference during its operation.
ENG - 22
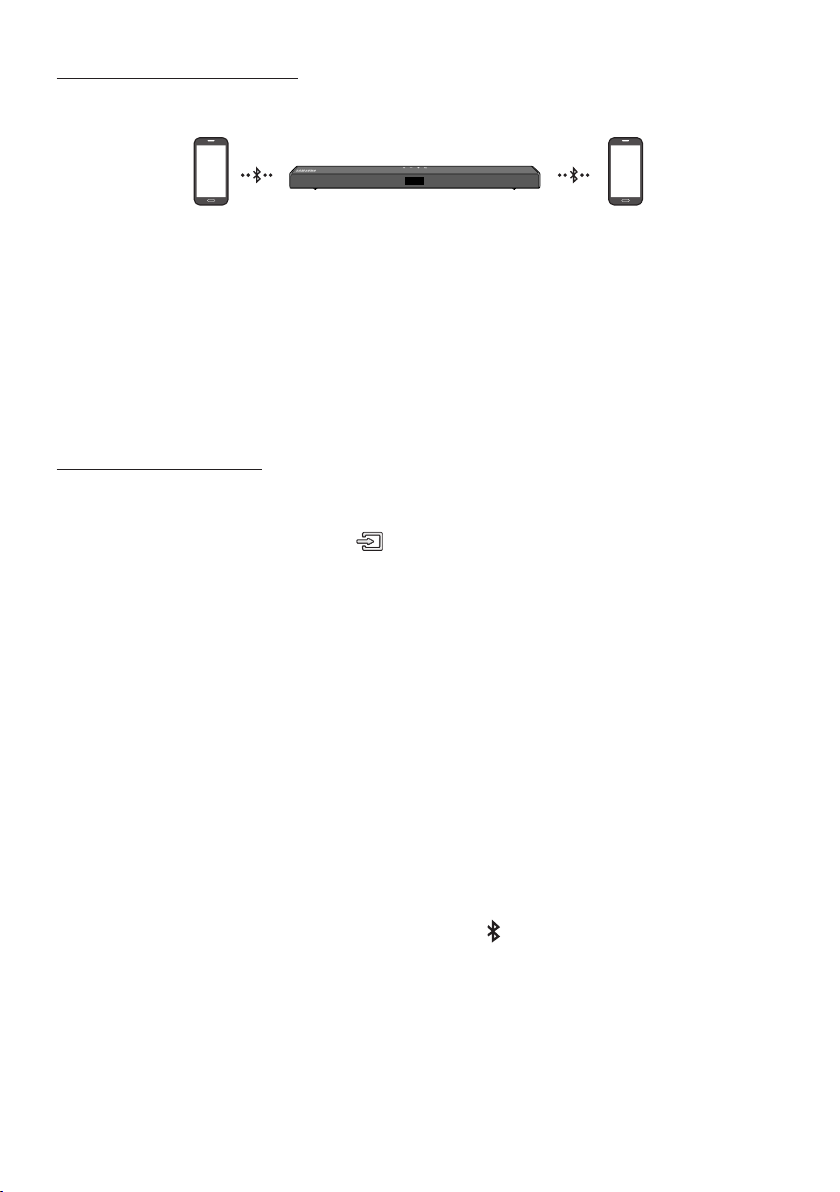
Bluetooth Multi connection
The Soundbar can be connected to 2 Bluetooth devices at the same time.
Bluetooth device A Bluetooth device B
1. Connect the Soundbar to up to two Bluetooth devices. (See page 19)
2. Play music from one of the connected Bluetooth devices while two devices are connected.
3. If music is played from the Bluetooth device “B” while playing from the device “A”, the music is
started playing on the device “B” and automatically being stopped/paused playback on the device
“A”.
4. In versions prior to AVRCP V1.4, the switching time of the device playing music may be delayed.
Bluetooth Multi Pairing
How to pair multiple devices to the Soundbar
1. Turn on the Soundbar.
2. Only in “BT” mode, press and hold the (Source) button on the top of the Soundbar for more
than 5 seconds for the Soundbar to go into “BT PAIRING” mode, then on the Bluetooth device side,
switch Bluetooth on, and select the Soundbar from the list of available devices, the Soundbar will
automatically connect to the Bluetooth device.
3. A 2nd Bluetooth device can be paired and connected to the Soundbar using the same method.
If you attempt to connect a 3rd device, a connected device that is not playing audio will lose its
Bluetooth connection, but will still be paired with the Soundbar.
4. Using the same method, you can pair up to 8 Bluetooth devices, but only the last 2 will stay
connected to the Soundbar at the same time.
NOTES
• Only 1 Samsung TV, or 2 Bluetooth devices can be connected to the Soundbar at one time.
• The Soundbar will be disconnected from Bluetooth devices when it receives a connection request
from a Samsung TV.
• The default of Soundbar is “ON-BT MULTI CONNECTION”, but for restoration to non-multi
connection mode from another mode, press and hold the
PAIR button on the remote control for
more than 5 seconds in standby mode, until “OFF-BT MULTI CONNECTION” appears in the display.
ENG - 23
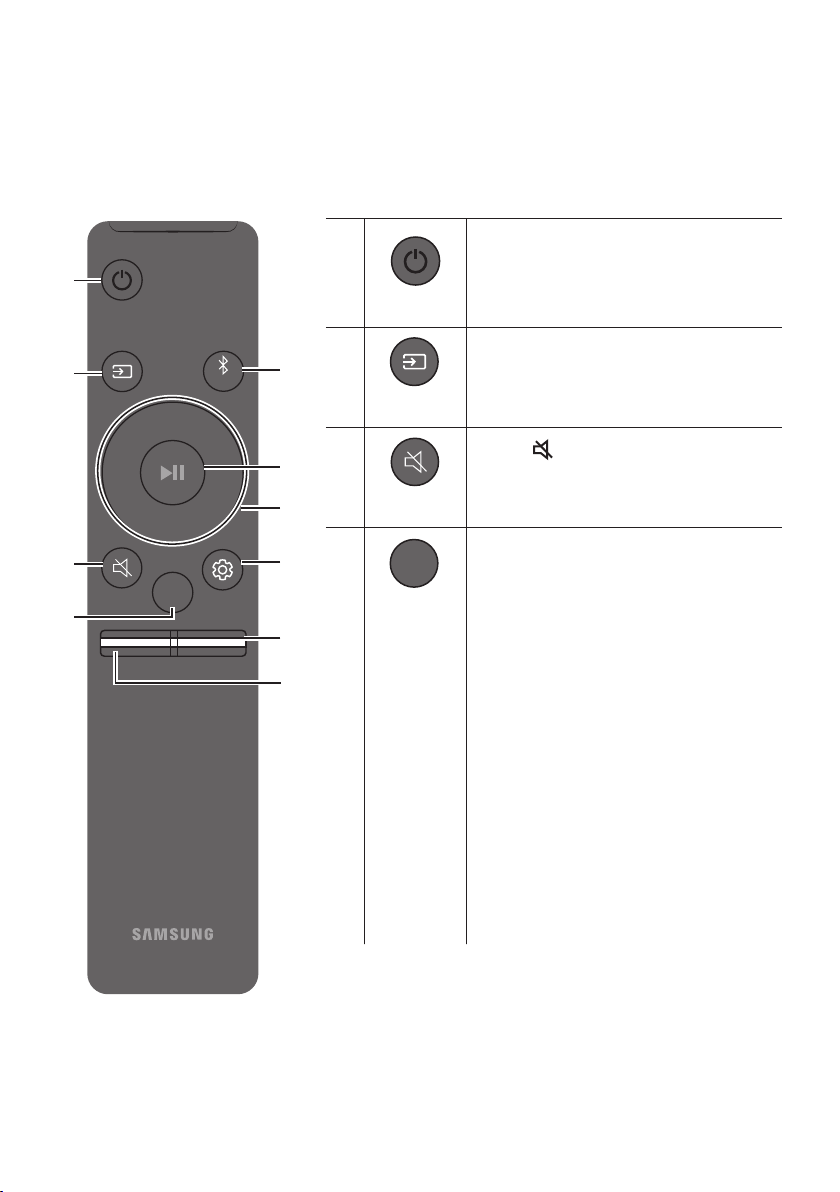
08 USING THE REMOTE CONTROL
How to Use the Remote Control
VOL WOOFER
SOUNDBAR
SOUND
MODE
PAIR
Power
VOL WOOFER
SOUND
MODE
PAIR
Turns the Soundbar on and off.
VOL WOOFER
SOUND
MODE
PAIR
Source
Press to select a source connected to the
Soundbar.
Mute
VOL WOOFER
SOUND
MODE
PAIR
Press the (Mute) button to mute the sound.
Press it again to unmute the sound.
SOUND MODE
VOL WOOFER
SOUND
MODE
PAIR
Press to cycle through the available sound modes:
SURROUND SOUND, BASS BOOST,
or
STANDARD.
– SURROUND SOUND
Provides a wider sound eld than standard.
– BASS BOOST
Sound eld mode with emphasis on bass
sound.
– STANDARD
Outputs the original sound.
• DRC (Dynamic Range Control)
Lets you apply dynamic range control to
Dolby Digital tracks. Press and hold the
SOUND MODE button for more than
5seconds while the Soundbar is powered off
to turn DRC (Dynamic Range Control) on or
off. With the DRC turned on, loud sound is
reduced. (The sound may be distorted.)
ENG - 24
• Bluetooth Power
This feature automatically turns the Soundbar on when it receives a connection
request from a previously connected TV or Bluetooth device. The setting is On by
default.
– Press and hold the SOUND MODE button for more than 5 seconds to turn off the
Bluetooth Power function.
VOL WOOFER
SOUND
MODE
PAIR
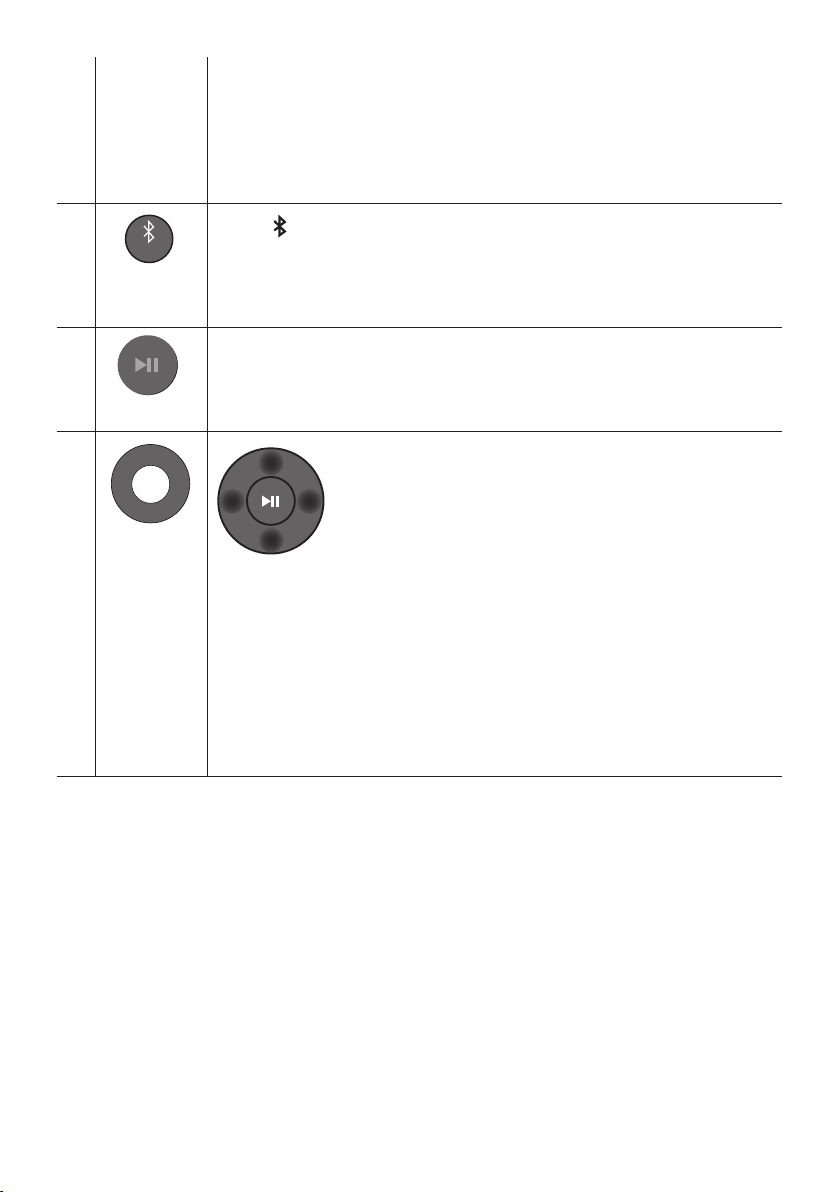
Bluetooth
PAIR
Press the PAIR button. “BT PAIRING” appears in the Soundbar’s display.
You can connect the Soundbar to a new Bluetooth device in this mode by selecting the
Soundbar from the Bluetooth device's search list.
Play / Pause
VOL WOOFER
SOUND
MODE
PAIR
Press the p button to pause a music le temporarily.
When you press the button again, the music le plays.
VOL WOOFER
SOUND
MODE
PAIR
Up/Down/
Left/Right
Press the indicated areas to select Up/Down/Left/Right.
Press Up/Down/Left/Right on the button to select or set functions.
• Repeat
To use the Repeat function in “USB” mode, press the Up button.
• Music Skip
Press the Right button to select the next music le. Press the Left button to select the
previous music le.
• ID SET
Press and hold the Up button for 5 seconds to complete ID SET (when connecting to a
wireless subwoofer or wireless rear speakers).
ENG - 25
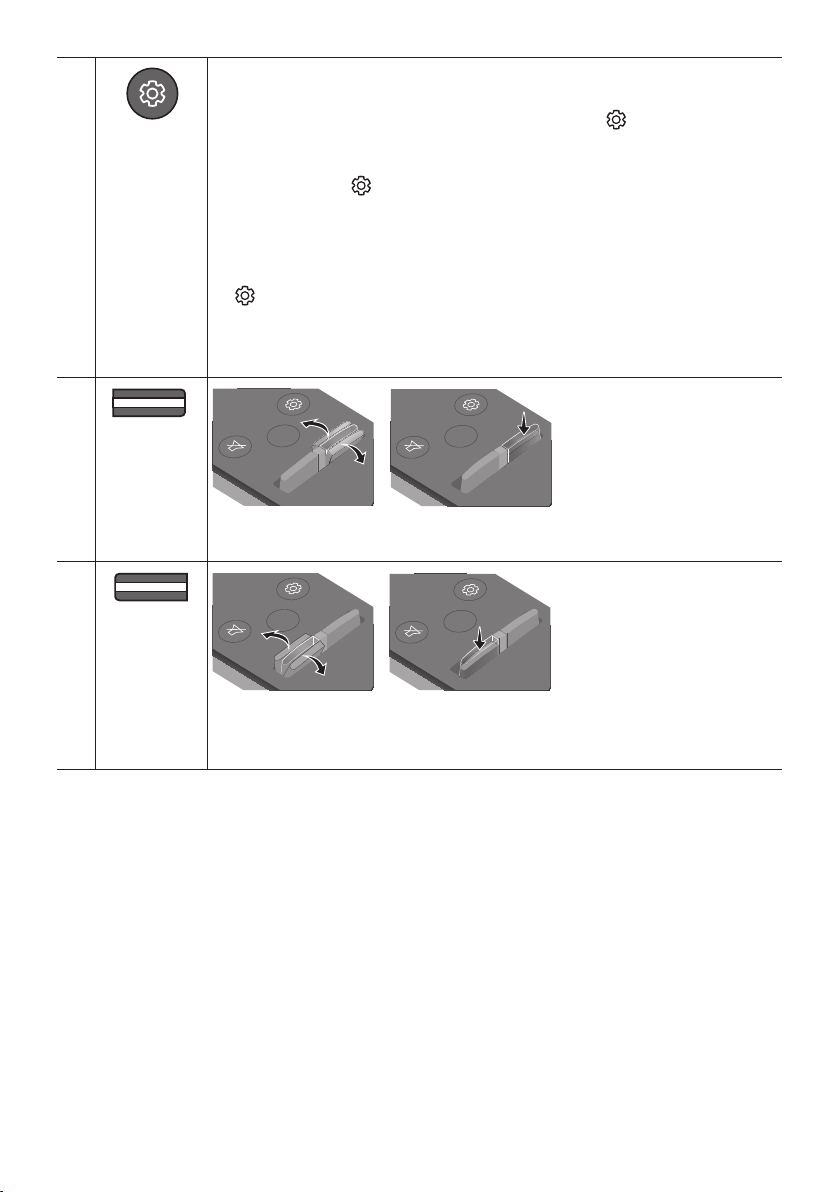
Sound Control
VOL WOOFER
SOUND
MODE
PAIR
When pressed, the settings TREBLE, BASS, and AUDIO SYNC are displayed in sequence.
The desired settings can be adjusted using the Up/Down buttons.
• To control the volume of the treble or bass sound, press the (Sound Control)
button to select TREBLE or BASS and then adjust the volume between -6~+6 by using
the Up/Down buttons.
• Press and hold the (Sound Control) button for about 5 seconds to adjust the sound
for each frequency band. 150Hz, 300Hz, 600Hz, 1.2kHz, 2.5kHz, 5kHz, and 10kHz are
selectable using the Left/Right buttons and each can be adjusted to a setting between
-6 to +6 using the Up/Down buttons. (Make sure the Sound mode is set to “STANDARD”.)
• If the video on the TV and audio from the Soundbar are not synchronised, press the
(Sound Control) button to select AUDIO SYNC and then
set the audio delay
between 0~300 milliseconds
by using the Up/Down buttons. (Not available in “USB” or
“BT” mode.)
• AUDIO SYNC is only supported for some functions.
VOL WOOFER
SOUND
MODE
PAIR
WOOFER
(BASS) LEVEL
SOUND
MODE
VOL
WOOFER
SOUNDBAR
SOUND
MODE
VOL
WOOFER
SOUNDBAR
SOUND
MODE
VOL
WOOFER
SOUNDBAR
SOUND
MODE
VOL
WOOFER
SOUNDBAR
Push the button up or down to adjust the level of the woofer (bass) to -12 or between -6 to
+6. To set the woofer (bass) volume level to 0 (Default), press the button.
VOL WOOFER
SOUND
MODE
PAIR
VOL
(Volume)
SOUND
MODE
VOL
WOOFER
SOUNDBAR
SOUND
MODE
VOL
WOOFER
SOUNDBAR
SOUND
MODE
VOL
WOOFER
SOUNDBAR
SOUND
MODE
VOL
WOOFER
SOUNDBAR
Push the button up or down to adjust the volume.
• Mute
Press the VOL button in to mute the sound. Press it in again to unmute the sound.
ENG - 26
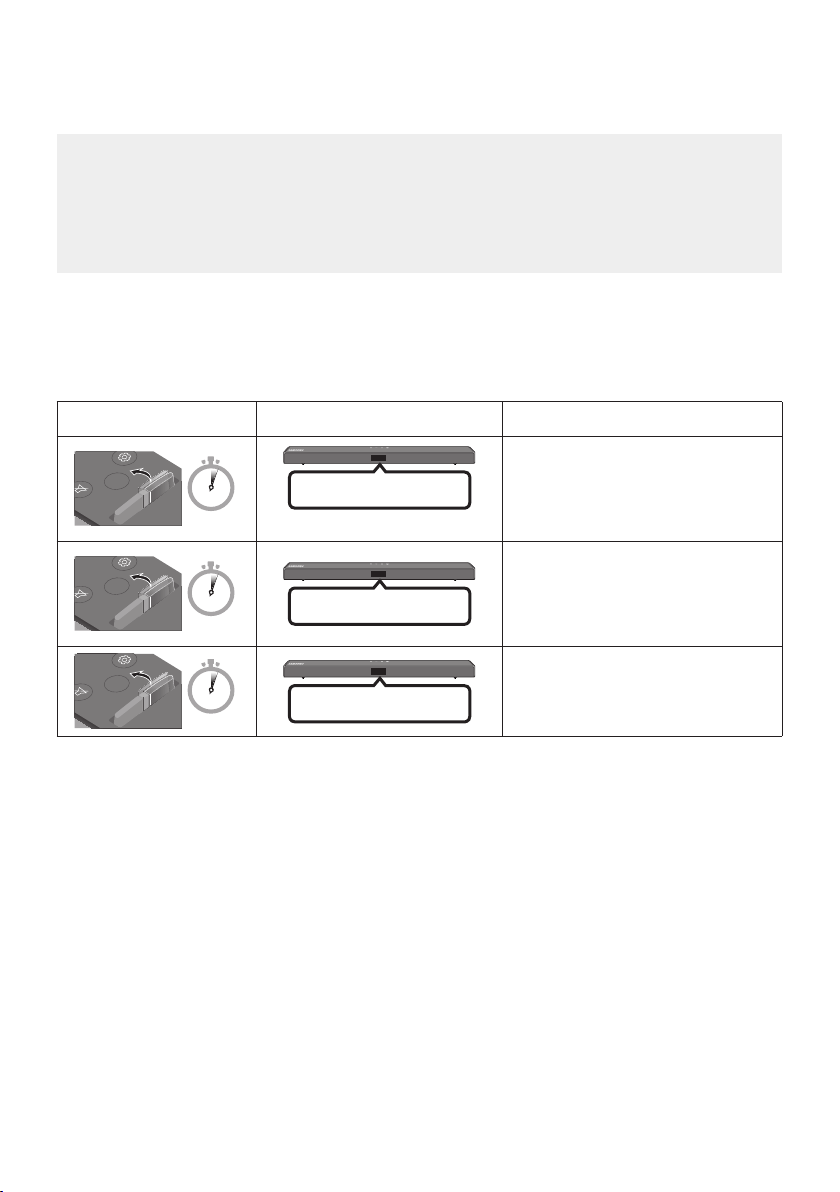
Adjusting the Soundbar volume with a TV remote control
Adjust the Soundbar volume using the TV’s remote control.
• This function can be used with IR remote controls only. Bluetooth remote controls (remote
controls that require pairing) are not supported.
• Set the TV speaker to External Speaker to use this function.
• Manufacturers supporting this function:
VIZIO, LG, Sony, Sharp, PHILIPS, PANASONIC, TOSHIBA, Hisense, RCA
1. Turn Off the Soundbar.
2. Push up and hold the WOOFER button for 5 seconds.
Each time you push the WOOFER button up and hold it for 5 seconds, the mode switches in the
following order: “OFF-TV REMOTE” (Default mode), “SAMSUNG-TV REMOTE”, “ALL-TV REMOTE”.
Remote Control Button Display Status
SOUND
MODE
VOL
WOOFER
SOUNDBAR
5 Sec
OFF-TV REMOTE
(Default mode)
Disable the TV remote control.
SOUND
MODE
VOL
WOOFER
SOUNDBAR
5 Sec
SAMSUNG-TV REMOTE
Enable a Samsung TV’s IR remote
control.
SOUND
MODE
VOL
WOOFER
SOUNDBAR
5 Sec
ALL-TV REMOTE
Enable a third-party TV’s IR remote
control.

ENG - 27
Using the Hidden Buttons (Buttons with more than one function)
Hidden Button
Reference page
Remote Control Button Function
WOOFER (Up) TV remote control On/Off (Standby) page 26
Left TV Auto connect On/Off (BT Ready) page 15
Up ID SET page 24
(Sound Control)
7 Band EQ page 25
SOUND MODE
DRC ON/OFF (Standby) page 23
Bluetooth Power page 24
PAIR
Bluetooth Multi-connection On/Off
(Standby)
page 22
Outputspecicationsforthedifferentsoundeffectmodes
Effect Input
Output
Without Wireless Rear
Speaker Kit
With Wireless Rear
Speaker Kit
SOUND MODE
Surround
VOL WOOFER
SOUND
MODE
Bluetooth
POWER
SURROUND
SOUND
2.0 ch
2.1 ch 4.1 ch
5.1 ch 2.1 ch 4.1 ch
BASS BOOST
2.0 ch
2.1 ch 4.1 ch
5.1 ch 2.1 ch 4.1 ch
STANDARD
2.0 ch
2.1 ch 2.1 ch
5.1 ch 2.1 ch 4.1 ch
• The Samsung Wireless Rear Speaker Kit can be purchased separately. To purchase a Kit, contact the
vendor you purchased the Soundbar from.
ENG - 28
09 INSTALLING THE
WALL MOUNT
Installation Precautions
• Install on a vertical wall only.
• Do not install in a place with high
temperature or humidity.
• Verify whether the wall is strong enough to
support the product’s weight. If not, reinforce
the wall or choose another installation point.
• Purchase and use the xing screws or
anchors appropriate for the kind of wall you
have (plaster board, iron board, wood, etc.). If
possible, x the support screws into wall
studs.
• Purchase wall mounting screws according to
the type and thickness of the wall you want to
mount the Soundbar on.
– Diameter: M5
– Length: 35 mm or longer recommended.
• Connect cables from the unit to external
devices before you install the Soundbar on
the wall.
• Make sure the unit is turned off and
unplugged from the power source before you
install it. Otherwise, it may cause an electric
shock.
Wallmount Components
Wall Mount Guide
x 2
(M4 x L10)
x 2
Holder-Screw Screw
x 2
Bracket-Wall Mount
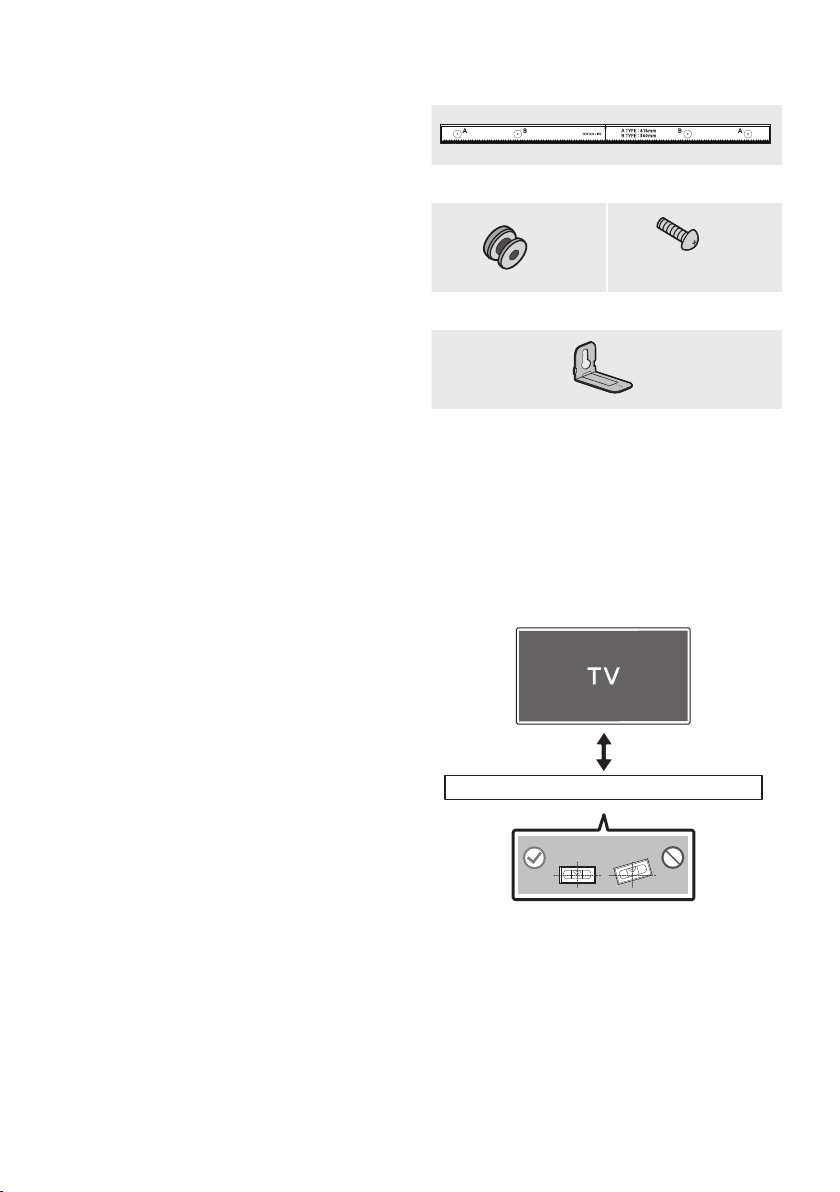
1. Place the Wall Mount Guide against the wall
surface.
• The Wall Mount Guide must be level.
• If your TV is mounted on the wall, install
the Soundbar at least 5 cm below the TV.
5 cm or more
ENG - 29
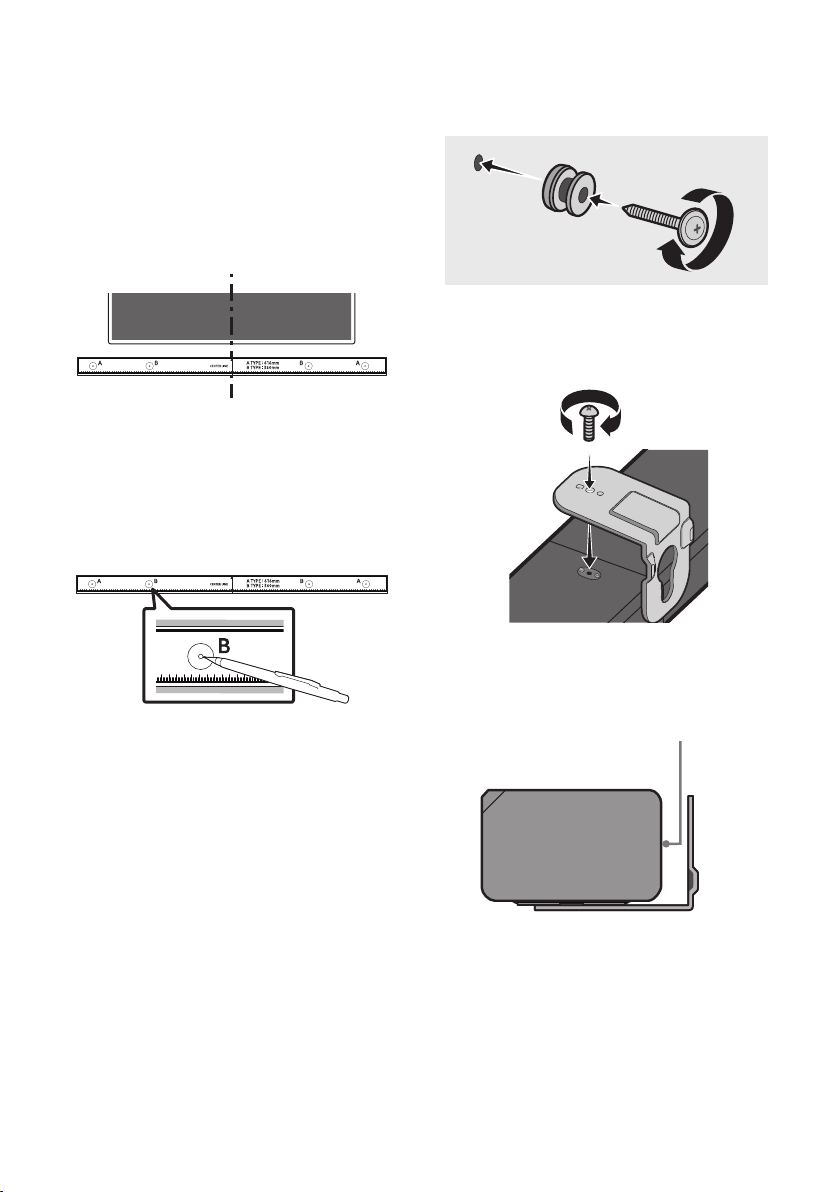
2. Align the Wall Mount Guide’s Centre Line
with the centre of your TV (if you are
mounting the Soundbar below your TV), and
then x the Wall Mount Guide to the wall
using tape.
• If you are not mounting below a TV, place
the Centre Line in the centre of the
installation area.
Centre Line
3. Push a pen tip or sharpened pencil tip
through the centre of the B-TYPE images on
each end of the Guide to mark the holes for
the supporting screws, and then remove the
Wall Mount Guide.
4. Using an appropriately sized drill bit, drill a
hole in the wall at each marking.
• If the markings do not correspond to the
positions of studs, make sure you insert
appropriate anchors into the holes before
you insert the support screws. If you use
anchors, make sure the holes you drill are
large enough for the anchors you use.
5. Push a screw (not supplied) through each
Holder-Screw, and then screw each screw
rmly into a support screw hole.
6. Install the 2 Bracket-Wall Mounts in the
correct orientation on the bottom of the
Soundbar using 2 Screws.
• When assembling, make sure the hanger
part of the Bracket-Wall Mounts are
located behind the rear of the Soundbar.
Rear of Soundbar
Right end of Soundbar

ENG - 30
7. Install the Soundbar with the attached
Bracket-Wall Mounts by hanging the
Bracket-Wall Mounts on the Holder-Screws
on the wall.
8. Slide the Soundbar down as shown below so
that the Bracket-Wall Mounts rest securely
on the Holder-Screws.
• Insert the Holder-Screws into the wide
(bottom) part of the Bracket-Wall
Mounts, and then slide the Bracket-Wall
Mounts down so that the Bracket-Wall
Mounts rest securely on the
Holder-Screws.
10 SOFTWARE
UPDATE
Samsung may offer updates for the Soundbar’s
systemrmwareinthefuture.
USB port
DC 24V
HDMI
USB (5V 0.5A)
DIGITAL AUDIO IN
(OPTICAL)
HDMI TO TV
(ARC)
HDMI IN
USB (5V 0.5A)
If an update is offered, you can update the
rmware by connecting a USB device with the
rmware update stored on it to the USB port on
your Soundbar. For more information about how
to download update les, go to the Samsung
website at www.samsung.com
Support.
Then, select the product type or enter the model
number of your Soundbar, select the Software &
Apps option, and then Downloads. Note that the
option names can vary.
How to check the Firmware
version
1. Turn off the Soundbar.
2. Press and hold the (Sound Control)
button for about 5 seconds on the remote
control.
3. Each version appears in the following order
on the Soundbar display.
(Software version → HDMI → Tx → Rx )
• Tx : Wireless Tx module in the Soundbar.
• Rx : Wireless Rx module in the Subwoofer.
• R2 VERSION DISPLAY
– No connect rear R2---
– Connected rear R2xxx

ENG - 31
Update Procedure
Important: The update function erases all user
settings. We recommend you write down your
settings so that you can easily reset them after
the update. Note that updating the rmware
resets the subwoofer connection too.
1. Connect a USB thumb drive to the USB port
on your computer.
Important: Make sure there are no music
les on the USB thumb drive. This may cause
the rmware update to fail.
2. Go to (samsung.com)
select Enter Model
Number and enter the model of your
Soundbar. Select manuals and downloads
and download the latest software le.
3. Save the downloaded software to a USB
stick and select “Extract Here” to unzip the
folder.
4. Turn off the Soundbar and connect the USB
stick containing the software update to the
USB port.
5. Turn on the Soundbar and change the source
to “USB” mode. Within 3 minutes, “UPDATE”
is displayed and the update begins. When the
update is complete, the Soundbar turns off
and then turns on automatically.
6. Press the (Volume) button on the top
panel for 5 seconds. “INIT” appears on the
display and then the Soundbar turns off.
The update is complete.
• This product has a DUAL BOOT function.
If the rmware fails to update, you can
update the rmware again.
7. Restore your settings on the Soundbar.
If UPDATE is not displayed
1. Turn off the Soundbar, disconnect and then
reconnect the USB storage device that
contains the update les to the Soundbar’s
USB port.
2. Disconnect the Soundbar’s power cord,
reconnect it, and then turn on the Soundbar.
NOTES
• The rmware update may not work properly
if audio les supported by the Soundbar are
stored in the USB storage device.
• Do not disconnect the power or remove the
USB device while updates are being applied.
The main unit will turn off automatically after
completing the rmware update.
• After the update is completed, the user setup
in the Soundbar is initialised so you can reset
your settings. We recommend you write
down your settings so that you can easily
reset them after the update. Note that
updating rmware resets the subwoofer
connection too.
If the connection to the subwoofer is not
re-established automatically after the
update, refer to page 6.
If the software update fails, check if the USB
stick is defective.
• Mac OS users should use MS-DOS (FAT) as the
USB format.
• Updating via USB may not be available,
depending on the USB storage device
manufacturer.
ENG - 32
11 TROUBLESHOOTING
Before seeking assistance, check the following.
Soundbar does not turn on.
; Check whether the power cord of the
Soundbar is correctly inserted into the
outlet.
Soundbar works erratically.
; After removing the power cord, insert it
again.
; Remote the power cord from the external
device and try again.
; If there is no signal, the Soundbar
automatically turns off after a certain
period of time. Turn on the power. (See
page 3.)
In case the remote control does not work.
; Point the remote directly at the Soundbar.
; Replace the batteries with new ones.
Soundbar does not output any sound.
; The volume of the Soundbar is too low or
muted. Adjust the volume.
; When any external device (STB, Bluetooth
device, mobile device, etc.) is connected,
adjust the volume of the external device.
; For sound output of the TV, select
Soundbar. (Samsung TV: Home (
) →
Settings ( ) → Sound → Sound Output →
Select Soundbar)
; The cable connection to the Soundbar may
not be loose. Remove the cable and
connect again.
; Remove the power cord completely,
reconnect, and turn the power on.
; Reset the product and try again.
(See page 31.)
Subwoofer does not output any sound.
; Check whether the LED indicator on the
rear of the Subwoofer is on in blue.
Reconnect the Soundbar and Subwoofer if
the indicator is blinking in blue or turned
red. (See page 7.)
; You may experience an issue if there is an
obstacle between the Soundbar and
Subwoofer. Move devices to an area away
from obstacles.
; Other devices sending radio frequency
signals in proximity may interrupt the
connection.
Keep your speaker away from such devices.
; Remove and reconnect the power plug.
The Subwoofer volume is too low.
; The original volume of the content you are
playing may be low. Try adjusting the
Subwoofer level. (See page 25.)
; Bring the Subwoofer speaker closer to you.
In case the TV is not connected via HDMI TO
TV (ARC).
; Check whether the HDMI cable is correctly
connected to the ARC terminal.
(See page 11.)
; Connection may not be possible due to the
connected external device (set-top box,
game machine, etc.). Directly connect the
Soundbar.
; HDMI-CEC may not be activated on the TV.
Turn on the CEC on the TV menu. (Samsung
TV: Home (
) → Settings ( ) → General
→ External Device Manager → Anynet+
(HDMI-CEC) ON)
ENG - 33
There is no sound in when connecting to the
TV in HDMI TO TV (ARC) mode.
; Your device is unable to play the input
signal. Change the TV’s audio output to
PCM or Dolby Digital.
(For a Samsung TV: Home (
) → Settings
(
) → Sound → Expert Settings → Digital
Output Audio Format)
Soundbar does not connect via Bluetooth.
; When connecting a new device, switch to
“BT PAIRING” for connection. (Press the
PAIR button on the remote control or
press the
(Source) button on the body
for at least 5 seconds.)
; If the Soundbar is connected to another
device, disconnect that device rst to
switch the device.
; Reconnect it after removing the Bluetooth
speaker list on the device to connect.
(Samsung TV: Home (
) → Settings ( )
→ Sound → Sound Output → Bluetooth
Speaker List)
; The automatic TV connection may be
disabled. While the Soundbar is in “BT
READY”, press and hold the Left button on
the Soundbar remote control for 5 seconds
to select ON-TV CONNECT. If you see
OFF-TV CONNECT, press and hold Left
button again for 5 seconds to switch the
selection.
; Remove and reconnect the power plug,
then try again.
; Reset the product and try again.
(See page 31.)
Sound drops out when connected via
Bluetooth.
; If your device that is connected via
Bluetooth moves too far away from the
Soundbar, it may cause the sound to drop
out. Move the device closer to the
Soundbar.
; If a part of your body is in contact with the
Bluetooth transceiver or the product is
installed on metal furniture, sound may
drop out. Check the installation
environment and conditions for use.
Bluetooth multi connection does not work.
; When the TV is connected to the soundbar,
Bluetooth multi connection may not
operate. Disconnect the Soundbar from the
TV and try again.
; Check whether the Bluetooth Multi
connection setting is turned on.
(Refer to the “Soundbar does not connect
via Bluetooth.” section.)
; Disconnect the device currently playing,
pair with the device that you want to
connect, and reconnect the previous
device.
; If the sound is inaudible even after
connecting properly, refer to the “Sound
drops out when connected via Bluetooth.”
section.
Soundbar does not turn on automatically with
the TV.
; When you turn off the Soundbar while
watching TV, power synchronization with
the TV is disabled. First turn off the TV.
ENG - 34
12 LICENCE
Manufactured under license from Dolby
Laboratories. Dolby, Dolby Audio and the
double-D symbol are trademarks of Dolby
Laboratories Licensing Corporation.
For DTS patents, see http://patents.dts.
com. Manufactured under license from DTS
Licensing Limited. DTS, the Symbol, DTS
in combination with the Symbol, and DTS
2.0 Channel are registered trademarks or
trademarks of DTS, Inc. in the United States
and/or other countries. © DTS, Inc. All Rights
Reserved.
The terms HDMI and HDMI High-Denition
Multimedia Interface, and the HDMI Logo are
trademarks or registered trademarks of HDMI
Licensing Administrator, Inc. in the United
States and other countries.
The Bluetooth® word mark and logos are
registered trademarks owned by the Bluetooth
SIG, Inc. and any use of such marks by Samsung
Electronics Co., Ltd. is under license. Other
trademarks and trade names are those of their
respective owners.
[ENERGY STAR]
ENERGYSTARqualiedmodelonly
– Your Samsung product is ENERGY STAR
qualied in its factory default setting.
Change to certain features, settings and
functionality in this product can change the
power consumption, possibly beyond the
limits required for ENERGY STAR
qualication.
– Environmental Protection Agency and
Department of Energy. ENERGY STAR is a
joint program of the Government agencies,
designed to promote energy efcient
products and practices.
Refer to www.energystar.gov for more
information of the ENERGY STAR Program.
ENERGYSTARqualiedmodelonly
(Applicable to Thin Client models only)
As an ENERGY STAR® Partner, SAMSUNG has
determined that this product meets the
ENERGY STAR® guidelines for energy
efciency.
– The ENERGY STAR Program has been to
reduced greenhouse gas emissions and
save energy through voluntary labeling.
– Power management setting of this product
have been enabled by default, and have
various timing setting from 1 minutes to 5
hours.
– The product can wake with a button press
on the chassis from sleep mode.
ENERGYSTARqualiedmodelonly(Theother
models)
– As an ENERGY STAR Partner, Samsung has
determined that this product or product
models meets the ENERGY STAR guideline
for energy efciency.

ENG - 35
13 OPEN SOURCE
LICENCE NOTICE
To send inquiries and requests for questions
regarding open sources, contact Samsung Open
Source (http://opensource.samsung.com)
14 IMPORTANT
NOTES ABOUT
SERVICE
• Figures and illustrations in this User Manual
are provided for reference only and may differ
from actual product appearance.
• An administration fee may be charged if
either
(a) an engineer is called out at your request
and there is no defect with the product (i.e.
where the user manual has not been read).
(b) you bring the unit to a repair centre and
there is no defect with the product (i.e.
where the user manual has not been read).
• You will be informed of the administration fee
amount before a technician visits.
ENG - 36
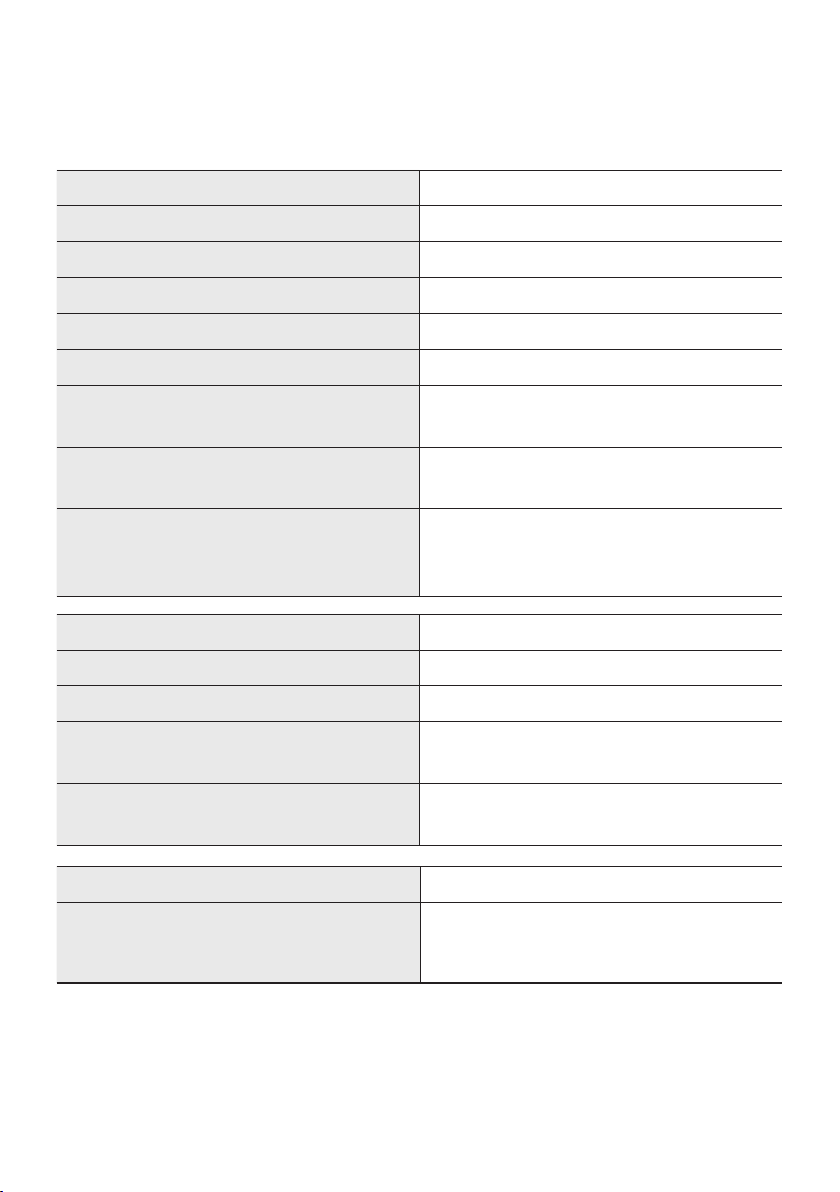
15 SPECIFICATIONS AND GUIDE
Specications
Model Name HW-A530
USB 5V/0.5A
Weight 2.1 kg
Dimensions (W x H x D) 860.0 x 55.0 x 85.0 mm
Operating Temperature Range +5°C to +35°C
Operating Humidity Range 10 % ~ 75 %
AMPLIFIER
Rated Output power
160W(40Wx4)
Supported play formats
(DTS 2.0 sound is played in DTS format.)
LPCM 2ch, Dolby Audio™ (supporting Dolby®
Digital), DTS
WIRELESS DEVICE OUTPUT POWER
BT max transmitter power
SRD max transmitter power
10mW at 2.4GHz – 2.4835GHz
10mW at 5.725GHz – 5.825GHz
Subwoofer Name PS-WA55D
Weight 5.3 kg
Dimensions (W x H x D) 200.6 x 353.0 x 290.0 mm
AMPLIFIER
Rated Output power 220W
WIRELESS DEVICE OUTPUT POWER
SRD max transmitter power
10mW at 5.725GHz – 5.825GHz
Overall Standby Power Consumption (W) 2.0W
Bluetooth
Port deactivation method
Press and hold the SOUND MODE button for
more than 5 seconds to turn off Bluetooth Power
function.
NOTES
• Samsung Electronics Co., Ltd reserves the right to change the specications without notice.
• Weight and dimensions are approximate.

ENG - 37
Hereby, Samsung declares that this radio equipment is in compliance with Directive 2014/53/EU and the
relevant UK statutory requirements.
The full text of the declaration of conformity is available at the following internet address:
http://www.samsung.com go to Support and enter the model name.
This equipment may be operated in all EU countries and in the UK.
[Correct disposal of batteries in this product]
(Applicable in countries with separate collection systems)
This marking on the battery, manual or packaging indicates that the batteries in this product should not be
disposed of with other household waste at the end of their working life. Where marked, the chemical
symbols Hg, Cd or Pb indicate that the battery contains mercury, cadmium or lead above the reference
levels in EC Directive 2006/66.
If batteries are not properly disposed of, these substances can cause harm to human health or the
environment.
To protect natural resources and to promote material reuse, please separate batteries from other types of
waste and recycle them through your local, free battery return system.
Correct Disposal of This Product
(Waste Electrical & Electronic Equipment)
(Applicable in countries with separate collection systems)
This marking on the product, accessories or literature indicates that the product and its electronic
accessories (e.g. charger, headset, USB cable) should not be disposed of with other household waste at the
end of their working life. To prevent possible harm to the environment or human health from uncontrolled
waste disposal, please separate these items from other types of waste and recycle them responsibly to
promote the sustainable reuse of material resources.
Household users should contact either the retailer where they purchased this product, or their local
government ofce, for details of where and how they can take these items for environmentally safe
recycling.
Business users should contact their supplier and check the terms and conditions of the purchase contract.
This product and its electronic accessories should not be mixed with other commercial wastes for disposal.
For information on Samsung’s environmental commitments and product specic regulatory obligations
e.g. REACH, WEEE, Batteries, visit:
www.samsung.com/uk/aboutsamsung/sustainability/environment/our-commitment/data/
COMMISSION REGULATION (EU) 2019/1782
Ecodesign requirements for external power supplies :
www.samsung.com/global/ecodesign_component

This Samsung product is warranted for the period of
twelve (12) months from the original date of purchase,
against defective materials and workmanship. In the
event that warranty service is required, you should return
the product to the retailer from whom it was purchased.
However, Samsung Authorised Dealers and Authorised
Service Centres in other EC Countries will comply with
the warranty on the terms issued to purchasers in the
country concerned. In case of difculty, details of our
Authorised Service Centres are available from:
Samsung Electronics U.K. Ltd
Samsung Customer Support Centre
Selectapost38,Shefeld,S973FJ
United Kingdom
United Kingdom
Tel : 0333 000 0333
www.samsung.com/uk/support
EIRE
Tel : 0818 717100
www.samsung.com/ie/support
@ WARRANTY CONDITIONS
1. The warranty is only valid if, when warranty service
is required, the warranty card is fully and properly
completed and is presented with the original invoice
or sales slip or conrmation, and the serial number
on the product has not been defaced.
2. Samsung’s obligations are limited to the repair or, at
its discretion, replacement of the product or the
defective part. Repaired or replaced products may
include new and or refurbished components and
equipment.
3. Warranty repairs must be carried out by Authorised
Samsung Dealers or Authorised Service Centres. No
re-imbursement will be made for repairs carried out
by non Samsung Dealers and, any such repair work
and damage to the products caused by such repair
work will not be covered by this warranty.
4. This product is not considered to be defective in
materials nor workmanship by reason that it
requires adaptation in order to conform to national
or local technical or safety standards in force in any
Country other than the one for which the product
was originally designed and manufactured. This
warranty will not cover, and no re-imbursement will
be made for such adaptation nor any damage which
may result.
5. This warranty covers none of the following:
a) Periodic check ups, maintenance and repair or
replacement of parts due to normal wear and
tear.
b) Cost relating to transport, removal or installation
of the product.
c) Misuse, including the failure to use this product for
its normal purposes or incorrect installation.
d) Damage caused by Lightning, Water, Fire, Acts of
God, War, Public Disturbances, incorrect mains
voltage, improper ventilation or any other cause
beyond the control of Samsung.
6. This warranty is valid for any person who legally
acquired possession of the product during the
warranty period.
7. The consumers’ statutory rights in any applicable
national legislation whether against the retailer
arising from the purchase contract or otherwise are
not affected by this warranty. Unless there is
national legislation to the contrary, the rights under
this warranty are the consumers’ sole rights and
Samsung, its subsidiaries and distributors shall not
be liable for indirect or consequential loss or any
damage to disc based media, removable memory or
any other related equipment or material.
8. Samsung shall honour warranties for all EU
specication products purchased by a consumer
within the following European countries listed.
– UK, Republic of Ireland, Germany, France,
Italy, Malta, Spain, Portugal, The
Netherlands, Belgium, Luxembourg,
Denmark, Sweden, Finland, Poland,
Hungary, Czech Republic, Slovakia, Austria,
Slovenia, Croatia, Estonia, Latvia, Lithuania,
Greece, Cyprus, Romania, Bulgaria,
Switzerland, Norway, Lichtenstein and
Iceland.
SAMSUNG ELECTRONICS (U.K.) LTD.
-2-
UNITED KINGDOM
EIRE
This Samsung product is warranted for the period of twelve (12) months from the origi-
nal date of purchase, against defective materials and workmanship. In the event that
warranty service is required, you should return the product to the retailer from whom it
was purchased. However, Samsung Authorised Dealers and Authorised Service Centres
in other EC Countries will comply with the warranty on the terms issued to purchasers in
the country concerned. In case of difficulty, details of our Authorised Service Centres are
available from:
Samsung Electronics U.K. Ltd. Customer Care CentrePO Box 479
GATESHEAD NE9 9BJ United Kingdom
United Kingdom
Tel : 0330 SAMSUNG (7267864)
Fax: 03307260001
www.samsung.com
Eire
Tel : 0818 717100
Fax: +44 117 915 6736
www.samsung.com
■WARRANTY CONDITIONS
1.
The warranty is only valid if, when warranty service is required, the warranty card is fully
and properly completed and is presented with the original invoice or sales slip or confir-
mation, and the serial number on the product has not been defaced.
2.
Samsung’s obligations are limited to the repair or, at its discretion, replacement of
the product or the defective part.
3. Warranty repairs must be carried out by Authorised Samsung Dealers or
Authorised Service Centres. No re-imbursement will be made for repairs carried
out by non Samsung Dealers and, any such repair work and damage to the prod-
ucts caused by such repair work will not be covered by this warranty.
4.
This product is not considered to be defective in materials nor workmanship by
reason that it requires adaptation in order to conform to national or local technical
or safety standards in force in any Country other than the one for which the product
was originally designed and manufactured. This warranty will not cover, and no re-
imbursement will be made for such adaptation nor any damage which may result.
5. This warranty covers none of the following:
a) Periodic check ups, maintenance and repair or replacement of parts due to
normal wear and tear.
b)
Cost relating to transport, removal or installation of the product.
c)
Misuse, including the faiure to use this product for its normal
purposes or incorrect installation.
d)
Damage caused by Lightning, Water, Fire, Acts of God, War, Public
Disturbances, incorrect mains voltage, improper ventilation or any other cause
beyond the control of Samsung.
6. This warranty is valid for any person who legally acquired
possession of the product during the warranty period.
7.
The consumers statutory rights in any applicable national legislation
whether against
the retailer arising from the purchase contract or otherwise are not affected by this
warranty. Unless there is national legislation to the contrary, the rights under this
warranty are the
consumers sole rights and Samsung, its subsidiaries and distribu-
tors shall not be liable for indirect or consequential loss or any damage to records,
compact discs, videos or audio taper or any other related equipment or material
.
SAMSUNG ELECTRONICS (U.K.) LTD.
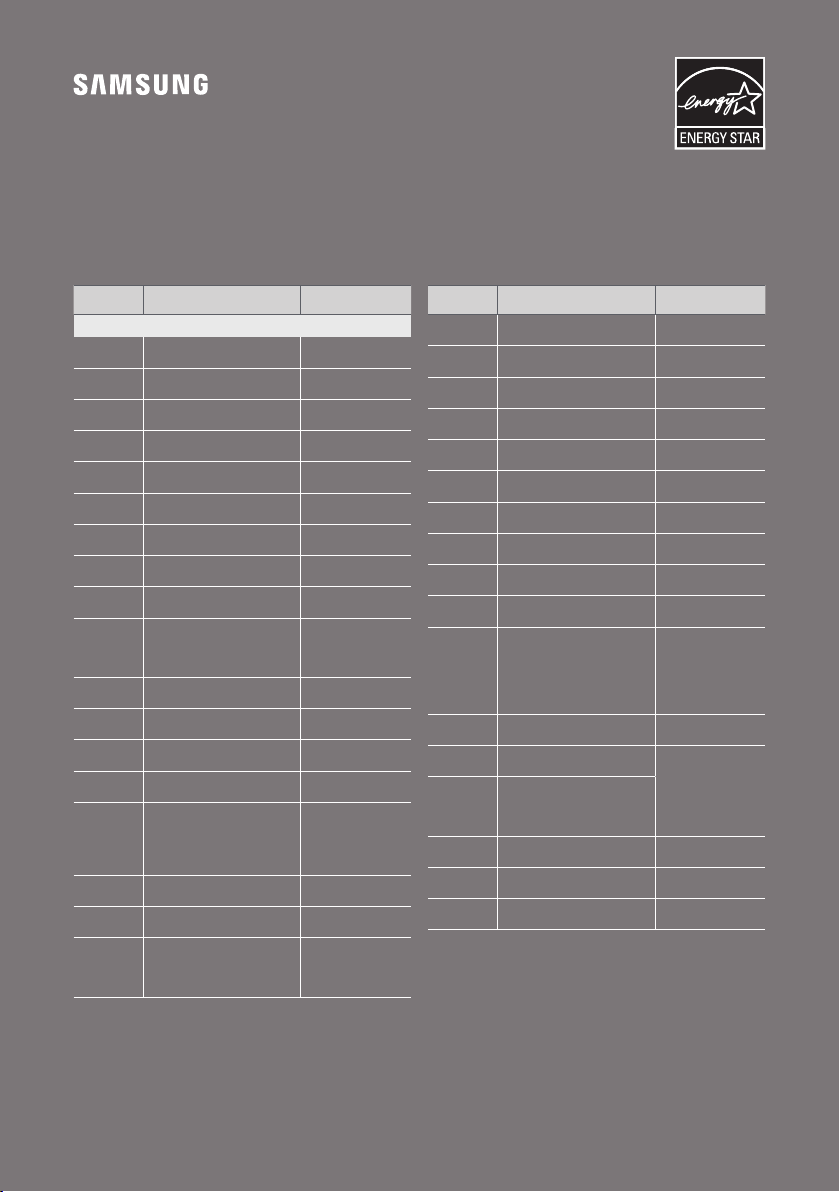
© 2021 Samsung Electronics Co., Ltd. All rights reserved.
Contact SAMSUNG WORLD WIDE
If you have any questions or comments relating to Samsung products, please contact the SAMSUNG customer
care Centre.
Country
Samsung Service Centre
Web Site
`
Europe
UK 0333 000 0333
www.samsung.com/uk/
support
IRELAND (EIRE) 0818 717100
www.samsung.com/ie/
support
GERMANY 06196 77 555 77
www.samsung.com/de/
support
FRANCE 01 48 63 00 00
www.samsung.com/fr/
support
ITALIA 800-SAMSUNG (800.7267864)
www.samsung.com/it/
support
SPAIN 91 175 00 15
www.samsung.com/es/
support
PORTUGAL 808 207 267
www.samsung.com/pt/
support
LUXEMBURG 261 03 710
www.samsung.com/be_
fr/support
NETHERLANDS 088 90 90 100
www.samsung.com/nl/
support
BELGIUM 02-201-24-18
www.samsung.com/be/
support (Dutch)
www.samsung.com/
be_fr/support (French)
NORWAY 21629099
www.samsung.com/no/
support
DENMARK 707 019 70
www.samsung.com/dk/
support
FINLAND 030-6227 515
support
SWEDEN 0771 726 786
www.samsung.com/se/
support
POLAND
801-172-678* lub +48 22 607-93-33*
pl/support/
HUNGARY 0680SAMSUNG (0680-726-7864)
www.samsung.com/hu/
support
AUSTRIA 0800 72 67 864 (0800-SAMSUNG)
www.samsung.com/at/
support
SWITZERLAND 0800 726 786
www.samsung.com/ch/
support (German)
www.samsung.com/
ch_fr/support (French)
Country
Samsung Service Centre
Web Site
CZECH 800 - SAMSUNG (800-726786)
www.samsung.com/cz/
support
SLOVAKIA 0800 - SAMSUNG (0800-726 786)
www.samsung.com/sk/
support
CROATIA 072 726 786
www.samsung.com/hr/
support
BOSNIA 055 233 999
www.samsung.com/
support
NORTH
MACEDONIA
023 207 777
www.samsung.com/mk/
support
MONTENEGRO 020 405 888
www.samsung.com/
support
SLOVENIA
www.samsung.com/si/
support
SERBIA 011 321 6899
www.samsung.com/rs/
support
KOSOVO 0800 10 10 1
www.samsung.com/
support
ALBANIA 045 620 202
www.samsung.com/al/
support
BULGARIA
www.samsung.com/bg/
support
ROMANIA
0800872678 - Apel gratuit
www.samsung.com/ro/
support
CYPRUS
8009 4000 only from landline, toll
free
www.samsung.com/gr/
support
GREECE
80111-SAMSUNG (80111 726 7864) only
from land line
(+30) 210 6897691 from mobile and
land line
LITHUANIA 8-800-77777
www.samsung.com/lt/
support
LATVIA 8000-7267
www.samsung.com/lv/
support
ESTONIA 800-7267
www.samsung.com/ee/
support