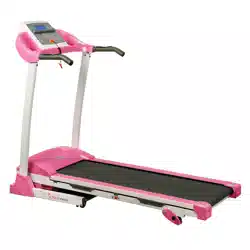
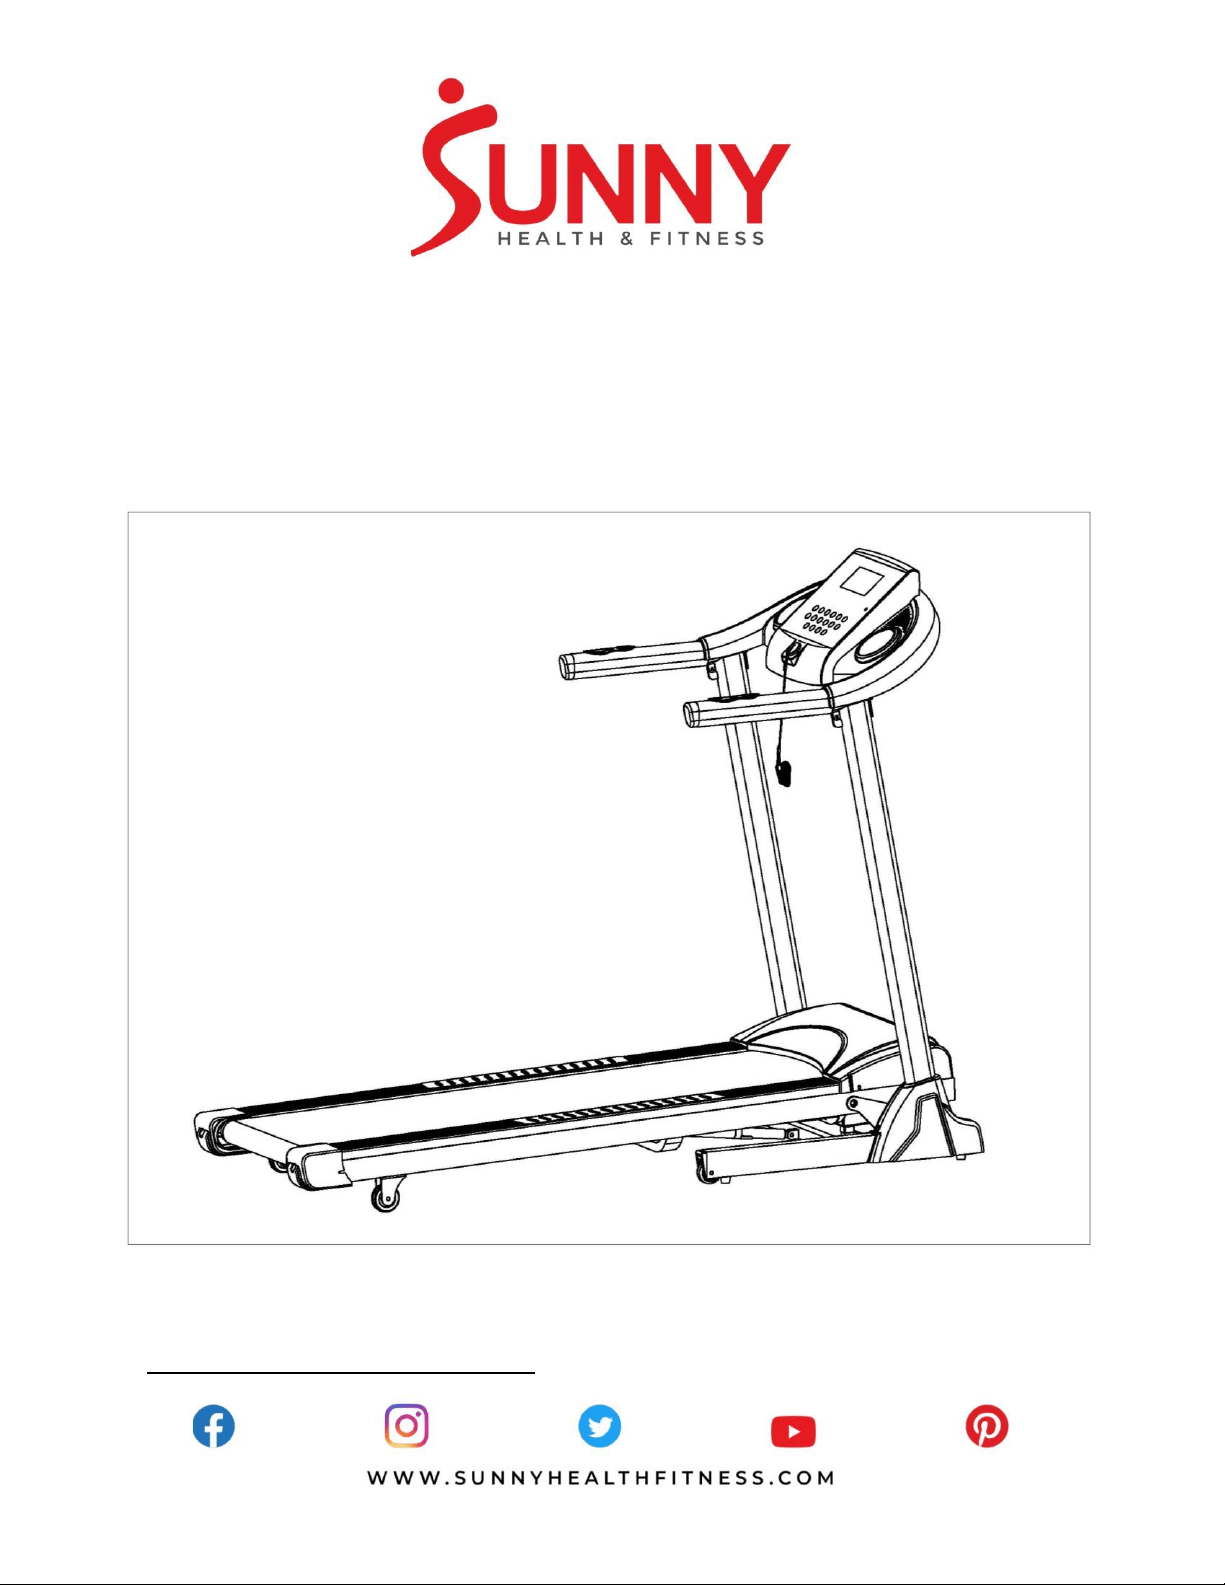
TREADMILL WITH AUTO INCLINE
SF-T7873
USER MANUAL
IMPORTANT! Please retain owner’s manual for maintenance and adjustment instructions. Your
satisfaction is very important to us, PLEASE DO NOT RETURN UNTIL YOU HAVE CONTACTED
US: [email protected] or 1 - 877 - 90SUNNY (877-907-8669).

1
IMPORTANT SAFETY INSTRUCTIONS
We thank you for choosing our product. To ensure your safety and health, please use this equipment
correctly. It is important to read this entire manual before assembling and using the equipment. Safe
and effective use can only be achieved if the equipment is assembled, maintained and used properly.
It is your responsibility to ensure that all users of the equipment are informed of all warnings and
precautions.
When using an electrical appliance, basic precautions should always be followed, including the
following:
Read all instructions before using (this appliance).
DANGER – To reduce the risk of electric shock and the injury from moving parts:
1) Always unplug this appliance from the electrical outlet immediately after using and before cleaning
or serving.
WARNING – To reduce the risk of burns, fire, electric shock, or injury to persons:
1. Before starting any exercise program, you should consult your physician to determine if you have
any medical or physical conditions that could put your health and safety at risk, or prevent you from
using the equipment properly. Your physician’s advice is essential if you are taking medication that
affects your heart rate, blood pressure or cholesterol level.
2. Be aware of your body’s signals. Incorrect or excessive exercise can damage your health. Stop
exercising if you experience any of the following symptoms: pain, tightness in your chest, irregular
heartbeat, shortness of breath, lightheadedness, dizziness or feelings of nausea. If you do
experience any of these conditions, you should consult your physician before continuing with your
exercise program.
3. Keep children and pets away from the equipment. The equipment is designed for adult use only.
4. Use the equipment on a solid, flat level surface with a protective cover for your floor or carpet. To
ensure safety, the equipment should have at least 8 feet (240 CM) of free space behind it and 2
feet (60 CM) on each side. Do not place the treadmill on any surface that blocks air openings. To
protect the floor or carpet from damage, place a mat under the treadmill.
5. Ensure that all nuts and bolts are securely tightened before using the equipment. The safety of the
equipment can only be maintained if it is regularly examined for damage and/or wear and tear.
6. Always use the equipment as indicated. If you find any defective components while assembling or
checking the equipment, or if you hear any unusual noises coming from the equipment during
exercise, discontinue use of the equipment immediately and do not use until the problem has been
rectified.
7. Wear suitable clothing while using the equipment. Avoid wearing loose clothing that may become
entangled in the equipment.
8. Do not place fingers or objects into the moving parts of the equipment.
9. The maximum weight capacity of this unit is 285 pounds (130 KG).
10. The equipment is not suitable for therapeutic use.
11. To avoid bodily injury and/or damage to the product or property, proper lifting and moving is
required.
12. Your product is intended for use in cool, dry conditions. You should avoid storage in extreme cold,
hot or damp areas as this may lead to corrosion and other related problems.
13. This equipment is designed for indoor and home use only, it is not intended for commercial use!
14. An appliance should never be left unattended when plugged in. Unplug from outlet when not in use,
and before putting on or taking off parts.
15. This appliance is not intended for use by persons with reduced physical, sensory or mental
capabilities, or lack of experience and knowledge, unless they have been given supervision or

2
instruction concerning use of the appliance by a person responsible for their safety. Keep children
under the age of 13 away from this machine.
16. Use this appliance only for its intended use as described in this manual. Do not use attachments
not recommended by the manufacturer.
17. Never operate this appliance if it has a damaged cord or plug, if it is not working properly, if it has
been dropped or damaged, or dropped into water. Return the appliance to a service center for
examination and repair.
18. Do not carry this appliance by supply cord or use cord as a handle.
19. Keep the cord away from heated surfaces.
20. Never operate the appliance with the air openings blocked. Keep the air openings free of lint, hair,
and the like.
21. Never drop or insert any object into any opening.
22. Do not use outdoors.
23. Do not operate where aerosol (spray) products are being used or where oxygen is being
administered.
24. To disconnect, turn all controls to the off position, then remove plug from outlet.
25. CAUTION: Risk of Injury to Persons – To Avoid Injury, use extreme caution when stepping onto or
off of a moving belt. Read Instruction Manual Before Using.
26. Connect this appliance to a properly grounded outlet only. See Grounding Instructions.
27. REMOVE CONTROL BOX (OR KEY, OR SAFETY PIN, AS APPLICABLE) WHEN NOT IN USE,
AND STORE OUT OF REACH OF CHILDREN.
SAVE THESE INSTRUCTIONS
IMPORTANT NOTE:
The belt must be lubricated before the first use! Please see Page 8 for instructions on how to
properly apply lubricant.

3
EXPLODED DIAGRAM
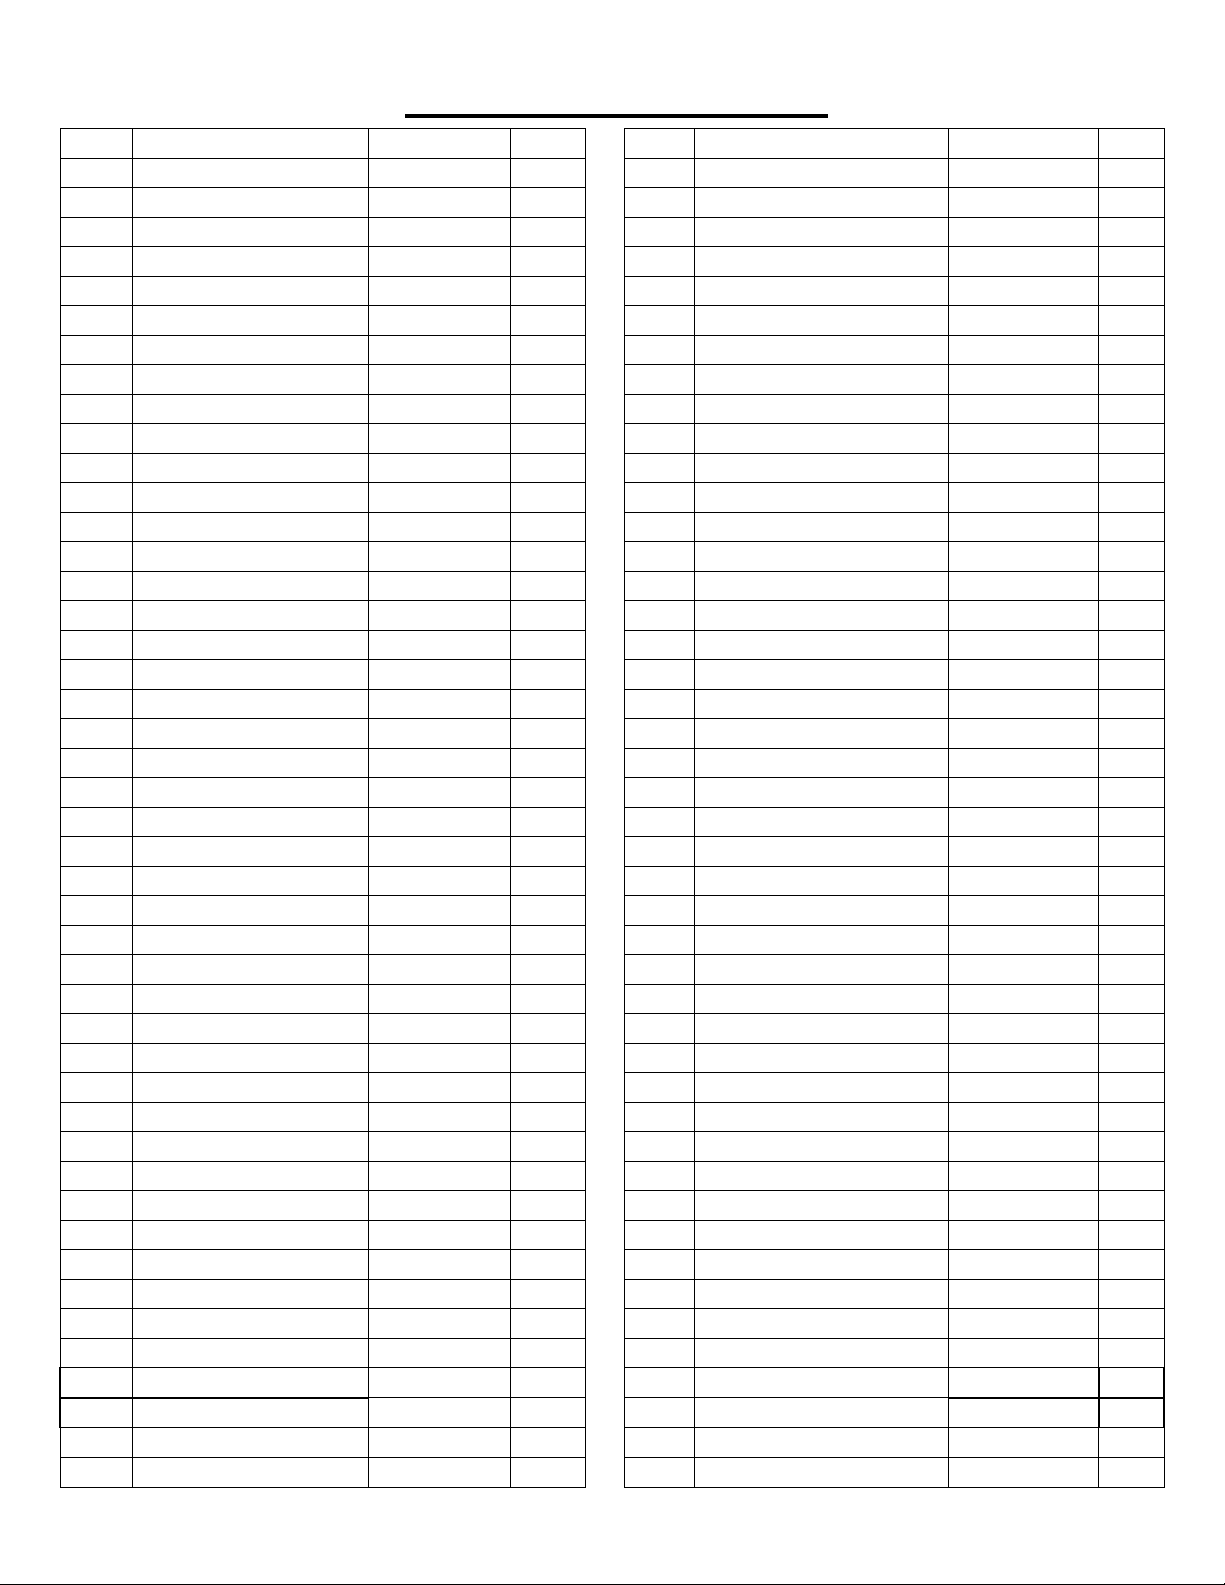
4
EXPLODED DIAGRAM
No.
Description
Specification
Qty.
No.
Description
Specification
Qty.
1
Base Frame
1
46
Bolt
M6X18
2
2
Main Frame
1
47
Bolt
M8X35
3
3L/R
Upright Tube
1 pr.
48
Bolt
M8X60
1
4
Console Frame
1
49
Bolt
M8X18
4
5
Reinforcement Tube
2
50
Bolt
M6X55
3
6
Incline Frame
1
51
Bolt
M6X30
6
7
Loudspeaker
2
52
Screw
M5X8
9
8
Filter Connecting Board
1
53
Screw
M4X8
4
9
Front Roller
1
54
Screw
ST4X32
6
10
Rear Roller
1
55
Screw
ST4X16
29
11
Cylinder
1
56
Screw
ST4X12
6
12
Long Sleeve
2
57
Screw
ST2.9X9.5
14
13
Short Sleeve
2
58
Screw
ST2.9X6
2
14
Running Belt
1
59
Bolt
M6X12
4
15
Running Board
1
60
Washer
Φ8X1.2
14
16
Side Rail
2
61
Washer
Φ6X1.2
3
17
Baffle
1
62
Washer
Φ10X1.2
2
18
Motor Cover
1
63
Flat Washer
Φ8X1.5
6
19
Console Upper Cover
1
64
Washer
Φ8
6
20
Console Bottom Cover
1
65
Nylon Nut
M8
8
21
Console Panel
1
66
Nylon Nut
M6
12
22
Panel Rear Cover
1
67
Nylon Nut
M10
2
23
Bottle Holder
2
68
Flat Washer
Φ20XΦ10X2.0
2
24L/R
Base Cover
1 pr.
69
Flat Washer
Φ26XΦ8.2X2.0
4
25L/R
Rear End Cap
1 pr.
70
Flat Washer
D4
2
26
Transport Wheel
2
71
Spring Washer
D4
2
27
Square Plug
2
72
Controller Board
1
28
Wire Plug
2
73
Shortcut Key
2
29
Power Buckle
1
74
Console Linking Wire
1
30
Adjusting Wheel
2
75
Extension Wire
1
31
Foot Pad
6
76
Controller Wire
1
32
Transport Wheel Plug
2
77
Safety Key
1
33
Rubber Pad
8
78
Light Sensor
1
34
Oval Plug
2
79
Light Sensor Bracket
1
35
Motor Belt
1
80
DC Motor
1
36
Square Plug
2
81
Incline Motor
1
37
Foam Grip
2
82
Switch
1
38L/R
Anti- Slip Mat
1 pr.
83
Overload Protector
1
39
Bolt
M10X40
1
84
Power Wire
1
40
Bolt
M10X20
2
85
Amplifier Board
1
41
Bolt
M10X55
1
86
Filter
1
42
Bolt
M8X20
2
87
Audio Jack
1
43
Bolt
M8X40
7
88
MP3 Wire
1
44
Bolt
M8X25
1
89
Allen Wrench
S=5
1
45
Bolt
M8*15
8
90
Spanner
S=13,14,15
1

5
HARDWARE PACKAGE
Ordering Replacement Parts (U.S. and Canadian Customers only)
Please provide the following information in order for us to accurately identify the part(s) needed:
✓ The model number (found on cover of manual)
✓ The product name (found on cover of manual)
✓ The part number found on the “EXPLODED DIAGRAM” and “PARTS LIST” (found near the front
of the manual)
Please contact us at [email protected] or 1 - 877 - 90SUNNY (877-907-8669).
# 45 M8*15 8PCS
# 89 S=5 1PC
# 60 Φ8X1.2 8PCS
# 90 S=13,14,15 1PC
6
ASSEMBLY INSTRUCTIONS
We value your experience using Sunny Health and Fitness products. For assistance with parts or
(877-907-8669).
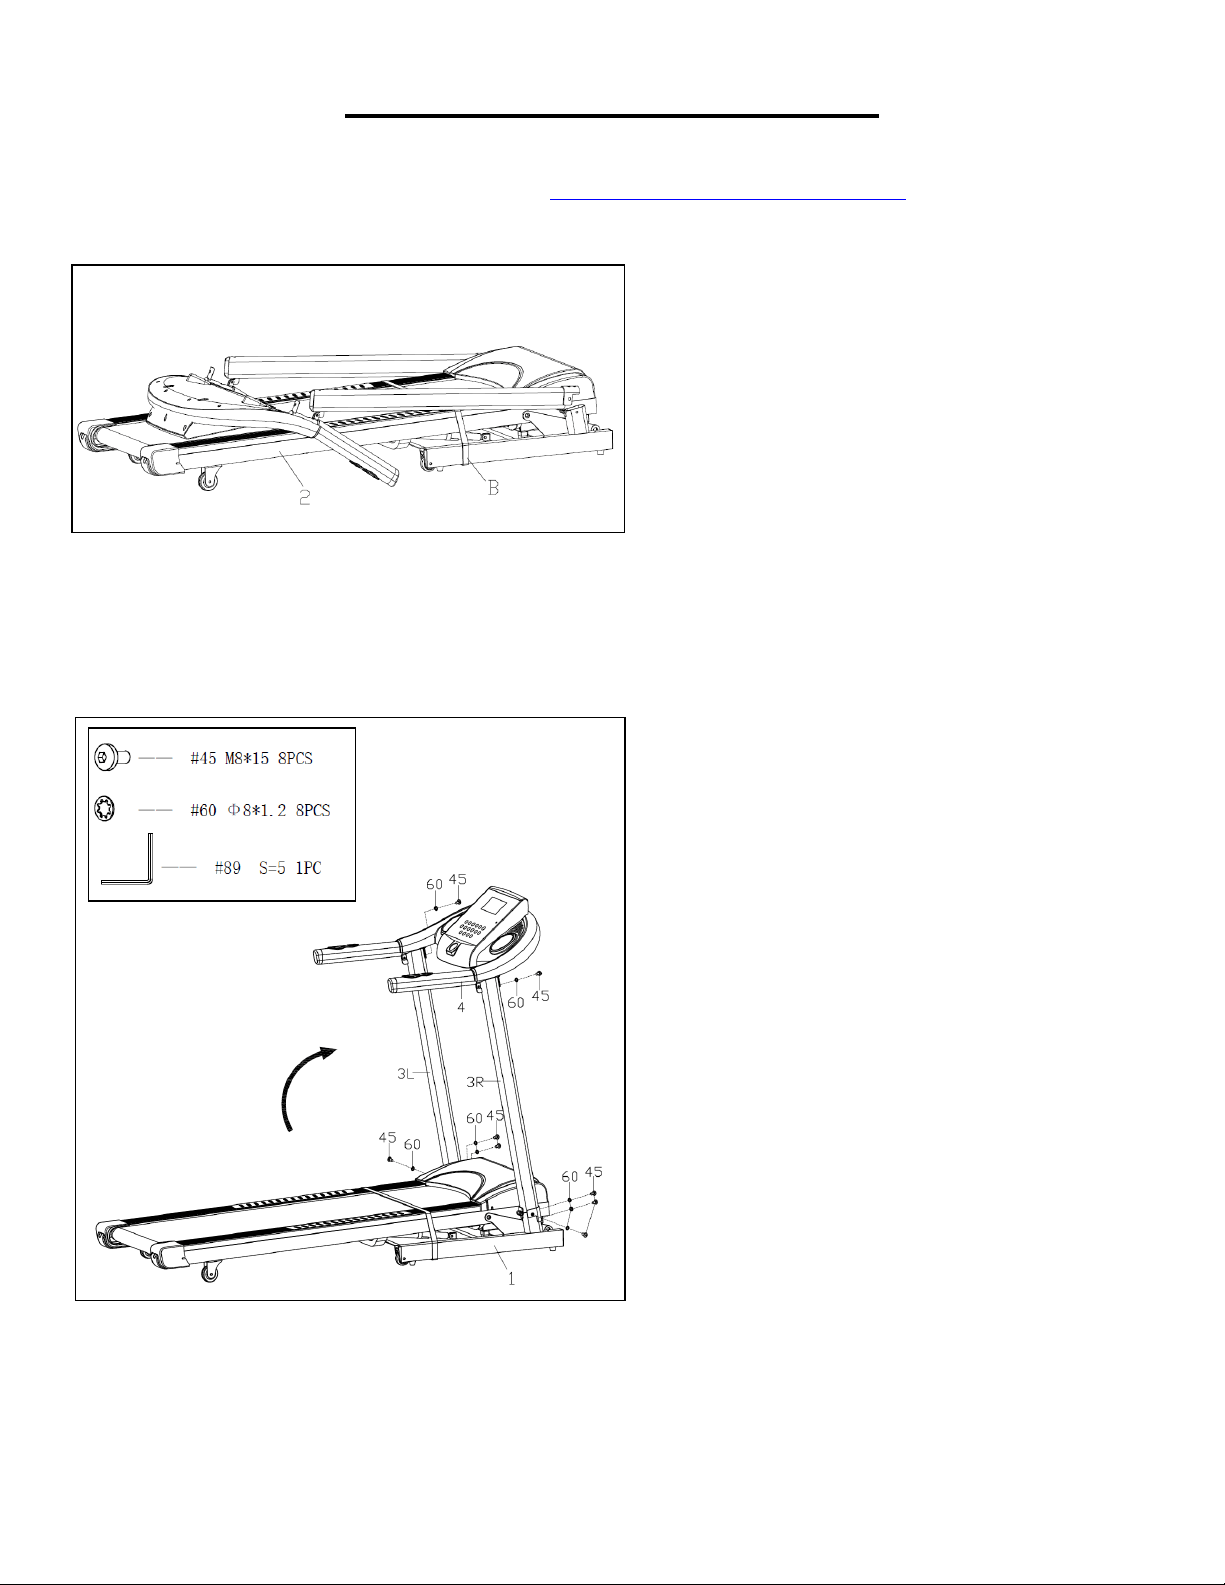
STEP 1:
We recommend having two people to do
the assembly.
Open the carton and remove contents.
Place the Main Frame (No. 2) on level
ground, and ensure that you have a work
area that is clean and has adequate
space. Do not cut the Packing Belt (No.
B) until the assembly is complete!
STEP 2:
Hold the Console Frame (No. 4). Then
lift up the Console Frame (No. 4) and
Left & Right Upright Tubes (No. 3L/R)
together, in the direction of the arrow.
Note: Make sure you do not cut or pinch
the wire inside the Right Upright Tube
(No. 3R).
Secure Left & Right Upright Tubes (No.
3L/R) to the Base Frame (No. 1) with 6
Bolts (No. 45) and 6 Washers (No. 60)
using Allen Wrench (No. 89).
Note: Do not fully tighten at this time.
Lock the Console Frame (No. 4) to the
Left & Right Upright Tubes (No. 3L/R)
with 2 Bolts (No. 45) and 2 Washers
(No. 60) using Allen Wrench (No. 89).
Now fully tighten the 6 Bolts (No. 45) and
6 Washers (No. 60) in Left & Right
Upright Tubes (No. 3L/R) and Base
Frame (No. 1) using Allen Wrench (No.
89).
7
We value your experience using Sunny Health and Fitness products. For assistance with parts or
(877-907-8669).
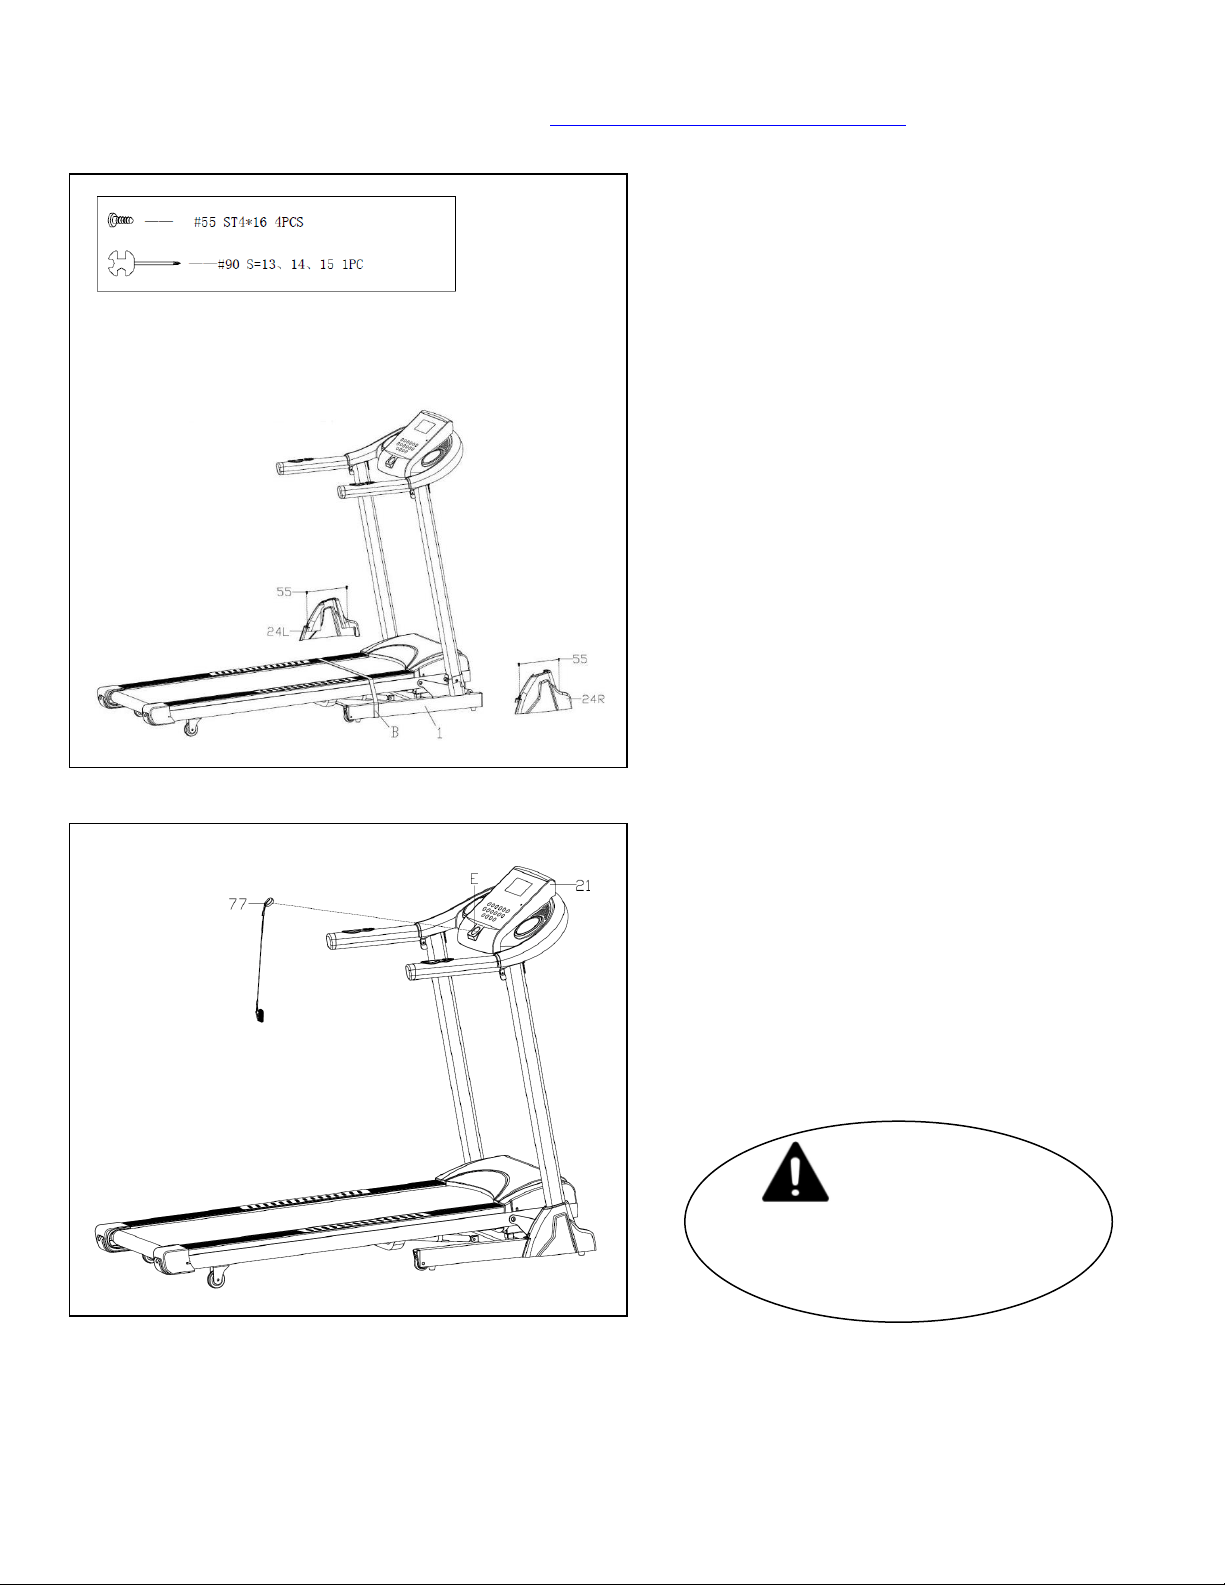
STEP 3:
Remove 4 Screws (No. 55) from the
Base Frame (No. 1) by Spanner (No.
90).
Attach the Base Cover (No. 24L/R) to the
Base Frame (No. 1) with 4 Screws (No.
55) that were just removed using
Spanner (No. 90).
Now you can cut the Packing Belt (No.
B).
STEP 4:
Put the Safety Key (No. 77) on the E slot
of Console Panel (No. 21).
The assembly is complete!
IMPORTANT NOTE!
You will need to lubricate
your treadmill before the first
use. See Page 8.
8
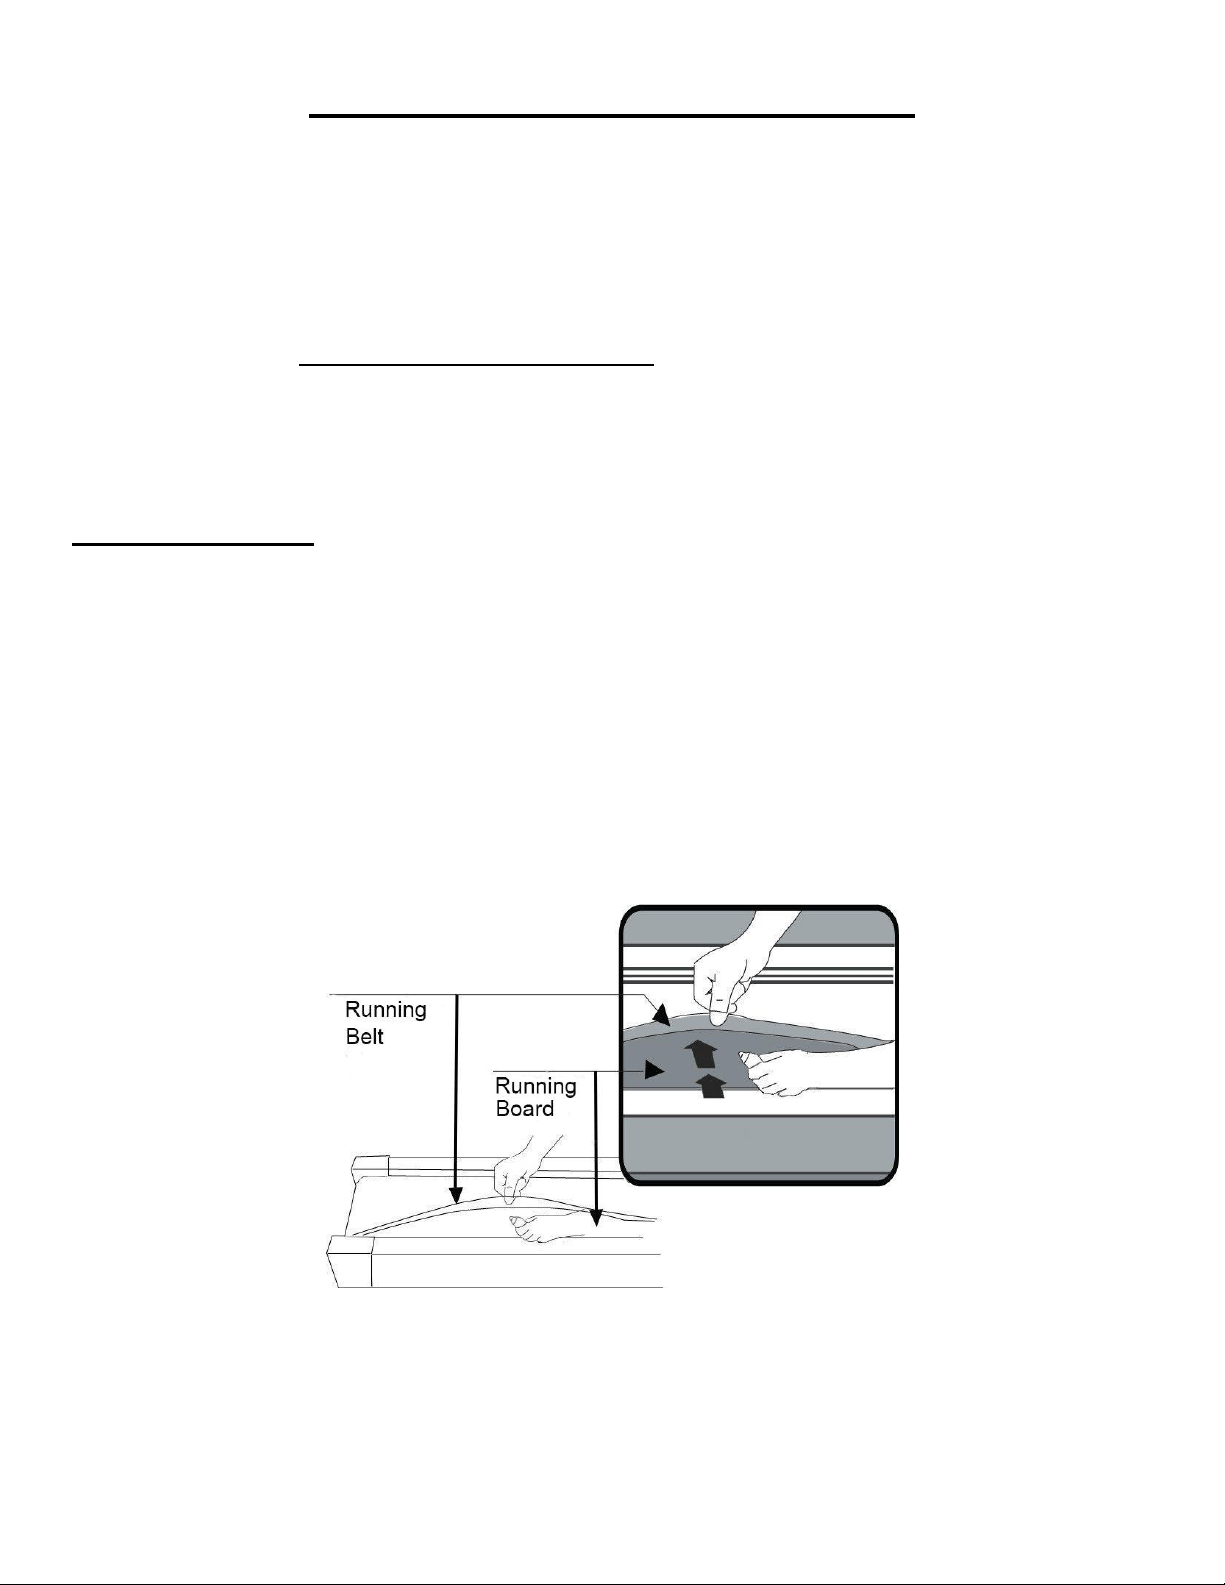
LUBRICATING THE TREADMILL
*IMPORTANT NOTE:
You will need to lubricate your treadmill before the first use.
Lubricating the Running Board (No.15) and Running Belt (No. 14) is essential as the friction
between the two affects the life span and function of the treadmill. Inspect the Running Board (No. 15)
and Running Belt (No. 14) regularly. Should you find any wear on the Running Board (No. 15),
please contact us at: [email protected].
WARNING: Always unplug the treadmill from the electrical outlet before cleaning, lubricating or
repairing the unit.
HOW TO LUBRICATE:
1. Raise the Running Belt (No. 14) up on one side and apply lubricant to the Running Board (No. 15).
Use a rag to thoroughly wipe the lubricant over the Running Board (No. 15). Repeat this process for
the other side.
2. The moving parts should turn freely and quietly. Abnormality of moving parts will affect the safety of
the equipment. Inspect and tighten bolts regularly.
3. To better maintain the treadmill and prolong its lifespan, it is suggested that maintenance be done
on a regular basis.
4. DO NOT LOOSEN OR MAKE ANY ADJUSTMENT TO THE RUNNING BELT WHILE APPLYING
LUBRICANT. A loose Running Belt (No. 14) will result in the runner sliding off during use, while too
tight of a Running Belt (No. 14) will negatively affect the motor’s performance and also create more
friction between the roller and Running Belt (No. 14). The most suitable tightness for the Running
Belt (No. 14) is when it is pulled out 50-75mm from the Running Board (No. 15).
The following time table is recommended:
Light user (less than 3 hours/ week) every five months
Medium user (4-7 hours/ week) every two months
Heavy user (more than 7 hours/ week) every one months

9
MAINTENANCE & CARE
General cleaning will help prolong the life and performance of your treadmill. Keep the unit clean and
maintained by dusting the components on a regular basis. Clean both sides of the Running Belt (No.
14) to prevent dust from accumulating underneath the Running Belt (No. 14). Keep your running
shoes clean so that dirt from your shoes does not wear out the Running Board (No. 15) and Running
Belt (No. 14). Clean the surface of the Running Belt (No. 14) with a clean damp cloth.
To better maintain the treadmill and prolong its life it is suggested that the machine be powered off for
10 minutes every 2 hours and fully powered off whenever not in use.
CENTERING THE RUNNING BELT:
Place the treadmill on level ground and set it at 3-5mph to check if the Running Belt (No. 14) drifts.
1. If the Running Belt (No. 14) moves
to the right, turn the adjusting bolt on
the right side ¼ turn clockwise, then
turn the left adjustment bolt ¼ turn
counter-clockwise. If the Running
Belt (No. 14) does not move, keep
adjusting ¼ turn at a time until it
centers. Refer to Fig. A.
2. If the Running Belt (No. 14) moves
to the left, turn the adjusting bolts on
the left side ¼ of a turn clockwise,
then turn the right adjustment bolt ¼
turn counter-clockwise. If the
Running Belt (No. 14) does not move,
keep adjusting ¼ turn at a time until it
centers. Refer to Fig. B.
3. Over time the Running Belt (No.
14) will loosen. To tighten the belt turn
the Left & Right side adjustment bolts
one full turn clockwise, check the
tension of the Running Belt (No. 14).
Continue this process until Running
Belt (No. 14) is at the correct tension.
Make sure to adjust both sides equally
to ensure correct Running Belt (No.
14) alignment. Refer to Fig. C.
Fig. A
Fig. B
Fig. C
10
FOLDING INSTRUCTIONS
FOLDING
UNFOLDING:
Turn off the power before folding.
Restore the incline to flat position
(Incline Level 0). Place your hand at
position “A” and lift up on the Main
Frame (No. 2) to push top of the
running board forward until the
Cylinder (No. 11) locks into the tube.
Note: When the Cylinder (No. 11)
successfully locks into the tube you will
hear a clicking sound.
Before lowering the Main Frame (No.
2), ensure that the space directly
underneath it is clear of any objects
and the power is turned off.
Grasp the Main Frame (No. 2) at
position “A” with one hand. Next, using
your foot, firmly push against the
Cylinder (No. 11) and press down on
the Main Frame (No. 2). Once the
Main Frame (No. 2) starts to lower, it
will automatically continue to steadily
lower itself until it reaches level ground.
11
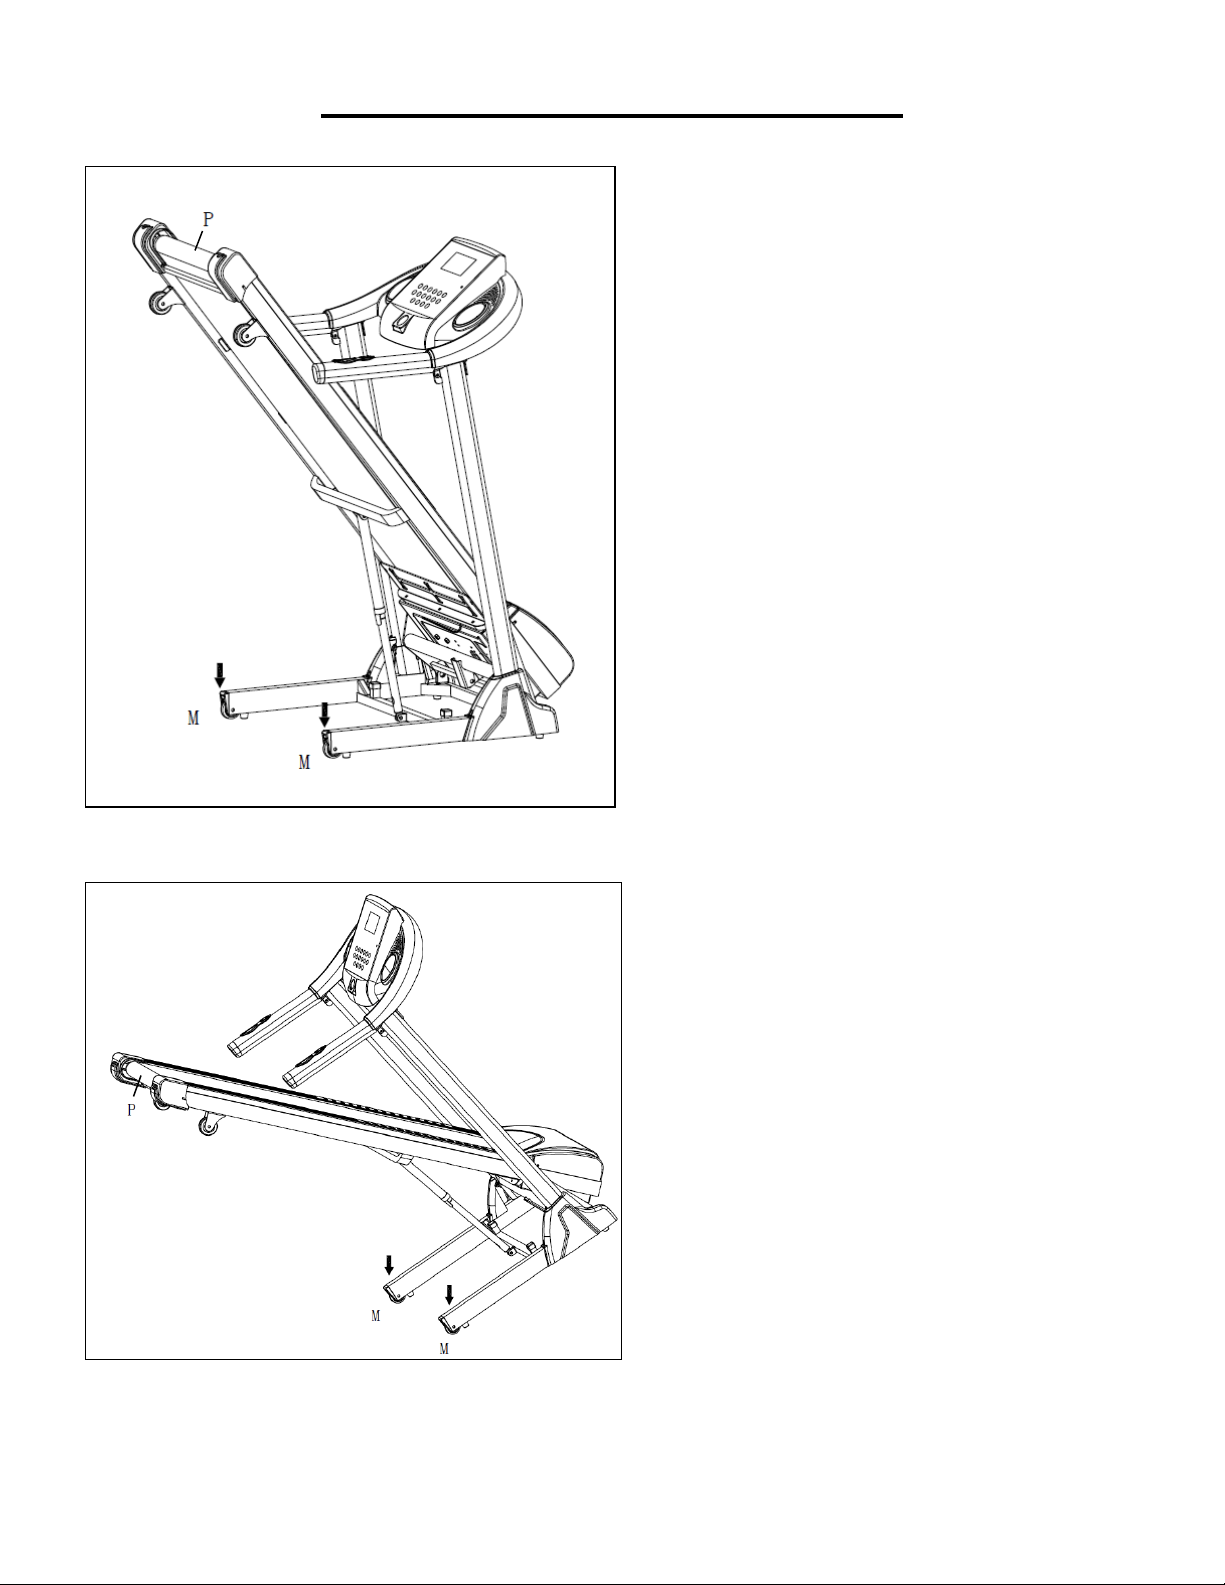
HOW TO MOVE THE MACHINE
Before attempting to move the
treadmill, make sure that it has been
properly folded. Unplug the power
cord.
To tilt, start by placing one hand at
position “P” to support the top end of
the treadmill. Next, place one foot at
position “M” to hold the bottom end
of the treadmill steady. With your
foot at “M”, slowly tilt the top of the
treadmill downward towards the
ground. Once the treadmill reaches
a low enough point, the wheels of
the treadmill touch the ground.
To transport, hold the treadmill at
position “P” and tilt until the wheels
“M” are able to move on the ground.
12
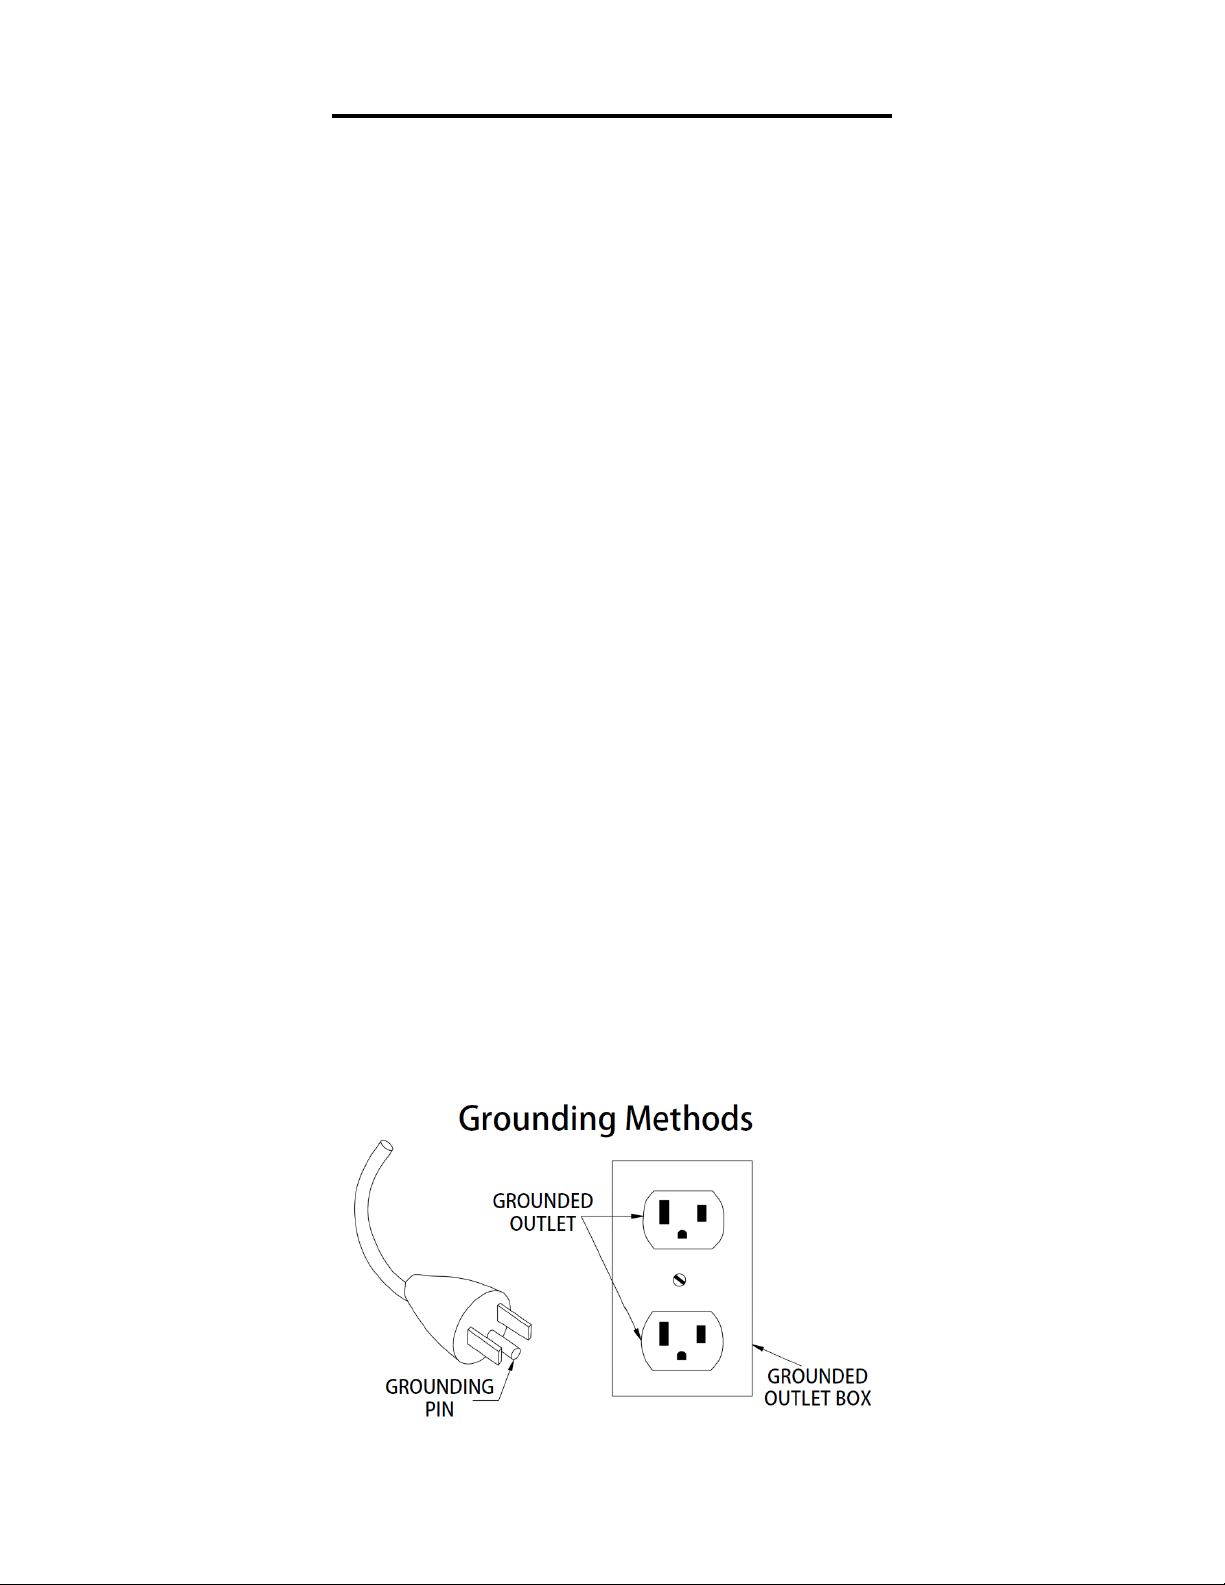
GROUNDING INSTRUCTIONS
WARNING: This treadmill requires a power source of 10 amps (100-120V) in order to properly
operate. For your safety, as well as the safety of others, please verify that the power source is correct
before plugging the equipment. Any power source above or below this level could cause significant
damage to the equipment and or user.
GROUNDING METHODS:
This product must be grounded. Grounding provides the least resistance for electrical current and will
reduce the risk of electric shock. This product is equipped with a cord having an equipment-grounding
conductor and a grounding plug. The plug must be plugged into an appropriate outlet that is properly
installed and grounded in accordance with all local codes and ordinances. Ensure that the product is
connected to an outlet which contains the same configuration as the plug. Do not use an adaptor for
this product.
This product is for use on a nominal 100-120V circuit and has a grounding plug that looks like the plug
illustrated in sketch A. Make sure that the product is connected to an outlet having the same
configuration as the plug. No adapter should be used with this product.
DANGER:
Improper connection of the equipment-grounding conductor can result in risk of electric shock. Check
with a certified electrician if you are in doubt as to whether the product is properly grounded. Do not
modify the plug provided with the product. If it will not fit the outlet, have a proper outlet installed by an
electrician.
WARNING!
1. NEVER use a ground fault circuit interrupt (GFCI) wall outlet with this treadmill. Route the power
cord away from any moving part of the treadmill including the elevation mechanism and transport
wheels.
2. NEVER operate the treadmill using a generator or UPS power supply.
3. NEVER remove any cover without first disconnecting AC power.
4. NEVER expose the treadmill to rain or moisture. This treadmill is not designed for use outdoors,
near pools or in any other high humidity environment.
(A)

13
EXERCISE INSTRUCTIONS
GETTING STARTED:
Before starting any exercise program, you should consult your physician to determine if you have any
medical or physical conditions that could put your health and safety at risk or prevent you from using
the equipment properly.
Be aware of your body’s signals. Incorrect or excessive exercise can damage your health.
Stop exercising immediately if you experience any of the following symptoms: pain, tightness in your
chest, irregular heartbeat, shortness of breath, lightheadedness, dizziness, or feelings of nausea.
Get to know your treadmill. Before attempting to use the treadmill take some time to stand alongside
and familiarize yourself with the controls.
1. Turn on the power switch.
2. Once you get on, you can stand with your feet on the side rails and stabilize yourself by holding
onto the handrails.
3. Next, attach the clip end of the Safety Key (No. 77) to your clothes and insert the magnetic end
of the key into the computer console.
4. Press the key START to start the machine.
5. The machine will start at the system default setting speed of 0.6 MPH. when you feel
comfortable, you may slowly increase this speed.
6. When you are finished with your exercise, press the key STOP to stop the machine or you can
remove the magnetic end of the Safety Key (No. 77) to stop the machine.
14
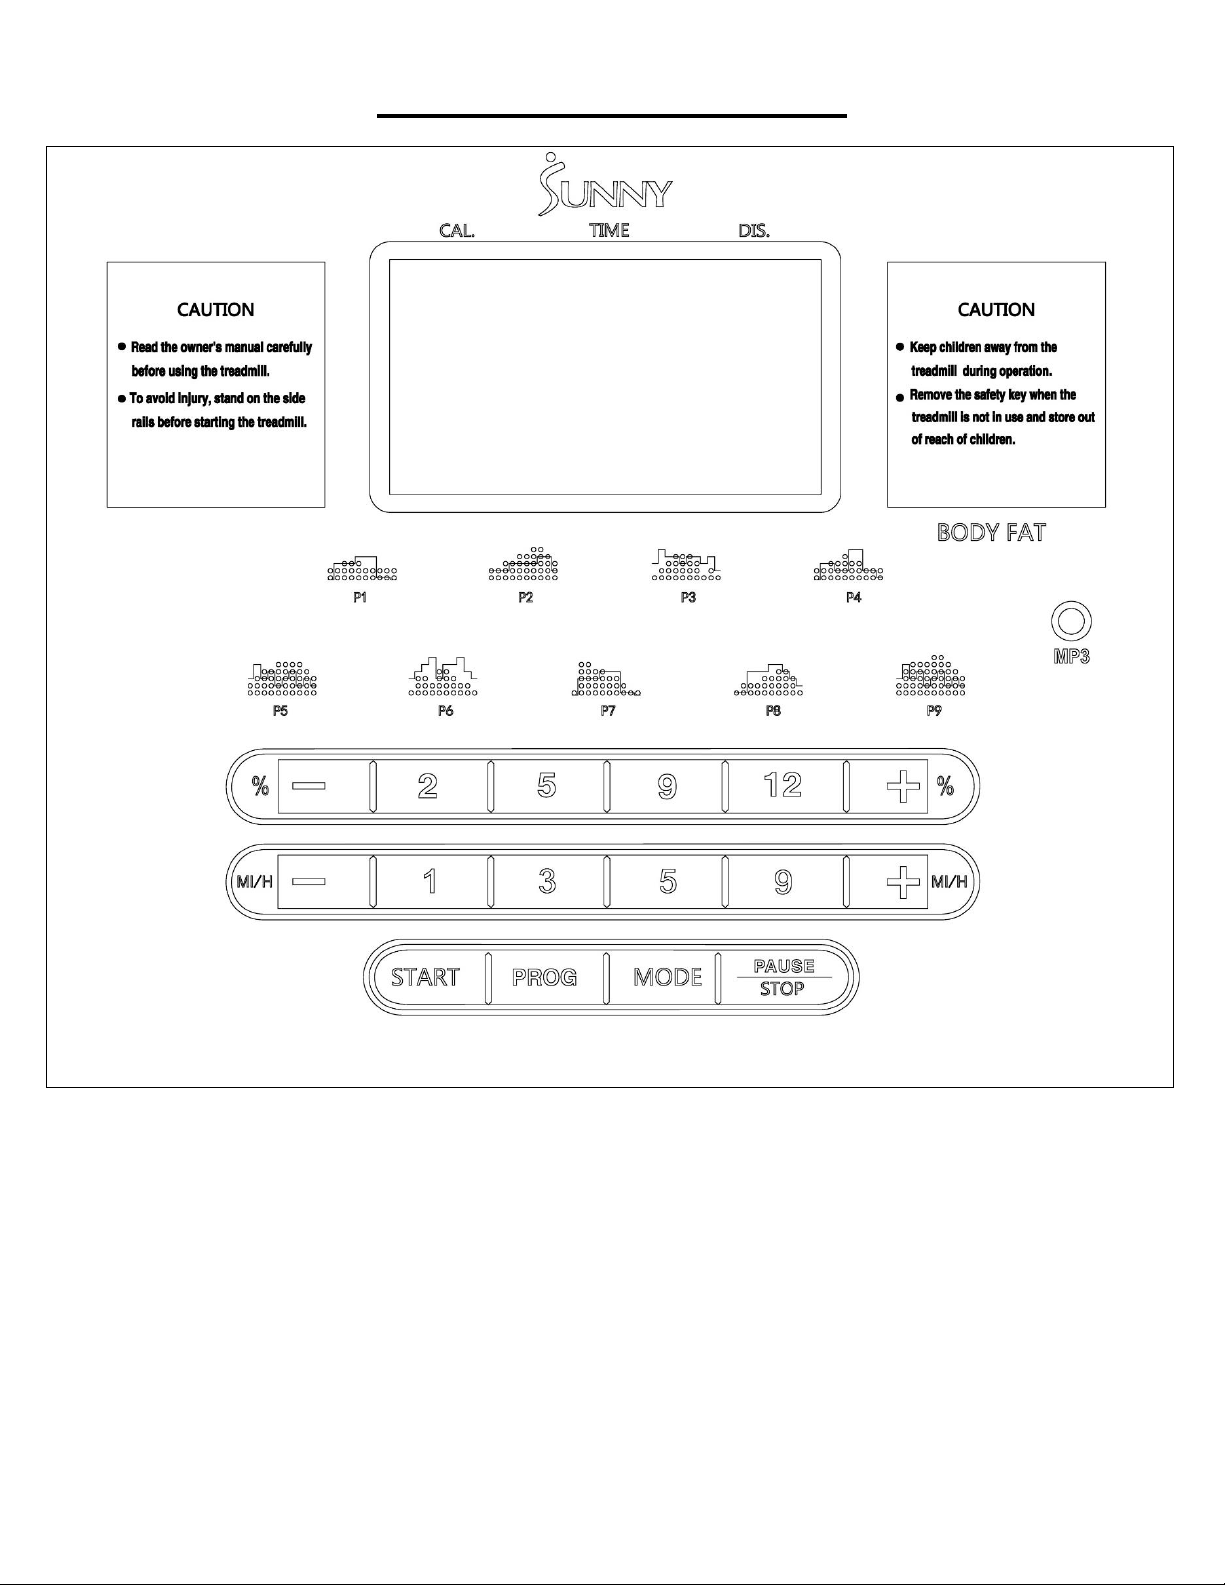
THE DISPLAY CONSOLE
DISPLAYS
1. Start:
Normal startup after 3 seconds countdown.
2. Number of programs:
Manual mode, 9 preset programs, HRC, FAT.
3. Safe lock function:
Remove the safety key in any mode, and the treadmill will slow down rapidly till it stops. The
console will beep continuously and “---” will be displayed on the window. Buttons will not function
when the safety key is removed. Insert the safety key onto the console. The display will light up for
2 seconds and then go into standby state, ready for you to input commands.

15
KEY FUNCTION
1. START:
Press to start up the treadmill in the stop state. The default speed displayed is 0.6 MPH.
2. PAUSE / STOP:
When the treadmill is running, press PAUSE / STOP once to pause the motor, and PAUSE will
show on the display. Time, distance and calorie data will be automatically saved. The speed will go
to zero, but the incline level stays the same. Press PAUSE / STOP again to stop the motor, and all
date will be cleared.
If you press START within 5 minutes, the data of time, distance and calorie will be accumulated,
and the starting speed is the same speed as before you pressed PAUSE.
PAUSE function lasts for about 5 minutes. If you do not press START again, the data will
automatically clear.
3. PROG:
In standby mode, press to select manual mode, P1-P9, HRC, and FAT programs. Manual mode is
the default mode.
4. MODE:
In standby mode, press to select H-1 to H-3 different countdown modes. H-1 is time countdown
mode, H-2 is distance countdown mode, and H-3 is calorie countdown mode. All mode parameters
can be adjusted by pressing SPEED+ / SPEED -, and then press START to start the treadmill.
5. SPEED+ / SPEED -:
In setting state, press to increase or decrease the set value. When the motor is running, press to
increase or decrease the speed. Value increases or decreases in increment of 0.1 KM/time or
0.1MI/time. After holding for more than 2 seconds, automatic continuous acceleration and
deceleration will be realized. The default speed is 0.6 MPH / 1.0 KMH. Max operating speed is 11
MPH / 18 KMH.
6. SPEED SHORTCUT KEYS (on the handrail):
Press to select 1MPH, 3MPH, 5MPH and 9MPH when the treadmill is running.
7. INCLINE + / INCLINE -:
When the motor is running, press to increase or decrease the incline. Value increases or
decreases in increment of 1 grade. When setting program parameters, press to increase or
decrease the set value. If you press and hold for 2 seconds, value will increase or decrease
quickly.
8. INCLINE SHORTCUT KEYS (on the handrail):
Press to select grade 2%, 5%, 9% and 12% when the treadmill is running.
DISPLAY FUNCTION
Speed display: Display the current running speed.
Incline display: Display the current incline.
Time display: Display the running time in manual mode and display the countdown time in the time
countdown mode or in program mode.
Distance display: Display the accumulated distance in manual mode, program mode, or the
countdown distance in distance countdown mode.
Calorie display: Display the accumulated calorie in manual mode, in program mode, or display the
countdown calorie in countdown calorie mode.
Heart rate display: Detect heat rate signals and display the pulse value.
Data display range of various parameters:
TIME: 0:00 – 99.59 (MIN)
DISTANCE: 0.00 – 99.9 (MILE)
CALORIES: 0.0 – 999 (KCAL)

16
SPEED: 0.6 – 11.0 (MPH)
PULSE: 50 – 200 (BPM)
INCLINE: 0 – 15%
HEART RATE MEASUREMENT FUNCTION
While the treadmill is on, hold the pulse sensor for 5 seconds and the heart rate value will be displayed.
The initial value is the actually measured heart rate, and the display range is 50-200 BPM. In the
heartbeat measurement process, there will be a heart shaped icon flashing. Heart rate displayed is for
reference only and cannot be used as medical data.
KILOMETERS OR MILES
When the safety key is removed, press PROGRAM and MODE for 3 seconds to change from miles to
kilometers.
MP3 FUNCTION
You can plug in an audio device to the treadmill. Sound volume is controlled on the device, not on the
treadmill.
SET UP COUNTDOWN MODE
1. Turn on the treadmill. The treadmill is in standby mode. Press MODE to select time countdown
mode, calorie countdown mode or distance countdown mode. Press START to start the treadmill.
2. To set countdown mode:
a. In manual mode, press MODE to enter time countdown mode. The time window will display the
time and flash. The initial time is 30:00. Set countdown time by pressing SPEED + / SPEED - or
INCLINE + / INCLINE -. Time setting range: 5:00-99:00. Value is in increment of 1:00. Press
START to start the treadmill. If you do not press START and you press MODE again, the time
value you set will be cleared and treadmill will go into distance countdown mode.
b. Press MODE to enter distance countdown mode. The initial distance is 1.00 KM/MI. Set the
distance by pressing SPEED + / SPEED – or INCLINE + / INCLINE –. Distance setting range:
1.0—99.0 KM/MI. Value is in increment of 1 KM/MI. Press START to start the treadmill. If you do
not press START and you press MODE again, the distance value you set will be cleared and
treadmill will go into calorie countdown mode.
c. Press MODE to enter calorie countdown. The initial calorie will be displayed as 50.0 kcal. Set the
calorie by pressing SPEED + / SPEED – or INCLINE + / INCLINE –. Calorie setting range:
20.0—990 kcal. Value increases in increment of 10 kcal. Press START to start the treadmill. If you
do not press START and you press MODE again, the calorie value you set will be cleared and
treadmill will go into standby mode.
MANUAL MODE:
1. Press START, and the motor will start operating after 3 seconds of countdown. The initial speed is
1.0 KMH / 0.6 MPH;
2. Press SPEED + / SPEED – to adjust speed; or press speed shortcuts to change to the speed
marked on the key;
3. Press INCLINE +/ INCLINE – to adjust the incline; or press incline shortcuts to change to the incline
marked on the key;
4. When the motor is running, press STOP / PAUSE to stop the treadmill;
5. To stop the treadmill immediately, remove the safety key; then, LCD window will display “---” and
the console will beep continuously.
6. When the set time, calorie or distance value reaches zero, the speed will gradually reduce till the
treadmill stops. The console will beep until the treadmill stops. The screen will display END. All
17
values go to zero and treadmill is now in standby state.
7. If a value reaches the maximum value, it will reset to 0 and the treadmill will stop. In manual mode,
the treadmill will stop when the time accumulates to be more than 99:59 (100 min)
PROGRAM MODE
1. In standby state, press PROG to select pre-set program P1-P9.
2. Press SPEED + / SPEED – or INCLINE + / INCLINE – to adjust the time. The initial time is set to
be 30 min. Only time can be set. Setting range: 5:00 - 99:00.
3. Press START key. The treadmill will start running and the speed will gradually increase to the
value for the first section of program (see details in the table of program parameters);
4. Press SPEED + / SPEED – to adjust speed or press speed shortcuts to change to the speed
marked on the key.
5. Press INCLINE + / INCLINE – to adjust the incline or press incline shortcuts to change to the
incline marked on the key.
6. Each program is divided into 10 sections; operating time for each section will be 1/10 of the set
time.
7. The console will beep once when switching from one section to another.
8. When the set time goes to zero, the treadmill will slow to a stop. The console will beep until the
treadmill stops. The screen will display END. All values go to zero and treadmill is now in standby
state.
9. At any time, if you need to stop the treadmill immediately, remove the safety key. LCD window will
display “---” and the console will beep continuously.
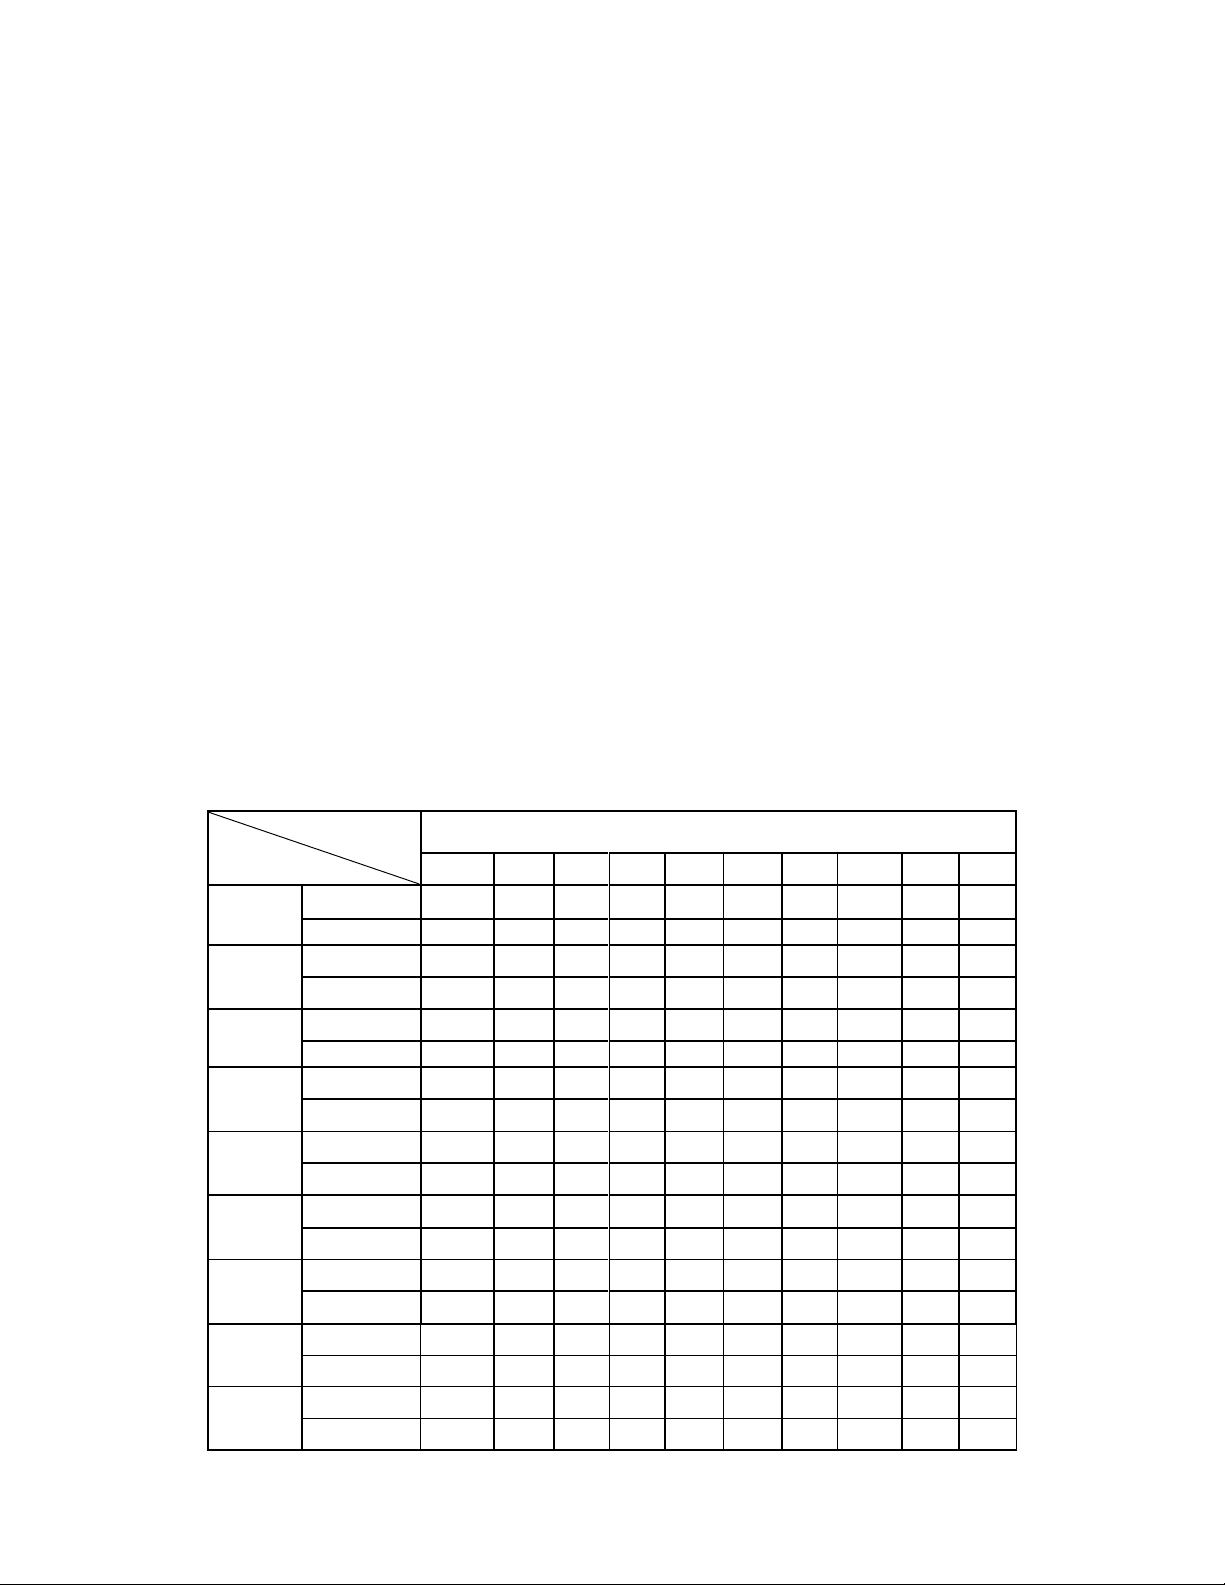
PROGRAM PARAMETERS
(speed is in MPH)
Setup time / 10 = running time for each section
1
2
3
4
5
6
7
8
9
10
P1
SPEED
1.8
1.8
3.7
3.1
3.1
2.5
2.5
2.5
2.5
1.8
INCLINE
0
3
3
3
4
4
4
1
1
0
P2
SPEED
2.5
2.5
3.7
3.7
5.0
5.0
6.2
6.2
5.0
3.7
INCLINE
2
2
2
3
3
3
3
4
4
2
P3
SPEED
1.2
2.5
3.7
5.0
4.3
5.0
3.7
1.2
1.8
1.2
INCLINE
3
5
4
4
3
4
4
3
4
2
P4
SPEED
1.8
1.8
3.1
3.7
4.3
3.7
3.1
2.5
1.8
1.8
INCLINE
0
3
3
2
2
5
5
3
3
2
P5
SPEED
2.5
3.7
5.0
5.0
6.2
6.8
6.8
6.2
5.0
3.7
INCLINE
3
5
3
4
2
3
4
2
3
2
P6
SPEED
1.2
3.7
3.1
2.5
5.0
4.3
3.1
1.8
1.8
1.2
INCLINE
3
4
5
6
3
5
5
6
4
3
P7
SPEED
1.2
5.6
5.6
4.3
4.3
3.7
3.1
1.8
1.2
1.2
INCLINE
0
3
3
3
4
4
4
1
1
0
P8
SPEED
1.2
2.5
2.5
2.5
3.1
3.7
5.0
5.0
3.7
1.2
INCLINE
1
1
4
4
4
5
5
4
3
2
P9
SPEED
2.5
4.3
5.6
6.2
6.8
7.5
7.5
6.2
5.0
3.7
INCLINE
3
5
3
4
2
3
4
2
3
2
18
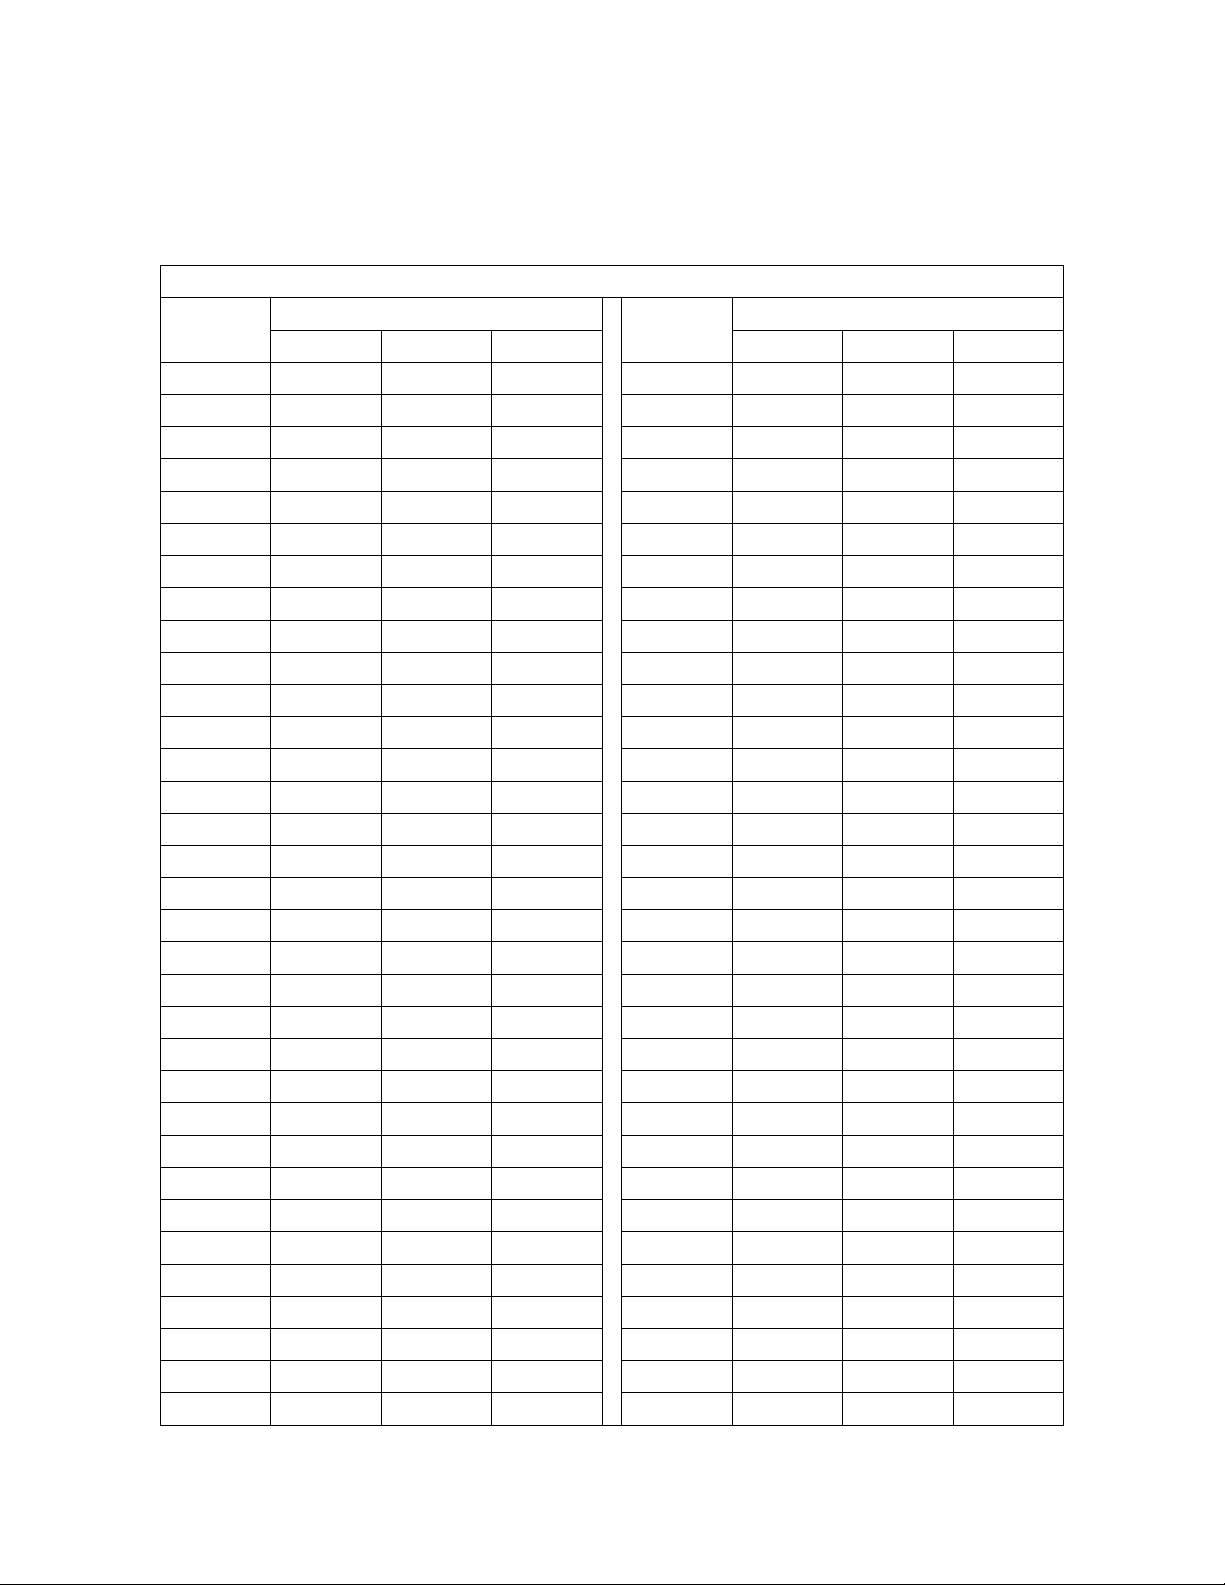
HEART RATE CONTROL (HRC)
1. The treadmill will adjust the speed automatically by checking the heart rate wirelessly and
comparing to the chart below. Use a heart rate chest strap (not included) with the HRC program.
The treadmill is compatible with chest strap that uses 5.3 KHz frequency. Lowest-Highest: the
adjustable range in the heart rate from the lowest to the highest.
HRC program
AGE
Target zone (L-H)
AGE
Target zone (L-H)
lowest
default
highest
lowest
default
highest
15
170
175
180
48
137
142
147
16
169
174
179
49
136
141
146
17
168
173
178
50
135
140
145
18
167
172
177
51
134
139
144
19
166
171
176
52
133
138
143
20
165
170
175
53
132
137
142
21
164
169
174
54
131
136
141
22
163
168
173
55
130
135
140
23
162
167
172
56
129
134
139
24
161
166
171
57
128
133
138
25
160
165
170
58
127
132
137
26
159
164
169
59
126
131
136
27
158
163
168
60
125
130
135
28
157
162
167
61
124
129
134
29
156
161
166
62
123
128
133
30
155
160
165
63
122
127
132
31
154
159
164
64
121
126
131
32
153
158
163
65
120
125
130
33
152
157
162
66
119
124
129
34
151
156
161
67
118
123
128
35
150
155
160
68
117
122
127
36
149
154
159
69
116
121
126
37
148
153
158
70
115
120
125
38
147
152
157
71
114
119
124
39
146
151
156
72
113
118
123
40
145
150
155
73
112
117
122
41
144
149
154
74
111
116
121
42
143
148
153
75
110
115
120
43
142
147
152
76
109
114
119
44
141
146
151
77
108
113
118
45
140
145
150
78
107
112
117
46
139
144
149
79
106
111
116
47
138
143
148
80
105
110
115

19
2. To select HRC, press PROG to cycle through the preset programs to reach HRC. Press SPEED +
/ SPEED - to adjust speed. After setting the values, press START to start the treadmill.
a: Age setting range: 13 - 80 years old, default value is 30 years old.
b: Default target heart rate: (220 - age) * 0.6
c: Users can revise target heart rate
d: Time setting range: 5 - 99 minutes, default time is 30 minutes.
3. HRC AUTOMATIC SPEED ADJUSTMENT.
a: HRC checks heart rate every 30 seconds.
b: When the heart rate is lower than target rate by 30 bpm, the speed will increase 1.2 MPH.
c: When the heart rate is lower than target rate by 6 - 29 bpm, the speed will increase 0.6 MPH.
d: When the heart rate is higher than target rate by 30 bpm, the speed will decrease 1.2 MPH.
e: When the heart rate is higher than target rate by 6 - 29 bpm, the speed will decrease 0.6 MPH.
f. When the heart rate is higher or lower than target rate by 0 - 5 bpm, the speed remains
unchanged.
4. Treadmill checks heart rate every 30 seconds. In below cases, the speed will slow to the lowest
within 20 seconds and shut down after 15 seconds at lowest speed. During this time, the treadmill
will beep every second.
a: When the treadmill cannot detect the heart rate twice in a row.
b: When heart rate exceeds value of 220 minus age.
5. HRC does not automatically adjust the incline based on the heart rate. Incline level can be
adjusted manually.
BODY FAT TEST
1. In standby state, press PROG to enter FAT (Physical fitness test) program.
2. Press MODE to enter the program of F—1, F—2, F—3, F—4, F—5 (F—1: gender, F—2:age,
F—3:height, F—4:weight, F—5:physical test)
3. Press SPEED + / SPEED – or INCLINE + / INCLINE – to set the parameter of F1 — F4 (see below
detailed table), then press MODE to enter the program of F—5 for physical test.
4. At this state, hold the handle pulse board for 5 - 6 seconds and it will display the FAT, check if the
weight matches with your height.
5. FAT program is to measure the relevance between height and weight, not the body proportion. FAT
is suitable for every man and woman, it provides the important grounds for adjusting the weight
with other health indicators. The normal FAT is between 20 - 24, which means if less than 19 is too
thin, and if between 25 - 29 is overweight and more than 30 is obesity.
F--1
Gender
1(man)
2(woman)
F--2
Age
10------------99
F--3
Height
40-87 inch / 100-200 cm
F--4
Weight
44-330 lbs. / 20-150 kg
F--5
FAT
≦19
Underweight
FAT
=(20-24)
Normal weight
FAT
=(25-29)
Overweight
FAT
≧30
Obesity

20
TROUBLESHOOTING
Problem
Potential reasons
Solutions
-------
Safety key falls down
1. Place the safety key back;
2. Replace safety key switch or magnetic sensor in the console panel;
if the problem still fails to be solved, replace the console panel.
E01
After powering on, the console
panel displays E01. The
communication failure from the
console panel to the driver. The
console panel displays E01 in
the operating process, the
communication failure from the
driver to the console panel.
1. Check whether the connecting joint between the console panel and
the controller board is loose; whether console linking wire, extension
wire, or controller wire are damaged; whether the console linking wire,
extension wire, or controller wire are in correct connecting order.
2. The controller board may be defective. Check and replace with a
good one.
3. The controller board may not be plugged correctly. Check and
ensure it is plugged correctly.
4. The transformer in the controller board may be damaged. Check
and replace with a good one.
E02
Explosion-proof protection or
DC motor abnormality.
1. Check whether the power supply voltage is less than 50% of the
normal value; please ensure correct voltage and test again;
2. Check whether DC motor’s wires are well connected; re-connect
wires; if the problem still fails to be solved, replace the DC motor;
2. Check whether there is peculiar odor generated by the controller
board; if yes, it means that IGBT has been broken down to cause short
circuit; then, replace the controller board.
E03
No sensory signal
Check whether the light sensor directs to the hole on DC motor; check
whether wires of light sensor are damaged and whether terminals of
the light sensor or speed terminals on the controller board are firmly
connected.
E04
Lifting learning or
self-inspection fails
1. Check whether incline motor’s signal wire is well inserted; re-insert
the signal wire joint to ensure that it is reliable;
2. Check whether incline motor's AC wires are properly connected
according to marks on controller board;
3. Check whether incline motor's AC wires are damaged to form open
circuit; if yes, replace wires or replace the incline motor;
4. Replace the controller board;
5. After all of these inspections, press the learning key in controller
board for learning again.
E05
Over-current protection
1. It may be the system’s self-protection against excessive current due
to the load exceeds the rated value; restart the machine;
2. Some part of the treadmill is jammed so the DC motor can not
rotate, thus triggering the self-protection against excessive current
under excessive load; adjust the treadmill and restart, or add lubricant.
3. Check whether there is over-current sound or burning odor when
the DC motor is running; replace the DC motor;
4. Check whether the controller board emits the odor of burning; if yes,
replace the controller board.
E06
Lifting sensor has no signal
1. Check whether incline motor's signal wire is damaged.
2. Check whether incline motor's signal wire is firmly connected to
controller board.

21
E09
Incline motor is not well
connected or damaged
Check whether incline motor's signal wire is well connected, if yes,
replace the incline moter.
No display
on the
console
panel
The controller board is not
powered on or is damaged.
1. Check whether the overload protector has tripped off; if yes, press
it;
2. Check the switch, overload protector and the controller board’s
power cord and transformer to ensure well connection;
3. Check whether the console linking wire, extension wire or controller
wire from the console panel to the controller board are well connected.
Dismantle the upright tube to check connecting joints on each section
of the wires from the console panel to the controller board; ensure that
each wire core is well connected; or the reason may be the console
linking wire, extension wire, or controller wire defected (damaged or
broke down); in such case, re-connect or replace wires.
4. The transformer in the controller board is damaged; replace the
controller board.
NOTE: If you are unable to resolve an issue using the troubleshooting guide above, please
contact Customer Service at [email protected]
Version 1.6