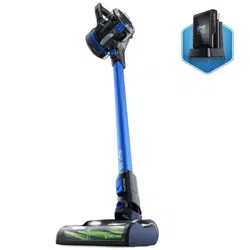
Owner 's Manual for Cordless Stick Vacuum
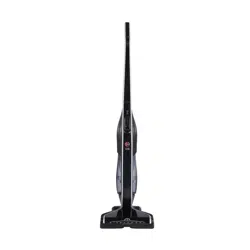
FEATURES
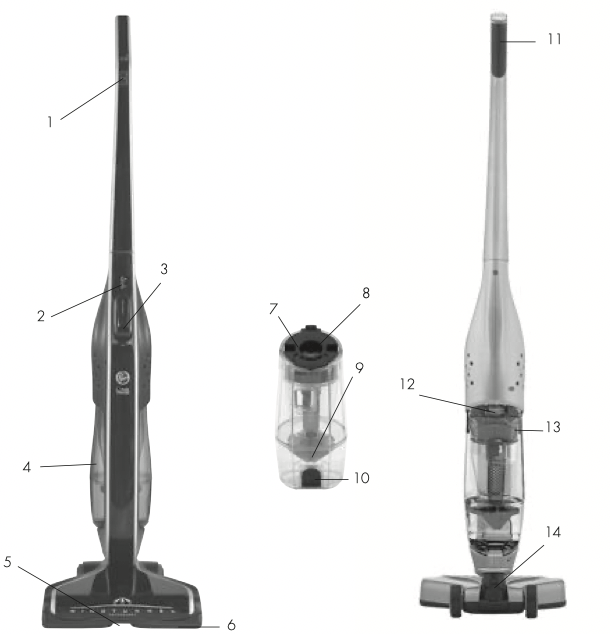
FRONT
1. On/Off Switch (0=OFF, I=Suction ON, I I =Suction and Brush ON)
2. Fuel Gauge
3. Battery Cavity
4. Dirt Cup
5. Large Debris Opening
6. Bottom Nozzle Cover (underneath nozzle)
DIRT CUP AND FILTER
7. Filter Cap
8. Filter (inside filter cap)
9. Baffle Tube
10. Bottom Empty Release Button
BACK
11. Handle
12. Dirt Cup Release Button
13. Carry Handle
14. Nozzle Release Button
If you need assistance:
Visit our website at hoover.com. Follow the authorized dealer locator link to find the Hoover® authorized dealer nearest you or call 1-800-944-9200 for an automated referral of Hoover® authorized dealer locations (U.S. only) or to speak with a customer service representative; Mon- Fri 8am- 7pm EST.
PLEASE DO NOT RETURN THIS PRODUCT TO THE STORE.
HOW TO OPERATE
Assembly
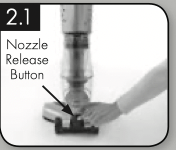
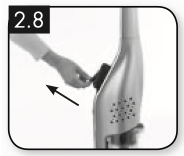
Line up nozzle with main body and firmly push nozzle into body of unit until nozzle locks into place. NOTE: To remove, push release button and pull the nozzle away from the body of the unit.
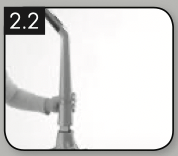
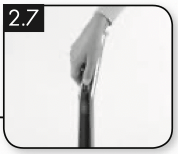
Insert handle into body.
NOTE: Ensure handle faces proper direction.
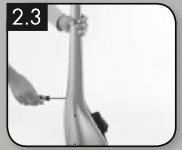
Insert screw and tighten until secure.
NOTE: DO NOT over tighten screw.
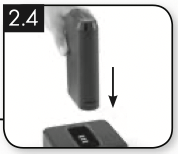
Charge battery fully before first use. Fully discharged battery will take up to 3 hours to charge. NOTE: See battery and charging manual for battery charging instructions. Use only manufacturer’s supplied or recommended battery and charger.
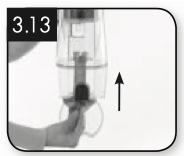
Insert charged battery into battery cavity until latch is locked into place. NOTE: When inserting and removing battery, ensure the switch is in the off position marked “O”.
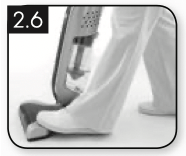
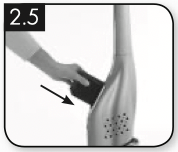
Hold down nozzle with foot and tilt back to reclining position.
To turn vacuum on, roll button forward
PUSH DIAL:
O - OFF
I - Suction ON for use on hard floors.
II - Suction andfor Brushroll ON
Recommended use on carpet.
To remove and charge battery, turn switch to off position. Pull on release lever located on end of battery and pull out gently.
MAINTENANCE
Dirt Cup & Filter Removal & Replacement
IMPORTANT: For best results, clean after each use.
REGULAR MAINTENANCE: Each time the dirt cup is emptied, the filter should be cleaned (Filter will be discolored after use. This will not affect the filter’s performance.)
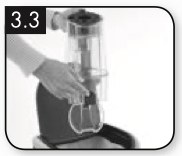
Dirt Cup Removal and Cleaning
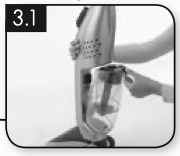
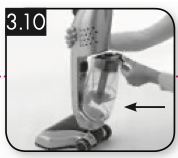
To Remove dirt cup, depress the dirt cup release button located on the top of the dirt cup and tip away from the body of the unit.

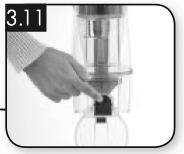
Press dirt cup empty button over trash can to release debris. Push door closed until latch clicks.
Dirt Cup Debris and Clog Removal
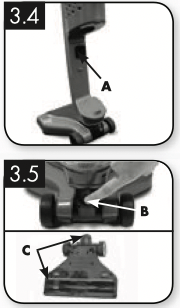
In order to maintain optimum performance of your cleaner, each time the dirt cup is removed for emptying it is recommended to check if there is any debris trapped in the dirt tube (A). If so, remove the debris before re-attaching the dirt cup to the cleaner.
If you still are experiencing reduced suction/performance, detach the nozzle base from the main unit (press button on back of nozzle to release, B) and inspect both openings of the nozzle base (C) for any trapped debris. Remove any debris that may be present before re-attaching the nozzle base to the main body of the cleaner.
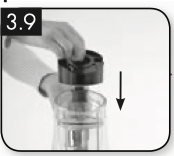
Filter Removal and Cleaning
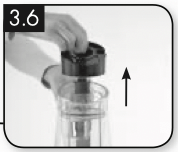
Pull out filter cap. Pull out filter and brush clean. Rinse under cold water as needed.
WARNING: Always dry filter for 24 hours before replacing.
WARNING: Do not use detergent or hot water to clean filter.
For filter replacement, please call 1-800-944-9200 or visit our website at hoover to locate a dealer nearest you. Filter Service Part # 410044001.
Dirt Cup and Filter Replacement

REPLACEMENT
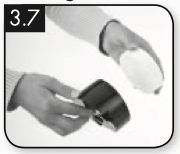
Insert filter into filter cap.
Insert filter cap into dirt cup.
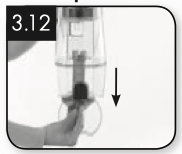
Place bottom of dirt cup onto housing and pivot into place until dirt cup release button locks.
Baffle Tube Removal and Replacement
REMOVAL
Hold dirt cup right side up and press bottom release button to open trap door.
Turn baffle tube counter clockwise until it stops. Pull out baffle tube, hold over trash can and shake free debris.
REPLACEMENT
To replace baffle tube, insert back into dirt cup, align slots and twist clockwise till tube locks in place.
Belt and Brushroll Replacement
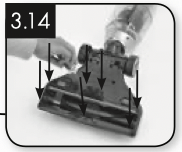
WARNING: Remove battery before servicing. Turn vacuum nozzle over. Remove screws indicated by arrows on bottom nozzle plate. Lift plate off nozzle bottom to access brush, belt and nozzle.
After replacement turn brushroll making sure belt turns freely. Return nozzle plate and screws.
For belt replacement, please call 1-800-944-9200 or visit our website at hoover to locate a dealer nearest you. Belt Service Part # 001942002
BATTERY FUEL GAUGE, DISPOSAL & SERVICE
Battery Fuel Gauge: Battery Capacity Indicator Information
All three LEDS will momentarily light when the product’s power switch is turned on. Then the Battery Fuel Gauge will indicate the pack’s remaining capacity as noted below. NOTE: Unit and lights will turn off when battery is fully discharged. Once battery is fully discharged return switch to off position.
3 LEDs lit Remaining battery capacity > 75%
2 LEDs lit Remaining battery capacity > 50%
1 LED lit Remaining battery capacity > 25%
1 LED blinking Remaining battery capacity < 25%
Battery Disposal
WARNING: RISK OF EXPLOSION OR EXPOSURE TO TOXIC MATERIAL
CAUTION: The battery used in this device may present a risk of fire or chemical burn if mistreated. Do not disassemble, heat above manufacturer’s maximum temperature limit (60˚C/140˚F), or incinerate. Replace battery with HOOVER ® battery Part # BH50000 REV B only. Use of another battery may present a risk of fire or explosion. Dispose of used battery promptly. Keep away from children. Do not disassemble and do not dispose of in fire.
Do not attempt to disassemble the battery or remove any component projecting from the battery terminals. The battery and charger have no user serviceable parts. Fire or injury may result. Prior to disposal, protect exposed terminals with heavy insulating tape to prevent shorting.
Lithium-ion Batteries
The battery must be collected, recycled or disposed of in an environmentally sound manner. The EPA certified RBRC Battery Recycling Seal on the lithium-ion (Li-ion) battery indicates Techtronic Industries, a corporate affiliate of Hoover, Inc., is voluntarily participating in an industry program to collect and recycle these batteries at the end of their useful life, when taken out of service in the United States or Canada. The RBRC program provides a convenient alternative to placing used Li-ion batteries into the trash or the municipal waste stream, which may be illegal in your area.
Please visit rbrc/call2recycle/ for information on Li-ion battery recycling and disposal bans/restrictions in your area. Hoover, Inc., involvement in this program is part of our commitment to preserving our environment and conserving our natural resources.
Service
ANY SERVICING SHOULD BE DONE BY AN AUTHORIZED SERVICE REPRESENTATIVE
Call 1-800-944-9200 USA & Canada
In the event that further assistance is required, see your Yellow Pages for an authorized HOOVER ® Dealer or visit hoover. Costs of any transportation to and from any place of repair are to be paid by the owner. The service parts used in this unit are easily replaced and readily available from an authorized HOOVER ® Dealer or retailer. Always identify your product by the model number and manufacturing code when requesting information or ordering replacement parts. (The model number appears behind the dirt cup of the product.)
TROUBLESHOOTING
If a minor problem develops, it usually can be remedied quite easily when the cause is identified by using the checklist below.
Any other servicing should be done by an authorized service representative.
WARNING: To reduce risk of personal injury - unplug vacuum before servicing.
| PROBLEM |
POSSIBLE REASON |
POSSIBLE SOLUTION |
| Product does not turn on |
1. Battery is not in product.
2. Battery is not inserted properly.
3. Battery is not charged.
4. Battery is too hot.
5. Internal component damage.
|
1. Insert battery into product.
2. Make sure battery is fully seated in battery cavity.
3. Remove and charge battery or replace with second charged battery.
4. Remove battery and let cool for 30 minutes, replace battery and retry or replace with second charged battery.
5. Call for service: 1-800-944-9200
|
| Product turns off while in use |
1. Battery is fully discharged.
2. Battery is too hot.
3. Internal component damage.
|
1. Remove and charge battery or replace with second charged battery.
2. Remove battery and let cool for 30 minutes, replace battery and retry or replace with second charged battery.
3. Call for service: 1-800-944-9200
|
| Product does not pick up dirt |
1. Dirt cup may be full.
2. Filter may be dirty.
3. Baffle tube may be dirty.
4. Airpath may be clogged.
5. Internal component damage.
|
1. Empty dirt cup.
2. Clean and/or wash filter.
3. Remove and clean.
4. Make sure the battery is removed and the product is off. Remove nozzle by pressing the nozzle release button and pulling the nozzle in a downward motion. Remove any debris clogged in the nozzle airpath. Reassemble nozzle to the product.
5. Call for service: 1-800-944-9200
|
| Brushroll will not turn |
1. Brushroll may have an obstruction.
2. Motor protection device tripped.
3. Broken belt.
4. Internal component damage.
|
1. Make sure the battery is removed and the product is turned off. Remove nozzle by pressing the nozzle release button and pulling the nozzle in a downward motion. Remove any debris clogged in the nozzle airpath. Reassemble nozzle to the product.
2. Turn product to off position, product will reset in approximately 30 minutes.
3.Make sure the battery is removed and the product is off. Remove nozzle cover replace with recommended belt and replace nozzle cover.
4. Call for service: 1-800-944-9200
|