
This product is intended for household use only.
If used commercially the warranty is void.
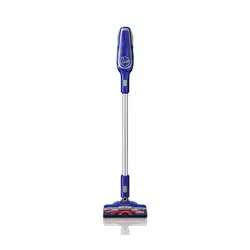
CORDLESS VACUUM
©2018 Techtronic Floor Care Technology Limited. All Rights Reserved.
USER MANUAL
IMPORTANT: READ CAREFULLY BEFORE ASSEMBLY AND USE.
REPLACEMENT PARTS:
Filter: 440012835
Charger: 440010414

IT’S GUARANTEED.
Get cleaning confi dence for up to 2 years with the Hoover limited warranty.
See warranty for complete details.
Register your vacuum by:
Calling 888 679-2121Visiting Hoover.com
or Hoover.ca
Make it offi cial.
Welcome to
Hoover
®
ownership.
2

Table of Contents
Safety Instructions......................................................................................................................................................................................................4
Getting to know your Hoover
®
IMPULSE
™
Cordless Vacuum ..................................................................................................................................6
What’s in the Box? ......................................................................................................................................................................................................7
Assembly ......................................................................................................................................................................................................................8
Mounting the Wall Bracket.........................................................................................................................................................................................9
Charging your IMPULSE
™
..........................................................................................................................................................................................10
The Hoover
®
Dashboard ............................................................................................................................................................................................11
Quick Start .................................................................................................................................................................................................................12
Using your Vacuum ...................................................................................................................................................................................................13
Using your Vacuum as a Handheld .........................................................................................................................................................................14
Using your Vacuum to Clean Up High .....................................................................................................................................................................15
Maintenance: Emptying the Dirt Cup ......................................................................................................................................................................16
Maintenance: Cleaning the Filters, Dirt Cup and Separator ................................................................................................................................17
Maintenance: Removing and Replacing the Brush Roll .......................................................................................................................................18
Troubleshooting ........................................................................................................................................................................................................19
How to Order Accessories ........................................................................................................................................................................................20
Service & Warranty Information .............................................................................................................................................................................21
Français .....................................................................................................................................................................................................................23
Espaňol ......................................................................................................................................................................................................................45
3

4
When using an electrical appliance, basic precautions should always be followed, including the
following: READ ALL INSTRUCTIONS BEFORE USING THIS APPLIANCE.
WARNING: TO REDUCE THE RISK OF FIRE,
ELECTRIC SHOCK, DAMAGE OR INJURY:
• Fully assemble before operating.
• Do not use appliance on wet surfaces. Do not expose appliance to rain. Store appliance indoors.
• The charger is for indoor use only. Be sure to always keep the appliance and charger indoors in
a dry place.
• Do not allow to be used as a toy. Not intended for use by children age 12 and under. Close
supervision is necessary when used near children. To avoid injury or damage, keep children
away from product, and do not allow children to place fi ngers or other objects into any
openings.
• Use only as described in this manual. Use only Hoover
®
recommended attachments and
products.
• Do not use charger with damaged cord or plug. If appliance or charger is not working as it
should, has been dropped, damaged, left outdoors, or dropped into water, take it to a service
center prior to continuing use.
• Do not pull or carry charger by cord, use cord as a handle, close a door on cord, or pull cord
around sharp edges or corners. Do not place product on cord. Do not run appliance over cord.
Keep cord away from heated surfaces.
• Do not unplug charger by pulling on cord. To unplug charger, grasp the plug, not the cord.
• Do not handle charger including charger plug and charger terminals, or appliance with wet
hands.
• Do not put any object into openings. Do not use with any opening blocked; keep free of dust,
lint, hair, and anything that may reduce air fl ow.
• Keep hair, loose clothing, fi ngers, and all parts of body away from openings and moving parts.
• Use extra care when cleaning on stairs to avoid personal injury or damage, and to prevent the
cleaner from falling, always place vacuum at the bottom of the stairs on the fl oor. Do not place
vacuum on stairs or furniture, as it may result in injury or damage. When using tools, always
ensure the handle is in the upright position.
• Do not use to pick up fl ammable or combustible liquids, such as gasoline, or fi ne wood
shavings, or use in areas where they may be present.
• Do not pick up anything that is burning or smoking, such as cigarettes, matches, or hot ashes.
• Do not use without Dirt Cup and/or Filters in place.
• Turn power switch o before removing or installing brush roll.
• Always turn o this appliance before connecting or disconnecting tools.
• Do not incinerate the charger, battery, or appliance even if it is severely damaged. The batteries
can explode in a fi re.
• This product includes rechargeable Lithium-Ion Batteries. Do not expose a battery pack or
appliance to fi re or excessive temperature. Exposure to fi re or temperature above 130ºC may
cause explosion.
• Do not expose battery to crushing, incineration or similar actions.
• Do not dispose of battery in a fi re or trash compactor. See battery disposal section for
directions.
• Do not attempt to disassemble battery.
• Unplug the charger from the outlet before any routine cleaning or maintenance.
IMPORTANT SAFETY INSTRUCTIONS SAVE THESE INSTRUCTIONS
SAVE THESE INSTRUCTIONS

5
• Leaks from battery cells can occur under extreme conditions. If any liquid gets on the skin
wash quickly with soap and water. If any liquid gets into the eyes, do not rub eyes, immediately
fl ush them with clean water continuously for a minimum of 15 minutes. Seek medical attention
immediately.
• Use only the charger (Hoover Model #440010414) supplied by Hoover
®
to recharge.
• Prevent unintentional starting. Ensure the appliance is o before picking up or carrying the
appliance. Carrying the appliance with your fi nger on the trigger or energizing appliances that are
powered on invites accidents.
• Do not use a battery pack or appliance that is damaged or modifi ed. Damaged or modifi ed
batteries may exhibit unpredictable behavior resulting in fi re, explosion or risk of injury.
• Follow all charging instructions and do not charge the battery pack or appliance outside of the
temperature range specifi ed in the instructions. Charging improperly or at temperatures outside of
the specifi ed range may damage the battery and increase the risk of fi re.
CHARGING AMBIENT TEMPERATURE RANGE: 5°C-50°C (41°F - 122°F)
• Have servicing performed by a qualifi ed repair person using only identical replacement parts. This
will ensure that the safety of the product is maintained.
• Do not modify or attempt to repair the appliance or the battery pack except as indicated in the
instructions for use and care.
CAUTION: The battery used in this device may present a risk of fi re or chemical burn
if mistreated. Do not disassemble, heat above manufacturer’s maximum temperature limit
(60°C/140°F), or incinerate. Use of another battery may present a risk of fi re or explosion. Dispose of
used battery promptly. Keep away from children. Do not disassemble and do not dispose of in fi re.
Do not attempt to disassemble the battery or remove any component projecting from the battery
terminals. The battery and charger have no user serviceable parts. Fire or injury may result. Prior to
disposal, protect exposed terminals with heavy insulating tape to prevent shorting.
BATTERY DISPOSAL WARNING:
RISK OF EXPLOSION OR EXPOSURE TO TOXIC MATERIAL.
LITHIUM-ION BATTERIES: The battery must be collected, recycled or disposed of in
an environmentally sound manner. The EPA certifi ed RBRC Battery Recycling Seal on the
lithium-ion (Li-ion) battery indicated Techtronic Industries, a corporate a liate of Hoover,
is voluntarily participating in an industry program to collect and recycle these batteries at
the end of their useful life, when taken out of service in the United States or
Canada. The RBRC program provides a convenient alternative to placing used
Li-ion batteries into the trash or the municipal waste stream, which may be
illegal in your area. Please visit www.rbrc.org/call2recycle/ for information on
Li-ion battery recycling and disposal bans/restrictions in your area. Hoover
involvement in this program is part of our commitment to preserving our
environment and conserving our natural resources.
WARNING: This product contains chemicals known to the State of California
to cause cancer, birth defects or reproductive harm. WASH HANDS AFTER HANDLING.

HARD
FLOOR
BOOST
MODE
HA
R
D
F
L
OOR
B
OO
ST
M
ODE
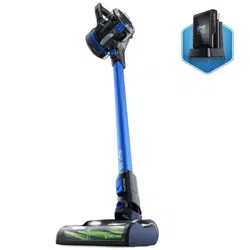
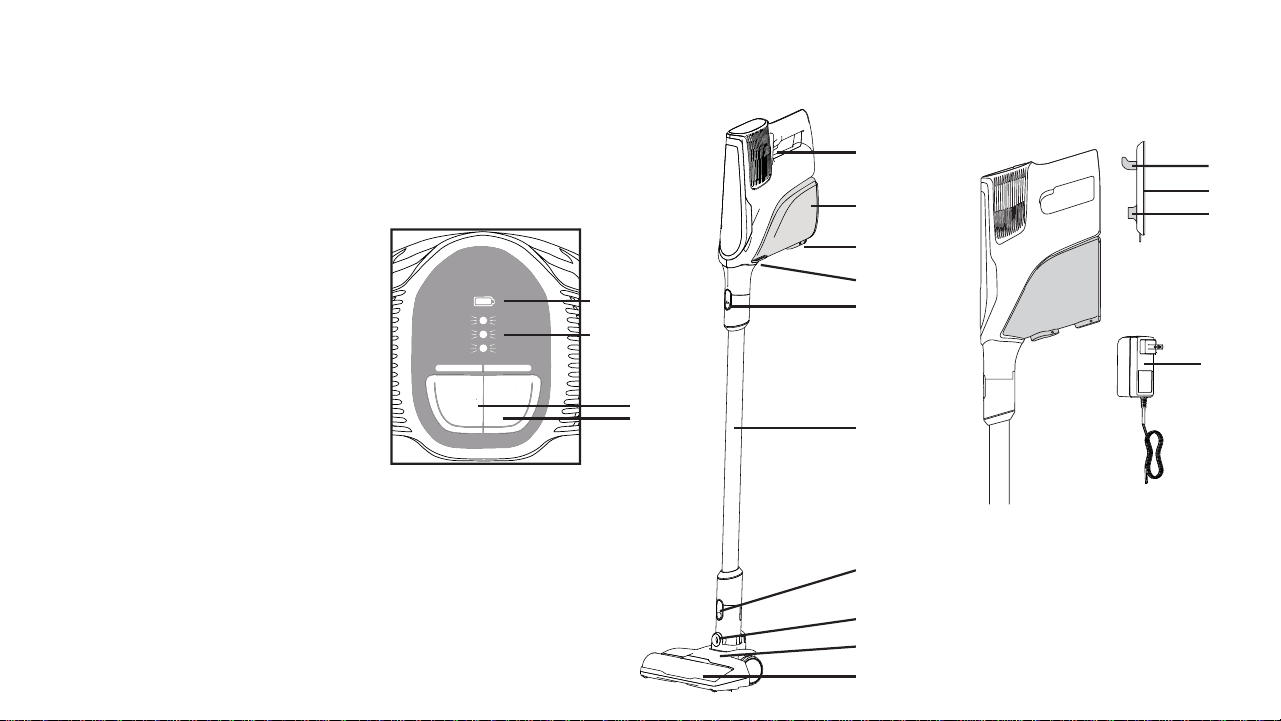
Getting to know your Hoover
®
IMPULSE
™
Cordless Vacuum
1. Hoover
®
Dashboard
2. Battery Level Indicator
3. Brush Roll Speed
4. Boost Mode
5. Power Trigger
6. Easy Empty Dirt Cup
7. Empty Button
8. Filter Access and Dirt Cup Release
9. Handheld Release Button
10. Reach Wand
11. Wand Release Button
12. Swivel Steering
13. Powered Nozzle
14. Easy Clean Brush Roll
15. Wall Mount Hook
16. Wall Mount
17. Charging Port
18. Charger
6
1
3
2
5
16
17
18
15
6
7
9
12
13
14
10
11
8
4

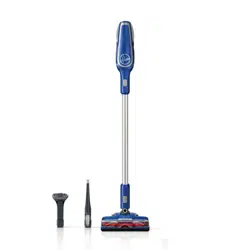
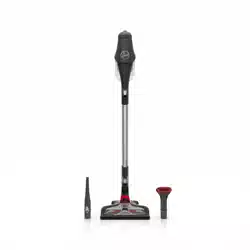
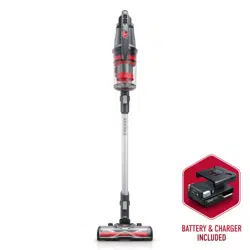
Unit Model
BH53000
üü
BH53010CDI
üüü
BH53020
üüü
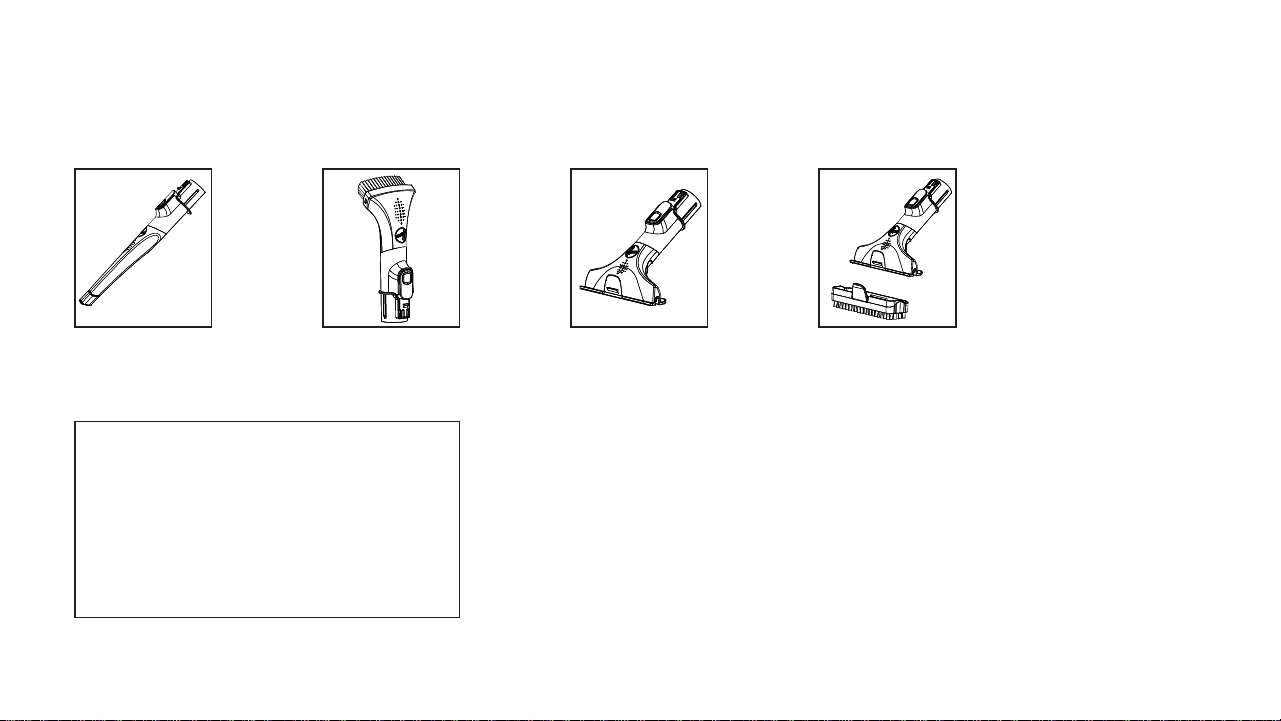
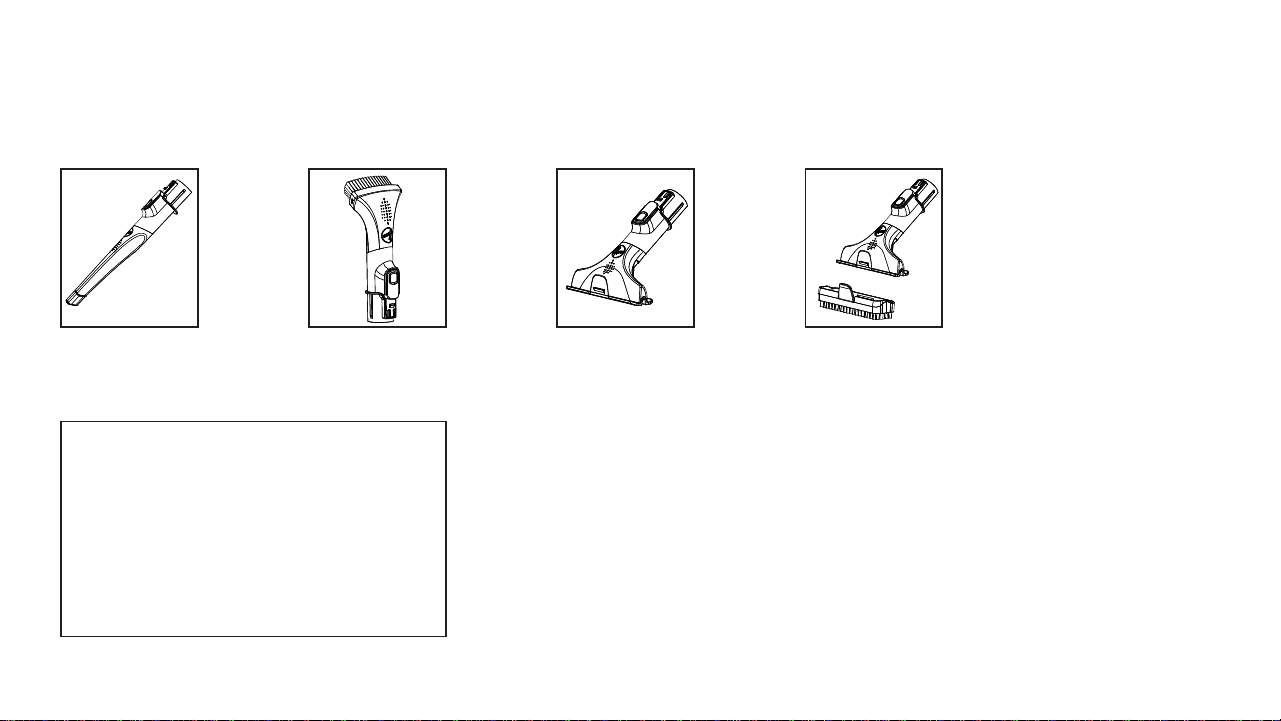
Dusting Brush
Crevice Tool
Pet Upholstery ToolUpholstery Tool
7
All models come with a Handheld, Powered Nozzle, Reach Wand, Charger and Wall Mount.
CONTENTS VARY DEPENDING ON THE MODEL PURCHASED.
What’s in the Box?

8
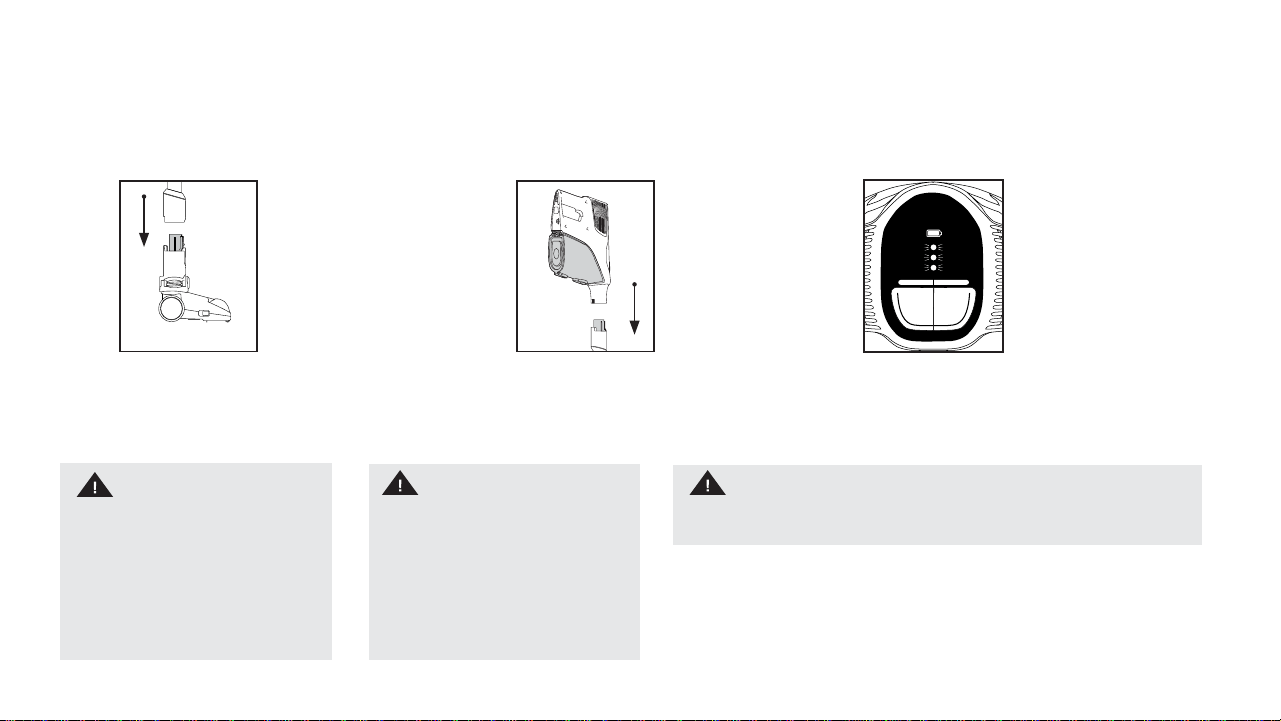
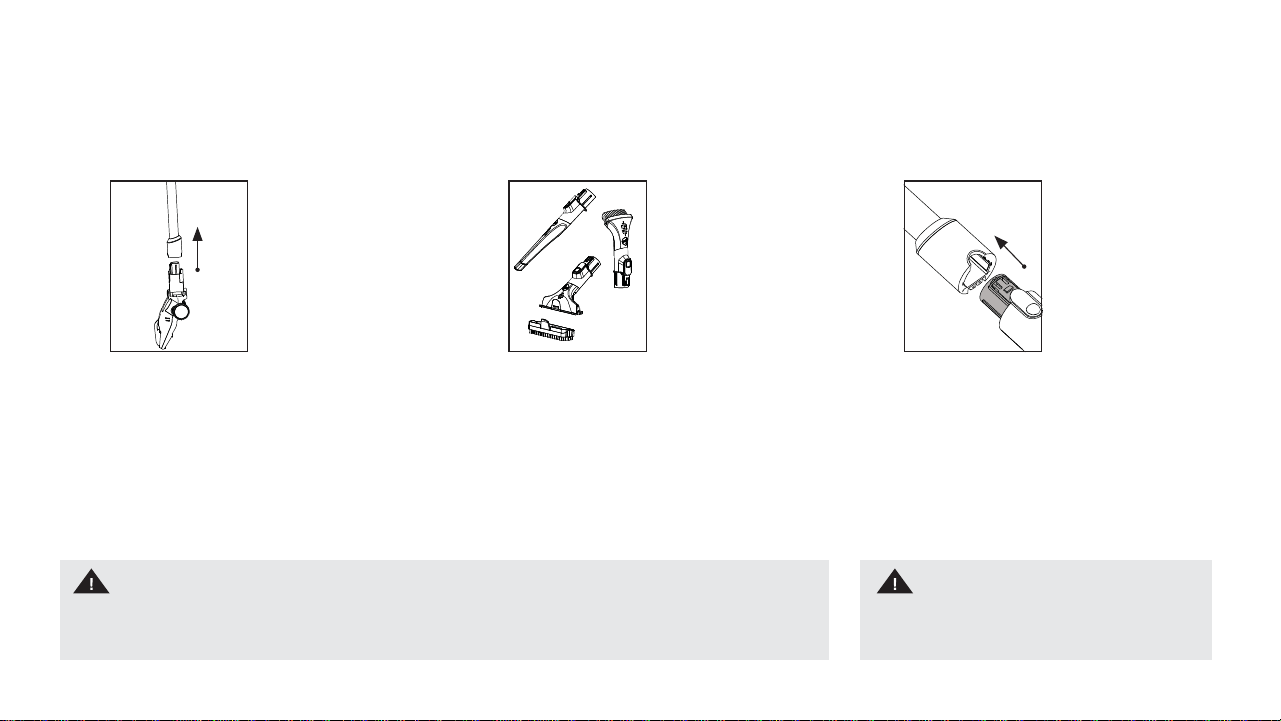
Assembly
Push the Handheld down
onto the Reach Wand
until it clicks into place.
Push the Reach Wand down onto
the Powered Nozzle until it clicks
into place.
Before fi rst use be sure to
fully charge the battery.
TIP: Charging your IMPULSE
™
may
take up to 3-4 hours.
123
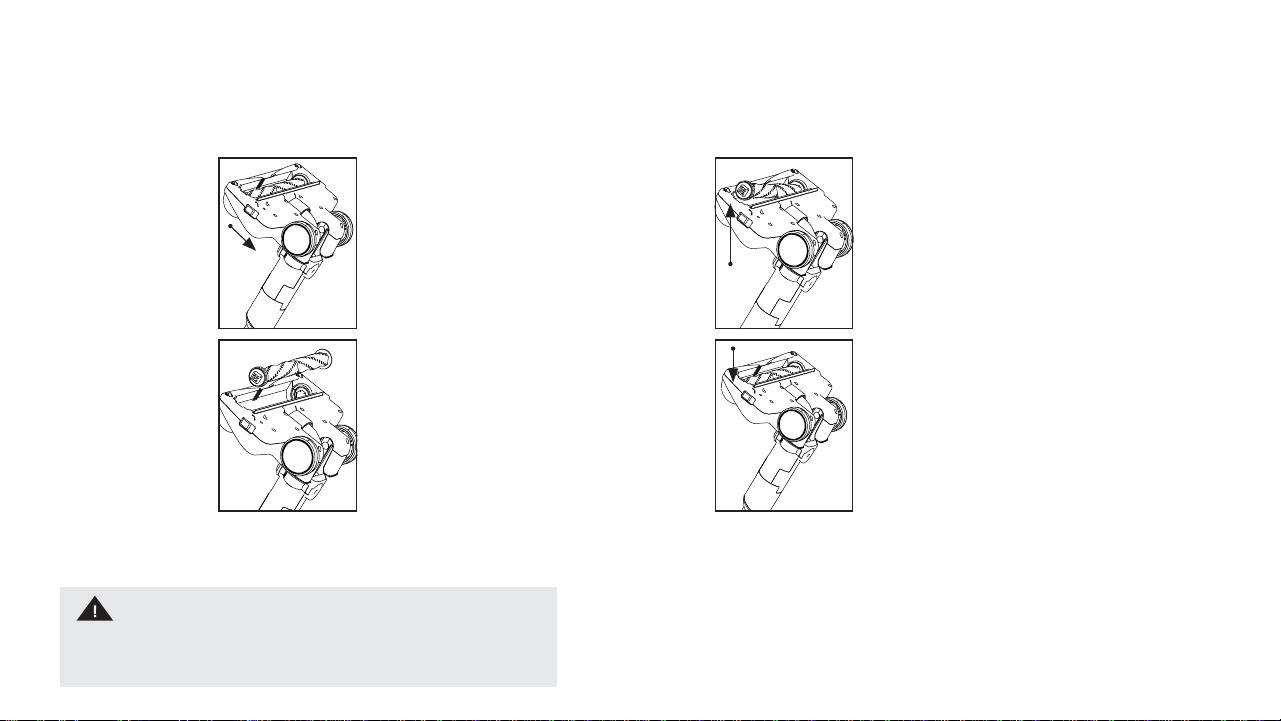
WARNING
To reduce the risk of personal injury
from moving parts, turn the power
switch to OFF and disconnect all
accessories before servicing.
IMPORTANT
This vacuum cleaner is not free
standing. In between uses or when
carrying out any maintenance always
lie fl at on the fl oor in a suitable location
so it does not become a trip hazard or
can be stepped on.
HARD
FLOOR
BOOST
MODE
IMPORTANT
Use only the charger supplied by the manufacturer to recharge.

9
Mounting the Wall Bracket
First, fully assemble the vacuum.
Locate the desired location for the
wall bracket. Be sure it is near an
outlet if you want to charge the
unit while on the wall mount.
NOTE: The wall bracket can
be used for storage use only,
without the charger, but the unit
would then need to be charged
separately.
1
Place the wall hook bracket on the
wall at the desired height. Mark
the wall anchor locations. Install
the anchors and screw the wall
hook bracket to the wall.
IMPORTANT: Use both screws to
mount the wall hook bracket to
the wall. Be sure to anchor the
screw into a stud or use the wall
anchors.
2
Place the charger plug end for
the unit in place in the wall hook
bracket (if desired for charging
unit while storing it on the wall
bracket).
3
Snap the wall mount cover in place. Store the vacuum by placing the unit
on the Wall Mount Hook with the hole
provided on the back of the handheld.
45

10
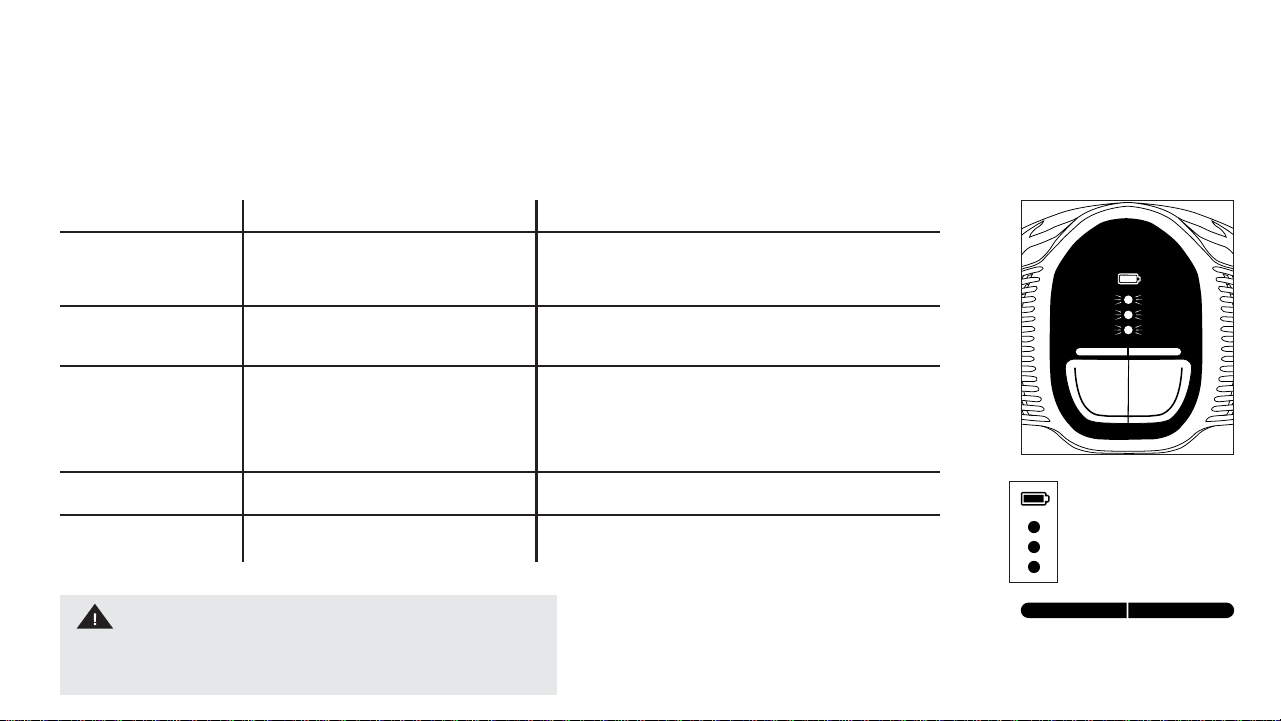
Charging your IMPULSE
™
The indicators will all pulse when
charging and turn o when fully
charged.
NOTE: The charger will be
warm while charging. The unit
will charge only for as long as
needed. It may take up to 3-4
hours for a full charge.
Charge the battery fully before fi rst
use. This will take up to 3-4 hours.
NOTE: Due to federal regulations
the battery does not come fully
charged.
123
Plug in charger. Power must be o
in order to recharge.
NOTE: If the unit is running and
the charger plug is connected to
the unit, the unit will shut off to
prevent damage to the charger
or unit.
IMPORTANT
Use only the charger supplied by the manufacturer to recharge.
HARD
FLOOR
BOOST
MODE
HARD
FLOOR
BOOST
MODE
11
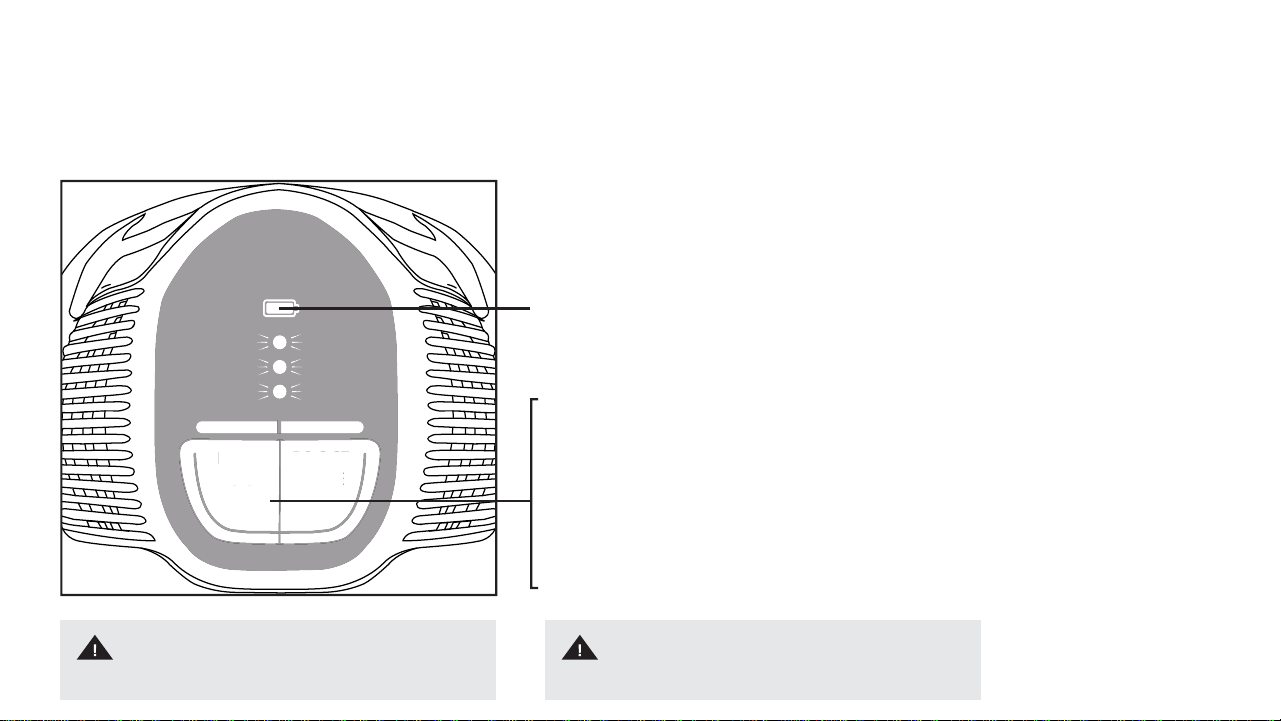
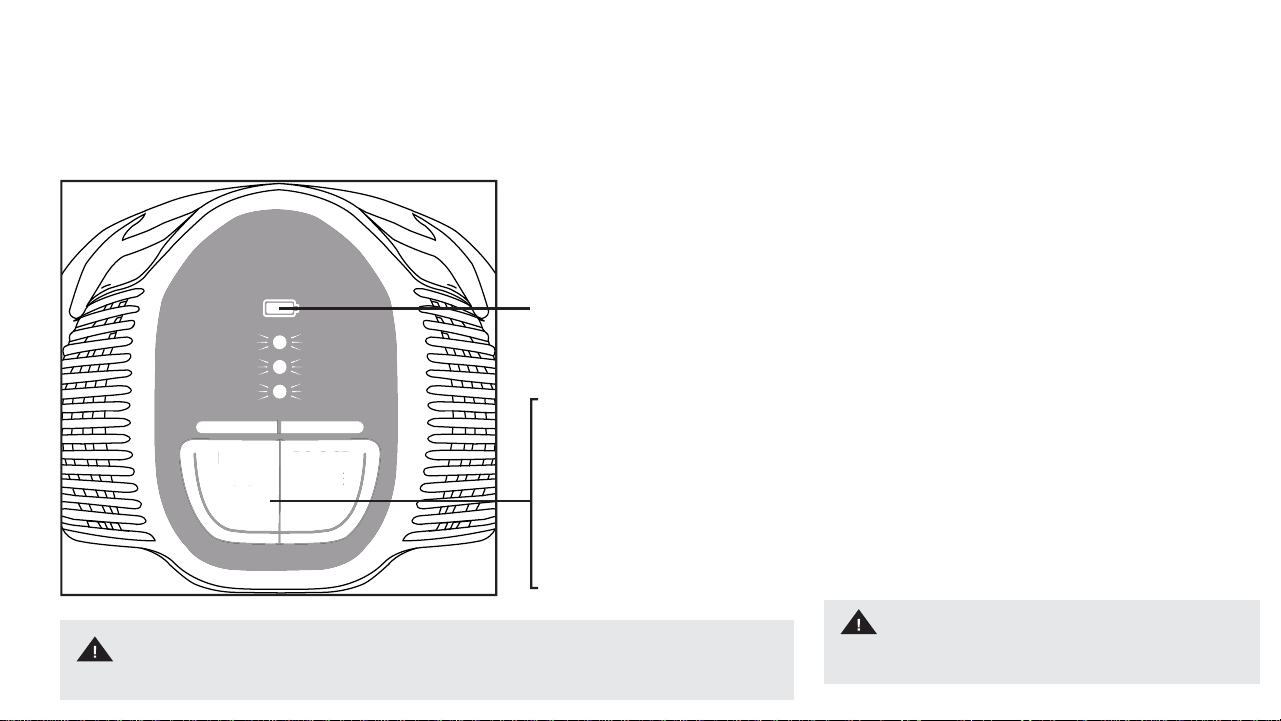
The Hoover
®
Dashboard
Battery Level Indicator
Select desired cleaning mode:
Carpet: Light OFF Great for lifting embedded
dirt from carpets.
Hard Floor: Light ON Helps reduce scatter of
debris on hard fl oors.
Boost Mode: Provides powerful suction for
hard to remove debris.
IMPORTANT
Standard Mode helps reserve battery power for longer runtime.
IMPORTANT
When light is illuminated above the mode, the selection is ON.
HARD
FLOOR
BOOST
MODE
H
A
RD
FL
OOR
B
OO
S
T
M
ODE
12
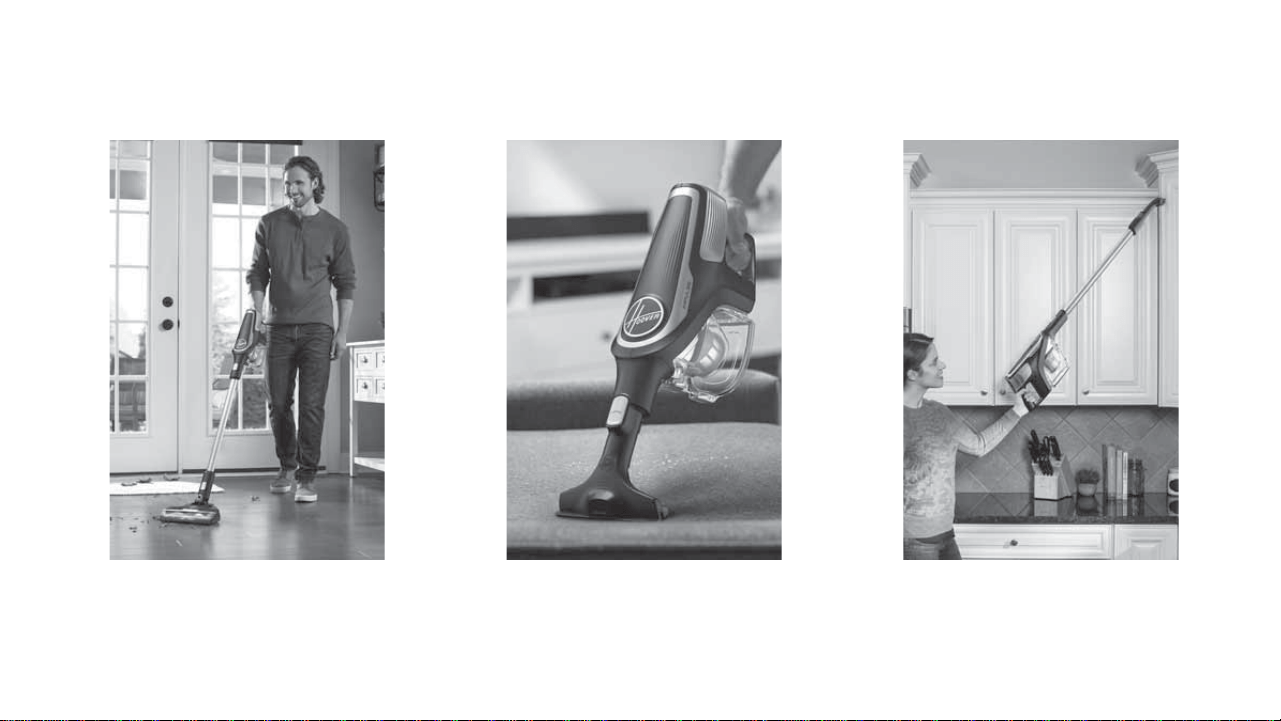
Quick Start
Handheld CleaningMulti-Floor Cleaning Up High Cleaning
123

13
HARD
FLOOR
BOOST
MODE
WARNING
Never leave the vacuum cleaner in one spot for an extended period of time as this may
damage the fl oor surface.
WARNING
To reduce the risk of personal injury from moving parts, turn
the power switch to OFF and disconnect all accessories
before servicing.
Using your Vacuum
Squeeze the trigger to turn the vacuum ON.
Release the trigger to shut the vacuum OFF.
NOTE: When power is ON, the Hoover
®
Dashboard will illuminate.
Select modes by pressing the buttons
on the dashboard. Refer to page 11 for
further detail.
For continuous power, double-click the
trigger. Power should remain ON. Squeeze
trigger again to power OFF.
When in use, the Hoover
®
Dashboard will
display the battery level. When the battery
level is getting low, recharge the battery.
1
3
2
4
HARD
FLOOR
BOOST
MODE

14
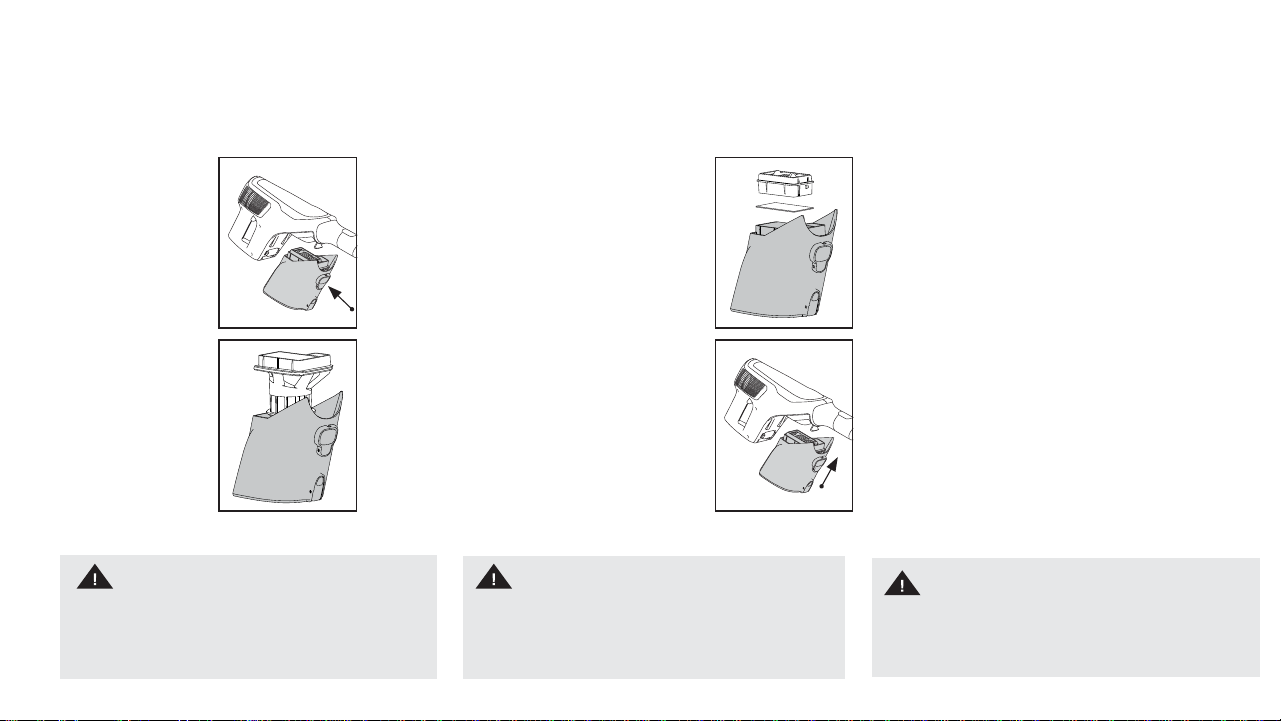
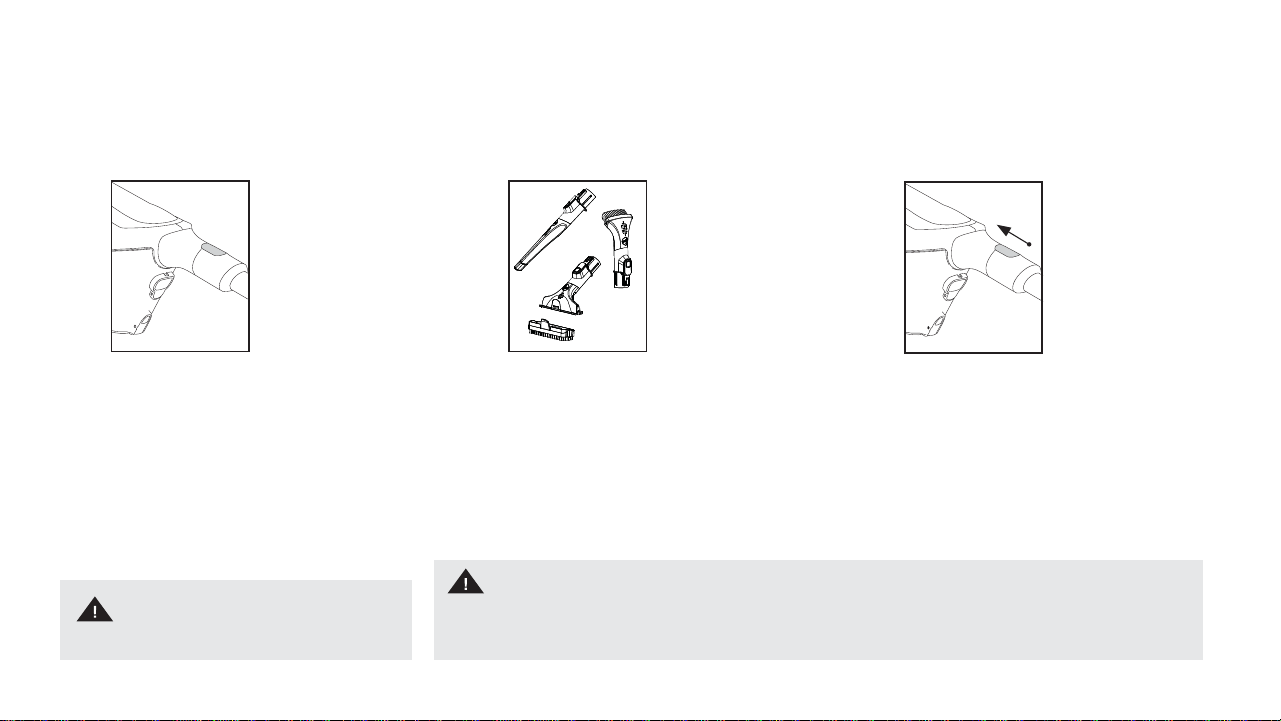
Using your Vacuum as a Handheld
Press the Handheld
Release Button. Pull to
separate the Handheld
from the Reach Wand.
Choose an accessory.
(All accessories not available on
all models).
NOTE: See page 7 to see what
accessories are included with
your IMPULSE
™
.
12
Push the chosen accessory
into the Handheld until
it clicks into place.
TIP: All available accessories
can be attached directly onto
the Handheld.
3
IMPORTANT
Not to be used for grooming a pet.
IMPORTANT
This vacuum cleaner is not free standing. In between uses or when carrying out any maintenance always lie fl at on the
fl oor in a suitable location so it does not become a trip hazard or can be stepped on.

15
Using your Vacuum to Clean Up High
Choose an accessory
(all accessories not available on
all models).
NOTE: See page 7 to see what
accessories are included with
your IMPULSE
™
.
Press the Powered Nozzle
Release Button and pull to
remove the Powered Nozzle
from the Reach Wand.
12
Push the chosen
accessory into the Reach
Wand until it clicks into
place.
TIP: The Reach Wand can
be used for hard-to-
reach places.
3
IMPORTANT
The power nozzle should not be used for overhead
cleaning.
IMPORTANT
This vacuum cleaner is not free standing. In between uses or when carrying out any maintenance always lie fl at on the
fl oor in a suitable location so it does not become a trip hazard or can be stepped on.

16
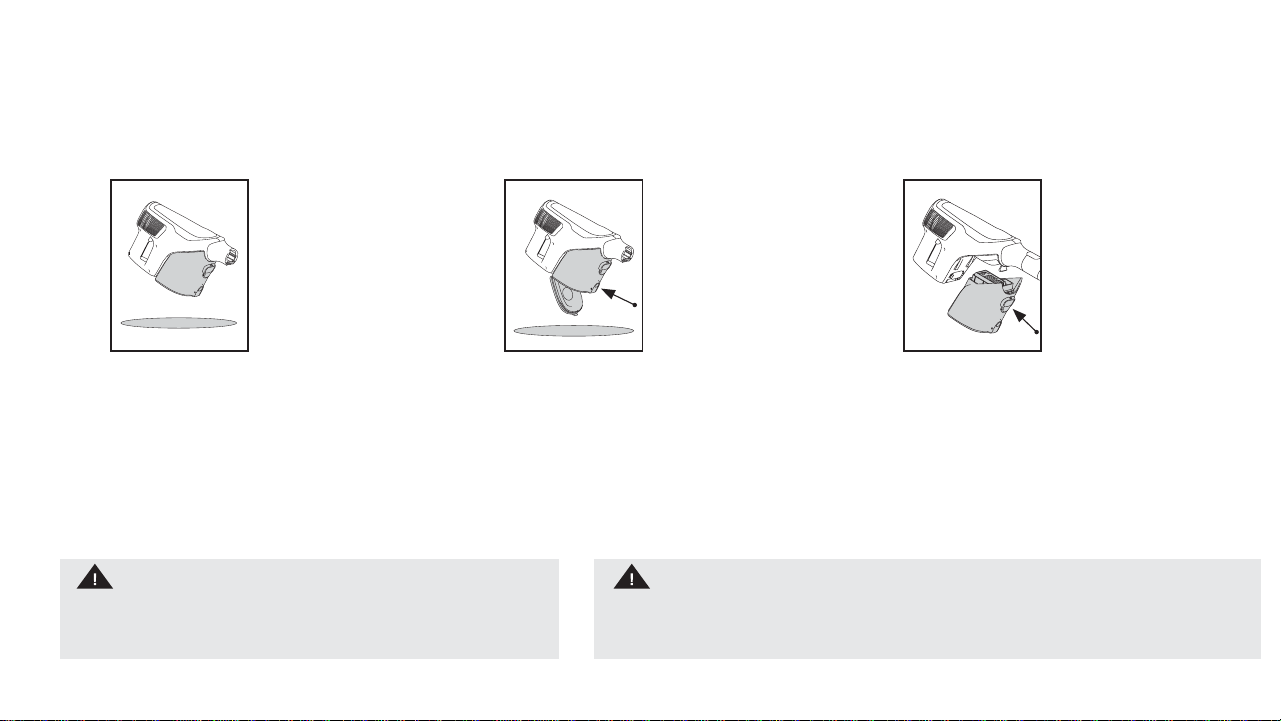
Maintenance: Emptying the Dirt Cup
Hold the Handheld over a
trash bin.
12
Press the Dirt Empty Button.
Tap the dirt cup on the side
of the trash can to remove
excess dirt.
WARNING
To reduce the risk of personal injury from moving parts, turn the power
switch to OFF and disconnect all accessories before servicing.
IMPORTANT
This vacuum cleaner is not free standing. In between uses or when carrying out any maintenance always
lie fl at on the fl oor in a suitable location so it does not become a trip hazard or can be stepped on.
The dirt cup can also be
removed to empty the trash
bin. Push the Dirt Cup Release
Button to remove.
3
17
WARNING
To reduce the risk of personal injury from moving
parts, turn the power switch to OFF and disconnect all
accessories before servicing.
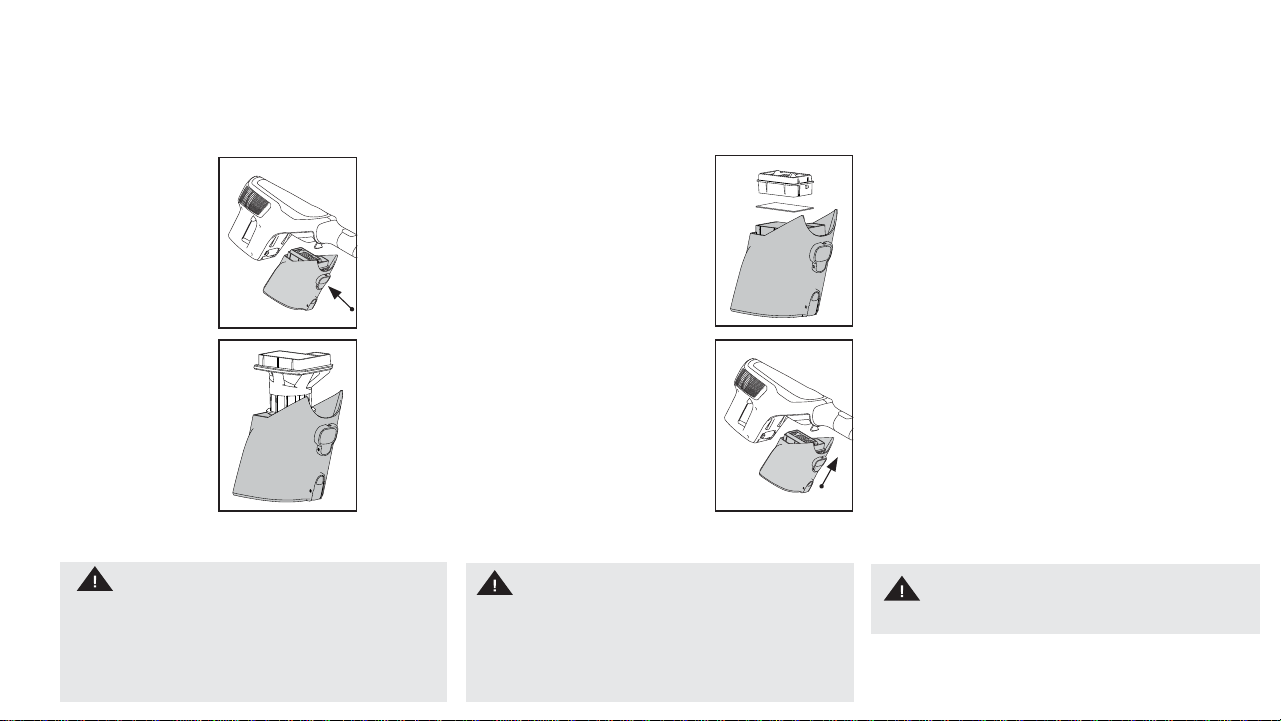
Maintenance: Cleaning the Filters, Dirt Cup and Separator (Filter: 440012835)
Press the Dirt Cup Release Button and
pull the dirt cup away.
To clean the separator, lift to remove. Clean dirt
and debris by wiping the metal screen with a
micro-fi ber cloth and then place back into the
dirt cup.
Pull the fi lters away and tap over a trash
bin to remove dirt. Rinse fi lters under warm
water until water is clear. Allow fi lters to dry
for 24 hours or until completely dry before
reinstalling.
To reassemble, align the dirt cup teeth and
click into place.
1
3
2
4
IMPORTANT
Do not use soap or other chemicals to clean. Dry fi lters
completely, for up to 24 hours, before reinstalling into
the product.
IMPORTANT
Do not use vacuum without the fi lters or separator in place.
18
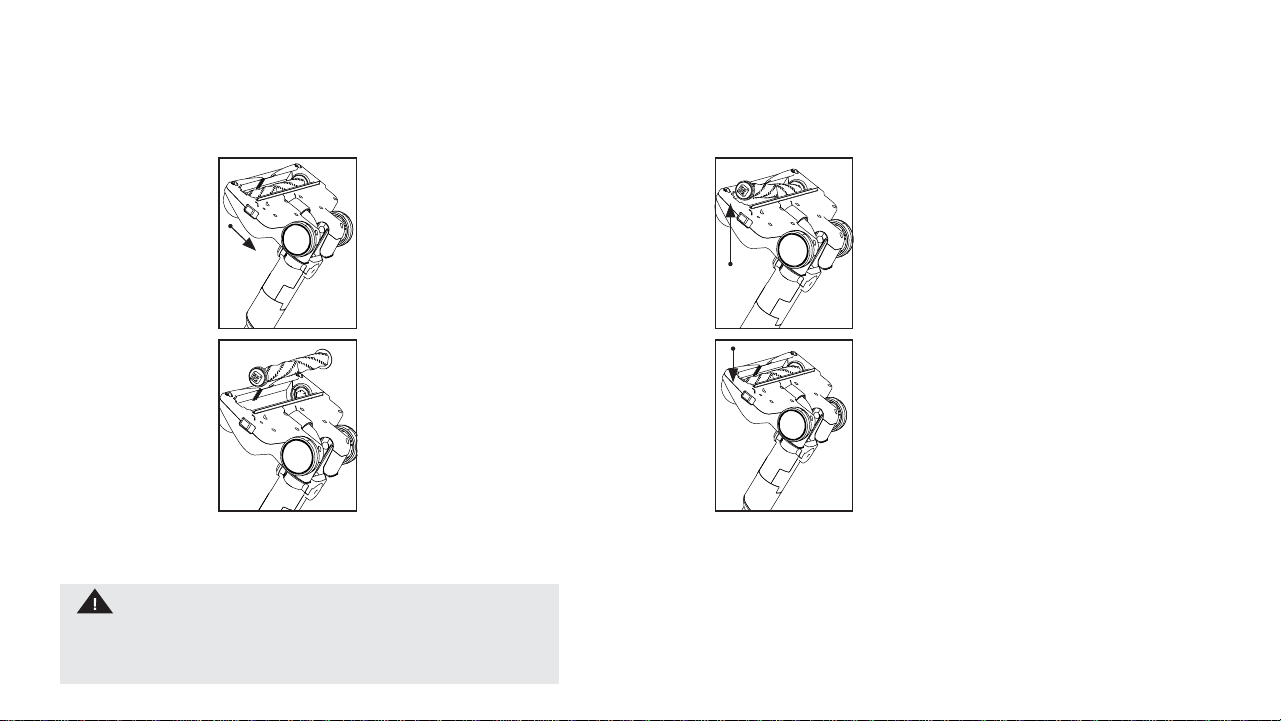
Maintenance: Removing and Replacing the Brush Roll
Remove Powered Nozzle from Reach Wand.
Turn the Powered Nozzle upside down. Slide
the Brush Roll Release Button.
Clear any threads or hair from both ends of
the brush roll and any dirt or debris inside
the housing of the Powered Nozzle.
Lift the end of brush roll to remove from the
Powered Nozzle.
Re-fi t the brush roll into the housing.
1
3
2
4
WARNING
To reduce the risk of personal injury from moving parts, turn the power
switch to OFF and disconnect all accessories before servicing.
19
Troubleshooting
WARNING
To reduce the risk of personal injury from moving parts, turn the power
switch to OFF and disconnect all accessories before servicing.
HARD
FLOOR
BOOST
MODE
Charging LEDs:
Pulsing = Charging
Flashing = Unit Error
Contact Customer Service:
1 (888) 679-2121
Mode LEDs:
If fl ashing, brush roll has stalled. Turn product o
to reset stall protection.
Any other servicing should be done by an authorized service representative.
If appliance is not working as it should, has been dropped, damaged, left outdoors, or dropped into water, take it to a
service center prior to continuing use.
PROBLEM POSSIBLE CAUSE POSSIBLE SOLUTION
Dust escaping from vacuum 1. Dirt cup full. 1. Empty dirt cup. (see page 16)
2. Dirt cup not installed correctly. 2. Review dirt cup removal and replacement. (see page 17)
3. Rinsable filter and/or separator not installed completely. 3. Review filter removal and cleaning. (see page 17)
4. Filter is dirty 4. Rinse Filter
Vacuum tools won’t pick up 1. Dirt cup full. 1. Empty dirt cup. (see page 16)
2. Filter is clogged. 2. Remove filter and clean. (see page 17)
3. Power carpet nozzle not spinning. 3. Remove and reattach. (see page 18)
Poor suction 1. Dirt cup not seated completely. 1. Reinstall dirt cup, make sure lid is closed completely. (see page 17)
2. Filter is clogged or dirty. 2. Remove filter and clean. (see page 17)
3. Dirt cup not installed correctly. 3. Review filter removal and replacement. (see page 17)
4. Battery charge is getting weak. 4. Charge battery. (see page 10)
5. Nozzle/dirt passage clogged. 5. Turn off the unit and then disconnect the nozzle to remove
debris. (see page 18)
Vacuum running warm 1. Dirty filter. 1. Clean filter, rinse, dry and re-assemble. (see page 17)
2. Low suction. 2. Locate clog and remove.
Vacuum won’t turn ON 1. Battery is not charged. 1. Charge battery. (see page 10)
or charge
2. Your battery may be too hot. 2. Let the vacuum cool for 30 minutes and retry.
20
How to Order Accessories
Upholstery Tool
Part #440012842
Dusting Brush
Part #440012841
Crevice Tool
Part #440012840
Pet Upholstery Tool
Part #440012853
WHAT TO BUY:
Buy Genuine Hoover
®
Parts & Accessories:
If you are in need of a new part, attachment or accessory, visit Hoover.com
or Hoover.ca for more information.
Having trouble locating an item or model on our site, contact Customer
Care at 888 679-2121.

21
SERVICE & WARRANTY FOR HOOVER
®
IMPULSE
™
CORDLESS
VACUUM PRODUCT & BATTERY SERVICE INFORMATION
ANY SERVICING SHOULD BE DONE BY AN AUTHORIZED SERVICE REPRESENTATIVE
Call 888 679-2121 USA & Canada
In the event that further assistance is required, visit an authorized service center. Find one nearest you by
visiting our website at www.hoover.com. Costs of any transportation to and from any place of repair are
to be paid by the owner. Always identify your product by the model number and manufacturing code when
requesting information or ordering replacement parts. (The model number and manufacturing code for the
vacuum appears behind the dirt cup and on the back of the charger.)
LIMITED TWO YEAR WARRANTY (DOMESTIC USE)
WHAT THIS WARRANTY COVERS: When used and maintained in normal household use and in accordance
with the Owner’s Guide, your Hoover
®
product and battery are warranted against original defects in material
and workmanship for a full two years from date of purchase (the “Warranty Period”). During the Warranty
Period, Hoover
®
will provide labor and parts at no cost to you, to correct such defect in your products
purchased in the United States, U.S. Military Exchanges and Canada.
HOW TO MAKE A WARRANTY CLAIM: If this product is not as warranted, take or send the product to a
Hoover
®
Authorized Warranty Service Dealer along with proof of purchase. For an automated referral to
authorized service outlets in the U.S.A., phone 888 679-2121 or visit Hoover
®
online at www.hoover.com.
WHAT THIS WARRANTY DOES NOT COVER: This warranty does not cover belts, fi lters and brush rolls, use
of the product in a commercial operation (such as maid, janitorial and equipment rental services), improper
maintenance of the product, damage due to misuse, acts of God, nature, vandalism or other acts beyond
the control of Hoover
®
, owner’s acts or omissions, use outside the country in which the product was initially
purchased and resales of the product by the original owner. This warranty does not cover pick up, delivery,
transportation or house calls. However, if you mail your product to a Hoover
®
Sales and Service Center for
warranty service, cost of shipping will be paid one way. Please call the Hoover
®
Services, 888 679-2121, on
how to ship this product. This warranty does not apply to products purchased outside the United States,
including its territories and possessions, a U.S. Military Exchange and Canada.
OTHER IMPORTANT TERMS: This warranty is not transferable and may not be assigned. This warranty shall
be governed and construed under the laws of the state of North Carolina. The Warranty Period will not be
extended by any replacement of batteries or parts or repair performed under this warranty.
THIS WARRANTY IS THE EXCLUSIVE WARRANTY AND REMEDY ALL OTHER WARRANTIES, EXPRESSED
OR IMPLIED, INCLUDING WARRANTIES OF MERCHANTABILITY OR FITNESS FOR PARTICULAR PURPOSE,
ARE DISCLAIMED IN NO EVENT WILL HOOVER BE LIABLE FOR ANY SPECIAL, INDIRECT, INCIDENTAL OR
CONSEQUENTIAL DAMAGES OF ANY KIND OR NATURE TO OWNER OR ANY PARTY CLAIMING THROUGH
OWNER, WHETHER BASED IN CONTRACT, NEGLIGENCE, TORT OR STRICT PRODUCTS LIABILITY OR ARISING
FROM ANY CAUSE WHATSOEVER.
Some states do not allow the exclusion of consequential damages, so the above exclusion may not apply to
you. This warranty gives you specifi c rights; you may also have others that vary from state to state.
QUESTIONS OR CONCERNS?
Contact us:
Hoover.com/support or Hoover.ca/support
888 679-2121
Connect with us:
Twitter: @HooverUSA
Facebook: facebook.com/hoover
Do not return to store. See behind the dirt cup for model
number.

22
NOTES :
ASPIRATEUR SANS FIL
Guide de l’utilisateur
PIÈCES DE RECHANGE :
Filtre : 440012835
Chargeur : 440010414
Ce produit est destiné à un usage domestique seulement. La
garantie est nulle si l’appareil est utilisé à des fi ns commerciales.
©Techtronic Floor Care Technology Limited, 2018. Tous droits réservés.
IMPORTANT: LISEZ ATTENTIVEMENT LE PRÉSENT GUIDE
D’UTILISATION AVANT D’ASSEMBLER ET D’UTILISER L’APPAREIL.
AS
PIRATE
U
R
S
AN
S
FI
L
G
uide de l’utilisateu
r
PI
ÈC
E
S
DE RE
C
HAN
G
E :
Filtr
e
: 44
00
12
835
C
ha
rge
ur : 44
00
1
0
414
Ce produit est destiné à un usage domestique seulement. La
garantie est nulle si l’appareil est utilisé à des fi ns commerciales.
©
Techtronic Floor Care Technology Limited, 2018. Tous droits r
é
serv
é
s
.
IMP
O
RTANT: LI
S
EZ ATTENTIVEMENT LE PRÉ
S
ENT
GU
IDE
D’
U
TILI
S
ATI
O
N AVANT D’A
SS
EMBLER ET D’
U
TILI
S
ER L’APPAREIL.

C'EST GARANTI.
Nettoyez en toute confi ance pendant deux (2) ans grâce à la garantie limitée de HooverMD.
Consultez la garantie pour obtenir plus de détails.
Pour enregistrer votre aspirateur :
Appelez au 1 888679-2121Visitez Hoover.com ou
Hoover.ca
Devenez offi ciellement propriétaire.
Bienvenue chez Hoover
MD
.
24

25
Table des matières
Consignes de sécurité ...........................................................................................................................................................................................................................26
Apprendre à connaître votre aspirateur sans fi l IMPULSE
MC
de Hoover
MD
....................................................................................................................................... 28
Contenu de la boîte ................................................................................................................................................................................................................................29
Assemblage ............................................................................................................................................................................................................................................ 30
Installation du support mural .............................................................................................................................................................................................................. 31
Charge de votre aspirateur IMPULSE
MC
. ...............................................................................................................................................................................................32
Tableau de bord Hoover
MD
..................................................................................................................................................................................................................... 33
Assemblage rapide ................................................................................................................................................................................................................................ 34
Utilisation de votre aspirateur ............................................................................................................................................................................................................. 35
Utilisation de votre appareil comme un aspirateur à main.............................................................................................................................................................. 36
Utilisation de votre appareil pour le nettoyage en hauteur ............................................................................................................................................................. 37
Entretien Vider le vide-poussière ........................................................................................................................................................................................................38
Entretien Nettoyage du fi ltres, du vide-poussière et du séparateur ............................................................................................................................................... 39
Entretien Retrait et réinstallation du rouleau-brosse ....................................................................................................................................................................... 40
Dépannage .............................................................................................................................................................................................................................................. 41
Commande d'accessoires ..................................................................................................................................................................................................................... 42
Renseignements concernant la garantie et les réparations ............................................................................................................................................................ 43

26
CONSIGNES DE SÉCURITÉ IMPORTANTES CONSERVEZ CES INSTRUCTIONS
CONSERVEZ CES INSTRUCTIONS
Lorsque vous utilisez des appareils électriques, veuillez toujours respecter entre autres les
consignes de sécurité élémentaires suivantes: VEUILLEZ LIRE TOUTES LES INSTRUCTIONS AVANT
D'UTILISER CET APPAREIL.
AVERTISSEMENT : POUR RÉDUIRE LE RISQUE D'INCENDIE, DE
DÉCHARGE ÉLECTRIQUE, DE DOMMAGE OU DE BLESSURE :
• Assemblez entièrement l’appareil avant de l’utiliser.
• N’utilisez pas l’appareil sur des surfaces mouillées. N’exposez pas l’appareil à la pluie. Appareil
de magasin à l’intérieur.
• Le chargeur est pour usage intérieur seulement. N’oubliez pas de toujours garder l’appareil et le
chargeur à l’intérieur dans un endroit sec.
• Ne permettez pas aux enfants de jouer avec l’appareil. Cet appareil ne doit pas être utilisé par
des enfants de moins de 12ans. Exercez une surveillance étroite lorsque l’appareil est utilisé à
proximité d’enfants. Gardez l’appareil hors de la portée des enfants et ne laissez pas ces derniers
introduire leurs doigts ou d’autres objets dans aucune ouverture afi n d’éviter les blessures ou les
bris.
• Utilisez l’appareil uniquement aux fi ns décrites dans le présent guide. N’utilisez que des
accessoires et des produits recommandés par Hoover
MD
.
• N’utilisez pas le chargeur si la fi che ou le cordon est endommagé. Si l’appareil ou le chargeur ne
fonctionnent pas adéquatement, s’ils sont tombés sur le sol ou dans l’eau, s’ils sont endommagés
ou ont été laissés à l’extérieur, apportez-les à un centre de service pour les faire inspecter avant
de continuer à les utiliser.
• Ne tirez pas ni ne transportez le chargeur par le cordon, n’utilisez pas le cordon comme une
poignée, ne coincez pas le cordon dans l’embrasure d’une porte et ne l’appuyez pas contre des
arêtes tranchantes ou des coins.
• Ne placez pas l’appareil sur le cordon. Ne faites pas rouler l’appareil sur le cordon. Tenez le
cordon éloigné des surfaces chaudes.
• Ne débranchez pas le chargeur en tirant sur le cordon. Pour débrancher le chargeur, tirez sur la
fi che.
• Ne manipulez pas le chargeur, y compris la fi che et les bornes, ni l’appareil si vous avez les mains
mouillées.
• N’insérez aucun objet dans les ouvertures. N’utilisez pas l’appareil si les ouvertures sont
obstruées et assurez-vous qu’elles sont exemptes de poussière, de mousse, de cheveux ou de tout
ce qui pourrait réduire le débit d’air.
• Gardez les cheveux, les vêtements amples, les doigts et toute autre partie du corps à l’écart des
ouvertures et des pièces en mouvement.
• Soyez très prudent lorsque vous nettoyez des escaliers afi n d’éviter les blessures et les bris,
la chute de l’appareil et assurez-vous de toujours déposer l’aspirateur au pied de l’escalier. Ne
placez pas l’aspirateur sur les marches d’un escalier ou sur un meuble, car cela peut entraîner
des dommages ou des blessures. Lorsque vous utilisez des accessoires, assurez-vous que la
poignée est toujours en position verticale.
• N’utilisez pas l’appareil pour aspirer des liquides infl ammables ou combustibles comme de
l’essence, ni de la sciure de bois, ni dans des endroits où de telles substances peuvent être
présentes.
• N’utilisez pas l’appareil pour aspirer quoi que ce soit qui brûle ou dégage de la fumée comme des
cigarettes, des allumettes ou des cendres chaudes.
• N’utilisez pas l’appareil si le vide-poussière ou les fi ltres ne sont pas installés.
• Éteignez l‘appareil avec l‘interrupteur avant de retirer ou installer le rouleau-brosse.
• Éteignez toujours l’appareil avant d’installer ou de retirer des accessoires.
• N’incinérez pas le chargeur, la pile ou l’appareil mêmes s’ils sont gravement endommagés. La pile
peut exploser au feu.
• Ce produit contient des piles au lithium-ion rechargeables. N’exposez pas le bloc-piles ou
l’appareil au feu ou à une température excessive. L’exposition au feu ou à une température
supérieure à 130°C représente un risque d’explosion.

27
• Évitez d’écraser et d’incinérer la pile ou de la soumettre à des actions similaires.
• Ne jetez pas la pile au feu ou dans un compresseur à déchets. Consultez le chapitre sur
l’élimination de la pile pour obtenir des instructions.
• Ne tentez pas de démonter la pile.
• Débranchez le chargeur de la prise avant de procéder à tout nettoyage ou entretien de routine.
• La pile peut fuir si elle est soumise à des conditions extrêmes. Si l’électrolyte entre en contact
avec votre peau, lavez aussitôt les parties touchées avec de l’eau et du savon. En cas de contact
avec les yeux, ne frottez pas. Rincez immédiatement vos yeux à l’eau propre pendant au moins
15minutes et consultez un médecin sans attendre.
• Utilisez uniquement le chargeur (modèle no440010414 de Hoover) fourni avec votre appareil
Hoover
MD
.
• Prévenez les mises en marche non intentionnelles. Assurez-vous que l’appareil est éteint avant de
le ramasser ou le transporter. Le transport de l’appareil en conservant les doigts sur la gâchette et
son branchement à une source électrique représentent un risque d’accident.
• N’utilisez ni un bloc-piles ni un appareil endommagé ou modifi é. Le fonctionnement des batteries
endommagées ou modifi ées peut être imprévisible et présenter des risques d’incendie, d’explosion
ou de blessures.
• Suivez toutes les instructions portant sur la recharge. Ne rechargez pas le bloc-piles ni l’appareil
à des températures autres que celles indiquées dans ces instructions. Toute recharge à des
températures hors de la plage indiquée présente des risques d’endommager la batterie en plus
d’augmenter les risques d’incendie.
TEMPÉRATURE AMBIANTE POUR LA RECHARGE : 5 °C à 50 °C (41 °F à 122 °F)
• Lorsqu’un entretien est nécessaire, confi ez votre appareil à un réparateur qualifi é qui n’utilisera
que des pièces de rechange identiques aux pièces d’origine. Vous vous assurerez ainsi de
préserver la sécurité de l’appareil.
• Ne modifi ez ni l’appareil ni le bloc-piles et ne tentez pas de les réparer, sauf dans la mesure
indiquée dans les présentes instructions quant à leur utilisation et à l’entretien requis.
MISE EN GARDE : La pile utilisée dans cet appareil peut présenter un risque d'incendie ou de brûlure
chimique si elle n'est pas manipulée adéquatement. Ne la démontez pas, ne la chau ez pas au-delà de la température maximale
établie par le fabricant (60°C/140°F) et ne l'incinérez pas. L'utilisation d'une autre pile pourrait causer un incendie ou une
explosion. Jetez rapidement toute pile usagée. Gardez la pile hors de la portée des enfants. Ne démontez pas la pile et ne la
jetez pas au feu. Ne tentez pas de démonter la pile ou de retirer tout composant en saillie des bornes de la pile. Ne tentez pas
de remplacer des pièces de la pile ou du chargeur. Cela pourrait provoquer un incendie ou une explosion. Avant de jeter la pile,
protégez les bornes exposées à l'aide d'un épais ruban isolant pour éviter les courts-circuits.
AVERTISSEMENT CONCERNANT L'ÉLIMINATION DE
LA PILE :
RISQUE D'EXPLOSION OU D'EXPOSITION AUX MATIÈRES TOXIQUES :
PILE AU LITHIUM-ION : La pile doit être recueillie, recyclée ou éliminée dans le
respect de l'environnement. Le sceau de recyclage des piles au lithium-ion de la
RBRC certifi é par l'EPA indique que TechtronicIndustries, société a liée à Hoover,
Inc., participe volontairement à un programme de collecte et de recyclage des piles
usagées au Canada et aux États-Unis. Le programme de recyclage de la RBRC o re une
solution de rechange pratique qui permet d'éviter que les piles soient jetées à la poubelle ou dans
les ordures ménagères municipales, ce qui pourrait être illégal dans votre région. Visitez le www.
rbrc.org/call2recycle/ pour obtenir de plus amples renseignements sur le recyclage des piles au
lithium-ion ainsi que sur les interdictions et les restrictions relatives à l'élimination de ces piles dans
votre région. Laparticipation de Hoover, Inc. à ce programme témoigne de son engagement à protéger
l'environnement et les ressources naturelles.
AVERTISSEMENT: Ce produit contient des produits chimiques reconnus par l'État de la Californie comme pouvant causer le cancer, des
anomalies congénitales ou des dysfonctions du système reproducteur. BIEN SE LAVER LES MAINS APRÈS LA MANIPULATION.
Apprendre à connaître votre aspirateur sans fil IMPULSE
MC
de Hoover
MD
28
1. Tableau de bord Hoover
MD
2. Indicateur de niveau de charge
3. Rouleau de brosse vitesse
4. Mode haute puissance
5. Gâchette de mise en marche
6. Vide-poussière facile à vider
7. Accès au fi ltres et libération de la saleté
8. Bouton vide
9. Bouton de dégagement de
l’aspirateur à main
10. Tube-rallonge
11. Bouton de dégagement du tuyau
12. Direction pivotante
13. Buse motorisée
14. Rouleau-brosse facile à nettoyer
15. Support à crochet mural
16. Support mural
17. Port de chargement
18. Chargeur
HARD
FLOOR
BOOST
MODE
HA
R
D
F
L
OOR
B
OO
ST
M
ODE
3
5
16
17
18
15
6
7
9
12
13
14
10
11
8
4
1
2

BH53000
üü
BH53010CDI
üüü
BH53020
üüü
Brosse à épousseterSuceur plat Modèle
Accessoire pour
revêtements en tissu
29
Tous les modèles sont équipés d’un aspirateur à main, d’une buse
motorisée, d’un tuyau-rallonge, d’un chargeur et d’un support mural.
LE CONTENU VARIE SELON LE MODÈLE ACHETÉ.
Contenu de la boîte
Accessoire pour articles
d’animaux en tissu
30
Assemblage
Poussez l'aspirateur à main
dans le tube-rallonge jusqu'à
ce qu'il s'enclenche.
Poussez le tube-rallonge dans la buse
motorisée jusqu'à ce qu'il s'enclenche.
Assurez-vous que la pile est complètement
chargée avant
d'utiliser l'appareil pour la première fois.
CONSEIL : La durée de charge de votre
aspirateur IMPULSE
MC
est d’environ 3
à 4 heures.
123
IMPORTANT
Cet aspirateur ne se tient pas seul en
position verticale. Entre les utilisations
ou lors de toute tâche d'entretien, posez
toujours l'aspirateur à plat sur le sol à
un emplacement où vous ne risquerez
pas de trébucher ou de marcher dessus.
AVERTISSEMENT
Afin de réduire le risque de blessures
causées par les pièces mobiles,
éteignez l’appareil en mettant
l’interrupteur à la position « OFF »
et débranchez tous les accessoires
avant d’effectuer l’entretien.
HARD
FLOOR
BOOST
MODE
IMPORTANT
Utilisez uniquement le chargeur fourni par le fabricant pour charger la batterie.

31
Installation du support mural
Assemblez d’abord tout l’aspirateur.
Déterminez l’emplacement souhaité
du support mural. Assurez-vous que
l’endroit se situe près d’une prise
de courant afi n de pouvoir charger
l’appareil directement depuis son
support mural.
REMARQUE : Le support mural
peut être utilisé seulement pour
le rangement de l’appareil sans
la pile que vous devrez charger
séparément.
Apposez le support à crochet au mur
à la hauteur désirée. Marquez les
emplacements d’ancrage au mur.
Installez les ancrages et vissez le
support à crochet mural au mur.
IMPORTANT : Fixez le support à
crochet au mur en utilisant les
deux vis. Assurez-vous d’insérer
les ancrages dans un montant ou
utilisez des ancrages muraux.
Rangez l’aspirateur le plaçant sur le
support à crochet mural en utilisant le
trou situé derrière l’aspirateur à main.
12
Installez la fi che du chargeur de
l’appareil au support à crochet
mural (si vous souhaitez charger
l’appareil lorsqu’il est rangé sur
son support mural).
3
Enclenchez le couvercle de fi xation
murale en place.
45

32
Charge de votre aspirateur IMPULSE
MC
Les témoins clignoteront pendant la
charge et s’éteindront dès la charge
terminée.
REMARQUE : Le chargeur devient
chaud pendant la recharge. La
recharge de l’appareil ne durera que le
temps nécessaire. La durée de charge
complète est d’environ 3 à 4 heures.
E ectuez une charge complète de
la pile avant la première utilisation.
La durée de charge est d’environ 3 à
4 heures.
REMARQUE : En raison des
règlements fédéraux, la pile n’est pas
complètement chargée au moment
de l’achat.
123
Branchez le chargeur. L’aspirateur doit
être hors tension afi n de le charger.
REMARQUE : L’appareil s’arrête lorsque
la fi che du chargeur y est branchée
afi n d’éviter les dommages au
chargeur ou à l’appareil.
IMPORTANT
Utilisez uniquement le chargeur fourni par le fabricant pour charger la batterie.
HARD
FLOOR
BOOST
MODE
HARD
FLOOR
BOOST
MODE
33
Tableau de bord Hoover
MD
REMARQUE
Le mode régulier (Standard) aide à économiser l’énergie de la pile pour que l’appareil fonctionne plus longtemps.
Indicateur de niveau de batterie
Choisir le mode de nettoyage désiré :
Éclairage de tapis éteint: Idéal pour soulever
la saleté incrustée sur les tapis.
Sol dur : Aide à réduire la dispersion des
débris sur les sols durs.
Mode haute puissance: Fournit une succion
puissante pour les débris di ciles à déloger.
HARD
FLOOR
BOOST
MODE
H
A
RD
FL
OOR
B
OO
S
T
M
ODE
IMPORTANT
Lorsque le témoin est allumé au-dessus du mode, la sélection
est ACTIVÉE.

34
Assemblage rapide
Nettoyage avec l'aspirateur à mainNettoyage multisurface Nettoyage en hauteur
123

35
Pendant l’utilisation, le tableau de bord Hoover®
a che le niveau de charge de la pile. Chargez
la pile dès que le niveau de puissance de la pile
est faible.
AVERTISSEMENT
Afi n de réduire le risque de blessures causées par les pièces
mobiles, éteignez l’appareil en mettant l’interrupteur à la
position «OFF» et débranchez tous les accessoires avant
d’effectuer l’entretien.
Utilisation de votre aspirateur
Enfoncez la gâchette pour mettre l'aspirateur
en marche. Relâchez la gâchette pour arrêter
l'aspirateur.
REMARQUE : Le tableau de bord Hoover
MD
s’allume lorsque l’aspirateur est mis en marche.
Sélectionnez les modes en appuyant sur les
boutons du tableau de bord. Consultez la page11
pour plus de détails.
REMARQUE : L'aspirateur est au mode”Suction
Only”si aucun mot n'est affi ché au tableau
de bord.
Appuyez deux fois sur la gâchette de mise en
marche pour que votre appareil fonctionne
continuellement. L'alimentation doit rester sous
tension. Appuyez à nouveau sur la gâchette pour
éteindre l’appareil.
12
4
AVERTISSEMENT
Ne laissez jamais l’aspirateur au même endroit pendant une longue période
pour éviter d’endommager la surface du plancher.
3
HARD
FLOOR
BOOST
MODE
HARD
FLOOR
BOOST
MODE
36
Utilisation de votre appareil comme un aspirateur à main
Appuyez sur le Bouton de Dégagement
de l'aspirateur à main. Tirez sur
l'aspirateur à main pour le dégager du
tube-rallonge.
Choisissez un accessoire.
(tous les accessoires ne sont pas
disponibles sur tous les modèles).
REMARQUE : Consultez
la page 29 pour voir les
accessoires fournis avec votre
aspirateur IMPULSE
MC
.
12
Poussez l'accessoire choisi dans
l'aspirateur à main jusqu'à ce qu'il
s'enclenche.
CONSEIL : Tous les accessoires
disponibles peuvent être
installés directement sur
l'appareil.
3
IMPORTANT
Cet aspirateur ne se tient pas seul en position verticale. Entre les utilisations ou lors de toute tâche d'entretien, posez
toujours l'aspirateur à plat sur le sol à un emplacement où vous ne risquerez pas de trébucher ou de marcher dessus.
IMPORTANT
N’utilisez pas l’aspirateur pour toiletter un animal.
37
Utilisation de votre appareil pour le nettoyage en hauteur
Choisissez un accessoire
(tous les accessoires ne sont pas
disponibles sur tous les modèles).
REMARQUE : Consultez
la page 29 pour voir les
accessoires fournis avec votre
aspirateur IMPULSE
MC
.
Appuyez sur le Bouton de
Dégagement de la buse motorisée
et des accessoires et tirez pour
retirer la buse motorisée du
tube-rallonge.
12
Poussez l'accessoire choisi
dans le tube-rallonge jusqu'à ce
qu'il s'enclenche.
CONSEIL : Le tube-rallonge
peut être utilisé pour nettoyer
des endroits diffi ciles à
atteindre.
3
IMPORTANT
Cet aspirateur ne se tient pas seul en position verticale. Entre les utilisations ou lors de toute tâche d'entretien, posez
toujours l'aspirateur à plat sur le sol à un emplacement où vous ne risquerez pas de trébucher ou de marcher dessus.
IMPORTANT
N’utilisez pas la buse motorisée pour nettoyer en
hauteur.
38
Entretien Vider le vide-poussière
Tenez l’aspirateur à main au-dessus
d’une poubelle.
12
Appuyez sur le Bouton de
Dégagement du vide-poussière.
Tapotez le vide-poussière sur la
paroid’une poubelle pour éliminer
le surplus de saletés.
AVERTISSEMENT
Afi n de réduire le risque de blessures causées par les pièces mobiles,
éteignez l’appareil en mettant l’interrupteur à la position «OFF» et
débranchez tous les accessoires avant d’effectuer l’entretien.
IMPORTANT
Cet aspirateur ne se tient pas seul en position verticale. Entre les utilisations ou lors de toute tâche
d'entretien, posez toujours l'aspirateur à plat sur le sol à un emplacement où vous ne risquerez pas de
trébucher ou de marcher dessus.
Le vide-poussière se retire afi n
de vider son contenu dans une
poubelle. Enfoncez le bouton de
dégagement du vide-poussière
puis retirez-le.
3
39
AVERTISSEMENT
Afi n de réduire le risque de blessures causées par
les pièces mobiles, éteignez l’appareil en mettant
l’interrupteur à la position «OFF» et débranchez tous
les accessoires avant d’effectuer l’entretien.
Entretien Nettoyage du filtres, du vide-poussière et du séparateur (Filtre: 440012835)
Retirez le tube-rallonge. Appuyez sur le bouton de
dégagement du vide-poussière puis retirez-le.
Pour nettoyer le séparateur, soulevez-le pour le retirer.
Nettoyez la saleté et les débris en essuyant l’écran
métallique avec un chi on en microfi bres, puis placez-le
dans la cuvette.
Retirez les fi ltres et frappez-le au-dessus d'une
poubelle afi n d'éliminer la saleté. Rincez le fi ltres
à l'eau chaude jusqu'à ce que l'eau soit claire.
Laissez sécher le fi ltres pendant 24 heures ou
jusqu'à ce qu'il soit entièrement sec avant de le
réinstaller.
Pour remonter, aligner les dents du vide-poussière
et enclencher en place.
1
3
2
4
IMPORTANT
N'UTILISEZ PAS DE SAVON NI D'AUTRES PRODUITS
CHIMIQUES POUR LE NETTOYAGE. FAITES SÉCHER LE
FILTRES COMPLÈTEMENT JUSQU'À 24 HEURES AVANT DE
LE RÉINSTALLER DANS LE PRODUIT.
IMPORTANT
N’utilisez pas l’aspirateur sans le fi ltre ou le séparateur.
40
Entretien Retrait et réinstallation du rouleau-brosse
Retirez la buse motorisée du tube-rallonge.
Retournez la buse motorisée à l'envers. Glissez le
bouton de dégagement du rouleau-brosse.
Enlevez tout fi l ou cheveu des extrémités du
rouleau-brosse ainsi que tout débris ou saleté du
logement de la buse motorisée.
Soulevez l'extrémité du rouleau-brosse pour
pouvoir le séparer de la buse motorisée.
Réinstallez le rouleau-brosse dans le logement.
1
3
2
4
AVERTISSEMENT
Afi n de réduire le risque de blessures causées par les pièces mobiles,
éteignez l’appareil en mettant l’interrupteur à la position «OFF» et
débranchez tous les accessoires avant d’effectuer l’entretien.

41
Dépannage
AVERTISSEMENT
Afi n de réduire le risque de blessures causées par les pièces mobiles, éteignez l’appareil en mettant l’interrupteur à la position «OFF» et
débranchez tous les accessoires avant d’effectuer l’entretien.
HARD
FLOOR
BOOST
MODE
DEL de charge :
Indicateurs pulsé = charge en cours
Indicateurs clignotants = erreur
Communiquez avec le Service à la
clientèle: 1 (888) 679-2121
DEL de mode :
Si elles clignotent, le rouleau-brosse est coincé.
Mettre l’appareil hors tension pour réinitialiser la
protection en cas de bloquage.
Toute autre tâche d’entretien doit être confi ée à un représentant de service autorisé.
Cessez d’utiliser l’appareil s’il ne fonctionne pas comme prévu, s’il a été échappé sur le sol ou dans l’eau, s’il est
endommagé ou s’il a été laissé à l’extérieur et apportez-le au centre de réparations.
PROBLÈME CAUSE POSSIBLE SOLUTION
La poussière s’échappe 1. Le vide-poussière est plein. 1. Videz le vide-poussière (consultez la page 38).
de l’aspirateur.
2. Le vide-poussière est mal installé. 2. Relisez le chapitre au sujet du retrait et de la réinstallation du
3. Le filtre lavable ou le séparateur n’est pas
bien installé.
vide-poussière (consultez la page 39).
3. Relisez le chapitre au sujet du retrait et du nettoyage du filtre
(consultez la page 39).
4. Le filtre est sale 4. Rincez le filtre (consulter la page 17).
Les accessoires de 1. Le vide-poussière est plein. 1. Videz le vide-poussière (consultez la page 38).
l’aspirateur n’aspirent pas.
2. Le filtre est obstrué. 2. Retirez le filtre, puis nettoyez-le (consultez la page 39).
3. La buse à tapis motorisée ne tourne pas. 3. Retirer et fixer à nouveau (consultez la page 40).
Aspiration faible. 1. L'étanchéité du vide-poussière n'est pas adéquate. 1. Réinstallez le vide-poussière en vous assurant que le couvercle est
2. Le filtre est obstrué ou sale.
complètement fermé (consultez la page 39).
3. Le vide-poussière est mal installé.
2. Retirez le filtre, puis nettoyez-le (consultez la page 39).
3. Relisez le chapitre au sujet du retrait et de la réinstallation du filtre
(consultez la page 39).
4. La charge de la batterie est faible. 4. Charger la batterie (consultez la page 32).
5. Buse ou conduit à poussière obstrué. 5. Éteignez l’appareil, puis retirez la buse pour enlever les débris
(consultez la page 40).
L’aspirateur commence 1. Le filtre est sale. 1. Nettoyez, rincez, asséchez le filtre et remontez-le (consultez la page 39).
à chauffer.
2. La succion est faible. 2. Repérez l’obstruction et retirez-la.
L'aspirateur ne S'ALLUME 1. La pile n’est pas chargée. 1. Charger la batterie (consultez la page 32).
pas ou ne se recharge pas.
2. La batterie est peut-être trop chaude. 2. Laissez refroidir l'aspirateur pendant 30 minutes puis réessayez.
42
Commande d'accessoires
Accessoire pour revêtements en tissu
Pièce n° 440012842
Brosse à épousseter
Pièce n° 440012841
Suceur plat
Pièce n° 440012840
QUOI ACHETER :
Achetez des pièces et accessoires authentiques de Hoover
MD
:
Si vous avez besoin d'une pièce ou d'un accessoire, visitez le site Hoover.
com ou Hoover.ca pour obtenir plus de détails.
Vous avez de la di culté à trouver un article ou un modèle sur notre site,
appelez notre Service à la clientèle au 1 888 679-2121.
Accessoire pour articles
d’animaux en tissu
Pièce n° 440012853

43
ENTRETIEN ET GARANTIE DE L’ASPIRATEUR SANS FIL IMPULSE
MC
DE HOOVER
MD
ET RENSEIGNEMENTS CONCERNANT
L’ENTRETIEN DE LA PILE
TOUTES AUTRES RÉPARATIONS DOIVENT ÊTRE CONFIÉES À UN REPRÉSENTANT DE SERVICE AUTORISÉ.
Appelez au 1 888 679-2121 (É.-U. et Canada)
Si vous avez besoin d'aide supplémentaire, visitez un centre de service autorisé. Trouvez le centre le plus près de chez vous en
visitant notre site Web à www.hoover.com. Les frais de transport à destination et en provenance de l'emplacement de réparation
sont payés par le propriétaire. Indiquez toujours le numéro de modèle et le code de fabrication de votre produit lorsque vous
demandez des renseignements ou que vous commandez des pièces de rechange. (Le numéro de modèle et le numéro de code du
fabricant de l’aspirateur se trouvent derrière le vide-poussière et à l’arrière du chargeur.)
GARANTIE LIMITÉE DE DEUX (2) ANS (UTILISATION DOMESTIQUE)
COUVERTURE DE LA GARANTIE : Lorsqu’ils sont utilisés et entretenus dans des conditions normales d’utilisation et d’entretien
domestiques, comme stipulé dans le guide de l’utilisateur, votre produit Hoover
MD
et sa batterie sont garantis contre les défauts
de fabrication et de main-d’œuvre pendant une période de deuxans à partir de la date d’achat (ci-après la «Période de
garantie»). Pendant la période de garantie, Hoover
MD
fournira la main-d’œuvre et les pièces gratuitement afi n de corriger une
telle défectuosité pour les produits achetés aux États-Unis dans les boutiques d’échanges militaires américaines et au Canada.
RÉCLAMATION AU TITRE DE LA GARANTIE : Si le produit n'est pas dans l'état prévu par la garantie, apportez ou envoyez le produit
chez un fournisseur autorisé de service sous garantie Hoover
MD
avec une preuve d'achat. Pour accéder à un service d'aide
automatique présentant la liste des centres de service autorisés aux États-Unis, composez le 1 888679-2121 ou visitez le site
Web de Hoover
MD
à www.hoover.com.
ÉLÉMENTS NON COUVERTS PAR LA GARANTIE : La présente garantie ne couvre pas les courroies, les fi ltres et les rouleaux-
brosses, toute utilisation du produit dans des conditions commerciales (par exemple dans le cadre de services ménagers, de
conciergerie et de location d’équipement), l’entretien inadéquat du produit, les dommages liés à une mauvaise utilisation, à des
cas fortuits ou à des catastrophes naturelles, au vandalisme, à tout autre acte hors du contrôle de Hoover
MD
, ou à tout acte ou
négligence de la part du propriétaire, toute utilisation dans un pays autre que celui où le produit a été acheté initialement et tout
produit revendu par son premier propriétaire. La présente garantie ne couvre pas le ramassage, la livraison, le transport, ni les
réparations à domicile. Cependant, si vous postez votre produit à un centre de service et de ventes Hoover
MD
pour une réparation
au titre de la garantie, les frais d’expédition ne seront payés qu’à l’envoi ou à l’expédition. Veuillez appeler au centre de Services
Hoover
MD
au 1888679-2121 pour connaître la méthode d’expédition de votre produit. Seuls les produits achetés aux États-Unis
(y compris ses territoires et ses possessions), au Canada ou en vertu du Programme d’échanges militaires américain sont visés
par cette garantie.
AUTRES CONDITIONS IMPORTANTES : La présente garantie n'est pas transférable et ne peut pas être cédée. La présente garantie
sera régie et interprétée selon les lois de l'État de la Caroline du Nord. La Période de garantie ne peut pas être prolongée par une
réparation ou un remplacement des piles ou des pièces exécutés en vertu de la présente garantie, quels qu'ils soient.
LA PRÉSENTE GARANTIE CONSTITUE L'UNIQUE GARANTIE ET RECOURS. L'ENTREPRISE DÉCLINE TOUTE RESPONSABILITÉ QUANT À
TOUTES LES AUTRES GARANTIES EXPRESSES OU IMPLICITES, Y COMPRIS LES GARANTIES LIÉES À LA QUALITÉ MARCHANDE OU À
LA COMPATIBILITÉ DU PRODUIT POUR UN USAGE PARTICULIER. HOOVER NE POURRA EN AUCUN CAS ÊTRE TENUE RESPONSABLE
DE DOMMAGES-INTÉRÊTS SPÉCIAUX OU DOMMAGES INDIRECTS, ACCESSOIRES OU CONSÉCUTIFS DE QUELQUE NATURE QUE CE
SOIT, SUBIS PAR LE PROPRIÉTAIRE DU PRODUIT OU PAR TOUTE PARTIE RÉCLAMANT PAR L'INTERMÉDIAIRE DU PROPRIÉTAIRE,
QU'ILS RELÈVENT DU DROIT DES CONTRATS, DE LA NÉGLIGENCE, DE LA RESPONSABILITÉ CIVILE DÉLICTUELLE OU DE LA
RESPONSABILITÉ STRICTE DU FAIT DES PRODUITS, OU QU'ILS DÉCOULENT DE QUELQUE CAUSE QUE CE SOIT.
Certains États ne permettent pas l'exclusion des dommages consécutifs. Par conséquent, l'exclusion précédente pourrait ne pas
être applicable dans votre cas. La présente garantie vous donne des droits précis. Vous pouvez également avoir d'autres droits,
lesquels varient d'une province à l'autre.
DES QUESTIONS OU DES PRÉOCCUPATIONS?
Communiquez avec nous:
Hoover.com/support ou Hoover.ca/support
1 888 679-2121
Suivez-nous:
Twitter: @HooverUSA
Facebook: facebook.com/hoover
Ne retournez pas le produit en magasin. Le numéro de
modèle se trouve derrière le vide-poussière.

44
NOTES :

ASPIRADORA INALÁMBRICA
MANUAL DEL USUARIO
IMPORTANTE: LEA CUIDADOSAMENTE ESTA INFORMACIÓN
ANTES DE ENSAMBLAR Y USAR LA ASPIRADORA.
PIEZAS DE REPUESTO:
FILTRO: 440012835
CARGADOR: 440010414
El único uso previsto para este producto es el uso doméstico.
Si se utiliza para uso comercial, se invalida la garantía.
©2018 Techtronic Floor Care Technology Limited. Todos los derechos reservados.
ASPIRADORA INAL
Á
MBRICA
M
ANUAL DEL U
S
UARI
O
IMPORTANTE: LEA CUIDADOSAMENTE ESTA INFORMACIÓ
N
A
NTE
S
DE EN
S
AMBLAR Y
US
AR LA A
S
PIRAD
O
RA.
PIEZA
S
DE REP
U
E
S
T
O
:
FILTR
O
: 44
00
12
835
C
AR
G
AD
O
R: 44
00
1
0
414
El único uso previsto para este producto es el uso doméstico.
Si se utiliza para uso comercial, se invalida la garantía
.
©
2018 Techtronic Floor
C
are Technology Limited. Todos los derechos reservados.

TIENE GARANTÍA.
Obtenga confi anza al limpiar con la garantía limitada de hasta dos años de Hoover.
Consulte la garantía para conocer los detalles completos.
Registre su aspiradora de la siguiente manera:
Llamando al 888 679-2121Visitando Hoover.com o
Hoover.ca
Hágalo ofi cial.
Bienvenido a la propiedad de Hoover
®
.
46

47
Índice
Instrucciones de seguridad .................................................................................................................................................................................................................. 48
Conozca su aspiradora inalámbrica Hoover® IMPULSE™.................................................................................................................................................................50
¿Qué hay en la caja? .............................................................................................................................................................................................................................. 51
Ensamblaje ............................................................................................................................................................................................................................................. 52
Montaje del soporte de pared ..............................................................................................................................................................................................................53
Carga de la unidad IMPULSE™. ............................................................................................................................................................................................................54
Panel de Hoover
®
.................................................................................................................................................................................................................................... 55
Inicio rápido ............................................................................................................................................................................................................................................ 56
Uso de la aspiradora .............................................................................................................................................................................................................................. 57
Uso de la aspiradora como un dispositivo portátil............................................................................................................................................................................58
Uso de la aspiradora para limpiar lugares elevados ........................................................................................................................................................................59
Mantenimiento: Vaciado de la copa de recolección de residuos ..................................................................................................................................................... 60
Mantenimiento: Limpieza del fi ltros, de la copa de recolección de residuos y del separador ................................................................................................... 61
Mantenimiento: Extracción y reemplazo del cepillo giratorio ......................................................................................................................................................... 62
Resolución de problemas ..................................................................................................................................................................................................................... 63
Cómo pedir accesorios .......................................................................................................................................................................................................................... 64
Información de servicio y garantía ...................................................................................................................................................................................................... 65

48
INSTRUCCIONES DE SEGURIDAD IMPORTANTES CONSERVE ESTAS INSTRUCCIONES
Cuando se utilizan aparatos eléctricos, se deben seguir siempre precauciones básicas, incluidas las
siguientes: LEA TODAS LAS INSTRUCCIONES ANTES DE UTILIZAR ESTE APARATO.
ADVERTENCIA: PARA DISMINUIR EL RIESGO DE INCENDIO, DESCARGA
ELÉCTRICA, DAÑOS O LESIONES, RESPETE LAS SIGUIENTES MEDIDAS:
• Arme la unidad por completo antes de ponerla en funcionamiento.
• No utilice este aparato en exteriores o en superfi cies mojadas. Dispositivo para almacenar dentro.
• El cargador es para uso en interiores. Recuerde mantener siempre el dispositivo y el cargador en el
interior en un lugar seco.
• Evite que se lo utilice como un juguete. Los niños de 12 años o menos no deben utilizar la unidad.
Cuando se lo utilice cerca de niños, será necesario hacerlo bajo una estricta supervisión. Para evitar
lesiones o daños, mantenga a los niños alejados del producto y no permita que introduzcan los
dedos ni objetos en ninguna de las aberturas del producto.
• Utilice la unidad únicamente según el uso descrito en este manual. Utilice únicamente los accesorios
y productos recomendados por Hoover.
• No utilice el cargador si el cable o el enchufe se encuentran dañados. Si el aparato o el cargador no
funcionan como deben; si se han caído, han sido dañados, dejados a la intemperie o sumergidos en
agua, llévelos a un Centro Técnico antes de continuar usándolos.
• No extraiga ni transporte el cargador tomándolo por el cable; no tire del cable, no cierre una puerta
con él ni lo enrosque alrededor de bordes o esquinas fi losas.
• No apoye el producto sobre el cable. No pase el aparato por encima del cable. Mantenga el cable
lejos de las superfi cies calientes.
• No desenchufe el cargador tirando del cable. Para desenchufarlo, agarre el enchufe, no el cable.
• No manipule el cargador (incluido el enchufe y los terminales) ni el aparato con las manos mojadas.
• No coloque ningún objeto en las aberturas. No utilice la unidad si alguna de sus aberturas se
encuentra bloqueada. Manténgala libre de polvo, pelusas, cabello y cualquier otro elemento que
pueda disminuir el fl ujo de aire.
• Evite que el cabello, la ropa suelta, los dedos y cualquier otra parte del cuerpo entren en contacto
con las aberturas y las piezas móviles de la unidad.
• Extreme las precauciones cuando limpie las escaleras para evitar lesiones o daños físicos, y a fi n
de evitar que la limpiadora se caiga, coloque siempre la aspiradora al pie de las escaleras sobre el
suelo. No coloque la aspiradora sobre las escaleras o sobre un mueble, ya que esto puede producir
lesiones o daños. Cuando utilice las herramientas accesorias, siempre asegúrese de que el mango se
encuentre en posición vertical.
• No utilice la unidad para aspirar líquidos combustibles o infl amables, tales como gasolina o restos
de madera lijada, ni la utilice en áreas en las que dichas sustancias puedan estar presentes.
• No aspire nada que se encuentre en combustión o emita humo, como cigarrillos, fósforos o cenizas
calientes.
• No utilice la unidad si esta no tiene colocados la copa de recolección de residuos o los fi ltros.
• Apague el interruptor de alimentación antes de extraer o instalar el cepillo giratorio.
• Apague siempre el aparato antes de conectar o desconectar las herramientas accesorias.
• No incinere el cargador, la batería ni el aparato, aun si estuvieran muy dañados. Las baterías pueden
explotar y provocar un incendio.
• Este producto incluye baterías recargables de iones de litio. No exponga el paquete de baterías o el
aparato al fuego o a temperaturas excesivas. La exposición al fuego o a temperaturas sobre los 130
°C puede causar una explosión.
• No aplaste ni incinere la batería, ni la someta a acciones similares.
• No deseche la batería en un incinerador ni en un compactador de desechos. Consulte la sección
sobre desecho de la batería para obtener instrucciones.

49
• No intente desarmar la batería.
• Desenchufe el cargador del tomacorriente antes de llevar a cabo una rutina de limpieza o
mantenimiento en la unidad.
• En condiciones extremas, pueden producirse pérdidas en las celdas de la batería. Si la piel entrara en
contacto con el líquido, lávese rápidamente con jabón y agua. Si el líquido le entrara en los ojos, no
se los frote. Enjuáguelos de inmediato con agua limpia, en forma continua durante 15 minutos como
mínimo. Consulte a un médico de inmediato.
• Para recargar la unidad, utilice únicamente el cargador (N.° de modelo de Hoover 440010414)
provisto por Hoover.
• Evite el encendido accidental. Asegúrese de que el aparato esté apagado antes de levantarlo o
de trasladarlo. Trasladar el aparato con su dedo en el gatillo o conectar los aparatos que están
encendidos puede provocar accidentes.
• No use un paquete de baterías o un aparato que esté dañado o se haya modifi cado. Las baterías
dañadas o modifi cadas pueden exhibir un comportamiento impredecible que puede provocar
incendios, explosiones o riesgo de lesiones.
• Siga todas las instrucciones de carga y no cargue el paquete de baterías ni el aparato fuera del rango
de temperaturas especifi cado en las instrucciones. La carga incorrecta o a temperaturas que estén
fuera del rango especifi cado puede dañar la batería y aumentar el riesgo de incendios.
RANGO DE TEMPERATURA AMBIENTE PARA LA CARGA: 5°C-50°C (41°F - 122°F)
• Solo una persona califi cada debe realizar el mantenimiento de la unidad, y deben utilizarse
únicamente piezas de repuesto idénticas. Esto garantizará que se mantenga la seguridad del
producto.
• No modifi que ni intente reparar el aparato o el paquete de baterías, excepto como se indica en las
instrucciones de uso y mantenimiento.
PRECAUCIÓN: La batería utilizada en este dispositivo puede presentar riesgo de incendio o quemaduras
química si no se utiliza adecuadamente. No la desarme, incinere, ni caliente a temperaturas superiores al límite máximo de
temperatura establecido por el fabricante (60°C/140°F). El uso de otra batería puede representar riesgos de incendios o
explosiones. Deseche la batería usada rápidamente. Manténgala alejada de los niños. No la desarme ni la deseche prendiéndola
fuego. No intente desarmar la batería o eliminar algún componente que sobresalga de las terminales de la batería. La batería y el
cargador no contienen piezas a las que el usuario pueda realizarles un servicio de mantenimiento. Esto podría causar incendio o
lesiones. Antes de desecharla, proteja las terminales expuestas con cinta aislante gruesa, para evitar un cortocircuito.
ADVERTENCIA SOBRE LA ELIMINACIÓN DE LA
BATERÍA:
RIESGO DE EXPLOSIÓN O EXPOSICIÓN A MATERIAL TÓXICO.
BATERÍAS DE IONES DE LITIO: La batería se debe recolectar, reciclar o desechar de una
forma que no sea perjudicial para el medio ambiente. El Sello de reciclado de la batería RBRC
certifi cado por EPA (Agencia de Protección Ambiental) en la batería de iones de litio (Li-ion)
indica que Techtronic Industries, una afi liada corporativa de Hoover, se encuentra participando
voluntariamente en un programa industrial para recolectar y reciclar estas baterías al fi nal de
sus vidas útiles, cuando son retiradas de servicio en los Estados Unidos o Canadá. El programa RBRC proporciona
una buena alternativa a desechar las baterías de iones de litio utilizadas en la basura o en caudales de residuos
municipales, lo que puede ser ilegal en su área. Visite la página www.rbrc.org/call2recycle/ para obtener información
sobre las prohibiciones/restricciones en su área, en relación con el reciclado y desecho de las baterías de iones
de litio. La participación de Hoover en este programa forma parte de nuestro compromiso por preservar el medio
ambiente y conservar los recursos naturales.
ADVERTENCIA: Este producto contiene químicos reconocidos por el estado de California como causantes de cáncer, defectos de
nacimiento u otros daños reproductivos. LÁVESE LAS MANOS LUEGO DE MANIPULARLO.
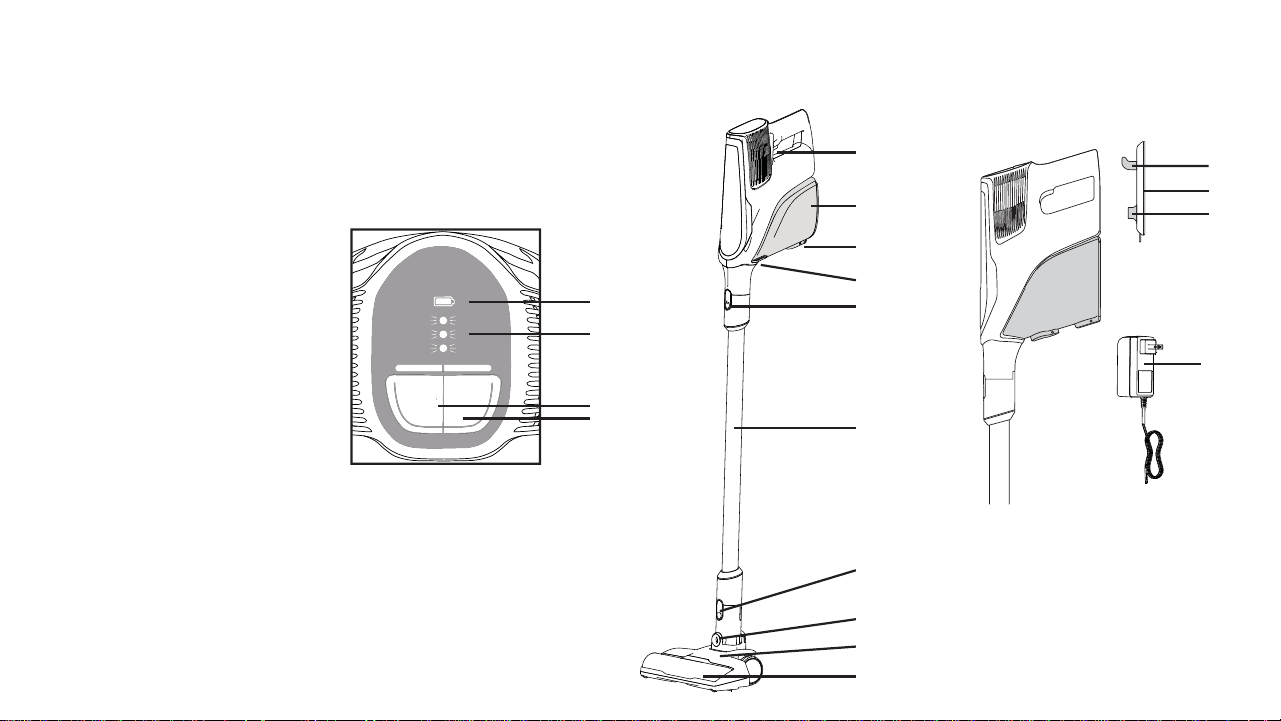
Conozca su aspiradora inalámbrica Hoover
®
IMPULSE
™
1. Panel de Hoover
®
2. Indicador de nivel de batería
3. Rodillo de cepillo velocidad
4. Modo impulso
5. Gatillo de encendido/apagado
6. Copa de recolección de
residuos fácil de vaciar
7. Acceso al fi ltros y liberación de la
Copa de suciedad
8. Botón vacío
9. Botón de liberación del
dispositivo portátil
10. Vara de alcance
11. Botón de liberación del tubo
12. Orientación giratoria
13. Boquilla eléctrica
14. Cepillo giratorio de limpieza rápida
15. Gancho de montaje en la pared
16. Montaje en la pared
17. Puerto de carga
18. Cargador
50
HARD
FLOOR
BOOST
MODE
HA
R
D
F
L
OOR
B
OO
ST
M
ODE
1
3
2
5
16
17
18
15
6
7
9
12
13
14
10
11
8
4
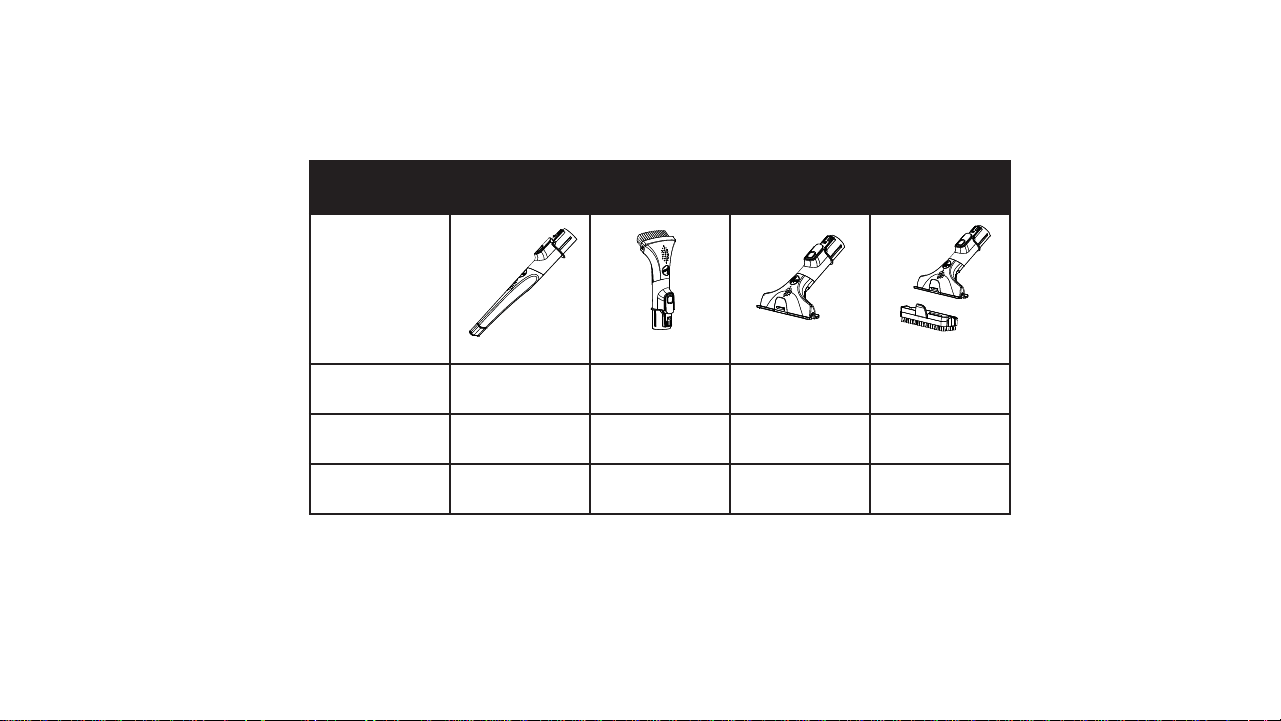
BH53000
üü
BH53010CDI
üüü
BH53020
üüü
Cepillo quitapolvo
Herramienta para
limpiezaen rinconesModelo de la unidad Herramienta para tapizados
51
Todos los modelos son portátiles y vienen con boquilla eléctrica, vara de alcance, cargador y montaje de pared.
EL CONTENIDO PUEDE VARIAR SEGÚN EL MODELO QUE COMPRÓ.
¿Qué hay en la caja?
Herramienta para eliminar pelos
de animales en tapizados
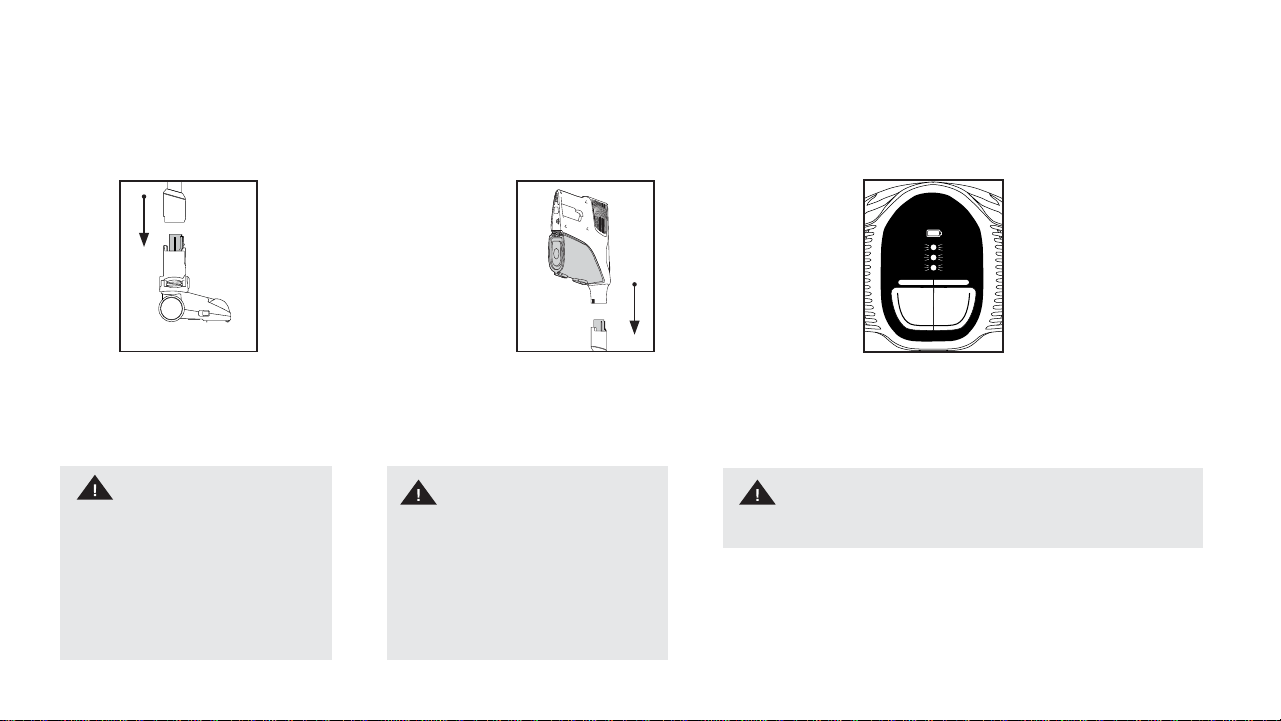
52
Ensamblaje
Empuje el dispositivo portátil
hacia abajo en la vara de
alcance hasta que encaje
en su sitio
(se oirá un clic).
Empuje la vara de alcance hacia abajo
en la boquilla eléctrica hasta que
encaje en su sitio.
Antes del primer uso, asegúrese de
cargar completamente la batería.
CONSEJO: La carga de la unidad
IMPULSE™ puede demorar de
3 a 4 horas como máximo.
123
ADVERTENCIA
Para reducir el riesgo de sufrir
lesiones personales por las piezas
móviles, apague el interruptor de
alimentación y desconecte todos
los accesorios antes de realizar un
servicio de mantenimiento.
IMPORTANTE
Esta aspiradora no se mantiene por sí
sola. Entre los usos o cuando lleve a
cabo cualquier tipo de mantenimiento,
siempre recuéstela sobre el piso en una
ubicación adecuada de modo que no
constituya una obstrucción en el paso
ninadie pueda pisarla.
HARD
FLOOR
BOOST
MODE
IMPORTANTE
Use solo el cargador provisto por el fabricante para recargar la unidad.

53
Montaje del soporte de pared
En primer lugar, ensamble completamente la aspiradora.
Busque el lugar deseado para el
soporte de pared. Asegúrese de que
esté cerca de una toma de corriente
si desea cargar la unidad mientras
se encuentra en el soporte de pared.
NOTA: El soporte de pared se puede
utilizar solo para almacenamiento,
sin el cargador, pero en ese caso,
la unidad tendría que cargarse por
separado.
Coloque el gancho de soporte en la
pared a la altura deseada. Marque
las ubicaciones del anclaje de pared.
Instale los anclajes y atornille el
gancho de soporte a la pared.
IMPORTANTE: Use ambos tornillos
para montar el gancho de soporte
a la pared. Asegúrese de fi jar el
tornillo en una tachuela o utilice los
anclajes de pared.
Coloque el extremo del enchufe
del cargador de la unidad en su
lugar en el gancho de soporte (si
lo desea para cargar la unidad
mientras se encuentra almacenada
en el soporte de pared). A
continuación, encaje la cubierta
en su lugar.
Para guardar la aspiradora, coloque la
unidad en el gancho de montaje en la
pared con el orifi cio provisto en la parte
posterior del dispositivo portátil.
12
3
Encaje la cubierta del montaje en pared
en su lugar.
45
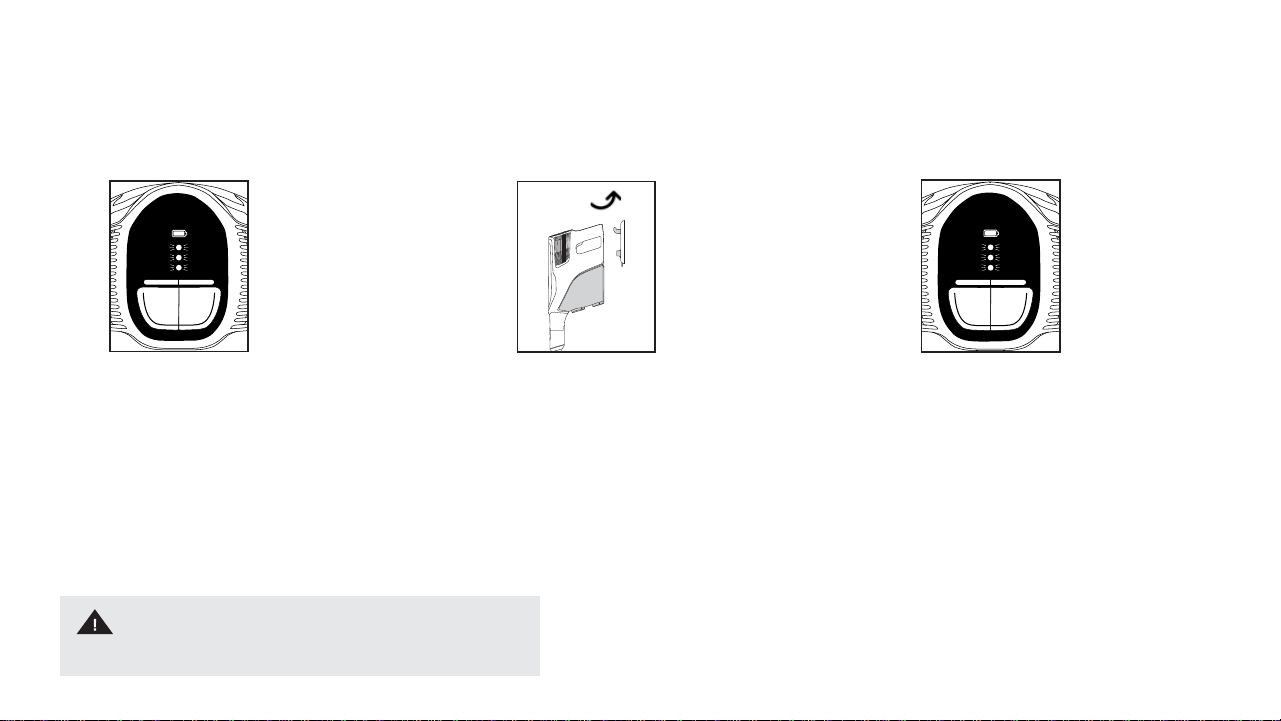
54
Carga de la unidad IMPULSE
™
Todos los indicadores parpadearán
cuando se cargue y se apagarán cuando
la carga esté completa.
NOTA: El cargador estará caliente
durante la carga. La unidad se
cargará solo durante el tiempo que
sea necesario. Puede demorar de
3 a 4 horas como máximo para
cargarse completamente.
Cargue la batería por completo antes
de utilizar la unidad por primera vez.
La carga llevará de 3a4horas como
máximo.
NOTA: Debido a reglamentaciones
federales la batería no viene
completamente cargada.
123
Enchufe el cargador. El interruptor de
encendido/apagado debe estar apagado
para recargar la unidad.
NOTA: Si la unidad está en
funcionamiento y el enchufe del
cargador está conectado a la unidad,
la unidad se apagará para evitar que
se dañe el cargador o la unidad.
IMPORTANTE
Use solo el cargador provisto por el fabricante para recargar la unidad.
HARD
FLOOR
BOOST
MODE
HARD
FLOOR
BOOST
MODE
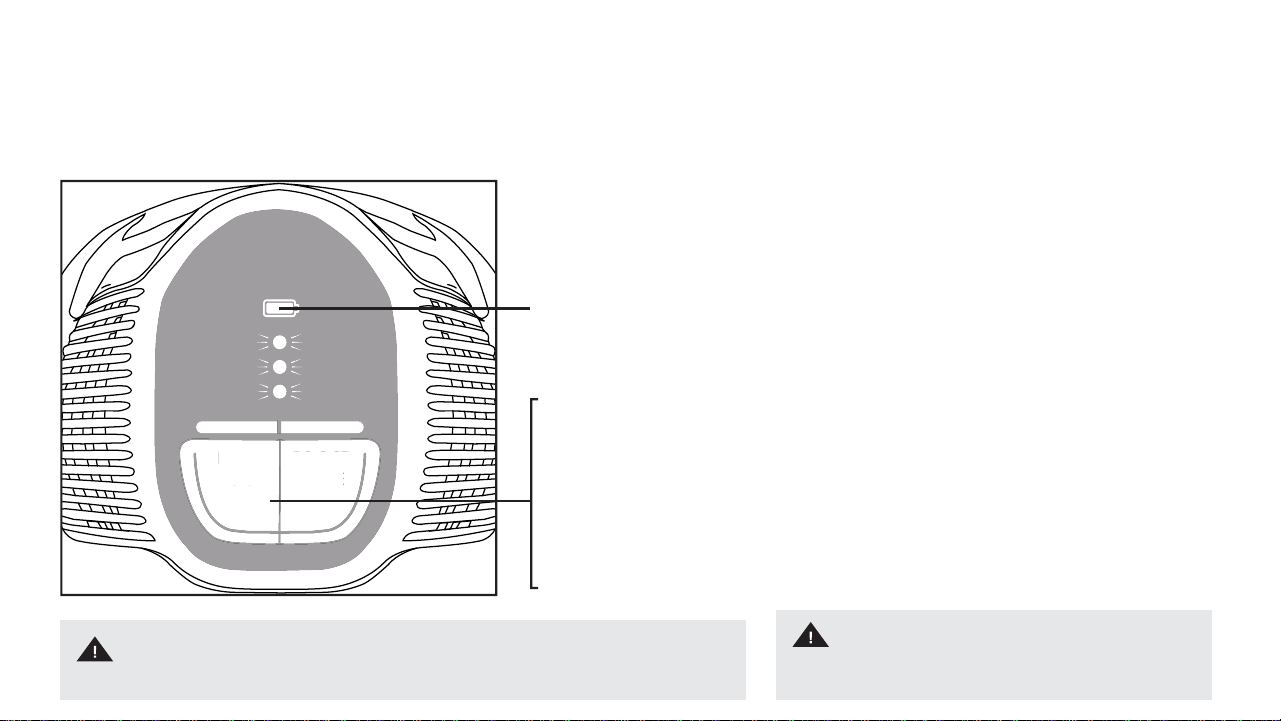
55
Panel de Hoover
®
NOTA
El modo Estándar ayuda a conservar la energía de la batería para extender el tiempo de funcionamiento.
Indicador de nivel de batería
Seleccione el modo de limpieza que desee:
Cepillo: Luz apagada excelente para levantar suciedad
incrustada de alfombras.
Piso duro: Ayuda a reducir la dispersión de desechos
en pisos duros.
Modo impulso: Ofrece poder de succión para desechos
que son difíciles de quitar.
HARD
FLOOR
BOOST
MODE
H
A
RD
FL
OOR
B
OO
S
T
M
ODE
IMPORTANT
Cuando la luz esté encendida sobre el modo, la sección estará
ACTIVADA.

56
Inicio rápido
Limpieza de manoLimpieza para diversos pisos Limpieza para lugares elevados
123
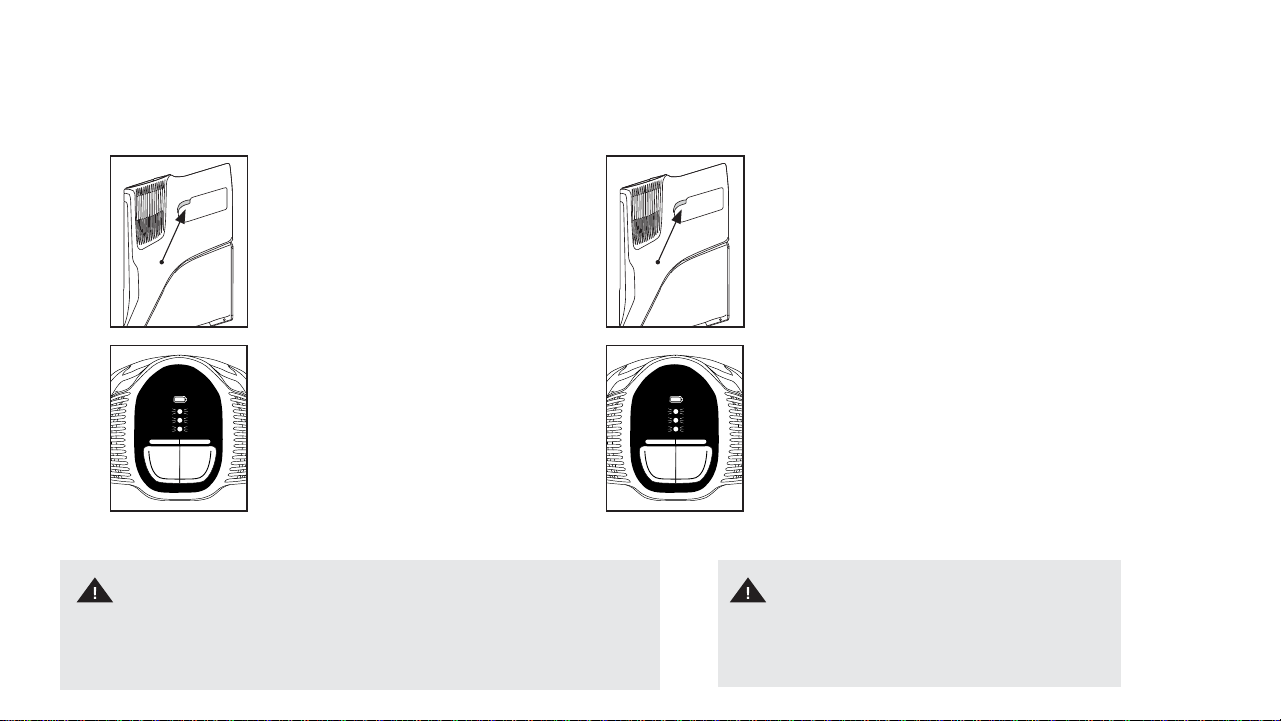
57
ADVERTENCIA
Nunca deje la aspiradora en un lugar por mucho tiempo ya que podría dañar la superfi cie
del piso.
ADVERTENCIA
Para reducir el riesgo de sufrir lesiones personales por las
piezas móviles, apague el interruptor de alimentación y
desconecte todos los accesorios antes de realizar un servicio
de mantenimiento.
Uso de la aspiradora
Apriete el gatillo para encender la aspiradora.
Suelte el gatillo para apagar la aspiradora.
NOTA: Cuando la alimentación esté encendida,
se iluminará el tablero de Hoover
®
.
Seleccione los modos presionando los botones del
panel. Consulte la página 11 para ver
más detalles.
NOTA: Si no se ilumina ninguna letra, la
aspiradora estará en el modo Solo succión.
Para alimentación continua, haga doble clic en
el interruptor. La alimentación debe permanecer
encendida. Apriete el gatillo nuevamente para
apagar la unidad.
Cuando esté en uso, el panel de Hoover® mostrará
el nivel de batería. Cuando disminuya el nivel de la
batería, recárguela.
1
3
2
4
HARD
FLOOR
BOOST
MODE
HARD
FLOOR
BOOST
MODE
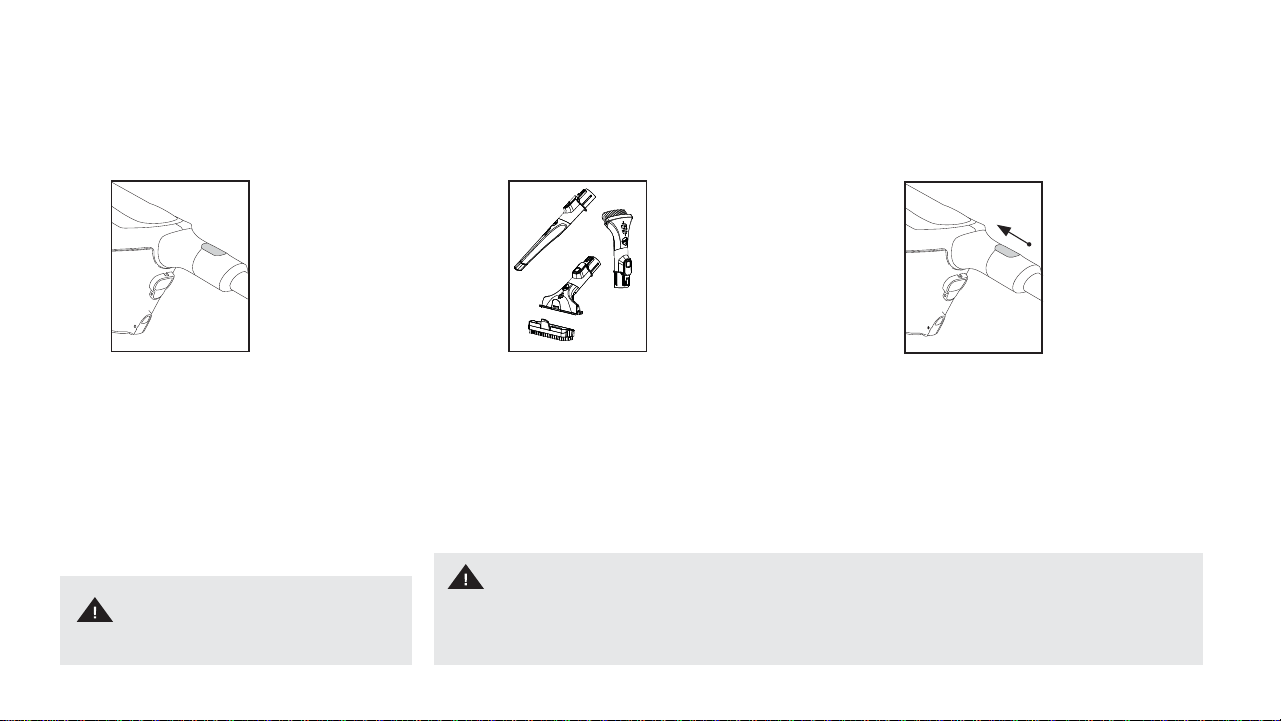
58
Uso de la aspiradora como un dispositivo portátil
Presione el Botón de Liberación del
dispositivo portátil. Tire para separar el
dispositivo portátil de la vara de alcance.
Elija un accesorio.
(No todos los accesorios están
disponibles en todos los modelos).
NOTA: Para ver qué accesorios
se incluyen con la unidad
IMPULSE™, consulte la
página 51.
12
Empuje el accesorio elegido en
el dispositivo portátil hasta que
encastre en su lugar.
CONSEJO: Todos los accesorios
disponibles se pueden conectar
directamente en la aspiradora
portátil.
3
IMPORTANTE
La aspiradora no debe utilizarse para limpiar
mascotas.
IMPORTANTE
Esta aspiradora no se mantiene por sí sola. Entre los usos o cuando lleve a cabo cualquier tipo de mantenimiento,
siempre recuéstela sobre el piso en una ubicación adecuada de modo que no constituya una obstrucción en el paso ni
nadie pueda pisarla.
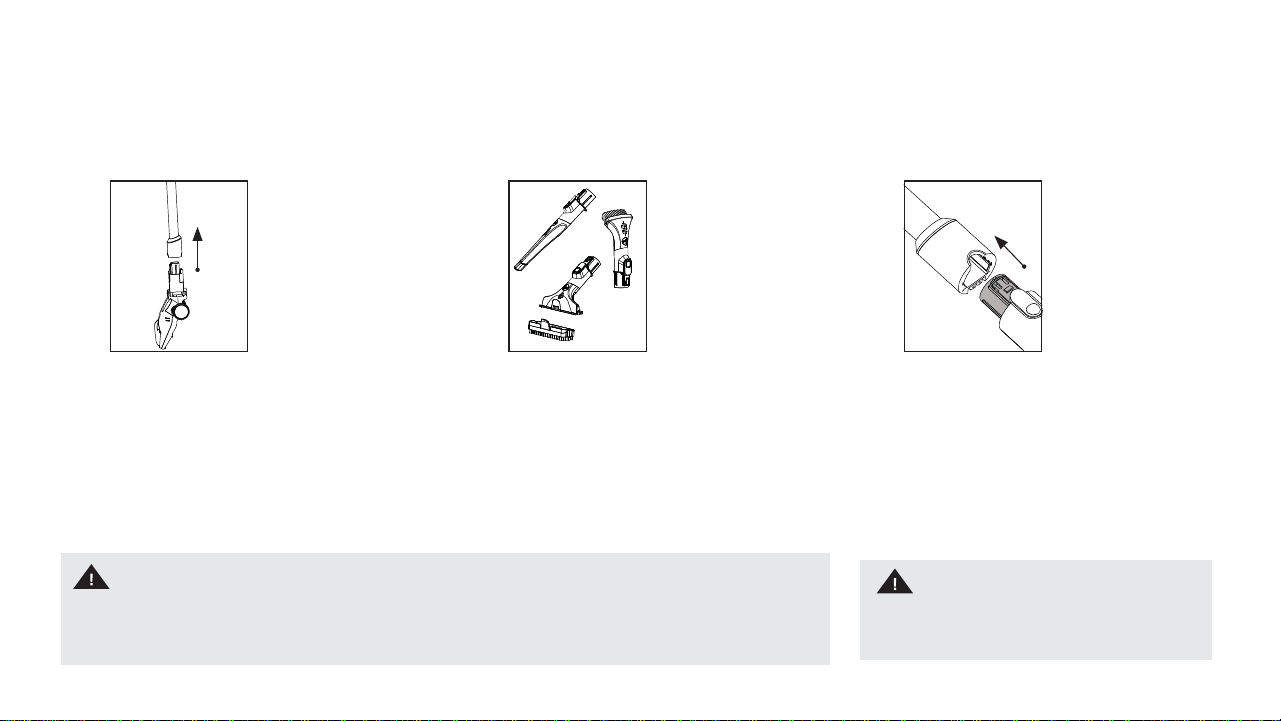
59
Uso de la aspiradora para limpiar lugares elevados
Elija un accesorio
(no todos los accesorios están
disponibles en todos los modelos).
NOTA: Para ver qué accesorios
se incluyen con la unidad
IMPULSE™, consulte la
página 51.
Presione el Botón de Liberación
de la boquilla eléctrica y tire para
extraer la boquilla eléctrica de la
vara de alcance.
12
Empuje el accesorio elegido
en la vara de alcance hasta
que encastre en su lugar.
CONSEJO: La vara de
alcance puede utilizarse
para lugares difíciles de
alcanzar.
3
IMPORTANTE
Esta aspiradora no se mantiene por sí sola. Entre los usos o cuando lleve a cabo cualquier tipo de mantenimiento,
siempre recuéstela sobre el piso en una ubicación adecuada de modo que no constituya una obstrucción en el paso ni
nadie pueda pisarla.
IMPORTANT
La boquilla eléctrica no se debe utilizar para la
limpieza en altura.
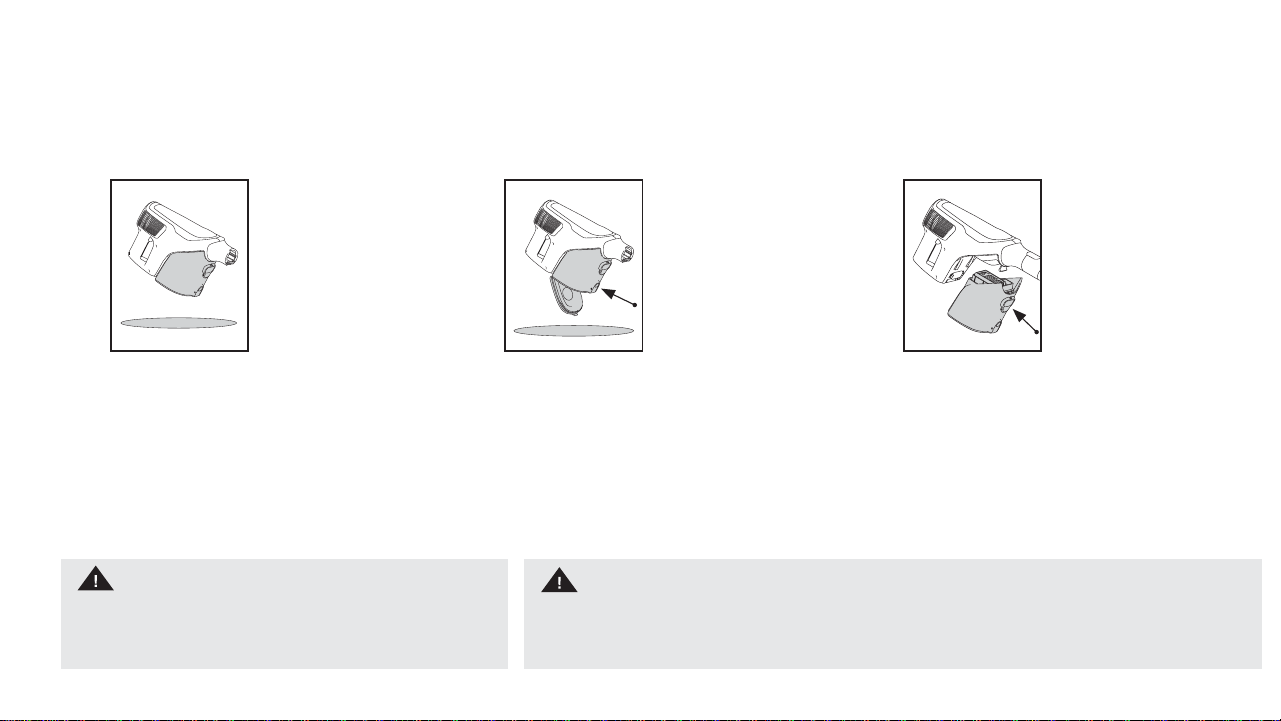
60
Mantenimiento: Vaciado de la copa de recolección de residuos
Sostenga el dispositivo portátil sobre
un cubo de basura.
12
Presione el botón de liberación de
la copa de recolección de residuos.
Golpee el vaso de recolección en la
parte lateral del contenedor de basura
para vaciar el exceso de suciedad.
ADVERTENCIA
Para reducir el riesgo de sufrir lesiones personales por las piezas
móviles, apague el interruptor de alimentación y desconecte todos
los accesorios antes de realizar un servicio de mantenimiento.
IMPORTANTE
Esta aspiradora no se mantiene por sí sola. Entre los usos o cuando lleve a cabo cualquier tipo de mantenimiento,
siempre recuéstela sobre el piso en una ubicación adecuada de modo que no constituya una obstrucción en el
paso ni nadie pueda pisarla.
La copa de recolección de
residuos también se puede
extraer para vaciar en el cubo
de basura. Presione el botón
de liberación de la copa de
recolección de residuos para
extraerla.
3
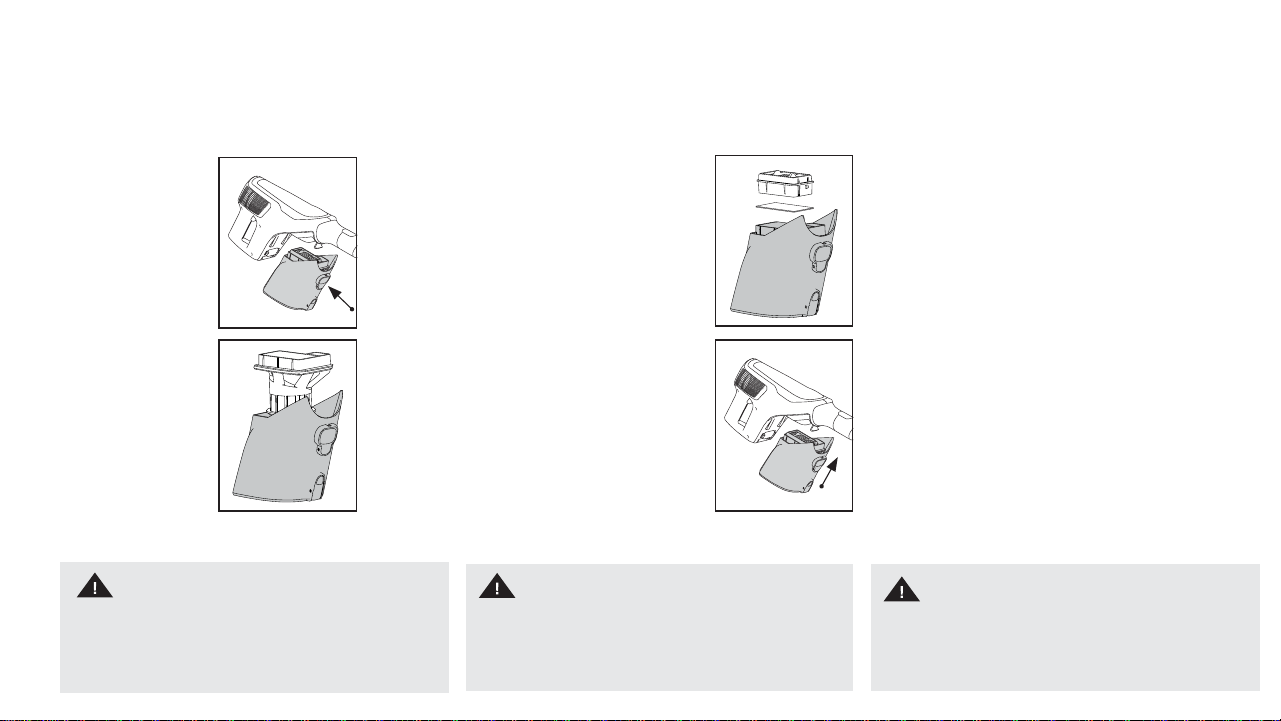
61
ADVERTENCIA
Para reducir el riesgo de sufrir lesiones personales por
las piezas móviles, apague el interruptor de alimentación
y desconecte todos los accesorios antes de realizar un
servicio de mantenimiento.
Mantenimiento: Limpieza del filtros, de la copa de recolección de residuos y del separador (Filtro: 440012835)
Quite la vara de alcance. Presione el botón de
liberación de la copa de recolección de residuos y
tire de la copa de recolección de residuos.
Para limpiar el separador, levante para quitarlo. Limpie
la suciedad y la suciedad frotando la rejilla metálica con
un paño de microfi bra y luego vuelva a colocarla en el
recipiente para tierra.
Tire los fi ltros y golpee sobre un cubo de basura
para quitar los residuos. Enjuague los fi ltros
con agua tibia hasta obtener el agua limpia.
Déjelo secar durante 24horas o hasta que esté
completamente seco antes de volver a colocarlo.
Para volver a armarla, alinee los dientes de la
copa de recolección de residuos y encástrela en
su lugar.
1
3
2
4
IMPORTANTE
No use jabón o cualquier otro químico para limpiarlo.
Seque los fi ltros completamente durante al menos 24
horas antes de volver a instalarlo en el producto.
IMPORTANTE
No utilice la aspiradora si esta no tiene colocados los
fi ltros o el separador.

62
Mantenimiento: Extracción y reemplazo del cepillo giratorio
Retire la boquilla eléctrica de la vara de alcance.
Voltee hacia abajo la boquilla eléctrica. Deslice el
botón de liberación del cepillo giratorio.
Quite todos los hilos o cabellos de ambos
extremos del cepillo giratorio y cualquier basura
o desecho que esté dentro del alojamiento de la
boquilla eléctrica.
Levante el extremo del cepillo giratorio para
extraerlo de la boquilla eléctrica.
Vuelva a colocar el cepillo giratorio en el
alojamiento.
1
3
2
4
ADVERTENCIA
Para reducir el riesgo de sufrir lesiones personales por las piezas móviles, apague
el interruptor de alimentación y desconecte todos los accesorios antes de realizar
un servicio de mantenimiento.
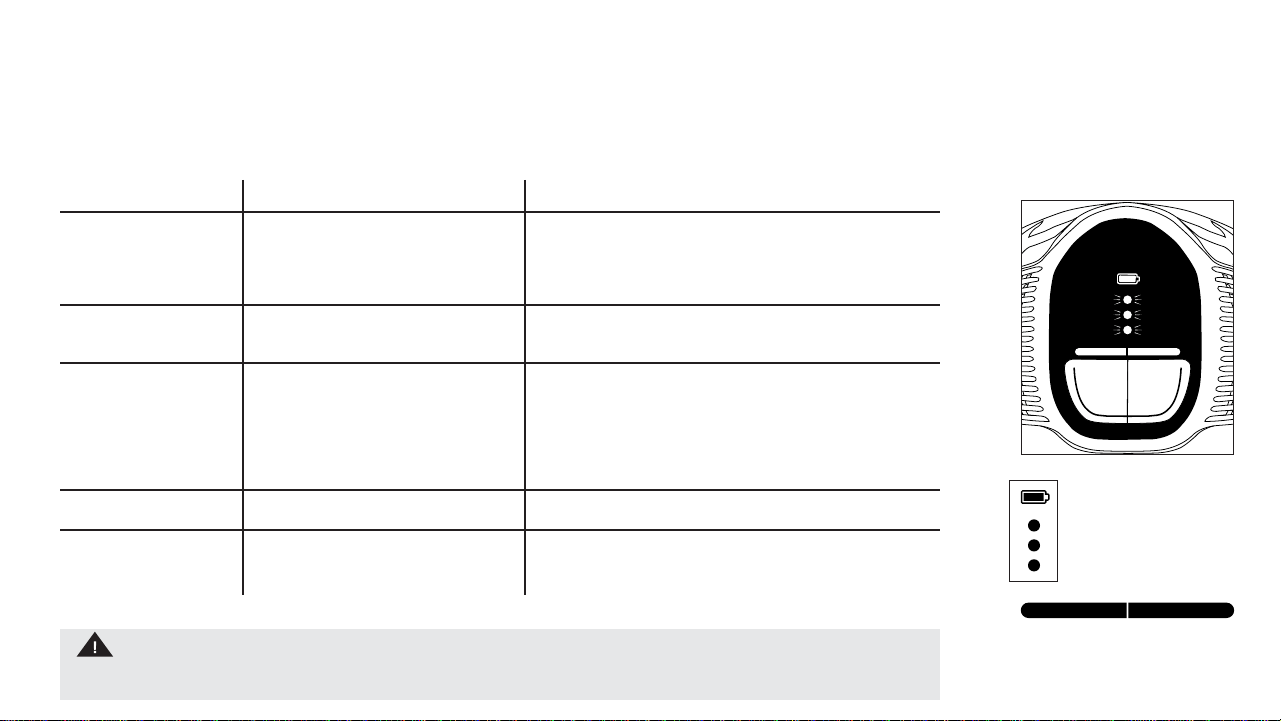
63
Resolución de problemas
ADVERTENCIA
Para reducir el riesgo de sufrir lesiones personales por las piezas móviles, apague el interruptor de alimentación y desconecte todos los
accesorios antes de realizar un servicio de mantenimiento.
HARD
FLOOR
BOOST
MODE
LED de carga:
Luces pulsantes = Cargando
Luces parpadeantes = Error en la unidad
Póngase en contacto con el Servicio
de atención al cliente: 1 (888) 679-2121
LED de modos:
Si parpadean, se trabó el cepillo giratorio. Apague
el producto y restablezca la protección de traba.
Cualquier otro mantenimiento lo debe realizar un representante de servicio autorizado.
Si el aparato no funciona como debe, si se ha caído, dañado o dejado a la intemperie, o si se ha sumergido en agua,
llévelo a un centro técnico antes de continuar usándolo.
PROBLEMA CAUSA POSIBLE SOLUCIÓN POSIBLE
Sale polvo de la aspiradora. 1. La copa de recolección de residuos está llena. 1. Vacíe la copa de recolección de residuos (consulte la página 60).
2. La copa de recolección de residuos no está 2. Revise la sección Extracción y reemplazo de la copa de recolección
colocada correctamente. de residuos (consulte la página 61).
3. El separador enjuagable no está instalado 3. Revise la sección Extracción y limpieza del filtro (consulte la página 61).
completamente.
4.
Las herramientas de 1. La copa de recolección de residuos está llena. 1. Vacíe la copa de recolección de residuos (consulte la página 60).
aspiración no aspiran.
2. El filtro está atascado. 2. Extraiga el filtro y límpielo (consulte la página 61).
3. La boquilla mecánica para alfombras no gira. 3. Quite y vuelva a colocar (consulte la página 62).
Hay mala succión. 1. La copa de recolección de residuos no está 1. Vuelva a instalar la copa de recolección de residuos y asegúrese de
apoyada completamente. que la tapa esté completamente cerrada (consulte la página 61).
2. El filtro está atascado o sucio. 2. Extraiga el filtro y límpielo (consulte la página 61).
3. La copa de recolección de residuos no está 3. Revise la sección Extracción y reemplazo del filtro (consulte la página 61).
colocada correctamente.
4. La carga de la batería se está debilitando. 4. Cargue la batería (consulte la página 56).
5. La boquilla está tapada o el pasaje de residuos 5. Apague la unidad y luego desconecte la boquilla para quitar la
está tapado. suciedad (consulte la página 62).
La aspiradora se calienta 1. El filtro está sucio. 1. Limpie, enjuague y seque el filtro y vuelva a armar (consulte la página 61).
2. Poca succión. 2. Localice y quite la obstrucción.
La aspiradora no se 1. La batería no está cargada. 1. Cargue la batería (consulte la página 56).
ENCIENDE o carga.
2. Es posible que la batería se haya recalentado. 2. Permita que la aspiradora se enfríe durante 30 minutos y vuelva a intentarlo.
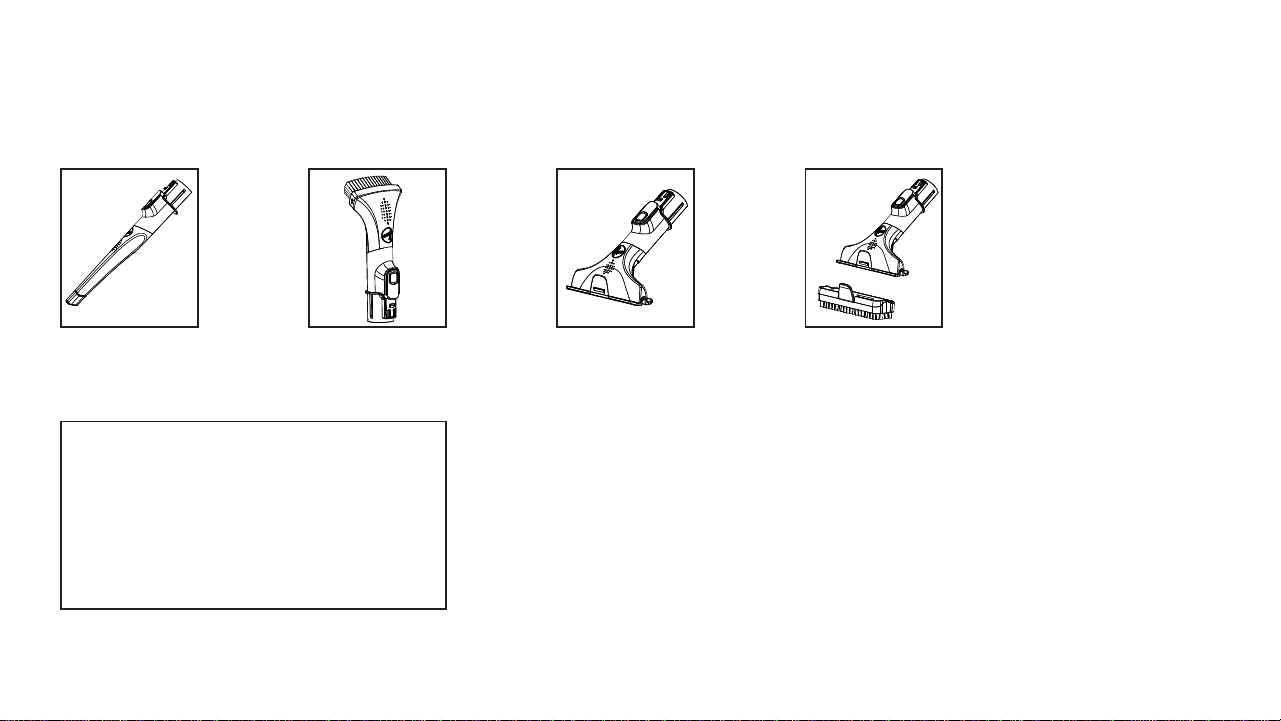
64
Cómo pedir accesorios
Herramienta para tapizados
N.° de pieza 440012842
Cepillo quitapolvo
N.° de pieza 440012841
Herramienta para limpieza
en rincones
N.° de pieza 440012840
QUÉ COMPRAR:
Compre piezas y accesorios Hoover
®
originales:
Si necesita una nueva pieza o accesorio, visite Hoover.com o Hoover.ca
para obtener más información.
Si tiene problema para localizar un artículo o modelo en nuestro sitio,
comuníquese con Atención al cliente llamando al 888 679-2121.
Herramienta para eliminar
pelos de animales en tapizados
N.° de pieza 440012853

65
SERVICIO Y GARANTÍA PARA LA ASPIRADORA INALÁMBRICA HOOVER
®
IMPULSE
™
E INFORMACIÓN DE
SERVICIO DE PRODUCTO Y BATERÍA
TODO SERVICIO DE MANTENIMIENTO DEBE SER REALIZADO POR UN REPRESENTANTE DE SERVICIO TÉCNICO AUTORIZADO.
Llame al 888 679-2121 en EE. UU y Canadá
En caso de que necesite asistencia adicional, visite un centro de servicio autorizado. Encuentre el más cercano en nuestro
sitio web: www.hoover.com. El propietario deberá pagar todos los costos de transporte desde y hasta cualquier lugar
de reparación. Siempre identifi que su producto de acuerdo al número del modelo y el código de fábrica cuando solicite
información o realice el pedido de las piezas de repuesto. (El número de modelo y el código de fabricación de la aspiradora
aparecen detrás de la copa de recolección o del cargador).
GARANTÍA LIMITADA DE DOS AÑOS (PARA USO DOMÉSTICO)
COBERTURA DE LA GARANTÍA: En casos de uso y mantenimiento domésticos en condiciones normales y conforme a la
Guía del propietario, el producto y la batería Hoover® tienen garantía contra fallas de fábrica en los materiales y fallas
por mano de obra por un periodo completo de dos años desde la fecha de compra (en adelante, el “Plazo de la garantía”).
Durante el plazo de la garantía, Hoover® le proporcionará la mano de obra y los repuestos, sin costo alguno, para reparar
dicha falla en los productos adquiridos en los Estados Unidos, en tiendas de intercambios militares de los EE.UU. y en
Canadá.
¿CÓMO HACER UN RECLAMO DE LA GARANTÍA?: Si este producto no presentara las características garantizadas, llévelo o
envíelo a un Distribuidor Técnico Ofi cial autorizado de Hoover® junto con el comprobante de compra. Para que lo redirijan
en forma automática a un Centro de Servicios autorizado en los EE.UU., llame al 888 679-2121 o visite el sitio en línea de
Hoover®, www.hoover.com.
¿QUÉ ES LO QUE NO CUBRE ESTA GARANTÍA?: La presente garantía no cubre las correas, los fi ltros y los cepillos
giratorios, el uso del producto en operaciones comerciales (tales como servicios de contratación de equipamiento y
limpieza), el mantenimiento incorrecto del producto, los daños derivados de su uso indebido, casos fortuitos o hechos
de la naturaleza, vandalismo u otros actos fuera del control de Hoover®, los actos o las omisiones del propietario, su uso
fuera del país de compra original y las reventas del producto por parte del propietario original. Esta garantía no cubre los
servicios de recolección, entrega, transporte o visitas a domicilio. Sin embargo, si envía su producto por correo a un centro
de servicio técnico y ventas de Hoover® para obtener el servicio de la garantía, solo se pagará el costo de envío de ida.
Llame al centro de servicio técnico de Hoover®, al 888 679-2121, para averiguar cómo enviar el producto. Esta garantía no
se aplica a los productos comprados fuera de los Estados Unidos, inclusive sus territorios y posesiones, un intercambio
militar estadounidense y Canadá.
OTROS TÉRMINOS IMPORTANTES: Esta garantía no es transferible y no puede asignarse. Esta garantía se regirá e
interpretará bajo las leyes del estado de Carolina del Norte. El Plazo de la garantía no se prolongará por el reemplazo de
las baterías o piezas, ni por cualquier reparación realizada conforme a esta garantía.
ESTA GARANTÍA ES LA GARANTÍA EXCLUSIVA Y SE RENUNCIA AL DERECHO DE CUALQUIER OTRA GARANTÍA, EXPRESA O
IMPLÍCITA, INCLUSIVE GARANTÍAS DE COMERCIABILIDAD O ADECUACIÓN PARA UN FIN PARTICULAR. EN NINGÚN CASO
HOOVER SERÁ RESPONSABLE POR NINGÚN DAÑO ESPECIAL, INDIRECTO, INCIDENTAL O CONSECUENTE DE NINGÚN TIPO
O NATURALEZA AL PROPIETARIO O CUALQUIER PARTE QUE RECLAME A TRAVÉS DEL PROPIETARIO, YA SEA CON BASE EN
UN CONTRATO, LA NEGLIGENCIA, EL AGRAVIO O LA RESPONSABILIDAD ESTRICTA DE LOS PRODUCTOS O PROCEDENTES
DE CUALQUIER CAUSA.
Algunos estados no permiten la exclusión de los daños consecuentes, por lo que la exclusión anterior puede no aplicarse a
usted. Esta garantía le otorga derechos específi cos. También puede tener otros derechos, que varían según el estado.
¿TIENE PREGUNTAS O INQUIETUDES?
Póngase en contacto con nosotros:
Hoover.com/support o Hoover.ca/support
888 679-2121
Comuníquese con nosotros:
Twitter: @HooverUSA
Facebook: facebook.com/hoover
No devuelva la unidad a la tienda. Busque el número del
modelo detrás de la copa de recolección.

66
NOTES :

67
NOTES :

#RethinkCleaning
FIND US ON:
Hoover.com
youtube.com/hoover facebook.com/hoover twitter.com/hooverusa
961152085
instagram.com/hoover