
Wireless Charging Alarm Clock
with Nightlight
User’s Guide
Getting Started
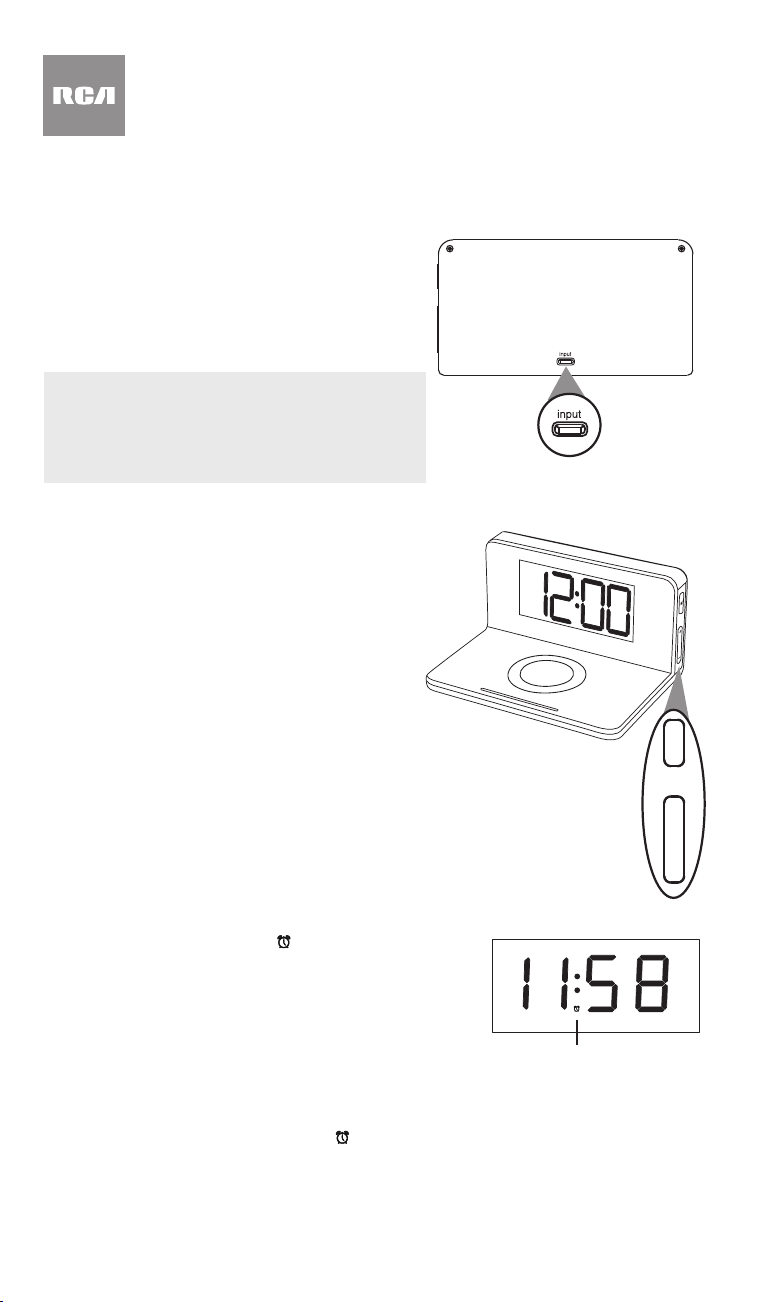
Step 1: Plug In
1. Plug the included USB-C power cable into the
input jack on the back of the clock.
2. Plug the other end of this cable into the included
power adapter.
3. Plug the power adapter into a working power
outlet.
Setting the Display Brightness
The clock display automatically adjusts its brightness depending on the time of day.
Max brightness during the day (from 7AM to 6:59PM)
Medium brightness in the evening (from 6 to 11:59PM)
Minimum brightness at night (from 12 to 6:59AM)
You can also go through these brightness settings manually by pressing the + and — buttons
on the right side of the clock.
To increase display brightness: Press the + button on the right side of the clock. Each press
goes to the next setting—minimum, medium, max, and off.
To decrease display brightness: Press the — button on the right side of the clock.
Note: Auto brightness settings take effect automatically. For example, if you have the display
set to max brightness, it will automatically go to minimum brightness at midnight.
BATTERY BACKUP
Your clock has a pre-installed battery backup that
will keep the time in case power is interrupted (like
by a power outage, for example). This battery is
not user replaceable.
Step 2: Set the Time
Note: By default, the clock uses the 12-hour format.
To switch between 12- and 24-hour time formats
(for example, 5:00 pm in 12-hour format would
be 17:00 in 24-hour format), double press the M
button on the right side of the clock.
1. Press the M button on the right side of the
clock.
2. Use the + and — buttons on right side of the
clock to adjust the minutes. Press the M button
to set the minutes and move to the hour.
3. Use the + and — buttons to adjust the hour.
Then press M to nish setting the time.
Everyday Use
Setting the Alarm
1. Press and hold the + button on the right side
of the clock for 2 seconds to activate the alarm.
The alarm indicator (
) appears on the display.
Using the Nightlight
The clock’s nightlight has four brightness
settings: low, medium, high, and off.
To turn the nightlight on and adjust it: Press
the nightlight button on the left side of the
clock. Each press goes to the next setting—low,
medium, high, and off.
Clock, back panel
Clock, right side
2. Press and hold the M button on the right side of the clock
until the minutes digits start blinking.
3. Use the + and — buttons on right side of the clock to adjust
the minutes for the alarm. Press the M button to set it and
move to the hour.
4. Use the + and — buttons to adjust the hour for the alarm.
Press the M button to set it.
To turn the alarm on: Press and hold the + button on the right
side of the clock. The alarm indicator (
) appears in the display when the alarm is on.
To turn the alarm off: Press and hold the — button on the right side of the clock. The alarm
indicator disappears from the display.
Notes:
• The alarm sounds for 3 minutes when activated.
• Press any button to turn off the alarm. Press anywhere else on the clock to activate snooze.
The alarm indicator remains on the clock display.
Alarm indicator
M
+
–
Clock, left side
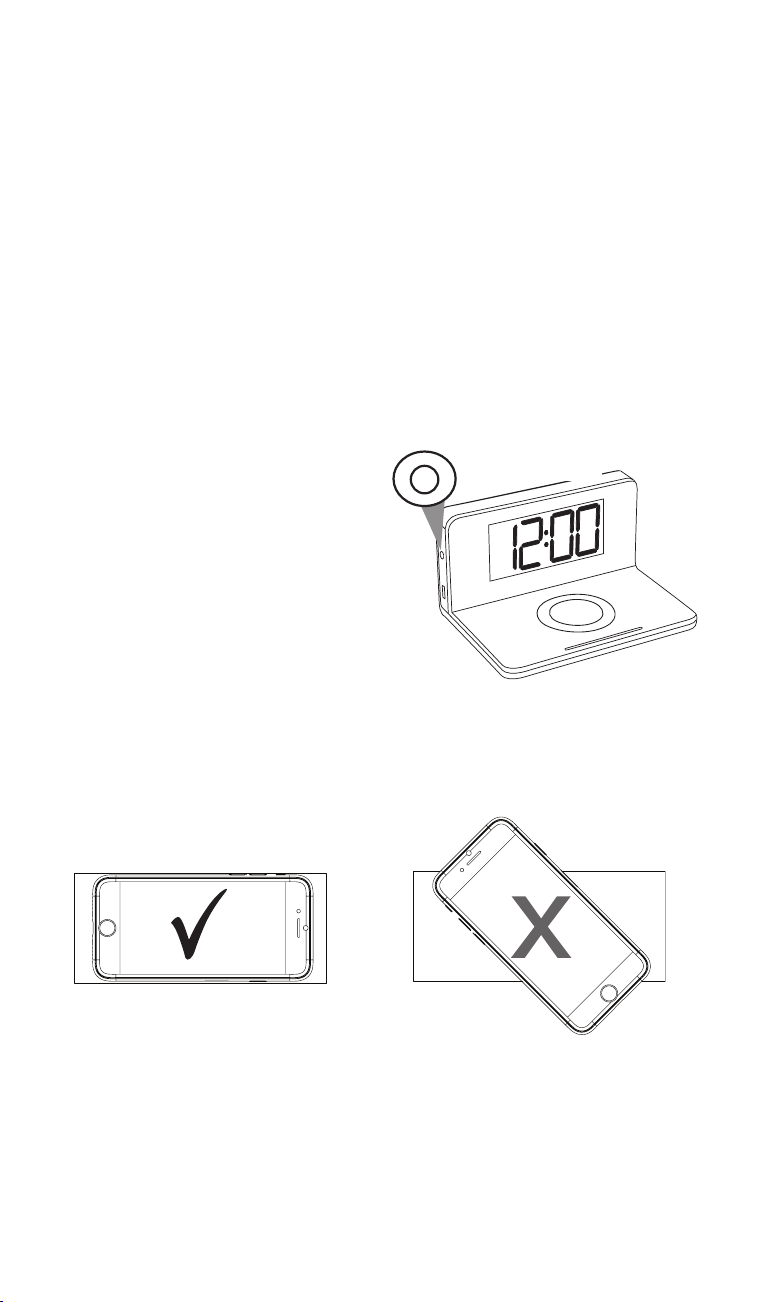
Charging your Device
IMPORTANT: Before you try to charge your device, make sure it is compatible with wireless
charging. If your device has a metal case, remove it before you put the device on the char-
ger.
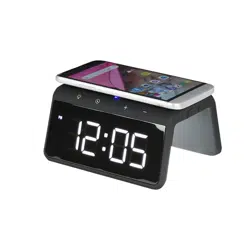
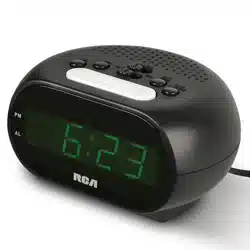
1. Place your wireless charging-compatible device directly onto the charging pad on top of
the clock. Refer to the placement illustrations here as a guide.
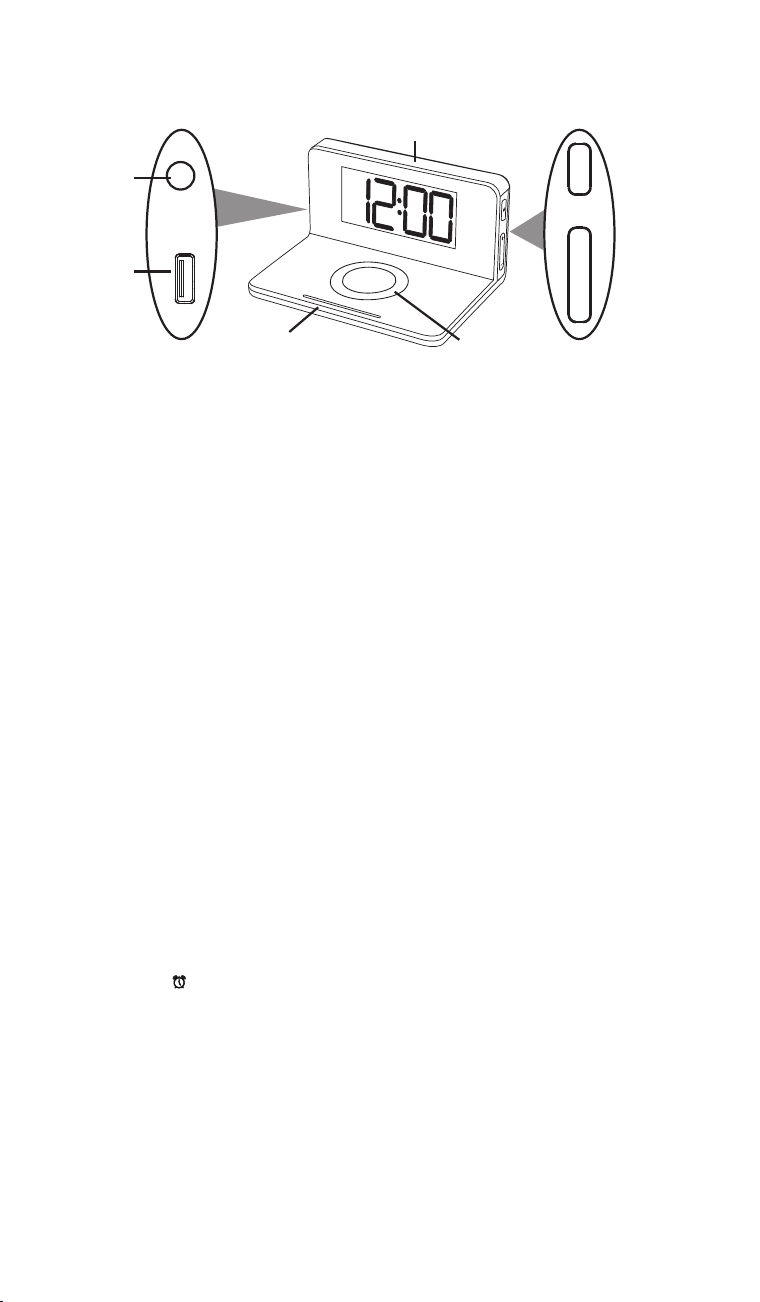
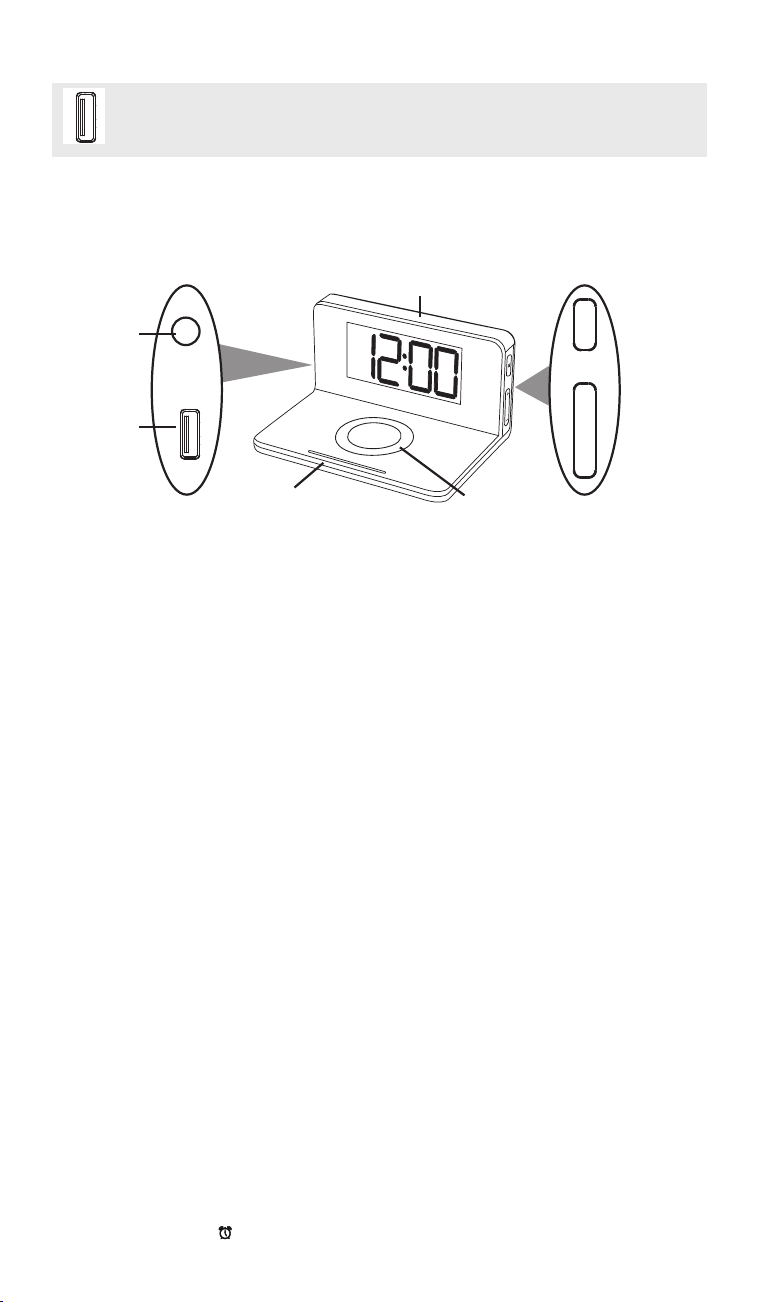
Tour of the Wireless Charging Alarm Clock
The charging indicator in front of the charging pad turns blue while your device is
charging. It turns off when your device has nished charging. Check your device’s
screen to see the progress of charging. You can remove your device at any time during
charging.
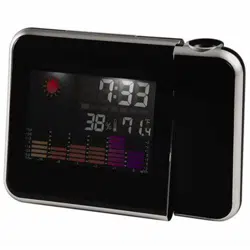
Important: If the charging indicator light starts blinking, there’s something interfering
with the charging. Make sure there are no objects between your phone and the charging
pad. You might need to remove your phone’s case to charge wirelessly.
2. When your device is completely charged, remove it from the charging pad.
Note: The clock must be plugged in to provide wireless charging.
You can charge normally too! This clock offers a USB port for charging. Just plug
the charging cable that came with your device into this charging port to charge!
Nightlight provides three levels of ambient lighting. Press the nightlight button on the left
side of the clock to cycle through the settings (low, medium, high, and off).
Wireless charging pad and indicator lets you charge compatible devices wirelessly when
the clock is using AC power. The indicator turns solid blue when your device is charged and
turns off when your device is charged. The charging indicator blinks when there is a problem
charging.
Right Side
M button enters time set (press) and alarm set (press and hold when the alarm is on) modes
+ button increases display brightness (press). It also turns on the alarm (press and hold) and
increases the ashing value when setting the time or alarm.
— button decreases display brightness (press). It also turns off the alarm (press and hold) and
decreases the ashing value when setting the time or alarm.
Left Side
Nightlight button cycles through the brightness settings for the nightlight: low, medium,
high, and off.
USB charging port provides wired charging for your USB device.
Back (not shown)
input plugs into the provided charging cable to power the clock.
Display
AM/PM indicator shows that the time displayed is AM or PM (does not apply to 24-hour
format).
Time/date digits show the current time or time/alarm setting values.
Alarm indicator (
) shows that an alarm is set.
M
+
–
Nightlight
Wireless
charging pad
Wireless charging
indicator
Right side
Left side
USB
charging
port
Nightlight
button
Réveil de chargement sans l
avec veilleuse
Guide de l’utilisateur
Guide de démarrage
Étape 1 : Branchement
1. Brancher le câble d’alimentation USB-C inclus dans
la prise input (entrée) située à l’arrière du réveil.
2. Brancher l’autre extrémité de ce câble sur
l’adaptateur d’alimentation inclus.
3. Brancher l’adaptateur d’alimentation sur une prise
secteur opérationnelle.
PILE DE SECOURS
Votre réveil dispose d’une pile de secours
préinstallée qui garde l’heure en cas de coupure de
courant (par exemple, en cas de panne de courant).
Cette pile n’est pas remplaçable par l’utilisateur.
Étape 2 : Réglage de l’heure
Remarque : Par défaut, le réveil utilise le format
12 heures. pour basculer entre les formats horaires
12 heures et 24 heures (par exemple, 5:00 pm au
format 12 heures correspond à 17:00 heures au
format 24 heures), appuyer deux fois de suite sur le
bouton M situé sur le côté droit du réveil.
1. Appuyer suite sur le bouton M situé sur le côté
droit du réveil.
2. Utiliser les boutons + et — situés sur le côté
droit du réveil pour régler les minutes. Appuyer
sur le bouton M pour conrmer les minutes et
passer au réglage des heures.
3. Utiliser les boutons + et — pour régler l’heure.
Puis appuyer sur le bouton M pour terminer le
réglage de l’heure.
Utilisation quotidienne
Réglage de l’alarme
1. Appuyer sur le bouton + sur le côté droit
du réveil et le maintenir enfoncé pendant 2
secondes pour activer l’alarme. L’indicateur
Réveil, panneau arrière
Réveil, côté droit
d’alarme apparaît sur l’écran ( ).
2. Appuyer et maintenir enfoncé le bouton M sur le côté droit
du réveil jusqu’à ce que les chiffres de l’heure commencent
à clignoter.
3. Appuyer sur les boutons + et — situés sur le côté droit du
réveil pour régler les minutes de l’alarme. Appuyer sur le
bouton M pour conrmer et passer au réglage de l’heure.
4. Utiliser les boutons + et — pour régler les heures de
l’alarme. Appuyer sur le bouton M pour conrmer.
Pour activer l’alarme : Appuyer sur le bouton + situé sur le côté droit du réveil et le
maintenir enfoncé. L’indicateur d’alarme (
) apparaît sur l’écran quand l’alarme est activée.
Pour désactiver l’alarme : Appuyer sur le bouton — situé sur le côté droit du réveil et le
maintenir enfoncé. L’indicateur d’alarme disparaît de l’écran.
Remarques :
• L’alarme retentit pendant 3 minutes lorsqu’elle est activée.
• Appuyer sur n’importe quel bouton pour désactiver l’alarme/ Appuyer n’importe où ailleurs
sur le réveil pour activer la répétition. L’indicateur d’alarme reste afché sur l’écran du réveil.
Indicateur d’alarme
M
+
–
Réglage de la luminosité de l’écran
L’écran du réveil ajuste automatiquement sa luminosité en fonction de l’heure de la journée.
Luminosité maximale pendant la journée (de 7h à 18h59)
Luminosité moyenne le soir (de 19h à 23h59)
Luminosité minimale la nuit (de 0h à 6h59)
Il est aussi possible de passer en revue ces réglages de luminosité manuellement en
appuyant sur les boutons + et — situés sur le côté droit du réveil.
Pour augmenter la luminosité de l’écran : Appuyer sur le bouton + situé sur le côté droit
du réveil. Chaque pression permet de passer au réglage suivant — minimal, moyen, maximal
et éteint.
Pour diminuer la luminosité de l’écran : Appuyer sur le bouton — situé sur le côté droit du
réveil.
Remarque : Les réglages automatiques de la luminosité prennent effet automatiquement.
Par exemple, si la luminosité maximale de l’écran a été réglée précédemment, il passera
automatiquement à la luminosité minimale à minuit.
Utilisation de la veilleuse
La veilleuse de l’horloge dispose de quatre réglages de luminosité : faible, moyen, élevé et
éteint.
Pour allumer la veilleuse et la régler :
Appuyer sur le bouton veilleuse situé sur le côté
gauche du réveil. Chaque pression permet de
passer au réglage suivant — faible, moyen, élevé
et éteint.
Pour charger l’appareil
IMPORTANT : Avant d’essayer de charger un
appareil, s’assurer qu’il est compatible avec le
Réveil, côté gauche
chargement sans l. Si l’appareil est équipé d’un boîtier métallique, le retirer avant de placer
l’appareil sur le chargeur.
1. Placer votre appareil compatible avec le chargement sans l directement sur le socle
de chargement sur le haut du réveil. Se reporter aux illustrations de positionnement ci-
dessous comme guide.
L’indicateur de charge situé à l’avant du socle de chargement devient bleu pendant que
l’appareil se charge. Le voyant s’éteint lorsque l’appareil est chargé. Vérier l’écran de
l’appareil pour voir la progression du chargement. Il est possible retirer l’appareil à tout
moment pendant le chargement.
Important : Si l’indicateur de charge commence à clignoter, c’est que quelque chose
interfère avec la charge. Vérier qu’il n’y a pas d’objets entre l’appareil et le socle de
chargement. Il sera peut-être nécessaire de retirer l’étui de l’appareil pour le recharger
sans l.
2. Lorsque l’appareil est complètement chargé, le retirer du socle de chargement.
Remarque : Le réveil doit être branché pour permettre le chargement sans l.
Wireless Charging Alarm Clock
with Nightlight
User’s Guide
Getting Started
Step 1: Plug In
1. Plug the included USB-C power cable into the
input jack on the back of the clock.
2. Plug the other end of this cable into the included
power adapter.
3. Plug the power adapter into a working power
outlet.
Setting the Display Brightness
The clock display automatically adjusts its brightness depending on the time of day.
Max brightness during the day (from 7AM to 6:59PM)
Medium brightness in the evening (from 6 to 11:59PM)
Minimum brightness at night (from 12 to 6:59AM)
You can also go through these brightness settings manually by pressing the + and — buttons
on the right side of the clock.
To increase display brightness: Press the + button on the right side of the clock. Each press
goes to the next setting—minimum, medium, max, and off.
To decrease display brightness: Press the — button on the right side of the clock.
Note: Auto brightness settings take effect automatically. For example, if you have the display
set to max brightness, it will automatically go to minimum brightness at midnight.
BATTERY BACKUP
Your clock has a pre-installed battery backup that
will keep the time in case power is interrupted (like
by a power outage, for example). This battery is
not user replaceable.
Step 2: Set the Time
Note: By default, the clock uses the 12-hour format.
To switch between 12- and 24-hour time formats
(for example, 5:00 pm in 12-hour format would
be 17:00 in 24-hour format), double press the M
button on the right side of the clock.
1. Press the M button on the right side of the
clock.
2. Use the + and — buttons on right side of the
clock to adjust the minutes. Press the M button
to set the minutes and move to the hour.
3. Use the + and — buttons to adjust the hour.
Then press M to nish setting the time.
Everyday Use
Setting the Alarm
1. Press and hold the + button on the right side
of the clock for 2 seconds to activate the alarm.
The alarm indicator (
) appears on the display.
Using the Nightlight
The clock’s nightlight has four brightness
settings: low, medium, high, and off.
To turn the nightlight on and adjust it: Press
the nightlight button on the left side of the
clock. Each press goes to the next setting—low,
medium, high, and off.
Clock, back panel
Clock, right side
2. Press and hold the M button on the right side of the clock
until the minutes digits start blinking.
3. Use the + and — buttons on right side of the clock to adjust
the minutes for the alarm. Press the M button to set it and
move to the hour.
4. Use the + and — buttons to adjust the hour for the alarm.
Press the M button to set it.
To turn the alarm on: Press and hold the + button on the right
side of the clock. The alarm indicator (
) appears in the display when the alarm is on.
To turn the alarm off: Press and hold the — button on the right side of the clock. The alarm
indicator disappears from the display.
Notes:
• The alarm sounds for 3 minutes when activated.
• Press any button to turn off the alarm. Press anywhere else on the clock to activate snooze.
The alarm indicator remains on the clock display.
Alarm indicator
M
+
–
Clock, left side
Charging your Device
IMPORTANT: Before you try to charge your device, make sure it is compatible with wireless
charging. If your device has a metal case, remove it before you put the device on the char-
ger.
1. Place your wireless charging-compatible device directly onto the charging pad on top of
the clock. Refer to the placement illustrations here as a guide.
Tour of the Wireless Charging Alarm Clock
The charging indicator in front of the charging pad turns blue while your device is
charging. It turns off when your device has nished charging. Check your device’s
screen to see the progress of charging. You can remove your device at any time during
charging.
Important: If the charging indicator light starts blinking, there’s something interfering
with the charging. Make sure there are no objects between your phone and the charging
pad. You might need to remove your phone’s case to charge wirelessly.
2. When your device is completely charged, remove it from the charging pad.
Note: The clock must be plugged in to provide wireless charging.
You can charge normally too! This clock offers a USB port for charging. Just plug
the charging cable that came with your device into this charging port to charge!
Nightlight provides three levels of ambient lighting. Press the nightlight button on the left
side of the clock to cycle through the settings (low, medium, high, and off).
Wireless charging pad and indicator lets you charge compatible devices wirelessly when
the clock is using AC power. The indicator turns solid blue when your device is charged and
turns off when your device is charged. The charging indicator blinks when there is a problem
charging.
Right Side
M button enters time set (press) and alarm set (press and hold when the alarm is on) modes
+ button increases display brightness (press). It also turns on the alarm (press and hold) and
increases the ashing value when setting the time or alarm.
— button decreases display brightness (press). It also turns off the alarm (press and hold) and
decreases the ashing value when setting the time or alarm.
Left Side
Nightlight button cycles through the brightness settings for the nightlight: low, medium,
high, and off.
USB charging port provides wired charging for your USB device.
Back (not shown)
input plugs into the provided charging cable to power the clock.
Display
AM/PM indicator shows that the time displayed is AM or PM (does not apply to 24-hour
format).
Time/date digits show the current time or time/alarm setting values.
Alarm indicator (
) shows that an alarm is set.
M
+
–
Nightlight
Wireless
charging pad
Wireless charging
indicator
Right side
Left side
USB
charging
port
Nightlight
button
Réveil de chargement sans l
avec veilleuse
Guide de l’utilisateur
Guide de démarrage
Étape 1 : Branchement
1. Brancher le câble d’alimentation USB-C inclus dans
la prise input (entrée) située à l’arrière du réveil.
2. Brancher l’autre extrémité de ce câble sur
l’adaptateur d’alimentation inclus.
3. Brancher l’adaptateur d’alimentation sur une prise
secteur opérationnelle.
PILE DE SECOURS
Votre réveil dispose d’une pile de secours
préinstallée qui garde l’heure en cas de coupure de
courant (par exemple, en cas de panne de courant).
Cette pile n’est pas remplaçable par l’utilisateur.
Étape 2 : Réglage de l’heure
Remarque : Par défaut, le réveil utilise le format
12 heures. pour basculer entre les formats horaires
12 heures et 24 heures (par exemple, 5:00 pm au
format 12 heures correspond à 17:00 heures au
format 24 heures), appuyer deux fois de suite sur le
bouton M situé sur le côté droit du réveil.
1. Appuyer suite sur le bouton M situé sur le côté
droit du réveil.
2. Utiliser les boutons + et — situés sur le côté
droit du réveil pour régler les minutes. Appuyer
sur le bouton M pour conrmer les minutes et
passer au réglage des heures.
3. Utiliser les boutons + et — pour régler l’heure.
Puis appuyer sur le bouton M pour terminer le
réglage de l’heure.
Utilisation quotidienne
Réglage de l’alarme
1. Appuyer sur le bouton + sur le côté droit
du réveil et le maintenir enfoncé pendant 2
secondes pour activer l’alarme. L’indicateur
Réveil, panneau arrière
Réveil, côté droit
d’alarme apparaît sur l’écran ( ).
2. Appuyer et maintenir enfoncé le bouton M sur le côté droit
du réveil jusqu’à ce que les chiffres de l’heure commencent
à clignoter.
3. Appuyer sur les boutons + et — situés sur le côté droit du
réveil pour régler les minutes de l’alarme. Appuyer sur le
bouton M pour conrmer et passer au réglage de l’heure.
4. Utiliser les boutons + et — pour régler les heures de
l’alarme. Appuyer sur le bouton M pour conrmer.
Pour activer l’alarme : Appuyer sur le bouton + situé sur le côté droit du réveil et le
maintenir enfoncé. L’indicateur d’alarme (
) apparaît sur l’écran quand l’alarme est activée.
Pour désactiver l’alarme : Appuyer sur le bouton — situé sur le côté droit du réveil et le
maintenir enfoncé. L’indicateur d’alarme disparaît de l’écran.
Remarques :
• L’alarme retentit pendant 3 minutes lorsqu’elle est activée.
• Appuyer sur n’importe quel bouton pour désactiver l’alarme/ Appuyer n’importe où ailleurs
sur le réveil pour activer la répétition. L’indicateur d’alarme reste afché sur l’écran du réveil.
Indicateur d’alarme
M
+
–
Réglage de la luminosité de l’écran
L’écran du réveil ajuste automatiquement sa luminosité en fonction de l’heure de la journée.
Luminosité maximale pendant la journée (de 7h à 18h59)
Luminosité moyenne le soir (de 19h à 23h59)
Luminosité minimale la nuit (de 0h à 6h59)
Il est aussi possible de passer en revue ces réglages de luminosité manuellement en
appuyant sur les boutons + et — situés sur le côté droit du réveil.
Pour augmenter la luminosité de l’écran : Appuyer sur le bouton + situé sur le côté droit
du réveil. Chaque pression permet de passer au réglage suivant — minimal, moyen, maximal
et éteint.
Pour diminuer la luminosité de l’écran : Appuyer sur le bouton — situé sur le côté droit du
réveil.
Remarque : Les réglages automatiques de la luminosité prennent effet automatiquement.
Par exemple, si la luminosité maximale de l’écran a été réglée précédemment, il passera
automatiquement à la luminosité minimale à minuit.
Utilisation de la veilleuse
La veilleuse de l’horloge dispose de quatre réglages de luminosité : faible, moyen, élevé et
éteint.
Pour allumer la veilleuse et la régler :
Appuyer sur le bouton veilleuse situé sur le côté
gauche du réveil. Chaque pression permet de
passer au réglage suivant — faible, moyen, élevé
et éteint.
Pour charger l’appareil
IMPORTANT : Avant d’essayer de charger un
appareil, s’assurer qu’il est compatible avec le
Réveil, côté gauche
chargement sans l. Si l’appareil est équipé d’un boîtier métallique, le retirer avant de placer
l’appareil sur le chargeur.
1. Placer votre appareil compatible avec le chargement sans l directement sur le socle
de chargement sur le haut du réveil. Se reporter aux illustrations de positionnement ci-
dessous comme guide.
L’indicateur de charge situé à l’avant du socle de chargement devient bleu pendant que
l’appareil se charge. Le voyant s’éteint lorsque l’appareil est chargé. Vérier l’écran de
l’appareil pour voir la progression du chargement. Il est possible retirer l’appareil à tout
moment pendant le chargement.
Important : Si l’indicateur de charge commence à clignoter, c’est que quelque chose
interfère avec la charge. Vérier qu’il n’y a pas d’objets entre l’appareil et le socle de
chargement. Il sera peut-être nécessaire de retirer l’étui de l’appareil pour le recharger
sans l.
2. Lorsque l’appareil est complètement chargé, le retirer du socle de chargement.
Remarque : Le réveil doit être branché pour permettre le chargement sans l.
Présentation du réveil à chargement sans l
Il est possible aussi de charger normalement ! Ce réveil offre un port USB de
chargement. Il suft de brancher le câble de chargement fourni avec l’appareil sur
ce port de chargement pour le recharger !
La veilleuse offre trois niveaux d’éclairage ambiant. Appuyer sur le bouton de veilleuse situé
sur le côté gauche du réveil pour faire déler les réglages (faible, moyen, élevé et éteint).
Le socle de chargement sans l et l’indicateur permettent de charger des appareils
compatibles sans l lorsque le réveil est alimenté sur le secteur. L’indicateur devient bleu xe
lorsque l’appareil est en cours de chargement et s’éteint lorsqu’il est chargé. L’indicateur de
chargement clignote en cas de problème de chargement.
Côté droit
Le bouton M permet d’entrer dans les modes de réglage de l’heure (appuyer) et de l’alarme
(appuyer et maintenir enfoncé lorsque l’alarme est activée)
Le bouton + augmente la luminosité de l’écran (appuyer). Il permet aussi d’activer l’alarme
(appuyer et maintenir enfoncé) et d’augmenter la valeur de clignotement lors du réglage de
l’heure ou de l’alarme.
Le bouton— diminue la luminosité de l’écran (appuyer). Il permet aussi l’arrêt de l’alarme
(appuyer et maintenir enfoncé) et de diminuer la valeur de clignotement lors du réglage de
l’heure ou de l’alarme.
Côté gauche
Le bouton veilleuse permet de faire déler les réglages de luminosité de la veilleuse :
faible, moyen, élevé et éteint.
Le port de chargement USB permet de charger un appareil USB par câble.
Arrière (non illustré)
La prise d’entrée (input) se branche sur le câble de chargement fourni pour alimenter le
réveil.
Écran
L’indicateur AM/PM indique si l’heure afchée est AM (Matin) ou PM (Après-midi) (ne
s’applique pas au format 24 heures).
Les chiffres heure/date indiquent l’heure actuelle ou les valeurs de réglage de l’heure
d’alarme.
L’indicateur d’alarme (
) indique qu’une alarme est activée.
M
+
–
Veilleuse
Socle de
chargement
sans l
Voyant de
chargement sans l
Côté droit
Côté gauche
Port de
charge USB
Bouton de
veilleuse
Reloj despertador con carga inalámbrica
y luz nocturna
Guía de usuario
Primeros pasos
Paso 1: Realice la conexión
1. Conecte el cable de alimentación USB-C incluido
al conector input ubicado en la parte posterior
del reloj.
2. Conecte el otro extremo de este cable al
adaptador de alimentación incluido.
3. Enchufe el adaptador de alimentación a un
tomacorriente en funcionamiento.
BATERÍA DE RESPALDO
El reloj incluye una batería de respaldo preinstalada
que conservará la hora en caso de que se interrumpa
el suministro de alimentación (por ejemplo, si ocurre
un corte en el suministro eléctrico). El usuario no
puede reemplazar esta batería.
Paso 2: Ajuste la hora
Nota: De forma predeterminada, el reloj utiliza
el formato de 12 horas. Para cambiar entre los
formatos de hora de 12 y 24 horas (por ejemplo,
5:00 p. m. en el formato de 12 horas serán las
17:00 en el formato de 24 horas), oprima dos veces
el botón M ubicado en la parte derecha del reloj.
1. Oprima el botón M ubicado en la parte derecha
del reloj.
2. Utilice los botones + y — ubicados en la parte
derecha del reloj para ajustar los minutos.
Oprima el botón M para establecer los minutos
y moverse a la hora.
3. Utilice los botones + y — para ajustar la hora. A
continuación, pulse M para nalizar el ajuste de
la hora.
Uso diario
Ajuste de la alarma
1. Mantenga pulsado el botón + ubicado en la parte
derecha del reloj durante 2 segundos para activar
la alarma. Aparecerá en la pantalla el indicador de
Reloj, panel posterior
Reloj, parte derecha
alarma ( ).
2. Mantenga oprimido el botón M ubicado en la parte derecha
del reloj hasta que los dígitos de los minutos comiencen a
parpadear.
3. Utilice los botones + y — ubicados en la parte derecha del reloj
para ajustar los minutos de la alarma. Oprima el botón M para
establecer los minutos y moverse a la hora.
4. Utilice los botones + y — para ajustar la hora de la alarma. Oprima el botón M para jar la alarma.
Para activar la alarma: mantenga oprimido el botón + ubicado en la parte derecha del
reloj. Cuando la alarma esté activada, aparecerá en la pantalla el icono de alarma (
).
Para desactivar la alarma: mantenga oprimido el botón — ubicado en la parte derecha del
reloj. El indicador de alarma desaparecerá de la pantalla.
Notas:
• La alarma suena durante 3 minutos cuando está activada.
• Oprima cualquier botón para desactivar la alarma. Oprima cualquier otro lugar del reloj
para activar la repetición de la alarma. El indicador de alarma seguirá apareciendo en la
pantalla del reloj.
Indicador de alarma
M
+
–
Conguración del brillo de la pantalla
La pantalla del reloj ajusta automáticamente su brillo según la hora del día.
Brillo máximo durante el día (desde las 7 a. m. hasta las 6:59 p. m.)
Brillo medio por la tarde (desde las 7 p. m. hasta las 11:59 p. m.)
Brillo mínimo por la noche (desde las 12 a. m. hasta las 6:59 a. m.)
También puede acceder a estos ajustes de brillo de forma manual oprimiendo los botones
+ y — ubicados en la parte derecha del reloj.
Para aumentar el brillo de la pantalla: oprima el botón + ubicado en la parte derecha del
reloj. Cada vez que oprima, podrá acceder al siguiente ajuste: mínimo, medio, máximo y
apagado.
Para reducir el brillo de la pantalla: oprima el botón — ubicado en la parte derecha del reloj.
Nota: La conguración de brillo automático se aplica automáticamente. Por ejemplo, si la
pantalla está congurada en el brillo máximo, cambiará automáticamente al brillo mínimo a
la medianoche.
Uso de la luz nocturna
La luz nocturna del reloj incluye cuatro ajustes de brillo: bajo, medio, alto y apagado.
Para encender la luz nocturna y ajustarla:
oprima el botón de luz nocturna ubicado en la
parte izquierda del reloj. Cada vez que oprima,
podrá acceder al siguiente ajuste: bajo, medio,
máximo y apagado.
Reloj, parte izquierda
Carga del dispositivo
IMPORTANTE: Antes de intentar cargar un dispositivo, asegúrese de que sea compatible
con la carga inalámbrica. Si el dispositivo tiene una funda metálica, extráigala antes de
colocar el dispositivo en el cargador.
1. Coloque el dispositivo compatible con la carga inalámbrica directamente en la base de
carga ubicada en la parte superior del reloj. Consulte las ilustraciones de colocación
detalladas aquí a modo de referencia.
El indicador de carga ubicado en la parte frontal de la base de carga se encenderá de
color azul mientras se esté cargando el dispositivo. Se apagará cuando el dispositivo
haya nalizado su carga. Revise la pantalla del dispositivo para observar el progreso
de la carga. Puede extraer el dispositivo de la base en cualquier momento durante el
proceso de carga.
Importante: Si el indicador de carga comienza a parpadear, existe alguna interferencia
con la carga. Asegúrese de que no existan objetos entre el dispositivo y la base de carga.
Deberá quitarle la funda al dispositivo para realizar la carga inalámbrica.
2. Cuando el dispositivo esté totalmente cargado, extráigalo de la base de carga.
Nota: El reloj deberá estar enchufado para poder ofrecer la funcionalidad de carga
inalámbrica.
Recorrido por el reloj despertador con carga inalámbrica
La luz nocturna ofrece tres niveles de iluminación ambiental. Oprima el botón de luz
nocturna ubicado en la parte izquierda del reloj para cambiar entre los ajustes: bajo, medio,
alto y apagado.
La base e indicador de carga inalámbrica le permiten cargar los dispositivos compatibles
de forma inalámbrica cuando el reloj está utilizando la alimentación de CA. El indicador se
enciende de color azul mientras se está cargando el dispositivo y se de carga parpadeará
cuando exista un problema con la carga.
Parte derecha
El botón M permite ingresar en los modos de ajuste de hora y ajuste de alarma (al
mantenerlo oprimido cuando la alarma está activada)
El botón + permite aumentar el brillo de la pantalla (al oprimirlo). También activa la alarma
(al mantenerlo oprimido) y aumenta el valor parpadeante al ajustar la hora o la alarma.
El botón — permite reducir el brillo de la pantalla (al oprimirlo). También desactiva la alarma
(al mantenerlo oprimido) y reduce el valor parpadeante al ajustar la hora o la alarma.
Parte izquierda
El botón de luz nocturna permite cambiar entre los ajustes de brillo para la luz nocturna:
bajo, medio, alto y apagado.
El puerto de carga USB ofrece una función de carga con cable para los dispositivos USB.
Parte posterior (no mostrada)
input (entrada) permite la conexión del cable de carga suministrado para la alimentación
del reloj.
Pantalla
El indicador de AM/PM muestra que la hora visualizada corresponde a AM o PM (no se
aplica al formato de 24 horas).
Los dígitos de fecha/hora muestran la hora actual o los valores de conguración de hora/
alarma.
El indicador de alarma (
) muestra que la alarma está activada.
M
+
–
Luz nocturna
Base de carga
inalámbrica
Indicador de
carga inalámbrica
Parte derecha
Parte izquierda
Puerto de
carga USB
Botón de
luz nocturna
¡También puede realizar la carga normal! Este reloj incluye un puerto USB de
carga. Para realizar la carga, simplemente conecte el cable de carga suministrado
con el dispositivo en este puerto de carga.
RCQ510 IB 02
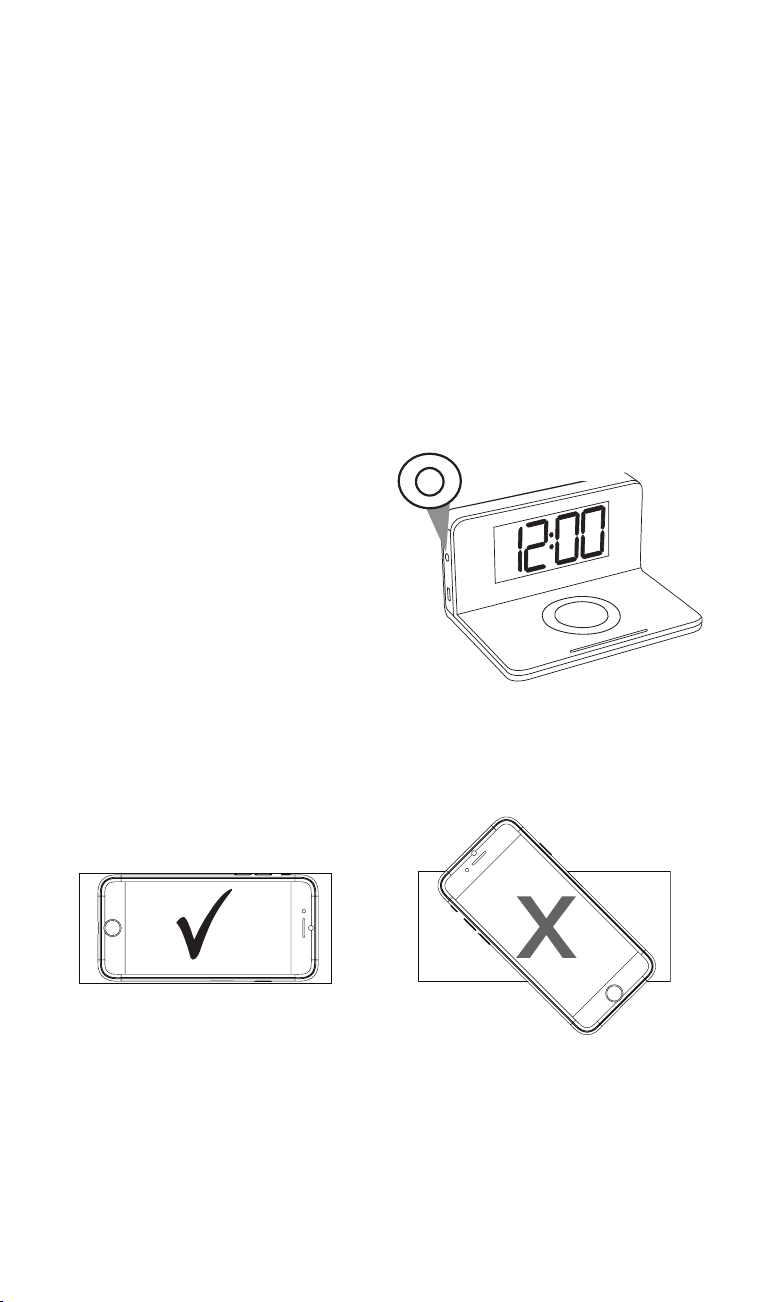
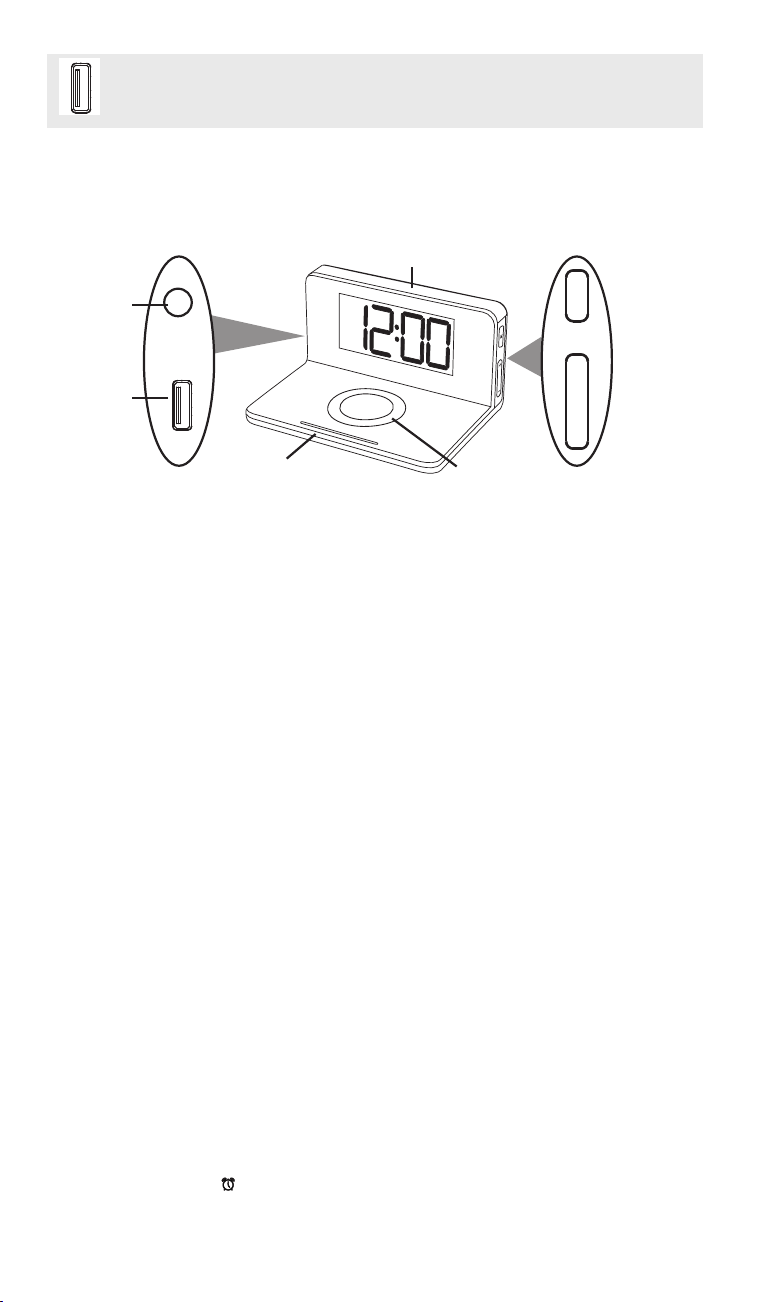