
Electrical consumption
Power Supply: 120 V ~ 60 Hz
Power Consumption: 5 Watts
• Attention should be drawn to the
environmental aspects of battery disposal.
• The use of apparatus in moderate climates.
This is class II equipment
designed with double or
reinforced insulation so it
does not require a safety
connection to electrical earth
(US: ground).
Important battery precautions
• Any battery may present a risk of fire,
explosion, or chemical burn if abused. Do not
try to charge a battery that is not intended to
be recharged, do not incinerate, and do not
puncture.
• Non-rechargeable batteries, such as alkaline
batteries, may leak if left in your product for
a long period of time. Remove the batteries
from the product if you are not going to use
it for a month or more.
• If your product uses more than one battery,
do not mix types and make sure they are
inserted correctly. Mixing types or inserting
incorrectly may cause them to leak.
• Discard any leaky or deformed battery
immediately. They may cause skin burns or
other personal injury.
• Please help to protect the environment by
recycling or disposing of batteries according
to federal, state, and local regulations.
WARNING: The battery (battery or batteries or
battery pack) shall not be exposed to excessive
heat such as sunshine, fire or the like.
Ecology
Help protect the environment - we recommend
that you dispose of used batteries by putting
them into specially designed receptacles.
CAUTION
Danger of explosion if battery is incorrectly
replaced. Replace only with the same or
equivalent type.
• Use only with the cart,
stand, tripod, bracket,
or table specified by
the manufacturer,
or sold with the
apparatus. When a cart
is used, use caution
when moving the cart/
apparatus combination
to avoid injury from tip-over.
• Unplug this apparatus during lightning storms
or when unused for long periods of time.
• Refer all servicing to qualified service personnel.
Servicing is required when the apparatus has
been damaged in any way, such as power-
supply cord or plug is damaged, liquid has been
spilled or objects have fallen into the apparatus,
the apparatus has been exposed to rain or
moisture, does not operate normally, or has
been dropped.
ADDITIONAL SAFETY INFORMATION
• Apparatus shall not be exposed to dripping or
splashing and no objects filled with liquids, such
as vases, shall be placed on the apparatus.
• Always leave sufficient space around the
product for ventilation. Do not place product in
or on a bed, rug, in a bookcase or cabinet that
may prevent air flow through vent openings.
• Do not place lighted candles, cigarettes, cigars,
etc. on the product.
• Connect power cord only to AC power source
as marked on the product.
• Care should be taken so that objects do not
fall into the product.
• Do not attempt to disassemble the cabinet.
This product does not contain customer
serviceable components.
• To be completely disconnect the power input,
the mains plug adaptor of apparatus shall be
disconnected from the mains.
• Mains plug is a disconnect device. The mains
plug should not be obstructed OR should be
easily accessed during intended use.
• The ventilation should not be impeded by
covering the ventilation openings with items
such as newspaper, table-cloths, curtains etc.
• No naked flame sources, such as lighted
candled, should be placed on the apparatus.
user manual
manuel de l’utilisateur
manual del usuario
RCPJ100A1
PLEASE READ AND SAVE THIS FOR FUTURE REFERENCE
IMPORTANT SAFETY INSTRUCTIONS
Before you begin
General controls
Clock
FCC information
Clock projector
Some of the following information may not
apply to your particular product; however, as
with any electronic product, precautions should
be observed during handling and use.
• Read these instructions.
• Keep these instructions.
• Heed all warnings.
• Follow all instructions.
• Do not use this apparatus near water.
• Clean only with dry cloth.
• Do not block any ventilation openings. Install in
accordance with the manufacturer’s instructions.
• Do not install near any heat sources such
as radiators, heat registers, stoves, or other
apparatus (including amplifiers) that produce
heat.
• Do not defeat the safety purpose of the
polarized or grounding-type plug. A polarized
plug has two blades with one wider than the
other. A grounding type plug has two blades
and a third grounding prong. The wide blade
or the third prong is provided for your safety. If
the provided plug does not fit into your outlet,
consult an electrician for replacement of the
obsolete outlet.
• Protect the power cord from being walked on
or pinched particularly at plugs, convenience
receptacles, and the point where they exit from
the apparatus.
• Only use attachments/accessories specified by
the manufacturer.
Refer to the Clock section for
instructions on properly setting the
Clock.
Battery back-up operation
• This clock is equipped with a time
back-up system that is powered by
2 AAA batteries (not included). The
power failure protection circuit will
not operate unless batteries are
installed.
• When normal household power
is interrupted, or AC line cord is
unplugged, the battery back-
up will power the clock to keep
track of time and alarm settings
programmed into memory.
• Normal operation will resume after
AC power is restored so you will not
have to reset the time or the alarm.
Note: It is recommended to replace the
batteries at least once per year even if
no power failures have occurred.
To install the batteries:
1. Open the battery compartment on
the back of the clock by pressing on
the tab and removing the cover.
2. Insert 2 AAA batteries (not
included). Make sure to match
the battery polarity marked in the
battery compartment.
3. Put the cover back on the
compartment and click it into place.
Power failure indicator
If you have not installed batteries in
the product, or the batteries run out
while AC power is disconnected, the
clock and alarm settings will be lost.
After AC power is reconnected, the
time 12:00 will be shown on the LCD
screen to indicate that power was
interrupted and you should readjust
the time settings.
Setting the time
1. In normal time display mode, press
and hold the MODE button on the
back of the clock until the hour
digits flash on the display.
2. Press the UP and DOWN buttons to
adjust the hour.
3. Press the MODE button to confirm.
The minutes digits flash.
4. Press the UP and DOWN buttons to
adjust the minutes.
5. To save and exit the time setting
mode, press MODE.
NOTE: By default, the time is displayed
in 12-hour mode (AM/PM). If you’d like
to switch to 24-hour mode, press and
hold the UP button on the back of the
clock until the time display switches.
Set alarm time
1. In normal time display mode, press
the MODE button twice to enter
alarm set mode.
2. Press and hold the MODE button
until the hour digits start to flash.
3. Press the UP and DOWN buttons
to set the hour you want for the
alarm.
NOTE: If you’re using 12-hour mode
time display, make sure you choose
the correct AM/PM setting when
you set the hour!
4. Press MODE to confirm. The
minutes digits start to flash.
5. Press the UP and DOWN buttons to
set the minutes you want for the
alarm.
6. Press MODE to confirm and return
to normal time display.
NOTE: If you go more than 10 seconds
without pressing a button while setting
the alarm, the clock returns to normal
time display.
Turning the alarm on/off
• Press the UP button on the back of
the clock to turn the alarm on or
off. The alarm icon ( )
appears on
the display when the alarm is active.
• While the alarm is sounding, you
can press any button on the back
of the clock (except for SNZ) to
deactivate the alarm.
Using SNOOZE
• Press the SNOOZE/LIGHT button on
the top of the clock. The alarm icon
(
) on the display will flash and
the alarm will sound again when
the snooze period (8 minutes) is
over.
• To deactivate SNOOZE, press any
button on the back of the clock
(except for SNZ).
Temperature and humidity
Showing maximum and
minimum humidity/
temperature
• Press the MAX/MIN button on the
back of the clock once to display
the clock’s maximum humidity and
temperature readings on its display.
• Press the MAX/MIN button a
second time to display the
clock’s minimum humidity and
temperature readings on its display.
• Press the MAX/MIN button a third
time to return to the current
temperature and humidity readings.
12 Month Limited Warranty
Applies to RCA Clock Radios
Voxx Accessories Corporation (the
“Company”) warrants to the original
retail purchaser of this product that
should this product or any part thereof,
under normal use and conditions,
be proven defective in material or
workmanship within 12 months from
the date of original purchase, such
defect(s) will be repaired or replaced
with new or reconditioned product (at
the Company’s option) without charge
for parts and repair labor.
To obtain repair or replacement
within the terms of the warranty, the
product is to be delivered with proof
of warranty coverage (e.g. dated bill
of sale), specification of defect(s),
transportation prepaid, to an approved
warranty station. For the location of
the nearest warranty station to you, call
toll-free to our control office: 1-800-
645-4994.
This Warranty is not transferable and
does not cover product purchased,
serviced or used outside the United
States or Canada. The warranty does
not extend to the elimination of
externally generated static or noise,
to costs incurred for the installation,
removal or reinstallation of the product.
The warranty does not apply to any
product or part thereof which, in the
opinion of the company, has suffered
or been damaged through alteration,
improper installation, mishandling,
misuse, neglect, accident or exposure to
moisture. This warranty does not apply
to damage caused by an AC adapter
not provided with the product, or by
leaving non-rechargeable batteries in
the product while plugged into an AC
outlet.
THE EXTENT OF THE COMPANY’S
LIABILITY UNDER THIS WARRANTY
IS LIMITED TO THE REPAIR OR
REPLACEMENT PROVIDED ABOVE AND,
IN NO EVENT, SHALL THE COMPANY’S
LIABILITY EXCEED THE PURCHASE
PRICE PAID BY PURCHASER FOR THE
PRODUCT.
This Warranty is in lieu of all other
express warranties or liabilities. ANY
IMPLIED WARRANTIES, INCLUDING
ANY IMPLIED WARRANTY OF
MERCHANTABILITY OR FITNESS FOR
A PARTICULAR PURPOSE, SHALL
BE LIMITED TO DURATION OF THIS
WARRANTY. ANY ACTION FOR BREACH
OF ANY WARRANTY HEREUNDER,
INCLUDING ANY IMPLIED WARRANTY,
MUST BE BROUGHT WITHIN A PERIOD
OF 24 MONTHS FROM THE DATE OF
ORIGINAL PURCHASE. IN NO CASE
SHALL THE COMPANY BE LIABLE FOR
ANY CONSEQUENTIAL OR INCIDENTAL
DAMAGES WHATSOEVER. No person or
representative is authorized to assume
for the Company any liability other than
expressed herein in connection with the
sale of this product.
Some states/provinces do not allow
limitations on how long an implied
warranty lasts or the exclusion or
limitation of incidental or consequential
damage so the above limitations or
exclusions may not apply to you. This
Warranty gives you specific legal rights
and you may also have other rights
which vary from state/province to state/
province.
Warranty information
]
Portable Cart Warning
Note: This device complies with part 15 of
the FCC Rules. Operation is subject to the
following two conditions: (1) This device may
not cause harmful interference, and (2) this
device must accept any interference received,
including interference that may cause undesired
operation.
This equipment has been tested and found
to comply with the limits for a Class B digital
device, pursuant to Part 15 of FCC Rules. These
limits are designed to provide reasonable
protection against harmful interference in
a residential installation. This equipment
generates, uses, and can radiate radio frequency
energy and, if not installed and used in
accordance with the instructions, may cause
harmful interference to radio communications.
However, there is no guarantee that
interference will not occur in a particular
installation. If this equipment does cause
harmful interference to radio or television
reception, which can be determined by
turning the equipment off and on, the user is
encouraged to try to correct the interference by
one or more of the following measures:
• Reorient or relocate the receiving antenna.
• Increase the separation between the
equipment and receiver.
• Connect the equipment into an outlet on
a circuit different from that to which the
receiver is connected.
• Consult the dealer or an experienced radio/
TV technician for help.
Changes or modifications not expressly
approved by Voxx could void the user’s
authority to operate the equipment.
Industry Canada Regulatory Information
Avis d’Industrie Canada
CAN ICES-3 (B) / NMB-3 (B)
RCPJ100A1 IB 00
Back view
Front view
SNOOZE/LIGHT – Pauses the alarm
for 8 minutes while it’s going off.
Turns on the display and projector
for 5 seconds when using battery
power.
PROJECTOR – Projects the time
onto your ceiling or wall.
TIME/DATE – Shows the current
time in 12- or 24-hour mode. Press
the MODE button on the back of
the clock to display the date.
DAY – Shows the day of the week.
MODE
– Switches between time
and date display. Press and hold
to access time setting, calendar
setting, and alarm setting modes.
UP
– In time/calendar/alarm set
modes, increases the hour, minute,
or day by one. In normal time
display mode, activates/deactivates
the alarm (single press) or switches
between 12- and 24-hour display
(press and hold).
DOWN – In time/calendar/alarm
set modes, decreases the hour,
minute, or day by one. In normal
time display mode, switches the
temperature display between
degrees Fahrenheit and Celsius.
MAX/MIN – Shows the maximum
(press once) and minimum (press
twice) humidity and temperature
registered by the clock in the past
12 hours.
SNZ – Pauses the alarm for 8
minutes while it’s going off.
A time projector is located on the
right side of the unit. Clock time
can be projected onto ceilings or
walls in a darkened environment
for easy reference. The distance
between the projector and the
projected surface should be within
3 to 9 feet.
To use the projector: Aim the
projector arm at the surface you
want to project onto.
Rotate the FOCUS WHEEL to adjust
the focus of the projected image.
Note: These directions are for
using the projector while the clock
is plugged in. To use the projector
and display on battery power,
press the SNOOZE/LIGHT button
on top of the clock. The display
and projector will illuminate for 5
seconds.
Setting the calendar
1. In normal time display mode, press
the MODE button on the back of
the clock once to enter calendar
setting mode.
2. Press and hold the MODE button on
the back of the clock until the year
digits flash on the display.
3. Press the UP and DOWN buttons to
adjust the year.
4. Press the MODE button to confirm.
The months digits flash.
5. Press the UP and DOWN buttons to
adjust the month.
6. Press the MODE button to confirm.
The date digits flash.
7. Press the UP and DOWN buttons to
adjust the date.
8. To save and exit the calendar
setting mode, press MODE.
Weather symbol
Temperature trend line
ProjectorSNOOZE/LIGHT button (top)
Changing between
Fahrenheit and Celsius
By default, this clock displays its
temperature readings in degrees
Fahrenheit.
• To switch to degrees Celsius, press
the DOWN button on the back of
the clock.
• To switch back to degrees
Fahrenheit, press the DOWN button
on the back of the clock again.
Projector Back View
Focus
Wheel
WEATHER SYMBOL – Shows the clock’s reading of the environmental conditions
(humidity). Note that air conditioning or central heating will affect this weather
symbol.
– Indicates that an alarm has been set and is active.
– Shows the relative humidity (indoors).
– Shows the temperature (indoors).
TEMPERATURE TREND LINE – Shows the variation in temperature (indoor) over the
last 12 hours.
It is important to read this user manual prior to using your new product for the first time.
Il est important de lire ce manuel avant d’utiliser votre nouveau produit pour la première fois.
Es importante leer este manual del usuario antes de usar su nuevo producto por primera vez.
English
ATTENTION : Danger d’explosion si la pile est
remplacée de manière incorrecte. Remplacez-la
uniquement avec le même type ou équivalent.
Consommation électrique
Alimentation : 120 V ~ 60 Hz
Consommation électrique : 5 Watts
• Pour déconnecter complètement l’alimentation,
la fiche secteur adaptateur de l’appareil doit être
déconnectée du secteur.
• La fiche secteur est un dispositif de déconnexion.
La fiche secteur ne doit pas être obstruée OU en
cas d’obstruction doit être facilement accessible
durant l’utilisation prévue.
• La ventilation ne doit pas être gênée par
l’obstruction des ouvertures de ventilation avec
des objets tels que journaux, nappes, rideaux, etc.
• Ne jamais poser de sources de flammes nues,
telles que des bougies allumées, sur l’appareil.
• Vérifier les directives de respect de
l’environnement en matière d’élimination de
la batterie
• Cet appareil doit être utilisé dans des climats
tempérés.
Ceci est un appareil de classe
II conçu avec isolation double
ou renforcée de sorte qu’il ne
nécessite pas une connexion
de sécurité électrique à la terre
(aux É.-U.).
Précautions importantes
relatives aux piles
• Toute pile peut présenter un risque d’incendie,
d’explosion ou de brûlure chimique en cas de
traitements inappropriés. Ne pas essayer de
charger une pile qui n’est pas conçue pour être
rechargée, ne pas l’incinérer et ne pas la percer.
• Les piles non rechargeables, par exemple les
piles alcalines, peuvent fuir si on les laisse dans
un produit pendant une longue période. Enlever
les piles du produit s’il n’est pas utilisé durant un
mois ou plus.
• Si le produit fonctionne avec plusieurs piles, ne
pas mélanger différents types de piles, et veiller à
les insérer correctement. Mélanger les piles ou les
insérer incorrectement peut provoquer des fuites.
• Jeter immédiatement toute pile présentant des
fuites ou toute pile déformée. Ces piles peuvent
provoquer des brûlures ou d’autres types de
blessures.
• Protéger l’environnement en recyclant ou
en éliminant les piles conformément aux
réglementations provinciales et locales.
Écologie : Contribuer à protéger
l’environnement – nous conseillons d’éliminer
les piles usagées en les plaçant dans des
conteneurs désignés.
AVERTISSEMENT : La pile (pile ou bloc de piles)
ne doit pas être exposée à une chaleur excessive,
par exemple à la chaleur dégagée par le soleil,
un feu, etc.
• Utiliser seulement les fixations/accessoires
spécifiés par le fabricant.
• Utiliser seulement avec le
chariot, le socle, le trépied, le
support ou la table spécifiés
par le fabricant, ou le dispositif
vendu avec l’appareil. Quand
un chariot est utilisé, faire
preuve de prudence lors du
déplacement de l’ensemble
chariot/appareil afin d’éviter
toute blessure provoquée par un basculement
éventuel.
• Débrancher cet appareil pendant les orages
électriques ou s’il n’est pas utilisé pendant de
longues périodes.
• Confier l’entretien du produit à un technicien
agréé. Faire réparer l’appareil s’il a été
endommagé de quelque manière que ce soit,
par exemple si le cordon d’alimentation, ou la
fiche, est endommagé(e), si du liquide a été
renversé sur l’appareil ou si des objets sont
tombés sur l’appareil, s’il a été exposé à la
pluie ou à l’humidité, s’il ne fonctionne pas
normalement ou s’il est tombé.
INFORMATION SUPPLÉMENTAIRE SUR LA
SÉCURITÉ
• L’appareil ne doit être exposé ni à un
égouttement ni à des éclaboussures. Aucun
objet rempli de liquide, par exemple un vase,
ne doit être placé sur l’appareil.
• Toujours laisser suffisamment d’espace autour
de l’appareil pour assurer sa ventilation. Ne pas
placer l’appareil sur ou dans un lit, sur un tapis,
dans une bibliothèque ou dans une armoire
pouvant empêcher le passage de l’air au travers
des ouvertures de ventilation.
• Ne pas placer des bougies allumées, des
cigarettes, des cigares, etc. sur l’appareil.
• Ne brancher le cordon d’alimentation que sur
les sources d’alimentation à c.a. Indiquées sur
le produit.
• Des précautions doivent être prises afin que
des objets ne puissent pas tomber sur l’appareil.
• Ne pas essayer de démonter le boîtier. Ce
produit ne contient aucun composant réparable
par l’utilisateur.
LIRE ET CONSERVER CES INSTRUCTIONS À TITRE DE RÉFÉRENCE FUTURE
CONSIGNES IMPORTANTES DE SÉCURITÉ
Déclaration de la Federal
Communication Commission (FCC)
Certaines des informations qui suivent peuvent
ne pas s’appliquer à ce produit particulier.
Cependant, comme pour tout appareil
électronique, prendre des précautions durant sa
manipulation et son utilisation.
• Lire ces instructions.
• Conserver ces instructions.
• Respecter tous les avertissements.
• Suivre toutes les instructions.
• Ne pas utiliser cet appareil à proximité d’eau.
• Nettoyer le produit seulement avec un chiffon sec.
• Ne bloquer aucune ouverture de ventilation.
Installer conformément aux instructions du
fabricant.
• Ne pas installer près d’une source de chaleur,
par exemple des radiateurs, des registres de
chaleur, des poêles ou autres appareils (y compris
des amplificateurs) qui produisent de la chaleur.
• Ne pas contourner le dispositif de sécurité de
la fiche polarisée ou de la fiche de type mise à
la terre. Une fiche polarisée est munie de deux
lames, dont l’une est plus large que l’autre.
Une fiche de mise à la terre est munie de deux
lames et d’une troisième broche de mise à la
terre. La lame large ou la troisième broche est
fournie pour garantir la sécurité. Si la fiche
fournie ne s’insère pas dans la prise, consulter
un électricien pour remplacer la prise obsolète.
• Protéger le cordon d’alimentation de manière
à ne pas marcher dessus ni le pincer, surtout au
niveau de la fiche, de la prise ou à la sortie du
cordon de l’appareil.
Remarque : Cet appareil est conforme à la partie
15 du règlement de la FCC. Le fonctionnement est
sujet aux deux conditions suivantes : (1) cet appareil
ne doit pas provoquer de brouillage préjudiciable et
(2) cet appareil doit accepter tout brouillage reçu, y
compris le brouillage susceptible de provoquer un
fonctionnement indésirable.
Cet équipement a été soumis à des essais et a été
déclaré conforme aux limites stipulées pour un
dispositif numérique de classe B, conformément
aux spécifications de la partie 15 du règlement
de la FCC. Ces limites ont pour but d’assurer une
protection raisonnable contre le brouillage nuisible
dans une installation résidentielle. Cet équipement
produit, utilise et peut émettre de l’énergie en
radiofréquence et, s’il n’est pas installé et utilisé
conformément aux directives, il peut causer un
brouillage nuisible dans les communications radio.
Cependant, il n’y a aucune garantie que des
interférences ne se produiront pas dans une
installation particulière. Si cet équipement provoque
effectivement du brouillage nuisible à la réception
de la radio ou de la télévision, ce qui peut être
déterminé en éteignant et rallumant l’équipement,
l’utilisateur est invité à essayer de corriger le
brouillage par une ou plusieurs des mesures
suivantes :
• Réorienter ou déplacer l’antenne de réception.
• Augmenter la distance séparant l’équipement du
récepteur.
• Brancher l’équipement sur une prise dont le circuit
est différent de celui où est branché le récepteur.
• Consulter le revendeur ou un technicien
expérimenté de radio/télévision.
Les changements ou les modifications effectués
qui ne sont pas expressément approuvés par
Audiovox peuvent annuler l’autorisation accordée à
l’utilisateur de se servir de l’équipement.
Avis d’Industrie Canada
CAN ICES-3 (B) / NMB-3 (B)
Français
Avant de commencer
Reportez-vous à la section Réveil
pour obtenir des instructions sur la
configuration correcte du réveil.
Fonctionnement sur piles
de secours
• Ce réveil est équipé d’un système
de sauvegarde de l’heure qui est
alimenté par 2 piles AAA (non
incluses). Le circuit de protection
contre les pannes de courant ne
peut pas fonctionner si les piles ne
sont pas installées.
• Quand l’alimentation secteur
domestique est interrompue, ou que
le cordon d’alimentation de c.a. est
débranché, les piles alimentent le
réveil pour garder l’heure ainsi que
les réglages de réveil programmés
en mémoire.
• Le fonctionnement normal reprend
dès que l’alimentation en c.a. est
rétablie sans qu’il soit nécessaire de
retoucher l’heure et les moments de
réveil.
Remarque : Il est recommandé de
remplacer les piles au moins une fois
par an même s’il n’y a pas eu de panne
de courant.
Installation des piles :
1. Ouvrir le compartiment des piles
au dos du réveil en appuyant
sur la languette et en retirant le
couvercle.
2. Insérer les 2 piles « AAA » (non
incluses). Respecter la polarité des
piles indiquée dans le compartiment
des piles.
3. Remettre le couvercle sur le
compartiment et l’enclencher.
Voyant de panne de
courant
Si des piles n’ont pas été installées
dans le produit, ou si les piles sont
épuisées alors que l’alimentation
secteur est débranchée, les réglages de
l’heure et des alarmes seront perdus.
Lorsque l’alimentation secteur revient,
l’heure 12:00 est affichée sur l’écran
ACL pour indiquer la panne de courant
et qu’il y a lieu de régler de nouveau
l’heure et le réveil.
Commandes générales
Vue de face
SNOOZE/LIGHT (répétition/
éclairage) – Suspend l’alarme
pendant 8 minutes lorsqu’elle se
déclenche. Éclaire l’écran et le
projecteur pendant 5 secondes
quand le réveil est alimenté par
les piles.
PROJECTEUR – Projette l’heure sur
le plafond ou un mur.
HEURE/DATE – Indique l’heure
actuelle en mode 12 ou 24 heures.
Appuyer sur le bouton MODE
sur le dos du réveil pour afficher
la date.
Symbole météo
Courbe de tendance
de la température
ProjecteurBouton SNOOZE/LIGHT (dessus)
JOUR – Affiche le jour de la semaine.
SYMBOLE MÉTÉO – Affiche les conditions de l’environnement (température,
humidité). Noter que la climatisation ou le chauffage central affecte ce symbole
météo.
– Indique qu’une alarme est paramétrée et active.
– Indique l’humidité relative (intérieure).
– Indique la température (intérieure).
COURBE DE TENDANCE DE LA TEMPÉRATURE – Indique les variations de la
température intérieure durant les 12 dernières heures.
Alarm function
Vue de dos
MODE
– Bascule l’affichage entre
l’heure et la date. Appuyer et
maintenir enfoncé pour accéder aux
modes de réglage de l’heure, de la
date et des alarmes.
UP (Haut)
– Dans les modes
de réglage heure/date/alarme,
augmente d’une unité l’heure,
les minutes ou le jour. En mode
d’affichage normal de l’heure,
active/désactive l’alarme (simple
pression) ou commute entre
l’affichage sur 12 ou 24 heures
(appuyer et maintenir enfoncé).
]
Portable Cart Warning
Avertissement pour
transport par chariot
DOWN (bas) – Dans les modes de réglage heure/date/alarme, diminue d’une unité
l’heure, les minutes ou le jour. En mode d’affichage normal, commute l’affichage de
la température entre les degrés Fahrenheit et Celsius.
MAX/MIN – Affiche l’humidité et la température maximales (appuyer une fois) ou
minimales (appuyer deux fois) enregistrées par le réveil au cours des dernières 12
heures.
SNZ (Rép.) – Suspend l’alarme pendant 8 minutes lorsqu’elle se déclenche.
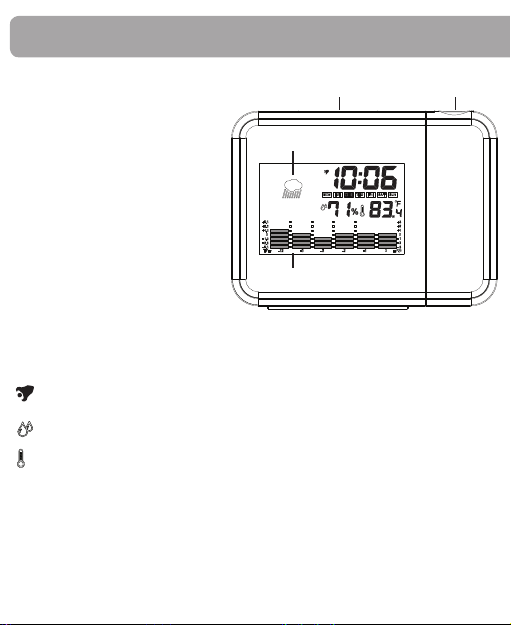
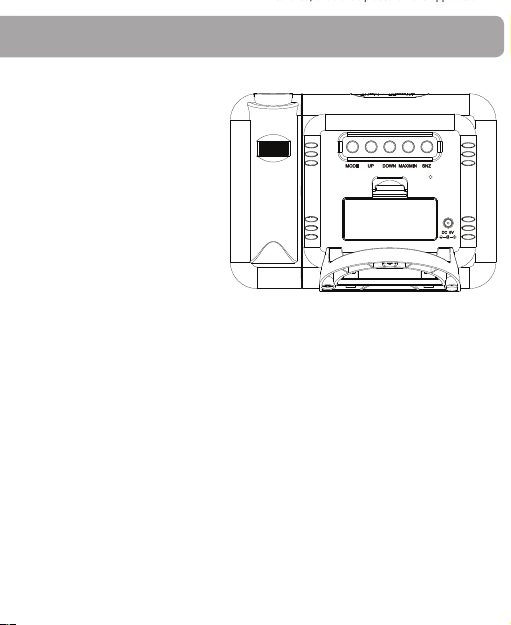
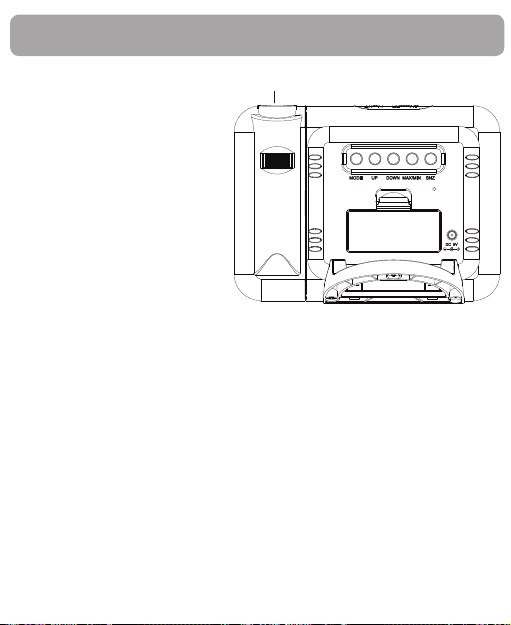

Projecteur du réveil
Garantie limitée de 12 mois
Applicable sur les radio-réveils RCA
Voxx Accessories Corporation (l’
«Entreprise») garantit à l’acheteur
au détail d’origine de ce produit que
si, dans les 12 mois suivant la date
d’achat d’origine, ce produit ou l’une
quelconque de ses pièces, sous réserve
d’utilisation et de conditions normales,
présente un ou des défauts de matériau
ou de fabrication, ce ou ces défauts
feront l’objet d’une réparation ou d’un
remplacement avec un produit neuf
ou reconditionné (à la discrétion de
l’Entreprise) sans frais pour les pièces et
pour la main-d’œuvre.
Pour obtenir une réparation ou un
remplacement en vertu des termes de
la garantie, le produit doit être livré
avec preuve de couverture de garantie
(c’est-à-dire une preuve d’achat datée),
une description du ou des défauts, et
les frais de transport payés d’avance,
à un centre de réparation agréé. Pour
connaître l’emplacement du centre de
réparation le plus proche de chez vous,
veuillez appeler sans frais notre bureau
de contrôle au : 1-800- 645-4994.
La présente garantie ne peut pas être
transférée et ne couvre pas les produits
achetés, réparés ou utilisés à l’extérieur
des États-Unis ou du Canada. La
garantie ne couvre ni l’élimination de
l’électricité statique ou du bruit produits
de façon externe ni les frais encourus
pour l’installation, l’enlèvement ou la
réinstallation du produit.
La garantie ne s’applique pas à tout
produit ou toute pièce du produit
qui selon l’avis de l’Entreprise, a subi
des dommages suite à une altération,
une installation incorrecte, une
manipulation incorrecte, une mauvaise
utilisation, une négligence, un accident
ou une exposition à de l’humidité.
Cette garantie ne s’applique pas à des
dommages causés par un adaptateur
c.a. qui n’est pas fourni avec le produit
ou lorsque des piles non rechargeables
ont été laissées dans le produit alors
qu’il était branché sur une prise secteur
(c.a.).
L’ÉTENDUE DE LA RESPONSABILITÉ
DE L’ENTREPRISE EN VERTU DE LA
PRÉSENTE GARANTIE EST LIMITÉE À LA
RÉPARATION OU AU REMPLACEMENT
INDIQUÉS CI-DESSUS ET, EN AUCUN CAS,
LA RESPONSABILITÉ DE L’ENTREPRISE NE
PEUT DÉPASSER LE PRIX D’ACHAT PAYÉ
PAR L’ACHETEUR POUR LE PRODUIT.
La présente garantie remplace toute
autre garantie ou responsabilité
expresse. TOUTE GARANTIE IMPLICITE,
INCLUANT TOUTE GARANTIE
IMPLICITE DE QUALITÉ MARCHANDE
OU D’ADAPTATION À UN USAGE
PARTICULIER, EST LIMITÉE À LA
DURÉE DE LA PRÉSENTE GARANTIE.
TOUTE ACTION POUR VIOLATION DE
TOUTE GARANTIE MENTIONNÉE DANS
LES PRÉSENTES, INCLUANT TOUTE
GARANTIE IMPLICITE DOIT ÊTRE
PRÉSENTÉE DANS LES 24 MOIS SUIVANT
LA DATE DE L’ACHAT D’ORIGINE. EN
AUCUN CAS L’ENTREPRISE NE PEUT
ÊTRE TENUE RESPONSABLE D’UN
QUELCONQUE DOMMAGE CONSÉCUTIF
OU INDIRECT. Aucune personne ni
aucun représentant n’est autorisé
à assumer pour l’Entreprise une
quelconque responsabilité autre que
celle exprimée dans les présentes en
relation avec la vente de ce produit.
Certaines juridictions n’autorisent
pas de limites quant à la durée
d’une garantie implicite ou quant
à l’exclusion ou à la limitation de
dommages indirects ou consécutifs;
les limitations et exclusions indiquées
dans les présentes pourraient donc ne
pas s’appliquer à votre cas. La présente
garantie vous donne des droits légaux
spécifiques et vous pourriez également
bénéficier d’autres droits, qui varient en
fonction de l’État/de la province.
Informations sur la garantie
Un projecteur d’heure est placé
sur le côté droit de l’appareil.
L’heure affichée par le réveil peut
être projetée sur les plafonds ou
les murs dans un environnement
sombre pour faciliter la
consultation. La distance entre
le projecteur et la surface de
projection doit être de 0,9 m à 2,7
m (3 à 9 pieds).
Pour utiliser le projecteur :
diriger le bras du projecteur vers
la surface devant servir d’écran.
Faire tourner la MOLETTE DE MISE
AU POINT pour régler la netteté de
l’image projetée.
Remarque : Ces instructions sont
valides pour utiliser le projecteur
lorsque le réveil est branché sur le
secteur. Pour utiliser le projecteur
et l’écran lors de l’alimentation
par piles, appuyer sur le bouton
SNOOZE/LIGHT sur le dessus du
réveil. L’écran et le projecteur
s’allument pendant 5 secondes.
Projecteur Vue arrière
Molette
de mise
au point
ATENCIÓN: Hay peligro de explosión si se
reemplaza incorrectamente la batería. Reemplácela
únicamente con una batería de igual tipo o
equivalente.
Consumo eléctrico
Fuente de potencia: 120 V ~ 60 Hz
Consumo de corriente: 5 Vatios
la red eléctrica del aparato deberá desconectarse
de la red eléctrica.
• El enchufe de la red eléctrica es un dispositivo
de desconexión. El enchufe de la red eléctrica
no deberá obstruirse O deberá ser fácilmente
accesible durante el uso para el cual fue diseñado.
• Para garantizar una ventilación adecuada, no
cubra las aberturas de ventilación con artículos
tales como periódicos, manteles, cortinas, etc.
• No deberán colocarse fuentes de llamas
desnudas, tales como velas encendidas, sobre
el aparato.
• Deberá prestarse atención a los aspectos
ambientales del desechamiento de baterías.
• El uso del aparato en climas moderados.
Este es un equipo de clase II
diseñado con aislamiento doble o
reforzado, y por tanto no requiere
una conexión de seguridad a
tierra eléctrica (EE.UU.: tierra).
Precauciones importantes sobre
las baterías
• Todas las baterías podrían presentar riesgo de
incendio, explosión o quemadura química si se
utilizan de manera negligente. No intente cargar
una batería que no ha sido diseñada para ser
recargada; no la incinere ni la perfore.
• Las baterías no recargables, tal como las baterías
alcalinas, podrían desarrollar fugas si se dejan
instaladas por un período de tiempo prolongado.
Extraiga las baterías del producto si no piensa
utilizar la unidad por espacio de un mes o más.
• Si el producto utiliza más de una batería, no
combine diferentes tipos de baterías y asegúrese
que estén instaladas correctamente. Las baterías
podrían desarrollar fugas si se combinan distintos
tipos o si se instalan incorrectamente.
• Deseche inmediatamente cualquier batería que
presente fugas o que esté deformada. Éstas
pueden ocasionar quemaduras de la piel u otras
lesiones.
• Ayude a proteger el medioambiente reciclando
o desechando las baterías según lo disponen los
reglamentos federales, estatales y locales.
ADVERTENCIA: La batería (batería o baterías o
paquete de batería) no debe estar expuesta al calor
excesivo tal como la luz del sol, fuego o fuentes
térmicas similares.
Ecología: Ayude a proteger el medioambiente –
le recomendamos desechar las baterías usadas en
receptáculos especialmente diseñados para ello.
• Use sólo aditamentos o accesorios especificados
por el fabricante.
• Use sólo con el carrito,
base, trípode, soporte
o mesa que especifica
el fabricante o que se
vende con el aparato.
Si usa un carrito, tenga
cuidado al moverlo junto
con el aparato para
evitar que se vuelque y
haga daño.
• Desenchufe este aparato en caso de tormentas
o de lapsos prolongados de inactividad.
• Solicite al personal técnico calificado todo tipo
de mantenimiento del producto. Es necesario
darle mantenimiento al aparato si ha sido
averiado de alguna forma, por ejemplo, si
se ha dañado el cable de alimentación o el
enchufe, si se le ha derramado algún líquido
encima, si han caído objetos en su interior, si
ha sido expuesto a la lluvia o la humedad, si no
funciona correctamente o si se ha dejado caer.
INFORMACIÓN ADICIONAL DE SEGURIDAD
• El aparato no deberá exponerse a goteos o
salpicaduras, y no se deberán colocar objetos
que contengan líquidos, como por ejemplo
floreros, sobre el mismo.
• Siempre deje suficiente espacio alrededor
del producto para facilitar su ventilación. No
coloque el producto en o sobre una cama,
alfombra, estante para libros o gabinete que
pueda impedir el flujo del aire a través de los
orificios o aberturas de ventilación.
• No coloque velas, cigarrillos, cigarros
encendidos. etc. en el producto.
• Conecte el cable de alimentación sólo en una
fuente de alimentación de CA, tal como está
marcado en el producto.
• Se debe tener cuidado para que los objetos no
se caigan dentro del producto.
• No trate de desarmar el gabinete. Este
producto no contiene componentes que el
usuario pueda reparar.
• Para apagar totalmente el aparato, desconecte el
suministro eléctrico; el adaptador del enchufe de
LEA Y GUARDE ESTA INFORMACIÓN PARA REFERENCIA EN EL FUTURO
IMPORTANTES INSTRUCCIONES DE SEGURIDAD
Información de la FCC
Parte de la siguiente información quizá no aplique a
su producto; sin embargo, al igual que con cualquier
producto electrónico, las precauciones deben
observarse durante el manejo y uso de la unidad.
• Lea estas instrucciones.
• Guarde estas instrucciones.
• Preste atención a todas las advertencias.
• Acate todas las instrucciones.
• No use este aparato cerca del agua.
• Limpie sólo con un trapo seco.
• No obstruya ningún orificio de ventilación.
Instale en conformidad con las instrucciones
del fabricante.
• No instale cerca de fuentes térmicas, como
radiadores, reguladores de calefacción, cocinas y
otros aparatos que generen calor (incluidos los
amplificadores).
• No anule el propósito de seguridad que
tiene el enchufe de tipo polarizado o puesto
a tierra. Un enchufe polarizado tiene dos
paletas, una más ancha que la otra. Un enchufe
puesto a tierra tiene dos paletas y una espiga
de conexión a tierra. La paleta más ancha
o la tercera espiga se han incluido por su
seguridad. Si el enchufe provisto no encaja en
su tomacorriente, solicítele a un electricista que
reemplace ese tomacorriente obsoleto.
• Proteja el cable de alimentación de modo que
no resulte pisado ni aprisionado, especialmente
en los enchufes, tomacorrientes y el punto por
donde salen del aparato.
Aviso: Este dispositivo cumple con la Sección 15 de
las Normas de la FCC. Su funcionamiento está sujeto
a las siguientes dos condiciones: (1) Este dispositivo
no debe causar interferencia y (2) este dispositivo
debe aceptar toda interferencia recibida, incluida
aquélla que puede causar un funcionamiento no
deseado.
Este equipo ha sido puesto a prueba y cumple
con los límites para dispositivos digitales de Clase
B, de acuerdo con las especificaciones de la Parte
15 de las Reglas de la FCC. El objetivo de estos
límites es ofrecer una protección razonable contra
interferencias nocivas en una instalación residencial.
Este equipo genera, utiliza y puede radiar energía de
radiofrecuencia y, si no se instala y utiliza de acuerdo
con estas instrucciones, puede generar interferencia
perjudicial para las radiocomunicaciones.
Sin embargo, no se garantiza que no se producirá
interferencia en una instalación en particular. Si
su equipo causa interferencia perjudicial para
la recepción de radio o televisión, que se puede
determinar apagando y encendiendo el equipo,
intente corregirla mediante uno o varios de los
siguientes procedimientos:
• Vuelva a orientar o cambie de lugar la antena
receptora.
• Aumente la separación entre el equipo y el
receptor.
• Conecte este equipo a un tomacorriente en
un circuito diferente al que esté conectado el
receptor.
• Consulte al distribuidor o a un técnico
experimentado de radio y televisión para solicitar
asistencia.
Los cambios o modificaciones no aprobados
expresamente por Voxx podrían anular la autoridad
del usuario para utilizar este equipo.
Información Regulatoria de la Industria
Canadiense
CAN ICES-3 (B) / NMB-3 (B)
Español
Controles generales
Vista posterior
Vista frontal
SNOOZE/LIGHT (REPETICIÓN DE
ALARMA/LUZ) – Pausa la alarma
durante 8 minutos mientras está
sonando. Activa la pantalla y el
proyector durante 5 segundos
cuando se usa alimentación de la
batería.
PROYECTOR – Proyecta la hora en
su cielo raso o pared.
HORA/FECHA – Muestra la hora
actual en modo de 12 o 24 horas.
Oprima el botón MODE (Modo)
ubicado en la parte posterior del
reloj para mostrar la fecha.
MODE – (MODO) Cambia entre
la hora y la fecha en la pantalla.
Oprima y no suelte para acceder a
los modos de ajuste de hora, ajuste
de calendario y ajuste de alarma.
UP – (HACIA ARRIBA) En
los modos de ajuste de hora,
calendario o alarma, aumenta la
hora, minutos o día por uno. En
el modo de visualización de hora
normal, activa o desactiva la alarma
(oprima una vez) o cambia el modo
de hora mostrado entre 12 y 24
horas (oprima y no suelte).
DOWN – (HACIA ABAJO) En
los modos de ajuste de hora,
calendario o alarma, disminuye
la hora, minutos o día por uno.
En el modo de visualización de
hora normal, cambia la unidad
de temperatura mostrada entre
Fahrenheit y Celsius.
MAX/MIN – (MÁX./MÍN.) Muestra
la humedad y temperatura máximas
(oprima una vez) o mínimas (oprima
dos veces) registradas por el reloj en
las 12 horas anteriores.
SNZ – (REPETICIÓN DE ALARMA)
Pausa la alarma durante 8 minutos
mientras está sonando.
Símbolo meteorológico
Línea de tendencia
de la temperatura
Proyector
Botón SNOOZE/LIGHT (REPETICIÓN DE
ALARMA/LUZ) (en la parte superior)
DÍA – Muestra el día de la semana.
SÍMBOLO METEOROLÓGICO – Muestra la lectura del reloj de las condiciones
ambientales (humedad). Observe que el aire acondicionado o la calefacción central
afectarán el símbolo meteorológico.
– Indica que se ha dispuesto una alarma y ésta está activa.
– Muestra la humedad relativa (interior).
– Muestra la temperatura (interior).
LÍNEA DE TENDENCIA DE LA TEMPERATURA – Muestra las variaciones de
temperatura (interior) de las últimas 12 horas.
Reloj
Ajuste de la hora
1. En el modo de visualización de
hora normal, oprima y no suelte el
botón MODE (Modo) ubicado en la
parte posterior del reloj hasta que
los dígitos de hora parpadeen en la
pantalla.
2. Oprima los botones UP (Hacia
arriba) o DOWN (Hacia abajo) para
ajustar la hora.
3. Oprima el botón MODE (Modo)
para confirmar. Los dígitos
minuteros empezarán a parpadear.
4. Oprima los botones UP (Hacia
arriba) o DOWN (Hacia abajo) para
ajustar los minutos.
5. Para guardar y salir del modo de
ajuste de hora, oprima MODE
(Modo).
AVISO: Por defecto, la hora se muestra
en el modo de 12 horas (AM/PM). Si
desea cambiar al modo de 24 horas,
oprima y no suelte el botón UP (Hacia
arriba) ubicado en la parte posterior del
reloj hasta que el modo de hora cambie.
Ajuste del calendario
1. En el modo de visualización de hora
normal, oprima una vez el botón
MODE (Modo) ubicado en la parte
posterior del reloj para entrar al
modo de ajuste de calendario.
2. Oprima y no suelte el botón
MODE (Modo) ubicado en la parte
posterior del reloj hasta que los
dígitos de año parpadeen en la
pantalla.
3. Oprima los botones UP (Hacia
arriba) o DOWN (Hacia abajo) para
ajustar el año.
4. Oprima el botón MODE (Modo)
para confirmar. Los dígitos de mes
empezarán a parpadear.
5. Oprima los botones UP (Hacia
arriba) o DOWN (Hacia abajo) para
ajustar el mes.
6. Oprima el botón MODE (Modo)
para confirmar. Los dígitos de fecha
empezarán a parpadear.
7. Oprima los botones UP (Hacia
arriba) o DOWN (Hacia abajo) para
ajustar la fecha.
8. Para guardar y salir del modo de
ajuste de calendario, oprima MODE
(Modo).
Proyector del reloj
En el lado derecho de la unidad hay
un proyector de hora. La hora del
reloj puede proyectarse en techos o
paredes en un ambiente oscurecido
para verla fácilmente. La distancia
entre el proyector y la superficie de
proyección deberá estar entre 3 a 9
pies (0.9 a 2.7 metros).
Para usar el proyector: Oriente
el brazo del proyector hacia
la superficie en la cual quiere
proyectar la imagen.
Gire la rueda de enfoque para
ajustar el enfoque de la imagen
proyectada.
Aviso: Estas instrucciones son
para usar el proyector con el reloj
enchufado. Para usar el proyector y
la pantalla con alimentación de la
batería, oprima el botón SNOOZE/
LIGHT (REPETICIÓN DE ALARMA/
LUZ) ubicado en la parte superior
del reloj. La pantalla y el proyector
se iluminarán durante 5 segundos.
Proyector Vista posterior
Rueda de
enfoque
Garantía limitada de 12 meses
Aplica a los Radio-Relojes RCA
Voxx Accessories Corporation (la “Compañía”)
le garantiza a usted, el comprador original de
este producto que si, bajo condiciones y uso
normales, se encontrara que este producto
o alguna pieza del mismo presenta defectos
materiales o de mano de obra dentro de
los primeros 12 meses a partir de la fecha
de compra original, tales defectos serán
reparados o reemplazados con un producto
nuevo o renovado (a opción de la Compañía)
sin cargo alguno por las piezas y labores de
reparación.
Para obtener los servicios de reparación o
reemplazo dentro de los términos de esta
garantía, el producto se entregará con prueba
de cobertura de garantía (por ejemplo,
factura con fecha de venta), especificación
de los defectos, transporte prepagado, a
una estación de garantía aprobada. Para
ubicar la estación de garantía más cercana a
su domicilio, llame libre de cargo a nuestra
oficina de control al: 1-800- 645-4994.
Esta Garantía no es transferible y no cubre un
producto adquirido, mantenido o utilizado
fuera de los Estados Unidos o Canadá. Esta
garantía no incluye la eliminación de estática
o ruidos generados externamente, ni los
costos incurridos en la instalación, remoción o
reinstalación del producto.
Esta garantía no aplica a ningún producto
o pieza que, sea opinión de la compañía,
haya sufrido daños debido a alteraciones,
instalación inadecuada, abuso, uso indebido,
negligencia, accidente o exposición a la
humedad. Esta garantía no aplica a daños
ocasionados por un adaptador de CA que no
haya sido suministrado con el producto, o por
dejar instaladas baterías no recargables en el
producto mientras la unidad se encontraba
enchufada a un tomacorriente de CA.
EL ALCANCE DE LA RESPONSABILIDAD
DE LA COMPAÑÍA BAJO ESTA GARANTÍA
ESTÁ LIMITADO A LA REPARACIÓN O EL
REEMPLAZO PROVISTO ARRIBA Y, EN NINGÚN
CASO, DEBERÁ LA RESPONSABILIDAD DE LA
COMPAÑÍA EXCEDER EL PRECIO DE COMPRA
PAGADO POR EL COMPRADOR DE ESTE
PRODUCTO.
Esta Garantía reemplaza cualesquiera otras
responsabilidades o garantías expresas.
CUALESQUIERA GARANTÍAS IMPLÍCITAS,
INCLUYENDO CUALQUIER GARANTÍA
IMPLÍCITA DE COMERCIABILIDAD O
ADAPTABILIDAD PARA UN PROPÓSITO EN
PARTICULAR ESTARÁN LIMITADAS A LA
DURACIÓN DE ESTA GARANTÍA. CUALQUIER
ACCIÓN PARA EL INCUMPLIMIENTO DE
CUALQUIER GARANTÍA EN EL PRESENTE,
INCLUYENDO CUALQUIER GARANTÍA
IMPLÍCITA, DEBERÁ PRESENTARSE DENTRO
DE UN PERÍODO DE 24 MESES A PARTIR DE LA
FECHA DE COMPRA ORIGINAL. EN NINGÚN
CASO LA COMPAÑÍA SERÁ RESPONSABLE
POR DAÑOS EMERGENTES O INCIDENTALES.
Ninguna persona ni representante están
autorizados a asumir, a nombre de la
Compañía, ninguna responsabilidad salvo la
expresada aquí en conexión con la venta de
este producto.
Algunos estados/provincias no permiten
limitaciones sobre la duración de una
garantía implícita o la exclusión o la
limitación de daños incidentales o
emergentes, de modo que es aposible que
las limitaciones o exclusiones anteriores no
apliquen en su caso. Esta Garantía le confiere
derechos legales específicos y es posible
además que usted tenga otros derechos que
pueden variar según el estado/provincia.
Información sobre la garantía
Réglage de l’heure
1. En mode normal d’affichage de
l’heure, appuyer et maintenir
enfoncé le bouton MODE sur le dos
du réveil jusqu’à ce que les chiffres
des heures clignotent sur l’écran.
2. Appuyer sur les boutons UP et
DOWN pour régler l’heure.
3. Appuyer sur le bouton MODE pour
confirmer. Les chiffres des minutes
clignotent.
4. Appuyer sur les boutons UP et
DOWN pour régler les minutes.
5. Pour enregistrer et quitter le mode
réglage de l’heure, appuyer sur
MODE.
REMARQUE : Par défaut, l’heure est
affichée en mode 12 heures (AM/PM). Si
le mode 24 heures est désiré, appuyer
et maintenir le bouton UP sur le dos du
réveil enfoncé jusqu’à ce que l’affichage
de l’heure change.
Réglage de la date
1. En mode normal d’affichage de
l’heure, appuyer sur le bouton
MODE sur le dos du réveil une fois
pour entrer en mode de réglage de
la date.
2. Appuyer et maintenir enfoncé
le bouton MODE sur le dos du
réveil jusqu’à ce que les chiffres de
l’année clignotent sur l’écran.
3. Appuyer sur les boutons UP et
DOWN pour régler l’année.
4. Appuyer sur le bouton MODE pour
confirmer. Les chiffres des mois
clignotent.
5. Appuyer sur les boutons UP et
DOWN pour régler les mois.
6. Appuyer sur le bouton MODE pour
confirmer. Les chiffres de la date
clignotent.
7. Appuyer sur les boutons UP et
DOWN pour régler la date.
8. Pour enregistrer et quitter le mode
réglage de la date, appuyer sur
MODE.
Réveil
Réglage de l’heure
d’alarme
1. En mode normal d’affichage de
l’heure, appuyer sur le bouton
MODE deux fois pour entrer en
mode de réglage de l’alarme.
2. Appuyer et maintenir enfoncé le
bouton MODE.
3. Appuyer sur les boutons UP et
DOWN pour régler l’heure d’alarme
désirée.
REMARQUE : Si le mode d’affichage
de l’heure de 12 heures est utilisé,
vérifier d’avoir bien choisi le bon
réglage AM/PM lorsque l’heure est
définie.
4. Appuyer sur MODE pour
confirmer. Les chiffres des minutes
commencent à clignoter.
5. Appuyer sur les boutons UP et
DOWN pour régler les minutes pour
l’alarme désirée.
6. Appuyer sur MODE pour confirmer
et revenir à l’affichage normal de
l’heure.
REMARQUE : S’il se passe plus de
10 secondes sans qu’un bouton soit
enfoncé lors du réglage de l’alarme,
le réveil revient à l’affichage normal
de l’heure.
Activer/désactiver l’alarme
• Appuyez sur le bouton UP sur le dos
du réveil pour activer ou désactiver
l’alarme. L’icône de l’alarme ( )
apparaît sur l’écran quand l’alarme
est activée.
• Lorsque l’alarme sonne, une
pression sur l’un quelconque des
boutons au dos du réveil (sauf sur
SNZ
) permet de désactiver l’alarme.
Utilisation de SNOOZE
(répétition)
• Appuyez sur le bouton SNOOZE/
LIGHT situé sur le dessus du réveil.
L’icône d’alarme ( ) clignote
sur l’écran et l’alarme sonne de
nouveau lorsque la période de
répétition est écoulée (8 minutes).
• Pour désactiver la fonction SNOOZE,
appuyer sur l’un quelconque des
boutons au dos du réveil (sauf sur
SNZ).
Fonctions d’alarme
Température et humidité
Affichage de la
température et de
l’humidité maximales et
minimales
• Appuyer sur le bouton MAX/MIN
au dos du réveil une fois pour
afficher la lecture de l’humidité et
de la température maximales sur
l’écran.
• Appuyer sur le bouton MAX/MIN
au dos du réveil une deuxième
fois pour afficher la lecture de
l’humidité et de la température
minimales sur l’écran.
• Appuyer sur le bouton MAX/MIN
une troisième fois pour revenir à
l’affichage de la température et de
l’humidité actuelles.
Changer entre
Fahrenheit et Celsius
Par défaut, ce réveil affiche ses lectures
de température en degrés Fahrenheit.
• Pour passer en degrés Celsius,
appuyer le bouton DOWN sur le dos
du réveil.
• Pour repasser en degrés Fahrenheit,
de nouveau appuyer le bouton
DOWN sur le dos du réveil.
Antes de comenzar
Consulte la sección Reloj para ver
las instrucciones de ajuste correcto
del Reloj.
Funcionamiento con
batería de respaldo
• Este reloj está equipado con un
sistema de respaldo de hora que
está alimentado por 2 baterías
AAA (no incluidas). El circuito de
protección de falla de potencia no
funcionará a menos que las baterías
estén instaladas.
• Cuando se interrumpe el suministro
eléctrico normal para la casa, o se
desenchufa el cable de alimentación
de CA; las baterías de respaldo
suministrarán la energía eléctrica
para el reloj, a fin de que éste
pueda mantener la hora y los
ajustes de alarma programados en
la memoria.
• El reloj continuará su
funcionamiento normal después de
que se restablezca la alimentación,
y usted no tendrá que reponer la
hora ni la alarma.
Aviso: Se recomienda reemplazar las
baterías al menos una vez por año
si no ha ocurrido ninguna falla de
alimentación.
Para instalar las baterías:
1. Abra el compartimiento de las
baterías en la parte posterior del
reloj. Para hacer esto, aplique
presión sobre la lengüeta y retire la
tapa.
2. Inserte 2 baterías AAA (no
incluidas). Cerciórese de que las
polaridades de las baterías (+ y -)
correspondan con las polaridades
marcadas en el compartimiento de
las baterías.
3. Reinstale la tapa del compartimiento
y engánchela en posición.
Indicador de interrupción
de la alimentación eléctrica
Si no ha instalado las baterías en el
producto, o las baterías se agotan
mientras la alimentación eléctrica
está desconectada, se perderán los
ajustes del reloj y de alarma. Después
de reconectar la alimentación de CA,
aparecerá la hora 12:00 en la pantalla
LCD para indicar que se interrumpió
la alimentación eléctrica y se deben
volver a ajustar los ajustes de hora.
Ajuste de la hora de
alarma
1. En el modo de visualización de hora
normal, oprima dos veces el botón
MODE (Modo) para entrar al modo
de ajuste de alarma.
2. Oprima y no suelte el botón MODE
(Modo).
3. Oprima los botones UP (Hacia
arriba) o DOWN (Hacia abajo) para
ajustar la hora deseada para la
alarma.
AVISO: Si esta usando el modo de
hora de 12 horas, ¡asegúrese de
seleccionar el ajuste AM/PM correcto
cuando ajuste la hora!
4. Oprima MODE (Modo) para
confirmar. Los dígitos minuteros
empezarán a parpadear.
5. Oprima los botones UP (Hacia
arriba) o DOWN (Hacia abajo) para
ajustar los minutos que usted desea
para la alarma.
6. Oprima MODE (Modo) para
confirmar y retornar a la pantalla
de hora normal.
AVISO: Si deja pasar más de 10
segundos sin apretar un botón mientras
ajusta la alarma, el reloj retorna a la
pantalla de hora normal.
Para activar o desactivar
la alarma
• Oprima el botón UP (Hacia arriba)
ubicado en la parte posterior del
reloj para activar o desactivar la
alarma. En la pantalla aparece el
icono de alarma ( )
cuando la
alarma está activada.
• Mientras la alarma está sonando,
usted puede oprimir cualquier
botón en la parte posterior del reloj
(excepto SNZ) para desactivar la
alarma.
Uso de SNOOZE
(Repetición de alarma)
• Oprima el botón SNOOZE/LIGHT
(Repetición de alarma /Luz) ubicado
en la parte superior del reloj. El
icono de alarma ( ) en la pantalla
parpadeará y la alarma volverá a
sonar cuando el período de pausa (8
minutos) finaliza.
• Para desactivar SNOOZE (Repetición
de alarma), oprima cualquier botón
en la parte posterior del reloj
(excepto SNZ).
Función de alarma
Temperatura y humedad
Para mostrar la
temperatura/humedad
máximas y mínimas
• Oprima una vez el botón MAX/
MIN (Máx/Mín) en la parte posterior
del reloj para visualizar las lecturas
de temperatura y humedad máximas
del reloj en la pantalla del mismo.
• Oprima por segunda vez el botón
MAX/MIN (Máx/Mín) para visualizar
las lecturas de temperatura y
humedad mínimas del reloj en la
pantalla del mismo.
• Oprima por tercera vez el botón
MAX/MIN (Máx/Mín) para retornar
a las lecturas de temperatura y
humedad actuales.
Para cambiar entre
Fahrenheit y Celsius
Por defecto, este reloj muestra las
lecturas de temperatura en grados
Fahrenheit.
• Para cambiar a grados Celsius,
oprima el botón DOWN (Hacia
abajo) ubicado en la parte posterior
del reloj.
• Para regresar a grados Fahrenheit,
oprima nuevamente el botón
DOWN (Hacia abajo) ubicado en la
parte posterior del reloj.
]
Portable Cart Warning
Advertencia sobre el
Carro Portátil
©2019 VOXX Accessories Corporation
3502 Woodview Trace, Suite 220
Indianapolis, IN 46268
Audiovox Canada Ltd.
6685 Kennedy Road,
Unit#3, Door 14
Mississuaga, Ontario L5T 3A5
Trademark(s) ® Registered
Marca(s) ® Registrada(s)
Marque(s) ® Deposée(s)
Printed in China
Impreso en China
Imprimé en Chine
Illustrations contained within this publication are for representation only and subject to change.
The descriptions and characteristics given in this document are given as a general indication and not
as a guarantee. In order to provide the highest quality product possible, we reserve the right to make
any improvement or modification without prior notice.
Les illustrations de cette publication sont fournies à titre indicatif seulement et sont sujettes à
changement.
Les descriptions et les caractéristiques décrites dans ce document représentent une indication générale
et ne constitue pas une garantie. Afin d’offrir la meilleure qualité de produit possible, nous nous
réservons le droit de faire toute amélioration ou modification et ce, sans préavis.
Las ilustraciones contenidas dentro de esta publicación son para propósitos de ilustración solamente y
están sujetas a cambio.
Las descripciones y las características presentadas en este documento son dadas a modo de indicación
general y no de garantía. Con el fin de proporcionarle la más alta calidad de producto posible, nos
reservamos el derecho a hacer mejoras o modificaciones sin previo aviso.
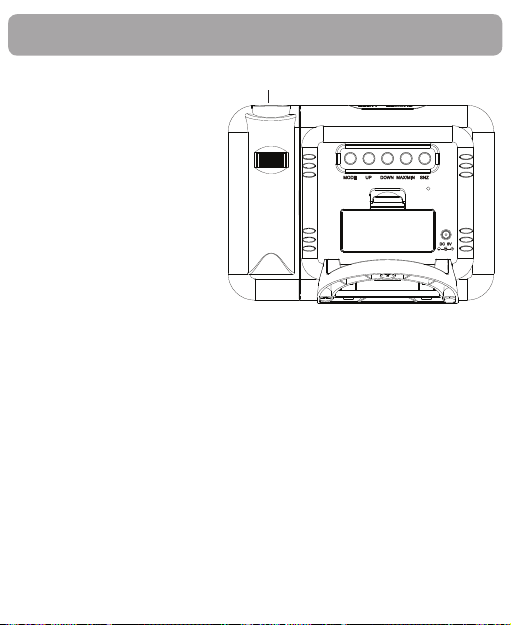
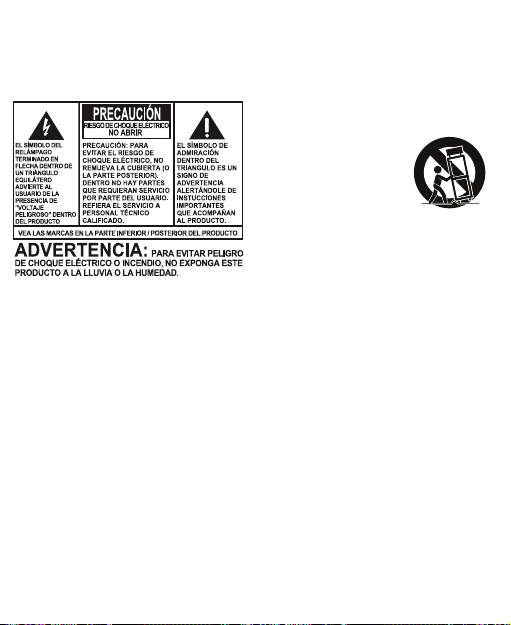
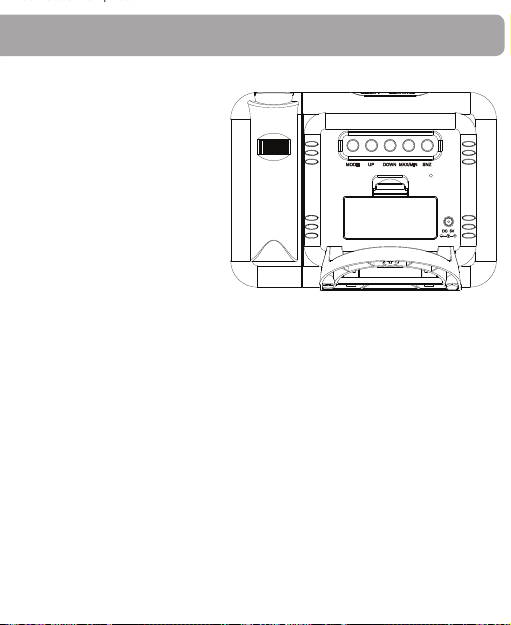
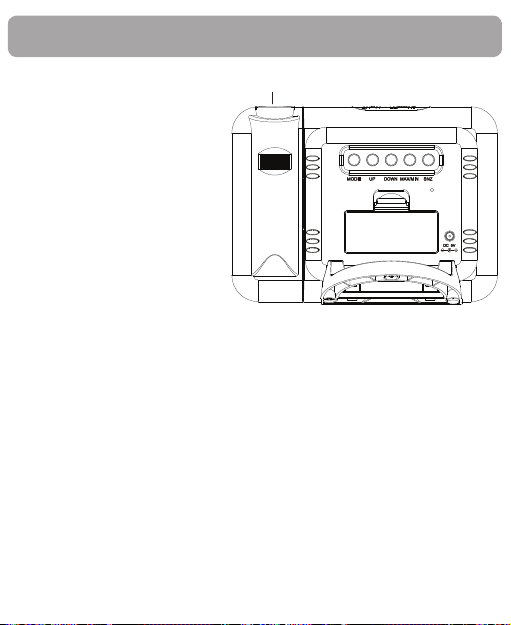