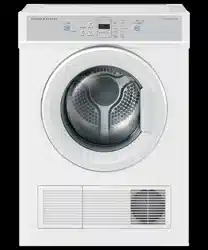
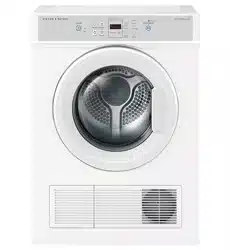
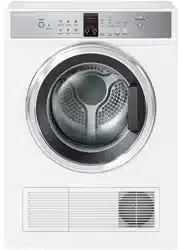
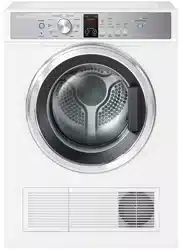
User Manual Vented Dryer
INSTALLATION INSTRUCTIONS
Accessories
Please check you received the following accessories with your Fisher & Paykel dryer. You will find them inside the drum:
- 1 x Installation guide/User guide
- 1 x Inverted panel
- 1 x Duct adapter
- 1 x Wall mounting kit
Unpacking
To ensure the best performance from your new dryer please follow the instructions below
Remove all packaging before use
1. Remove the outer packaging (including the polystyrene packer and plastic wrapping).
- Ensure packaging materials are kept out of reach of children.
- Help protect the environment and dispose of the packaging from around the dryer in an environmentally friendly manner.
2. Tilt the dryer backwards and ‘walk’ it off the base one foot at a time. Not doing so may cause damage to your floor and dryer.
3. Remove all packaging and accessories from inside the drum and ensure you remove protective covers from the door and console.
Location
- The dryer must be installed in a well-ventilated, dust-free environment.
- The dryer must not be installed on any textured floor coverings (eg carpet, rugs).
- Do not install the dryer behind a lockable door, sliding door, or behind a door where the hinge is on the opposite side to that of the dryer in such a way that the full opening of the door is inhibited. Ensure the dryer door can always be opened fully.
- Venting
- Correct installation is very important for all dryers to ensure maximum efficiency and safety.
- Never run the dryer unless the airflow system is free from obstruction.
- There must be adequate ventilation to avoid the back flow of gases into the room from appliances burning fuels, including open fires, when operating the dryer.
- Exhaust air must not be discharged into a flue which is used for exhausting fumes from appliances burning gas or other fuels.
- External venting
- Your dryer has been designed to be vented outside to provide the following advantages:
- Ensures optimum efficiency by preventing recirculation of moist air.
- Eliminates condensation on walls and ceilings. z Reduces the chance of lint being sucked into the dryer.
- Prevents lint and other fine particles being blown into the room. z All external venting systems must be:
- Made from 100mm diameter flexible foil sleeved with a galvanised metal pipe where the vent system goes through the wall, or 100mm diameter galvanised metal piping.
- Exhausted outside and not into another confined space, eg the roof cavity of a house.
- Fitted with a vent cap outside to stop rain water entering the dryer exhaust system.
- Angled to avoid condensation running back into the dryer.
- The vent system should be a maximum of two metres with no more than three 90° bends.
- Vent systems over two metres long require special installation. Contact a Fisher & Paykel trained and supported service technician.
- Internal venting
- The dryer is set up in the factory for front venting. If front venting is used there must be adequate ventilation to avoid the build up of moisture in the room, which can affect the performance of the dryer. Venting must comply with local by-laws and regulations.
Installation options
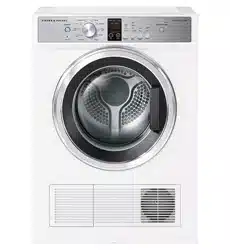
There are two different ways your dryer can be positioned. Freestanding or inverted and mounted on a wall.
Freestanding
The dryer stands on the floor and can easily be moved into position.
1 Move the dryer into the desired position. Do not lift the dryer by the top panel.
2 Have a minimum clearance on all sides of at least 20mm.
3 Have a minimum clearance at the rear of 75mm. The spacers from the accessory wall mounting kit can be used to set this distance.
4 Install the dryer on a stable and level floor.
Freestanding venting options
Note: the vent system should be less than two metres long with no more than three 90⁰ bends. Before a rear venting option is installed the dryer must be changed from the front venting factory setup. Remove the outlet grille from the front left-hand side and replace with the outlet cover from the rear left-hand side. These covers should be gently pried at the sides to prevent damage.
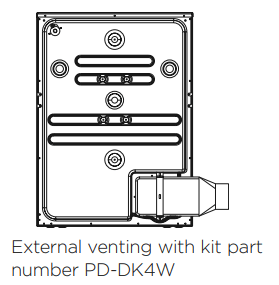
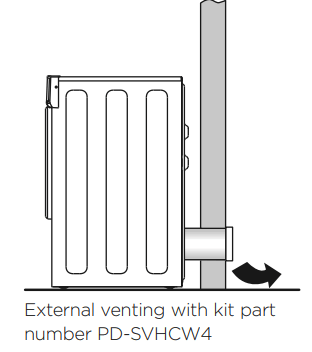
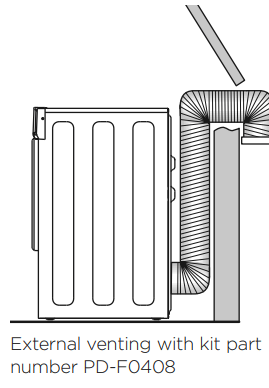
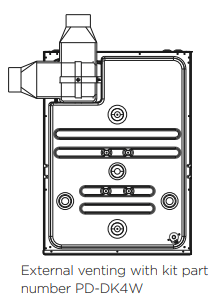
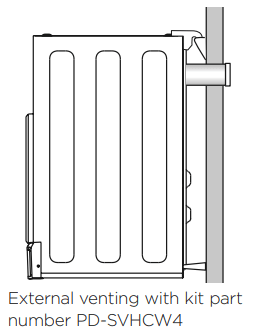
External venting
The dryer is vented with a kit that can be positioned to remove air to the side. The dryer is vented directly through the wall using a ducting kit in combination with the duct adaptor supplied with the dryer. The dryer is vented through a window using a ducting kit in combination with the duct adaptor supplied with the dryer. This requires the dryer to be a minimum distance of 140mm from the wall to ensure the ducting is not restricted with tight bends or can be crushed.
Internal venting
Front venting is the only recommended option for venting into the room. The dryer is set up for front venting when it leaves the factory.
Note: where possible all efforts should be made to vent the dryer externally to avoid moisture build up around the dryer.
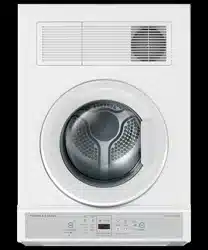
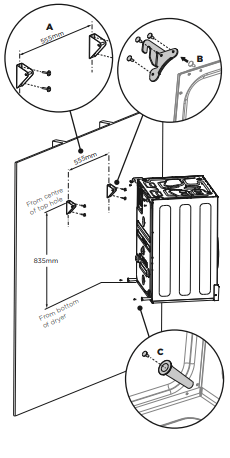
Inverted wall mounting installation
Your dryer has been designed to be inverted and mounted on the wall above a washer or tub. A wall mounting kit must be used. Inverting allows access to the dryer control panel.
Tools and parts required:
- Drill and 3mm bit
- Cross-head screwdriver.
Wall mounting kit includes:
- 2 x Plastic spacers
- 2 x Wall hanging brackets
- 2 x Hanging hook
- 4 x Wood screws
- 6 x Screws for hanging hooks and plastic spacers.
Inverted wall mounting
Wall mounting
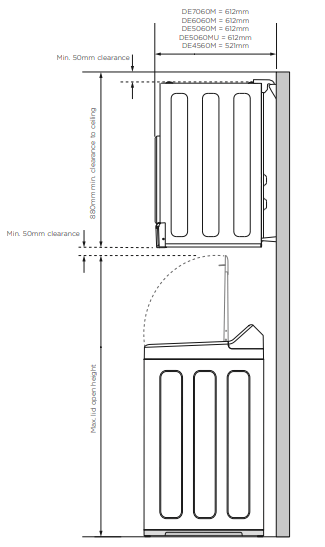
1 Determine the position of the dryer on the wall and mark the bracket position. A minimum of 50mm is needed between the top of the dryer and the ceiling for ease of installation. If mounting above a washing machine, allow sufficient room to open the lid of the washer. Refer to page 11 for lid clearances
2 Fix the wall hanging brackets to the wall securely, ie into the stud. If the studs are too far apart, fit a timber slat to the studs and then mount the brackets to the slat. If a slat is used, install a second slat behind the spacers to ensure the dryer is horizontal. The distance between the centre of each bracket is 555mm (A).
3 To install the hooks onto the dryer, remove one screw from each side (B), reuse these screws with two more (each side) from the kit to fasten the hooks in place.
4 Remove plastic plugs from the back of the dryer and screw the spacers provided in place (C).
5 With assistance, mount the dryer on the wall brackets.
6 Fit inverted control panel over the existing panel.
7 Adjust the display to read correctly on an inverted panel:
- For DE7060M, DE6060M and DE5060M press
 and
and for three seconds.
- For DE4560M press and
 for three seconds.
- The dryer will beep to indicate you have made a correct selection, and the display will change after three seconds.
- Repeat the same steps to return the panel to the factory setting.
Before a rear venting option is installed the dryer must be changed from the front venting factory setup. Remove the outlet grille from the front left-hand side and replace with the outlet cover from the rear left-hand side. These covers should be gently pried at the sides to prevent damage.
External venting options
- Kits are available that allow the dryer to be vented upwards or to the side.
- The dryer can be vented directly through the wall with a kit, in combination with the duct adaptor supplied with the dryer.
Note: the vent system should be less than two metres long with no more than three 90⁰ bends.
Internal venting
Front venting is the only option for internal venting. The dryer is set up for front venting when it leaves the factory.
Note: where possible all efforts should be made to vent the dryer externally to avoid moisture build up around the dryer.
Electrical connection
1 This appliance must be connected to a 220V – 240V, 50Hz, sinusoidal, 10A electrical supply.
2 Uncoil the power cord, remove and discard the plastic pin cover and plug into a power socket.
3 Connect the appliance to an earthed outlet protected by a fuse of suitable capacity.
- Check the power cord for damage and make sure it is not squashed or twisted when installing the dryer.
- Always remove the power cord from the power socket by the plug, not by the cord.
Completing the installation
Installation test cycle
Ensure the installation test cycle is completed before you dry any items in your dryer. This checks your dryer is installed correctly and functioning properly prior to use.
1 Turn your dryer on by pressing ‘POWER’  .
.
2 Select the ‘Time Dry’ cycle for 30 minutes. Ensure the drum is empty and the door is closed (you will hear it click shut).
3 Press  , the drum will start rotating.
- Observe the dryer for any problems.
- The dryer will beep and display any faults on the screen if there are any problems. Refer to ‘Fault codes’.
4 At the completion of the cycle open the door and check that there is warmth inside the dryer. This indicates the dryer is operating normally.
If there are any problems, you must address these before proceeding with normal use. The dryer will automatically turn off at the end of the cycle if there are no problems.
Before you start, it is a good idea to go through the following checklist:
1 Has the packaging been removed?
2 Is the lint filter correctly in place?
3 Has the power cord been connected to an appropriate power supply and the power turned on?
4 Have you performed the installation test cycle?
Product specifications
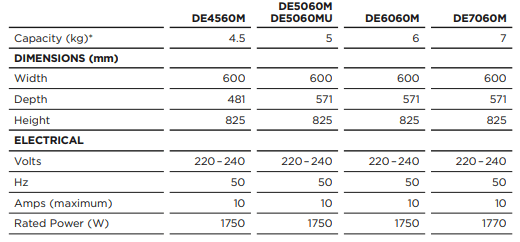
* Capacity refers to the maximum dry weight of items the dryer can dry at any one time. Rated capacity is determined by a countries performance standards, so similar dryers may have different capacities for different markets.
CONTROL PANNEL
DE7060M, DE6060M and DE5060M models
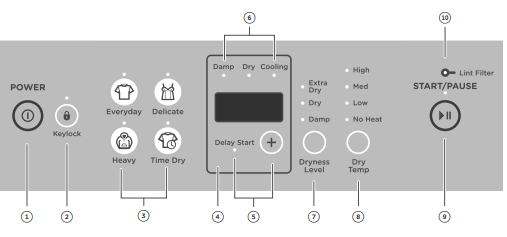
1 POWER : Press to turn the dryer on/off
2 Keylock : Press for two seconds to disable all buttons on the display panel, except ‘POWER’ :This prevents accidental button presses
3 Drying cycles : Select your desired drying cycle.
- Red LED illuminates to indicate the selected drying cycle.
4 Digital display screen : Shows the following:
- Delayed start time of the drying cycle.
- Notifications if an error is detected or a warning is necessary.
5 Delay Start : Press to increase the delay start time for drying cycles. Note: Delay start is not available for time dry cycles.
6 Progress lights : The progress lights indicate what stage of the cycle the dryer is currently at (‘Damp’, ‘Dry’ or ‘Cooling’). All three lights are on at the beginning of the cycle. The light for the current stage of the cycle flashes, and each one goes out when that stage of the cycle is complete.
7 Dryness Level : Allows you to select the level of dryness for your load.
8 Dry Temp: Allows you to select the drying temperature for your cycle.
9 START/PAUSE : Press to start or pause the selected drying cycle.
10 Lint Filter :The lint filter light will flash when the machine is switched on as a reminder to clear the lint filter before each cycle.
DE5060MU model
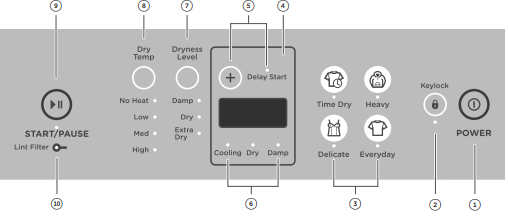
1 POWER : Press to turn the dryer on/off
2 Keylock : Press for two seconds to disable all buttons on the display panel, except ‘POWER’ . This prevents accidental button presses.
3 Drying cycles : Select your desired drying cycle.
- Red LED illuminates to indicate the selected drying cycle.
4 Digital display screen : Shows the following:
- Delayed start time of the drying cycle.
- Notifications if an error is detected or a warning is necessary.
5 Delay Start : Press to increase the delay start time for drying cycles. Note: Delay start is not available for time dry cycles.
6 Progress lights : The progress lights indicate what stage of the cycle the dryer is currently at (‘Damp’, ‘Dry’ or ‘Cooling’). All three lights are on at the beginning of the cycle. The light for the current stage of the cycle flashes, and each one goes out when that stage of the cycle is complete.
7 Dryness Level : Allows you to select the level of dryness for your load.
8 Dry Temp : Allows you to select the drying temperature for your cycle.
9 START/PAUSE : Press to start or pause the selected drying cycle.
10 Lint Filter : The lint filter light will flash when the machine is switched on as a reminder to clear the lint filter before each cycle
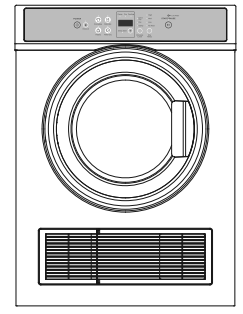
DE4560M model
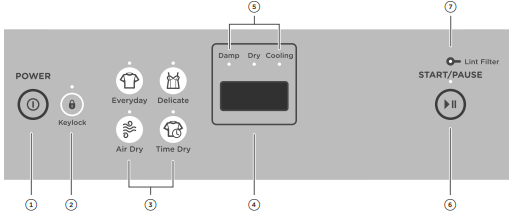
1 POWER : Press to turn the dryer on/off.
2 Keylock : Press for two seconds to disable all buttons on the display panel, except ‘POWER’ . This prevents accidental button presses.
3 Drying cycles : Select your desired drying cycle.
- Red LED illuminates to indicate the selected drying cycle.
4 Digital display screen : Shows the following:
- Notifications if an error is detected or a warning is necessary.
5 Progress lights :The progress lights indicate what stage of the cycle the dryer is currently at (‘Damp’, ‘Dry’ or ‘Cooling’). All three lights are on at the beginning of the cycle. The light for the current stage of the cycle flashes, and each one goes out when that stage of the cycle is complete.
6 START/PAUSE: Press to start or pause the selected drying cycle.
7 Lint Filter : The lint filter light will flash when the machine is switched on as a reminder to clear the lint filter before each cycle.
Timed programmes (Time Dry)
When a timed cycle is selected the machine dries for the selected time regardless of the level of moisture in the load. It is important to check the items throughout the timed programmes to avoid over drying.
To adjust the length of timed cycles (DE7060M, DE6060M, DE5060M and DE5060MU):
- Press ‘Time Dry’.
- Press ‘Delay Start ’.
To adjust the length of timed cycles (DE4560M):
- Press ‘Time Dry’ to scroll through the time selections available.
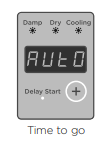
Time to go
If you have selected one of the ‘Time Dry’ cycles your dryer displays approximately how many minutes the cycle has remaining. The word is displayed on the screen for automatic cycles.
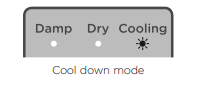
Airing/Cool down (Cooling)
When the dryer has sensed that the load is dry it will automatically go into an airing or cool down cycle. During ‘Cooling’ the drum tumbles and cool air is blown through the clothes. This cools the load to reduce creasing if the clothes are left in the dryer.
Keylock
This option enables you to deactivate the buttons on the display panel, except for the ‘POWER’ and . This option helps prevent accidental button presses.
To turn Keylock ON or OFF, at any time when the dryer is powered on:
- Press for two seconds. Note: When activated, the light next to the is illuminated. If Keylock is activated and the dryer is powered off:
- To turn your dryer on, press ‘POWER’ , then press for two seconds to turn Keylock off. Select your drying cycle, any options and then press to start the cycle.
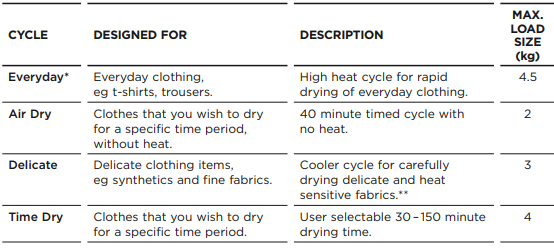
DRYING CYCLES
DE7060M model

Your dryer has a number of drying cycles to suit your laundry needs. Selecting the most appropriate cycle for each particular load will help to ensure you get the best result.
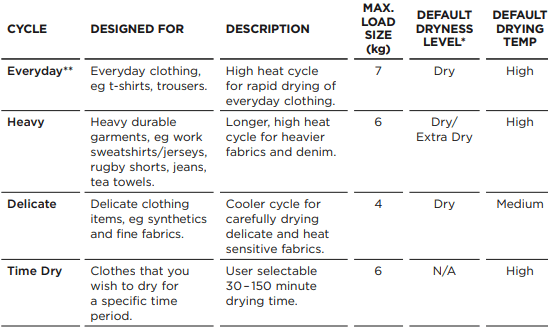
* Dryness level is only an option on automatic sensing cycles. On the ‘Time Dry’ cycle, dryness will vary depending on the load and its initial moisture content.
** ‘Everyday’, ‘Dry’, ‘High’ dry temp is the recommended cycle for everyday cotton items.
DE6060M and DE5060M models

Your dryer has a number of drying cycles to suit your laundry needs. Selecting the most appropriate cycle for each particular load will help to ensure you get the best result.
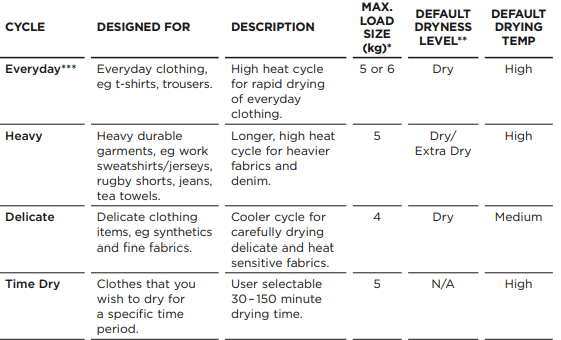
* Depends on your model of dryer (5 or 6kg capacity).
** Dryness level is only an option on automatic sensing cycles. On the ‘Time Dry’ cycle, dryness will vary depending on the load and its initial moisture content.
*** For DE5060M model ‘Everyday’, ‘Dry’, ‘High’ dry temp is the recommended cycle for everyday cotton items. For DE6060M model ‘Everyday’, ‘Dry/Extra Dry’, ‘High’ dry temp is the recommended cycle for everyday cotton items.
DE5060MU model

Your dryer has a number of drying cycles to suit your laundry needs. Selecting the most appropriate cycle for each particular load will help to ensure you get the best result.
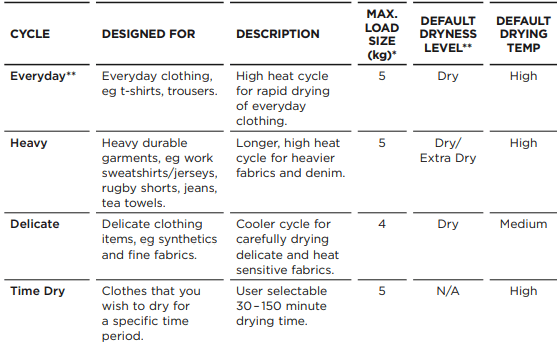
* Dryness level is only an option on automatic sensing cycles. On the ‘Time Dry’ cycle, dryness will vary depending on the load and its initial moisture content.
** For DE5060MU model ‘Everyday’, ‘Dry’, ‘High’ dry temp is the recommended cycle for everyday cotton items.
DE4560M model

Your dryer has a number of drying cycles to suit your laundry needs. Selecting the most appropriate cycle for each particular load will help to ensure you get the best result.
* ‘Everyday’ is the recommended cycle for everyday cotton items.
** Also used for safely drying bulky items on low-medium heat
SORTING AND LOADING
When preparing your load there are some important things to consider:
Sorting
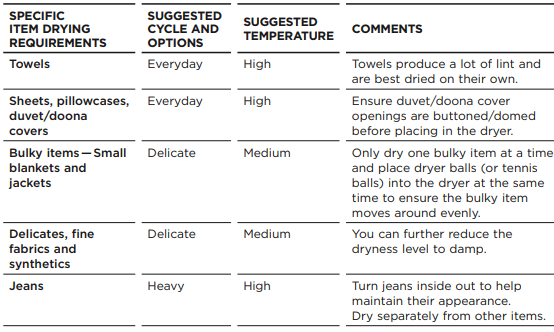
- We recommend sorting your garments before placing them into the dryer. Sort into loads of similar items, and loads that will likely take similar times to dry. Heavier items (eg towels, and flannelette sheets) are best dried separately from lightweight items (eg synthetics, polyester-cotton sheets and shirts). This prevents some items becoming over-dried while others are still damp and helps extend the life of your clothing and linen.
- Fisher & Paykel recommends tumble drying bulky items such as duvets/doonas on low-medium heat only. Do not overload the drum because this can cause scorching of the item.
- Care labels provide valuable information about the fabric type and how the item should be dried. Always follow advice on care labels and only dry items in this dryer with care labels indicating tumble drying is suitable.
- Drying your clothes as soon as you remove them from the washer will decrease both wrinkles formation and dye transfer from coloured to white items.
- Separate coloured items from white/light items where possible, especially when new. Colour run may be an issue, particularly if you intend to delay the start of the drying cycle.
- We recommend that articles of clothing with screen-printing are turned inside out to prevent damage to the print. Hooks or zippers should be fastened and where possible and those items turned inside out.
Before you load
- Check pockets for items that could damage your clothes or get caught in the dryer.
- Close zippers, hooks and eyes, and other fastenings (ie fasten the openings of duvet/ doona covers), and remove loose bra wires. These may damage both your dryer and your clothes.
- Check the lint filter is clean and the water tank is empty (if the dryer is not set up to drain automatically).
Loading
Garments need to be loaded correctly to minimise creasing and wrinkling, and to ensure the load is dried evenly.
- Allow enough room in the dryer for clothes to tumble freely. (Hint: load the dryer in terms of the space the garments take up when dry, rather than when they are wet).
- Shake clothes out and load individually to help items dry evenly and reduce tangling.
- Only dry a sheet load up to a maximum of 4kg in the dryer at one time.
- Hang garments as soon as the drying cycle is complete to reduce the need for ironing.
Drying times
- Drying very small loads is inefficient. Try to dry medium to large loads.
- Heavier items (towels, flannelette sheets) will take longer to dry than light items (synthetics and polyester cotton sheets and shirts).
- Drying times can be reduced by spinning the wash load at the highest spin speed suitable for the load type in your washing machine.
- Check bulky items during the cycle to ensure even drying, pause the dryer and reposition the item if necessary.
Drying duvets/doonas and other bulky items
Depending on the size, you may need to use a commercial dryer at the laundromat. Add your bulky item to the dryer along with dryer balls (or tennis balls) to help evenly distribute the filling and cut down dryer time. Dry at low-medium temperature only, stopping regularly to check.
Do not leave your dryer unattended while tumbling bulky items.
Remove the duvet/doona from the dryer every half hour or so and fluff to redistribute the filling. Return items to the dryer and continue the cycle. This will ensure that your duvet/doona dries evenly
GETTING STARTED QUICKLY
Lint
Some items are lint givers, while others are lint collectors. Always dry lint givers and collectors separately

- Check the lint filter is clean before every load. Ensure it is replaced correctly before using your dryer.
- The lint filter indicator light will flash at the beginning of every cycle when the machine is switched on, as a reminder to check the lint filter.
- Sort and load items into the dryer drum, ensuring no items are in the way of the door. Close the door.
1 Press ‘POWER’ to activate your dryer.
2 Your dryer will default to the ‘Everyday’ cycle. Select your desired drying cycle by pressing the cycle button of your choice.
3 DE7060M, DE6060M, DE5060M and DE5060MU models only. Select your preferred drying options, using the buttons on the right hand side of the panel (if you wish to select options different from the default options for the cycle).
4 Press to start the cycle.
- If you make an invalid selection the dryer will beep to alert you.
- When the cycle finishes, your dryer will beep and then turn off automatically.
- If you wish to change a cycle once drying has started, press then select the new cycle. Press to restart the dryer with the new cycle. This may affect drying performance.
- If you wish to stop the dryer before the cycle has finished you MUST remove the clothes IMMEDIATELY and spread them out to cool. DO NOT leave the clothes in the dryer or bunched up in a clothes basket. Take extreme care as the drum and the load items may be extremely hot.
- Failure to follow the advice in this guide may result in damage to your garments and your expectations of drying performance may not be met.
CUSTOMISING DRYING CYCLE
Delay Start (DE7060M, DE6060M, DE5060M and DE5060MU models only)
The ‘Delay Start’ option enables you to delay the start of the drying cycle from between 5 minutes and 12 hours. Times you can select are 5 min, 15 min, 30 min, 1 hour, then hourly up to 12 hours. This can be useful to time your drying to finish when you arrive home from work, or to start when power rates are lower.
To ‘Delay Start’ your cycle:
1 Select the cycle.
2 Press ‘Delay Start + ’ to cycle through the delay start times available.
3 Press to confirm your selection and start the countdown.
4 The display will indicate the time until the cycle will start.
To decrease or turn off ‘Delay Start’:
1 Press ‘Delay Start + ’ to cycle through the delay start times available.
Avoid using ‘Delay Start’ for damp, non-colourfast items as this may cause dye run to occur.
Drying cycle options (DE7060M, DE6060M, DE5060M and DE5060MU models only)
All drying cycles default to the recommended options based on the average expected load to be dried. You can vary the options (‘Dryness Level’, ‘Dry Temp’) to create your desired cycle.
To change the cycle or options you have selected after a cycle has started:
- Press and select your new cycle or options, then press again to resume drying.
Note: Some options may not be available for selection under certain conditions and after particular stages of the drying cycle have passed.
| DESCRIPTION |
OPTIONS |
|
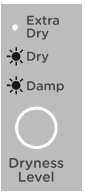
Dryness Level
When your dryer senses that the clothes have dried to the dryness level selected, the dryer will automatically finish the cycle. Note: Two lights are used to show some dryness levels, eg to achieve the ‘Damp Dry’ setting both the ‘Dry’ and the ‘Damp’ dry lights will be illuminated.
|
| There are five dryness levels from ‘Damp’ through to ‘Extra Dry’. If you wish to change from the default dryness, you can choose the dryness level to suit your load depending on how dry you wish your items to be. |
|
 |
|
|
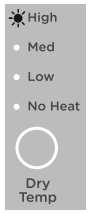
Dry Temp
There are four drying temperatures you can choose from for your cycle.
|
|
High: Clothes temperatures reach up to 80°C.
Medium: Clothes temperatures reach up to 70°C.
Low: Clothes temperatures reach up to 45°C.
No heat: Cool air is blown through the dryer for the period selected.
|
|
 |
|
Customising dryer cycles (DE7060M, DE6060M, DE5060M and DE5060MU models only)
After using your dryer a few times you may discover there are some drying options you prefer for some cycles.
You can programme your dryer to remember the drying options you prefer for each drying cycle, eg you may want to set the ‘Everyday’ cycle to a lower drying temperature.
To customise a cycle:
1 Press ‘POWER’ to turn the dryer on.
2 Select the cycle you wish to customise.
3 Press any of the drying options buttons for three seconds. The lights will flash on and off and the display will show to indicate that the dryer is in cycle adjustment mode.
4 Select the drying options you prefer by pressing the relevant option button.
5 Press for three seconds to save the selected settings. The dryer will then beep to indicate your customised cycle has been saved.
Reset Defaults
You can reset your dryer to the default settings it left the factory with:
1 Press and together for three seconds.
2 Your dryer will now be reset to the default settings.
CARING FOR YOUR DRYER
When you have finished using your dryer
- Unplug the machine from the power socket.
- Wipe around the door to remove any remaining condensation and foreign matter.
- Clear the lint filter.
Cleaning your dryer
Before you start cleaning your dryer, ensure that it is disconnected from the power (ie unplug the machine from the power socket).
Cleaning the control panel and outer surfaces of the dryer
Use a soft damp cloth to wipe all surfaces, then wipe dry. Avoid using chemical or scouring cleaners, as these will damage the paint and plastic surfaces of your dryer.
Cleaning the inside of your dryer
It is important that you occasionally clean the inside of your dryer. If the drum has any residual dirt or lint stuck to it, remove this and wipe it clean with a damp cloth. Do not leave any metal objects in the drum, as these may cause rust.
Cleaning the filters
Cleaning the lint filter
- Lint is generally formed during wearing and washing. Fibres (ie lint) released from the clothes during the drying cycle are collected in the lint filter.
- It is important to clean the lint filter after every load, as the lint produced in the drying process can become a fire hazard if it is allowed to accumulate in or around your dryer.
- The lint filter is located in the door opening (at the bottom).
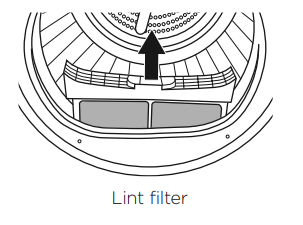
To clean the filter:
1 Open the dryer door.
2 Remove the lint filter by pulling it up and out of the filter slot. Open it out and wipe the surfaces clean with your hand.
3 Close the lint filter and place it back in the opening. Ensure the filter is fitted correctly back in place before operating the dryer.
BEFORE YOU CALL FOR SERVICE
User warnings
Your dryer is capable of diagnosing a number of its own problems. It will sound a continuous series of beeps and display a user prompt when it has a problem that you can correct yourself. To stop the beeps sounding, touch any button on the control panel. Do not try to continue your drying cycle once you stop the noise. You must address the problem the dryer is alerting you to. Check the below table before you call for service.
| PROBLEM |
DISPLAYED AS |
WHAT TO DO |
| Keylock is activated |
 |
Press for two seconds to deactivate the Keylock. |
| The door is not closed |
 |
Close the door fully and press . |
| Try opening and closing the door again. |
| Reposition the load, make sure the load is correctly in the drum and that protruding items are not stopping the door from closing. |
| Dryer has been paused |
 |
Press to resume the cycle. |
Once you have addressed the issue the user prompt was alerting you to, try using your dryer as per usual. If the issue persists, call your Fisher & Paykel trained and supported service technician.
FAULT CODES
When a continuous series of beeps is sounded, all the lights turn off on the control panel and a number appears on the display, a fault has occurred. The dryer will automatically enter this mode if a fault occurs. The fault code will be displayed as followed by a number on the digital display. To stop the beeps, press any button then perform the following steps:
1 Turn your machine off at the power socket.
2 Wait one minute and turn it back on.
3 Check your machine is installed correctly (refer to ‘Installation instructions’ section).
4 Remove your load from the dryer and retry.
5 Perform a ‘Time Dry’ cycle, eg ‘Time Dry’ for 30 minutes.
6 If the fault re-occurs repeat steps 1 and 2.
7 If the machine still will not work call a Fisher & Paykel trained and supported service technician to arrange service (refer to the ‘Customer care’ section). Record the fault code number displayed and the serial number of your dryer (located on the rear of the machine, or on the inside of the door below the glass) before calling. The fault code will indicate to the service technician what the problem could potentially be.
If a fault code is being displayed, you can still turn your dryer off by pressing ‘POWER’ .
TROUBLESHOOTING
| PROBLEM |
POSSIBLE CAUSES |
WHAT TO DO |
| Pressing ‘POWER’ does not turn on the dryer |
Fault with household power supply. |
Try plugging in and turning on another electrical device at the same socket. |
| Dryer does not heat |
Dryer set to ‘Air Dry’ cycle (DE4560M model only). |
Check what cycle the dryer is set to (refer ‘Drying cycles’). Change to preferred cycle. |
| The dryer has progressed to ‘Cooling’. |
Check the progress lights — is the ‘Cooling’ light illuminated? Refer to ‘Progress lights’ . |
| Pressing does not start the drying cycle |
Dryer door not closed properly |
Open and close the door. Check that the lint filter is correctly in place and not obstructing the door. |
| Is the dryer displaying a user warning or fault code? |
Refer to ‘Before you call for service’. |
| Lint filter needs to be emptied. |
Empty the lint filter and ensure it is correctly in place. |
| Dryer is overloaded. |
Remove some items from the dryer |
| ‘Delay Start’ function is set. |
Refer to page 26 for more information. |
| Keylock is ON. |
To disable press for two seconds |
| Dryer stops working mid-cycle |
Power failure. |
Press ‘POWER’ and restart the desired cycle. |
| Dryer has been paused. |
Press to restart the cycle. |
| Dryer door is open. |
Ensure the door is firmly shut |
| Clothes getting too hot or damaged |
Cycle selected not appropriate for the load. |
Ensure the cycle selected is appropriate for items in the load. Refer to ‘Drying cycles’. |
| Items removed from dryer before the end of cycle cool down had finished. |
Removing items before cool down may damage clothing if it is not spread out and exposed to air to cool once removed from the dryer. |
| Dryer is beeping and displaying unfamiliar light patterns and/or message on the digital display |
Dryer has a fault. |
Try turning the dryer off and waiting 30 seconds before turning it back on. Refer to ‘Before you call for service’. |
| Dryer is taking too long /results were not satisfactory |
Drying cycle selected not appropriate for the load |
Select an appropriate cycle for the load. Refer to ‘Drying cycles’. |
| Dryness level selected not appropriate for the load |
Select a higher dryness level. Refer to ‘Dryness Level’ |
| Dryer overloaded for the cycle. |
Some cycles have a lower max load size. Refer to ‘Drying cycles’. |
| Try dividing the load in half and dry half at a time. |
| Lint filter is blocked |
Clean the lint |
| Load overly wet at the start of cycle. |
Remove more water from the load before placing it in the dryer, eg select a faster spin speed on your washer, if appropriate for your load. |
| Load was damp dry at the start of cycle. |
If the load had been partially air dried, eg has been washed and placed on the line, use a ‘Time Dry’ cycle and monitor the dryness of your clothes. |
| Items got tangled. |
Try separating items and drying similar items together. Refer to ‘Loading’ for further tips |
| Noises |
Dryer is overloaded. |
Remove some items from the dryer |
| Dryer has a fault. |
Dryer is beeping and displaying unfamiliar light patterns and/ or message on the digital display. Refer to ‘Before you call for service’. |
| Vibration |
Dryer is not installed on a stable surface. |
Ensure the dryer is installed on a flat, stable surface. |
| Dryer is overloaded. |
Remove some items from the dryer. |
| Creasing |
‘Dry Temp’ and/or ‘Dryness Level’ selected too hot/too long for load type (DE7060M, DE6060M, DE5060M and DE5060MU only). |
Try selecting a lower ‘Dry Temp’ and ‘Dryness Level’ |
| Dye transfer |
White/light and coloured items not separated before drying. |
Remember to separate white/light and coloured items before placing them in the dryer. |
| Wet items left sitting in the dryer for long periods of time before drying. |
Refer to ‘Sorting’ for tips to prevent dye transfer |
| Linting |
Lint filter not cleaned or replaced |
Ensure the lint filter is cleaned after every cycle and replaced correctly. Refer to ‘Cleaning the filters’ |
| Loads not sorted correctly. |
Dry lint givers separately from lint receivers. Also, dry similar colours together eg light coloured items with light coloured items, dark items with dark items. Refer to ‘Sorting and loading’. |
| Clothes over dried. |
Over drying clothes in the dryer can cause them to attract lint. Use an auto sensing cycle or ensure you check your load if using the time dry cycles to avoid over drying. Refer to ‘Drying cycles’. |
| Fabric damage |
Instructions on care label not followed |
Follow the instructions on the care label of the items. |
| ‘Dry Temp’ or ‘Dryness Level’ selected not appropriate for the fabric type (DE7060M, DE6060M, DE5060M and DE5060MU only). |
Ensure the ‘Dry Temp’ and ‘Dryness Level’ selected is appropriate for the fabric type. Refer to the items care label. Refer to ‘Drying cycles’. |
| Metal parts on the items or in the load. |
Fasten zips and other clasps before placing items in the dryer |
| Items not separated or dried on an appropriate cycle for the fabric type |
Dry similar items together. Ensure an appropriate cycle is selected. Refer to ‘Drying cycles’. |
| Used a ‘Time Dry’ cycle and did not monitor the dryness of clothes during the cycle |
Ensure that clothes are checked for dryness during the cycle when using the timed programmes to avoid over drying. Refer to ‘Customising drying cycle’. |
| Tangling |
Loads not separated during loading. |
Try separating out larger items from smaller items |
| Items loaded into the dryer incorrectly. |
Load items individually into the dryer. Do not place folded items in the dryer. |
| Load size too large. |
Try drying smaller load sizes. Some cycles have a lower maximum |
| Sheets and duvet/doona covers due to their size, are prone to tangling. |
Dry sheets and duvet/doona covers separately from other laundry, apart from towels. Ensure duvet/doona covers are buttoned or fastened closed before drying. Try adding a knotted towel to sheets loads if you are experiencing a lot of tangling. |