User Guide Fisher & Paykel
INSTALLATION INSTRUCTIONS
- Check the lint filter is clean before every load. Ensure it is replaced correctly before using your dryer.
- The lint filter indicator light will flash at the beginning of every cycle when the machine is switched on, as a reminder to check the lint filter.
- Sort and load items into the dryer drum, ensuring no items are in the way of the door. Close the door.
- Press ‘Power’ to activate your dryer.
- Your dryer will default to the ‘Everyday’ cycle. Select your desired drying cycle by turning the SmartTouch™ Control Dial (DE7060P only) or gently touching the cycle button of your choice.
- Select your preferred drying options, using the SmartTouch™ buttons on the right hand side of the panel (if you wish to select options different from the default options for the cycle).
- Touch the
 button to start the cycle.
- If you make an invalid selection the dryer will beep to alert you.
- When the cycle finishes, your dryer will beep and then turn off automatically. If the ‘Wrinkle Free’ option has been selected the dryer will rotate the drum periodically blowing cool air into the drum to help minimise wrinkling and creasing of your load.
- If you wish to change a cycle once a drying cycle has started, touch the button then select the new cycle. Touch to restart the dryer with the new cycle. This may affect drying performance.
IMPORTANT!
- If you wish to stop the dryer before the cycle has finished you MUST remove the clothes IMMEDIATELY and spread them out to cool. DO NOT leave the clothes in the dryer or bunched up in a clothes basket. Take extreme care as the drum and the load items may be extremely hot.
- Failure to follow the advice in this guide may result in damage to your garments and your expectations of drying performance may not be met.
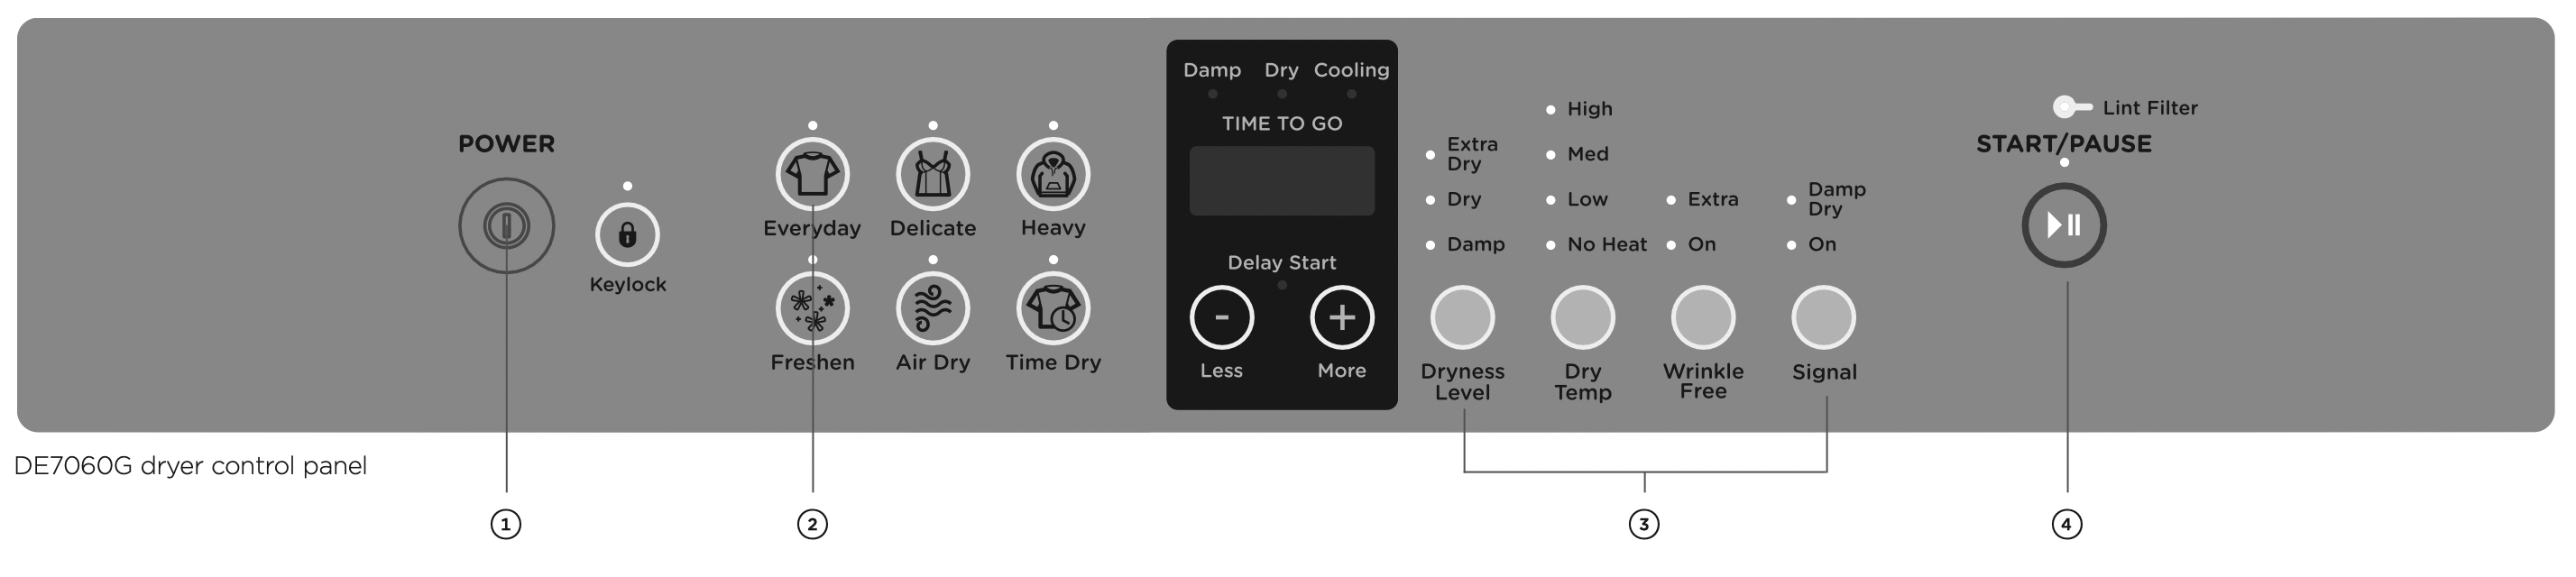
DRYER CONTROLS
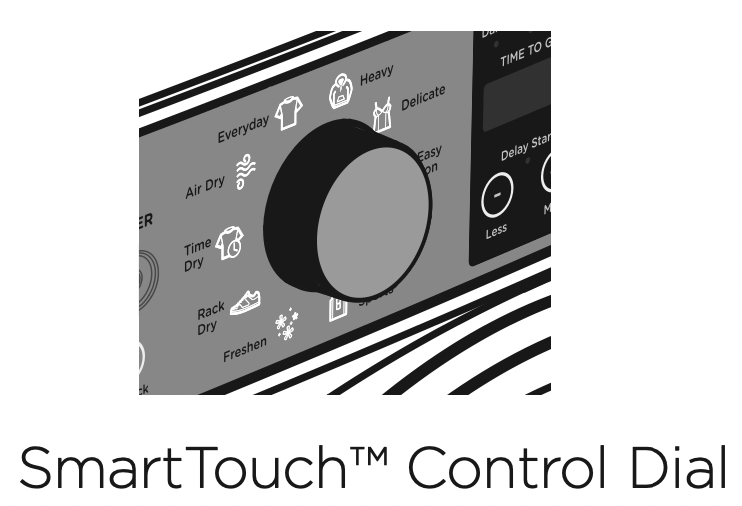
SmartTouch™ Control Dial
The SmartTouch™ Control Dial (DE7060P only) provides easy and efficient drying cycle selection. As you rotate the dial, the icon of the drying cycle selected will be illuminated, along with the default settings for that cycle on the right side of the control panel.
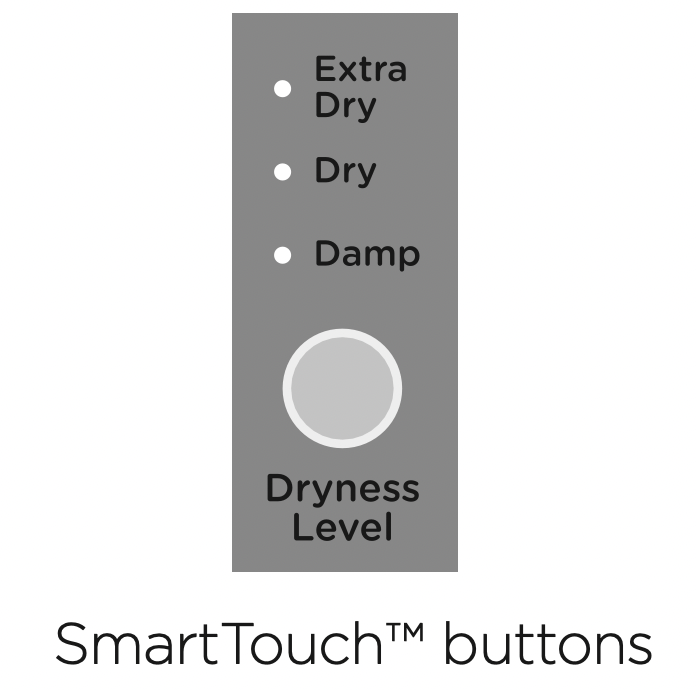
SmartTouch™ buttons
The smooth, easy clean buttons enable easy selection of options with lights clearly showing the selections you are making.
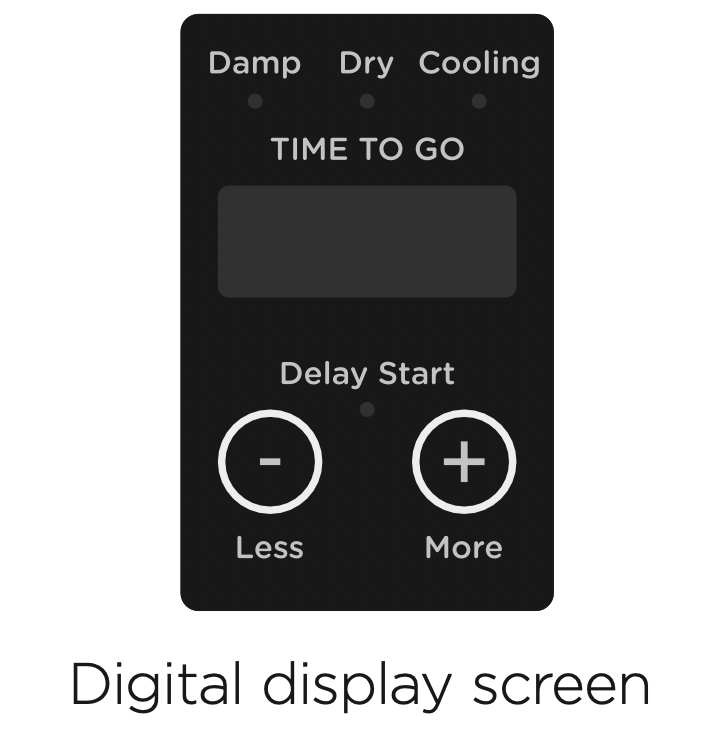
Digital display screen
The digital display screen provides feedback on how long the drying cycle has to go. If you have programmed a ‘Delay Start’, the time remaining until the cycle will start will be displayed here, along with any messages to help you with the overall running of your dryer (eg user warnings).
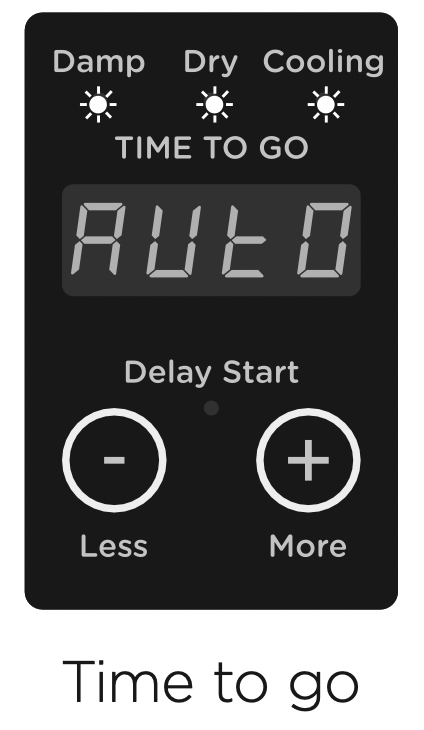
Time to go
Your dryer displays approximately how many minutes the cycle you are running has remaining if you have chosen one of the Time Dry cycles. If you have chosen an automatic cycle the word  will appear on the screen.
Be aware that a number of factors can influence the overall cycle time, eg the fabric type and construction of garment, load size, how wet the load is, etc.
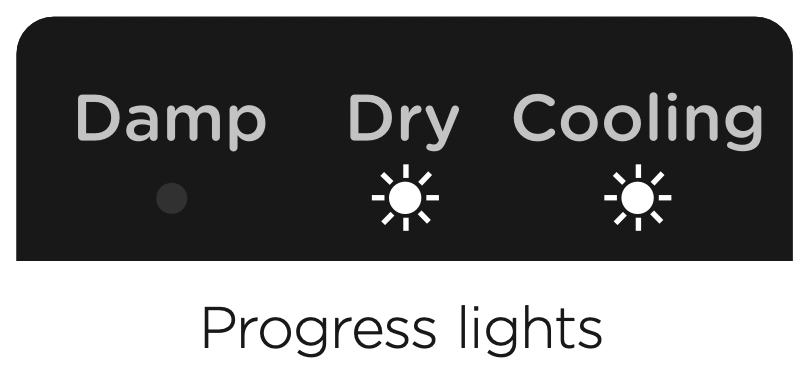
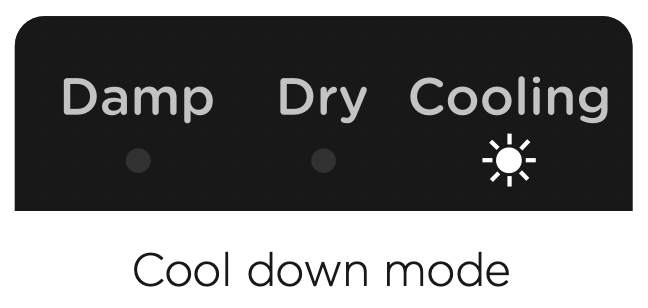
Progress lights
The progress lights indicate what part of the cycle the dryer is currently on (‘Damp’, ‘Dry’ or ‘Cooling’). All three lights are on at the beginning of the cycle. The light for the current part of the cycle flashes, and each one goes out when that part of the cycle is complete.
Keylock
Keylock can be used to lock the buttons on your dryer. This will avoid accidental button touches. For more detail refer to the ‘Drying cycle options’ section.
SORTING AND LOADING
When preparing your load there are some important things to consider:
Sorting:
- It is best that you sort your garments before placing them into the dryer. Sort into loads of similar items, and loads that will take similar times to dry. Heavier items (eg towels and flannelette sheets) are best dried separately from lightweight items (eg synthetics, polyester-cotton sheets and shirts). This prevents the possibility of some items becoming over-dried whilst others are still damp. It will also help to extend the life of your clothing and linen.
- Drying your clothes as soon as you remove them from the washer will decrease the chance of wrinkles, and dye transfer from coloured items to white items from occurring.
- Garments with hooks or zippers should be fastened where possible and turned inside out.
- Care labels on garments provide valuable information about the fabric type and how the garment should be dried. Always follow the advice on the garment labels. Only dry items in this dryer that have a care label stating tumble drying is suitable.
- Separate coloured items from white/light items where possible, especially when new. Colour run may be an issue, especially if you intend to delay the start of the drying cycle.
Before you load
- Check pockets for items that could damage your clothes or get caught in the dryer.
- Close zippers, hooks and eyes, and other fastenings (ie fasten the openings of duvet/doona covers), and remove loose bra wires. These may damage both your dryer and your clothes.
- Check the lint filter is clean.
Loading
- Garments need to be loaded correctly to minimise creasing and wrinkling, and to ensure the load is dried evenly. Make sure there is plenty of room for the garments to tumble freely while drying.
- Hint: load the dryer in terms of the space the garments take up when dry, rather than when they are wet. Do not overload your dryer, as this may damage your dryer and clothes.
- It is a good idea to dry ‘permanent press’ type garments (eg business shirts) together on the ‘Easy Iron’ cycle (DE7060P only) or a separate cycle with the ‘Wrinkle Free’ option on. This will help reduce wrinkling and the need for ironing.
To reduce tangling
- Load items individually.
- Ensure duvet/doona covers are fastened before placing in the dryer.
To reduce creasing
- Shake clothes out and load individually to help items dry evenly.
- Launder permanent press garments separately, eg business shirts.
- Allow enough room in the dryer for clothes to tumble freely.
- Hang garments as soon as the drying cycle is complete to reduce the need for ironing.
Drying times
- Drying very small loads is inefficient. Try to dry medium to large loads.
- Heavier items (towels and flannelette sheets) will take longer to dry than light items (synthetics and polyester cotton sheets and shirts).
- Drying times can be reduced by spinning the wash load at the highest spin speed suitable for the load type in your washing machine.
Drying bulky items
- It is important that you check the care label of any item carefully, to ensure it is suitable for tumble drying, before placing it into the dryer.
- Check bulky items during the cycle to ensure even drying, pause the dryer and reposition the item if necessary.
- Do not overload the dryer and take extra care with duvets/doonas which can expand as they dry. Ensure there is enough space for the load to tumble.
Lint
Some items are lint givers, while others are lint collectors. Always dry lint givers and collectors separately.

Drying rack
There are many items that would benefit from being dried on a drying rack. For example items like sport shoes, soft toys, hats and woollen items that may be damaged if they are tumbled.
A drying rack is installed in your dryer when it leaves the factory.
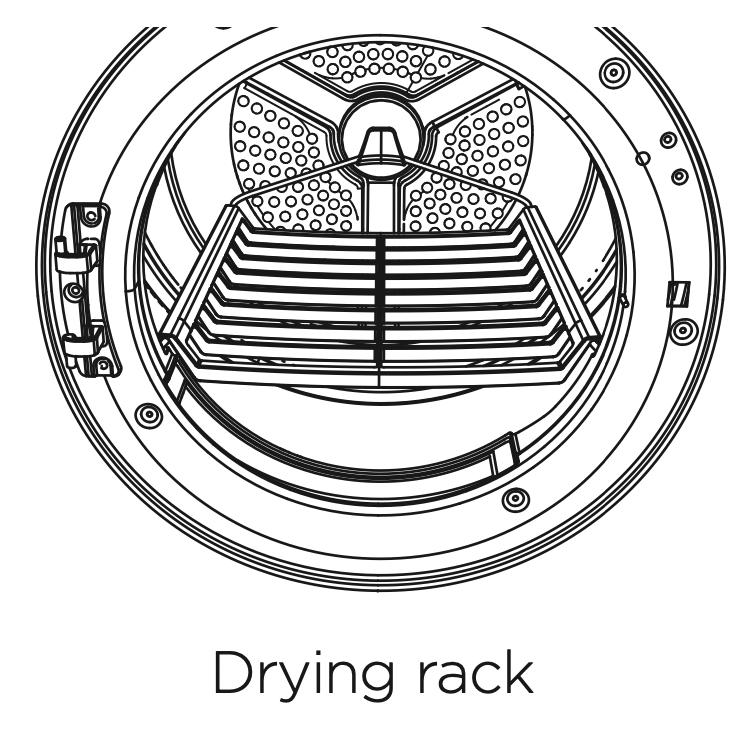
When you are using the drying rack you must select the ‘Rack Dry’ cycle (DE7060P only) or the ‘Time Dry’ cycle with ‘Med’ or ‘Low’ Dry Temp selected, do not use ‘High’ Dry Temp.
DRYING CYCLES
DE7060G model

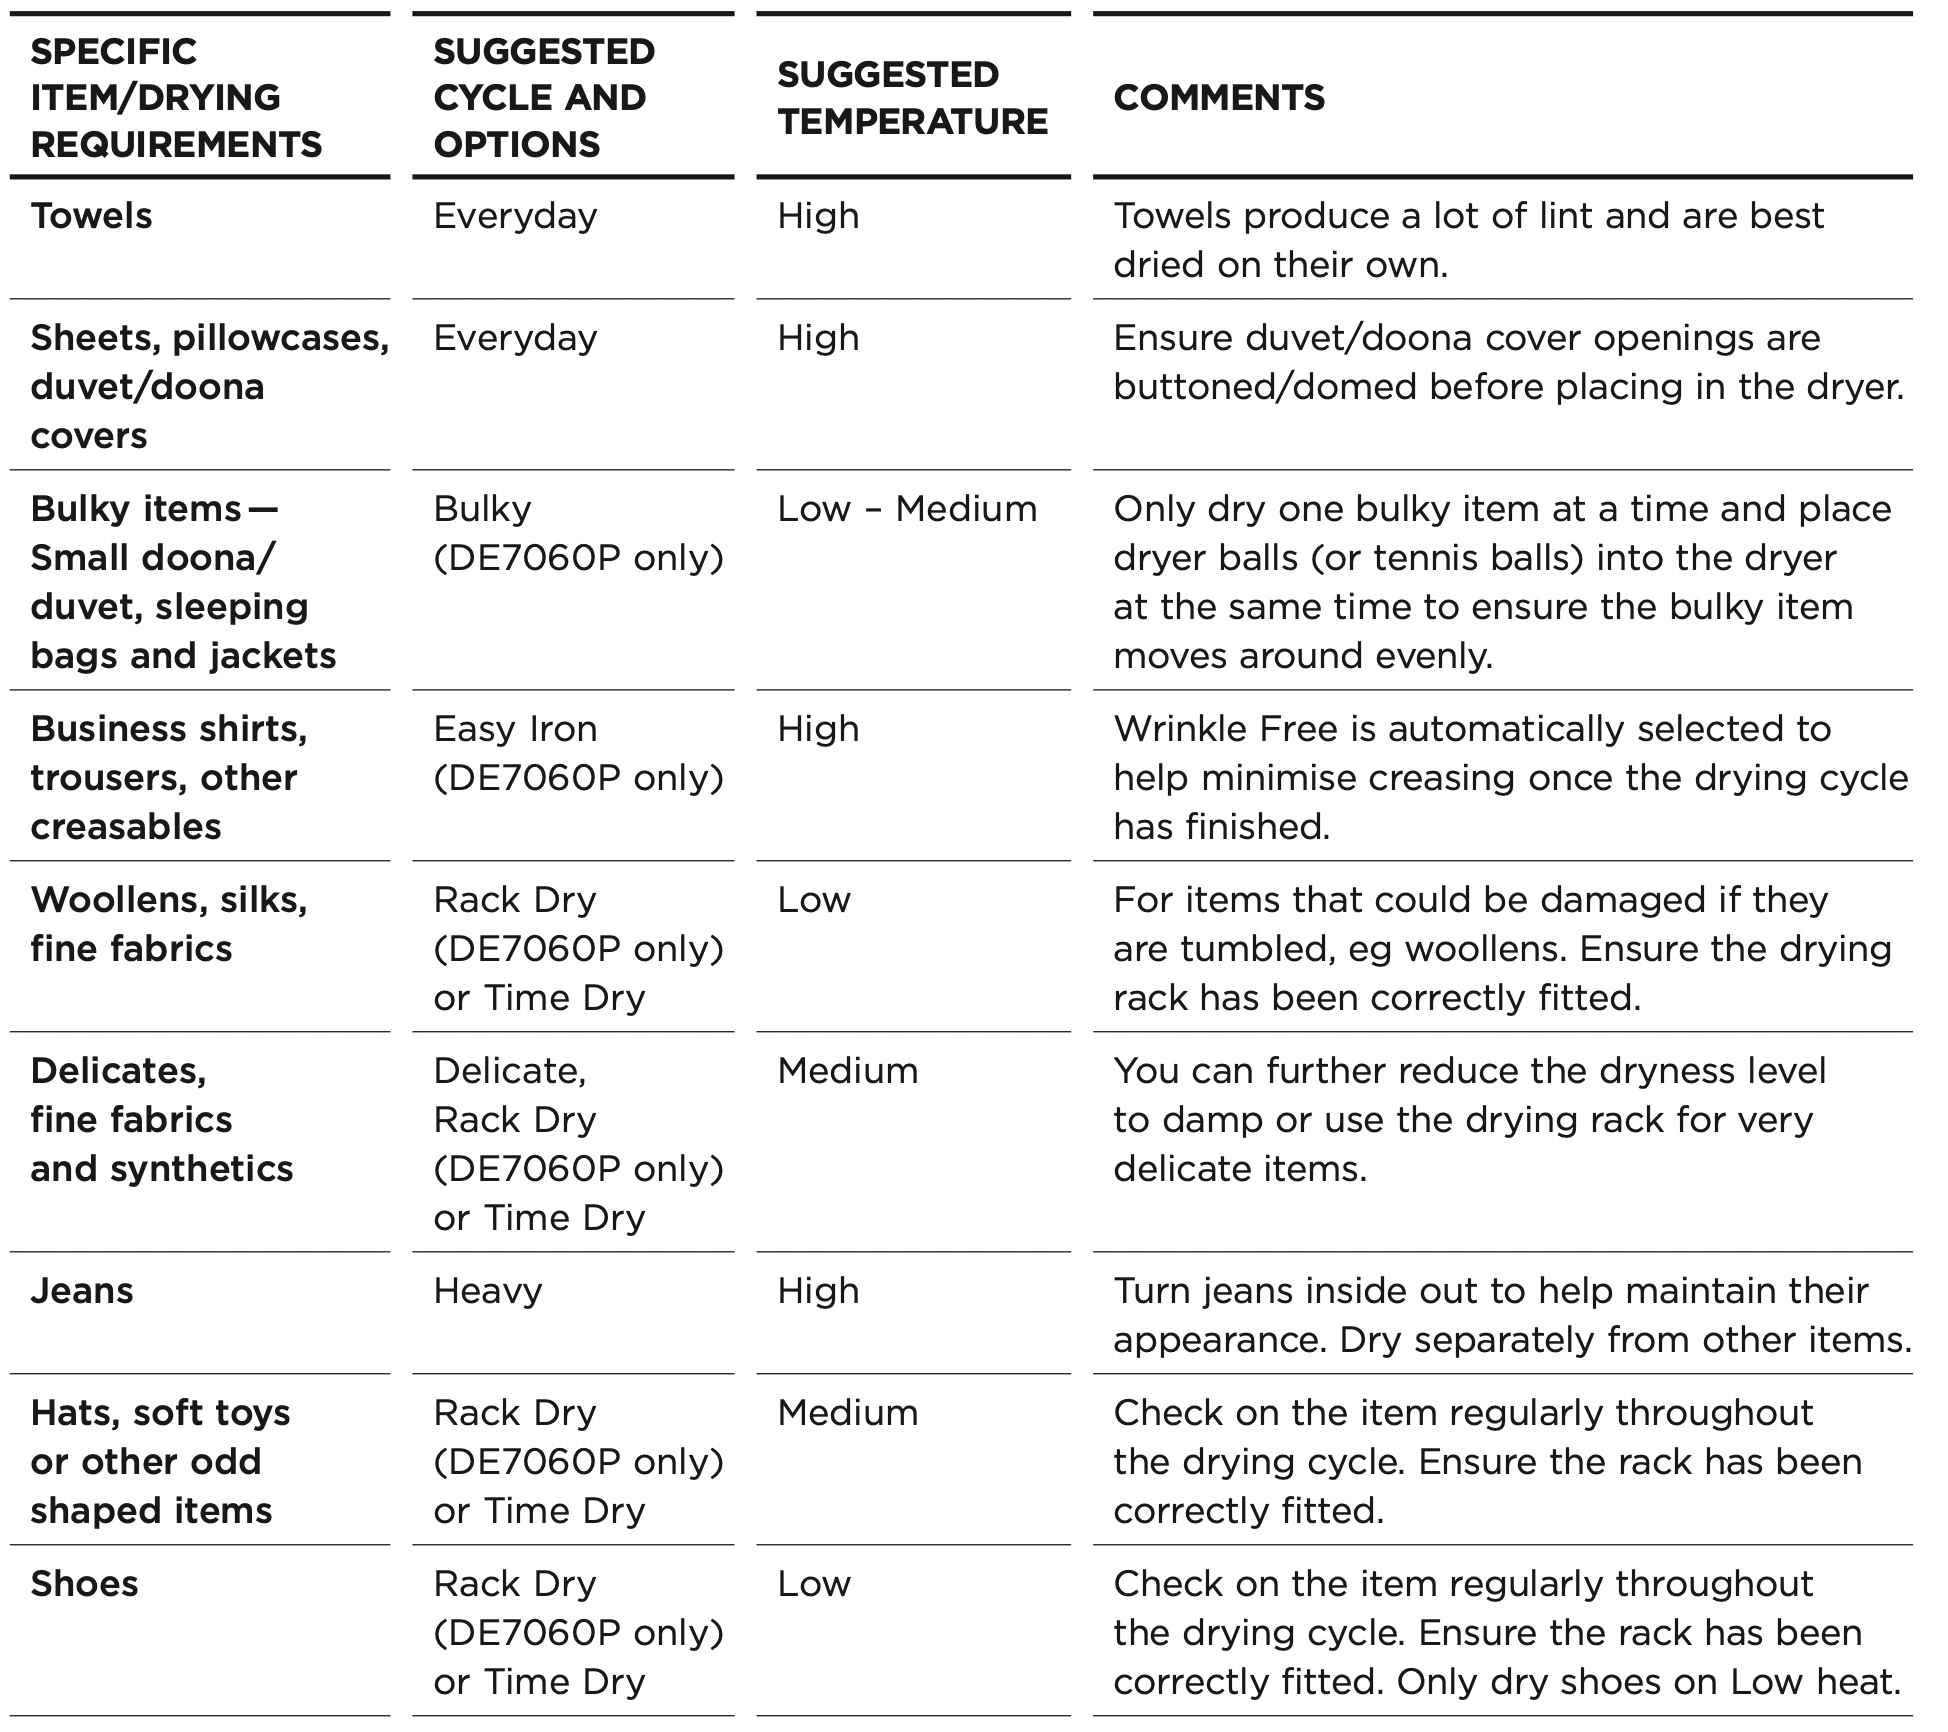
Your dryer has a number of drying cycles to suit your laundry needs. Selecting the most appropriate cycle for each particular load will help ensure you get the best result.
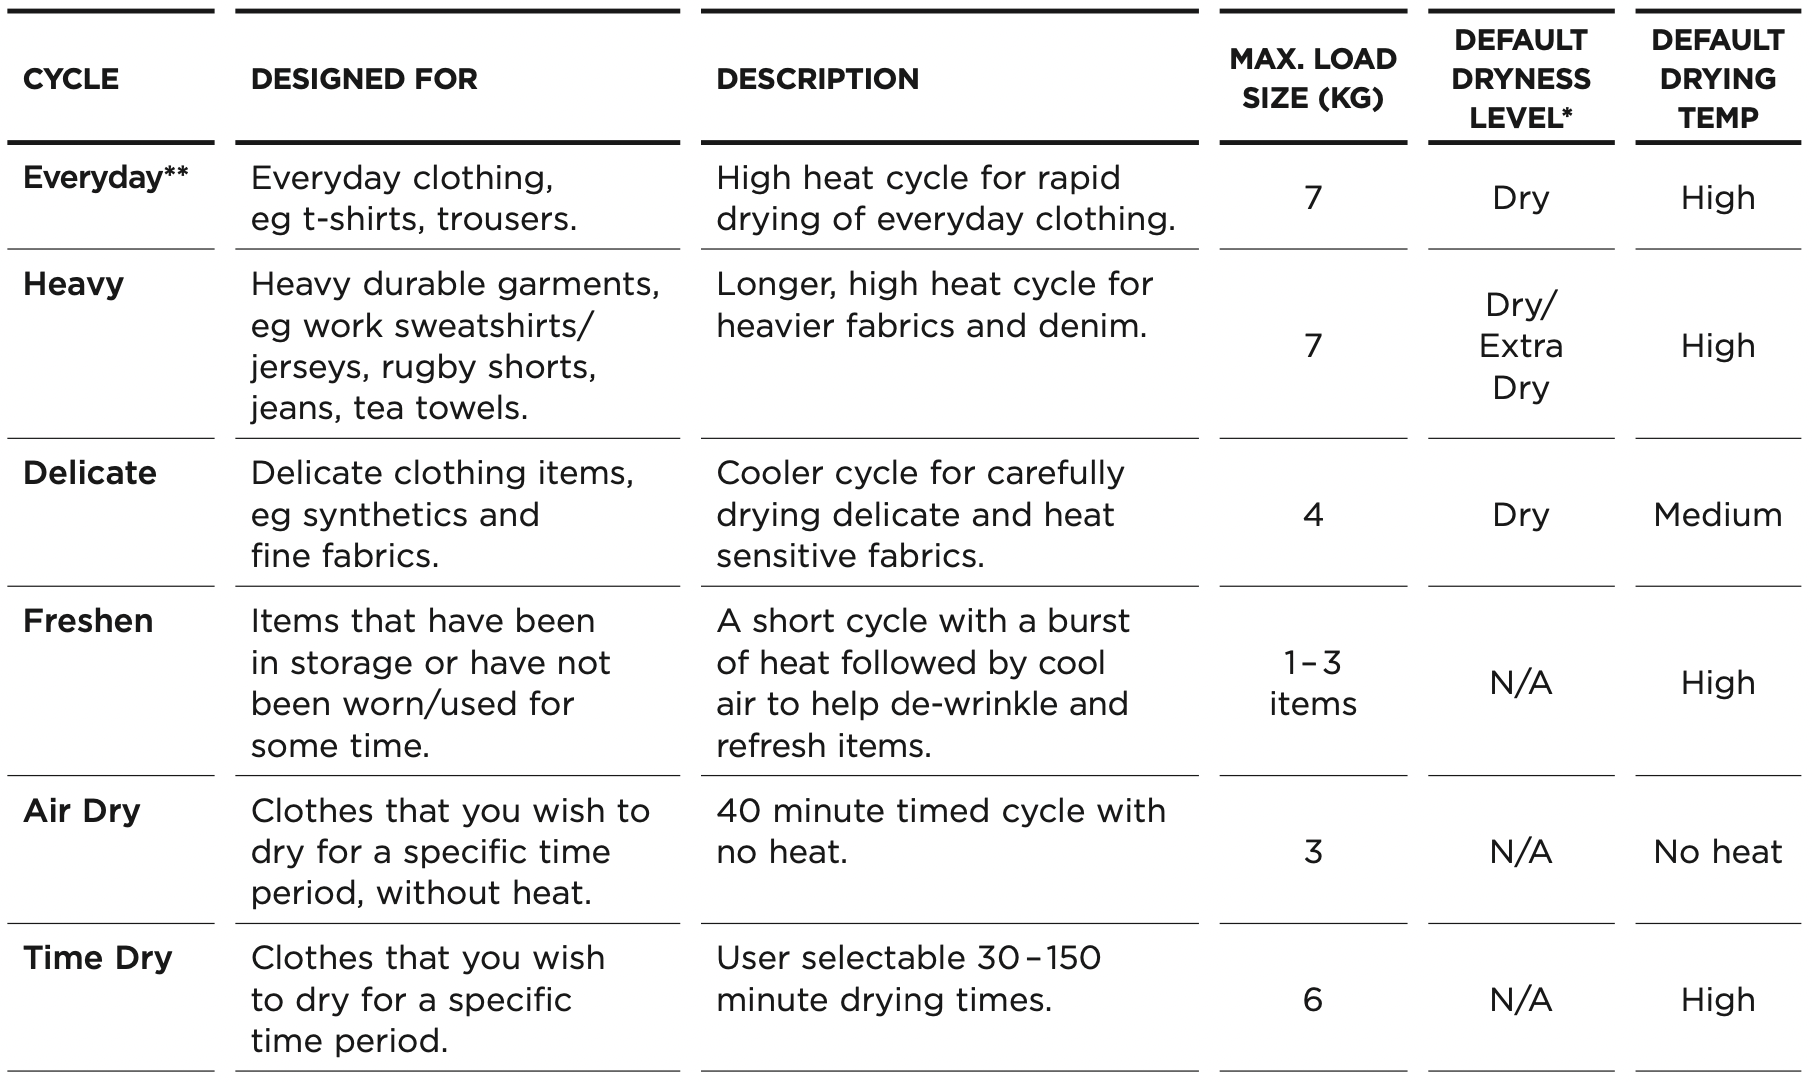
* Dryness level is only an option on automatic sensing cycles. On ‘Time Dry’ cycle, dryness will vary depending on the load and its initial moisture content.
** For NZ AU ‘Everyday’, Extra Dry’, ‘High’ dry temp is the recommended cycle for everyday cotton items.
** For SG ‘Everyday’, ‘Dry’, ‘High’ dry temp is the recommended cycle for everyday cotton items.
DRYING CYCLE OPTIONS
Timed programmes (Time Dry, Rack Dry, Air Dry)
The dryer dries for the selected time regardless of the level of moisture in your clothes. It is important to check the clothes throughout the timed programmes to avoid over drying.
Drying cycles
All drying cycles default to the recommended options for that cycle based on the average expected load to be dried using that cycle. You can vary the options (eg ‘Dryness Level’, ‘Dry Temp’) to create your desired cycle.
Note: some options are not available on some cycles, for clothes care reasons, or because the option is not appropriate for the cycle.
To change a drying cycle you have selected after a cycle has started, touch and select your new cycle, then touch again to resume drying.
Note: some options may not be available for selection under certain conditions and after particular stages of the drying cycle have passed.
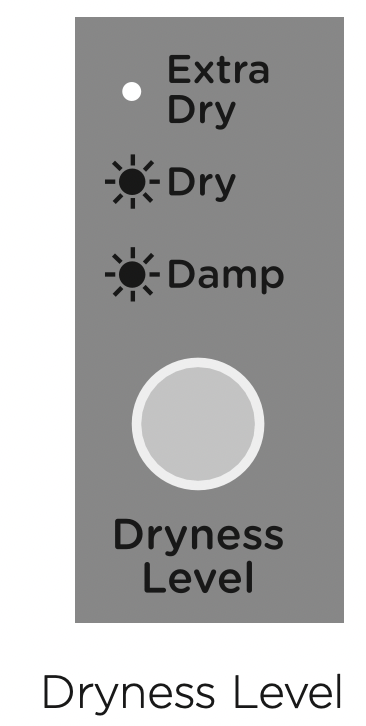
Dryness Level
Your dryer takes the guess work out of choosing drying times by sensing the dryness of the load. When your dryer senses that the clothes have dried to the dryness level you have selected, the dryer will automatically finish the cycle.
The dryer has five dryness levels from ‘Damp’ through to ‘Extra Dry’. Choose the dryness level to suit your load depending on how dry you wish for your clothes to be. If you find the load is not dry enough, select the next dryness level up. The higher the level, the longer the drying time and the drier your clothes will become.
Note: two lights are used to show some dryness levels. For example, to achieve the Damp Dry setting both the ‘Dry’ and the ‘Damp’ lights will be illuminated.
Airing/Cool down (Cooling)
When the dryer has sensed that the load is dry it will automatically go into an airing or cool down cycle. During ‘Cooling’ the drum tumbles and cool air is blown through the clothes. This cools the load to reduce creasing if the clothes are left in the dryer.
Dry Temp
There are four drying temperatures you can choose from:
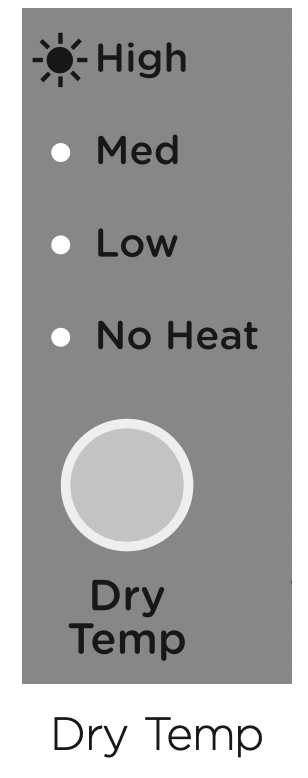
- High: Clothes temperatures up to 80°C.
- Medium: Clothes temperatures up to 70°C.
- Low: Clothes temperatures up to 45°C.
- No heat: Cool air is blown through the dryer for the period selected. Touch the ‘Dry Temp’ button until the light next to your desired drying temperature is illuminated.
Wrinkle Free
If you wish to minimise wrinkling, select one of the ‘Wrinkle Free’ options. At the end of the cycle, the drum will rotate periodically and cool air will be circulated through the load to minimise wrinkling and creasing. This is particularly useful if you cannot remove the items immediately after the cycle ends.
There are two wrinkle free options:
- ‘On’ provides ‘Wrinkle Free’ operation for 1 hour.
- ‘Extra’ provides ‘Wrinkle Free’ operation for 24 hours.
If you wish to stop the dryer at any stage during the ‘Wrinkle Free’ stage of the cycle, simply touch . You can then open the dryer door and remove your items. Press ‘Power’ to stop the cycle and turn the dryer off.

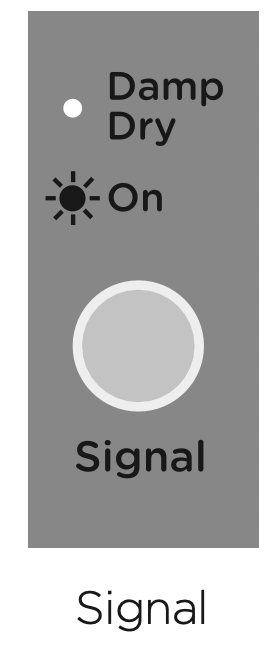
Signal
The ‘Signal’ option automatically defaults to ‘On’ for all cycles. This means a series of beeps will sound at the end of a cycle, to alert you that the dryer has finished. You can turn the ‘Signal’ off by touching the ‘Signal’ button until no lights are illuminated.
When you select a dryness level above damp/dry and wish your dryer to alert you to remove items once your load reaches the damp/dry stage, touch the ‘Signal’ button once to select ‘Damp Dry’. Ensure ‘On’ is also selected. When your load reaches the damp/dry stage, the dryer will beep to alert you to remove your items, then continue drying until the remaining load reaches the dryness level you selected.
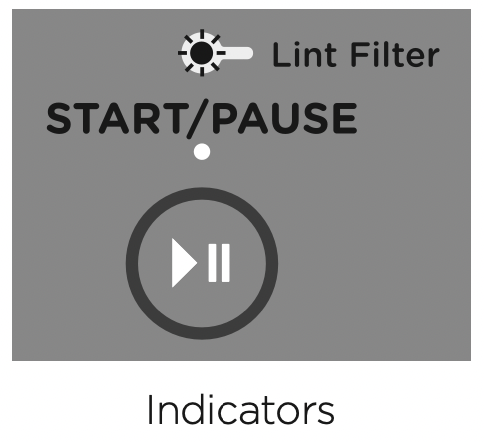
Indicator lights
The lint filter light will flash when the machine is switched on as a reminder to clear the lint filter before each cycle.
Keylock
This option enables you to deactivate the buttons on the display panel, except for the ‘Power’ and  buttons. This option helps prevent accidental button presses.
To turn Keylock mode ON or OFF, at any time when the dryer is powered on:
- Touch and hold the button for 2 seconds.
Note: when activated, the light above the button is illuminated.
If Keylock mode is activated and the dryer is powered off:
- To turn your dryer on, press the ‘Power’ button, then touch and hold the button for two seconds to turn Keylock off. Select your drying cycle, any options and then touch to start the cycle.
Delay Start
The ‘Delay Start’ option enables you to delay the start of the drying cycle from between 5 minutes and 12 hours. Times you can select are 5 min, 15 min, 30 min, 1 hour, then hourly up to 12 hours. This can be useful to time your drying to finish when you arrive home from work, or to start when power rates are lower.
To programme a ‘Delay Start’, simply touch the ‘More’ + button to increase the delay time and ‘Less’ - button to decrease the time or to turn ‘Delay Start’ off. Touch to confirm your selection and start the countdown. Once the ‘Delay Start’ has been started, the time will count down on the digital display in one minute increments, the ‘Delay Start’ light will flash and the light will stop flashing and remain lit. The ‘Delay Start’ option is not available on ‘Time Dry’ or ‘Rack Dry’.
We suggest that you avoid using ‘Delay Start’ for damp, non-colourfast items as this may cause dye run to occur.
Customising dryer cycles
After using your dryer a few times you may discover there are some drying options you prefer for some cycles.
You can programme your dryer to remember the drying options you prefer for each drying cycle. For instance, you may want to set the ‘Easy Iron’ cycle to a lower drying temperature or set the ‘Everyday’ cycle so it automatically has the ‘Wrinkle Free’ option selected.
To customise a cycle:
- Press ‘Power’ to turn the dryer on.
- Turn to select the cycle you wish to customise.
- Touch and hold any of the drying options buttons for 3 seconds. The lights will flash on and off and the display will show to indicate that the dryer is in cycle adjustment mode.
- Select the drying options you prefer by touching the relevant option button.
- Touch and hold for 3 seconds to save the selected settings. The dryer will then beep to indicate your customised cycle has been saved.
Factory reset
You can reset your dryer to the default settings it left the factory with:
- Select the ‘Freshen’ cycle.
- Touch and hold the ‘Delay Start’, ‘More’ + , the ‘Delay Start’, ‘Less’ - and ‘Signal’ buttons together for three seconds.
- Your dryer will now be reset to the default settings.
When you have finished using your dryer
- Unplug the dryer from the power socket.
- Wipe around the door to remove any remaining condensation and/or foreign matter.
- Clear the lint filter.
Cleaning your dryer
Before you start cleaning your dryer, ensure that it is disconnected from the power (ie unplug the dryer from the power socket).
Cleaning the control panel and outer surfaces of the dryer
Use a soft damp cloth to wipe all surfaces, then wipe dry. Avoid using chemical or scouring cleaners, as these will damage the paint and plastic surfaces of your dryer.
Cleaning the inside of your dryer
It is important that you occasionally clean the inside of your dryer. If the drum has any residual dirt or lint stuck to it, remove this and wipe it clean with a damp cloth.
Do not leave any metal objects in the drum, as these may cause rust.
Cleaning the lint filter
- Lint is generally formed during wearing and washing. Fibres (ie lint) released from the clothes during the drying cycle are collected in the lint filter.
- It is important to clean the lint filter after every load, as the lint produced in the drying process can become a fire hazard if it is allowed to accumulate in or around your dryer.
- The lint filter is located in the door opening (at the bottom).
- There is a warning light that will flash at the beginning of every cycle to remind you to clean the filter. Lint becomes a fire hazard if left to build up, and will reduce the efficiency of your dryer.
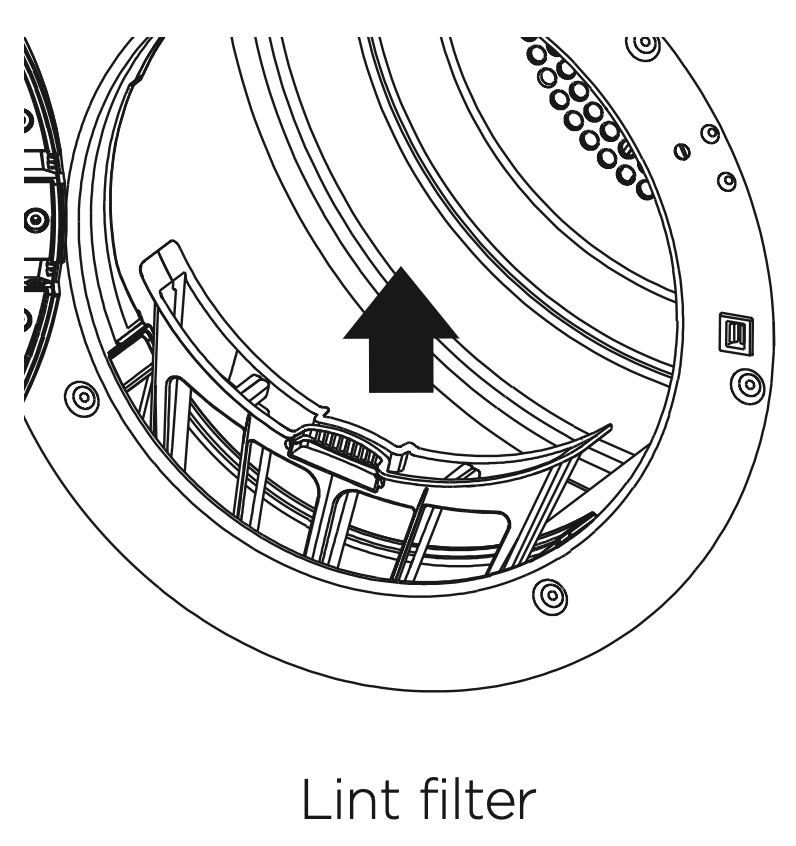
To clean the filter:
- Open the dryer door.
- Remove the lint filter by pulling it up and out of the filter slot. Open it out and wipe the surface clean with your hand.
- Close the lint filter and place it back in the opening. Ensure the filter is fitted correctly back in place before operating the dryer.
BEFORE YOU CALL FOR SERVICE
Your dryer is capable of diagnosing a number of its own problems. It will sound a continuous series of beeps and display a code when it has a problem that you can correct yourself. All control panel lights will turn off and a code will be displayed to inform you what the problem is. To stop the beeps sounding, touch any button on the control panel.
Do not try to continue your drying cycle once you stop the beeps. You must address the problem the dryer is alerting you to.
User warnings
Check this chart before you call for service.
| PROBLEM |
DISPLAYED AS |
WHAT TO DO
|
| Keylock is activated |
 |
Touch and hold the ‘Keylock’ button for 2 seconds to deactivate the Keylock.
|
| The door is not closed |
 |
Close the door fully and touch . |
|
Try opening and closing the door again.
|
|
Reposition the load, make sure the load is correctly in the drum and that protruding items are not stopping the door from closing.
|
| Dryer has been paused |
 |
Touch the to resume the cycle.
|
Once you have addressed the issue the user warning was alerting you to, try using your dryer as per usual.
If the symptom persists, call your Fisher & Paykel trained and supported service technician.
Fault codes
When a continuous series of beeps is sounded, all the lights turn off on the control panel and a number appears on the display, a fault has occurred. The dryer will automatically enter this mode if a fault occurs. The fault code will be displayed as followed by a number on the digital display. To stop the beeps, touch any button then perform the following steps:
- Turn your dryer off at the power point.
- Wait one minute and turn it back on.
- Check your dryer is installed correctly (refer to the ‘Installation instructions’ section).
- Remove your dryer load and retry.
- Perform a ‘Time Dry’ cycle, eg ‘Time Dry’ for 30 minutes.
- If the fault re-occurs repeat steps 1 and 2.
- If the dryer still will not work you will be required to call a Fisher & Paykel trained and supported service technician to arrange service (refer to the ‘Customer Care’ section). Record the fault code number displayed and the serial number of your dryer (located on the rear of the dryer, or on the inside of the door below the glass) before calling. The fault code will indicate to the service technician what the problem could potentially be.
If a fault code is being displayed, you can still turn your dryer off by pressing ‘Power’.
TROUBLESHOOTING
The following is a list of problems you may encounter when using this appliance and some suggestions that may help to correct the problem. If you still have problems, please contact your Fisher & Paykel trained and supported service technician.
| PROBLEM |
POSSIBLE CAUSES
|
WHAT TO DO |
|
Pressing ‘Power’ does not turn on the dryer
|
Fault with household power supply. |
Try plugging in and turning on another electrical appliance.
|
|
Touching does not start the drying cycle
|
Dryer could be displaying a user warning or fault code.
|
Refer to page 28. |
|
‘Delay Start’ function is set.
|
Refer to page 26 for more information. |
| Dryer keeps stopping and starting |
The ‘Wrinkle Free’ option has been selected. |
Refer to page 25 for more information.
|
| Dryer stops working midcycle |
Power failure. |
Press ‘Power’ and restart the desired cycle.
|
| Dryer has been paused. |
Touch the button to restart the cycle.
|
|
Dryer door is open.
|
Ensure the door is firmly shut. |
| Dryer is taking too long/ results were not satisfactory |
Drying cycle selected not appropriate for the load.
|
Select an appropriate cycle for the load. Refer to pages 19, 21 and 22.
|
|
Dryness level selected not appropriate for the load.
|
Select a higher dryness level. Refer to page 24. |
|
Selected drying temp, not appropriate for the load.
|
Select a higher drying temp. Refer to page 23. |
|
Dryer overloaded for the cycle.
|
Some cycles have a lower max. load size. Refer to pages 22 and 23.
|
|
Try dividing the load in half and dry half at a time.
|
|
Lint filter is blocked.
|
Clean the lint filter. |
|
Load overly wet at the start of cycle.
|
Remove more water from the load before placing it in the dryer, eg select a faster spin on your washer, a speed appropriate for your load.
|
| Clothes getting too hot or damaged |
Cycle selected not appropriate for the load.
|
Ensure the cycle selected is appropriate for items in the load. Refer to pages 19, 22 and 23.
|
|
Items removed from dryer before the end of cycle cool down had finished.
|
Removing items before cool down may damage clothing if it is not spread out and exposed to cooler air once removed from the dryer. |
|
Dryer is beeping, displaying unfamiliar light patterns and/or a message on the digital display
|
Dryer has a fault. |
Refer to page 28. |
| Noises |
Dryer is overloaded. |
Remove some items from the dryer.
|
| Dryer has a fault. |
Continuous beeping or a musical series of beeps with a message displayed on digital display. Refer to page 28.
|
|
Beeps signalling the end of a drying cycle.
|
End of cycle beeps can be turned off. Refer to page 25.
|
| Vibration |
Dryer is not installed on a stable surface.
|
Ensure the dryer is installed on a flat, stable surface. Refer page 7.
|
| Dryer is overloaded. |
Remove some items from the dryer.
|
| Creasing |
Cycle selection not appropriate for the load.
|
Select the ‘Easy Iron’ cycle (DE7060P only), or ‘Wrinkle Free’ option to minimise creasing.
|
| Dryer is overloaded. |
Remove some items from the dryer.
|
|
‘Dry Temp’ and/or ‘Dryness Level’ selected too hot/too long for load type.
|
Try selecting a lower ‘Dry Temp’ and ‘Dryness Level’.
|
|
‘Wrinkle Free’ option not selected.
|
Select the ‘Wrinkle Free’ option to rotate the load at the end of the drying cycle. Refer to page 25.
|
| Dye transfer |
White/light and coloured items not separated before drying.
|
Remember to separate white/light and coloured items before placing them in the dryer.
|
| Wet items left sitting in the dryer for long periods of time before drying. |
Do not leave wet items sitting in the dryer for long periods of time before drying, if they are prone to colour run. If you do intend to leave them for long periods before drying, then separate the load and put those items that may cause colour run aside.
|
| Linting |
Lint filter not cleaned or replaced.
|
Ensure the lint filter is cleaned after every cycle and replaced correctly. Refer to page 27.
|
| Loads not sorted correctly. |
Dry lint givers separately from lint receivers. Dry similar colours together eg light coloured items with light coloured items, dark items with dark items. Refer to page 19.
|
| Clothes over dried. |
Over drying clothes in the dryer can cause them to attract lint. Use an auto sensing cycle or ensure you check your load if using the time dry cycles to avoid over drying. Refer to pages 22 and 23.
|
|
New items have been dried in the dryer recently.
New towels or flannelette sheets can leave lint in the dryer, which may be picked up by subsequent loads.
|
Clean the lint filter and use ‘Air Dry’ cycle to clear any remaining lint from the dryer.
|
| Fabric damage |
Catching on metal part on items in the load.
|
Fasten zips and other clasps before placing items in the dryer.
|
|
Items not separated or dried on an appropriate cycle for the fabric type.
|
Dry similar items together. Ensure an appropriate cycle is selected. Refer to pages 19, 22 and 23.
|
| Items fell off the rack when using ‘Rack Dry’. |
Ensure the rack is installed correctly (refer to page 21) and only one or two garments are placed on the rack at a time.
|
|
‘Dry Temp’ or ‘Dryness Level’ selected not appropriate for the fabric type.
|
Ensure the ‘Dry Temp’ and ‘Dryness Level’ selected is appropriate for the fabric type. Refer to the items care label. Refer to pages 22 and 23.
|
|
Used a ‘Time Dry’ cycle and did not monitor the dryness of clothes during the cycle.
|
Ensure that clothes are checked for dryness during the cycle when using the timed programmes to avoid over drying. Refer to pages 22 and 23.
|
|
Instructions on care label not followed.
|
Follow the instructions on the care label of the items.
|
| Tangling |
Loads not separated during loading.
|
Try separating out larger items from smaller items.
|
|
Items loaded into the dryer incorrectly.
|
Load items individually into the dryer. Do not place folded items in the dryer.
|
| Incorrect cycle selection. |
Try using the ‘Easy Iron’ cycle (DE7060P only) or ‘Wrinkle free’ option selected to dry shirts. Refer to page 22.
|
| Load size too large. |
Try drying smaller load sizes.
Some cycles have a lower maximum load size. Refer to pages 22 and 23.
|
|
Delicate items not dried on the drying rack.
|
Dry pantyhose, bras and any other delicate items prone to tangling using the drying rack.
|
| Sheets and duvet covers due to their size, are prone to tangling. |
Dry sheets and duvet/doona covers separately from other laundry. Ensure duvet/doona covers are buttoned or fastened closed before drying. Try adding a knotted towel to sheets loads if you are experiencing a lot of tangling. Sheets and duvet/doona covers due to their size, are prone to tangling.
|