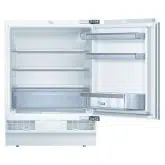
Familiarise yourself with the parts of your appliance.
Appliance
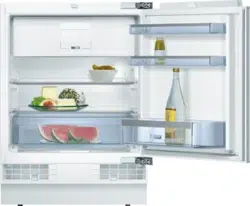
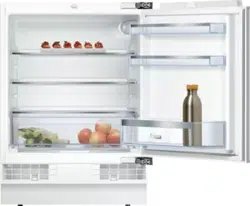
You can find an overview of the parts of your appliance here.
1 Light switch
2 Controls
3 Pull-out container
4 Rating plate
5 Fruit and vegetable container
6 Ventilation grille
7 Door storage compartment for large bottles
Note: Deviations between your appliance and the diagrams may differ with regard to their features and size.
Controls
The controls are used to configure all functions of your appliance and to obtain information about the operating status.
1. The temperature controller sets the temperature.
Features
Here you can see an overview of the features of your appliance and their use.
The features of your appliance de- pend on the model.
Shelf
To vary the shelves as required, re- move the shelf and re-insert it else- where.
→ "Removing the shelf", Page 18
Pull-out container
Do not store animal-based food in the pull-out container. You can take out the pull-out container for loading and unloading. → Page 18
Fruit and vegetable container with cover
Store fresh fruit and vegetables in the fruit and vegetable container.
Remove the fruit and vegetable con- tainer loading and unloading.
→ Page 18
Condensation may form in the fruit and vegetable container depending on the food and quantity stored.
Remove the condensation with a dry cloth.
To ensure that the quality and aroma are retained, store fruit and veget- ables that are sensitive to cold out- side of the appliance at temperatures of approx. 8 °C to 12 °C.
Fruit that is sensitive to cold
Pineapples
Bananas
Mangoes
Papayas
Citrus fruits
Vegetables that are sensitive to cold
Aubergines
Gherkins
Courgettes
Peppers
Tomatoes
Potatoes
Door racks
To adjust the door racks as required, remove the door rack and re-insert elsewhere.
→ "Removing door racks", Page 18
Accessories
Only use original accessories. These have been made especially for your appliance. Here you can find an over- view of your appliance's accessories and how to use them.
The accessories for your appliance depend on the model.
Egg tray
Store eggs safely on the egg tray.
Bottle holder
The bottle holder prevents bottles from falling over when the appliance door is opened and closed.
Basic operation
You can find out everything you need to know about operating your appli- ance here.
Switching on the appliance
1.Turn the temperature controller from position "0". a The appliance begins to cool.
2.Set the required temperature.
→ Page 15
Operating tips
Once you have switched on the appliance, the set temperature is only reached after several hours. Do not put in any food in the appli- ance until the temperature is reached.
If you open the refrigerator com- partment door frequently, put large quantities of food in the appliance or if the room temperature is high, the temperature of the refrigerator compartment rises.
Switching off the appliance
▶ Turn the temperature controller to position "0".
The appliance stops cooling.
Setting the temperature
After you have switched on the appli- ance, you can set the temperature.
Setting the refrigerator compartment temperature
▶ Turn the temperature controller to the required setting. When the controller is at a medium setting, the temperature drops to approx. 4 °C in the coldest zone.
→ ""OK" sticker", Page 16
Refrigerator compartment
You can keep meat, sausage, fish, dairy products, eggs, ready meals and pastries in the refrigerator com- partment.
The temperature can be set from set- ting 1 to setting 5.
When the controller is at a medium setting, the temperature drops to ap- prox. 4 °C in the coldest zone.
→ ""OK" sticker", Page 16
The refrigerator compartment can also be used to store highly perish- able foods in the short to medium term. The lower the selected temper- ature, the longer the food remains fresh.
Tips for storing food in the re- frigerator compartment
Follow the tips if you store food in your refrigerator compartment.
To ensure that the freshness and quality of the food is retained for longer, only store fresh and un- spoiled food.
In the case of ready-made products and bottled goods, do not exceed the best-before date or use-by date specified by the manu- facturer.
To retain aroma, colour and fresh- ness or to prevent taste transfer and discolouration of the plastic parts, store food well wrapped or covered.
Leave warm food and beverages to cool down before placing them in the refrigerator compartment.
Chill zones in the refrigerator compartment
The air circulation in the refrigerator compartment creates different chill zones.
Coldest zone
The coldest zone is in the pull-out container.
Warmest zone
The warmest zone is at the very top of the door.
Tip: Store food that does not spoil easily in the warmest zone, e.g. hard cheese and butter. Cheese can then continue to release its aroma and the butter will still be easy to spread.
Cooling capacity
The temperature in the refrigerator compartment may rise temporarily if loaded with fairly larger amounts of food or drinks.
Tip: Turn the temperature controller to a higher setting for approx. seven hours.
→ "Setting the refrigerator compart- ment temperature", Page 15
"OK" sticker
The "OK" sticker lets you check whether the refrigerator compartment reaches the safe temperature ranges of +4 °C or colder recommended for food.
The "OK" sticker is not included with all models.
If the sticker does not indicate "OK", gradually reduce the temperature.
→ "Setting the refrigerator compartment temperature", Page 15
Once the appliance is switched on, it may take up to 12 hours until the set temperature is reached.
Correct setting
Defrosting
Observe the information when you want to defrost your appliance.
Defrosting in the refrigerator compartment
When the appliance is operating, condensation droplets or frost form on the rear panel of the refrigerator compartment due to functional reas- ons. The back panel in the refriger- ator compartment defrosts automatic- ally.
Condensation or frost run through the condensation channel into the drain- age hole to the evaporation pan and do not have to be wiped away.
To ensure that the condensation can drain and odours do not form, ob- serve the following information:
→ "Cleaning the condensation chan- nel and drainage hole", Page 17.
Cleaning and servicing
To keep your appliance working effi- ciently for a long time, it is important to clean and maintain it carefully.
Preparing the appliance for cleaning
Find out how to prepare your appli- ance for cleaning.
1. Switch off the appliance. → Page 15
2. Disconnect the appliance from the power supply
Unplug the appliance from the mains or switch off the circuit breaker in the fuse box.
3. Take out all of the food and store it in a cool location. Place ice packs (if available) onto the food.
4. Remove all fittings from the appliance. → Page 18
Cleaning the appliance
Clean the appliance as specified to ensure that it is not damaged by in- correct cleaning or unsuitable clean- ing products.
An ingress of moisture can cause an electric shock.
Do not use steam- or high-pressure cleaners to clean the appliance.
Liquid in the lighting can be dangerous.
The rinsing water must not run into the light.
ATTENTION!
Unsuitable cleaning products may damage the surfaces of the appliance.
Do not use hard scouring pads or cleaning sponges.
Do not use harsh or abrasive detergents.
Do not use cleaning products with a high alcohol content.
If you clean fittings and accessories in the dishwasher, this may cause them to become deformed or discolour.
Never clean shelves or containers in the dishwasher.
1. Prepare the appliance for cleaning. → Page 16
2. Clean the appliance, the fittings and the door seals clean with a dish cloth, lukewarm water and a little pH-neutral washing-up liquid.
3. Dry thoroughly with a soft, dry cloth.
4. Insert the fittings.
5. Electrically connect the appliance. → Page 11
6. Switch on the appliance. → Page 15
7. Putting the food into the appliance
Cleaning the condensation channel and drainage hole
Regularly clean the condensation channel and drainage hole to ensure that the condensation can drain.
2. Carefully clean the condensation channel and the drainage hole, e.g. using a moistened cotton bud.
Cleaning the ventilation grille
1. Remove the ventilation grille for cleaning.
‒ To do this, depress the clips in the ventilation openings and simultaneously remove the ventilation grille forwards.
2. Clean the ventilation grille with lukewarm soapy water and a dish cloth.
3. Let the ventilation grille dry completely and insert it.
Removing the fittings
If you want to clean the fittings thoroughly, remove these from your appliance.
Removing the shelf
▶ Lift the shelf, pull it out, lower it and swing it out to the side.
Removing door racks
▶ Lift the door rack upwards and remove it.
Removing pull-out containers
▶ Lift the container and pull it out.
Remove the fruit and vegetable container with the lid
1. Lift the container with the lid.
2. Remove the container to the front.
Troubleshooting en
Troubleshooting
You can rectify minor faults on your appliance yourself. Read the troubleshoot- ing information before contacting after-sales service. This will avoid unneces- sary costs.
WARNING
Risk of electric shock!
Improper repairs are dangerous.
▶ Repairs to the appliance should only be carried out by trained specialist staff.
▶ Only use genuine spare parts when repairing the appliance.
▶ If the power cord of this appliance is damaged, it must be replaced by the manufacturer, the manufacturer's Customer Service or a similarly qualified person in order to prevent any risk.
Malfunctions
Errors
Cause
Troubleshooting
The appliance is not working.
The mains plug has not been inserted properly.
▶Connect the mains plug.
No displays light up
Fuse has been tripped.
▶ Check the fuses
The power has failed.
1. Check whether the power is on.
2. Place ice packs (if available) on the top shelf.
The lighting does not work.
The illuminant is defective.
1. Switch off the appliance. → Page 15
2. Disconnect the appliance from the mains. Unplug the appliance from the mains or switch off the circuit breaker in the fuse box.
3. Slide the cover grille forwards and remove it.
4. Replace the illuminant. Replacement illuminant: 220–240 V AC, E14 bulb holder, see the defective illuminant'ss wattage.
The light switch is jammed.
▶ Check whether the light switch can be moved.
The refrigeration unit is switching on more frequently and for longer.
The appliance door was opened frequently.
▶ Do not open appliance door unnecessarily.
The ventilation openings are covered up.
▶ Remove any obstructions from in front of the ventilation openings.
The base of the refrigerator compartment is wet.
The condensation channel or drainage hole are blocked.
▶ Clean the condensation channel and the drainage hole. → Page 17
Noise
Errors
Cause
Troubleshooting
Appliance has a humming sound.
Not a fault. A motor is running, e.g. refrigerating unit, fan.
No action required.
The appliance bubbles, buzzes or gargles.
Not a fault. Refrigerant flows through the pipes.
No action required.
The appliance clicks.
Not a fault. Motor, switches or solenoid valves are switching on or off.
No action required.
The appliance makes noises.
The appliance is not level.
▶ Align the appliance using a spirit level. If required, place something underneath it.
Fittings wobble or stick.
▶ Check the removable fittings and, if required, replace these.
Bottles or containers are touching.
▶ Move the bottles or containers away from each other.
Odours
Errors
Cause
Troubleshooting
The appliance has an unpleasant smell.
Different causes are possible.
1. Prepare the appliance for cleaning. → Page 16
2. Clean the appliance. → Page 17
3. Clean all food packaging.
4. To prevent odours from forming, store strong smelling food in airtight containers.
5. After 24 hours, check whether odours are still forming.
#1 The width of the fridge is 598mm. Can you confirm this is the widest width of the fridge. Also, please confirm the width of the fridge door, as I suspect this will be smaller. Thank you
Model KUR15AFF0G is the widest integrated fridge we offer and the door is the same width as the appliance.
#2 Is this fridge KUR15AFF0G supplied with all the metal bracketry as standard so I can fix my own timber door panel to your fridge door? If so is the type of metal bracketry fixed or sliding? If it’s sliding, are you able to provide fixed as an alternative?
All fixtures are included, this appliance has fixed hinges and cannot be attached to sliding hinges as these are different designs.
#3 Model KUR15AFFOG How do I check the temp? There is no control panel as mentioned in user manual. I've turned dial to 4 but how do I know it's right. There is no ok button.
Model KUR15AFF0G has a temperature dial from 1-5. We recommend the dial is set at 3 this is a medium setting and will be approximately 4 degrees
#4 How deep are the shelves on this model please. Thank you.
Individual measurements of parts are not included in the specification however the depth of the appliance is 548 mm
#5 Is this model frost free? On the Currys advert it says it is in one description and not in another part.